
MultiReader Stream 5574 - E-reader PRESTIGIO - Free user manual and instructions
Find the device manual for free MultiReader Stream 5574 PRESTIGIO in PDF.
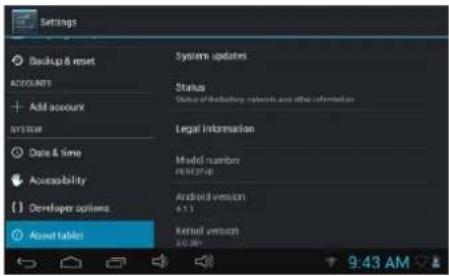
| Product Type | E-reader |
| Brand | Prestigio |
| Model | MultiReader Stream 5574 |
| Processor | ARM Cortex A8 1 GHz |
| RAM | 512 MB DDR3 |
| Operating System | Android 4.1 (Jelly Bean) |
| Display | 7 inch TFT LCD, capacitive touch, 800 x 480 pixels resolution |
| Internal Storage | 4 GB flash memory (approximately 2.4 GB user accessible) |
| External Storage | Micro SD/SDHC slot up to 32 GB |
| Connectivity | Micro USB 2.0, Wi-Fi 802.11 b/g/n |
| Battery | Integrated rechargeable, charges via 5V/1.5A power adapter |
| Speaker | Built-in |
| Headphone Jack | 3.5 mm jack |
| Dimensions (approx) | Approximately 190 x 120 x 10 mm |
| Weight (approx) | Approximately 300 g |
| Power Supply | 5V/1.5A power adapter included |
| Main Functions | E-book reading, music, video, photos, internet browsing, email, voice recorder, Android apps |
| Care and Cleaning | Clean with a soft, dry cloth. Avoid moisture and chemicals. |
| Safety | Use only the original charger. Do not expose to water or heat source. |
| Spare Parts and Repairability | Battery is built-in and not user replaceable. In case of failure, contact customer service. |
| General Information | Manufactured by Prestigio. Comes with USB cable and quick start guide. |
Frequently Asked Questions - MultiReader Stream 5574 PRESTIGIO
User questions about MultiReader Stream 5574 PRESTIGIO
0 question about this device. Answer the ones you know or ask your own.
Ask a new question about this device
Download the instructions for your E-reader in PDF format for free! Find your manual MultiReader Stream 5574 - PRESTIGIO and take your electronic device back in hand. On this page are published all the documents necessary for the use of your device. MultiReader Stream 5574 by PRESTIGIO.
USER MANUAL MultiReader Stream 5574 PRESTIGIO
Transferring Files 4
Power On/Off 5
Unlocking the Screen 5
Prestigio Wizard....5
Home Screen....6
Tips of touching screen 8
Accessing Internet....9
Using the Virtual Keyboard 10
Playing Music....10
Playing Video....11
Viewing Photos 12
Using the Sound Recorder 13
Exploring Files 13
Sending/Receiving E-mails 14
Other Applications 15
Managing Apps 15
Managing Tasks 16
Troubleshooting 16
Specifications....17
Accessories
- Prestigio Multi-Reader
- Legal and Safety Notices
-
Quick Start Guide
-
AC Adapter
- USB Cable
- Warranty Card
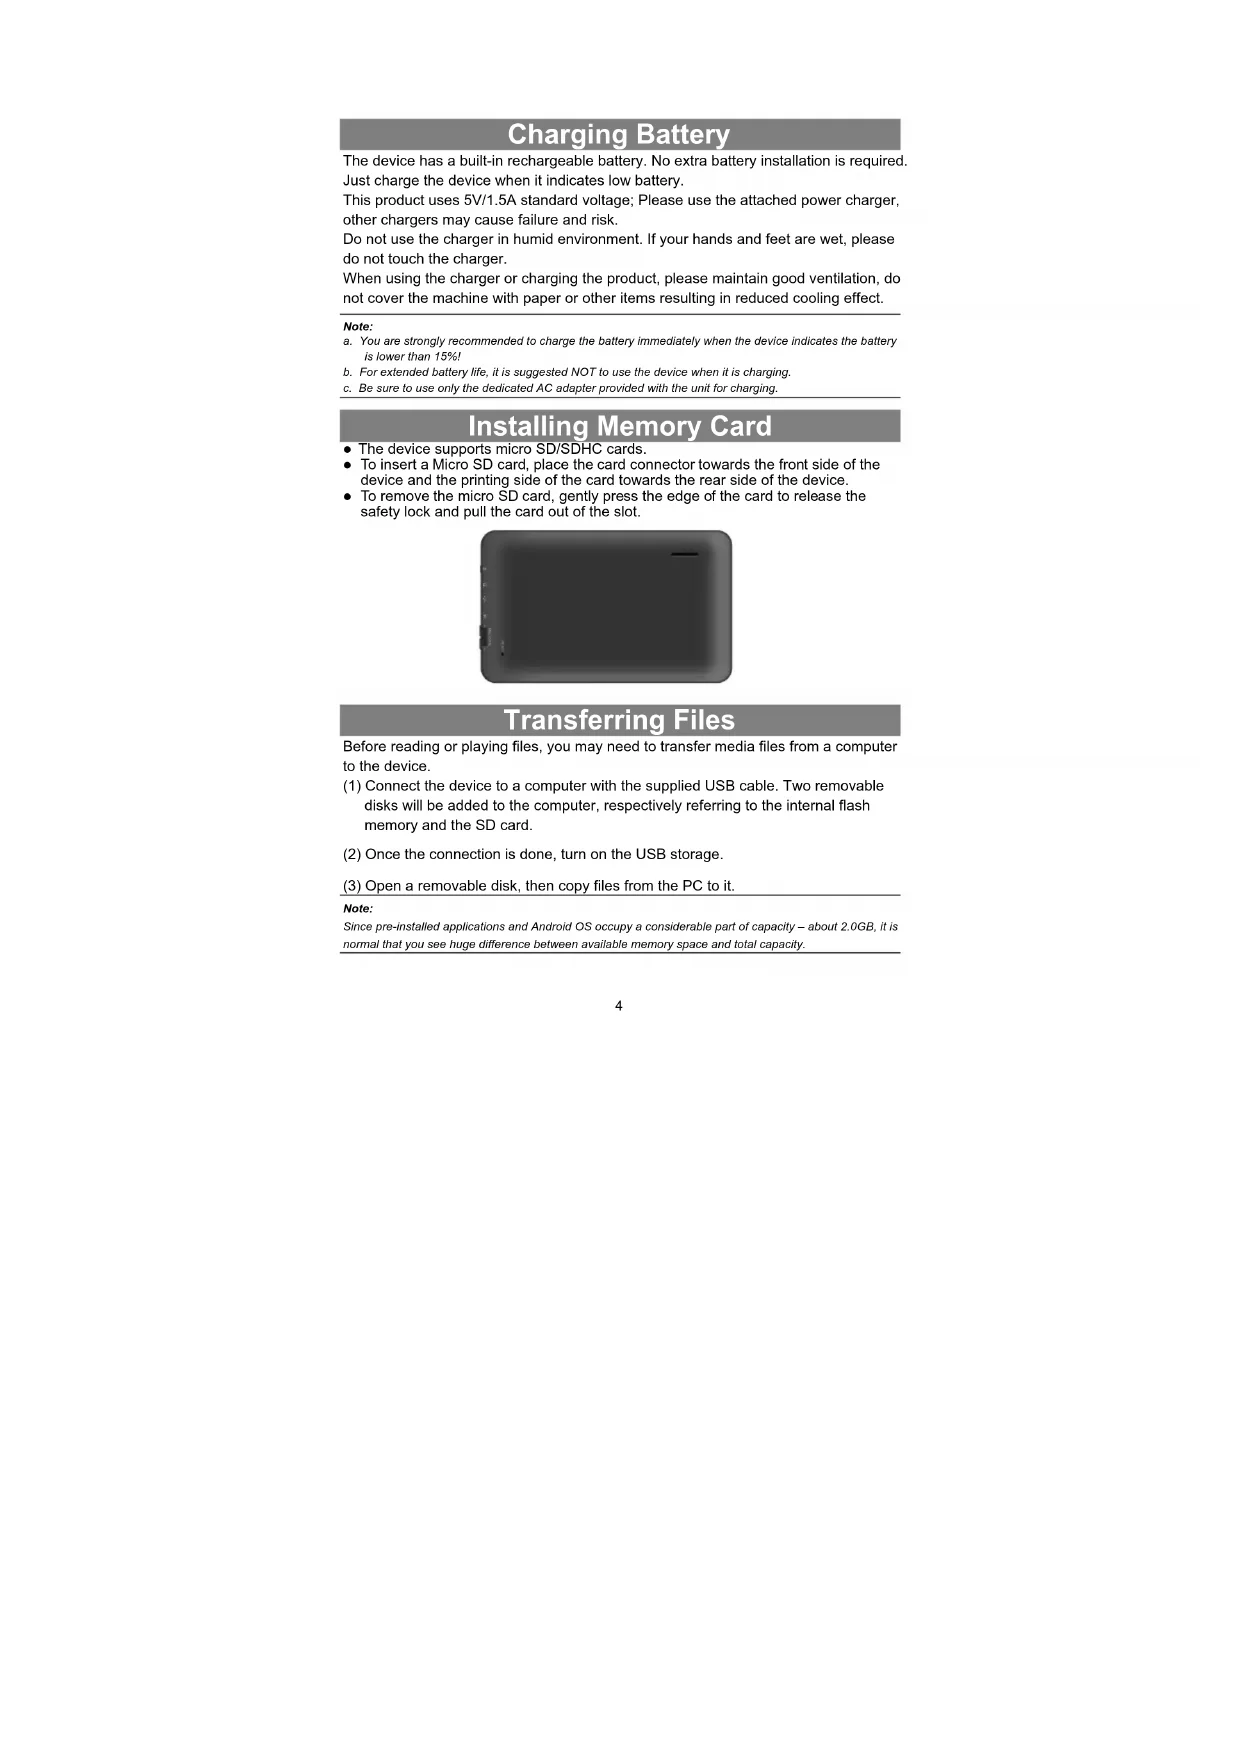
Buttons & Ports
1 Power
Turn on/off the device; Suspend/Activate the device
2 Earphone Jack Earphones connection.
USB port USB connection.
4 Vol +\ Vol - Button Adjust the volume level.
Speaker Emit sound, voice or music
6 Reset Reset the device if it fails to operate correctly
7 Micro SD Card Slot Insert Micro SD card.
Charging Battery
The device has a built-in rechargeable battery. No extra battery installation is required. Just charge the device when it indicates low battery.
This product uses 5V/1.5A standard voltage; Please use the attached power charger, other chargers may cause failure and risk.
Do not use the charger in humid environment. If your hands and feet are wet, please do not touch the charger.
When using the charger or charging the product, please maintain good ventilation, do not cover the machine with paper or other items resulting in reduced cooling effect.
Note:
a. You are strongly recommended to charge the battery immediately when the device indicates the battery is lower than 15%!
b. For extended battery life, it is suggested NOT to use the device when it is charging.
c. Be sure to use only the dedicated AC adapter provided with the unit for charging.
Installing Memory Card
- The device supports micro SD/SDHC cards.
- To insert a Micro SD card, place the card connector towards the front side of the device and the printing side of the card towards the rear side of the device.
- To remove the micro SD card, gently press the edge of the card to release the safety lock and pull the card out of the slot.
natural_image
Dark rectangular object with a small horizontal line and vertical markers on the left side (no text or symbols)Transferring Files
Before reading or playing files, you may need to transfer media files from a computer to the device.
(1) Connect the device to a computer with the supplied USB cable. Two removable disks will be added to the computer, respectively referring to the internal flash memory and the SD card.
(2) Once the connection is done, turn on the USB storage.
(3) Open a removable disk, then copy files from the PC to it.
Note:
Since pre-installed applications and Android OS occupy a considerable part of capacity – about 2.0GB, it is normal that you see huge difference between available memory space and total capacity.
Power On/Off
To turn on the device, press and hold the Power button on the unit until you see the boot-up screen then release.
To turn off the device, press and hold the Powerbutton until you see the option "Power Off", tap on "Power Off" and then tap on "OK".
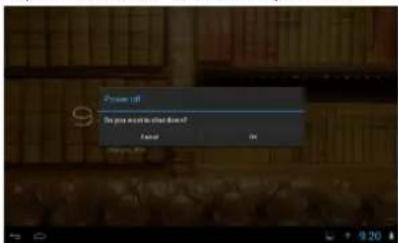
Tip: For the sake of power saving, this device may sleep with the screen display locked when there is no touch action for a while (depending on the actual setting of Display-Sleep). You can briefly press the Power button to wake it up.
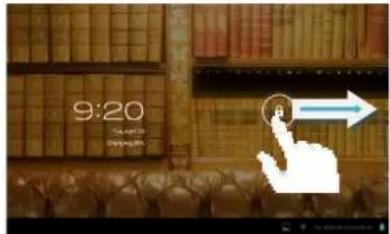
Unlocking the Screen
The screen will be locked after the device is idle for a few seconds. You need to unlock the screen by dragging the lock icon ⑧ rightwards before you continue to use the device.
Prestigio Wizard
- When using the device for the first time (or after resetting all users' personalized settings) the device will automatically launch the Startup Wizard.
- The Startup wizard interface will offer to choose the system language from the language list and the Time Zone, etc.
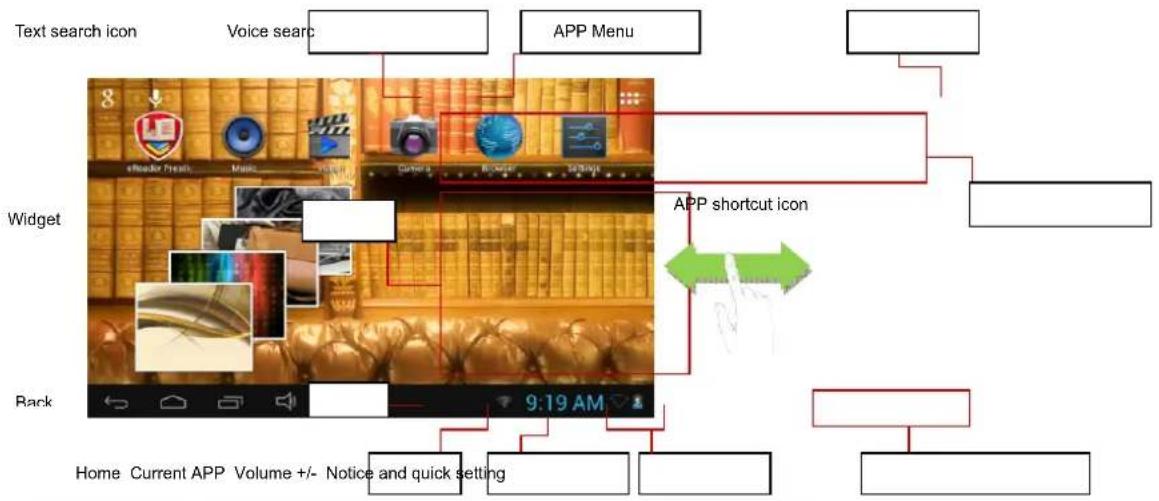
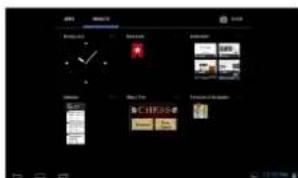
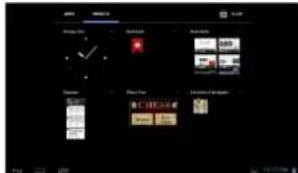
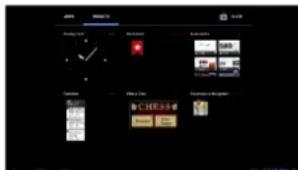
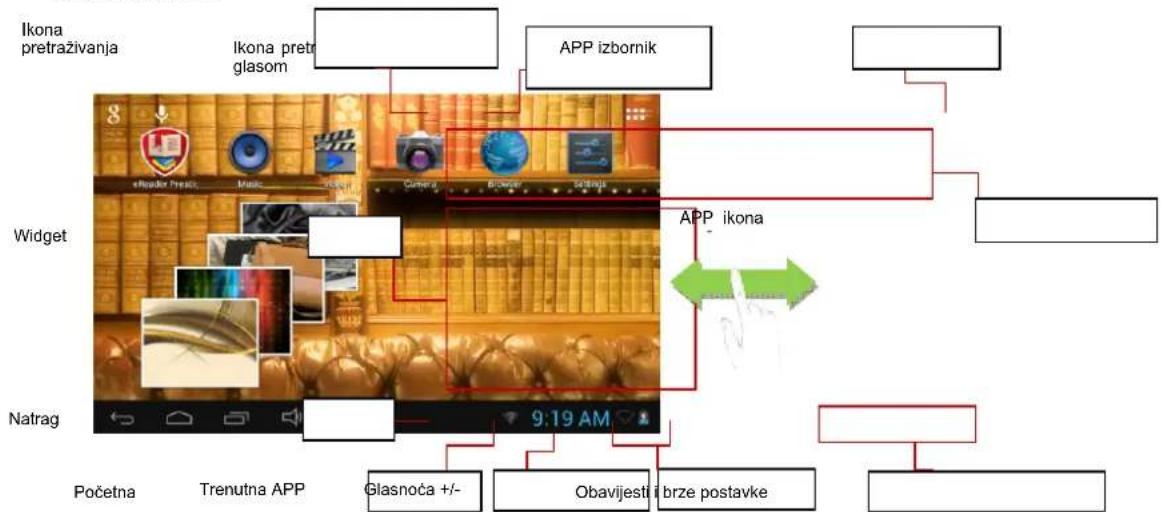
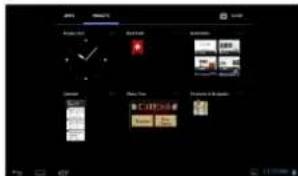
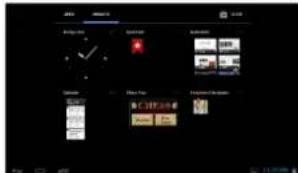
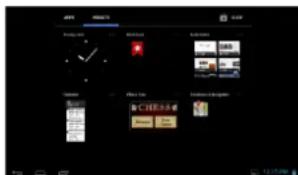
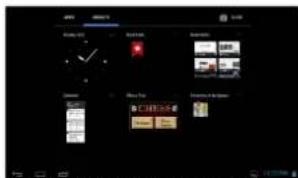
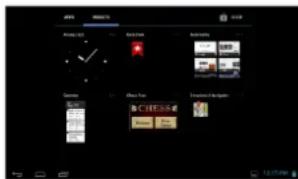
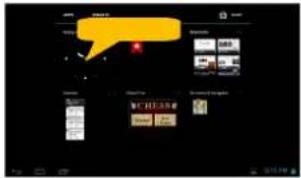
Home Screen
The Home Screen consists three separate screens for positioning the shortcuts, widgets etc... Slide your finger left or right on the screen to go to the extended screens.
Main Screen
flowchart
graph TD
    A["Text search icon"] --> B["Voice search"]
    B --> C["APP Menu"]
    C --> D["Widget"]
    D --> E["App shortcut icon"]
    E --> F["Back"]
    F --> G["Home Current APP Volume +/- Notice and quick setting"]
    style A fill:#f9f,stroke:#333
    style B fill:#ccf,stroke:#333
    style C fill:#cfc,stroke:#333
    style D fill:#fcc,stroke:#333
    style E fill:#cff,stroke:#333
    style F fill:#ffc,stroke:#333
    style G fill:#fcc,stroke:#333
| Text search icon Tap the icon for Google search with input keywords | |
| Voice search icon | Tap the icon for Google search with voice recorder |
| APP menu Tap the icon to show all the APPs installed. | |
| APP shortcut icon Tap each corresponding icon to run the APP | |
| Widget Tap each corresponding icon to run the APP | |
| Back Tap it to back the previous menu | |
| Home Tap it to back the home page | |
| Current App Tap the icon to show currently running APP | |
| Volume+/- Increase volume or decrease volume | |
| Notice/Quick setting | Tap it to show the notification or some quick settings like WIFI,brightness |
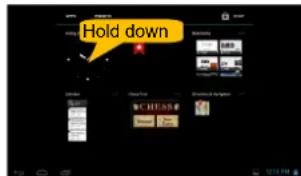
Customizing Home Screen Items
- To add a Home Screen item (shortcut, widget etc.), you can tap the application icon to display all applications and widgets, then hold your tap on an item to place it on the home page.
Hold down


Note: If current page of Home Screen has no enough room for a shortcut or widget, you will be prompted that there is no more room.
• To move a Home Screen item, hold your finger onto it to highlight it, then drag it to the desired location, and release it.
- To remove a Home Screen item, hold your finger onto it to highlight it, drag it to the recycle bin symbol "X" and then release your finger.
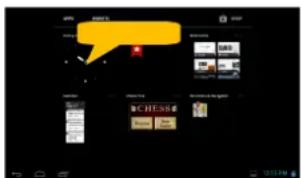
Display all Applications and widgets
The device has many useful applications and widgets pre-installed. You can tap the Application Tab to display them.
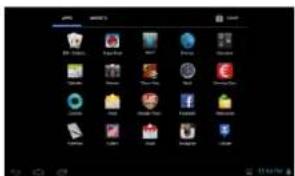

Tip : Holding your finger on an item can add it to the desktop as a shortcut.
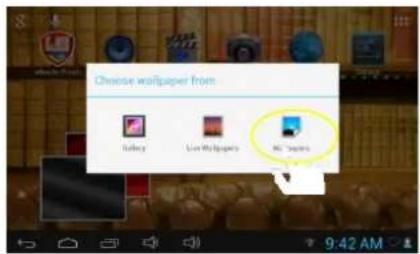
Changing the wallpaper
Hold your tap on the Home screen until a menu appear. Tap on "Wallpaper" and then choose a picture as the desktop wallpaper.
Changing the System Settings
Tap the Setting icon 📄 on the Home Screen to open the settings menu and change relevant settings for your device if necessary.
Tips of touching screen
- When watching a video or listening to music, you can tap on the progress bar to play any designated section of the file. You can drag the cursor of the progress bar to any other elapsed time point of the file.

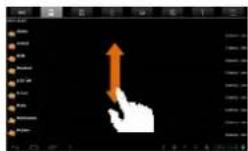
- In different browsers (File, Music, etc.), you can hold your finger on the screen and then drag up and down to scroll the file list up and down.
- In some browsers (File, Music etc.), you may hold your finger on an item to display options.
Accessing Internet
This device features connection of WiFi networks that provide you easy access to the Internet.
For Wi-Fi application, you need to configure a Wi-Fi network first, and you will have to stay in a Wi-Fi service zone. Whenever it is within the coverage of a Wi-Fi network you have configured, the device will attempt to make a connection.

Make WI-FI Connection
Before launching an Internet application such as the web browser, you first need to activate the Wi-Fi and configure a Wi-Fi network.
(1) Tap the Setting icon ■ on the Home Screen to open the settings menu.
(2) Select "WIFI" and slide the toggle switch to "ON" to turn on WIFI.
(3) The device will scan automatically for available WiFi networks and display them in the right panel. The list of available networks shows all the wireless networks in range of your device.
(4) Choose a network from the list and then tap "Connect" to connect. Some network may be secured with password, enter the password before connecting. If the connection is successful, the message connected to... (Wi-Fi Network Name) will appear under the WIFI Setting.
Note:
- The available network list is constantly refreshed automatically.
- When the Wi-Fi is enabled, the device will connect automatically to your configured networks when they are in range.
Launching the Web browser
To launch the Web browser, you tap the Browser icon in the Home screen.
To display context menus, tap

- You can scroll the screen up and down by tapping on the page and dragging it up or down (be careful not to tap a link until you are ready!).
• To open a link, simply tap it.
• To go back to the previous page that you browsed, tap the Back icon.
- To display the available menu items, t ap the Menuicon.
• To go back directly to the Home screen, tap the Home icon.
Tapping on any text input field can open the virtual board. With the virtual keyboard, you can enter a website address or any text required.
Backspace
Enter
Input method
Caps Lock
Number/ Letter switch
Space
Tap the Music icon in the Apps page to launch the music player.
Music Library
You should enter the music library once you start the music player. The Music Library shows your music files sorted by categories (Artist, Album, etc.) if your music files contain these song information tags.
- You can drag your finger up and down on the file list to scroll through it.
- Tap a song to play.
Music Playback Screen
During playback of a music file, tap on the MENU icon ☐ to pop up a context menu:
Library— return to music library menu.
Party Shuffle – select Party Shuffle mode.
Add to playlist – add a song to the playlist.
Delete – delete a song.
Sound Effects – Set the sound effects for the music playback.
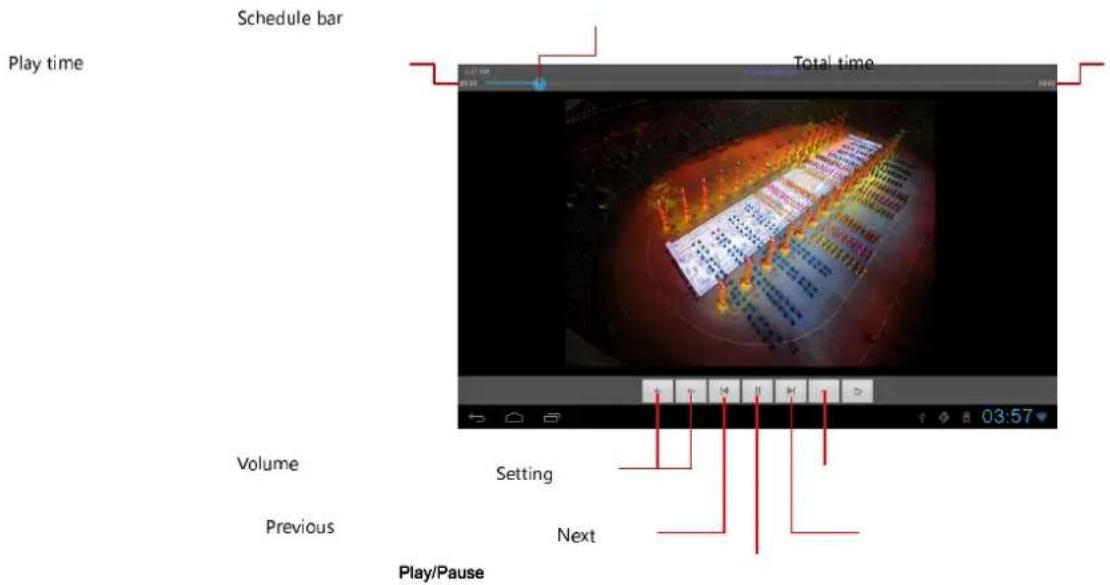
Playing Video
Tap the Movie Player icon in the Home or Apps page to launch the video player.
Navigate through Video Files
Find the video files/folders under correct directory after you enter the video player.
- You can drag your finger up and down on the video list to scroll through it.
- Tap a video to start playing.
Vedio Playback Screen
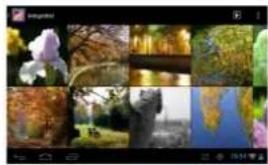
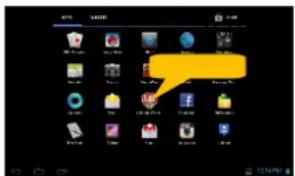
Viewing Photos
Tap the Gallery icon in the Apps page to launch the Photo Gallery.
Viewing Photos
(1) Photos should be listed in thumbnail. You can slide your finger on the screen left or right to browse photos.
natural_image
Collage of nature photos including flowers, trees, water, and a landscape with distant hills (no text or symbols)(2) Tap a photo thumbnail to view the photo in full screen.

natural_image
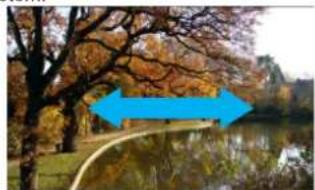
Autumn park scene with golden-brown trees reflected in a calm lake, no visible text or symbols(3) To display the previous/next picture, slide your finger on the screen horizontally.
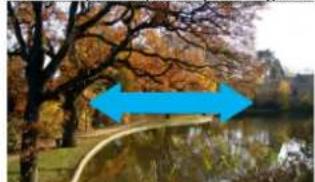
natural_image
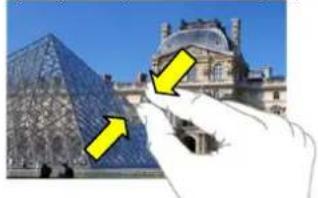
Autumn landscape with a curved path, bare trees, and a calm lake in the background (no text or symbols visible)(4) To zoom in or out the picture, pinch your finger on the picture.
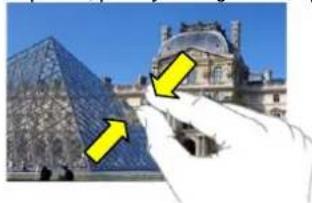
natural_image
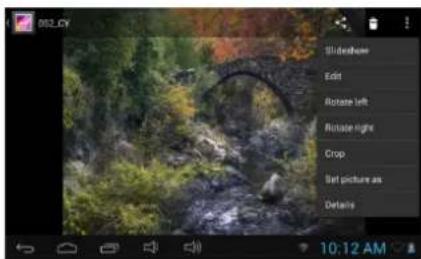
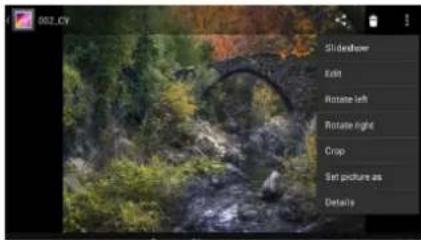
Hand holding a glass pyramid sculpture with yellow arrows pointing to it, set against a blue sky background (no text or symbols visible)Display Menu
When you are viewing the picture, you can tap on the screen or the Menu icon to show a menu.

Using the Sound Recorder
Tap the Sound Recorder in the apps page to launch the sound recorder.

- To start making recorder, tap on the Start button to start sound recording.
- Tap on the Stop button to stop sound recording
- The recorder will be saved in memory card under file name "Recordings".
Exploring Files
You can explore files and folders with File Manager application.
Using the File Manager
Navigate through Files and Folders
- Tap the File Manager icon in the application page to launch the application.
- You can drag your finger up and down to scroll the file list up and down.
- Tap the corresponding icons in front of the page to view the file under internal storage, external SD card, USB, Image, Video.
- Tap to open a file or folder.
- You can go back one level in the interface by tapping on the icon ↩ or

Sending/Receiving E-mails
This device has an E-mail application pre-installed. You can send or receive e-mails from the Internet at any time with this device. Make sure you have an Internet connection before using the email service.
In the Home Screen, tap the - to display all applications and then tap the Email icon to launch the e-mail application.
Setup Email Account
First you need to setup an E-mail account for receiving or sending emails.
(1) Start up the email application by tapping the Email application icon and you are prompted to setup an account.
(2) Input your email address and login password. You can set the account as default by selecting the option "Send email from this account by default".
(3) Tap "Manual Setup" to set the email server information.
(4) Choose the server type from POP3, IMAP or Exchange for incoming emails. To know what type of your email server is, you can consult the service provider, network administrator or search for information in the Internet.
(5) Input required information (server, port etc.). You can obtain the information from the service provider, network administrator or the Internet.
(6) Choose the server type for outgoing emails, and input required server information.
(7) Click "Next" to continue. Your tablet will check the server settings. When it prompts you that "Your account is set up, and email is on its way", your account is set up successfully.
(8) Input your name and then tap on "Done" to finish.
Note: If you have more than one account, every time when you start up the email application, you enter the default email account.
Manage Accounts
You can setup more than one account and manage these accounts by checking information about the account, adding another account or deleting an account.
Add another Account
Following these steps to add another account if you want.
(1) Launch the email application and then tap on the Menu icon 📄 to display the
menu item. Choose "Accounts" to display accounts.
(2) Tap on the Menu icon 📄 display the menu item, and then choose "Add account".
(3) Follow the steps of setting up a Email Account to add an account.
Delete an Email Account
(1) When you are in the email box, tap on the Menu icon 📄 to display the menu items.
(2) Tap on "Accounts" to display all email accounts.
(3) Hold your tap on the account that you want to delete until a menu pop up.
(4) Tap on "Remove Account", and then tap on "OK" to confirm.
Check the Account Setting
(1) When you are in the email box, tap on the Menu icon to display the menu items.
(2) Tap on "Accounts" to display all email accounts.
(3) Hold your tap on the account that you want to check until a menu pop up.
(4) Tap "Account settings", and then you should see all setting information about the account. You can edit these settings as you want.
View Emails
You should enter your mailbox when you start up the email application.
- In the mailbox, you can slide your finger up and down to scroll through the email list.
- Tap on an email to open it.
- Holding your tap on the email can display a menu. With the menu, you can open, reply, forward or delete the email.
Other Applications
Some useful small apps have been preinstalled in this device, such as Calculator, Calendar, Sound Recorder, Office Suite etc.. They are easy to use, thus no detailed instructions are necessary for these apps. Please always follow the actual operation of your device.
Managing Apps
You can manage your applications of the device easily.
There are numbers of useful apps pre-installed in the device as it is produced at the factory, and you can copy some from other resources, download or purchase them from the Internet.
Install Applications
You can install applications following these steps:
(1) Open the File Manager application, then find the app you want to install.
(2) Tap the app to start installing. However, for the sake of security, the device may prompt you that there is possibility of attack risk if you install and run some apps whose sources are not guaranteed. In this case, you shall turn to the Settings menu and select Security to check the "Unknown sources" before you go on with the installation.
(3) Once the installation is completed, you can find the icon of the app in the Apps screen. It is ready for running.
Uninstall Applications
(1) Tap the Settings shortcut in the Home Screen to display setting menus.
(2) Select "Apps".
(3) Tab on the application that you want to uninstall.
(4) Tab on "Uninstall" to uninstall the application.
(5) You can simply tap and hold on an app icon to jump to the Home Screen, and then drag it to the dustbin icon to uninstall it.
Note:
- You cannot uninstall the pre-installed applications, but you can deactivate or stop them.
- Make sure all apps you have copied or downloaded to your device are in the .apk format.
Managing Tasks
Your device can handle multiple tasks at the same time. For example, you can view photos while listening to music. Multitasking is helpful but inefficient if too many tasks are running. In order to save system memory and enhance system performance, you can end some tasks that you don't use at the moment.
(1) Tap t□splay applications that are running currently.
(2) Hold your tap on the application that you want to stop, and then select "Remove from list".
Troubleshooting
Reset this device
- In the event that the device freezes, you can reset the device by pressing and holding the Power button for about 10 seconds.
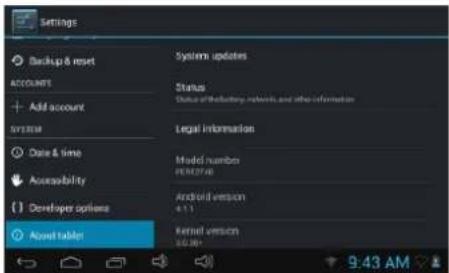
Specifications
Technical Specifications
Processor High performance ARM Cortex A8 at 1GHz
RAM 512MB DDR3
OS Android 4.1 (Jelly Bean)
Display 7" TFT LCD, Capacitive multi-touch
Resolution 800 x 480 pixels
Storage capacity 4 GB flash memory (about 2.4GB are accessible by user), Memory card slot supports micro SDHC card up to 32 GB
Interfaces Micro USB 2.0, Micro SD (micro SDHC compatible)
Communications WiFi (802.11 b/g/n)
Battery 3200 mAh Li-Pol battery
Dimensions 192 x 116 x 10.7mm (L x W x H) (appro.)
Weight 320 g (appro.)
natural_image
Dark rectangular device with a small black icon on the left side (no visible text or symbols)Передача файлов
Сенсорный экран
natural_image
Grid of six nature photos including iris, bridge, waterfall, lake, and tree (no text or symbols)natural_image
Autumn park scene with golden-brown trees reflected in a calm lake (no text or symbols visible)natural_image
Autumn park scene with a calm lake, autumn trees, and a blue arrow pointing to a distant structure (no text or symbols)natural_image
Hand holding a glass pyramid with yellow arrows pointing to it, next to a museum building (no visible text or symbols)Просмотр фото
Диктофон
natural_image
Blank gray rectangular device with a small black icon on the left side (no text or symbols visible)Failide teisaldamine
Prestigio viisard

WiFi-ühenduse loomine
natural_image
Collage of nature photos including iris, autumn, lake, and garden (no text or symbols)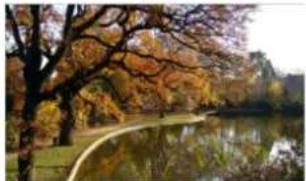
natural_image
Autumn park scene with a calm lake, golden-brown trees, and a winding path (no text or symbols visible)natural_image
Scenic autumn landscape with trees reflected in water, featuring a blue arrow pointing to a path (no text or symbols)natural_image
Hand holding a glass pyramid with yellow arrows pointing to a museum building (no text or symbols visible)Menüü kuvamine
Helisalvesti kasutamine
Veaotsing
Seadme lähtestamine
natural_image
Front view of a dark gray rectangular device with a small icon on the left side (no visible text or symbols)Prenos datotek
Pred branjem ali predvajanjem datotek, boste morda morali prenesti datoteke iz računalnika na napravo.
(1) Povežite napravo z računalnikom s priloženim USB kablom. Na računalniku bosta dodana dva izmenljiva diska, ki prikazujeta notranji bliskovni pomnilnik in SD kartico.
(2) Ko je povezava vzpostavljena, vključite USB shrambo.
(3) Odprite izmenljivi disk, nato nanj kopirajte datoteke iz računalnika.
Opomba:
Prestigio Čarovnik


natural_image
Grid of nature photos including autumn trees, water, and distant buildings (no text or symbols)natural_image
Autumn park scene with golden-brown trees reflected in a calm lake, no visible text or symbolsnatural_image
Autumn park scene with a lake, trees, and a blue arrow pointing to a path (no text or symbols)(4) Za povečanje/ pomanjšanje slike, stisnite prsta nazaslonu.

natural_image
Hand holding a glass dome structure with yellow arrows pointing to it, next to a building labeled 'Museum' (no text or symbols on the structure itself)Meni za prikaz
natural_image
Scenic outdoor scene with a stone bridge over a stream, surrounded by greenery and trees (no visible text or symbols)Uporaba snemalnika za zvok
Tapnitesnamlnik za zvok na strani aplikacij za zagon snemalnika zvoka

- Za zagon snemalnika, tapnite na tipkoStart
• Tapnite na tipkoStop a ustavitev snemalnika zvoka. - Posnetek se bo shranil na pomnilniško kartico pod imenom "Posnetki".
Iskanje datotek
natural_image
Dark rectangular object with a small horizontal line and vertical markers on the left side (no text or symbols)Съветник Prestigio

natural_image
Collage of nature photos including spring, autumn, lake, and forest (no text or symbols visible)natural_image
Autumn park scene with golden-brown trees reflected in a calm lake, no visible text or symbolsnatural_image
Autumn landscape with a calm lake, bare trees, and a blue arrow pointing to a small bridge (no text or symbols)natural_image
Hand pointing at a glass pyramid structure with yellow arrows pointing to it, set against a blue sky (no text or symbols visible)Екранно меню
natural_image
Blank gray rectangular image with no visible text, symbols, or markingsPřenos souborů


natural_image
Collage of nature photos including a sun, waterfall, bridge, and forest (no text or symbols)natural_image
Autumn park scene with golden-brown trees reflected in a calm lake (no text or symbols visible)natural_image
Autumn landscape with a winding path, autumn trees, and a calm lake (no text or symbols visible)natural_image
Hand holding a museum glass pyramid with yellow arrows pointing to it, against a blue sky (no text or symbols visible)Nabídka zobrazení
natural_image
Front view of a dark gray rectangular electronic device with a small icon on the left side (no visible text or symbols)Assistant Prestigio

pour les afficher.
natural_image
Collage of nature photos including a flower, autumn foliage, water, and distant trees (no text or symbols visible)natural_image
Autumn park scene with golden-brown trees reflected in a calm lake, no visible text or symbolsnatural_image
Autumn landscape with trees, a pond, and a blue double-headed arrow indicating direction (no text or symbols)natural_image
Hand holding a glass pyramid with yellow arrows pointing to it, next to a museum building (no visible text or symbols)Menu d'Affichage
Dépannage
Réinitialiser cet appareil
Specifications techniques
Communication WiFi (802.11 b/g/n)
Batterie 3200mAh BatterieL' Polymer
Dimensions 192 x 116 x 10.7mm (LxWxH) (appro.)
Polds 320 g (appro.)
PTúΛψΣGΣBςΔULψΣTúADúTς
PER5474BC
Οδηγός Prestigio


natural_image
Collage of nature photos including a iris, waterfall, bridge, and water reflection (no text or symbols)
natural_image
Autumn park scene with golden-brown trees reflected in a calm lake, no visible text or symbolsnatural_image
Autumn park scene with trees reflected in a calm lake, featuring two blue arrows pointing to the right side (no text or symbols)natural_image
Exterior view of the Louvre Pyramid and Great Saint Joseph, with a hand pointing at it (no signage or text visible)Μενού οθόνης
natural_image
Front view of a dark gray rectangular device with a small black icon on the left side (no visible text or symbols)Prijenos datoteka
Prije čitanja ili reprodukcije datoteka, možda ćete trebati prebaciti datoteke s računala na uređaj.
(1) Spojite uređaj na računalo s priloženim USB kabelom. Dva prijenosna diska bit će dodana u računalo, za internu memoriju i za SD karticu.
(2) Kada ste sve spojili, uključite USB pohranu.
(3) Otvorite prijenosni disk, zatim na njega kopirajte datoteke s računala.
Napomena:
S obzirom da aplikacije i Android OS zauzimaju velik dio memorije – oko2.0GB, normalno je da vidite veliku razliku između dostupne memorije i ukupnog kapaciteta.
Prestigio Wizard
- Kada koristite uređaj po prvi puta (ili nakon resetiranja korisničkih postavki) uređaj će automatski pokrenuti program Startup Wizard.
- Startup wizard sučelje će ponuditi izbor jezika s popisa i vremensku zonu, itd.
•
Početni zaslon
Početni zaslon sastoji se od tri odvojena zaslona za postavljanje prečaca, Widgeta, itd. Povucite prstom lijevo ili desno po zaslonu za prelazak na dodatne stranice.
Glavni zaslon
flowchart
graph TD
    A["Ikona pretraživanja"] --> B["Ikona pretr glasom"]
    B --> C["APP izbornik"]
    C --> D["App ikona"]
    D --> E["Obavijesti i brze postavke"]
    E --> F["Početna"]
    F --> G["Trenutna APP"]
    G --> H["Glasnoća +/-"]
    H --> I["9:19 AM"]
    I --> J["Widget"]
    J --> K["Logo: e-Regidor Prešić, Music, Camera, Camera, Biobryst, Seznijs"]
    K --> L["Green arrow indicates interaction path"]
| Ikona pretraživanja tekstom | Dodirnite ikonu za Google pretraživanje unosom teksta |
| Ikona pretraživanja glasom | Dodirnite ikonu za Google pretraživanje snimačem zvuka |
| APP izbornik Dotaknite | ikonu za prikaz svih instaliranih aplikacija. |
| APP ikona prečaca Dotaknite željenu ikonu za pokretanje određene aplikacije. | |
| Widget Dotaknite željenu ikonu za pokretanje određene aplikacije. | |
| Natrag Dotaknite za povratak na prethodni izbornik | |
| Početna Dotaknite za povratak na početnu stranicu | |
| Trenutna APP Dotaknite | ikonu za prikaz aplikacije koje se upravo izvršava |
| Glasnoća +/- Pojačajte ili stišajte glasnoću | |
| Obavijesti i brze postavke | Dotaknite za prikaz obavijesti ili za brze postavke poput WIFI i osvjetljenja |
Prilagođavanje predmeta početnog zaslona
- Za dodati predmet na početni zaslon (prečac, Widgete, itd.), možete dotaknuti ikonu aplikacija za prikaz svih aplikacija i Widgeta, zatim ju držite kako bi je postavili na početni zaslon.
Hold down


Savjet : Držanjem prsta na predmetu, možete ga dodati kao prečac.
Izrada WI-FI veze
Prije pokretanja Internetske aplikacije, poput preglednika, prvo morate aktivirati Wi-Fi i konfigurirati/Mi-Fi mrežu.
- Možete pomicati zaslon gore ili dolje dodirom na zaslon i povlačenjem gore/dolje (pazite da ne dotaknete poveznicu ako to ne želite).
- Za otvaranje poveznice, jednostavno ju dotaknite.
- Za povratak na stranicu koju ste prethodno gledali, dotaknite na ikonu Natrag
- Za prikaz dostupnih predmeta izbornika, dotaknite na ikonu izbornika
- Za povratak ravno na početni zaslon, dotaknite ikonu
natural_image
Grid of nine nature photos including iris, waterfall, and lake views (no text or symbols)
natural_image
Autumn park scene with golden-brown trees reflected in a calm lake, no visible text or symbols(3) Za prikaz prethodne/sljedeće slike, povucite vodoravno prstom po zaslonu.

natural_image
Autumn park scene with a blue arrow pointing to a calm lake, surrounded by autumn-colored trees (no text or symbols visible)(4) Za povećavanje ili smanjivanje slike, uhvatite sliku prstima.

natural_image
Hand holding a glass pyramid next to the Louvre Museum, with yellow arrows pointing to it (no text or symbols visible)Izbornik prikaza
Kada gledate sliku, možete dotaknuti na zaslon ili ikonu izbornika za prikaz izbornika.
natural_image
Outdoor scene with a stone bridge over a stream, surrounded by greenery and foliage (no visible text or symbols)- Za snimanje, dotaknite tipku Start za početak snimanja.
- Dotaknite tipkuStop na prekid snimanja.
- Zapis će biti pohranjen na memorijskoj kartici u datoteci "Snimke".
Pretraživanje datoteka
Možete pretraživati datoteke programomFile Manager.
Korištenje programaFile Manager

Pretraživanje kroz datoteke i mape
- Dotaknite ikonu programaFile Manager na zaslonu aplikacija za pokretanje.
- Možete povući prstom gore dolje za pregled popisa datoteka.
- Dotaknite potrebnu ikonu na zaslonu za pregled datoteke u unutarnjoj pohrani, vanjskoj SD kartici, USB, Slike, Video.
- Dotaknite za otvaranje datoteke ili mape.
- Možete se vratiti jednu razinu dodirom na ikonu

Slanje/Primanje e-pošte
Uređaj ima instaliranu aplikaciju e-pošte. Možete u bilo koje vrijeme slati ili primati e-poštu putem interneta s ovim uređajem. Provjerite da imate internetsku vezu prije korištenja usluge e-pošte.
Na početnom zaslonu, dodirnite na za prikaz svih aplikacija i zatim na ikonu E-pošte za pokretanje aplikacije.
Postavljanje računa e-pošte
Prvo morate postaviti račun za slanje ili primanje e-pošte.
(1) Pokrenite aplikaciju e-pošte dodirom na ikonuEmail aplikacije i tražit će vas da postavite račun.
(2) Unesite svoju e-mail adresu i lozinku. Možete postaviti račun kao zadan, odabirom opcije "Šalji e-poštu s ovog računa".
(3) Dotaknite "Ručne postavke" za unos informacija o serveru.
(4) Odaberite jedan od tipova servera, POP3, IMAP ili Exchange za dolaznu poštu. Kako bi znali koji je server u pitanju, provjerite sa svojim pružateljem usluga, mrežnim administratorom, ili potražite informacije na internetu.
(5) Unesite potrebne informacije (server, port, itd.). Možete dobiti informacije od pružatelja usluge, mrežnog administratora ili s interneta.
(6) Odaberite tip servera za odlaznu poštu, i unesite potrebne informacije o serveru.
(7) Kliknite "Sljedeće" za nastavak. Uređaj će provjeriti postavke servera. Kad se pokaže obavijest „Račun je postavljen i pošta je u dolasku“, vaš je račun uspješno postavljen.
(8) Unesite svoje ime i dotaknite „Gotovo“ za kraj.
Napomena: Ako imate više od jednog računa, svaki put kada pokrenete aplikaciju e-pošte, otvorit će se zadani račun.
Upravljanje računima
Možete postaviti više od jednog računa i možete njima upravljati pregledom informacija i računu, dodavanjem računa ili brisanjem računa.
Dodavanje računa
Pratite ove upute ako želite dodati još jedan račun.
(1) Pokrenite aplikaciju e-pošte i dotaknite ikonu izbornika prikaz opcija. Odaberite „Računi“ za prikaz računa.
(2) Dotaknite ikonu izbornika prikaz opcija i zatim odaberite „Dodati račun“.
(3) Pratite upute za postavljanje računa e-pošte za dodavanje novog računa.
Brisanje računa e-pošte
(1) Kada ste u aplikaciji e-pošte, dotaknite ikonu izbornika prikaz opcija.
(2) Dotaknite na "Računi" za prikaz svih računa e-pošte.
(3) Držite prst na računu koji želite izbrisati dok se ne pojavi dodatni izbornik.
(4) Dotaknite na "Brisanje računa" i zatim na "U redu" za potvrditi.
Rješenja problema
Resetiranje uređaja
natural_image
Front view of a dark gray rectangular device with a small black icon on the left side (no text or symbols visible)Fájlok átvitele
Prestigio Varázsló
natural_image
Collage of nature photos including iris, trees, water, and a river (no text or symbols visible)natural_image
Autumn park scene with golden-brown trees reflected in a calm lake, no visible text or symbolsnatural_image
Scenic autumn landscape with a calm lake, bare trees, and a blue arrow overlay (no text or symbols)natural_image
Hand holding a glass pyramid and a stone structure with yellow arrows pointing to it, set against a blue sky (no text or symbols)Menü megjelenítése
(Capacitive multitouch)
natural_image
Gray rectangular device with a small black icon on the left side (no visible text or symbols)Failų perkėlimas
natural_image
Collage of nature photos including iris, bridge, waterfall, and tree (no text or symbols)natural_image
Autumn park scene with golden-brown trees reflected in a calm lake, no visible text or symbolsnatural_image
Scenic autumn landscape with a curved path, trees, and a calm lake under clear sky (no text or symbols)natural_image
Hand holding a glass pyramid with yellow arrows pointing to it, next to the Louvre (no text or symbols visible)Ekrano meniu
Diktofono naudojimas
Trikčių šalinimas
natural_image
Front view of a dark gray tablet device with a small icon on the right side (no visible text or symbols)Failu pārkopēšana
Prestigio vednis

natural_image
Autumn park scene with golden-brown trees reflected in a calm lake, no visible text or symbols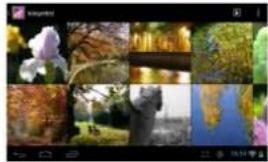
natural_image
Collage of nature photos including a iris, autumn foliage, water, and trees (no text or symbols visible)natural_image
Scenic autumn landscape with a lake, bare trees, and a blue arrow indicating direction (no text or symbols)natural_image
Hand holding a magnifying glass over the Louvre Pyramid, with yellow arrows pointing to it (no text or symbols visible)Displeja izvēlne
- Lai säktu ierakstu, pieskarieties starta pogai

Vol +\ Vol - knop Volumeregeling.
natural_image
Dark gray rectangular object with a small horizontal line and small symbols on the left side (no readable text or labels)Bestanden overbrengen
Systeeminstellingen veranderen
natural_image
Collage of nature photos including a iris, autumn trees, and water, displayed in a grid layout with no visible text or symbols.natural_image
Autumn park scene with golden-brown trees reflected in a calm lake, no visible text or symbolsnatural_image
Autumn landscape with a calm lake, bare trees, and a blue arrow pointing to a small bridge (no text or symbols)natural_image
Hand holding a glass pyramid with yellow arrows pointing to it, next to a building labeled 'Moura' (no text or symbols on the pyramid itself)Weergavemenu
Processor High performance ARM Cortex A8 op 1 GHz
RAM 512MB DDR3
OS Android 4.1 (Jelly Bean)
Beeldscherm 7" TFT LCD, capacitief multi-touch
Resolutie 800 x 480 pixels
Opslagcapaciteit 4 GB flash geheugen (circa 2,4GB is
natural_image
Gray rectangular device with a small black icon on the left side (no visible text or symbols)Kopiowanie plików

natural_image
Collage of nature photos including iris, bridge, waterfall, and tree (no text or symbols)natural_image
Autumn park scene with golden-brown trees reflected in a calm lake, no visible text or symbolsnatural_image
Scenic autumn park scene with a calm lake, golden-brown trees, and a blue arrow overlay (no text or symbols)natural_image
Hand holding a glass pyramid and a historic building with yellow arrows pointing to it (no text or symbols visible)Menu wyświetlacza
1 Vypínač
Sprievodca Prestigio
Tip: Ak podržite prst na položke, môžete ju pridat' na plochu vo forme odkazu.
Zmena tapety
natural_image
Grid of nine nature photos including a iris, bridge, lake, and globe, displayed in a photo editing interface (no text or symbols on the images themselves)natural_image
Autumn park scene with colorful trees reflected in a calm lake (no text or symbols visible)natural_image
Scenic autumn landscape with a curved path, trees, and a calm lake (no text or symbols visible)natural_image
Hand pointing at a glass pyramid with yellow arrows pointing to it, next to a museum building (no visible text or symbols)Zobrazenie menu
1 Power
Dugme za uključivanje/isključivanje uređaja; zaustavljanje/aktivaciju uređaja
natural_image
Top-down view of a dark gray rectangular device with a small black icon on the left side (no text or symbols visible)Prebacivanje datoteka
Pre čitanja ili puštanja datoteka, može biti potrebno da se medijske datoteke prebace sa računara na uređaj.
(1) Povežite uređaj sa računarom koristeći priloženi USB kabl. Dva uklonjiva diska biće dodata na računaru, koji će se odnositi na internu fleš memoriju i na SD karticu, tim redosledom.
(2) Kada se ostvari veza, uključite USB memoriju.
(3) Otvorite uklonjivi disk, a zatim prekopirajte datoteke sa računara na njega.
Napomena:
S obzirom da unapred instalirane aplikacije i Android operativni sistem zauzimaju značajan deo kapaciteta memorije – oko 2.0GB, normalno da je vidite ogromnu razliku između raspoloživog i ukupnog kapaciteta memorije.
Savet: Za smanjivanje potrošnje baterije, ovaj uređajmože da uđe u režim pavanja sa zaključanim ekranom nakon što se uređaj neko vreme ne koristi (u zavisnosti od podešavanja izvršenih za Ekran – Režim spavanja). Za buđenje uređaja, dovoljno je jednom kratko pritisnuti dugme Power.
Otključavanje ekrana

Promena sistemskim podešavanja
Kliknite na ikonicu Podešavanja 🚪na Početnoj strani da olvorite meni za podešavanja i promenite ona koja su neophodna vašem uređaju.
Uspostavljanje bežične veze
- Ekran možete pretraživati gore i dole tako što ćete prstom kliknuti na tu stranicu i povući je gore ili dole (pazite da ne kliknete na link pre nego što to budete želeli!)
-
Za otvaranje linka, samo kliknite na njega.
-
Za povratak na prethodnu stranicu koju ste pretraživali, kliknite ikonicu
- Za prikaz raspoloživih stavki iz menija, kliknitena ikonicu menija
- Za povratak direktno na Početnu stranicu, kliknite na ikonicu Početne strane
Korišćenje virtuelne tastature
Delete –brisanje pesme
Sound Effects – zapodešavanjezvučnihefekatareprodukcije
natural_image
Collage of nature photos including iris, bridge, waterfall, and forest (no text or symbols)natural_image
Autumn landscape with golden-brown trees reflected in a calm lake, no text or symbols visible(3) Za pregled prethodne/naredne fotografije, predite prstom preko ekrana horizontalnim pokretom.
natural_image
Scenic autumn landscape with a curved path, trees, and a lake in the background (no text or symbols visible)(4) Za uvećanje ili smanjivanje slike, rastavite ili skupite prste po ekranu.
natural_image
Hand holding a glass pyramid with yellow arrows pointing to the structure, next to a museum building (no visible text or symbols)Prikazivanje menija
Dok gledate fotografiju, možete kliknuti na ekran ili ikonicu menija da bi vam se prikazao meni.
Korišćenje aplikacije za snimanje zvuka
- Da biste počeli snimanje, kliknite na dugme Start
• Da prekinete snimanje, kliknitena dugme Stop - Snimljen materijal će biti sačuvan na memorijskoj kartici pod imenom "Recordings".
Pretraživanje fajlova
Fajlove i foldere možete pretraživati korišćenjem aplikacije File Manager (Upravljanje datotekama).
Korišćenje aplikacijeFile Manager
Rešavanje problema
Resetovanje uređaja
1 Güç
natural_image
Gray rectangular object with a small black square and horizontal line on top (no text or symbols)
natural_image
Collage of nature photos including a iris, autumn trees, water, and distant mountains (no text or symbols)natural_image
Autumn landscape with golden-brown trees reflected in a calm lake, no visible text or symbolsnatural_image
Scenic autumn landscape with a curved path, trees, and a calm lake (no text or symbols visible)natural_image
Exterior view of the Louvre Museum with a hand pointing to its facade (no signage or text visible)Gösterim Menüsü
Sorun Giderme
natural_image
Gray rectangular object with a small mark on the left side (no visible text or symbols)Передача файлів


natural_image
Collage of nature photos including flowers, trees, water, and a landscape with blue sky (no text or symbols)natural_image
Autumn park scene with trees reflected in a calm lake, no visible text or symbolsnatural_image
Autumn landscape with a calm lake, golden-brown trees, and a blue arrow overlay (no text or symbols)natural_image
Hand holding a glass dome structure with yellow arrows pointing to it, against a blue sky background (no text or symbols)Меню Дисплея


natural_image
Collage of nature photos including a flower, bridge, waterfall, and landscape (no text or symbols visible)الشاشة

natural_image
Autumn park scene with golden-brown trees reflected in a calm lake, no visible text or symbolsnatural_image
Scenic autumn landscape with a calm lake, trees, and a blue arrow overlay (no text or symbols)natural_image
Hand holding a glass pyramid and a dome structure, with yellow arrows pointing to them (no text or symbols visible)قانفقطالعرض
استخدام مسجل الصوت

الكُمْلَ خَلَالِ الْمُفَاتِ وَالْمُجْلِدِات
natural_image
Gray rectangular object with a small black square and horizontal line on top (no text or symbols)Prestigio Wizard
natural_image
Collage of nature photos including iris, waterfall, and sky (no text or symbols)natural_image
Autumn park scene with golden-brown trees reflected in a calm lake, no visible text or symbolsnatural_image
Autumn landscape with trees reflected in a calm pond, featuring two blue arrows pointing left (no text or symbols)natural_image
Hand holding a glass pyramid with yellow arrows pointing to it, next to a building with a dome (no visible text or symbols)Menü anzeigen
Fehlersuche
Display 7" TFT LCD, Capacitive multi-touch
natural_image
Grid of nature photos including iris, waterfall, and lake with no visible text or symbolsnatural_image
Autumn park scene with golden-brown trees reflected in a calm lake, no visible text or symbolsnatural_image
Scenic autumn landscape with a curved path, trees, and a calm lake (no text or symbols visible)natural_image
Hand holding a glass pyramid with yellow arrows pointing to it, next to a museum building (no visible text or symbols)natural_image
Dark rectangular object with a small horizontal line and faint vertical lines on the left side (no text or symbols)

natural_image
Collage of nature photos including a iris, autumn, bridge, and globe (no text or symbols)natural_image
Autumn park scene with golden-brown trees reflected in a calm lake, no visible text or symbolsnatural_image
Autumn park scene with trees, a pond, and a curved path (no text or symbols visible)natural_image
Hand holding a glass pyramid next to a domed building under a clear blue sky (no text or symbols visible)
natural_image
Blank gray rectangular device with no visible text, symbols, or markings

natural_image
Collage of nature photos including iris, autumn, bridge, waterfall, and lake (no text or symbols)natural_image
Autumn park scene with colorful trees reflected in a calm lake (no text or symbols visible)natural_image
Scenic autumn landscape with a calm lake, bare trees, and a blue arrow pointing to a bridge (no text or symbols)natural_image
Hand holding a white object with yellow arrows pointing to a glass pyramid and the Louvre Museum building (no text or symbols visible)Menu de exibição
Utilizando o Gravador de Som
Navegando entre
Interfaces Micro USB 2.0, Micro SD (micro SDHC
compatível)
natural_image
Gray rectangular device with a small black indicator panel on the left side (no visible text or symbols on the device body)Överföra filer
Prestigio-guiden


Tips om pekskärmen
natural_image
Collage of nature photos including iris, autumn, lake, and distant bridge (no text or symbols)
natural_image
Autumn park scene with golden-brown trees reflected in a calm lake, no visible text or symbolsnatural_image
Autumn landscape with a calm lake, golden-brown trees, and a blue arrow overlay (no text or symbols)natural_image
Hand holding a glass pyramid with yellow arrows pointing to the structure, next to a museum building (no visible text or symbols)Visa menyn

- Accessories
- Charging Battery
- Note:
- Installing Memory Card
- Transferring Files
- Power On/Off
- Unlocking the Screen
- Prestigio Wizard
- Home Screen
- Customizing Home Screen Items
- Display all Applications and widgets
- Changing the wallpaper
- Changing the System Settings
- Tips of touching screen
- Accessing Internet
- Make WI-FI Connection
- Launching the Web browser
- Music Library
- Playing Video
- Navigate through Video Files
- Vedio Playback Screen
- Viewing Photos
- Display Menu
- Using the Sound Recorder
- Exploring Files
- Navigate through Files and Folders
- Sending/Receiving E-mails
- Setup Email Account
- Manage Accounts
- Add another Account
- Delete an Email Account
- Check the Account Setting
- View Emails
- Other Applications
- Managing Apps
- Install Applications
- Uninstall Applications
- Managing Tasks
- Troubleshooting
- Reset this device
- Specifications
- Technical Specifications
- Передача файлов
- Сенсорный экран
- Просмотр фото
- Диктофон
- Failide teisaldamine
- Prestigio viisard
- WiFi-ühenduse loomine
- Menüü kuvamine
- Helisalvesti kasutamine
- Veaotsing
- Seadme lähtestamine
- Prenos datotek
- Opomba:
- Prestigio Čarovnik
- Meni za prikaz
- Uporaba snemalnika za zvok
- Iskanje datotek
- Съветник Prestigio
- Екранно меню
- Přenos souborů
- Nabídka zobrazení
- Assistant Prestigio
- Menu d'Affichage
- Dépannage
- Réinitialiser cet appareil
- Specifications techniques
- PTúΛψΣGΣBςΔULψΣTúADúTς
- Οδηγός Prestigio
- Μενού οθόνης
- Prijenos datoteka
- Napomena:
- Početni zaslon
- Prilagođavanje predmeta početnog zaslona
- Izrada WI-FI veze
- Izbornik prikaza
- Pretraživanje datoteka
- Pretraživanje kroz datoteke i mape
- Slanje/Primanje e-pošte
- Postavljanje računa e-pošte
- Upravljanje računima
- Dodavanje računa
- Brisanje računa e-pošte
- Rješenja problema
- Resetiranje uređaja
- Fájlok átvitele
- Prestigio Varázsló
- Menü megjelenítése
- Failų perkėlimas
- Ekrano meniu
- Diktofono naudojimas
- Trikčių šalinimas
- Failu pārkopēšana
- Prestigio vednis
- Displeja izvēlne
- Bestanden overbrengen
- Systeeminstellingen veranderen
- Weergavemenu
- Kopiowanie plików
- Menu wyświetlacza
- Sprievodca Prestigio
- Zmena tapety
- Zobrazenie menu
- Prebacivanje datoteka
- Otključavanje ekrana
- Promena sistemskim podešavanja
- Uspostavljanje bežične veze
- Korišćenje virtuelne tastature
- Prikazivanje menija
- Korišćenje aplikacije za snimanje zvuka
- Pretraživanje fajlova
- Rešavanje problema
- Resetovanje uređaja
- Gösterim Menüsü
- Sorun Giderme
- Передача файлів
- Меню Дисплея
- Menü anzeigen
- Fehlersuche
- Menu de exibição
- Utilizando o Gravador de Som
- Navegando entre
- Överföra filer
- Prestigio-guiden
- Tips om pekskärmen
- Visa menyn
Brand : PRESTIGIO
Model : MultiReader Stream 5574
Category : E-reader