SR 4353 - Radio AEG - Free user manual and instructions
Find the device manual for free SR 4353 AEG in PDF.

| Product type | Stereo radio cassette with CD/MP3 player |
| Brand | AEG |
| Model | SR 4353 |
| Mains power supply | AC 230 V ~ 50 Hz |
| Battery power supply | 6 D/R20 batteries, 1.5 V each |
| Power consumption | 15 W |
| Net weight | 1.78 kg |
| FM frequency range | 88 – 108 MHz |
| AM frequency range | 540 – 1600 kHz |
| CD playback formats | Audio CD, CD-R, CD-RW, MP3 |
| Radio functions | FM stereo (with FM ST indicator), AM mono |
| Cassette functions | Play, fast forward, rewind, pause |
| CD programmed playback | Up to 20 tracks (approx) |
| CD repeat modes | Repeat one track, repeat entire disc, random, intro |
| Auxiliary input | AUX IN socket (3.5 mm jack) |
| Bass amplification | BASS button (on/off) |
| Display | LCD screen |
| Antenna | Telescopic antenna for FM, built-in antenna for AM |
| Auto standby | Standby after approximately 15 minutes without signal |
| Cleaning and maintenance | Wipe with a slightly damp cloth, without additives |
| Safety instructions | Do not expose to water, do not open the casing, keep out of reach of children |
Frequently Asked Questions - SR 4353 AEG
User questions about SR 4353 AEG
0 question about this device. Answer the ones you know or ask your own.
Ask a new question about this device
Download the instructions for your Radio in PDF format for free! Find your manual SR 4353 - AEG and take your electronic device back in hand. On this page are published all the documents necessary for the use of your device. SR 4353 by AEG.
USER MANUAL SR 4353 AEG
GB Stereo Cassette Radio with CD
Overview of the Components.. 3
Instruction Manual.. Page 34
Technical Data . Page 38
Disposal Page 38
Język polski
Spis tresci
Przegladelementow oblsugi Strona 3
TexhiHnnapaMeTpu .ctop.55
Pycckn
CopepkaHne
ObsopeTaeIe npibopa .ctp.3
PykoBoCTBO no 3KcIpyatau.. ctp. 56
TexHueckme xapaKTepcntuKn ctp.61
VHF (Stereo) = FM.ST, Middengolf = AM (Mono)
VHF (Stereo) = FM.ST, Onda Media = AM (Mono)
34 English Instruction Manual
Thank you for choosing our product. We hope you enjoy using the device.
Symbols in these Instructions for Use
Important information for your safety is specially marked. It is essential to comply with these instructions in order to avoid accidents and prevent damage to the machine:

WARNING:
This warns you of dangers to your health and indicates possible injury risks.

CAUTION:
This refers to possible hazards to the machine or other objects.

NOTE:
This highlights tips and information.
General Safety Instructions
Read the operating instructions carefully before putting the appliance into operation and keep the instructions including the warranty, the receipt and, if possible, the box with the internal packing. If you give this device to other people, please also pass on the operating instructions.
- To avoid the risk of fire or electric shock, you should not expose the device to rain or humidity. Do not use the device near water (e.g. bathroom, swimming pool, humid cellars).
- Do not use the unit in extremely hot, cold, dusty, or damp places.
The unit is designed solely for private use and its intended purpose. This unit is not designed for commercial use. - Make sure that the power cable is not bent, pinched, or comes into contact with heat sources.
- Make sure that the power cable is not a tripping hazard.
- Never touch the mains plug or the cord with wet hands.
- Always connect the unit to a properly installed plug socket. Be sure the device voltage corresponds to the grid voltage.
- The mains plug must always be easily accessible.
Always install batteries in the correct direction. - Avoid covering the device's vent openings.
- Never cover the vent holes with objects, such as magazines, tablecloths, curtains etc.
- This appliance shall not be exposed to dripping or splashing water and that no object filled with liquids such as vases shall be placed on apparatus.
-
Open sources of fire, such as e.g. burning candles may not be placed onto the unit.
-
Never open the device's case. Improper repairs can cause severe danger to the user. If the device or particularly the power cord is damaged, don't use the device any further and have it repaired by a qualified specialist. Check the power cord regularly for damages.
- To avoid any danger, a damaged power cord must be replaced only by the producer, its customer service or a similarly qualified person with an equal cord.
- If the device won't be used over an extended period of time, disconnect the power cord and remove the batteries.
These symbols may be found on the machine and are intended to indicate the following:
The lightning symbol should advise the user of parts in the inside of the device which carry dangerously high voltage levels.
The symbol with an exclamation mark should advise the user of important operation or maintenance instructions in the accompanying documentation.
Devices bearing this symbol work with a "class 1 laser" for tracing the CD. The built-in safety switches should prevent the user being exposed to dangerous laser light, which is invisible to the human eye, when the CD compartment is opened.
Children and Frail Individuals
- In order to ensure your children's safety, please keep all packaging (plastic bags, boxes, polystyrene etc.) out of their reach.
WARNING!
Caution! Do not allow small children to play with the foil as there is a danger of suffocation!
- This device is not intended to be used by individuals (including children) who have restricted physical, sensory or mental abilities and/or insufficient knowledge and/or experience, unless they are supervised by an individual who is responsible for their safety or have received instructions on how to use the device.
Children should be supervised at all times in order to ensure that they do not play with the device.
Special safety information
This device works with a class 1 laser.
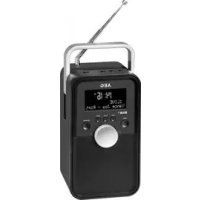
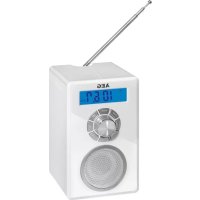
Overview of the Components
1 Handle
2 CD compartment
3 Band selector switch (FM ST / AM)
4 Radio scale
5 TUNING control
6 Telescopic antenna
7 PUSH TO OPEN CD tray (open/close)
8 button (reverse search)
9 Bton (forward search)
10 button (Play/Pause/deactivate standby)
11 button
12 LCD display
13 button (replay)
14 button (tape playing function rewind)
15 Cassette deck
16 button (tape playing function fast forward)
17 Taste button (stop/open cassette deck)
18 II button (Pause)
19 FM ST. control lamp
20 FOLD-/-10 button (Skip track/album down)
21 PROG/P-MODE button (Memory/Repeat/random playback)
22 FOLD+/+10 button (Skip track/album up)
23 BASS switch (bass amplification)
24 POWER control lamp
25 VOLUME (volume control)
26 Function selector switch (RADIO / TAPE OFF / CD/MP3/AUX)
Reverse (not shown)
AC Mains connection
AUX IN jack (3.5 mm jack plug)
Underside (not shown)
Battery compartment
Intended Use
This device is used for:
The reception of radio programmers
- Playing back audio/MP3 CDs /audio cassettes.
- Audio reproduction of external audio sources.
It is intended exclusively for this purpose and may only be used as such.
It may only be used in the manner described in these instructions for use. The device must not be used for commercial purposes.
Any other use of this device is considered to be contrary to the intended use and may result in damage to materials or even personal injury.
The firm ETV - Elektro-Technische Vertriebsgesellschaft mbH does not accept any liability for damage caused as a result of the use of this device contrary to its intended use.
Start-up of the device/introduction
- Please read the operating instructions carefully before using the device for the first time!
- Select a suitable location for the device, such as a dry, flat, non-slip surface on which it is easy to operate the machine.
- Ensure that the device is sufficiently ventilated!
- Remove the protective film from the display if it is still present.
Power Supply
- Connect the power cable supplied (see battery compartment if necessary) to a properly installed safety power socket and the mains connector AC on the back of the machine.
- Ensure that the voltage is the same as that indicated on the model identification plate.
Inserting the Batteries (not supplied)
- Open the lid of the battery compartment on the bottom.
- Insert 6 batteries of type D/R20 1.5 V. Please ensure that the polarity is correct (see the floor of the battery compartment)!
- If the device is not used for a long period of time, remove the batteries to avoid the spilling of battery acid.
- Then close the battery lid.
NOTE:
When a mains cable is connected the batteries are automatically switched off.
CAUTION:
- Different battery types or new and used batteries must not be used together.
- Batteries are not to be disposed of together with domestic wastes. Disposse of the used batteries at the relevant collection bin or at your dealer's.
WARNING:
Do not expose the batteries to intense heat, such as sunlight, fire or similar. Danger of explosion!
Transport Safety Device, CD Compartment
- Open the CD tray (2) by pressing the PUSH TO OPEN button (7).
- Before operating the machine for the first time, remove the transport safety device from the CD player if it is still in place.
Volume
The desired volume can be sent using the VOLUME regulator (25).
36 English
Amplifying bass
Press the BASS switch (23) to turn the bass amplification on or off.
Switch-off
he machine is switched off when the function selector switch (26) is turned to the TAPE OFF position. The POWER (24) control lamp goes off. Unplug the device.
NOTE:
After approx. 15 minutes without a signal, the device will automatically switch to standby. To use the device again, press the button (10).
AUX IN jack
- Connect the 3.5mm stereo RCA cable to an external audio source. If required, use a suitable adapter (not included).
- Insert the other end of the cable into the AUX-IN jack (Back Side) on the unit.
- Set the function selector switch (26) to the "CD/MP3/AUX" position.
- Start the playback of your audio source. Listen to the sound playback via the speaker.
- For the further procedure, please refer to the user manual of the external audio source.
NOTE:
If possible, adjust the volume of the external unit to a comfortable level.
Listening to the Radio
- Set the function selector switch (26) to the "RADIO" position.
- Select the desired frequency band with the band selector switch (3).
VHF (Stereo) = FM.ST, Medium wave = AM (Mono)
- Tune in the desired station with the station adjustment knob TUNING (5).
- The FM ST. indicator lamp (19) will only be lit, when the station is received in stereo quality. If reception is too weak and there is noise on the station being received, this lamp will flicker.
- For FM mode pull out the telescopic antenna (6) and turn it to improve reception.
- An aerial is integrated into the device for the reception of AM stations. The machine can be aligned to the station by turning it. In this frequency band programs are transmitted in "mono" only.
Playing CDs/MP3
This is how you play a CD
- Turn the function selector switch (26) to the "CD/MP3/AUX".
- Open the CD tray (2) by pressing the PUSH TO OPEN button (7).
- Insert an audio CD with the printed side facing upwards on to the central cone so that the CD clicks into place and then close the lid of the CD compartment.
- After a few seconds the total number of songs/tracks is shown in the display.
NOTE:
In the case of CDs in MP3 format the number of folders is briefly displayed at first.
- Press the button (10) to restart playback. The CD will play from the first title. The current track and the "CD" or "MP3" message are shown on the display.
NOTE:
With CDs in MP3 format the current track and folder are shown alternately in the display.
- In order to remove a CD, please press the button (11), open the CD compartment and lift the CD out carefully.
Always keep the CD deck closed.
OTE:
- If a disc is inserted the wrong way, or if no disc is inserted, the message "---" will flash and "NOd" will appear on the display.
- Playback of CDs produced by the user cannot be guaranteed due to the large variety of software and CD media available.
Description of the CD buttons
11/10
You can briefly interrupt and resume playback using this button. The symbol “▶” flashes on the display. Pressing again continues playback.
(9/8)
When playing an audio CD or a CD in MP3 format:
Withbu can jump to the next or previous track etc.
- If the button is kept pressed down, the machine starts to search through the tracks.
The button can be used as follows:
Press once = This jumps back to the previous track.
Press twice = This plays the song before etc. If the button is kept pressed down, the machine starts to search through the tracks.
(11)
The CD stops.
PROG./P-MODE (21)
- In stop mode for programming any order of tracks (see the section on "Programmed Play").
- When playing back music to select the replay mode (see next chapter).
When playing an audio CD:
Press once = (The symbol flashes) the current track is repeated continuously.
Press twice = (The symbol is lit) the whole CD is played continuously.
Press three times = (RDM appears in the display) all titles are replayed successively in random order.
Press four times = (INTRO appears in the display) every title of the CD is played for 10 seconds each.
Press five times = All functions are cancelled. The normal play mode is resumed.
Only when playing CD's in MP3 format:
Press once = (The symbol flashes) the current track is repeated continuously.
Press twice = (The symbol is lit) the whole CD is played continuously.
Press three times = The selected folder of the MP3 CD is repeated continuously ( LD appears in the display).
Press four times = (RDM appears in the display) All titles are replayed successively in random order.
Press five times = The function is deactivated and the CD is played in the normal mode.
FOLD+/+10 and FOLD-/-10 (22/20) (only with MP3 CD's)
- Press this button during playback to skip forward, or back by 10 titles each (if more than 10 titles are stored on a CD).
- Keep the button pressed down to select the next or previous folder (if the CD contains several folders).
Programmed Play
This can be used to program any desired sequence of tracks.
- Press the button (11).
- Press the "PROG./P-MODE" button (21). "P01" (preset location) appears on the display and PROG flashes on the display. Use the buttons (9/8) to select the desired track and then press the "PROG./P-MODE" button again. The display changes to memory slot P02.
- Select the next track with the button and press the "PROG./P-MODE" button again. Repeat the procedure until all the desired tracks are selected.
NOTE:
Once the storage capacity of the tracks to be programmed has been reached "FUL" flashes in the display.
- Press the button (10). The playback starts. The first selected track number is shown on the display, the message "CD" or "MP3" and PROG is shown on the display.
- Press once the button to stop the playback while retaining the program.
- To play the programme back again, press the button.
- To delete the program, press the button twice. The PROG control lamp goes out.
The device stops automatically after all the programmed titles have been played back. The PROG display will go out and the programmed sequence will be deleted from the memory.
Playing back Music in MP3 Format
With this device it is possible to play back pieces of music in MP3 format. The device also supports all standard CD types: CD, CD-RW, CD-R.
This machine of is able to play MP3 CDs. Up to 200 tracks can be compressed and stored on these CDs. Your machine detects an MP3 CD automatically (the total number of tracks and MP3s appears in the display). If you would like to play one of these CDs, proceed as described under "Playing CDs/MP3". Tracks can be programmed as described under "Playing Back Programmed Tracks".
Please note:
There are a number of different recording and compression methods, as well as quality differences between CDs and self-recorded CDs.
Furthermore, the music industry does not adhere to fixed standards (copy protection).
For these reasons it is possible that in rare cases there are problems with the playback of CDs and MP3 CDs. This is not a malfunction of the device.
Cassette operation
Playback of cassettes
- Set the function selector switch (26) to position "TAPE OFF".
- Press the button (17), to open the cassette deck (15).
- Slide a recorded audio tape into the deck with the tape opening facing upwards and with the side to be listened to facing the front (full reel to the right).
- Close the cassette deck again.
- Press the button (13) to restart the playback.
38 English
Description of the operating buttons
(13)
Starts the playback.
(17)
- Stops playback.
- In stop-mode to open the cassette deck.
11(6/14)
Rewinding or fast forwarding of the tape.
CAUTION:
Always press the button (17) between switching over the cassette and to stop the tape play function. By doing so, you prevent damage to the cassette tape or on the device.
II(18)
Briefly pauses playback. Pressing the button again will continue playback.
Cleaning and Maintenance
Always remove the mains plug before cleaning the machine.
- Any marks on the surface can be wiped off with a slightly damp cloth without any additives.
Troubleshooting
| Symptoms Course | Solve Solution | |
| CD can not be played back. | CD is not inserted or inserted incorrectly. | Ensure that the disc is inserted with the label facing upwards. |
| Batteries too weak. | Insert new batteries or operate the device with the mains lead. | |
| CD jumps dur ing playback. | Check the disc for fingerprints, dirt or scratches. | Check the disc for fingerprints, dirt or scratches. |
| Device cannot be operated. | Device crashes and "hangs". | Disconnect the power supply for 5 sec. Then switch the device on again. |
NOTE: Automatic Standby switch
In order to comply with the "ErP 2 (Energy-related Products)" Ecodesign Directive (2009/125/EC) that aims at animproved energy efficiency and general environmental compatibility, the device will automatically switch to standby after a certain amount of time without a signal. To use the device again press the button (10).
Technical Data
Model: SR 4353 CD/MP3
Power supply: AC 230 V~50 Hz
Battery operation: .6x1.5VTypED/R20
Power consumption: 15W
Protection class:
Net weight: 1.78 kg
Radio section:
Frequency ranges: FM 88 ~ 108.0 MsHz AM 540 ~ 1600 KHz
The right to make technical and design modifications in the course of continuous product development remains reserved.
This device has been tested according to all relevant current CE guidelines, such as electromagnetic compatibility and low voltage directives, and has been constructed in accordance with the latest safety regulations.
Disposal
Meaning of the "Dustbin" Symbol
Protect our environment: do not dispose of electrical equipment in the domestic waste.
Please return any electrical equipment that you will no longer use to the collection points provided for their disposal.
This helps avoid the potential effects of incorrect disposal on the environment and human health.
This will contribute to the recycling and other forms of reutilisation of electrical and electronic equipment.
Information concerning where the equipment can be disposed of can be obtained from your local authority.
Instrukcja obslugi
25 VOLUME (regulator sily glosu)
CTC Clatronic Sp. z o.o
YctaHOBHeHn6BaTapei (BaTapei He BxOJaTb do o6cary noCTaBKn)
BiiKpnTe BiDIOIOk IJa 6aTapeHa 3aHn cToPOHi npIy.
- IocTaBTe Ha MicCe 6 BaTapeiok TnHy D/R201,5 B.3BepHItb YBaIy Ha npaBnIbHy nOlaPHiCt b BaTapei (DnBnCb HnKHe CTOpOHy BiJnJIky dIra 6 Tapei)!
- RaIb Bu He BnKOpNCToBye Te npuaT prBaIiY cac, BuJaIb 6aTaapei3 BiDjNky, uO6 yHnKHyTu "BntiKaHH" KNCJOTN.
3akpiTe biDinok dna 6aTapei.
I PIMITKA.
KuO Bu niiKJIOUHTe Ka6eJIb Do eNEKTpOmepeXi, To XINBHeHH BID 6aTapeN npnHnHTbc aBTOMaTHHO.
52
YkpaIHcbka

YBAGA.
- Batapei pi3Horo TINY a60 HOBI i Bxte 3actocobhi 6atapei HE MOXHA BNKOPNCTOByBaTN pa3OM.
BaTapei He MoXHa BKNuTaN B DomaUHe CmTTn. PpOcMBOBdATn Ncyti BaTapei Ha CneuaJIbHi NYHKTN 360py He6e3NeuHnx BiXoJIB abo NOBepHyTn B MaRa3Hn, De Bu Kynnn npnaI.

NONEPEDKEHHA.
YHnKaIe BnIbBy BnCOKx TemepaTyp, HapnKJaI npA MOrO COHrHO rPOMIHn, BORHIO TOU, Ha 6aTapei. IChye He6e3neka Bn6yxy!
PnpctpiI dIaXnCTy nporpaBaCy KOMnakT-dnckiB CD npI TpAHCnOpTyBaHHi
BjdkpnTe IOTOK IJNA KOMNaKT-DnCKIB (2) HATNCKaHHAM KHONK PUSH TO OPEN (7).
- Ipeed TIM JAK BKJIOHTN npnla, BUNaIITb npncTpi n3axncty CD-nporpaBaHpy npu TpaHCnpTyBaHHi.
Cnna 3Byky
KhoIkoVOLUME peyIITOpOM CUY 3ByKy (25) Bn moKeTe o6paTn rHyHicTB, LIO Bam noO6aETbCra.
36iBWeHHH HxKHXyACTOT
HaTucHtB nepemikau BASS (23), uo6 yBimkhytn a6o BMKHyTN 36ilbueHHH HxHix qactOT.
BukIOueHHA
Ppnaad BmKHyTo, kUo KlaBiu NepeKluOeHHa FyHKuJ (26) HaxoDntbC B noLoXeHHI TAPE OFF. KoHTpoBHa lamNooyKa POWER (24) norache. Picra cBo rBtA rHITb Bnky 3 po3-ETKn eNEkTPOXINBJIeHHa.

NIPMITKA.
3a BiCyTHOCTi ciHany 6jIbJe 15 XBNINn npuJad ATOMatuHNO nepeJeB pexm OuykBaHH. Lio6 cKOpNCTyBaTNCr npuJADOM 3HOBy, HATNCHTb KONKy I/010).
Po3'cm AUX IN
1.ПiД'ЕнайTe 3,5-МСТеpeOKa6ь RCAdo3OBHiiHbOToIxKepeNaayIOcNHaJy.IKIo NOtpi6Ho,BNKOpNCTOByITe BiIDNoBInHn aadTep (He DoJaetcb).
2. BCTABTe iHsIn KHeu Ka6eIy po3'em AUX-IN (TnIbHa CTOpOHa) Ha BNPO6i.
3. BctaHOBITb nepemikau yHKui (26) y noJIOxehnra "CD/ MP3/AUX".
4. 3anyctitb BiTbOpenHa i3JKepeHa 3Byk.3ByK 6yde BIBTBOPIOBAtncbYepe3 rHyHOMOBeCb.
5. NoidaIbSi IHCTpyKuIykaTBeNociBHKy KOpNCtYBaHa 3OBHIHbOrO DKepeNa 3Byky.

PIMITKA.
KMO KMOJINBO, BCTAHOBITb NOTPI6HNI pIBeH b rYHOCTi Ha 3OBHIHbOMy npucTpoi.
Cnyxanhpaio
- BcTaHOBiTb nepemKau cyHKui (26) y noJoxeHHRA "RADIO".
-
Bn6epiB noTpi6Hm diana3OH yactOT 3a donomoroIO npemukaua diana3ohIB (3). DBY (ctepeo) = FM.ST, Cepedhi xbnii = AM (Mono)
-
PerynTOpom TUNING (5) BCTaHOBITb paIOcTaHIO, LIO Bu xOueTe cIyXaTI.
- Ihdkatop FM ST. (19) 6yde cbitnnc, koli cnHan CTahui npinMaetbC B pexmimi ctepeo. RaIIO npiOM HeCTa6ilbHni i 3Byk nepedayi paioctahuMi Mae nepekoDn, lamnochka mirae.
- Пи пиимо радionepeдч в дялэо FM витгнть телескогину antheHy (6) i obepHtB II habkoLo OCI.dekiIbka pa3iB ДЯ NOKpaUeHHNпиOMy.
- Дяприиому радiocань в дялбоги AM в пладi interграва на Anteha. В можete обертын плад habКрг оci i takIM чнOMшУкТи ONТмальни пииму радioxbиь.Вцьому dianasoHi nepedani BeDyTBcR TlbknВ ржimi MOHO 3ByKy.
OuHHe iTexHicHe 6cIyROByBaHH
Ipeed ouHnHnmpnnaDy BnTnHiB BnKy 3 po3eKn enektpuHoi mepexi.
ПлЯМиHa NOBepxHII pIyAMy MOxHa BnIaIITN3JIeKABONORIO TKaHIHO,6e3doaTkoBnx MNoOuNx 3acO6iB.
YcyHeHHa HeoJIikB
Yka3bBaet Ha BO3MOxHHyIO ONaCHOCTb,IINI3JeJIIMN INpyTNX OKpyKaIOUxN INpeDMETOB.

TPIMEYAHNIA:
JaetcoBebtunHOpMaIIO.
I I P N M E U A H N I:
- Ecnn Dnck BCTaBHeH He npabNbHo, JIn6o Dnck OTCytCTByET, HAnDnCnIe HauHcT MrrTaB COObUeHne "--" n "NOd".
- 13-3a orpomHoro YnCna pa3nHnHoro nporpaMMHoro 06ecneueHHN IOCTyINbIX HOCNTeJIe (YNCbIX DnCKOB CD) He rapaHTnpyETcB OBCnpOn3BeJeHne DnCKOB CD, 3aNNcaHHbIX CAMM NOJb3ObaTeJIem.
OnncanHe KhoNok dJa CD
II/(10)
Moxho KpaTkoBpeMeHHO npepBaTи BO306HOBNb BOCnpoN3BeHHe NOMOULIO 3ToI KHONKn. Ha DCNIIee MIVaet CIMBOJ " . HaxmTe CHOB, YTO6bl IpOJOJIKNb BOCpOuN3BeHHe.
1/(9/8)
PnBocnpon3BeJeHnn audio CD nn Dncka CD B opMaTe MP3:
C nOMOJIbIO HIOXHO nepeiTn Ha CneIyIOUIO UINI npEdbIyUIO 3aIINCb I T.D.
- Ecn ydepkmbaTb KhoNky HaxaToi, npu6op HaHHeT noNCK NO 3aNNcM.
Khonkacnojbl3yetcTak:
OndokpaTHoe HkaTne nepexoHnHa3aK K npeBbIyUeJ 3aPNCN.
Двоиhoeнжкатne = BOCPON3BcEHNe npeIbIyUcei 3aIncn nT.D. Ecnn Jx e KhoNka ydepxkBaetcnaHaxKaToi, npu6op NaHnHaet NOICK N0 3aIncm.
(11)
OctaHabJbBaet Dnck CD.
PROG./P-MODE (21)
Bpejme ocTaHOBKn Cnyknt IJnI npOrpAmMnPoBaHn BOCIpOn3BeDeHn 3aIncE B JIObOM npApKe (cm. pa3- den "IporpaMMnpoBaHoe BocIpOn3BeDeHne").
- Ppi BOCPpon3BedeHm My3bIKn Ia Bb6opa peXIMAnOBTOpa BOCPpon3BedeHn (CM. cIeNyUoun pa3deJ).
PnBocnpOn3BeJeHm audio CD:
OndokpaTHoe HaxaTne = (MnraET CmBON)HepepbIBHO BOCPON3BOJNTcA TEKUa3aNtCb.
ДВОИhoe HαжаТиE = (rOpiT CmB0JI) HcpepbIbHO BOCPpON3BOJNTcR BeCbДnCK CD.
HaxmTe Tpu p3a = (Ha dncnnee noBvTCra RDM) BCE 3aIcN BOCpON3BOJATCn PocJeIOBaTeJIbHO B CnyaHOM npAKe.
Haxmte yeTbipe pa3a = (ha nncnnee noBntcINTRO) kaxd 3anncb nscka CD Bocnpo- n3BOIDTCn 10 ckyH.
HaxmTe pTb pa3 = BCE cyHKUIN OTMeHHOTcB. Bo3-OBHOBLIETcObHbIpeKIM BOCpON3BeDeHnA.
TOnbKO npB BOCPON3BeHm DnCKOB CD BΦopMaTe MP3: Ondokpathoe Haxatne = HenpepbIBHO BOCPON3BOIDTCa TEKUza 3aINCb (Mnraet CnMBOJ
ДВОИhoe HαжаТиE = (rOpyT CmB0JI)HcpepbIBHO BOCpOIN3BOJNTcBAeCbДИCK CD.
Haxatne Tpu p3a = HnpepbIBHO BOCpOu3BOUITcBbI6paHHa nnka Ha Dncke MP3CD (Ha nucnlee noka3aHo FOLD).
Haxatne yeTbipe pa3a = (Ha dncnlee noBHTcR RDM) BCE 3aIncn BOCpOIN3BOJNTcN PocJeIOBaTeJIbHO B CnyaHOM npRdKe.
HaxmTe npTb pa3 = cyHKnIa DeakTNBnpyETcN IINCK CD BOCIpOIN3BOIDITcB O6bIHOM pexIme.
FOLD+/+10 n FOLD-/-10 (22/20) (TOJIbKO,ДЛА ДИСКOB MP3 CD)
Haxmnte 3ty KhoNky BO Bpemr Bocnpoun3BeJeHnna I nponycka Bnepei nIi Ha3ad Ha 10 zanicei (ecnn 6oJee 10 zanicei coxpaneho na ducke CD).
- Ydepknaite KhoNky HaxaToI nIy Bb6opa cneIyouei nn npdeBdyuie nanKn (ecn nnck CD coepxnt HeckoBko nanok).
PpOpaMMNPOBaHHoe BocnpOn3BedeHne
MoXHo nporpaMMPOBaTb JIO6yIO HxKHyIO NOcJeIOBaTeJIb-HOCTb 3aINCEI.
- Haxmte KnaBnuy 11).
- HaxMMTe KJIaBnUy "PROG./P-MODE" (21). HaДиСплг. норВИТСР "P01" (coхрангемя поЗИЯ) и 3amИrae ндИКацИng PROG. ИспьзУтЕ КНОПКIIK(9/8) ДИ Быбopa hyжног 3aIupcN, 3aTeM ChOBа HaxMMTe KHONKY "PROG./P-MODE". HaДиСплг eN3MeHNTСR MecTo B ПамRTN Ha P02.
- Bb6epnte cJeIouyIO 3aIncb KJIabnIeien IOBa HaxmTe KJIabNluy "PROG./P-MODE". NOBToprIte 3Ty npOeIpy Do Bblbopa BCex Heo6xoIMbIX 3aIncen.
60
Pycckn
I P N I M E U A H N I:
Iocne 3aONHeHnI npOrpAmMpyEmbIM 3aNcAMMeCTa xpaHHeHnHa dncJIeE 6ydt MraTb HAdnCb"FUL".
- HaxmTe KnaBnuy II/10).HauHETcBocnpOn3-BeJeHne.HaIncIe noka3bIAOTcH oMeP npBoi BbIbpaHHo 3aPiNC,coo6uEHe "CD"nn "MP3" n PROG.
- OINH pa3 HaxMMTE KlaBnWy TTo6bIOCTaHOBTb BOCpON3BeHeHne, He npepbIbI npOrpaMMy.
6.ДлпnpoДоЛжЕнгьОБсрпОиЗБeDEнгьЗаIpOрpamMnpoBaHHNoIPOCJIeDObaTeBbOCTNHaKmTte KHOJkyI1.
7.ДяуденипограмьдвбдынжмteКларшу .KoHTpoJIbHaJЯmIOYka PROG BbIKHQUHtca.
YcTPOIcTBO OCTaHOBITCR ABTOMaTHeCKN NocLe BOCpON3-BeDenHn BCex 3aNPoRpaMMIpOBaHHbIX 3aNInCe. OTo6paxKeHne PROG npEkpATITCR, a 3aNPoRpaMMIpOBaHHa nocJeDoBaTeJIbHoCTb 6yEt yJaHeHa n3 pAmrTn.
Bocnpo3BeJeHne My3bIKN B φopMaTe MP3
JaHHoe yCTpoNCTBO oBecneYHBAET BOCnPOn3BeDHeHne My3bKn BΦoPMaTe MP3. YCTpoNCTBO TAKKe NOJdEpeXHBAET BCE TaHApTHe TINbI DnCKOB CD:CD-RW,CD-R.
JaHHbI np6op MoKet BOCpOn3BOOHTb DnCKn MP3 CD.
Do 200 3aInceM MOrT 6bITb CxAToB n COxpaHeHb Ha TaKHX
DnCKax CD.YcTpoiCTBO aBTOMaTIueckn OnpeJeHt MP3
CD (Ha DnCnIe 6yTeT BbIEDeHo 06Uee YnCNo 3aInceN i
DnCKOB MP3).O BOCpOn3BeDEHm OdHoro I3 3THX DnCKOB
CD cm.B pa3deJe "Bocpn3BeDEHne DnCKOB CD/MP3".3a-
PiNcMoKHO pOprpAMmPOBaTb, KaK paCCMOrpeHo B rnaBe "PporpAMmPOBaHne BOCpON3BeDEHnR".
Poxanyuicta yuTne:
CytectbyIOT HeCKoJIbKO pa3HbIX MeTOIOB 3aINcN IN CkATNA a TaKKe OTJInuB KaueCTBe O6bIHbIX DnCKOB CD IN DnCKOB CD, 3aINcaHHbIX camOCTOrTeNbHO.
Bonee Toro, My3bikalbHnHnyctpHne npuepKnaeTc eHnhix CTaHapTOB (3auNTa OT KONnpOBAHNA).
IIO 3TMM pnpHnAM B KpaHHe peKnx CnyaX BO3MOxHbI np6JIeMbI pN BOCpOIN3BeDeHN nnCKOB CD n MP3 CD. 3TO HE ABNAETCA pnp3HaKOM HeipabInbHO pa60tby yCTpoiCTBa.
Pa6ota c kaccetamu
Bocnpon3BeDenHe kaccet
- YctaHOBInTe nepeKnIOuATEIb-ceJIeKTop fynKcI (26) B noJoxKeHne "TAPE OFF".
- HaxMMTe KhoNky 17, TTo6bI OTKpbITb KaCCeTHyIO deKy (15).
- BCTaBbTe 3aHcHHyO ayDnOKaccTeY Bdeky, YTObblOBtBepCTne CJIeHToI CMOTpeIIO BBepx, A pOcNlUuBaMaM CTOpHa 6bJa HApBaBHeA BnpeEi (HaMoTaHHa KaTyuKa cnpaBA).
- Choba 3akpoTe kaccTeHyIO deky.
- HaxmTe KhoNky (3) nla BO3o6HOBJIeHnRA BOCpOIN3-BeHeHnA.
Onncnne pa6ooyKHOHOK
(13)
3aynyckaET BOCPON3BedeHne.
A(17)
OctaHaBnBaet BocPon3BeJeHne.
BpeXnmeOCTaHOBKnOTKpbIbAeT KAcCeTHyIO DeKy.
1/1(16/14)
IpeMoTka IeHTbHa3aJ nnBnepen.

BHIMAHINE:
Bcerda haxmMaTe KhoNky 一 ( 17 ) npn nepeKIOUeHNc KaccetbHaOCTaHOBVOCpOn3BeDEHnJeHTbl.3a CHT ETOIpeoTbpaAaeTcNobpeXDeHne KaccETHOJNeHTbl IINyCTPOCTBa.
II (18)
KpaTkoBpeMeHHa Na3a BocnpOn3BeDeHn. NOBtOpHoe HkaTne KhoNk npOdoJXNT BOCpOn3BeDeHne.
OuInCTka n TexHnueckoe o6cIyXnBaHne
Ipeed ouctkoi np6opa BceTda n3BlekaTe BnIky 3neKtpoNTAHIN.
JIO6bIe OTMeTKn Ha NOBepXHOCTM MoXHO CTepTe b CneRka BnaXHoi TKAHBIO 6e3 KaKx-JINBO DO6aOB.
Диагнoctnika