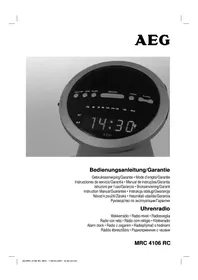
MRC 406 RC - Radio AEG - Free user manual and instructions
Find the device manual for free MRC 406 RC AEG in PDF.



| Product type | Alarm clock radio |
| Brand | AEG |
| Model | MRC 406 RC |
| Mains power supply | 230 V, 50 Hz |
| Backup power supply | 2 R03/AAA 1.5 V batteries (not included) |
| Frequency range | FM 88-108 MHz |
| Power | 3 W |
| Display | Digital LED |
| Alarm | Dual alarm (AL1 and AL2) with day selection |
| Snooze function | Yes, repeats every 9 minutes |
| Sleep timer | Yes, up to 1 h 59 min |
| Time setting | Automatic (DCF) or manual |
| Alarm type | Radio or buzzer (selectable) |
| Volume | Adjustable via knob (includes buzzer) |
| Safety | Do not expose to water, do not block openings |
| Maintenance | Clean with a slightly damp cloth without detergent |
| Warranty | 24 months |
| Batteries | Do not mix types, recycle at end of life |
Frequently Asked Questions - MRC 406 RC AEG
User questions about MRC 406 RC AEG
0 question about this device. Answer the ones you know or ask your own.
Ask a new question about this device
Download the instructions for your Radio in PDF format for free! Find your manual MRC 406 RC - AEG and take your electronic device back in hand. On this page are published all the documents necessary for the use of your device. MRC 406 RC by AEG.
USER MANUAL MRC 406 RC AEG
Overview of the Components.. 3
8 Instruction Manual. Page 28
Technical Data.. Page 30
0 Guarantee
FRANÇAIS
JEZYK POLSKI
Sommaire
D-47906 Kempen/Germany

1 Touche minutes (MIN)
1 Minutt-knapp (MIN)
General Safety Instructions
Read the operating instructions carefully before putting the appliance into operation and keep the instructions including the warranty, the receipt and, if possible, the box with the internal packing. If you give this device to other people, please also pass on the operating instructions.
- To avoid the risk of fire or an electric shock, you should not expose the device to rain or moisture. Consequently, do not use the device in the immediate vicinity of water - for example near a bath tub, a swimming pool or in a damp cellar.
- Use the device only for the intended purpose.
- Only connect the device at a properly installed plug socket. Pay attention that the specified voltage corresponds to the voltage of the plug socket.
- When using external mains supply, pay attention to the correct polarity and voltage. Always place the batteries in the correct direction.
- Assemble the device in such a way that the available ventilation openings are not covered.
- Never open the housing of the device. Incorrect repairs can constitute a considerable risk for the user. Should the device become damaged, in particular the mains supply cable, do not operate the device any longer, but rather have it repaired by an expert. Check the mains supply cable regularly for damage.
- For safety reasons a broken or damaged mains lead may only be replaced by an equivalent lead from the manufacturer, our customer service department or a similary qualified person.
- If the device is not used for a longer period, remove the plug connector from the plug socket or take out the batteries.
These symbols may be found on the machine and are intended to indicate the following:
The lightning symbol should advise the user of parts in the inside of the device which carry dangerously high voltage levels.
The symbol with an exclamation mark should advise the user of important operation or maintenance instructions in the accompanying documentation.
Children and Frail Individuals
- In order to ensure your children's safety, please keep all packaging (plastic bags, boxes, polystyrene etc.) out of their reach.
Caution! Do not allow small children to play with the foil as there is a danger of suffocation!
- In order to protect children or frail individuals from the hazards of electrical equipment, please ensure that this device is only used under supervision. This device is not a toy. Do not allow small children to play with it.
Symbols in these Instructions for Use
Important information for your safety is specially marked. It is essential to comply with these instructions in order to avoid accidents and prevent damage to the machine:
WARNING:
This warns you of dangers to your health and indicates possible injury risks.
CAUTION:
This refers to possible hazards to the machine or other objects.
NOTE: This highlights tips and information.
Special Safety Instructions
- Do not use the device in locations that are extremely hot, cold, dusty or moist.
- Do not cover any ventilation slits with objects such as magazines, tablecloths, curtains etc.
- Never touch the mains plug or lead with wet hands.
- Keep the mains lead away from heaters.
- Never put a heavy object on the electric lead.
- Keep the device away from vases, baths, wash basins etc. If liquid enters the device this may cause serious damage.
Overview of the Components
1 Set minutes (MIN)
2 Deactivate/activate the radio-controlled time adjustment / hour button (RCC/HR)
3 Time setting function key (MODE)
4 Alarm function key (ALARM)
5 Function key for delayed switch-off (SLEEP)
6 Wake-up interval
(SNOOZE)
7 Function switch (AUTO/OFF/ON)
8 LED for activated alarm function (AL1/AL2)
9 Station
TUNING
scale
11 LED
regulator
12 BUZZ/VOLUME (volume) regulator
13 LED display for radio signal
Putting into function
- Select a suitable location for the radio recorder, such as a dry, flat, non-slip surface on which it is easy to operate the machine.
- Ensure that the radio recorder is suffi cientsly ventilated!
- Insert the plug into a properly installed 230V, 50Hz power socket. Ensure that the voltage is the same as that indicated on the model identifi cation plate.
Set the time automatically
After you have inserted the mains plug into the socket, the time data are automatically taken over by the transmitter after a few minutes. As long as the dot (13) is fl ashing in the display the device is searching for the radio signal. Once a radio signal is found, -0 0-, -0 1- etc. appears in the display. The correct time then appears in the display (the dot (13) lights up).
The time is automatically adjusted every hour on the hour by the transmitter signal.
I NOTE:
Reception in a radius of 2000 km from Frankfurt/Main should be trouble-free. However, disturbances may occur owing to the local reception position. Buildings with tall metal elements and the vicinity of TV sets, PCs, cell phones, etc. can disturb reception! If the automatic setting is still not possible after 10 minutes despite the alignment of the incorporated antenna, the reception position is too bad. In this case please adjust the time manually or change the position of the device.
Manual time setting (24 h)
Hours: Press the MODE key (3) and the RCC/HR key (2) simultaneously.
Minutes: Press the MODE key (3) and the MIN key (1) simultaneously.
Year: Keep the MODE button (3) pressed down. The year appears in the display. Press the MIN button (1) repeatedly to set the year in annual steps. Press the RCC/HR button (2) repeatedly to set the year in decade steps.
Date: First keep the MODE button (3) pressed down until the year is displayed. Then press the SNOOZE button (6) to display the date. Set the month with the MIN button (1) and the day with the RCC/HR button (2).
NOTE:
In order to display the weekday, press the SNOOZE button again (6) in date mode. In the display appears e.g. dA Y 1" = day 1 = Monday, dA Y 2" = Tuesday etc.
Radio station tuning
Push the function switch (7) to the ON position and select a station by turning the TUNING control (10). The station scale (9) indicates the selected frequency.
If reception is too weak and the station being received hisses, try to improve reception by turning, unwinding or winding up the throw-out antenna.
Volume
The desired volume can be sent using the BUZZ / VOLUME regulator (12).
Alarm Function
You also have the opportunity of setting two alarm times.
- Keep the ALARM button (4) pressed down to call up AL1 in the display.
- Release the button to set the alarm time. - - - - - appears in the display.
- Keep the SNOOZE button (6) pressed down to set the days on which you would like to be woken up on the set days. dY 15" = Monday - Friday appears in the display, for example. Keep pressing the SNOOZE button to set the following periods:
dY 15 = Monday - Friday, dY 67 = Saturday - Sunday,
dY 17 = Monday - Saturday and
-
-
-
-
-
- = deactivate alarm function.
-
-
-
-
-
With the RCC/HR button (2) you can set the hours, and with the MIN button (1) the minutes.
- Press the MODE button (3) to call up the normal time display.
- A dot lights up in the display next to AL 1 (8). The first alarm is now active!
- If you would like to set a second alarm time, press the ALARM button (4) twice (AL2 appears in the display). For the following steps please proceed as described above.
- A dot appears in the display next to AL 2 (8). The second alarm is now active!
In order to deactivate the alarm times, press the ALARM button once (AL1) or twice (AL2). Then press the SNOOZE button (6) repeatedly until ·s appears in the display. Press the MODE button (3) to call up the normal display. The dot (8) next to AL1 or AL2 goes off.
Radio alarm
- Once the alarm times are set and a radio station has been selected, shift the function selector (7) to "AUTO".
- As soon as the alarm time is reached, the radio is switched on. The selected radio station plays at the set volume.
To turn the radio off simply press the ALARM button.
Buzzer alarm
- If you would not like to be woken up by the radio, turn the volume control (12) to the BUZZ position (buzzer) until it locks in place.
Instead of the radio, the buzzer goes off when the alarm time is reached.
To turn off the alarm, push the function switch (7) to the OFF position or press the ALARM button (4).
Automatic Alarm Interval
The automatically set alarm function can be shut off for approximately 9 minutes with the SNOOZE key (6).
Switch-off
The device is switched off if the function switch (7) is in the OFF" position.
Delayed Shut-Off
The delayed switch-off function can be used when the switch is in the positions AUTO or OFF.
- If the SLEEP button (5) is pressed the radio turns off after 1 hour or 1 hour and 59 minutes. The switch-off time can be adjusted by pressing the SLEEP and the HOUR button (2) or the MIN button (1) at the same time.
- This function can be cancelled with the SNOOZE key (6).
Inserting the batteries (not supplied)
If there is a power cut or the mains plug has been removed from the power socket, the settings will be retained if the power reserve batteries are inserted.
- Open the battery compartment on the bottom.
- Insert 2 batteries of type R03,AAA"1,5 V. Ensure that the polarity is correct (see the floor of the battery compartment)!
- Close the battery compartment again.
- If the device is not used for a prolonged period of time, please take the batteries out in order to prevent leakage of battery acid.
- Different battery types or new and used batteries must not be used together.

CAUTION:
Batteries are not to be disposed of together with domestic wastes. Disposse of the used batteries at the relevant collection bin or at your dealer's.

WARNING:
Do not expose the batteries to high temperatures or direct sunlight. Never throw batteries into the fire. There is a danger of explosion!
Cleaning
- Remove the plug before cleaning.
- Clean the appliance with a slightly humid cloth without any additives.
- Do not dip the appliance in water.
Technical Data
Model: MRC 4106 RC
Power supply: 230 V, 50 Hz
Power consumption: 3 W
Battery power reserve: 2 x 1,5V ,R03/AAA
Frequency range: UKW / FM 88 ~ 108 MHz
This device has been tested according to all relevant current CE guidelines, such as electromagnetic compatibility and low voltage directives, and has been constructed in accordance with the latest safety regulations.
Subject to technical changes without prior notice!
Guarantee
The device supplied by our Company is covered by a 24 month guarantee starting on the date of purchase (receipt).
During the life of the guarantee any fault of the device or its accessories ascribable to material or manufacturing defects will be eliminated free of charge by repairing or, at our discretion, by replacing it. The guarantee services do not entail an extension of the life of the guarantee nor do they give rise to any right to a new guarantee!
Proof of the guarantee is provided by the proof of purchase. Without proof of purchase no free replacement or repair will be carried out.
If you wish to make a claim under the guarantee please return the entire machine in the original packaging to your dealer together with the receipt.
Defects to consumables or parts subject to wearing as well as cleaning, maintenance or the replacement of said parts are not covered by the guarantee and hence are to be paid!
The guarantee lapses in case of unauthorized tampering.
After the expiry of the guarantee
After the expiry of the guarantee repairs can be carried by the competent dealer or repair service against the payment of the ensuing costs.

Meaning of the "Dustbin" Symbol
Protect our environment: do not dispose of electrical equipment in the domestic waste.
Please return any electrical equipment that you will no longer use to the collection points provided for their disposal.
This helps avoid the potential effects of incorrect disposal on the environment and human health.
This will contribute to the recycling and other forms of reutilisation of electrical and electronic equipment.
Information concerning where the equipment can be disposed of can be obtained from your local authority.
Yka3bIbaeHa BO3MOxHHyO ONaCHOCTb IIN3DeJIIN IN DpyrNX OKpyKaIOxN INpeDMETOB.
I I P N M E U A H N E: J a e T c o B e t b i n H F o p M a C H I O.
CneuaHbIe yka3aHnno TeXnKe 6e3oNaChOCTn
He yctaHaBnBaIte H3eJIne B CInbHO ropeHx, XoIoNbIX ININ BLaXHBIX MecTax.
He 3aKpbBaIte BHTINLIAUHOHbIe OTBepCTN KaKIMN-JI60 npEpmTaMn, KaK HApnpMeP ra3etAm, DeKOpaTnBhbIMn caΦeTKaMn, 3aHaBeCarmn T.D.
He npikacaiTecb MOKpbIM pykamN K cTeBOMy Hhpy nH uTencJIIO.
CeteboIuHpy HeonKHeN KacaTbca 6atape otOpneHHn.
HnB KOem Cnyuae He cTaBte Ha cTeBoi UHyp TArKeIbIe npedmetbl.
Деркнгндддддддддддддддддддддддддддддддддддддддддддддддддддддддддддддддддддддддддддддддддддддддддддддддддддд徳нгнгнгнгнгнгнгнгнгнгнгнгнгнгнгнгнгнгнгнгнгнгнгнгнгнгнгнгнгнгнгнгнгнгнгнгнгнгнgngngngngngngngngngngngngngngngngngngngngngngngngngngngngngngngngngngngngngngngngngngngngngngngngngngngngngngngngngngngngngngngngngngngngngngngngngngngngngngngngngngngngngngngngngg
HaHMeHOBaHne DeTaJe
1 Khonka MNHyT (MIN)
2 DeakTNBnPOBaHne/aKTbNPOBaHne
paHnoynpaBHeMOn KOppeKTHIpOBKn TOHOrO BPeMeHN / KhoNka qacob (RCC/HR)
3 ΦyHKUHOHaJIbHaN KHOHka IporpaMMIpOBAHN BpEmEH (MODE)
4ФУнкуналььнай Kногka nporpaMnpoBaHna 6yДиьнka (ALARM)
5 ΦyHKUHOHaJIbHNa KHOJa BbIKIOueHnC 3aIepKko (SLEEP)
6 INHTepBaB BKJIIOUeHn/BBkIIOUeHn 6yDnIbHnKa (SNOOZE)
7 ΦyHKuHOHaJIbHbI nepeKluOaTeJIb (AUTO/OFF/ON)
8 CBeToIOIOHbI INHINKATOp BKIOUeHn6 6yINJIbHNKA (AL1/AL2)
9 ⅢkaIaHaacTpoKn
10 Peryntop TUNING
11 CBeToIOHOHbI DnCJIeI
12 Perjntop BUZZ / VOLUME (rpoMkoctb)
13 INdkaTop paIIOcnIHana Ha CBTeOIOHOM IINcIIe
BkHoueHne
Подберпг ДЯЗТОВ ПОДХОДИЕ МECTO,TAKOBБМ YBЛЯERCYСХА,ПОСКАИ ИСHEКОЛБКАЯ NOВЕРХHOCTB,C XOPOSHIM DOCTYNOM KИЗDEJIINO.
Cneinte 3a TEM, yTo6b6bila oBecepeHa doCTaTOHnABEHTINRAI IN3dENIA!
BCTaBbTe CteByIO BnIKy Bpo3eTKy C hAnpRKeHEm Cetn 230 B,50 Tc, yCTaHOBJIeHHyIO B COOTBeTCTBM N C npEiINcAHmM. PpOKoHTpOInpyTe, COOTBeTCTByET JI HAnpRKeHHe BaWee CTeH AnpRKeHIO nITaHn I3DeHn, Yka3aHHoe Ha TINOBOI Ta6NIuKe.
AbTomaTHueckoe nporpaMnpoBaHne yacOB
Pocne toro, KaB Bb BotKHyn CteBoB Ka6eB B po3ety, POKa3aHn BpeMeHH Yepe3 HeCKOJIbKO MmHYT ABOMaTHueckn pINHMMAHOCTC paIIOCTAHUN.
IokaHa Iincnlee Mrraet INHdkatop paNocnHana (nyHKT 13), np60 npuET paNocnHan. KaK toIbko paNocnHan 6ydt HauDeH, Ha Iincnlee NOBnHcTc -00-,-01-ntd. Ha Iincnlee NoRbHcTc TOHHe NOKa3aHne YacOB 3aropaetc HnDkatop paNocnHana (13).
- Poka3aHne yacOB KoprKeTnpyeTc aBtOMaTnueckn, KaKdbI NOJIbI Yac np NOMOu CNrHaIpaDIOCTaHUN.
IIPIMEUYAHNE:
PnEMBpaHnce npmepHO 2000 KMOT PhaHKpYrTa Ha MaHe OcUyecTBnEeTcB63 npoBnEM, HO NOMEXn Pn npnEmo,OBcNOBHeHHBe MecTHbIMN yCNoBnMn npHema, Bc-Takn BO3MOxHb. BOCoEHHOCTN NOMEXn PnnpHemOryt BO3HNKHyTb B 3daHnRx, FDe MHOrO MetaJIInuecknx DeTanei, a TAK JVE B6IIm3 C BkIIOueHHbIMN TeBEIN3OpAMN KOMNbHTepaMn, MObINbHMn TeteFOHaMn n dp..EcIn, HECMOTpHa HAcToPOhky BCTPoEHHO npHmHO aHTehbl, ABtOMaTHeCKa YCTaHOBka HeBO3MOxHn pnmepHO uepe3 10MHyt, 3NaHTyCNOBnA npHema cNIuKOM cnaBle.B 3Tom Cnyae yCTaHABINBaTe NOKa3AHn YacOB BpyHyIO INI NOMEHHT MeTO IN pacnoLOKeHH.
PyuHoe nporpaMnpoBaHne noka3aHH qacOB (24 u)
Yacbl: OndHOBpeMeHHo HaxMITE KHOKNK MODE (3) IN KHOKNK RCC/HR (2).
MnHyTbI: OJHOBpeMeHNO HaKMnTe KhoNkY MODE (3) n KhoNkY MIN Taste (1).
Ioi: dapeKHTe hkaToH KhoNky MODE (3).
IoNOBHTCnHaHNCJee.NOBTOPbIM HaxmAHmE KONKIN MIN(1),BbIbpaetc HxhHbI RO,ODHO HxKaTne paBHO ODHOMy RoY.IOBTOPbIM HaXmAHmE KONK IN RCC/HR (2) BbIbpaETc HxhHbI RoD DecaTHTNMM Waramn.
Data: Chauana dejknte haKaToi KhoNky MODE (3), noka He noBnTcra roid. 3aTe mHaKmTe KhoNky SNOOZE (6), noBJIReTcra data. KhoNkoM MIN (1) BbIbnpaETcra MeCua KhoNkoRCC/HR (2) BblbnpaETcra DeHb.
I PIMMEAHHE:
TtobbB3BaTbH3BaHneDnHeJeN,BMoYceDatumModeCHOBAHaKMMTEHaKHONKySNOOZE(6).HaDcnnneeNoBHTC,Hanpimep,dAY1"=DeHb1-nHOeJIbHHK,dAY2"=BTOPHNIKITd.
HacTpoIka Ha paadnoctaHcHIO
IpeBnBte yHKuHOHaJIbHbI nepeKIOaTeJIb (7) B nOIOJKeHne "ON" n, BpaAaI peryIaTOp "TUNING" (10), HAcTpOInTeCb Ha KaKyIO-HN6ByIb paIIOCTaHcUIO. LkaIa HAcTpOKn (9) NOKa3bIbAet YacToTy HAcTpOKn.
Ecn npnem cnwokom nloxoh npaioctauny uymnt, nonpooyte ynyuwnb npneM, Bpaua, ckpuyna Hnn H3n6aB npoBOJOnHy aHTEHy.
PerynnpobKa rpoMkoCTn
Pn noMoU np epyIaTopa BUZZ / VOLUME (12) oTperyIpyTe rpoMKoCTb 3Byka.
BydnhbHnK
YBaCecTbBO3MOXHOCTb3aPpOrpaMPOBaTb6yINbHnKHa
2 pa3hblx nO BpEmEH 3BOHka.
-Деркнite Нжатои KhoNky ALARM(4),Ha nucnnee noBntcA1L.
OTnyCTHe KHOHky, YTO6bI 3aBeCTn 6yDnJIbHnK Ha onpeDenEHHoe Bpemr, HdNcPiee NOBHTCn
-Держнге Нахатои кногу SNOOZE (6),чтбы Бьбраты DHH,HA KOTOBь Бы XOTITE 3aBecn 6yDINbHNK. Ha DnCnIe NORBtCn,HANPIMep,dY 15^ = noHeJeBnHK -ПТИц. NOBTOpHbIM HAnKaTHem KHOngK SNOOZE Bby MOKeTe BbOpaTb CNeDyUOuINE DnH:
dY 15 = noHeIeIbHnK - nTnHnIa,
dy67=cy60Ta-BCKpeceHbe,
dy 17 = noheJebnK-cy6ota n
-·-=0yINbHbIKBbIKHOeH.
KhoRCC/HR (2) BbBb6paTe yacbl, a KhoNkoMIN 1-MHHTbl.
HaKMnTe KOnKy (3),YTO6bI Bb3BaTb Ha DnCnIeHOPMaJIbHOe nOKa3aHHe BpeMeHn.
HaDnCnnee 3aropaetcn HnDnKAtop BKnUoyehn6yDnIbHnKa AL 1 (8).IepBoe BpEm npO6yKdEHHaKTMBIpOBAHO.
EcnBbXOTNE Bb6paTb BTOpoe Bpem3BOHka 6yDnIbHnKa,HaKMITE 2 pa3a Ha KhoNky ALARM (4) (Ha DnCnnee nOBNTcR AL2).PocJeYUoJne WArn OnncAhb BBiJe.
Ha Dnncnnee 3aropaetc HnndkKatop BkIoueHn6yDnblbNka AL 1 (8).Btropoe Bpema npo6yKeHnA kTNBupoBaHO.
Длгь Вькlioчени 3БОнКOB 6уДиьнka HaЖмITE KHONKY ALARM 1 pa3 (1x AL1) nIN 2 pa3a (2x AL2). 3aTeM HaЖмAJte KHONKY SNOOZE (6)do tex nop, nOKa HaДиСЛпee He NOBITcR _-- -". HAnKMITE KHOJNY MODE (3), YTO6bl NOKa3aTb HopMaJIbHoe Bpemr. RaCHET INДИКATOP BKIOUChENI 6yДиьнka AL 1 (8).
BdHbHc BkHueHem paHNo
PnOe nporpaMMPOBaHm6yDINbNkA n BblOba paHIOCTaHcHnpePeBnHbTe FyHKUHOHaJIbHbI nepeKIIouateIb (7)BnoJKeHne"AUTO".
Kak Tolbko HactaHET Bpemr BkIIOueHn6yDnIbNka, BKIOUHTcpaIIO. Pnpuem BkIOUHTcHa HAcTpoEHHyO 3apaHee paIOCTaHnIO C yCTaHOBNEHHo3apaHee rPOMKOCTbIO.
Yro6bI BbIKIOHTb paHIO npocTo HAKMITE KHOKNy ALARM.
BydunbHnK C BKNIOueHHem 3yMMepa
BkIIOUeHHe 6yDINbHnKa c paDIOIOpHMeHHKOM MOxHNO 3aMeHHTb Ha DpyrO PeXHM, DnA 3TO rpoBepHtpepyInpOBky rpOMKocTH "BUZZ / VOLUME "(12)do nolooKeHn "BUZZ" TAK TTo6b YETKO NOyCTBOBaT bIeHOK.
Kak TOnbko HactaHET BpemBkIOueHn6yDmblbHnka, BMeCTO CnHaIpaPAnocTaHnPa3dAcTcToHaNbHbIN CnHaJI.
Yro6bblBkIOuHTbToHaIbHbCnHrA6yDnBnKa nepeBnBHeTcFHyKUHOHaIbHbNepeKnOuateJIb7B noLoKeHne "OFF"nn HaxMnte KhoNky ALARM"4).
BdHbHK C ABTOMaTHKo HHTepBaHOrO BHLOHeHH
Pn NOMOu KNONK "SNOOZE" (6) IMeTc BO3MOHHOCTb BbIKIOHTb 6yDINbHNK pIIM. Ha 9 MHyT.
BbIKIIOUeHnE
3JIeKIpnpBOp BbIKIOHcE,ecnIyHKUHOHaIbHbI nepeKIOHATen (7) HaxoINTcB NoIOXeHN "OFF".
BbIKIIOUeHHe c 3aIepKkoI
Pekm Bbiklouhen C 3aepkKoN cnoIb3yETcT oIbKO B noIOKeHH npeKluOteA"AUTO"nn "OFF".
BpMa BbKIOeHn MOxHO peyIIpOBaTb,HaKMma OHOBpeMeHHo KHOJIKN "SLEEP" u "HOUR"(2)nn "MIN"(1).
- Hακαπe Khoικη "SNOOZE" (6) BbikliouaeT 30T pεχιm.
BctaBHeHne 6aTapeek (6aTaepKn B KOMJIeKT NOCTaBKn HE BXoJrT)
Ha cnyaai c6oEB B3eKTPocetn mnc cCNI CTeBaBNIka 6ydt BbHyTa n3 po3ETKN, BCTaBHeHHbe 6aTapeN KcIyKaT pe3epbOM XOJa YacOB NCOXpaHRT IporpamMPOBaHne.
- OTKpoTe OTcEeKn Ia 6BaTapeeK Ha HnKHeN CTopoHe.
-
BCTaBbTe c OTCek 2 6aTapeKn No 1,5 B Tnna R03 ,AAA CNeIeTe 3a npaBnIbHOn IIOJIrpHOCTbIO (CMOTpn DHO OTCEKa)!
-
3akpoTe OTCEK IINb6atapeek O6paTHO.
- Ecn3IeKtponpnpoD oJIORe BpeM He HcN0nb3yETB BbHbTe 6BaTapeHn H3 Hero, YTO6bI IpeOToBpaTntb "BbTEKaHHe" UeNoHn HnX.
- Hn B KOem Cnyuae He MeMaTe HOBbE 6aTaapeKm Co CTapbIMn, a TaKke C 6aTaapeHkAm DpyrNx TINOB.
BHIMAHHE:
He BbIbpaBcBAIte 6aTapeKn B DOMaHm Mycop. IoxkanyIcta cAaIte Otpa6oTHHbIe 6aTapeKn Ha CneuaJIbHbI pyHKT pInema HIN B TpOBOYTOUky.
PENyTPENKDEHNE:
He noBepraTe 6atapeKn CnilbHomy HarpBey nIIN B03deNCTBnIO npMbx COJIeHbIX nyuei. HIKoRda He 6pocaiTe 6atapeKn B OOrb. CyIecTByET onaChocTb B3pbBa!
UncTkau yxOa
-ПередческовВьнбтЕВилкуирозETK.
- Pnpnte 3neKtpnpn6p cIeKa BlaXHoTprKnO 6e3 KaNX-NHO MOUoXxCpeDCTB.
- Hn B KOem Cnyae He norpykaTe 3neKtpnpnbOpbI B BOy.
TexHnueckne daHHbIe
MoeIb: MRC 4106 RC
3neKtponHHe: 230B,50T
PntpebIeMaM MoHocTb: 3 BaTT
BaTapeKa pe3epBHO rntaHnra: .2x1,5B,R03/AAA
Дианэончст... YKB / FM 88 ~ 108 MHz
3To H3deneHHe npoJIO BCE Heo6xOaHmble n AkTyalbHbIe npOBepKn, npEtnncAHnble DnpeKTHBOI CE, K npim. Ha 3NEKTPOMarHTHyO COBMeCTHMOCt b COOTBeTCTBHe Tpe6oBaHnM K Hn3KOBoNbTHOH TEXHKe, OHO 6blno TaKKe CCKHOpyuPobAHO N NOcTPOeHO C yHETOM NOcneHnx Tpe6oBaHn I IO TEXHKe 6e3OnaCHOCTH.
MbOCTaBnAeM 3a C06oI npBaO Ha TeXHueCKeN H3MeHeHnI
TapaHTnHoe 6R3aTeNbCTBO
TapaHTnHbI cpoK Ha TeppHTOpN PoCCnCKo FedepaunnyCTaHaBnBaETcONHOMOuHBIMnpEcdTaBnTeJAMN.
KaccobbyuekRbnaTcrapaTHnHbIM TaHOHom.Be3 HrOHeBO3MOxHEN6ecnIaThbpeMOHTINN3aMeHaN3dEInr.
B cnyae BO3HKNKOBHHN pnpTeH3n no rapaHTn, npedbRBeT e 3deIne B nOIOHOHOMKNEKTAuHN, C opHINHaJIbHOH ynaKOBHOH n KACCObbIM YekOM TpROBOI TOUKe, npOdaBSeI 3TO I3dJIeNe.
DeΦeKtby n3HaWnBaEmbIX npHnAaIeXHoCTe HnTpyuNXcB DeTaeJe, a TaKHe YnCTKa, Texo6CnyKnBaHne Hn 3aMeHa TpyuNXc DetaJe He NoJaIOT NOpIraPANTHO, INo3ToMy npOBoDARTCa OTdEInhHyOnNAty!
TapaHTN TepETcR npB BCKpbITIN H3dEINr NOCTOPOHMMIJIaAMH.
Pocne rapaHTM
Pocne OKOHaHn Cpoka rapaHTn, peMOHT n3denn Ipon3BODITc 3a ONIATy, COOTBETCTBYOUMM MaCTepCKMN INI PyHKTAMN CEPBCHORO O6ClyKbAHn.
GARANTIE-KARTE
Garantiebewijs · Carte de garantie



- FRANÇAIS
- JEZYK POLSKI
- Sommaire
- General Safety Instructions
- Children and Frail Individuals
- Symbols in these Instructions for Use
- WARNING:
- CAUTION:
- Special Safety Instructions
- Overview of the Components
- Putting into function
- Set the time automatically
- I NOTE:
- Manual time setting (24 h)
- NOTE:
- Radio station tuning
- Volume
- Alarm Function
- Radio alarm
- Buzzer alarm
- Automatic Alarm Interval
- Switch-off
- Delayed Shut-Off
- Inserting the batteries (not supplied)
- Cleaning
- Technical Data
- Guarantee
- After the expiry of the guarantee
- Meaning of the "Dustbin" Symbol
- I I P N M E U A H N E: J a e T c o B e t b i n H F o p M a C H I O.
- CneuaHbIe yka3aHnno TeXnKe 6e3oNaChOCTn
- HaHMeHOBaHne DeTaJe
- BkHoueHne
- AbTomaTHueckoe nporpaMnpoBaHne yacOB
- IIPIMEUYAHNE:
- PyuHoe nporpaMnpoBaHne noka3aHH qacOB (24 u)
- I PIMMEAHHE:
- HacTpoIka Ha paadnoctaHcHIO
- PerynnpobKa rpoMkoCTn
- BydnhbHnK
- BdHbHc BkHueHem paHNo
- BydunbHnK C BKNIOueHHem 3yMMepa
- BdHbHK C ABTOMaTHKo HHTepBaHOrO BHLOHeHH
- BbIKIIOUeHnE
- BbIKIIOUeHHe c 3aIepKkoI
- BctaBHeHne 6aTapeek (6aTaepKn B KOMJIeKT NOCTaBKn HE BXoJrT)
- BHIMAHHE:
- PENyTPENKDEHNE:
- UncTkau yxOa
- TexHnueckne daHHbIe
- TapaHTnHoe 6R3aTeNbCTBO
- Pocne rapaHTM
- GARANTIE-KARTE
Brand : AEG
Model : MRC 406 RC
Category : Radio