
KRC 4330 DVB-T - Radio AEG - Free user manual and instructions
Find the device manual for free KRC 4330 DVB-T AEG in PDF.


| Product Type | Portable DVB-T Radio |
| Brand | AEG |
| Model | KRC 4330 DVB-T |
| Dimensions (approx.) | 180 x 120 x 50 mm |
| Weight (approx.) | 0.5 kg (including batteries) |
| Power Supply | 4 x AA batteries (1.5V) or DC 6V via AC adapter |
| Tuner | DVB-T (MPEG-4) and FM radio |
| Frequency Range (DVB-T) | UHF band IV/V (470-862 MHz) |
| Frequency Range (FM) | 87.5 – 108 MHz |
| Display | LCD screen with channel information |
| Audio Output | Built-in speaker (mono), headphone jack 3.5 mm |
| Memory Channels | Up to 100 programmable presets |
| Main Functions | DVB-T TV/radio reception, FM radio, electronic programme guide (EPG), timer, sleep function |
| Antenna | Built-in telescopic antenna for DVB-T and FM |
| Care & Cleaning | Wipe with a dry soft cloth; do not use solvents |
| Safety | Keep away from moisture; use only specified batteries; do not open the device |
| Spare Parts / Repairability | Contact AEG service center for replacement parts; user replaceable batteries only |
| General Information | Manual available in PDF; 38 pages; multiple languages |
Frequently Asked Questions - KRC 4330 DVB-T AEG
User questions about KRC 4330 DVB-T AEG
0 question about this device. Answer the ones you know or ask your own.
Ask a new question about this device
Download the instructions for your Radio in PDF format for free! Find your manual KRC 4330 DVB-T - AEG and take your electronic device back in hand. On this page are published all the documents necessary for the use of your device. KRC 4330 DVB-T by AEG.
USER MANUAL KRC 4330 DVB-T AEG
Kitchen Entertainment Centre with DVB-T
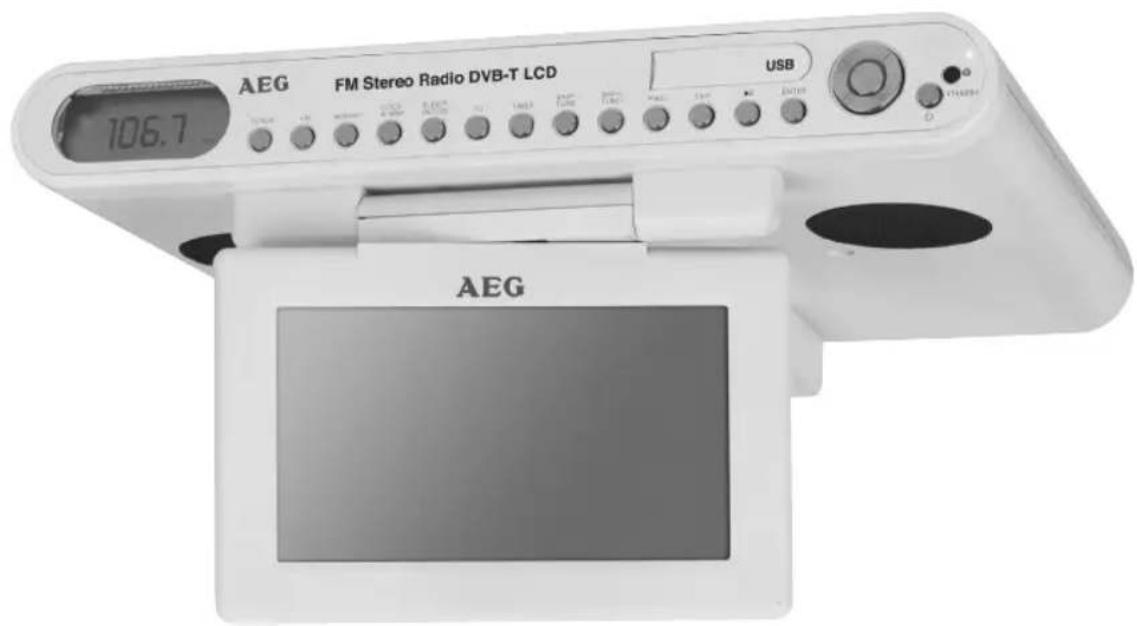
PERFECT IN FORM AND FUNCTION
AEG
Deutsch
2
Inhaltsverzeichnis
Deutsch
Instructions Page 21
About the DVB-T receiver ...... Page 26
Technical data Page 34
Menu diagram Page 35


3 Deutsch
natural_image
Line drawing of a 3D rectangular box with two internal compartments and mounting holes, labeled 'FRONT' (no text or symbols on the diagram itself)
natural_image
Line drawing of a device rear panel with three cylindrical connectors and labeled component B (no text or symbols on the diagram itself)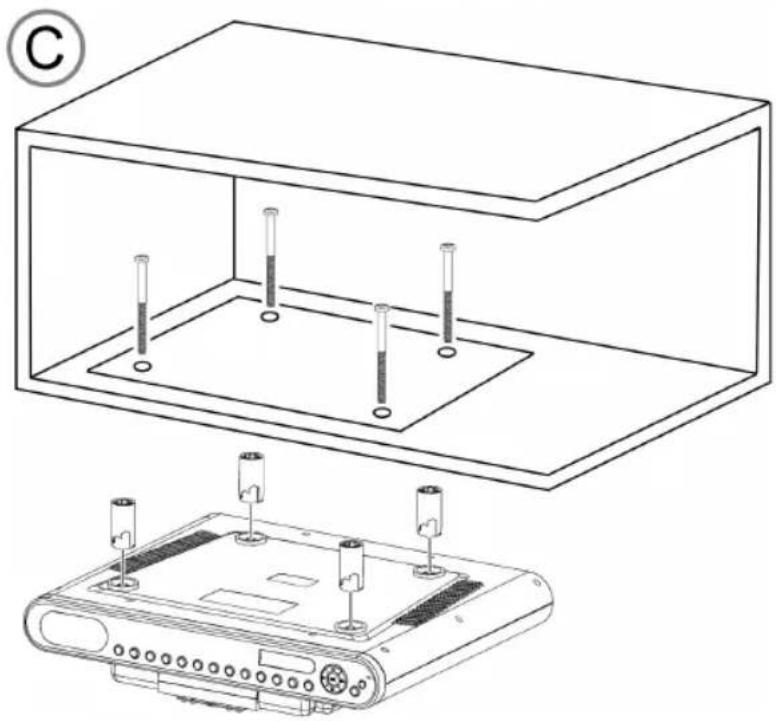
natural_image
Technical line drawing of a device enclosure with three vertical sensors and a separate view of a multi-pin electronic device (no text or symbols)Deutsch
D-47906 Kempen/Germany
2 TV/AUX: Switch between DVB-T and AUX
3 FM: Switch to FM radio
4 MEMORY: Storing FM radio stations
5 CLOCK/ALARM: Show/set clock and alarm time
6 SLEEP/SNOOZE: Activate sleep timer and snooze
7 EQ: Choose sound settings
8 TIMER: Activate timer alarm
9 SKIP-/TUNE-: Time settings/downward FM search/skip through radio stations
10 SKIP+/TUNE+: Time settings/Upward FM search/Skip through radio stations
11 USB port
12 VOL-: Decrease volume/Move cursor leftward/Move to the left in the zoomed picture
13 CH+: Change channels upward/Move cursor upward/Move upward in zoomed picture
14 VOL+: Increase volume/Move cursor right-ward/Move to the right in the zoomed picture
15 MENU: Bring up DVB-T menu
16 CH-: Change channels downward/Move cursor downward/Move downward in the zoomed picture
17 Power indicator light
18 IR: Receiver for remote control signals
19 ⏻ STANDBY: Turn on or switch to Standby
20 OK: Confirm menu or menu item/Bring up channel list
21 ▶II: Pause TV picture or music/film file. Pressing again resumes play
22 EXIT: Leave menu or menu item
23 P.ADJ: Bring up picture settings menu
24 LCD display
25 TV ANT: TV antenna input
26 VIDEO: Auxiliary video input
27 AUDIO R/L: Auxiliary audio input
28 DC +12V: Power supply input (optional)
29 FM ANT: FM antenna
30 Battery compartment
31 LCD release button
32 Breaker contact for LCD display
Remote control (Fig. 3)
1 MUTE: Mute switch
2 INFO: Brings up the programme information for the channel currently tuned in.
3 TEXT: Turn on videotext
4 SUBTITLE: Show subtitles, if station is broadcasting them.
5 : Switch to previous channel.
6 DTV MODE: In DVB-T mode for switching between TV and radio mode.
7 EXIT: Leave menu or menu item
8 OK: Confirm menu or menu item/Bring up channel list
9 AUDIO: Brings up the audio information menu.
10 CLOCK: Show/set clock and alarm time
11 ALARM SET 1: Turn Alarm Time 1 on or off
12 GUIDE: Opens the 9-panel preview window
13 ALARM SET 2: Turn Alarm Time 2 on or off
14 SEARCH: Activates automatic channel search in DVB-T mode.
15 Blue button: In various menus to activate the function shown
16 Yellow button: In various menus to activate the function shown
17 FM: Switch to FM radio
18 TV/AUX: Switch between DVB-T and AUX
19 SLEEP: Activate sleep timer
20 MONO: Switch between stereo and mono in FM mode
21 MEMORY: Storing FM radio stations
22 SNOOZE: Activate snooze
23 EQ: Choose sound settings
24 TIMER: Activate timer alarm
25 Green button: In various menus to activate the function shown
26 Red button: In various menus to activate the function shown
27 EPG: Electronic Programme Guide
28 SKIP/TUNER ▼: Time settings/downward FM search/skip through radio stations
29 FAVOR: Bring up favourite list
30 SKIP/TUNER ▲: Time settings/Upward FM search/skip through radio stations
31 P.ADJ: Bring up picture settings menu
32 PAUSE: Pause TV picture or music/film file Pressing again resumes play
33 CH+/CH-: Change channels/Move cursor/Move in zoomed picture VOL+/VOL-: Set volume/Move cursor/Move in zoomed picture
34 MENU: Bring up DVB-T menu
35 P/N: Switch between NTSC/PAL/AUTO colour norms
36 Number buttons
37 ⏻ POWER: Turn on or switch to Standby


22 English
General Safety Instructions
Read the operating instructions carefully before putting the appliance into operation and keep the instructions including the warranty, the receipt and, if possible, the box with the internal packing. If you give this device to other people, please also pass on the operating instructions.
- To avoid the risk of fire or an electric shock, you should not expose the device to rain or moisture. Consequently, do not use the device in the immediate vicinity of water - for example near a bath tub, a swimming pool or in a damp cellar.
- Use this device only privately and for the intended purpose. This device is not intended for commercial use.
- Only connect the device at a properly installed plug socket. Pay attention that the specified voltage corresponds to the voltage of the plug socket.
- When using external mains supply, pay attention to the correct polarity and voltage. Always place the batteries in the correct direction.
- Assemble the device in such a way that the available ventilation openings are not covered.
- Never open the housing of the device. Incorrect repairs can constitute a considerable risk for the user. Should the device become damaged, in particular the mains supply cable, do not operate the device any longer, but rather have it repaired by an expert. Check the mains supply cable regularly for damage.
- For safety reasons a broken or damaged mains lead may only be replaced by an equivalent lead from the manufacturer, our customer service department or a similar qualified person.
- If the device is not used for a longer period, remove the plug connector from the plug socket or take out the batteries.
These symbols may be found on the machine and are intended to indicate the following:

The lightning symbol should advise the user of parts on the inside of the device which carry dangerously high voltage levels.

The symbol with an exclamation mark should advise the user of important operation or maintenance instructions in the accompanying documentation.
Children and the Disabled
- In order to ensure your children's safety, please keep all packaging (plastic bags, boxes, polystyrene etc.) out of their reach.
WARNING!
Caution! Do not allow small children to play with the sheet plastic as there is a danger of suffocation!
- This device is not intended to be used by individuals (including children) who have restricted physical, sensory or mental abilities and/or insufficient knowledge and/or experience, unless they are supervised by an individual who is responsible for their safety or have received instructions on how to use the device.
• Children should be supervised at all times in order to ensure that they do not play with the device.
Symbols Used in These Instructions
Important information for your safety is specially marked. It is essential to comply with these instructions in order to avoid accidents and prevent damage to the machine:
WARNING:
This warns you of dangers to your health and indicates possible injury risks
CAUTION:
This refers to possible hazards to the machine or other objects.
i NOTE:
This highlights tips and information.
English
Installation Instructions for Bottom-Mounted Devices

CAUTION:
Make sure that the plug is not inserted when assemb ling the device.
- Remove all objects from the cupboard and anything which is fragile in the adjacent cupboards.
- For the installation the cupboard must fulfil the following conditions:
Thickness of the cupboard floor between 16 mm and 20 mm.
- The wall mounting of the cupboard must be stable and anchored firmly in the wall with at least 2 screws.
- Important! Do not install the device above a cooker!
- When installing the device it must be ensured that there is a power socket within reach.
- The mains socket must be within easy reach, so that the plug can be quickly removed in an emergency.
- Important! Do not connect the device to the mains power supply until after installation!
- The device cannot be installed under cupboards under which there is a lighting strip.
- For installation you may require the following items: a drill with 6 mm drill bit, gimlet or nail, screwdriver, measuring tape, adhesive tape, scissors, safety goggles.
Installation Accessories
4 screws
4 spacers
1 drilling template

CAUTION:
You should use only the installation accessories supplied.

WARNING:
If screws are inserted too deeply (screws too long) this may damage the device or represent a hazard to the user or others.
Installation
Illustration A (see Page 4)
- Use the adhesive tape to adhere the template into the cabinet with the word FRONT facing forward.

NOTE:
For cabinets with overhangs, first insert the crosses into the attachment points. Then stick the drilling template, with the printed side up, under the cabinet.
- Adhere the template firmly under the cupboard with adhesive tape. With the help of a gimlet or nail pierce the crosses at the attachment points and use it to mark the holes.
- Remove the template and drill the holes into the wall cupboard.
Illustration B (see Page 4)
Lightly turning the spacer gives you a choice of three different heights.
- Choose the spacer position that best matches the moulding. Insert the spacer into the holes provided on the device.

CAUTION:
The thickness of the cupboard floor must be between 16 mm and 20 mm.

NOTE:
Sufficient ventilation is only guaranteed with a spacer.
Illustration C (see Page 4)
- Countersink the screws into the holes in the cupboard.
• Using the 4 screws and the spacers, attach the kitchen radio to the bottom of the cupboard. - Tighten the screws with a screwdriver until they are hand tight.

CAUTION:
You should use a hand screwdriver and not a battery-driven one.

24 English
Start-up of the device / Introduction
- Read the operating instructions thoroughly before the start-up!
• Make sure that the device is adequately ventilated!
Power supply
- Insert the plug into a properly installed 230 V, 50 Hz power socket. The display lights up in blue and the time appears.
- Please ensure that the mains voltage corresponds to the information on the type plate.
i NOTE:
You can optionally operate the device with a 12V power adaptor also. (Power adaptor not included.)
Inserting the batteries (not supplied)
If there is a power cut or the mains plug has been removed from the power socket, the settings will be retained if the power reserve batteries are inserted.
- Open the battery compartment (30) on the bottom of the device.
- Insert 2 batteries of type R03 "AAA" 1.5 V. Ensure that the polarity is correct (see the floor of the battery compartment)!
- Close the battery compartment again.
- If the device is not used for a prolonged period of time, please take the batteries out in order to prevent leakage of battery acid.
CAUTION:
- Different battery types or new and used batteries must not be used together.
- Batteries are not to be disposed of together with domestic wastes. Dispose of the used batteries at the relevant collection bin or at your dealer's.
WARNING:
Do not expose the batteries to high temperatures or direct sunlight. Never throw batteries into the fire. There is a danger of explosion!
Remote Control Batteries
- Open the lid of the battery compartment on the back of the remote control.
- Insert 2 batteries of type R03 "AAA" 1,5 V. Ensure that the polarity is correct (see the floor of the battery compartment)!
- Close the battery compartment again.
- If the remote control is not used for a prolonged period, remove the batteries in order to prevent battery acid leaking.
CAUTION:
- Different battery types or new and used batteries must not be used together.
- Batteries are not to be disposed of together with domestic wastes. Dispose of the used batteries at the relevant collection bin or at your dealer's.
WARNING:
Do not expose the batteries to high temperatures or direct sunlight. Never throw batteries into the fire. There is a danger of explosion!
Switching the device on/off (19)
Switch the device to the standby mode with the ⏻ STANDBY button (the time is displayed). If this button is pressed once more, the device switches on again.
Infrared remote control
For operating the music centre from a distance of up to 5 metres without a lead. If the range of the remote control is reduced, the batteries have to be replaced. During operation ensure that there is nothing blocking the direct line between the remote control and the sensor (18) on the machine.
EQ (7/23)
(Preset equalizer function). Various sound modes are available (ROCK, JAZZ, POP, CLASSIC).
VIDEO / AUDIO R/L Input Sockets (26/27)
For connecting analogue replay devices. This port also allows you to play back pictures and sound from other media devices, such as an MP3 player, a CD player, etc.
- Connect the external device with an appropriate cinch cable (3x RCA) to the VIDEO / AUDIO R/L sockets.
- Repeatedly press the TV/AUX button (2/18) until the display (1) shows AUX.
- For the remaining procedure please see the operating instructions of the external sound source.
- You can change the volume with the VOL+/-button (12/14/33).
i NOTE:
Adjust the volume of the external device to a comfortable level.
English
Setting the clock and alarm times (24 hour)
- Hold down the CLOCK/ALARM button (5/10) for about 3 seconds. The hours on the clock begin to blink.
- To set your clock time or wake-up time, press the SKIP/TUNE buttons (9/10) or the SKIP/TUNER buttons (28/30 on the remote control).
- Confirm your settings with the CLOCK/ALARM button.
- You can set the clock time, alarm time 1 (AL1) and alarm time 2 (AL2) one after the other.
Tuning in radio stations (Radio)
- Press the FM button (3/17). The display shows FM and the frequency currently tuned in.
- Choose a station by pressing the SKIP/TUNE buttons (9/10) or SKIP/TUNER buttons (28/30 on the remote control).
- To save the station you've found, press the MEMORY button (4/21). The memory location (e.g., P-01) blinks. Use the SKIP/TUNE or SKIP/TUNER buttons to choose a memory location. To save the station, press the MEMORY button.

NOTE:
- If you hold down the SKIP/TUNE or SKIP/TUNER buttons, the search for the next station will start.
- Automatic station search: Hold down the ▶II button (21) for about 3 seconds. The device searches the entire FM band for stations and saves them one by one.
- The STEREO control lamp ("ST" in display) only lights up if the selected station is being received in stereo quality. If reception is too weak and there is noise on the station being received, this lamp will flicker. Try to improve reception by turning and bending or twisting and altering the length of the antenna. If reception is bad, we recommend using the MONO button (20 on the remote control) to switch to mono.
Setting the alarm time
As follows:
- Switch the device to the standby mode with the ⏻ STANDBY button (the time is displayed).
- Press the ALARM SET 1 or ALARM SET 2 button (11/13 on the remote control) to activate the alarm time. The symbol "1" or "2" appears on the display (1). You can choose among the following alarm modes by repeatedly pressing the ALARM SET 1 or ALARM 2 button:
• = wake up to the buzzer - RD = wake up to the last radio station tuned in
• TV = wake up to the last TV station tuned in - When the alarm time comes, the device activates in the desired alarm mode. The volume continuously increases.
Turning off the Alarm
Press the ⏻ STANDBY button in order to switch off the alarm.
Deactivating the Alarm Time
Repeatedly press the ALARM 1 or ALARM 2 button until the display no longer shows a symbol.
Automatic Alarm Interval
The automatically set alarm function can be shut off for approximately 9 minutes with the SLEEP/SNOOZE key (6/25). The display (1) shows the SNOOZE prompt.
Delayed Switch-off (SLEEP Button (6/16))
With the device switched on, here you can set the period in 10-minute steps from 90 to 10 minutes, after which the device should switch automatically to standby mode. Press the SLEEP / SNOOZE button repeatedly until the desired length of time is shown in the display. The display (1) shows the SLEEP prompt. After the time that has been entered has elapsed the device switches off automatically.
This function can be cancelled with the SLEEP/SNOOZE key.
Timer alarm
You can set the device to give off an increasingly loud beep at the preselected time.
- Press the TIMER button (8/24). The display (1) shows the TIMER prompt and 01 blinks.
- Choose the desired time by pressing the SKIP/TUNE buttons (9/10) or SKIP/TUNER buttons (28/30 on the remote control) (1-90 min.).
- Press the TIMER button again to store your setting. The display will show the selected time and TIMER.
Deactivating the timer alarm
To deactivate or stop the function, press the TIMER button. The TIMER display goes out.

26
English
About the DVB-T receiver
"DVB-T" stands for the international "Digital Video Broadcasting – Terrestrial" standard and refers to digital television which is broadcast via antenna.
This enables you to receive digital channels via a firmly installed home antenna.
If receiving in the core transmission area, you may also use an optional passive or active room antenna. Ask your digital television channel provider and your specialist television dealer.
Connecting the antenna
Insert the antenna cable plug into the "TV ANT" (25) antenna socket on the receiver.
Activating or deactivating voltage at the antenna output
⇒ Press the TV/AUX button (2/18) to switch the device into DVB-T mode.
→ Press the "MENU" key.
Use the arrow keys "VOL+" and "◄ VOL-" to call up the "SETUP" menu.
→ Use the arrow keys "▼ CH-" and "▲ CH+" to call up the "Installation" menu. Press the "OK" button.
→ Use the arrow keys "▼ CH-" and "▲ CH+" to call up the "Antenna Setting" menu.
You may choose between the following options:
- On – provides the voltage to feed an active DVB-T antenna. At the receiver's antenna port, a 5V-voltage is present.
- Off – to connect a passive DVB-T antenna or roof aerial. No voltage is present at the receiver's antenna port.
⇒ Use the "▶ VOL+" and "◀ VOL-" keys to select the desired setting.
⇒ In order to exit the menu, press the "EXIT" button repeatedly.

NOTE:
If the maximum current of 100 mA is exceeded, the message "antenna overload" appears. Please check your aerial connection.

CAUTION:
When connecting an active DVB-T antenna: Please pay attention to the instructions given in the Operating Manual of your active DVB-T antenna. Otherwise the receiver could become damaged.
Initial Installation
The first time the device is switched on the start window of the installation assistant appears. With the help of the installation menu you can easily make the most important adjustments to the receiver.
⇒ Use the "▼ CH-" or "▲ CH+" arrow keys to select the desired option. Select by using the "▶ VOL+" or "◀ VOL-" arrow buttons. Start the automatic channel search with the "red" button.
As soon as the Installation assistant has finished the search run (100%), the device switches to TV mode.
Carrying out basic settings
Navigating in menus and sub-menus
⇒ In order to switch between the menu options, press the "▶ VOL+,◀ VOL-, ▼ CH-, ▲ CH+" buttons on the remote control.
To confirm the selected menu option, press the "OK" key.
The settings for this menu option are displayed.
⇒ To move from one setting to the next, press the "▼ CH-" and "▲ CH+" arrow keys.
The selected setting is marked.
⇒ By pressing the OK key you jump to the settings menu.
⇒ You may:
- switch between the options with the "◀ VOL-, ▼ CH-, ▲ CH+, ▶ VOL+ " arrow keys.
- use the numerical keys to enter numbers if the setting requires a numerical input.
⇒ Press the EXIT key to change back to the last menu level.
⇒ In order to exit the main menu, press the "EXIT" button repeatedly.
The on-screen menu is closed and the screen is switched to TV or radio mode. The system settings must be adjusted to enable you to use the receiver's full range of functions (see the following Chapter).
→ Press the "MENU" key on the remote control.

English
27
Changing system settings

CAUTION:
Select only the option "on" with "Antenna Setting", if you connect an active DVB-T antenna. Otherwise, the receiver or antenna may be damaged.
Select the "SETUP/Installation menu".
You can carry out the following settings in the submenus:
| Setting Options Explanation | ||
| Antenna Setting off/on When "off", no voltage is connected to the antenna output – suitable for connection to the roof antenna and the passive DVB-T antenna.When "on" an active DVB-T antenna without its own power supply can be connected. | ||
| Country Setting Select your country. | ||
| OSD Language You can select the required language for the screen menu. | ||
| Audio Language | Here you can set the preferred audio language. | |
| Subtitle Language | Here you can select the preferred subtitle language. | |
| LCN on/off If supported by TV channels, with the LCN function switched on, your regional channels are saved sorted, independent from their frequency.It is not possible to sort the channels if the LCN function is activated. | ||
| GMT Usage | On/off | Here you can set whether the time zone should be set automatically. |
| Time Zone | Here you can set the corresponding time zone. | |
| Set date(Only possible if the option "GMT Usage" is set to "Off".) | Here set the date manually. | |
| Set time(Only possible if the option "GMT Usage" is set to "Off".) | Here set the time manually. | |
→ Carry out the desired settings.
Select the "SETUP/TV-SETUP" menu.
You can carry out the following settings in the submenus:
| Setting Options Explanation | ||
| TV Formatblack margins on the top and the bottom that the most important part of the picture.4:3 picture.that the picture is completely filled. | 4:3 LB/4:3 PS/16:9/16:9 AUTO screen.4:3 LB:transmissions in wide screen format are fully displayed. You will see of the screen.4:3 PS:Transmissions in wide screen format are altered in such a way is always in the centre of a16:9:Select the 16:9 format with a wide screen TV.16:9 AUTO:Select the 16:9 format for a television with a wide screen is so | Select between 4:3 format or 16:9 format (wide screen) according to your |
| TV Mode | PAL/NTSC/AUTO | If you are not sure which TV standard is suitable, select "Auto". |
| OSD Transparenz | 1-8 | Select the transparency of the OSD menu. |
| Banner Display Time | 1s-Always | Select the time after which the OSD is to fade out. |
| Video Enhancement and black/white Expansion opens. Please make the required adjustments. | Off/on | With the Video Enhancement switched on the menu for setting the Flesh Tone |
→ Carry out the desired settings.
28
English
Search and edit channels
In order to quickly search a channel or to change the features of saved channels, select the "SETUP/Installation" submenu.
Automatic channel search (Auto/Scan):
→ Start the automatic channel search with the "OK" button.
All available channels will be searched and stored in a programme slot. Previously stored channels will be erased.
Manual search (Manual Scan):
The individual settings for a station can be carried out in this menu. For this method, it is necessary to know the searched-for programme's channel number, frequency and bandwidth.
⇒ Press the "green" button to call up the "Manual Scan" menu.
⇒ For changing the settings, use the "◀VOL-" and "▶VOL+" arrow buttons.
⇒ After having carried out all settings, the search run is activated by pressing the "OK" button.
All channels found in the area will be stored in a programme slot.
Child Protection/Password (PIN code)
In the "Password", you can carry out the following settings:
• the "Menu Lock" (Setup Menu Lock),
• set the "channel lock" (child lock),
• set the "censorship lock",
• changing the password.
Menu Lock (Setup Menu Lock),
In this menu you can set whether the password has to be entered in order to call up the SETUP menu.
Child Lock
In the "TV/TV List" menu (see page 30) you can block individual channels. With the "channel lock" function you can switch this lock on and off.
⇒ If you would like to switch on the child lock, select the "on" option.
⇒ If you would like to switch off the child lock, select the "off" option.
Censorship Lock
In this menu you can choose between:
"No block"
- "Total block" = all channels and some menu options can only be released after the password has been entered.
- "2" to "18" = Here you can determine the desired age rating. This function must be supported by the channel, which must transmit appropriate data.
Changing the password
You may change the password (PIN code) set in the factory and enter any other four-digit number as your personal PIN code. The password "0000" has been pre-programmed in the factory.
i
NOTE:
• Note your new password; once changed, only the new code is valid for all password queries.
- If you've forgotten your personal password, you can assign a new password by means of the master password "8888".
⇒ Enter the old password (PIN) using the numerical keys.
→ Enter the new password using the numeral keys.
→ Enter the new password again.
The information window "PIN code changed" appears.
⇒ Press the 'OK' key to confirm.
The new password is integrated.
Factory defaults
i
NOTE:
The receiver is reset to its condition on delivery. All of your settings and stored data are deleted.
⇒ Select the "Set Default" submenu in the
"SETUP" menu by using the "▼ CH-" and
"▲ CH+" arrow buttons.
⇒ Press the 'OK' key to confirm.
You will be prompted to confirm your selection.
⇒ Press the "OK" button if you would like to return the receiver back to the factory settings.
⇒ Press the "EXIT" button if you would like to exit the menu.
⇒ Wait until the receiver re-starts.
This process may take a few minutes. The installation menu then appears.
⇒ Press the "EXIT" key to return to the TV channel.

English
Changing time settings
In the "SETUP/Installation" menu you can determine the "time zone". Adjust the "time zone" relative to the main time zone (GMT) according to where you live.

NOTE:
The "Date" and "Time" cannot be set manually until the option "Off" is selected in the "GMT Usage" menu.
Operation
Basic operating steps
Switching between radio and TV mode
⇒To switch between radio mode and TV mode, press the "DTV/MODE" key.

NOTE:
Radio programmes are not offered in all broadcast areas. Please ask programme providers and in specialist shops for more information.
Selecting channel
To change to the previous or next channel press the "▼ CH-" and "▲ CH+" arrow keys or the "CH+, CH-" keys at the receiver.
→ You may also switch directly to a station by entering the memory space number of the station using the numerical keys.
Volume
⇒ To increase or reduce the volume, press the volume keys "▶ VOL+" and "◀ VOL-".
⇒ To switch the sound off at the receiver, press the "MUTE" key.
User interface on the TV screen
You may carry out individual settings on your receiver via the user interface menus. The user interface consists of a main menu and its sub-menus.
⇒ Press the "MENU" key.
The main menu is displayed.
⇒ Select the main menu you require with the "▶ VOL+" and "◀ VOL-" buttons.
⇒ Select the desired sub-menu using the "▼ CH-" or "▲ CH+" arrow keys and press the "OK" key.
The sub-menu is displayed.
Structure of the sub-menus
Top: Name of the menu
Left: Menu options
Bottom: The information strip shows you the buttons with which you can move within the current menu or make adjustments.
Menu overview
Main menu Submenu/Menu item / Description
| TV | Here you can change the TV list and call up the EPG menu. |
| RADIO Here you can change the RADIO list and call up the EPG menu (provided that radio stations are available). |
| MULTIMEDIA Here you can bring up the picture, MP3 and movie files from a connected USB storage device (see page 32). |
| GAME | Select the game, calendar or the calculator. |
SETUP Here you can:
- change the system settings of the device, see page 27.
- change the settings of the child lock/password, see page 28.
- install new software, if necessary, by USB stick
- return the device to its default status, see page 28.
INFO key Displays information on the receiver and installed software

English
Programme Manager
⇒Call up the "TV/TV List" or the "RADIO/Radio List" menu.
NOTE:
Radio channel settings can only be carried out if these channels are broadcast by your provider. If necessary, ask your provider.
→Select the desired sub-menu.
Please note the messages at the bottom edge of the picture concerning further operation. The coloured buttons on the remote control correspond to those on the screen.
NOTE:
If you have switched on "Installation"/"LCN" in the submenu, the menus "Move" and "Sort" are not listed. Moreover, the channel numbers specified by the television stations are used.
Delete
You can completely delete channels from the Programme Table.
→ Select the "TV List" submenu in the "TV" menu.
→ Use the "▼ CH-" and "▲ CH+" arrow keys to select the channel you wish to delete.
Select the "Delete" tool with the "▶ VOL+" and "◀ VOL-".
NOTE:
The designation of the tool is shown at the bottom left-hand edge of the screen.
⇒ If you want to delete a channel, press the "OK" button on the remote control. The selected channel will be marked with an "X".
⇒ Repeat these steps for any other channel you may wish to delete.
⇒ Press the "yellow" button. Acknowledge the confirmation prompt with the "OK" button.
The selected channels will be deleted from the table.
→ Exit the menu by pressing the "EXIT" button repeatedly.
Favourites List
For an easier and quicker access to your favourite channels, you can add these channels to your Favourites List.
→ Select the "TV List" submenu in the "TV" menu.
⇒ Use the "▼ CH-" and "▲ CH+" arrow keys to select the desired channel.
Select the "Favorites" tool with the "▶ VOL+" and "◀ VOL-".
NOTE:
The designation of the tool is shown at the bottom left-hand edge of the screen.
⇒ In order to assignment the channel to the list of favourites, press the corresponding number button (1-8) on the remote control.
The corresponding symbol is highlighted.
Repeat these steps for the next station which you would like to include in the list of favourites.
⇒ If you would like to remove a channel from the list of favourites, select it with the arrow buttons "▼ CH-" and "▲ CH+" and press the corresponding number button (1-8) again.
⇒ Press the "yellow" button. Acknowledge the confirmation prompt with the "OK" button.
The stations have now been integrated into the list of favourites.
⇒ Press the "EXIT" key once you have marked all desired stations as favourites.
Locking
You may lock stations; these cannot then be called up without inputting the password.
⇒ Select the "TV List" submenu in the "TV" menu.
⇒ Use the "▼ CH-" and "▲ CH+" arrow keys to select the station which you would like to lock.
⇒ Select the "Lock" tool with the "▶ VOL+" and "◀ VOL-".
NOTE:
The designation of the tool is shown at the bottom left-hand edge of the screen.
⇒ If you want to block a channel, press the "OK" button on the remote control.
The selected station is marked with the symbol "____".
⇒ Repeat these steps for the next station which you would like to lock.
⇒ Press the "yellow" button. Acknowledge the confirmation prompt with the "OK" button.
⇒ If you want to unblock the channel, select it by using the "▼ CH-" or "▲ CH+" arrow buttons and press the "red" button again.
⇒ Press the "EXIT" key after you have locked all channels you wish to lock.
English
Moving (Move)
You can rearrange the stations to form your own personal order.
→ Select the "TV List" submenu in the "TV" menu.
→ Use the "▼ CH-" and "▲ CH+" arrow keys to select the desired channel.
Select the "Move" tool with the "▶ VOL+" and "◀ VOL-".

NOTE:
The designation of the tool is shown at the bottom left-hand edge of the screen.
⇒ If you would like to move the station, press the "OK" button on the remote control.
The selected station is marked with the symbol "☑".
⇒ Use the "▼ CH-" and "▲ CH+" arrow keys to select the programme slot to which you would like to move the marked station.
→ Press the "OK" button. The station is moved.
→ Repeat the above steps for the next station which you would like to move.
→ Press the "yellow" button. Acknowledge the confirmation prompt with the "OK" button.
Rename and sort
You may change the names of the channels and sort the channels by various criteria.
Renaming channels:
→ Select the "TV List" submenu in the "TV" menu.
⇒ Use the "▼ CH-" or "▲ CH+" arrow keys to select the channel you wish to rename.
⇒ Select the "Edit" tool with the "▶ VOL+" and "◀ VOL-".

NOTE:
The designation of the tool is shown at the bottom left-hand edge of the screen.
→ Press the "OK" button. The "Channel Information" window appears.
→ Press the "OK" button on the remote control.
A keypad will be displayed on the screen.
Use the number buttons to select the individual characters for the new designation.

NOTE:
With the "blue" button you can choose between capitals and small letters. In order to delete the letters that have already been entered, press the "green" button.
⇒ To accept the new name press the red key. The "Channel Information" windows appears.
⇒ Press the "red" button again in order to store the changes.
The new name is stored.
Sorting:
⇒ Select the "TV List" submenu in the "TV" menu.
⇒ Select the "Sort" tool with the "▶ VOL+" and "◀ VOL-".

NOTE:
The designation of the tool is shown at the bottom left-hand edge of the screen.
The following sorting options are available:
A-Z
• Free - CA (encoded)
• TP Asc. (Transponder)
⇒ Select the desired choice by pressing the corresponding coloured button on the remote control.
→ Exit the menu by simply pressing the "EXIT" button repeatedly.
Skipping channels
It is possible to "block" individual channels for scrolling through with the arrow buttons "▼ CH-" and
"▲ CH+". Selection of these channels is then only possible with the numerical buttons on the remote control.
⇒ Select the "TV List" submenu in the "TV" menu.
⇒ Select the "Skip" tool with the "▶ VOL+" and "◀ VOL-".

NOTE:
The name of the tool is shown at the bottom left-hand corner of the screen.
⇒ Use the "▼ CH-" and "▲ CH+" arrow buttons to select the channel which you would like to skip.
→ Confirm your selection with the "OK" button.
⇒ After you have selected all of the channels which you would like to skip, press the "yellow" button to store them.
⇒ Exit the menu by pressing the "EXIT" button repeatedly.


32 English
USB connection
Via the USB connection it is possible to play back audio, video and image files.
This device has been developed using state-of-the-art technical developments in the USB field. Unfortunately, due to the huge variety of different data carriers, which are available today, it is not possible to ensure full compatibility with any data carrier. For this reason there may in exceptional cases be problems with playing back USB storage media. Which is not considered a malfunction of the device.
→ Insert a USB storage device into the appropriate socket.
⇒ In the "MULTIMEDIA" main menu select between the options:
- My album
- My music
- My movie
i NOTE:
Only the selected file types are displayed.
⇒ Press "OK". A new window is opened.
Select the file that you want to play/display using the "▼ CH-", "▲ CH+" and "► VOL+",
◀ VOL-" arrow buttons.
→ Press "OK".
i NOTE:
- Please note the messages at the bottom edge of the screen for further instructions. The coloured buttons on the remote control correspond to those on the screen.
- When playing movies, press the "EXIT" button to stop playback.
- The symbol in the yellow circle shows the function which is activated the next time the "yellow" button is pressed.
- If you have selected a directory, if available, use the arrow buttons to select the "Root" folder and press the "OK" to return to the next higher-ranking directory.
- Take size into consideration when saving your image files, as pictures that are too large may be displayed either very slowly or not at all. At best, the size of the pictures equals the size of the picture format of the reproducer. Usually, this size of TVs is 1024x576 pixels (aspect ratio 16:9) or 768x576 (aspect ratio 4:3).
Please note that any conversion usually leads to information loss with regard to the original format.
EPG (Electronic Programme Guide)
Your digital receiver is equipped with an electronic programme guide. With this feature you can view the programme information of one or more programmes on the display. You can get an overview on the currently running broadcasts or on the broadcasts of the day.
The EPG features enable you to:
• view information on programme contents on the display (Detail);
• to preselect broadcasts to be automatically switched on when they start;
• to programme broadcasts (Book).
i NOTE:
This function can only be used if it is supported by the selected station.
⇒ In order to display the Electronic Programme Guide, press the "EPG" button.
The Electronic Programme Guide is displayed. On the left side of the screen you will see the channel list and on the right side the list of programmes.
In the upper section the current date is displayed together with a miniature picture of the programme that is currently on.
Please note the messages at the bottom edge of the screen for further instructions. The coloured buttons on the remote control correspond to those on the screen.
⇒ Press the "EXIT" button in order to hide the window.
Preselection/programming of broadcasts:
⇒ Press the EPG key. The Programme Overview window will be displayed.
⇒ With the arrow keys ▼ CH-, ▲ CH+, ▶ VOL+, ◀ VOL- you can select the channel or the desired programme.
⇒ Press the "red" button. A new window is opened.
⇒ Press the "OK" button in order to adopt the settings.
⇒ Press the "EXIT" key to return to the TV programme.
If the start time of the selected broadcast has been reached, the device switches to this broadcast/channel.
i NOTE:
To change the data predefined by the channel (start/end time, etc.) select the corresponding line using the "▼ CH-" and "▲ CH+" arrow keys.
English
Time Reservation
The receiver can be programmed to switch to a specific channel at the desired time. Furthermore, you can programme the receiver in a way that it switches on or off or that a short message is displayed at a specific time.
Set the timer as follows:
In the "SETUP" menu select the "Advance Timer" submenu.
⇒ Use the arrow buttons "▼ CH-" or "▲ CH+" to select a free timer position.
⇒ Press the "red" button (Add) to call up the editing window.
Select the individual lines using the "▼ CH-" or "▲ CH+" arrow buttons.
Adjust the settings with the "VOL+" and "◄ VOL-" arrow buttons and the number buttons.
→ Press the "OK" button to activate the timer.
⇒ Press the "EXIT" button in order to return to the TV programme.

NOTE:
With the "green" button (Del) you can delete a timer storage location.
Game
You can choose between the "Gomoku" game and the "Calendar" and "Calculator". Make your selection and follow the instructions at the bottom edge of the screen.
Additional functions
Displaying information

NOTE:
This function is only available if the station broadcasts corresponding data.
You may display the following information on the current channel.
⇒ To display additional information on the screen, press the "INFO" key.

NOTE:
Press the "INFO" button twice in order to display details on the current programme such as frequency, band width, etc.
To return to the normal screen display, press the "INFO" key again.
Show Channel List
⇒ Press the "OK" key to view the list of TV of radio channels (depending on the type of use).
⇒ Now mark a station using the "▼ CH-" or "▲ CH+" arrow keys.
⇒ To switch to the marked station, press the "OK" key.
⇒ Press the "EXIT" button, in order to return to the normal screen display.
Show Favorite List
⇒ To call up the list of your favourite stations, press the "FAVOR" key during operation.
Select the desired group of favourites by repeatedly pressing the "yellow" button.

NOTE:
This function can only be used if you have defined a list of favourites (see page 30).
⇒ Use the "▼ CH-" and "▲ CH+" arrow keys to select the desired station.
⇒ Press the "EXIT" button, in order to return to the normal screen display.
Displaying teletext/Using the Search Function
⇒ To call up teletext, press the "TEXT" key during operation.
⇒ Use the "▲ CH+" and "▼ CH-" arrow buttons to select the desired teletext language.
→ Press "OK".
⇒ Enter the desired page number using the numerical keys.

NOTE:
This function can only be used if the station which is set offers teletext.
In order to use the teletext search function, press the "TEXT" button again. Use the number and arrow buttons to enter the desired search term.
→ Start the search by pressing the "OK" button. The device searches through the teletext of the channel that is set for the search term.
⇒ After the search has finished you can use the arrow keys "▼ CH+, ▼ CH-" to select the teletext pages found. Confirm your selection with the "OK" button.
⇒ In order to exit the search function, press the "EXIT" button.
⇒ In order to exit the teletext again, press the "EXIT" button again.
34 English
Selecting an audio setting
This setting can be used to switch between stereo (LR), and mono left (LL) or mono right (RR).
In order to change audio settings, press the "AUDIO" button during operation.
→ Use the arrow buttons to make your selection or carry out the adjustments.
⇒ Press the "EXIT" button, in order to return to the normal screen display.
Recall
To call up the channel which was last selected again, press the "S" key.
Cleaning
- Remove the plug before cleaning.
- Clean the appliance with a slightly humid cloth without any additives.
- Do not dip the appliance in water.
Technical data
Model: KRC 4330 DVB-T
Power supply: AC 100-240 V, 50/60 Hz DC 12V/2A
Power consumption: 20 W
Protection class: ......II
Battery power reserve: .....2X 1.5 V, Type AAA/R03
Net weight: 2.2 kg
Radio section:
Frequency ranges: ...... VHF / FM 87.5 \~ 108 MHz
LCD display:
Size: 7" / 17.5cm (270° rotatable)
Resolution: 1440 (H) x 234 (V)
Contrast: 300:1
TV input:
Frequency ranges: 177.5 MHz \~ 858 MHz
Subject to technical changes without prior notice!
This device has been tested according to all relevant current CE guidelines, such as electromagnetic compatibility and low voltage directives, and has been constructed in accordance with the latest safety regulations.
Meaning of the "Dustbin" Symbol
Protect our environment: Do not dispose of electrical equipment with domestic waste.
Please return any electrical equipment that you will no longer use to the collection points provided for their disposal.
This helps avoid the potential effects of incorrect disposal on the environment and human health.
This will contribute to the recycling and other forms of reutilisation of electrical and electronic equipment.
Information concerning where the equipment can be disposed of can be obtained from your local authority.

English
Menu diagram
| Mainmenu | Submenu | ||
| TV TV ListTV Guide | |||
| RADIO Radio ListRadio Guide | |||
| MULTIMEDIA My MusicMy Movie | My Album | ||
| GAME GomokuCalenderCalculator | |||
| SETUP Installation Antenna Setting OFFONCountry SettingOSD LanguageAudio LanguageSubtitle LanguageLCNONGMT UsageOFFTime ZoneSet DateSet Time | OFFON | ||
| TV Format4:3 LB | |||
| 4:3 PS16:9 AUTO16:9TV Mode NTSC | PAL | ||
| AUTO | |||
| OSD Transparency Banner Display Time Video Enhancement ON | 1-81s - AlwaysOFF | ||
| Password ONChannel Lock OFFONCensorship Lock Total Block 2-18Change Password YES Advance TimerSW UPDATE Set Default | Setup Menu Lock OFF | ||










KRC 4330 DVB-T
GARANTIE-KARTE


- Deutsch
- Inhaltsverzeichnis
- Deutsch
- Remote control (Fig. 3)
- English
- General Safety Instructions
- Children and the Disabled
- WARNING!
- Symbols Used in These Instructions
- WARNING:
- CAUTION:
- i NOTE:
- English
- Installation Instructions for Bottom-Mounted Devices
- Make sure that the plug is not inserted when assemb ling the device.
- Installation Accessories
- Installation
- Illustration A (see Page 4)
- NOTE:
- Illustration B (see Page 4)
- Illustration C (see Page 4)
- English
- Start-up of the device / Introduction
- Power supply
- Inserting the batteries (not supplied)
- Remote Control Batteries
- Switching the device on/off (19)
- Infrared remote control
- EQ (7/23)
- VIDEO / AUDIO R/L Input Sockets (26/27)
- Setting the clock and alarm times (24 hour)
- Tuning in radio stations (Radio)
- Setting the alarm time
- Turning off the Alarm
- Deactivating the Alarm Time
- Automatic Alarm Interval
- Delayed Switch-off (SLEEP Button (6/16))
- Timer alarm
- Deactivating the timer alarm
- About the DVB-T receiver
- Connecting the antenna
- Activating or deactivating voltage at the antenna output
- Initial Installation
- Carrying out basic settings
- Navigating in menus and sub-menus
- Changing system settings
- Search and edit channels
- Automatic channel search (Auto/Scan):
- Manual search (Manual Scan):
- Child Protection/Password (PIN code)
- Menu Lock (Setup Menu Lock),
- Child Lock
- Censorship Lock
- Changing the password
- Factory defaults
- Changing time settings
- Operation
- Basic operating steps
- Switching between radio and TV mode
- Selecting channel
- Volume
- User interface on the TV screen
- Structure of the sub-menus
- Menu overview
- Programme Manager
- Delete
- Favourites List
- Locking
- Moving (Move)
- Rename and sort
- Sorting:
- Skipping channels
- English
- USB connection
- EPG (Electronic Programme Guide)
- Preselection/programming of broadcasts:
- Time Reservation
- Game
- Additional functions
- Displaying information
- Show Channel List
- Show Favorite List
- Displaying teletext/Using the Search Function
- English
- Selecting an audio setting
- Recall
- Cleaning
- Technical data
- Meaning of the "Dustbin" Symbol
- KRC 4330 DVB-T
- GARANTIE-KARTE
Brand : AEG
Model : KRC 4330 DVB-T
Category : Radio