
DT10 - Thermostat BOSCH - Free user manual and instructions
Find the device manual for free DT10 BOSCH in PDF.
| Product type | Programmable thermostat |
| Brand | Bosch |
| Model | DT10 |
| Dimensions (H x W x D) | 120 x 133 x 27 mm |
| Weight | Approximately 200 g |
| Rated voltage | 24 V DC |
| Rated current | 30 mA |
| Permissible ambient temperature | 0 °C to +50 °C |
| Display type | 24-hour display, backlit |
| Protection class | I |
| Protection type | IP 24 |
| Number of channels | 1 channel (heating or domestic hot water via Heatronic 3) |
| Time programming | Weekly, 3 switching periods per day |
| Main functions | Time/date setting, switching time programming, holiday mode, automatic summer/winter switchover, service modes (auto, permanent, off) |
| Cleaning and maintenance | Clean with a soft, dry cloth. Do not use abrasive products. |
| Safety | Installation to be carried out by a qualified installer. Disconnect the power supply (230 V AC) before any intervention. |
| Compatibility | Devices equipped with Heatronic 3 |
Frequently Asked Questions - DT10 BOSCH
User questions about DT10 BOSCH
0 question about this device. Answer the ones you know or ask your own.
Ask a new question about this device
Download the instructions for your Thermostat in PDF format for free! Find your manual DT10 - BOSCH and take your electronic device back in hand. On this page are published all the documents necessary for the use of your device. DT10 by BOSCH.
USER MANUAL DT10 BOSCH
These instructions must be observed to ensure correct operation.
This accessory item should only be installed by an approved installer.
- Never connect this accessory item to the 230 V mains electricity supply.
Isolate the mains electricity supply before starting any work.
1 Technical data for the accessory item
- Accessory item may only be fitted in appliances with Heatronic 3
- Can be combined with a controller without its own timer
- DT 10: single channel with seven-day program and three timed periods each day (channel allocation: heating or hot water via Heatronic 3)
- DT 20: two channels for heating and hot water (two seven-day programs with three timed periods per day)
Technical data
| Dimensions HxWxD 1 | 20x133x27 mm |
| Rated voltage 24 V DC | |
| Rated current 30 mA | |
| Ambient temperature | 0 ... +50 °C |
| Display 24-hour; | illuminated |
| Class of protection II | |
| Safety rating IP 24 | |
| € |
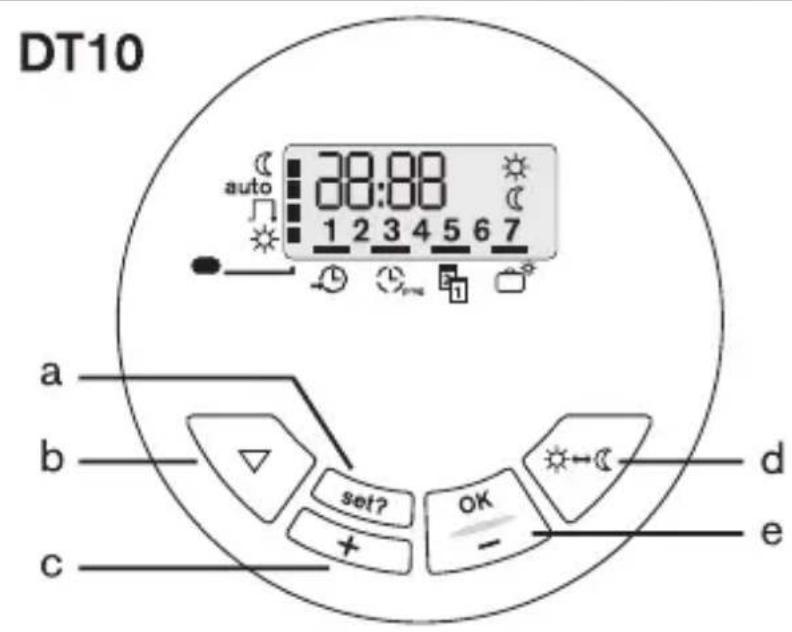
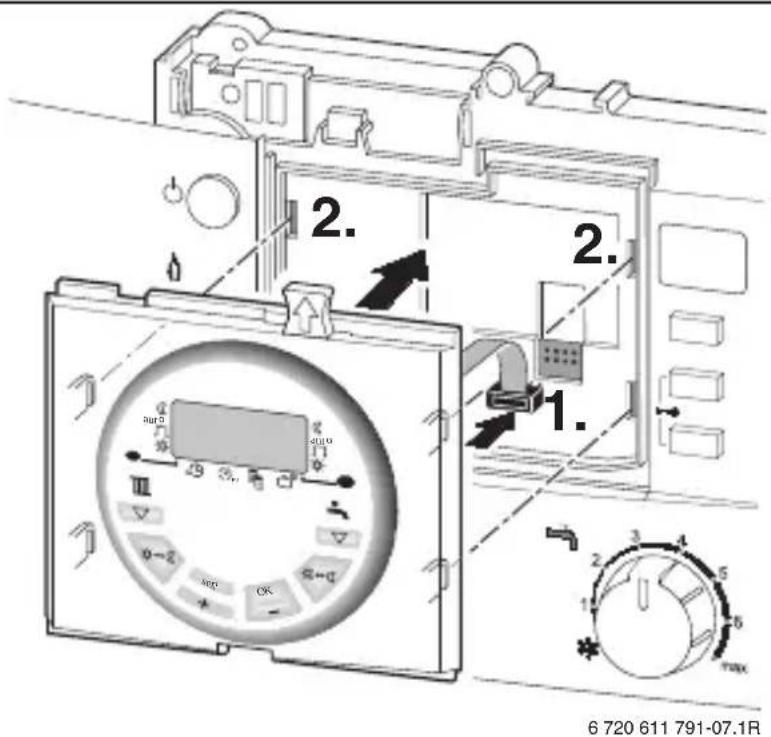
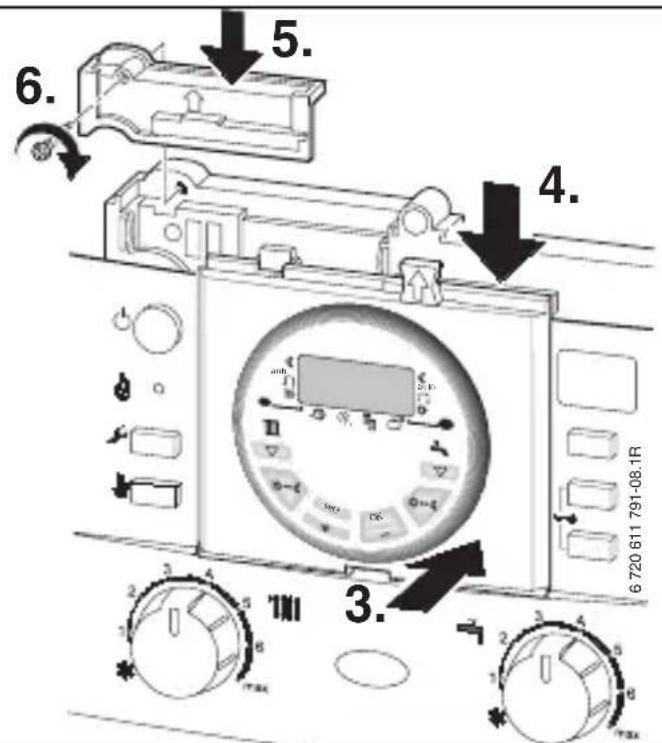
2 Installation

Danger: risk of electric shock!
Before installing, disconnect the mains electricity supply (230 V AC).
For a detailed description of the parts of the appliance, see the installation manual for the heater.
Connect and install the accessory item as shown in Figures 2 to 5 on page 103.
3 Operation
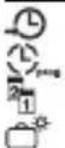
3.1 Buttons and symbols (Figure 1, on page 102)
Buttons:
a Menu button?
b:Select heating mode button
(Press to select Auto/
c:Change settings
-Press and release to change settings by one unit
-Press and hold to change settings continuously
d : Advance button (press to switch
available during auto/
e:Change settings
-Press and release to change settings by one unit
-Press and hold to change settings continuously
Symbols on the timer:
Operating modes
Heating / hot water constantly off
auto Automatic operation (all timed periods
active for heating / hot water)
Heating / hot water on from first timed period to last timed period of the day
Heating / hot water constantly on
LED on = heating / hot water on
LED off = heating / hot water off
Function
Clock settings
Timed periods
Date setting
Holiday function
DT 20 only

Heating channel
Hot water channel
Symbols on the display:
1...7 Weekday (1 = Monday...
7 = Sunday)
C Program the switch-off point
Program the switch-on point
Heating channel (DT 20 only)
Hot water channel (DT 20 only)
3.2 Programming
For base setting see page 105; to restore the factory settings:
Press


together.
The set time and date remain unchanged.
To exit settings:
Press repeatedly or do not press any button for approx. 60 seconds.
3.2.1 Setting the clock and date
Clock:
Press until the bar in the display shows above the symbol.
Press and the hours flash in the display: set the hour with

Press and the minutes flash in the display: set the minutes with OK /
Date:
Press until the bar in the display shows above the symbol.
Press OK and the year 8 flashes in the display: set the year with OK / +
Press and the month flashes in the display: set the month with OK +7
Press sel? and the day 8 flashes in the display: set the day with OK / +
3.2.2 Daylight saving
Press until the bar in the display shows above the symbol.
Press once and three set? times until dLS is shown in the display.
Switch daylight saving automatic setting on or off using ON; OFF).
3.2.3 Setting the timed periods
Setting options:
Max. 3 timed periods per day
-
Same times for groups of days or different times for each day
Possible day groupings: -
Monday to Friday (1-5)
- Saturday and Sunday (6-7)
The smallest timed period is one minute

Deactivate timed periods you do not need by making the switch-on and switch-off points the same.
Press until the bar in the display shows above the symbol.
Press, which will display the first group 1-5: select the desired group/day with set? (1-5/1,2,...5/6-7/6,7).
Set the first timed period:
Press until the first ON time is displayed DT 10:6:30 DT 20:6:30 Set the ON time with


Press until the first OFF time is displayed
DT 10:8:30
DT 20:8:30
Set the OFF time with OK
Set other timed periods:
Press and set the next on/off time with
Repeat until all timed periods are set for the selected group/day.
Setting the hot water channel (DT 20 only):
After setting the group/day for the heating channel Press which will make SET appear in the display.
Press and set the on/off times for the hot water channel as described above.
Setting other groups/days:
Select the desired group/day with set? Press and set the timed periods as described above.
3.2.4 Changing the operating mode
Press the select button to choose the operating mode auto/for operating modes, see section 3.1).
To change the operating mode for a short time during the mode auto/
Press;the operating mode will change from to of vice versa until the next on/off time.
3.2.5 Setting holidays
Press until the bar in the display shows above the symbol.
Press OK the display shows 00: set the number of days you require the system to be off with /OK (max.99).
Press and the system will be set to operating mode
After the set number of days have elapsed, the operating mode will switch back to auto/ at midnight.
To cancel the holiday function:
press any button.
C Programar fim de service
Programar inico de service
KaHaJI npriroTOBLeHnra ropeyB BoDbI
CnmbolbHa dnCpJee:
1...7 DeHb HeJeN (1 = noHeJeBbHK...
7 = BockpeceHbe)

ПограMMИрованеTOчКИ
BbIKJIoueHnI

OchOBHyIO HaCTpoiKy CM. Ha cTp. 105, yCTaHOBNTb CHOBa:
HaxaTb+
OДHOВРЕМEHNO.
YcTaHOBJIeHHbIe TeKUJee BpeMn DaTacoXpaHrOTc.
OkoHuaHnepeXImaHaCTpoiKn:
HaxMMaTb, NOKa He
HOBITcHyXHaYyHKuNnIINB TeueHne npImepHo 60 cekynHe HaXIMaTb HkKaKx KHONOK.
3.2.1 YctaHOBka Tekyuzero BpeMeHn I daTbI
Tekyüee Bpem:
Hakimatb, NOKa KypcOp He OKaKetcHa
Hakatb, INDnKaunyacOB MnaeT: yCTaHOBNTb Yacbl NocpeIcTBOM OK
Hakatb, INDnKaunr MInHyT Mnraet: yCTaHOBNTb MNHyTbI NocpeDCTBOM
ДаТа:
Hakimatb, NOKa KypcOp He OKaKeTcHa
HaxaTb, INdNkauZna rOda MnraeT: yCTaHOBNTb rOД NocpeDCTBOM OK
Hakatb, INdNkau HAeMa Mmraet: yCTaHOBNTb MEaI NocpeDCTBOM
Hakatb, INDnKaunrA HnMnraet: yCTaHOBntb DeHbNOCpeIDCTBOM
3.2.2 YctaHOBka
aBTOMaTnueCKOro nepexoHa JIeTHee/ 3mHee Bpemr
HaximMaTb, Noka Kypcop He
OKaXeTcHaI

OuHpa3HaXaTbN

Tpn pa3a HaxaTb, Noka He NOBNTcHa DnCpIee dLS.
BkIIOHTb INN BbIKIOHTb aBTOMaTnueckn nepexoJHa
JIeTHee/3nMHee BpeMa
NOCpeDCTBOM


BKN; BbIKJ).
3.2.3 YctaHObKa BpeMeH nepeKJIIOUeHnA
Bo3MOxHo yCTaHOBnTb:
MaKc.3 nepoJa nepeKIOUeHnB CyTKN
- OДинakOBbIe BpeMeHa
пеpekIoUcHЯ Ha HeCKoJbKO
Днeн (rgyPnOBAЯ NaCTpoIka)
ИПи pa3ЛИчHьe BpeMeHa
пepekIoUcHЯ Ha KaXdIy DeHb
- rpynnobaa hactpoika no dHram:
- c noHeJeIbHnka nO nIaTHnUy (1-5)
-cy660ta n BocKpeceHbe (6-7)
KpaTuaHnI nepnoD
peeknueHpaBEN1MHyTe

HencnoIb3yemble
pepnoDbI
pepeKJIIOUeHnA
deakTNBnpoBaTb,
yctaHOBnB
OДинakOBbie TOUKN
BKNIOUOeHnI
BbIKJIIOUeHnI.
Hakimatb, noka Kypcop He
OKaXeTcHaI

HaxaTb, NOBJIaETcA
nepBa rpynna 1-5: Bbl6paTb
HxKHyU rpynny/JeHb
IocpeDCTBOM (1-5/1,2,
...5/6-7/6,7).
YcTaHOBtB nepBbI nepNoI nepeKJIoueHnA:
HaxnMaTb, noka He
NORNTCA NepBoe Bpemr
BKNIOUOeHnA
DT 10:6:30
DT 20:6:30
yCTaHOBNTb BpEmr BKJIIOUeHnI
PocpeDCTBOM


Hatab, NOBnEeTc
NepBoe BpeMa BbIKJIIOUeHnA
DT 10:8:30 C
DT 20:8:30 C
yCTaHOBNTb BpEmr BbIKJIIOUeHnI
PocpeDCTBOM


YctaHOBtB nocJeDyUOuNe nepNoDbI nepeKJIoueHnA:
Hakatb uYCTaHOBNTb CneDyUouee Bpemn NpeKJIuOHeHnI NocpeIDCTBOM OK / +
Повторь поцедур, рoka Всеверема плперидыпөрөлючени дя Bыбранhoe Гупь/Днг He 6уdT yctановленьbl.
Hac troika kana npirotoBlenia ropayeBODbl (Tolbko DT 20):
NOCJIe yCTaHOBKn rpynnbl/DnA JIa KaHaJa OToPJIeHnI HaxKaTb, Ha IInCpJIee NOABJIaETcA SET
HaxaTb u yCTaHOBNTb BpeMeHa nepeKJIIOUeHnI JI KAnJa npNroTOBJeHnI rOpAYe BOdBi KaK OINcAo HbIWe.
YctaHOBtB pyrIe rpynnbl/AnH:
BbI6paTb HxKHyIO rpynny/JeHb NocpeiCTBOM set? . HaXaTb I yCTaHOBNTb BpEmHa IINI nePNOdbI nepeKJIIOUeHnA, KaK OINCAHO BblSe.
CTOINHOCT /No-HNCKA CTOINHOCT
-KpatoHaTnCKaHe:HaMaJIraBaHe c eHa eHnHa
-ПрдьлжntелноHaTиСkaHe:БbP3a CMЯHa Ha CTOnHOCCTTa
CnmboJI N Bbpy YacOBHKOBnI npekbcBa:
PexkMn Ha pa6oTa
napHO/ToNnBa BOJa NocToHNo 3KJ.
auto aBTOMaTnueh peXmBcNk
BpeMeHa 3a npeBKnIOUbaHe Ha napHO/ TOnla BOda ca aKTnBn)
napHo/ToPnlaBoDaBKn.,MeKdy
IbpbOTO NIOcJIeDHOTo BpeMe 3a npeBkJIIOuBaHe Ha JeHr
napHo/ToPnla BOda NOCToHHO BKnI.

LED BkI. = napHO/ToPnla BOda BkI. LED n3Kl. = napHO/ToPnla BOda n3Kl.
ФУнкун

4ac
BpeMeo6pa6oTbaa nporpama(n) Data
IOnuBHa npOrpama
camo DT 20

OTonnteJeh KaHaJ
KaHaJI 3a TOnJa BODa
CnmboJIHa dnCpJIeJ:
1...7 DeH OT ceMnuaTa (1=
noHeIeHnK...7=HeIeJIa)

-KOPOTKHaTnCHyTN:HaOdHy OOnHnIcIO 6JIbWe
- TpmbaNo HaTncHyTu: LbNdka 3MiHa 3NaueHH
- Tpmbano HaTncHyTu: LbNdka 3MiHa 3HaueHH
CnmboHnHa TaMepi:
Pexmnpo60tn
TpNBaIe ONaIOBaHHHaarpiB BOIN BUMKHeHi
auto ABTomTuHnpeXm (yci Yacn yBIMKHeHHI IJI ONaJIIOBaHH/HarpiBy BOIN aKTNBHI)
OnaIIOBaHHa/HarpiB BoH yBIMKHeHi, mix nepuM Ta ocTaHHim YacOM yBIMKHeHHa
TpBbane OanIOBaHHHaarpib BoynyBIMKHeHi
CД yBIMKH. = onaJIIOBaHHHaIrpIB BOIN yBIMKHeHi

CДВIMKH. = ONaIIOBaHHHa/HarpiB BOДN BIMKHeHi
Функua

4ac
Yacobi nporpamn
Data
Pporpama dna Bicnyctkn
TiJbKu DT 20

KaHaJ onaJIeHHa
KaHaJI HarpiBy BODi
CnmboHnHa nncnJIeI:
1...7 DeHb TnKHa (1 = noHeiIOK...
7 = He,diin
3a nporpaMyBaTN MOMENT BIMKHeHHA
3anporpaMyBaTN MOMENT yBIMKHeHHA
KaHaJI onaJIeHHa (TinbKn DT 20)
KaHaJ HarpiBy BoDi (TilbKn DT 20)
3.2 ПорpaMuBaHЯ
ДлЯ 6a3OBuX NaCTpoIOK IINBnCb CTOpiHky 105, BiINHOBJIeHHa:
HaTnCHyTN OndHouaCHO.

Ta +
BcTaHOBHeHyac i daTa 36epiraIOTBcra.
3aBepseHnHaCTpOioK:
HaTNOkATn TaK YacTo, nOKn He 6ynde BiO6paXKeHa 6aXaHa 4yHKciI, a6o npN6n3Ho 60 cekyHd He HaTnCKaTn XoDHy KlaBiIy.
3.2.1 BcTaHOBnTn Yac N daTy
4ac:
HaTNOkATn TaK YaCTO, NOKN KypCop He 6ynde p03TaWOBaHn HaI
HATNCHyTN,iHdNKauiI rOuH 6JIIMae:BcTaHOBHTn rOuHv 3a DOnOMoTOU OK
HATNOHYTN, iHdNkauiXBUNH 6JIMae: BcTaHOBHTNXBUNHN 3a DOnOMOIO OK
Data:
HaTNOKaTn TaK YaCTO, NOKN KypCop He 6ynde po3TaWOBaHn HaD
OK HATNCHTN, INDINKAUIPOKY 6JIIMae: BCTaHOBNTn pIK 3a DOJONOMOIO /OK
HATNOHYTN,INDKaCIAI MicuO 6nMaEc:BCTaHOBHTN Micu3a DOONOMOIO OK
HATNOHYTN,INDKauiJ DNH 6JIIMae:BCTaHOBHTN DeHb 3a DONOMOIO /OK
3.2.2 BctaHOBJIeHHJIITHbOro/ 3IMOBOrO yacy
HaTNOkATn TaK YaCTO, NOKn KypCop He 6ynde po3TaWOBaHn HaD
HaTnCHyTN OdnH pa3 OK Tpnui, HOKn Ha dncnnei He 3'ABNTbcdLS.
YBIMKHyTN a6o BnMKHyTe JITHi
3n 3nMHi Yac 3a DOnOMOIO
/(+yBMKH.;
=BNMKH.).
3.2.3 BctaHOBNTuac yBimKHeHn
Moxnbocti hactpoKn
MaKc.3 nepioyn yBimKHeHHa Y DeHb
- OndaKobi yacn yBimKHeHHa dIa 6araTbox nHIB (CTBOpEHra rpynn) a6o pi3Hi yacn yBimKHeHHa dIa KOKHOrO dHra
CTBOpENHa rpyn dHiB: 3 noHeiIka nO n'ATHnIO (1-5) Cy60Ta n HeiJa (6-7)
- NaIMeHsIn nepioD yBIMKHeHHaCKlaDae 1 XBnInHy

Henotpi6hi nepioynyBIMKHeHHaDeaKTnByBaTn 3aDOnOMOIOBCTaHOBJIeHHaMometiB yBIMKHeHHbBIMKHeHHHa Ond3HaueHHa
HATNOKATN TaK YacTo, NOKI KypCop He 6yde p03TaWOBaHn HaD
HATINCHyTN,6ynde BiO6paXeNo nepuI rpyny 1-5: O6paTn 6aXaHy rpyny/JeHb 3a DOnOMOroIO (1-5/1,2,...5/ 6-7/6,7).
BcTaHOBnTn nepuN nepioD yBIMKHeHHa
HATNCKaTN TaK YacTo, NOKn He 6yJe BiIOobpaXeHO nepsiYac yBIMKHeHHA DT 10:6:30 DT 20:6:30 BCTaHObHTn Yac yBIMKHeHHa DOIOMOTO
HATNOHYTN,6ynde BiO6paJKeHO nepuN yac BnMKHeHHa DT 10:8:30 C DT 20:8:30 III C BcTaHOBHTN YAC BnMKHeHHa 3a DOnOMOroIO Ox
BctaHOBHTn noaJIbwi nepioyn yBIMKHeHHa
HaTnCHyTN NBCTaHOBNTn HAcTyHnH Yuac yBIMKHeHHa DOIOMOFOIO
Повторюгелу, пон He 6удуть Bстановлени усічаси abo nepioДи yBIMKHeHЯ Дя обрано Груп/N/DнЯ.
BcTaHOBtN KaHaJI HarpiBy BODn (TilbKn DT 20):
Пися Встуовленья рупн/Дня Кан Any OnaIOBaHnHaTNCHTI :set?6yde BiO6paJKeHo SET
HaTnCHyTN BCTaHOBNTn Yac yBIMKHeHHaJaKaHaJy HarpiBy BoHn K HaBeJeHo BNue.
BctaHOBHTI noaJIbwi rpynn/ndhi:
Obpatn6aXaHny rpyny/JeHb 3a DOnOMOrOIO set? HATNCHTN iBCTaHOBNTn Yacn a6o nepioy yBIMKHeHHЯ K HaBeDeHO Bnue.
3.2.4 3miHa peXmMiB po6OTn
BcTaHOBHTnpeXmpo60Tu / auto/3aHOnOMoHO (iHOpMauiIO npo peXmnpo60Tu DnVBncb B rnaBi 3.1).
KopoTkoaHa 3MiHa po6oHorOpekmMy nI qac auto/
HaTnchyTu peXm nepeIe do HacTyHoi ToKn nepemKaHHa 3 a6o HaBnaKn.
3.2.5 BcTaHOBHTn nporpamy BiDnyctkn
HaTNOkATn TaK YaCTO, NOKn KypCop He 6ynde p03TaWOBaHn HaD
HaTnchTyN 6ynde BiO6paXeHO 00:BcTaHOBnTu YncNo dHiB BiDnyCTKn 3a DOnOMoHO (MaKc.99).
HaTnCHyTN set? 6ynde 3iINcHeHa HacTpOiKa BiIOBIDHO Do peXmMy po6oTu
H3aKInHeHHn DnIB BiDnyCTKn 6yJe 3iINcHeHO nepmkaHHHa peXmpoBOTn auto/
BiMiHa nporpaMn «BiDnycTka»
HaTnchTu 6yDb kky KnaBiuy.
Anhang/Appendice/Appendix/APendice/Supplemento/ Załacznik/Aanhangsel/Annexe/Dodatok/Pielikums/Priedas/Lisa/ПаразгелуPrilog/Anexa/Dodatok/Dodatek/Függelék/Приложения/Дodatek


2

3
4
5
DT 10:
| 1-5 | 6:30 8:30 | 12:00 12:00 | 16:30 | 22:30 | ||
| 6-7 | 7:00 9:00 | 12:00 12:00 | 16:00 | 23:00 | ||
| 1 | ||||||
| 2 | ||||||
| 3 | ||||||
| 4 | ||||||
| 5 | ||||||
| 6 | ||||||
| 7 |
1
DT 20:
| Spro | |||||||
| III | 1-5 | 6:30 8:30 12:00 12:00 16:30 22:30 | |||||
| 6-7 | 7:00 9:00 12:00 12:00 16:00 23:00 | ||||||
| 1 | |||||||
| 2 | |||||||
| 3 | |||||||
| 4 | |||||||
| 5 | |||||||
| 6 | |||||||
| 7 | |||||||
| IV | 1-5 | 6:30 8:30 12:00 12:00 16:30 22:30 | |||||
| 6-7 | 7:00 9:00 12:00 12:00 16:00 23:00 | ||||||
| 1 | |||||||
| 2 | |||||||
| 3 | |||||||
| 4 | |||||||
| 5 | |||||||
| 6 | |||||||
| 7 | |||||||
2


- Technical data for the accessory item
- Installation
- Operation
- Buttons and symbols (Figure 1, on page 102)
- Buttons:
- Symbols on the timer:
- Operating modes
- Function
- DT 20 only
- Symbols on the display:
- Programming
- Setting the clock and date
- Clock:
- Date:
- Daylight saving
- Setting the timed periods
- Set the first timed period:
- Set other timed periods:
- Setting the hot water channel (DT 20 only):
- Setting other groups/days:
- Changing the operating mode
- Setting holidays
- CnmbolbHa dnCpJee:
- YctaHOBka Tekyuzero BpeMeHn I daTbI
- Tekyüee Bpem:
- ДаТа:
- YctaHOBka
- YctaHObKa BpeMeH nepeKJIIOUeHnA
- YcTaHOBtB nepBbI nepNoI nepeKJIoueHnA:
- YctaHOBtB nocJeDyUOuNe nepNoDbI nepeKJIoueHnA:
- Hac troika kana npirotoBlenia ropayeBODbl (Tolbko DT 20):
- YctaHOBtB pyrIe rpynnbl/AnH:
- CnmboJI N Bbpy YacOBHKOBnI npekbcBa:
- PexkMn Ha pa6oTa
- ФУнкун
- camo DT 20
- CnmboJIHa dnCpJIeJ:
- CnmboHnHa TaMepi:
- Pexmnpo60tn
- Функua
- TiJbKu DT 20
- CnmboHnHa nncnJIeI:
- ПорpaMuBaHЯ
- BcTaHOBnTn Yac N daTy
- 4ac:
- Data:
- BctaHOBJIeHHJIITHbOro/ 3IMOBOrO yacy
- BctaHOBNTuac yBimKHeHn
- BcTaHOBnTn nepuN nepioD yBIMKHeHHa
- BctaHOBHTn noaJIbwi nepioyn yBIMKHeHHa
- BcTaHOBtN KaHaJI HarpiBy BODn (TilbKn DT 20):
- BctaHOBHTI noaJIbwi rpynn/ndhi:
- 3miHa peXmMiB po6OTn
- BcTaHOBHTn nporpamy BiDnyctkn
Brand : BOSCH
Model : DT10
Category : Thermostat