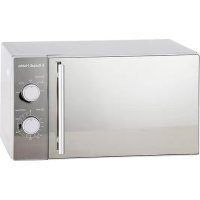
1955056 - Microwave Oven RUSSELL HOBBS - Free user manual and instructions
Find the device manual for free 1955056 RUSSELL HOBBS in PDF.
User questions about 1955056 RUSSELL HOBBS
0 question about this device. Answer the ones you know or ask your own.
Ask a new question about this device
Download the instructions for your Microwave Oven in PDF format for free! Find your manual 1955056 - RUSSELL HOBBS and take your electronic device back in hand. On this page are published all the documents necessary for the use of your device. 1955056 by RUSSELL HOBBS.
USER MANUAL 1955056 RUSSELL HOBBS
HHCTpyKcnn (bblrapckn) 86
193iWU
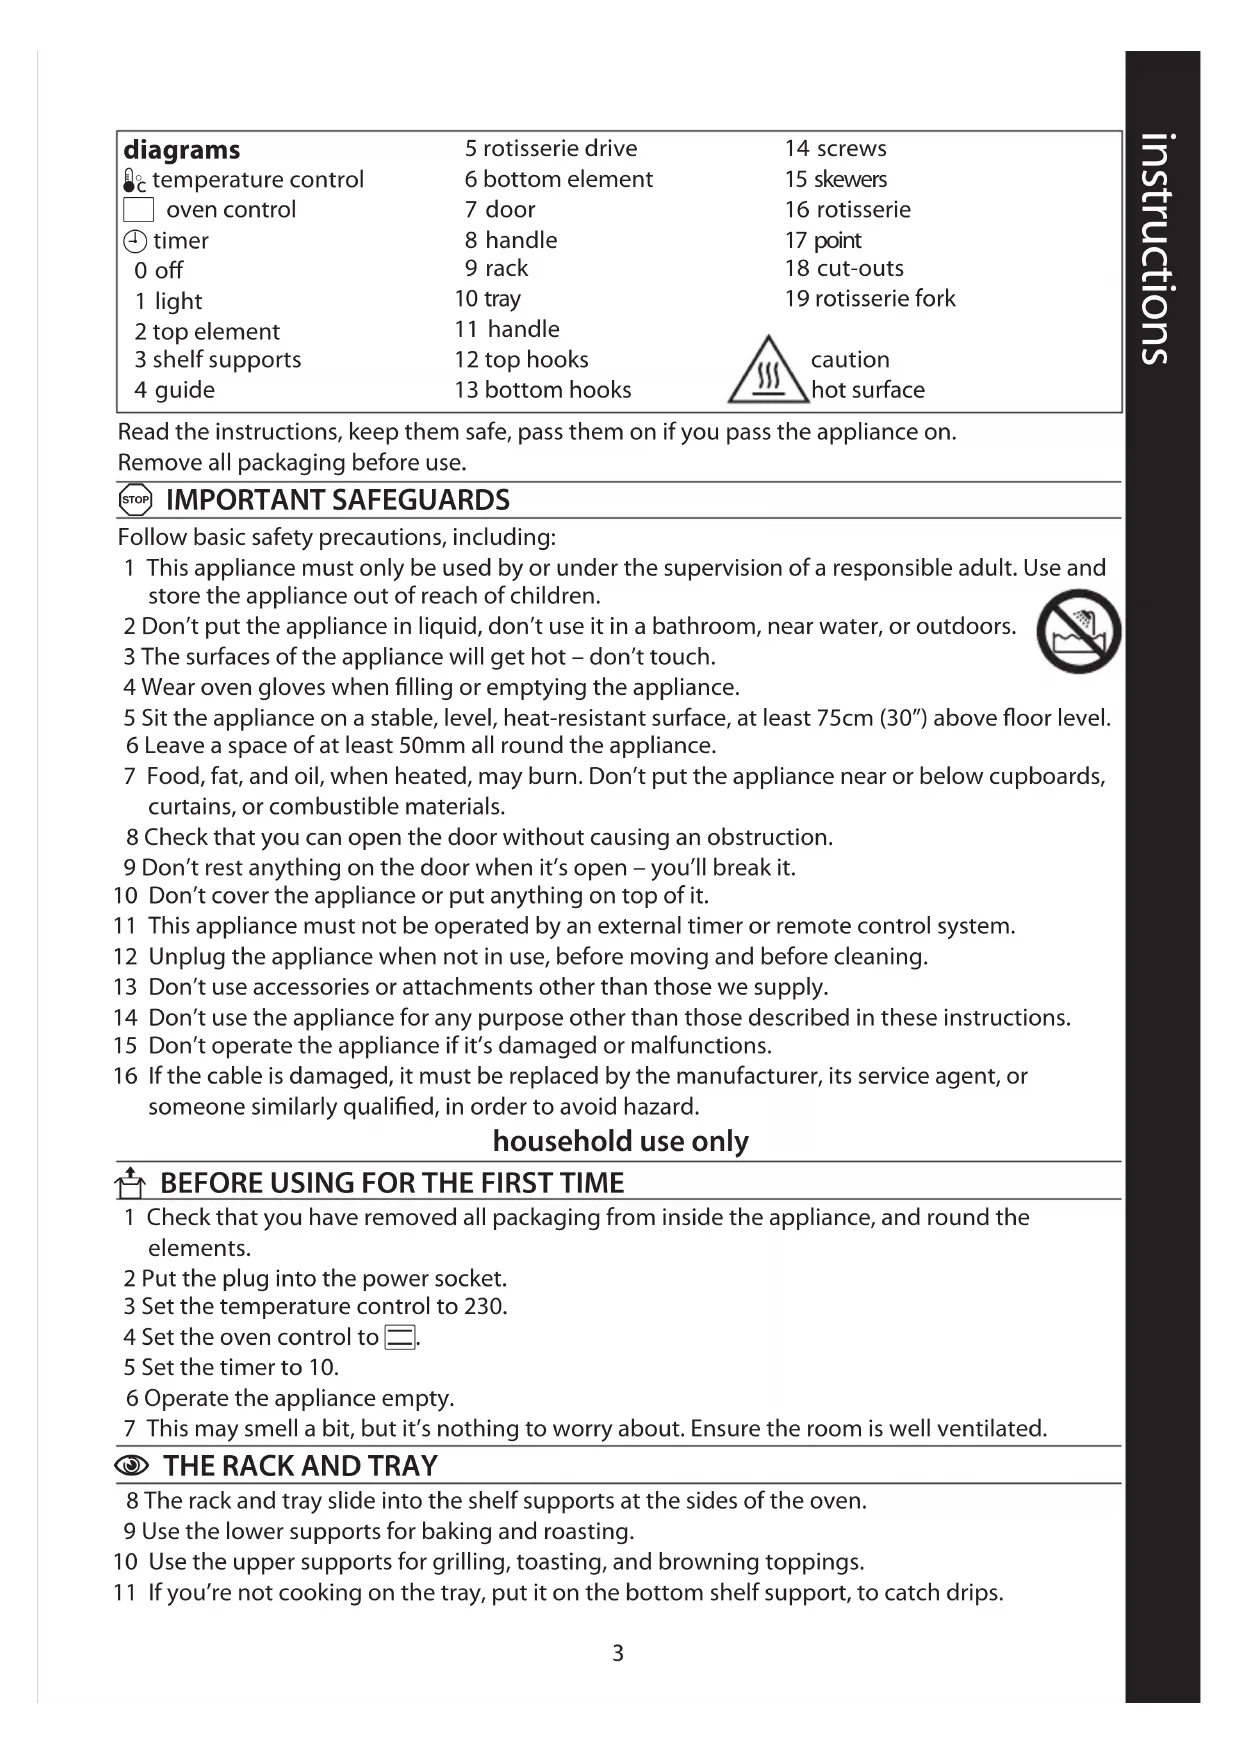
| diagrams | 5 rotisserie drive | 14 screws |
| temperature control | 6 bottom element | 15 skewers |
| oven control | 7 door | 16 rotisserie |
| timer | 8 handle | 17 point |
| 0 off | 9 rack | 18 cut-outs |
| 1 light | 10 tray | 19 rotisserie fork |
| 2 top element | 11 handle | |
| 3 shelf supports | 12 top hooks | caution |
| 4 guide | 13 bottom hooks | hot surface |
Read the instructions, keep them safe, pass them on if you pass the appliance on. Remove all packaging before use.

IMPORTANT SAFEGUARDS
Follow basic safety precautions, including:
1 This appliance must only be used by or under the supervision of a responsible adult. Use and store the appliance out of reach of children.
2 Don't put the appliance in liquid, don't use it in a bathroom, near water, or outdoors.
3 The surfaces of the appliance will get hot - don't touch.
4 Wear oven gloves when filling or emptying the appliance.
5 Sit the appliance on a stable, level, heat-resistant surface, at least 75cm (30^ ) above floor level.
6 Leave a space of at least 50mm all round the appliance.
7 Food, fat, and oil, when heated, may burn. Don't put the appliance near or below cupboards, curtains, or combustible materials.
8 Check that you can open the door without causing an obstruction.
9 Don't rest anything on the door when it's open - you'll break it.
10 Don't cover the appliance or put anything on top of it.
11 This appliance must not be operated by an external timer or remote control system.
12 Unplug the appliance when not in use, before moving and before cleaning.
13 Don't use accessories or attachments other than those we supply.
14 Don't use the appliance for any purpose other than those described in these instructions.
15 Don't operate the appliance if it's damaged or malfunctions.
16 If the cable is damaged, it must be replaced by the manufacturer, its service agent, or someone similarly qualified, in order to avoid hazard.
household use only

BEFORE USING FOR THE FIRST TIME
1 Check that you have removed all packaging from inside the appliance, and round the elements.
2 Put the plug into the power socket.
3 Set the temperature control to 230.
4 Set the oven control to
5 Set the timer to 10.
6 Operate the appliance empty.
7 This may smell a bit, but it's nothing to worry about. Ensure the room is well ventilated.

THE RACK AND TRAY
8 The rack and tray slide into the shelf supports at the sides of the oven.
9 Use the lower supports for baking and roasting.
10 Use the upper supports for grilling, toasting, and browning toppings.
11 If you're not cooking on the tray, put it on the bottom shelf support, to catch drips.
THE HANDLE
12 To fit the handle to the rack/tray:
a) catch the hooks on the top of the rack/tray
b) lower the handle till the bottom catches the underside of the rack/tray
c) lift the handle, and the rack/tray comes with it
d) the top hooks fit the tray, the bottom hooks fit the rack
USING THE OVEN
13 Put the plug into the power socket.
14 Set the temperature control to the required temperature (100 - 230^)
15 Set the oven to the function you require:
X all elements off
top element and rotisserie
bottom element
both elements
16 Turn the timer clockwise to the required time. The light will glow.
If you need to cook for more than 60 minutes, simply set the timer again when it returns to zero.
17 When the time returns to 0, the appliance will switch off. You'll hear a "ding". The light will go off.
18 When using the bottom element, or both elements (□□), preheat the oven, and wait till the light goes out before cooking.
THE DOOR - OPEN OR CLOSED?
19 The door has 3 stable positions, open, closed, and half open (about 30^
20 Keep the door half open when using the top element , either as a grill, or with the rotisserie.
21 This will prevent the thermostat operating and switching off the element.
22 Keep the door closed when using the bottom element , for baking, or both elements together for traditional oven cooking.
23 The door gets hot - wear oven gloves.
GRILLING AND SPITTING
24 When grilling, or cooking anything that comes close to the top element, keep an eye on the food, to avoid fat or juices spitting on the top element.
25 If you see spitting, move the food down, away from the top element.
26 You may have to extend the cooking time slightly, to make up for the extra distance.
27 Spitting will make cleaning difficult.
28 Residues burned on to the top element may shorten its life.
29 Burned residues falling back into the food may affect the look and taste of the food.
THE ROTISSERIE
30 Whatever you are roasting, a bird, a rabbit, or a piece of meat, it must be mounted centrally on the rotisserie.
31 If it is not mounted centrally, then one side will cook faster than the other.
32 There must be no loose bits, or they will be unevenly cooked.
33 The closer you can get to a cylinder shape, with the rotisserie exactly in the centre, the better will be the results.
34 Tie loose bits, like wings, or small legs, with string.
35 Loosen both screws, then remove the skewer from the pointed end of the rotisserie.
36 Push the pointed end through the centre of the meat, and out the other side.
37 Replace the skewer on the rotisserie, and push both skewers into the ends of the meat.
38 The meat will shrink as it is cooked, and it must not fall off the skewers, so push them well in.
39 Move the meat and skewers along the rotisserie till the meat is roughly in the centre, then tighten both screws, to hold it in place.
40 Fit the pointed end of the rotisserie into the rotisserie drive, then lower the other end into the guide on the other side of the oven.
41 Check that nothing will touch the inside of the oven as the rotisserie rotates.
42 Slide the tray into the bottom support, to catch the drips.
43 Leave the door half open.
44 Set the temperature control to the required temperature (100 - 230^)
45 If the temperature is too high, the outside will cook faster than the centre.
46 We suggest you cook at low to medium temperatures.
47 If you want to crisp the outside of the meat, then turn the temperature up towards the end of the cooking time.
48 Set the oven control to
49 Turn the timer clockwise to the required time.
50 Use the rotisserie fork to lift the rotisserie out of the oven.
51 Fit the ends of the fork under the cut-outs in the rotisserie.
52 Hold the fork with both hands.
53 Lift the left side a little, to free the end from the guide, then move the rotisserie to the right, to free the pointed end.
54 Carefully remove the fork and rotisserie from the oven.
55 We suggest that you practise a few times before you start cooking.
CARE AND MAINTENANCE
56 Unplug the appliance and let it cool before cleaning or storing away.
57 Wipe all surfaces with a clean damp cloth.
58 Wash the removebla parts in warm soapy water.
59 Don't use scourers, wire wool, or soap pads.
60 Don't put any part of the appliance in a dishwasher.
discoluration
61 With use, the surfaces of the appliance will discolour.
62 This is inevitable, harmless, and won't affect the operation of the appliance.
ENVIRONMENTAL PROTECTION
To avoid environmental and health problems due to hazardous substances in electrical and electronic goods, appliances marked with this symbol mustn't be disposed of with unsorted municipal waste, but recovered, reused, or recycled.

COOKING TIMES & FOOD SAFETY
- Use these times purely as a guide.
- Cook meat, poultry, and derivatives (mince, burgers, etc.) till the juices run clear. Cook fish till the flesh is opaque throughout.
- When cooking pre-packed foods, follow any guidelines on the package or label.
| food temperature food temperature | |||
| beef 190-210 °C pastry 190-210 °C | |||
| bread 200-220 °C pork 190-210 °C | |||
| casseroles | 140-160 °C | quiche/flan | 160-180 °C |
| chicken | 190-210 °C | rich fruit cake | 140-160 °C |
| fish | 170-190 °C | scones | 190-220 °C |
| lamb | 190-210 °C | sponge cake | 160-180 °C |
| meringue | 90-110 °C | Yorkshire pudding | 200-220 °C |
| milk pudding | 140-160 °C | ||
BEHANDLING OG VEDLIKEHOLD
LUUKKU - AUKI VAI KINNI?
BAKHbIE MEPbI INPEIOCTOPOXHOCTN
CneNyTe OCHOBbIM INHCTpyKcIyAM NO 6e3ONaCHOCtN, BKJIouaY CneDyUoIue:
1 DeTAM pa3peSeHNOIb3OBAtbcra yCTPOINCTBOM TOnbKO NOd IpNCMOTPOM B3POCnblX. NcnoJIb3yIte n xpaHInTe np6Op B MeCTax HeIOCTynHbIX dIa IeTei.
2 He norpykaai Te np6op B kakyio-lno 6nKocb; He nCnoB3yIe ero B BaHHO KOMHaTe, OKOIO BOdbI IIN BHe NOMEueHNI.
3 NobepxHocn yctpoiCTBa HarpeBaIOTcra He npKacaiTecb K Hm.
4 Pn HApONHeHn yCtpoNCTBa nnn BbIeMKe n3 Hero HaDeBaIte KxOHNbIe pyKaBnIbl.
5 UcTpoIcTBo CneIyEt yCTaHaBnIBaTb Ha yCToIuBOi, POBHO, TepMOcToIkoI NOBepXHocTN, MInHMym 75 cm (30") HAD yPOBHeM Iona.
6 OctaBbTe nO MeHbWei Mepe 50 MM npocTpaHCTBa BOKpyr yctpOYCTBa.
7 B pe3yIbTaTe HArpeBa npOdyKtbl, Jxip, MacNo MoryT 3aropeTbcra. He pacnoIaraiTe yCTpoiCTBO BO3ne 6yfoTOB, 3aHaBeCOK IIN BO3rOpaEmbIX BeIeCTB.
8 Y6eIntecb, yTo DBepb 6ecnPenrTCTBENHO OTKpbIBaetcra.
9 He cTaBbTe HnueRo Ha OTKpbI TYIO DBepb BO n36eKaHne ee NOLOMKn.
10 He naKpbIbAaTe npu6op n He pa3MeaaiTe HnUero Ha ero nobepxHocTn.
11 Пибор He может pa6otab ot BHeшero TaMepa nIN dNCTaHcNOHHOcCtEmbl ynpaBneHn.
12 OtklouaTe np6op ot cetn, KOrda He nCnoJb3yete ee, nepeD nepeHoCKo Nnn YnCTKoN.
13 IcnoIb3yIte ToIbKO npHaIeJXHocTn HacaKn OT npOn3BoInteJIa.
14 Пибор He может pa60taTb OT BHeшero TaMepa ИпДИСТаHцINOHн СИСТeMbI ynpaBNeHn.
15 He nCnoB3yIe np6Op, ecn OH noBpeKdEn nIpa6OtaeT c nepe6oAMy.
16 Ecn Ka6enb NOBpeKdEn, OH DoJxH 6bITb 3aMeHeH npOn3BOJTeJEM, cepBnCHbIM areHTOM nn dpYrIM KBaJIuΦIuPObAHbIM IIncOM IIncOM IIneI ppeDfTbaueHn ONaCHOCTN.
TOlbKO DnI 6bITOBORIO NcNoIb3OBAHnI

IPEEDIIEPBbIM IICIOJIb3OBAHnEM IPNBOPA
1 Y6eIntecb, yTO Bbl ydaJIINn ynaKOBOHbIM MaTePnJI n3 yCTpoiCTBa n BOKpyr 3JeMeHTOB.
2 BkIIOUHTe BnIKy Bpo3ETKy.
3 YctaHOBITE peryIaTOp TemnepaTypbHa 230.
4 YctaHOBtpe peryJATOp neuHa
5 YctaHOBNTe TaIMep Ha 10.
6 Bknioute nyctoe yctpoiCTBO.
7 MoKet nOaBtbcr He6oJbwoi 3aIax, Ho BOnHOBaTbcr He cToI. O6ecneYbTe xopoWyo BeHTnJIaCIO KOMHaTbl.

PEWETKA I IOIDOH
8 PeWetka n noDIOH cKoJIb3aT no onopam noIOK no 6okam neu.
9 HnKHe onOpbl nCNoIb3yIOTc Ia BbIeKaHn I noJkaPbAHn.
10 BepxHne onopbI nCnoJb3yIOTcI dJI JXapKn Ha rpiJIe, npriTOBHeHn TocOB nOdpymaHaHn HaunHKn.
11 Ecnn Bbl He roTOBnTe Ha noDIOHe, yCTaHOBnTe erO Ha HIXHIO OOnOpY nONKn, YTO6bHa Hero naDaJIu KaIII.

PYKORTKA
12Дяnpсоeинehи pyKoTkn KpewTe/NoDOnHy:
1) NOUeNTe KpOuKn K BepxHeu qactn peWeeTKN/NoDIOHa
2) onyctnte pykoTky, yTo6bl HxHHeu qactbIO NOxBaTuNb Hn3 peWteKn/NoDoHa
regulator temperature regulator piekarnika
④ regulator czasowy
0 wyłaczony
1 lampka
2 gorny element
IPIN ANO THN INPQTH XPHSE
3N3NOJ3BAHE HAΦYPHATA
13 BkIoueTe uencenaB 3axpaHbuaa KOnTaKT.
14 3aàiTe Heo6xOImMaTa Tempepatypa (100-230°C) Upe3 konyeTo 3a KOHTpOHa Tempepatypa.
15 HactpoTe fypHaTa Ha Heo6xOImMaTa BN FyHKnIa.
| BCNUCKN eJemeHTN ca N3KJIIOUeH |
| ROpeH eJemeHT N rPnJ |
| ДОЛeH eJemeHT |
| ИДВaTа eJemeHTa |
16 3aBbptTe TaMepa nO nocoka Ha yacOBnKOBaTa CTpeJka Do JKeJaHOTo BpeMe. JAmnUkatae CBETHe.
Ako Tp86Ba Da roTbIe 3a noBuee ot 60 MmHyTu, npocTo HacTpoiTe TaMepa Ose BeHbX, CneD KaTO DOCTnRHe Hyla.
17 Korato taImepbT ce BbPhe Ha 0, ypeBt ige ce n3KnouH. Ie yyete 3BbH. lamnukata ue yrache.
18 Korato n3non3BaTe doJHnna eIeMeHT nn n DbaTa eIeMeHTa (□□), 3arpeYTe npedBapntEnho fypHaTaN3uKaIte lamnnuKaTa da n3rache, npdN da rotBNTe.
BPATNUKATA - OTBOPEHA UNI3ATBOPEHA?
19 Bpata nma 3 cta6nHn no3nHn, OTBopeHa, 3aTBopeHa n noLyOTBopeHa (okono 30^
20ДрькTe BpaTnUkata ПolyOTbOpeHa, KOrato n3PON3BaTe rOpHna eIeMeHT KaTo rPnI nIIc rPnI npbUkata.
21 ToBa ue npedotbpaTn pa6oTa Ha TePmoctata N n3KnIOUbaHe Ha eIeMeHTa.
22ДрьжTe BpaTnUkKaTa 3aTBopeHa, KOraTo N3NoI3BaTe DOnHnIe EneMeHT 3a NeueHe nIIu I BaTa eNeMeHTa 3aeIHO 3a TpaNtioHNO RotBeHe Ha cypHa.
23 BpaTnUkata ce HaropeuBa - HocTe roTBapcKn pBkaBnI.
TOTBEHE HA TPNJI N CbPcEHE
24 Korato rotbute Ha rpnn nnr rotbute Heo, KoTo ce do6nkaBa Do rohpHna eIemEnT, cJeTe XpaHaTa, 3a Da n36erHeTe npbckAHeTo Ha COKOB Bbpxu rOpHna eIeMeHT.
25 Ako Bnnte Cbpyhe, npemctete XpaHaTa HdoJy, daJeOT rOpHna eIemEnT.
26 Moxe da ce HanoxM aNko Da yDbJXnTe BpeMeTo Ha rOTBeTe, 3a da KOMneHcnpate 3a pa3CToRHeTO.
27 LbpeHTo 3aTpduHn NouchTaHeTo.
28 3aropeiin octaTbun no rohpHn enMeHT moKe da ckbcrt kINBOTa My.
29 PaanaheTo Ha 3aRopEnoCTaTbCn B XpaHaTa MoKe Ja NOBInRe Bbpxu BbHsHnBn IN BkyCa Ha xpaHaTa.
#
30 He3aBnCmO KaKBO neyeTe, PTuCa, 3aek nIi NapYe MeCo, Te Tp86Ba Da 6bDaT noCTaBeHn ceHTpaIIHO Ha rPILA.
31 Ako He ca nocTaBeHn cHTpaJHo, eHaTa cTpaHa ige ce crotBn no-6bP3o OT dpyraTa.
32 He Tp6Ba Da nMa Cbo6oHN yactn nn Te ige ce crotbT HepaBHomepHO.
33 KOnkTo nO-6nI3o CTe Do cIIINHdpuHa fOpMa, KaTo rpnBTe B ceHTbpa, TOLKOBa NOdo6pn 6bDat pezylTaTnte.
34 3aBbpxKeTe CBO6oHNHe YacTn KaTo KpUla IIn MaJIK KpaKa C BpbB.
35 Pa3xna6eTe Dbata BnHTa, nocne OTcTpaHeTe WnHa OT OCTpna Kpa Ha rPnla.
36 HaTnCHeTe 3aoCTpeHna Kpa Ipe3 ueHTbpa Ha MeCOTO, 3a Da N3Je3e OT dpyrata cTpHa.
37 NocTabeTe 1111Ha rPnIa n HaTnCHeTe n DBaTa 1111Ba B KpaIuJaTa Ha MeCOTO.
38 Mecoto ue ce CBne npn roTbeHTo n He Tp6Ba da naHHe OT wuOBeTe, 3aTOBa rHaTnCHeTe do6pe.
39Прндвижete MecOTO Ишшовete NO Гпа,ДOKATO MecOTO CTINГHe ueHTbpa,CleED KOeTO 3aTeHrTe BnHTOBeTe,3a Да Го 3aДьрЖaT.
40 NocTaBete 3aoCTpeHnKpaHn RaPnla B CToiKaT3a RpnI, CneI KoETo CnucHeTe Dpyrna KpaBbB BoDaua OT DpyraTa CTpHa Ha Fyphata.
41 PpOBepeTe daJIH HeIe DOKOCBa BbTpEshocTtHa Hc yPHaTa, KOraTo rpnBc Ce BbpTN.
42ПьзHeTe TaBata noДонHaTa NOДnopa,3aДа уЯВя KaNKte.
43 OctaBeTe BpaTnUkKaTa nOlyoTBopeHa.
44 3aДаиTe Heo6xOДммаТ TeMпратур(a (100-230°C) Upe3 konчeto 3a KoHTpoI Ha TeMпратурata.
45 Ako TemnepaTypata e TBbpe BncoKa, BbHsHocTt a ce crotbn no-6bp3o ot uehtbpa.
46 PpeIparame Bn da roTbTe Ha Hncka Do cpeHa TemnepaTypa.
47 Ako nckaTe BbHnHocTtHa MeCOTo Da e XpynKaBa, yBeneTe TempePaTypaTa KbM KpaHa rotBeHeTo.
48 HactpoTe KOHTpOJa Ha cyphHaTa Ha
49 3aBbptete TaMepa No Nocoka Ha YacOBHkoBaTa CTpeNka Do XeJHaHTo BpeMe.
50 N3noJ3BaIe BnNtata 3a rpn, 3a da n3BaIte rpnla ot yphHaTa.
51 NocTaBeTe KpanuTaHa BnNuaTaNOD CNOTOBeTe B rPnla.
52IpbXTe BnInuTaTa C DBe pbc.
53Повдигнеле леслявастара,зд освобонite Края OT Ворача, спд Koeto Мрд HeTe rрILA наясно,зд освобонite зоctpeни Краи.
54 BnMaTeHNO OTCpaHeTe BnNcaTa n rpnla ot ypHaTa.
55 PpeIparame da ce ynpaxHnTe HAKOLKo nTn, npEi Da 3aNoUHeTe da rotBnTe.
TPIJINIPOIDPbXKA
56 I3kIIOUeTe ypea n ro ocTaBeTe da ce oxlaDi npei Da ro noocntte nn npnpepeTe.
57 NocTeTe BCnUKNIOBbpxHOCTN C uHCTa BnaXHa KbPna.
58 MInTe cBaIaIe Ce cactn C TOnla canyHeHa BOJa, n3PnAkaBte rN do6pe, otceJdaTe n rN OCTaBeTe Da n3CbXHaT.
59 He n3noJ3BaIe Te IeHn Tb6n, CTomAHeHa BbIHa nn CanyHeHn NOJIOJKN.
60 He noctabrayte KOrTo n da e yact OTypeBa B MraJHa MaunHa.
06e3uBETaBaHe
61 Cynotpe6aTa Ha ypeHa, noBbpxHocHTe My ce 3ary6aTcBETA cn.
62 ToBa e Hn36eJHo, 6e3o6uHNo u HЯMa da IOBnIe Ha φyHKuOHnpaHeTo Ha ypeJa.

ОПАЗBAHE HA OKOLHATA CPEДA
3a da ce n36erHaT ekoloruHn n 3dpabHn npo6lemn nopadn haHnue Ha onaChn cy6ctaHn B eIektpnuecknte n eIektpoHHn cToKn, ypeiTe, o6o3NaeHN C To3n CmB0l, He Tp8Ba da ce I3XBbPJIaT 3aeDHO C HecOpTnpaHn O6uHcN O'TnaDbuN, a CneBbDa ca Ce BbPHaT 6paTHO, da ce n3PON3BaT OTHO BO II IN peuKInpaT.

BPEME 3A TOTBEHE IN B3OПАСHОCT HA XPAHNTE
- I3noI3BaIte Te3n BpeMeBn nepNoDi cAmO KaTo opNeHTnpOBbUHN.
- TOTBeTe MeCo, Domaunn n npOn3BoDn (KaIma, uHnueu n dp.),doKaTo npn 6oDbAne note cok 6e3 KpbB. Pnbata ce rotbn, dokaTo MeCTo Do6ne Hnpo3paueh BnD.
Korato roTbnte npedBaPHTeHNO ONaKOBaHn XpaHn, cIeDbaTe BCNUkN yKa3aHnA, nocOueHn Ha onaKOBkata nn eTNKeTa.
XpHa TemnepaTpa XpaHa TemnepaTpa
| Телейко 190-210 °C stadkиш 190-210 °C | |||
| хлajб | 200-220 °C | СВИнско | 190-210 °C |
| касерол | 140-160 °C | Киш/плобова пига | 160-180 °C |
| плейшко | 190-210 °C | Кекс с плобове | 140-160 °C |
| рьба | 170-190 °C | Кураби | 190-220 °C |
| агнeshко | 190-210 °C | пандшина | 160-180 °C |
| целучки | 90-110 °C | йорширский пухинг | 200-220 °C |
| м_LEechен_пухинг | 140-160 °C | ||

Jolal ayblal yblal yll, yall yall yall yll (4
13
(230-100) 28
15
X
alallgall
Jauieill
Jnnae 25
g 16
60 60
.
0 17
aoll 18
19
1
gaa 2a
3 20
121
Jai 22
23
.24
25
.
. 26
14
15
16
17
18
19
5
6
7
8
9
10
11
12
Lg 1
Jy J
J 1
J2
J3
J4
1
A 1
Jglnnnne nnnnnnnnnnnnnnnnnnnnnnnnnnnnnnnnnnnnnnnnnnnnnnnnnnnnnnnnnnnnnnnnnnnnnnnnnnnnnnnnnnnnnnnnnnnnnnnnnnnnnnnnnnnnnnnnn
2
J 3
j 4
75 75
j50 6
j j j j j j j j j j j j j j j j j j j j j j j j j j j j j j j j j j j j j j j j j j j j j j j j j j j j j j j j j j j j
.
8
9
10
11
Aaii jia iai jia jia iaiy 12
13
14
15
16
.
b0a jiaai Jaaui
g 1
J 1
2
.230 3