
KF 1600 EP - Blender DELONGHI - Free user manual and instructions
Find the device manual for free KF 1600 EP DELONGHI in PDF.
| Brand | DeLonghi |
| Model | KF 1600 EP |
| Product type | Electronic blender |
| Jug material | Unbreakable glass |
| Maximum capacity | Three quarters of the jug (do not fill completely) |
| Number of speeds | 14 speeds (1 to 14) |
| Special functions | Auto 3 min, Pulse, Stop, ON/OFF switch |
| Control type | Electronic with buttons and indicator lights |
| Included accessories | Measuring cap/feeder (A1), lid, jug group, blades, motor base |
| Recommended use | Mixing, emulsifying, crushing ice, preparing drinks, soups, sauces |
| Maximum continuous use time | 3 consecutive minutes |
| Pause between cycles | 1 minute |
| Maximum number of cycles | 5 cycles before cooling |
| Automatic cleaning | Auto 3 min function with warm water |
| Manual cleaning | Hand wash accessories (warm soapy water); do not put in dishwasher |
| Safety | Very sharp blades, do not use without lid, do not immerse motor base in water |
| Power supply | See rating plate (standard mains voltage) |
| Repairability | Repairs exclusively by an authorized service center; use original spare parts |
Frequently Asked Questions - KF 1600 EP DELONGHI
User questions about KF 1600 EP DELONGHI
0 question about this device. Answer the ones you know or ask your own.
Ask a new question about this device
Download the instructions for your Blender in PDF format for free! Find your manual KF 1600 EP - DELONGHI and take your electronic device back in hand. On this page are published all the documents necessary for the use of your device. KF 1600 EP by DELONGHI.
USER MANUAL KF 1600 EP DELONGHI
natural_image
Illustration of a blender with a glass of juice and a straw, accompanied by a lemon slice (no text or symbols)Instructions for use
Mode d'emploi
Gebrauchsanweisung
A) If your appliance comes fitted with a plug, it will incorporate a 13 Amp fuse. If it does not fit your socket, the plug should be cut off from the mains lead, and an appropriate plug fitted, as below.
WARNING: Very carefully dispose of the cut off plug after removing the fuse: do not insert in a 13 Amp socket elsewhere in the house as this could cause a shock hazard. With alternative plugs not incorporating a fuse, the circuit must be protected by a 15 Amp fuse. If the plug is a moulded-on type, the fuse cover must be re-fitted when changing the fuse using a 13 Amp Asta approved fuse to BS 1362. In the event of losing the fuse cover, the plug must NOT be used until a replacement fuse cover can be obtained from your nearest electrical dealer.
The colour of the correct replacement fuse cover is that as marked on the base of the plug.
B) If your appliance is not fitted with a plug, please follow the instructions provided below:
IMPORTANT
The wires in the mains lead are coloured in accordance with the following code:
Blue: Neutral
Brown: Live
As the colours of the wires in the mains lead of this appliance may not correspond with the coloured markings identifying the terminals in your plug, proceed as follows:
The wire which is coloured blue must be connected to the terminal which is marked with the letter N or coloured black.
The wire which is coloured brown must be connected to the terminal which is marked with the letter L or coloured red.
ELECTRICAL CONNECTION (U.K. ONLY) (MOD. KF1600EP)
A) If your appliance comes fitted with a plug, it will incorporate a 13 Amp fuse. If it does not fit your socket, the plug should be cut off from the mains lead, and on appropriate plug fitted, as below. warning: Very carefully dispose of the cut off plug after removing the fuse: do not insert in a 13 Amp socket elsewhere in the house as this could cause a shock hazard. With alternative plugs not incorporating a fuse, the circuit must be protected by a 15 Amp fuse. If the plug is a moulded-on type, the fuse cover must be re-fitted when changing the fuse using a 13 Amp Asta approved fuse to BS 1362. In the event of losing the fuse cover, the plug must NOT be used until a replacement fuse cover can be obtained from your nearest electrical dealer. The colour of the correct replacement fuse cover is that as marked on the base of the plug.
B) If your appliance is not fitted with a plug, please follow the instructins provided below:
WARNING - THIS APPLIANCE MUST BE EARTHED IMPORTANT
The wires in the mains lead are coloured in accordance with the following code:
Green and yellow Earth
Blue Neutral
Brown Live

As the colours of the wires in the mains lead may not correspond with the coloured markings identifying the terminals in your plug, proceed as follows:
The green and yellow wire must be connected to the terminal in the plug marked with the letter E or the earth symbol
or coloured green or green and yellow.
The blue wire must be connected to the terminal marked with the letter N or coloured black.
The brown wire must be connected to the terminal marked with the letter L or coloured red.
ITALIANO
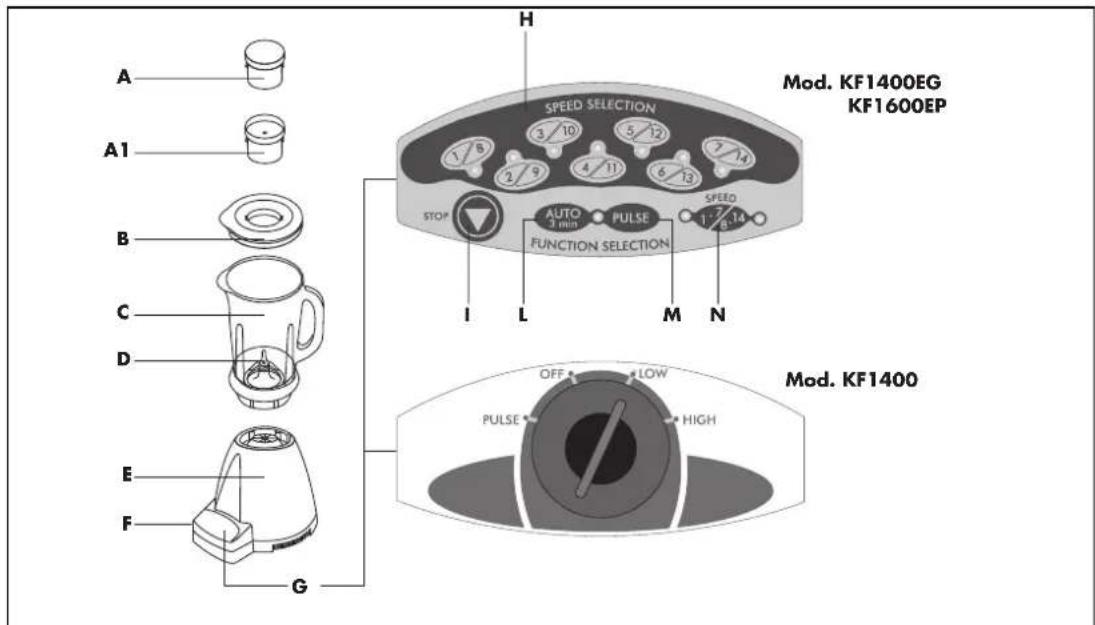
A. Misurino (KF1400)
F.Interruttore ON/OFF (solo mod. KF1400EG/ KF1600EP)
A. Measuring cup (KF1400)
A1. Measuring cup/feeder (with hole) (KF1400/KF1600EP)
B. Lid
C. Blender jar
D. Blade
E. Motor
F.ON/OFF switch (only model KF1400EG/KF1600EP)
G. Control Panel
H. Power regulating buttons and
warning light
I. OFF button
L. Auto 3 minute button
M. Pulse button
N. High power regulating switch and warning lights
NEDERLANDS
A. Moatbeker (KF1400)
F. ON/OFF-schakelaa (alleen model KF1400EG/ KF1600EP)
G. Bedieningspaneel
natural_image
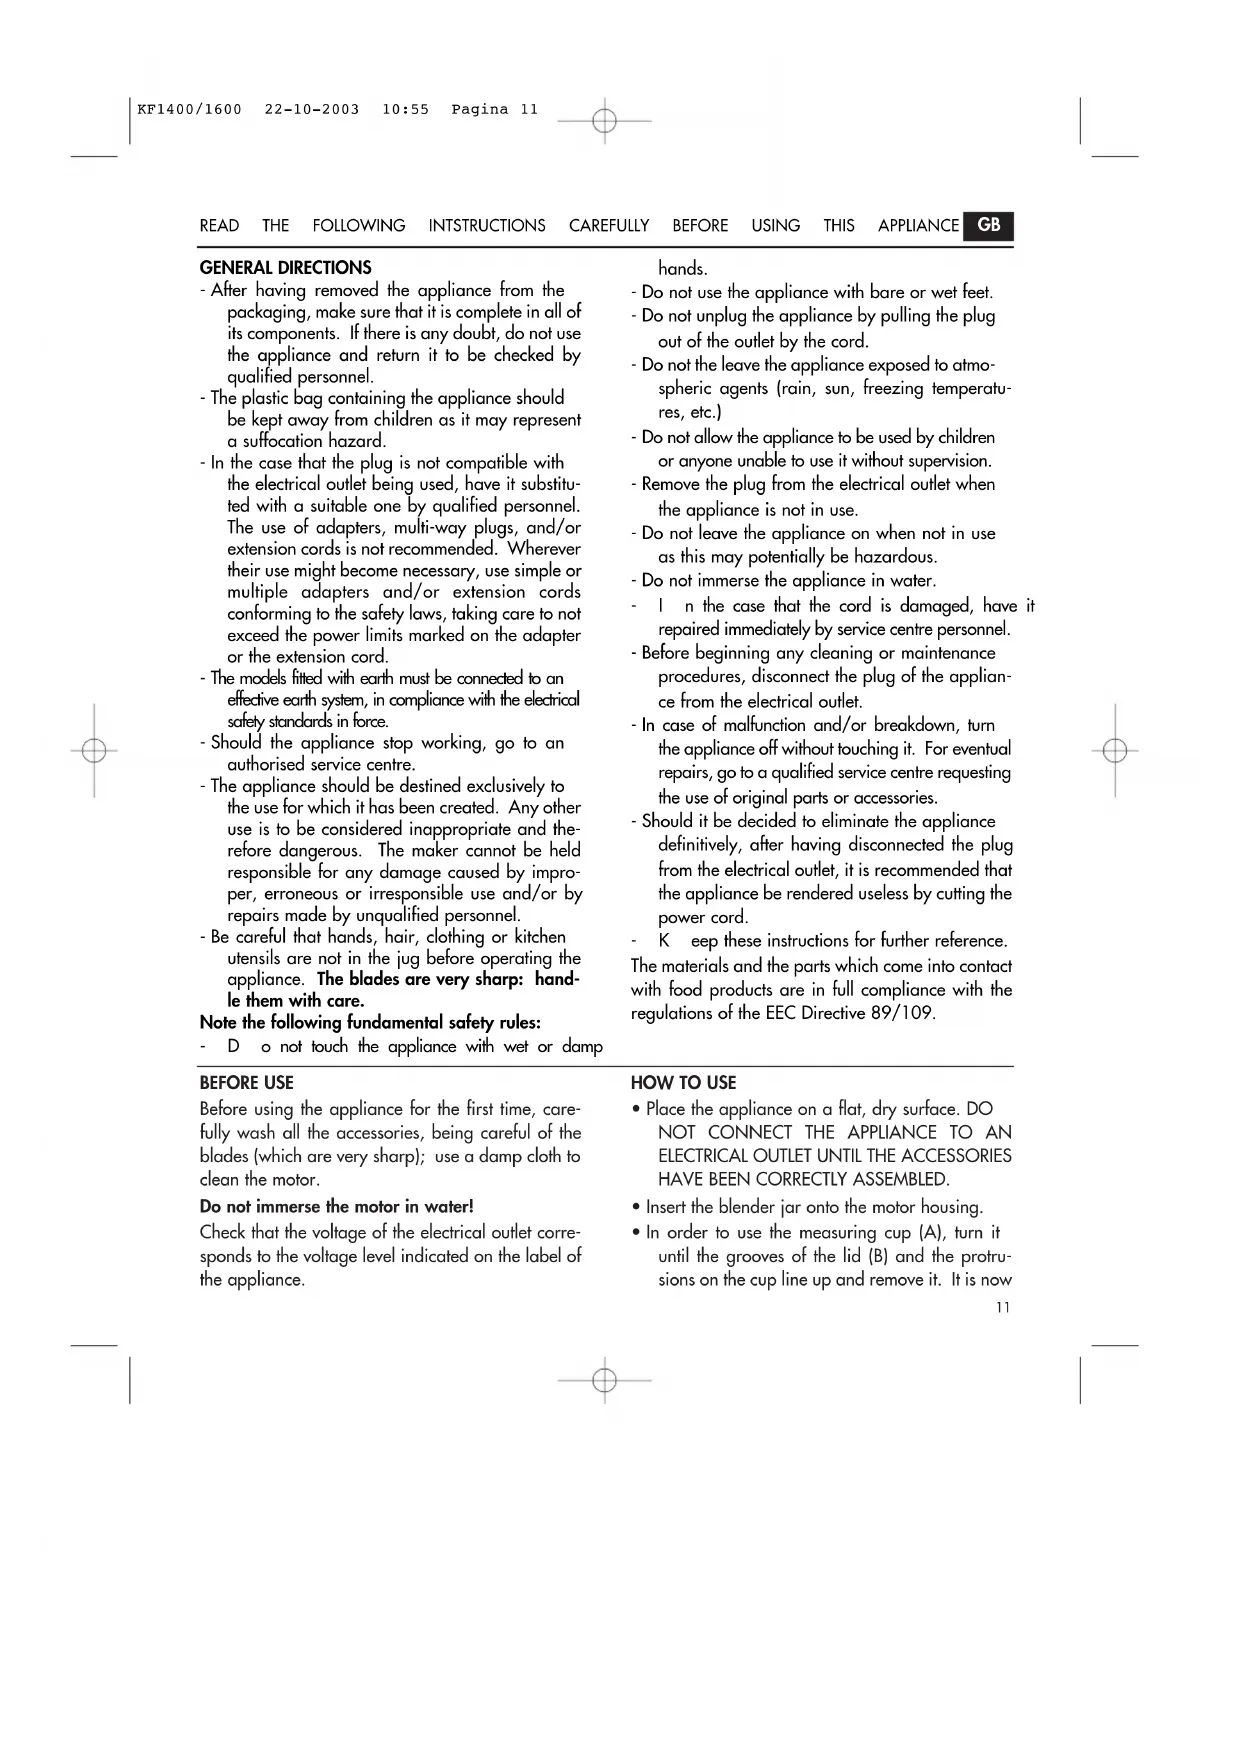
Illustration of two cooking utensils: one pouring oil from a container, the other adding a spatula (no text or symbols)- After having removed the appliance from the packaging, make sure that it is complete in all of its components. If there is any doubt, do not use the appliance and return it to be checked by qualified personnel.
- The plastic bag containing the appliance should be kept away from children as it may represent a suffocation hazard.
- In the case that the plug is not compatible with the electrical outlet being used, have it substituted with a suitable one by qualified personnel. The use of adapters, multi-way plugs, and/or extension cords is not recommended. Wherever their use might become necessary, use simple or multiple adapters and/or extension cords conforming to the safety laws, taking care to not exceed the power limits marked on the adapter or the extension cord.
- The models fitted with earth must be connected to an effective earth system, in compliance with the electrical safety standards in force.
- Should the appliance stop working, go to an authorised service centre.
- The appliance should be destined exclusively to the use for which it has been created. Any other use is to be considered inappropriate and therefore dangerous. The maker cannot be held responsible for any damage caused by improper, erroneous or irresponsible use and/or by repairs made by unqualified personnel.
- Be careful that hands, hair, clothing or kitchen utensils are not in the jug before operating the appliance. The blades are very sharp: handle them with care.
Note the following fundamental safety rules:
- D o not touch the appliance with wet or damp
hands.
- Do not use the appliance with bare or wet feet.
- Do not unplug the appliance by pulling the plug out of the outlet by the cord.
- Do not the leave the appliance exposed to atmospheric agents (rain, sun, freezing temperatures, etc.)
- Do not allow the appliance to be used by children or anyone unable to use it without supervision.
- Remove the plug from the electrical outlet when the appliance is not in use.
- Do not leave the appliance on when not in use as this may potentially be hazardous.
-
Do not immerse the appliance in water.
-
In the case that the cord is damaged, have it repaired immediately by service centre personnel.
- Before beginning any cleaning or maintenance procedures, disconnect the plug of the appliance from the electrical outlet.
- In case of malfunction and/or breakdown, turn the appliance off without touching it. For eventual repairs, go to a qualified service centre requesting the use of original parts or accessories.
- Should it be decided to eliminate the appliance definitively, after having disconnected the plug from the electrical outlet, it is recommended that the appliance be rendered useless by cutting the power cord.
- Keep these instructions for further reference. The materials and the parts which come into contact with food products are in full compliance with the regulations of the EEC Directive 89/109.
BEFORE USE
Before using the appliance for the first time, carefully wash all the accessories, being careful of the blades (which are very sharp); use a damp cloth to clean the motor.
Do not immerse the motor in water!
Check that the voltage of the electrical outlet corresponds to the voltage level indicated on the label of the appliance.
HOW TO USE
- Place the appliance on a flat, dry surface. DO NOT CONNECT THE APPLIANCE TO AN ELECTRICAL OUTLET UNTIL THE ACCESSORIES HAVE BEEN CORRECTLY ASSEMBLED.
- Insert the blender jar onto the motor housing.
- In order to use the measuring cup (A), turn it until the grooves of the lid (B) and the protrusions on the cup line up and remove it. It is now
possible to use it as a measuring cup and also add ingredients to the blender jar through the hole on the lid while working (while the appliance is turned off).
- Pour the ingredients into the blender jar.
This operation may be done the following ways:
- removing the entire lid (A+B)
- inserting the lid (A) without the measuring cup/feeder (A/A1)
3.(only electronic models) using the feeder A1
as a funnel. The feeder A1 can be used both in the original position and upside down, in the case that larger quantities of liquids are added.

natural_image
Illustration of two cooking machines with oil and a spatula, separated by a diagonal line (no text or symbols)- To use the measu-
ring cup/feeder (A/A1), turn it in a counterclockwise direction until the grooves of the lid (B) and the protrusions on the cup line up and remove it.
Attention:
- Do not use the appliance for more than 3 minutes consecutively. Pause for a minute and then continue to use per max 5 cycles. After that leave the appliance cool down.
- Cut solid food into cubes and add water.
- During use, make sure that the lid is properly inserted.
Mechanical model KF1400:
- In order to begin the operation of blending the ingredients, simply turn the dial to select the desired speed (LOW or HIGH).
When the ingredients have reached the desired consistency, turn the dial back to the OFF position. - The PULSE position is used to operate the appliance at the maximum speed, allowing better control over short processing.
Electronic model KF1400EG/KF1600EP:
- T turn on the appliance by pressing the switch (F) found on the side of the control panel. The left hand warning light of the speed indicator (N) will turn on and the light next to the speed 1 will flash.
- Select the speed from 1 to 14 by pressing the relative button. The higher the number selected, the higher the speed of the blades.
- The appliance is equipped to function at speeds from 1 to 7. If it is desired to have the appliance function at speeds 8 to 14, press the high power regulating switch (N). The relative right hand warning light will turn on.
- When the ingredients have reached the desired consistency, press the STOP button (I).
Use of the AUTO 3 min button.
This function is useful for the processing items which require a longer time or for cleaning the blender jar.
- Press the AUTO 3 min. button (L). The warning light between the AUTO 3 min. (L) and PULSE (M) buttons next to the speed 1 will begin to flash.
- Select the desired speed among the 14 available. The warning light of the selected speed will turn on and the appliance will begin to operate.
- The blender will operate intermittently for three minutes and then will shut off.
- T o interrupt before the three minutes are up, press the STOP button. It is possible to change the selected speed while processing, thereby prolonging for three more minutes the operation of the appliance.
Toclean the jug, proceed as follows:
- Pour a cupful of lukewarm or hot water into the blender jar.
- Press the AUTO 3 min. (L) button. The warning light between the AUTO 3 min. (L) and PULSE (M) buttons and the warning light next to the 1 button will begin to flash.
- Select the speed 7 or 14. The warning light of the selected speed will turn on and the appliance will begin to operate.
- When the appliance shuts off, empty the blender jar and dry it thoroughly.
Use of the PULSE (M)
The PULSE button allows for better control during short processing.
- Press the PULSE (M) button. The warning light between the AUTO 3 min. (L) and PULSE (M) buttons will turn on.
- Select the desired speed. The appliance will operate as long as the button remains pressed.
CLEANING OF THE APPLIANCE
Never immerse the motor housing in water.
- All of the remains of the ingredients must be removed with a spatula. In the models having a plastic blender jar, use a rubber spatula so as to not scratch the surface.
- Pour lukewarm water into the blender jar, filling to the halfway point. Operate the appliance for a few seconds then empty the jar.
Repeat the operation if possible.
For electronic models, it is possible to clean the appliance automatically, as described in the paragraph "how to use the AUTO 3 min. button".
The blender jar and all the plastic components should not be washed in the dishwasher or in boiling water.
- Remove the blender jar, the lid, and the measuring cup before washing them in lukewarm water and mild detergent. The rinse and dry thoroughly.
- The glass blender jar in the model KF1400EG and KF1600EP is made of unbreakable glass of the highest quality to assure the maximum resistance. In any case, it is advisable to take the necessary precautions in order to avoid violent knocks.
- Use a damp cloth or sponge to clean the motor housing and the electrical cord. Dry thoroughly with a soft cloth.
- W rap the cord carefully around the base of the motor housing.
SUGGESTIONS FOR USE
1 General
- In order to get results and not risk that the ingredients spill out of the blender jar, add the ingredients to the jug a little at a time.
- Do not fill the jar more than _full – the movement of the blades will increase the volume of the ingredients in the jug. The recipes which use large quantities of
ingredients should be processed in batches.
- Pour in the liquid ingredients before the solid ones, as long as the recipe doesn't say otherwise. The liquid will facilitate the processing and will allow for the use of lower speed. Always add a cup of water before processing ice.
- Blend for 5 – 30 seconds and then check the consistency. Continue to process the ingredients in this way until the desired consistency is obtained. Be sure to not process the ingredients too much; this would cause a loss of consistency to the entire recipe.
• Always use the blender with the lid well inserted. - DO NOT remove the blender jar from the motor housing while the appliance is in use.
- In order to avoid the possibility of injury to the user or damage to the appliance, do not insert hands or utensils into the jar while the appliance is operating. It is possible to utilise a spatula while the appliance is turned off.
2 Solid ingredients
- It is necessary to pay particular attention during the processing of fine ingredients. In this case, it is necessary to interrupt the processing from time to time, take off the lid and scrape the ingredients down off the sides of the jar and the blades. Then reinsert the lid and continue processing. If the processing becomes lengthy in this way, select a higher speed.
- To add solid ingredients to the blender jar, remove the measuring cup from the lid and add them a little at a time through the hole in the lid. The vegetable and cheese ingredients must always be cut into cubes before being added to the jar.
3 Hot preparations
It is always necessary to remove the measuring cup from the lid before beginning the preparation of hot recipes.
- Slowly add the hot ingredients, maximum 2 cups at a time, through the hole in the lid.
RECIPE COLLECTION
Practical and convenient, your appliance will allow you to prepare quickly and with excellent results, creams, mayonnaise, sauces, frittatas, pancakes, fillings for vegetables, frappès, drinks and cocktails of every kind. In this recipe collection there are some ideas for using your appliance in diverse ways. These recipes should be considered a point of departure and surely your own creativity will add to the uses and preparations. In the recipes which follow, the speeds written in numbers correspond to those of the electronic models (KF1400EG/KF1600EP), while the power indicators written in full refer to the mechanical model (KF1400).
WHIPPED CREAM
• 200 ml of whipping cream
Pour the liquid cream into the blender jar and operate at a speed 9 (HIGH) for approximately 20 - 30 seconds.
MASCARPONE CREAM
• 250 gr. mascarpone cheese
• 3 eggs • 50 gr. sugar
• 1/4 l. whipped cream
Put all the ingredients (except the whipped cream) into the blender jar and operate the appliance at speed 4 (LOW) until the mixture is light. Pour the cream into small serving bowls and garnish with the whipped cream (whipped as described in the preceding recipe). Keep the dessert chilled in the refrigerator a few hours before serving
MAYONNAISE
• 1 whole egg • oil
• a tablespoon of mustard • a pinch of salt
• a few drops of lemon juice
Put the egg, the mustard, the lemon juice and the salt in the blender jar and operate on speed 5 (LOW) for a few seconds. Fill the measuring cup with oil and at speed 5 (LOW) continue to mix (adding oil a little at a time) until the mayonnaise becomes firm. Ideal with poached fish.
TUNA FISH SAUCE
• 120 gr. tuna packed in oil
• 150 gr. mayonnaise
• a handful of capers
Put all the ingredients into the blender jar and process at speed 3 (LOW) for a few seconds. Ideal for the preparation of vitello tonnato..
PINK SAUCE
- 50 gr. mayonnaise • 10 gr. ketchup
• 4 drops of Worcestershire sauce
Put all the ingredients together in the blender jar and operate at speed 3 (LOW) for a few seconds. Ideal with French fried potatoes and club sandwiches.
OMELET WITH ONION
• 6 eggs • 2 tablespoons of milk
• 1 onion, finely diced • 2 tablespoons of oil
• salt
Blend the eggs in the blender jar at speed 2 (LOW) for approximately 30 seconds with the milk and the salt. Place a frying pan on the stove with the oil and sauté the onion. Pour the mixture into the frying pan and let the eggs cook until firm, taking care that they don't stick to the pan.
CREPE BATTER
• 100 gr. flour • 1 dl. milk
• 4 whole eggs • salt
Put into the blender jar all the ingredients and operate the appliance at speed 2 (LOW) for approximately 30 seconds. The batter should be quite creamy.
ZUCCHINI (COURGETTES) WITH TUNA
• 4 zucchini • 1
- 120 gr. tuna packed in oil
- 1 can of peeled tomatoes
• 100 gr. grated cheese
Cut the zucchini length-wise in half, and with a spoon, scoop out the pulp, being careful not to break them. Place this pulp in the blender jar along with the egg, the tuna, the grated cheese, the salt and the parsley and operate the appliance at speed 14 (HIGH) until the mixture seems homogeneous. Cut the zucchini in half cross-wise and stuff them with the mixture. Place them in a buttered baking dish. In a bowl combine a few spoonfuls of water, two spoonfuls of oil and the tomatoes, broken up with fork and add to the baking dish. Distribute a few pieces of butter on top of the zucchini and place in a preheated oven for about 40 minutes. These zucchini are delicious at room temperature.
F R A P P É
• 1 apple • 1 dl. milk
Cut the apple into small pieces and place in the blender jar with the milk. Blend it all at speed 13 (HIGH) for about 1 minute. Naturally, any type of fruit desired may be substituted for the apple.
S G R O P P I N O
• 100 gr. lemon sherbet ice cream
- 1/2 glass of sparkling white wine
- 1 shot of vodka
Place all the ingredients into the blender jar and blend at speed 9 (HIGH) for about 1 minute, until the mixture is homogenous.
ITALIAN ICE
- Ice - flavoured syrup
Pour the ice into the blender jar and operate the PULSE switch at speed 14 (HIGH) until all the ice is chopped uniformly. Put the ice into a glass and add the syrup.
F LIRE ATTENTIVEMENT LE PRÉSENT MODE D'EMPLOI AVANT D'UTILISER L'APPAREIL
AVERTISSEMENTS GÉNÉRAUX
natural_image
Illustration of two cooking steps: oil being poured into a blender with a spatula (no text or symbols)natural_image
Illustration of two cooking funnels with oil being poured into them, separated by a diagonal line (no text or symbols)Elektronik model KF1400EG/KF1600EP:
natural_image
Illustration of two cooking methods: oil being poured into a blender with a brush (no text or symbols)Opgelet:
natural_image
Illustration of two cooking steps: pouring oil from a bottle onto a blender, with no text or symbols present.natural_image
Illustration of two cooking utensils: one pouring oil from a container, the other adding a spatula (no text or symbols)natural_image
Illustration of two cooking steps: pouring oil from a can into a blender with a spatula (no text or symbols)Προσοχή:
natural_image
Illustration of two cooking steps: one pouring oil from a container, the other adding a spatula to a blender (no text or symbols)Elektronik model KF1400EG/KF1600EP:
O P P S K R I F T E R
T U N F I S K S A U S
• 120 gram tunfisk i olje
• 150 gram majones
- en håndfull kapers
natural_image
Illustration of two cooking pots with oil being poured into them, separated by a diagonal line (no text or symbols)Mekanisk model KF1400:
Elektronislk model KF1400EG/KF1600EP:
natural_image
Illustration of two cooking steps: oil being poured into a blender with a spatula (no text or symbols)natural_image
Illustration of two cooking steps: pouring oil from a container to a lid, separated by a diagonal line (no text or symbols)natural_image
Illustration of two cooking machines with oil and a spatula, separated by a diagonal line (no text or symbols)natural_image
Illustration of two cooking steps: pouring oil from a can into a blender with a spatula (no text or symbols)Figyelem!
natural_image
Illustration of two cooking utensils in a blender, one pouring oil from a can into the other (no text or symbols)Pozor:
natural_image
Illustration of two cooking machines with oil being poured into them, separated by a diagonal line (no text or symbols)
- IMPORTANT
- ELECTRICAL CONNECTION (U.K. ONLY) (MOD. KF1600EP)
- WARNING - THIS APPLIANCE MUST BE EARTHED IMPORTANT
- ITALIANO
- NEDERLANDS
- hands.
- BEFORE USE
- Do not immerse the motor in water!
- HOW TO USE
- Attention:
- Mechanical model KF1400:
- Electronic model KF1400EG/KF1600EP:
- Use of the AUTO 3 min button.
- Toclean the jug, proceed as follows:
- Use of the PULSE (M)
- CLEANING OF THE APPLIANCE
- SUGGESTIONS FOR USE
- RECIPE COLLECTION
- WHIPPED CREAM
- MASCARPONE CREAM
- MAYONNAISE
- TUNA FISH SAUCE
- PINK SAUCE
- OMELET WITH ONION
- CREPE BATTER
- ZUCCHINI (COURGETTES) WITH TUNA
- F R A P P É
- S G R O P P I N O
- ITALIAN ICE
- F LIRE ATTENTIVEMENT LE PRÉSENT MODE D'EMPLOI AVANT D'UTILISER L'APPAREIL
- AVERTISSEMENTS GÉNÉRAUX
- Elektronik model KF1400EG/KF1600EP:
- Opgelet:
- Προσοχή:
- O P P S K R I F T E R
- T U N F I S K S A U S
- Mekanisk model KF1400:
- Elektronislk model KF1400EG/KF1600EP:
- Figyelem!
- Pozor:
Brand : DELONGHI
Model : KF 1600 EP
Category : Blender