
KF 8170 H - Blender DELONGHI - Free user manual and instructions
Find the device manual for free KF 8170 H DELONGHI in PDF.
| Brand | DeLonghi |
| Model | KF 8170 H |
| Product type | Blender with coffee grinder |
| Power supply | 220-240 V ~ 50/60 Hz |
| Speeds | Variable with Pulse function (P) |
| Bowl capacity | Glass bowl (approx. 1.5 L) |
| Coffee grinder | Separate bowl for coffee beans, max capacity: half of the bowl |
| Pulse function | Intermittent press for precise control |
| Maximum continuous use | 1 minute, then 4-minute pause, max 5 cycles |
| Maintenance and cleaning | Bowl and accessories washable with warm water; motor unit wiped with a damp cloth |
| Dishwasher | Not recommended for bowl and plastic parts |
| Safety | Do not immerse motor unit; do not use empty; sharp blades |
| Spare parts | Available from authorized after-sales service (original) |
| Repairability | Contact an authorized service center |
| General information | 20-page user manual, includes recipes |
Frequently Asked Questions - KF 8170 H DELONGHI
User questions about KF 8170 H DELONGHI
0 question about this device. Answer the ones you know or ask your own.
Ask a new question about this device
Download the instructions for your Blender in PDF format for free! Find your manual KF 8170 H - DELONGHI and take your electronic device back in hand. On this page are published all the documents necessary for the use of your device. KF 8170 H by DELONGHI.
USER MANUAL KF 8170 H DELONGHI
A) If your appliance comes fitted with a plug, it will incorporate a 13 Amp fuse. If it does not fit your socket, the plug should be cut off from the mains lead, and on appropriate plug fitted, as below. warning: Very carefully dispose of the cut off plug after removing the fuse: do not insert in a 13 Amp socket elsewhere in the house as this could cause a shock hazard. With alternative plugs not incorporating a fuse, the circuit must be protected by a 15 Amp fuse. If the plug is a moulded-on type, the fuse cover must be re-fitted when changing the fuse using a 13 Amp Asta approved fuse to BS 1362. In the event of losing the fuse cover, the plug must NOT be used until a replacement fuse cover can be obtained from your nearest electrical dealer. The colour of the correct replacement fuse cover is that as marked on the base of the plug.
B) If your appliance is not fitted with a plug, please follow the instructins provided below:
WARNING - THIS APPLIANCE MUST BE EARTHED IMPORTANT
The wires in the mains lead are coloured in accordance with the following code:
Green and yellow Earth Blue Neutral Brown Live

As the colours of the wires in the mains lead may not correspond with the coloured markings identifying the terminals in your plug, proceed as follows:
The green and yellow wire must be connected to the terminal in the plug marked with the letter E or the earth symbol ± or coloured green or green and yellow.
The blue wire must be connected to the terminal marked with the letter N or coloured black.
The brown wire must be connected to the terminal marked with the letter L or coloured red.
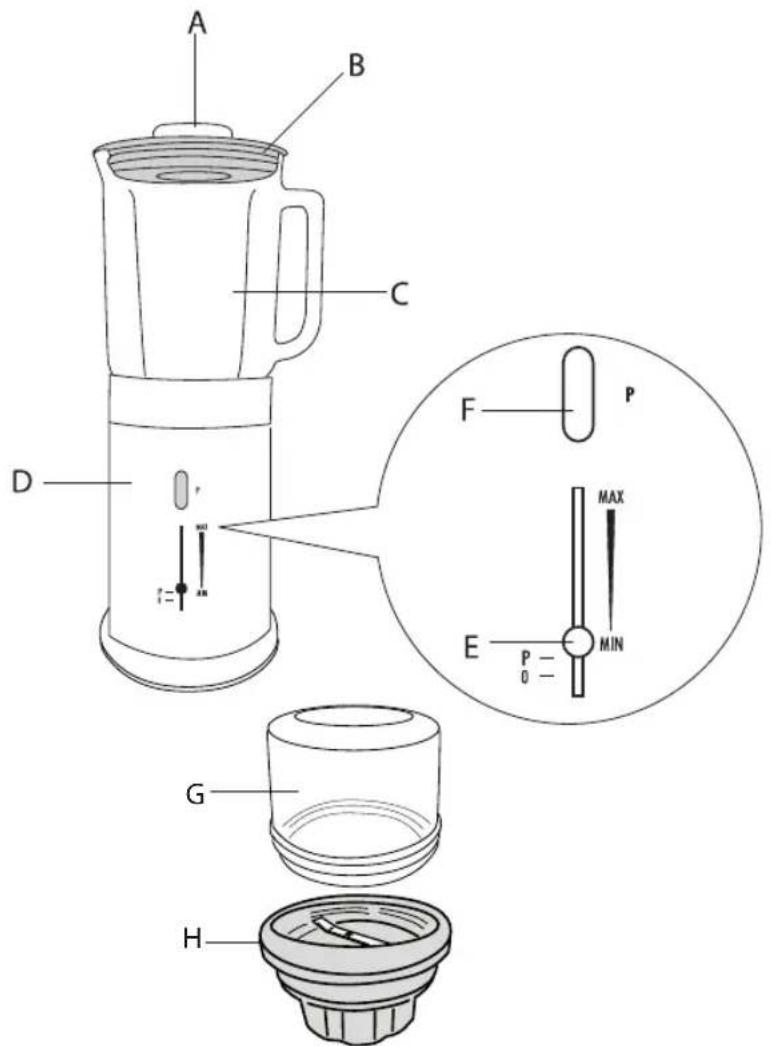
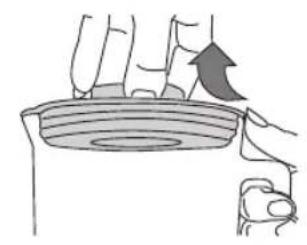
fig.1
fig.2
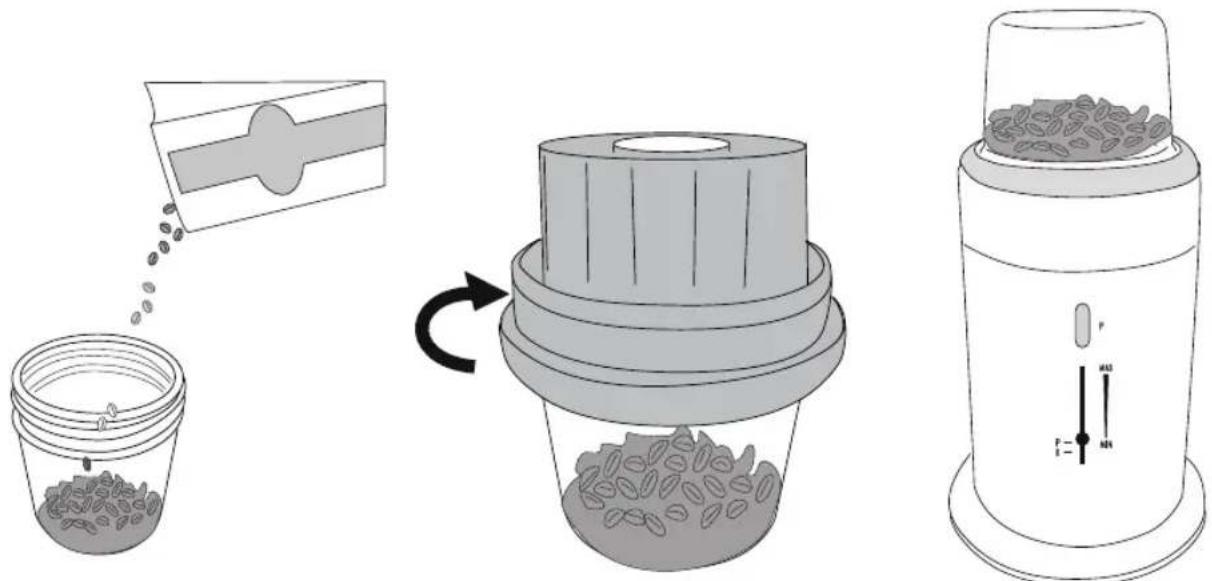
fig. 3 fig. 4 fig. 5
GENERALWARNINGS
- After removing the packaging, make sure the product is complete and undamaged. If in doubt, do not use the appliance and contact a qualified professional only.
- The plastic bag containing the product must not be left within reach of children as it represents a potential hazard.
- If the plug fitted to the appliance does not match the power socket, have the socket replaced with a suitable type by a qualified professional. The use of adapters, multiple sockets and/or extensions is not recommended. If their use is unavoidable, only adapters, multiple sockets and extensions complying with current safety standards and regulations should be used, taking care not to exceed the power limit indicated on the adapter and/or extension.
- Earthed models must be connected to an efficient earth connection as specified by current electrical safety standards and regulations.
- In the event of malfunction, contact an authorised service centre only.
- The appliance must be used only for those purposes for which it was specifically designed. Any other use is considered improper and thus dangerous. The manufacturer is not liable for damage caused by inappropriate, incorrect or irresponsible use of the appliance and/or repairs carried out by unqualified persons.
- Make sure that hands, hair, clothing and kitchen utensils are clear of the container before starting the appliance. The blades can cut. Handle with care.
Special attention must be paid to the following fundamental safety rules:
-
NEVER use the blender empty.
-
Never touch the appliance with wet or damp hands.
- Never use the appliance with bare or damp feet.
- Never unplug the appliance by pulling the power cable.
- Protect the appliance from atmospheric agents (rain, sun, frost, etc).
- The appliance is not intended for use by persons (including children) with reduced physical, sen
sory or mental capabilities, or lack of experience and knowledge, unless they have been given supervision or instruction concerning use of the appliance by a person responsible for their safety. Children should be supervised to ensure that they do not play with the appliance.
- Unplug the appliance from the mains socket when not in use.
- Never leave the appliance on unnecessarily, as it is a potential source of danger.
- Never immerse the appliance in water.
- If the power cable is damaged, it must be replaced by the manufacturer or an authorised service centre to avoid all risk.
- Before cleaning or servicing, disconnect the appliance by unplugging from the mains.
- If the appliance breaks down or malfunctions, turn it off. Do not tamper. For any repairs, contact an authorised service centre only and insist on the use of original spare parts and accessories.
- When the appliance is to be discarded, after unplugging from the mains, cut the cable to make the appliance unusable.
- Save these instructions carefully for future reference.
- Never pour boiling hot liquids into the jar.
Materials and accessories coming into contact with food conform to European regulation no. 1935/2004
Important information for correct disposal of the product in accordance with EC Directive 2002/96/EC.

At the end of its working life, the product must not be disposed of as urban waste. It must be taken to a special local authority differentiated waste collection centre or to a dealer providing this service. Disposing of a household appliance separately avoids possible negative consequences for the environment and
health deriving from inappropriate disposal and enables the constituent materials to be recovered to obtain significant savings in energy and resources. As a reminder of the need to dispose of household appliances separately, the product is marked with a crossed-out wheeled dustbin.
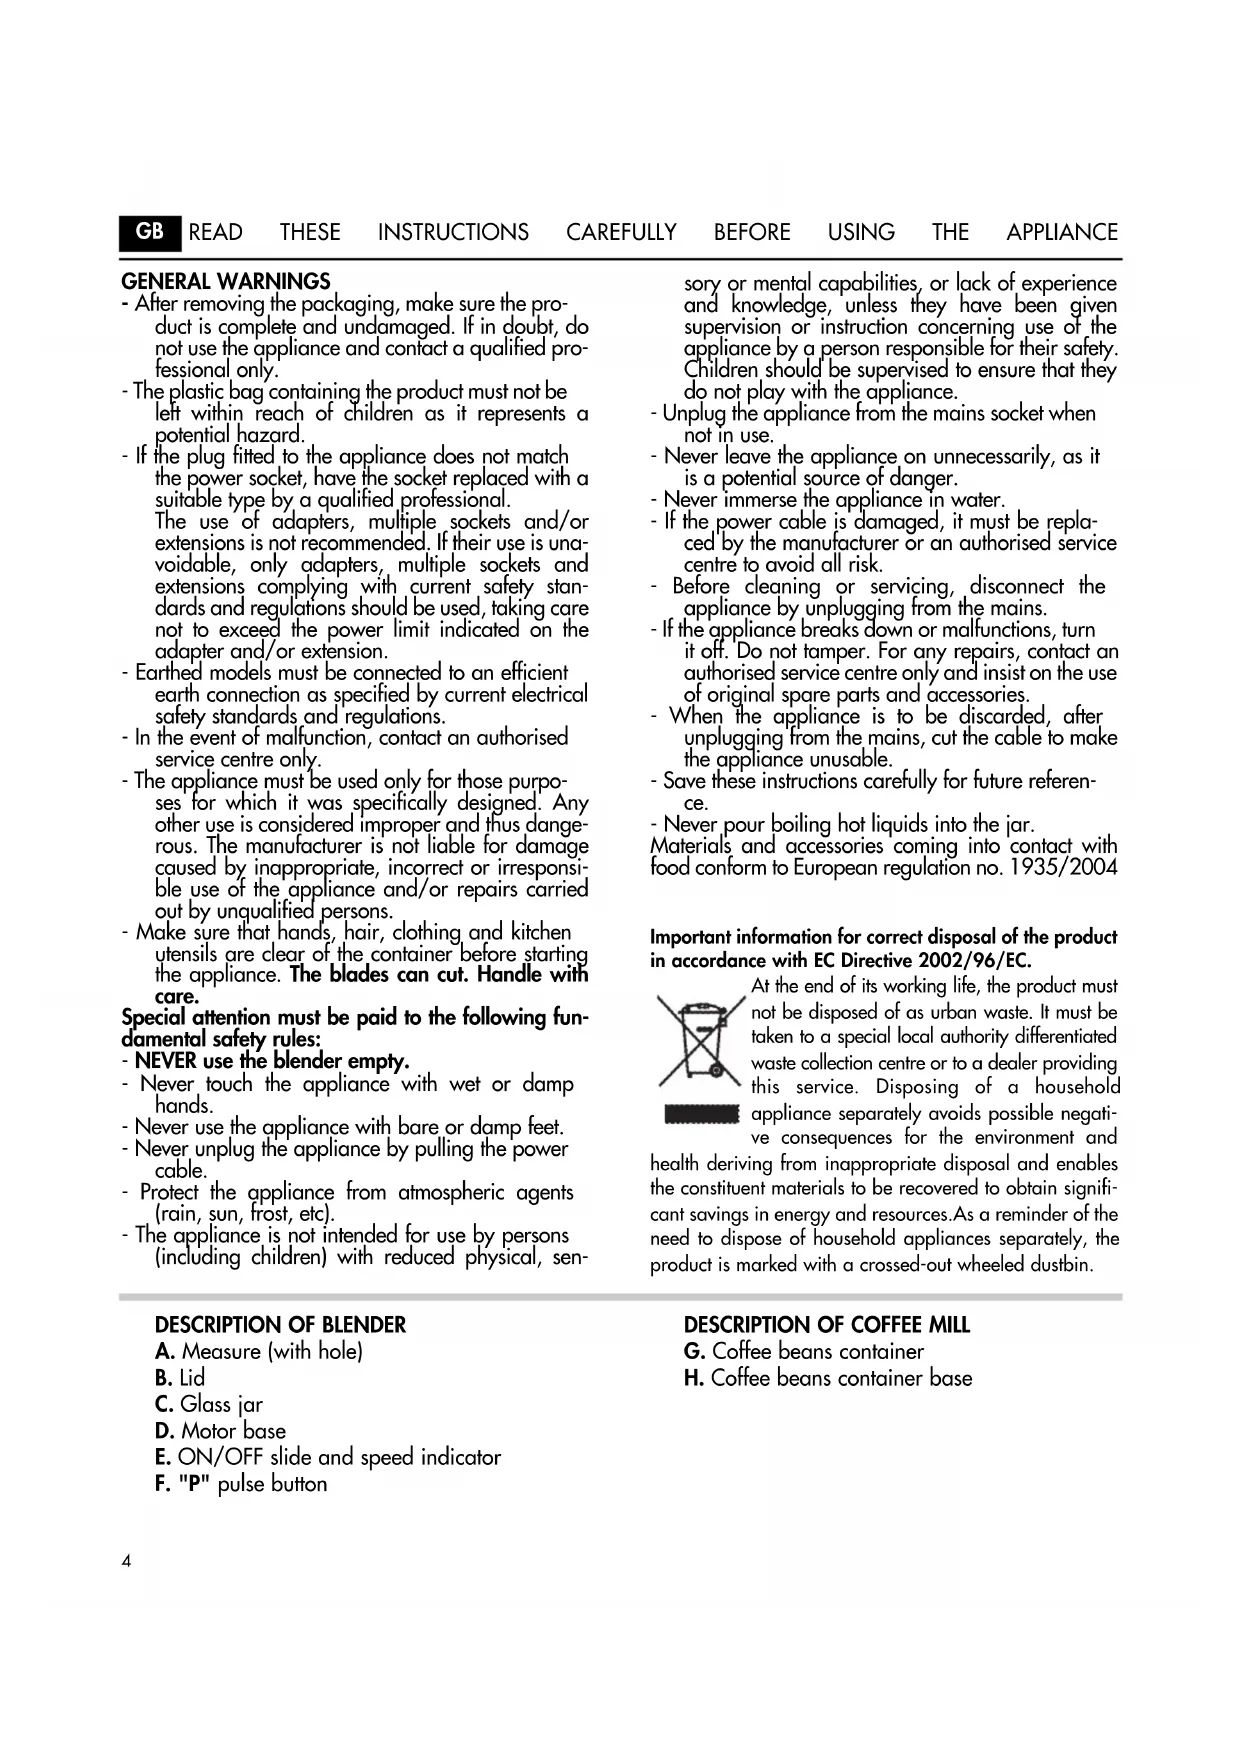
DESCRIPTION OF BLENDER
A. Measure (with hole)
B. Lid
C. Glass jar
D. Motor base
E. ON/OFF slide and speed indicator
F. "P" pulse button
DESCRIPTION OF COFFEE MILL
G. Coffee beans container
H. Coffee beans container base
BEFORE USE
Before using the appliance for the first time, wash all accessories thoroughly. Take care when handling the blades as they are sharp. Wipe the motor base with a damp cloth.
Never immerse the motor base in water!
Check that the mains supply voltage corresponds to the voltage indicated on the rating plate.
HOW TO USE THE BLENDER
- PLACE THE APPLIANCE ON A DRY FLAT SURFACE. DO NOT PLUG THE APPLIANCE INTO THE MAINS UNTIL ALL ACCESSORIES HAVE BEEN CORRECTLY FITTED.
- Place the blender jar on the motor base.
- Pour the ingredients into the jar. This may be done by:
- Removing the entire lid (A + B) by rotating anticlockwise;
- Using the lid (B) (fig. 2);
- The appliance is supplied with a handy measure (A) with a hole for adding, for example, drops of flavouring or essence without opening the lid. If you turn the measure (A) upside down and close the hole, it can also be used as a measure for oil or similar.
Important:
Never use the appliance for more than 1 minute consecutively. Pause for 4 minutes between one cycle and the next and use for a maximum of five cycles. The appliance must then be left to cool down.
- Cut solid food into cubes and add water.
- Place the lid (B) on the jar.
- Plug into the mains.
- To start processing the ingredients, just move the slide (E) to select the desired speed. When the ingredients have reached the required consistency, move the slide back to the (O) position.
- Before cleaning, always unplug from the mains.
USING THE "P" FUNCTION
The "P" (pulse) function improves control for short periods of processing.
Position the slide (E) in the "P" position and press the button (F) intermittently until you have completed processing.
The appliance functions while the (F) button is pressed.
CLEANING THE APPLIANCE
NEVER IMMERSE the motor base in water!
Make sure the appliance is unplugged from the mains socket.
- Remains of the ingredients being processed must be removed with a spatula.
- Half fill the blender jar with lukewarm water. Operate the appliance for a few seconds then empty the jar. Repeat the operation if possible.
The blender jar and all plastic components must not be washed in the dishwasher or in boiling water.
Take care when handling the glass jar to avoid violent impact.
For more thorough cleaning, the base of the jar can be removed by turning the ring on the bottom. After cleaning, replace the base and screw on.
- Clean the motor base and power cable with a damp cloth or sponge. Dry thoroughly with a soft cloth.
- Wrap the power cable carefully around the bottom of the motor base.
TIPS
1. General
- Add the ingredients to the jar a little at a time for best results and to avoid them overflowing.
- Do not fill the jar more than two thirds full. The movement of the blades will increase the volume of the ingredients. Recipes using large quantities of ingredients should be processed in batches.
- Unless the recipe specifies otherwise, add liquid ingredients before solid ingredients. The liquid will facilitate processing and allow you to use a slower speed. Always add a cup of water before processing ice.
- Blend for 5 - 30 seconds then check the consistency. Continue this procedure until the desired consistency is obtained. Do not over process the ingredients as this would change the consistency of the recipe.
Always use the blender with the lid firmly on. - NEVER remove the jar from the motor base while the appliance is in operation.
- To avoid the risk of injury or damage to the appliance, never place hands or implements in the jar while the appliance is in operation. A spatula can be used when the appliance is off.
2. Solid ingredients
Take special care when preparing solid ingredients. Interrupt processing from time to time, remove the lid and scrape the ingredients from the sides of the jar using a knife. Replace the lid and continue processing. If this makes processing excessively lengthy, select a higher speed.
- To add solid ingredients to the jar, remove the measure from the lid and add them a little at a time through the hole. Vegetables and cheese should always be diced before being placed in the jar.
3. Processing hot ingredients
Always remove the measure from the lid before preparing hot recipes.
- Add hot ingredients slowly, a maximum of two cups at a time, through the hole in the lid.
HOW TO USE THE COFFEE MILL
- Place the motor base (D) on a dry flat surface.
- Pour the required quantity of coffee beans into the coffee beans container (G) making sure never to fill it more than half full.
- Place the coffee beans container base (H) on the coffee beans container (G) and screw on fully (Fig. 4).
- Turn the coffee mill upside down and attach to the motor base (Fig. 5).
- Plug into the mains.
- To use the coffee mill, simply select the required speed with the slide (E). When the coffee is perfectly ground, move the slide back to the "0" position again and the appliance stops. While the coffee is being ground, press down on the glass container.
- After grinding the coffee, unplug from the mains socket and remove the coffee mill.
TIPS
- For the most fragrant coffee, grind just the right amount of coffee as you need it.
- Never fill the beans container more than half full. As a rough guide, use a tablespoon of beans per cup (e.g. 4 tablespoons of beans for 4 cups of coffee). As you use the mill, you will of course discover the optimum quantities for your own personal taste.
- After grinding coffee, always wait at least one minute before using the coffee mill again to avoid the appliance overheating.
- The coffee mill must be used to grind coffee beans only.
CLEANING
- Unplug from the mains.
- Extract the coffee mill by pulling it upwards. Wash the beans container and base with water and mild washing up liquid. Rinse thoroughly and dry.
- THE GLASS CONTAINER AND PLASTIC BASE MUST NEVER BE WASHED IN A DISHWASHER OR WITH BOILING WATER.
R E C I P E S
Practical and convenient, you can use your appliance to quickly prepare excellent creams, mayonnaise, sauces, omelettes, pancakes, fillings for vegetables, milk shakes, drinks and cocktails of every kind. These recipes will help you discover the most complete and varied way to use your appliance. They should be considered as a starting point, then it's up to you and your imagination to find other uses and create other preparations.
WHIPPED CREA M
- 200 ml whipping cream
Pour the cream in the blender jar and operate at medium speed for about 20 - 30 seconds.
MAYONNAISE
1 whole egg - oil
- one teaspoon mustard - a pinch of salt
- a few drops of lemon juice
Put the egg, mustard, lemon juice and salt in the blender jar and operate at MIN speed for a few seconds. Fill the measuring cup with oil and add a little at a time while continuing to mix until the mayonnaise becomes firm. Ideal with poached fish.
PINK SAUCE
- 50 g mayonnaise - 10 g tomato ketchup
- 4 drops Worcestershire sauce
Put all the ingredients together in the blender jar and operate at MIN speed for a few seconds. Ideal with French fries and club sandwiches.
MASCARPONE CREAM
- 250 g mascarapone - 3 eggs
- 1/4 g whipped cream - 50 g sugar
Put all the ingredients (except the whipped cream) in the blender jar and operate the appliance at MIN speed until the mixture is light. Pour the cream into small serving bowls and garnish with the whipped cream (whipped as described in the preceding recipe). Chill the dessert for a few hours in the refrigerator before serving.
TUNA SAUCE
120 g tuna in oil
150 g mayonnaise
- a handful of capers
Put all the ingredients in the blender jar and process at MIN speed for a few seconds. Ideal to prepare veal with tuna sauce.
ONION OMELETTE
- 6 eggs -2 dessertspoons milk
- 1 onion - 2 dessertspoons oil
salt
Blend the eggs in the jar at MIN speed for approximately 30 seconds with the milk and salt. Place a frying pan on the stove with the oil and sauté the onion. Pour the mixture in the frying pan and let the eggs cook until firm, making sure they do not stick to the pan.
CREPE
BATTER
- 100 g flour - 1dl milk
- 4 whole eggs - salt
Put all the ingredients in the blender jar and operate the appliance at MIN speed for approximately 30 seconds. The batter should be quite creamy.
MILK
SHAKE
- 1 apple - 1 dl milk
Cut the apple into small pieces and place in the blender jar with the milk. Blend at medium speed for about 1 minute. The apple can, of course, be replaced with whatever type of fruit you prefer.
WATER
ICE
ice • flavoured syrup
Pour the ice in the blender jar and operate in PULSE mode until all the ice is chopped uniformly. Put the ice into a glass and add the syrup.
COURGETTES WITH TUNA
4 courgettes 1 egg
- 120g tuna in oil - 1 tin peeled tomatoes
- 100 g grated Grana cheese
salt
- parsley
Cut the courgettes in half lengthwise and scoop out the pulp using a spoon, taking care not to break them. Place the courgette pulp in the jar along with the egg, tuna, grated cheese, salt and parsley and operate the appliance at medium speed until the mixture is smoothly blended. Use the mixture to fill the half courgettes prepared previously. Place them in a buttered baking dish and pour over them a little water mixed with a couple of dessertspoons of oil and some pulped peeled tomatoes. Top the courgettes with a few pieces of butter. Bake in a preheated oven for about 40 minutes. These courgettes are delicious at room temperature.
S G R O P P I N O
- 100g lemon sherbet ice-cream
1/2 glass sparkling white wine - 1 shot vodka
Place all the ingredients in the blender jar and blend at medium speed for about 1 minute, until the mixture is evenly blended.
AVERTISSEMENTS
OMELETTE AUX OIGNONS
julie gai 12 aay iisll aably
1
8gai 2aia hao jie cai a
(D)
.5
jGg (G) 10
(3)
eGg (H) aegell eGg 1
(4)
(5)
1
(E)
buai 1i iuiuui jbi li g uai
0
eegil baiol g
3^x = - 2 + 22 = - 1
Jaa 1
.8g
j4.11 13:53
1
aai 1 aai 1 1 1 1 1 1 1
.
y
1 1
aal j! sall no fae jsi aaiy plgill 2j yell alge gao gall aiae all bryrall geel lgl gcl i jbiill cylac n agi y
alaa aabay j5 g 12all pue wad . ayul aae bao y 12y iaiw! aebay . 12all pue y 12y iaiw!
alilui 1
j 1000
2j 15-34 jy gdl xai y .
i iill caggl gll clgall no
jle laiaa ciigall no aiaic cias
12! 2! aIall cllgall jilll lglssal .
Jlill Jyjilw. ssc aagll bj
JiLgic Ildc Jf ae y pliy gny
Jll gia Jlacll
a 30-5 aal .
all jaii Sall
jaii
a.sall glslalp
Jlalclllg gao jajj 1
Jglal Jccll kdl pnnn no qgdlg 2
Y. jgal lgi g yjy aiaaiai i jil
Jccll qrgdll Jldgolg g d j
JglallkysLacie bmaipnlae nn . jge
1
j 1 j 1 1 1 1 1 1 1 1 1 1 1
1a 1
bDd
Jy. g 2g jglj
.
a#
aIall. 1000000000000000000000000000000000000000000000000
.(1)
.(2) (B)
(A)la jyjgljgj
/lll j 100000000000000000000000000000000000000000000000000000000000
yoo
4a 412y j5y j5y 40
clll aai 1
(B)
Jill lla
jall plisil g k cllgall g 111
| a a a a a a a a a a a a a a a a a a a a a a a a a a a a a a a a a a a a a a a a a a a a a a a a a a a |
by = 11 cdog
()A
B
C
D
ae jdu bua /ON/OFF e
jill"P" F
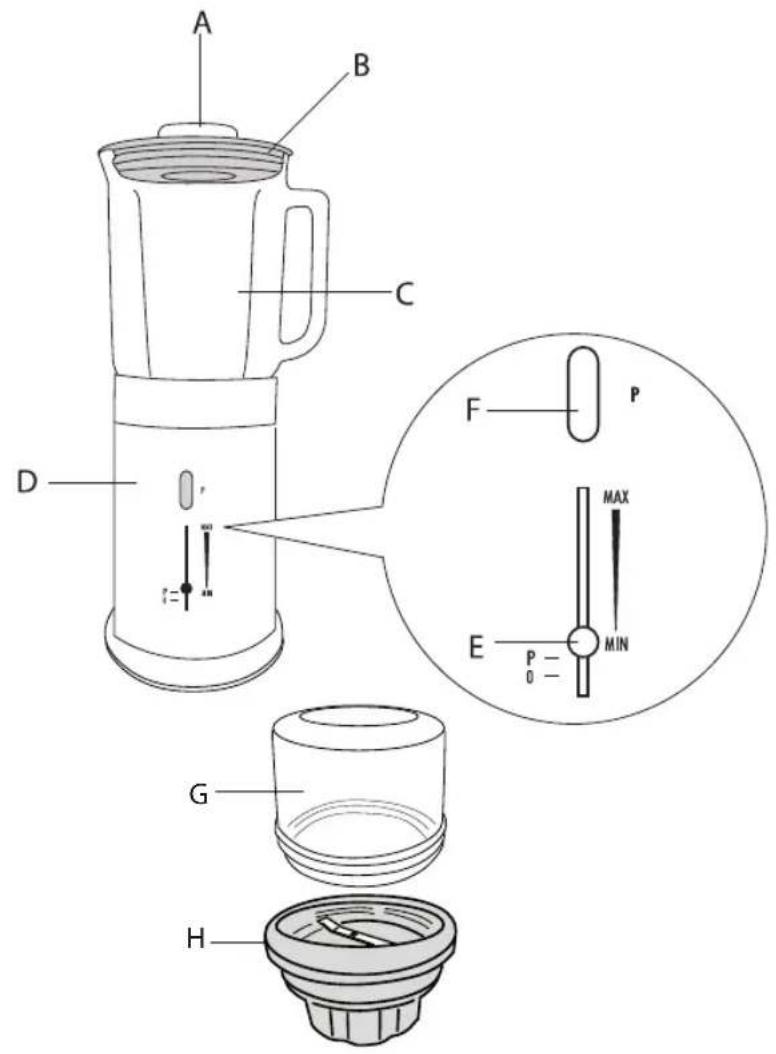
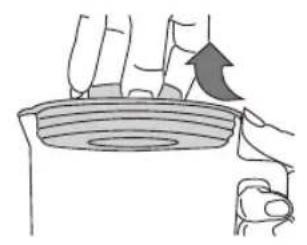
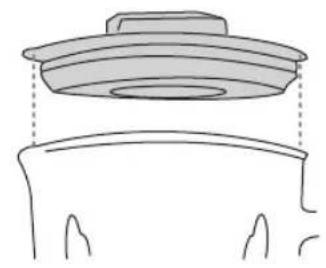
fig.1
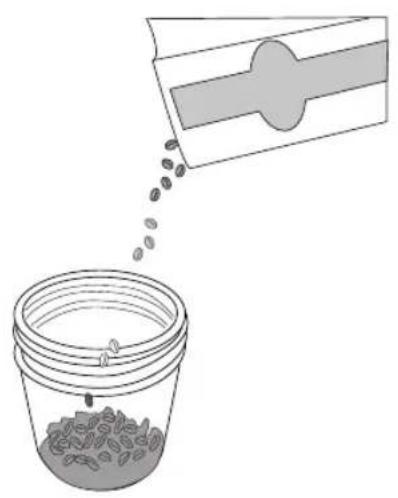
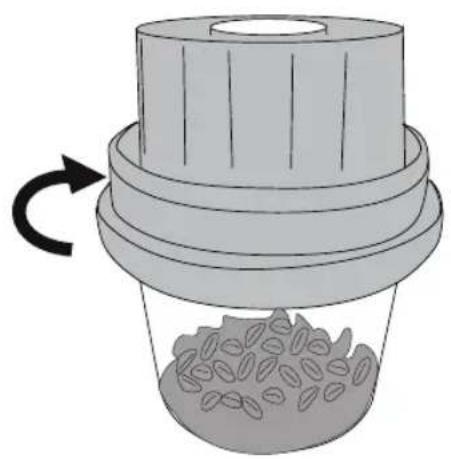
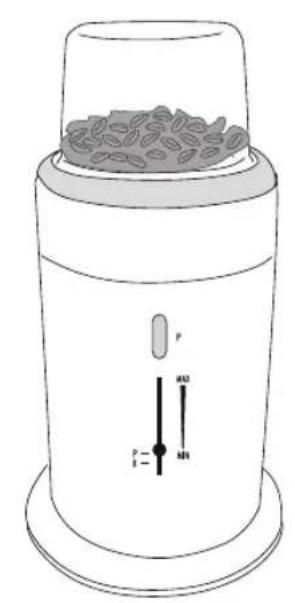
fig. 3 fig. 4 fig. 5

puiy

De' Longhi Appliances
via L. Seitz, 47
31100 - Treviso - Italia
- WARNING - THIS APPLIANCE MUST BE EARTHED IMPORTANT
- GENERALWARNINGS
- Special attention must be paid to the following fundamental safety rules:
- DESCRIPTION OF BLENDER
- DESCRIPTION OF COFFEE MILL
- BEFORE USE
- Never immerse the motor base in water!
- HOW TO USE THE BLENDER
- Important:
- USING THE "P" FUNCTION
- CLEANING THE APPLIANCE
- TIPS
- General
- Solid ingredients
- Processing hot ingredients
- HOW TO USE THE COFFEE MILL
- CLEANING
- R E C I P E S
- WHIPPED CREA M
- MAYONNAISE
- PINK SAUCE
- MASCARPONE CREAM
- TUNA SAUCE
- ONION OMELETTE
- CREPE
- BATTER
- MILK
- SHAKE
- WATER
- ICE
- COURGETTES WITH TUNA
- S G R O P P I N O
- AVERTISSEMENTS
- OMELETTE AUX OIGNONS
- j4.11 13:53
- alilui 1
- 1
- bDd
Brand : DELONGHI
Model : KF 8170 H
Category : Blender