Novo Compact SMP35100 - Smartphone Yarvik - Free user manual and instructions
Find the device manual for free Novo Compact SMP35100 Yarvik in PDF.
User questions about Novo Compact SMP35100 Yarvik
0 question about this device. Answer the ones you know or ask your own.
Ask a new question about this device
Download the instructions for your Smartphone in PDF format for free! Find your manual Novo Compact SMP35100 - Yarvik and take your electronic device back in hand. On this page are published all the documents necessary for the use of your device. Novo Compact SMP35100 by Yarvik.
USER MANUAL Novo Compact SMP35100 Yarvik
1 Prior to first use
2 Smartphone Startup
3 Android Home Screen
3.1 Adding widgets and shortcuts to your Home Screen
3.2 Setting a Wallpaper
3.3 Application Menu
4 Setting up your Yarvik Smartphone
4.1 Settings Menu
4.2 WiFi & Bluetooth
4.3 Sound settings
4.4 Display
4.5 Applications
4.6 Storage & MicroSD/USB Drive Access
4.7 Language & keyboard
4.8 Date & time
5 Apps
6 Calling and Messaging
6.1 Calling
6.2 Messaging
7 GNU/GPL Licensing Information
8 Warranty Statement
9 Important Information
1 Prior to first use
Dear user,
Thank you for purchasing our product.
To ensure you a quick and convenient use of your new Yarvik Smartphone, please read these instructions carefully prior to use.
We hope you will absolutely enjoy your Yarvik Smartphone for the longest time possible!
Please note: Your Yarvik Smartphone is a high precision electronic product, do not try to disassemble the Smartphone, as this will void your warranty and may result in malfunctioning of the device;
- Avoid strong beating of or to the product;
- Avoid using the Smartphone in a high or low temperature environment, or in any environment where the device can get in contact with moisture, dust or magnetic fields;
- Do not expose the Smartphone to strong sunlight for an extended period of time;
- Don't operate the touch screen of the Smartphone with sharp objects, as this may result in scratching the screen surface;
- Using connected headphones on the Smartphone for too long and/or setting the audio volume up too high when using the headphones may cause serious hearing damage;
- Do not cross the road, drive a motor vehicle or bicycle while using the Smartphone with headphones to avoid traffic accidents;
- Only use permitted batteries, chargers and accessories with your Yarvik Smartphone. The use of any other products with the Smartphone can be dangerous and may violate the warranty regulations;
- Only use a slightly wet cotton cloth to clean the Smartphone, and only use water to wet the cotton cloth. The Smartphone should not be cleaned with any sort of (glass) cleaning aid.
You may go ahead and use your Yarvik Smartphone right out of the box, without charging the battery first.
It is best for the battery to first run on the charge left in it, and to be fully recharged once it's completely drained for the first time.
If the Smartphone isn't switching on right out of the box, the battery is already completely drained and you should of course recharge it first.
2 Smartphone Startup up
When you first power on your Yarvik Smartphone, you will be presented the startup sequence.
The very first startup may take a while, approximately 2-3 minutes.
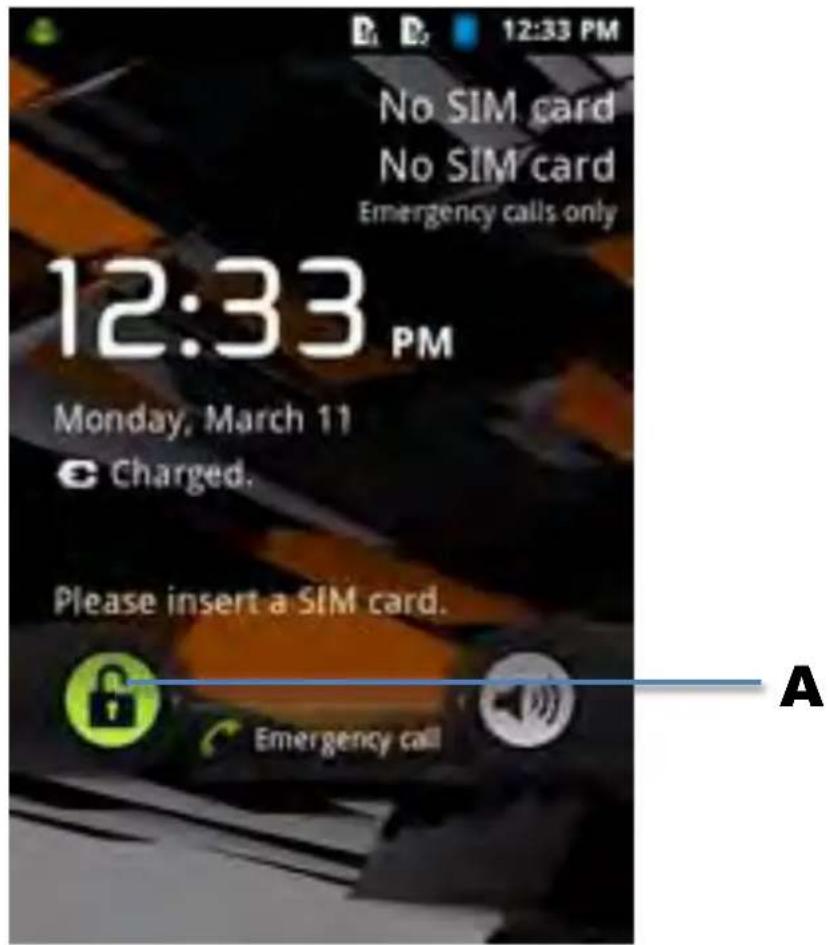
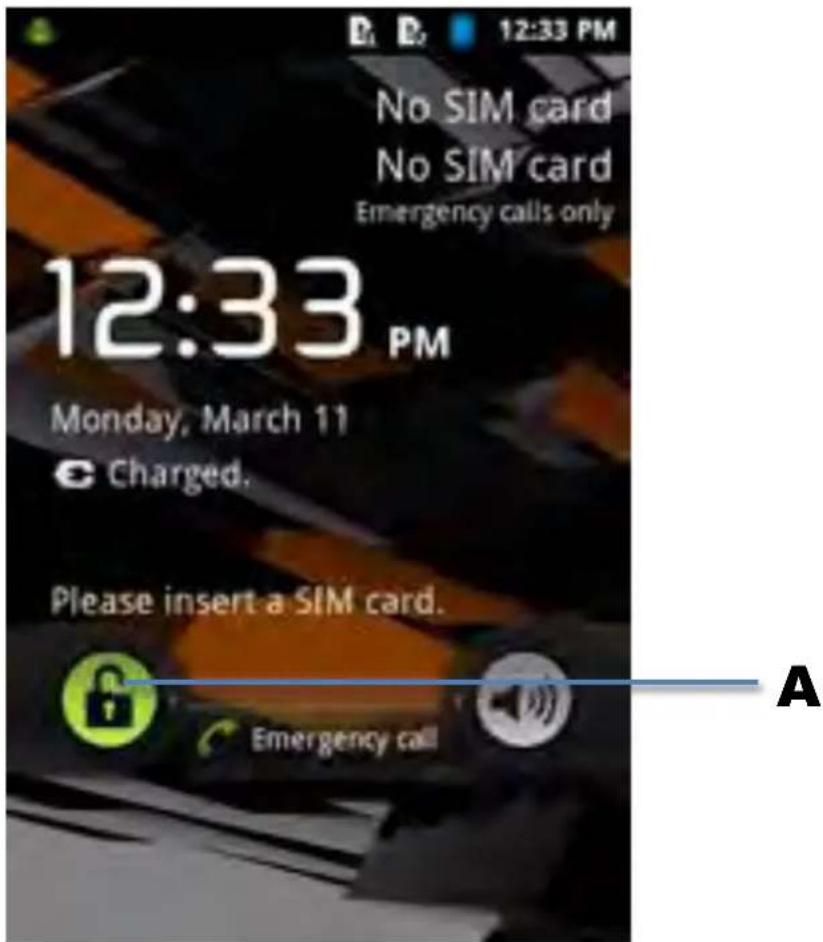
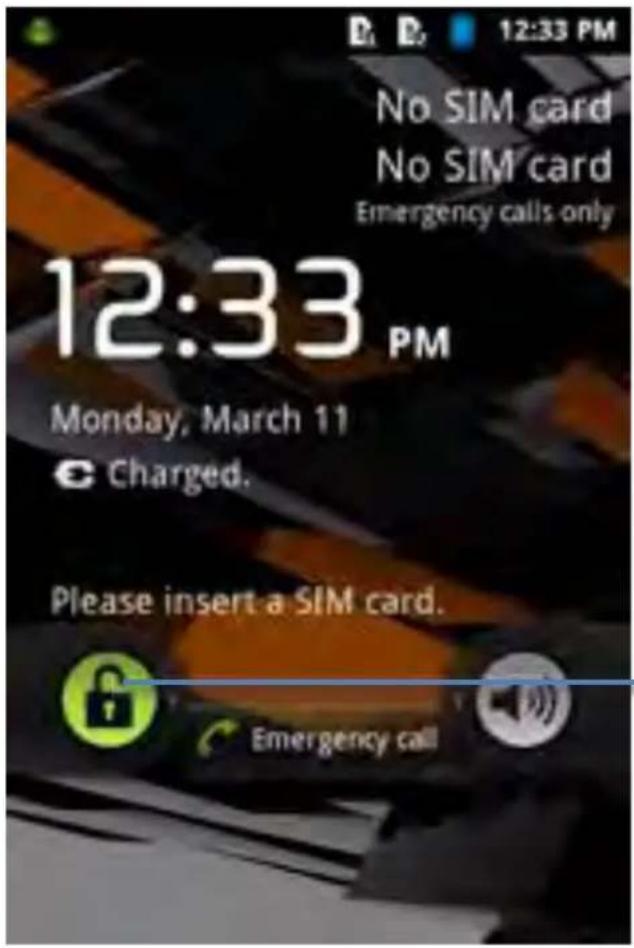
After the startup sequence the Smartphone has completed starting up and you will be presented the Android Lock Screen.

Android Lock Screen
Slide the lock bar (A) to the right to unlock the Smartphone. You will then be taken to the Android Home Screen.
3 Android Home Screenen
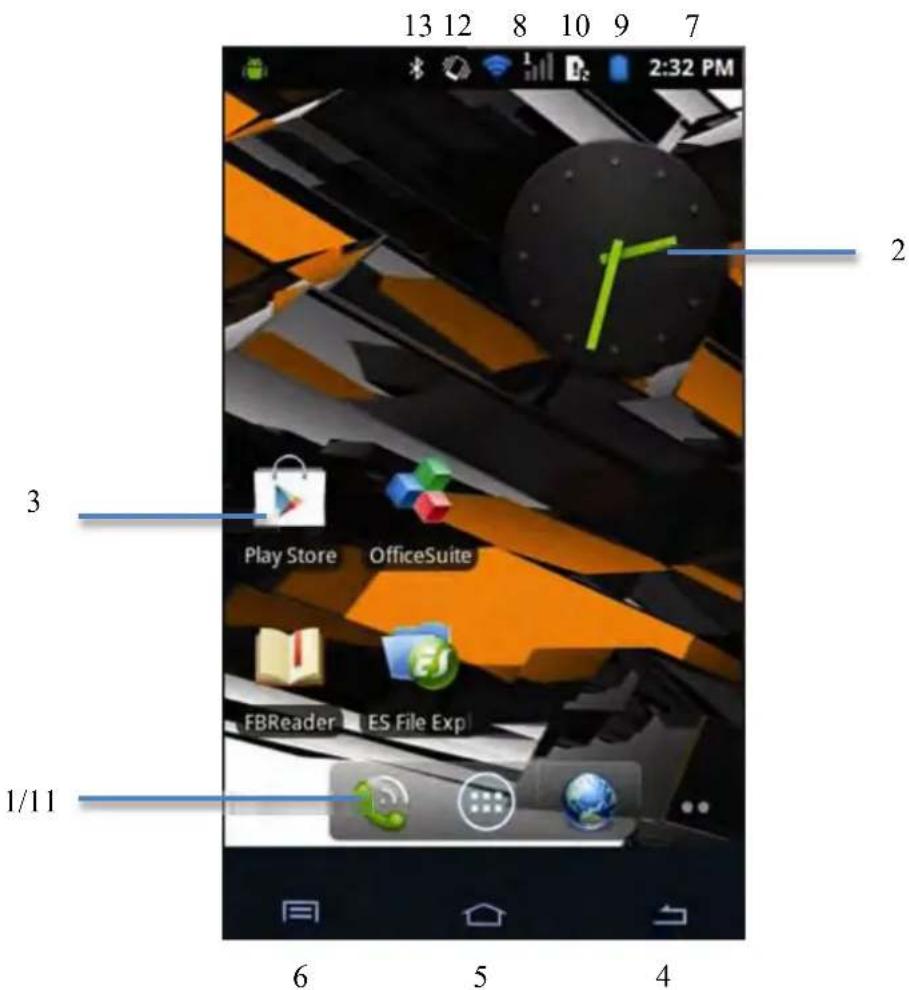
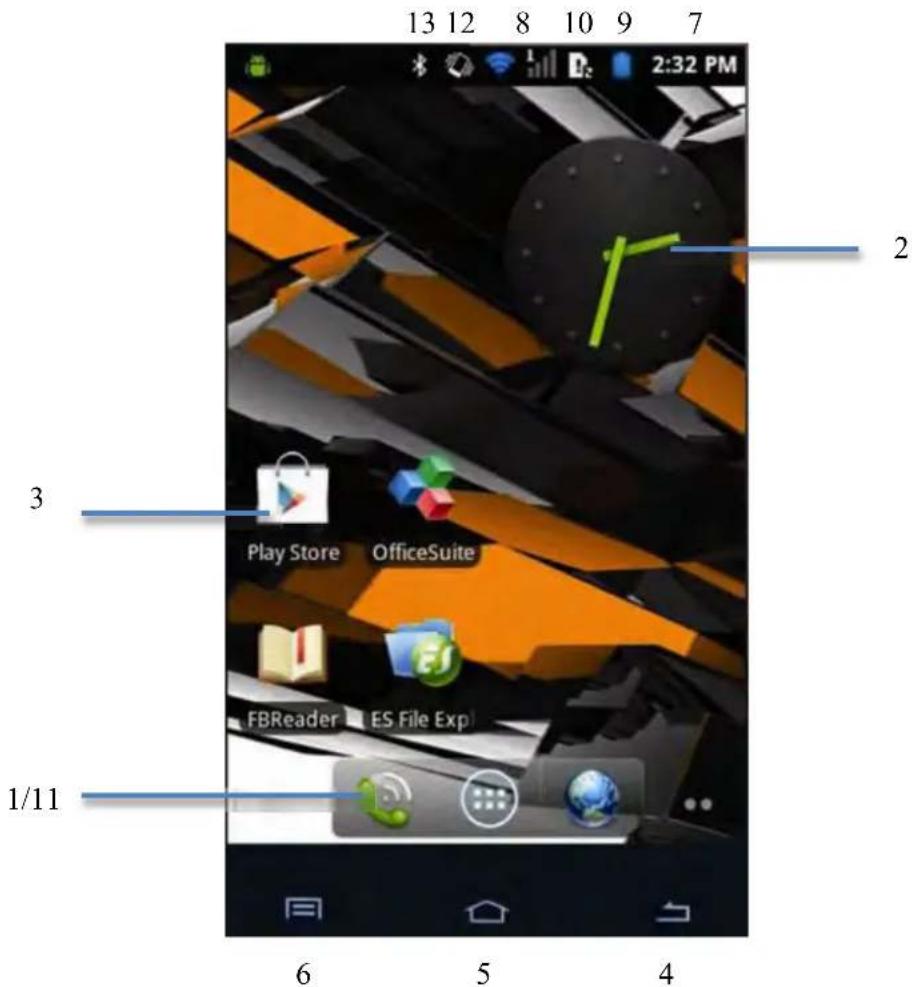
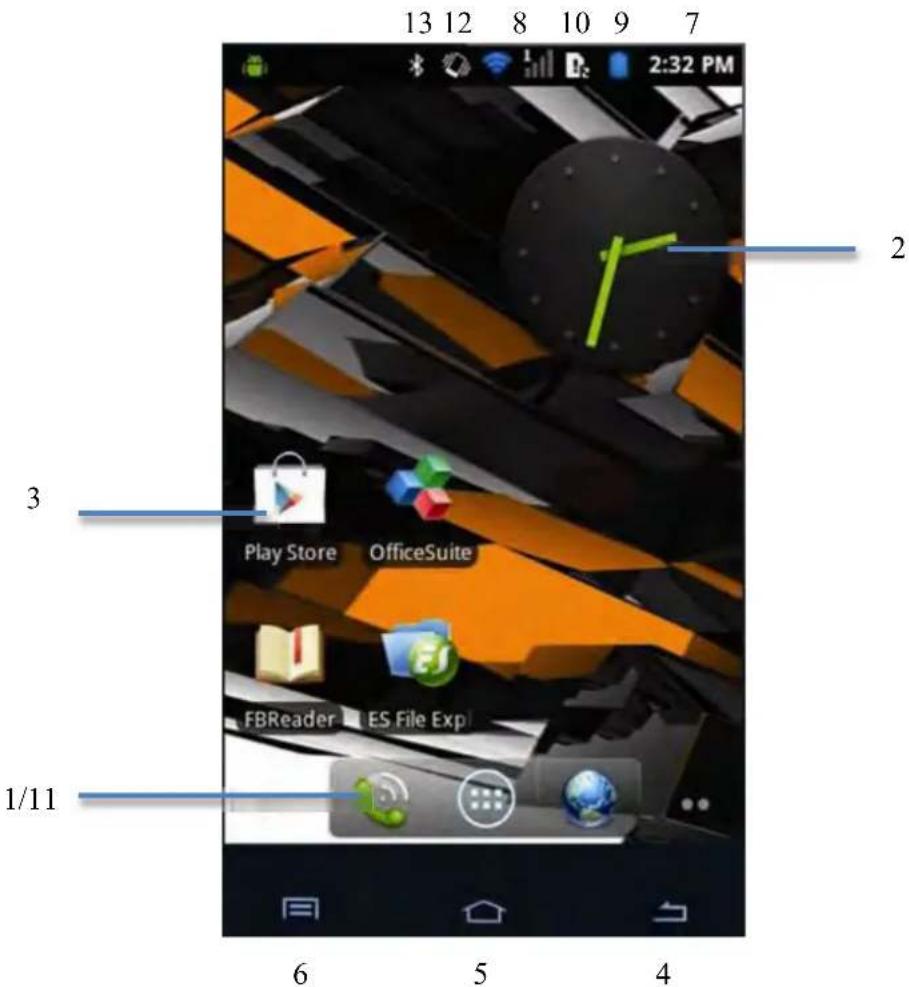
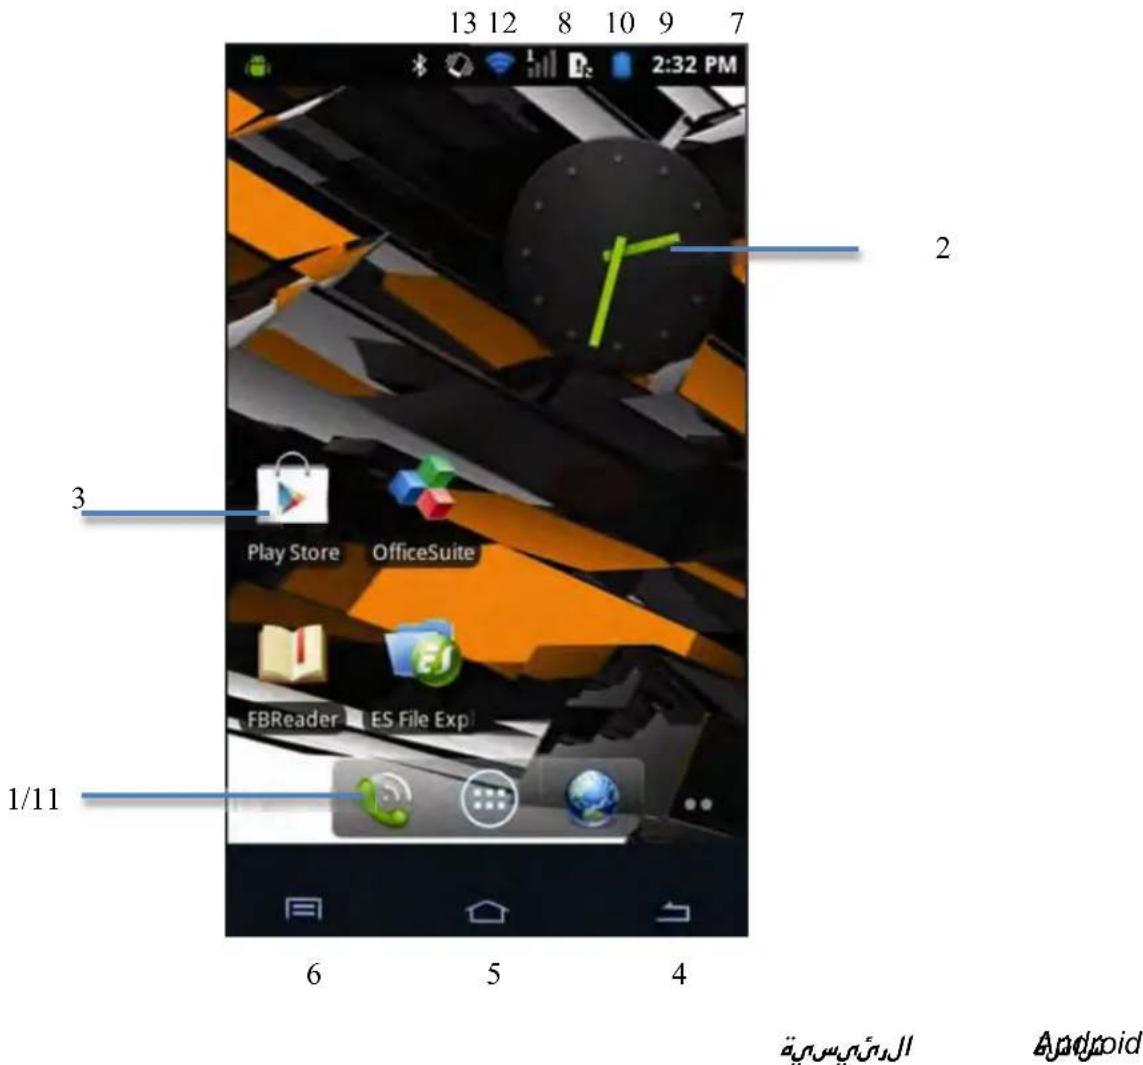
Android Home Screen
On the topside of the Smartphone's screen you can always find the status bar. The status bar contains both system information and function buttons.
1 - App and widget menu
2-Widget(analog clock)
3 - App Shortcuts
4 - Back button - brings you back to the previous screen, or previous website when using the Browser
5 - Home - brings you back to the Android Home Screen
6 - Multitask button
7 - System time
8 - Wi-Fi Signal Indicator
9 - Battery Level indicator
10 - SIM card Signal Indicator
11 - Phone, Browser bar
12 - Vibration mode
13-Bluetooth Signal Indicator
The home screen consists of multiple pages which can be accessed by swiping the home screen left/right.
Click on a running app in the multitask view to quickly switch to it. You can close running apps by swiping the application left.
3.1 Adding widgets and shortcuts to your Home Screen
To add a widget, press the app and widget button in the bottom of your Home Screen:

In the following screen, you can find all the installed apps and widgets, both separately viewable by pressing "Apps" or "Widgets" on top of the screen respectively.
Press "Widgets" to view all available widgets. When showing all widgets, you can swipe the screen to browse to the next page (if available).
Press and hold the desired widget to have the Home Screen show up and release the widget to any empty spot on the home screen.
To add a shortcut to any app, press the app and widget button in the bottom of your Home
Screen:

In the following screen, you can find all the installed apps and widgets, both separately viewable by pressing "Apps" or "Widgets" on top of the screen respectively.
Press "Apps" to view all installed apps.
Press and hold the desired app to have the home screen show up and release the shortcut to any empty spot on the Home Screen.
To remove widgets and/or app shortcuts from your Home Screen, press and hold them and drag them to the appeared "Remove" text on top of your Home Screen.
3.2 Setting a Wallpaper
To change the Home Screen wallpaper, press and hold the Home Screen until the "Choose wallpaper from" menu comes up.
You can choose from "Gallery" (Snapshots), "Live Wallpapers" (animated wallpapers), "Wallpapers" (default static images.)
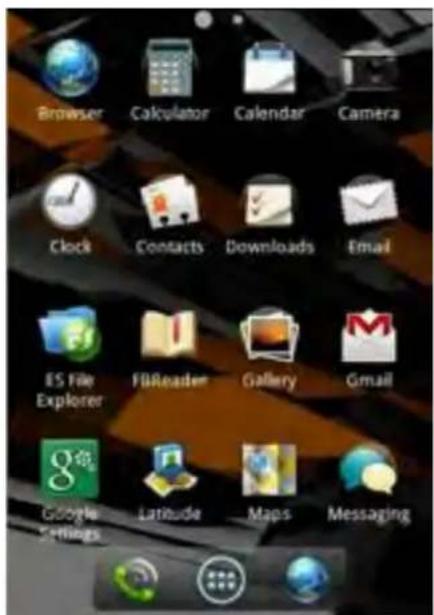
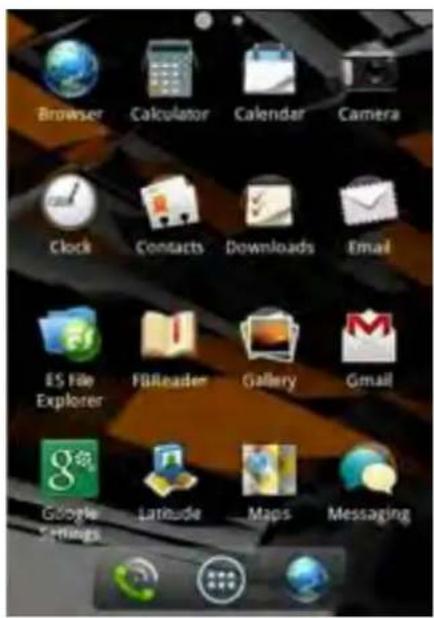
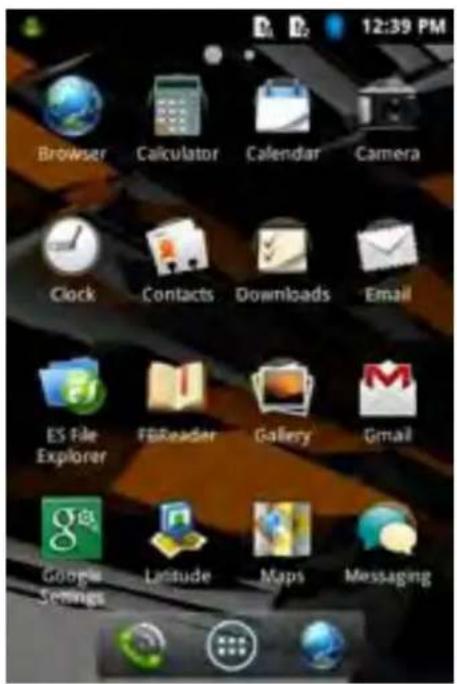
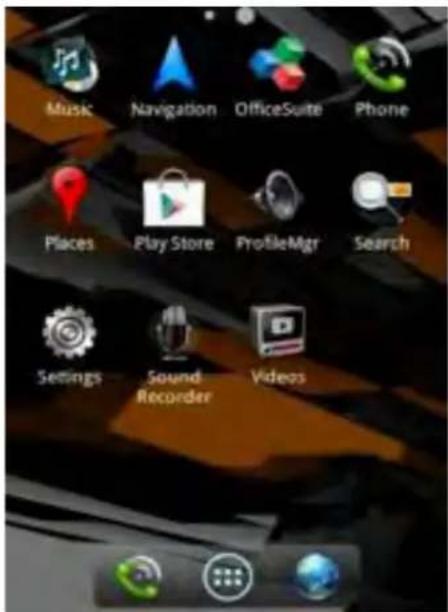
3.3 Application Menu
Press the app and widget button on the bottom of your Home Screen:

When the system displays the widgets, press "Apps" to view all installed apps.
Here you can find all the pre-installed programs or "apps" as well as additional apps that you install.
You can launch any app by just pressing the corresponding icon.
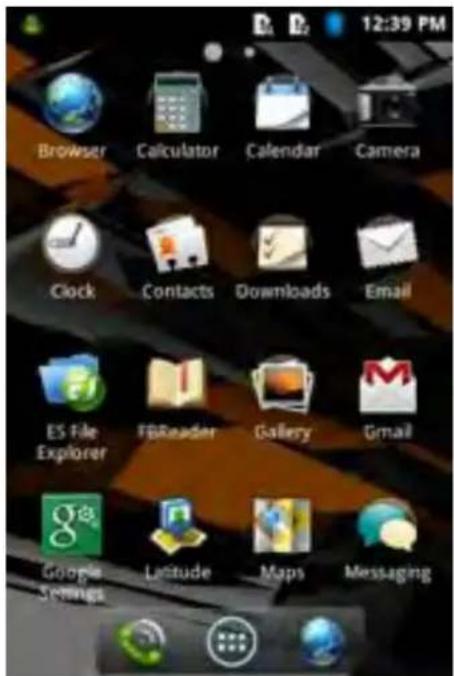
Application Screen
4 Setting up your Yarvik Smartphone
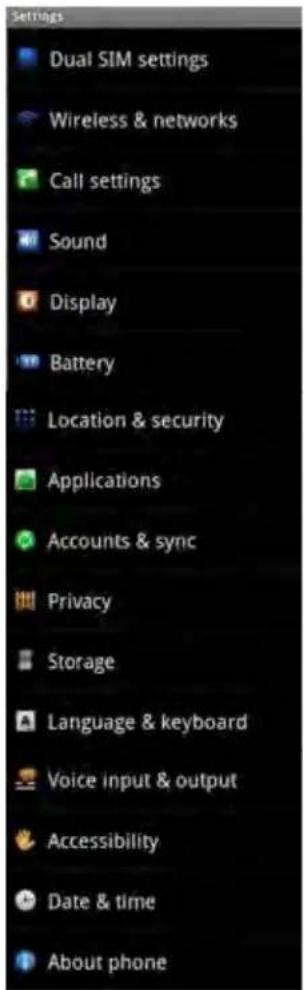
4.1 Settings Menu
Press the Settings icon in the Application Menu to enter the Settings menu. In the Settings menu you can find the options to set up your Yarvik Smartphone.

Settings Menu
We will go through the most important parts:
4.2 WiFi & Bluetooth
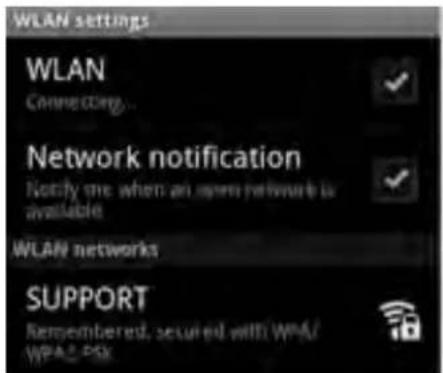
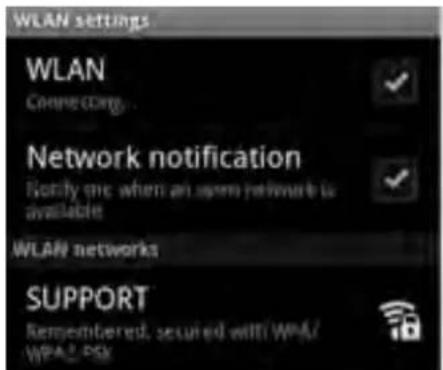
Wi-Fi
Set up a connection with a wireless Wi-Fi network.
Checkmark the WLAN button to activate Wi-Fi.
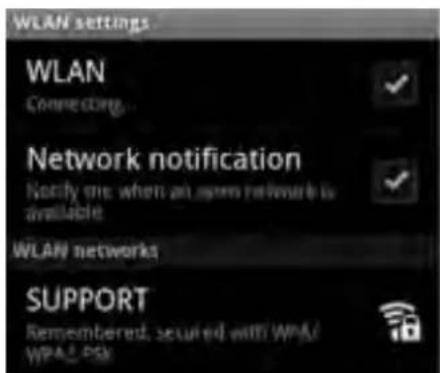
The available Wi-Fi networks appear in the network list on the bottom screen. Tap the network of your choice. If the network is secured, you're prompted to enter the network security key.
Press the "Connect" button and the Smartphone is connecting to the network. Once "Connected" appears underneath the network name and the wireless reception icon is shown in the topside status bar, you're successfully connected to the wireless network.
Viewing your Yarvik Smartphone's Wi-Fi MAC address
While in the Wi-Fi settings screen, click on the multitask button in the bottom left corner.

Press "Advanced" in the unfolding menu.
Your Wi-Fi MAC address is displayed in the following "Advanced Wi-Fi" screen under "MAC address".
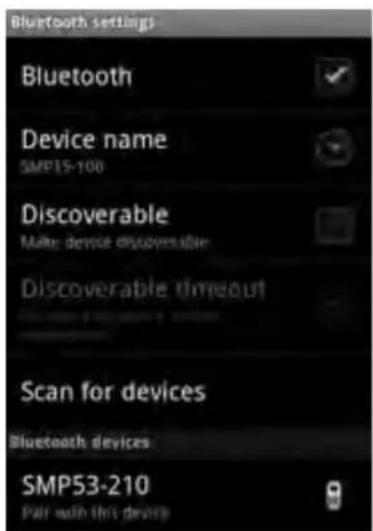
Bluetooth
Your Yarvik Smartphone is equipped with a built-in Bluetooth module for connecting with Bluetooth compatible peripherals, like headphones and speakers.
Slide the Bluetooth On/Off button to "On" to activate Bluetooth.
Once activated, your Yarvik Smartphone will automatically start searching for nearby Bluetooth devices. You can always manually search for Bluetooth devices by clicking "Search for Devices" in the bottom side of the screen. It may be required for the to be connected peripherals to do so.
All discovered devices will appear in the "Available Devices" list:
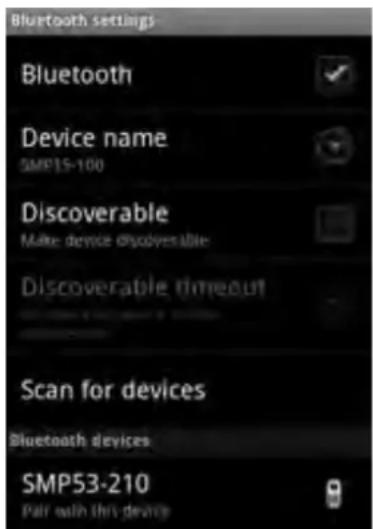
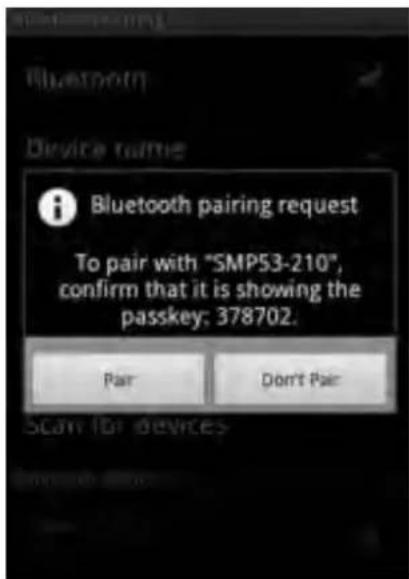
Click on the discovered Bluetooth device to pair your Yarvik Smartphone with it. The "Bluetooth pairing request" windows will appear:

Most Bluetooth devices require a pin code to connect. This code usually is 0000 or 1234. Please refer to the instructions manual of your Bluetooth device if the pin code is different. After you have entered the correct pin code, press "OK".
Your Yarvik Smartphone will now start pairing with your Bluetooth device, and after a few seconds the connection will be completed, showing a "Connected" message underneath the concerning Bluetooth device in the "Available Devices" list.
You can connect multiple Bluetooth devices to your Yarvik Smartphone for use at the same time.
4.3 Sound settings
Here you can change the audio profiles of the Smartphone (e.g. only vibration, vibration and Ring).
4.4 Display
Here you can change the brightness of the display, font sizes and the auto sleep time. Please note that the higher the display brightness, the higher the energy consumption. This will drain your battery substantially faster. If you don't want the display to auto rotate as you tilt the Smartphone, you can enable/disable this functionality in the Auto-rotate screen setting.
4.5 Applications
Here you can manage applications that are installed on your Yarvik Smartphone.
You can click apps that you have installed to see the app info and uninstall them if needed by using the "Uninstall" button.
Please note that the preinstalled default applications (like e.g. the calculator) cannot be uninstalled.
4.6 Storage & microSD Drive Access
Shows you the memory information. When a microSD card is present, you will find the memory information of the inserted card here.
Connecting your Yarvik Smartphone to a PC or MAC by USB
You can connect your Yarvik Smartphone to a PC or MAC using the provided USB cable. When connected to a computer, you can access the Smartphone's memory and, if presented, an inserted microSD card as standard USB Mass Storage Device.
Please refer to the printed Quick Start Guide of your Yarvik Smartphone to determine the Smartphone's USB port.
Connect the USB cable to the USB port of your Yarvik Smartphone and to a free USB port on your computer.
In the topside of your Smartphone's screen, two messages will appear shortly after each other:
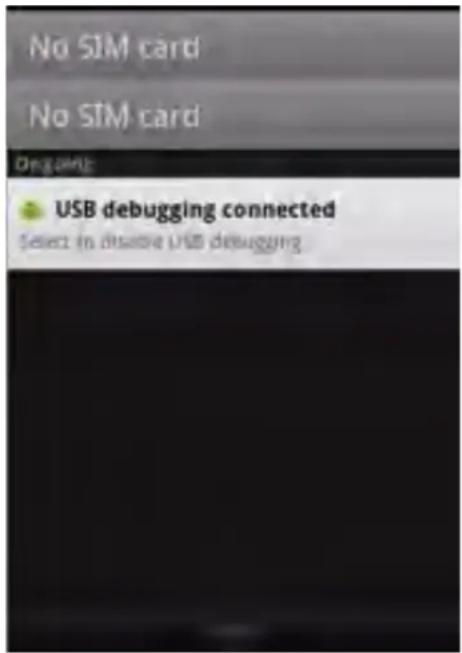
Once the second message "USB connected" appears, click on it. The following screen will appear:
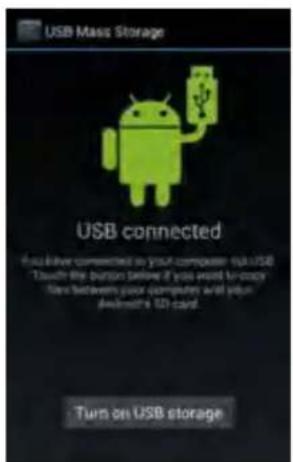
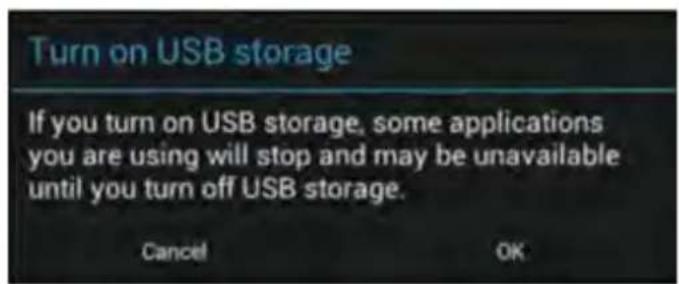
Click on the button "Turn on USB storage". A notification windows will appear:
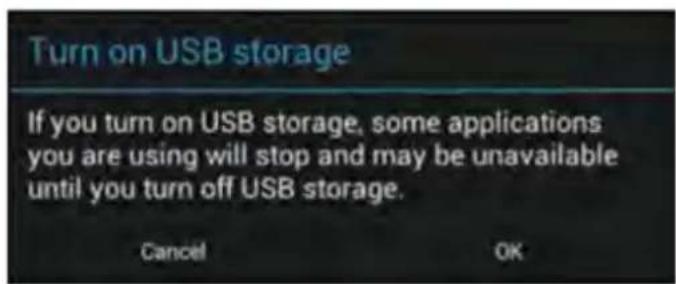
Click on "OK" to confirm.
The memory of your Yarvik Smartphone will now appear as Mass Storage Drive in your computer's file system, and can be used e.g. to copy files from and to your Yarvik Smartphone.
If you have a microSD card in your Smartphone, the card will be recognized by the computer as a second Mass Storage Drive.
To stop using the Mass Storage Device function, click on the "Turn off USB storage" button and remove the USB cable.
Note: There are no hardware drivers needed to access the Yarvik Smartphone's memory. In the case your computer prompts for any driver installation, you can simply ignore it.

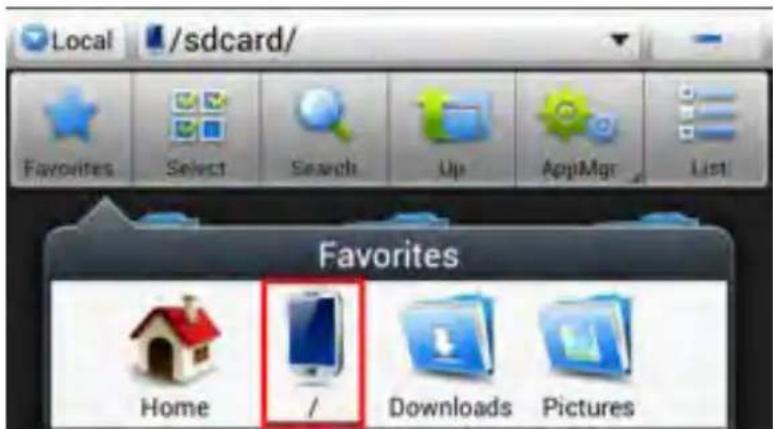
Access your MicroSD card or USB drive in ES File Explorer
If you have inserted a microSD card in your Yarvik Smartphone, you can access its contents as following:
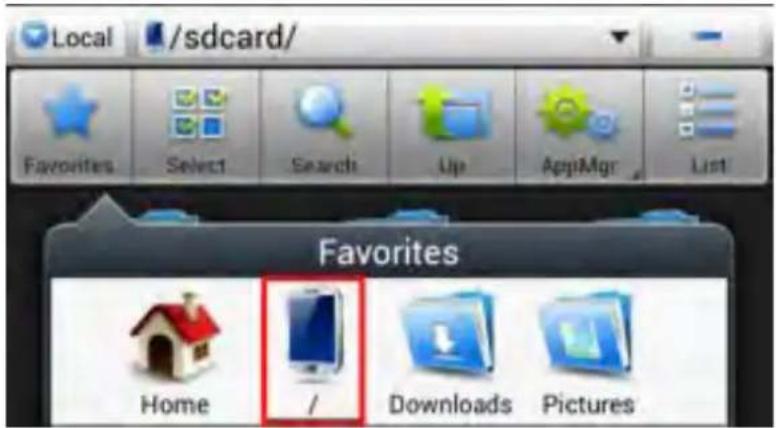
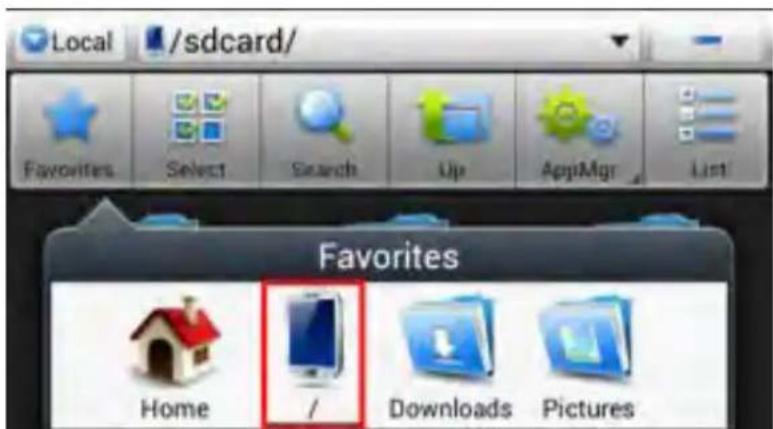
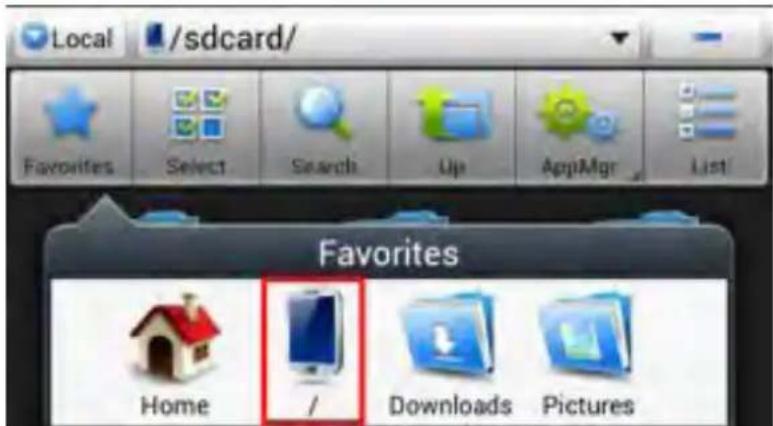
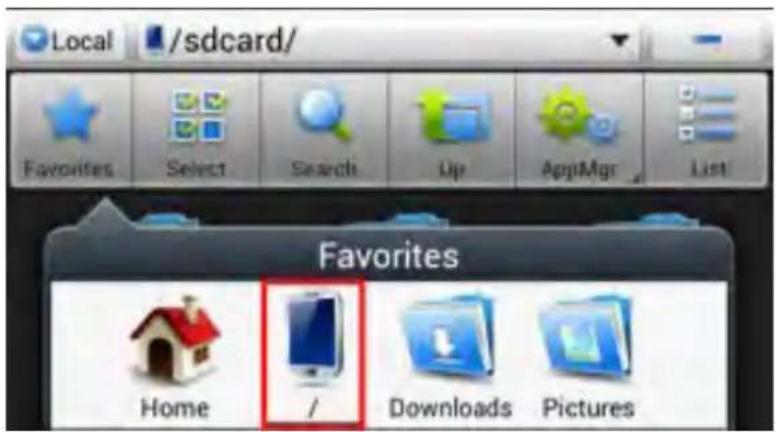
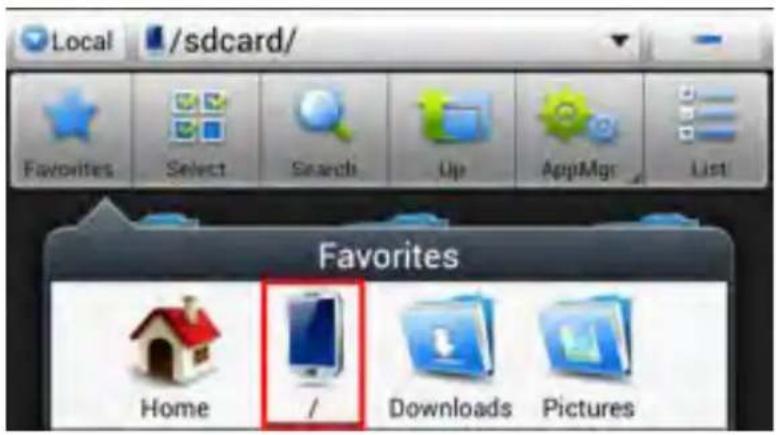
Open the ES File Explorer app and click on the Favorites button (with the blue star icon).
The Favorites menu now unfolds. Click on the "root" icon labeled with "/":
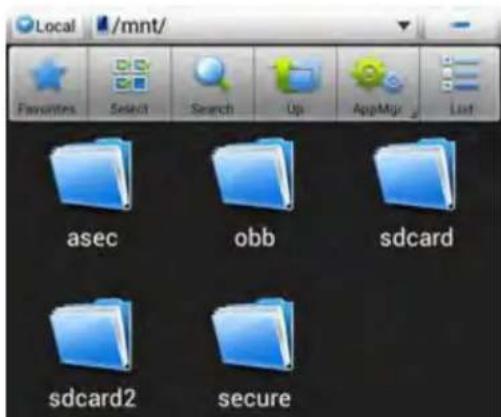
You will now reach the "root" of the Smartphone's file system, containing several files and folders.
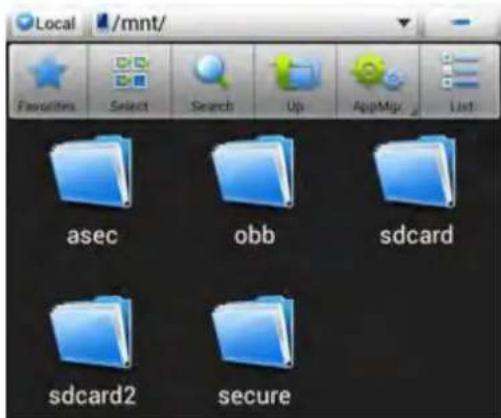
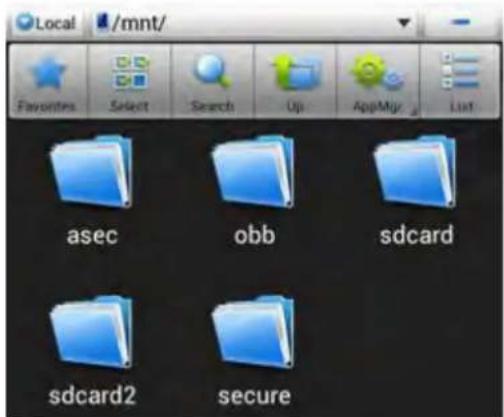
Locate and click on the "mnt" folder:

The "mnt" folder now opens, showing several folders:
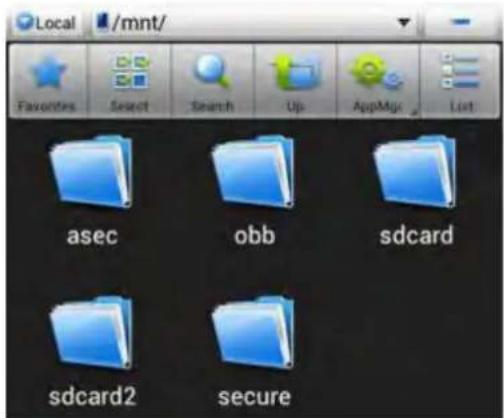
The "sdcard" folder is the internal memory of your Yarvik Smartphone.
You can, when available, also use the sdcard2 shortcuts in the earlier mentioned Favorites menu for quick access to your microSD card respectively.
4.7 Language & keyboard
Use "Select language" to select the display language of your Yarvik Smartphone.
This applies to all the screen texts in the entire system.
Under "Android keyboard" you may setup the onscreen keyboard of your Smartphone.
4.8 Date & time
Here you can setup the date and the time for your Yarvik Smartphone.
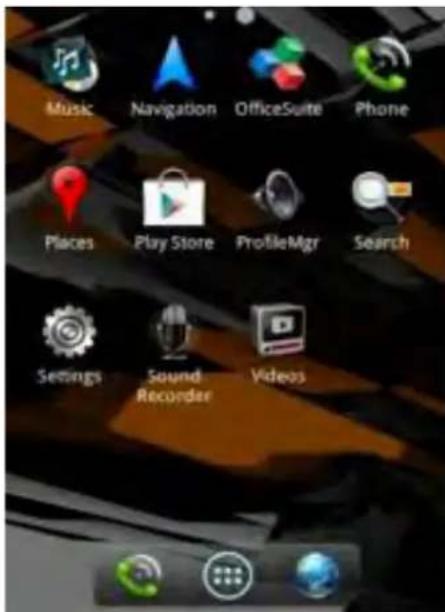
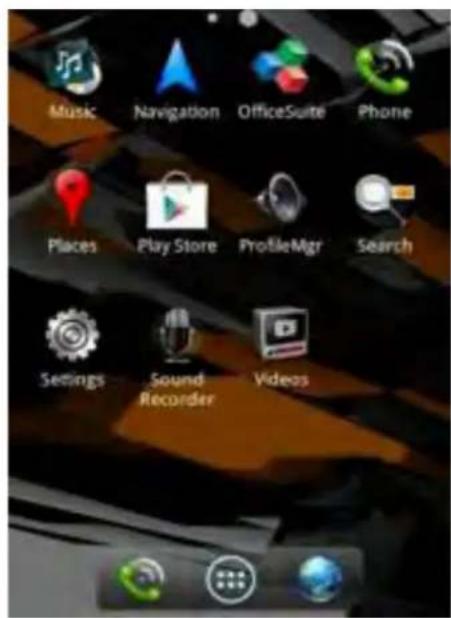
5 Apps
The Yarvik Smartphone will come with pre installed Apps (see below examples).
6 Calling and Messaging
6.1 Calling
Calling.
To make a call with your Yarvik Smartphone you must choose the "Phone" application on the
Android Home Screen input the area code and phonenumber
Press to engage a phonecall.
Press to engage a phonecall.
You can store the phone number of persons who you frequently call in your contacts.
To do so press the icon on your Android Home Screen, then select on the topside of the screen to enter the log book.
Press the phone number which you would like to store in the contacts and select the option.

To view your contacts select the icon on the topside of the screen.
To perform an international phone call press and hold the 0 icon to add a + sign. Insert the full number in (international number, area code and phone number).
Press the to engage the international call.
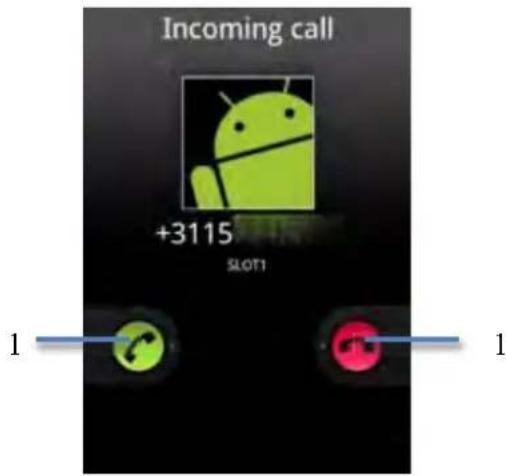
Being called.
When being called on your Yarvik Smartphone you will be presented with 3 options. To select an option you can swipe left or right.
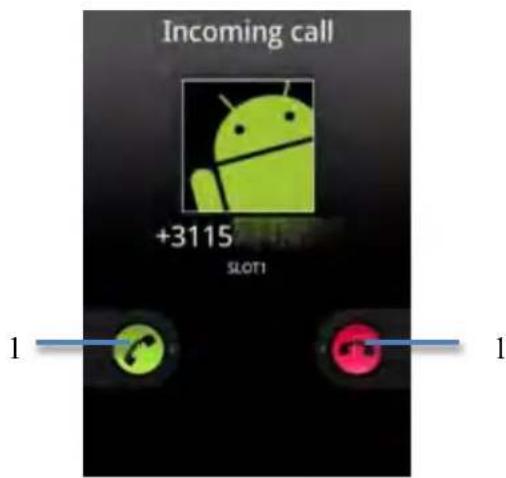
- Answer caller.
- Ignore caller.
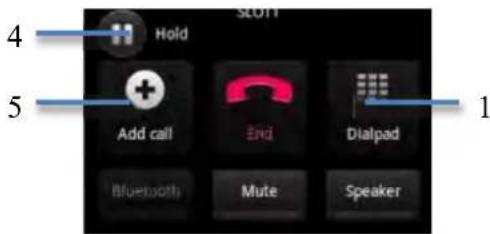
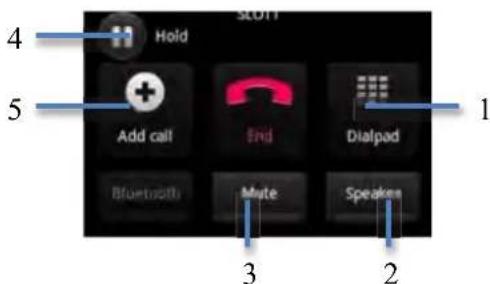
Options during a call.
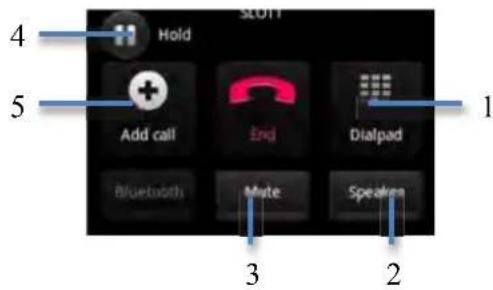
- Open the phone digit panel
- Enable/disable speaker
- Mute
- On hold
- Add additional phone call
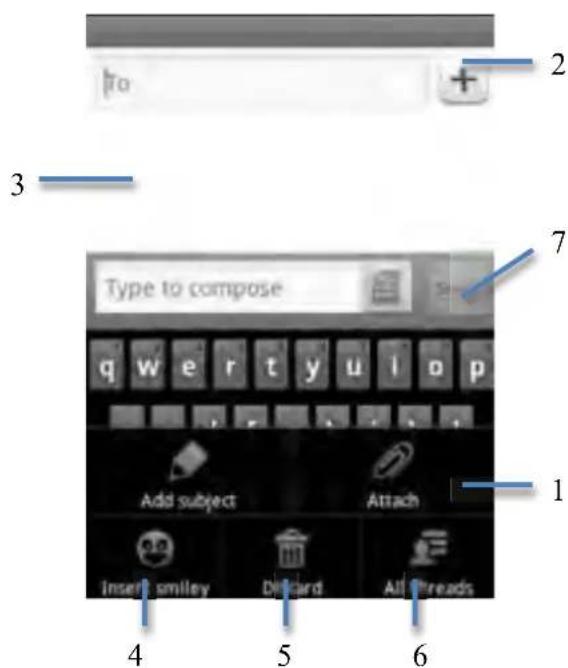
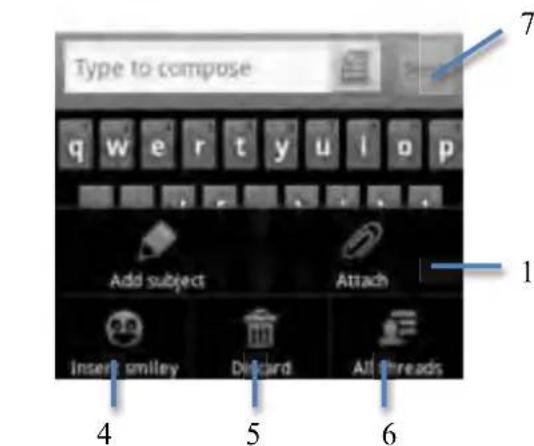
Messaging.
With your Yarvik Smartphone you can also transmit SMS and MMS messages (please note when using this feature outside of your region additional costs may be added to your regular messaging costs).
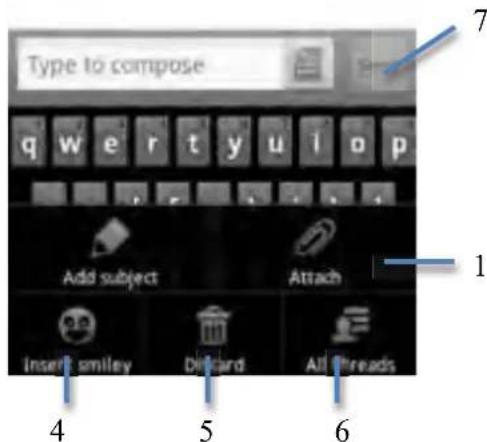
Sending a SMS / MMS message.
Select the on on the Android Home Screen, you will be presented with the messaging overview.
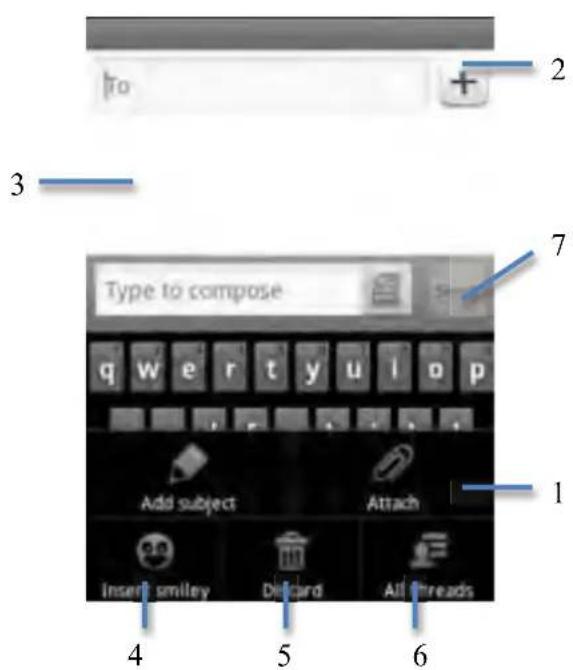
- Add videos, audio and pictures to your message (MMS feature)
- Add contact to your message
- Conversation overview
- Add an smiley into the conversation
- Discard message
- Reply to all
- Send message
Add a voicemail number / playback voicemail messages.
To assign a voicemail number to your Yarvik Smartphone you must press the icon on
your Android Home Screen, press and hold the icon. The option "Add number" will appear.
In the Voicemail option you can select the Voicemail settings and input your Voicemail phone number.
After you have assigned a Voicemail Phone number to your Yarvik Smartphone you can press
and hold the icon to call your Voicemail.
Index
Access your MicroSD card or USB drive in ES File Explorer
Access your MicroSD card or USB drive in ES File Explorer
Access your MicroSD card or USB drive in ES File Explorer
Access your MicroSD card or USB drive in ES File Explorer
2 Arranque doSmartphoneone
Ecrā principal do Android
Access your MicroSD card or USB drive in ES File Explorer
Access your MicroSD card or USB drive in ES File Explorer
Access your MicroSD card or USB drive in ES File Explorer
Access your MicroSD card or USB drive in ES File Explorer
Ak ste do svojho smartfónu Yarvik vložili microSD kartu, možete do ich obsahu vstupovat nasledovne:
Otvorte aplikáciu ES File Explorer (Prieskumnik ES) a kliknite na tlacidlo Favorites (Najoblúbenejsie) (sikonou modraj hviezdy).
Rozbalí sa ponuka Favorites (Ob'ubené). Kliknite na „korenovú“ ikonu označenú s „:
Vise Wi-Fi MAC-addresse for Yarvik Smartphone
Access your MicroSD card or USB drive in ES File Explorer
4.2 WiFi in Bluetooth
Wi-Fi
Nastavite povezavo z brežićnim omrežjem Wi-Fi. Odkljukajte gumb WLAN in aktivirajte Wi-Fi.
Access your MicroSD card or USB drive in ES File Explorer
Access your MicroSD card or USB drive in ES File Explorer
Ako ste umetnuli microSD karticu u Vas Yarvik Telefon, sadržaju na njoj možete pristupiti na sljedeci način:
Otvorite applikaciju ES File Explorer (ES pretraga datoteka) i kliknite na tipku Favorites (Favoriti) (s plavom zvjezdicom).
Otvara se izbornik Favorites (Favoriti). Kliknite na ikonu „korijen“ označenu sa „:
Doci ce te do ,korijena" datotecnog sustava Telefona, koji sadrzi nekoliko datoteka i mapa.
Pronadite i pritisnite mapu „mnt“:

Access your MicroSD card or USB drive in ES File Explorer
Access your MicroSD card or USB drive in ES File Explorer
Ako cTe IIOCTaBnH MicroSD KapTa BbB BaIIINcMapTfoH Yarvik, MoKcTe Ia IIOJIyUHTe IOCTbI IO HcR KaKTo CJIcJBa:
OTBOpTe IIpHIOJKeHHeTo ES File Explorer H IIpaKHeTe Bbpxy 6yToHa Favorites (IIpeIIOHTaHN) (c IKOHa KaTO cINH 3Be3Ja).
Cera MeHTo Favorites (IpeIIOHTaHH) ce pa3rpbIIa. IIpaKHeTe HKOHaTa „KopeH" O3HaYeHa c „:
Cera cte IOCTHnHaJIN DO,OCHOBHa INpeKTopnHa Ha qaiIOBa cnCTema Ha cMaprfoHa, cbIbpxKaIIa peHIIa qaiIOBE H IaIKN.
HamepeTe HIIpaKHeTe Bbpxy IaIkaTa .mnt":

IIaikata „mnt" cc OTbapra, IOKa3BaHKn HRAKOJIko IIaIKN:
IIaKata „sCard" e BbTpeneHata NaMeT Ha BaIIHcMaprOH Yarvik.
MokcTe, KOraTo c HaJIuHa, Ia H3IOJBaTe IIpeKHe IbT sdcard2 B IIO-rope cHOMeHaToTo MeHIO Favorites (IpeJIOuHTaHH) 3a 6bp3 IOCTbI IO BaIIaTa microSD Kapra.
ToBa ce IIpHJIaHa BcHcKN cKpaHHN TEKcTOBc B IJIaTa CnCTMa.
B „Android keyboard" („KJabhaTypa Ha Android") MoKeTe Ja NaHacTpOnTe ekpaHaTa KJIabhaTypa Ha BaIIHH cMapTfoH.
4.8 Датуниace
Tyk MoKTe Ia HactpOHTe IaTata H uaca Ha BaIIHc mApfoH Yarvik.
5 Пиложеня
CMaprfoHbT Yarvik 6bJe IocTaBeH c IIpeIbapnteJIHO HcTaJIHpAHH Apps (IIpNIOxHeH) (BHXKTe IIpIMepHTe IO-IOJy).

6 6aXdAnn n CbO6eHn
6.1 06axdknna
06aKaHaHHa
3a Ia H3BbprHrTe o6aKJaHe cbc CBOA cMaprfoH Yarvik Tp6Ba Ia H36peTe IIpHIOXcHHeTo „Phone" („TeJIefoH") ot
HaJIHHa Android HJa BbBcIeTe KoJa H TeJeOHeH Homcp
HaTnchHe,3aJa 3aIOuHete TeJIefoHeH pa3roBOp.
HaTnchHeTe , 3a Ja IIpeKpaTHe TeJIefoH en pa3roBOp.
MozkeTe Ja cBxpaHHTe TeJIefoHHNt HOpE Ha JInIeTo, C KOEtO CTe TROBOPNJn HAcKopo B CBOHTe KOHTaKTH.
3aДаHaIIpaBHTe TOBa,HaTnCHcTe HKOHaTa Ha NaHaJIHHa eKpaH Ha Android, cIeI ToBa 136epTe B TropHaT aYact Ha eKpaHa, 3aДa BJIc3eTc B IHCBBHnKa.
HaTNCHeTe TeJIeOHHnT HOMep, KOITo NcKaTe Na cBxpaHnTe B KOHTaKTnTe n H36epeTe OIIINrTa Add to contacs
3a Ia BnIHe CBOHTe KOHTaKTH, H36epTe NKOHaTa B rOpHaTa cTpaHa Ha ekpaHa.
3a IpaIPOBeIeTe MeKdyHapOJeH pa3ROBOp,HaTHcHeTe H 3aIpbXTe HKOHaTa IO6aBcTe cHMBoJ+
BbBeTe IIJIHnI TeJIefoH HOMep B (MeKdyHApOJeH HOMep, KOJ Ha oBJAcTTa n TeJIefoH HOMep).
HaTnchHe,3aJa 3aIOuHHe MeKJyHapOJeH pa3roBOp.
BxoJnIO o6aKaJaHe.
Korato IIOJIyuaBATE BxOJaIIO oBaJdaHe Ha BaIIHcMapTfoH Yarvik, Iue HMaTe 3 OIIHH. 3a Ia H36epTe OIIHH, Tp6Ba Ia IIb3HeTe HaJIbBO HIN HaIacHO.
- OTOBOP Ha o6aKaJaHe.
2.ИгнорupaHeHaO6aKlaHe.
OuHn IIO BpeMe Ha pa3roBOp.

- OToBopete nHaHeJa c TeJIefoHna KJIaBHaTypa
- AKTHBHpAe/JeaKTHBHpAe Ha BnCOKOROBOpHTeJ
- Barjymbaane
- 3aIbpxKaHe
- I06aBN IOINbJIHHTeJIeHe TeJIefoHep pa3roBop
Cbo6iEHHa.
CbC CBOA CMAPTOH Yarvik MokeTe Ja IIpeaBaTe SMS N MMS cbo6eHHa (MOJIa OTBeJKeTe, Ye KOrato H3IOJIBaTe Ta3n 0yHKINH3BbH CBOr peHOn, MOKeJa 6bIaT IO6aBeHN OIIbJIHHTeJIHN pa3XoIN KbM peRyJRApHNTe BN pa3XoIN 3a cbo6eHHa).
H3npaansHa SMS/MMScbo6eHne.
I36peTe HkoHaTa Ha NaHuaJIHHa ekpaH Android, Ie NOpJyHTe IperJIeH a cbo6ueHnra.

1.Добавerte Bndeo,ayno n cHmKn KbMcBoTo cbo6ueHne (MMS yHKnna)
2. Ió6aBeTe KOHTaKT KbM CBOeTo CbO6IIHe
3.Перледнаразrobop
4. Ió6aBeTe yCMHBKa KbM cB08 pa3rOBoP
5. H3tpHrTe cbo6uHenE
6. Otrbohop na BcHKn
7. H3npaTH cbo6eHHe
Dó6aBeTe HOMep Ha ΓλacOBA NIOHa / Bb3npoH3BekJaHe Ha cbo6IeHHB ΓλacOBA NIOHa.
3aJaHa3HaHTHe Homep Ha rJiacOba IIOIIa KbM CBOB cMaprfoH Yarvik Tpa6Ba JaHaTHcHeTe

HkoHaTa Ha BaIIHra HauJIeH ekpeH Android, HATncHeTn 3aIpbKTe HKOHaTa

IIe ce noBn onHra "Add number" (,No6aBn Homep").
B OIIINHrTa IJacOBa IIIOIa MoKeTe Ja H36peTe Voicemail settings (HaCtpoNn Ha IJACOBa IIIOIa) N Da BBBeJeTe CBOr HOMep 3a IJIacOBa IIIOIa.
CJIeKATOCTeHa3HaHJINTeJIefoHeH HOMep 3a IAcOBa NIOua BbB BaIIINcMaprfoH Yarvik,
MOKeTe Ia HaTHcHeTe N 3aIbPxHrTe HKOHaTa IIIIa.

3a Ia IIO3BbHHTe Ha BaIIaTa TJIacOBA
Cuprins
1 Inainte de prima utiliser
2 Pornire Smartphone
3 Ecran de inception Android
3.1 Adaugarea unor widgets 山 scurtaturi la ecranul de inceput
3.2 Setarea unei imagini de fundal
3.3 Menu de aplicaciones
Access your MicroSD card or USB drive in ES File Explorer
Daca ati introdus un card MicroSD in Smartphone-ul Yarvik, ii puteti accesa continutul dupa cum urmeazá:
Deschidei aplicata ES File Explorer (Explorare fiisiere ES) si dati clipe butonul Favorites (Preferinte) (avand ca simbol o stea albastră).
Se desfasoara meniul Favorites (Preferinte). Dati clic pe iconita ,radaicina" etichetata cu ,/":

IepBaHaCtpoiKa MoKeT 3aHrTB HeKOTOpoe BpeM, OKoJo 2-3 MHHyT.
IocJIe 3aBepHHeHH pHa HacTpoE cMaprfoHa Ha 3KpaHe IIOBHTc8 KpaH 6JIOKHPOBKN Android.
Ekpan 6iokupo6ku Android
IpeBnHbTe 3aOK (A) BIIpaBO JJIpa36JIOKpOBaHHcMapTfoHa. IocJIe Yero IIOBHTcR rIaBHbN Okpan Android.
3 Гльский Android
Глбьн кран Android
BbepxuykpaHa cMapToHa BceIa pacIOJIOKeHa Ctpoka coCTOAHN. Ctpoka coCTOAHN coIepKHT KaK cHcTcMHyHO HHΦOpMaIIHNO, TaK I ΦyHKIIHOHaJIbHbIe KHOIIKN.
1-MeHIOIpHJOKeHHN BnIXeTOB
2-BnJKeT (aHaJIOROBbIe qacbl)
3- 3hauKn npHIOxcknn
4- KhoIka «Ha3aI» - Bo3BpaH na npebIyIHH 3KpA HJI npebIyIHH Be6-caI, ecJH B HactoIIH MMeHT HcNoJIb3yeTc8pay3ep.
5-KhOIIKa DOMO- -B03BpaT KJIaBHOMy OKpaHy Android.
6-MHOrO3aJaUHaN KaHONKa
7-CnctemHoeBpeMa
8- HuaKaTop cnHaJa Wi-Fi
9- HndkaTop ypoBna 3apna 6aTape
10 - HnHKaTOp cHrHaJa SIM-KapTBi
11- IaHcJIb TeJIefoHa, 6pay3epa
12-PeKHM Bn6p0Bb3Oba
13 - HndkaTop cnHnHaJa Bluetooth
TJIaBHyI 3KpaH COCTOHT H3 pa3JINuHbIX CtpaHHII,IOCTyIK KOtOpbIM BO3MOKeH C IIOMOIIbIO IIpeMeIeHHra TJIaBHO rKpHa BIIpaBO/BJIeBO.
HaKMHTe Ha 3aIyHHeOe IprHIOKeHHe B MHOro3aJaHOM IpocMoTpe, YTObI 6bIcTpo IpeKJIIOHTbcr Ha Hee. YTo6bl 3aKpbITb 3aIyHHeOe IprHIOKeHHe, IPOkpyTHe ero BJIeBO.
3Iecb MoKHO H3MeHHTb KOHfHpyaHIO 3ByKOB cMapTfoHa (HaipnMep, ToJIbKO Bn6paIIra, Bn6paIIra I McJIoIIIA).
4.4 ΘκρaH
3Jecb MOxH0 H3MeHHtB JpKocTb 3KpaHa, pa3Mep IIpHΦTa H BpeM aBTOMaTHueCKORo peKHMa CHa.
O6paHTe BHHMaHHe, YTO YEM BbIIIE apKocTb 3KpaHa, TeM BblIe IOTpe6JIeHHe 3HeprHn. 3To IIpHBcIeT K 6bIcTpOMy pacXoJy 3HeprHn 6aTapEn.
EcJIH BbI Hc XOTHTe, YTO6bl 3KpaH ABTomaTHueCKn BpaJlaCn IIpH IepCBopauHBAHIN cMapTfoHa, BbIMoKeTe BKIOHTb/OTKIOHTb DaHHyO fYHKIIIOB HacToPoiKaX «Auto-rotate screen» («ABTomaTHueCKO BrpaJeHHaHa»).
4.5 Пиюжения
3decbMOKHO ynpabJrTb npHIOKeHHaMH,ycTaHOBJeHHbIMHa cMapToH Yarvik.
BbIMoKcTe HaKaTb Ha yCTaHOBJeHHoc IIpHIOXeHNc IJI pOcMoTpa HhΦopMaIIH O HcM, IIpn Heo6xoIIMOCTH yJaINTb C IOMOuBIO KHOIIKN «Uninstall» («YJaIHTb»).
06paHTte BHHMaHHe, YTO IIpHIOJKeHHa, IpeDyCTaHOBJIeHHbIe IIO yMOJIuaHHIO (TaKHe KaK, HApHMeP, KaJIbKyJIaTOp), He MOrYt 6bITb yJaJIeHbI.
Access your MicroSD card or USB drive in ES File Explorer
EcJIN B cMapTfoH Yarvik BcTaBJIeHa KapTa MicroSD, Bbl MoKeTe IIOJUyHTb IOCTyI K ee coIepKHMOMy cJIeIyOIIIM O6pa30M:
OTKpoIe IIpHIOJKeHne ES File Explorer I HaxMMTe KHOIIky Favorites (U36paHHoe) (3HaOOK B BnIe cHHei 3Be3IbI).
Pa3BepHETcMeHIOFavorites(H36paHHoe).HaKMHTe 3HaayOK(KOpHEBOIaIKN),KOTOpbI O6o3Haayetc CHMBOJOM /

TeIepb OTKpbT IOCTyI K «KOpHeBOH» IaIIke faiIOBOH cHcTeMbI cMapTfoHa, B KOTopoH HaxOJrTcH HeCKoJIbKO faiIOB H IaIOK.
HaIHTe HIIeIKHITe IaIKy «mnt»:

OTKpoetc nIka «mnt», B KOtOpOH HaxOJrTc HeckoJIbKO nIaOK:

IIaKa «sdcard» IIpeIOCTaBJIeT IOCTyI K BHyTpHeH IaMaTH cMaprTOHa Yarvik.
EcJH IOCTyIHO, Bb TaKKe MoKTe HcNoJIb3OBaTb JApJIbIK «SDcard2» ByIOMaHyTom paHee McHIO Favorites («I36paHHoc»)ДЯ 6bICtpoRo IOCTyIIa K KapTe NaMaTH MicroSD.
4.7Язби Клавиatype
HcnoJIb3yIte KHOIIky «Select language» («BbI6paTb Ia3bIK») IIIA BbI6opa Ia3bika HHTepfeica cMaprfoHa Yarvik.
JaHHbIy3bIK6yJeTHCIOJIb3OBaTbCRAIBBCErTOEKeCTaBcHCTeMbl.
B pa3eJIe «Android keyboard» («Клавиatype Android») Bbl MoKcTe HacTpOnTb 3KpaHHyO KJIaBNaTpy cMapTfoHa.
4.8 Дataи Время
3Decb Bbl MoKeTe HAcTpOHT bAty H BpeMa cMaptfoHa Yarvik.
5 Пиложеня
CMapTfoH Yarvik nocTabJIeTc r 3apaHee ycTaHOBJEHHbIMN IIpHIOJKeHHaMn (cm. IipHMepbI Hxke).

Otnpabka SMS/MMS-coo6eHH
HaKMHTe 3NaOH Ha TJIaBHOM 3KpaHc Android, nocJe yero oTKpoEcTcOHO coo6uHn.
- I06aBHTb BHeo, ayHno H3o6paJKeHne K coo6uEHHIO (ToJIbKO JIA MMScoo6uEHH)
- JIo6aHTb KOHTaKT K COo6eHHIO
- O63op 6eeJIbI
4.ДобавпьсмайнкбесеJ - OTMeHHTb coo6ueHHe
- OTBeHTb Bcem
- OTnpaBHTb coo6HcHne
YcTaHOBKa HOMepa rOIOcoBOI NooTbI / BocIIpOIN3BeJeHHe cOO6IeHHI RoIOcoBOI IooTbI

Дя устайн HOMepa Глобов IOчтбlaHa cMapTfoHe Yarvik HaKMHTe 3HaYOK Ha
JIaBHOM 3KpaHe Android, 3aTeM HaKMITE n yIepKbAite 3HaOk. Ha 3KpaHe oTo6pa3HTc oIIHra «Add number» («До6abITb HOMeP»).
B I npaMCTpax roIOcoBOI IOUThI MOxHO BbI6paTb HcO6XoHMBiC HAcTpoIKN H BBCCTH HOMep ROIOCOBOI IOUThI.
IocJe yctaHOBKn HOMepa roJIOcOBoH IOUThb Ha cMaprfoH Yarvik Bb MoKeTe HcIOJIb3OBaTb
3HaUOK, HaxKaB N yIcprKINBa eTO, YTO6bI IIO3BOHHTb Ha HOMep rIoOCOBn IOYtBI.
PokaJuk
1 Do noqatky BnKopncTahHra
2 YbimKHeHHcMapToohy
3 TolobnEkpan Android
3.1 DoaBaHnB ViKetiB Ta apNikB Ha roJOBHn ekpaH
3.2 HanaWtYBaHHa OHOBOrO pncyHka
3.3 MeHIO nporpaM
4 HanaatyBaHHcMapToHvYarvik
4.1 MeHIO HanaTyaHb
4.2 WiFi Ta Bluetooth
4.3 Napametpn 3Byky
4.4 EkpaH
4.5 Поррамн
4.6 Doctyn do nam'ayi ta kaptn MicroSD/Hocia USB
4.7 MoBa Ta KnaBiaIatypa
4.8 Data Ta Yac
5Поррамn
6 Tepeonhi 3BInKn Ta nobidomJeHHa
6.1 Tepeohhi 3Bihkn
6.2 Повдомлени
7 InΦopmaζη npo nizεη3iG N U/G P L
8 TapaHTiHi 306OB'3aHHa
9 BaxIbBa iHΦopMaúi
1 Do nochatky BnKopncTahnHa
IIaHOBHH KOpHcTbayu,
JaKyEmo 3a npH6aHHHaIIO npOyKTy.
3 MeTOIO IIIBNIKOTo Ta 3pyHOrO BHKOpHcTaHHaIIoro HOBOrO cMapTfoHy Yarvik IPOsHMo yBaJxHO O3HaHOMHTncb 3 IIM Noci6HNKOM Do NooaTKy eKcIIJaTaii.
Mn cnoiBaemocb, IIO Bn 6yJeTe B IOBHi MiPi HacoIoJxCyBaTHc b CmapTfoH Yarvik kOMOra IOBIIe!
Heo6xio npHnHTno yBaH: CmapTfoH Yarvik - ue BncoKOTOHH eJeKTPoHHn IpnJa, He Hamaarntecb po3bpatn Horo, 60 ie cnpHHHTb aHyIOBAHHrapaHTI Ta MoKe npH3BecTH IO HeCpPaBHoi p6oTH IIpHJaIy.
-
YHnKaIte HaHeceHHNcHJIbHnx yJapIB IpoDyKTy.
-
YHnKaIte BnKOpNCTaHHcMapTfoHy Iprn BnCoki Hn Hn3bKi TeMIIepaTypi a6o BV 6yNb-IAKOMy cpeIOBHI,Je IpiHJaIMOKe IOTpaIHHTY KOHTaKT 3 BOJIOHO, INJOM a6o MaHITHMN IOJIMN.
-
YHKAaTe NtpaJIJIHHHa CMapTfoH IprMnx COHryHHx IpOMEHIB IIpOTrOM TPhBAJIOrO yacy.
He BHKOPHCTOByTe IJIa KepyBaHHceHCOPHM ekpaHOM cMapTfoHy roctpi IIpeJMeTH, TaK JIe MOKe IIPN3BecTH IO NIOIIKOJIkeHHI IOBepxHi eKpaHa.
BHKOPHCTaHHaHbYIHHKIB,IIKIOueHIXIO cMapTfoHY IpoTfROM TpHBAIOrO Yacy, Ta/a6o 3aHaITTO BHCOKA rHyHcTB IIJ vac BHKOpHCTaHHaHbYIHHKIB MOKe cepNo3HO IIIkoIHTN CJIYX.
He IepetHaIe Iopory, He ciJaIte 3a KepMo aBTOMo6iJy Hn BeIOcHIIeJa IIq Yac BHKOpHCTaHHcMapTfoHy pa3OM 3 HaByIHINKaMn, a6N yHNKHyTN IOpOJXHbOTpaHCIOPTHX IpHToJ.
-
BnKOpHCTOByIe TiIbKn BiIIOBIIi 6aTapeiKn, 3apAHI npHcTpoi Ta akceCyApN 3i cMaprfoHOM Yarvik. BnKOpHcTaHH8 6yIb-IAKNX iHINx IpnHcTpoIB 3i cMaprfoHOM MOKe cTAHOBHn He6e3IeKY Ta IIpH3BeCTn Do IOPuyIeHHra paAHTiHNX yMOB.
-
BHKOPHCTOByTe TiJIbKN TPOXN BOJORY 6aOBHny TKaHHy IJIa OUHIIeHHcMaprfoHy, IJIa 3BOJIOKeHHI 6aOBHHOITKahHHBHKOPHCTOByTe TIJIbKN BOHy. CmaprfoH He MOKHa OUYIaTH 6vIJb-IAHM 3acobom IJIa OUHIIeHH (CKJa).
Bn MoKeTe BHKOpHCTOByBaTH cMapTfoH Yarvik BiJaPa3y J, IicTaBIIH Ioro 3 yIaKOBKn, 6e3 IepBHHOrO 3apJxKeHH6batapei.
BaxkaHO cnoaATky IOBHicTIO PO3PAnTH 6aTapeIO, IicJIy OTO IOBHicTIO 3apAnTH.
KIO CMapTfOH He BMnKaetbces IIcIaTaBaHH3 yIaKOBKN, 6aTape BKe IIOBHiCTO p03pJkeHa, OTKe cNoHaTKy Heo6xIHO II 3apAHTN.
2 YbIMKHeHHcMapToOHyOHy
IiI qac nepIoro BMnKaHHcMaprfoHy Yarvik Bam Heo6xio 6yJe BnKoHaTH pIHaJIaITyBaHb.
IepHHe HaJIaITyBaHHMe MoKe 3aHrTH DeaKn Yac, 6IN3bKO 2-3 XBHNH.
IicJ3aBepHHeHHpaHyHaJIaHTyBaHb cMapTfoHy Ha ekpaHi 3'YBHTbcra ekpaH 6IoKyBaHH Android.
Ekpan 6iokyaannn Android
IepemictiB 3amok (A) npabopyu IJIy po36IOkyBaHHc mApTfoHa. IIicJIy OTO 3'ABHTbcra roJIOBHN ekpan Android.
3 Головни ekpan Android
Toloshni ekepan Android
Bropi ekpaHa cMaprfoHy 3aBkHn po3TaIOBaHH pIOK cTATcy. PIAOK cTATcy BKIOHAc kCHeMHy IHOpMaIIO, TaK IyHKIIIOHaJIbHi KHOIIKN.
1-Mehio 3actocyHKIB Ta BiKcTeB
2-BidKer(aHaJIOROBn roaHHNK)
3-ApJHKn 3actocyHKIB
4- KhoIIka «Ha3aI» - noBepHeHHn IIO nopeHbOro ekpaHa a6o nopeHbOro Be6-caHTy, kIIO 3apa3 BiIKpHTn 6pay3ep.
5-Khonka «IdoMy»- noBepHeHHa roJIOHn ekpan Android.
6- Barato3aJauHa KJIaBina
7-Cncremmn qac
8- IHHkaTOp cHraJy Wi-Fi
9- IIndkaTop pibn 3apny akyMyJrTopa
10 - IHHKatop cHrHaJy SIM-kaPTn
11- IaHeJIb TeJIefoHy,6pay3epa
12 - Peknmbi6paanii
13 - INHKAtop cnHaJy Bluetooth
TIOOBHnEeKpaH cKlaIaIcBc3 p3HOMaHITHX cToPiHOK, IOCTyIIO JIKNX MOKJIINBn 3a IIOHOMOIO IIepemIIeHHra TIOJBHO eKpaHa IIpaBOpuy/JIBOpuy.
HaTnchIb 3aNyIeHy IporpaMy y 6araToIJIbOBomy IpeRJIi IJIrTOI, IIIO6 IIIBNko IpeeHTNo Hei. Bn MoKeTe 3aKpHTN 3aNyIeHy IporpaMy, IpeMeICTHBIIH II JIBopyu.
Access your MicroSD card or USB drive in ES File Explorer
YkuOy BaHcMapTfoH Yarvik BcTabJIeHa KapTa MicroSD, Bn MoKeTe OTpMaTH IocTyI IO II BMICTy TaKHi cNoci6:
BiKpnTe 3actocyHOK ES File Explorer Ta HATNCHTb KHOHNky Favorites (YIOIO6aHHN) (i3 3HaUKOM y BnIJIcIHbOi 3ipKN).
Po3rOpHeTbCMeHIOFavorites(YIIOIO6aHH).HaTHCHITb 3HaOK «KopeHRA,AKN II03HaueHO CHMBOJOM «/»:
3apa3 BiikpHTo DoctyIIO KopeHeBOi HAIKN FaiIOBOi CnCTeMH cMapTfoHy,Je 3haxOJIbTbcJekJIbKa FaiJIIB Ta IIaIOK.
3HaIitb Ta KlaHITb HANKy «mnt»:

BiKpHcTbca nAnka «mnt», y kii 3haoTbcra Iekilbka nanok:
IIaKa «sCard» Iae IocTyI IO BHyTpiiHbOi Iam'arTi cMaprfoHy Yarvik.
Як immo loocTyHIO, Bn taKoJ MoKeTe BHKOpHcTObyBaTH npIik «sCard2»В 3raHaHomy paHHie McHIO Favorites («YnoO6aHHa») IIJI IIBNkoTo loocTyu y KoAPTN NaM'rti MicroSD.
4.7 MoBa Ta KnaBiaTypa
BHKOPHCTOByIte KHOIIky «Select language» («O6paTH MOBy») IJIa 6paHHa MOH eKpaHa cMaprfoHy Yarvik.
IcMoBa 6yIe BHKOpHcTaHa IyI yCx TEKCTIB BciI cHCTemI.
Y po3diIi «Android keyboard» («KJIaBiaItypa Android») Bn moKeTc HajaIIITyBaTH cKaPaHHy KJIaBiIatypy cmapTfoHa.
4.8 Data Ta Yac
TyBn MoKeTe BcTaHOBHT TaTy Ta vac cMaprfoHy Yarvik.
5 Поррамn
Cmaprfoh Yarvik noctabJIeTbc8 i3 3a3JaIeIb BcTaHOJIeHMM 3acTOcyHKamn (INB. npNKJIaII nn IJI).


6 Telefonni 3Bihkn Ta nobidomlenna
6.1 Telefonni 3Binhn
BukJInK
Дя 3дисення TeJIeФОHHOrO I3BiHka 3a ДОПOMOROcMaprФоHy Yarvik BiДКрИТe nporpaMy «Phone» («TcJIeФОH») Ha
roIOBHOmy ekpaHI Android , a nOTIM BBeIITb KOJ MICTa Ta HOMep TeJefoHy.
HaTnchHtB KhoNkU, 06 3aTeJefoHyBaTH.
HaTnchItb KhoIky 3aBcPIIeHHra TceJcfoHHoro I3BiHka.
Bn moKeTe 36epertH y cIncky KOHTaKtIB TeIefoHHi HmOpH oci6, kHM qacto TeIefoHyTe.
IJIy IbOTo HaTHcHITb 3HaUOK Ha roIOBHOmy ekpaHI Android, a NotIM HaTHcHITb Bropi ekpHaHa IIaBXOUY IO JyPHaJy BnKJIHKiB.
HaTnchHb HOMep TeJIefoHy, AKN XOueTe 36epertn y cIncky KOHTaKTIB, JaJI o6epitb Iapametp Add to contacts
IJIepeJIy cHcKy KOHTaKTiB HATnCHiTb 3HaOk Bropi ekpaHa.
JIa 3iHcHnHa MxHapOAnHO r3BInKa HATnCHiTb Ta yTpHmYte 3NaOH, IIO6 IOJAtN CHMBOJI +
BBeITb HOMep IOBHicTIO (MIXHapOHN HOMep, KOIMcTa Ta HOMep TeJIeOHy).
HaTnchItb KHOIIKy 3JIiCHeHHaMIXHapOIOHOI3BiHKa.
BiiIOBIIb Ha I3BiHok
Ipn BxIDHOMy 33BiHKy Ha cMapTfoH Yarvik Bam 6yNyTB JocTyHi 3 oIIii. IINBn6bpyOuHicI3HNXIIpOBeITbIIBopya6oIPabOpuy.

- BiIOBicTH Ha BHKJINK.
- ITHOPVBAHTBHKJINK.
Onii,doctynHHiuaCTeJefoHHo3BbHka
- BiikpnTH uHΦpOBy NaHeJIb TeJIeΦoHa
-
YbIMKHyTH/BHMKHyTH DHHaMik
-
BHMKHYTH 3BYK
- YtpmaHHa
- IodatnIte oinn TeJefoHHnn 3BbIHOK
IobiDomJIeHHra.
3a IIOIOMOIO cMapTfoHy Yarvik MoKHa BiIIpabJIaTH SMS Ta MMS-IOBIOMJIeHHA (3BepHITb yBaIy, 3a 3a BiIIpaBky IOBIOMJIeHb 3a MeKaAMn BaIIoro perioHy, OKpIM CTAHapTHNX TapNΦIB, MoKe 6byTN C7aHTyTa IOnaTKOba IIaTa).
BiiipapBa SMS/MMS-noiBijomJenb
HaTnCHiB 3NaOH KaHrOJIOBHOMy ekpaHI Android, icJr QOro BiKpHcBcBikHO IOBIOMJIeHHa.

- Iodatn Biico, ayio Ta 306paKeHHn Do NobiomJicHH (TJIbKn JIN MMS-IOBiiOMJcHb)
- JIoJAtH KOHTaKT Jo IOBijOMJIeHH
- OrJyIb 6eciH
- Iodatn emorpamv lo 6eciiH
- CkacyBaTH IOBIOMJEHH
- Bīdnobjctn BCIM
- Haniicjatn nobijomjeHH
YcTaHOBKa Homepa TIOOCOBoI NooTH / BiITBOpEHNHOBIOMJIeHb TIOOCOBoI NooTH
IyctaHOBKn Homepa roJocOBoII IooTH Ha cMaprfoHi Yarvik haHCHITb JpIK
IIOOBHOMy ekpaHI Android, IOTIM HATnCHiTB Ta yTpHMyIe KHOIIKy Ha ekpaHI 3'YBHTbcr OIIIA «Add number» («Додати Homep»).
B oniiX roJIOcoBOI IOITH Bn MOKeTe o6paTH HaJIaIIITyBaHHr rOJIOcoBOI IIOHTN Ta BBecTH HOpE rOJIOcoBOI IOITH.
IicJIa BCTaHOBKn HOMepa roJIOcOBoi IIOHTn Bn MoKeTe, BiIOIOBIAHNO, BHKOpNCTOByBaTH
KHOIIky, IIIOI3BOHHTN Ha HOMep I0LOCOOII IOIHTN, HAITNCHYBIIH Ta yTpIMyIOUH II.
1
Android 3
3.1
ai a ai 分母最小值为 k . 3.2
3.3
Yarvik 4
4.1
BluetoothWiFi 4.2
Gall 4.3
4.4
4.5
MicroSD/USB 4.6
4.7
4.8
5
6
J6.1
6.2
GNU/GPL 7
J 8
piaiaill jyjc
Lijie 1
yariv klll yarik
Jssy Jybjy Yarvik sall lalai jol
y Yarvik sill dla: a
jlll lll 1
y
y 1
y
aannnnae aee
y
S OBC = S AOB + S_ BOC
yivk 1000
i j 1
Julla a bai jil bao call p wll lal alh 11y a h Jull a bai bao
()iill 100
yArvik sll
J 1
Jilliaaibv ylgic
Jyavik sill
3 2
Slll lal jai 15i, 1j. Android
A
Jusj
Android 4 15 15 15 15 15 15 15 15 (A)
Ie biaaii aie 15 e 15 iis gns yss slll lallllllllllllllllllllllllllllllllllllllllllllllllllllllllllllllllllllllllllllllllllllllllllllllllllllllllllllllllllllllllllllllllllll

y
Ie biaial qy jn 15 15 k s r g y aaii lal lllll 12 12 12 12 12 12 12 12 12 12 12 12 12 12 12 12 12 12 12 12 12 12
"Apps" 102
y 1 y
左向右异
Choose wallpaper "aiai jai i aiai iiaiaiaiaiaiaiaiaiaiaiaiaiaiaiaiaiaiaiaiaiaiaiaiaiaiaiaiaiaiaiaiaiaiaiaiaiaiaiaiaiaiaiaiaiaiaiaiaiaiaiaiaiaiaiaiaiaiaiaiaiaiaiaiaiaiaiaiaiaiaiaiaiaiaiaiaiaiaiaiaiaiaiaiaiaia ia" (j) "from "Wallpapers" (品) "Live Wallpapers" (r) "Gallery" J
3.3

aaii iiaai jai jai jai bll ie biie
ailll lalllllllll "Apps" 1e biall, aalil allll lalll
aepaae aee
aaiiaaiiie
gjyabJia
Yarvikk 4
山
y
//13/25,11/24
c1 = j2^2 且 J 使 S = S
4.2 WiFi & Bluetooth
Wi-Fi
Wi-Fi 2
WLAN
aaii i 11111111111111111111111
"Connect"
"Connected" aks
a
Yarvik Wi-Fi MAC
(1) (multitask) all j j j j j j j j j j j j j j j j j j j j j j j j

"Advanced" (c)
."MAC address" "Advanced Wi-Fi" Wi-Fi MAC
Bluetooth
"Search for Devices"
i 1
"Available Devices"
Yarvik 1234567890123456789012345678901234567890123456789012345678901234567890123456789012345678901234567890123456789
.1234 0000 0000 0000 jn jn jn jn jn jn jn jn jn jn jn jn jn jn jn jn jn jn jn jn jn jn jn jn jn jn jn jn jn jn jn jn jn jn jn jn jn jn jn jn jn jn jn jn jn jn jn jn jn jn j
y Yarvik y
yarvik
4.3
.(j)
4.4
gill g 100000000000000000000000000000000000000000000000000
415.
SiYarvik 1e Ii iI 11 11 11 11 11 11 11 11 11 11 11 11 11 11 11 11 11 11 11 11 11 11 11 11 11 11 11 11 1
microSD 4.6
m microSD 1
USB a Mac PC Yarvik
JU 11111111111111111111111111111111111111111111111
.(USB) "Turn on USB storage"
iJyjI jyj
"OK" 5
Jalal Yarvik sall aila 1
Aeill yS jn jss aalbglge Jy Sll dll MicroSD 15
.USB 1 kJ "Turn off USB storage" Jz jz
y:abx
aBluyi dJolj sK, Jolci jolci

Access your MicroSD card or USB drive in ES File Explorer
:LaLgIyJyIyIyIyIyIyIyIyIyIyIyIyIyIyIyIyIyIyIyIyIyIyIyIyIyIyIyIyIy
()Favorites ES File Explorer
lll llllllllllllllllllllllllllllllllllllllllllllllllllllllllllllllllllllllllllllllllllllllllllllllllllllllllllllllllllllllllllllllllllllllllllllllllllllllll

“mnt"
.Yarvik slll a lld sld"sdcard"
I I I I I I I I I I I I I I I I I I I I I I I I I I I I I I I I I I I I I I I I I I I I I I I I I I I I I I I I I I I I I
4.7
"Yarvik (a) (a) (a) (a) (a) (a) (a) (a) (a) (a) (a) (a) (a) (a) (a) (a) (a)
AaSLpulill aaiillnagaaiae gie bbiy
"Android keyboard"
.Yarvik
(olil) jil) Yarvik Sll

6
6.4
Jll
A
a
y
J 1