
BHT2000A - Beard trimmer REMINGTON - Free user manual and instructions
Find the device manual for free BHT2000A REMINGTON in PDF.
User questions about BHT2000A REMINGTON
0 question about this device. Answer the ones you know or ask your own.
Ask a new question about this device
Download the instructions for your Beard trimmer in PDF format for free! Find your manual BHT2000A - REMINGTON and take your electronic device back in hand. On this page are published all the documents necessary for the use of your device. BHT2000A by REMINGTON.
USER MANUAL BHT2000A REMINGTON
Thank you for buying your new Remington® product. Please read these instructions carefully and keep them safe. Remove all packaging before use.

IMPORTANT SAFETY INSTRUCTIONS
WARNING - TO REDUCE THE RISK OF BURNS, ELECTROCUTION, FIRE OR INJURY TO PERSONS:
1 This appliance can be used by children aged from 8 years and above and persons with reduced physical, sensory or mental capabilities or lack of experience and knowledge if they have been supervised/instructed and understand the hazards involved. Children shall not play with the appliance. Cleaning and user maintenance shall not be done by children unless they are older than 8 and supervised. Keep the appliance and cable out of reach of children under 8 years.
2 Do not use this product if it is not working correctly, if it has been dropped or damaged, or dropped in water.
3 Do not leave the appliance unattended while plugged in except whilst charging.
4 Keep the power plug and cord away from heated surfaces.
5 Make sure the power plug and cord do not get wet.
6 Do not plug or unplug the appliance with wet hands.
7 Do not use the product with a damaged cord. A replacement can be obtained via our International Service Centres.
8 Store the product at a temperature between 15^ and 35^
9 Always unplug from the mains whilst cleaning.
10 Do not use attachments other than those we supply.
11 This product is for cordless use only.
12 This appliance should be supplied with approved safety isolating adaptors SW-040010EU/HK28G-3.6-100 (for Europe) and SW-040010BS/HK28B-3.6-100 (for United Kingdom) with the output capacity of 3.6-4.0Vdc; 100mA.
13 This product is for household use only.
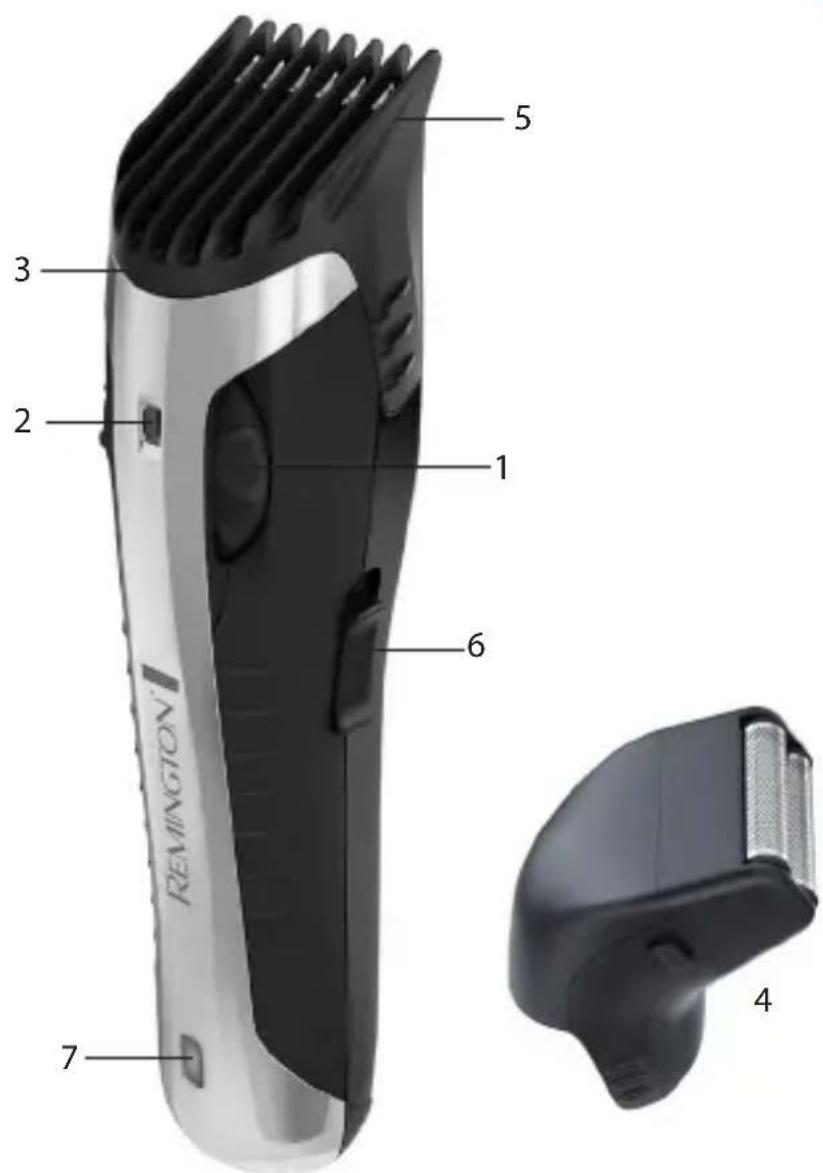

KEY FEATURES
1 5 Position "Zoom wheel"
5 Cutting assembly
2 Length position indicator
6 On/off switch
3 Adjustable trimmer comb attachment
7 Charging indicator
4 Mini foil shaving attachment
8 Charging adaptor (not shown)

GETTING STARTED
Be patient when first using your body trimmer. As with any new product, it may take a little while to familiarise yourself with the product. Take the time to acquaint yourself with your new trimmer, as we are confident you will receive years of enjoyable use and complete satisfaction.
CHARGING
Before using your body trimmer for the first time, charge for 14-16 hours.
- Ensure the appliance is turned off.
- Connect the charging adaptor to the product and then to the mains. The charging indicator will light up.
- Use product until the battery is low.
- Your trimmer cannot be overcharged. However, if the product is not going to be used for an extended period time (2-3 months), unplug it from the mains and store. Fully recharge your body trimmer when you would like to use it again.
To preserve the life of your batteries, let them run out every six months then recharge for 14-16 hours.
INSTRUCTIONS FOR USE
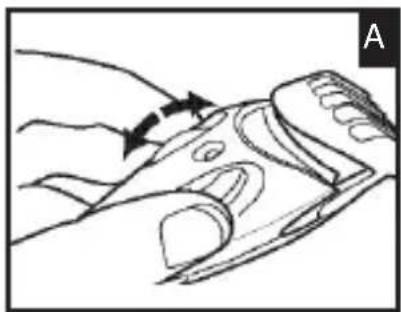

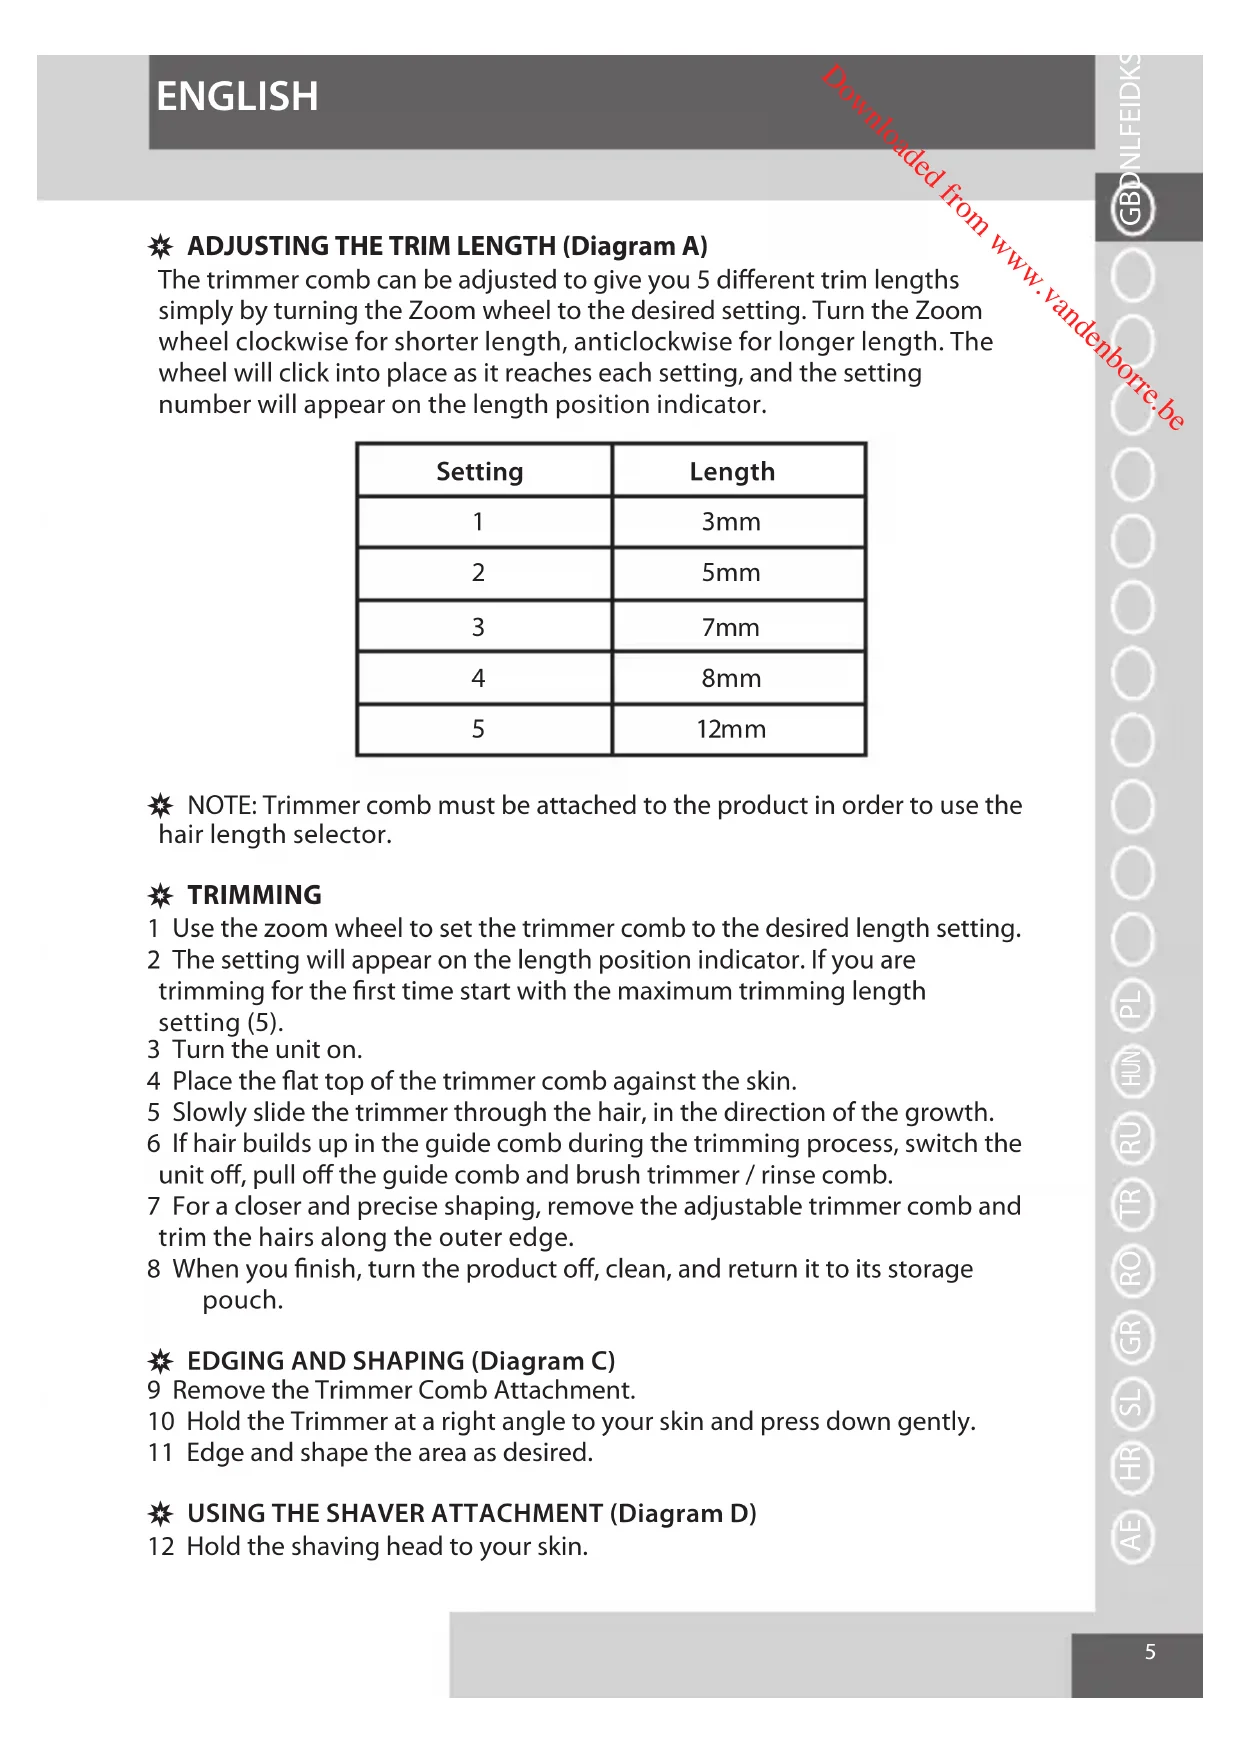
ADJUSTING THE TRIM LENGTH (Diagram A)
The trimmer comb can be adjusted to give you 5 different trim lengths simply by turning the Zoom wheel to the desired setting. Turn the Zoom wheel clockwise for shorter length, anticlockwise for longer length. The wheel will click into place as it reaches each setting, and the setting number will appear on the length position indicator.
| Setting | Length |
| 1 | 3mm |
| 2 | 5mm |
| 3 | 7mm |
| 4 | 8mm |
| 5 | 12mm |
NOTE: Trimmer comb must be attached to the product in order to use the hair length selector.
TRIMMING
1 Use the zoom wheel to set the trimmer comb to the desired length setting.
2 The setting will appear on the length position indicator. If you are trimming for the first time start with the maximum trimming length setting (5).
3 Turn the unit on.
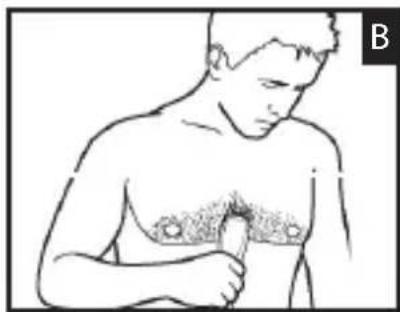
4 Place the flat top of the trimmer comb against the skin.
5 Slowly slide the trimmer through the hair, in the direction of the growth.
6 If hair builds up in the guide comb during the trimming process, switch the unit off, pull off the guide comb and brush trimmer / rinse comb.
7 For a closer and precise shaping, remove the adjustable trimmer comb and trim the hairs along the outer edge.
8 When you finish, turn the product off, clean, and return it to its storage pouch.
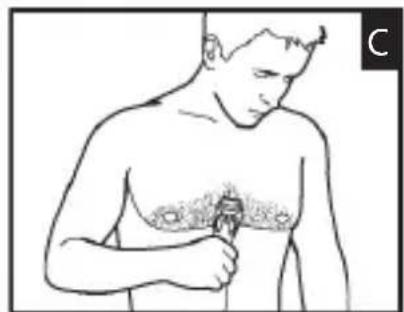
EDGING AND SHAPING (Diagram C)
9 Remove the Trimmer Comb Attachment.
10 Hold the Trimmer at a right angle to your skin and press down gently.
11 Edge and shape the area as desired.
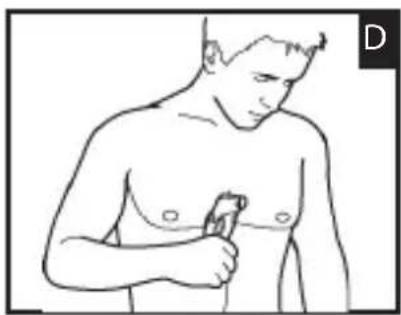
USING THE SHAYER ATTACHMENT (Diagram D)
12 Hold the shaving head to your skin.
ENGLISH
13 Stretch the skin with your free hand so the hairs stand upright.
14 Only apply light pressure on the shaving head while shaving.
15 Shave against hair growth.
16 The Microscreen shaving technology with circular foil holes is developed to give a controlled close cut.
EXCHANGING THE ATTACHMENTS
17 Always ensure the trimmer is switched off before changing the trimmer and shaver attachments.
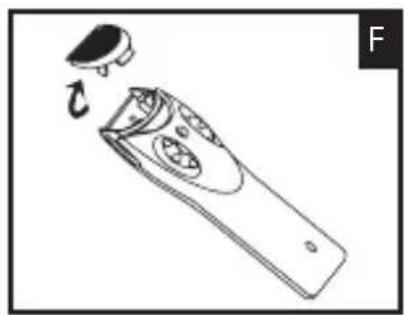
REMOVING THE TRIMMER COMB AND CUTTING ASSEMBLY
18 Hold the Trimmer in one hand with your thumb firmly on the Zoom wheel to keep it from turning.
19 With your other hand, gently pull the trimmer comb attachment off the Trimmer.
20 Remove the cutting assembly by firmly pushing up on the blade with your thumb (Diagram E & F).
REMOVING THE SHAYER ATTACHMENT
21 Hold the Trimmer in one hand with your thumb firmly on the Zoom wheel to keep it from turning.
22 With your other hand, gently pull the Shaver Attachment off the Trimmer.
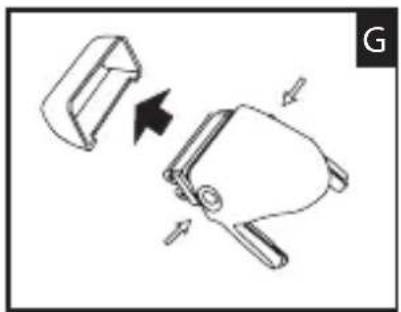
REMOVING THE SHAYER COVER (Diagram G)
23 Gently push the buttons either side of the shaving foil. With the other hand lift the shaver cover. Clean then replace.
REPLACING THE CUTTER ASSEMBLY
24 Hold the Trimmer in one hand. With your other hand, insert the lower part of the cutter assembly into the Trimmer, push down the cutter until firmly attached.
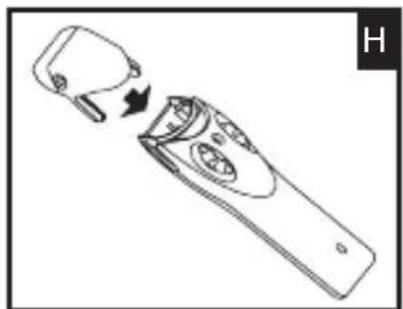
REPLACING THE TRIMMER COMB AND SHAVER ATTACHMENT (Diagram H)
25 Hold the Trimmer in one hand with your thumb firmly on the Zoom wheel to keep it from turning. Ensure that the Length Position Indicator is at 1.
26 Slide the comb/shaver down the grooves until it clicks into place.
NOTE: The trimmer comb and shaver attachment can only be attached in one way. If it does not go on correctly, turn it around and try again.
REPLACING THE FOILS & CUTTERS
27 To ensure the continued highest quality performance from your shaver, we recommend that the foil and cutter are replaced regularly.
Signs that your foils and cutters need replacing.
- Irritation: as foils get worn, you may experience skin irritation.
Pulling: as the cutters wear, your shave may not feel as close and you may feel the cutter pulling your hair. - Wear through: you may notice that the cutters have worn through the foils.
Replacement cutters and foils available.
Care for your product to ensure a long lasting performance. We recommend you clean your shaver after each use. The easiest and the most hygienic way to clean the shaver is by rinsing the product head after use with warm water.
Always keep the trimmer in the "off" position when not in use.
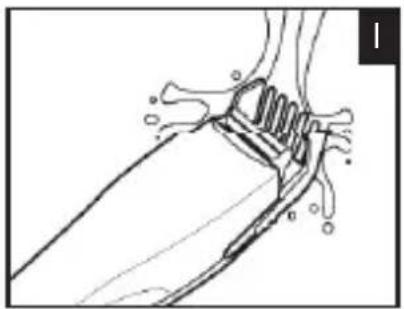
AFTER EACH USE
- Turn Trimmer off.
- Remove the adjustable trimmer comb and cutter assembly or shaver attachment.
- Gentle tap on a flat surface to remove hair particles, and brush the remaining hairs away/rinse under warm water (Diagram I).
CLEANING CAUTIONS
- Only the adjustable trimmer comb and cutter assembly may be removed from the Trimmer for cleaning.
- Cleaning should only be done with a soft brush, such as the brush supplied with the product.
Only use the light-grade oil supplied or sewing machine oil on the blades. - Do not use harsh or corrosive cleaners on the units or their cutters.
- Do not apply pressure or hard objects to cutters.
- Do not disassemble cutter assembly.
- Do not submerge in water as damage will occur.
WARNING:
Detach the hand-held part from the supply cord before cleaning in water. Shaver heads suitable for cleaning under an open water tap.
STORAGE
- Store this appliance and cord in a moisture-free area. Do not store it in temperatures exceeding 140^ (60^) .
- Do not wrap the cord of the charging adaptor around the appliance.

BATTERY REMOVAL
The battery must be removed from the appliance before it is scrapped.
- The appliance must be disconnected from the supply mains when removing the battery.
- Ensure the clipper is discharged of all power and disconnected from the mains.
- Remove the trimmer head or shaver head.
Unscrew 1 screw located on the back housing of the trimmer.
- Lift or pry the clipper halves apart, exposing the inner housing.
Unscrew 2 screws located on the inner housing.
- Remove the inner housing, lift or pry the inner housing to upper and lower part.
- Remove the battery and printed circuit board assembly from the lower part.
- Cut the tabs on both ends of the battery and remove from the printed circuit board.
The battery is to be disposed of safely.

ENVIRONMENTAL PROTECTION
To avoid environmental and health problems due to hazardous substances in electrical and electronic goods, appliances marked with this symbol must not be disposed of with unsorted municipal waste, but recovered, reused or recycled.
UDSKIFTNING AF TILBEHØR
16 Sorg altid for, at trimmeren er slukket, for du skifter trimmer- og shaverdele.

SADAN FJERNES TRIMMERKAMMEN OG SKAEREENHEDEN
UDSKIFTNING AF SKAER & KNIVE
J 1 J 1 J 1 J 1 J 1 J 1 J 1 J 1 J 1 J 1 J 1 J 1 J 1 J 1 J 1 J 1 J 1 J 1 J 1 J 1 J 1 J 1 J 1 J 1 J 1 J 1 J 1 J 1 J 1 J 1 J 1 J 1 J 1
27
•
.
.
•
.
•
•
•
.
J 11111111111111111111111111111111111
J 1
a1111
joo haoe bllgaoaogbuiill jaii jia 1
i 10000000000000000000000000000000000000000000000000000000000
11
(D)
12
13
14
15
16
.
17
· = 1
18
.
19
E Jk) 20
.(F &
a
21
.
22
(G)
23
A
a
24
(H)
25
1JgUgUgUgUgUgUgUgUgUgUgUgUgUgUgUgUgUgUgUgUgUgUgUgUgUgUgUgUgUgUgUgUgUgUgUgUgUgUgUgUgUgUgUgUgUgUgUgUgUgUg
Remington® is a Registered Trade Mark of Spectrum Brands, Inc.,
or one of its subsidiaries
VARTA Consumer Batteries GmbH & Co. KGaA, Alfred-Krupp-Str. 9, 73479 Ellwangen, Germany
www.remington-europe.com
© 2013 SBI