BP W100 - Blood pressure monitor MICROLIFE - Free user manual and instructions
Find the device manual for free BP W100 MICROLIFE in PDF.
| Product type | Wrist blood pressure monitor |
| Brand | Microlife |
| Model | BP W100 |
| Measurement method | Oscillometric, conforming to Korotkoff method |
| Measurement range (pressure) | 20 - 280 mmHg |
| Measurement range (pulse) | 40 - 200 beats/min |
| Resolution | 1 mmHg |
| Static accuracy | ± 3 mmHg |
| Pulse accuracy | ± 5 % of reading |
| Dimensions | 80 × 70 × 70 mm |
| Weight | 130 g (with batteries) |
| Power supply | 2 AAA alkaline batteries 1.5 V |
| Battery life | Approximately 460 measurements (new batteries) |
| Memory capacity | 200 results |
| Displays | Systolic pressure, diastolic pressure, pulse, date/time, alarm, arrhythmia indicator, battery charge indicator |
| Special functions | Cardiac arrhythmia detection, programmable alarm, auto-off |
| Wrist circumference | 13.5 - 21.5 cm |
| Operating conditions | 10 - 40 °C, relative humidity 15 - 95 % |
| Storage conditions | -20 to 55 °C, relative humidity 15 - 95 % |
| Protection | IP20 |
| Standards | EN 1060-1/-3/-4, IEC 60601-1, IEC 60601-1-2, IEC 60601-1-11 |
| Warranty | 5 years (excluding batteries, cuff and consumable parts) |
| Cleaning | Device: dry, soft cloth. Cuff: damp cloth with mild detergent |
Frequently Asked Questions - BP W100 MICROLIFE
User questions about BP W100 MICROLIFE
0 question about this device. Answer the ones you know or ask your own.
Ask a new question about this device
Download the instructions for your Blood pressure monitor in PDF format for free! Find your manual BP W100 - MICROLIFE and take your electronic device back in hand. On this page are published all the documents necessary for the use of your device. BP W100 by MICROLIFE.
USER MANUAL BP W100 MICROLIFE
Europe/Middle-East/Africa
Microfle AG
Esperstrasse 139
3443 Widner/Switzerland
Tel. +41/717277030
Fax+41/7-7277039
EnednirMicrolife.ch
www.mitsalife.com
Asia
Microbial Corporation
9F.431.RuiGang Road, Neilu
Taipei 11492 Taiwan, R.O.C.
Tel:189628797-1298
F+88678797-1253
Email service@nigra.com.cn
www.microlife.com
North / Central / South America
Microlit: USA, Inc.
1617 Guf to Bay Bld. 2nd Floor Ste A
Caarwater, FL 33755/USA
Tel:1724425353
Fax+7274425377
Email: rasa@nrolius.com
www.misolite.com
RR=15/1417-17.75

Microlife BP W100
EN1
图
FR 10
ES 20
PT 30
DE 60
DE 4
RU 57
PL 64
图→/4
10
601
RO 96
CZ> 106
16
0
SL 126
TR 135
GR 14B
AB 154
A 10
F 108

microlife
Microlife BP W100
mikrolife
Guarantee Card BP W100
Name of Purchaser / Nom de l'acheteur / Nombre del comprader / Nombre de comprider / Nombre de Kaufers / M.O. noxaryarnes / Imle / Nazvasko nahycowy / Vasarlo neve / Ime ha ygynaia / Numele cmparatalorul / Jmelo kupjurov / Meno zakaznikla / Ime in primek kupača / Alcinari Ad / Ovarrytravnoj ycoayam / (yaz) / yaznna
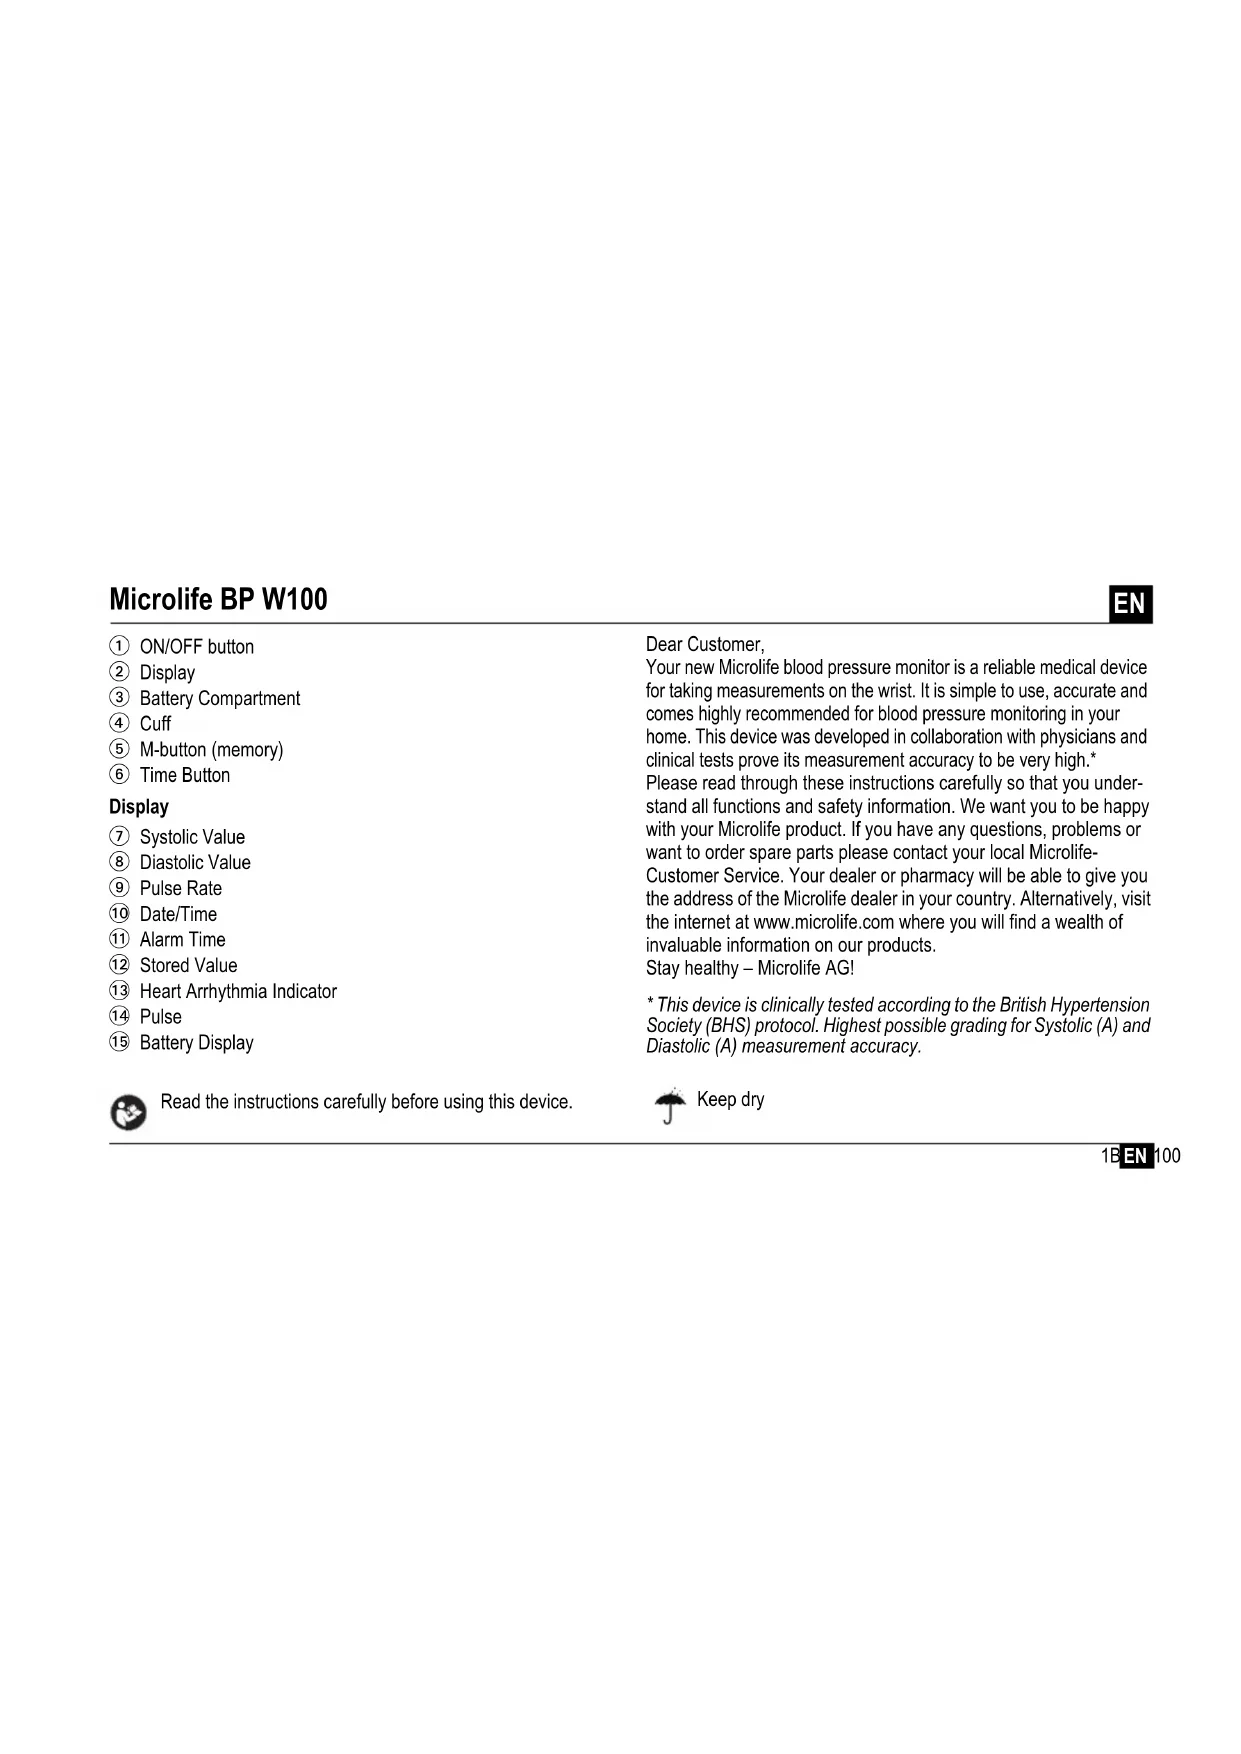
① ON/OFF button
② Display
③ Battery Compartment
Cuff
⑤ M-button (memory)
⑥ Time Button
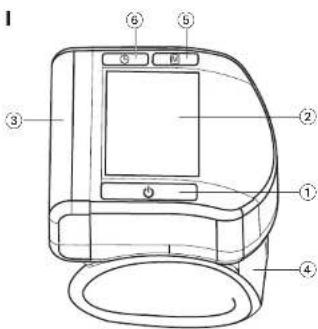
Display
Systolic Value
⑧ Diastolic Value
⑨ Pulse Rate
10 Date/Time
1 Alarm Time
12 Stored Value
13 Heart Arrhythmia Indicator
14 Pulse
15 Battery Display
Dear Customer,
Your new Microlife blood pressure monitor is a reliable medical device for taking measurements on the wrist. It is simple to use, accurate and comes highly recommended for blood pressure monitoring in your home. This device was developed in collaboration with physicians and clinical tests prove its measurement accuracy to be very high.*
Please read through these instructions carefully so that you understand all functions and safety information. We want you to be happy with your Microlife product. If you have any questions, problems or want to order spare parts please contact your local Microlife-
Customer Service. Your dealer or pharmacy will be able to give you the address of the Microlife dealer in your country. Alternatively, visit the internet at www.microlife.com where you will find a wealth of invaluable information on our products.
Stay healthy - Microlife AG!
- This device is clinically tested according to the British Hypertension Society (BHS) protocol. Highest possible grading for Systolic (A) and Diastolic (A) measurement accuracy.

Read the instructions carefully before using this device.

Keep dry
Table of Contents
- Important Facts about Blood Pressure and Self-Measurement
How do I evaluate my blood pressure?
-
Using the device for the First Time
-
Activating the fitted batteries
-
Setting the date and time
-
Taking a Blood Pressure Measurement using this device
-
Appearance of the Heart Arrhythmia Indicator for early Detection
-
Data Memory
Viewing the stored values
Memory full
Clearing all values
How not to store a reading
-
Setting the Alarm Function
-
Battery Indicator and Battery change
-
Low battery
- Flat battery - replacement
-
Using rechargeable batteries
-
Error Messages
-
Safety, Care, Accuracy Test and Disposal
Safety and protection
Device care
- Cleaning the cuff
Accuracy test
DisposaI
-
Guarantee
-
Technical Specifications Guarantee Card (see Back Cover)

Type BF applied part
-
Important Facts about Blood Pressure and Self- Measurement
-
Blood pressure is the pressure of the blood flowing in the arteries generated by the pumping of the heart. Two values, the systolic (upper) value and the diastolic (lower) value, are always measured.
- The device indicates the pulse rate (the number of times the heart beats in a minute).
- Permanently high blood pressure values can damage your health and must be treated by your doctor!
- Always discuss your values with your doctor and tell him/her if you have noticed anything unusual or feel unsure. Never rely on single blood pressure readings.
-
A number of factors can affect the accuracy of measurements taken on the wrist. In some cases, the result may differ from the measurement taken on the upper arm. We therefore advise you to compare these values with those produced by the upper arm measurement and discuss them with your doctor.
-
Enter your readings in the enclosed blood pressure diary. This will give your doctor a quick overview.
- There are many causes of excessively high blood pressure values. Your doctor will explain them in more detail and offer treatment where appropriate. Besides medication, relaxation techniques, weight loss and exercise can also lower your blood pressure.
- Under no circumstances should you alter the dosages of any drugs prescribed by your doctor!
- Depending on physical exertion and condition, blood pressure is subject to wide fluctuations as the day progresses. You should therefore take your measurements in the same quiet conditions and when you feel relaxed! Take at least two measurements per day, one in the morning and one in the evening.
It is quite normal for two measurements taken in quick succession to produce significantly different results. - Deviations between measurements taken by your doctor or in the pharmacy and those taken at home are quite normal, as these situations are completely different.
- Several measurements provide a much clearer picture than just one single measurement.
- Leave a small break of at least 15 seconds between two measurements.
-
If you are pregnant, you should monitor your blood pressure very closely as it can change drastically during this time!
-
If you suffer from an irregular heartbeat (arrhythmia, see «Section 4.»), measurements taken with this device should only be evaluated after consultation with your doctor.
The pulse display is not suitable for checking the frequency of heart pacemakers!
How do I evaluate my blood pressure?
Table for classifying blood pressure values in adults in accordance with the World Health Organisation (WHO) in 2003. Data in mmHg.
| Range Systolic Diastolic Recommendation | ||||
| blood pressure too low | ↓ 100 | ↓ 60 | Consult your doctor | |
| 1. | blood pressure optimum | 100 - 120 | 60 - 80 | Self-check |
| 2. | blood pressure normal | 120 - 130 | 80 - 85 | Self-check |
| 3. | blood pressure slightly high | 130 - 140 | 85 - 90 | Consult your doctor |
| 4. | blood pressure too high | 140 - 160 | 90 - 100 | Seek medical advice |
| 5. | blood pressure far too high | 160 - 180 | 100 - 110 | Seek medical advice |
| 6. | blood pressure dangerously high | 180 ↑ | 110 ↑ | Urgently seek medical advice! |
The higher value is the one that determines the evaluation. Example: a readout value between 150/85 or 120/98 mmHg indicates «blood pressure too high».
2. Using the Device for the First Time
Activating the fitted batteries
Pull out the protective strip from the battery compartment ③.
Setting the date and time
- After the new batteries are fitted, the year number flashes in the display. You can set the year by pressing the M-button 5. To confirm and then set the month, press the time button 6.
- Press the M-button to set the month. Press the time button to confirm and then set the day.
- Follow the instructions above to set the day, hour and minutes.
- Once you have set the minutes and pressed the time button, the date and time are set and the time is displayed.
- If you want to change the date and time, press and hold the time button down for approx. 3 seconds until the year number starts to flash. Now you can enter the new values as described above.
3. Taking a Blood Pressure Measurement using this Device
Checklist for taking a reliable measurement
- Avoid activity, eating or smoking immediately before the measurement.
- Sit down for at least 5 minutes before the measurement and relax.
- Always take the measurement on the left arm while sitting.
-
Remove any items of clothing and your watch, for example, so that your wrist is free.
-
Always ensure that the cuff is positioned correctly, as shown in the pictures illustrated on the short instruction card.
- Fit the cuff comfortably but not too tight. The cuff will cover a wrist circumference of 13.5 to 21.5cm (5.25 - 8.5 inches).
- Support your arm in a relaxed position and ensure that the device is at the same height as your heart.
- Press the ON/OFF button 1 to start the measurement.
- The cuff will now pump up automatically. Relax, do not move and do not tense your arm muscles until the measurement result is displayed. Breathe normally and do not talk.
- When the correct pressure is reached, the pumping stops and the pressure falls gradually. If the required pressure was not reached, the device will automatically pump some more air into the cuff.
11.During the measurement, the heart symbol ⑭ flashes in the display and a beep sounds every time a heartbeat is detected.
12.The result, comprising the systolic 7 and the diastolic 8 blood pressure and the pulse rate 9 is displayed and a long beep is heard. Note also the explanations on further display symbols in this booklet. - Remove and switch off the monitor and enter the result in the enclosed blood pressure pass. (The monitor does switch off automatically after approx. 1 min.).
You can stop the measurement at any time by pressing the ON/OFF button (e.g. if you feel uneasy or an unpleasant pressure sensation).
4. Appearance of the Heart Arrhythmia Indicator for early Detection
This symbol 13 indicates that certain pulse irregularities were detected during the measurement. In this case, the result may deviate from your normal blood pressure - repeat the measurement. In most cases, this is no cause for concern. However, if the symbol appears on a regular basis (e.g. several times a week with measurements taken daily) we advise you to tell your doctor. Please show your doctor the following explanation:
Information for the doctor on frequent appearance of the Arrhythmia indicator
This device is an oscillometric blood pressure monitor that also analyses pulse frequency during measurement. The device is clinically tested.
The arrhythmia symbol is displayed after the measurement, if pulse irregularities occur during measurement. If the symbol appears more frequently (e.g. several times per week on measurements performed daily) we recommend the patient to seek medical advice.
This device does not replace a cardiac examination, but serves to detect pulse irregularities at an early stage.
5. Data Memory
At the end of each measurement, this device automatically stores the result, including date and time.
Viewing the stored values
Press the M-button ⑤ briefly, when the device is switched off. The display first shows «M» ⑫ and then a value, e.g. «M 17». This means that there are 17 values in the memory. The device then switches to the last stored result.
Pressing the M-button again displays the previous value. Pressing the M-button repeatedly enables you to move from one stored value to another.
Memory full
When the memory has stored 200 results, the memory is full. From this point onwards, a new measured value is stored by overwriting the oldest value.
Clearing all values
If you are sure that you want to permanently remove all stored values, hold down the M-button (the device must have been switched off beforehand) until «CL» appears and then release the button. To permanently clear the memory, press the M-button while «CL» is flashing. Individual values cannot be cleared.
How not to store a reading
As soon as the reading is displayed press and hold the ON/OFF button ① until «M» ⑫ is flashing. Confirm to delete the reading by pressing the M-button ⑤.
6. Setting the Alarm Function
This device allows you to set 2 alarm times at which an alarm signal will then be triggered. This can be a useful aid, for instance as a reminder to take medication.
- To set an alarm time, press the time button (6) (the device must have been switched off beforehand) and immediately afterwards the M-button (5) and hold both down until the bell symbol (11) appears in the bottom left of the display. Then release both buttons. The flashing «1» in the display indicates that the first alarm time can now be set.
- Press the time button to set the hours - the hour display flashes and pressing the M-button allows you to set the alarm hour. To confirm, press the time button.
- The minute display will now flash. The minutes can be set using the M-button. To confirm, press the time button again.
- The bell symbol will now flash. Use the M-button to select whether the alarm time is to be active (bell) or inactive (crossed-out bell). To confirm, press the time button.
To set a second alarm time, proceed as above but if the «1» flashes, press the M-button to select «2» and confirm with the time button.
An active alarm time is indicated by the bell symbol in the display.
The alarm will sound at the set time every day.
To switch-off the alarm when it is sounding, press the ON/OFF button ①.
To permanently switch off the alarm, proceed as above and select the crossed-out bell symbol. This will then disappear from the display.
The alarm times must be re-entered each time the batteries are replaced.
7. Battery Indicator and Battery change
Low battery
When the batteries are approximately 34 empty the battery symbol ⑮ will flash as soon as the device is switched on (partly filled battery displayed). Although the device will continue to measure reliably, you should obtain replacement batteries.
Flat battery - replacement
When the batteries are flat, the battery symbol 15 will flash as soon as the device is switched on (flat battery displayed). You cannot take any further measurements and must replace the batteries.
- Open the battery compartment 3 by pulling off the cap.
- Replace the batteries - ensure correct polarity as shown by the symbols in the compartment.
- To set date and time, follow the procedure described in «Section 2».
The memory retains all values although date and time (and possibly also set alarm times) must be reset - the year number therefore flashes automatically after the batteries are replaced.
Use 2 new, long-life 1.5V size AAA alkaline batteries.
Do not use batteries beyond their date of expiry.
Remove batteries if the device is not going to be used for a prolonged period.
Using rechargeable batteries
You can also operate this device using rechargeable batteries.
Only use NiMH type reusable batteries.
Batteries must be removed and recharged when the flat battery symbol appears. They should not remain inside the device as they may become damaged (total discharge as a result of low use of the device, even when switched off).
Always remove the rechargeable batteries if you do not intend to use the device for a week or more.
Batteries cannot be charged in the blood pressure monitor. Recharge batteries in an external charger and observe the information regarding charging, care and durability.
8. Error Messages
If an error occurs during the measurement, the measurement is interrupted and an error message, e.g. «ERR 3», is displayed.
| Error Description Potential cause and remedy | ||
| «ERR 1» | Signal too weak | The pulse signals on the cuff are too weak. Re-position the cuff and repeat the measurement.* |
| Error Description Potential cause and remedy | |
| «ERR 2» Error signal During the measurement, error signals were detected by the cuff, caused for instance by movement or muscle tension. Repeat the measurement, keeping your arm still. | |
| «ERR 3» N o p r e in the cuff | An adequate pressure cannot be generated in the cuff. A leak may have occurred. Check that the cuff is correctly connected and is not too loose. Replace the batteries if necessary. Repeat the measurement. |
| «ERR 5» A b n o r result | Fine measuring signals are inaccurate and no result can therefore be displayed. Read through the checklist for performing reliable measurements and then repeat the measurement.* |
| «HI» Pulse or cuff pressure too high | The pressure in the cuff is too high (over 300 mmHg) OR the pulse is too high (over 200 beats per minute). Relax for 5 minutes and repeat the measurement.* |
| «LO» Pulse too low The pulse is too low (less than 40 beats per minute). Repeat the measurement.* | |
- Please consult your doctor, if this or any other problem occurs repeatedly.
If you think the results are unusual, please read through the information in «Section 1.» carefully.
9. Safety, Care, Accuracy Test and Disposal

Safety and protection
- This device may only be used for the purposes described in these instructions. The manufacturer cannot be held liable for damage caused by incorrect application.
This device comprises sensitive components and must be treated with caution. Observe the storage and operating conditions described in the «Technical Specifications» section. -
Protect it from:
-
water and moisture
- extreme temperatures
- impact and dropping
- contamination and dust
- direct sunlight
- heat and cold
The cuffs are sensitive and must be handled with care.
-Only pump up the cuff once fitted.
- The function of this device may be compromised when used close to strong electromagnetic fields such as mobile phones or radio installations and we recommend a distance of at least 1 m. In
cases where you suspect this to be unavoidable, please verify if the device is working properly before use.
- Do not use this device if you think it is damaged or notice anything unusual.
- Never open this device.
-If the device is not going to be used for a prolonged period the batteries should be removed. - Read the additional safety information provided within the individual sections of this instruction manual.

Ensure that children do not use this device unsupervised; some parts are small enough to be swallowed. Be aware of the risk of strangulation in case this device is supplied with cables or tubes.
Device care
Clean the device only with a soft, dry cloth.
Cleaning the cuff
Carefully remove any marks on the cuff with a damp cloth and mild detergent.
Accuracy test
We recommend this device is tested for accuracy every 2 years or after mechanical impact (e.g. being dropped). Please contact your local Microlife-Service to arrange the test (see foreword).
Disposal

Batteries and electronic devices must be disposed of in accordance with the locally applicable regulations, not with domestic waste.
10.Guarantee
This device is covered by a 5 year guarantee from the date of purchase. The guarantee is valid only on presentation of the guarantee card completed by the dealer (see back) confirming date of purchase or the receipt.
- Batteries, cuff and parts that become worn with use are not included.
- Opening or altering the device invalidates the guarantee.
The guarantee does not cover damage caused by improper handling, discharged batteries, accidents or non-compliance with the operating instructions.
Please contact your local Microlife-Service (see foreword).
11. Technical Specifications
Operating conditions: 10 - 40 °C / 50 - 104 °F 15 - 95 % relative maximum humidity
Storage conditions: -20 +55 °C / -4 +131 °F 15 - 95 % relative maximum humidity
Weight: 130 g (including batteries)
Dimensions: 80 × 70 × 70 ~mm
Measuring procedure: oscillometric, corresponding to Korotkoff method: Phase I systolic, Phase V diastolic
Measurement range: 20 - 280 mmHg - blood pressure 40 - 200 beats per minute - pulse
Cuff pressure display
range: 0 - 299 mmHg
Resolution: 1mmHg
Static accuracy: pressure within ± 3mmHg
Pulse accuracy: ± 5% of the readout value
Voltage source: 2 × 1.5V alkaline batteries; size AAA
Battery lifetime: approx. 460 measurements (using new batteries)
IP Class: IP20
Reference to EN 1060-1/-3/-4; IEC 60601-1; standards: IEC 60601-1-2 (EMC); IEC 60601-1-11
Expected service life: Device: 5 years or 10000 measurements Accessories: 2 years
This device complies with the requirements of the Medical Device Directive 93/42/EEC.
Technical alterations reserved.
Microlife BP W100
FR
YbaxaemblnokynataTeB,
BaH HOBbI TOHOmeTp Microlife AIBIaTc HAdEeHbIM MeiunHckm np6opom dIy BbIOnJIHeHn I3MepeHn Ha 3aIaCTbe. OH npocT bICNoIb3OBAHn, Toey n HAcToTeJIbHo peKOMeHDoBaNdI N3MepeHn apTePnaJIbHO rDaJIeHn B DomaUnHX ycNoBnx. Pnp6op 6bl pa3pa6oTaH BCOTpyDHNueCTBe C BpaayAM, a KINHNueckne Tectbl NOITBepdNII BBICOKYIO TOHOCbE rO IN3MepeHn.*
Ioxayncta, BHMaTeIbHO npOHTe HAcTOnue yka3aHnI dIyNONyehnYteKTO npEDCTaBHeN O6o BcEx fynkunx NTexHNke 6e3oNaCHOCTn. Ham 6bXOTeNoCb, YTO6bBi 6bln yDObNEbTOpeHb KaeeCTbOM n3DeNn Microlife. Pn BO3HKnHOBeHn BOpocOB, np6bnm IIN dIra 3akaz3 aIanachbIX qactei, NOxAyncta, opaauaTeCB MeCThBn cepBncBn ueTp Microlife. BaW dInep nIin anTEKa MOryt npEOCTaBt Bam aIpc E DInepa Microlife B BawE CTpaHne. B KaueCTBe aIbTEpHaTNBbl, NoCeTNe B IVHTepHeTe cTaHnUy www.microlife.ru, rDe BcI CMOKeTe HaITn pRd nonE3bIX CBeHn IIO haWeMy n3DeNIO.
BybTe 3doopBoi - Microlife AG!
*Mom npubop 6bI Kluuueckn npomecmupoban coaanacho npomokony Ibumahckozo obuecmea zunepmohu (BHS). Bbcuui Knaacc moHocmu u3mepenur cucmoueckozo (eepxhezo) (A) u duacmonueckko (HuXHezo) (A) daenehua.
OrnabJIeHne
-
Baxhna HnΦopMaζησo6 aPtepnaIbHOM daBJIeHm n caMoCTOaTeJIbHoe I3MpeHne
-
Kac onpeDenItb apTePnAnbHoe daBneHne?
XpaHntb BCYXOM MeCTe
-
Baxhna nHΦopMaun o6 apTepaNbHom daBJIeHNn camocToTaeNbHOe N3MepeHne
-
AptepnabHoe daBHeHne -3TO daBHeHne KpOBn, noDaBaemocepduem B apTePN. Bcerda n3MepaOTc Da 3NaueHna, cncToNcckoe (BepxHe) daBHeHne n dnaactOnuYeCKoe (HxKHe) daBHeHne.
Kpome TOrO, npi6op noka3bIbaeT yacToTy nyIbca (HcNo ynapOB cepdua B MInHyTu). -
NocToaHHo NOBbIeHHe apTepeNaJIbHOe daJIbeHne MoKet haHeCTn yUepe6 BaWeMy 3OpOBbIO, n B 3TOM cIyuee Bam Heo6xOdmo 6paATnbcR K Bpauy!
Bcerda coo6aaiTe Bpauy O BaWem daBleHn n coo6aaiTe emy/ en,ecnn Bby 3amEtTnN yTO-H6yDb Heo6bIuHoe nn YyBCTByeTe HeyBepeHHocTb. HnkOrda He noJolarAtecb Ha pe3yJbTaOdHOKpArHO N3MepeHn apTePnaIbHoro DaBHeHn. - PnH3MepeHH apTeepaHbHO daBneHna Ha 3aIacTbe Ha ToHocb H3MepeHH MoKet BnIaTB pId fakTopoB. B HeKOtopbIX cnyaX pe3yJbTaT MoKeT OTmuaTcR O N3MepeHH Ha nIeue. PeKomeHdyETc rpaBHNT 3TN 3HaueHnC pe3yJbTaTAMn, nonyueHHbIMn PnH3MepeHHx Ha IIneue, INpOKOHcyJbTpObaTbc C BrpayOM.
Bhocnte pe3yIbTaTbI 3mpeHn B npInOxKeHbI dHeBnK apTeepaIbHoro daBneHn. 3To no3BOJNT BpaU y6bICtpo nOnyHTb 06uee pndTabHeHne O BaWe m apTePnaIbHom daBneHn. - 4pe3mepHoe IOBbIeHHe apTePnAJIbHorO daBHeHnMoKet 6bITb BbI3BaHO prdOM npuHH. Bpa pa3bYcHHT Bam 3TO 6oJee noDpObHO n CInyae HeOxODMocTN pEaN0XHT MeToD JeUeHn. KpOME TOrO, MeDNkAmEtO3HOJeUeHne, MeTOnIKn CHaTIN HAnpJKeHn, ChNXeHHe Beca n UynpaXHeHn TaKke cnOCo6CTByOT ChNXeHnApTePnAJIbHorO daBHeHn.
- Hn npn KaKnx 06cToTBeBbax He MeHnTe Do3npOBky IIO6bIX NekapCTB, Ha3HaueHHbIX BpaOm!
B 3aBcHMOCTOn OT cHn3UeCKHX Harpy3OK N COCTOHN, aPtePpAIBHOE dABNeHne NOBepKeHO 3NaHTeNBbIM KOJIe6aHNrM BTeueHne IN. PoTOMy KaxDbI pa3 npOeDpya n3MepeHn DOnKHa npOBoNDbcR B cNoKoINbIX ycIOBnX N KOrda BbI He UyBcTByeTe HapJxEHN! BblONHnIe No KpaHn Mepe DBA n3MepeHn B DeH, OHO YTPOM I OHO BeOpom.
CobepeHNO HopMaJIbHO,ecn npi DByx N3MpeHnX NOpIa IOnyueHbIe pe3yIbTaTbI 6byT OTNuaTbCra dpyrOT dpya.
PacxoxdeHm Mekdy pe3yIbTaTAMn N3MepeHn, nOlyeHHbIMn BpaHOM INB aNTKe, IN pe3yIbTaTAMn, nOlyeHHbIMn B DOMaHINX ycNoBmX, TAKKc JEblrTOc BNOJHe HOpMaIbHbIMn, NCKoJIbKy CNTyauIN, B KOTOpbIX npOBdTcR N3MepeHn, COBepHHeHO pa3NHybl.
MhorokpaThbIe N3MepeHnno3B0JIoT noNuyHTb 6oTee YETKYIO KAPTHy, He m npOTo OAnHOKpTaHoe N3MepeHne.
CepaTe He6oBwO nepepbIB, NO KpaHHeMpe,B 15cekyHmexdyDyMn3MepeHnMn.
BoBpem6epemehocn CneNyET TuaTeNbHO CneDntb 3a apTePnAibHbIM DaBHeHMe, NOCKOBky Ha npOTyKeHm 3TOrO nepNoa OHO MoKet CyueCTBeHHo MeHrtbc!
- EcIN BbI CtpaAeTe HApUeHHeM cepDue6neHnra (apITMN, cm «Pa3dE 4.»), To ouEnKa pe3yIbTaTob n3MepeHn npu6opa moKcET 6bIb DaHa TOnbKOncNe KOHCyIbTaUcN C BpaVOM.
- Noka3aHnnybca He npriOndblnncNoB3OBaHnB KaueCTBe KOHTpOJaCToTbI KapdnoctmMyJrTopa!
Kak onpeJeInb apTepeNaIbHoe daBneHne?
Tabnca knaccnkaun apertnabHoro daBneHn DnB3pocbIX no daHHbIM Bcemnpoh opraHn3aun 3dpabooxpaHeHn (WHO) 3a 2003 roJ. DaHbIe B MM pT. CT.
YdaJIeHHe BCex 3NaUeHn
EcIn Bb yBepeHb TOM, YTO XOTnTE ydaNTb BCE xpaHmblie 3HaueHnE63 BO3MOXHOCTN BOCCTaHOBNeHnA, ydepKINBaTKe KHOkny M B HaxKaTOM NIOJoxEHn (PpeBapnteHb NOp6Op Heo6xOIMO BbIKIQUHTb) Do NOBHeHn «CL» n 3aTeM OTNyCTne KHOkny.ДЯ ONUCTkn PAMrN HAXMte KHOIky M B MOMHT, KOJa MURAET «CL». OTdJIbHbIe 3HaueHnE He MorTy 6bITy daneHbI.
Kak OTMeHHTb coXpaHeHne pe3yNbTaTata
Kak tonbko OTO6pa3ntcpe3yIbTaT,HAKMNTe N ydepKBAJIte KONky BKN/BbIKN ①do MOMeHTa, KaK HauHET Mrratb 3HaK «M» 12. IoDtBepnTe ydaeneHne pe3yIbTaTata, Haxab KONky M 5.
6. HactpoKa cnHaHa
Pnp6op no3BOJraET yCTaHaBnBaTb 23haeHnBpeMeHN, KOrda cpa60taet CnHaI. 3TO MoKET 6bITb NOJIe3HbIM, HApNIMep, IIN HAONMHAnO Heo6xOdMOCt NpInHrTa JekapCTBO.
1.ДяЗаданьВрemeи CnHanaнанхмite Khonky Time (BpeM) ⑥ (празырпелбю пибор Heo6xOДМо BbIKNCHITb)И срау ќе NOСпЕ 3ТOrO KhONkY M ⑤и удржиBaITE INxB HaxaTom NOLoxeHIM DO NOВLEHINС CMBOJ3BOHKA ⑪ВЛБОH HIXKHe YAcTи DcPJIe. 3ATEM OTNUCTte Obe KhONk. МогAoUmN 3HaK «1» HaДсПлee roBOPNT O TOM,УTO ceiuaC MoXeT 6bITb 3aDAHO BpeM nepBoro CnHana.
2. HaxMMte KhoNky Time (Bpem) dny yctahOBKn yaca -nHnKAtOp Yacob 3amraet n HaxaTne M KOHN M MOxHO yCTaHObntb Yac CnHaJa. Nn noTBePckDeHHn HaxMMte KhoNky Time (Bpem).
3. 3aTeM 3aMnraet HnDkaTOp MNHyT. MmHyTb MoXHO yCTaHOBNTb npn nOmoi KhoNk M. IJI na NOdTBePckdEHHaOBTOH aXMMte KhoNky Time (Bpem).
4. Tenepb 3amraet cmboB 3BOHka. NcnoB3ynte KhoNKy M dIra TORO, yTObblakTNBnPoBaTb BpEma CnHaJa (3BOHOK) INIOTKIOHTb CnHaJI (nepeepkHytBJ 3BOHOK). IJRA NOITBepKdEHN HAXMNTe KhoNKy Time (BpEMr).
Toro, TTO6bI 3aTaB BToPOn CnHAn, npOeJaTe BbIeONiCahHyIO npOeDpy, Ho eCN I 工 _ 工 MnaE, HaxMnte KhONky M nraToro, TTO6bI BbIpaTb 已 _ 工 ^ 2 N noTBePNTe npn nomoun KNONk Time (Bpema).
BpeMaakTBHOro CnHaAna CoPBOXJaETCa CmBOJOM 3BOHka Ha DnCnJIee.
CunHan 6ydt3BvataB yctaHOBnEHoe BpemKaJdbI DeHb.
ДлгTORO,уTO6blOTKIOHHTbCINHANBOBpeM3ByaHnHAJHKMTeKHONKYBKJI/BbIKJI①.
ДлгTORO,уTO6blIOCTOARHNOOTKINOHITbCINHAN,BBINOJNHITe BblIweyKa3aHHyIO npOceDpy N BBIEpeNTe nepepeKHyTbIMBOJ 3BOHka.3aTeM OH INcYe3NET CINNJIe.
BpemcHnAIOB Heo6xOaIMO BBOuTb KaKdbI pa3 nocne 3ameHbI 6atapei.
NcnoJb3ObaHne aKKymyIaTOpOB
C np6bopom moxno pa6oTaB, mOnn63y akkMyJrTopHbe 6aTapei.
Poxayncta,ncnoB3yTe TOnbKO OINH TnN aKKMyIaTOpHbIX 6atapei NiMH
Batapeu Heo6xmo BbHyt b nepe3apnTb,ecn noB- nreTc CmBOJ 3neMeHTOB NHTAHy (pa3pXeHHa 6atape).OHHe DoJKNbI OCTaBaTcBc BYTp n np6opa, NOCKOBy MOyT BbiTN I3 CTPO (JaKe B BbIKIOueHHOM np6ope baatae npdoJkaHO p3pKaTc).
Bcerda BbHmMaTe aKkyMnyTOpbl,ecn He cobpaetecb noJb3OBaTbC np6opom B TeueHne HeJeIN JIn Boonee!
AkkymyIaTOPbHEMOrT3apKaTbcBTOHOMeTpE! IOBTOpHO3apdnte AKKymyIaTOPbBO BHeuHem 3apdHOM
yctpoCTBe nO3HaKOMbTeCb CnHΦopMaüne no 3apJKe, yxody n cpoky cnxykb!
8. Coo6eHn8 o6On6kax
EcIn BO Bpemn3MepeHn npOnCxOoNt OOn6Ka, To npOceDpya n3MepeHn npepbIbAeTcN bblDaTeCn COo6JeHne o6 OOn6Ke, HapnpMep «ERR 3».
BaTePnIte ca noTuH n3ToUeHN
Korato 6atepnte ca npn3nteHIO 34 nON3BaHn, CMBOTbT Ha 6aTePraTa 15 ue 3anoHe da Mna BeDHa cIe BDKNoYBaHTo Ha anapata (Ha dncnnie ce noBBA qactuHO nbnHa 6atepna). BbnpkeN ye anapatbT ue npOdbnxn da n3Bbpwba HaeJdHn 3MepBaHn, Tpr6Ba da NOMeHTE 6atepnte.
BaTepeHnTe ca n3ToeHN -NoMnaHa
Korato 6aTePnnte Ca n3ToeHn, CmBOJbT 6aTePn 15 3anoBa da Mna BeDHara cIeB KINHOBaHe Ha anapata (Ha IncPiTe Ce NOKa3Ba npa3Ha 6aTePn). He MoKeTe Da n3BbPbBaTe NOBeHe N3MepBaHn, Tp6Ba Da nOdmEnTe 6aTePnnte.
-
OToBopTe OTdJIeHHeIeTO 3a 6aTeepn ③ Upe3 n3DbpNbaHe Ha KaNaaykata.
2.Подмehete6atepeHte-увepeTe ce,чe e cna3eHa nonpaHocTTa, KaKTo e nOKa3aHO Ha CnMBOJInTe B OTdJeHHeIeTO. -
3a Da HacptponTe data n uac, cneDbaiTe npoepypaTa, onncaHa B «Pa3dien 2.»
PametTa 3ana3Ba BCnUKn DaHn, BbIpeKNe Ye daTata N acbT (a BepoTHO n 3adaeHnTE BpemeHa 3a anapMaTa) Tpr6Ba Da 6bDat HacTpoEHN OTHOB-OtaBa rOINHaTa 3anoHb Da MInra aBTOMaTHuHO, Cne KaTO ca CMeHeHs 6aTepuHte.
KaKbN 6aTeepnn KKaBa npOeDpya?
N3noI3BaIe 2 HOBn, IbIroTpainH, 1.5 V AAA anKaJIHN 6aTeepin.
He n3no3BaIte 6aTeepn C n3TeKbI cpoK Ha roHOCT.
OTcpanHe6aTepeHnTE,ako anapaTbT Hma da ce n3noJ3Ba 3a no-DbIbI r nepNoI OT BpeMe.
N3noJI3BaHe Ha akymyIaTOpHn 6aTeepHn
Moxete da n3no13BaTe anapata n cakymaToPn6 batepn.
MOnA, m3nON3BaIe cAmO TIn «NiMH» peuKnpyem6aTeepnn!
Batepnite Tp6Ba da ce otctpanraBat n 3apekdaT, ako ce noBn CmboBt 6atepy (npa3Ha 6atepy)! He 6nuBa da octabat BbTpe B anapata, TbN KATO MOKe da ce NOBpeJrT (NbIHO pa3peKdane B pe3yTTaT Ha OPAHHeHa yIOTppeBa Ha anapata, DOpN N KOrato e N3KnHoueH).
BnHaHOr OTCpaHraBaIte aKymyIaTOpHIne 6aTePm, aKO He CmTaTe Da n3NoI3BaTe anapata 3a ceMnua nn nobue!
9. Tect 3a 6e3onacnoct, rpnka, touhoct n denoHnpahe

Be3oNaChocn 3aunTa
To3n np6op moKe da ce nON3Ba eINHCTBeHO 3a ueJIta, ONICAHa B Ta3N KHNKka. PpOu3BOUNTeJIrT He MoKe Da HOCN OTROBOPHOCT 3a IOBpeNi, pnpunHeHOn OT HenpaBnHa yNoTppe6a.
BTO3n np6bOp HMa yBCTBnteJHn DeTaiJn n C Hero Tp86Ba da ce 60paBn BHNMaTeJHo. Cna3BaIte YcNobJraTa 3a cbXpaHeHne n EKcnnoataa, onncanB pa3dEe [ T e x h u e c k n c e n i f n k a u n n n n n n n
- Na3ete ro 0r:
-Boa nBlaara
- ekCTpeMH TeMpepaTyprn
- ydap n n3nyckaHe
-3aMbpcBaHeI npax
-празкСЛьнчЕБСВETПИна
-TOJIINHaI CTyD
MaHSeTne CaUyBCTBnTEJIHN I TpIbBa Da Ce 6opabN BHHMaTeJIHO C TIX.
- Tomnai Te MaHwTa cAmo KOrato e NocTaBEn Do6pe Ha pKaTata.
-Функцят ha TOBa yCTpoIcTBO MOKe DA 6bIe KOMnpoMeTnpaHa, KOrato CE n3No3Ba B 6nN3OCT Do CnHn ENEKtpomarHHTN NOIeta,
KATO MO6HNI H TepeOH Hn PAADHOHCTaALuH, Hn Hne npenopbU Bame pa3CTO8HHe OT HaMMAKO 1 M. B CnyaHTe, KOrato TOBa e Hen36ExHo, Tp6Ba Da ce yBepTe daJIn yCTpoCTBOTo pa60T npabuHNO peniYnOTpe6a.
He non3BaIte np6opa, aKO MncIInTe, He e NOBpeHnIN 3a6eJeknte HneO HpeHNO.
- HnKora He oTbaprIe np6opa.
Ako np6opbT hma da ce non3ba 3a npoBjXnTeH nepnoD ot BpeMe, batepuNTe Tpr6Ba da ce n3BaXdTaT.
- PpoyeTe TEONbHHTeHNHTe INCTpyKm3a 6e30nacHOCT B HINBUNyAHNTE pa3dJIOn OT 6pOwypata.

He no3B0JRABaTe Ha Deca Da n3non3Bat np6opa 6e poJntenck KOHTPO; HkON YacTn Ca DoCTaTBHO MaKN, 3a da 6bDat NorbHnat. BdTe He HAreCHO C pNcKa OT 3aDyUbaHaB e CnyaH, Ye TOBA yCTpoiCTBO e ChA6DeHo C KaBeJIN INI Tp6bn
Tpka 3a anapaTa
TouinBaIe anapaTa cMo C MeKa cyxa Kbpna.
NouchTaHe Ha MaHweta
BHHMaTeHNOOTcPaHeteBCaKaBn CneiN Bbpxy MaHWeTa C BlaXHa KbpNa N MeK npenapat.
Tect 3a ToyoHCT
PpenopbnteHoe e anapaTbT da ce TecTba 3a TOOHocHa BCEKn 2 roHNn nn CneI MexaHuey yap (HanpImep cIeN n3nyckaHe).
MOna, Cbpxte Ce C MeCTHnI pTeCTaBtEn Ha Microlife-Ycnyr, 3a da opraHn3nPate n3BbPwBaHTo Ha Tecta (BnXte npedroBopa).
Денихаре

BaTePnIte n eEnKToPHHnTE ypeDn TpR6Ba da ce n3XBpIaT CbIaCHO MeCTHnTE pNIOXmPi a3nope6n, a He c 6ntOBnTE OTnabu.
10.RapaHnna
To3n ypeI e c 5-roDmHa rapaHua OT daTata Ha 3akynyBaHe.
RapaHcraTa Baxn cAmo npn NOKa3BaHe Ha rapaHcnoHHaTa KapTa,
nonbJIHeHa OT npOdaBaua (BnxTe O3aD) C noTBbpxKeHne 3a
DaTaTa Ha NOKyNka N KAcoba 6eJexKa.
BatepeNTe, MaHWeTbT IN N3HocBaUHTe Ce Yactn He Ca BKNIOueHN B rapaHcIyra.
- OТьарянeto Ии МоДиФикaциTe no npiбopa npaВт rapaHцЯТа HeBaIyndHa.
-「IapanuTHe NOKPnBa NOBpeN, PnPHneHn OT He npabnHO nI3BaHe, n3TOueHn 6aTePN, 3IOJnyKn IIN HeCna3BaHe Ha Yka3aHnTa 3a EKcNlOaTaun.
Mol, cBbpxTe ce C MeCTHnI npedctabNTen Ha Microlife-Ycnyr (BnxTe npedroBOp).
11.TexHueckn cneuKauin
| РабOTиУсLOВиЯ: | 10 - 40 °C / 50 - 104 °F |
| 15 - 95 % OTHOCHTeПа МAKСИМАпа Влж-Ноct | |
| УсLOВиЯ Na | -20 - +55 °C / -4 - +131 °F |
| сБхpaHенe: | 15 - 95 % OTHOCHTeПа МAKСИМАпа Влж-Ноct |
| ТeroNo: | 130 r (ВКЛЮЧТЕПО 6aTePrynIte) |
| ГаБAPИТи: | 80 x 70 x 70 MM |
| ПроцEDура Na | OCUJILOМЕТРУнA, OTROВAPЯSHA Na MeToDA |
| ИЗМерВанe: | KорOTКOB:Фa3a I cnsTOnHNo, VФa3aДиac-Толно |
| ОБVBAT Na ИЗМерВанe: | 20 - 280 mmHg - КрБВHO HaJIЯганe |
| 40 - 200 уdapa B МИнУт-a - ПиLC | |
| ОБVBAT Na HaJIЯГанeto Na MaHSeTe, ИЗБexДан | 0 - 299 mmHg |
| ндиспья: | |
| РаЗДЕЛТЕПИа | 1 mmHg |
| способн{oct:} | |
| Статчна Toчн{oct:} | HaJIЯганeВ рамКITE Na ± 3 mmHg |
| Точн{oct Na nулca:} | ±5 % OTOTYeTeHATA StOйHoct |
N3TOUHKn Ha
| Hansejechen: | 2 x 1.5 V aikaln6aTePm; rolemna AAA |
| Kmbot ha 6aTePmnte: | Приблentелно 460 Измервань (при илл�ьане на Нова 6aTePm) |
| IP klnac ha 3aunta: | IP20 |
| Претрак KaBm | EN 1060-1 /-3 /-4; IEC 60601-1; |
| cTaHaprtn: | IEC 60601-1-2 (EMC); IEC 60601-1-11 |
| ОчakbaH cPoK ha | УстroduCTBO: 5 rodNH Или 10000 Измер- BaHnry |
| eKcnnoatauia: | Аксесаур: 2 rodNH |
ToBa n3dJIne OTROBapra Ha n3nCKBaHnraHa NIpKeTnBaTa 3a MeiunHcKn n3dJIeNn 93/42/EEC.
3ana3Ba npaboto cn Ha texHnueckn npomEHn.
Microlife BP W100
RO
gilll sllal gall bale jol aol gil
aiee eae eee eee
aill (lill) aalalalal alalal Las laol Logwos jus
()
i 1
A
y
1
jaiill aylll lylal Jaoi!
bi = 12 - ai
alilg jlljgl aiall g aal .9
aalgl aolll
1111 1111 1111 1111 1111 1111 1111 1111 1111 1111 1111 1111 1111 11
a 5 M j b i
12 1
M j
J
J
0s glau 0sj11
ypl 41, y. o jslal aol 2 aol j sll j yjll
pall Jao jod jyall pall jla o slil cial lo 1o. o jol

aai
i 111111111111111111111111111111111111111111
yjll plaa bai yls cag y jyall ayac g j 1 kay
yai y jyai jyai jyai jyai jyai jyai jyai jyai jyai jyai jyai jyai jyai jyai jyai jyai jyai jyai jyai jyai jyai jyai jyai jyai jyai jyai jyai jyai jyai jyai jyai jyai jyai jyai
jsslll lalil jyag ggb
Lgaii pi gill jll g a biiy lpc jia kla 13 joll i
paal bia n c. jall 128 g a ylll l a jn Jg, waiell e li
aic g. gialll e 12 y Cylall jg, waiill jy - gaiall
egssll g ai y oic all ie jio, )alitio kki jaiil jbi 1j
waiall glbln jy rj, sblb jyblsai (logiy galiall
jlll gllp jgol rlll lgl 111111111111111111111111111111111111111111111111111111
(1)gllb 100000000000000000000000000000000000000000000000000000000000000000000000000000000000000000
yjbjj jg yjbjj jgs
15 15 15 15 15 15 15 15 15 15 15 15 15 15 15 15 15 15 15 15 15 15 15 15 15 15 15 15 15 15 15 15 15 15 00000000000000000000000000000000000000000000000000000000000000000000
1 1
1
1
1
1
J 1
Jglil Jlal
Lj
Lj
Lj
Lj
Lj
Lj
Lj
Lj
Lj
Lj
Lj
Lj
Lj
Lj
Lj
Lj
Lj
Lj
Lj
Lj
Lj
Lj
Lj
Lj
Lj
Lj
Lj
Lj
Lj
Lj
Lj
Lj
Lj
Lj
L
Ji,111111111111111111111111111111111
()gagolglg 10
| ### | ||
| J# | ERR 1 | ### |
| J# | ERR 2 | AAA alkaline ### V 1,0 x 7 |
| J# | ERR 3 | ### |
| J# | ERR 4 | ### |
| J# | ERR 5 | ### |
| J# | ERR 6 | ### |
| J# | ERR 7 | ### |
| J# | ERR 8 | ### |
| J# | ERR 9 | ### |
| J# | ERR 10 | ### |
| J# | ERR 11 | ### |
| J# | ERR 12 | ### |
| J# | ERR 13 | ### |
| J# | ERR 14 | ### |
| J# | ERR 15 | ### |
| J# | ERR 16 | ### |
| J# | ERR 17 | ### |
| J# | ERR 18 | ### |
| J# | ERR 19 | ### |
| J# | ERR 20 | ### |
| J# | ERR 21 | ### |
| J# | ERR 22 | ### |
| J# | ERR 23 | ### |
| J# | ERR 24 | ### |
| J# | ERR 25 | ### |
| J# | ERR 26 | ### |
| J# | ERR 27 | ### |
| J# | ERR 28 | ### |
| J# | ERR 29 | ### |
| J# | ERR 30 | ### |
| J# | ERR 31 | ### |
| J# | ERR 32 | ### |
| J# | ERR 33 | ### |
| J# | ERR 34 | ### |
| J# | ERR 35 | ### |
| J# | ERR 36 | ### |
| J# | ERR 37 | ### |
| J# | ERR 38 | ### |
| J# | ERR 39 | ### |
| J# | ERR 40 | ### |
| J# | ERR 41 | ### |
| J# | ERR 42 | ### |
| J# | ERR 43 | ### |
| J# | ERR 44 | ### |
| J# | ERR 45 | ### |
| J# | ERR 46 | ### |
| J# | ERR 47 | ### |
| J# | ERR 48 | ### |
| J# | ERR 49 | ### |
| J# | ERR 50 | ### |
| J# | ERR 51 | ### |
| J# | ERR 52 | ### |
| J# | ERR 53 | ### |
| J# | ERR 54 | ### |
| J# | ERR 55 | ### |
| J# | ERR 56 | ### |
| J# | ERR 57 | ### |
| J# | ERR 58 | ### |
| J# | ERR 59 | ### |
| J# | ERR 60 | ### |
| J# | ERR 61 | ### |
| J# | ERR 62 | ### |
| J# | ERR 63 | ### |
| J# | ERR 64 | ### |
| J# | ERR 65 | ### |
| J# | ERR 66 | ### |
| J# | ERR 67 | ### |
| J# | ERR 68 | ### |
| J# | ERR 69 | ### |
| J# | ERR 70 | ### |
| J# | ERR 71 | ### |
| J# | ERR 72 | ### |
| J# | ERR 73 | ### |
| J# | ERR 74 | ### |
| J# | ERR 75 | ### |
| J# | ERR 76 | ### |
| J# | ERR 77 | ### |
| J# | ERR 78 | ### |
| J# | ERR 79 | ### |
| J# | ERR 80 | ### |
| J# | ERR 81 | ### |
| J# | ERR 82 | ### |
| J# | ERR 83 | ### |
| J# | ERR 84 | ### |
| J# | ERR 85 | ### |
| J# | ERR 86 | ### |
| J# | ERR 87 | ### |
| J# | ERR 88 | ### |
| J# | ERR 89 | ### |
| J# | ERR 90 | ### |
| J# | ERR 91 | ### |
| J# | ERR 92 | ### |
| J# | ERR 93 | ### |
| J# | ERR 94 | ### |
| J# | ERR 95 | ### |
| J# | ERR 96 | ### |
| J# | ERR 97 | ### |
| J# | ERR 98 | ### |
| J# | ERR 99 | ### |
| J# | ERR 100 | ### |
J 1 J 2
J 3
J 4
J 5
J 6
J 7
J 8
1 1
jgljyai
aajg jalal aacai ab g Jaauiu Jia jlgjll a bi
g jz
aig jz
Jaii jai jai jai jai jai jai jai jai jai jai jai jai jai jai jai jai jai jai jai jai jai jai jai jai jai jai jai jai jai jai jai jai jai jai jai jai jai jai jai jai jai jai jai jai jai jai jai jai jai jai jali y
y j 1 yj 1 1 1 1 1 1 1 1 1 1 1 1
y. jll lgs gag aall gall jglall llaiaai l
blall paaaill bnnnnaa aagaae gailall jay n jay
bly jiny jao Jalaill aagaae aalil cai yraa jgall lla
jaiell clalal gall gaii aalll gaii giall giall giall giall giall giall giall giall giall giall giall giall giall giall giall giall giall giall giall giall giall giall giall giall giall giall giall giall giall giall giall giall giall giall
| AAA ∑Alkaline y1,0xY | :Aggl :Aggl :Aggl :Aggl :Aggl :Aggl :Aggl :Aggl :Aggl :Aggl :Aggl :Aggl :Aggl :Aggl :Aggl :Aggl :Aggl :Aggl :Aggl :Aggl :Aggl :Aggl :Aggl :Aggl :Aggl :Aggl | ||
| EN 1060-1 /3-4; IEC 60601-1; IEC 60601-1-2 (EMC); IEC 60601-1-11 | :Aggl :Aggl :Aggl :Aggl :Aggl :Aggl :Aggl :Aggl :Aggl :Aggl :Aggl :Aggl :Aggl :Aggl :Aggl :Aggl :Aggl :Aggl :Aggl :Aggl :Aggl :Aggl :Aggl :Aggl :Aggr :Aggr :Aggr :Aggr :Aggr :Aggr :Aggr :Aggr :Aggr :Aggr :Aggr :Aggr :Aggr :Aggr :Aggr :Aggr :Aggr :Aggr :Aggr :Aggr :Aggr :Aggr :Aggr :Aggr :Aggr :Aggl :Aggl :Aggl :Aggl :Aggl :Aggl :Aggl :Aggl :Aggl :Aggl :Aggl :Aggl :Aggl :Aggl :Aggl :Aggl :Aggl :Aggl :Aggl :Aggl :Aggl :Aggl :Aggl :Aggl :Aggr |
Microlife BP W100
jz jz jz jz jz jz jz jz jz jz jz jz jz jz jz jz jz jz jz jz jz jz jz jz jz jz jz jz jz jz jz jz jz jz jz jz jz jz jz jz jz jz jz jz jz jz jz jz jz jz jz
1 = 3

J ①
J Lai ②
L J ③
L J ④
(M) ⑤
J L J ⑥
J L J ⑦
J L J ⑧
J L J ⑨
J L J ⑩
J L J ⑪
J L J ⑫
() (12
J L J ⑬
J L J ⑭
(BF)

Sj jy Jw y S y 0jai (Pacemaker) jw jnol sss sas jy oal
y j 1 Jn jnn n nn nnnn nn nnnnnnnnnnnnnnnnnnnnnnnnnnnnnnnnnnnnnnnnnnnnnnnnnnnnnnnnnnnnnnnnnnnnnnnnnnnnnnnnnnnnnnnnnnnnnnnnnnnnnnnnnnnnnnnnnnnnnnnnnnnnnnnnnnnnnnnnnn nn n nn n nn n nn n nn n nn n nn n nn n nn n nn n nn n nn n nn n nn n nn n nn n nn n nn n nn n nn n nn n nn n nn n nn n nn n nn n nn n nn n nn n nn n nn n nn n nn n nn n nn n nn n nn n nn n nn n nn n nn n nn n nn n nn n nn n nn n nn n nn n nn n nn n nn
J 1 1 1 1 1 1 1 1 1 1 1 1 1 1 1 1 1 1 1 1 1 1 1 1 1 1 1 1 1 1 1 1 1 1 1 1 1 1 1 1 1 1 1 1 1 1 1 1 1 1 0
J
J
J
J
J
J
J
J
J
J
J
J
J
J
J
J
J
J
J
J
J
J
J
J
J
J
J
J
J
J
J
J
J
J
J
J
J
J
J
J
J
J
J
J
J
J
J
J
J
J
J
J
J
J
J
J
J
J
J
J
J
J
J
J
J
J
J
J
J
J
J
J
J
J
J
J
J
J
J
J
J
J
J
J
J
J
J
J
J
J
J
J
J
J
J
J
J
J
J
J
J
J
J
J
J
J
J
J
J
J
J
J
J
J
J
J
J
J
J
J
J
J
J
J
J
J
J
J
J
J
J 1
J 1
J 1
J 1
J 1
J 1
J 1
J 1
J 1
J 1
J 1
J 1
J 1
J 1
J 1
J 1
J 1
J 1
J 1
J 1
J 1
J 1
J 1
1
| 《ERR 1》 |
15
j 1 j 1 j 1 j 1 j 1 j 1 j 1 j 1 j 1 j 1 j 1 j 1 j 1 j 1 j 1 j 1 j 1 j 1 j 1 j 1 j 1 j 1 j 1 j 1 j 1 j 1 j 1 j 1 j 1 j 1 j 1 j 1 j 1 j 1 j
oalil oik jll i jbi jjls 4 1k jla jlae b 0d jil 4 g d 5g jgl j gl j 3i k

olus j1 c
S ACD = S COD + S BDO - S CDO
Sj oJg 8 gBra Jg Sj Bwgi Cbi I j 20000000000000000000000000000
88622471
1

julil g jy 0jla i jia jai jai jai jai jai jai jai jai jai jai jai jai jai jai jai jai jai jai jai jai jai jai jai jai jai jai jai jai jai jai jai jai jai jai jai jai jai jai jai jai jai jai jai jai jai jai jai jai jai jai jali

Lai 4
2
jl 且 a < 0
-
2j
上, 43 个
- 2 < 3,2 < 32,3 < 4,·s ,4
1
S OBC = S COD + S_ BOC
yLai Cilbilaro
j 1
S ACD = S COD + S DCE - S BOC
j 1 j 1 j 1 j 1 j 1 j 1 j 1 j 1 j 1 j 1 j 1 j 1 j 1 j 1 j 1 j 1 j 1 j 1 j 1 j 1 j 1 j 1 j 1 j 1 j 1 j 1 j 1 j 1 j 1 j 1 j 1 j 1 j 1 j 1 j
yaii jia jiyabi 2j1s jilial
| EN 1060-1/-3/-4; IEC 60601-1; IEC 60601-1-2 (EMC); IEC 60601-1-11 | Jablal al-jahra Jablal al-jahra Jablal al-jahra Jablal al-jahra Jablal al-jahra Jablal al-jahra Jablal al-jahra Jablal al-jahra Jablal al-jahra Jablal al-jahra Jablal al-jahra Jablal al-jahra Jablal al-jahra Jablal all al Jablal al-jahra Jablal al-jahra Jablal al-jahra Jablal al-jahra Jablal al-jahra Jablal al-jahra Jablal al-jahra Jablal al-jahra Jablal al-jahra Jablal al-jahra Jablal al-jahra Jablal al-jahra Jablai al-jahra Jablal al-jahra Jablal al-jahra Jablal al-jahra Jablal al-jahra Jablal al-jahra Jablal al-jahra Jablal al-jahra Jablal al-jahra Jablal al-jahra Jablal al-jahra Jablal al-jahra Jablal al-jahru Jablal al-jahru Jablal al-jahru Jablal al-jahru Jablal al-jahru Jablal al-jahru Jablal al-jahru Jablal al-jahru Jablal al-jahru Jablal al-jahru Jablal al-jahru Jablal al-jahru Jablal al-jahru Jablai al-jahru Jablal al-jahru Jablal al-jahru Jablal al-jahru Jablal al-jahru Jablal al-jahru Jablal al-jahru Jablal al-jahru Jablal al-jahru Jablal al-jahru Jablal al-jahru Jablal al-jahru Jablal al-jahrun Jablal al-jahru Jablal al-jahru Jablal al-jahru Jablal al-jahru Jablal al-jahru Jablal al-jahru Jablal al-jahru Jablal al-jahru Jablal al-jahru Jablal al-jahru Jablal al-jahru Jablal al-jahru Jablaj al-jahru Jablal al-jahru Jablal al-jahru Jablal al-jahru Jablal al-jahru Jablal al-jahru Jablal al-jahru Jablal al-jahru Jablal al-jahru Jablal al-jahru Jablal al-jahru Jablal al-jahru Jablal al-jahRU Jablal al-jahru Jablal al-jahru Jablal al-jahru Jablal al-jahru Jablal al-jahru Jablal al-jahru Jablal al-jahru Jablal al-jahru Jablal al-jahru Jablal al-jahru Jablal al-jahru Jablal al-jahru JablAL al-jahru JablAL al-jahru JablAL al-jahru JablAL al-jahru JablAL al-jahru JablAL al-jahru JablAL al-jahru JablAL al-jahru JablAL al-jahru JablAL al-jahru JablAL al-jahru JablAL al-jahru JablAL al-jahRU JablAL al-jahru JablAL al-jahru JablAL al-jahru JablAL al-jahru JablAL al-jahru JablAL al-jahru JablAL al-jahru JablAL al-jahru JablAL al-jahru JablAL al-jahru JablAL al-jahru JablAL al-jahru Jablal al-jahru JablAL al-jahru JablAL al-jahru JablAL al-jahru JablAL al-jahru JablAL al-jahru JablAL al-jahru JablAL al-jahru JablAL al-jahru JablAL al-jahru JablAL al-jahru JablAL al-jahRU JablAL al-jahRU JablAL al-jahRU JablAL al-jahRU JablAL al-jahRU JablAL al-jahRU JablAL al-jahRU JablAL al-jahRU JablAL al-jahRU JablAL al-jahRU JablAL al-jahRU JablAL al-jahRU JablAL al-jahRU Jablal al-jahRU JablAL al-jahRU JablAL al-jahRU JablAL al-jahRU JablAL al-jahRU JablAL al-jahRU JablAL al-jahRU JablAL al-jahRU JablAL al-jahRU JablAL al-jahRU JablAL al-jahRU JablAL al-jahRU JablAL al-jahUU JablAL al-jahUU JablAL al-jahUU JablAL al-jahUU JablAL al-jahUU JablAL al-jahUU JablAL al-jahUU JablAL al-jahUU JablAL al-jahUU JablAL al-jahUU JablAL al-jahUU JablAL al-jahUU JablAL al-jahUU JablA JablAL al-jahUU JablAL al-jahUU JablAL al-jahUU JablAL al-jahUU JablAL al-jahUU JablAL al-jahUU JablAL al-jahUU JablAL al-jahUU JablAL al-jahUU JablAL al-jahUU JablAL al-jahUU JablAL al-jahUU JablAl al-jahUU JablAL al-jahUU JablAL al-jahUU JablAL al-jahUU JablAL al-jahUU JablAL al-jahUU JablAL al-jahUU JablAL al-jahUU JablAL al-jahUU JablAL al-jahUU JablAL al-jahUU JablAL al-jahUU JablAL al-jahU JablAL al-jahUU JablAL al-jahUU JablAL al-jahUU JablAL al-jahUU JablAL al-jahUU JablAL al-jahUU JablAL al-jahUU JablAL al-jahUU JablAL al-jahUU JablAL al-jahUU JablAL al-jahUU JablAL al-jahUU JablCAL al-jahUU JablCAL al-jahUU JablCAL al-jahUU JablCAL al-jahUU JablCAL al-jahUU JablCAL al-jahUU JablCAL al-jahUU JablCAL al-jahUU JablCAL al-jahUU JablCAL al-jahUU JablCAL al-jahUU JablCAL al-jahUU JablCAL al-jahU JablCAL al-jahUU JablCAL al-jahUU JablCAL al-jahUU JablCAL al-jahUU JablCAL al-jahUU JablCAL al-jahUU JablCAL al-jahUU JablCAL al-jahUU JablCAL al-jahUU JablCAL al-jahUU JablCAL al-jahUU JablCAL al-jahUU JablNAL al-jahUU JablCAL al-jahUU JablCAL al-jahUU JablCAL al-jahUU JablCAL al-jahUU JablCAL al-jahUU JablCAL al-jahUU JablCAL al-jahUU JablCAL al-jahUU JablCAL al-jahUU JablCAL al-jahUU JablCAL al-jahUU JablCAL al-jahuu JablCAL al-jahUU JablCAL al-jahUU JablCAL al-jahUU JablCAL al-jahUU JablCAL al-jahUU JablCAL al-jahUU JablCAL al-jahUU JablCAL al-jahUU JablCAL al-jahUU JablCAL al-jahUU JablCAL al-jahUU JablCAL al-jahUU JablDAL al-jahUU JablCAL al-jahUU JablCAL al-jahUU JablCAL al-jahUU JablCAL al-jahUU JablCAL al-jahUU JablCAL al-jahUU JablCAL al-jahUU JablCAL al-jahUU JablCAL al-jahUU JablCAL al-jahUU JablCAL al-jahUU JablCAL al-jahIU JablCAL al-jahUU JablCAL al-jahUU JablCAL al-jahUU JablCAL al-jahUU JablCAL al-jahUU JablCAL al-jahUU JablCAL al-jahUU JablCAL al-jahUU JablCAL al-jahUU JablCAL al-jahUU JablCAL al-jahUU JablCAL al-jahUU JablCALEl al-jahUU JablCAL al-jahUU JablCAL al-jahUU JablCAL al-jahUU JablCAL al-jahUU JablCAL al-jahUU JablCAL al-jahUU JablCAL al-jahUU JablCAL al-jahUU JablCAL al-jahUU JablCAL al-jahUU JablCAL al-jahUU JablCAL al-jah### U JablCAL al-jah### U JablCAL al-jah### U JablCAL al-jah### U JablCAL al-jah### U JablCAL al-jah### U JablCAL al-jah### U JablCAL al-jah### U JablCAL al-jah### U JablCAL al-jah### U JablCAL al-jah### U JablCAL al-jah### U |