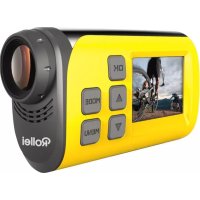
S30 - Camcorder ROLLEI - Free user manual and instructions
Find the device manual for free S30 ROLLEI in PDF.



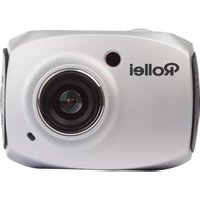
| Product type | Action camcorder |
| Brand | Rollei |
| Model | S30 |
| Sensor | 2-megapixel CMOS |
| Maximum video resolution | Full HD 1080p at 30 fps |
| Maximum photo resolution | 5 megapixels (2560×1920) |
| Screen | 1.5-inch TFT LCD |
| Memory | Micro SD card up to 32 GB (class 4 minimum) |
| Connectivity | WiFi, USB, HDMI |
| Battery | Built-in lithium polymer, charges via USB (6 to 10 hours for first charge) |
| Battery life | Approximately 60 minutes (continuous use, estimated) |
| Dimensions | 82 × 47.2 × 27.1 mm |
| Weight | Approximately 75 g |
| Waterproofing | Waterproof housing included (depth not specified) |
| Included accessories | Bike and helmet mounts, straps, stickers, USB and HDMI cables |
| Main features | Continuous video recording, photo burst mode, self-timer, WiFi for remote control |
| Maintenance | Clean with a soft, dry cloth; avoid solvents |
| Safety | Do not use while charging; turn off if overheating |
| Repairability | Contact Rollei customer service if issues arise |
Frequently Asked Questions - S30 ROLLEI
User questions about S30 ROLLEI
0 question about this device. Answer the ones you know or ask your own.
Ask a new question about this device
Download the instructions for your Camcorder in PDF format for free! Find your manual S30 - ROLLEI and take your electronic device back in hand. On this page are published all the documents necessary for the use of your device. S30 by ROLLEI.
USER MANUAL S30 ROLLEI
Rollei Actioncam S-30 WiFi

facebook.com/rollei.actioncam.en

facebook.com/rollei.actioncam.de
USERGUIDe
FOR ENGLISH | GERMAN | SPANISH | PORTUGUESE | ITALIAN
GREEK | FRENCH | DUTCH | POLISH | CZECH | RUSSIAN | HUNGARIAN
SWEDISH | FINNISH | NORWEGIAN | DANISH
Rollei actioncam
Rollei Actioncam S-30 WiFi
English 4-17
German 18-31
Spanish 32-45
Portuguese 46-59
Italian 60-73
Greek 74-87
French 88-101
Dutch 102-115
Polish 116-129
Czech 130-143
Russian 144-157
Hungarian 158-172
Swedish 173-185
Finnish 186-199
Norwegian 200-213
Danish 214-227
Appearances and Buttons
Part names
- USB jack
- Start/Stop/Power/Shutter button
- Indicator light
- Speaker
- Microphone
- OK button
- Up/Wi-Fi button
8.Mode button - Menu button
- Down button
- LCD screen
12.Lens - Micro SD Card slot
- HDMI jack
- Reset
16.Bracket - Tripod slot
- Water proof case
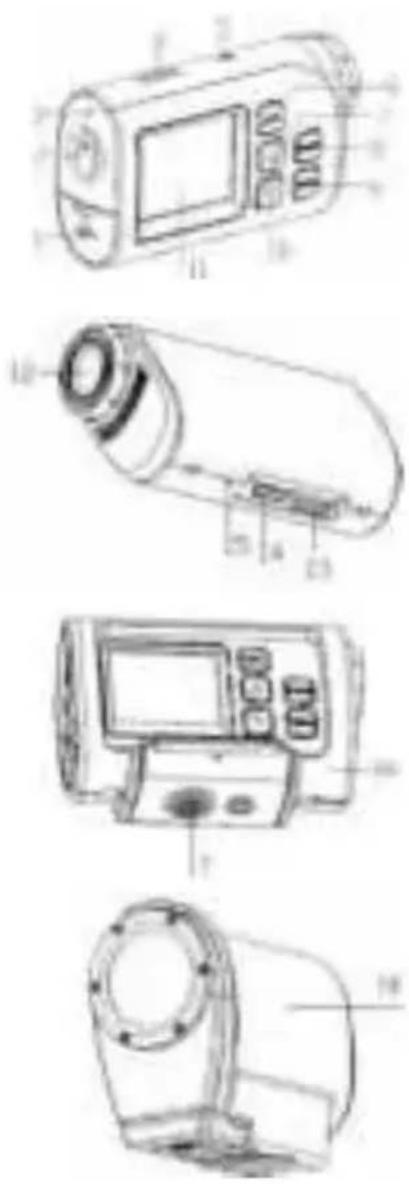
1) All images and illustrations given in this manual are for explanation purpose and may differ slightly from the actual product.
Mounting accessories2
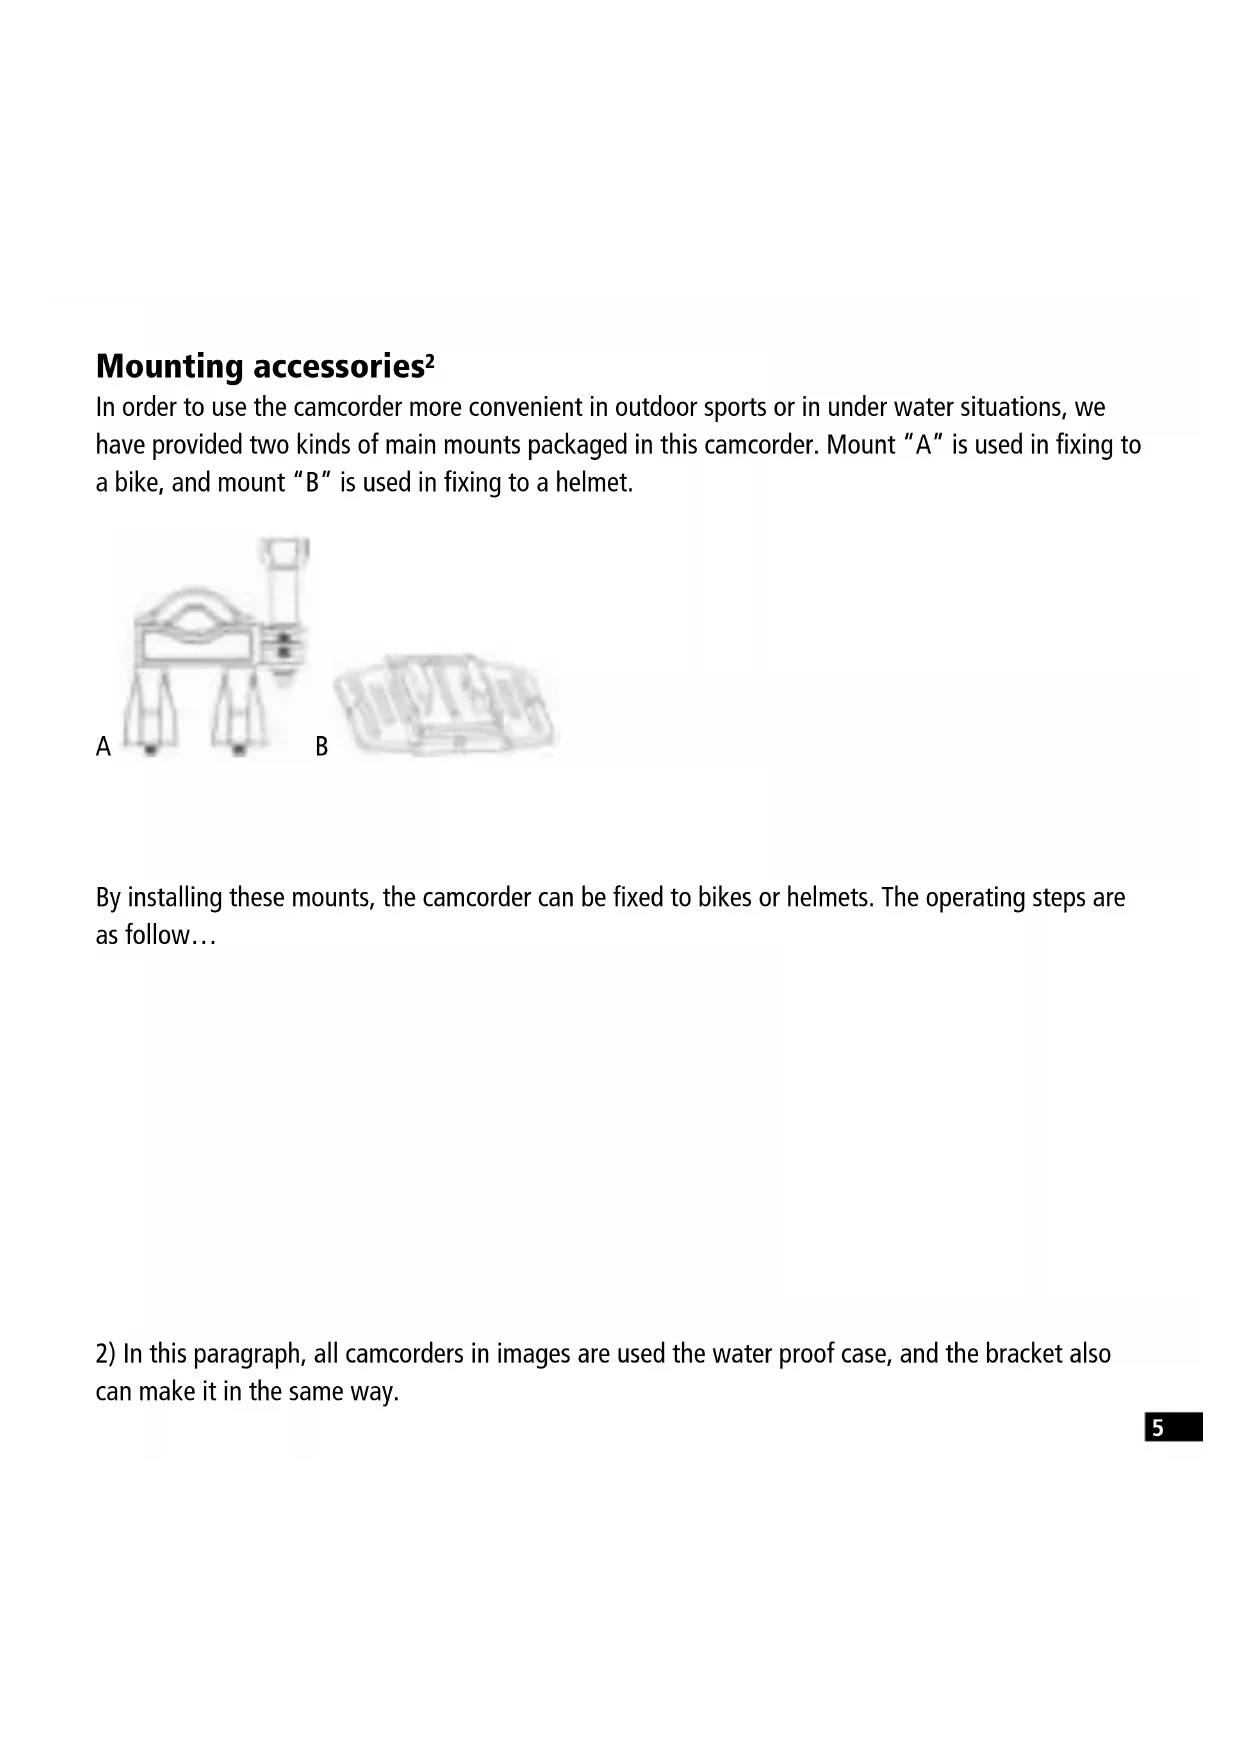
In order to use the camcorder more convenient in outdoor sports or in under water situations, we have provided two kinds of main mounts packaged in this camcorder. Mount "A" is used in fixing to a bike, and mount "B" is used in fixing to a helmet.
A
B
By installing these mounts, the camcorder can be fixed to bikes or helmets. The operating steps are as follow...
2) In this paragraph, all camcorders in images are used the water proof case, and the bracket also can make it in the same way.
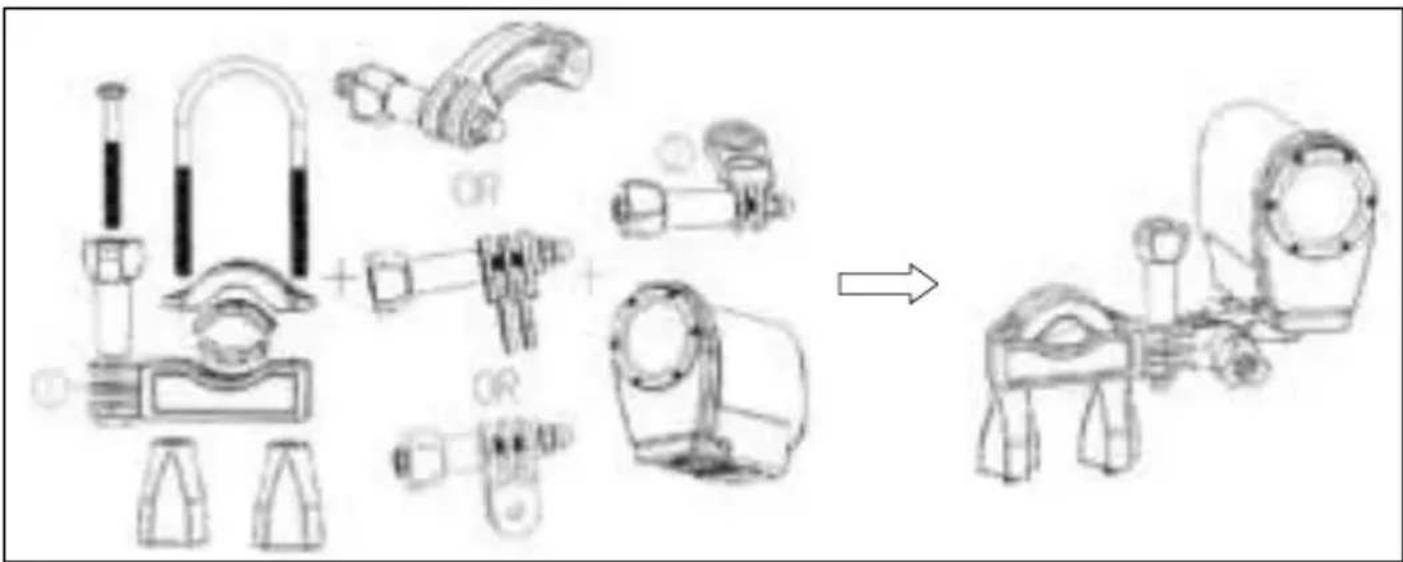
Fix the Rollei S-30 Wifi camcorder to a bike
- Put the camcorder into the water proof case or the bracket, then lock it.
- Find the mount "A", fix it to the handlebar of a bike by placing the rubber pad, and rotating screws.
- Choosing connectors from the three given below, and then fix them to the part 1 of the main mount "A".
- Fix the connector 2 that have a metal screw on it to the last connector.
- Fix the tripod slot of the camcorder to the metal screw of the mount 2 respectively.
- Adjust those screws to make the camcorder more steady and convenient.
Fix the Action Rollei S-30 Wifi to a helmet
- Put the camcorder into the water proof case or the bracket, then lock it.
- Fix the connector 3 to the main mount "B" as given below.
- Choosing connectors from the three given below, and then fix them to the connector 3.
- Fix the connector 2 that have a metal screw on it to the last connector.
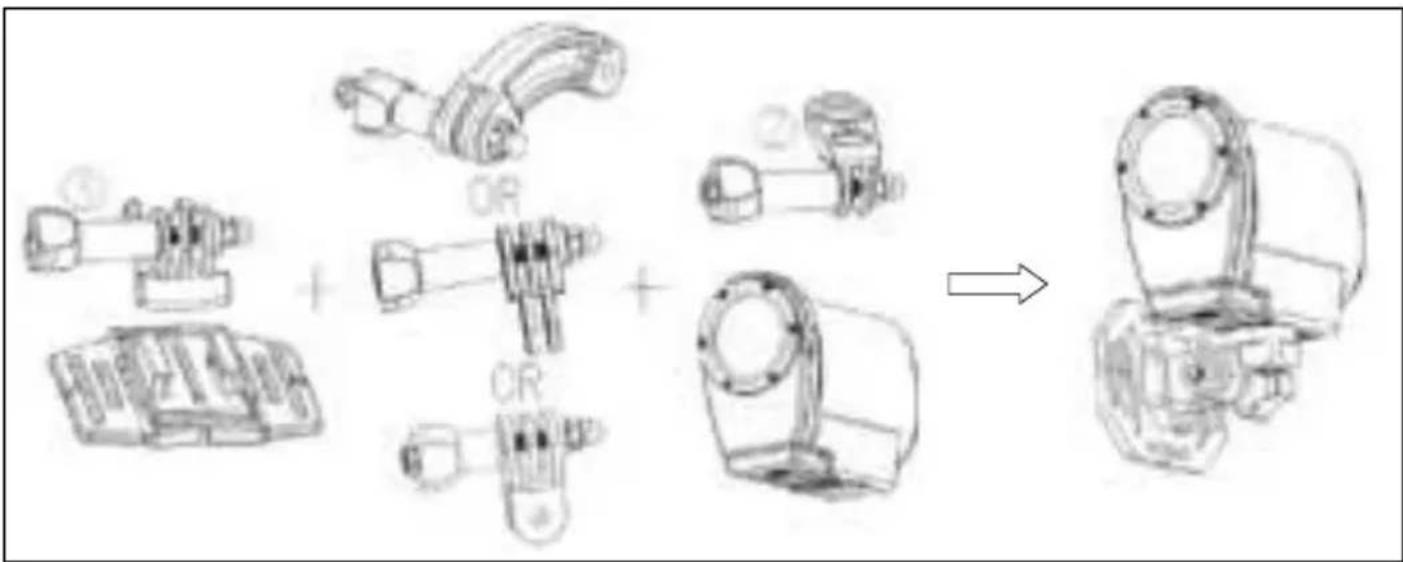
- Fix the tripod slot of the camcorder to the metal screw of the mount 2 respectively.
- Adjust those screws to make the camcorder more steady and convenient.
- After fixing the camcorder to the mount correctly, you need to choose which way to fix them to the helmet.
a) Using a strap: Insert a strap into the two ends of the main mount "B", adjust length according to the helmet's size, and then tie the strap up to your helmet.
b) Using a sticker: Use the side of a sticker paste to the bottom of the main mount "B", and the other side paste to your helmet.
NOTeS:
Preparing before using Charging the camcorder
The camcorder has an internal lithium-polymer battery; please charge it for about 6-10 hour, the first time.
- Turn off the camcorder.
- Find the USB cable, and connect to a computer.
- Open the USB cover at the side of the camcorder, and find the USB jack in it.
- Connect the other side of the USB cable to the USB jack of the camcorder.
- During charging, the busy indicator light turns red, once the battery is fully charged, the busy indicator light will turn off.
- Its normal that the camcorder will become warm after extend using.
- Don't use the power adapter output current is below 1A.
- Over heat of the camcorder, please turn it off.
- Don't use the camcorder when charging.
Inserting the Micro SD card
Before using this camcorder, a Micro SD Card (at least Class 4) that can save your video files and images is necessary.
- Find the Micro SD Card cover at the bottom of the camcorder.
- Open it and find the Micro SD Card slot in it, then put the Micro SD Card into the slot, make sure the direction of the card is the same as shown on the slot cover.
- If it's inserted successfully, you will hear a litter clear buzzer.
TIPS: The camcorder cannot record without a Micro SD Card.
Basic operation
Turn the camcorder on and off.
- Turn the camcorder on
Long press the POWER button to turn on the camcorder.
- Turn the camcorder off
Long press the POWER button again to turn off the camcorder.
Normally the busy indicator light always keep blue after turning on the camcorder, but when turning on and turning off the camcorder and other movement, the busy indicator light will flash.
Switching the mode
The camcorder has three types of modes: video-, capture-, and playback mode. Press the MODE button to switch between these modes.

Video mode. Recording movie clips

Capture mode. Taking still images

Playback mode. Viewing the recorded files
Setting the camcorder
After turning on the camcorder, press the MENU button in any mode to enter the menu interface, and then press the MODE button to enter the set-up menu Press the UP and DOWN button to choose the option to set for the camcorder. At last, press the OK button to enter its submenu or to confirm the settings, press the MENU button to exit. (Sounds/Backlight/ Power frequency/ Power save/Date & time... / Language/ USB/ Format / Reset All...)
Powers save
To save power, using this function, the camcorder will turn off automatically after a period of time. Off / [1 min] / [3min] / [5min]
Date & time...
Set the date and time. Press the MODE button to switch between year, month, date, hour, minute, second. Press the OK button to confirm.
Language
Set on-screen language. [EN] / [FR] / [NL] / [ES] / [IT] / [PT] / [DE] / [DK] / [SE] / [FI] / [GR] / [CZ[ / [PL] / [HU] / [RU] / [NO]
USB
Extend other functions by using USB.
[MSDC]: choose this option to enter the storage mode when connecting to a computer.
[Pictbridge]: choose this option to print images when connecting to a printer marked with the Pictbridge logo.
[H264]/[MJPG]: choose this function to set it as a PC camera when connecting to a computer. The operating steps as below:
Select this option; and connect the camcorder to a computer; then you can use it as a PC camera by double click the icon in [my computer]
After connecting to a computer, Press the MODE button to switch between [MSDC] and PC camera mode.
Format
Delete all datas including protected files. It is advised to download important files to a computer before formatting.[Yes] / [No]
Recording movie clips
- Press the MODE button to switch the camcorder to video mode
- Use the screen to view the object that you want to record.
- Press the SHUTTER button to start recording, press it again to stop recording.
- Press the UP button to have a pause, repeat it to recovery.
- Press the DOWN button to enter the power save mode, and the screen is totally black. During this time, it still records movie clips. Press it again to recover.
- Pressing the OK button to capture a still image while recording movies, and the icon "capture done" will show on the screen.
- After exit the recording, Press the UP button to enter the Wi-Fi connection mode, for detail usage refer to the chapter Wi-Fi connecting.
- Press the MENU button to set the camcorder in video mode. (Movie size/ Video quality/ White balance/ Metering / Effect /Seamless/Date stamp)
Seamless
Set the loop recording time: Off / [1Min] / [3 Min] / [5 Min]
Taking still images
- Press the MODE button to switch the camcorder to capture mode
- Use the screen to view the object that you want to take, press the SHUTTER or the OK button to capture it.
- Press the DOWN button to enter the power save mode, the screen is totally black.
- Press the UP button to enter the Wi-Fi connection mode, the detail use refers to Wi-Fi connecting.
- Press the MENU button to set the camcorder in capture mode. (Resolution/ Quality/ Metering/ White balance/ ISO/ Exposure / Sharpness/ Effect/Drive mode/Burst mode/ Date stamp)
Driver mode
[2s] / [10s]: set a delay from the time the shutter button is pressed to the time the image is shot.
Driver mode
Take several pictures per shoot Off /[3] /[5]/ [10]
Playback
All recorded videos and images are saved on the Micro SD card, only after insert the Micro SD card you can view the recorded files.
- Press the MODE button to enter the playback mode
- Press the UP and DOWN button to view all the files.
- When viewing images, press the OK button to start the slide show, press the MENU button to exit.
- When playing video files, press the OK button to start playing, press the UP button to have a pause, press it again to recover. At last, press the MENU button to stop the replay.
- Press the MENU button to set the camcorder in playback mode. (Protect/ Delete/ Slide show/ Photo effect/ Rotate/ Resize/ Voice memo)
Delete
Choose to delete files. [Single] / [all]
Slide show
This mode playback all images on your memory card automatically.
Start: starts the slide show
Interval: [1 up to 10sec]
Transition: [1] /[2] /[3] /[4] /[5] /[mix]
Repeat: [Yes] /[No]
Photo effect
Set the color effect to add a color tone to the image:
[B&W] /[sepia] /[negative] /[vivid red] /[vivid green] /[vivid blue]
Resize
Resize the current image to a smaller size image.
[3M] / [2M] / [1M] / [VGA]
Voice memo
Add background music or voice recording for the current file:
[Add] /[delete]
Connections
Downloading files
There are two ways to download files from the memory card to a computer:
Using a Card Reader
- Eject the memory card from the camcorder and insert it into a card reader.
- Connect the card reader to the computer.
- Open [My Computer] or [Windows Explorer] and double-click the removable disk icon that represents the memory card.
- Copy images from the card into a directory of your choice on your Computer.
Using a USB Cable
- Connect the supplied USB cable to the computer's USB port and turn the camcorder on.
- Turn the Camcorder on, the screen will turn bright, and you will see an icon "MSDC" on the screen.
- Open [My Computer] or [Windows Explorer]. A „Removable Disk“ appears in the drive list. Double-click the „Removable Disk“ icon to view its contents. Files stored on the camera are located in the folder named „DCIM“.
- Copy the required files to your computer.
Connecting a HdTV
- Connect the camcorder to HDTV with the attached HDMI-cable.
- Turn on HDTV and switch to HDMI-mode.
- Turn on the camcorder.
- After connecting correctly, the screen of the camcorder will darken, but we can see the objects shown on the HDTV, and we can use it to record videos, images, and set menus, just the screen is the HDTV.
Wi-Fi connecting
You can use your cell phone/tablet PC in Android or iOS system to control the camcorder through the Wi-Fi function.
- Make sure you have installed the APP "Rollei S-30 WiFi" on your cell phone or tablet PC (Androids can download from the "Play Store", for iOS download it from the "APP Store").
- Turn the camcorder on and press the UP button to enter the Wi-Fi connecting mode. The "Waiting for Wi-Fi Connecting"-Note appears on the camera screen.
- Open the Wifi-Mode of your Cell Phone or Tablet PC and search a Wi-Fi-Device named "Rollei S-30Wi-Fi_xxxxx" (xxxxxx is from 000001 to 010200). When found connect it. The primary password is "00000000"
- After building up the Wi-Fi connection successfully, an icon" Wi-Fi Connection Ready...!" is shown on the screen of the camcorder.
- Run the "Rollei S-30 WiFi". The content of the Screen of your camcorder is shown on your cell phone or tablet PC. At this time you can control it by your cell phone or tablet PC.
Start:
- Touch the two icon [ ] to switch between video mode and capture mode.
- Touch the ico to start recording a movie clip, touch it again to stop recording. And touch the icon take a still photo.
Settings: (It may be different depending on your software version)
Touch the icon you want to set, including self-timer, resolution, white balance.
- Self-timer: Set a delay from the time the shutter icon is touched to the time the image is shot. Off / [2s] / [10s]
- Photo resolution: [5M] / [3M] / [2M] / [1M] / [VGA]
- Video resolution: [FHD 1080p@30fps] / [HD 720P@60fps] / [HD 1280x720(30fps)]
- White balance: Auto/Daylight/Cloudy/Fluorescent/Incandescent
Touch the icon to set more options. Continues shooting, white balance, frequency, format camera, and version information.
- Continues shooting: it will take several photos per shoot as you set. Off/ [3 photos]/ [5 photos] / [10 photos]
- During using, either press the UP button of the camcorder or exit the "Rollei S-30 WiFi" App to end the connection.
Specification
| Sensor 2.0 Mega Pixel CMOS Sensor | |
| Operation modes Video mode, Capture mode, Playback mode | |
| Shutter Electronic | |
| LCD screen 1.5" TFT Screen | |
| Storage Micro SD card (up to 32G) | |
| Resolution Video: [1920x1080(30fps)] / [1280x720(60fps)] / [1280x720(30fps)] | |
| Image: [2560x1920] / [2048x1536] / [1600x1200] / [1280x960] / [640x480] | |
| Continue shoot [3] / [5] / [10] frames per shoot | |
| ISO Auto/50/100/200/400/800 | |
| Metering Center/Multi/Spot→ | |
| Exposure -2EV~ +2EV | |
| White balance Auto/Daylight/Cloudy/Tungsten/Fluor H | |
| File format Image: JPG Video: MOV | |
| Battery Lithium-polymer battery(build in) | |
| Speaker Build in | |
| Microphone Build in | |
| Dimension 82 x 47.2 x 27.1 mm | |
| Weight About 75 g |
Aus / [3] / [5] / [10]
Wiedergabe
Apart from using the mode of the computer, a computer with 100 MB RAM and 2 GB RAM is also suitable for this purpose.
Formatar
Avalua: Bivr: [1920x1080(30fps)] / [1280x720(60fps)] / [1280x720(30fps)]
Φωτογραφία: [2560x1920] / [2048x1536] / [1600x1200] / [1280x960] / [640x480]
Transition: [1] /[2] /[3] /[4] /[5] /[mix]
Répéter: [Oui] /[Non]
Effet photo
Vypnuto / [3] / [5] / [10]
Přehrávání
IpeHnauHm nCnoJb3OBAHnB Kamepy Heo6xOdImo yCTaHOBnTb KapTy MicroSD (Knacc He HnKe 4), Ha KOTopyu Bbl CMOXeTe COxpaHrTb CBOB BnDe03aPiNCn N3O6paXeHnA:
- Hainte Kpbkky cnoTa Kapb MicroSD, pacnoJooKeHHy Chn3y KaMepbl.
-
OTKpoIe KpbIshky n HauDInTe cnot dJa KapTbI MicroSD. BcTaBbTe KapTy MicroSD b cnot. Y6eIntecb, yTO HapBaJIeHne KapTbI COBnadaet C HApRaBJIeHneM, yKa3aHHbIM Ha KpbIshKe cNOTa.
-
Ecnn KapTa BCTabHeHa npaBnIbHO, Bbl yCJIbIuNTe IeJyOK.
BHIMAHNE. Kamepa He MoXeT 3aINcBbAtb foaiIb6e3 KapTb MicroSD.
OchOBhble yHKcH
BkIIOUeHne N BbIKJIIOUeHne KaMEpbI
- BkIIOUeHne kAmepbI
YTO6bI BKHouHTb KaMepy, HaxMTe I DOIro ydePxmbaTe KHOkky POWER.
- BbIKJIIOUeHne KaMEpbI
YTo6bI BbIKJIIOHTb Kamepy, CHOBA HaxMnte I DoIro ydepxnBaIte KhoNky POWER.
ObbHNO nocne BkIoueHnKaMepbl INHdkaTOp 3aHrTOCTN NOCTOARHNO CBETNTCnHIM; npBkIoueHN/ BbIKIOUeHn KaMepbl IN DpyRnx DeiCTBnX INHdkaTOp 3aHrTOCTN MrraeT.
BbI6op pexnma
Kamepa nmeet nppekma: pekm 3anucn Bndeo, pekm fotoceMkn n pekm Bocnpon3BeHn. InypekeKnoueHn Mekdy pekMaMaN HaxImaTe KhONKy MODE.

Pexim 3aIscn BIneO. 3aIscb BIneOpOIIKOB

PexnMΦOTOCbEMKn.CbEmKaΦOTOrpaΦn

Pexim Bocnpo3BeDeHna. PpocMToP 3aIncAHbIX paJIOB
HactpoNka kamepbI
После Вкюченя камеры нахмITE Кноку MENUВ Лобом ржимe,чTOбы BOИТВ MEHIO.HaЖмITE MODE,чTOбы BOITN B MeHIO HAcTpoEK.НжIMаITE UP n DOWN,чTOбы BbI6paTb HAcTpoIky, KOTopyЮ Bbl XOTITEи3MeHNTb.HaЖмITE OK,чTOбы BOITN B ПОДмEHIO ИП NODTBepdntb HAcTpoIKN. ДЯьвIXODа нахмITE MENU.(3Bykn/ПодCBetka/YacToTa cetn/энeproc6ep./Дata nВрем... /ЯзIK/ USB/ФорMaT/C6poc.Bce...)
3heprocbepexeHne
3aHnscb BndeopOJNKOB
- Haxmte MODE, yTo6bl nepeKIOuHTb KaMepy B pexm 3aIncn BIndeo
2.ИспоьзуиTe ДиСплeн,ЧToБы ВиДeТь标明,КOTОрьи Bbl XOTITE CHЯТь. - Haxmte SHUTTER, yTo6bI hauatb 3aIncB. HaxmTe KhoNky eue pa3, YTO6bl OCTaHOBnTB 3aIncB.
- Haxmte UP, yTo6bl nocTaBnTb na3y. Haxmte KhoNky eue pa3, yTo6bl Bo3o6HOBnTb 3aInCb.
- Haxmte DOWN, yTo6bI BOITn B pexm 3heproc6epekeHna. Dncnnei noNocTbIO noracHe. PpN 3aInCb BVdeo 6ydt npOJKeHa. Haxmte KhoNky eue pa3, yTo6bI BepHyTbCBy ObUHbI peKIM.
- Haxmte OK, yTo6bI cHrTb fOTOrpaΦnIO BO BpeM 3aIncn BnDeopOPIka. Ha dinCnIee OTO6pa3ntc3HaouK «3aIncb 3aBepseHa».
- Посл e Вьхоба n3 ржима 3aисн haЖмITE UP,чToБы BOИТи B pexIM coeINHeHnЯ no Wi-Fi. Ioppo6hee cm.В pa3dene «Поdkлioченke K Wi-Fi».
- Haxmte MENU, uTo6bI hAcTpoNTb pa6Oy kAmepbI B pexnme BnDeo3aHncn. (Pa3M. pfInbMa/KauecTBo/BaJAnC 6enoro/Im 3Kcn3/3ΦΦeKT /Luknueckar cBemka/Bneu. dAtbl)
UkJnuecka Cbemka
YcTaHOBnTe BpeM 3aHnCn OTpe3Ka: [BbIK] / [1 MmHyTa] / [3 MmHyTbI] / [5 MmHyT]
CbeMaΦotorpaΦn
- Haxmte MODE, yTo6bl nepeKJIIOHTb KaMepy B peXIM fOToCbeMKn
- Исторы Доступа, что бли видах obъekt, которь влхOTITE сггт. НжмITE SHUTTER nnn OK, что bсделаь снIMOK.
- Haxmte DOWN, yTo6bI BOITN B pexm 3Heproc6eXeHnA. Dncnnei noHocTbIO noracHT.
- Haxmte UP, yTo6bI BOiTn B pexm coeHHeHn no Wi-Fi. Ioppo6Hee cm. B pa3Je «IopKnIOueHne KWi-Fi>.
- Haxmte MENU, yTo6bI hAcTpoNTb pa6Otu KaMepbl B peXnme foTOcBemKn. (Pa3peSeHne/KaueCTBO/V3m 3KcN3/BaHaHc 6eIoro/ISO/ 3KcNo3nua/Pe3KocTB/3ΦΦeKT/ABTOcnyck/ CepiHaA cbEMka/ Bneu. dAtbl)
ABTOCnyck
[2 cekyndb] / [10 cekynd]: yctahOBITE BpeM 3aepxKm Mekdy HaxaTneM KhoNk Shutter n cbeMKoNn3o6paXeHn.
Cepinna cbeMa
CbeMka HeckoJIbKnx KaIPOB Ha CHIMOK
[BbIK] / [3] / [5]/[10]
Bocnpon3BepeHne
Bce 3aHcHbIe BndeoknIbI n 3o6paXeHna coXpaHraTcHa KapTy MicroSD.
3aIncahHbIe paiJIb MOryT 6bITb npocMOTpeHbI, TOnbKO ecnKapTa MicroSD BCTabHeHa B KaMEpy.
- Haxmte MODE, yTo6bI BOITN B pexIM Bocnpn3BedeHna
- HaximaiTe UP n DOWN, yTo6bl npocmotpeb BCE paaiIbI.
-
Пи посмOTpe ИЗбраженин НжмITE OK, чTo6bl 3aNyCTnTb сайД-шоу. Дя Вьхда n3 cnaId-шоу НжмITE MENU.
-
Пи посмOTpe вideофайноь нажмITE OK, уTO6bI 3aNYCTnTb BOCPON3BeDEHne. HabKMITE UP, уTO6bI NOCTaBnTb nay3y. HabKMITE KHOJky eue pa3, уTO6bI BO3O6HOBnTb BOCPON3BeDEHne. HabKMITE MENU, уTO6bI OCTaHOBnTb BOCPON3BeDEHne.
- HaxmTe MEnu, TTo6bI hAcTpoNTb pa60Ty kAmepbI B pexnme BocnpOn3BeDeHnra. (3aunTa/CtepeTB/CnaI-D-woy/3ofoeKr/TobOpOT/u3MeHnTb pa3Mep/3Byk. namrTkca)
Crepetb
Bb6op fainob dny ydaJeHna. [Kaxdb] / [Bce]
CnaH-woy
B 3TOM pexime BCE n3o6paXeHnHa kaTe naMrtn 6yDt BocnpOn3BOJtbcr aBTOMaTnueckn.
CTapT: 3anyckaet cnaI-d-woy
IHTepBaI: [oT 1do 10cekyHd]
IepexoIbI: [1] / [2] / [3] / [4] / [5] / [npemewaTb]
Transition(overgang): [1] / [2] / [3] / [4] / [5] / [mix]
Repeat (upprepaa): [ja] / [nej]
Fotoffekt
Stille inn videokameraet
Rollei Service Germany
Denisstraße 28a
D-67663 Kaiserslautern
Hotline +49 (0)6 31/3 42 84 49
Distribution:
Subject to technical changes!





- ROLLEI ACTIONCAM S-30 WIFI
- USERGUIDE
- ROLLEI ACTIONCAM
- APPEARANCES AND BUTTONS
- PART NAMES
- MOUNTING ACCESSORIES2
- FIX THE ROLLEI S-30 WIFI CAMCORDER TO A BIKE
- FIX THE ACTION ROLLEI S-30 WIFI TO A HELMET
- NOTES
- PREPARING BEFORE USING CHARGING THE CAMCORDER
- INSERTING THE MICRO SD CARD
- BASIC OPERATION
- TURN THE CAMCORDER ON AND OFF
- SWITCHING THE MODE
- SETTING THE CAMCORDER
- POWERS SAVE
- DATE & TIME
- LANGUAGE
- USB
- FORMAT
- RECORDING MOVIE CLIPS
- SEAMLESS
- TAKING STILL IMAGES
- DRIVER MODE
- PLAYBACK
- DELETE
- SLIDE SHOW
- PHOTO EFFECT
- RESIZE
- VOICE MEMO
- CONNECTIONS
- DOWNLOADING FILES
- USING A CARD READER
- USING A USB CABLE
- CONNECTING A HDTV
- WI-FI CONNECTING
- START
- SETTINGS: (IT MAY BE DIFFERENT DEPENDING ON YOUR SOFTWARE VERSION)
- SPECIFICATION
- WIEDERGABE
- FORMATAR
- EFFET PHOTO
- PŘEHRÁVÁNÍ
- OCHOBHBLE YHKCH
- BKIIOUEHNE N BBIKJIIOUEHNE KAMEPBI
- BBI6OP PEXNMA
- HACTPONKA KAMEPBI
- 3HEPROCBEPEXEHNE
- 3AHNSCB BNDEOPOJNKOB
- UKJNUECKA CBEMKA
- CBEMAΦOTORPAΦN
- ABTOCNYCK
- CEPINNA CBEMA
- BOCNPON3BEPEHNE
- CREPETB
- CNAH-WOY
- FOTOFFEKT
- STILLE INN VIDEOKAMERAET
- DISTRIBUTION
Brand : ROLLEI
Model : S30
Category : Camcorder