
112459 - Oven PRINCESS - Free user manual and instructions
Find the device manual for free 112459 PRINCESS in PDF.
| Product type | Countertop oven |
| Brand | Princess |
| Model | 112459 |
| Capacity | Approximately 20 liters (estimate) |
| Approximate dimensions (W x D x H) | 40 x 30 x 30 cm |
| Approximate weight | 5 kg |
| Power supply | 220-240 V ~ 50/60 Hz |
| Power consumption | 1200 W (estimate) |
| Temperature range | 0 °C to 230 °C |
| Timer | 0 to 15 minutes + continuous mode |
| Main functions | Grill, bake, defrost |
| Included accessories | Baking rack, baking tray, crumb tray |
| Rack material | Metal |
| Control type | Mechanical knobs |
| Indicator light | On/Off |
| Door | With window and handle |
| Cleaning | Interior with damp cloth, accessories with soapy water |
| Maintenance | Removable crumb tray to empty regularly |
| Safety | Auto shut-off, hot surface indicated, use with gloves |
| Repairability | Defective parts to be replaced by manufacturer or authorized repairer |
| Intended use | Indoor domestic use only |
| General information | Manual available in multiple languages |
Frequently Asked Questions - 112459 PRINCESS
User questions about 112459 PRINCESS
0 question about this device. Answer the ones you know or ask your own.
Ask a new question about this device
Download the instructions for your Oven in PDF format for free! Find your manual 112459 - PRINCESS and take your electronic device back in hand. On this page are published all the documents necessary for the use of your device. 112459 by PRINCESS.
USER MANUAL 112459 PRINCESS
You have purchased a Princess product. Our aim is to provide quality products with a tasteful design and at an affordable price. We hope that you will enjoy this product for many years.
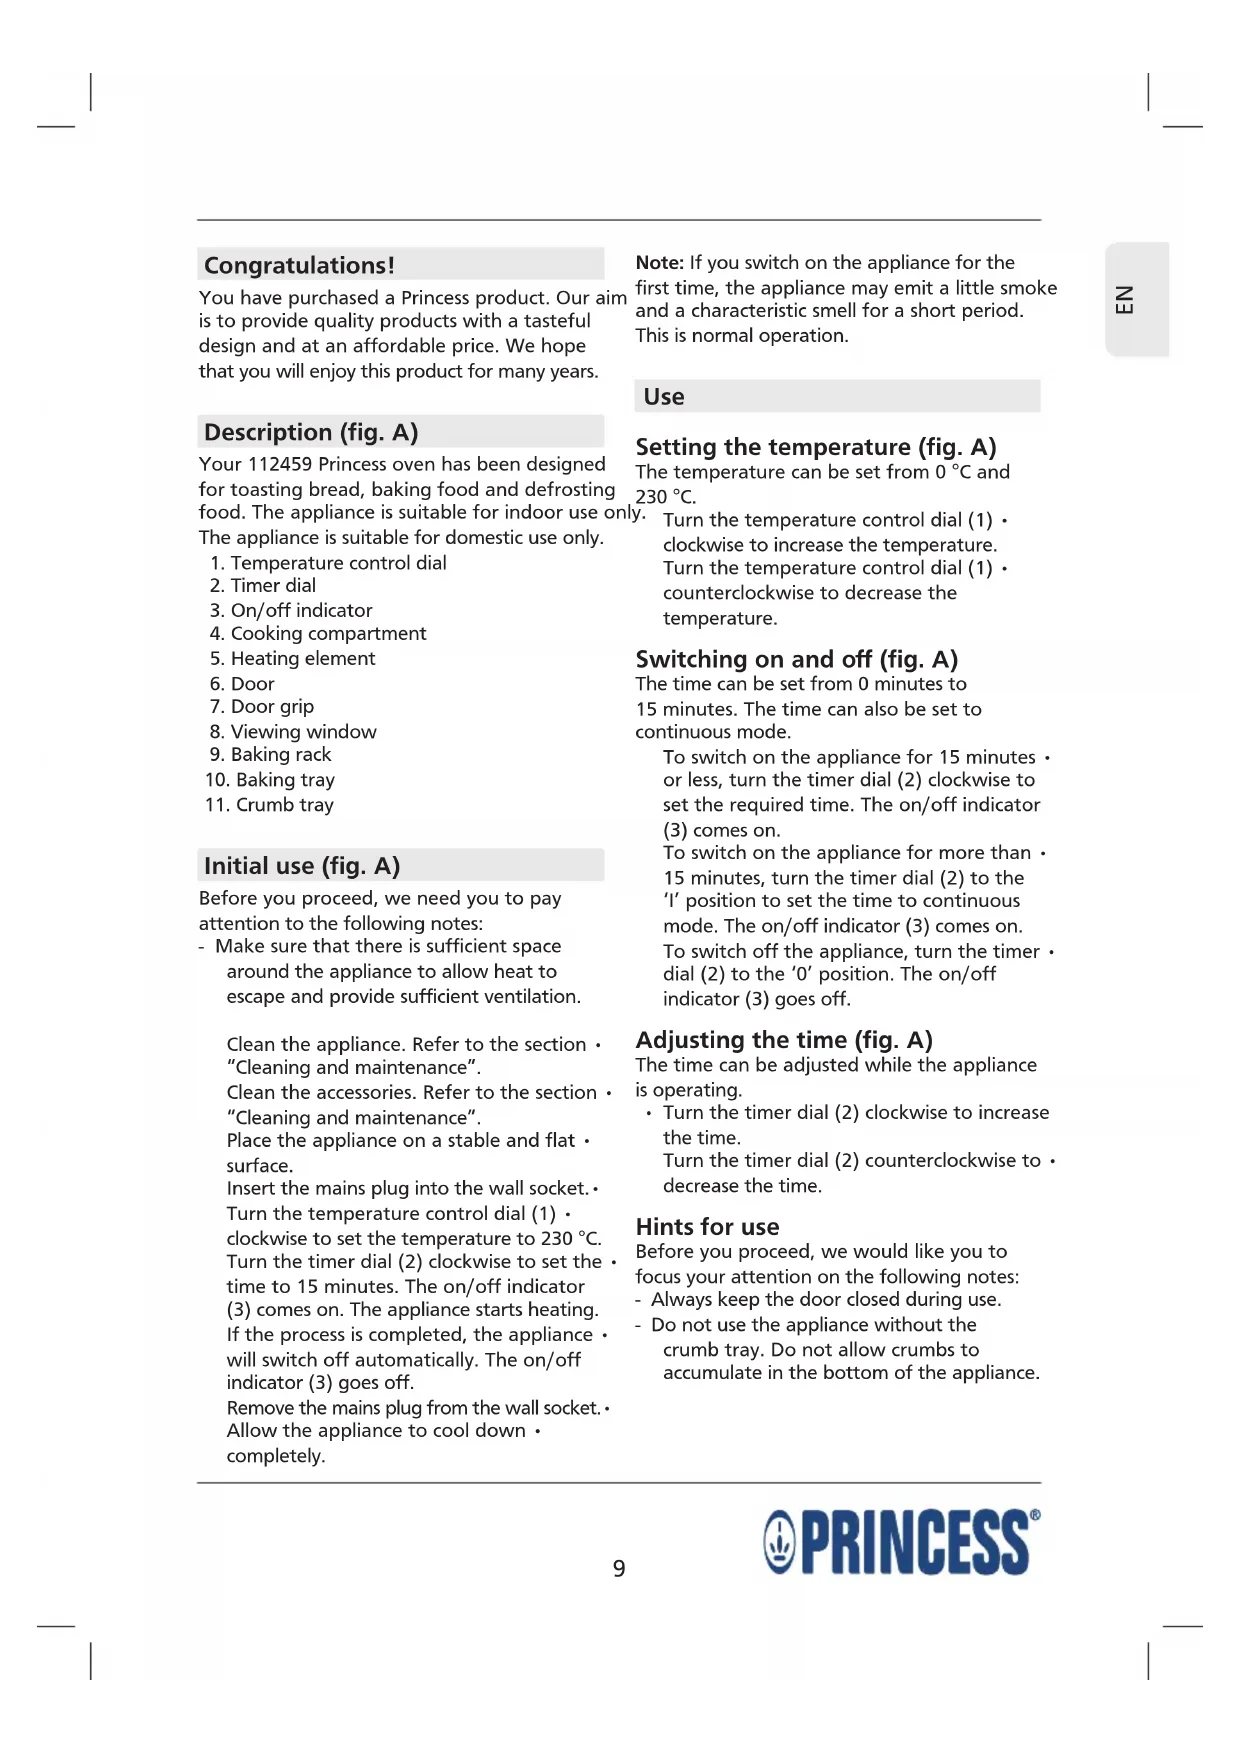
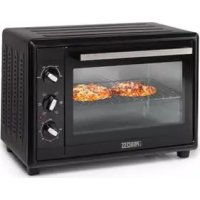
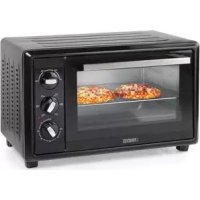
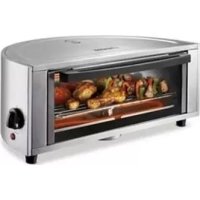
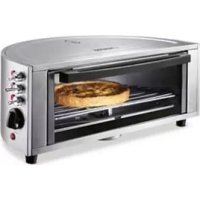
Description (fig. A)
Your 112459 Princess oven has been designed for toasting bread, baking food and defrosting food. The appliance is suitable for indoor use only. The appliance is suitable for domestic use only.
- Temperature control dial
- Timer dial
- On/off indicator
- Cooking compartment
- Heating element
- Door
- Door grip
- Viewing window
- Baking rack
- Baking tray
- Crumb tray
Initial use (fig. A)
Before you proceed, we need you to pay attention to the following notes:
- Make sure that there is sufficient space around the appliance to allow heat to escape and provide sufficient ventilation.
Clean the appliance. Refer to the section "Cleaning and maintenance".
Clean the accessories. Refer to the section "Cleaning and maintenance".
Place the appliance on a stable and flat surface.
Insert the mains plug into the wall socket. - Turn the temperature control dial (1) - clockwise to set the temperature to 230^
Turn the timer dial (2) clockwise to set the time to 15 minutes. The on/off indicator (3) comes on. The appliance starts heating. If the process is completed, the appliance will switch off automatically. The on/off indicator (3) goes off.
Remove the mains plug from the wall socket. - Allow the appliance to cool down completely.
Note: If you switch on the appliance for the first time, the appliance may emit a little smoke and a characteristic smell for a short period. This is normal operation.
Use
Setting the temperature (fig. A)
The temperature can be set from 0^ and 230^ .
Turn the temperature control dial (1) clockwise to increase the temperature.
Turn the temperature control dial (1) - counterclockwise to decrease the temperature.
Switching on and off (fig. A)
The time can be set from 0 minutes to
15 minutes. The time can also be set to continuous mode.
To switch on the appliance for 15 minutes or less, turn the timer dial (2) clockwise to set the required time. The on/off indicator (3) comes on.
To switch on the appliance for more than 15 minutes, turn the timer dial (2) to the 'I' position to set the time to continuous mode. The on/off indicator (3) comes on.
To switch off the appliance, turn the timer dial (2) to the '0' position. The on/off indicator (3) goes off.
Adjusting the time (fig. A)
The time can be adjusted while the appliance is operating.
- Turn the timer dial (2) clockwise to increase the time.
Turn the timer dial (2) counterclockwise to decrease the time.
Hints for use
Before you proceed, we would like you to focus your attention on the following notes:
- Always keep the door closed during use.
- Do not use the appliance without the crumb tray. Do not allow crumbs to accumulate in the bottom of the appliance.
Toasting bread (fig. A - C)
Note: The space between the upper heating element and the food must be at least 30mm in order to achieve the best results.
Place the appliance on a stable and flat surface.
Insert the mains plug into the wall socket.
Slide the baking rack (9) into the cooking compartment (4) (fig. B).
Put the required number of slices of bread onto the baking rack (9).
Insert the crumb tray (11) into the bottom of the appliance using the handgrip (12) (fig. C).
Set the temperature using the temperature control dial (1).
Switch on the appliance by turning the timer dial (2) clockwise to set the time.
The on/off indicator (3) comes on.
The appliance starts toasting the bread.
Note: Experiment with the required time to achieve the best results. Toasting four slices of bread at the same time will take longer than toasting one slice of bread at the time. The default time for toasting bread is 3 to 6 minutes.
Regularly look through the viewing window (8) to check whether the bread is toasted and to make sure that it does not burn.
To interrupt the process, turn the timer dial (2) to the '0' position. The on/off indicator (3) goes off.
If the process is completed, the appliance will switch off automatically. A bell will ring.
The on/off indicator (3) goes off.
Use oven gloves to remove the bread from the appliance.
After use, remove the mains plug from the wall socket and wait until the appliance has cooled down.
Baking food (fig. A-C)
Before you proceed, we would like you to focus your attention on the following notes:
- Always place the baking tray onto the baking rack. Do not place the baking tray directly onto the lower heating element.
- If necessary, preheat the oven before putting the food into the cooking compartment.
Note: The space between the upper heating element and the food must be at least 30mm in order to achieve the best results.
Place the appliance on a stable and flat surface.
Insert the mains plug into the wall socket.
Open the door (6) using the door grip (7). Slide the baking rack (9) into the cooking compartment (4) (fig. B).
If necessary, place the baking tray (10) onto the baking rack (9) (fig. B).
Put the food onto the baking rack (9) or the baking tray (10).
Insert the crumb tray (11) into the bottom of the appliance using the handgrip (12) (fig. C).
Set the temperature using the temperature - control dial (1).
Switch on the appliance by turning the timer dial (2) clockwise to set the time.
The on/off indicator (3) comes on.
The appliance starts baking the food.
Note: Experiment with the required time to achieve the best results. Small pieces will bake better and more quickly than large pieces.
Regularly look through the viewing window (8) to check whether the food is baked and to make sure that it does not burn.
To interrupt the process, turn the timer dial (2) to the '0' position. The on/off indicator (3) goes off.
If the process is completed, the appliance will switch off automatically. A bell will ring. The on/off indicator (3) goes off.
- Use oven gloves to remove the food from the appliance.
After use, remove the mains plug from the wall socket and wait until the appliance has cooled down.
Defrosting food (fig. A - C)
Before you proceed, we need you to pay attention to the following notes:
- Always cook the food immediately after defrosting.
Before you proceed, we would like you to focus your attention on the following notes:
- Always use the baking tray in order to defrost food. Always place the baking tray onto the baking rack. Do not place the baking tray directly onto the lower heating element.
- Set a low temperature in order to defrost food. If the temperature is set too high, the food will burn easily.
Note: The space between the upper heating element and the food must be at least 30mm in order to achieve the best results.
Place the appliance on a stable and flat surface.
Insert the mains plug into the wall socket.
Slide the baking rack (9) into the cooking compartment (4) (fig. B).
Place the baking tray (10) onto the baking rack (9) (fig. B).
Put the food onto the baking tray (10). Insert the crumb tray (11) into the bottom of the appliance using the handgrip (12) (fig. C).
Set the temperature using the temperature control dial (1).
Switch on the appliance by turning the timer dial (2) clockwise to set the time.
The on/off indicator (3) comes on.
The appliance starts defrosting the food.
Note: Experiment with the required time to achieve the best results. The time required for defrosting food depends on the type of food, the weight of the food and the shape of the food.
Regularly look through the viewing window (8) to check whether the food is defrosted and to make sure that it does not burn.
Halfway the process, open the door (6), turn over the food and close the door again.
To interrupt the process, turn the timer dial (2) to the '0' position. The on/off indicator (3) goes off.
If the process is completed, the appliance will switch off automatically. A bell will ring. The on/off indicator (3) goes off.
Use oven gloves to remove the food from the appliance.
After use, remove the mains plug from the wall socket and wait until the appliance has cooled down.
Cleaning and maintenance
Before you proceed, we need you to pay attention to the following notes:
- Before cleaning or maintenance, remove the mains plug from the wall socket and wait until the appliance has cooled down.
- Do not immerse the appliance in water or any other liquids.
Before you proceed, we would like you to focus your attention on the following notes:
- Do not use aggressive or abrasive cleaning agents to clean the appliance.
- Do not use sharp objects to clean the appliance.
- Do not use oven cleaners to clean the inside of the appliance.
- Do not clean the appliance in the dishwasher. Do not clean the accessories in the dishwasher. Regularly check the appliance for possible damage.
Clean the inside of the appliance with a damp cloth. Thoroughly dry the inside of the appliance with a clean, dry cloth. Do not wipe the heating elements.
Regularly clean the accessories:
- Clean the baking rack and the baking tray in soapy water. Thoroughly dry the accessories.
-
Tilt the appliance slightly backward. Open the crumb tray by pulling the handgrip backward and down. Carefully shake the crumb tray to remove crumbs. Insert the crumb tray back into the bottom of the appliance using the handgrip.
-
- Store the appliance with the accessories in a dry place, out of the reach of children.
Safety instructions
General safety
- Read the manual carefully before use.
Keep the manual for future reference.
Only use the appliance and the accessories - for their intended purposes. Do not use the appliance and the accessories for other purposes than described in the manual.
Do not use the appliance if any part or any accessory is damaged or defective. If a part or an accessory is damaged or defective, it must be replaced by the manufacturer or an authorised repair agent.
Children should be supervised to ensure that they do not play with the appliance.
The use of this appliance by children or persons with a physical, sensory, mental or motorial disability, or lack of experience and knowledge can give cause to hazards.
Persons responsible for their safety should give explicit instructions or supervise the use of the appliance.
Do not use the appliance near bathtubs, showers, basins or other vessels containing water.
Do not immerse the appliance in water or other liquids. If the appliance is immersed in water or other liquids, do not remove the appliance with your hands. Immediately remove the mains plug from the wall socket.
If the appliance is immersed in water or other liquids, do not use the appliance again.
This appliance is intended to be used in domestic and similar applications such as staff kitchen areas in shops, offices and other working environments; farm houses; by clients in hotels, motels and other residential type environments; bed-and-breakfast type environments.
Electrical safety
Before use, always check that the mains - voltage is the same as the voltage on the rating plate of the appliance.
Connect the appliance to an earthed wall - socket. If necessary, use an earthed extension cable of a suitable diameter (at least 3 × 1.5 ~mm^2 ).
For additional protection, install a residual - current device (RCD) with a rated residual operating current that does not exceed 30mA .
The appliance is not intended to be operated by means of an external timer or separate remote-control system.
Make sure that water cannot enter the contact plugs of the mains cable and the extension cable.
Always fully unwind the mains cable and the extension cable.
Make sure that the mains cable does not hang over the edge of a worktop and cannot be caught accidentally or tripped over.
Keep the mains cable away from heat, oil and sharp edges.
Regularly check the mains cable and the - mains plug for signs of damage. Do not use the appliance if the mains cable or the mains plug is damaged or defective. If the mains cable or the mains plug is damaged or defective, it must be replaced by the manufacturer or an authorised repair agent. Do not pull the mains cable to disconnect - the mains plug from the mains.
- Disconnect the mains plug from the mains when the appliance is not in use, before assembly or disassembly and before cleaning and maintenance.
Safety instructions for ovens
- Do not use the appliance outdoors. Place the appliance on a stable and surface.
- Place the appliance on a heat-resistant and splash-proof surface.
- Do not place the appliance on a hob.
- Do not cover the appliance.
Make sure that there is sufficient space around the appliance to allow heat to escape and provide sufficient ventilation.
Make sure that the appliance does not come into contact with flammable material.
- Keep the appliance away from heat sources. Do not place the appliance on hot surfaces or near open flames.
- Only put containers made of metal, stone or glass in the appliance. Do not put containers made of other materials in the appliance.
- Do not use the appliance for storage purposes.
Beware of hot parts. The surfaces marked with a caution symbol for hot surfaces are liable to become hot during use. The
accessible surfaces can become hot when the appliance is operating. The outer surface can become hot when the appliance is operating.
Be careful when touching the appliance. If you need to touch the appliance during or shortly after use, always wear oven gloves.
Make sure that your hands are dry before touching the appliance.
Do not leave the appliance unattended. during use.
Do not move the appliance while it is switched on or is still hot. Remove the mains plug from the wall socket and wait until the appliance has cooled down.
U.K. Wiring instructions
The wires in the mains lead are coloured in accordance with the following code:
BLUE NEUTRAL
BROWN LIVE
GREEN/YELLOW EARTH
As the colours of the wire in the mains lead of this appliance may not correspond with the colour markings identifying the terminals on your plug, proceed as follows:
The wire which is coloured BLUE must be connected to the terminal which is marked with the letter N or coloured black.
The wire which is coloured BROWN must be connected to the terminal which is marked with the letter L or coloured red.
The wire which is coloured GREEN/YELLOW must be connected to the terminal which is marked with the letter E or ( ) and is coloured GREEN or GREEN/YELLOW.
If a 13Amp (BS1363) plug is used, a 13Amp (BS1362) fuse must be fitted, or if any other type of plug is used, a 13Amp fuse must be fitted, either in the plug or adaptor, or on the distribution board.
Warning! This appliance must be earthed.
Disclaimer
Subject to change; specifications can be changed without further notice.
Felicitations!
Sikkerhetsinstruktjoner for owner
ExTe ayopaoEi eva npoiov nC Princess.
Tóxoc macéiva aacnapexoume TIOIOKA Tpoiovtae wpaio oxediao o e oikovopikec Tiue. EAnizouve va atolauoente auto to Tpoiov yia tonla xpovia.
περιγραφή (εικ. A)
O oópvoc 112459 Princess éxé σεδiaotéi yia tooT ψωμiou, ψnoiμo kai ξεπáγωμa Tpɒφiμwv. H oukeun Tpoopiciεta iya εωτepkκ xρησn μóvo. H oukeun Tpoopiciεta iya oikiaκn xρησn μóvo.
J 1 J 1 J 1 J 1 J 1 J 1 J 1 J 1 J 1 J 1 J 1 J 1 J 1 J 1 J 1 J 1 J 1 J 1 J 1 J 1 J 1 J 1 J 1 J 1 J 1 J 1 J 1 J 1 J 1 J 1 J 1 J 1 J 1 J 1 J
gaiol
J 1
1 2 3 4 5 6 7 8 9 10 11 12 13 14 15 16 17 18 19 20 21 22 23 24 25 26 27 28 29 30 31 32 33 34 35 36 37 38 39 40 41 42 43 44 45 46 47 48 49 50 51 52 53 54 55 56 57 58 59 60 61 62 63 64 65 66 67 68 69 70 71 72 73 74 75 76 77 78 79 80 81 82 83 84 85 86 87 88 89 90
JyIyIyIyIyIyIyIyIyIyIyIyIyIyIyIyIyIyIyIyIyIyIyIyIyIyIyIyIyIyIyIyIyIyIyIyIyIyIyIyIyIyIyIyIyIyIyIyIyIyIy
(A) 230 0 0 0 0 0 0 0 0 0 0 0 0 0 0 0 0 0 0 0 0 0 0 0 0 0 0 0 0 0 0 0 0 0 0 0 0 0 0 0 0 0 0 0 0 0 0
(A) 150 a111 b111 15 152d j111 152d j111 152d j111 152d j111 152d j111 152d j111 152d j111 152d j111 152d j111 152d j111 152d j111 152d j111
(2) 100000000000000000000000000000000000000000000000000
(1)(2)
1
Princess Ciaia 1234567890123456789012345678901234567890123456789012345678901234567890123456789012345678901234567890123456789
(A)
112459 Princess 1
plabll all jy g plabll jjll jnaii
jglal .a jiaall puiu wulio jglal
. a jiall plaiu uuua
.
.1
.2
.3
.4
.5
.6
.7
.8
.9
.10
.11
(A)
1 1111 1111 1111 1111 1111 1111 1111 1111 1111 1111 11
"11111111111111111111111111111111111111 230
- Description (fig. A)
- Initial use (fig. A)
- Use
- Setting the temperature (fig. A)
- Switching on and off (fig. A)
- Adjusting the time (fig. A)
- Hints for use
- Toasting bread (fig. A - C)
- Baking food (fig. A-C)
- Defrosting food (fig. A - C)
- Cleaning and maintenance
- Safety instructions
- General safety
- Electrical safety
- Safety instructions for ovens
- U.K. Wiring instructions
- Disclaimer
- Felicitations!
- Sikkerhetsinstruktjoner for owner
- περιγραφή (εικ. A)
- gaiol
- 1
- (A)
Brand : PRINCESS
Model : 112459
Category : Oven