
SLX70LR - Pregnant PIONEER - Free user manual and instructions
Find the device manual for free SLX70LR PIONEER in PDF.

| Product Type | 2-way acoustic speaker, magnetically shielded |
| Brand | Pioneer |
| Model | SLX70LR |
| Configuration | 2-way, sealed enclosure |
| Woofer | 13 cm x 2 |
| Tweeter | 2.5 cm dome |
| Nominal impedance | 6 Ω |
| Frequency response | 40 Hz to 5000 Hz |
| Sensitivity | 82 dB |
| Maximum input power | 130 W |
| Crossover frequency | 1.7 kHz |
| Dimensions (W x H x D) | 175 mm x 722 mm x 70 mm (excluding protrusions) |
| Weight (per speaker) | 5.2 kg |
| Supplied accessories | Wall and speaker brackets (S and L), screws (long and short), cleaning cloth, wall mounting templates, instruction manual |
| Installation | Wall mounting mandatory (bracket supplied) or on optional stand (CP-LX70 or CP-LX70TS) |
| Grille | Non-removable |
| Maintenance and cleaning | Soft, dry cloth; for the cabinet, cloth lightly dampened with neutral soapy water (no alcohol or solvents) |
| Safety | Do not place on unstable surface; do not sit or stand on the speaker; disconnect the amplifier before touching terminals; use screws suitable for the wall |
| General information | Designed for home cinema use with Pioneer plasma TV; front and surround speakers are interchangeable |
Frequently Asked Questions - SLX70LR PIONEER
User questions about SLX70LR PIONEER
0 question about this device. Answer the ones you know or ask your own.
Ask a new question about this device
Download the instructions for your Pregnant in PDF format for free! Find your manual SLX70LR - PIONEER and take your electronic device back in hand. On this page are published all the documents necessary for the use of your device. SLX70LR by PIONEER.
USER MANUAL SLX70LR PIONEER
Pioneer sound.vision.soul
Operating Instructions | Mode d'emploi | Bedienungsanleitung
Istruzioni per l'uso | Handleiding | Manual de instrucciones
Manual de instruções | Bruksanvisning | Brugsanvisning
Bruksanvisning | Käytöohjeet | Иструкции по заимп.
Speaker System
Enceintes acoustiques
Lautsprechersystem
Sistema di diffusori
Luidsprekersystem
Sistema de Colunas
Sistema de colunas
Högtalarsystem
Höjttalersystem
Höyttalersystem
Kaiutinjärestelmä
Akyctnueckajnstema
S-LX-LR70
Thank you for buying this Pioneer product. Please read through these operating instructions so you will know how to operate your model properly. After you have finished reading the instructions, put them away in a safe place for future reference.
Before you start
The nominal impedance of this speaker system is 6 Ω. Connect the speaker system to an amplifier with a load impedance of 6 Ω (a model with "6 Ω" displayed on the speaker output terminals).
In order to prevent damage to the speaker system resulting from input overload, please observe the following precautions:
- Do not supply power to the speaker system in excess of the maximum permissible input.
- When using a graphic equalizer to emphasize loud sounds in the high-frequency range, do not use excessive amplifier volume.
- Do not try to force a low-powered amplifier to produce loud volumes of sound (the amplifier's harmonic distortion will be increased, and you may damage the speaker).
Care of the speaker cabinets
With normal use, wiping with a soft cloth should be sufficient to keep the cabinet clean. If necessary, clean with a cloth dipped in a neutral cleanser diluted live or six times with water and wrung out well. Do not use furniture wax or cleansers. Never use alcohol, thinners, benzine, insecticide sprays or other chemicals on or near this unit since these will corrode the surfaces. When using chemically-treated cloths, be sure to carefully read their accompanying instruction manual.
Cleaning the glossy finish of the speaker system
- When cleaning the finish of the speaker system, gently wipe it with a dry soft cloth; the supplied cleaning cloth.
If you use a dusty or hard cloth or if you rub the screen hard, the finish of the product will be scratched.
If you clean the surface of the speaker system with a wet cloth, water droplets on the surface may enter into the product, resulting in malfunction.
Caution
Installation
- Do not place the speaker on an unstable surface, as doing so may cause the speaker to fall and cause damage or bodily injury.
- Switch off and unplug your AV equipment and consult the instructions when connecting up components. Make sure you use the correct connecting cables.
- When placing this unit, avoid areas where it may be likely to fall and cause injury in the event of a natural disaster (such as an earthquake). For more information, see page 6.
- Pioneer is not responsible for any accidents or damage that result from improper installation, misuse or modification of the product, or natural disasters.
Using the speakers
Do not use the speaker to output distorted sound for long periods of time. This can result in damages to the speaker and poses a potential fire hazard.
- Do not sit or stand on the speaker, or let children play on the speaker. Doing so could provoke the speaker to fall, causing damages or bodily injury.
CAUTION
These speaker terminals carry HAZARDOUS LIVE voltage. To prevent the risk of electric shock when connecting or disconnecting the speaker cables, disconnect the power cord before touching any uninsulated parts.
Confirm your accessories
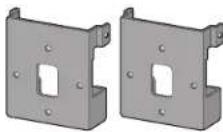
- Bracket (for speakers/S) x 2
- Bracket (for speakers/L) x 2
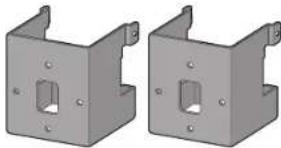
- Bracket (for wall/Left) x 1
- Bracket (for wall/Right) x 1
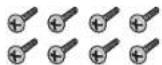
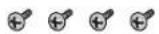
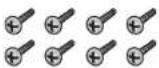
- Screw (long) x 8
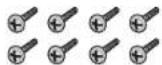
- Screw (short) x 4

- Cleaning cloth x 1
- Wall mounting template (Left) x 1
- Wall mounting template (Right) x 1
- Operating instructions
When using for home theater systems
Combine this speaker system with a Pioneer plasma television to enjoy excellent acoustics that match your interior.
This speaker system can be used as surround speakers of a home theater system.
Arrange speakers as illustrated below.
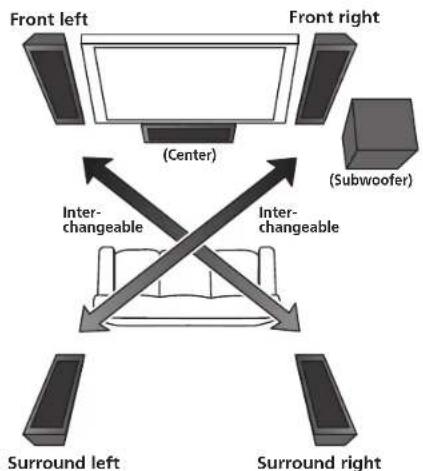
So far as possible, place the front left and front right speakers on the same plane as the TV screen.
Place the left and right speakers equal distances from your listening position for good stereo sound. Use speaker cords of the same length for each speaker.
The front right speaker and the surround left speaker are interchangeable. The front left speaker and the surround right speaker are also interchangeable.
When using this speaker system as surround speakers, place the front right speaker as the surround left speaker, and the front left speaker as the surround right speaker.
S-LX70C is recommended for the center speaker.
S-LX70W is recommended for the subwoofer.
Speaker system grill
The speaker system grill cannot be removed. Do not try to forcibly remove it since doing so may damage the grille.

Installing the speakers
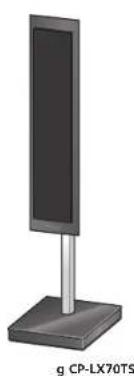
This speaker system cannot be placed directly on the surface of floors or shelves. Always attach to a wall using the supplied brackets, or use speaker stand CP-LX70 (floor stand) (sold separately) or CP-LX70TS (tabletoc stand) (sold separately) when placing on the surface of floors or shelves.
This speaker system is magnetically shielded. However, depending on the installation location, color distortion may occur if the speaker system is installed extremely close to the screen of a television set. If this happens, turn the power switch of the television set OFF, and turn it ON after 15 to 30 minutes. If the problem persists, place the speaker system away from the television set.
Mounting on walls
Make sure that the wall you intend to mount the speakers on is strong enough to support them.
- Remember that the speaker system is heavy. Improper installation of the speakers could cause them to fall and cause damage or injuries to persons nearby.
- Mounting screws are not supplied. Use screws suitable for the wall material and support the weight of the speaker. If you are unsure of the qualities and strength of the walls, consult a professional for advice.
Once decided on the location of installation (such as the wall space to the left and right of the TV), attach the speakers following the next procedures.
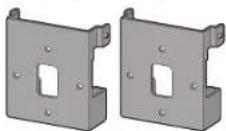
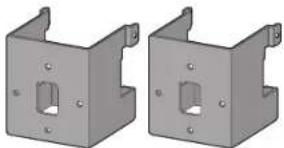
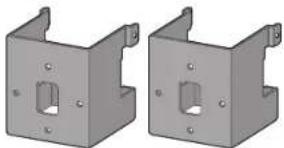
Two types of brackets (for speakers) are supplied. When using alongside with a Pioneer plasma television, use the L-type brackets. When attaching flush against the wall, use the S-type brackets. The left and right wall brackets are shaped differently. Be sure to install the correct bracket on each side.

Bracket (for wall/Left) Bracket (for wall/Right)
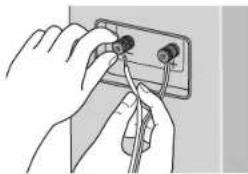
1 Connect speaker cables.
- Speaker cables are not included with this speaker system.
This speaker does not include speaker cables used for connecting to an amplifier. Take the following factors into consideration when choosing speaker cables so that you can get the most from your speaker system:
- Use heavy-gauge speaker cable if possible, and keep the cables to the minimum necessary length.
- If the length of cable required for left and right speakers differs, use cables of the same length, matched to the longer distance.
- Cables have differing characteristics. Keep this in mind when using any cable.
- Connections at speaker and amplifier terminals should be made as tight and secure as possible to help reduce contact resistance.
When mounting the speakers onto walls using the brackets, connect the speaker cables before attaching speakers onto the brackets.
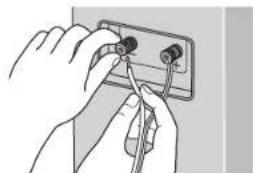
- If the cables' wires happen to be pushed out of the terminals, allowing the wires to come into contact with each other, it places an excessive additional load on the amp. This may cause the amp to stop functioning, and may even damage the amp.
- After connecting the plugs, pull lightly on the cables to make sure that the ends of the cables are securely connected to the terminals. Poor connections can create noise and interruptions in the sound.
- When using a set of speakers connected to an amplifier, you won't be able to obtain the normal stereo effect if the polarity (+,-) of one of the speakers (left or right) is reversed.
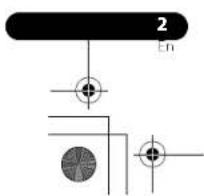
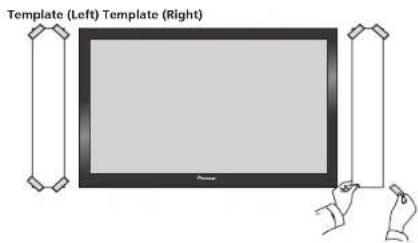
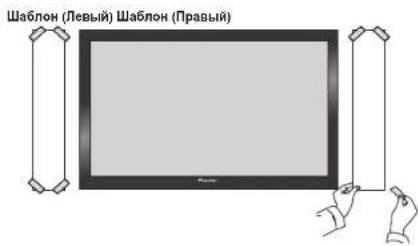
2 Paste the supplied wall mounting template on the area of installation.
- The left and right wall mounting templates are shaped differently.
Attach the template level to the ground using an adhesive such as tape. Make sure the template is straight to avoid mounting the speaker crookedly. Pasting the template too close to the TV may cause the TV to get in the way of the speaker when installing. Make sure the template and TV do not overlap.

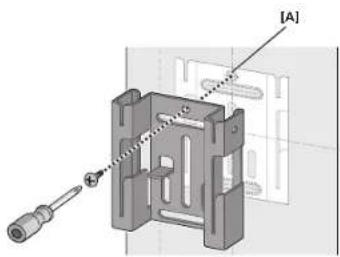
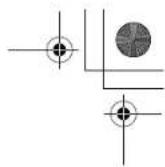
3 Temporarily attach the bracket (for wall) to the specified location on the template.
Align the bracket (for wall) to the specified location on the template and temporarily attach with a screw (6 mm diameter screw recommended) at location [A].
Adjust the attachment position of the bracket so that it is aligned with the template.
The following illustration is an example of attaching the right bracket (for wall).
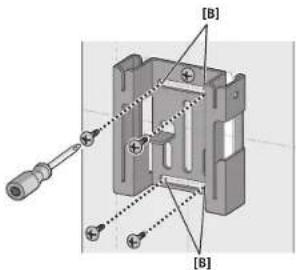
4 Attach the bracket (for wall).
Attach bracket with screws (6 mm diameter screws recommended) at the 4 locations [B] (recommended). Firmly tighten the screw [A] that was used to temporarily attach the bracket to the wall as well. To avoid speaker from wobbling or falling off, firmly attach bracket at multiple locations.
- Alterswards, remove the template by tearing along the perforations.
The following illustration is an example of attaching the bracket with screws at five locations: Screw location [A] and the 4 corners of screw location [B] (recommended).
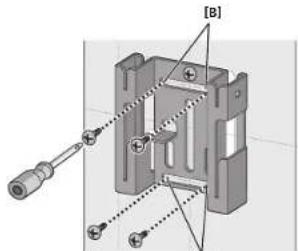
[B]
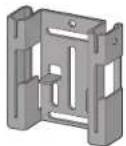
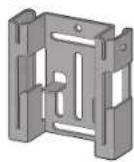
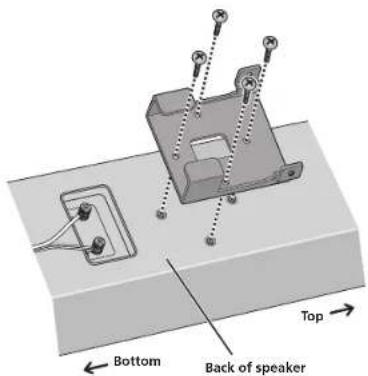
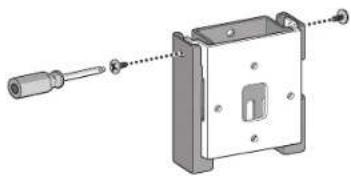
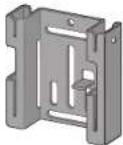
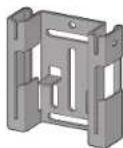
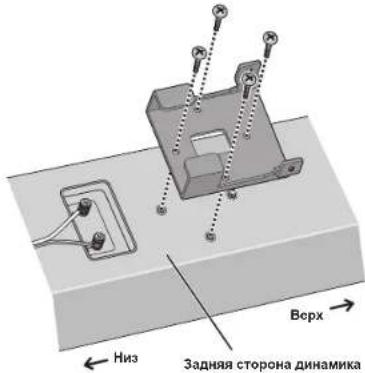
5 Attach the bracket (for speaker) onto speaker.
Attach the bracket on with suppplied screws (long) at the 4 screw holes.
The brackets have a direction in which it should be attached. Attach correctly using the following illustration as a reference.
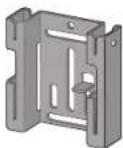
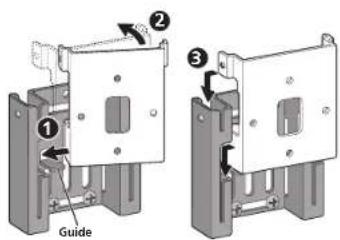
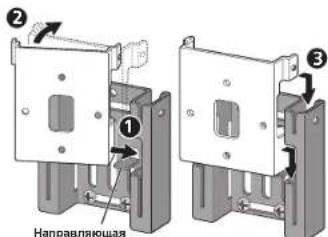
6 Attach speaker onto bracket (for wall).
The following illustration does not show the speaker attached to the bracket (for speakers) for description purposes.
- Mounting the left speaker
Place the bottom right edge of the bracket (attached on the speaker) on top of the guide of the left bracket (for wall) from a diagonal angle (1)
Bring left side of both brackets together so that they become horizontal to each other (2)
Move slightly to the right and slide down until stops, while aligning the right protruding section to the groove of the left bracket (for wall) (3)

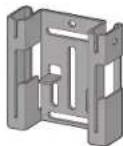
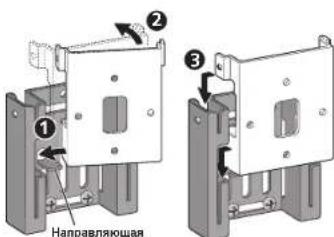
- Mounting the right speaker
Place the bottom left edge of the bracket (attached on the speaker) on top of the guide of the right bracket (for wall) from a diagonal angle.
Bring right side of both brackets together so that they become horizontal to each other (2)
Move slightly to the left and slide down until stops, while aligning the left protruding section to the groove of the right bracket (for wall) (5)
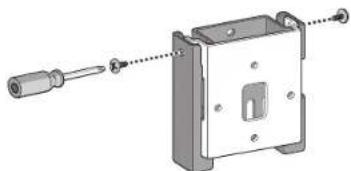
7 Secure brackets together with screws.
Secure the brackets together by using the supplied screws (short) at the screw holes located on the top of the left and right side of the brackets.
If you cannot secure both sides (due to such cases as lack of space to use a screwdriver), make sure that one side is secured with a screw.
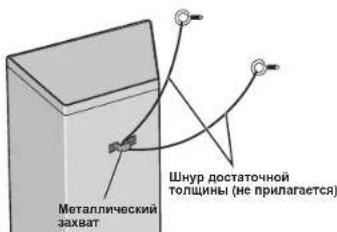
8 Secure speaker to wall with a cord.
Screw two picture hooks or similar into the wall behind the speaker. Pass a thick cord (not provided) around the hooks and through the metal catch so that the speaker is stabilized (make sure to test that it supports the weight of the speaker).
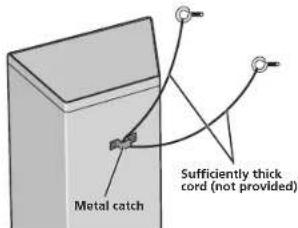
- Do not attach the metal catch directly to the wall. It should only be used in conjunction with reinforced string to prevent the speaker from falling.
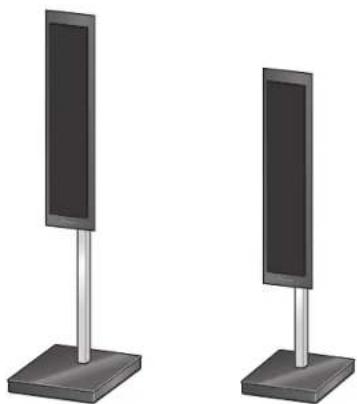
Using separately sold stands
This speaker system can be placed on the floor by using speaker stand CP-LX/0 (floor stand). They can also be placed on shelves by using speaker stand CP-LX/0TS (tabletop stand).
For further information on attachment, refer to the instruction manual of CP-LX70 or CP-LX70TS.


Specifications
Enclosure... Closed-box type (magnetically shielded)
Configuration... 2-way
Woofer... 13 cm cone x2
Tweeter. 2.5 cm dome Nominal impaction. 6 Frequency response .40 Hz to 50 000 Hz
Sensitivity. .82 dB Maximum input power 130 W Crossover frequency. 1.7 kHz
Exterior dimensions. 175 mm (W) x 722 mm (H) x 70 mm (D) (Excluding protrusions) Weight. 5.2 kg (each)
Supplied accessories
Bracket (for speakers/S) 2
Bracket (for speakers/L) 2
Bracket (for wall/Let). 1
Bracket (for wall/Right) 1
Screw (long) 8
Screw (short) 4
Cleaning cloth 1
Wall mounting template (Left). 1
Wall mounting template (Right) 1
Operating instructions
- Appearance and specifications are subject to change without notice.

is a trademark placed on a product with Pioneer's Phase Control Technology.
The Technology enables high-grade 5.1ch with no delay in the bass area.

If you went to dispose this product, do not mix it with general household waste. There is a separate collection system for used electronic products in accordance with legislation on that requires proper treatment, recovery and recycling.
Private households in the member states of the EU, in Switzerland and Norway may return their used electronic products (free of charge to designated collection facilities or to a retailer (if you purchase a similar new one).
For countries not mentioned above, please contact your local authorities for the correct method of disposal.
By doing so you will ensure that your disposed product undergoes the necessary treatment, recovery and recycling into thus prevent potential negative effects on the environment and human health.
- Staffa (per diffusion/S) x 2

- Staffa (per diffusor/L) x 2
- Staffa (per parete/Sinistra) x 1
- Staffa (per parete/Destra) x 1
Wooer 13 cm conus x2
Tweefer: 2.5 cm Koepel
Nominale impedante 6 Frequertiebereik 40 Hz tJ50,000 Hz
Gevoeligheid .82 dB
Maxima ingangsvermogen 130W
Wisseifrequenie 1,7 kHz
Buitenafmetingen. 175 mm (B) x 722 mm (H) x 70 mm (D)
(excl. uilstekende delen)
Gewicht 5.2 kg (per sluk)
Bigeleverde accessoires
- Parafuso (longo) x 8
- Parafuso (curto) x 4
Published by Pioneer Corporation. Copyright © 2007 Pioneer Corporation. All rights reserved.

- Brakett (for vegg/hyre) x 1

- Skrue (lang) x 8

- Skrue (kort) x 4

- Rengjoringskutx1
Monteringsstensil for vagg (vonstra) x 1
Monteringsstensil for vegg (hoyre) x 1
Bruksanvising
4 Fest braketten (for vegger).
Copyright © 2007 Pioneer Corporation.
Tb3OBaHne DnHaMnKaMn
IeOnyckaIte BbBOI Yepe3 HnHAMHK NcKaKeHHo 3BykaB TeueHHe IInIIeBHO TepHOa BpeMeHH. 2To MoKet Bb3BaT NobpeKJeHHe INHAMHK N CO3Aet NtOeHHaIbHy IOAnCHOCT Bo3rOpAHN HIOkapa.
He caHITecb H He BCTaBaHTe Ha HINHAMHK, a TaKke He NIOBOJTHIe TETM HPrATb HA INHMHK, 3TO MoKTe pNHBcTt K NaIECHINO INHMHKa, YTO MoKTe pNPHHITy UICp6 h Tn TPABm.
BHIMAHNE
Ecnn CnCTema BKNIOUOHEA, npNKOCHOBEHHe K KOHTAKTAM rpoMKOROBOPHTENe OIACHO. Bo m36ekAHme ONACHOCTN npaXeHHn 3NEKTPnueCKHM TKOM npi NOkNIIOHcHm HnN OTKNOHcHm Ka6eBn rpoMKOROBPTeH eOTCOEHNHrTe Ka6bJI NtANHa, npKeJde Yem npNKACA tCB K JIObIM HeH30INPOBAHHbIM DeTaJIaM.


PpOBepbTe KOMnJIeKTHoCtb npHaIaJIeXHocTei
Cko6a(JHJHHAMHKOB/S)x2
Cko6a(mHnnHAMHKOB/L)x2
Cko6a(nra cTeHb/naBaa)x1

Cko6a()
- lIpyn(nnHb)x8
IIIpyn (kopotkn) x 4

- IpoHpOuHHaT KAnh X1
Ⅲa6noJnKpennHna hctene(Neb)x1
Ⅲa6noh nKpennnna ha cTnc (npabn) x 1
Hnctpykuiu no 3eknyataun
1 POncoeINHHTe Ka6eIN DnHaMMKOB.
KaeIeJINIIAHMHKOIEHPIIRAIHOHTBCOMMIIEKIEIOCTIKBAAHHOI AByCITHECKOCHTEIA.
K DAHHOMY DHHAMHKY He pHJIaIaOTc K a6eH HINHAMHKOB, HCHIOB3yEMbI IIOIOOeHNHEH N KYCHNIHTIO. 1IO6bI OeCEHNTB KoppeKTHyIO paOby NH camBE BICOKHe paOohne XapAKeTepHCTKH AkyCTHHeCKoI CHCTMeI, IIpN BbOpe Ka6eNe HINAMHKOB pIHHHMaHTe BO BHMAHNE cTeJIOUHHe fKaTOPHI:
IIO BOSMOKIOCTH, HCNHOB3yHTe Ka6c.HINAMHKTHHA Heavy Gauge H MHHMABIBIO Hc06xoHMoJ DHHb.
FenHnHaKabcnC,KnOxoJHMaaJnIcBOI npaHOI HnHnKOB,OTnHacte,HeNIOyTc Ka6nOOnHnAkoBnO,IHHMa, COOTCTETYOniCh 605c nnHmHNOy paccnoHIO.
Ka6cHn HMeOT paaKTePHTHK. PnH b6ope H 3KCHYATUHNIOO KAB6e HOMIHTC 60TOM.
CocHHHnHa KOHTAKTHHX paaBemax HINHAMKHa yCHHTcH C.Ic.yET BbHOHJI HbTOHbKO IIOHO HPOHO, HACOJIbKO 30I BO3MOKIO, TTObU yMeHHHJI KOTAKTHOE COHPOTB.IHCHE.
PnKpIeHHHINHHAMHKOB HA cTeHeC NMOIMBIO cKo6,NOIcoEHHHTe Ka6cHINHHAMHKOB NpeJ3aKpeJIChHcEM HINHAMHKOB HA cKo6ax.
EHNIOBOA KaBcHb6yT CUYaHNO BbIePHyH H3 KOHTAHX PAEBMOB H BOUY T B KOHAKT MEKJy COoH, 3TO BbIOBETpe3MEPHYIO IOIOHHIEIHyHO Hpy3kY Ha YCHINTE.10 OMOeT CTbI pHnHooCooB E PBOOE H daKe IIOOMKn yCHINTE.B
IIOe NOcOeHHHeH HHTceTe cnerKa NotHHTe 3a Ka6eHH, TIO6bIy6eHHbTcB, TIO KOHN Ka6eN IpOHo DePKATCB KOTAKTHbIX pa3bExM. IIOxOH KOHTk MoKet cTaB IIpHHHO HOJIeHHH YMOB H IpePBHCTORO 3ByaHHA.
Korda HcnoIb3yctek KOMNTCKT DHHAMHKOB, NOcOeHNCHHbIX K OHMY YCNHTCIO, BHCMOKCTNONYHTB HOPMaBHn CTcpcOHOHNCCKN OoFcKT, cnnNOJPOPHoCTb (+,-) NIOKNIOOHNR OIHORHOHNHAMNKOB (NCBOFOHIN PpABoro) HAPYTHCA.
2 PnKneIe npnlaraeMbIe 7a6NoH nJa KpennHeHa cTeHe B o6NaCTy yctAHOBKn.
-ⅡeBHHHpaBHIIa6IOJIIMIJIbKpeJIcIIHHIaCTIEHMeKTpahyIOΦOpMy.
IpnKpeHHe OeOHO 106IOHa K MOHTAaKHO IOoepXIOCTn C HOMOIOB KOIOHIOI HTHN T A. YOeHITcB B TOM, YTO Iooio paoHOJok EPOBHO, YO6bHcYcTaanOBHbIb DHHAMNK KPHBO.IpKIOEBAHHe Ia6IOHa CIHIKOM 3KO K TEeBHOPOy MOKeT HpHBcTH K TOmy, YTO TEeBH3Op MOKeT HOMeIHbIb HpyCtAHOBKe DHHAMKHO. YOeHITcB B TOM, YTO Ioo6IOH II TeeBH3Op He IpeKpbABHOpy APyApyTA.

3BpeMeHNO npHoCoEduHHTe Cko6y (Dnra CTeHbI) Byka3aHHOM Ha 1a6NoHE MecTe.
BbPOBHNHTE KcOBy (UH CIeHb) C yKa3HHOM Ha 1a60IOHe MeCTOM H BVPMeHHO IIpHcooHInHTe ee c HOMOIO BHNTHa (peKoMeHJyETC BHNITI BnHMePOM 6MM) B MeCTe [A].
OtperyHpyIe NoIOJKeHHe KpeJIeHHK CKo6bTaKHM 06pa3OM, TTO6bOH aCOBIIaJa cIa6IOHOm.
BINHUYIHPBEIENPHCYIOKAKIHPMEP3AKPEIIEHHIHPANOIcKO61 (,

4 PnPKpENTe CkO6y (DnA CTHeBbI).
PpHcOeHHHTRE CkOyC HOMOHbBHTOB (peKoMeIyOTcR BHHITb
AHmEIpom 6 MM) B 4 MeCTax [B] (peKoMeIyETcR).TakKe KPeIKO
3HHTHE BHT[ A], KOtOpH HcHOJIb3OBA.ICIM II BpeMeHIOT0
KpeIeHnCHKcKbI KCTHe. YToBb136eKaIIb KOeBaIIH NII HADJIHN
DAMHnka, IPOUHO 3aKpeHIHTe CkOy B HECKLbIKHX MECTAX.
3atcm ydaHnTc mabJIO, pa3opnBa cro yio n npoepaun.
BINHpyHPHEcI pheYIOK KaIPHMep 3aekpeiHHeN Eko6M BHITAMn HHTMeCTax. MeTe BHTTA[A] H4 MeTe yTOBBX BHTTOBB.
5 PnKpEnnte cko6y (DnA DnHaMnKa) Ha DnHaMnK.
3aKpeHHTeCK6yC HOMOIOBIOIUPHIAEEMBXBHITOB(DHHHbIE)B4 pe360BxOTBEPCTHX.
CkObIOTHINHOHnPABEHHIOB KOTOPOM OHN DIOKHI6bTbI npHKpENHE.3aKePHTHe Hx INPAHBILHO,NOIb3yoc bclIyoIHMH pHyCNKOM IINCPAKB。
6 3aKpeHnTe DnHaMMK HaCKoBe (DnA CTeHbI).
CJIeIyIOHNI PCHYOHK NIOK3bIA8AETINHMAHK, INPHKPNENHHK KCKO6E (JLIN DII HAMHKA), BIEJXN IPOCTOTN ONIHCAH.
- YctahOBka neBOrO nHaMnKa
HIOeHTHE HINHINI npabai kpaik cko6b (IHPKpeHHHIOH K HAMHKHA) HOEPX HAHPBAAHOEJIeBOI cKO6b (JHCTENH) IOI IARoAHNHNM yTTOV ()
CoBMeCTHIE HeBbIe CTPOHbI 6OeHX cKOB TAKHM O6pa3OM, YIO6b OHN 6bln TOpH30HTaJIbHb Ipyr Apyr (2).
CnIeKa IpeBnHbTe BnPABO H 3aBnHbTe BnH3 Do KOHua, BbPaBnHBaa nPiHOTm Ipabyo BVbCTyNpOuYbAcTb C DOpOKoB N BeBOB cKo6 (JTAcHeH)
- YctahOBka npaBoro DHHAMnKa
TOMcCTHTN HxHnH NcBn KpaK cKob (npHKpIeCHHO KnnHaMnKa) NOBcpx HappanIOHc npAoH cKob (Tt cTeH) nO HAroHaJIbHM yrTOm()
CoBMCETHTIINPABHcCTOPOHIO6OCHXCKOBAKHM06pA3OM,TOObON 6bHHROPnHOHTAIHbNpyIpyr()
CncreA npeDHHHC BNEBO HADHHTC BH3IO KOHUA, BHPABHHBA
nPH OTM CByTOBbCTyANIOYIOACTb cIPOKkON BpAOBIOCKO6
(204 CTMH) (205
7 3akpennte cko6bI MEKdy CO6oN C NMOUbBO BNHTOB.
3aepnHIE cKbMEXcKOeHc HMOUHO HPIHARAEMHX BHTOB (KpO1kHX)BpeB0BXOTBepTHX,paioIOKeHHxBBepxyIpa IeBOAqCTRE Kc06.
EJIH BHe MEoKeTe 3aKepiHTb OBe cToPOHaB (HnHpHMeP, H3-3a HExBAtKH IpocTaHcTB DIA HcNIOB3OaBHnIb OTBePTKH), 063aTeBbHO 3aKpeHTe C nOMoHbBnHrTA OHy H3 CTOpOH.
8 PnKpEnTe DNHAMNK CTeHe c nomoubH wHypa.
BcphHTC BaKapTHHbIX KpIoka Hn HNOobHc Hm PnHnoocobchHH B cthyNoaHnHHAMHKa. Iponyctte TontnH hnp (Hc pnharaactc) bokpy KpKOb Hycpe3MetaT HwceckH 3axNtakHM obaPOM, YTObH 3aHKnOpabatb NnHAMKb B yctOHNOM nIOJokHNN (OBaTeCNH 0y6cHTccB TOM, YTO KOJIcTpyKHn HbApckHnaCT BCC NHAMKa).
He npHKpeHnIteMetaTINHcckn3axBAT HeNocpeCTBeHHO K cTeHe.Ero cTeayET HcNObOaBT ToBko BcoHTAHHH CO IIHYPOM IOBIIeHHoK cckTKoCH TII pIepOTbPaHHeHH NaDeHH NINAMHA.
IcnoB3oBaHne OTeJeBHo npOdaHouxCCTOeK
JaHnAkyCTHeecka cHcTeMa MoKc yctanabHHbTaeh n HIOy c HOMOIO HO CTOKN nnAMHNK CP-LX70 (HAnOHNHO CTOKKa).JANHAR ayCtHTHeecka cHcTeMa MOKc yctanabHHbTaeh n HIOkx C HOMOHO CTOKN nnAMHNK CP-LX70TS (NaTOHNO CTOKKa).
3aIahHeHnIHOpMaHHeNo KpEeHHIO HnHaMKnOB Ha cToBkAn, noKaYfCTa, 6paAaHTecb K HcETpyKuHM No 0KeNpyaTaN CP-LX70 HnCP-LX70TS.
PpHcnoNb3oBaHHn CP-LX70 PpHcnoNb3oBaHHn CP-LX70TS

TexHnueckne xapaKTepeNCTIKN
KopHyc.3KpbTTO TINH Closd-box (c MaHHTHEM KpaHHPOAHHE)
KoHpyuua. 2IOHOCH
HIOKoACTOTHBI HAMHK 13-cm, KOHyc x2
BbCOKOACTOTHBI HAMHK 2,5 cm, KyoH
HomIHAIbHOE HOHOE COUPOHIEHHe 6Ω
YACTOTHAR XAPAKTEPHHTKA. 40Tu 5000Tu
YyCTHOEJIbHOCTb. 82 AB
MAKHMALBHAR BXOHAH MOHOCTb 130Br
Yactota pa3UCIeHH. 175 MM (III) x 722 MM (B) x 70 MM (I) (6e3 bHaiaonnx qacteh)
Bcc 5,2KR (kaaH)
NoctabIaemble B KOMnJIeKTe npHaADNeXHOCTN
Cko6a (JINHAMHKOB/S). 2
Cko6a (JINHAMHKOB/L). 2
Cko6a (JINCTEHN/NEB) 1
Cko6a (JINCTEHN/HPAB) 1
IIyyu (JINHHB) .8
Iyyu (KOPOTK) 4
IporpoTHA TKAHL. 1
IIabnoon JnKpennneHa nCTe (JIbH). 1
IIabnoon JnKpennneHa nCTe (Ppani). 1
Inetpykn no ocknyataunn
BHeHHH Bn H TeXHNHeckHe XapKeTepHeTHKMOrY 6bItb H3MeHeHb 6e 3IpeBapHTeHbHO r yBeOMJIeHH.

AEBNAETOTPOBIM 3HAKOM, HAOCHMBM HAIPOyKTb, B KOTOPBX INPHMEHECT TEXHOITR PERYINIOBKN PA3b Pioneer Phase Control Technology.
TATCXHOITR NIOBOJACT NOUYATB BHCOKOKAQCCTBCHHOC 5.1- KAHAHTBOC 3BvAHNC 6c3aDCPKK B DnanaOHC HINKHX HACTOT.

EcnBbJxKnaeTaYTNHINPOBaTbDAnHOHe BbIbpaBbIaBeN EoBMeCtOcBbNHbM6bITOBMbMYCOPOM. CyueBctyET OndnHbAChCTema COpcaNcHbTOBAHbIX 3NeKPTPOHbIX N3dJIIN B COOTBCTCBNN C3aKHOHDaTeBbCTOB, KOTOPanpeNDnIraeTcoBTBeCTByIOUeeObaPaeHMe,BO3BaPAT nPepeBaOToKy.
ActHbE KInHeTb-BrCTpAnHex EC, B WBeUapn HOpBmN MOryt 6ecrNaTHo BO3BpaATb NcNoJIb3OBAHbIe 3NeKtPOHHbIe IaDfNIR B COOTBeCTByuOuIe NyHbIc C6paI INdNepy (PnI NKpyKe xCdoHoro HOBOI nEINHO).
B ctpa hax, He nepeuHcneHbIX bIiue, dnn NpUyHeHHn HnFOpMaunio npabInbIbIX cncO6ax yTuINH3auN oBpaauAHTecB COOTBTCTByoUHme yupEckdHn.
IocTynar TakmO6pa3OM,BbMOKeTe 6bTbYbepeHbBTOM,TO yTNIMNPOyEMBn pNOyKT 6yET COOTBECTBYUOM O6pa30M O6pa50TAH nepeAH B COOTBECTBYUOyI INK NEpePAoTah 6e3 BO3MOxHBIX HeratINBHXIOcNEcTBn DOKOxyKaHOuE CpeDn I3DOPOBBnIOoe
Discover the benefits of registering your product online at http://www.pioneer.co.uk (or http://www.pioneer.eu).
PIONEER ELECTRONICS (USA) INC.
P.O. BOX 1540, Long Beach, California 90801-1540, U.S.A. TEL: (800) 421-1404
PIONEER ELECTRONICS OF CANADA, INC.
300 Allstate Parkway, Markham, Ontario L3R 0P2, Canada TEL: 1-877-283-5901, 905-479-4411
PIONEER EUROPE NV
Haven 1087, Keelberglaan 1, B-9120 Melsele, Belgium TEL: 03/570.05.11
PIONEER ELECTRONICS ASIACENTRE PTE. LTD.
253 Alexandra Road, #04-01, Singapore 159936 TEL: 65-6472-7555
PIONEER ELECTRONICS AUSTRALIA PTY. LTD.
178-184 Boundary Road, Braeside, Victoria 3195, Australia, TEL: (03) 9586-6300
PIONEER ELECTRONICS DE MEXICO S.A. DE C.V.
Blvd.Manuel Avila Camacho 138 10 piso Col.Lomas de Chapultepec, Mexico,D.F. 11000 TEL: 55-9178-4270
K002_B_En
Published by Pioneer Corporation.
Copyright © 2007 Pioneer Corporation.
All rights reserved.
Publication de Pioneer Corporation.
© 2007 Pioneer Corporation.