
Wakeup Light HF3476 - Light therapy PHILIPS - Free user manual and instructions
Find the device manual for free Wakeup Light HF3476 PHILIPS in PDF.
| Product type | Light therapy wake-up light |
| Brand | Philips |
| Model | Wakeup Light HF3476 |
| Category | Light therapy |
| Power supply | Mains, 230 V, 50 Hz |
| Power | Approximately 20 W |
| Dimensions (approx.) | 20 x 15 x 15 cm |
| Weight (approx.) | 0.6 kg |
| Lighting type | Non-replaceable incandescent lamp |
| Light intensity | Adjustable from 1 to 20 |
| Dawn simulation | Yes, 30 minutes before the alarm |
| Radio | FM, with automatic search |
| Alarm sounds | Radio, birds, beep, African jungle, wind chime |
| Volume | Adjustable from 1 to 20 |
| Display | Digital, adjustable brightness (1-4) |
| Programmable sleep mode | From 15 min to 2 hours |
| Snooze function | Fixed 9 minutes |
| Alarm test | Yes, accessible by holding the lever in the lower position |
| Cleaning | Damp cloth, no abrasive products |
| Protection class | Double insulation (class II) |
| Usage | Indoor, domestic |
Frequently Asked Questions - Wakeup Light HF3476 PHILIPS
User questions about Wakeup Light HF3476 PHILIPS
0 question about this device. Answer the ones you know or ask your own.
Ask a new question about this device
Download the instructions for your Light therapy in PDF format for free! Find your manual Wakeup Light HF3476 - PHILIPS and take your electronic device back in hand. On this page are published all the documents necessary for the use of your device. Wakeup Light HF3476 by PHILIPS.
USER MANUAL Wakeup Light HF3476 PHILIPS
Congratulations on your purchase and welcome to Philips! To fully benefit from the support that Philips offers, register your product at www.philips.com/welcome.
The Philips Wake-up Light helps you wake up more pleasantly. The light intensity of the lamp gradually increases to the set level in the 30 minutes before the set wake-up time. The light increases the production of energy hormones and prepares your body for waking up in a very natural way. It also makes you feel more energetic. To make waking up an even more pleasant experience, you can use natural wake-up sounds or the FM radio. The sleep timer allows you to read or listen to music before you go to sleep and switches off the light or radio after a set time.
Light and the biological clock
Exposure to light regulates the biological clock that controls the body's sleep-wake rhythm. The level of the hormone melatonin rises in the evening, preparing our body for sleep. The light in the morning stimulates the production of the hormone cortisol, which makes us awake and alert.
Optimally, the sleep-wake rhythm is in sync with the rhythm of our daily life. This is often not the case in modern life, as we often have to wake up when it is still dark.
The effects of the Wake-up Light
The Philips Wake-up Light gently prepares your body for waking up during the last half hour of sleep. In the early morning hours our eyes are more sensitive to light than when we are awake. During that period the relatively low light levels of a simulated natural sunrise elevate the cortisol level shortly after awakening. People who use the Wake-up Light wake up more easily, have a better overall mood in the morning and feel more energetic. Starting the day with the Wake-Up Light may have a positive effect on your productivity and concentration. Because the sensitivity to light differs per person, you can set the light intensity of your Wake-up Light to a level that matches your light sensitivity for an optimal start of the day.
For more information about the Wake-up Light, see www.philips.com.
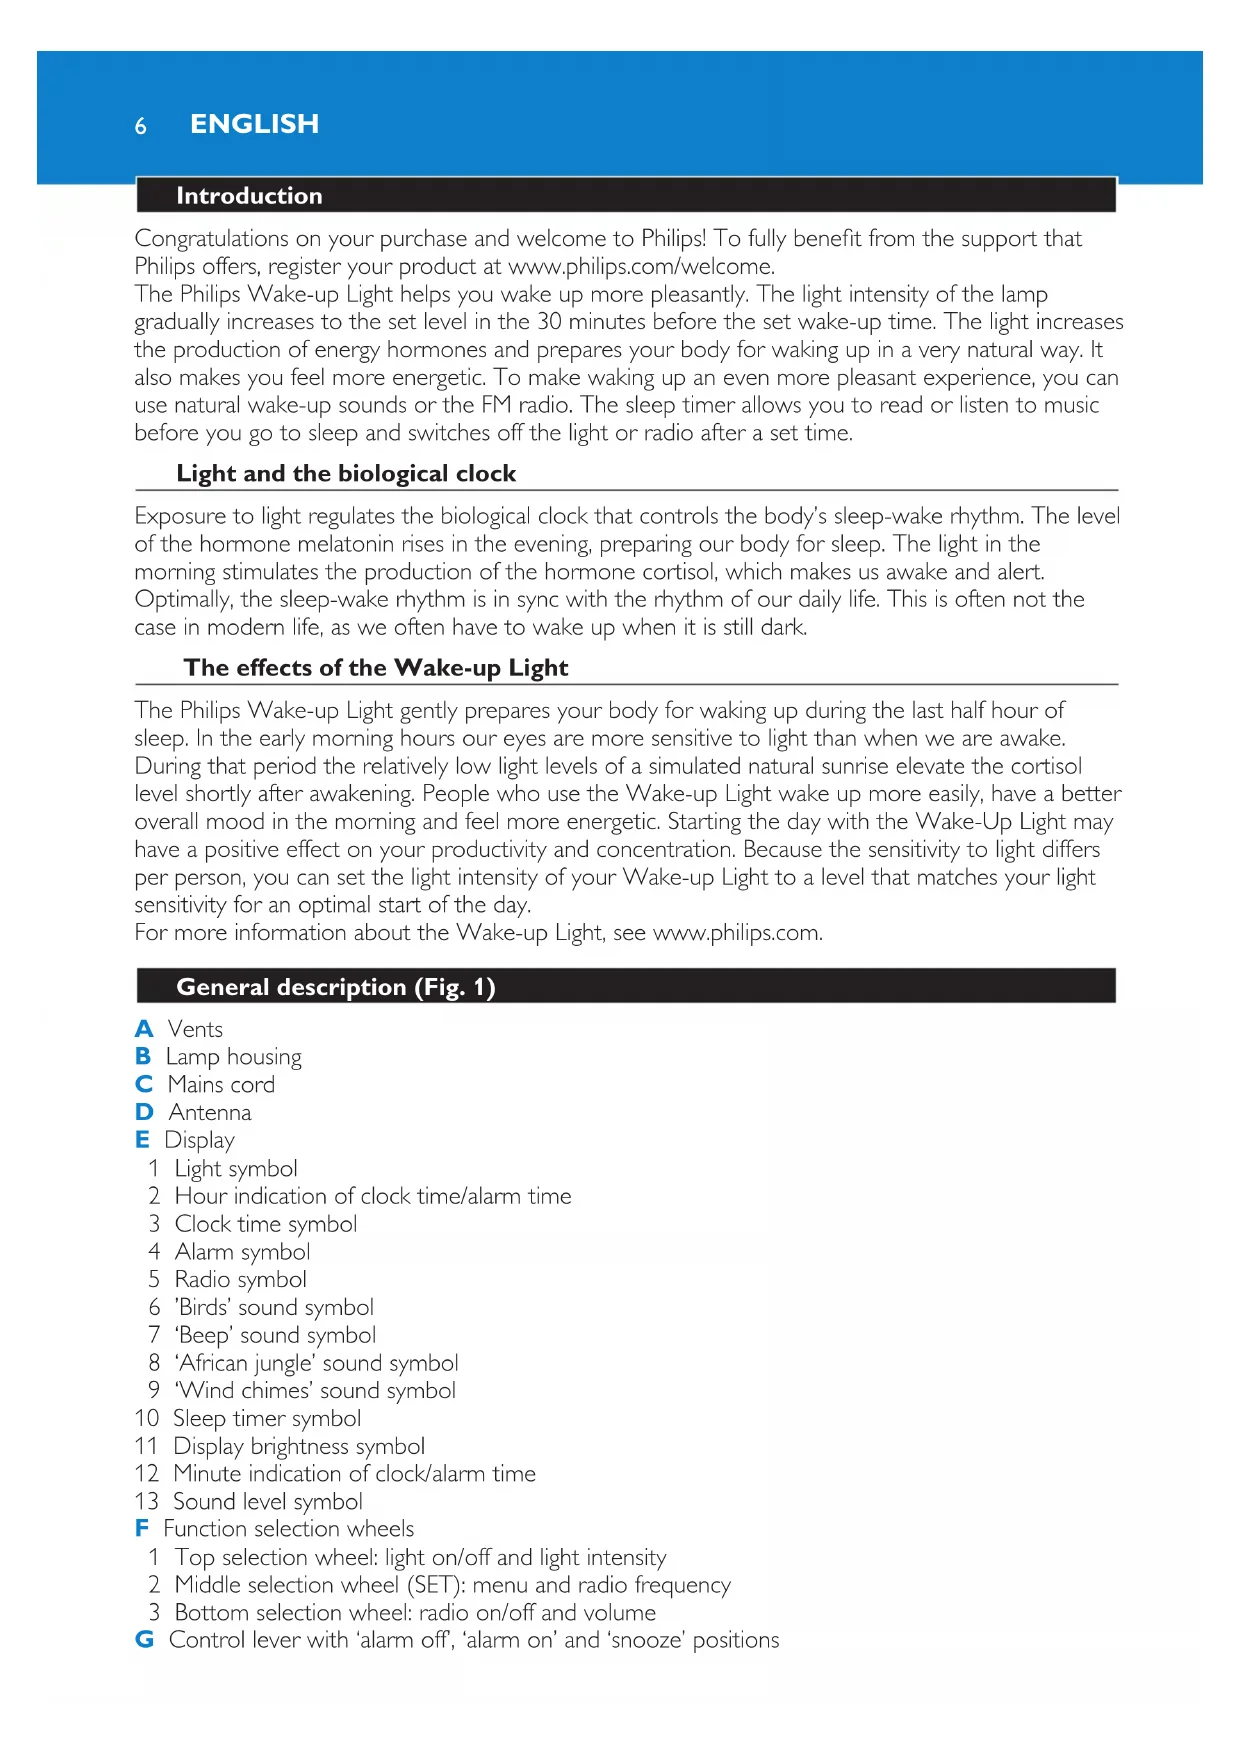
General description (Fig. 1)
A Vents
B Lamp housing
C Mains cord
D Antenna
E Display
1 Light symbol
2 Hour indication of clock time/alarm time
3 Clock time symbol
4 Alarm symbol
5 Radio symbol
6 'Birds' sound symbol
7 'Beep' sound symbol
8 'African jungle' sound symbol
9 'Wind chimes' sound symbol
10 Sleep timer symbol
11 Display brightness symbol
12 Minute indication of clock/alarm time
13 Sound level symbol
F Function selection wheels
1 Top selection wheel: light on/off and light intensity
2 Middle selection wheel (SET): menu and radio frequency
3 Bottom selection wheel: radio on/off and volume
G Control lever with 'alarm off', 'alarm on' and 'snooze' positions
Important
- Read this user manual carefully before you use the appliance and save it for future reference.
- This appliance is double insulated according to Class II (Fig. 2).
Danger
Water and electricity are a dangerous combination. Do not use this appliance in wet surroundings (e.g. in the bathroom or near a shower or swimming pool).
- Do not let water run into the appliance or spill water onto the appliance (Fig. 3).
Warning
- Check if the voltage indicated on the appliance corresponds to the local mains voltage before you connect the appliance.
The appliance is suitable for a mains voltage of 230V and a frequency of 50Hz
If the mains cord is damaged, you must have it replaced by Philips, a service centre authorised by Philips or similarly qualified persons in order to avoid a hazard. - This appliance is not intended for use by persons (including children) with reduced physical, sensory or mental capabilities, or lack of experience and knowledge, unless they have been given supervision or instruction concerning use of the appliance by a person responsible for their safety.
- Children should be supervised to ensure that they do not play with the appliance.
- This appliance is for indoor use only (Fig. 4).
Caution
- Do not drop the appliance or expose it to heavy shocks.
- Place the appliance on a stable, level and non-slippery surface.
- Do not use the appliance at room temperatures lower than 10^ C or higher than 35^ C .
- Make sure the vents on the top and in the bottom of the appliance remain open during use.
- Never use the appliance if the lamp housing or top cover is damaged, broken or missing.
- Consult your doctor before you start using the appliance if you have suffered from or are suffering from a serious depression.
- Do not use this appliance as a means to reduce your hours of sleep. The purpose of this appliance is to help you wake up more easily. It does not diminish your need for sleep.
- The appliance has no on/off switch. To disconnect the appliance from the mains, remove the plug from the wall socket.
This appliance is only intended for household use, including similar use like in hotels.
General
- This appliance allows you to choose the light intensity level you want to wake up to (see section 'Using the lamp', chapter 'Using the appliance').
If you often wake up too early or with a headache, reduce the light level. - If you share a bedroom with someone else, this person may unintentionally wake up from the light of the appliance, even though this person is further removed from the appliance. This phenomenon is the result of differences in light sensitivity between people.
Electromagnetic fields (EMF)
This Philips appliance complies with all standards regarding electromagnetic fields (EMF). If handled properly and according to the instructions in this user manual, the appliance is safe to use based on scientific evidence available today.
Preparing for use
How to use the 3 function selection wheels
The control panel has three function selection wheels. With these wheels you can set all functions of the appliance.
ENGLISH8
Note: Be aware that, if you do not turn the wheel for 5 seconds when you are in the menu (SET), the appliance automatically leaves the menu and displays the clock time again.
You can operate the function selection wheels in the following way:
1 Press one of the function selection wheels to activate the selection mode (Fig. 5).
2 Turn the same function selection wheel up and/or down to select a setting (Fig. 6).
Note: You can also turn the top wheel (light intensity wheel) and the bottom wheel (volume wheel) up and down to select a setting without pressing the wheel first.
3 Press the same function selection wheel again to confirm the selected setting.
Before first use
1 Place the appliance at 40-50cm from your head, for example on a bedside table (Fig. 7).
2 Put the plug in the wall socket.
The hour indication on the display starts flashing to indicate that you have to set the clock time (Fig. 8).
Setting the clock
1 Turn the middle selection wheel (SET) up and/or down to select the hour.
Note: You can only do this when you are in the set clock menu and when the hour indication flashes. If this is not the case, press the middle selection wheel (SET) two times. You are now in the set clock menu.
2 Press the middle selection wheel (SET) to confirm.
The minute indication starts flashing (Fig. 9).
3 Turn the middle selection wheel (SET) up and/or down to select the minutes.
4 Press the middle selection wheel (SET) to confirm.
The appliance leaves the menu and the display shows the set clock time.
The appliance is now ready for use.
Note: Every time you remove the plug from the wall socket for more than 15 minutes, you have to set the clock time again in the way described above. To change the set clock time when the plug is still in the wall socket, see section 'Menu functions of middle selection wheel (SET)' in chapter 'Using the appliance'.
Using the appliance
Using the lamp
You can use the appliance as a bedside lamp.
1 To switch on the lamp, press the top selection wheel (1). Then turn it to select the light intensity level you prefer (2). (Fig. 10)
You can choose a light intensity between 1 and 20.
Note: It takes approx. 1 second for the lamp to go on. This is normal, the lamp needs to heat up.
Note: The light intensity you have selected is automatically set as the light intensity level for the alarm as well.
Tip: When you use the appliance for the first time, set the light intensity to 20. The moment you wake up, check which light intensity level the appliance has reached by slightly turning the top selection wheel.
When you do this, the current alarm light intensity level appears on the display. Set the alarm light intensity to this level for the next day.
2 To switch off the lamp, press the selection wheel again.
Menu functions of middle selection wheel (SET)
Below you find a description of all functions that can be set in the menu. These functions appear in the menu in the following order:
Clock time
Alarm time
- Alarm sound
- Sleep timer You can use the sleep timer when you want the radio and/or lamp to stay on for a set period of time (15 minutes to 2 hours) before you go to sleep. You can switch off the sleep timer again by setting the sleep timer period to 00:00 or by switching off the radio and/or lamp.
Display brightness You can choose a display brightness between 1 and 4.
You can operate the function selection wheels in the following way:
1 Press the middle selection wheel (SET) to enter the menu.
2 Turn the middle selection wheel (SET) to select a function.
3 Press the middle selection wheel (SET) to enter this function.
4 Turn the middle selection wheel (SET) to select a setting.
5 Press the middle selection wheel (SET) to confirm.
Radio/volume
1 To switch on the radio, press the bottom selection wheel. (Fig. 11)
2 To select the desired radio frequency, turn the middle selection wheel (SET) (Fig. 12).
Tip: To scan radio frequencies automatically, press and hold the middle selection wheel (SET) for approx. 2 seconds.
3 To switch off the radio, press the bottom selection wheel again.
Volume
1 To set the volume turn the bottom selection wheel to select the volume level you prefer.
You can choose a volume level between 1 and 20.
Note: The volume level you have selected is automatically set as the volume level for the alarm as well.
Setting the alarm
When you set the alarm, you choose an alarm time and the type of sound you want to wake up to. The alarm is set when the alarm symbol is visible on the display. The light intensity slowly increases to the selected level during the last 30 minutes before the set alarm time. The sound slowly increases in 90 seconds to the selected level after the set alarm time.
Note: You can set the light intensity or alarm volume by turning the top or bottom selection wheel respectively. If you do not want to wake up to the lamp or to a sound, select a light intensity or volume level of 0. See section 'Using the lamp' and 'Radio/Volume'.
1 Push the control lever down to the middle position to switch the alarm on. (Fig. 13)
The hour indication flashes (Fig. 14).
To adjust the time, follow steps 2 to 5. If the alarm time is correct, just wait for a few seconds.
2 Turn the middle selection wheel (SET) to select the hour.
Note: You can only do this when the hour indication flashes. If this is not the case, push the control lever up and down again to enter the alarm time mode. You can also set the alarm time in the menu (see section 'Menu functions of middle selection wheel (SET)' above).
3 Press the middle selection wheel (SET) to confirm.
The minute indication starts to flash (Fig. 15).
4 Turn the middle selection wheel (SET) to select the minutes.
5 Press the middle selection wheel (SET) to confirm or wait for a few seconds.
The appliance leaves the menu and the display shows the clock time.
The alarm time is now set.
Switching off the alarm
To switch off the alarm function, push up the control lever to the top position.
Setting the alarm sound
See section 'Menu functions of middle selection wheel (SET)' above.
You can choose one of the following sounds:
Radio (Fig. 16)
Birds (Fig. 17)
- Beep (Fig. 18)
- African jungle (Fig. 19)
Wind chimes (Fig. 20)
Snoozing
1 Push down the control lever to the bottom position when the alarm goes off. (Fig. 21)
The lamp continues to be on at the selected intensity level, but the alarm sound stops. After 9 minutes, the wake-up sound is automatically played again.
Note: The 9-minute snooze time is fixed. This time cannot be adjusted.
Note: If you push down the control lever with too much force, it may jump back to off position.
Alarm demonstration
During the alarm demonstration the appliance performs an accelerated wake-up procedure. This means that you see a rapid increase of the light intensity to the selected level and you hear the selected sound increase rapidly to the selected level.
1 Push the control lever down to the bottom position for a few seconds until TEST appears on the display (Fig. 22).
2 Push the control lever down again to stop the demonstration.
Note: The appliance continues to run the alarm demonstration until you push down the control lever again. The test automatically stops after 9 hours.
Cleaning and maintenance
Never use scouring pads, abrasive cleaning agents or aggressive liquids such as petrol or acetone to clean the appliance.
Regularly remove dust from the outside of the appliance with a dry cloth.
1 Unplug the appliance before you clean it.
2 Clean the outside of the appliance with a dry cloth.
Do not let water run into the appliance or spill water onto the appliance (Fig. 3).
Environment
- Do not throw away the appliance with the normal household waste at the end of its life, but hand it in at an official collection point for recycling. By doing this, you help to preserve the environment (Fig. 23).
Guarantee and service
If you need service or information or if you have a problem, please visit the Philips website at www. philips.com or contact the Philips Consumer Care Centre in your country (you find its phone number in the worldwide guarantee leaflet). If there is no Consumer Care Centre in your country, go to your local Philips dealer.
Guarantee restrictions
For safety reasons, the lamp of this appliance cannot be replaced. If the appliance or the lamp does not work, please visit the Philips website at www.philips.com or contact the Philips Consumer Care Centre in your country (you find its phone number in the worldwide guarantee leaflet). If there is no Consumer Care Centre in your country, go to your local Philips dealer.
Troubleshooting
This chapter summarises the most common problems you could encounter with the appliance. If you are unable to solve the problem with the information below, contact the Consumer Care Centre in your country.
Problem Solution
The appliance does not Perhaps the plug is not inserted properly in the wall socket. Put the work at all. plug properly in the wall socket.
Perhaps there is a power failure. Check if the power supply works by connecting another appliance.
The appliance functions Perhaps the lamp has reached the end of its life. The lamp has properly, but the lamp an expected life of more than 7 years. The life depends on the use of does not work the appliance. In case of heavy use, the lamp may last less than 7 years. anymore. The lamp is not replaceable. If the lamp breaks down, contact the Philips Consumer Care Centre in your country.
The appliance becomes This is normal, as the appliance is heated up by the light of the lamp. hot during use.
The appliance does not Remove the plug from the wall socket and reinsert it. If you reinsert respond when I try to the plug within 15 minutes, the appliance remembers the alarm settings set different functions. you have set. If you reinsert the plug after a longer period of time, the appliance resets to its factory default settings.
The lamp does not go on when the alarm goes off. Perhaps you set the light intensity level too low. Increase the light intensity level.
Perhaps you switched off the alarm function by setting the control lever to the top position. To switch on the alarm function, set the control lever to the middle position
Perhaps the appliance is defective. Contact the Philips Consumer Care Centre in your country.
Problem Solution
The lamp does not go It takes approx. 1 second for the lamp to go on. This is normal, the lamp on right away when I needs to heat up.
I do not hear the alarm Perhaps you set the sound level too low. See section 'Radio/volume' to sound when the alarm set a higher sound level. goes off.
Perhaps you switched off the alarm function by setting the control lever to the top position.
If you selected the radio as the alarm sound, the radio may be defective. Switch on the radio button after you switch off the alarm to check if the radio works. If it does not work, contact the Philips Consumer Care Centre in your country.
The radio does not The radio may be defective. Contact the Philips Consumer Care work. Centre in your country.
The radio produces a crackling sound. Perhaps the broadcast signal is weak. Turn the middle selection wheel (SET) to adjust the frequency and/or change the position of the antenna.
The alarm went off Perhaps you switched off the alarm function by setting the control yesterday, but it did not lever to the top position.
Perhaps you set a too low sound level and/or light intensity level. Set a higher sound and/or light intensity level.
Perhaps there was a power failure that lasted more than 15 minutes. In this case the appliance is reset to the factory default settings. Check the alarm settings (see chapter 'Using the appliance').
The light wakes me too Perhaps the light intensity level you have set is not appropriate for you. early/too late. Try a lower light intensity level if you wake up too early or a higher light intensity level if you wake up too late. If light intensity level 20 is not high enough, move the appliance closer to the bed.
Perhaps you woke up too late because the appliance is positioned at a lower level than your head. Make sure the appliance is located at a height at which the light is not blocked by your bed, duvet or pillow. Also make sure the appliance is not placed too far away.
The lamp flashes. Perhaps there has been a power failure. It is normal for the lamp to flash after a power failure.
Perhaps the appliance is not suitable for the voltage to which it is connected. Make sure that the voltage indicated on the appliance corresponds to the local mains voltage.
Introduktion
Stille inn alarmlyden
CBeT 6noAoMnueckne Yacbl
CBeTOBOe n3AUYeHne BANReT Ha HauN 6nOAnrueckne Yacbl, peryAnpyUoIne UKCA COH-6oApCTBOBaHne. Beepom ypoBeHb rOpMOHa MeaToHIna NOBbiUaeTcR, NOdrotABuBraOpAHN3M KO cHy. YtpenHn CBET CTmUAnpyet BbipAOBtKv rOpMOHa KOpTu3O, KOtOpbJ 3aCTaBAreT HAc PPOChyTbcR. B uDeaJe, zkA coH-6oAPCTBOBaHne DOAnKeH 6bITb CnHXPOHN3uPObaH C cyTOHbIM ZIKlOM. KaK npabNIO, pNTM COBpeMeHHOn JxN3Hn He N03BOAReT 3TOrO, BeDb Ham YaCTO npNXoANTcR BCTaBA Tb, kOrda eEe TEMHO.
3ΦΦeKtbl 6yAnbHnKa Wake-up Light
Будньник Philips Wake-up Light 3a nouaca Do npo6ykeHnna HauHae aKKpaTHO NOIROTaBnBaTb BaU opraHn3M. PaHHm yTpom rAa3a YeAOBeKa 60aee yvBCTBnTeAusbHbK CBeTy, Yem BO Bpema 6oApCTBOBaHnra. B 3TO Bpema, DaKe cpaBHnTeAho HeApKn CBET, IMNTpyouuBOCXoA, COAHua CTMyAmpye TBipaoTKy KOpTN3Ola cpa3y NocAe npo6yKeHnna. IcnoAboBaHne 6yDnBnka Wake-up Light DeAae npo6yKeHnne 60aee npocTbIM, NOdHMmaet yTpEHHee NaCTpoEHn e npi6abAare THeprn. PpO6yKeHnnc nOMoCbIO Wake-Up Light moKeT NOAnrTeABHo NOBnArTb Ha BaUy pa6oTOcNtco6HocTb nCocpeDoToueHHocTb. TaK ka K yBCTBnTeAhoCTb K CBETy y pa3hByx AIODeY pa3ANuAeTcR, MOJHO hAcPTOnTb yPoBeHb JRPKoCTN Wake-up Light B COOTBeTCTBn BaWe CBeTooyBCTBnTeAho BIO DAra CaMOrO Auywero npo6yKeHnra.
AnHHTeABHO 6yHaBnKe Wake-up Light cm. Ha www.philips.com.
06uee onncanHe (Pnc. 1)
A BeHTnAAJIIOHHbIe OTBepCTNIA
B _ oH
C CeTeBoN uHyp
D AHTeHHa
E Ancnnien
1 CnMBOA CBeta
2 INHdNkaun 3NaueHnnaocOB BpeMeHH NaocB/6yDnAbHNka
3 CmBOA BpeMeH yacOB
4 CnMBOA6yAnbHnKa
5 CmBOA paAno
6 CnMBOA 3ByKOBOrO cnHrHa“IeHne nTnU"
7 CmBOA 3ByKOBOO CnHaaaa "3ymMeP"
8 CnMBOAN3ByKOBOO CNHaA“AΦpNkA HCKNe DxyH
9 CnMBOA 3ByKOBOrO CNHaHa "My3bika BeTpa"
10 Cmbo TaMepa HouHoro peKIma
11 Cmboa peyAnpoBkn npKoCTn dncnAe
12 INHnkaunna 3NaueHHn MInHyT BpeMeHN yacOB/6yNnBnHa
13 CnMBOA peRyAnPOBKN rPOMKoCTN
F KoIeCNKn-peryAToPbI Bbl6opa yHKuN
1 Bepxhee koalecnko-peryAToP:CBETBk/ByiKa n peryaIPOBa npKocTn
2 CpeAHee KoAeCnKO-peryAaTOp (SET): MeHIO npaAnOuacToTa
3 HnKHee KOaecNKo-peryAraTOp: paAnIO BkV/BBiKA IN rPOMKOCTb
G PepeKIOUaTeA b c noAOKeHnMa alarm off (bYdNAbHnK oTKA), alarm on (bYdNAbHnK BKA.) snooze (BkIOueHne fynKuIN npOAnEHH)
BHHMaHne
- Αо Naа Акпауациnpi6opa BnMaTeaHObO O3HaKOMbTecb C hAcToIuM pyKOBOdCTBOM n COxpaHnte erO AaAaBHeJWeRo NcNoA3OBaHnB K aueCTBe cPpABoUHOrO MaTePnaAa.
- ABOHnHa n3OAnu npn60pa COOTBeTCTByeT KAccy 3aunTbI II (Pnc. 2).
Onacho
Boda n 3aektpnuecTBO - 3TO onachoe coeTaHne! He noab3yntecb npnbopom praOM c BOaON (HaNPmep, B BaHHoN KOMHaTe, PdOM C dywem nn 6accenHom).
- 136eraTe nonaHaHn BOaBl B np6Op. He OonyckaTepoAHaBHaHa n np6Op BOaBl (Pnc. 3).
PpeAynpeKdEHHe
- Ipea, noKIOeHem np60pa y6eNTecb, UTo yka3aHHoe Ha HEM HOMHaBHOe HapJxHeHc COOTBeTCTByET HApJxHIO MeTHOH 3AEKTPOCeTn.
- Pnp6op npEHa3HaueH Aa pa60TbO T 3Aektpocetn c HapjKeHHem 230 B, yacToToi 50 T.
B clyuae noBpeKdEHHa ceTeBOrO uHypa, ero Heo6xOaHMo 3aMeHnTb. TTo6bl o6ecneuHTb 6e3OnacHyIO kCnAyaTaunIO np6opa, 3aMeHnTe uHyp B TopROBoI opraHn3aunn Philips, B aBTOpN3OBaHHOM cepBnCHOM ueHTpe Philips nB cepBnCHOM ueHTpe C nepcoHaAM OHaONuHOn KBaAnΦnKaun.
-Данньnpi6op He npedHa3HaueH dAЯ NCNoB3OBaHnA nIaMn (BkIoUy aTee) C OrpaHnueHHbIMN BO3MOxHOCCTaMn CEHCOPHO CNCTeMbI NAn OrpaHnueHHbIMN INHTeAAKeTyaABHbIMN BO3MOxHOCCTaMn, a TaKKe AILaMn C HeOCTaTOUHbIM ONbITOM N 3HaHnA M, KpOME cAyuae B KOHTPOAЯ IAN INHcTpPyKTIpOBaHnI NO BONPocAM NCNoB3OBaHnI npi6opa co CTOpOHbI Anu, OTBeTCTBeHHbIX 3a INX 6e3OJaCHOCTb.
He n03BOAHTe AeTAM nIpaTb c np6Opom. - Pn6op npeHa3HaueH ToBko Aa DomaHero NcNoB3ObAHn (Pnc. 4).
BHMMaHne
- Pn6op HeAb3a POHrTb IIN NOBepraTb yDapam.
- YcTaHaBAABaIe Tepn6Op Ha pOBHyIO, yCTOnuHByIO, He cKOAb3Kyo IOBepxHocTb.
He noAbyTecb np6opom pn TempeaType Hxke 10^ nn Bbiue 35^ - Прп IncnoB3OBAHnnp6opa He 6AoKpyIe ero BeHTnAunOHhle OTBepCTnCBepxy n CHn3y.
- 3aπpeuεaetcnoAusb3ObaTbcnp6opom,ecn KOpnyc AamnbI NAn BepxHЯ KpbIshKa NOBpeKdEhbl, pa3bntbI nn OTCyTCTBYOT.
- EcnBbI cTpaAaET Hn CTPaAaTN TjXeAImN fOpMaMn dEInpeccn IpeaNcNoAboHneM np60pa nocobetyteCb C BpaOH.
He nCnoAbyIe np6op kaK cpeaTBO dA KOKpaueHn IPOAOXHTeAhoCTn cHa. Pnp6op npEHa3NaueH dA 6Oae MrgkOro np6yKeHn. Pnp6op He cokpaaet noTpe6HoCTb B CHe.
-Прибор He ochaшипегкюаTeAm BkA./BbIKA.ДЯ BBKIAOueHnЯ рибopa OTcoeAnHITe ceTeBOI shyp OT pO3eTKN əAekTpocetn. - Пибор пеДнаЗнayен TOько Дя ДомшHERO ИСпОБЗOBAHЯ,В TOM YИСАЕ aHaIOrNHyORO DOMaSHHeMy,HaNPIMeP,В FOCTINHILax.
06uee onncanne
-
Pnp6op ochaen peyAToPOM npKocTn cBeTa dA npO6xKeHna (cm. pa3deA "UcnoAb3OBaHne cBeTnAbHnka", rAAbb "UcnoAb3OBaHne np6opa").
-
Ecam Bbl yacto npocbinaeTcB cAnuKOM paHO nC rOAnOBHou, yMeHbWnte ypoBeHbApkoCTn.
- EcnB BaWei CnAaBHe CNT eue KTO-HN6yAb, 3OT YeAOBeK MoKeT npocbInaTbcra OT 3aropaoJooCROc CBeta, daKe ecAn HxOAnTCra DaAbe OE T np6Opa. 3To MoKeT npoCXoAnTB 6aIroAdpra pa3HOJ CBeToCyBCTBHTaeHOCTH.
3AektpomarHHTbIe nOa (3Mn)
AaHbI np6op Philips cooTBeCTBye TcHaapTam NO 3AekTpomarHHTbIM NoAam (Mn).Pnp npaBbHOM oBaueHN COAaCHO INCHtpyKUINM, PpNBaeHHbIM B pyKOBOACTBE NOAb3ObaTeA, IcNoB3OBaHne np6opa 6eONaCHO B COOTBeCTBn C COBPMeHHbIM HayHbIM DaHHbIM.
IopAroToBka npn6opa Ka pa6oTe
IcnoAb3OBaHne 3-x KOaecNKOB-peryAToPob BbI6opa yHKuN
Ha naneu npabAeHn paCnoAoKeHb TpN KOaecnKa-peryATopa Bb6opa yHKcN. C nomoubIO 3TnxpeyAToPOB npo3BOAnTCs HacTroPka p6Otbl np6opa.
IpnmeaHne. Ime me B bgy ymo, ean He nobopaynbamb Koaeckko-peryAamop 5 cekyng B MeHIO (SET), np60p abmomamnueckn Bbixogum n3 MeHIO n nepexogum K HopmaabHomy omobpaXeHHIO BpeMeHN.
KoaceuKn-peyAToBbIbOpa yHKn INcNoAByOTc cAeDyUcIMm o6pa3OM:
1 AIA BxOaBpeKIM HAcTPOiKN HaKMITE AIO6oe KOLeCNKO-peryAeTOp Bbl6opa _YHK (Pnc.5).
2 NOBEPHnTe 3TO JKe KOaecnKO-peryAraTOp BBepx H/nn BHN3 AABBbI6opa npaMeTpTa (Pnc. 6).
IpHmueaHne. Bepxhee KoalecuKo-peryamop (ypoBeHb apKocm) n HnXHee KoAecuKo-peryamop (ypoBeHb rpomKocm) moXHO nobepHymb BBepx nn Bn3 gAra Bbi6opa napamempa, 6e3 npegBapnmeAbHorO HaKamna.
3 CHOba HaXMMTe Ha To Xe KOLeCNKO-peryAaTOp Bbl6opa yHKnI AIA NOATBepKdEHHa Bbl6opa.
Ipea nepBbIM HcnoAb3ObaHHem
1 UcTaHOBInTe npH6Op Ha paCCToHnn 40-50 cm OT roAoBbl, HApPImep, Ha Tym6OuKe (Pnc. 7).
2 BCTaBbTe BnAky ceteBoro shypa B po3eTKy 3AekTpocetN.
Ha Ancnaee Haunet MuraTb HAnkaun 3NaueHn yacob, Noka3bBaH eO6xOAMocTb yCTaHOBKn BpeMeHn (Pnc.8).
YCTaHOBka yacOB
1 NobeprHnte cpeAhee KoalecNko-peryAraTOp (SET) BBepx H/HH BHN3 AAR Bbl6opa 3HaueHnA yaca.
Ппмechа.БыборЗачehняЧаСВОзМожЕн moькOB МEHIO yCMaHOBKN YAcOB, Korga NHgNKaцЯ YacOB Muraem.EcAn np6bOp B gpyrom pexKmE,gbaxgbl HaxMmme cpeGhee KOLeCNko-peryAmop (SET).TenepbBbMeHIO yCMAHOBKN YAcOB.
2 HaKMMTe cpeAHee KoAecnko-peryAToP (SET) Aa noATBepKdEHHa.
HaHHeT MInraTb INHAnkaunia 3NaueHnMaHyT (Pnc.9).
3 NobeprHnte cpeAhee KoalecNKo-peryAraTOp (SET) BBepx n/nn Bn3 dAa BbI6opa 3HaueHnMnHT.
4 HaKMMTe cpeAHee KoAecnko-peryAaTOp (SET) AAn noATBepKdEHHJ.
Pn6Op BbIaET n3 MeHIO Ha AnCIIae OTo6pa3HTcYCTaHOBaeHHoe BpeM YacoB.
Tenepb npi60p roTOB K 3KcnyaTaun.
IpHmeyaHne. EcaBbimaunmb Bnky n3 po3emKn 3Aekmpocemn Ha cpoK 6oAee 15 MHNym, Heo6xognmo 6ygem BbinoAHmmb ycmaHOBky YacOB, KAK onncAo HbIwe. 4mo6bl n3MeHmhb Hacmpoynk BypeMeHH, Korga np6op nogKaIOUeH K 3Aekmpocemn, CM. pa3geA "OyHKuH MeHIO cpeHero KOaecnKaapeYAmopa (SET)" rAABbl "VcnoAb30BaHne np6opa".
NcnoB3OBAHnne np6opa
PpIMMeHHeNcCBeTHaBnHa Ka
Pn6op MOXHO NcNOaB3OBaTb B KaueCTBe HaCTObHOnAaMnbl.
1 UTo6bI BKAIOUHTb CBETNAHbHK, HAKMITE BEpxHee KOaecNko-peryAraTOp (1). 3aTeM NOBepHnte erO, UTo6bI yCTaHOBnTB Heo6xoAMbI yPOBeHb rPKocTn (2). (Pnc. 10)
yCTaHOBka 6yAnAbHnKa
Прин haCTpoKe 6yAnbHnka Heo6xOaMIO yCTaHOBnTb BpeMa cpaTaBbAHn6 6yAnbHnKa n TIN 3ByKOBOrO CnHaA. Korda CmBOA 6yAnbHnKa OTO6paXaETCa Ha AnCpAee, 6yAnbHnK yCTaHOBaeH. 3a 30 MInHT Do BpeMeH INPO6yxDeHnRArkOCTb CBeTNbHnKa NocTepeHHO yBeAnuHBaETcA DO yCTaHOBAEHHORO yPoBHn. IocAe Cpa6aTbBAHn6 yAnbHnKa, B TeueHne 90 CEkyHa rPOMKoCTb CnHaA PAABHO yBeAnuHBaEeTc A DO yCTaHOBAEHHORO yPoBHn.
PpHMeaHne. RPKoCmb CBemnAbHnka n rpoMKocmb CNrHaA ycmahabnbaomc c nomoubBepxHero n HxKHe r KOaecnKOB-peryAmopob coombemcmbenHO. Ean Bbl He xomme np6yXgambcbom Cbema nn om 3Byka, ycmaHObme ypoBeH bpkocm nn rpoMKocnn Ha O. Cm. pa3geA "UcnOa30BaHne CBemnAbHnka" n "Pagno/rrpokocmb".
1 ABA BKAIOUeHn6yAINbHnka ONyCTHe nepeKIAOHTeB CpeAHee NOAOKeHne. (Pnc. 13)
Hauhet MiraTb HAnkaun 3HaueHn yacob (Pnc.14).
Ara yctaHOBKn BpeMeHn BbIOAnHe 2-5. Ean BpeMa cpa6aTbIBaHHa 6yAnbHKa npaBnAbHo, nPoCTO NDOxKAnTe HeCKoABko CekyHa.
2 NOBepHnTe CpeAHee KOaecnko-peryAToP (SET) ABy BbIbopa 3HaueHnna Yaca.
PpimueaHne. BbnoAHeHne HacmpoKn BO3MOxHO moAbko npu MURAHIN INghkaun 3HaueHna YacOB. Ean nHgkaun He muraem, nepemecmme nepekauyameB BBepx-BHN3 gAByOga B pekm HacmpoKn BPemEH 6ygnabHnKa. Bpema cpaabmbHnA 6ygnabHnKa MOxHO makKe ycmaHOmbb MeHIO (cm. Bblwe B pa3geAe "DyHKun MeHIO cpghero KoaceNka-peryamop(a (SET)).
3 HaKMTe cpeAHee KOaecnko-peryAToP (SET) AAn NOaTBepKaAeHHa.
HauHET MInraTb 3HaueHHe MNHyTbI (Pnc.15)
4 NobeHnTe cpeAHee Koalechko-peryAToP (SET) ABy Bbl6opa 3HaueHnMaHyT.
5 HaxMMTe cpeAHee KOaecnKO-peryAaTOp (SET) AAA NOATBepKdEHHN NNN PNOOJKNTe HeCKoABko CekyHd.
Pn6Op BbIaET n3 MeHIO Ha dncnaee OTo6pa3ntc yCTaHOBaeHHoe BpeMraCob.
Bpem 6yAnbHnka yCTaHOBaeHo.
OTKIAIOUeHHe 6yAnAhbHnKa
AOTKIAOueHnIyHKUN6yANbHnKa IepemeCTHTe nepeKIOaTeB B BepxHee NOIOKeHne.
YCTaHOBka CNrHaAa 6yAnbHnKa
Cm. BbIeB pa3AeAe "DyHKuIN MeHIO cpeAHeRo KOaecnKa-peryAraTopa (SET)".
MOxHOBbIbPaTbOAnHn3CaeDyIOUHX3ByKObIX CnHaAOB:
- PaAno (Pnc. 16)
- Pene nTnC (Pnc. 17)
- 3ymmep(Pnc.18)
3Bykn aΦpɪnkaHcknx ᾅχyHræn (Pnc. 19) - My3bika Betpa (Pnc. 20)
Функци npoадаehня
1 Onyctnte nepeKauaTeB KpaHHe HxKHee NIOOKeHne AAn OTKAUoyehn CnHaA 6yAnbHnka. (Pnc. 21)
CBeTHaBnK npOAOJXHT ropeTb C yCTaHOBaeHHo JpKOCTbIO, HO cHrHa 6yAnbHnKa npEkpaaetc. Yepe3 9 MmHyT 3ByuHHe CNrHaA 6yAnbHnKa ABTomaTHueCKN BO306HOBNTc.
PpHmueaHne. 9-mn MmHymhbl nHmepBaA fukcnpoBAn. 3mom npamemp He peryAuPyemca.
PpHmueaHne. Ean Hagabmb Ha nepeKaIOyameA b CAnuKOM CnAbHO, OH MoXem nepeckOuymb BBepx, B noAOKeHne omKAIOUeyHn.
AemohcTpaunCnHaAOB 6yAnbHnka
AemohctpauncaHbON 6yduNbHKa npOn3BOAnTcC npeyBeuHHeHNo ckopocTbIO.To eCTb MOxHO Ha6IoDaTb CTpeMnTeAbHOe yBeUneHne rPKoCTn DO Bbl6paHHoro yPOBnI NCblIaTb MRHOBeHHoe yBeUneHne IpOMKoCTN Bbl6paHHoro 3ByKOBOrO CnHaAdoYCTaHOBaeHHoro yPOBnI.
1 Onyctnte nepekauateb B KpaHne HnXHe noLoXeHne Ha HeCKoAko cekyHa, noka Ha dncnlee He oTo6pa3ntcnaHAnkaunr Test (Tect) (Pnc. 22).
2AraOCTaHOBKn AemOHCTpaun CHOBa ONyCTNe IpeKAAUoHaTeAe.
PpHmeyane. Pp6op 6ygem npogoxamb gemohcmpauno cunhaob 6yngnBnka, noka Bbi cHOBA He cgbHeme nepeKluoyameBn3. PeXIM gemOHcmpauun abmomamueckn npekpaamaemcyepe3 9 YacOB.
YnCTka n o6cayXuBaHne
3aIpeaaetcnaocnoab3oBaTbArauHCTKN npn6opa r6kn c a6pa3HBbIM NOKpbITHeM, a6pa3NBbIe
yNCTaune CpeAcTBA HAn PaCTBOPHTeAN Tnna 6eHNHa HAn aTeToHa.
PeryaepHO ydaayTe nbIb c BHeuHne NOBepxHocT np6opa npn nomoun cyxon TkaHN.
1 IpeaOnCTKo np6opa oToeAnHraTe erO Ot 3AekTPOcETN.
2 PpOtpnTe HApUxHyIO NOBepXHOCTb pN6Opa cyxOu TkaHbIO.
I36eraaTe nonaHaHHBaB B npH6Op. He aOnyckaTe npoAunBaHHa Ha npH6Op BoAbi (Pnc. 3).
3aunTa OkpykaIoUe CpeAbI
- Pocae OKOHuaHna Cpoka cayk6bI He BbIbpaCbIaIe Tnpnbop BmecTe C 6bITOBbIMN OTXoAaMn. IpeaIte erO B cneuHa3npobAHbI pyHKT dAaBHeJWeY TnAn3aUIn. 3TNMBbl NOMOKeTe 3aunTHTb OkpykaioyIO cpey (Pnc.23).
TapaHTMa N 06cayXkBaHne
AIAI NOAYeHNAIOANHTeBHOINHOFOPMaUNN B CAYae BO3HNKHOBEHNAIPO6aEM 3aINTe Ha Be6-caIT www.philips.com IAN O6paTnTeCB LcHTp NODepKKNOTpe6nteAe Philips B BaWei CTpaHe (Homep TeAefoHa cHTpa yka3aH Na rapaHTnHOM TaOHe).Ean NDObHbI cHTp B BaWei CTpaHE OTCyTCTByET, O6paTnTeCB MecTHyIO TOpROyIO opraHn3aunio Philips.
OrpaHnueHne AeiCTBna rapaHTnn
B ueAix 6e3oNaacHocTn AAMna CBeTHNbHnKa He NoAeJHT 3aMeHe. EcAn npIbOp nn CBeTHNbHnK He pa6OtaIoT, 3aIaIte Ha Be6-caIT Philips www.philips.com HAn ObaPATntecb B LcHTp NODepKKn IOTpe6bTeAeN Philips B BaWei cTpaHe (Homep TeAefoHa cEHTpa yka3aH Ha rapaHTnHOM TaLoHe). EcAn NDo6hBn UeHTP B BaWei cTpaHe OTCyTCTByeT, ObaPATntecb B MeCTHyIO ToproBvIO opraHn3aunio Philips.
Ponck nycTpaHenne HeNCnPabBHOCTe
AaHna rAba nocBaaheHa Hn6oae paCnpocTpaHeHHbIM npo6eMaM, BO3NkaIOuIm npn IcnoB3OBaHm npibopa. Ean camocToarTeAbHO CnpaBntbcr C Bo3NkUHMn npo6eMaMn He ydaetc, o6patntecb B ueHTp noAdepKKn Notpe6nteAen B BaWei cTpaHe.
Ppo6Aema Cnooc6bpeweHn
Pn6Op He BKAIOyaeTcA.
Bo3MOxH0 He npabnAbHO BCTaBAneH TeKep B PO3eTKy 3AekTPOCeTN.
PpabnAbHO BCTaBBTe WTeKep B PO3eTKy 3AekTPOCeTN.
Pp6op pa6oTaet npaBnAbHO, HO CBETNbHk He rOpNT.
Bo3MOxHa HeNCpPaBHOCTb B cETn NITaHn. IpoBepbTe nCpPaBHOCTb cETn NITaHn, NOkAIOUChN KaKoN-H6yAb ApyrO 3AeKTPoPnp6Op.
Bo3MOxHNO,Amna BbipabOtaa CBOI pecypc. OxNdaembl cPOK cAYK6bl Amnbl 6oAee cemn AET. Cpok cayk6bl 3aBNCHT OT xapaKTepa NcnoAb3OBAHIN np6opa. B cAYuae INTEHCNBHO rCNOAb3OBAHIN, cPOK cAYK6bl Amnbl MoKeT COCTaBNT MeHee 7 AET. Amna He NOAeHNr 3aMeHe. Ean Amna pa36nAACb, o6paNTecb B ueHTp NOAdepKKn Notpe6nteJ Philips BaWei CTpaHbI.
Bo Bpemnncnoab3OBaHnnp6op HarpeBaetc.
To HopMaBHO, np6op HarpBaetcT O Tenna, BbdeAemrO aAMnO.
Pnp6op He pearupyeT Ha NOnbITKn 13MeHeHnHaCTpoek fHKu.
OTcoeAHHTe Bnky OT po3ETKN 3AekTPOCeTN n CHOBA BCTaBbTe. EcAn BCTaBNTb Bnky DO nCTeueHnra 15 MmHyT, npnbop coxpaHnT B namrtn BblnoAHeHHbIe HAcTpoiKn. Ecan NODKAIOUHTb npnbop K 3AekTPOceTN cnYctra 6oAee AANTeAbHOe Bpemr, npnbop nepeuAdet K 3aBOADKIM HaCTPOkAM NO yMOAAHnIO.
Pn cpa6aTbBaHnn 6yAnbHnKa lamna He 3aropaetc.
Bo3MOxH0 6bI yCTaHOBaeH cAnuKoM Hn3Kn yPOBeH bRkoCTn. YBeAunyTe yPOBeH bRkoCTn.
Bo3MOxHNO yHKnna 6yAnbHnka 6bIa OTKIOueHa npu yCTaHOBKe IpeKIAOyateA B MaKcImaHBO BepXHee NOAOKeHne. AAB KIAOyeHn AYHKUIN 6yAnbHnka YCTaHOBInTe nepeKIAOyateA B CpeADHee IOAOKeHne
CBeTnAbHnK He 3aropaeTcraPazy nocAe BkAIOUeHn.
Bo3MOxHNo np6Op HenCnpaBeH.ObpaTnTeCb B ueHTp noAePxxN noTpe6nteAe Philips BaWei cTpaHbI.
YTo6bl CBETnAbHnK 3aIopeAeTpe6yeTcR OKoAo 1 cekyHdbI.3TO HOpMaIbHO,Amne Heo6xOAnMo HaIpeTbcra.
He cbluy cnHaA 6yAnbHnKa npn erO cpa6aTbIBaHN.
Bo3MOxKHO 6bIyCTaHOBaeH cAnIKOM Hn3KN yPOBeHb rPOMKOCTN. Cm. pa3deI "PaDIO/ΓpOMKoCTb" dAry yCTaHOBKn 6Oaee BBICOKoro yPOBHr rPOMKOCTN.
Bo3MOxHNO 6yHKUa 6yHaNbHnKa 6bHa OTKIOueHa npu yCTaHOBKe nepeKIAOHTAeA B MaKcIMMaHb HO BepXHee NOAOKeHne.
Bo3MOxHOb, B KaueCTBe CnHnAa 6yAnbHnKa yCTaHO bHe OpaNo, npaDIOnpneMHNK MoKet 6bITb HeNCpPaBcH. BkIoUHTe paNO nocAe BbIKIOueHn6yAnbHnKa AAn npOBepKn erO pa6oTbI. Ean paNO He pa6oTaet, o6paNTecb B UeHTp NOAdepKKn NOTpe6uTeAleh Philips BaWe cTpaHbl.
PpO6Aema Cnooc6peuHn
PaNo He pa6oTaet. PaHOpnemHK MoKeT 6bItb HeNCpabEh. O6paNTeCb B ceHTp NoAdepKKn NOTpe6nteAlei Philips BaWei cTpaHbl.
PaAno 3ByuHc Bo3MoXHo paAnocnHa cA6bI. NObepHnte cpeAhee KoAeKnO-
notpecknaIOUIM peryAaTOp (SET) AHaNtpoiKaHa YaactOTy H/nnn N3MeHNTe
3BykOM. nAOJKeHne aHTeHHbl.
Будиьнк сработаВозможно Функшия 6удиьнka 6ыla оTKIoueHa npu yctaHOBKe Bчepa, a ceroДн He NepeKaIOUaTeA B MaKcIMaBHO BepxHee NOAOKeHne.
Bo3MOxHb 6bI yCTaHOBaeH cIuKOM Hn3Ku yPOBeHrPOMKOCTn I/nn yPOBeH rPKoCTn. YcTaHOBITE 60Aee BbICOKu yPOBeHrPOMKOCTn I/ nn rPKOCTn.
Bo3MOxHNO,Ha cPOK 6oAee 15 MInHyT npeKpaTnAacb noaHa HApJxKeHn 3AnEKTPOcETn. B 3Tom CAYyae npi6Op nepexoNT K 3aBOADCKIM HaCTpOuKaM NO yMOUaHNo. IpOBepbTe HaCTpOuKn 6yAnlbHnka (cm. rAaby 'UcnoAboHne npi6opa").
CBeT 6yAnr MeHn Bo3MoXHo yCTaHOBaeHHb IyPoBeH bPKoCTn Bam He nOaxoAnr.
cAnuKOM p03dHO/ POnpo6yIte yMeHbUHTb yPoBeH bPKoCTn, cAn Bbl npocbinaeTeCb
paHO. cAnuKOM paHO, HAN YBeAunHtB erO, eCan npocbinaeTeCb CAnuKOM
no3dHO. ECan yPoBeHb 20 HeDocTaToUH oPKn, nepeaBnHbTe np6Op
6Anke K KpOBaTu.
Bo3MOxHOBbI npocbinaeTcB cAnuKOM nO3HO, TaK KaK np6Op yCTaHOBaeH HIXKe UPOBnPaCpNOAOXeHNrOLOBbI. Pnp6Op Heo6xoAIMO yCTaHOBnTB Ha Bicote, pni KOTopoCBeT He 3acAoHeK pOBaTbIO, OdeAOM nn NODyUkoi. PaCtOraHne Do np6Opa He AOxAHO 6bITb CAnuKOM 6oAusbIM.
CBeTHaBnK MiraeT. Bo3MoXHo npOn3oWeA c6oJ 3AekTpOHTaHnI. Pn c6oe 3AekTpOHTaHnI MIRaHne CBeTHaBnIKA HOpMaABHO.
Bo3MOxHNO, HApJKeHne B ceTn He NOaXoNT AAn npi6opa. PpOBepbTe, COOTBeTCTByeT An HApJKeHne, Yka3aHHoe Ha npi6ope, HApJKeHIO B ceTn.
Introduktion

- Light and the biological clock
- The effects of the Wake-up Light
- General description (Fig. 1)
- Important
- Danger
- Warning
- Caution
- General
- Electromagnetic fields (EMF)
- Preparing for use
- How to use the 3 function selection wheels
- ENGLISH8
- Before first use
- Setting the clock
- Using the appliance
- Using the lamp
- Menu functions of middle selection wheel (SET)
- Radio/volume
- Volume
- Setting the alarm
- Switching off the alarm
- Setting the alarm sound
- Snoozing
- Alarm demonstration
- Cleaning and maintenance
- Environment
- Guarantee and service
- Guarantee restrictions
- Troubleshooting
- Problem Solution
- Introduktion
- Stille inn alarmlyden
- CBeT 6noAoMnueckne Yacbl
- 3ΦΦeKtbl 6yAnbHnKa Wake-up Light
- 06uee onncanHe (Pnc. 1)
- F KoIeCNKn-peryAToPbI Bbl6opa yHKuN
- BHHMaHne
- Onacho
- PpeAynpeKdEHHe
- BHMMaHne
- 06uee onncanne
- 3AektpomarHHTbIe nOa (3Mn)
- IopAroToBka npn6opa Ka pa6oTe
- IcnoAb3OBaHne 3-x KOaecNKOB-peryAToPob BbI6opa yHKuN
- Ipea nepBbIM HcnoAb3ObaHHem
- YCTaHOBka yacOB
- NcnoB3OBAHnne np6opa
- PpIMMeHHeNcCBeTHaBnHa Ka
- yCTaHOBka 6yAnAbHnKa
- OTKIAIOUeHHe 6yAnAhbHnKa
- YCTaHOBka CNrHaAa 6yAnbHnKa
- Функци npoадаehня
- AemohcTpaunCnHaAOB 6yAnbHnka
- YnCTka n o6cayXuBaHne
- 3aunTa OkpykaIoUe CpeAbI
- TapaHTMa N 06cayXkBaHne
- OrpaHnueHne AeiCTBna rapaHTnn
- Ponck nycTpaHenne HeNCnPabBHOCTe
- Ppo6Aema Cnooc6bpeweHn
- PpO6Aema Cnooc6peuHn
Brand : PHILIPS
Model : Wakeup Light HF3476
Category : Light therapy