LCS8131N3 - Network card / adapter Longshine - Free user manual and instructions
Find the device manual for free LCS8131N3 Longshine in PDF.

User questions about LCS8131N3 Longshine
0 question about this device. Answer the ones you know or ask your own.
Ask a new question about this device
Download the instructions for your Network card / adapter in PDF format for free! Find your manual LCS8131N3 - Longshine and take your electronic device back in hand. On this page are published all the documents necessary for the use of your device. LCS8131N3 by Longshine.
USER MANUAL LCS8131N3 Longshine
This equipment complies with the requirements relating to electromagnetic compatibility, EN 55022 class B for ITE, the essential protection requirement of Council Directive 89/336/EEC on the approximation of the laws of the Member States relating to electromagnetic compatibility.
Company has an on-going policy of upgrading its products and it may be possible that information in this document is not up-to-date. Please check with your local distributors for the latest information. No part of this document can be copied or reproduced in any form without written consent from the company.
Trademarks:
All trade names and trademarks are the properties of their respective companies. Copyright © 2010, All Rights Reserved.
WLAN GENERAL
GB
OVERVIEW
Thank you for purchasing this product. Read this chapter to know about your IEEE 802.11n Wireless Adapter.
Unpacking information
Before getting started, please verify that your package includes the following items:
- IEEE 802.11n Wireless Adapter
- One quick installation guide
- One Utility/ Manual CD
WLAN GENERAL
Introduction to the IEEE 802.11n Wireless Adapter
The IEEE 802.11n Wireless adapter provides users to launch IEEE 802.11n wireless network at 300 Mbps in the 2.4GHz frequency, which is also compatible with IEEE 802.11b/g wireless devices at 11/54Mbps. You can configure this adapter with ad-hoc mode to connect to other 2.4GHz wireless computers or with Infrastructure mode to connect to a wireless AP or router for accessing to Internet. This adapter includes a convenient Utility for scanning available networks and saving preferred networks that users usually connected with. Security encryption can also be configured by this utility.
flowchart
graph TD
    A["Internet"] --> B["ADSL Modem"]
    B --> C["Infrastructure Network"]
    B --> D["Wireless Router"]

text_image
NoteBook NoteBook Ad Hoc Network
text_image
NoteBook Personal ComputerKey Features
- Complies with IEEE 802.11b/g/n wireless standard
• High Speed transfer data rate up to 150/300 Mbps
• Supports auto-installation and diagnostic utilities.
- Support wireless data encryption with 64/128-bit WEP, WPA, WPA2 (TKIP with IEEE 802.1x) and AES functions.
WLAN GENERAL
LED Status
| LED Indications | Status | Working Status |
| Radio/ACT LED | Flashing green The R | Radio adapter is on |
| Intermittently flashing green | The adapter is connected but is not transmitting or receiving data | |
| Fats flashing green | The adapter is active and transmitting or receiving data. | |
| Off The Radio adapter | is off |
WLAN GENERAL
INSTALLATION GUIDE
Attention:
Make sure to install the software and driver BEFORE plugging the WLAN adapter into USB port.
Software Installation
Note: The following driver installation guide uses Windows XP as the presumed operation system. The procedures and screens in Windows 2000, Vista and Win7 are familiar with Windows XP.
Insert the CD-Rom that came with this product to your CD-Rom drive. The menu window pops up automatically. Please click the "Driver" button of this product.

text_image
WIRELESS PCI Driver Manual QIG PCI-E Driver Manual QIG USB Driver QIG Router Manual WIN LINUX MAC 802.11n 300 Mbps EXITNote: If the CD-Rom fails to auto-run, please click on "My Computer"→ your CD-Rom Drive then double-click the "Setup" icon to start the this menu.
WLAN GENERAL
- The language-selecting window pops up. Please select the language you use and click OK.

text_image
Choose Setup Language Select the language for this installation from choices below. English OK Cancel- The welcome window pops up. Click the "Next" button to proceed.
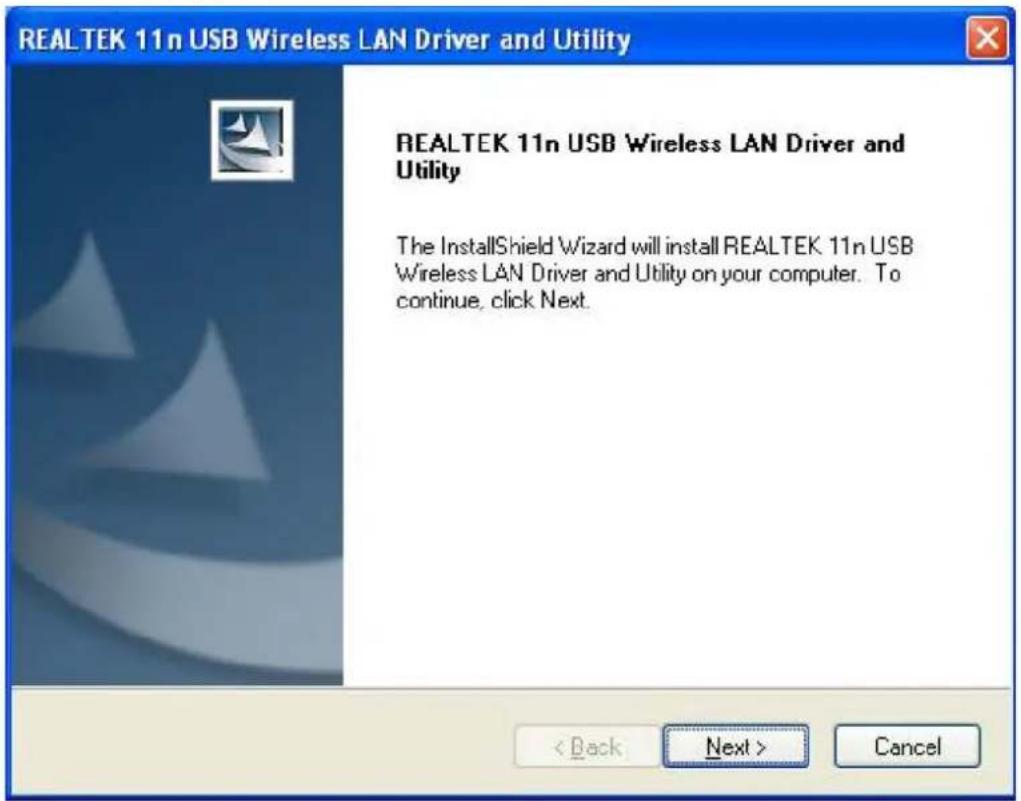
text_image
REALTEK 11n USB Wireless LAN Driver and Utility REALTEK 11n USB Wireless LAN Driver and Utility The InstallShield Wizard will install REALTEK 11n USB Wireless LAN Driver and Utility on your computer. To continue, click Next.WLAN GENERAL
- Click the "Install" button to start installing.
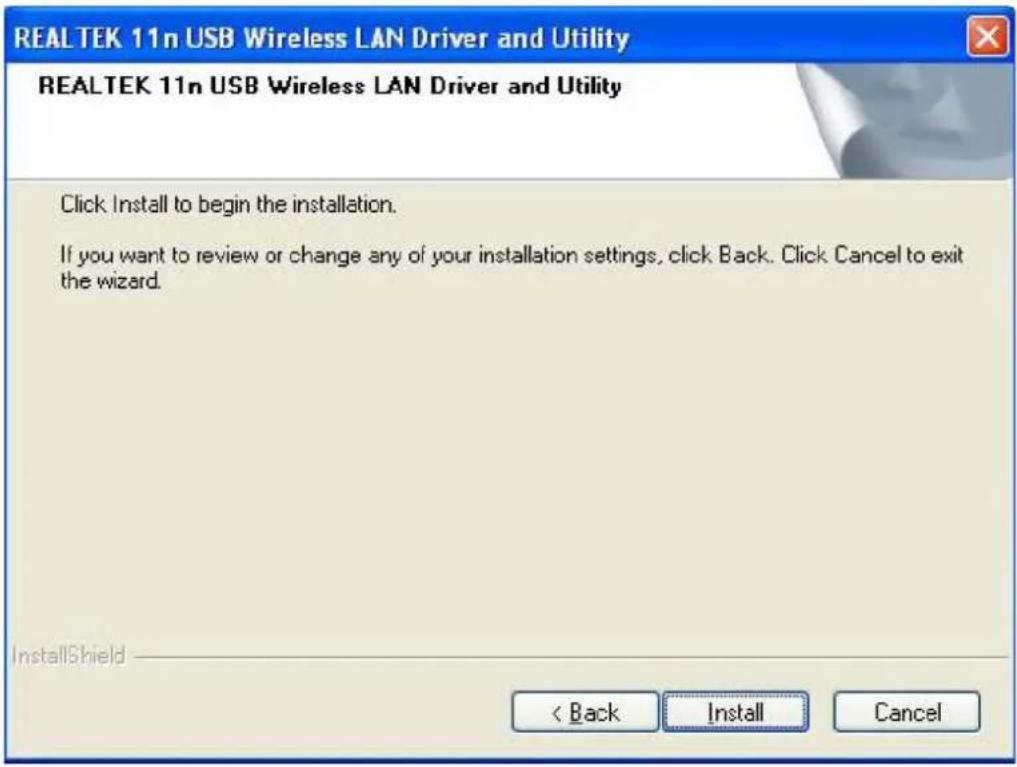
text_image
REALTEK 11n USB Wireless LAN Driver and Utility REALTEK 11n USB Wireless LAN Driver and Utility Click Install to begin the installation. If you want to review or change any of your installation settings, click Back. Click Cancel to exit the wizard. InstallShield < Back Install Cancel- Please wait while installation.

bar
Now searching for Hardware and installing Drivers... | Category | Value (%) | |---|---| | Current Searching for Hardware and installing Drivers... | 50 |WLAN GENERAL
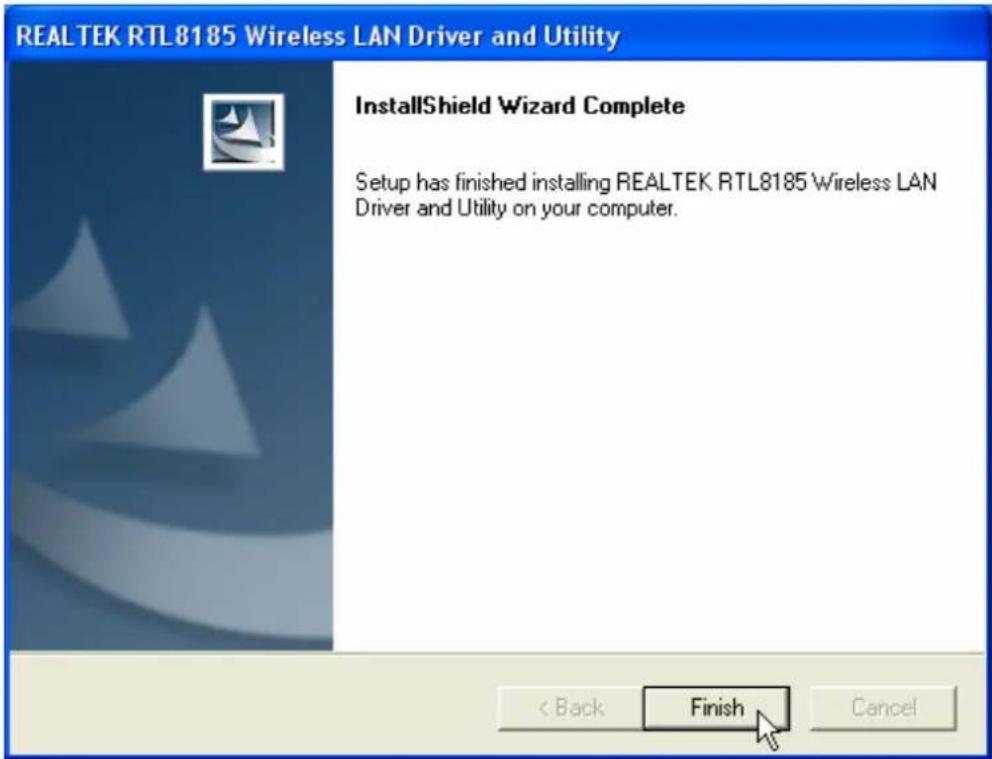
- Click the "Finish" button to complete driver and utility installation.
text_image
REALTEK RTL8185 Wireless LAN Driver and Utility InstallShield Wizard Complete Setup has finished installing REALTEK RTL8185 Wireless LAN Driver and Utility on your computer. < Back Finish CancelWLAN GENERAL
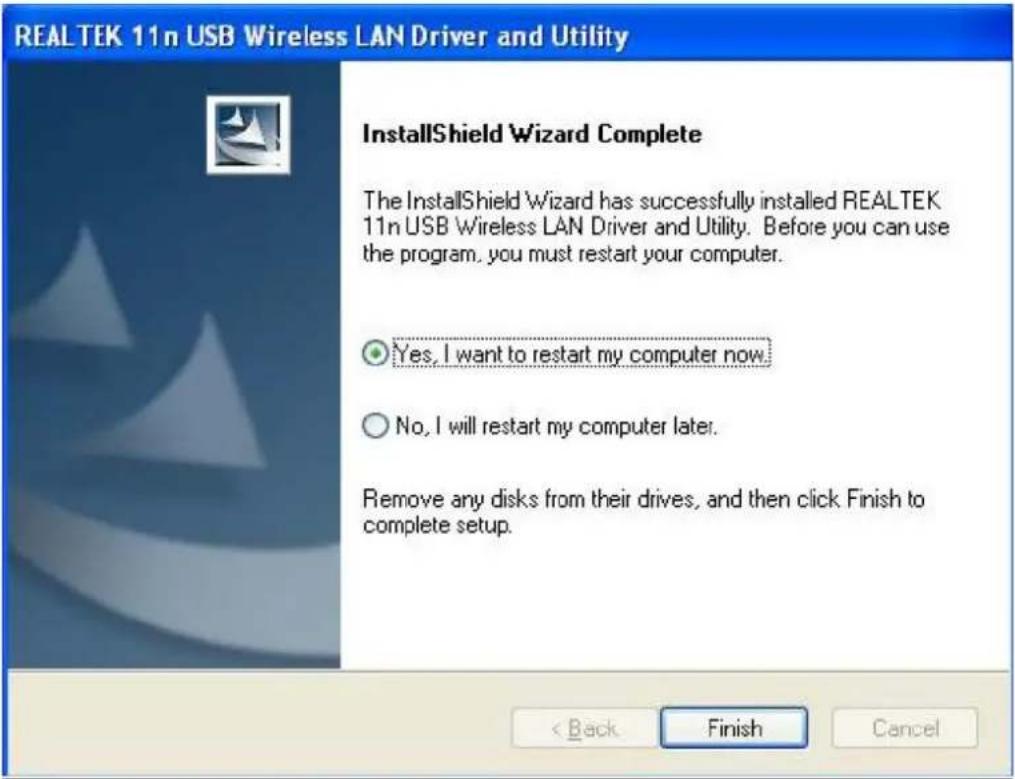
- Select "Yes, I want to restart my computer now" and click the "Finish" button.
text_image
REALTEK 11n USB Wireless LAN Driver and Utility InstallShield Wizard Complete The InstallShield Wizard has successfully installed REALTEK 11n USB Wireless LAN Driver and Utility. Before you can use the program, you must restart your computer. Yes, I want to restart my computer now. No, I will restart my computer later. Remove any disks from their drives, and then click Finish to complete setup. < Back Finish CancelWLAN GENERAL
MANAGEMENT GUIDE
Read this chapter to understand the management interface of the device and how to manage the device.
Making a Basic Network Connection
Before You Start
In the following instruction for making a network connection, we use the utility we provided to configure your wireless network settings.
Note: For Windows XP users that want to configure your wireless network using this Utility, please perform the following procedures to disable your native Windows XP wireless support (Wireless Zero Configuration Service)
-
Double click the icon on your desktop to start the utility.
-
Make sure that the "Windows Zero Config" checkbox is unchecked.
Windows Zero Config
Ad-Hoc Mode
An Ad-Hoc mode wireless network connects two computers directly without the use of a router or AP. It is also known as a peer-to-peer network. For example, we can install this wireless adapter to two computers respectively. The communication between the two computers is an Ad-Hoc mode network.
WLAN GENERAL

natural_image
Two computer devices with sound waves, no text or symbols presentAd-Hoc Mode
To use this adapter in Ad-Hoc Mode
- Double click the icon on your desktop.
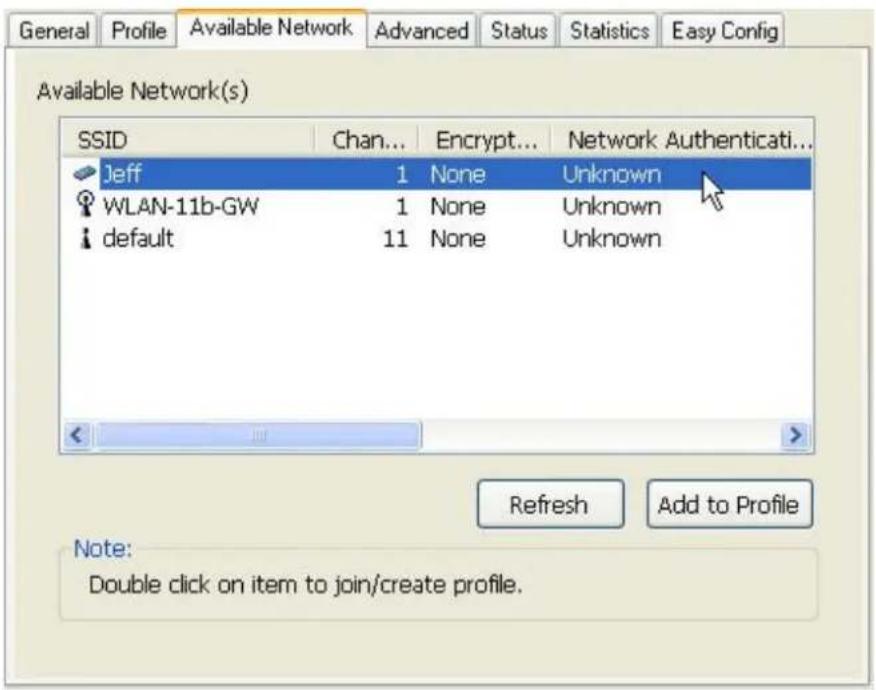
- Click the "Available Network" button to scan available wireless network adapters. Double click on the network adapter that you are going to connect to.
text_image
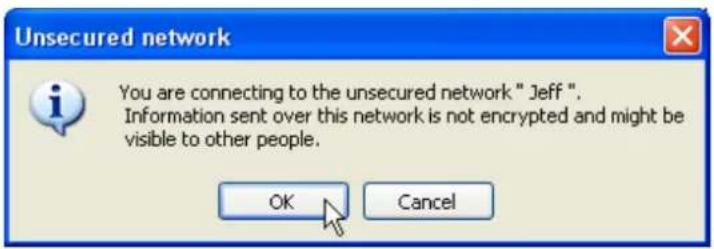
General Profile Available Network Advanced Status Statistics Easy Config Available Network(s) SSID Chan... Encrypt... Network Authenticati... Jeff 1 None Unknown WLAN-11b-GW 1 None Unknown default 11 None Unknown Refresh Add to Profile Note: Double click on item to join/create profile.- Click the OK button to confirm that you are connecting to an open wireless network.
text_image
Unsecured network You are connecting to the unsecured network " Jeff". Information sent over this network is not encrypted and might be visible to other people. OK CancelWLAN GENERAL
- Click OK to add this network into the profile list.
Note: This example is an open wireless network. If you are going to connect to a Wireless adapter with security protection, you will have to configure the encryption settings in this profile to be corresponding to the other wireless adapter. Please click on the "Network Authentication" drop list to select an authentication method, and then select a "Data encryption" type. Fill in each required blanks and click "OK".
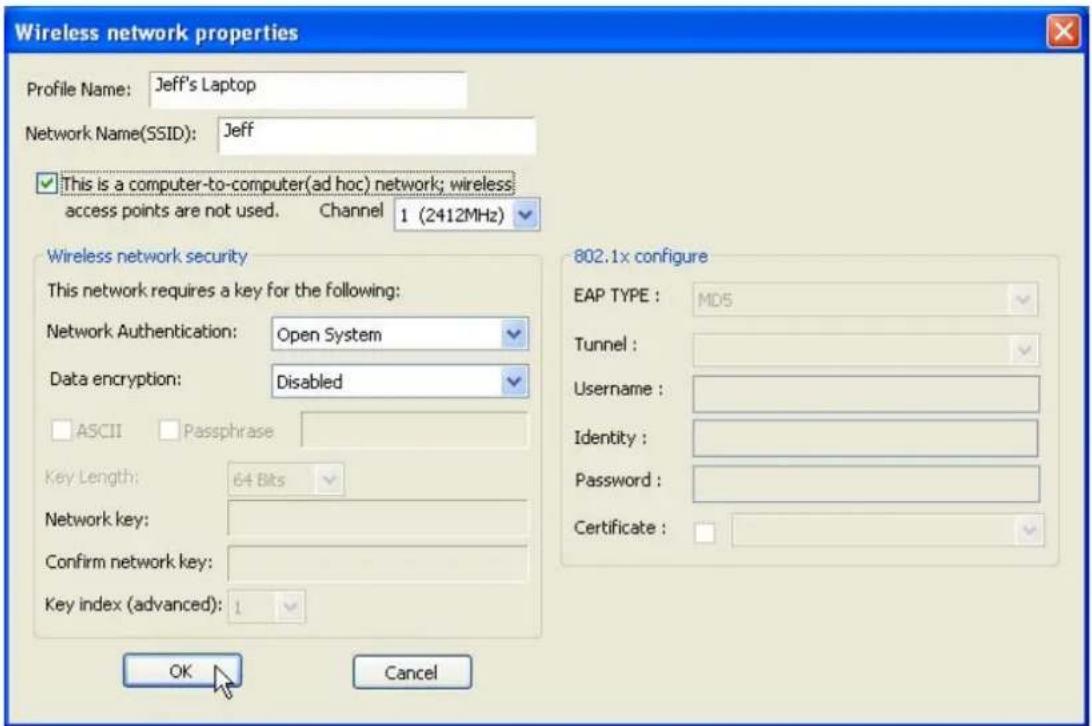
text_image
Wireless network properties Profile Name: Jeff's Laptop Network Name(SSID): Jeff ✓ This is a computer-to-computer(ad hoc) network; wireless access points are not used. Channel 1 (2412MHz) Wireless network security This network requires a key for the following: Network Authentication: Open System Data encryption: Disabled ASCII Passphrase Key Length: 64 Bits Network key: Confirm network key: Key index (advanced): 1 OK Cancel 802.1x configure EAP TYPE : MD5 Tunnel : Username : Identity : Password : Certificate :WLAN GENERAL
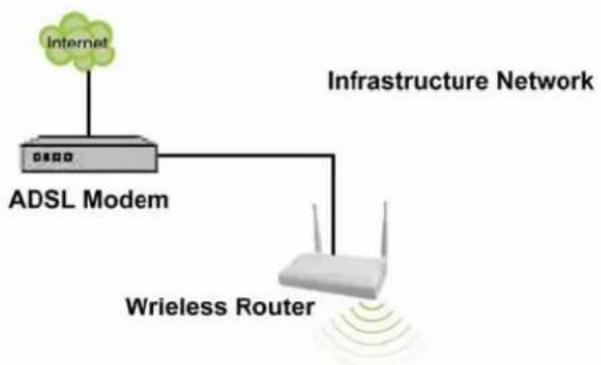
Infrastructure Mode
An Infrastructure Mode network contains at least one wireless client and one wireless AP or router. This client connects to Internet or intranet by communicating with this wireless AP.
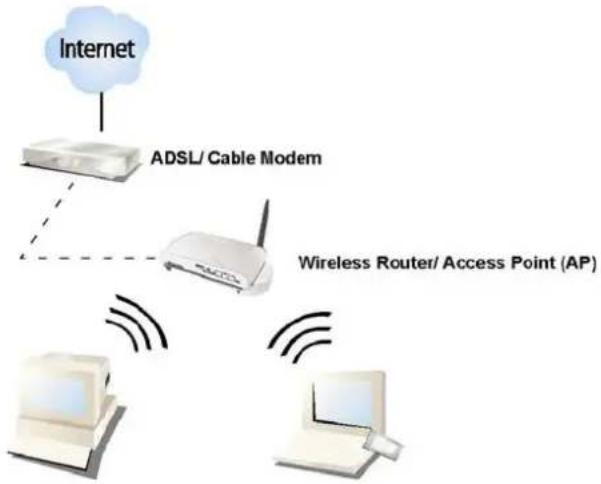
flowchart
graph TD
    A["Internet"] --> B["ADSL/ Cable Modem"]
    B --> C["Wireless Router/ Access Point (AP)"]
    C --> D["Desktop"]
    C --> E["Laptop"]
    C --> F["Network"]
Infrastructure Mode
To use this adapter in Infrastructure Mode:
- Double click the

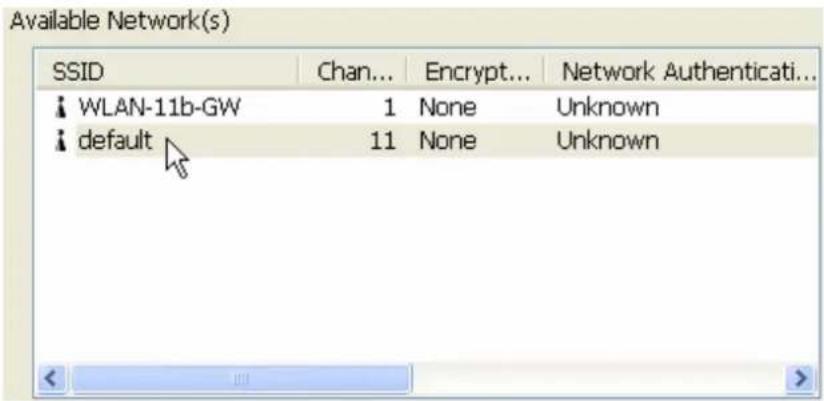
- Click the "Available Network" button to scan available access points. Double click on the AP that you are going to connect to.
text_image
Available Network(s) SSID Chan... Encrypt... Network Authenticati... WLAN-11b-GW 1 None Unknown default 11 None UnknownWLAN GENERAL
- Click the OK button to confirm that you are connecting to an open wireless network.
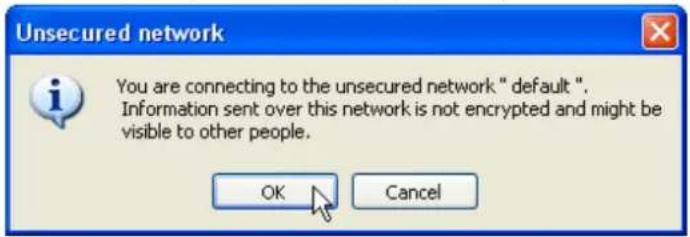
text_image
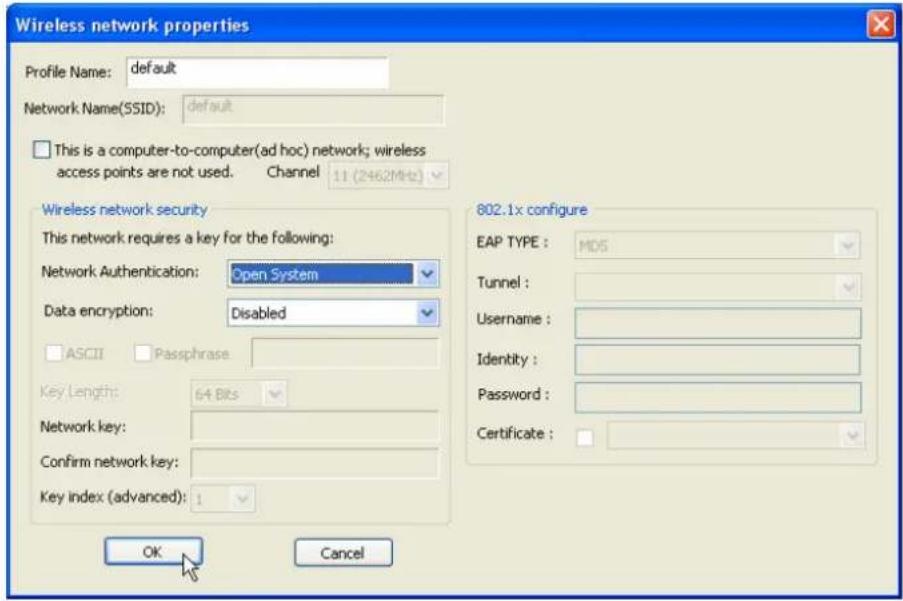
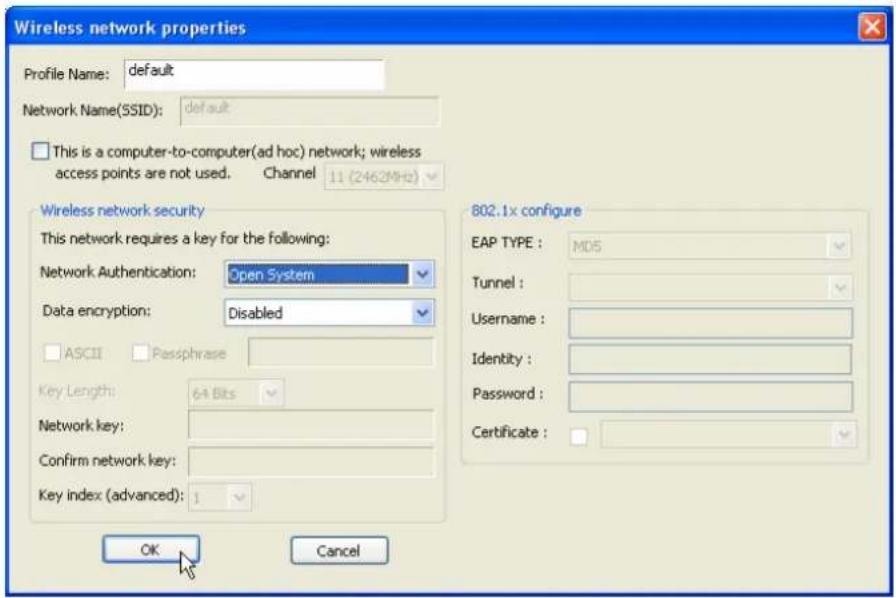
Unsecured network You are connecting to the unsecured network " default". Information sent over this network is not encrypted and might be visible to other people. OK Cancel- Click OK to add this network into the profile list.
text_image
Wireless network properties Profile Name: default Network Name(SSID): default This is a computer-to-computer(ad hoc) network; wireless access points are not used. Channel 11 (246.2MHz) Wireless network security This network requires a key for the following: Network Authentication: Open System Data encryption: Disabled ASCII Passphrase Key Length: 64 Bits Network key: Confirm network key: Key index (advanced): 1 OK Cancel 802.1x configure EAP TYPE : MDS Tunnel : Username : Identity : Password : Certificate :WLAN GENERAL
Note:
This example is an open wireless network. If you are going to connect to an AP with security protection, you will have to configure the encryption settings in this profile to be corresponding to your AP. Please click on the “Network Authentication” drop list to select an authentication method, and then select a “Data encryption” type. Fill in each required blanks and click “OK”.
Introduction to the Wireless LAN Utility
Note: This management instruction uses Windows XP as the presumed operation system. Some functions are not supported in Windows 98se or Windows ME.
Starting the Wireless LAN Utility

Double click the shortcut on your desktop. The Wireless LAN Utility pops up.
You may click on the tabs above to configure this adapter. The checkboxes below provide the following functions:
| Show Tray Icon | Check this checkbox to show the utility icon on your system tray, which is in the notification area at the lower-right corner of the windows desktop. You may also uncheck it to remove the utility icon from system tray. |
| Windows Zero Config | Uncheck this checkbox to use native Windows XP wireless support (Wireless Zero Configuration Service) instead of using this utility to configure your wireless network. |
| Radio Off | Check this checkbox to prevent this adapter form transmitting or receiving signals. Uncheck it to communicate. |
| Disable Adapter | Check this checkbox to disable this wireless adapter. Un-check it to enable this adapter again. |
WLAN GENERAL
Configuration Guide
This chapter describes how to configure your Adapter for wireless connectivity to your Wireless Local Area Network (WLAN) and how to use the data security encryption features.
Configuration of the adapter in Windows 2000 is similar to configuration in Windows XP. This User Guide uses Windows XP for example.
After Installing the Adapter, the Adapter icon will appear in your system tray at the bottom of the screen. This icon shows the signal strength using color to indicate the strength of the received signal (RSSI).

Purple: no connection.

White: network failing.

Partially green: good signal strength.

Completely green: excellent signal strength.
WLAN GENERAL
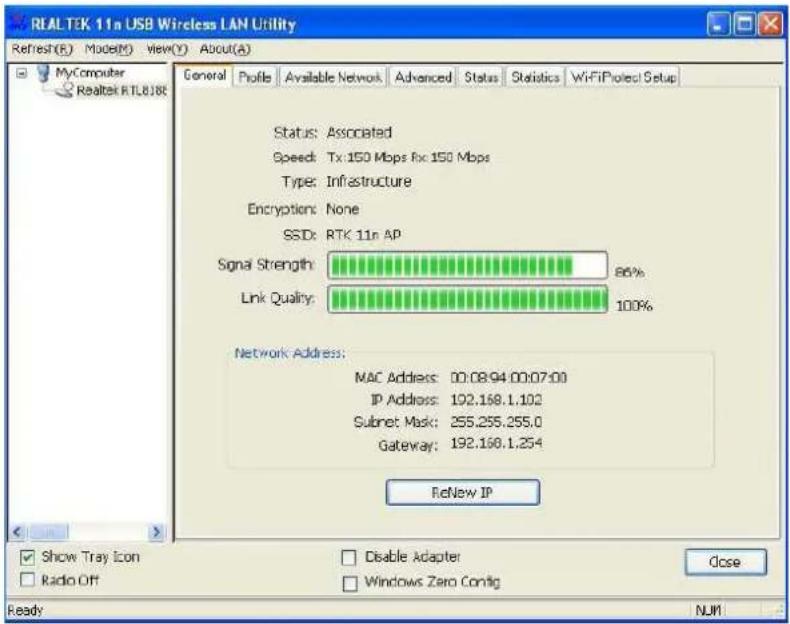
General
After starting the utility, the general page pops up This General tab provides the information of your current wireless network connection. You may click the Renew button to refresh those listed information.
text_image
REALTEK 11n USB Wireless LAN Utility Refresh(R) Mode(M) View(Y) About(A) General Profile Available Network Advanced Status Statistics WiFiProtecl Setup Status: Associated Speed: Tx: 150 Mbps Fix: 150 Mbps Type: Infrastructure Encryption: None SSDx: RTK 11n AP Signal Strength: 86% Link Quality: 100% Network Address: MAC Address: 00.08.94.00.07.00 IP Address: 192.168.1.102 Subset Mask: 255.255.255.0 Gateway: 192.168.1.254 ReNew IP Show Tray Icon Radio Off Disable Adapter Windows Zero Config Open Ready NUMStatus:
Speed:
Type:
Encryption:
SSID:
Signal Strength:
Link Quality
Network Address:
Check if the device associated to target network.
The current connection speed
Infrastructure mode or Ad-Hoc mode.
The performing encryption mode for connecting to current network profile.
The SSID (network name) of the connected wireless network.
Indicates the signal strength detected by this adapter.
Indicates the link quality of this wireless connection.
Shows the current IP addresses settings for this adapter.
WLAN GENERAL
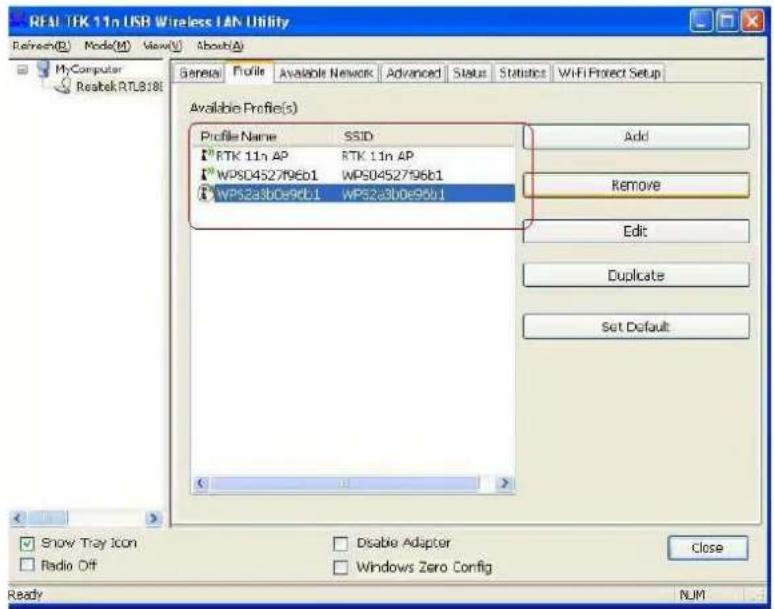
Profile
The Profile tab lists the preferred connections. You can click the buttons beside to do configure each connection.
text_image
REAL TEK 11n USB Wireless LAN Utility Refresh(E) Node(M) View(V) About(A) My Computer Realtek RTL818t General Folile Available Network Advanced Status Statistics WiFi Project Setup Available Profile(s) Profile Name SSID RTK 11n AP RTK 11n AP WPSD452796b1 WPS04S2756b1 WPS2a3b0e96b1 WPS2a3b0e96b1 Add Remove Edit Duplicate Set Default Show Tray Icon Disable Adaptor Close Radio Off Windows Zero Config Ready NJMAdd Click this button to add a connection profile for this adapter.
Remove To remove a connection profile, click this profile on the profile list and click this button to delete it.
Edit To modify the configurations for a profile, click this profile on the profile list and click this button to edit.
Duplicate To make a copy of a profile, click the profile that going to be copied, and click this button to copy it.
Set Default To select a profile as your default wireless connection, click this profile on the list and click this button. You may also double click on each profile to select it as your default wireless connection.
WLAN GENERAL
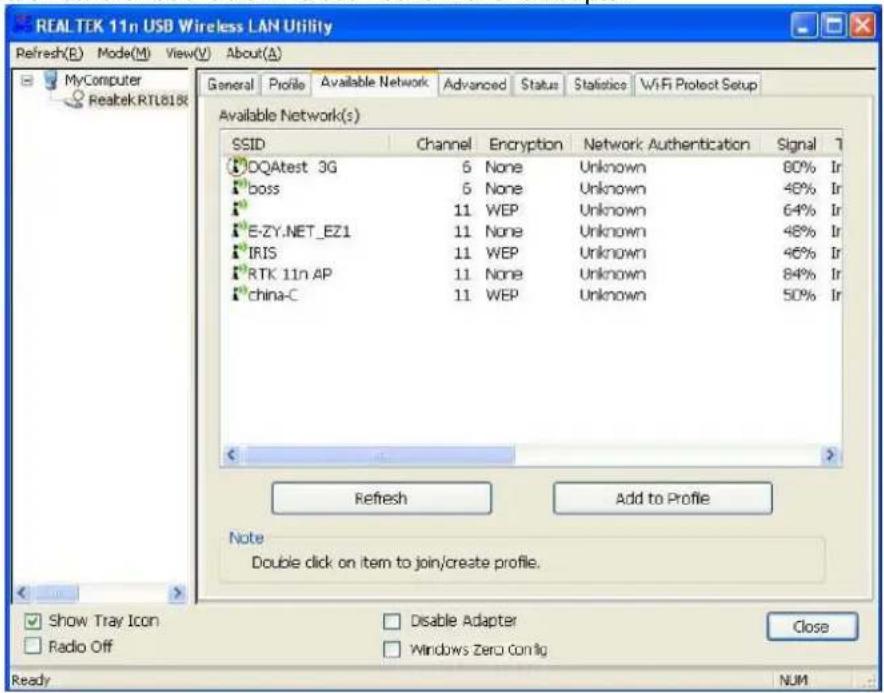
Available Network
This available tab lists the reachable wireless network of this adapter.
text_image
REALTEK 11n USB Wireless LAN Utility Refresh(B) Mode(M) View(V) About(A) MyComputer Realtek.RTL8186 General Profile Available Network Advanced Status Statistics WiFi Protect Setup Available Network(s) SSID Channel Encryption Network Authentication Signal DQAtest 3G 6 None Unknown 80% Ir boss 5 None Unknown 48% Ir 11 WEP Unknown 64% Ir E-ZY.NET_EZ1 11 None Unknown 48% Ir IRIS 11 WEP Unknown 46% Ir RTK 11n AP 11 None Unknown 84% Ir china-C 11 WEP Unknown 50% Ir Refresh Add to Profile Note Double click on item to join/create profile. Show Tray Icon Radio Off Disable Adapter Windows Zero Config Close Ready NUMRefresh Add to Profile
Click this button to rescan available networks around the adapter. To add an available Network to your profile list, select an available network and click this button to add.
WLAN GENERAL
Advanced
This Advanced tab provides advanced configurations to this adapter. Every modification in this tab will be performed after clicking the Apply button.
To restore the default settings of the advanced tab, click the Set defaults button to perform restoring.
text_image
REALTEK 11n USB Wireless LAN Utility Refresh(R) Mode(M) View(Y) About(A) General Profile Available Network Advanced Status Statistics Wi-Fi Protect Setup MyComputer Realtek RTL8188 Wireless Mode 602.11b/g Fragment Threshold 2347 256 2432 Preamble Mode Auto RTS Threshold 2346 Channel Plan FCC 0 2432 Set Defaults Apply Show Tray Icon Radio Off Disable Adapter Windows Zero Config Close Ready NUM| Power Save | |
| None | Disable Power saving function. |
| Min | Minimum power consumption |
| Max | Maximum power consumption |
| Turbo Mode | |
| OFF | Disable turbo mode |
| ON | Enable turbo mode |
| AUTO | Enable or disable turbo automatically according to the detected environment |
| Fragment Threshold | |
| The maximum size of a packet that is going to be segmented and transmitted. Select the size from 256 to 2432(default) bytes. | |
| RTS Threshold | |
| Select the RTS Threshold form 0 to 2432(default) | |
| Wireless Mode | |
| 802.11g/b | Connect to a 802.11b/g network (2.4GHz/54Mbps) |
| 802.11b | Connect to a 802.11b network (2.4GHz/11Mbps) |
| 802.11b Preamble Mode | |
| Select the preamble mode to be long, short or auto detection mode. | |
| Region Domain | |
| Select your region from the drop list. Please note that it is necessary for you to select a correct region. Selecting an incorrect region may again the applicable law. | |
WLAN GENERAL
Status
This tab shows the current connection status of this adapter.
text_image
REALTEK 11n USB Wireless LAN Utility Refresh(R) Mode(M) View(V) About(A) General Profile Available Network Advanced Status Statistics WiFi Protect Setup Manufacturer NDIS Driver Version Short Radio Header Encryption Authenticate Channel Set MAC Address Data Rate (AUTO) Channel (Frequency) Status SSID Network Type Power Save Mode Associated AP MAC Up Time (hh:mm:ss) REALTEK 1084.1.609.2009 No Disabled Open System FCC 00:08:94:00:07:00 Tx:150 Mbps Rfc:150 Mbps 11 (2462 MHz) Associated RTK 11n AP Infrastructure None 00:E0:4C:01:96:E1 0:03:32 Show Tray Icon Radio Off Disable Adapter Windows Zero Config Close Ready NUMWLAN GENERAL
Statistics
See this tab to show the transmission activity record. Clicking the "Reset" button recounts the values from zero.
text_image
REALTEK 11n USB Wireless LAN Utility Refresh(E) Mode(M) View(V) About(A) MyComputer Realtel RTL81st General Profile Available Network Advanced Status Statistic WiFi Project Setup Counter Name Value Tx OK 168 Tx Error 0 Rx OK 117 Rx Packet Count 117 Rx Retry 2 Rx ICV Error 0 Reset Show Tray Icon Disable Adapter Close Radio Off Windows Zero Config Ready NUMWLAN GENERAL
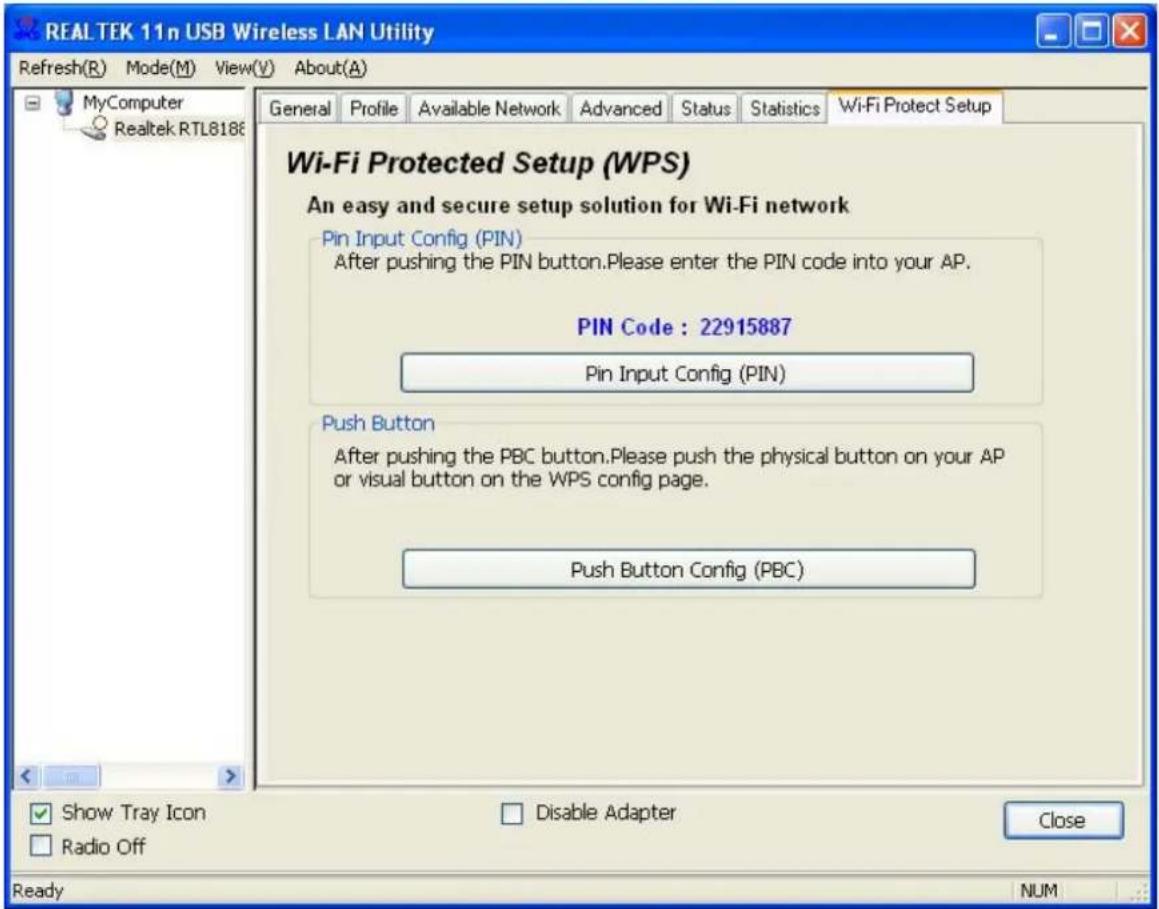
WPS - Wi-Fi Protect Setup
The main purpose of Wi-Fi Protected Setup (Wi-Fi Simple Configuration) is to simplify the security setup and management of Wi-Fi networks. This adapter supports both the PIN configuration method and PBC configuration method. If the wireless card supports Wi-Fi Protected Setup (WPS), you can set up a wireless connection between wireless card and router by using either Push Button Configuration (PBC) method or PIN method.

text_image
REALTEK 11n USB Wireless LAN Utility Refresh(R) Mode(M) View(V) About(A) General Profile Available Network Advanced Status Statistics Wi-Fi Protect Setup MyComputer Realtek RTL8186 Wi-Fi Protected Setup (WPS) An easy and secure setup solution for Wi-Fi network Pin Input Config (PIN) After pushing the PIN button.Please enter the PIN code into your AP. PIN Code : 22915887 Pin Input Config (PIN) Push Button After pushing the PBC button.Please push the physical button on your AP or visual button on the WPS config page. Push Button Config (PBC) Show Tray Icon Radio Off Disable Adapter Close Ready NUMTwo methods of configuring the QQS are shown here.
(QSS = Quick Security Settings. By selecting the wireless router and wireless card in the QSS window you can automatically set up WPA2 secure connection level without using the router or
WLAN GENERAL
network adapter management software. This avoids the use of complex interface settings and greatly simplifies the installation of the wireless security settings.)
Pin Code: 8-digit numbers. It is randomly generated from system
1. PIN method
Click the button "Pin Input Config (PIN)". The following window is then displayed.

text_image
Wi-Fi Protected Setup (WPS) Do you want to select a specific AP ? Yes NoClick the button "Yes" to select an AP.
text_image
Wi-Fi Protected Setup - Select AP WPS AP Name WPS AP MAC RTK 11n AP 00:E0:4C:81:96:B1 DQAtest 3G 00:E1:4C:81:96:53 Refresh Select CancelThis window contains the buttons "Refresh / Select / Cancel". Select an AP name, then click
WLAN GENERAL
"Select". You can then use the PIN method to configure the QSS.
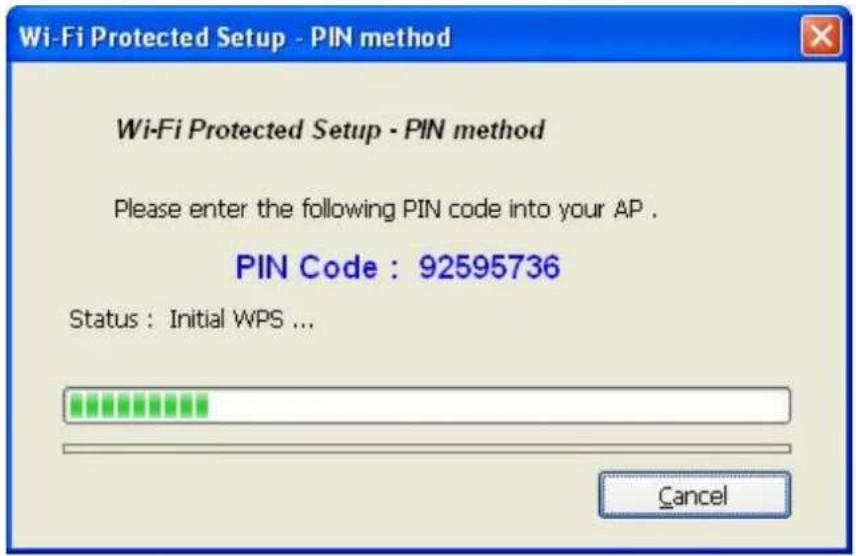
text_image
Wi-Fi Protected Setup - PIN method Wi-Fi Protected Setup - PIN method Please enter the following PIN code into your AP . PIN Code : 92595736 Status : Initial WPS ... CancelDouble click the Internet WEB browser icon on your screen. Enter the IP address of your selected router/AP into the URL and press Enter. You can then enter the configuration.
Go to the WPS (Wi-Fi) configuration page, type the PIN code of adapter and click the confirm button to set up the WPS connection.
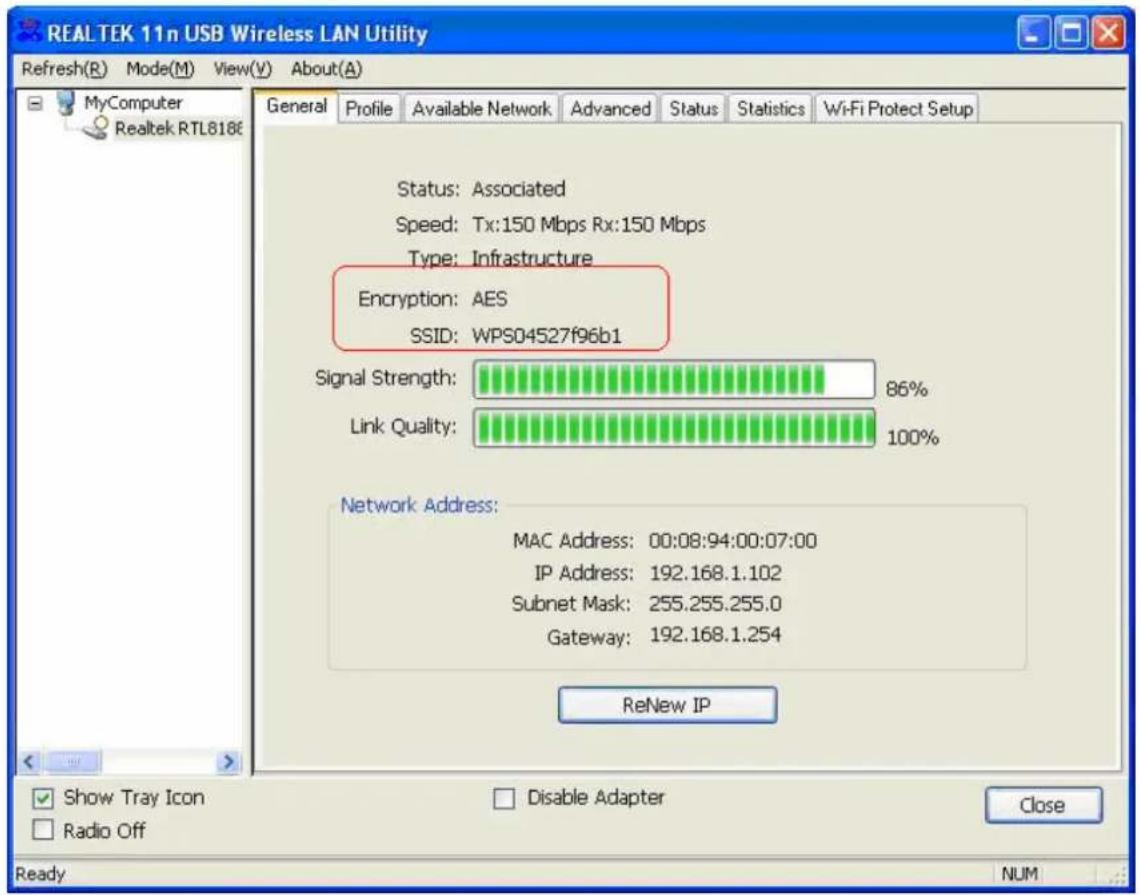
When the "General" window appears, the WPS has been configured successfully.
WLAN GENERAL
text_image
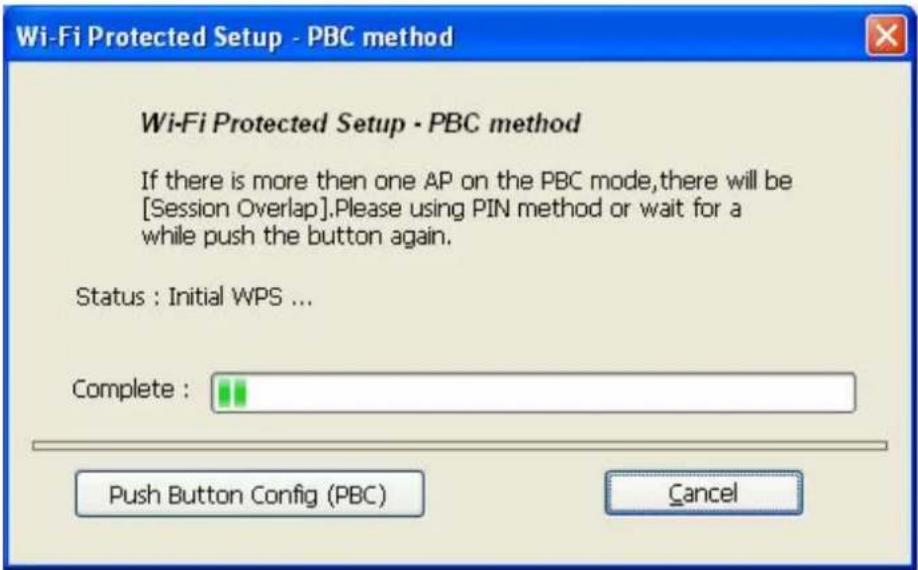
REALTEK 11n USB Wireless LAN Utility Refresh(R) Mode(M) View(V) About(A) General Profile Available Network Advanced Status Statistics Wi-Fi Protect Setup MyComputer Realtek RTL8186 Status: Associated Speed: Tx:150 Mbps Rx:150 Mbps Type: Infrastructure Encryption: AES SSID: WPS04527f96b1 Signal Strength: 86% Link Quality: 100% Network Address: MAC Address: 00:08:94:00:07:00 IP Address: 192.168.1.102 Subnet Mask: 255.255.255.0 Gateway: 192.168.1.254 ReNew IP Show Tray Icon Radio Off Ready Disable Adapter Close2. PBC (Push Button Configuration) method
After pushing the PBC button, push the physical button on your AP or the virtual button on the WPS configuration page, to call up the following window.
WLAN GENERAL
text_image
Wi-Fi Protected Setup - PBC method Wi-Fi Protected Setup - PBC method If there is more then one AP on the PBC mode,there will be [Session Overlap].Please using PIN method or wait for a while push the button again. Status : Initial WPS ... Complete : Push Button Config (PBC) CancelCall up the WPS (Wi-Fi) configuration page of your desired router/AP, and then start the PCB connection.
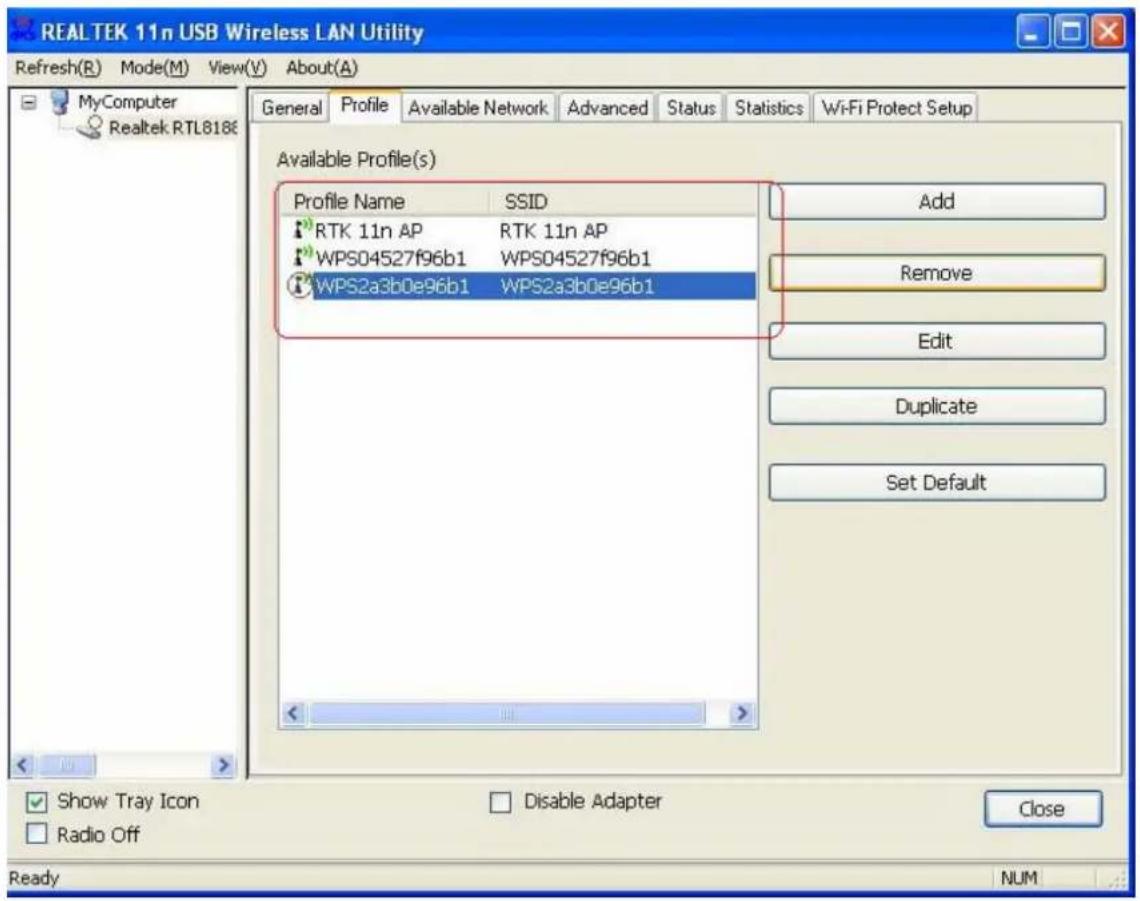
Once the WPS has been configured successfully, the available profiles are changed.
WLAN GENERAL
text_image
REALTEK 11n USB Wireless LAN Utility Refresh(R) Mode(M) View(V) About(A) MyComputer Realtek RTL8186 General Profile Available Network Advanced Status Statistics Wi-Fi Protect Setup Available Profile(s) Profile Name SSID RTK 11n AP RTK 11n AP WPS04527f96b1 WPS04527f96b1 WPS2a3b0e96b1 WPS2a3b0e96b1 Add Remove Edit Duplicate Set Default Show Tray Icon Radio Off Disable Adapter Close Ready NUM- Click the "Install" button to start installing.
WLAN GENERAL
AP mode management guide
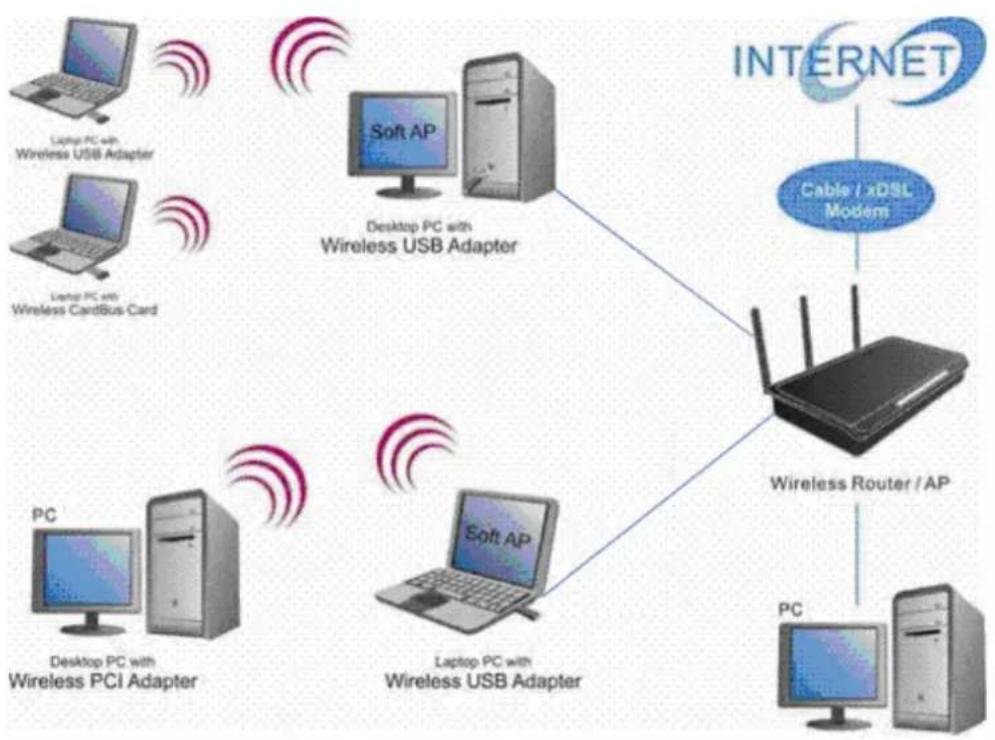
flowchart
graph TD
    A["PC"] --> B["Desktop PC with Wireless PCI Adapter"]
    B --> C["Soft AP"]
    C --> D["Desktop PC with Wireless USB Adapter"]
    D --> E["Soft AP"]
    E --> F["PC"]
    G["Laptop PC with Wireless USB Adapter"] --> H["Desktop PC with Wireless CardBus Card"]
    I["Laptop PC with Wireless USB Adapter"] --> J["Desktop PC with Wireless USB Adapter"]
    K["PC"] --> L["Soft AP"]
    M["Laptop PC with Wireless USB Adapter"] --> N["Soft AP"]
    O["PC"] --> P["Soft AP"]
    Q["PC"] --> R["Soft AP"]
    S["Internet"] --> T["Cable / xDSL Modem"]
    T --> U["Wireless Router / AP"]
General
After configuring the adapter in AP mode, this "General" page shows up, which shows the general information of this AP.

text_image
REAL TEK 11n USB Wireless LAN Utility Refresh(R) Mode(M) View(V) About(A) MyC Station General Profile Available Network Status Statistics Wi-Fi Protect Setup Access PointWLAN GENERAL
SSID:
The SSID (network name) of the wireless network constructed by this AP.
BSSID: The MAC address of this AP
Config: Click this button to change configurations to this AP
Association Table:
Shows the information of those devices that associated with this AP including their MAC addresses and the time that they connected with this device.

text_image
REAL TEK Wireless LAN Utility Refresh RT-Set Mode(M) View(V) About (A) My Computer Realtek RTL8185 54f General Advanced Statistics SoftAP SSID: user-29fea547f0_AP BSSID: 00:E0:4C:81:96:77 Association Table Config AID Mac Address Life Time 1 00:11:09:0D:DA:4F 9:22 Show Tray Icon Radio Off Disable Adapter Close Ready NUMWLAN GENERAL
Advanced
Beacon Interval: Define the interval between beacons from 20\~1000
DTIM Period: Set the DTIM period between 1\~255
Preamble Mode: Click the drop list to select the preamble to be long, short or auto
Set Defaults: Click this button to restore the settings above to default
Apply: Click this button to execute changes.
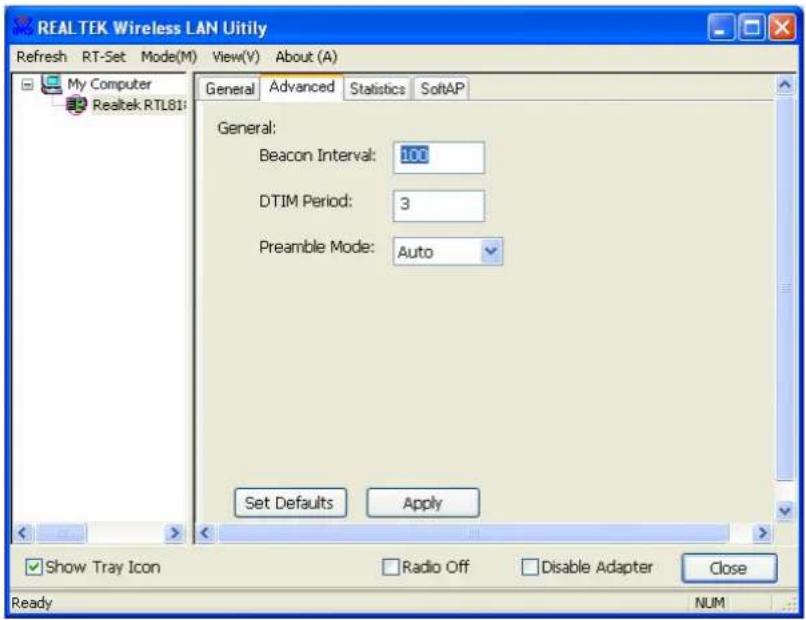
text_image
REAL TEK Wireless LAN Utility Refresh RT-Set Mode(M) View(V) About (A) My Computer Realtek RTL81: General Advanced Statistics SoftAP General: Beacon Interval: 100 DTIM Period: 3 Preamble Mode: Auto Set Defaults Apply Show Tray Icon Radio Off Disable Adapter Close Ready NUMWLAN GENERAL
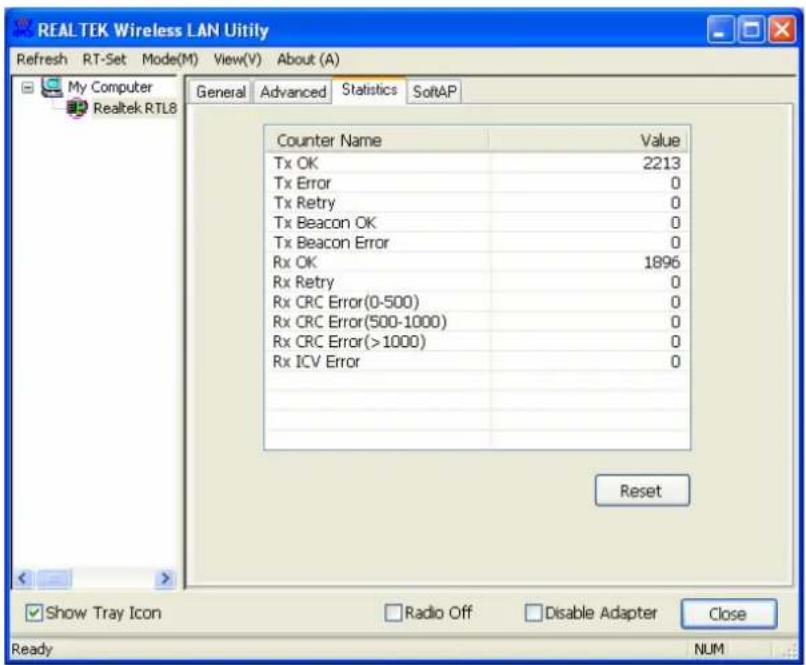
Statistics
See this tab to show the transmission activity record. Clicking the "Reset" button recounts the values from zero.
text_image
REALTEK Wireless LAN Utility Refresh RT-Set Mode(M) View(V) About (A) My Computer Realtek RTL8 General Advanced Statistics SoftAP Counter Name Value Tx OK 2213 Tx Error 0 Tx Retry 0 Tx Beacon OK 0 Tx Beacon Error 0 Rx OK 1896 Rx Retry 0 Rx CRC Error(0-500) 0 Rx CRC Error(500-1000) 0 Rx CRC Error(>1000) 0 Rx ICV Error 0 Reset Show Tray Icon Radio Off Disable Adapter Close Ready NUMWLAN GENERAL
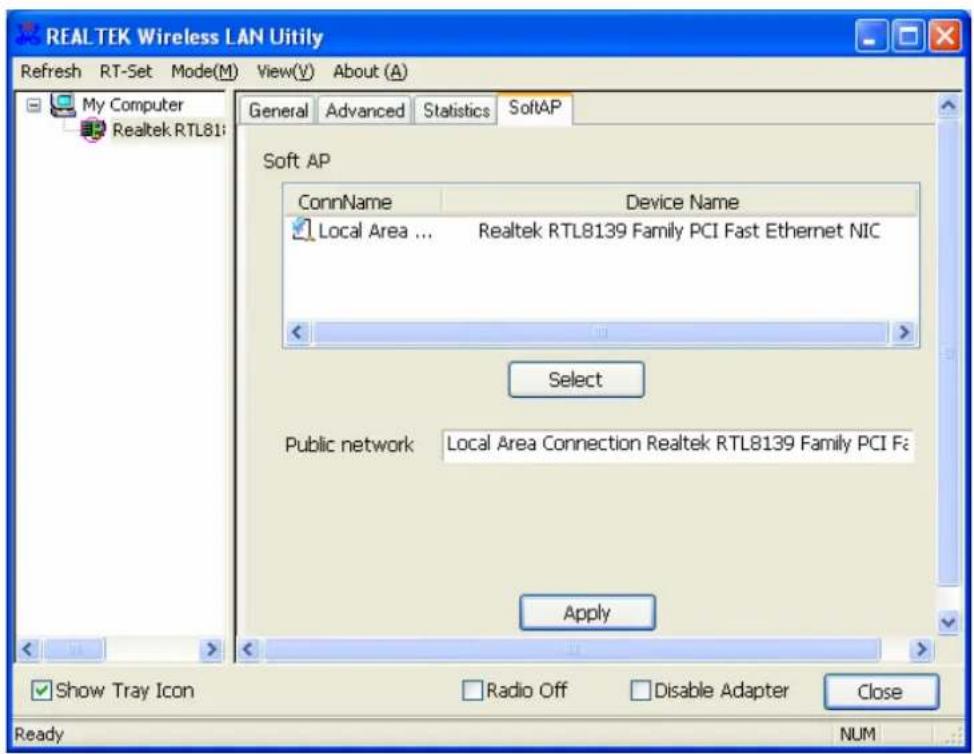
SoftAP
This page allows users to select the adapter for connect to public network.
Please click on the device that are used for connecting to public network and click the "Select" button, and then click the "Apply" button to execute.
text_image
REALTEK Wireless LAN Utiily Refresh RT-Set Mode(M) View(V) About (A) General Advanced Statistics SoftAP My Computer Realtek RTL81: Soft AP ConnName Device Name Local Area ... Realtek RTL8139 Family PCI Fast Ethernet NIC Select Public network Local Area Connection Realtek RTL8139 Family PCI Fa Apply Show Tray Icon Radio Off Disable Adapter Close Ready NUMWLAN GENERAL
PRODUCT SPECIFICATION
| Standard |
| IEEE 802.11n draft 2.0, IEEE 802.11g, IEEE 802.11b, IEEE 802.3, IEEE 802.3u |
| Interface |
| Complies with USB 2.0 |
| Security |
| 64/128-bit WPA , WPA2 |
| Receiver Sensitivity |
| 802.11n Typical -68 dBm |
| 802.11g Typical -73 dBm |
| 802.11b Typical -84 dBm |
| Channel |
| USA 11, Europe 13, Japan 14 |
| Transmit Power |
| 16 dBm typically @ 802.11b |
| 14 dBm typically @ 802.11g |
| 13 dBm typically @ 802.11n |
| Network Data Rate |
| 802.11b: 1,2,5.5 and 11 Mbps |
| 802.11g: 6,9,12,18,24,36,48 and 54 Mbps |
| 802.11n: up to 150/300 Mbps |
| Range Coverage |
| Indoor 35~100 meters |
| Outdoor 100~300 meters |
| Temperature |
| Operating: 0°C ~ 40°C (32°~104°F) |
| Storage: -10°C ~ 70°C (14°~158°F) |
| Humidity |
| Operating: 10% ~ 90% RH, non-condensing |
| Storage: 5%~90% RH, non-condensing |
| Emission |
| FCC, CE, VCCI Class B |
WLAN GENERAL
D
CE-Hinweis

text_image
NoteBook NoteBook Ad Hoc Network
text_image
NoteBook Personal ComputerHaupteigenschaften
text_image
Choose Setup Language Select the language for this installation from choices below. English OK Canceltext_image
REALTEK 11n USB Wireless LAN Driver and Utility REALTEK 11n USB Wireless LAN Driver and Utility The InstallShield Wizard will install REALTEK 11n USB Wireless LAN Driver and Utility on your computer. To continue, click Next.WLAN GENERAL
text_image
REALTEK 11n USB Wireless LAN Driver and Utility REALTEK 11n USB Wireless LAN Driver and Utility Click Install to begin the installation. If you want to review or change any of your installation settings, click Back. Click Cancel to exit the wizard. InstallShield < Back Install Cancelbar
Now searching for Hardware and installing Drivers... | Category | Value (%) | |---|---| | Current Search Engine | 50 |WLAN GENERAL
text_image
REALTEK RTL8185 Wireless LAN Driver and Utility InstallShield Wizard Complete Setup has finished installing REALTEK RTL8185 Wireless LAN Driver and Utility on your computer. < Back Finish CancelWLAN GENERAL
text_image
REALTEK 11n USB Wireless LAN Driver and Utility InstallShield Wizard Complete The InstallShield Wizard has successfully installed REALTEK 11n USB Wireless LAN Driver and Utility. Before you can use the program, you must restart your computer. Yes, I want to restart my computer now. No, I will restart my computer later. Remove any disks from their drives, and then click Finish to complete setup. < Back Finish CancelWLAN GENERAL
natural_image
Two computer devices with sound waves, no text or symbols presentAd-Hoc Mode
text_image
General Profile Available Network Advanced Status Statistics Easy Config Available Network(s) SSID Chan... Encrypt... Network Authenticati... Jeff 1 None Unknown WLAN-11b-GW 1 None Unknown default 11 None Unknown Refresh Add to Profile Note: Double click on item to join/create profile.text_image
Unsecured network You are connecting to the unsecured network " Jeff". Information sent over this network is not encrypted and might be visible to other people. OK Canceltext_image
Wireless network properties Profile Name: Jeff's Laptop Network Name(SSID): Jeff ✓ This is a computer-to-computer(ad hoc) network; wireless access points are not used. Channel 1 (2412MHz) Wireless network security This network requires a key for the following: Network Authentication: Open System Data encryption: Disabled ASCII Passphrase Key Length: 64 Bits Network key: Confirm network key: Key index (advanced): 1 OK Cancel 802.1x configure EAP TYPE : MDS Tunnel : Username : Identity : Password : Certificate :WLAN GENERAL
Infrastruktur-Modus
text_image
Unsecured network You are connecting to the unsecured network " default". Information sent over this network is not encrypted and might be visible to other people. OK CancelWLAN GENERAL
text_image
Wireless network properties Profile Name: default Network Name(SSID): default This is a computer-to-computer(ad hoc) network; wireless access points are not used. Channel 11 (2462MHz) Wireless network security This network requires a key for the following: Network Authentication: Open System Data encryption: Disabled ASCII Passphrase Key Length: 64 Bits Network key: Confirm network key: Key index (advanced): 1 OK Cancel 802.1x configure EAP TYPE : MDS Tunnel : Username : Identity : Password : Certificate :WLAN GENERAL
WPS - Wi-Fi Protect Setup
text_image
Wi-Fi Protected Setup (WPS) Do you want to select a specific AP ? Yes Notext_image
Wi-Fi Protected Setup - Select AP WPS AP Name WPS AP MAC RTK 11n AP 00:E0:4C:81:96:B1 DQAtest 3G 00:E1:4C:81:96:53 Refresh Select Canceltext_image
Wi-Fi Protected Setup - PIN method Wi-Fi Protected Setup - PIN method Please enter the following PIN code into your AP . PIN Code : 92595736 Status : Initial WPS ... CancelWLAN GENERAL
text_image
REALTEK 11n USB Wireless LAN Utility Refresh(R) Mode(M) View(V) About(A) General Profile Available Network Advanced Status Statistics Wi-Fi Protect Setup Status: Associated Speed: Tx:150 Mbps Rx:150 Mbps Type: Infrastructure Encryption: AES SSID: WPS04527f96b1 Signal Strength: 86% Link Quality: 100% Network Address: MAC Address: 00:08:94:00:07:00 IP Address: 192.168.1.102 Subnet Mask: 255.255.255.0 Gateway: 192.168.1.254 ReNew IP Show Tray Icon Radio Off Ready Disable Adapter Close NUMWLAN GENERAL
2. PBC (Push Button Configuration) Methode
text_image
REAL TEK 11n USB Wireless LAN Utility Refresh(R) Mode(M) View(V) About(A) General Profile Available Network Advanced Status Statistics Wi-Fi Protect Setup Wi-Fi Protected Setup (WPS) An easy and secure setup solution for Wi-Fi network Pin Input Config (PIN) After pushing the PIN button.Please enter the PIN code into your AP. PIN Code : 22915887 Pin Input Config (PIN) Push Button After pushing the PBC button.Please push the physical button on your AP or visual button on the WPS config page. Push Button Config (PBC) Show Tray Icon Radio Off Disable Adapter Close Ready NUMtext_image
Wi-Fi Protected Setup - PBC method Wi-Fi Protected Setup · PBC method If there is more then one AP on the PBC mode,there will be [Session Overlap].Please using PIN method or wait for a while push the button again. Status : Initial WPS ... Complete : Push Button Config (PBC) CancelWLAN GENERAL
flowchart
graph TD
    A["PC"] -->|Desktop PC with Wireless PCI Adapter| B["Soft AP"]
    A -->|Desktop PC with Wireless CardBus Card| C["Soft AP"]
    D["Laptop PC with Wireless USB Adapter"] --> E["Desktop PC with Wireless USB Adapter"]
    F["PC"] --> G["Soft AP"]
    F --> H["Soft AP"]
    I["PC"] --> J["Soft AP"]
    I --> K["Soft AP"]
    L["PC"] --> M["Soft AP"]
    L --> N["Soft AP"]
    O["Internet"] --> P["Cable / xDSL Modem"]
    P --> Q["Wireless Router / AP"]
Allgemein
text_image
REALTEK Wireless LAN Utiily Refresh RT-Set Mode(M) View(V) About (A) General Advanced Statistics SoftAP Soft AP ConnName Device Name Local Area ... Realtek RTL8139 Family PCI Fast Ethernet NIC Select Public network Local Area Connection Realtek RTL8139 Family PCI Fa Apply Show Tray Icon Radio Off Disable Adapter Close Ready NUMWLAN GENERAL
PRODUKT-
SPEZIFIKATIONEN
Standard
IEEE 802,11b, IEEE 802,11g
Schnittstelle
PCI (23415); PC-Card (23416); USB (23413)
Sicherheit
54Mbps OFDM, 10%PER, -68dBm
11Mbps CCK, 8%PER, -86dBm
1Mbps BPSK, 8%PER, -92dBm
Kanal
USA 11, Europa 13, Japan 14
text_image
NoteBook NoteBook Ad Hoc Network
text_image
NoteBook Personal Computertext_image
Choose Setup Language Select the language for this installation from choices below. English OK Canceltext_image
REALTEK 11n USB Wireless LAN Driver and Utility REALTEK 11n USB Wireless LAN Driver and Utility The InstallShield Wizard will install REALTEK 11n USB Wireless LAN Driver and Utility on your computer. To continue, click Next. < Back Next > CancelWLAN GENERAL
text_image
REALTEK 11n USB Wireless LAN Driver and Utility REALTEK 11n USB Wireless LAN Driver and Utility Click Install to begin the installation. If you want to review or change any of your installation settings, click Back. Click Cancel to exit the wizard. InstallShield < Back Install Cancelbar
Now searching for Hardware and installing Drivers... | Category | Value (%) | |---|---| | Current Search Engine | 50 |WLAN GENERAL
text_image
REALTEK RTL8185 Wireless LAN Driver and Utility InstallShield Wizard Complete Setup has finished installing REALTEK RTL8185 Wireless LAN Driver and Utility on your computer. < Back Finish CancelWLAN GENERAL
text_image
REALTEK 11n USB Wireless LAN Driver and Utility InstallShield Wizard Complete The InstallShield Wizard has successfully installed REALTEK 11n USB Wireless LAN Driver and Utility. Before you can use the program, you must restart your computer. Yes, I want to restart my computer now. No, I will restart my computer later. Remove any disks from their drives, and then click Finish to complete setup. < Back Finish CancelWLAN GENERAL
GUIDE DE GESTION
natural_image
Two computer devices with sound waves, no text or symbols presentAd-Hoc Mode
text_image
General Profile Available Network Advanced Status Statistics Easy Config Available Network(s) SSID Chan... Encrypt... Network Authenticati... Jeff 1 None Unknown WLAN-11b-GW 1 None Unknown default 11 None Unknown Refresh Add to Profile Note: Double click on item to join/create profile.WLAN GENERAL
text_image
Unsecured network You are connecting to the unsecured network " Jeff". Information sent over this network is not encrypted and might be visible to other people. OK Canceltext_image
Wireless network properties Profile Name: Jeff's Laptop Network Name(SSID): Jeff ✓ This is a computer-to-computer(ad hoc) network; wireless access points are not used. Channel 1 (2412MHz) Wireless network security This network requires a key for the following: Network Authentication: Open System Data encryption: Disabled ASCII Passphrase Key Length: 64 Bits Network key: Confirm network key: Key index (advanced): 1 OK Cancel 802.1x configure EAP TYPE : MDS Tunnel : Username : Identity : Password : Certificate :WLAN GENERAL
Mode infrastructure
text_image
Unsecured network You are connecting to the unsecured network " default". Information sent over this network is not encrypted and might be visible to other people. OK CancelWLAN GENERAL
text_image
Wireless network properties Profile Name: default Network Name(SSID): default This is a computer-to-computer(ad hoc) network; wireless access points are not used. Channel 11 (2462MHz) Wireless network security This network requires a key for the following: Network Authentication: Open System Data encryption: Disabled ASCII Passphrase Key Length: 64 Bits Network key: Confirm network key: Key index (advanced): 1 OK Cancel 802.1x configure EAP TYPE : MDS Tunnel : Username : Identity : Password : Certificate :WLAN GENERAL
Remarque :
WPS - Wi-Fi Protect Setup
text_image
Wi-Fi Protected Setup (WPS) Do you want to select a specific AP ? Yes Notext_image
Wi-Fi Protected Setup - Select AP WPS AP Name WPS AP MAC RTK 11n AP 00:E0:4C:81:96:B1 DQAtest 3G 00:E1:4C:81:96:53 Refresh Select CancelWLAN GENERAL
text_image
Wi-Fi Protected Setup - PIN method Wi-Fi Protected Setup - PIN method Please enter the following PIN code into your AP . PIN Code : 92595736 Status : Initial WPS ... Canceltext_image
REALTEK 11n USB Wireless LAN Utility Refresh(R) Mode(M) View(V) About(A) General Profile Available Network Advanced Status Statistics Wi-Fi Protect Setup MyComputer Realtek RTL8186 Status: Associated Speed: Tx:150 Mbps Rx:150 Mbps Type: Infrastructure Encryption: AES SSID: WPS04527f96b1 Signal Strength: 86% Link Quality: 100% Network Address: MAC Address: 00:08:94:00:07:00 IP Address: 192.168.1.102 Subnet Mask: 255.255.255.0 Gateway: 192.168.1.254 ReNew IP Show Tray Icon Radio Off Ready Disable Adapter Close NUMWLAN GENERAL
2. Méthode PBC (Push Button Configuration)
text_image
Wi-Fi Protected Setup - PBC method Wi-Fi Protected Setup - PBC method If there is more then one AP on the PBC mode,there will be [Session Overlap].Please using PIN method or wait for a while push the button again. Status : Initial WPS ... Complete : Push Button Config (PBC) CancelWLAN GENERAL
flowchart
graph TD
    A["PC"] -->|Desktop PC with Wireless PCI Adapter| B["Soft AP"]
    C["Laptop PC with Wireless CardBus Card"] -->|Laptop PC with Wireless USB Adapter| D["Soft AP"]
    E["PC"] -->|Desktop PC with Wireless PCI Adapter| F["Soft AP"]
    G["Laptop PC with Wireless USB Adapter"] -->|Desktop PC with Wireless PCI Adapter| H["Soft AP"]
    I["PC"] -->|Desktop PC with Wireless PCI Adapter| J["Soft AP"]
    K["Internet"] --> L["Cable / xDSL Modem"]
    L --> M["Wireless Router / AP"]
    M --> N["PC"]
    M --> O["Internet"]
General
text_image
REALTEK Wireless LAN Utiily Refresh RT-Set Mode(M) View(V) About (A) General Advanced Statistics SoftAP My Computer Realtek RTL81: Soft AP ConnName Device Name Local Area ... Realtek RTL8139 Family PCI Fast Ethernet NIC Select Public network Local Area Connection Realtek RTL8139 Family PCI Fa Apply Show Tray Icon Radio Off Disable Adapter Close Ready NUMWLAN GENERAL
CARACTERISTIQUES DU PRO-
DUIT
Standard
IEEE 802.11b, IEEE 802.11g
Interface
PCI (23415); PC-Card (23416); USB (23413)
Sécurité
54Mbps OFDM, 10%PER, -68dBm
11Mbps CCK, 8%PER, -86dBm
1Mbps BPSK, 8%PER, -92dBm
Canal
USA 11, Europe 13, Japan 14
Débit
802.11g: 6, 9, 12, 18, 24, 36, 48, et 54Mbps
Puissance de transmission
16dBm\~18dBm
Zone couverte
text_image
NoteBook NoteBook Ad Hoc Network
text_image
NoteBook Personal Computertext_image
Choose Setup Language Select the language for this installation from choices below. English OK Canceltext_image
REALTEK 11n USB Wireless LAN Driver and Utility REALTEK 11n USB Wireless LAN Driver and Utility The InstallShield Wizard will install REALTEK 11n USB Wireless LAN Driver and Utility on your computer. To continue, click Next.WLAN GENERAL
text_image
REALTEK 11n USB Wireless LAN Driver and Utility REALTEK 11n USB Wireless LAN Driver and Utility Click Install to begin the installation. If you want to review or change any of your installation settings, click Back. Click Cancel to exit the wizard. InstallShield < Back Install Cancelbar
Now searching for Hardware and installing Drivers... | Category | Value (%) | |---|---| | Current Searching for Hardware and installing Drivers... | 50 |WLAN GENERAL
text_image
REALTEK RTL8185 Wireless LAN Driver and Utility InstallShield Wizard Complete Setup has finished installing REALTEK RTL8185 Wireless LAN Driver and Utility on your computer. < Back Finish CancelWLAN GENERAL
text_image
REALTEK 11n USB Wireless LAN Driver and Utility InstallShield Wizard Complete The InstallShield Wizard has successfully installed REALTEK 11n USB Wireless LAN Driver and Utility. Before you can use the program, you must restart your computer. Yes, I want to restart my computer now. No, I will restart my computer later. Remove any disks from their drives, and then click Finish to complete setup. < Back Finish CancelWLAN GENERAL
GUÍA DE GESTIÓN
natural_image
Two computer devices with sound waves, no text or symbols presentAd-Hoc Mode
text_image
General Profile Available Network Advanced Status Statistics Easy Config Available Network(s) SSID Chan... Encrypt... Network Authenticati... Jeff 1 None Unknown WLAN-11b-GW 1 None Unknown default 11 None Unknown Refresh Add to Profile Note: Double click on item to join/create profile.text_image
Unsecured network You are connecting to the unsecured network " Jeff". Information sent over this network is not encrypted and might be visible to other people. OK CancelWLAN GENERAL
text_image
Wireless network properties Profile Name: Jeff's Laptop Network Name(SSID): Jeff ✓ This is a computer-to-computer(ad hoc) network; wireless access points are not used. Channel 1 (2412MHz) Wireless network security This network requires a key for the following: Network Authentication: Open System Data encryption: Disabled ASCII Passphrase Key Length: 64 Bits Network key: Confirm network key: Key index (advanced): 1 OK Cancel 802.1x configure EAP TYPE : MDS Tunnel : Username : Identity : Password : Certificate :WLAN GENERAL
Modo Infraestructura
text_image
Unsecured network You are connecting to the unsecured network " default". Information sent over this network is not encrypted and might be visible to other people. OK Canceltext_image
Wireless network properties Profile Name: default Network Name(SSID): default This is a computer-to-computer(ad hoc) network; wireless access points are not used. Channel 11 (2462MHz) Wireless network security This network requires a key for the following: Network Authentication: Open System Data encryption: Disabled ASCII Passphrase Key Length: 64 Bits Network key: Confirm network key: Key index (advanced): 1 OK Cancel 802.1x configure EAP TYPE: MDS Tunnel : Username : Identity : Password : Certificate :WLAN GENERAL
Nota:
text_image
Wi-Fi Protected Setup (WPS) Do you want to select a specific AP ? Yes Notext_image
Wi-Fi Protected Setup - Select AP WPS AP Name WPS AP MAC RTK 11n AP 00:E0:4C:81:96:B1 DQAtest 3G 00:E1:4C:81:96:53 Refresh Select CancelWLAN GENERAL
text_image
Wi-Fi Protected Setup - PIN method Wi-Fi Protected Setup - PIN method Please enter the following PIN code into your AP . PIN Code : 92595736 Status : Initial WPS ... Canceltext_image
REAL TEK 11n USB Wireless LAN Utility Refresh(R) Mode(M) View(V) About(A) MyComputer Realtek RTL8186 General Profile Available Network Advanced Status Statistics Wi-Fi Protect Setup Status: Associated Speed: Tx:150 Mbps Rx:150 Mbps Type: Infrastructure Encryption: AES SSID: WPS04527f96b1 Signal Strength: 86% Link Quality: 100% Network Address: MAC Address: 00:08:94:00:07:00 IP Address: 192.168.1.102 Subnet Mask: 255.255.255.0 Gateway: 192.168.1.254 ReNew IP Show Tray Icon Radio Off Ready Disable Adapter Close NUMWLAN GENERAL
text_image
Wi-Fi Protected Setup - PBC method If there is more then one AP on the PBC mode, there will be [Session Overlap].Please using PIN method or wait for a while push the button again. Status : Initial WPS ... Complete : Push Button Config (PBC) CancelWLAN GENERAL
flowchart
graph TD
    A["PC"] --> B["Desktop PC with Wireless PCI Adapter"]
    B --> C["Soft AP"]
    C --> D["Desktop PC with Wireless USB Adapter"]
    D --> E["Soft AP"]
    E --> F["PC"]
    G["Laptop PC with Wireless CardBus Card"] --> H["Desktop PC with Wireless USB Adapter"]
    I["Laptop PC with Wireless USB Adapter"] --> J["Soft AP"]
    K["PC"] --> L["Desktop PC with Wireless PCI Adapter"]
    M["PC"] --> N["Soft AP"]
    O["PC"] --> P["Soft AP"]
    Q["PC"] --> R["Soft AP"]
    S["Internet"] --> T["Cable / xDSL Modem"]
    T --> U["Wireless Router / AP"]
    U --> V["PC"]
text_image
REALTEK Wireless LAN Utility Refresh RT-Set Mode(M) View(V) About (A) General Advanced Statistics SoftAP My Computer Realtek RTL8139 Soft AP ConnName Device Name Local Area ... Realtek RTL8139 Family PCI Fast Ethernet NIC Select Public network Local Area Connection Realtek RTL8139 Family PCI Fa Apply Show Tray Icon Radio Off Disable Adapter Close Ready NUMWLAN GENERAL
ESPECIFICACIÓN DEL
PRODUCTO
Norma
IEEE 802.11b, IEEE 802.11g
Interfaz
PCI (23415); PC-Card (23416); USB (23413)
Seguridad
WEP 64/128 bit, WPA (TKIP con IEEE 802.1x), AES
54 Mbps OFDM, 10% PER, -68dBm
11 Mbps CCK, 8% PER, -86dBm
11 Mbps BPSK, 8%PER, -92dBm
Canal
text_image
NoteBook NoteBook Ad Hoc Network
text_image
NoteBook Personal Computertext_image
Choose Setup Language Select the language for this installation from choices below. English OK Canceltext_image
REALTEK 11n USB Wireless LAN Driver and Utility REALTEK 11n USB Wireless LAN Driver and Utility The InstallShield Wizard will install REALTEK 11n USB Wireless LAN Driver and Utility on your computer. To continue, click Next. < Back Next > CancelWLAN GENERAL
text_image
REALTEK 11n USB Wireless LAN Driver and Utility REALTEK 11n USB Wireless LAN Driver and Utility Click Install to begin the installation. If you want to review or change any of your installation settings, click Back. Click Cancel to exit the wizard. InstallShield < Back Install Cancelbar
Now searching for Hardware and installing Drivers... | Category | Value (%) | |---|---| | Current Search Engine | 50 |WLAN GENERAL
text_image
REALTEK RTL8185 Wireless LAN Driver and Utility InstallShield Wizard Complete Setup has finished installing REALTEK RTL8185 Wireless LAN Driver and Utility on your computer. < Back Finish CancelWLAN GENERAL
text_image
REALTEK 11n USB Wireless LAN Driver and Utility InstallShield Wizard Complete The InstallShield Wizard has successfully installed REALTEK 11n USB Wireless LAN Driver and Utility. Before you can use the program, you must restart your computer. Yes, I want to restart my computer now. No, I will restart my computer later. Remove any disks from their drives, and then click Finish to complete setup. < Back Finish CancelWLAN GENERAL
UTILIZZO DELL'APPARECCHIO
natural_image
Two computer devices with sound waves, no text or symbols presentAd-Hoc Mode
text_image
General Profile Available Network Advanced Status Statistics Easy Config Available Network(s) SSID Chan... Encrypt... Network Authenticati... Jeff 1 None Unknown WLAN-11b-GW 1 None Unknown default 11 None Unknown Refresh Add to Profile Note: Double click on item to join/create profile.text_image
Unsecured network You are connecting to the unsecured network " Jeff". Information sent over this network is not encrypted and might be visible to other people. OK CancelWLAN GENERAL
text_image
Wireless network properties Profile Name: Jeff's Laptop Network Name(SSID): Jeff ✓ This is a computer-to-computer(ad hoc) network; wireless access points are not used. Channel 1 (2412MHz) Wireless network security This network requires a key for the following: Network Authentication: Open System Data encryption: Disabled ASCII Passphrase Key Length: 64 Bits Network key: Confirm network key: Key index (advanced): 1 OK Cancel 802.1x configure EAP TYPE : MDS Tunnel : Username : Identity : Password : Certificate :WLAN GENERAL
text_image
Unsecured network You are connecting to the unsecured network " default". Information sent over this network is not encrypted and might be visible to other people. OK CancelWLAN GENERAL
text_image
Wireless network properties Profile Name: default Network Name(SSID): default This is a computer-to-computer(ad hoc) network; wireless access points are not used. Channel 11 (2462MHz) Wireless network security This network requires a key for the following: Network Authentication: Open System Data encryption: Disabled ASCII Passphrase Key Lengths: 64 Bits Network key: Confirm network key: Key index (advanced): 1 OK Cancel 802.1x configure EAP TYPE : MDS Tunnel : Username : Identity : Password : Certificate :Nota:
text_image
Wi-Fi Protected Setup (WPS) Do you want to select a specific AP ? Yes Notext_image
Wi-Fi Protected Setup - Select AP WPS AP Name WPS AP MAC RTK 11n AP 00:E0:4C:81:96:B1 DQAtest 3G 00:E1:4C:81:96:53 Refresh Select Canceltext_image
Wi-Fi Protected Setup - PIN method Wi-Fi Protected Setup - PIN method Please enter the following PIN code into your AP . PIN Code : 92595736 Status : Initial WPS ... Canceltext_image
REALTEK 11n USB Wireless LAN Utility Refresh(R) Mode(M) View(V) About(A) MyComputer Realtek RTL818E General Profile Available Network Advanced Status Statistics Wi-Fi Protect Setup Status: Associated Speed: Tx:150 Mbps Rx:150 Mbps Type: Infrastructure Encryption: AES SSID: WPS04527f96b1 Signal Strength: 86% Link Quality: 100% Network Address: MAC Address: 00:08:94:00:07:00 IP Address: 192.168.1.102 Subnet Mask: 255.255.255.0 Gateway: 192.168.1.254 ReNew IP Show Tray Icon Radio Off Ready Disable Adapter Close NUM2. Sistema PBC (Push Button Configuration - configurazione a pulsante)
text_image
Wi-Fi Protected Setup - PBC method Wi-Fi Protected Setup - PBC method If there is more then one AP on the PBC mode,there will be [Session Overlap].Please using PIN method or wait for a while push the button again. Status : Initial WPS ... Complete : Push Button Config (PBC) Canceltext_image
REALTEK Wireless LAN Utiily Refresh RT-Set Mode(M) View(V) About (A) My Computer Realtek RTL81: General Advanced Statistics SoftAP Soft AP ConnName Device Name Local Area ... Realtek RTL8139 Family PCI Fast Ethernet NIC Select Public network Local Area Connection Realtek RTL8139 Family PCI Fa Apply Show Tray Icon Radio Off Disable Adapter Close Ready NUMWLAN GENERAL
DATI TECNICI
Standard
IEEE 802.11b, IEEE 802.11g
Interfaccia
PCI (23415); PC-Card (23416); USB (23413)
Sicurezza
64/128-bit WEP, WPA (TKIP con IEEE 802.1x), AES
54Mbps OFDM, 10%PER, -68dBm
11Mbps CCK, 8%PER, -86dBm
1Mbps BPSK, 8%PER, -92dBm
Canale
802.11g: 6, 9, 12, 18, 24, 36, 48, e 54Mbps
text_image
NoteBook NoteBook Ad Hoc Network
text_image
NoteBook Personal ComputerEssentiële features
text_image
Choose Setup Language Select the language for this installation from choices below. English OK Canceltext_image
REALTEK 11n USB Wireless LAN Driver and Utility REALTEK 11n USB Wireless LAN Driver and Utility The InstallShield Wizard will install REALTEK 11n USB Wireless LAN Driver and Utility on your computer. To continue, click Next.text_image
REALTEK 11n USB Wireless LAN Driver and Utility REALTEK 11n USB Wireless LAN Driver and Utility Click Install to begin the installation. If you want to review or change any of your installation settings, click Back. Click Cancel to exit the wizard. InstallShield < Back Install Cancelbar
Now searching for Hardware and installing Drivers... | Category | Value (%) | |---|---| | Current Searching for Hardware and installing Drivers... | 50 |text_image
REALTEK RTL8185 Wireless LAN Driver and Utility InstallShield Wizard Complete Setup has finished installing REALTEK RTL8185 Wireless LAN Driver and Utility on your computer. < Back Finish Canceltext_image
REALTEK 11n USB Wireless LAN Driver and Utility InstallShield Wizard Complete The InstallShield Wizard has successfully installed REALTEK 11n USB Wireless LAN Driver and Utility. Before you can use the program, you must restart your computer. Yes, I want to restart my computer now. No, I will restart my computer later. Remove any disks from their drives, and then click Finish to complete setup. < Back Finish CancelWLAN GENERAL
MANAGEMENTHANDLEIDING
natural_image
Two computer monitors with sound waves, no text or symbols presentAd-Hoc Mode
text_image
General Profile Available Network Advanced Status Statistics Easy Config Available Network(s) SSID Chan... Encrypt... Network Authenticati... Jeff 1 None Unknown WLAN-11b-GW 1 None Unknown default 11 None Unknown Refresh Add to Profile Note: Double click on item to join/create profile.text_image
Unsecured network You are connecting to the unsecured network " Jeff". Information sent over this network is not encrypted and might be visible to other people. OK Canceltext_image
Wireless network properties Profile Name: Jeff's Laptop Network Name(SSID): Jeff ✓ This is a computer-to-computer(ad hoc) network; wireless access points are not used. Channel 1 (2412MHz) Wireless network security This network requires a key for the following: Network Authentication: Open System Data encryption: Disabled ASCII Passphrase Key Length: 64 Bits Network key: Confirm network key: Key index (advanced): 1 OK Cancel 802.1x configure EAP TYPE : MDS Tunnel : Username : Identity : Password : Certificate :Infrastructuurmodus
text_image
Unsecured network You are connecting to the unsecured network " default". Information sent over this network is not encrypted and might be visible to other people. OK Canceltext_image
Wireless network properties Profile Name: default Network Name(SSID): default This is a computer-to-computer(ad hoc) network; wireless access points are not used. Channel 11 (2462MHz) Wireless network security This network requires a key for the following: Network Authentication: Open System Data encryption: Disabled ASCII Passphrase Key Length: 64 Bits Network key: Confirm network key: Key index (advanced): 1 OK Cancel 802.1x configure EAP TYPE : MDS Tunnel : Username : Identity : Password : Certificate :WLAN GENERAL
Let op:
text_image
Wi-Fi Protected Setup (WPS) Do you want to select a specific AP ? Yes Notext_image
Wi-Fi Protected Setup - Select AP WPS AP Name WPS AP MAC RTK 11n AP 00:E0:4C:81:96:B1 DQAtest 3G 00:E1:4C:81:96:53 Refresh Select CancelWLAN GENERAL
text_image
Wi-Fi Protected Setup - PIN method Wi-Fi Protected Setup - PIN method Please enter the following PIN code into your AP . PIN Code : 92595736 Status : Initial WPS ... Canceltext_image
REALTEK 11n USB Wireless LAN Utility Refresh(R) Mode(M) View(V) About(A) MyComputer Realtek RTL818E General Profile Available Network Advanced Status Statistics Wi-Fi Protect Setup Status: Associated Speed: Tx:150 Mbps Rx:150 Mbps Type: Infrastructure Encryption: AES SSID: WPS04527f96b1 Signal Strength: 86% Link Quality: 100% Network Address: MAC Address: 00:08:94:00:07:00 IP Address: 192.168.1.102 Subnet Mask: 255.255.255.0 Gateway: 192.168.1.254 ReNew IP Show Tray Icon Radio Off Ready Disable Adapter Close NUM2. PBC (Push Button Configuration: drukknopconfiguratie) methode
text_image
Wi-Fi Protected Setup - PBC method Wi-Fi Protected Setup - PBC method If there is more then one AP on the PBC mode,there will be [Session Overlap].Please using PIN method or wait for a while push the button again. Status : Initial WPS ... Complete : Push Button Config (PBC) Cancelflowchart
graph TD
    A["PC"] --> B["Desktop PC with Wireless PCI Adapter"]
    A --> C["Soft PC with Wireless USB Adapter"]
    D["Laptop PC with Wireless CardBus Card"] --> E["Desktop PC with Wireless USB Adapter"]
    F["Laptop PC with Wireless USB Adapter"] --> G["Soft AP"]
    H["PC"] --> I["Desktop PC with Wireless PCI Adapter"]
    H --> J["Soft AP"]
    K["PC"] --> L["Desktop PC with Wireless USB Adapter"]
    K --> M["Soft AP"]
    N["Internet"] --> O["Cable / xDSL Modem"]
    O --> P["Wireless Router / AP"]
    P --> Q["PC"]
    style P fill:#f9f,stroke:#333
Algemeen
text_image
REALTEK Wireless LAN Utiily Refresh RT-Set Mode(M) View(V) About (A) General Advanced Statistics SoftAP My Computer Realtek RTL81: Soft AP ConnName Device Name Local Area ... Realtek RTL8139 Family PCI Fast Ethernet NIC Select Public network Local Area Connection Realtek RTL8139 Family PCI Fa Apply Show Tray Icon Radio Off Disable Adapter Close Ready NUMWLAN GENERAL
PRODUCTSPECIFICATIE
Standaard
IEEE 802.11b, IEEE 802.11g
Interface
PCI (23415); PC-Card (23416); USB (23413)
Beveiliging
Receivergevoeligheid
54Mbps OFDM, 10%PER, -68dBm
11Mbps CCK, 8%PER, -86dBm
1Mbps BPSK, 8%PER, -92dBm
Kanaal
USA 11, Europa 13, Japan 14
Gegevenssnelheid
802.11b: 1, 2, 5.5 en 11Mbps
802.11g: 6, 9, 12, 18, 24, 36, 48, en 54Mbps
Transsievermogen
16dBm\~18dBm
Bereik
Indoor 35\~100 meter
Outdoor 100\~300 meter
LED indicator
Link (groen)
Bedrijfstemperatuur
0-40°C (32-104°F)
Bedrijfsvochtigheid
10% \~ 90% (niet condenserend)
Emissie
text_image
NoteBook NoteBook Ad Hoc Network
text_image
NoteBook Personal Computertext_image
Choose Setup Language Select the language for this installation from choices below. English OK Canceltext_image
REALTEK 11n USB Wireless LAN Driver and Utility REALTEK 11n USB Wireless LAN Driver and Utility The InstallShield Wizard will install REALTEK 11n USB Wireless LAN Driver and Utility on your computer. To continue, click Next. < Back Next > CancelWLAN GENERAL
text_image
REALTEK 11n USB Wireless LAN Driver and Utility REALTEK 11n USB Wireless LAN Driver and Utility Click Install to begin the installation. If you want to review or change any of your installation settings, click Back. Click Cancel to exit the wizard. InstallShield < Back Install Cancelbar
Now searching for Hardware and installing Drivers... | Category | Value (%) | |---|---| | Current Search Engine | 50 |WLAN GENERAL
text_image
REALTEK RTL8185 Wireless LAN Driver and Utility InstallShield Wizard Complete Setup has finished installing REALTEK RTL8185 Wireless LAN Driver and Utility on your computer. < Back Finish CancelWLAN GENERAL
text_image
REALTEK 11n USB Wireless LAN Driver and Utility InstallShield Wizard Complete The InstallShield Wizard has successfully installed REALTEK 11n USB Wireless LAN Driver and Utility. Before you can use the program, you must restart your computer. Yes, I want to restart my computer now. No, I will restart my computer later. Remove any disks from their drives, and then click Finish to complete setup. < Back Finish CancelWLAN GENERAL
MANUAL DE GESTÃO
natural_image
Two computer devices with sound waves, no text or symbols presentAd-Hoc Mode
Utilizar este adaptador no modo Ad-Hoc
text_image
General Profile Available Network Advanced Status Statistics Easy Config Available Network(s) SSID Chan... Encrypt... Network Authenticati... Jeff 1 None Unknown WLAN-11b-GW 1 None Unknown default 11 None Unknown Refresh Add to Profile Note: Double click on item to join/create profile.text_image
Unsecured network You are connecting to the unsecured network " Jeff". Information sent over this network is not encrypted and might be visible to other people. OK Cancel- Clique em OK para adicionar esta rede à lista de perfis.
text_image
Wireless network properties Profile Name: Jeff's Laptop Network Name(SSID): Jeff ✓ This is a computer-to-computer(ad hoc) network; wireless access points are not used. Channel 1 (2412MHz) Wireless network security This network requires a key for the following: Network Authentication: Open System Data encryption: Disabled ASCII Passphrase Key Length: 64 Bits Network key: Confirm network key: Key index (advanced): 1 OK Cancel 802.1x configure EAP TYPE : MD5 Tunnel : Username : Identity : Password : Certificate :text_image
Unsecured network You are connecting to the unsecured network " default". Information sent over this network is not encrypted and might be visible to other people. OK Cancel- Clique em OK para adicionar esta rede à lista de perfis.
text_image
Wireless network properties Profile Name: default Network Name(SSID): default This is a computer-to-computer(ad hoc) network; wireless access points are not used. Channel 11 (2462MHz) Wireless network security This network requires a key for the following: Network Authentication: Open System Data encryption: Disabled ASCII Passphrase Key Length: 64 Bits Network key: Confirm network key: Key index (advanced): 1 OK Cancel 802.1x configure EAP TYPE: MDS Tunnel: Username: Identity: Password: Certificate :WLAN GENERAL
Nota:
WPS - Wi-Fi Protect Setup
text_image
Wi-Fi Protected Setup (WPS) Do you want to select a specific AP ? Yes Notext_image
Wi-Fi Protected Setup - Select AP WPS AP Name WPS AP MAC RTK 11n AP 00:E0:4C:81:96:B1 DQAtest 3G 00:E1:4C:81:96:53 Refresh Select Canceltext_image
Wi-Fi Protected Setup - PIN method Wi-Fi Protected Setup - PIN method Please enter the following PIN code into your AP . PIN Code : 92595736 Status : Initial WPS ... Canceltext_image
REALTEK 11n USB Wireless LAN Utility Refresh(R) Mode(M) View(V) About(A) MyComputer Realtek RTL818E General Profile Available Network Advanced Status Statistics Wi-Fi Protect Setup Status: Associated Speed: Tx:150 Mbps Rx:150 Mbps Type: Infrastructure Encryption: AES SSID: WPS04527f96b1 Signal Strength: 86% Link Quality: 100% Network Address: MAC Address: 00:08:94:00:07:00 IP Address: 192.168.1.102 Subnet Mask: 255.255.255.0 Gateway: 192.168.1.254 ReNew IP Show Tray Icon Radio Off Ready Disable Adapter Close NUM2. Método PBC (Push Button Configuration)
text_image
Wi-Fi Protected Setup - PBC method Wi-Fi Protected Setup - PBC method If there is more then one AP on the PBC mode, there will be [Session Overlap].Please using PIN method or wait for a while push the button again. Status : Initial WPS ... Complete : Push Button Config (PBC) Cancelflowchart
graph TD
    A["PC"] --> B["Desktop PC with Wireless PCI Adapter"]
    B --> C["Soft AP"]
    C --> D["Desktop PC with Wireless USB Adapter"]
    D --> E["Soft AP"]
    E --> F["PC"]
    G["Laptop PC with Wireless CardBus Card"] --> H["Desktop PC with Wireless USB Adapter"]
    I["Laptop PC with Wireless USB Adapter"] --> J["Soft AP"]
    K["PC"] --> L["Desktop PC with Wireless PCI Adapter"]
    M["PC"] --> N["Soft AP"]
    O["PC"] --> P["Soft AP"]
    Q["PC"] --> R["Soft AP"]
    S["Internet"] --> T["Cable / xDSL Modem"]
    T --> U["Wireless Router / AP"]
    U --> V["Soft AP"]
    V --> W["Desktop PC with Wireless USB Adapter"]
    X["Soft AP"] --> Y["Desktop PC with Wireless USB Adapter"]
Generalidades
text_image
REALTEK Wireless LAN Utility Refresh RT-Set Mode(M) View(V) About (A) General Advanced Statistics SoftAP My Computer Realtek RTL8139 Soft AP ConnName Device Name Local Area ... Realtek RTL8139 Family PCI Fast Ethernet NIC Select Public network Local Area Connection Realtek RTL8139 Family PCI Fa Apply Show Tray Icon Radio Off Disable Adapter Close Ready NUMWLAN GENERAL
ESPECIFICAÇÕES DO
PRODUTO
Norma
IEEE 802.11b, IEEE 802.11g
Interface
PCI (23415); PC-Card (23416); USB (23413)
Segurança
64/128-bit WEP, WPA (TKIP com IEEE 802.1x), AES
54Mbps OFDM, 10%PER, -68dBm
11Mbps CCK, 8%PER, -86dBm
1Mbps BPSK, 8%PER, -92dBm
Canal
802.11g: 6, 9, 12, 18, 24, 36, 48, e 54Mbps
text_image
NoteBook NoteBook Ad Hoc Network
natural_image
Illustration of a laptop with a probe and Wi-Fi signal icon, labeled 'NoteBook' below (no other text or symbols)
natural_image
Illustration of a personal computer with a monitor, tower, and antenna emitting signal waves (no text or symbols)text_image
Choose Setup Language Select the language for this installation from choices below. English OK Canceltext_image
REALTEK 11n USB Wireless LAN Driver and Utility REALTEK 11n USB Wireless LAN Driver and Utility The InstallShield Wizard will install REALTEK 11n USB Wireless LAN Driver and Utility on your computer. To continue, click Next. < Back Next > CancelWLAN GENERAL
text_image
REALTEK 11n USB Wireless LAN Driver and Utility REALTEK 11n USB Wireless LAN Driver and Utility Click Install to begin the installation. If you want to review or change any of your installation settings, click Back. Click Cancel to exit the wizard. InstallShield < Back Install Cancelbar
Now searching for Hardware and installing Drivers... | Category | Value (%) | |---|---| | Current Search Engine | 50 |WLAN GENERAL
text_image
REALTEK RTL8185 Wireless LAN Driver and Utility InstallShield Wizard Complete Setup has finished installing REALTEK RTL8185 Wireless LAN Driver and Utility on your computer. < Back Finish CancelWLAN GENERAL
text_image
REALTEK 11n USB Wireless LAN Driver and Utility InstallShield Wizard Complete The InstallShield Wizard has successfully installed REALTEK 11n USB Wireless LAN Driver and Utility. Before you can use the program, you must restart your computer. Yes, I want to restart my computer now. No, I will restart my computer later. Remove any disks from their drives, and then click Finish to complete setup. < Back Finish CancelWLAN GENERAL
INSTRUKCJA ZARZĄDZANIA
natural_image
Two computer monitors with sound waves, no text or symbols presentAd-Hoc Mode
text_image
General Profile Available Network Advanced Status Statistics Easy Config Available Network(s) SSID Chan... Encrypt... Network Authenticati... Jeff 1 None Unknown WLAN-11b-GW 1 None Unknown default 11 None Unknown Refresh Add to Profile Note: Double click on item to join/create profile.text_image
Unsecured network You are connecting to the unsecured network " Jeff". Information sent over this network is not encrypted and might be visible to other people. OK Canceltext_image
Wireless network properties Profile Name: Jeff's Laptop Network Name(SSID): Jeff ✓ This is a computer-to-computer(ad hoc) network; wireless access points are not used. Channel 1 (2412MHz) Wireless network security This network requires a key for the following: Network Authentication: Open System Data encryption: Disabled ASCII Passphrase Key Length: 64 Bits Network key: Confirm network key: Key index (advanced): 1 OK Cancel 802.1x configure EAP TYPE : MDS Tunnel : Username : Identity : Password : Certificate :WLAN GENERAL
Tryb Infrastruktury
text_image
Unsecured network You are connecting to the unsecured network " default". Information sent over this network is not encrypted and might be visible to other people. OK Canceltext_image
Wireless network properties Profile Name: default Network Name(SSID): default This is a computer-to-computer(ad hoc) network; wireless access points are not used. Channel 11 (2462MHz) Wireless network security This network requires a key for the following: Network Authentication: Open System Data encryption: Disabled ASCII Passphrase Key Length: 64 Bits Network key: Confirm network key: Key index (advanced): 1 OK Cancel 802.1x configure EAP TYPE : MDS Tunnel : Username : Identity : Password : Certificate :Uwaga:
WPS - Wi-Fi Protect Setup
text_image
REAL TEK 11n USB Wireless LAN Utility Refresh(R) Mode(M) View(V) About(A) General Profile Available Network Advanced Status Statistics Wi-Fi Protect Setup Wi-Fi Protected Setup (WPS) An easy and secure setup solution for Wi-Fi network Pin Input Config (PIN) After pushing the PIN button.Please enter the PIN code into your AP. PIN Code : 22915887 Pin Input Config (PIN) Push Button After pushing the PBC button.Please push the physical button on your AP or visual button on the WPS config page. Push Button Config (PBC) Show Tray Icon Radio Off Disable Adapter Close Ready NUMtext_image
Wi-Fi Protected Setup (WPS) Do you want to select a specific AP ? Yes Notext_image
Wi-Fi Protected Setup - Select AP WPS AP Name WPS AP MAC RTK 11n AP 00:E0:4C:81:96:B1 DQAtest 3G 00:E1:4C:81:96:53 Refresh Select CancelWLAN GENERAL
text_image
Wi-Fi Protected Setup - PIN method Wi-Fi Protected Setup - PIN method Please enter the following PIN code into your AP . PIN Code : 92595736 Status : Initial WPS ... Canceltext_image
REALTEK 11n USB Wireless LAN Utility Refresh(R) Mode(M) View(V) About(A) MyComputer Realtek RTL818& General Profile Available Network Advanced Status Statistics Wi-Fi Protect Setup Status: Associated Speed: Tx:150 Mbps Rx:150 Mbps Type: Infrastructure Encryption: AES SSID: WPS04527f96b1 Signal Strength: 86% Link Quality: 100% Network Address: MAC Address: 00:08:94:00:07:00 IP Address: 192.168.1.102 Subnet Mask: 255.255.255.0 Gateway: 192.168.1.254 ReNew IP Show Tray Icon Radio Off Ready Disable Adapter Close NUMWLAN GENERAL
2. Metoda PBC (Push Button Configuration)
text_image
Wi-Fi Protected Setup - PBC method If there is more then one AP on the PBC mode,there will be [Session Overlap].Please using PIN method or wait for a while push the button again. Status : Initial WPS ... Complete : Push Button Config (PBC) CancelWLAN GENERAL
flowchart
graph TD
    A["PC"] -->|Desktop PC with Wireless PCI Adapter| B["Soft AP"]
    A -->|Desktop PC with Wireless CardBus Card| C["Soft AP"]
    D["Laptop PC with Wireless USB Adapter"] --> E["Desktop PC with Wireless USB Adapter"]
    F["PC"] --> G["Soft AP"]
    F --> H["Soft AP"]
    I["PC"] --> J["Soft AP"]
    K["PC"] --> L["Soft AP"]
    M["Internet"] --> N["Cable / xDSL Modem"]
    N --> O["Wireless Router / AP"]
    O --> P["PC"]
    style O fill:#f9f,stroke:#333
General
text_image
REALTEK Wireless LAN Utiily Refresh RT-Set Mode(M) View(V) About (A) General Advanced Statistics SoftAP My Computer Realtek RTL81: Soft AP ConnName Device Name Local Area ... Realtek RTL8139 Family PCI Fast Ethernet NIC Select Public network Local Area Connection Realtek RTL8139 Family PCI Fa Apply Show Tray Icon Radio Off Disable Adapter Close Ready NUMWLAN GENERAL
DANE TECHNICZNE
PRODUKTU
Standard
IEEE 802.11b, IEEE 802.11g
Interfejs
PCI (23415); PC-Card (23416); USB (23413)
Bezpieczeństwo
WEP 64/128 bitów, WPA (TKIP z IEEE 802.1x), AES
Czułość odbiornika
54 Mbps OFDM, 10% PER, -68 dBm
11 Mbps CCK, 8% PER, -86 dBm
1 Mbps BPSK, 8% PER, -92 dBm
Kanal
USA 11, Europa 13, Japonia 14
0 - 40^ (32-104 ^ )
FCC Class B, CE, VCCI Class B
WLAN GENERAL
SE
CE Märkning Varning

text_image
NoteBook NoteBook Ad Hoc Network
text_image
NoteBook Personal ComputerHuvudfunktioner
• Följer IEEE 802.11b/g/n wireless standard
- High Speed transfer data rate upp till 150/300 Mbps
text_image
Choose Setup Language Select the language for this installation from choices below. English OK Canceltext_image
REALTEK 11n USB Wireless LAN Driver and Utility REALTEK 11n USB Wireless LAN Driver and Utility The InstallShield Wizard will install REALTEK 11n USB Wireless LAN Driver and Utility on your computer. To continue, click Next. < Back Next > CancelWLAN GENERAL
text_image
REALTEK 11n USB Wireless LAN Driver and Utility REALTEK 11n USB Wireless LAN Driver and Utility Click Install to begin the installation. If you want to review or change any of your installation settings, click Back. Click Cancel to exit the wizard. InstallShield < Back Install Cancelbar
Now searching for Hardware and installing Drivers... | Category | Value (%) | |---|---| | Current Search Engine | 50 |WLAN GENERAL
text_image
REALTEK RTL8185 Wireless LAN Driver and Utility InstallShield Wizard Complete Setup has finished installing REALTEK RTL8185 Wireless LAN Driver and Utility on your computer. < Back Finish CancelWLAN GENERAL
text_image
REALTEK 11n USB Wireless LAN Driver and Utility InstallShield Wizard Complete The InstallShield Wizard has successfully installed REALTEK 11n USB Wireless LAN Driver and Utility. Before you can use the program, you must restart your computer. Yes, I want to restart my computer now. No, I will restart my computer later. Remove any disks from their drives, and then click Finish to complete setup. < Back Finish CancelWLAN GENERAL
INSTRUKTIONER
natural_image
Two computer devices with sound waves, no text or symbols presentAd-Hoc Mode
WLAN GENERAL
text_image
General Profile Available Network Advanced Status Statistics Easy Config Available Network(s) SSID Chan... Encrypt... Network Authenticati... Jeff 1 None Unknown WLAN-11b-GW 1 None Unknown default 11 None Unknown Refresh Add to Profile Note: Double click on item to join/create profile.text_image
Unsecured network You are connecting to the unsecured network " Jeff". Information sent over this network is not encrypted and might be visible to other people. OK Canceltext_image
Wireless network properties Profile Name: Jeff's Laptop Network Name(SSID): Jeff ✓ This is a computer-to-computer(ad hoc) network; wireless access points are not used. Channel 1 (2412MHz) Wireless network security This network requires a key for the following: Network Authentication: Open System Data encryption: Disabled ASCII Passphrase Key Length: 64 Bits Network key: Confirm network key: Key index (advanced): 1 OK Cancel 802.1x configure EAP TYPE : MDS Tunnel : Username : Identity : Password : Certificate :WLAN GENERAL
Infrastructure Mode
text_image
Unsecured network You are connecting to the unsecured network " default". Information sent over this network is not encrypted and might be visible to other people. OK Canceltext_image
Wireless network properties Profile Name: default Network Name(SSID): default This is a computer-to-computer(ad hoc) network; wireless access points are not used. Channel 11 (2462MHz) Wireless network security This network requires a key for the following: Network Authentication: Open System Data encryption: Disabled ASCII Passphrase Key Length: 64 Bits Network key: Confirm network key: Key index (advanced): 1 OK Cancel 802.1x configure EAP TYPE: MDS Tunnel: Username: Identity: Password: Certificate :WLAN GENERAL
Obs!
WPS - Wi-Fi Protect Setup
text_image
Wi-Fi Protected Setup (WPS) Do you want to select a specific AP ? Yes Notext_image
Wi-Fi Protected Setup - Select AP WPS AP Name WPS AP MAC RTK 11n AP 00:E0:4C:81:96:B1 DQAtest 3G 00:E1:4C:81:96:53 Refresh Select Canceltext_image
Wi-Fi Protected Setup - PIN method Wi-Fi Protected Setup - PIN method Please enter the following PIN code into your AP . PIN Code : 92595736 Status : Initial WPS ... Canceltext_image
REALTEK 11n USB Wireless LAN Utility Refresh(R) Mode(M) View(V) About(A) MyComputer Realtek RTL818E General Profile Available Network Advanced Status Statistics Wi-Fi Protect Setup Status: Associated Speed: Tx:150 Mbps Rx:150 Mbps Type: Infrastructure Encryption: AES SSID: WPS04527f96b1 Signal Strength: 86% Link Quality: 100% Network Address: MAC Address: 00:08:94:00:07:00 IP Address: 192.168.1.102 Subnet Mask: 255.255.255.0 Gateway: 192.168.1.254 ReNew IP Show Tray Icon Radio Off Ready Disable Adapter Close NUM2. PBC-metoden (Push Button Configuration)
text_image
Wi-Fi Protected Setup - PBC method Wi-Fi Protected Setup - PBC method If there is more then one AP on the PBC mode,there will be [Session Overlap].Please using PIN method or wait for a while push the button again. Status : Initial WPS ... Complete : Push Button Config (PBC) Cancelflowchart
graph TD
    A["PC"] -->|Desktop PC with Wireless PCI Adapter| B["Soft AP"]
    C["Laptop PC with Wireless USB Adapter"] -->|Laptop PC with Wireless CardBus Card| D["Soft AP"]
    E["PC"] -->|Desktop PC with Wireless PCI Adapter| F["Soft AP"]
    G["Laptop PC with Wireless USB Adapter"] -->|Desktop PC with Wireless PCI Adapter| H["Soft AP"]
    I["PC"] -->|Desktop PC with Wireless PCI Adapter| J["Soft AP"]
    K["PC"] -->|Desktop PC with Wireless CardBus Card| L["Soft AP"]
    M["Internet"] --> N["Cable / xDSL Modem"]
    N --> O["Wireless Router / AP"]
    O --> P["PC"]
    style A fill:#f9f,stroke:#333
    style C fill:#f9f,stroke:#333
    style G fill:#f9f,stroke:#333
    style I fill:#f9f,stroke:#333
    style K fill:#f9f,stroke:#333
    style M fill:#f9f,stroke:#333
    style N fill:#ccf,stroke:#333
General
text_image
REALTEK Wireless LAN Utiily Refresh RT-Set Mode(M) View(V) About (A) General Advanced Statistics SoftAP My Computer Realtek RTL81: Soft AP ConnName Device Name Local Area ... Realtek RTL8139 Family PCI Fast Ethernet NIC Select Public network Local Area Connection Realtek RTL8139 Family PCI Fa Apply Show Tray Icon Radio Off Disable Adapter Close Ready NUMWLAN GENERAL
PRODUKTSPECIFIKATIONER
Standard
IEEE 802.11b, IEEE 802.11g
Gränssnitt
PCI (23415); PC-Card (23416); USB (23413)
Säkerhet
64/128-bit WEP, WPA (TKIP med IEEE 802.1x), AES
54Mbps OFDM, 10%PER, -68dBm
11Mbps CCK, 8%PER, -86dBm
1Mbps BPSK, 8%PER, -92dBm
Kanal
USA 11, Europe 13, Japan 14
Datahastighet
This equipment complies with the requirements relating to electromagnetic compatibility, EN 55022 class B for ITE, the essential protection requirement of Council Directive 89/336/EEC on the approximation of the laws of the Member States relating to electromagnetic compatibility.
Company has an on-going policy of upgrading its products and it may be possible that information in this document is not up-to-date. Please check with your local distributors for the latest information. No part of this document can be copied or reproduced in any form without written consent from the company.
Trademarks:
All trade names and trademarks are the properties of their respective companies. Copyright © 2010, All Rights Reserved.
WLAN GENERAL
OVERBLIK
text_image
NoteBook NoteBook Ad Hoc Network
text_image
NoteBook Personal ComputerSoftware installation
text_image
Choose Setup Language Select the language for this installation from choices below. English OK Canceltext_image
REALTEK 11n USB Wireless LAN Driver and Utility REALTEK 11n USB Wireless LAN Driver and Utility The InstallShield Wizard will install REALTEK 11n USB Wireless LAN Driver and Utility on your computer. To continue, click Next. < Back Next > CancelWLAN GENERAL
text_image
REALTEK 11n USB Wireless LAN Driver and Utility REALTEK 11n USB Wireless LAN Driver and Utility Click Install to begin the installation. If you want to review or change any of your installation settings, click Back. Click Cancel to exit the wizard. InstallShield < Back Install Cancel- Vent venligst imens den installerer.

bar
Now searching for Hardware and installing Drivers... | Category | Value (%) | |---|---| | Current Search Engine | 50 |WLAN GENERAL
text_image
REALTEK RTL8185 Wireless LAN Driver and Utility InstallShield Wizard Complete Setup has finished installing REALTEK RTL8185 Wireless LAN Driver and Utility on your computer. < Back Finish CancelWLAN GENERAL
text_image
REALTEK 11n USB Wireless LAN Driver and Utility InstallShield Wizard Complete The InstallShield Wizard has successfully installed REALTEK 11n USB Wireless LAN Driver and Utility. Before you can use the program, you must restart your computer. Yes, I want to restart my computer now. No, I will restart my computer later. Remove any disks from their drives, and then click Finish to complete setup. < Back Finish CancelWLAN GENERAL
MANAGEMENT GUIDE
natural_image
Two computer devices with sound waves, no text or symbols presentAd-Hoc Mode
Anvendelse af denne adapter i Ad-Hoc modus
text_image
General Profile Available Network Advanced Status Statistics Easy Config Available Network(s) SSID Chan... Encrypt... Network Authenticati... Jeff 1 None Unknown WLAN-11b-GW 1 None Unknown default 11 None Unknown Refresh Add to Profile Note: Double click on item to join/create profile.text_image
Unsecured network You are connecting to the unsecured network " Jeff". Information sent over this network is not encrypted and might be visible to other people. OK CancelWLAN GENERAL
text_image
Wireless network properties Profile Name: Jeff's Laptop Network Name(SSID): Jeff ✓ This is a computer-to-computer(ad hoc) network; wireless access points are not used. Channel 1 (2412MHz) Wireless network security This network requires a key for the following: Network Authentication: Open System Data encryption: Disabled ASCII Passphrase Key Length: 64 Bits Network key: Confirm network key: Key index (advanced): 1 OK Cancel 802.1x configure EAP TYPE : MDS Tunnel : Username : Identity : Password : Certificate :WLAN GENERAL
Infrastruktur modus
flowchart
graph TD
    A["Internet"] --> B["ADSL/ Cable Modem"]
    B --> C["Wireless Router/ Access Point (AP)"]
    C --> D["Desktop"]
    C --> E["Laptop"]
    C --> F["Network"]
Infrastructure Mode
text_image
Unsecured network You are connecting to the unsecured network " default". Information sent over this network is not encrypted and might be visible to other people. OK Canceltext_image
Wireless network properties Profile Name: default Network Name(SSID): default This is a computer-to-computer(ad hoc) network; wireless access points are not used. Channel 11 (2462MHz) Wireless network security This network requires a key for the following: Network Authentication: Open System Data encryption: Disabled ASCII Passphrase Key Length: 64 Bits Network key: Confirm network key: Key index (advanced): 1 OK Cancel 802.1x configure EAP TYPE : MDS Tunnel : Username : Identity : Password : Certificate :WLAN GENERAL
Bemærk venligst:
WPS - Wi-Fi Protected Setup
text_image
REAL TEK 11n USB Wireless LAN Utility Refresh(R) Mode(M) View(V) About(A) General Profile Available Network Advanced Status Statistics Wi-Fi Protect Setup Wi-Fi Protected Setup (WPS) An easy and secure setup solution for Wi-Fi network Pin Input Config (PIN) After pushing the PIN button.Please enter the PIN code into your AP. PIN Code : 22915887 Pin Input Config (PIN) Push Button After pushing the PBC button.Please push the physical button on your AP or visual button on the WPS config page. Push Button Config (PBC) Show Tray Icon Radio Off Disable Adapter Close Ready NUMHer vises to metoder til at konfigurere QSS.
text_image
Wi-Fi Protected Setup (WPS) Do you want to select a specific AP ? Yes Notext_image
Wi-Fi Protected Setup - Select AP WPS AP Name WPS AP MAC RTK 11n AP 00:E0:4C:81:96:B1 DQAtest 3G 00:E1:4C:81:96:53 Refresh Select Canceltext_image
Wi-Fi Protected Setup - PIN method Wi-Fi Protected Setup - PIN method Please enter the following PIN code into your AP . PIN Code : 92595736 Status : Initial WPS ... Canceltext_image
REALTEK 11n USB Wireless LAN Utility Refresh(R) Mode(M) View(V) About(A) MyComputer Realtek RTL818E General Profile Available Network Advanced Status Statistics Wi-Fi Protect Setup Status: Associated Speed: Tx:150 Mbps Rx:150 Mbps Type: Infrastructure Encryption: AES SSID: WPS04527f96b1 Signal Strength: 86% Link Quality: 100% Network Address: MAC Address: 00:08:94:00:07:00 IP Address: 192.168.1.102 Subnet Mask: 255.255.255.0 Gateway: 192.168.1.254 ReNew IP Show Tray Icon Radio Off Ready Disable Adapter Close NUM2. PBC-metoden (Push Button Configuration)
text_image
Wi-Fi Protected Setup - PBC method Wi-Fi Protected Setup - PBC method If there is more then one AP on the PBC mode,there will be [Session Overlap].Please using PIN method or wait for a while push the button again. Status : Initial WPS ... Complete : Push Button Config (PBC) Cancelflowchart
graph TD
    A["PC"] -->|Desktop PC with Wireless PCI Adapter| B["Soft AP"]
    C["Laptop PC with Wireless USB Adapter"] -->|Laptop PC with Wireless CardBus Card| D["Soft AP"]
    E["PC"] -->|Desktop PC with Wireless PCI Adapter| F["Soft AP"]
    G["Laptop PC with Wireless USB Adapter"] -->|Desktop PC with Wireless PCI Adapter| H["Soft AP"]
    I["PC"] -->|Desktop PC with Wireless PCI Adapter| J["Soft AP"]
    K["PC"] -->|Desktop PC with Wireless CardBus Card| L["Soft AP"]
    M["Internet"] --> N["Cable / xDSL Modem"]
    N --> O["Wireless Router / AP"]
    O --> P["PC"]
    style O fill:#f9f,stroke:#333
Generelt
Efter konfigurationen af adapteren i AP modus, vises denne "Generelt" side, som viser dette APs generelle informationer.

text_image
REAL TEK 11n USB Wireless LAN Utility Refresh(R) Mode(M) View(V) About(A) MyC Station General Profile Available Network Status Statistics Wi-Fi Protect Setup Access PointWLAN GENERAL
SSID:
BSSID: MACadresser for dette AP
text_image
REALTEK Wireless LAN Utiily Refresh RT-Set Mode(M) View(V) About (A) General Advanced Statistics SoftAP My Computer Realtek RTL81: Soft AP ConnName Device Name Local Area ... Realtek RTL8139 Family PCI Fast Ethernet NIC Select Public network Local Area Connection Realtek RTL8139 Family PCI Fa Apply Show Tray Icon Radio Off Disable Adapter Close Ready NUMWLAN GENERAL
PRODUKTSPECIFIKATION
Standard
IEEE 802.11b, IEEE 802.11g
Interface
PCI (23415); PC-kort (23416); USB (23413)
Sikkerhed
64/128-bit WEP, WPA (TKIP med IEEE 802.1x), AES
54Mbps OFDM, 10%PER, -68dBm
11Mbps CCK, 8%PER, -86dBm
1Mbps BPSK, 8%PER, -92dBm
Kanal
USA 11, Europa 13, Japan 14
Datarate
802.11b: 1, 2, 5.5 og 11Mbps
802.11g: 6, 9, 12, 18, 24, 36, 48, og 54Mbps
Transmissionsstyrke
16dBm\~18dBm
Områdedækning
Indenfor 35\~100 meter
Udenfor 100\~300meter
LED indikation
Link (grøn)
Driftstemperatur
0-40°C (32-104°F)
Driftsfugtighed
10% \~ 90% (ikke-kondenserende)
Emission
FCC Class B, CE, VCCI Class B
WLAN GENERAL
DISCLAIMER
Information in this document is subject to change without notice. The manufacturer does not make any representations or warranties (implied or otherwise) regarding the accuracy and completeness of this document and shall in no event be liable for any loss of profit or any commercial damages, including but not limited to special, incidental, consequential, or other damages. No part of this document may be reproduced or transmitted in any form, electronic or mechanical, by any means, including photocopying, recording or information recording and retrieval systems without the expressed written permission of the manufacturer. All brand names and product names mentioned in this document are trademarks, or registered trademarks of their respective holders.
DECLARATION OF CONFORMITY IN ACCORDANCE WITH THE RADIO AND TELECOMMUNICATIONS TERMINAL EQUIPMENT ACT (FTEG) AND DIRECTIVE 1999/5/EC (R & TTE DIRECTIVE)

= European Community Conformity Mark
We, Manufacturer/Importer
Longshine Technologie (Europe) GmbH
An der Strusbek 9
22926 Ahrensburg
Germany
Declare that the Product
LCS-8131N3
Wireless USB Adapter
Is In Conformity With:
| Standards | Results |
| EN300328 V1.7.1 (2006-10) | Pass |
| EN301489-1 V1.8.1 (2008-04) | Pass |
| EN301489-17V1.3.2 (2008-04) | Pass |
| EN55022:2006+A1:2007 | Pass |
| EN61000-4-2:2009 | Pass |
| EN61000-4-3:2006+A1:2008 | Pass |
| EN50371:2002 | Pass |
| EN60950-1:2006+A11:2009 | Pass |
Identification of signatory empowered to bind the manufacturer or his authorized representative.
Signature
Manufacturer/Importer

Date: 08.04.2010