
LCS-8131N2 - Network card / adapter Longshine - Free user manual and instructions
Find the device manual for free LCS-8131N2 Longshine in PDF.


| Product Type | IEEE 802.11n Wireless USB Adapter |
| Model | LCS-8131N2 |
| Brand | Longshine |
| Interface | USB 2.0 |
| Wireless Standards | IEEE 802.11n draft 2.0, 802.11g, 802.11b |
| Frequency Band | 2.4 GHz |
| Data Rate | Up to 150 Mbps (802.11n), 54 Mbps (802.11g), 11 Mbps (802.11b) |
| Security | 64/128-bit WEP, WPA (TKIP with IEEE 802.1x), AES |
| Receiver Sensitivity | 802.11n: -68 dBm, 802.11g: -73 dBm, 802.11b: -84 dBm |
| Transmit Power | 16 dBm (802.11b), 14 dBm (802.11g), 13 dBm (802.11n) |
| LED Indicator | Link (Green) |
| Operating Temperature | 0-40°C (32-104°F) |
| Operating Humidity | 10% ~ 90% (non-condensing) |
| Emission Compliance | FCC Class B, CE, VCCI Class B |
| Power Supply | USB bus powered (5V DC) |
| Dimensions (approx.) | 70 x 20 x 10 mm |
| Weight (approx.) | 20 g |
| Soft AP Function | Yes, via utility mode switch |
| Wi-Fi Protected Setup (WPS) | PIN and Push Button Configuration |
| System Requirements | Windows 98se/ME/2000/XP/Vista, CD-ROM drive, USB port |
| Package Contents | Wireless USB adapter, Utility/CD manual |
Frequently Asked Questions - LCS-8131N2 Longshine
User questions about LCS-8131N2 Longshine
0 question about this device. Answer the ones you know or ask your own.
Ask a new question about this device
Download the instructions for your Network card / adapter in PDF format for free! Find your manual LCS-8131N2 - Longshine and take your electronic device back in hand. On this page are published all the documents necessary for the use of your device. LCS-8131N2 by Longshine.
USER MANUAL LCS-8131N2 Longshine
IEEE 802.11n Draft 2.0 Wireless USB Adapter
User's Manual
English
Deutsch
Italiano
Español
User's Guide
IEEE 802.11n Draft 2.0 Wireless USB Adapter
FCC Certifications
Federal Communication Commission Interference Statement

This equipment has been tested and found to comply with the limits for a Class B digital device, pursuant to Part 15 of the FCC Rules. These limits are designed to provide reasonable protection against harmful interference in a residential installation. This equipment generates, uses and can radiate radio frequency energy and, if not installed and used in accordance with the instructions, may cause harmful interference to radio communications. However, there is no guarantee that interference will not occur in a particular installation. If this equipment does cause harmful interference to radio or television reception, which can be determined by turning the equipment off and on, the user is encouraged to try to correct the interference by one of the following measures:
-Reorient or relocate the receiving antenna.
-Increase the separation between the equipment and receiver.
-Connect the equipment into an outlet on a circuit different from that to which the receiver is connected.
-Consult the dealer or an experienced radio/TV technician for help.
This device complies with Part 15 of the FCC Rules. Operation is subject to the following two conditions: (1) This device may not cause harmful interference, and (2) this device must accept any interference received, including interference that may cause undesired operation.
FCC Caution: Any changes or modifications not expressly approved by the party responsible for compliance could void the user's authority to operate this equipment.
IMPORTANT NOTE:
FCC Radiation Exposure Statement:
This equipment complies with FCC radiation exposure limits set forth for an uncontrolled environment. This equipment should be installed and operated with minimum distance 20cm between the radiator & your body.
This transmitter must not be co-located or operating in conjunction with any other antenna or transmitter.
CE Mark Warning
CE
This equipment complies with the requirements relating to electromagnetic compatibility, EN 55022 class B for ITE, the essential protection requirement of Council Directive 2004/108/EC on the approximation of the laws of the Member States relating to electromagnetic compatibility.
Company has an on-going policy of upgrading its products and it may be possible that information in this document is not up-to-date. Please check with your local distributors for the latest information. No part of this document can be copied or reproduced in any form without written consent from the company.
Trademarks:
All trade names and trademarks are the properties of their respective companies. Copyright © 2009, All Rights Reserved.
OVERVIEW
Thank you for purchasing this product. Read this chapter to know about your IEEE 802.11n Wireless Adapter.
Unpacking information
Before getting started, please verify that your package includes the following items:
- IEEE 802.11n Wireless Adapter
- One Utility/ Manual CD
Introduction to the IEEE 802.11n Wireless Adapter
The IEEE 802.11n Wireless adapter provides users to launch IEEE 802.11n wireless network at 150 Mbps in the 2.4GHz frequency, which is also compatible with IEEE 802.11b /g wireless devices. You can configure this adapter with ad-hoc mode to connect to other 2.4GHz wireless computers or with Infrastructure mode to connect to a wireless AP or router for accessing to Internet. This adapter includes a convenient Utility for scanning available networks and saving preferred networks that users usually connected with. Security encryption can also be configured by this utility.
![graph TD A["Internet"] --> B["ADSL Modem"] B --> C["Infrastructure Network"] B --> D["Wireless Router"] D --> E["NoteBook"] D --> F["Personal Computer"]](/content/2026/05/858512/images/12abd904cd6c3cde7a48b1bb5296bf13cfc2267f4b8895182d0977992a691425.jpg)

Key Features
Complies with IEEE 802.11 n/b/g wireless standard
☐ High Speed transfer data rate up to 150 Mbps
Support QoS Enhancement (WMM, WMM-PS Client mode)
■ Support frame aggregation, Power saving mechanism, channel management and co-existence
□ Supports auto-installation and diagnostic utilities.
Support wireless data encryption with 64/128-bit WEP, WPA (TKIP with IEEE 802.1x) and AES functions.
INSTALLATION GUIDE
Installation
Note: The following driver installation guide uses Windows XP as the presumed operation system. The procedures and screens in Windows 98se, 2000 and Vista are familiar with Windows XP.
- Unplug the power cord of your computer from outlet. Remove the cover of your computer.
- Install the adapter into a PCI socket, PCMCIA slot or USB port.
- The "Found New Hardware Wizard" pops up. (Note: This wizard won't pop up in Windows 98 and ME. The system finds the new hardware and installs the hardware automatically. Please skip the following steps and restart the system after installation.)
- Click the "Cancel" button.

Insert the CD-Rom that came with this product to your CD-Rom drive. The menu window pops up automatically. Please click the Driver> Win button of this product.

Note: If the CD-Rom fails to auto-run, please click on "My Computer"→ your CD-Rom Drive then double-click the "Setup" icon to start the this menu.
- The language-selecting window pops up. Please select the language you use and click Next.
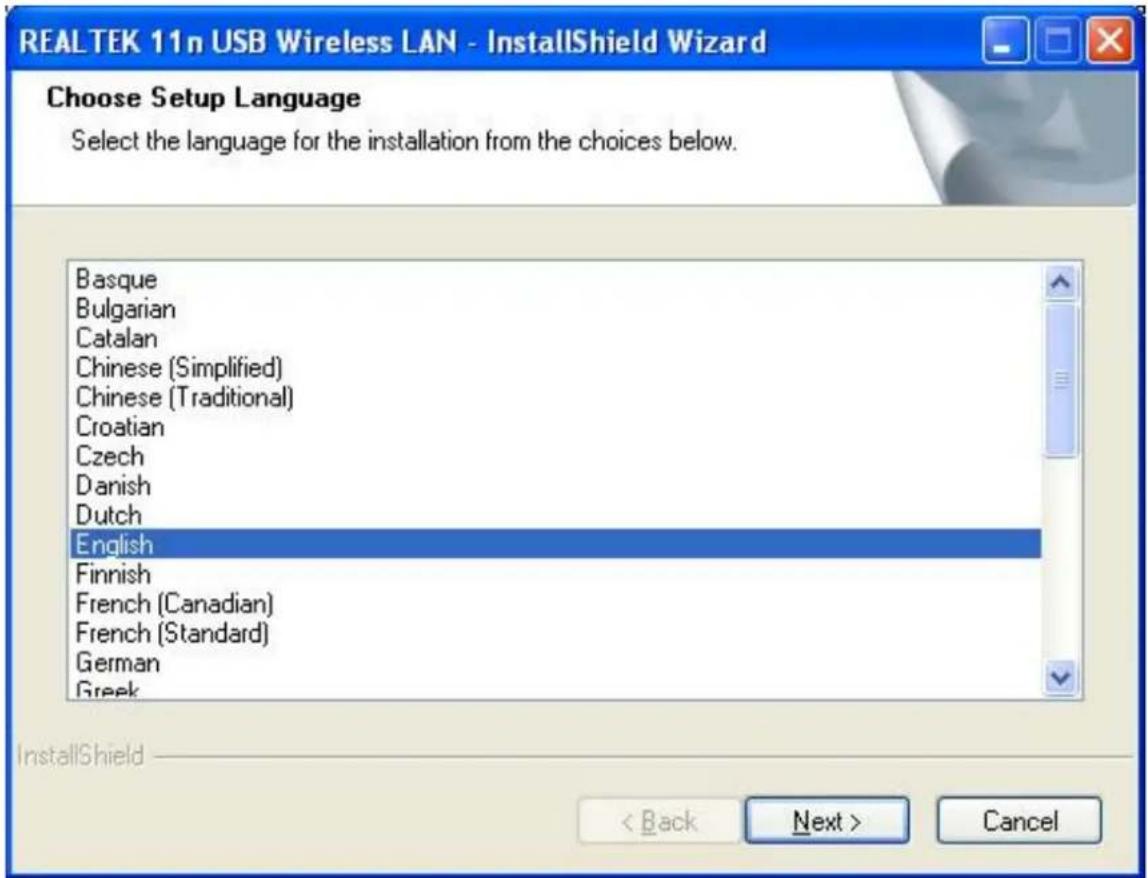
- The welcome window pops up. Click the "Next" button to proceed.

- . Click the "Install" button to start installing.

4. P lease wait while installation

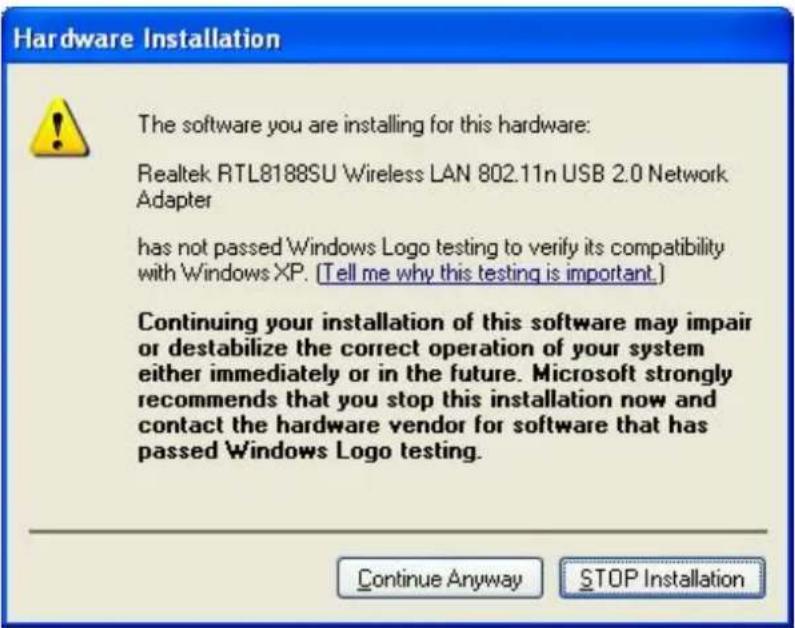
- This Windows Logo testing warning window may pop up upon installation. Please click the "Continue Anyway" to continue.


- Please wait again while installation

Now installing REALTEK 11n USB Wireless LAN Driver
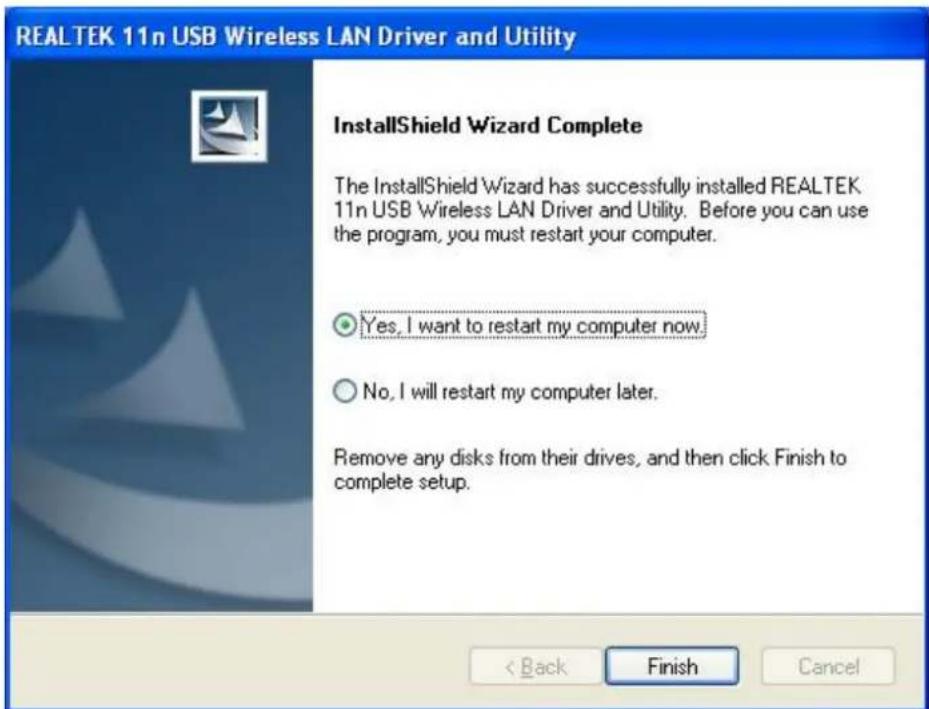
- For Windows XP and 2000 users, please shut down the computer. If you are using Windows 98se or ME, the system may ask for restarting. Please select "No, I will restart my computer later." and then shut the computer down. Click the "Finish" button to complete driver and utility installation.
MANAGEMENT GUIDE
Read this chapter to understand the management interface of the device and how to manage the device.
Making a Basic Network Connection
Connecting with Microsoft Zero Configuration tool
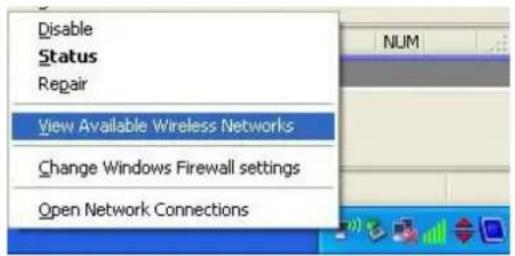
After specifying the Microsoft Zero Configuration tool to configure your wireless network, right click on the icon on system tray. Select "View Available Wireless Networks" to specify your wireless network.
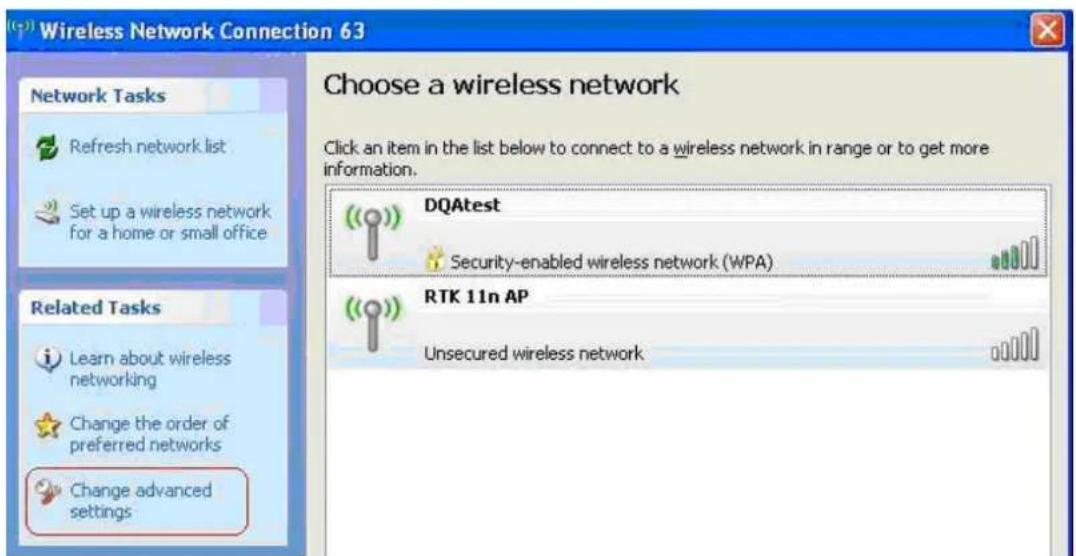
The tool shows the available wireless networks. Select your demanding network to connect with. To connect to a wireless network, please click Change advanced settings to be compatible with your wireless network settings.
Connecting with 802.11n Wireless LAN Utility
We provide this Utility for users to connect to a wireless network easily. It provides more information and configuration for this adapter. As default, the Utility is started automatically upon starting your computer and connects to a connectable wireless network with best signal strength and with no security setting. Right click on the icon in the system tray and select Open Config utility if the Utility does not start. Please refer to the following chapters to get information regarding to the functions of this Utility.
Starting the Wireless LAN Utility
Double click the shortcut on your desktop. The Wireless LAN Utility pops up.

You may click on the tabs above to configure this adapter. The checkboxes below provide the following functions:
| Show Tray Icon | Check this checkbox to show the utility icon on your system tray, which is in the notification area at the lower-right corner of the windows desktop. You may also uncheck it to remove the utility icon from system tray. |
| Radio Off | Check this checkbox to prevent this adapter form transmitting or receiving signals. Uncheck it to communicate. |
| Disable Adapter | Check this checkbox to disable this wireless adapter. Uncheck it to enable this adapter again. |
To use this adapter in Station Mode
- Double click the icon on your desktop.
- Click the "Available Network" button to scan available wireless network adapters. Double click on the network adapter that you are going to connect to.

- Click the OK button to confirm that you are connecting to an open wireless network.
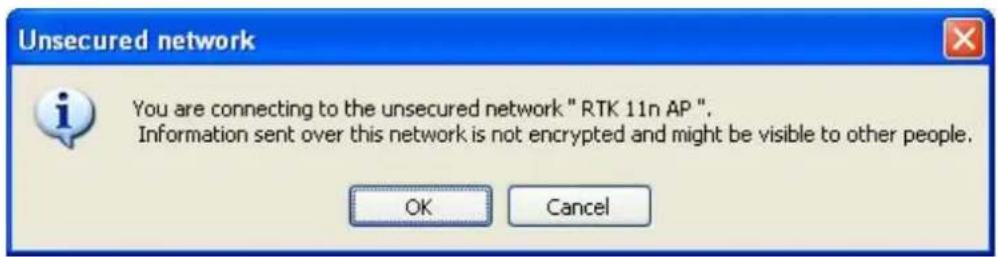
- Click OK to add this network into the profile list.
Note: This example is an open wireless network. If you are going to connect to a Wireless adapter with security protection, you will have to configure the encryption settings in this profile to be corresponding to the other wireless adapter. Please click on the “Network Authentication” drop list to select an authentication method, and then select a “Data encryption” type. Fill in each required blanks and click “OK”.
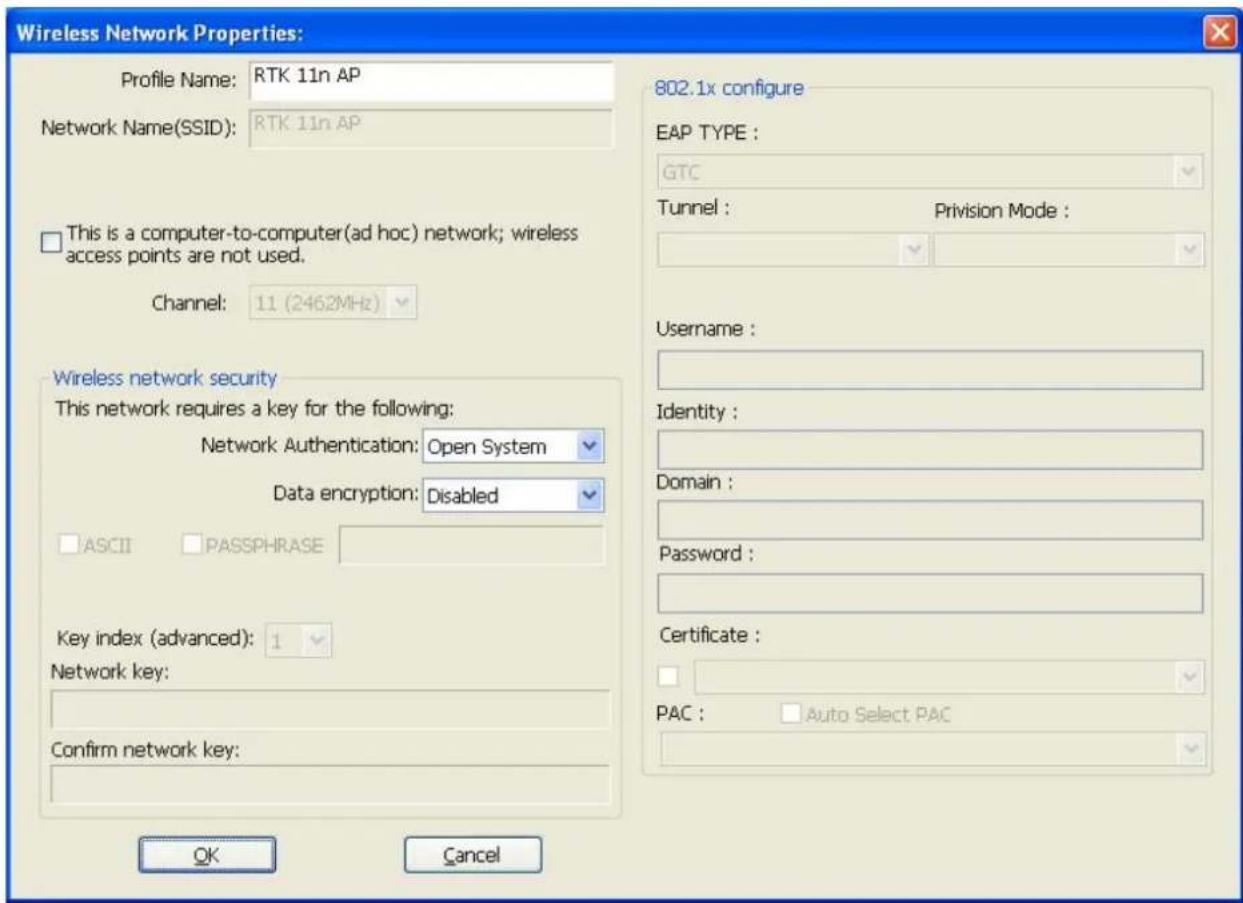
Note: This management instruction uses Windows XP as the presumed operation system. Some functions are not supported in Windows 98se or Windows ME.
General
After starting the utility, the general page pops up This General tab provides the information of your current wireless network connection. You may click the Renew IP button to refresh those listed information.
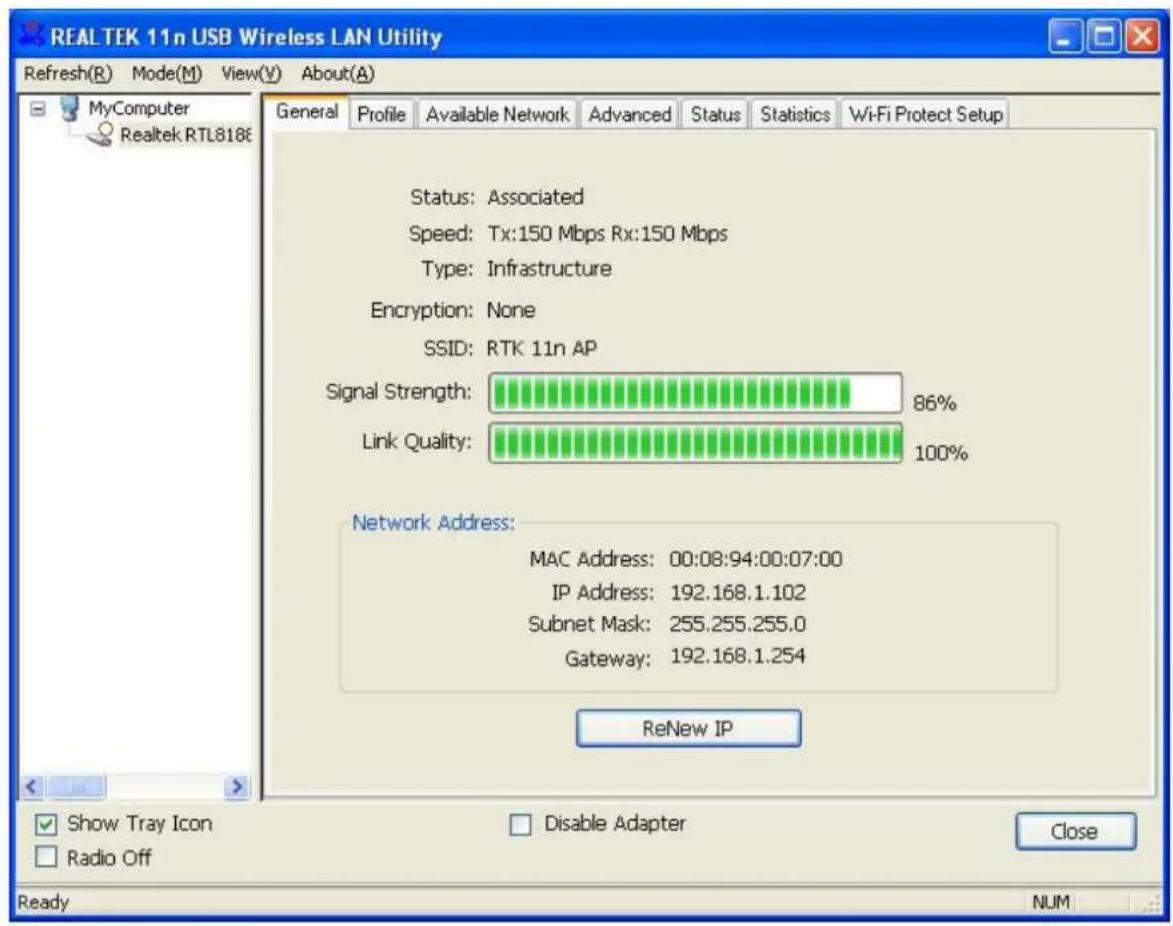
| Status: | Check if the device associated to target network. |
| Speed: | The current connection speed |
| Type: | Infrastructure mode or Ad-Hoc mode. |
| Encryption: | The performing encryption mode for connecting to current network profile. |
| SSID: | The SSID (network name) of the connected wireless network. |
| Signal Strength: | Indicates the signal strength detected by this adapter. |
| Link Quality | Indicates the link quality of this wireless connection. |
| Network Address: | Shows the current IP addresses settings for this adapter. |
Profile
The Profile tab lists the preferred connections. You can click the buttons beside to do configure each connection.

| Add | Click this button to add a connection profile for this adapter. |
| Remove | To remove a connection profile, click this profile on the profile list and click this button to delete it. |
| Edit | To modify the configurations for a profile, click this profile on the profile list and click this button to edit. |
| Duplicate | To make a copy of a profile, click the profile that going to be copied, and click this button to copy it. |
| Set Default | To select a profile as your default wireless connection, click this profile on the list and click this button. You may also double click on each profile to select it as your default wireless connection. |
Available Network
This available tab lists the reachable wireless network of this adapter.

| Refresh | Click this button to rescan available networks around the adapter. |
| Add to Profile | To add an available Network to your profile list, select an available network and click this button to add. |
Advanced
This Advanced tab provides advanced configurations to this adapter. Every modification in this tab will be performed after clicking the Apply button.
To restore the default settings of the advanced tab, click the Set defaults button to perform restoring.

| Fragment Threshold |
| The maximum size of a packet that is going to be segmented and transmitted. Select the size from 256 to 2432(default) bytes. |
| RTS Threshold |
| Select the RTS Threshold form 0 to 2432(default) |
| Wireless Mode |
| 802.11g/b Connect to a 802.11b/g network (2.4GHz/54Mbps) |
| 802.11b Connect to a 802.11b network (2.4GHz/11Mbps) |
| 802.11n Connect to a 802.11n network (2.4GHz/150Mbps) |
| Preamble Mode |
| Select the preamble mode to be long, short or auto detection mode. |
| Channel Plan |
| Select your channel from the drop list. Please note that it is necessary for you to select a correct channel. Selecting an incorrect channel may again the applicable law. |
Status
This tab shows the current connection status of this adapter.

Statistics
See this tab to show the transmission activity record. Clicking the "Reset" button recounts the values from zero.

Wi-Fi Protect Setup
The primary goal of Wi-Fi Protected Setup (Wi-Fi Simple Configuration) is to simplify the security setup and management of Wi-Fi networks. This adapter supports the configuration setup using PIN configuration method or PBC configuration method. If the wireless card supports Wi-Fi Protected Setup (WPS), you can establish a wireless connection between wireless card and router using either Push Button Configuration (PBC) method or PIN method.

Here we will introduce two ways to configure the QSS
(QSS is known as rapid security settings, by pressing the wireless router and wireless card on the QSS button to automatically set up WPA2 secure connection level without the router or network adapter management software to conduct the cumbersome interface settings, greatly simplifying the operation of the wireless security settings.)
Pin Code: 8-digit numbers. It is randomly generated from system
1. PIN method
Click the button "Pin Input Config (PIN)", and then come to the following figure.

Click the button "Yes", you can select one of the AP.

In this figure, you can operate these buttons "Refresh / Select / Cancel". Select the name of one AP, then click "Select" button, you could use PIN method to configure the QSS.

Double click the Internet WEB browser icon on your desktop screen. Type the IP address of you selected router/AP into the URL and press Enter, and then you can enter the configuration.
Please enter the WPS (Wi-Fi) configuration page, type the PIN code of adapter and click confirm button to build WPS connection.
2. PBC (Push Button Configuration) method
After pushing the PBC button, please push the physical button on your AP or visual button on the WPS config page, then come to the following figure.
![Wi-Fi Protected Setup - PBC method If there is more then one AP on the PBC mode,there will be [Session Overlap].Please using PIN method or wait for a while push the button again. Status : Initial WPS ... Complete : Push Button Config (PBC) Cancel](/content/2026/05/858512/images/1700c41679761883f83738de2d665a6cff5c7cdc30d1a51557e7eb8dc2b2684d.jpg)
Please enter the WPS (Wi-Fi) configuration page of your desired router/AP, and then start PCB connection. When WPS is configured successfully, the available profile(s) is changed.

APPENDIX
Windows Vista Driver Installation
Note: The following driver installation guide uses Windows XP as the presumed operation system. The procedures and screens in Windows 98se, 2000 and Vista are familiar with Windows XP.
- Unplug the power cord of your computer from outlet. Remove the cover of your computer.
- Install the adapter into a PCI socket, PCMCIA slot or USB port.
- The "Found New Hardware Wizard" pops up. (Note: This wizard won't pop up in Windows 98 and ME. The system finds the new hardware and installs the hardware automatically. Please skip the following steps and restart the system after installation.)
- click Cancel, and run the Setup Wizard program on the CD-ROM.

Insert the CD-Rom that came with this product to your CD-Rom drive. The menu window pops up automatically. Please click the Driver> Win button of this product.

Note: If the CD-Rom fails to auto-run, please click on "My Computer"→ your CD-Rom Drive then double-click the "Setup" icon to start the this menu.
- The language-selecting window pops up. Please select the language you use and click OK.

- The welcome window pops up. Click the "Next" button to proceed.

- . Click the "Install" button to start installing.

- This Windows Logo testing warning window may pop up upon installation. Please click the "Install this driver software anyway" to continue.

- Please wait again while installation

Now installing REALTEK 11n USB Wireless LAN Driver
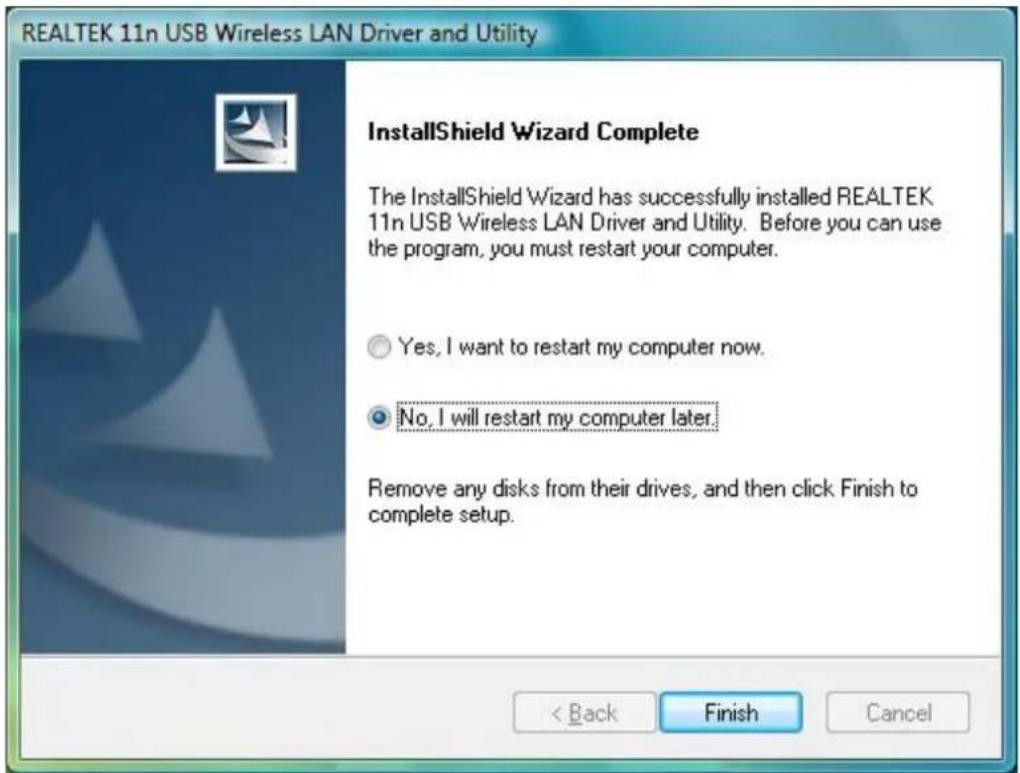
- For Windows XP and 2000 users, please shut down the computer. If you are using Windows 98se or ME, the system may ask for restarting. Please select "No, I will restart my computer later." and then shut the computer down. Click the "Finish" button to complete driver and utility installation.
Software Access Point (Soft AP) Application:
![graph TD A["PC"] -->|Desktop PC with Wireless PCI Adapter| B["Soft AP"] A -->|Desktop PC with Wireless CardBus Card| C["Soft AP"] D["Laptop PC with Wireless USB Adapter"] --> E["Desktop PC with Wireless USB Adapter"] F["PC"] -->|Desktop PC with Wireless PCI Adapter| G["Soft AP"] F -->|Desktop PC wit…](/content/2026/05/858512/images/897b2ee44713295018823fe0c706c6eee39930bd5e13d8825ecddf8d4d4de229.jpg)
General
To use this adapter as an access point, please click the "Mode" on Functional menu and select "Access Point".

Then switch from station mode to AP:

At the same time, you will find that the icon on the system tray is changed.

After configuring the adapter in AP mode, this "General" page shows up, which shows the general information of this AP.
| SSID: | The SSID (network name) of the wireless network constructed by this AP. |
| BSSID: | The MAC address of this AP |
| Config: | Click this button to change configurations to this AP |
| Association Table: | Shows the information of those devices that associated with this AP including their MAC addresses and the time that they connected with this device. |

Advanced
| Beacon Interval: | Define the interval between beacons from 20~1000 |
| DTIM Period: Set | the DTIM period between 1~255 |
| Preamble Mode: Click the drop list to select the preamble to be long, short or auto | |
| Set Defaults: Click | this button to restore the settings above to default |
| Apply: | Click this button to execute changes. |

Statistics
See this tab to show the transmission activity record. Clicking the "Reset" button recounts the values from zero.

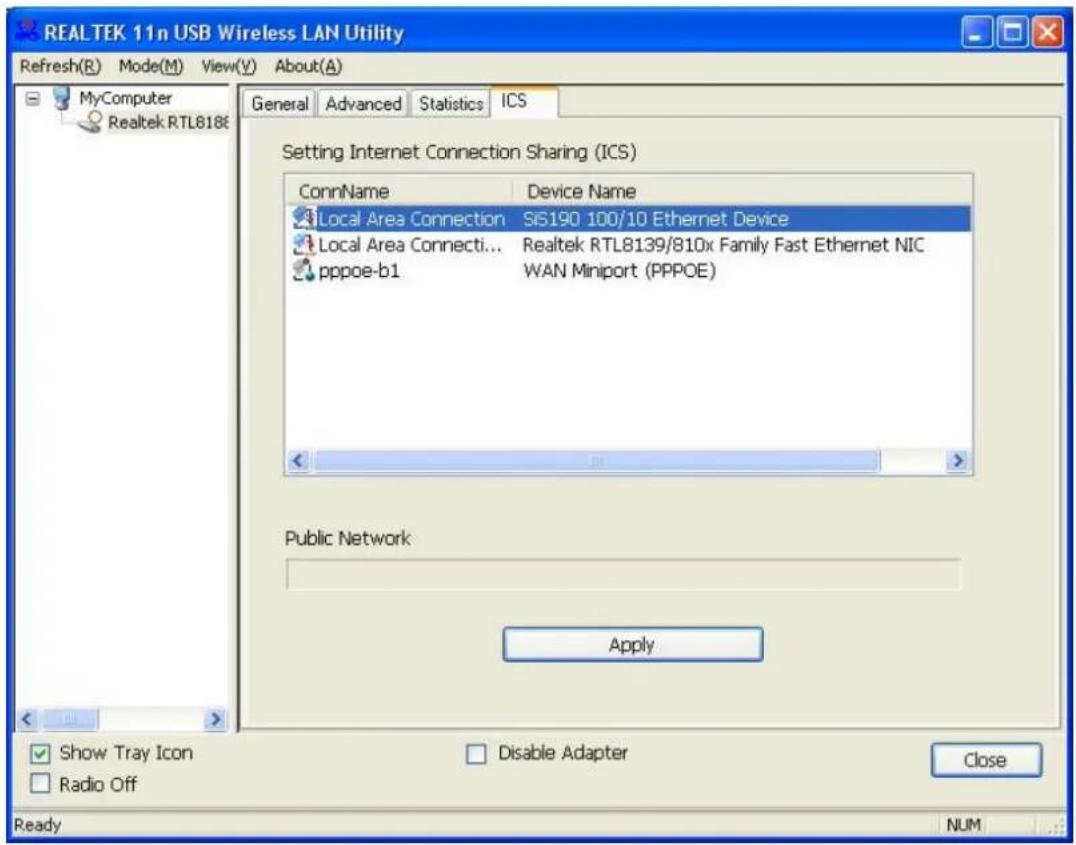
ICS
This page allows users to select the adapter for connect to public network.
Please click on the device that are used for connecting to public network, and then click the "Apply" button to execute.
PRODUCT SPECIFICATION
Standard
IEEE 802.11n draft 2.0, IEEE 802.11g, IEEE 802.11b, IEEE 802.3, IEEE 802.3u
Interface
Complies with USB 2.0
Security
64/128-bit WEP, WPA (TKIP with IEEE 802.1x), AES
Receiver Sensitivity
802.11n Typical -68 dBm
802.11g Typical -73 dBm
802.11b Typical -84 dBm
Data Rate
802.11b: 1, 2, 5.5 and 11Mbps
802.11g: 6, 9, 12, 18, 24, 36, 48, and 54Mbps
802.11n: up to 150 Mbps
Transmit Power
16 dBm typically @ 802.11b
14 dBm typically @ 802.11g
13 dBm typically @ 802.11n
LED indicator
Link(Green)
Operating Temperature
0- 40 0 C (32 - 104 0 C)
Operating Humidity
10% \~ 90% (non-condensing)
Emission
FCC Class B, CE, VCCI Class B
Benutzer Handbuch
IEEE 802.11n Draft 2.0 Wireless
USB Adapter
Haupteigenschaften

Allgemein
16 dBm typically @ 802.11b
14 dBm typically @ 802.11g
13 dBm typically @ 802.11n
Reichweite

UTILIZZO DELL'APPARECCHIO
Per connettersi usando l'utility 802.11n Wireless LAN
802.11g: 6, 9, 12, 18, 24, 36, 48, e 54Mbps
GUÍA DE GESTIÓN
DECLARATION OF CONFORMITY IN ACCORDANCE WITH THE RADIO AND TELECOMMUNICATIONS TERMINAL EQUIPMENT ACT (FTEG) AND DIRECTIVE 1999/5/EC (R & TTE DIRECTIVE)

= European Community Conformity Mark
We, Manufacturer/Importer
Longshine Technologie (Europe) GmbH
An der Strusbek 9
22926 Ahrensburg
Germany
Declare That The Product
LCS-8131N2
IEEE802.11b/g/n Wrieless USB Adapter
Is In Conformity With:
| Standards | Results |
| EN 300328 V1.7.1 (2006-10) | Pass |
| EN 62311:2008 | Pass |
| EN 301489-1 V1.8.1 (2008-04) | Pass |
| EN 301489-17V1.3.2 (2008-04) | Pass |
| EN 55022 :2006+A1 :2007 Class B | Pass |
| EN 61000-4-2 :1995+A1 :1998+A2 :2001 | Pass |
| EN 61000-4-3 :2006+A1 :2008 | Pass |
| EN 60950-1:2006 | Pass |
Identification of signatory empowered to bind the manufacturer or his authorized representative.
Signature
Manufacturer/Importer

Date: 14.10.2009


- IEEE 802.11N DRAFT 2.0 WIRELESS USB ADAPTER
- USER'S GUIDE
- FCC CERTIFICATIONS
- FEDERAL COMMUNICATION COMMISSION INTERFERENCE STATEMENT
- IMPORTANT NOTE
- FCC RADIATION EXPOSURE STATEMENT
- CE MARK WARNING
- CE
- TRADEMARKS
- OVERVIEW
- UNPACKING INFORMATION
- INTRODUCTION TO THE IEEE 802.11N WIRELESS ADAPTER
- KEY FEATURES
- INSTALLATION GUIDE
- INSTALLATION
- P LEASE WAIT WHILE INSTALLATION
- MANAGEMENT GUIDE
- MAKING A BASIC NETWORK CONNECTION
- CONNECTING WITH MICROSOFT ZERO CONFIGURATION TOOL
- CONNECTING WITH 802.11N WIRELESS LAN UTILITY
- STARTING THE WIRELESS LAN UTILITY
- TO USE THIS ADAPTER IN STATION MODE
- GENERAL
- PROFILE
- AVAILABLE NETWORK
- ADVANCED
- STATUS
- STATISTICS
- WI-FI PROTECT SETUP
- PIN METHOD
- PBC (PUSH BUTTON CONFIGURATION) METHOD
- APPENDIX
- WINDOWS VISTA DRIVER INSTALLATION
- ICS
- PRODUCT SPECIFICATION
- STANDARD
- INTERFACE
- SECURITY
- RECEIVER SENSITIVITY
- DATA RATE
- TRANSMIT POWER
- LED INDICATOR
- OPERATING TEMPERATURE
- OPERATING HUMIDITY
- EMISSION
- BENUTZER HANDBUCH
- HAUPTEIGENSCHAFTEN
- ALLGEMEIN
- REICHWEITE
- UTILIZZO DELL'APPARECCHIO
- PER CONNETTERSI USANDO L'UTILITY 802.11N WIRELESS LAN
- GUÍA DE GESTIÓN
- DECLARATION OF CONFORMITY IN ACCORDANCE WITH THE RADIO AND TELECOMMUNICATIONS TERMINAL EQUIPMENT ACT (FTEG) AND DIRECTIVE 1999/5/EC (R & TTE DIRECTIVE)
- DECLARE THAT THE PRODUCT
Brand : Longshine
Model : LCS-8131N2
Category : Network card / adapter