
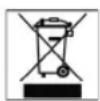
HCC 3156 - Hair Straightener CLATRONIC - Free user manual and instructions
Find the device manual for free HCC 3156 CLATRONIC in PDF.
| Product type | Straightener and curler |
| Brand | Clatronic |
| Model | HCC 3156 |
| Power supply | 220-240 V, 50 Hz |
| Power consumption | 40 W |
| Protection class | II |
| Heating time | Approximately 4 minutes |
| Plate type | Heating plates |
| Recommended use | Dry hair |
| Straightening function | Yes |
| Curling function | Yes |
| Indicator light | Green (on), Red (heating) |
| Automatic shut-off | No (manual switch) |
| Safety | Do not use near water, risk of burns |
| Cleaning | Soft dry cloth for housing, slightly damp cloth for plates |
| Warranty | 24 months |
| Package contents | Straightener, curler, charging station, user manual |
Frequently Asked Questions - HCC 3156 CLATRONIC
User questions about HCC 3156 CLATRONIC
0 question about this device. Answer the ones you know or ask your own.
Ask a new question about this device
Download the instructions for your Hair Straightener in PDF format for free! Find your manual HCC 3156 - CLATRONIC and take your electronic device back in hand. On this page are published all the documents necessary for the use of your device. HCC 3156 by CLATRONIC.
USER MANUAL HCC 3156 CLATRONIC
D-47906 Kempen/Germany
General Safety Instructions
Read the operating instructions carefully before putting the appliance into operation and keep the instructions including the warranty, the receipt and, if possible, the box with the internal packing. If you give this device to other people, please also pass on the operating instructions.
- The appliance is designed exclusively for private use and for the envisaged purpose. This appliance is not fit for commercial use. Do not use it outdoors (except if it is designed to be used outdoors). Keep it away from sources of heat, direct sunlight, humidity (never dip it into any liquid) and sharp edges. Do not use the appliance with wet hands. If the appliance is humid or wet, unplug it immediately.
- When cleaning or putting it away, switch off the appliance and always pull out the plug from the socket (pull on the plug, not the cable) if the appliance is not being used and remove the attached accessories.
- Do not operate the machine without supervision. If you should leave the workplace, always switch the machine off or remove the plug from the socket (pull the plug itself, not the lead).
- Check the appliance and the cable for damage on a regular basis. Do not use the appliance if it is damaged.
- Do not try to repair the appliance on your own. Always contact an authorized technician. To avoid the exposure to danger, always have a faulty cable be replaced only by the manufacturer, by our customer service or by a qualified person and with a cable of the same type.
- Use only original spare parts.
- Pay careful attention to the following "Special Safety Instructions".
Children and Frail Individuals
- In order to ensure your children's safety, please keep all packaging (plastic bags, boxes, polystyrene etc.) out of their reach.
Caution! Do not allow small children to play with the foil as there is a danger of suffocation! - In order to protect children or frail individuals from the hazards of electrical equipment, please ensure that this device is only used under supervision. This device is not a toy. Do not allow small children to play with it.
Symbols in these Instructions for Use
Important information for your safety is specially marked. It is essential to comply with these instructions in order to avoid accidents and prevent damage to the machine:
WARNING:
This warns you of dangers to your health and indicates possible injury risks.
CAUTION:
This refers to possible hazards to the machine or other objects.
NOTE: This highlights tips and information.
Special safety instructions for this device

Keep the device away from water and moisture such as, for example, bath tubs, shower areas or even persons taking a bath! Such situations constitute a Danger of life! through electric shock.
CAUTION:
- The hair straightener and the hair curler become hot during operation!
- Do not carry or lift the charging station during operation, but turn it off first and then remove the mains plug.
If the device is used in the bathroom please remove the plug from the socket after use as the proximity of water represents a hazard. This also applies if the device is switched off.
WARNING:
-
Allow the device to cool down before cleaning it and storing it away! Danger of burning!
Always remove the plug from the socket after use. -
As additional protection we recommend the installation of a fault current protection device (RCD) with a rated current of not more than 30mA in the wiring system of the bathroom. Please contact an authorised electrician for advice.
Before Initial Use
When the multicurler is switched on for the first time there may be a slight smell. You should therefore operate the device for approximately 10 minutes with the hair straightener and hair curler inserted. Ensuring sufficient ventilation!
Commissioning
- Remove all the packing materials.
- Place the device on a firm, fl at surface. Position it such that it cannot tip over.
General Use
Hair Straightener
- Fully unwind the mains cable.
- Insert the plug into a properly 230V 50Hz installed socket with earthing contact and turn the charging station on with the I/O switch on the side. The green mains control lamp lights up. The power on lamp remains on and shows that the device is working.
- Insert the hair straightener vertically into the charging station. The red control lamps on the charging station and on the inside of the hair straightener light up.
- The heating surfaces heat up. After approximately 4 minutes the device is ready to use.
- Remove the device from the charging station; the red control lamps go off.
WARNING:
Only the lower sections of the device should be touched. The upper section becomes hot. Danger of burns.
- You should only use the hair straightener for dry hair. Take a strand of hair and pull it carefully downwards until it is taut. The remaining hair should be put up or fixed in place. Before the halves are pressed together for approx. 5 seconds, we recommend that you ensure that the hair is positioned correctly. Always begin at the base of the hair and move the device in the direction of the hair tip. In order to produce a uniform appearance it is important that the next strands fall in one line. We do not recommend using the device if your hair is damaged or bleached.
- During a break or when you are not using the device for a short time you should insert it back into the charging station. The heating surfaces heat up again in the meantime. The red control lamps go on.
I NOTE:
Do not leave the device unattended if it is on the charging station and this is switched on.
- To switch off the device press the I/O switch and remove the plug from the socket. The green control lamp goes off. Leave it cool for a few minutes before putting it away.
Hair curler
- Fully unwind the mains cable.
- Insert the plug into a properly 230V 50Hz installed socket with earthing contact and turn the charging station on with the I/O switch on the side. The green mains control lamp lights up. The power on lamp remains on and shows that the device is working.
- Insert the hair curler vertically into the charging station. The red control lamp on the charging station lights up.
- Move the on/off switch on the hair curler to ON; the red control lamp on the handle lights up.
- The hair curler is heated up. After approximately 4 minutes the device is ready to use.
- Remove the device from the charging station; the red control lamps go off.
WARNING:
Only the lower sections of the device should be touched. The upper section becomes hot. Danger of burns.
- Press the button above the handle to open the curling tongs. Clamp the strands of hair firmly between them and curl them up to just before the hairline. Curl your slightly damp hair evenly over the hair curler and shape it to the required hairstyle. Hold the device only briefly around the strand of hair in order not to damage the hair. Carefully unwind the rolled-up strands of hair again.
- During a break or when you are not using the device for a short time you should insert it back into the charging station. The hair curler is heated up again in the meantime. The red control lamps go on.
i NOTE:
Do not leave the device unattended if it is on the charging station and this is switched on.
- In order to switch off the device, move the switch on the handle to OFF, press the I/O switch and remove the plug from the socket. The green control lamp goes off. Leave it cool for a few minutes before putting it away.
Cleaning and care
Always remove the mains plug before cleaning or servicing the device!
- The housing and charging station are cleaned with a soft, dry cloth - without additives.
- The hot plates and hair curler should be cleaned with a slightly damp cloth. If necessary you can use a commercial dish washing detergent.
- Dry the hot plates and hair curler thoroughly whenever they have been cleaned!
- The device must never be immersed in water!
Technical Data
Model: HCC 3156
Power supply: 220-240 V, 50 Hz
Power consumption: 40 W
Protection class: II
This device has been tested according to all relevant current CE guidelines, such as electromagnetic compatibility and low voltage directives, and has been constructed in accordance with the latest safety regulations.
Subject to technical changes without prior notice!
Guarantee
The device supplied by our Company is covered by a 24 month guarantee starting on the date of purchase (receipt).
During the life of the guarantee any fault of the device or its accessories ascribable to material or manufacturing defects will be eliminated free of charge by repairing or, at our discretion, by replacing it. The guarantee services do not entail an extension of the life of the guarantee nor do they give rise to any right to a new guarantee!
Proof of the guarantee is provided by the proof of purchase. Without proof of purchase no free replacement or repair will be carried out.
If you wish to make a claim under the guarantee please return the entire machine in the original packaging to your dealer together with the receipt.
Defects to consumables or parts subject to wearing as well as cleaning, maintenance or the replacement of said parts are not covered by the guarantee and hence are to be paid!
The guarantee lapses in case of unauthorized tampering.
After the expiry of the guarantee
After the expiry of the guarantee repairs can be carried by the competent dealer or repair service against the payment of the ensuing costs.

Meaning of the "Dustbin" Symbol
Protect our environment: do not dispose of electrical equipment in the domestic waste.
Please return any electrical equipment that you will no longer use to the collection points provided for their disposal.
This helps avoid the potential effects of incorrect disposal on the environment and human health.
This will contribute to the recycling and other forms of reutilisation of electrical and electronic equipment.
Information concerning where the equipment can be disposed of can be obtained from your local authority.
Yka3bIbaeHa BO3MOKHyHO ONaCHOCTb IIN3DeJIH N DpyrNX OKpyKaIOxN INpeDMETOB.
I IPNMEUAHNE: Jaet coBEBi HnHOpMaJIIO.
CneuHaBbIe yka3aHn no 6e3oNaChOCTn DnA 3TOrO np6opa

Pnp6op He dOJKeH HaxoOnTbCn POJIn30CTn OT BObIyBnAaHn (HanpImep, Bo3Ne BaHH, B dyuWeBbIX NOMeueHNAX INN POJIn30CTn OT KynAHOxCn IIOdei! N3-3a BO3MOXHOrO yDapa TOKOM pNt 3TOM BO3NHkaet ONaCHOct DnI Hn3HnI
BHIMAHHE:
BbipnmttebBOLONCUINuIbDn3aBbKBO BKNIOHOM COCTOHHN CTAHOBATC TROPHMN!
He nepehoCHTe HneoHMaTe 3apAHOe ycTPOcTBO BO BkIOUeHHOM COCTOHHN, CHaHaBbIKIOUHTe erO, a NOTOM BbIePHHTe BNky H3 PO3ETK.
EcnnoB3yTeCbUHnCaAMn B BaHHoKOMHate,TO He 3a6yDBe NO OKOHaHN BbHyTB WTENCel N3 PO3eTK, TAK KAK 6nI3OCTB BObl PpEDCTaBnREOT ONaCHOCTb. 3To pacnpocptpaHnETc H Na To CnyaH,ecn nIuNcb BBIKIOUHeHb.
PNEUYPNEXHEHNE:
IpeTe TM KAK NOHCTHTb Pn6Op Hn y6paTb Ha MeTo, octyDnte erO!OnachOcTB oKOrOB!
- P0 OKOHuaHn BcerdaBbIHMaTe WTeNCeIb n3 pO3eTKN.
B KaueCTBe DOnONHInTebHoM Mepb3aunTbOT npapKeHHN 3NeKPToTOKOM peKOMeHNdyETcR CHa6DnTB 3NeKTPoPBOOky BaHHo KOMHaTbY cTPOINCTBOM TKOBON (RCD), Cpa6aTbBAIOUeRo H TOK yTeKN 60Jee 30 mA. IIO 3ToMy BOpocy 6paTnTEcB 3a COBtOM K 3NeKTPnKy, IMeKOuEMy COOTBETCTBYOuIN DOYNCK.
Ipeep npBbIM BkHIOueHHeM
PnepBOM BKNIOUeHIM MOKeT CNYHTCA, YTO NOBNTC JERKIN 3anax. I03tomy BKNIOUHTe np6Op npImepHO Ha 10 MIn.H.CBCTaBHeHHbIMN B HrO BbIPnPMITEeM DII BOLOC NUIIcAMN DIIA3aBbKn.OBeceNeYbTe DOCTaTOHy BOHTINHIO!
Bbo npnbopa B 3KcnnyaTaunHO
- YdaHte BCE ynaKOBOuHbIe MaTePnAbl.
- NocTaBbTe npH6Op Ha TBepyu n PObHyIO NOBepxHOCTb. yctAHOBITE erO taKIM 06pa3OM, YTO6bl OH He CMOr nepeBepHyTbCra.
PpIMeHHe
LIIuIbIyIaIyBbInpMaIeHnBoloc
- PoiHocbHpa3MOTaHTe cTeBOJ Ka6eNb.
- BotKHnTe BnKy B WttenCeIbHyIO pO3eTKy C 3a3emHIOUmm KOHTAKTOM, yCTAHOBIIeHHyIO cOrJIaCHO IpeIINCAHNRM, 230B,50r.IN BkIIOHTe 3apAHOHe yCTPOIcTB O npN NMOUKN KHOKN I/O, paONIOJKeHHoC6Oky. CBETOHINIKATOp CETn npOdoJIkaET CBETNTCBn nIHAN3IPyeT rTOBHOCTb np6opa.
- BotKHHTe ⅢIuIbI DnB BInpMaJIHHe B0LOC B 3apJHOe yCTPOCTBO B BEPTMKAJIbHOM NIOJOKeHH. 3aRopaETcK pachar KOHTPOJIbHaJIaMIOUka Ha 3apJHOM yCTPOIcTBe H Ha BHyTpHeHc TcPOHe ⅢIuIcOB DnB BInpMaJIHHe B0LOC.
- IpoIcxOIOHT NOOrpeB HArpeBaTeIbHbIX nIaCTIN. IpnMepHO uepe3 4 MNHT UINUcI bI rTOBbI K paOte.
- BbHbTe np6op n3 zapnHOrO yctpoCTBa, kpaChble KOHTpOBHbI NaMIOQK INOTyXaIOT.
PPEyPENHENE:
Bepnte npboop pykamn Tolbko 3a ero Hn3uyno Yactb.
BepxHnYtacTb CTAHOBHTCH rOpye. Onachocb OXora.
- TIOIb3yIteCb BbINPMAITeEM DnA BOLOc NCKIQUHTeBHO TOJIbKO HA cyuxx BOLOcax. Bo3bMITE B pyKN PpRb BOLOC, AKKypaTHO OTTARHTe ee BHN3 IN CIERKHaTARHTe. OCTaJIbHO BOLOC Lyuwe BCErO OTKHyTB BBExn HIN B CTOPOHY IN 3aKoIOTb. Ipeed TEM KAK CkATb SInuIbI pImMePHo HA 5 CEkyH, peKOMeHdyETc Eue pa3 npOBepHTb, npABINbHO IN Bbl6paHa No3uINu 3uINuOB. Bcerda HauHnHe Tc KOpHeB OLOc n Pa6otaTE B HApPabNeHH IN KOHNKB. YTo6bl NOlyuHTb paBHomePhyIO 3aNBky, OChE bBaHNO 6paTc CneDyUsoHy npRb c ToJr Je NNHN. He peKOMeHdyETc 3aBnBaTb UINuAMNI NobpeXeHnHn IN N ObecUBeueHHBBOLOC.
- Bo Bpemnay3n nn np KpaTkoBpeMeHHo npnoctaHOBe pa60tbcuamH.HarpeBaTeNbHeI pnaCTnHb 6ydt CHOba nOOrpeBaTbcra.3aropahOTcKpaCHbI KoHTpoNbHbe lamnoukN.
I I PIMMEYAHNE: He octabnTe npnbop 6e3 npncmOTpa, noka OH HaxoINTcra BO BKIOHcEHHom 3aprHOM yCTPOCTBE.
- YTO6bI BbIKIOHHTb PnB6Op HAKMITE Ha BbIKIOHATeNB I/O N BbITaUNTE BnIKy N3 po3EK CETN. 3eNEHa KOTpONbHa JAMNOUka NotyxHET. Pepe TEm KAK erO y6paTb, daJIte EMy HECKOJIbKO MInHYT OCTbITb.
LunuDnna3aBbKn
- PoiHocbHpa3MaToaTe CeTeBOKa6eBb
- BotKNHTe BnIKy B WITENCEJIbHyIO PO3ETky C 3a3eMIIHOUM KOHTAKTOM, yCTaHOBEnHHyO cOrIaCHO ppeINHCANRM, 230 B, 50 rL. N BkHIOHTe 3apJHNOe yCTpoIcTB O npN POMOuN KHOKN I/O, paONIOJOKeHN OcOky. CBetOHnIHnKATOp CETn npoDOJIkaET CBETNTCBn HnTHAHIN3IPYET RTOBHOCTb npNo6opa.
3.LIINIIbI DnI 3aBnBKn B0TKNHe B rOpHOTaJIbHOM NOLOKeHHN B NO3aprAHOe yCTpoiCTBO.3arOpHTcK PAcHAR KOHTPOJIbHa JAMNOUHa Ha NO3aprADHom YCTpoiCTBe.
4.YCTAHOBHTBbIKIOHATeJIbHaUINIaXnIa3ABNBA BNOIOKeHHeON,3aROpITcKpaCHaKoHTpOJIbHaJNaMNoUkaHa pyuke.
5. LINHJI DnI 3aBbKn HArpeBaIOCTc. PInmepHO uepe3 4 MHHYT NINHJI FOTOBb K paOte.
6. BbHbTe npBop n3 3apnHO yCTpoCTBa, KpaChbIe KOHTpOblHbI NAMIOUKNOTyXaIOT.
IPEyIpeKJHHe:
Bepite np6op pykamn Tolbko 3a ero Hn3uO qactb.
Bepxnaqctb cTahOBnTc ropue. OnacHOCTb OHOra.
- HaxMMTE KONKY HAD UINUAMN, YTObI OTKpbTb Nx. 3aKMITE npAIB B0NC MEXdy HMMN 3aKpyTne IH NOHTN DO KOPHeB B0NC.PaBHOMepHO HAKpyNBaTe BaWN BnAAHbE, BbIEpTBIE NOIOTeHM EBOcBi HA UINuBdN 4nuecky no BaWemy JeHaHIO. DePKNTE PnDIN B0NC TOJbKO KOpOTKoe BpeMn HAKpyEHbIMN Ha UINuB, YTObI He NOBpeNTb B0NCb. OctopOHHo packpyTne 3aKpyehHbIe npRn B0NC O6paTHo.
8.BoBpemnay3bInn npKpAeKOBpeMeHHo npnoCTaHOBe paOToBc uHnuaAMn. 4uNpuDn 3aBnBKn 6dyT MeJyTe HArpeBaTbCn. 3aropahOTc KpaCHbIe KOHTpoJIbHbIe IamNoUKN.
I INPIMEYAHNE: He octabnTe np6op 6e3 npncmTopa, noka OH HAXOINTcB O BKNIOHcHOM 3aprHOM yCTPOJCTBE.
9.ДЯ ВИКЛIOHENI npIbOpa yCTaHOBnTE BvIKNIOUaTeNb Ha pyuKe B nIoJKeHne OFF, HaxMITE nepeKIIIOUaTeNB I/O N BvHbTe BVNIky n3 po3eTkn. 3eJIeHaN KOHTpoJIbHaN lamNoUka notyXnet.пepeD Tem kak erO y6paTb, daIte emY HECKoJIbKO MInHYT OCTbIb.
OuHcKa n yXoJ
- PpeI KaJdoI YIcTkoI UINIOB BbIHMaIte BnIKy I3 pO3eTKI!
Kopnyc H 3aprdHoe yctpoCTBO npotpnte MAnKo, cyxon TpnnKo6e3 doabHeHMAOuNX CpeCTB.
HarpBaTeBHeIe nactnHbI uinuDJIa3aBnBKn npotnpaTe CnEka BnaJHoTprKoI. PnH HeoXoJIMocTH MOxHO pImeHHT obuHBe MoOuJe CpeCTBa IINOCyDbl, PpeJaeraMbe TOpROBne.
IocneKaXdouHCTKNOPOOIO npoTnTe HAcyHOHarpeBaTeBbHe INaCTnHbI NmNcI dy 3aBnBKnI - Hn B KOem cnyuae He norpykaHte ounbI B Body!
TexHHueckne daHhble
Moienb: HCC 3156
3JIeKTPoRITaHHe: 220-240B,50Tc
Iotpe6nemar moohocb: 40 BaTT
Klacc 3aunrbl:
3To H3dJIeHHe IPOJIO BCE Heo6xOaHmBle N AKTyAJIbHbIe npOBepKn, IpEINHCaHHbIe DInpeKTHBOI CE, K pIM. Ha 3JIeKTPOMARHTHYO COBMecTUMOCtB NOOTBETCTBNE Tpe6oBaHnM K Hn3KOBoIbTHOH TEXHKe, OHO 6bIIO TaKKe COKHcTppyuPoBaHO IN NOCTpoEO H CyETOM NocJeHNX Tpe6oBaHn IIO TEXHKe 6e30NaChOCTN.
Mbl octabnem 3a coboi npaBo Ha texhueckne HmMeHenHa!
TapaHTHHOe 063aTeJbCTBO
TapaHTnHbI cpoK h TaTeppntOpu PocCnCKo Feepaunu yCTaHaBnBaetcnoHOMOHyIMnpEcdTaBtEnAMN.
KaccobbyuekraBnTcra paHnhbIM TaHOH.63 Hero HeBO3MOKeH 6ecIaTHbI peMOHT HIN 3aMeHa N3deJIIA.
B cnyae Bo3HKnHOBKnHn npTeH3n no rapaHTn, npeIbRbTE n3dJIne B NOHOBKOMNKeTauHH, C opHnHaJIbHOy naHOBKO IN KACCObbM YeKOM TOpROB ToUKe, npOdaBWe 3To n3dJIeNE.
DepeKtby 3HaawBaembIX npHnAaIeXHOCTe HIN TpyuNXcR detalne, a TaKHe YnCTKa, Texo6CnyXBaHne IN 3aMeHa TpyuNXc Rdetalne He NOnaIaOT nOd rapaHTIO, IN PO3TOMy npOBoJrTc3a OTdeNbHyO ONlany!
IapaHTnTepReTc npB BCKpbITn H3dJIIN NOCTOPOHHIMN IInaMn.
Pocne rapaHTM
Pocne OKOHaHn cpoKa rapaHTn, peMOHT n3dEiN npo3BODNTcA 3a ONIATy, COOTBETCTBYUOUMM MaCTepCKMM IIN pYHKtAMn CepBnCHOr O6ClyKbAHn.
GARANTIE-KARTE
Garantiebewijs · Carte de garantie
Certifi cateo digaranzia · Tarjeta de garantia
Cartao de garantia · Guarantee card
Garantikort · Karta gwarancyjna · Zaručni list
Garancia lap·「apaHTnHaH KapToUka
HCC 3156
24 Monate Garantie gemäß Garantie-Erklärung 24 maanden garantie overeenkomstig schriflietiekrechte garantie 24 mois de garantie conformément à la déclaration de garantie 24 meses de garantie según la déclaration de garantia 24 meses de garantia, conforme a déclaration de garantia 24 mesi di garanzia a seconda della spiegazione della garanzia 24 months guarantee according to guarantee declaration 24 manedes garanti i henhold til garantierkläering 24 misiace gwarancj na podstawe karty gwarancjynej Zaruka 24 mésicu podle prohlasei o zaruce A garanciat lásá dhasznalati ulasitásaban Tapačnýhne 603atéltcTa - cMTPN pykoBóctBO nonbObatema
Kaultdatum, Handlerspmolr, Unterschrit - Koopdatum, Stampel van do laverancur, Handleekening - Date d'achat, cachet du revendeur, signature - Feche de compra, Sello del vendedor, Firma - Data de compra, Carimbo do vendedor. Assinatura - Data dell'aquisto, timbro del commerciale, fima - Purchase date, Dealer stamp, Signature - Kjopsdato, stempel fra forhandier, underschrift - Data kupna, Pieczatka sklepu, Podosi - Datum kurpe, Razizko prodjece, Podosi - A vasarlasi dalum, a vasarlasi hely balyegcjo, alairas da loxynynn nehvat roptovna, nangncs

CHATRONIC
INTERNATIONAL GMBH
Industriering Ost 40 · D-47906 Kempen

CAtRONIC
INTERNATIONAL GMBH
D-47906 Kempen/Germany · Industriering Ost 40
Internet: http://www.clatronic.de · email: info@clatronic.de


- General Safety Instructions
- Children and Frail Individuals
- Symbols in these Instructions for Use
- WARNING:
- CAUTION:
- Special safety instructions for this device
- Before Initial Use
- Commissioning
- General Use
- Hair Straightener
- I NOTE:
- Hair curler
- Cleaning and care
- Technical Data
- Guarantee
- After the expiry of the guarantee
- Meaning of the "Dustbin" Symbol
- CneuHaBbIe yka3aHn no 6e3oNaChOCTn DnA 3TOrO np6opa
- BHIMAHHE:
- PNEUYPNEXHEHNE:
- Ipeep npBbIM BkHIOueHHeM
- Bbo npnbopa B 3KcnnyaTaunHO
- PpIMeHHe
- LIIuIbIyIaIyBbInpMaIeHnBoloc
- LunuDnna3aBbKn
- OuHcKa n yXoJ
- TexHHueckne daHhble
- TapaHTHHOe 063aTeJbCTBO
- Pocne rapaHTM
- GARANTIE-KARTE
- HCC 3156
Brand : CLATRONIC
Model : HCC 3156
Category : Hair Straightener