
EIS82453 - Hob ELECTROLUX - Free user manual and instructions
Find the device manual for free EIS82453 ELECTROLUX in PDF.
| Product type | Induction hob |
| Brand | ELECTROLUX |
| Model | EIS82453 |
| Total power | 7.35 kW |
| Power supply | 220-240 V / 400 V 2N, 50 Hz |
| Number of cooking zones | 4 |
| Technology | Induction |
| Cooking zones (diameters) | Front left: 125-210 mm, Rear left: 125-210 mm, Front center: 125-145 mm, Rear right: 205-240 mm |
| Zone power (nominal) | Front left: 2300 W, Rear left: 2300 W, Front center: 1400 W, Rear right: 2300 W |
| PowerBoost | Yes (up to 3600 W on rear right zone) |
| Main functions | PowerBoost, SenseBoil, Bridge, Hob²Hood, Timer, Pause, Power management |
| Display | Touch control panel with digital display |
| Child safety | Yes (child safety device) |
| Key lock | Yes |
| Pan detection | Yes |
| Automatic safety shut-off | Yes |
| Residual heat indicator | Yes (3 levels) |
| Hob-to-hood connection (Hob²Hood) | Yes (infrared) |
| Cleaning | Ceramic surface, use a scraper and a special product |
| Surface material | Ceramic glass |
| Installation | Built-in |
| Power cable | H05V2V2-F (90°C min) |
| Connection | Single-phase or two-phase depending on configuration |
| Energy efficiency class | 187.7 Wh/kg (according to IEC/EN 60350-2) |
Frequently Asked Questions - EIS82453 ELECTROLUX
User questions about EIS82453 ELECTROLUX
0 question about this device. Answer the ones you know or ask your own.
Ask a new question about this device
Download the instructions for your Hob in PDF format for free! Find your manual EIS82453 - ELECTROLUX and take your electronic device back in hand. On this page are published all the documents necessary for the use of your device. EIS82453 by ELECTROLUX.
USER MANUAL EIS82453 ELECTROLUX
How to install your Electrolux Induction Hob - Worktop installation

4. PERSHKRIMI PRODUKTIT
4.1 Skema e siperfaques sè gatimit

1 Zona e gatimit me induksion
2 Paneli kontrollit

IotbpcTe Bndeo ypoka ,KaJa moHTnpate Baunna HnykunoHen Nnot Electrolux - MOHTaX Ha pa60Te HnOT" ,KATO HAnuWeTe TbJHOTO IMe, NOKa3aHO Ha rpaФnkata no-DoJy.

YouTube
www.youtube.com/electrolux
www.youtube.com/aeg
How to install your Electrolux Induction Hob - Worktop installation

4.ОПИSCAHNEHA YPEДА
4.1 Pa3noJoxHeHa nobbpxHocTt 3a rotBeHe
1 INyKUHOHa 3OHa 3a roTBeHe
2 KOnTpOlen nahanen

3a noDpo6Ha HnΦopMaζη 3a
pa3Mepnte Ha 3OHTe 3a rOTBeHe, BIXTe „TexHnueckn DaHHN".
4.2 OΦopMJIeHne Ha KOHTpOHHnnaHeI
I3noJI3BaIte ceH3OpHnTe noJeta, 3a da pa60nte c ypeJa. Ioka3aHnTa ha dncnpe, INdikatopuTE n 3ByKOBtne CnHaII NOKa3BAt KOI cyHKun pa60TAT.
6. BCEKNДHEBHA YNOTPEBA

BHIMAHHE!
Bx. rnaBa "Be3oNaCHOCT".
6.1 AkTnBnpaHe n DeaakTnBnpaHe
HaTnCHeTe n 3aDpBxTe ①, 3a Da aKTbNpuate nn DeakTbNpuate NIOuata.
6.2 OTKpNbAHe Ha cBd
Ta3nФyHKUЯ NOKa3Ba HaNInuHneTo Ha rotBapcKsCbD BbPxy NNouaTa n DeakTbNupa 3OHnte 3a rotBeHe, aKO He bJde OTKpNT rotBapcKsCbD NO BpeMe Ha rotBeHe.
Ako noctabute roTbapckn cbBbpxy 30ha 3a roTbeHe, npdei da n3bepete cTeenHa hArpbaHe, INndkaToptbT na 0 Ha JeHtata 3a ynpaBneHne ce noRBA.
Ako MaxheTe roTbapcknBcD OT aKTNBupaHa 30Ha 3a roTBeHe nro OCTaBte HactpaHa BpeMeHHo, INdNKaTOPHe NaC bOTBeTHaTa KOHTPOJNa JIeHTa 3aNoCHat Da MIRat. Ako He NoCTaBte roTbapcknBcD o6paTHo Bbpxy aKTNBupaHaTa 30Ha 3a roTBeHe BpAMKIne Ha 120 cekyHn, 3OHaTa 3a roTBeHe Ie Ce DeakTNbPa ABTomaTuHOr.
3a da noDHOBnTe rOTBeHeTo, NOCTaBeTe rOTBapckn CbI O6paTHO Bbpyx 3OHnTe 3a rOTBeHe B pAMKIne Ha NOCOueHOTo BpeMe.
6.3ИЗПОЛЗВане Ha 3ОнITE 3a rotBeHe
CnojTe roTbapcknTe cbdoBe Bbpxu
cHTbpa Ha n36paHata 30Ha 3a rotBehe.
HNyKUnOHnTe 30Hn 3a rotBehe
aBTOMaTHUHO Ce pncnoc6BbAT KbM
pa3Mepa Ha dbHOTO Ha roTbapcknA cbD.
Mokete da rotbnte c rojram rotbapcncbHa DBe 30Hn 3a rotbehe eHDOBpemEHo, KaTo n3non3BaTe yHKunra Bridge. Rotbapcknte cbOBe Tpr6Ba Da nOKPnuBat CpeDaTa Ha Dbete 3OHN, HO da He n3JIN3at n3BbH MapknpoBkata.AKO sbOBeTe 3a rotbeHe ce HamnPat Mekdy Dbata CEHTbpa, yHKunra Bridge Hma da 6bde AKTNBnpaHa.
6.4 HacrpoKn 3a 3aToJIaHe
- Hatnche JekhaHaTa CTeneH Ha HarpBaHe Ha JeHTaTa 3a ynpabLeHne. IHdkaTopite NaIeHTaTa 3a ynpabLeHne CE NOBBAt Do N3paHOTo HnBO Ha HactpOikKaTa Ha HarpBaHe.
- 3a Да ДeakTиВирTe 3OHa 3a rotBeHe, HATiNCHete 0.
6.5 PowerBoost
Ta3nФyHKUINIpeIOCTaBnIOBEeMOUHOCT Ha INDyKUNOHNTE 30Hn 3a rotBeHe.
ΦyHKUINaMoKe Da 6bJe aKTINBnPaHa 3a INDyKUNOHNTE 30Hn 3a rotBeHe 3a
OrpaHnueH nepNO dt Bpeme.CneTobA, INDyKUNOHnHaTa 30Ha 3a rotBeHe
ABTomAtuHo Ce IpeBKnUoyBa ObaTHo Ha Hau-BnCOKata NaCTpoKa 3a HapraBaHe.

Bx. rIaba "Texnuecka nHΦopMaζu".
3a daakTNBnapeTe yHKnraTa 3a 3oHaTa 3a roTBeHe:doKoCHeTe P.
3a Da n3KIOUHTe cyHKcIyTa: IpomHa Ha NaCTpOJaTa Ha HarpBaHe.
6.6 OptiHeat Control (3-cTbKnOB INHdNkaTOP 3a OCTaTbUHa TOnJIHa)

BHIMAHHE!
三 /二 /二OKaTO INHnKaTOpbTe widim, cIeCTByBa pMCK OT n3rapHnO T OCTaTbHa TOJIInHa.
ИнданоюнITE 30н 3а ROTBEHe npOn3BExJaT TOnПиHa, HeO6xOДмma 3a npOueca Ha RotBEHe, HAnpaBO Ha DbHOTo Ha rotBapcKnCsbD. CtBKnOKepaMnKaTa ce 3aIpRaBa OT TOnПиHaTa Ha CbdoBeTe 3a ROTBeHe.
Индikatopnte ce noBBAbat, KOraTo 3OHa 3a roTBeHe e ropeu. Te noka3Bat HnBOTO Ha OCTaTbUHaTa TOnJIInHa 3a 3OHTe 3a RotBeHe, KOINTo N3IOn3BaTe B MOMENTa:
- npoDbJnxkabaHa roTbeHeTo,
- -пдьрхан ha TOnJIHa
- OCTaTbUHa TOnnInHa.
6.10 CtpyKTypa Ha MeHIOTo
Tablunata noka3Ba OCHOBHATA ctpyKtypa Ha MeHIOTo.
Iotpe6nteJckn hactpojkn
3a n3n3aHe OT MeHOTo: HATiCHeTe ①.
OffSound Control
Mokete da akTbBnpaTe / deakTbBnpaTe 3ByKOBITE CnHann B MeHIOTo > Iotpe6nteNcN hAcTpoKn.

BnKTe „CtpyKtypa Ha MeHIOTo".
Korato 3ByKOBIte CnHaN ca n3KJIIOHeH, BCE OSe MOKeTe Da yBaTe 3ByKOBnCnHaN, KOrato:
HaTINCHETe ①
TaMepbT n3racBa,
- HAATNCKATE HeaKTINBEH CIMBOJ.
BCNUKIN30HIN3aTOTBeHeCa DeakTNBupaHn,
CneAkTNBnPaHeToHaPiNoyataH He 3aDaBaTe HnKaKbN CTeneHn HaHarpaBaHe IIN HA CKOpOCT Ha BeHTNuTaTopa,
pa3JIeTe HeIIO uIN OCTaBnTe HeIIO (cBd, Kbpna n T.H.) Ha KOHTpOInHOTo Ta6No 3a noBuee ot 10 cekyHn. Ipo3ByaBa cnHaJn pIoYaTa ce DeakTbNpa. CbaIeTe npEIMeta INIIN oOncTeTe KOHTpONHOTo Ta6No.
- ypejbT cTaba MHOrO ropeu (Hanp. KORATO TeuHocTTa B TEHxpePaTa e 3Bprna HnblHo). OCTabete 3oHaT a 3a rotBeHe Da n3ctInHe, ppei Da n3noI3BaTe Pnota OTHOBO.
He CTe DeaekTbUbpaln 30HaTa 3a rotBeH He CTe npomEnJIn CTenEHTa Ha HapraBaHe. CJeI n3BecTHo BpeMe PIOuata ce DeakTbUpa.
Bpb3kaTamaMekdyCTeNEHTaHaHarpBaHe n BpeMeTo, CneI KOeTO ypeDbT ce DeakTnBnpa:
| Насторики за зато- пляне | Плотьт се Deaktni- Вира след |
| 1 - 2 | 6 час |
| 3 - 4 | 5 час |
| 5 | 4 час |
| 6 - 9 | 1,5 час |
7.2 Nay3a
Ta3nФyHKZna3aDaba BCNUKn ONEpaTINBHN 30Hn 3a rotBeHe, KOINTo pa6OraT Ha HauHNCkata HAcTPOka Ha 3aTOJIJaHe.
KoratoФункцятapa60tN,MOKe da ce n3PON3BAT ① IN. BcHKnOCTaHAnCnMBOINHa NaHeJa 3a ynpabJeHne ca DeakTbUpaHn.
MaTePnAHa roTbapcknte CbdoBe
- npabunho: Ugamma, CTomaha, emaJInpaHa CTomaha, HepbXdaema CTomaha, MHOROcnoHObIbHO (C npabuHa MapknupbKa oT npoN3BODnteJIa).
He npabnH0 aJyMmHm, Mei, MecnHCTbKlno, Kepamnka, nopueHaH.
CbIbT 3a roTBeHe e noDxoJa 3a HnyKuONHa nloa, ako:
BODaTa 3aBnpa MhOrO 6bP3o Ha 30Ha, HAcTpoEHa Ha Han-BnCOKaTa HAcTpoiKa 3a HArpBaHe.
MaHHT PnBJIuHa IbHOTo Ha rotBapCKn CbD.
Pa3mepn Ha roTbapckn CbdoBe
IHyDyKUHOHHTe 30Hn 3a rotBeHe aBTOMaTNUHO Ce npncno6BaBt KbMa pa3Mepa Ha DbHOTo Ha rotBapckncaBd.
- EfeKTHBHOCTTHa 30HATA 3a roTBHe 3aBnCn OT dNaMeTbpa Ha roTBapCKnBa CbD. CbDoBe 3a roTBHe c nO-MaJbK dNaMeTbp OT MInHMaJIHnI NOJyCabat cMo qAcT OT
MOUHOCCTTa, rHeepuapaHa OT 30HaTa 3a IOTBeHe.
- Ot cboobpaqhenia 3a cnypnoct n 3a onTnmaHn pe3yIITATn npn rotBHe, He n3No13BaIte rotBapcKn cbI, KOTo e no-roJAM OT NocOeHOT B „CneuNcNkaun Ha 30Hn 3a rotBeHe". N36raBaiTe n3No13BaHTo Ha rotBapcKn cbI 6bn3o Do KOHTpONHOTo TabIO NO BpeMe Ha rotBHe. Toba Moze da nobInere Bbpxy fynKcuOHnpaHTo HA KOHTpONHOTo TabIo INI M OMOe CnyauHDo a AKTNbPa fynHKUInTe Ha KOTNoHa.
i
Buxte „Texnueckn xapaKtepcntuKn".
8.2 WymoBe no BpeMe Ha pa6oTa
Ako cyete:
- pykaiz 3ByK: rotBapcKnT cBd e HanpaBeH OT pa3Jiuyeh MaTePnaI (KOHCTpyKzna CaHDbVU);
CBNCTI3BYK: IN3NOIN3BaTe 3OHa 3a rotBeHe C BnCOKO HnBO Ha MoUHOCt, a rotBapcknT CbE He NaPbaEN OT pa3JIuYeMaTepnaI (KOHCTpykUncaHbV). - 6yueHe: IN3PON3BaTe BnCOKO HnBO Ha MOUHOCT;
- UpaKaHe: eIekTpnuEcko npeBknUOvaHe;
cBcKaHe,6pMbYeHe:BeHTnJaTOpbTp pa60Tu.
UymoBeTe ca HopMaJIHn I He Noka3BaT HEn3npaBHOCT.
8.3 Öko Timer (Eko Taïmep)
3a da nectnte eheprn, HarpeBaTeIyT ha 30HaTa 3a roTBeHe Ce DeakTINBupa npEi n CunHana Ha TaMepa 3a O6pOraBaHe Ha OCTabaUsoTo BpeMe. PaZNIkata BvB BpeMeTo 3a pa6oTa 3abuCn OT cTeNeHTa Ha HarpaBaHe N BpeMeTpaeheto Ha rotBeHeto.
8.4 OnpocTeHo pIbKOBOdCTBO 3a rotBeHe
Bpb3kata MeKdy CTeneHTa Ha HarpBaHe m KOHCyMaIraTa Ha eHepnHa 3oHaTa He e JInHeHa. Korato YBeJIuNtte CTeneHTa Ha HarpBaHe, TRe He e npOnOpzIOHaJIHa Ha YBeJIuYabAHeto Ha KOHCyMaIraTa Ha eHepn. ToBa O3NaHaba, Ye 3oHaTa 3a rotBeHe CbC cpeHa CTeEN Ha HarpBaHe n3NoJ3Ba NO-MANKO OT NIOBOINHaTc OCBora eHepn.
i
ДааннiteВ tabицараз ca calo opneHTnOBoHn.
| Hасторки за Затонл�е | Изэнзваши, за за: | Враеме (Mин) | Преторыки |
| 1 | Повдьржайтс сrotвената xрана то- пла. | при нео- бходи- мост | Проставete калak вьрух rotварскney сыd. |
| 1 - 2 | Сос „Холанда", разtonete: масло, шокалд, лесатин. | 5 - 25 | От bраеме на bраеме разбьрваши. |
| 2 | За Втврдявано: пухкову омлели, пес- чени яйца. | 10 - 40 | Готвато с поставен калak. |
| 2 - 3 | За Bavарень на орizu и ястся с млько, праз cottonл�ны на ratови ястny. | 25 - 50 | Добавete пою два пьтуни поевочему teч- ност, оTKOLКOTO e орizuzt, по среда- та на ratвенeto сmedete мльчине блида. |
| 3 - 4 | Зelenчуни, риба r месо на пара. | 20 - 45 | Добавete Няковко сученп льжши вoda. Праверete к olчессытOTO вoda по bраеме на поцеса. |
| Hасторки за затоллamede | Изменberryte , за дa: | Врeme (Mин) | Прелорыки |
| 4 - 5 | Картофи и дугни зеленчуни на пара. | 20 - 60 | Покрийские Дьното на готварскя сбдс 1-2 см вoda. Правераяпейно на вodату по Врeme на пюцеса.Дръжтеба калaka на готварскя сбд. |
| 4 - 5 | Говende на по-rogLEMи кolyочевахрана, яхни и суни. | 60 - 150 | До 3 л т教职工 спостс CBSTавки. |
| 6 - 7 | Лесо залъжвае:шицел (фиме),телшко кордан Бльо, кotлети, кфотета, наdenиca, дрб, маслоно-брашени замъжka, яиca, палачини, понични. | при нео-бхODи-MоCT | Оьberгete, korato e Neobхомmo. |
| 7 - 8 | С们но пьжende, karтоф.kioфтета,фиме-Mиньон, ст教职工. | 5 - 15 | Оьberгete, korato e Neobхомmo. |
| 9 | Калвае на вoda, говende на мakаронец Иделя, залъжвае на месо (гулаш, заушно), пьжende на karтофи. | ||
| P | Калвае на поlemи кolyочева вoda. PowerBoost e aktivbanan. |
8.5 Пpenopbknи cBBeTu 3a Hob²Hood
Korato ynpabnbaTe nioyataC cyHKun:
- Na3ete naHeJa ha acnPapatopa ot npraKa CJbHYeBa CBETJInHa.
He noctabraTe xaIoreHna CBETlnHa Bbpxy naheJa ha abcop6aTopa.
He nokpmbaIte KOMaHdHoto Ta6JIO Ha IIOuHTe.
He npeKbcbai Te cunHaIa MeJy IIOuata H acnnpaTopa (HapnPmep C pKa, roTbapcka pkoXbaTkA INI IN TeHKepa). BnKTe n3o6paXeHneTo.
AcnnpaTopbT, noka3an no-dony, e camo c nIIOCTpaTnBHa ueI.
i
Дугн дисанционно КОТРОЛИРаMuуpeи могатда 6лOKиратсгнал. HeI3noI3BaIte TaKINBA ypeiN B 6ln3OCTdoПLOUaTа,doKaTo HOb²Hood e BkIIOUeH.
A6cop6aTopn 3a roTBeHe C cyHKunia Hob²Hood
3a da Hamepnte nblnHaTa rama
abcopbatoPn, KOnTo pa6oTc Ta3n
fynkui, BnxTe Haunn Notpe6ntenckn
ye6caT. Acnpatopnte Ha Electrolux, KOnTo
pa6oTc T a3n fynkui, Tpr6Ba Da Nmat
CMBONA AUTO.
9. Глижам поочьбаHE

BHIMAHHE!
Bx. rnaBa "Be3oNaChOCT".
9.1 O6za HnΦopMaζη
-Почистваима след BCякaynotpe6a.
BnHaHn n3noJI3BaIte roTbApcKn cIIOBe C HCTO DbHO.
HaapackBaHnI NITbMNI PeTNa IIO NBpXHOCTTa He BnIyRr Ha pa6OtaTa HApNoYata.
- ɪnʒənɪzɪbawɪte cneɪzɪaɪen nʊɔːnctbaɪs
ɪpɛnapat,ɪpɛdɪnəhauɛn 3a
nɒBbpxHOCCTTHa nɪlota.
BnHarnn3no3BaIte cTbprAnka, npenopbUbaHa 3a nIoOu CbC cTbKNeHa nobbpXHOCT. N3no3BaIte cTbprAnkata camo KaTo dOnbJInHTeJeH INcTpymeHT 3a nouchCTBaHe Ha cTbKnoto Cnei CTaNdapTHaT aPooeDypa 3a nouchCTBaHe.

BHIMAHINE!
He n3no3BaIte HOXOBe nIIN dpyn OCTpN, MetaHn INHCTpyMeHTN 3a NOUcHbAHe Ha CTbKNeHaTa NOBbPxHOCT.
11. TEXHINUeCKN DAHHN
11.1 Ta6eIka c daHnn
Moden EIS82453
Tin 62 D4A 01 AA
INdukn7.35kW
CepnEn No
ELECTROLUX
PpOdyKToB KoD (PNC) 949 599 294 00
220 - 240 V / 400 V 2N, 50 Hz
How to install your Electrolux Induction Hob - Worktop installation

4. DESCRIPCÍO DEL PRODUCTE
How to install your Electrolux Induction Hob - Worktop installation

4. OPIS PROIZVODA
4.1 Raspored povrsine za kuhanje

1 Indukcijska zona kuhanja
2 Upravljacka ploča

Detaljne informacije o velicinama zona kuhanja potrazite u poglavlju "Tehnički podaci".
4.2 Izgled upravljačke ploce

Koristite polja senzora za rukovanje uredajem. Zasloni, indicatori i zvukovi govore koje funkcjije rade.
| Polje senzo-ra | Funkcija | Opis | |
| 1 | ① | Uključeno / Isključeno | Za uključivanje i isključivanje urežaja. |
| 2 | II | Pauza | Za uključivanje i isključivanje funkcjë. |
| 3 | ◎ | Tajmer | Za postavljanje funkcjë. |
| 4 | +/- | - | Za povećanje ili smanjenje vremena. |
| 5 | - | Zaslon tajmera | Za prikaz vremena u minutama. |
| 6 | ◎° | SenseBoil® | SenseBoil®. Za automatisko podešavanje temperature vode takо da ne vrije kada dosegne točku vretenja. |
| 7 | ■ | Bridge | Za uključivanje i isključivanje funkcjë. |
| 8 | AUTO | Hob²Hood | Za uključivanje i isključivanje ručnog načina rada funkci-je. |
| 9 | - | Kontrolna traka | Za postavljanje stipnjia kuhanja. |
| 10 | P | PowerBoost | Za uključivanje funkcjë. |
| 11 | Blokiranje / Urežaj za zašitù djece | Za zakljucavanje/otključavanje upravljäčke ploće. |
4.3 Indikatori zaslona
| Indicator | Opis |
| E + brojka | Došlo je do kvara. |
| E/ E/ E | OptiHeat Control (3-stupanjski indicator preostale topline): nastavak kuhanja / odžava-nje topline / zaostala toplina. |
5. PRIJE PRVE UPORABE

UPOZORENJE!
6. SVAKODNEVNA UPORABA

UPOZORENJE!
Welcome to Electrolux! Thank you for choosing our appliance.

Get usage advice, brochures, trouble shooter, service and repair information: www.electrolux.com/support
Subject to change without notice.
CONTENTS
1.SAFETY INFORMATION. 92
2.SAFETYINSTRUCTIONS 94
3. INSTALLATION 96
4.PRODUCT DESCRIPTION. 98
5. BEFORE FIRST USE 100
6.DAILYUSE 100
7. ADDITIONAL FUNCTIONS 104
8. HINTS AND TIPS 106
9.CARE AND CLEANING. 108
10.TROUBLESHOOTING. 108
11. TECHNICAL DATA 110
12. ENERGY EFFICIENCY 111
13. ENVIRONMENTAL CONCERNS 112
1. SAFETY INFORMATION
Before the installation and use of the appliance, carefully read the supplied instructions. The manufacturer is not responsible for any injuries or damage that are the result of incorrect installation or usage. Always keep the instructions in a safe and accessible location for future reference.
1.1 Children and vulnerable people safety
-
This appliance can be used by children aged from 8 years and above and persons with reduced physical, sensory or mental capabilities or lack of experience and knowledge if they have been given supervision or instruction concerning the use of the appliance in a safe way and understand the hazards involved. Children of less than 8 years of age and persons with very extensive and complex disabilities shall be kept away from the appliance unless continuously supervised.
-
Children should be supervised to ensure that they do not play with the appliance.
- Keep all packaging away from children and dispose of it appropriately.
- WARNING: The appliance and its accessible parts become hot during use. Keep children and pets away from the appliance when in use and when cooling down.
- If the appliance has a child safety device, it should be activated.
- Children shall not carry out cleaning and user maintenance of the appliance without supervision.
1.2 General Safety
- This appliance is for cooking purposes only.
- This appliance is designed for single household domestic use in an indoor environment.
- This appliance may be used in, offices, hotel guest rooms, bed & breakfast guest rooms, farm guest houses and other similar accommodation where such use does not exceed (average) domestic usage levels.
- WARNING: The appliance and its accessible parts become hot during use. Care should be taken to avoid touching heating elements.
WARNING: Unattended cooking on a hob with fat or oil can be dangerous and may result in fire. - Smoke is an indication of overheating. Never use water to extinguish the cooking fire. Switch off the appliance and cover flames with e.g. a fire blanket or lid.
- WARNING: The appliance must not be supplied through an external switching device, such as a timer, or connected to a circuit that is regularly switched on and off by a utility.
-
CAUTION: The cooking process has to be supervised (even the automatic cooking functions). A short term cooking process has to be supervised continuously.
WARNING: Danger of fire: Do not store items on the cooking surfaces. -
Metallic objects such as knives, forks, spoons and lids should not be placed on the hob surface since they can get hot.
- Do not use the appliance before installing it in the built-in structure.
- Do not use a steam cleaner to clean the appliance.
- After use, switch off the hob element by its control and do not rely on the pan detector.
- If the glass ceramic surface / glass surface is cracked, switch off the appliance and unplug it from the mains. In case the appliance is connected to the mains directly using junction box, remove the fuse to disconnect the appliance from power supply. In either case contact the Authorised Service Centre.
- If the supply cord is damaged, it must be replaced by the manufacturer, an authorized Service or similarly qualified persons in order to avoid a hazard.
- WARNING: Use only hob guards designed by the manufacturer of the cooking appliance or indicated by the manufacturer of the appliance in the instructions for use as suitable or hob guards incorporated in the appliance. The use of inappropriate guards can cause accidents.
2. SAFETY INSTRUCTIONS
2.1 Installation

WARNING!
Only a qualified person must install this appliance.

WARNING!
Risk of injury or damage to the appliance.
- Remove all the packaging.
- Do not install or use a damaged appliance.
- Follow the installation instructions supplied with the appliance.
- Keep the minimum distance from other appliances and units.
Always take care when moving the appliance as it is heavy. Always use safety gloves and enclosed footwear.
- Seal the cut surfaces of the cabinet with a sealant to prevent moisture from causing swelling.
- Protect the bottom of the appliance from steam and moisture.
- Do not install the appliance next to a door or under a window. This prevents hot cookware from falling from the appliance when the door or the window is opened.
Each appliance has cooling fans on the bottom.
- If the appliance is installed above a drawer:
- Do not store any small pieces or sheets of paper that could be pulled in, as they can damage the cooling fans or impair the cooling system.
-
Keep a distance of minimum 2 cm between the bottom of the appliance and parts stored in the drawer.
-
Remove any separator panels installed in the cabinet below the appliance.
2.2 Electrical Connection

WARNING!
Risk of fire and electric shock.
- All electrical connections should be made by a qualified electrician.
The appliance must be earthed. - Before carrying out any operation make sure that the appliance is disconnected from the power supply.
- Make sure that the parameters on the rating plate are compatible with the electrical ratings of the mains power supply.
- Make sure the appliance is installed correctly. Loose and incorrect electricity mains cable or plug (if applicable) can make the terminal become too hot.
- Use the correct electricity mains cable.
- Do not let the electricity mains cable tangle.
Make sure that a shock protection is installed. - Use the strain relief clamp on the cable.
Make sure the mains cable or plug (if applicable) does not touch the hot appliance or hot cookware, when you connect the appliance to a socket. - Do not use multi-plug adapters and extension cables.
- Make sure not to cause damage to the mains plug (if applicable) or to the mains cable. Contact our Authorised Service Centre or an electrician to change a damaged mains cable.
- The shock protection of live and insulated parts must be fastened in such a way that it cannot be removed without tools.
- Connect the mains plug to the mains socket only at the end of the installation. Make sure that there is access to the mains plug after the installation.
If the mains socket is loose, do not connect the mains plug.
- Do not pull the mains cable to disconnect the appliance. Always pull the mains plug.
- Use only correct isolation devices: line protecting cut-outs, fuses (screw type fuses removed from the holder), earth leakage trips and contactors.
- The electrical installation must have an isolation device which lets you disconnect the appliance from the mains at all poles. The isolation device must have a contact opening width of minimum 3 mm.
- If the E3 code appears on the screen, immediately disconnect the hob and check if the electrical connection and the mains voltage are correct.
2.3 Use

WARNING!
Risk of injury, burns and electric shock.
- Do not change the specification of this appliance.
- Remove all the packaging, labelling and protective film (if applicable) before first use.
Make sure that the ventilation openings are not blocked. - Do not let the appliance stay unattended during operation.
- Set the cooking zone to "off" after each use.
- Do not put cutlery or saucepan lids on the cooking zones. They can become hot.
- Do not operate the appliance with wet hands or when it has contact with water.
- Do not use the appliance as a work surface or as a storage surface.
- If the surface of the appliance is cracked, disconnect immediately the appliance from the power supply. This to prevent an electrical shock.
- Users with a pacemaker must keep a distance of minimum 30~cm from the induction cooking zones when the appliance is in operation.
- When you place food into hot oil, it may splash.
- Do not use aluminum foil or other materials between the cooking surface and the cookware, unless otherwise
specified by the manufacturer of this appliance.
- Use only accessories recommended for this appliance by the manufacturer.

WARNING!
Risk of fire and explosion.
- Fats and oil when heated can release flammable vapours. Keep flames or heated objects away from fats and oils when you cook with them.
- The vapours that very hot oil releases can cause spontaneous combustion.
Used oil, that can contain food remnants, can cause fire at a lower temperature than oil used for the first time. - Do not put flammable products or items that are wet with flammable products in, near or on the appliance.

WARNING!
Risk of damage to the appliance.
- Do not keep hot cookware on the control panel.
- Do not put a hot pan cover on the glass surface of the hob.
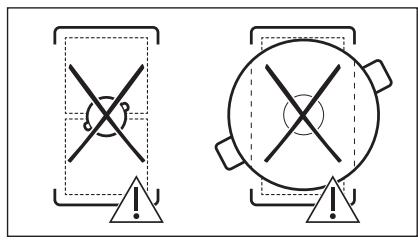
- Do not let cookware boil dry.
- Be careful not to let objects or cookware fall on the appliance. The surface can be damaged.
- Do not activate the cooking zones with empty cookware or without cookware.
- Cookware made of cast iron or with a damaged bottom can cause scratches on the glass / glass ceramic. Always lift these objects up when you have to move them on the cooking surface.
2.4 Care and cleaning
Clean the appliance regularly to prevent the deterioration of the surface material.
3. INSTALLATION

WARNING!
Refer to Safety chapters.
- Switch off the appliance and let it cool down before cleaning.
- Do not use water spray and steam to clean the appliance.
- Clean the appliance with a moist soft cloth. Use only neutral detergents. Do not use abrasive products, abrasive cleaning pads, solvents or metal objects, unless otherwise specified.
2.5 Service
To repair the appliance contact the Authorised Service Centre. Use original spare parts only.
- Concerning the lamp(s) inside this product and spare part lamps sold separately: These lamps are intended to withstand extreme physical conditions in household appliances, such as temperature, vibration, humidity, or are intended to signal information about the operational status of the appliance. They are not intended to be used in other applications and are not suitable for household room illumination.
2.6 Disposal

WARNING!
Risk of injury or suffocation.
- Contact your local authority for information on how to dispose of the appliance.
- Disconnect the appliance from the mains supply.
- Cut off the mains electrical cable close to the appliance and dispose of it.
3.1 Before the installation
Before you install the hob, write down the information below from the rating plate. The rating plate is on the bottom of the hob.
Serial number
3.2 Built-in hobs
Only use the built-in hobs after you assemble the hob into correct built-in units and work surfaces that align to the standards.
3.3 Connection cable
- The hob is supplied with a connection cable.
- To replace the damaged mains cable, use the cable type: H05V2V2-F which withstands a temperature of 90^ or higher. A single wire must have a minimal cross section in accordance with the table below. Speak to your local Service Centre. The connection cable may only be replaced by a qualified electrician.
WARNING!
All electrical connections must be made by a qualified electrician.
CAUTION!
Connections via contact plugs are forbidden.
CAUTION!
Do not drill or solder the wire ends. It is forbidden.
CAUTION!
Do not connect the cable without cable end sleeve.
One-phase connection
- Remove the cable end sleeve from black, brown and blue wires.
- Remove a part of the insulation of the brown, black and blue cable ends.
- Connect the ends of black and brown cables.
- Apply a new wire end sleeve on the shared wire's end (special tool required).
- Connect the ends of two blue cables.
- Apply a new wire end sleeve on the shared wire's end (special tool required).
Two-phase connection
- Remove the cable end sleeve from blue wires.
- Remove a part of the insulation of the blue cable ends.
- Connect the ends of two blue cables.
- Apply a new end wire sleeve on the shared wire's end (special tool required).
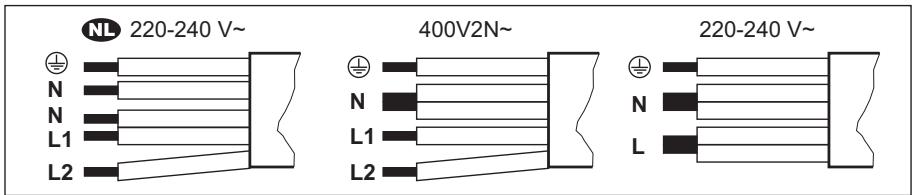
| NL 220 - 240 V~ | Two-phase connection: 400 V2N~ | One-phase connection: 220 - 240 V~ | |||
| 5x1,5 mm² | 5x1,5 mm² or 4x2,5 mm² | 5x1,5 mm² or 3x4 mm² | |||
| ½ | Green - yellow | ½ | Green - yellow | ½ | Green - yellow |
| N | Blue and blue | N | Blue and blue | N | Blue and blue |
| L1 | Black | L1 | Black | L | Black and brown |
| L2 | Brown | L2 | Brown | ||
3.4 Assembly
If you install the hob under a hood, please see the installation instructions of the hood for the minimum distance between the appliances.

If the appliance is installed above a drawer, the hob ventilation can warm up the items stored in the drawer during the cooking process.
Find the video tutorial "How to install your Electrolux Induction Hob - Worktop installation" by typing out the full name indicated in the graphic below.

www.youtube.com/electrolux
www.youtube.com/aeg
How to install your Electrolux Induction Hob - Worktop installation

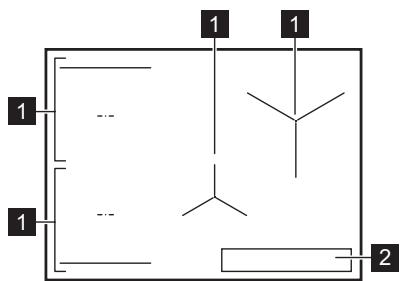
4. PRODUCT DESCRIPTION
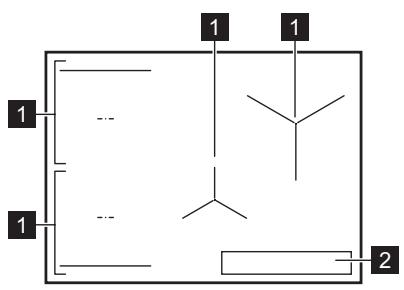
4.1 Cooking surface layout

1 Induction cooking zone
2 Control panel
i
For detailed information on the sizes of the cooking zones refer to "Technical data".
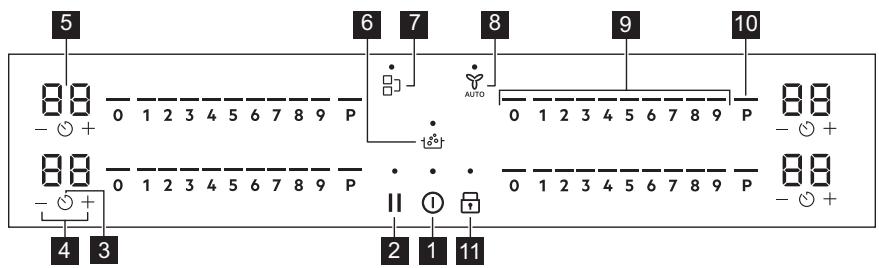
4.2 Control panel layout
Use the sensor fields to operate the appliance. The displays, indicators and sounds tell which functions operate.
| Sensor field | Function | Description | |
| 1 | ① | On / Off | To activate and deactivate the appliance. |
| 2 | II | Pause | To activate and deactivate the function. |
| 3 | ○ | Timer | To set the function. |
| 4 | +/- | - | To increase or decrease the time. |
| 5 | - | Timer display | To show the time in minutes. |
| 6 | ○○ | SenseBoil® | SenseBoil®. To automatically adjust the temperature of water so that it does not boil over once it reaches the boiling point. |
| 7 | ■ | Bridge | To activate and deactivate the function. |
| 8 | AUTO | Hob²Hood | To activate and deactivate the manual mode of the function. |
| 9 | - | Control bar | To set a heat setting. |
| 10 | P | PowerBoost | To activate the function. |
| 11 | ○ | Lock / Child Safety Device | To lock / unlock the control panel. |
4.3 Display indicators
| Indicator | Description |
| E + digit | There is a malfunction. |
| / / / | OptiHeat Control (3 step Residual heat indicator): continue cooking / keep warm / resid-ual heat. |
5. BEFORE FIRST USE

WARNING!
Refer to Safety chapters.
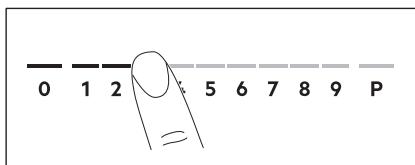
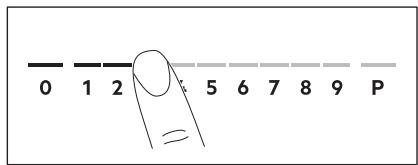
5.1 Power limitation
Power limitation defines how much power is used by the hob in total, within the limits of the house installation fuses.
The hob is set to its highest possible power level by default.
To decrease or increase the power level:
- Enter the menu: press and hold ① for 3 seconds. Then, press and hold
- Press on the front timer until P appears.
- Press - / + on the front timer to set the power level.
- Press ① to exit.
Power levels
Refer to "Technical data" chapter.

CAUTION!
Make sure that the selected power fits the house installation fuses.

CAUTION!
If the power level is lower than or equal to 2000 W you cannot activate SenseBoil®.
P73—7350W
P15—1500W
P20—2000W
P25—2500W
P30—3000W
P35—3500W
P40—4000W
P45—4500W
P50—5000W
P60—6000W
6. DAILY USE

WARNING!
Refer to Safety chapters.
6.1 Activating and deactivating
Press and hold ① to activate or deactivate the hob.
6.2 Pot detection
This feature indicates the presence of cookware on the hob and deactivates the cooking zones if no cookware is detected during a cooking session.
If you put cookware on a cooking zone before you select a heat setting, the indicator above 0 on the control bar appears.
If you remove cookware from an activated cooking zone and set it aside temporarily, the indicators above the corresponding control bar will start blinking. If you do not place the
cookware back on the activated cooking zone within 120 seconds, the cooking zone will automatically deactivate.
To resume cooking, make sure to put the cookware back on the cooking zones within the indicated timeout.
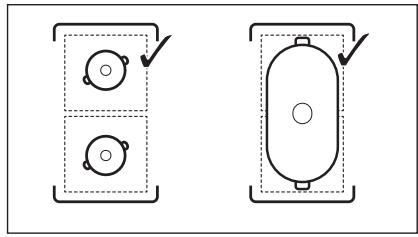
6.3 Using the cooking zones
Place the cookware in the centre of the selected zone. Induction cooking zones adapt to the dimension of the bottom of the cookware automatically.
You can cook with large cookware placed on two cooking zones at the same time using Bridge function. The cookware must cover the centres of both zones but not go beyond the area marking. If the cookware is located between the two centres, Bridge function will not be activated.
6.4 Heat setting
- Press the desired heat setting on the control bar.
The indicators above the control bar appear up to the selected heat setting level.
2. To deactivate a cooking zone, press 0.
6.5 PowerBoost
This function makes more power available to the induction cooking zones. The function can be activated for the induction cooking zone only for a limited period of time. After this time the induction cooking zone automatically sets back to the highest heat setting.
i
Refer to "Technical data" chapter.
To activate the function for a cooking zone: touch P.
To deactivate the function: change the heat setting.
6.6 OptiHeat Control (3 step Residual heat indicator)

WARNING!
/ As long as the indicator is visible, there is a risk of burns from residual heat.
The induction cooking zones produce the heat necessary for the cooking process directly in the bottom of the cookware. The glass ceramic is heated by the heat of the cookware.
The indicators appear when a cooking zone is hot. They show the level of the residual heat for the cooking zones you are currently using:
- continue cooking,
- -keepwarm,
- residual heat.
The indicator may also appear:
for the neighbouring cooking zones even if you are not using them,
- when hot cookware is placed on cold cooking zone,
- when the hob is deactivated but the cooking zone is still hot.
The indicator disappears when the cooking zone has cooled down.
6.7 Timer options
Count Down Timer
Use this function to specify how long a cooking zone should operate during a single cooking session.
Set the heat setting for the selected cooking zone and then set the function.
- Press 00 appears on the timer display.
- Press + or - to set the time (00-99 minutes).
- Press to start the timer or wait 3 seconds. The timer begins to count down.
To change the time: select the cooking zone with and press + or -.
To deactivate the function: select the cooking zone with and press —. The remaining time counts back to 00.
The timer finishes counting down, a signal sounds and 00 blinks. The cooking zone deactivates. Press any symbol to stop the signal and blinking.
Minute Minder
You can use this function when the hob is activated but the cooking zones do not operate. The heat setting shows 00.
-
Press
-
Press + or - to set the time.
The timer finishes counting down, a signal sounds and 00 blinks. Press any symbol to stop the signal and blinking.
To deactivate the function: press and —. The remaining time counts back to 00.
6.8 Power management
If multiple zones are active and the consumed power exceeds the limitation of the power supply, this function divides the available power between all cooking zones. The hob controls heat settings to protect the fuses of the house installation.
If the hob reaches the limit of maximum available power (refer to the rating plate), the power of the cooking zones will be automatically reduced.
- The heat setting of the cooking zone selected first is always prioritised. The remaining power will be divided between the other cooking zones according to the order of selection.
- For cooking zones that have a reduced power, the control bar blinks and shows the maximum possible heat settings.
- Wait until the display stops flashing or reduce the heat setting of the cooking zone selected last. The cooking zones will continue operating with the reduced heat setting. Change the heat settings of the cooking zones manually, if necessary.
6.9 SenseBoil®
The function automatically adjusts the temperature of water so that it does not boil over once it reaches the boiling point.
i
If there is any residual heat ( / / ) on the cooking zone you want to use, an acoustic signal sounds and the function does not start.
The function does not work with non-stick cookware.
CAUTION!
Do not use the function with empty cookware.
Do not leave the hob unattended while the function is operating.
- Place pots filled with 1 - 5 l of cold water on the available cooking zones for which you want to start the function.
If you place one pot on only one cooking zone the function starts automatically. - Touch ① to activate the hob.
- Touch 8^ to activate the function.
A blinking indicator above P appears for each cooking zone on which you can presently use the function.
4. Touch anywhere on the slider of the chosen cooking zone.
The function starts.
Once the function starts the indicators above the slider appear and the animation starts running.
i
If you do not place a pot on any of the cooking zones within 5 seconds, the function deactivates automatically.
When the function reaches the boiling point the hob emits an acoustic signal and the heat setting automatically changes to a default simmering level.
To deactivate the function before the boiling point has been reached, touch or 0.
To deactivate the function after the boiling point has been reached, touch the slider and adjust the heat setting manually.
If you activate Pause or remove the pot the function deactivates.
If you set a Count Down Timer on one of the cooking zones and the set time runs out before the boiling point is reached the function deactivates automatically.
Hints and tips:
- The function is best suited for boiling water and cooking potatoes.
- The function may not work properly for kettles and stovetop espresso pots.
- Fill between half to three quarters of the pot with cold tap water leaving 4cm from the rim of the pot empty. Do not use less than 1 l or more than 5 l of water. Make sure the total weight of the water (or the water and potatoes) ranges between 1-5 kg.
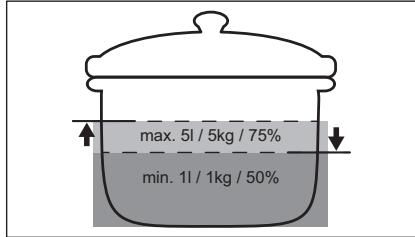
To achieve the best results cook only whole, unpeeled, medium-sized potatoes. Make sure you do not pack potatoes too tightly.
- During the heat up phase avoid energetic stirring of other pots and parallel cooking processes (such as frying or boiling) on other cooking zones.
- Avoid producing external vibrations (e.g. from using a blender or placing a mobile phone next to the hob) when the function is running.
Depending on the type of food and cookware you can adjust the heat setting after the boiling point has been reached.
- Add salt once the boiling point has been reached.
Use a lid to save energy.
6.10 Menu structure
The table shows the basic menu structure.
User settings
| Sym-bol | Setting | Possible options |
| b | Sound | On / Off (--) |
| P | Power limitation | 15 - 73 |
| H | Hood mode | 0 - 6 |
| E | Alarm / error histo-ry | The list of recent alarms / errors. |
To enter user settings: press and hold ① for 3 seconds. Then, press and hold ⑦ . The settings appear on the timer of the left cooking zones.
Navigating the menu: the menu consists of the setting symbol and a value. The symbol appears on the rear timer and the value appears on the front timer. To navigate between the settings press on the front timer. To change the setting value press + or - on the front timer.
To exit the menu: press ①.
OffSound Control
You can activate / deactivate the sounds in the Menu > User settings.
i
Refer to "Menu structure".
When the sounds are off you can still hear the sound when:
- you touch ①,
the timer comes down,
you press an inactive symbol.
7. ADDITIONAL FUNCTIONS
7.1 Automatic Switch Off
The function deactivates the hob automatically if:
- all of the cooking zones are deactivated,
- you do not set any heat setting or fan speed setting after the activation of the hob.
- you spill something or put something on the control panel for more than 10 seconds (a pan, a cloth, etc.). A signal sounds and the hob deactivates. Remove the object or clean the control panel.
- the appliance gets too hot (e.g. when a saucepan boils dry). Let the cooking zone cool down before you use the hob again.
- you do not deactivate a cooking zone or change the heat setting. After some time, the hob deactivates.
The relation between the heat setting and the time after which the appliance deactivates:
| Heat setting | The hob deactivates after |
| 1 - 2 | 6 hours |
| 3 - 4 | 5 hours |
| 5 | 4 hours |
| 6 - 9 | 1.5 hours |
7.2 Pause
This function sets all operating cooking zones to the lowest heat setting.
When the function operates, ① and Ⅱ can be used. All other symbols on the control panels are locked.
The function does not stop the timer functions.
- To activate the function: press II.
The heat setting is lowered to 1. - To deactivate the function: press II.
The previous heat setting appears.
7.3 Lock
You can lock the control panel while the hob operates. It prevents an accidental change of the heat setting.
Set the heat setting first.
To activate the function: press
To deactivate the function: press again.
i
The function deactivates as you deactivate the hob.
7.4 Child Safety Device
This function prevents an accidental operation of the hob.
To activate the function: press ① . Do not set any heat setting. Press and hold for 3 seconds, until the indicator above the symbol appears. Deactivate the hob with ① .
i
The function stays active when you deactivate the hob. The indicator above is on.
To deactivate the function: press ① . Do not set any heat setting. Press and hold for 3 seconds, until the indicator above the symbol disappears. Deactivate the hob with ① .
Cooking with the function activated: press ① , then press for 3 seconds, until the indicator above the symbol disappears. You can operate the hob. When you deactivate the hob with ① the function operates again.
7.5 Bridge
i
The function operates when the pot covers the centres of the two zones. For more information on the correct placement of cookware refer to "Using the cooking zones". The function does not work while SenseBoil® operates.
This function connects two left side cooking zones and they operate as one.
First set the heat setting for one of the left side cooking zones.
To activate the function: touch. To set or change the heat setting touch one of the control sensors.
To deactivate the function: touch.1. The cooking zones operate independently.
7.6 Hob²Hood
It is an advanced automatic function which connects the hob to a special hood. Both the hob and the hood have an infrared signal communicator. Speed of the fan is defined automatically on basis of mode setting and temperature of the hottest cookware on the hob. You can also operate the fan from the hob manually.
i
For most of the hoods the remote system is originally deactivated. Activate it before you use the function. For more information refer to hood user manual.
Operating the function automatically
To operate the function automatically set the automatic mode to H1 – H6. The hob is originally set to H5. The hood reacts whenever you operate the hob. The hob recognizes temperature of the cookware automatically and adjusts the speed of the fan.
Automatic modes
| Automat- ic light | Boiling1) | Frying2) | |
| H0 | Off | Off | Off |
| H1 | On | Off | Off |
| \( H_2 \)3) | On | Fan speed 1 | Fan speed 1 |
| H3 | On | Off | Fan speed 1 |
| H4 | On | Fan speed 1 | Fan speed 1 |
| H5 | On | Fan speed 1 | Fan speed 2 |
| H6 | On | Fan speed 2 | Fan speed 3 |
1) The hob detects the boiling process and activates fan speed in accordance with automatic mode.
2) The hob detects the frying process and activates fan speed in accordance with automatic mode.
3) This mode activates the fan and the light and does not rely on the temperature.
Changing the automatic mode
- Deactivate the hob.
- Press ① for 3 seconds. The display comes on and goes off.
- Press for 3 seconds.
- Press a few times until H comes on.
- Press + of the timer to select an automatic mode.
i
To operate the hood directly on the hood panel deactivate the automatic mode of the function.
i
When you finish cooking and deactivate the hob, the hood fan may still operate for a certain period of time. After that time the system deactivates the fan automatically and prevents you from accidental activation of the fan for the next 30 seconds.
Operating the fan speed manually
You can also operate the function manually. To do that press AUTO when the hob is active. This deactivates automatic operation of the function and allows you to change the fan speed manually. When you press AUTO you raise the fan speed by one. When you reach an intensive level and press AUTO again you will set fan speed to 0 which deactivates the hood fan. To start the fan again with fan speed 1 press AUTO.
i
To activate automatic operation of the function, deactivate the hob and activate it again.
Activating the light
You can set the hob to activate the light automatically whenever you activate the hob. To do so set the automatic mode to H1 - H6.
i
The light on the hood deactivates 2 minutes after deactivating the hob.
8. HINTS AND TIPS

WARNING!
Refer to Safety chapters.
8.1 Cookware
i
For induction cooking zones a strong electro-magnetic field creates the heat in the cookware very quickly.
Use the induction cooking zones with suitable cookware.
- To prevent overheating and improve the performance of the zones, the cookware must be as thick and flat as possible.
- Ensure cookware bases are clean and dry before placing on the hob surface.
Always be careful no to slide or rub the cookware on the edges and corners of the glass as it may chip or damage the glass surface.
Cookware material
- correct: cast iron, steel, enamelled steel, stainless steel, multi-layer bottom (with a correct marking from a manufacturer).
not correct: aluminium, copper, brass, glass, ceramic, porcelain.
Cookware is suitable for an induction hob if:
water boils very quickly on a zone set to the highest heat setting.
- a magnet pulls on to the bottom of the cookware.
Cookware dimensions
- Induction cooking zones adapt to the dimension of the bottom of the cookware automatically.
- The cooking zone efficiency is related to the diameter of the cookware. The cookware with a diameter smaller than the minimum receives only a part of the power generated by the cooking zone.
- For both safety reasons and optimal cooking results, do not use cookware larger than indicated in "Cooking zones specification". Avoid keeping cookware close to the control panel during the cooking session. This might impact the functioning of the control panel or accidentally activate hob functions.
i
Refer to "Technical data".
8.2 Noises during operation
If you can hear:
- crack noise: cookware is made of different materials (a sandwich construction).
whistle sound: you use a cooking zone with a high power level and the cookware is made of different materials (a sandwich construction).
humming: you use a high power level.
- clicking: electric switching occurs.
- hissing, buzzing: the fan operates.
The noises are normal and do not indicate any malfunction.
8.3 Öko Timer (Eco Timer)
To save energy, the heater of the cooking zone deactivates before the count down timer sounds. The difference in the operation time
depends on the heat setting level and the length of the cooking operation.
8.4 Simplified cooking guide
The correlation between the heat setting of a zone and its consumption of power is not linear. When you increase the heat setting, it is not proportional to the increase of the consumption of power. It means that a cooking zone with the medium heat setting uses less than a half of its power.
i
The data in the table is for guidance only.
| Heat setting | Use to: | Time (min) | Hints |
| 1 | Keep cooked food warm. | as neces-sary | Put a lid on the cookware. |
| 1 - 2 | Hollandaise sauce; melt: butter, choco-late, gelatine. | 5 - 25 | Mix from time to time. |
| 2 | Solidify: fluffy omelettes, baked eggs. | 10 - 40 | Cook with a lid on. |
| 2 - 3 | Simmer rice and milk-based dishes, heat up ready-cooked meals. | 25 - 50 | Add at least twice as much liquid as rice, mix milk dishes halfway through the procedure. |
| 3 - 4 | Stew vegetables, fish, meat. | 20 - 45 | Add a few tablespoons of water. Check the water amount during the process. |
| 4 - 5 | Steam potatoes and other vegetables. | 20 - 60 | Cover the bottom of the pot with 1-2 cm of water. Check the water level during the process. Keep the lid on the pot. |
| 4 - 5 | Cook larger quantities of food, stews and soups. | 60 - 150 | Up to 3 l of liquid plus ingredients. |
| 6 - 7 | Gentle fry: scallope, veal cordon bleu, cutlets, rissoles, sausages, liver, roux, eggs, pancakes, doughnuts. | as neces-sary | Turn over when needed. |
| 7 - 8 | Heavy fry, hash browns, loin steaks, steaks. | 5 - 15 | Turn over when needed. |
| 9 | Boil water, cook pasta, sear meat (goulash, pot roast), deep-fry chips. | ||
| P | Boil large quantities of water. PowerBoost is activated. | ||
8.5 Hints and tips for Hob²Hood
When you operate the hob with the function:
-
Protect the hood panel from direct sunlight.
-
Do not spot halogen light on the hood panel.
- Do not cover the hob control panel.
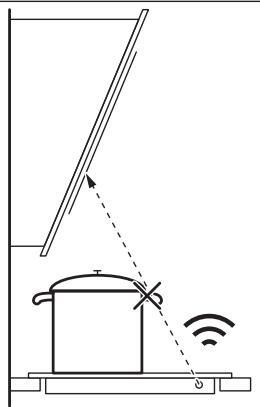
- Do not interrupt the signal between the hob and the hood (e.g. with the hand, a
cookware handle or a tall pot). See the picture.
The hood pictured below is for illustration purpose only.
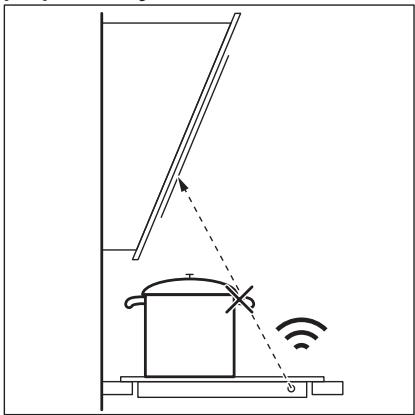

Other remotely controlled appliances may block the signal. Do not use any such appliances near to the hob while Hob²Hood is on.
Cooker hoods with the Hob²Hood function To find the full range of cooker hoods which work with this function refer to our consumer website. The Electrolux cooker hoods that work with this function must have the symbol AUTO.
9. CARE AND CLEANING

WARNING!
Refer to Safety chapters.
9.1 General information
Clean the hob after each use.
Always use cookware with a clean base.
- Scratches or dark stains on the surface have no effect on how the hob operates.
- Use a special cleaning agent suitable for the surface of the hob.
Always use a scraper recommended for hobs with a glass surface. Use the scraper only as an additional tool for cleaning the glass after the standard cleaning procedure.

WARNING!
Do not use knives or any other sharp, metal tools to clean the glass surface.
10. TROUBLESHOOTING

WARNING!
Refer to Safety chapters.
9.2 Cleaning the hob
- Remove immediately: melted plastic, plastic foil, salt, sugar and food with sugar, otherwise, the dirt can cause damage to the hob. Take care to avoid burns. Use a special hob scraper on the glass surface at an acute angle and move the blade on the surface.
- Remove when the hob is sufficiently cool: limescale rings, water rings, fat stains, shiny metallic discoloration. Clean the hob with a moist cloth and a non-abrasive detergent. After cleaning, wipe the hob dry with a soft cloth.
- Remove shiny metallic discoloration: use a solution of water with vinegar and clean the glass surface with a cloth.
10.1 What to do if...
| Problem | Possible cause | Remedy |
| You cannot activate or operate the hob. | The hob is not connected to an elec-trical supply or it is connected incor-rectly. | Check if the hob is correctly connected to the electrical supply. |
| The fuse is blown. | Make sure that the fuse is the cause of the malfunction. If the fuse is blown again and again, contact a qualified electrician. | |
| You did not set the heat setting for 60 seconds. | Activate the hob again and set the heat setting in less than 60 seconds. | |
| You touched 2 or more sensor fields at the same time. | Touch only one sensor field. | |
| Pause operates. | Refer to "Pause". | |
| There is water or fat stains on the control panel. | Clean the control panel. | |
| You can hear a constant beep noise. | The electrical connection is incor-rect. | Disconnect the hob from the electrical supply. Ask a qualified electrician to check the installation. |
| You cannot select the maximum heat setting for one of the cook-ing zones. | The other zones consume the maxi-mum available power. Your hob works properly. | Reduce the heat setting of the other cooking zones connected to the same phase. Refer to "Power management". |
| An acoustic signal sounds and the hob deactivates. An acoustic signal sounds when the hob is deactivated. | You put something on one or more sensor fields. | Remove the object from the sensor fields. |
| The hob deactivates. | You put something on the sensor field ①. | Remove the object from the sensor field. |
| Residual heat indicator does not come on. | The zone is not hot because it oper-ated only for a short time or the sen-sor is damaged. | If the zone operated sufficiently long to be hot, speak to an Authorised Service Centre. |
| Hob²Hood does not work. | You covered the control panel. | Remove the object from the control panel. |
| You use a very tall pot which blocks the signal. | Use a smaller pot, change the cooking zone or operate the hood manually. | |
| The control panel becomes hot to the touch. | The cookware is too large or you put it too close to the control panel. | Put large cookware on the rear zones, if possible. |
| There is no sound when you touch the panel sensor fields. | The sounds are deactivated. | Activate the sounds. Refer to "Daily use". |
| The indicator above the symbol comes on. | Child Safety Device or Lock oper-ates. | Refer to "Child Safety Device" and "Lock". |
| The control bar blinks. | There is no cookware on the zone or the zone is not fully covered. | Put cookware on the zone so that it fully covers the cooking zone. |
| The cookware is unsuitable. | Use cookware suitable for induction hobs. Refer to "Hints and tips". | |
| The diameter of the bottom of the cookware is too small for the zone. | Use cookware with correct dimensions. Refer to "Technical data". | |
| F and I appear simultaneously. | The power is too low due to unsuitable cookware or an empty pot. | Use the appropriate type of cookware. Refer to "Hints and Tips" and "Technical Data". Do not activate any zone with an emp-y pot on it. |
| F and I appear simultaneously. | The pot is empty or contains some liquid other than water, e.g. oil. | Avoid using the function with liquids other than water. |
| F and I appear simultaneously. | There is too much or too little water in the pot. You boiled some food other than water and potatoes. The boiling point was moved in time and SenseBoil® could not work properly. | Only boil water and potatoes with the use of SenseBoil®. Refer to "Hints and Tips". |
| You hear a beep sound, the indi-cators above 0° blink and SenseBoil® does not start. | None of the cooking zones is ready to be used with SenseBoil®. There is some residual heat on the cooking zones you want to choose or they are still in use. | Finish your previous cooking activities and choose a free cooking zone with-out any residual heat. |
| SenseBoil® does not work. | The power level of the hob is too low. | Set the power level to a higher value. Make sure that the selected power fits the house installation fuses. Refer to "Before first use" > "Power limitation". |
| E and a number come on. | There is an error in the hob. | Deactivate the hob and activate it again after 30 seconds. If E comes on again, disconnect the hob from the electrical supply. After 30 seconds, connect the hob again. If the problem continues, speak to an Authorised Service Centre. |
10.2 If you cannot find a solution...
If you cannot find a solution to the problem yourself, contact your dealer or an Authorised Service Centre. Give the data from the rating plate. Make sure, you operated the hob correctly. If not the servicing by a service
technician or dealer will not be free of charge, also during the warranty period. The information about guarantee period and Authorised Service Centres are in the guarantee booklet.
11. TECHNICAL DATA
11.1 Rating plate
Model EIS82453
Typ 62 D4A 01 AA
PNC 94959929400
220 - 240 V / 400 V 2N, 50 Hz
11.2 Cooking zones specification
| Cooking zone | Nominal power (maximum heat setting) [W] | PowerBoost [W] | PowerBoost maximum dura- tion [min] | Cookware diameter [mm] |
| Left front | 2300 | 3200 | 10 | 125 - 210 |
| Left rear | 2300 | 3200 | 10 | 125 - 210 |
| Middle front | 1400 | 2500 | 4 | 125 - 145 |
| Right rear | 2300 | 3600 | 10 | 205 - 240 |
The power of the cooking zones can be different in some small range from the data in the table. It changes with the material and dimensions of the cookware.
For optimal cooking results use cookware no larger than the diameter in the table.
12. ENERGY EFFICIENCY
12.1 Product Information
| Model identification | EIS82453 | |
| Type of hob | Built-In Hob | |
| Number of cooking zones | 4 | |
| Heating technology | Induction | |
| Diameter of circular cooking zones (Ø) | Middle front | 14.5 cm |
| Right rear | 24.0 cm | |
| Length (L) and width (W) of non circular cooking zone | Left front | L 22.3 cm |
| W 21.8 cm | ||
| Length (L) and width (W) of non circular cooking zone | Left rear | L 22.3 cm |
| W 21.8 cm | ||
| Energy consumption per cooking zone (EC electric cooking) | Left front | 189.1 Wh/kg |
| Left rear | 189.1 Wh/kg | |
| Middle front | 187.5 Wh/kg | |
| Right rear | 185.2 Wh/kg | |
| Energy consumption of the hob (EC electric hob) | 187.7 Wh/kg | |
IEC / EN 60350-2 - Household electric cooking appliances - Part 2: Hobs - Methods for measuring performance.
The energy measurements referring to the cooking area are identified by the markings of the respective cooking zones.
12.2 Energy saving
You can save energy during everyday cooking if you follow the hints below.
-
When you heat up water, use only the amount you need.
If it is possible, always put the lids on the cookware. -
Put the cookware directly in the centre of the cooking zone.
- Use the residual heat to keep the food warm or to melt it.
13. ENVIRONMENTAL CONCERNS
Recycle materials with the symbol .Put the packaging in relevant containers to recycle it. Help protect the environment and human health by recycling waste of electrical and electronic appliances. Do not dispose of
appliances marked with the symbol with the household waste. Return the product to your local recycling facility or contact your municipal office.
How to install your Electrolux Induction Hob - Worktop installation

4. TOOTE KIRJELDUS
4.1 Keeduala paigutus
How to install your Electrolux Induction Hob - Worktop installation

4. DESCRIPTION DE L'APPAREIL
How to install your Electrolux Induction Hob - Worktop installation

ouy jyohu gdoom30u 1300 oossm5ogoyoo,
goobm30o, oboomoo ooymg30u am5ogol
ougyjdo, 60000300
amymofoafoafofofofofofofofofofofofofofofofofofofofofofofofofofofofofofofofofofofofofofofofofofofofofofofofofofofofofofofofofofofofofofofofofofofofofofofofofofofofofofofo
Oy dmydmoos yxhol 6doomss
Oy60gmo, ymo 350mgoos
U30duo amboogol 36mgoan ooadmo
Ossbmmu yxsoa 056ymo U86jo.
033200 3000m 05Ugmyj8oos "mmnn
033y6mo Electrolux-0u 060gj300no
Jy6 - Udyam dagoo
Oy6y6o" 330mm am300ym uynoo%
Oonoooymo Unymo Usbmo Uy35oo.

YouTube
www.youtube.com/electrolux
www.youtube.com/aeg
How to install your Electrolux Induction Hob - Worktop installation

4. 36mmoygohu oog
4.1 u3aou aumuae6gjmo 6003nou 85m8
1 0300ou amo86oo o6yj6mo
2 3m566mmolu 3560mo
i
uouo uomg600ou 6m520ou
m00ou ouu6000000000
06m400ou ouuowoo,
obomd3600000015000
om560000
4.2 a6030u 35gmou 85m8g

amymommou uusayos30moo gdoomyo5oo Uo5ummyo 30mmoo. coou3000, 60030000000 bdo ydymo50g5, oog mdo mo qy6b0 dyomdu.
-
c0000000
-
coomol coooyo8oo oofooo + - 1s6-1u
Gdno SuynymoBu ymyo3molu,
gdoMoBdu uog5moMu bds GdoBdo0.
Uog5moUs GdoBdoU gluyy3O
GdoMoo 5daoun Udo mmu.
5600000000000000000000000000000000000000000000000000000000
6.83390dou 050x0560
- 306006000000000000000000000000000000000000000000000000000000000000000000000
g6h0o h0o0300.
g6h0u ooyy0ou 0008 om00u
60mm 5000 05000m6000
60030050000
i
Oy 5 ydool y6do3mmdo 13a mol
oMdo8o0doom mdo0do 6m6o
J3oo o cooc8o0, 8y6f8o
O3mdoy6o ooy6o3o0o.
aou aodoo8, 0o8 y6j30s ooyomol
o236yogu 0o063u, fmo 356
bam365 u86umu gdmubdu
Uad6y63omol 36620mo 36mdosy
ooc030 oovom 0o30mo 90mo
5uyomol623 om5y6.
yomou 0060000000300
85joou 0060000003000000
-6s60-6.
Gyomol Gomol oogomol aogoo 500
Gyoloo oogofo300aloo 600
Gmouo oogfofo300goo 600
Ogdo
Oy yoofoynooyoo 3yofo 50000
J3oo, y6fooo
OyUwJomol AmUs8600000000000
0m560 Cooy60000003000
OoOmo, Ooy60000003000000
OoOomol Ooo300030, 6y610
OoMooGoo
JU 8y6f60s Jy6u 3Om3o760 8aamno3u, ony:
6mmmbu3aoudmuusooy y30m6n6s00o0000000
003000000000000000000000000000000000000000000000000000
10 68860 68860 6500000000000000000000000000000000000000000000000000000000000000000000000000000
amymoossdoom5 600000 (aog.
Gosu madmoooc yomnou
200630300). 600000 m6gmlu
808noofoymou bmoob
8dmyoovoo
0j3356gdoomooo 3m6gmno 55
033000006000000u 3600
330000006000000u 36008, jy
330000006000000u 36008,
yoooho3030no 0j30goyom
ogodu o no gmo u mou, maou
o00806 amymonms
oofo3060:
i
obomoo,05oyu Ugyy
6m0g0u8b0g0n0g0m0m0ymo, b0su 0o53
0008oo, on:
900600000003u ①
Gooogmoaogogun oodmmu.
| 3066666666 | f# |
| 1 - 2 | 6 lssssdo |
| 3 - 4 | 5 lssssdo |
| 5 | 4 lssssdo |
| 6 - 9 | 1,5 lssssdo |
7.2 38y6b
JU 8y6300 y300 m56g3m6u, 6md2mo3
Oy6300 do60dysmy 8y6300du
3o60060000y6300.
6mcooU83 56560s 8yosmdu, ① 1
20odmoos 8oadmyo60ymo 0j60u. 8doom30u
3560960 6luoymo y30cmu 6b3u ooadmm
oo8mm30moos.
g6000000000000000000000000
1. 566600u8uuu60666666
0003000000001
Uo06y003000u 3s00000000000001-
oo.
2. 50000000000000000000
- 0050006000003000000000000000
7.3 gddmm330
0305 080admoosoo 080mm3mon 080mgo 3660001yogou 3660molu oogamolu qomlu.
000 083005 080gog
083005080mno 080gogouo 080b30300
083molu.
Xo00005000003000000000000000000000000000000000000000000000000000000000000000000000
i
y6j000000000000000000000000000000000000000000
7.4 3300 yusgmo6bmodu omynommo
| 330m20000000000000000000000000000000000000000000000000000000000000000000000000000000000000000000000000000 | 1) | 2) | |
| H6 | 50000000 | 305000000000000000000000000000000000000000000000000000000000000000000000000000000000000000000000000000 | |
| m600u | m600u | ||
| uohgjxgjxgjxgjxgjxgjxgjxgjxgjxgjxgjxgjxgjxgjxgjxgjxgjxgjxgjxgjxgjxgjxgjxgjxgjxgjxgjxgjxgjxgjxgjxgjxgjxgjx | |||
1) jy6m 3085mU yomol 36mouu coo 30mdy6mMgndos50uusduoloo 3060mnuu mnuu uohjmo.
2) jymoa 5mou yjol 3moju 0
3ooy mno yjodn o5 oUsdouoo
3ooy mmou uohjmo.
3) 0u gogodoo sfooygogdu 35gaoomouo 00
065000du oosmou 00d000000
coodmoocgoymo.
30m08y6n6gndal 33m
- jymou 000j03000
- 00000000①36000g600000000000000000000000000000000000
- 00000000 3 9000000000000000
- 00000000003668005x26y2, U55dHshgdmh6000
- 000000000000000000+,600000000000000000
i
gddm30uugmoaogdmoaon30
gddm30u3629o gooa00
gy5j00u 30mdygo ygo.
i
6m0uus 86o005u 005uymoo 00
Jymsu 2aamnncs30, 8a0m30u
305omommo, aUusmmns cmol
8m33oymo 3gmonu 05d9
33m3 858mdmu ygmdu. 8cmou
30028, uUoOds 350omos mlu
30m00uymo 8o0oog3u 0o 8o0
30 85oU 856gmmdoan am86do
305omomnu 8doob630nn
86o0ymynu 8Uudmmssu.
356omomohu uohjshou bmoa aohm03
2305g6160u bmoa aom03
aandmo. adoosnol ofoomn oom03
AUTO, mgo jyno sgyno. sboglu
y6160u 3gmadnyno dyamol
oofo8o8osu co uagymodsu godmo30
60mm 20000000000000000
3050000000000000000
405000000000000000
50500000000000000
6050000000000000
70500000000000
8050000000
9.1,
i
y6j00u 30mgo ymo 4yamol
oossyogomoo, osmnno jmy
oo oomoo goofo
gssooaou gssgogomdo
0306y6o 8oogodmoos 850000
030mdoyno 8oogogomdo 0306
mocuub yngol 8oogogomdo. 03030
00yy600 30mdoyno 6gofo H1-H6-
90.
i
g00000000000000000000000000000000000000000000
8.2 bgygno ygmdou gmalu
Og aUoo:
8666016b2:7y6300000000000000000000000000000000000000000000000000000000000000000000000
Usu365nu bds:ny60m 66mnu
aoudmsn uomn
yngmo cdo6ooynnb3oosub3
duusmol85 (6636036505dofo).
8y8y60:oy60oo 6668ooU ooom com5oJ.
Oooy50: 00016m 80006030 Uyymcoos.
200050,6y6y6y6:dyasmo 3gfoom
bdo 5mndyogos 0s6 doynoogdu
ooaoyoadnoos
8.3 Oko Timer (330 000000)
J6m00u 23m5m00u003u, u3300u
dm00g00u 6m6u gdsb000
G00g00c000d G00g0u d00300mol
buoyogosdsd. ydsmdu Gmmol
B6n03 83mo00d0o ydsb000
Ouyg00y m 36m00u o u3300u
dm00g00u m36m00u
658m03msds 6om300gymo
8.4 u3dmou amofool 0603gmymo U60ad235gmm
m5u uod6ymgmou 360820moos 00
aou uo dmoaou ambdoqou 3mmgmo
snofo30. mcoog uod6ymgmo
3uoadofou 6mo, o0 sof 50
uoadmofou abdsofoou 36m3mo
JU 6d53u, mda uadmoau ma6cogdu
6Mu uagymu uogbu 36s3gmo
amobasnu doLo uoadmoqou 6b036
63mgdu.
i
560a5ygm 66amnao dmgooymo
om563o0do 6bmnm
U66mdd235ygm 66086ymooss.
| 1 | \( \begin{array}{lll} {\mathrm{{2005}}\mathrm{{63}}\mathrm{{64}}\mathrm{{65}}\mathrm{{66}}\mathrm{{67}}\mathrm{{68}}\mathrm{{69}}} & & \\ {\mathrm{{2005}}\mathrm{{63}}\mathrm{{64}}\mathrm{{65}}\mathrm{{66}}\mathrm{{67}}\mathrm{{68}}\mathrm{{69}}} & & \\ {\mathrm{{2005}}\mathrm{{63}}\mathrm{{64}}\mathrm{{65}}\mathrm{{66}}\mathrm{{67}}\mathrm{{68}} \end{array} \) | \( \begin{array}{lll} {\mathrm{{2005}}\mathrm{{63}}\mathrm{{64}}\mathrm{{65}}\mathrm{{66}}\mathrm{{67}}\mathrm{{68}} \end{array} \) | \( \begin{array}{lll} {\mathrm{{2005}}\mathrm{{63}}\mathrm{{64}}\mathrm{{65}}\mathrm{{66}}\mathrm{{67}} \end{array} \) |
| 1 | \( \begin{array}{lll} {\mathrm{{2005}}\mathrm{{63}}\mathrm{{64}}\mathrm{{65}}\mathrm{{66}}\mathrm{{67}}\mathrm{{68}}\mathrm{{69}}} & & \\ {\mathrm{{2005}}\mathrm{{63}}\mathrm{{64}}\mathrm{{65}}\mathrm{{66}} \end{array} \) | \( \begin{array}{lll} {\mathrm{{2005}}\mathrm{{63}}\mathrm{{64}}\mathrm{{65}}\mathrm{{66}} \end{array} \) | \( \begin{array}{lll} {\mathrm{{2005}}\mathrm{{63}}\mathrm{{64}}\mathrm{{65}}\mathrm{{66}} \end{array} \) |
| 1 - 2 | \( \begin{array}{lll} {\mathrm{{2005}}\mathrm{{63}}\mathrm{{64}}\mathrm{{65}}\mathrm{{66}} \end{array} \) | 5 - 25 | \( \begin{array}{lll} {\mathrm{{2005}}\mathrm{{63}}\mathrm{{64}}\mathrm{{65}}\mathrm{{66}} \end{array} \) |
| 2 | \( \begin{array}{lll} {\mathrm{{2005}}\mathrm{{63}}\mathrm{{64}}\mathrm{{65}}\mathrm{{66}} \end{array} \) | 10 - 40 | \( \begin{array}{lll} {\mathrm{{2005}}\mathrm{{63}}\mathrm{{64}}\mathrm{{65}}\mathrm{{66}} \end{array} \) |
| 2 - 3 | \( \begin{array}{lll} {\mathrm{{2005}}\mathrm{{63}}\mathrm{{64}}\mathrm{{65}} \end{array} \) | 25 - 50 | \( \begin{array}{lll} {\mathrm{{2005}}\mathrm{{63}}\mathrm{{64}}\mathrm{{65}} \end{array} \) |
| \( \begin{array}{lll} {\mathrm{{2005}}\mathrm{{63}}\mathrm{{64}}\mathrm{{65}} \end{array} \) | \( \begin{array}{lll} {\mathrm{{2005}}\mathrm{{63}}\mathrm{{64}}\mathrm{{65}} \end{array} \) | \( \begin{array}{lll} {\mathrm{{2005}}\mathrm{{63}}\mathrm{{64}}\mathrm{{65}} \end{array} \) | |
| \( \begin{array}{lll} {\mathrm{{2005}}\mathrm{{63}}\mathrm{{64}}\mathrm{{65}} \end{array} \) | \( \begin{array}{lll} \text{20-45} & & \\ {\mathrm{{2005}}\mathrm{{63}}\mathrm{{64}}\mathrm{{65}} \end{array} \) | \( \begin{array}{lll} {\mathrm{{2005}}\mathrm{{63}}\mathrm{{64}}\mathrm{{65}} \end{array} \) | |
| 3 - 4 | \( \begin{array}{lll} {\mathrm{{2005}}\mathrm{{63}}\mathrm{{64}}\mathrm{{65}} \end{array} \) | 20 - 45 | \( \begin{array}{lll} {\mathrm{{2005}}\mathrm{{63}}\mathrm{{64}}\mathrm{{65}} \end{array} \) |
| \( \begin{array}{lll} {\mathrm{{2005}}\mathrm{{63}}\mathrm{{64}} \end{array} \) | \( \begin{array}{lll} {\mathrm{{2005}}\mathrm{{63}}\mathrm{{64}} \end{array} \) | \( \begin{array}{lll} {\mathrm{{2005}}\mathrm{{63}}\mathrm{{64}} \end{array} \) | |
| 4 - 5 | \( \begin{array}{lll} {\mathrm{{2005}}\mathrm{{63}}\mathrm{{64}} \end{array} \) | 20 - 60 | \( \begin{array}{lll} {\mathrm{{2005}}\mathrm{{63}}\mathrm{{64}} \end{array} \) |
| \( \begin{array}{lll} {\mathrm{{2005}}\mathrm{{63}} \end{array} \) | \( \begin{array}{lll} {\mathrm{{2005}}\mathrm{{63}} \end{array} \) | \( \begin{array}{lll} {\mathrm{{2005}}\mathrm{{63}} \end{array} \) | |
| \( \begin{array}{lll} {\mathrm{{2005}}\mathrm{{63}} \end{array} \) | \( \begin{array}{lll} {\mathrm{{2005}}\mathrm{{63}} \end{array} \) | \( \begin{array}{lll} {\mathrm{{2005}}\mathrm{{63}} \end}{\text{2005}} \end{array} \) | |
| 1086763594 | 3086763594 | 2006 | 2006 |
| 3086763594 | 3086763594 | (50) | (50) |
| 4-5 | 3086763594 | 60 - 150 | 3086763594 |
| 6-7 | 3086763594: 3086763594, 3086763594, 3086763594, 3086763594, 3086763594, 3086763594, 3086763594, 3086763594, 3086763594, 306763594, 3086763594, 3086763594, 3086763594, 3086763594, 3086763594, 3086763594, 3086763594, 308676. | 3086763594 | 3086763594 |
| 7-8 | 3086763594: 3086763594, 3086763594, 3086763594, 3086763594, 3086763594, 3086763594, 3086763594, 306763594, 3085300 | 5 - 15 | 3086763594 |
| 9 | 3086763594: 3086763594, 3086763594, 3086763594, 3086763594, 3086763594, 3086763594, 3086763594, 3000300 | 3086763594 | 3086763594 |
| P | 3086763594: 3086763594, 3086763594, 3086763594, 3086763594, 3086763594, 3086763594, 3086763594, 3090300 | PowerBoost 3086763594 | 3086763594 |
9.2 8888888888888888888888888
Gyym36mo3 mOgmo: 0oCo56
3ouoosu, 3ouooymo gmm80
ooomn, oJno os oumol o032mo
Uofo, 0o5ssaoaog 0o0b30380
fhydsouodmns fmyol co6o56
oamofomu. amoocogcoo3mou
oamosu. aomoy60fmyol
Uoossymo uogb030 ydou
60cos3o6602 dub30mo yonb01
36060000 cos sdmds300360
60cos3662
aasaaagao fagou uusdshousu
aogahogou gagoo: aouu,
yomou mojoo, 6oou mojoo,
8o5030 moombougmo. yng.
3550mo gafodobgoun Ucmo Gommon o
ssssbsbmo uogbou uayysdmo.
afo5cou agoogfynou 3550mo
Ucmo Gommon gddhmo.
aamboomn 860536g mnm56
8yogmnyo ymo aagomdo:
aodmyo5oo daonfo yymou blu6no
h36oo yjdo5oo ydyou 8oc3o.
10. 36mgoaol ydaogb3ns

gogogogogg
abomgmo yluogmboymgdol 03gdo.
10.1 65 y5003000m o...
| 36mmdggds | guddmm d06y60 | 3ddmss |
| jy60hungho3s 5d ydg3c0s | jy60u u6u u6ng60y60u 5b | yduymdgo, mnd jy60 co5u |
| 306 ydh60ds. | u6u u6ng60u6ng60y60u 5b | yduymu5u5 u6ng60 u6u |
| yduymu5b. | dng60y60u. | |
| 36mdmgo | 36mdmgo | 36mdmgo |
| 36mdmgo | 36mdmgo | |
| 36mdmgo | 36mdmgo | |
| 36mdmgo | 36mdmgo | |
| 36mdmgo | 36mdmgo | |
| 36mdmgo | 36mdmgo | |
| 36mdmgo | 36mdmgo | |
| 36mdmgo | 36MDMGO | |
| 36mdmgo | 36mdmgo | |
| 36mdmgo | 36mdmgo | |
| 36mdmgo | 36mdmgo | |
| 36mdmgo | 36mdmgo | |
| 36mdmgo | 36mdmgo | |
| 36mdmgo | 36mdmgo | |
| 36mdmgo | ||
| 36mdmgo | ||
| 36mdmgo | ||
| 36mdmgo | ||
| 36mdmgo | ||
| 36mdmgo | ||
| 36mdmgo | ||
| 36mdmgo | ||
| 36mdmgo | ||
| 36mdmgo | ||
| 36mdmgo | 36mdmgo | |
| 36mdmgo | 36mdmgo | |
| 36mdmgo | 36mdmgo | |
| 36mdmgo | 36mdmgo | |
| 36mdmgo | 36mdmgo | |
| 36mdmgo | 36mdmgo | |
| 36mdmgo | ||
| 36mdmgo | ||
| 36mdmgo | ||
| 36mdmgo | ||
| 36mdmgo | ||
| 36mdmgo | ||
| 36mdmgo | ||
| 36mdmgo | ||
| 36mdmgo | ||
| 36mdmgo | ||
| 36mdmgo | 36mdmgo | |
| 36mdmgo | 36mdmgo | |
| 36mdmgo | 36mdmgo | |
| 36mdmgo | 36mdmgo | |
| 36mdmgo | 36mdmgo | |
| 36mdmgo | 36mdmgo | |
| 36mdmgo. | 36mdmgo | |
| 36mdmgo. | 36mdmgo | |
| 36mdmgo. | 36mdmgo | |
| 36mdmgo. | 36mdmgo | |
| 36mdmgo. | 36mdmgo | |
| 36mdmgo. | 36mdmgo | |
| 36mdmgo. | 36MDMGO | |
| 36mdmgo. | 36MDMGO | |
| 36mdmgo. | 36MDMGO | |
| 36mdmgo. | 36MDMGO | |
| 36mdmgo. | 36MDMGO | |
| 36mdmgo. | 36MDMGO | |
| 36mdmgo. | 36MDMGO | |
| 36mmol/mol | 2g | 2g |
| 2g | 2g | |
| 2g | 2g | 2g |
| 1g | 1g | 1g |
| 2g | 2g | 1g |
| 2g | ||
10.2 36m0yj0u ydm8b36u 85u 336 3mymmoo...
Omy 36mmommool uodmgo3bmoI g6lu oos30
30m 3mmmmoo, oovy3ofoomoo oJg35u
OommoU 5v 3gmno6ooyum Uoh30u
B566u. oovogoo OJf5ooymo
Om566dou oomgo8ooyo slwyo
Om566d2o. oovy6ooyo, mmd 563mo
Ummo ooy300. ov 0f50y
amolubuyou s yomgou uymolou
ofo3mnu 5000no, ju amduoy
s ofoy yosum, u030 gns600u
amjogoo 3ghomco. 05cmds
wos60om 3ghomcou cos
3gmooymo uom30u 05gmo
2U8o0 ooonoymo os865om
6mnyo.
11. 0j6o3ymo a5o3o
11.1 j6665ymo 3u3m68o
omogoeisEIS82453
30 62 D4A 01 AA
650g7.35 33
UoM.#
ELECTROLUX
36mcogol608b06030 (PNC) 949599
29400
220-2403/40032N,5036
Ogshomgdo 30yfo
7.35 330
C∈
11.2 uJdmou aamtsosgdou tm6dou 0jfoyno absalssogdgo
| uδδδδδδu δmδδδδδu δmδδδδδu | δmδδδδδu uδδδδδδu (δsμδδδδδu δsμδδδδδu 3δsμδδδδδu) [3δ] | PowerBoost [3δ] | PowerBoost δsμδδδδδu δsμδδδδδu [δω] | uδδδδδδu δmδmδm δmδmδm [δω] |
| δmδδδδδu δmδδδδδu | 2300 | 3200 | 10 | 125 - 210 |
| δmδδδδδu δmδδδδδu | 2300 | 3200 | 10 | 125 - 210 |
| δmδδδδδu | 1400 | 2500 | 4 | 125 - 145 |
| δmδδδδδu δmδδδδδu | 2300 | 3600 | 10 | 205 - 240 |
U3300u amo6oogou m60u
Uddm06o, 2uudmmn, m653
85ub30gogmoju gomam
Oooomoymo 6mgool5. oluo
85ub30oov 6ooymmu fmymol
Oosmou oosmdomoydou dojco00.
U3300u am8oogol uy300um
Ooo80ouo3u,ooaogno sn y6oo
ooosomoglu 6bmoan ooonoooym
ooagohu.
12. 6568m0g30g7y6m0s
12.1 650m6d8b036m0gjGou gUsb
| davomol ovo50000000000000000000000000000000000000000000000000000000000000000000000000000000000000000000000000000 | EIS82453 |
| lubnymogol ogo30 | |
| uugamol amluadobogogombo m5000lu oomg6mds | |
| ssomodol ogo1000000000000000000000000000000000000000000000000000000000000000000000000000000000000000000000000000 | |
| uugamol amluadobogogombo fmoovombo m5000lu oomg6mdo (O) | 14.5 U# 24.0 U# |
| uugamol amluadobogogombo fmoovombo m500lu ogmdo (L) c## l##g6b (W) | L 22.3 U# W 21.8 U# |
| uugamol amluadobogogombo fmoovombo m50lu ogmdo (L) c## l##g6b (W) | L 22.3 U# W 21.8 U# |
| uugamol amluadobogogombo fmoovombo m50lu ogmdo (EC electric cooking) | 189.1 3000/38 189.1 3000/38 187.5 3000/38 185.2 3000/38 |
IEC/EN60350-2-ww6wdo w8aomou mss
omgmoommyoommo00 - 260000000000000000000000000000000000000000000000000
Uusdmoa umuudooo oom 6m580 6jmgoo Uo6mdol uoofoogobnoos bocdo 3JUsdol anuuaodooo mo 6m6do Uo3oogoo.
12.2 56800u 88m300
Oy 3j0mm Oo0000gMn030du
0000mouu60oo, 0d0000J6mogno
U3308u ym30cmomoynco m86ooaoulu
o8m83u.
How to install your Electrolux Induction Hob - Worktop installation

OcbI KpybIINFbIHb TEK 6JIIKTI MaMaH FaHa oPhaTyFa Tnic.

ECKEPTY!
KapaKaTay HeMece KypblfBIfa 3aKbIM Keny Kayni 6ap.
- OpaMaTeepaIaIapbIHbIH 6apJIbIFbIH aJIbIHbI3.
BvniHReN KpypbIJIbIbIOpHaTNaHbI3 Hemece icKe KocnabI3.
KypbIJIbIMeH 6ipre keTki3iJrEh opHaTy HcaynapbIH opbIHdaHbI3.
KypbIJIbIbnap MeH 3aTtApDbIh apacbiHaftbIMHNHMym KaawblkTbIKTbCaKaTaHbI3.
Kypblfbl aybip 6oNfaHdbikTaH, ophblHaH KblnKbItkAn Ke3de epkawah a6aB 6oIbHb3. Opkawah Kayinci3dk KOIfa6bl MeH 6itey aRKnim Knih3.
KopnyctbIH kecinreH 6etepine bIrfan kipin yIkeynTin xi6epmec ywiH TbIfb13daFbIwnen 6iTeHi3.
KypblfblHbH actbHfbI KafbH by MeH bJFaDah KopFaHbI3.
Kypblfblb eciktih jkahbiHa Hemece Tepe3eHH acTbHa KOImaHbI. Byic Hemece Tepe3e aWbIFaH Ke3e bCTbIK bIDICTap KypblfbldaH KyJaan Ketney yuH KaKeT. - Θρ KγρbβI NfblHbIH acTbIHfbl XaFbIHda e3 XeNДeTkiUTepi 6ap.
Erep KypbIJIbI TapTnAbIH yCTiHe opHaTbIJCa:
KeIeTeKiUke Kipin KeTyi MymKIn KIuKeHe KaFa3apDbI Hemece npaKaTapDbI caKaTaMaHbI3,ce6eBi OIap caIKbIHDaTkbIUsKa 3aKbIM KeItpyI Hemece caIKbIHDaTy JxYneCiH 3aKbIMdAyblMymKIn.
KypbIINFbIHbIH actbIHfBI KaFBI MEH TapTnada caKTanFaH 3aTTapDbIH apacbHa KEMiHne 2 CM opbIH KaJDbIPbIHbI3.
KypblfblhlaH actbHfbI kafblHa ophaJaackaH ke3 KeIreH 6enriW naHenbdi aJIbHbI3.
2.2 3Jektp TorbHa Kocy

ECKEPTY!
KoHTaKT TbIFbIHdapbl apKbJIbI KocyFa TbIbIM CaIbHaDbI.
ABAHJIAHbI3
CbIM WETTEPIH 6yPbIaMaHbI3 HEmecE dHeKepeIeMeHi3. ByFaH TbIbIM caJIbHaIbI.

A6AIAHbI3
Ka6eNb 8etI MyfTaBj XOK Ka6eNbdi KaIFamaHbI3.
BipΦa3anbIKKocblbIM
- Kapa, KOhbp XeHe KeK cbIMapdaH Ka6ebb COhbl MypTaCbIH aJIbIbI3.
- KoHbIp, Kapa JKeHe KeK Ka6eIb yIuTapbIH OkwaaynaydbiH 6ip 6eJIirH anbIn TaCTaHbI3.
- Kapa Kahe KoHbIp Ka6eIbIepDInyUHTapbIH KaIFaHbI3.
-
Φρδιρ cβMhBιH yMbIHa 6eπicijreH cβIM COHbI MyΦTaCbI H KOJIaHbIbI3 (apHaNbI KypaI KaKεT).
-
Ekek kaebbnih yIHTapbIH kajFaHbI3.
- Ερδιρ cβMhBιH yMbIHa δεπιCιRηch CbIM COHbI MyΦTaCbI H KΩДaHbIbI3 (apHaNbI KypaJI KaKeT).
EkiΦa3aJIbIK KocblbIM
- Kek cbimapdaH Ka6eIb IeTI MyΦTaCbIH aIbIbI3.
- KeK Ka6eBb YuTapbH OkuayyDbH 6ip 6eJirH anbH TaCTaHb3.
- Eki KeK Ka6eBbDIn YWtApbH XaNFaHbI3.
- Φρδιρ cβMhBih γMbHa 6eπicijreH cβM coHbI MyΦTaCbIH KOJdaHbHb3 (apHaBb KypaJI KaKεT).
| NL 220 - 240 B~ | Ек φаазалык косьлым: 400 B2N~ | Бір φаазалык косьлыm: 220 - 240 B~ | |||
| 5x1,5 MM² | 5x1,5 MM² hemece 4x2,5 MM² | 5x1,5 MM² or 3x4 MM² | |||
| ½ | Жасьл - capы | ½ | Жасьл - capы | ½ | Жасьл - capы |
| N | Көк жэне көк | N | Көк жэне көк | N | Көк жэне көк |
| L1 | Кара | L1 | Кара | L | Кара жэне коньр |
| L2 | Коньр | L2 | Коньр | ||
3.4 Kypactbipy
KypblfblblyaayaTapTkblTbHaactbHa OPHaTaCaHbI3,KypblfblnapdbHa apacbHaFaBIMNH.KaBlkTBkTbOpHaTy HcaynapbHaH KapaHbI3.
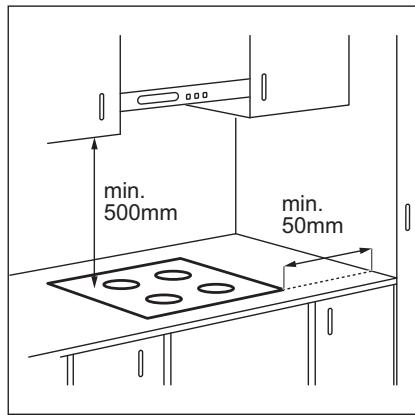
KypblfTapTnabH yCTiHe opHaTbIca, neWtIH jEeIeTeKiWi TaFam Nicipy 6apbcHda TapTnadaFb3aTAPdbjXbIbITyblMmKiH.
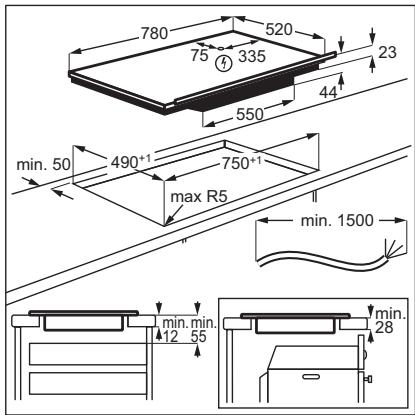
TemeHderi cI36aba KepcetinreH ToIbIK aTaydbI tepy apKblb «Electrolux INdYkUINbIK PNTaCbIH OPhATy eDiCi - Kymbc YCTeJIHe OPhATy» BInDeO KylbIFbIH KapaHbI3.

YouTube
www.youtube.com/electrolux
www.youtube.com/aeg
How to install your Electrolux Induction Hob - Worktop installation

4. BYиbIM CINATTAMACbi
4.1 Θ3ipney 6etinH opHanacybI
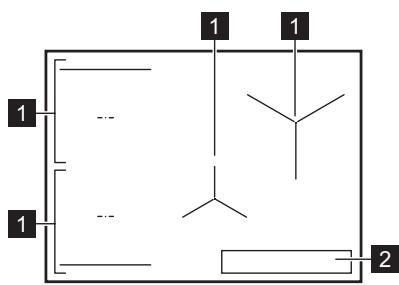
1 INdkyuJbIK nicipy aMafty
2 Backapy TaKTacbl
i
Ticipy aImaKTapbIbHbI eJIWeMdepi TpaJIbToJIbIK aKnapaT any yUiH «TexnKaJIbIK DepeKTeP» TaPaybIH KapaJIbI3.
4.2 Baçkapy nāhejīnH opHañacybI

Kypblfblb icke kocy yuish ceHcoplbik epictepi naaIaNahbIb3. BeHne6eTep, INdikatopnap MeH dblbictbIK ciHaIap KaI cyHKnIapdbIH KymbIC XacaiTbIHbIN KepceTeedi.
| Сенистор Лык эрIC | Фунreichа Косулы / Θширuti | Сидастамсы | |
| 1 | ① | Kосулы / Θширuti | Курсынfliesы iccke Косу жэne сэндіру. |
| 2 | II | Кidирic | Фунreichаны iccke Косады жэne сэндірedi. |
| 3 | ◎ | Таймер | Фунreichаны орнау. |
| 4 | +/- | - | Уakсытсы көбeyтuroreme hemece aзai'tуfa aphanfahn. |
| 5 | - | Таймер бийнебeti | Уakсытсы минут SFоьынша керсетurore aphanfahn. |
| 6 | ☆ | SenseBoil® | SenseBoil®. Сydын Tempepaтуарын кайнay tempepaтуарыnaх яжтkende ТБIM кайнал кетпейтіндій etin abTomattsi Tjurde pettey ушін. |
| 7 | ■ | Bridge | Фунreichаны iccke Косады жэne сэндірedi. |
| 8 | AUTO | Hob' Hood | Фунreichаны колmenбасару рекимін iccke Косуfa жэne сэндіруге aphanfahn. |
| 9 | - | Басару панelli | Кызу napametriи орнауfa aphanfahn. |
| 10 | P | PowerBoost | Фунreichаны косуfa aphanfahn. |
| 11 | Курсытay / Бала kayincia'diri Курсынfliesы | Басару панelliin Күрсayлды/Күрсayын afытады. |
TpyfAHa KaIbIK bICTbIKTaH KynIKTepe any Kayni 6ap.
Hndykuinbik 33ipny ayamakTapbl 33ipny npoceci yuhi KaKeT Kb13ydbi TikeJeblb1cTbIH TMeHri XaFbIHDa Tydbipadbl. IbHbI KepaMkabIdbIcTbIH Kb3yImeH Kb13aDbI.
HnkaTopnapnicipyaMaFbI bICTbIK Ke3eKepcetinei. Onap ka3ipri yaBTTa naJaIaNbIbIn TpyHan nicipy aMakTapbIHbIN KaNbIK Kbi3yihkpcTei.
- nicipydi xanfactbipy,
- -XbblblYctay,
- KaJIaIbIK Kbl3Y.
CoHdai-ak 6yI INDnKaTOpMbHaJkaFdaJa KepiHyi MymKIn:
Tinti naIaIaNbIn XatnacaHb3 da, ipreIec 3eipIey aIMakTapby ywiH,
CybIK 3eipJey aMAmFbIHbICTbIK bIDbIC KOyblfHaHda,
nIITa 6eJIceHci3iipinreHne, 6ipak 3iipney aIMAfbl eNl bICTbK ke3Je.
MnHyT caHbIHbI Dbl6bIC
Erep6ipheweaMak6enceHdi 60JbIn, TyTbHaTbH Kyat KyaT Ke3iH IN WeKTeYiHeh acbIn KeTcE,6yN fynHKUIN KOJXeTIIMDi KyaATbI 6apJIbIK nicipy aMaKaTApbl apacbIHda 6enei. PnITa TpyfBIn KaJaOpHaTbIJFaH caKaTaHDbIpFbIWTapdbI KOpFay MaKCaTbIHDa Kb3y npaametpneip HpeTeydI.
- Erep nIHTa 6apbIHwa konKetIMdi KyaT WeriHe JKTce (TexHnKaJIbIK aKnapaT TaKTaWacbIH KapaHbI3), Nicipy aMakTapbIHbIH KyaTbI ABTomATTbI TypDe a3aJbI.
YHemi bipinwi TaHdaNfAH nicipy aImaFbHbIH KbI3y napameTpine 6acMbIK 6epinei. KaFAN kyAT taHday petHe caikec 6aca nicipy aImakTapbl apacbHa da 6eJIHei.
KyaTbI a3aIbIfAH nicipy anaHdapbl yuHIN bAckapy kOJaFbI KbIbIbIKTaIbI JxHe eH YIKeH bIKTMaJI KbI3y napamETpneipn Kepcetei.
ДисплелжынллбтayынТOKтkaнша KTYIH3 Hemece COHfbl TaHdaIaNfah Nicipy aanaHBiHbH Kb3y napaMeTpIn a3aIbHbI3. Nicipy ayMaKTapbl a3aIbTlFaNfAH Kb3y napaMeTpImeH xMybIC icTei bepeDi. Erep KaKeT 6oJCa, nicipy ayMaKTapblHbH Kb3y napaMeTpNepiH KoJImeH e3reptiH3.
6.9 SenseBoil®
Функцясудын Temnéратураьн Кай hay Temnéратураьн НжЕТКЕнDE ТыМ Кай Han ketпейтіндіе etin abTOMaTTb Typde peTTeNi.
i
Erep naIandaHbIb3KeIeTINicipy
anaHbIHaJxblny ( / /) KaIbIn
kAnca,db6bIcTbK CnTHaN ecTIneDi XHe
fHyHKuia Icke KocblImaIdbl.
fHyHKuiaKa6bIcNaITbH bIDbICTapMeH
XyMbIC icTeMeNi.
ABAHJIAHbI3
BvI pHyHKUHbI 6Oc bIbICpeH naJaIaHyFa 6oMaJbI.
ByfpyHKnIa icTeN tyPfHa, nIINaHbI KapaycbI3 KaIdbIpyFa 6oMaIbI.
- 1-5л салкын су толтырлфан bIDICTapdblФУHKUЯнbl icke KOCY KaKET nicipy aIMaKTapbHa KOblHbI3.
Erep6ipnicipyaimaftbHa6bpblbictbKoicaHb3,pyHKpnaABTOMaTTbyTpdeickeKocbinaB. - Neusti Kocy wuih ① Tymecin TyptiH3.
3.ФункциЯны КOCY yuH TymeciH 6acblb13.
AfbIMdaFby yaKbTTa yHKnIyHbI naIdanaHyf a6oNaTbIn ap6ip niCipy aMafBHa JxOFapblDaFby KbINbJIbIKTaNTbIH
P INHdNkaTOpbl naIda 6oJaDbI.
- TaHdAnFaH Nicipy aMafbHbIH KByriptKicihI Ke3 KeJreH KepiH TyptHi3. ΦyHKunraHbI icKe KocblJaDbI. ΦyHKunia icKe KocblfAHHaH KeiH, KByriptKhiH yCTiHderi Hndkatopnap Kepcetilin, aHmuaqna OHaH bactaDbI.
i
Erep5ceynidiwiHne nicipy aImaKTapbHa bIDbICTbKOIMacaHbI3, fYHKnA ABTomaTT tyPe eweedi.
Функця Кай hay hyKtecihe keTkeHne,ПЛNTa ДыбICTblcNTHaHл WbIFapabIжэнКы3y DeHreи abTomaTTbI Tpyde eDENKI KaHay DeHreinHe e3repeDi.
KaHay TemnepaTypacbHa JxetKeHre DeiH
fYHKunHbI eWipy yuHIn HcHeme0
TyMecIH TyptHi3.
KaHa HYKTeCine KeTKeHHHe KeiH
ФуHKUЯHbI eWipy yuH, kYrIpTkHi TpyTIn,
Kb3y napaMeTpIH KOJImeH peTteH3.
Erep Kidipic yHKUraCbIH KoccaHbI3 Hemece bIbIcTbI aIbIN TactaHaI3, yHKUra Ewei.
Erepnicipy aImakTapbHbH 6ipeyihde Kepi caHaKa TaMepi cyHKUraCbH opHaTaCaHb3 JHeOpHaTbJFaH yaKbIT KaHay HkyTecHe JeTne aAaTcNa, cyHKuRa ABTomaTTbI Tpyde eWeedi.
Ce3KemekTepeHeKeHeCTep:
-ФункцясудьkaинатуfasxeHe KapToNTbI nicipyreжakcblyneceidi.
БунфунцишэйнжтepmenЗпессдайынданьн КошешалнжтерддypblICЖмblc icTeMeyimMmKIN.
KcTpeNdiXapTbcM MeH TepTHeYuApacbHdaBf DeHreRe DeiH CaIKbH WymeK cybMeH TOITbIPbIN, KcCTpeNdiXneriHe4CM60Ckbln KaIbIPbHb3.1Pa3HemeC5ApTbIK cyblnaiJaHa6aHb3.Cybln (HemeCeCy MeH KapTOTNb)XaNNbCaJMaFb1-5Kr apaJIbIHda eKeHHe Ke3 KeTeK3iH3.
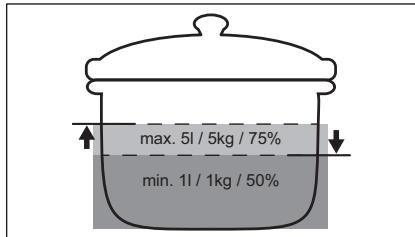
- Eh jakcbi hntnxere kon kekkiy uih TeK 6ytih, apwblmafah, optawa enuemderi KaptonTapdbi niiciphi3. KaptonTbI TbIM TbIfb13 etin canMaHbI3.
KbI3dbpy fpa3acbIHda baca KaCTpEndepdi KapkIHbI apaNaCTbpydAn KHe 6bacna nicipy aMMAKTapbIHda KaTap nicipyre (MbICanbl, KybIPy Hemece KaHATy) 6oMaNbI.
-ФункцяЖуMbICICTeTnTpFaHKe3de CbIPKbI Tep6eNtCtePdi(MbICaJIbI, apaNaCTbIPfBItbI NaДaHaHy HemeCe PINTaHbIHKaHbHa YaJIbTeNeΦoHdbI KOIO) TyfBIs36aHbI3.
Tafam Meh bIdbic TypiHe cAnkec KaHay TemnepaTypacbHa JekTeKHeH KeiH Kb3y napameTpih peTeyre 60labl.
KaiHay TempepaTypacbHa XeTKeHne T3 KOCbIHbI3.
KyaattbI yHemdey yIiH KaKaNTbI naIdaHaHbIHb3.
6.10 Məzɪp Kʌþbɪnɪbɪmbl
Kectepe Heri3ri M3ip KypblbIMbi Kepcetilei.
PaindanaHyubi napametprpei
| Таньа | Параметр | Муемки онц�лар |
| b | Дыбыс | Косуны / Θшірүл (-) |
| P | Куатшектeyi | 15 - 73 |
| H | Тутін тартусы разхимi | 0 - 6 |
| E | Дасыл / Катe Журналы | Сонгы дамылардын / Кателердин тizimi. |
PaiDanaHyybI npaMeTpneipin eHri3y: TuyMeciN 3 cekynd 6acbln TypbHb3. CodaH KeiIN TuyMeciN 6acbln TypbHb3. Papanetpnp coJ xak nicipy anaHapbHbH TaMePiHe naJa 6oNaBbl.
Məzipdi wapnay: məzip napametp TaHbanaIpaBHAn H KəHe MəHHeN KypaIaNbl. TaH6a apTKbl TaMHepDe naJa bOaNbl, an mH aIbIHfbl TaMHepDe KeiHedi. InapaMeTpnepeapacBHaDa wapnay ywiH aIbIHfbl TaMHepDi Tymecin 6acIHb13. InapaMeTp mAHIN e3repTy Wih anIbIHfbl TaMHepDi + Hemece - Tymecin 6acIHb13.
How to install your Electrolux Induction Hob - Worktop installation

4. IZSTRÄDÄJUMA APRAKSTS
How to install your Electrolux Induction Hob - Worktop installation

4. GAMINIO APRAŠYMAS
4.1 Kaitinimo paviršiç planas

1 Indukciné kaitviete
2 Valdymo skydelis
i
JIHcA CO MHOrgy OBeMHN I CNoJKeHN IppeKn BO pa3BojOT, OCBeH aKO He Ce POnI NoCToJaH HaD3Op.
- Децata trpe6a дa бидат пон надзор дa не уграат co anapatot.
- Дожete ja ambaлajka ta поалеку od deca n Фрlete ja COODBETHO.
- ПЕДУПЕДУBAнБЕ: Урedingи нееговпесдосташи Deюви.staHyBaatжшкп ри уnotpeба.Држete Г Deцату и млеленцпт epdaleky od anapatot kora paBOTи Или кORA ce laDiN.
- Ako anapatotima ype3a 3austnta Ha deca, Tpe6a da ce BKnyu.
- Деца на Треба дa го чист илдуbaат anapatot 6e3 надзор.
1.2 Onstata 6e36eHocST
- Oboj anapa t e Hamehet cmo 3a rotBeHe.
-Урекот e наMuHET Da ro KOpIcTn eДно ДOMaКИNcHcTBo BO DOMaши YCЛOBи BO 3aTbOpeH ПpoCTop. - YpeIOT MOKe Ia Ce KOpIcTn BO KaHZeJIapuN, XOTeJIckn CO6n, TocTINHnI, fApMn Co TocTINHnIuN IN dpyrN CInuHn CMeCTyBaHa KaDe HeROBOTo KOpIcTeHe He HaDMHyBa (npocEHHO) HnBO Ha KOpIcTeHe BO DoMaKInHCTBO.
- ПЕДУПЕДУBAHBE: Урети нееговпесосташи Deяови стоныат яшkin поуnotpe6a. Трба за се Вима вда не се дочни ргеша.
- Догоньдддддддддддддддддддддддддддддддддддддддддддддддддддддддддддддддддддддддддддддддддддддддддддддддддддд徳.
- ПЕДУПЕДУBAHBE: Говьeto на NOВшина 3a Говье с масгпл MacNo 6e3 habзор можеда bide onacHO n da DoBeDe do noxap.
-ЧадOT e noka3aTeJ 3a nperepeBaHbe. Нкогаш He Користе ВODa 3a racheHeBe Ha NOxap Od rotBeHbe. Иckлучete ro ypeIOTи NOkpniJte ro ПлameHOT co Na пример ORHooTnOpHa NOKPnBka Или Калak. - ПЕДУПЕДУBAнБЕ: AnapaToT He cMee Да 6иdedoCTaВeHпpeky NaДВОрeшen урeding 3a пpeKINHyBaHbe, KaKO
Ha npimep Tajmep iIa 6nde noBp3aH ha cTpyja kora ce racin n paIIN NOCTOJaHO CO NOMoH Ha ypeI.
BHIMAHHE! IpocecoT ha rotBeHe mopa da Bnde HaIgIeIyBaH (dypn nФyHKcInTe 3a aBTOMaTcKO rotBeHe. KpaTKte npoecn Ha rotBeHe mopa da bndaT noctoJaHo HaIgIeIyBaHn.
- ПЕДУПЕДУBAнБЕ: OnachocT od oran: He chyвajte
праздмети на поршинITE 3a ГтBEнБe.
- MetaJIHnIte npedMeTn, KaKo ITo Ce HOJKeBn, BInLyuKn, NaJNcN i KanaCn, He Tpe6a Da ce OCTaBaat Ha NOBpUHHata 3a rOTBeHe 6ndejKn MoKe Da ce BxKeUHTaT.
- He kopncTeTe ro anapaTOT nped Da ro MOHTnPaTe BO BrpaDeHaTa CtpyKTypa.
HekopnicteTe uicTaHa napea 3a uicTeHbHa ypeIoT.
- ПО корис te beto, ncknyte ja pIHrnaTa ha NOBpshnHaTa 3a rotbehe npeky cooDbetHaT a KOHTpoJa n He notnpajTe ce Ha ypeDOT 3a OTkpBaHb e TeHcpe.
- Ako ctaKno-KepaMnUkata / ctaKneHaTa NOBpUnHa e HanyKhata, ncknyute ro anapatot 3a da ja n36eHete MOxHocTa od ctpyen ydap. Bo cnyaj anapatot da e NOBp3an CO wTekepot co pa3BOJHa kyTuJa, n3BaJeTe ja cNojkata 3a da ro ncknylnte anapatot od ctpyja. Bo cekoj cnyaj KOHTaKtnpajTe ro OBnaCTeHNOT cepBnCeH ueHTap.
- ДOKOLKY Кабелот 3a Наоюваные ce Oштети, Треба да се 3amehи од CTраHA на пОНЗВODИТЕЛOT, OBlaacteh Сервис Или слічни KBалпфінкуваши Лица 3a дa ce n36berHe onaCHOCT.
- ПРЕДУПЕДУBAHBE: Корис-teе само 3aштпци 3a NOВшина 3a ГтBEи He npabBeHи Od CTpaHa Ha ПОНЗБODINTEJOT Ha anapaTOT 3a ГтBEи Ил ИОп eKo Ce HabeDEHn BO yNATCTBaTа 3a KOPISTeHe KaKO ПОГДHи IJI 3aштпHTиц 3a NOВшинa 3a ГтBEи KOI Ce DeI Od camnot anapat.Корисьeto Ha HecoOДВeTHN 3aштпТиц 3a NOВшинa 3a ГтBEи мОж eЯдппИЗВИкa He3roДa.
2. БЕЗБЕДноСИУПАТСТВА
2.1 MoThaxa

IPEyUNPEyBAHbE!
AnapaTOM Mopa Da 6nJe MOHTnpaH cAmo OJ KBAJIINΦNkYBaHO JInze.

IPEDYNPEDYBAHbE!
Onachoct od nobpeda nn noiTuBaHe ha anapatot.
I3BaTe ja cenata ambaJaxa.
- HemojTe Da MoHTnpaTe HNTy Da KOpNCTnTe OwTeTeH anapat.
CneTe Tn HNCTpyKcIMTe 3a MOHTnpaHe daeHn CO anapatOT.
OdpjyBajTe MmHImaHa OdaIaeHcOCT od npnte anapatn n deIOBN.
- Cekoraw BHMabjTe kora ro npehecybaTe anapatot 3aToa wTo e TeKoK. Cekoraw Hocete 3aWtHTn paKaBnCn n npJIoXeHInTe o6yBKn.
3aayeneTe rni 3aceeyenHte NOBpunHn Ha nJaakapot co 3aNTINbau 3a da cnpeYnte Blaarata Da npdeN3BnKa HndrHyBaHe.
3aunTeTe ro dHOTo Ha anapatot oD napea nBnara.
He ro mONTnpajte anapatot BO 6n3nHa ha Bpata nn noi npo3opeu. Ha Oboj naHH Ke cnpeHTe HekoJ Kekok caI 3a rotBeHbe da naHne od anapatot Kora Bpata Ta nn npo3opeoT ce OTbOpeHn.
- Cekoj anapat mma BeHTnlaTopn 3a JanaDeHe Ha HOTO.
Ako anaparot e uHCTaInpaH naD cnokata:
He yubajte MaII npedMeTI INI INCTOBX xapTnja KON MOxAT da 6nDAt BOBNeUeHn 3aTOA uTo MOKe Da I N OWTetAT BEHTNJaTOPiTe 3a JnadeHe INI DA rO OWTetAT CnCTeMOT 3a JnAdeHe.
-
Uybajte pactojaHne OJ MInHMym 2 cm NOMeIy DNHO To Ha anapatOT IN DeIOBITE KOI CE UyBaAT BO φnOKaT.
-
ɪЗbaɪdete 6илно кор pa3děnyвач на плочи моHTиран BO плakapOT по anapatOT.
OD INDyKTHBHTe PNHrN KORA anapaTOT pa60tN.
KoraKe cTaBnTe XpaHa BO BpeNo MacNo, Toa MoKe Da ce pacnPcHe.
He KopncTeTe aIyMnHnymMcKa foIJa IIN npyrMaTePnJaN NOMEfy NOBpShnHaTa 3a rotBeHe n CaIoT 3a rotBeHe,OCBeH aKO nonNaKy He e HaBeJeHO oI npOn3BODnTeJOT Ha OBOj anapat.
KopncTeTe cAmo doaToCu npenopauHn 3a OBOJ anapaT oN pOn3BODnteIOT.

IPEDYNPEDYBAHbE!
Onacnoct oJ noKap n ekcnnojna.
- Пи загреваьe, масотипг e mаслOTO
МожатдаинсутtaaTЗапалыnpen.
Држete ro паменOTиЛЗзаганITE
праздmetи подалеку OД масотипe
mасLOTOKA rOTBNTe CO HNB.
IcnapyBaHaTa KOn IIn NcnyuTa MHOrgyeuKoTo MaCNo MOKe Da npEiN3BnKaaTcNOHTaHO COROpyBaHe. - YnOtpe6eHToMaCNo, Koe MoKe Da coOpJxN OCTaTOu OD XpaHa, MOKe Da npEiIN3BnKa NOKap Ha NOnIcKa TemnepaTypa OTKoIKy MaCNoTO Koe Ce KopInCTn 3a npBnat.
He ctabajte 3anaJIbN pOun3BOJn nI npEJMTe KOn CE MOKPn 3aeJHO CO 3anaJIbN pOun3BOJN BO anapaTOT, IIN BO HerOBA 6JIu3Ha.

ПЕДУРЕДУBAнБ!
Onachoct od owtetybahe ha anapatot.
He yBajte KeuKn caoBu 3a rotBehe Ha KOHTpOHaTAt Nloya.
He ro cTabajTe kanakOT ha XeUka TaBa Bp3 cTakNeHaTa NOBpuHnHa Ha IIOuYata 3a rotBeHc.
He octabajte caobu 3a rotbehe da BpujaT 6e3 BOa.
BHHMabajTe da He naHnat npedmetn nnncaIOBN Ha anapaTOT. NOBpunHaTa moKe da ce OWTeTI.
He nBknyyBaJte 30HnTe 3a roTbe He co npa3HN caOBN nn6e caOBN.
- CaIOBnTe HAnpABeHn OJIneHO JeJIe3O
NIIu CO OJTeTeHO DHO MOKe Da
IpeIN3BnKaaT rpeBaHnI Ha CTaKlIoTO /
CTaKlOKePamkata. CekoraW
IOniRHyBaJTe rN OBHe IpeDMeTu Harope
KORA Tpe6a Da rH NOMeCTnTe Ha NOBpWHHaTAta 3a rotBeHe.
2.4 Hera n YnCTeHbE
- PeNoH uNCTeTo anapatOT 3a da cnpeuHTe OHTeYBaHe Ha NOBpHnHcKnOT MaTepnjAn.
Icknyete ro anapatot n octabeTe ro da ce onaDi nped qncTeHeto.
He KopinCTe TcTcAn Co BoDen Cnpej napea 3a YnCTeHb Ha anapaTOT.
-Чис te ro anapaTOT co Влжн MaKa kpna. KopriTe camo HeytrpAnHn dTepeRHTN. He KopriTe a6pa3nBn npOn3BoDn, abpa3nBn cyHfepn 3a ChisHe, pactbOpbyaun nIi MeTaJIHn PpeMTe, oCBeH aKo He e NonHaKy HabeJeHO.
2.5 CepBnC
3a da ro nonpaBnte anapaTOT, KOHTaKTpajTe CO OBnacteHnOT cepBnceH ueHTap. KopncTeTe cAmO opuHaJIHn pe3epBn DeJIOBn.
Bo OJHOC Ha CBETINITE BO BHTpeUHOCTa Ha OBOJ pON3BOD n pe3epBHNTe CBTINIKI
Ito ce npodabaat noce6ho:Obne CBETNIKn Ce npedBIDeHn Da n3dpkatakCTpeMHN fni3uKN ycNOBN BO anapatnte 3a DomaknHCTBO, KaKo ITO CE TEMpeHpTa, Bn6paun, BlaJxHocT uNc Ce npedBIDeHn 3a daBaHaBe CnHaJI N 3a pa60thata Coctoj6a Ha anapaTOT. Tne He ce npedBIDeHn Da ce KOpNCTa 3a dpyHn HameHn Hi Ce nOroDn 3a OCBetnyBaHe npocToPn BO DOMOT.
2.6 OToCtpaHyBaHbE
PNEyPENEYBAHbE!
Pn3nk od nobpea nn 3aynybahe.
- KohtaktnpajTe co Baunite JoklanuHn opraHn 3a da doBne Te HΦopMaun 3a Toa KaKo Da ce Ocno6oDIne oJ anapatOT.
- Incnyete ro anapatot oJ npNKnyokOT 3a ctpya.
- ɪərədæTe ro eŋeKtpnHnOt kaβeI 6JIncky do anapatot n φpIeTe ro.
3. MOHTAXKA
I PNEyPENyBAHbE!
BnTe Bo norglaBJata 3a 3aHTnTa nCnryphocT.
3.1 Празд монтжата
Ipei da ja MOHTnpate NOBpHnHaTa 3a rotBeHe, HAnuWeTe rN INHOpMaunTe noDOny od nloOkaT a 3a cneuCnKaun. IIOUkata co CneuCnKaun ce Haora Ha dnHOTo OD KyKmWTeTO Ha anapaTOT.
Cepinsckn 6poj (S.N.)
3.2 Bvpaedn nployn 3a roTbeHe
KopncTeTe r anapatnte 7To ce BrpaDyBaaT camo aKO Ce npeTXoJHO BrpaDeHn BO COOBeTHN eJEMENTn 3a BrpaDyBaHe N BO pa60THN NOBpUHN KOn rN IcNoIHyBaAT CTaHapdnte.
3.3 Ka6eI 3a noBp3yBaHbe
Плочараза за rotвьеima ka6e93a noBp3yBaHbe.
3a da ro 3aMeHnte oWTeTeHnOt npKnyuHnK 3a cTpyja, KOpNCTeTe TnHa Ka6en: H05V2V2-F KoJ mIdpjxvBa tempepatya od 90^ nII Nobucoka. Edna Jnca Mopa da NMa MNHMaJIeN ppecek Bo corlaachocT co TabelaT noDony. O6paTeTe ce BO IokaHnOT cepBncen YeHTap. Ka6eJOT 3a noBp3yBaHe cmee da 6nDE 3aMeHET caMo od KBaJIINΦnkyBaH eJeKtpnUap.
PNEyPENEYBAHbE!
Cnte eIeKtpuHn IOBp3yBaHa Mopa da 6nDaT n3BpSeHn OJ KBaINΦNkYBaH eIeKtpuHap.

BHIMAHNE!
Ib3yBaHaTa npeky KOHTaKTHn npknnyoCi ce 3a6paHeTn.

BHIMAHNE!
Hemojte da ngdunuHTe nnn 3aJIeMyBaTe KpaEBnTe Ha JncaTa.Toa e 3a6paHeTo.

BHIMAHHE!
He nobp3ybajte ro ka6enot 6e3 3aBpuTeKoT.
EhOa3Ho nobp3yBahe
- ɪəbaɪdete ro 3aBPseTOKOT ha Ka6eIOT OJ UPhAta, KaΦeAbaTaɪ CnHaTa Jxɪza.
2.ИЗbaДеTe ja ИЗоlaциJaTаOD КраeВиTe NaцрНOT, KaФeAБNot И сИнNot Ka6eJN. -
Поврзete Г Краевпe Haцнite И КаденITE Ka6nI.
-
Ctabete HOB 3aBpweK3a KIHa H3aBpweK HA cNoJeHnOT Ka6e (noTpe6eH e cneuJaHe anAT).
- Поврзetime Краевпente Ha Два сини Ka6n.
- Ctabete HOB 3aBpweK 3a Jnca Ha 3aBpweK Ha cnoJeHnot Ka6e (noTpe6e H cneujaH anat).
DBoΦa3Ho NOBp3yBaHe
1.ИЗbaДеTe ro 3aВpшeТOKOT ha KaБeЛOT OД синота КИЦA.
2. OTeTpaHeteJeO nI3oNaJataHa KpaEBnTe OD CnHnOT Ka6eJ.
3. Повзете Ги Краевпес Ha Два сини Ka6и.
4. Ctabete HOB 3aBpseTOK 3a Jnca Ha 3abPseTOK Ha cnoJeHnot Ka6e (NOTpe6eH e cneuJaEN anAT).
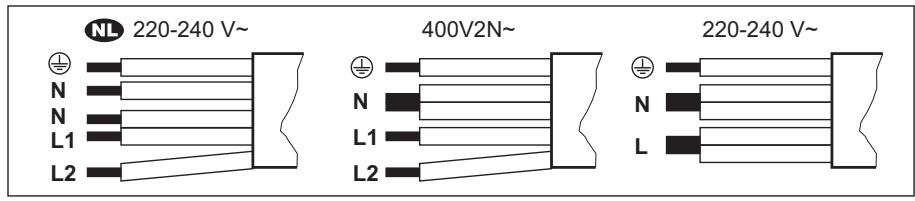
| NL 220 - 240 V~ | Двофазно поврзувалье: 400 V2N~ | Еднофазно поврзуваьe: 220 - 240 V~ | |||
| 5x1,5 MM² | 5x1,5 MM²尤其是4x2,5 MM² | 5x1,5 MM²尤其是3x4 MM² | |||
| ½ | Зелena - жолta | ½ | Зелena - жолta | ½ | Зелena - жолta |
| N | Сина и сина | N | Сина и сина | N | Сина и сина |
| L1 | Zipna | L1 | Zipna | L | Zipna и кafeевa |
| L2 | Кafeевa | L2 | Кafeевa | ||
3.4 CklonyBaHe
AkoMOHTOPaTe pIoUa 3a roTBeHeNoxay6a,Be MOJIMe Da rN BnDInTe yNaTcTBata3a MOHTpaHBe Ha xay6bTa 3a MmHImaJIHaДИCTAHCa MeIy anapatnte.

Ako anapaTOT e MOHTnpaH naФnOKata, BeHTnlaunjata Ha NOBpUHHata 3a rotBeHe MoKe Da rN 3aTOPnI INpeDMeTNTe KOI CE cyBaat BOФnOKata 3a Bpeme Ha npOuecot Ha rotBeHe.
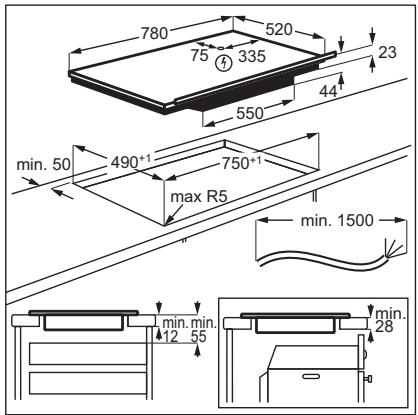
HajndeTo ro BnIeO ynaTCTBOTO ,Kako da ja JnHCTaIIpaTe BaIaTa INyKUncKa IIOua 3a rotBeHe Electrolux - MoHTnpaBe" Taka WTo Ke ro BHeceTe CEJIoTO IMe HabeJeHO Ha CInkata NDoIy.

YouTube
www.youtube.com/electrolux
www.youtube.com/aeg
How to install your Electrolux Induction Hob - Worktop installation

4.ОПИС HA ПОН3ВОДOT
4.1 ŠeMa ha noBpShnHaTa 3a rotBeHe
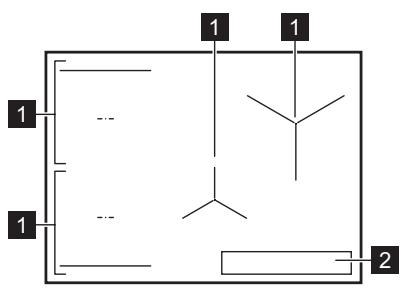
1 INduKuicka pInHra
2 KOnTpOJIHa Ta6Na

3a noTeaHn HOpMaun 3a roEmHaTa Ha pRInTe BnTe BO "TexnKn nOatou"
4.2 PacnopeHa KOHTpOHaTa Ta6Na

Pakybaje co anapatot co nomou ha ceH3opcknte noJIbHa. EkpaHnTe, noka3aTeIte n 3ByuNTe nokaybaaT kon yHKun pa6oTaT.
| Сенистор ско пole | Функциja | Опис | |
| 1 | ① | Вълухи / Иълухи | 3a вълухуваье и在其ълухуваье на anaparot. |
| 2 | II | Палза | 3a вълухуваье и在其ълухуваье на Функциjaда. |
| 3 | ◎ | Тajмер | 3a поставваье на Функциjaда. |
| 4 | +/- | - | 3a згелемваье пли hamалуваье на ВрemeTo. |
| 5 | - | Екpan на тajмерот | 3a п riskаможваье на ВрemeTo BO минут. |
| 6 | ® | SenseBoil® | SenseBoil®. Функциjaда grabоматски ѳ п风险管理ява temпегатура на ворота за то не пreakице OTКако ке ja достигнешточкatingа на Вриende. |
| Сенистор Скоб нole | Функуда | Опис | |
| 7 | 1 | Bridge | 3a влесувашие и在其点点头 на脚下 сима. Функуда. |
| 8 | AUTO | Hob'2Hood | 3a влесувашие и在其点点头 на рачниот рожим на脚下 сима. Функуда. |
| 9 | - | Контуна лentesа | 3a постов��ашие на поставka 3a щачина на топлина. |
| 10 | P | PowerBoost | 3a влесувашие на脚下сима. |
| 11 | 1 | Зak再说вашие / Урета 6e3бедност на.Deca | 3a за再说вашие / олесувашие на kontrPORнога на табla. |
4.3 Показатулma 3a ekpaHot
| Показател | Опис |
| E+6poj | Има.Deф ekт. |
| E/ E/ | OptiHeat Control (Показно сBVЕТно за п reproстанда толпина во 3 чекори): пroduлжни со ratveье / подграваль / п reproстанда толпина. |
5. ПЕД ПВATA УNOTPEBA

IPEDYNPEDYBAHbE!
BnTe Bo norglaBJata 3a 3aHTnta nCnryphoCT.
5.1 OrpauHcyBaHbe Ha jaUnHaTa
OrpaHcyBaHe ha jaHnHaTa deHnHnpa KONky eHeprJa TPOSh BkynHO nOuata 3a rotBeHe, BO rpaHnCtne Ha OcNrgyBaUte 3a HnCTanaJHa Ha KyKaTata.
Плоча за rattebe CTaHdapdno e noctabeha Ha HajBnCOKOTO HnBO Ha jaUnHa.
3a da ro hamajnte uin 3rolemnte HNBOTO Ha MOKHOCT:
- BJIe3eTe BO MEHTo: pIurTnCHeTe n 3aIpxKeTe ① 3 cekyHdN. IIOToa, pIurTnCHeTe N dPjKeTe
- Пиитискajte ro Na пешиот тajмер сд дда К He Исчесп P.
- Пптуникajte ro -/ +Ha npeДиNot Tajmep 3a Да Г NOCTaBnTe HNBOTo Ha jaUnHaTa.
4.ПиTuNCHeTe ①3aДаИЗЛe3eTe.HnBOaHaMOKHOCT
BnTe ro norgaBJeTo ,TexHnuKInHΦopMaun".

BHIMAHNE!
Поберете дали одбраната мok noct OДROВАРа на осигурвачпЕ В КИКATA.

BHIMAHHE!
Ako HINBOTo Ha jaunHa e pONHcK Onn EHaKaBO Ha 2000 W, He moKeTe da Bknynte SenseBoil®.
P73-7.350W
P15—1.500 W
P20—2.000W
P25—2.500W
P30—3.000W
P35—3.500W
P40—4.000W
P45—4.500W
P50—5.000W
P60—6.000W
6. CEKOДHEBHA YNOTPEBA

IPEDUNPENEYBAHbE!
BnTe Bo norglaBJata 3a 3aHTnta nCnryphocT.
6.1 AktnBupaHe i DeaakTnBupaHe
PnTncHeTe ro n dpKeTe ro ① 3a da ja BAknyuHte nnN NCKnyuHte nloaTa 3a rotBeHe.
6.2 OTKpNbBaHbTeHuepe
ObaaФyHKnja yKaKyBa Ha npncyctBO Ha caIOBn 3a rotBeHe Ha nIOuYata 3a rotBeHe n IINCKJLyUyBa pINHnIte aKo He ce OTkpNJat caIOBn 3a rotBeHe 3a BpeMe Ha rotBeHeTo.
Ako cTaBnTe caIOBn 3a roTbeHe ha pIHrna nped da n36epTe noCTabKa 3a TOnJIInHa, ce nojabyBa noka3aTeJot na O ha KOHTpOJHaTaJeHtA.
AkoOTcpaHnTe ca3a rotBeHe oD BknyeHa pInrnaI npBpeMeHO ro CTaBnTe HactpaHa, noka3aTeNITe HaD COoBETHaT a KOHTpOHaJIeHTa Ke 3aOnuHaT da TpeNkaat. Ako He r BoPATne CaODT 3a rotBeHe Ha BknyeHaTa pInrJa BO pOK o1 120 cekyHn, pInrIata Ke CE NCKnyu ABOMATcKn.
3a da npoDOnKInTe co rotBeHbeto, nOrpNkTe ce da rN BpaTte caObNTe 3a rotBeHe Ha pInrIInTe BO HabeEHnOT pOK.
6.3 KopncTeHbe Ha pnuHJIInTe
CTabeTe ro caIoT 3a roTbeHe DnpeKTHO BO ueHTapOT Ha OdbpaHata pIHrIa.
INHnyKTNBHTe PNHRn ABTomatCKn Ce npNJIarOyBaaT Ha dIMHeH3NITe Ha dHOTo Ha caJOT 3a rotBeHc.
Mokete da rotBnte BO roJemn caOBN ha DBe pNHRn nCTOBpeMeHO KOpNCTejkn ja fynKunjata Bridge.CaOT 3a rotBeHe mOpa da Tn NOKPnBa CEHTpnte Ha DBeTe pNHRn HO He Cmee Da OND HAdBOP OD MapKnpaHaTa oBnact.AKO caTOT 3a rotBeHe e cTabeh Mey Dbata ceHtpn, fyHKunjata Bridge Hema da Bnnde BKnyeHa.
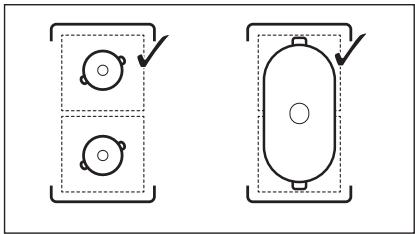

6.4 NocTaBKn 3a noDrpeBaHbe

- Пи捜сichte ja cakahata noctabka 3a TOnJIInHa Ha KOHTpOINHATA JIeHTA.
Ioka3HnTe CBetna HaJ KOHTpOHaTa JeHtA ceNojabyBaat Do n36paHOTo HNBO Ha NOCTaByBaHe Ha TOnPInHa. - 3a da ja ncknyuTe pHHraTa, npntncheTe 0.
6.5 PowerBoost
Функида ообзбдува полесма мк 3а ндуктунгпе рингл. Функида може д биде akтуврана 3а Индуктуньата рингл само 3a odpe dedeo Врeme. Посlete товсяд Индуктуньата рингл abTomatски ce вра__ ha Hajrolема差别я__ <|im_start|>assistant
i
Budete ro norlaabjeto ,Texnukn HOpmaun
3a da ja akTbHpaTe yHKunjata 3a pInrJnata:doPte P. Ce BknyuBa
3a ncknybahe Ha cyHKunjata: npomehe ja jaHnata Ha TOnnHaT.
6.6 OptiHeat Control (Покастел за п reprostанда тонлпва в 3 чекopa)

PNEUynPEyBAhE!
E / Ce dokeka noka3aTeIOT e BnIINB, NOCTO PI3Mk OJ N3ropeHnIc OJ IpeoctHaTaTAtonJIInHa.
HnycknTe pHnJna npOn3BeDyBaat HeonXoHaTata TOnJIHa 3a npOecOT Ha rotBeHe DnpeKTHo Ha dHOTO Ha caOBte 3a rotBeHe. CtakIOkepAMkata ce 3arpeBa od TOnJIHaTata Ha caOBte 3a rotBeHe.
Ioka3aTeIneCe nojabyBaat Kora pInHrlatae XeIka. Ioka3aTeIneTo npKakxyBaat HnBOTO Ha npeOCTaHaT aONnHa 3aPnHrJIte KOI MOMENTHO IN KOpNCITE:
- npoDOnJx Co rotBe,
- OdpjyBaHbHe Ha TOnnHa,
- npeoctaHaTa TOnJIInHa.
Покастен може, по тaka, за се поави:
3a COCEdHnTe pHHgnn, dypu n aKO He rN KOpNCHTne,
KORA JIeKoK CaI 3a rotBeHe Ke ce CTaBn Ha CTuDeHa pUHrna,
Kora noBpHnHaTa 3a roTBeHe e nckIyueHa, Ho pInHrIaTa ce yUte e Jxekka.
IokaTeNoT IcYe3HyBa Kora pInHrNaTa e n3JaDeHa.
6.7 Onцин Ha Tajmepot
Tajmep 3a o6pojyBaHbe
KopncTe ja oBaaa fynkunja 3a da odpeiNe KOIky dOIIro Ke paBoTI eHa pINrJIa 3a Bpeme Ha eHa cecnJa ha roTBeHe.
IocTabete ja jaunhata ha tonlinhata 3a n36paHATA pHHra, a notoa noctabete ja cyHKnjuata.
- Питуншете Го 00 ce nojabуba Ha ekpaHOT Ha TajmepOT.
2.ПиTuNTiCHeTe ro+uHn一3a da ro nOCTaBHTe BpeMeTo (00-99 MmHyTu).
3.ПиТИСHTeRo 3aДa ro CTapTyBaTe TajМерOT nIIN noUeKaJte 3 cekuHdI. TajMерOT 3anOChyBa DA oD6pojyBa.
3a da ro npomehnte Bpemeto: n36epete ja pInHrlata co npTnCThe ro +nnI -
3a da ja ncknynte fynkunjaTa: n36peTe ja pnhrata co n npntnche ro -IpeoctaHaTOTO Bpeme o6pojyBa do 00.
Tajmepot 3aBpuyBa co O6bpojyBaHbeto, ce ornlaCyBa CnHaJI N 00 TpeNka. PnHrIata ce ncknyuBa. PnITnCHete Ha KOJ 6nIO Cm6oI 3a Da ro 3anpeTe CnHaIOT N TpeKaNbeto.
IOTCETHNK BO MHNHYTN
Mokete da ja kopnctnte obaa yHKunja Kora nloyata 3a rotBehe e BknyeHa n Kora He pa60tat pHHJInTe. NocTabkaT 3a tonnnHata nokaxyBa 00.
6.10 CtpyKTypa Ha MeHn
TabeJlata ja nokajyba ochOBhata ctpykTpa Ha MeHTo.
Kopncnucn noctabkn
| Симбо л | Посtabka | Можни орци |
| b | Звк | Вкneys / Искneys (-) |
CnTe pInrIe ne ncknyeHn,
He NOCTaBYBaTe HnKaBb NocTbKa 3a TOnJIiHaTa NJIn NOCTaBA 3a 6p3HHaTa Ha
BENTINATOPOT NO BKnyuBaHbETo HaJIIOUaTa 3a rotBeHe,
IcTpyaTe IINn CTaBaTe HeUTo Ha KOHTpOHaTa TaBna NObKe o10 cekyHn (TeHuepe, TkaeHnHa, nTH.). Ce orJIacCyBa CnHaJn INIOuYata 3a roTBeHe ce nckIyuBya. OCTpaHete rOppeMeTOT IINJa NCNUCTe KOHTpOHaTa IIIOua.
anapaTOT cTaHyBa npemHory jekok (Ha np. kora bPne npa3Ho TeHpe).Octabete ja pInrIata Da ce OJauNi Ppei NOBTOPOda ja KOpNCITE IIOUaTa 3a rotBeHe.
He ja NCKnyuBaTe pHHnTaHa He ja MeHyBaTe NOCTaBkata 3a jaYHa Ha TOnJIiHaTAt. IIO n3BeCHO BpeMe, IIOUaTa 3a rotBeHe ce NCKnyuBa.
Ondocot nomery nocTaBkata 3a TOnnHnHaTaN BpeMeTo N0 Koe Ce NCKnyuBa NIOUyata 3a rotBeHe:
How to install your Electrolux Induction Hob - Worktop installation

4. OPIS URZADZENIA
1.1Бe3OpaCHOCTb DeTei N IInC OOrpaHnueHHbIMN BO3MOxHOCTaMn
3TOT np60p MOKeT NcNoJIb3OBAtBcra DeTbMn CTapWe BOCbMn JET N IINaMn C OrpaHnueHHbIMN Qn3nueckmN, CEHCOPHbIMN INI YMCCTBeHHbIMN CNOco6HOCTaMn IN C HeIOCTaTOUHbIM ONbITOM INI 3HaHnA Mn TOJbKO pIn YCNoBn HaxOxJdEHNy POn D PrncMOTpOM IINa, OTBeuaOuIeRo 3a INX 6e3OpacHocTb, INI nOcNe PONUyeHnA
COOTBETCTBYUOxN INHCTpyKuN, NO3BOJIAOxN IM 6e30nacHO 3KcIyauTnpOBaTb N3DeJIne N daIOxN IM IpeDCTaBHeHne O6 ONaCHocTN, CBraHHoN C erO 3KcIyatauNe. DeTAM MlaIwe 8 let N JInzam C apko BbIPaXeHHbIMN i KOMPLeKCHbIMN HApYSeHnA M N 3dOpOBbJ 3aIpeuaTeCra HaxOuNTbcr PAdOM C npbOpom 6e3 NoCTOAHNO PrncMOtpa.
- Дети дожны нахоиться по писмотом дя недочушия有很大 с рпбором.
XpaHnTe BCE yNaKOBOUHbI MaTePnaJIbI BHe DoCraEMOCTN DeTei N YTuIN3npyIte IX HAdJeKaUIM o6pa3OM.
BHIMAHHE! Pn6op n ero OTKpbItbIe 3JIeMeHtbl CnJbHo HArpeBaIoTcB O BpEma 3KcNpyaTuu. He noDnyckaTte DeTei NDOMaShHx XINBOTbIX K np6Opy BO BpEma erO INCNoJb3OBaHnA, a TaKxe KOrda Pn6Op eSe He ycpeI OCTbITb. - Ecπn npnbop ochauşeh yctpoiCTBOM 3aunTbI deTei, erocneDyeT BKNUOHTb.
OuHCTka n DoctynHOe NOJb3OBaTeJIIO TexHnueCKoe 6cbnyxmbAHne npnbopa He doJIxHbI BblIOJIHrTbcra DeTbMn 6e3 npncmOTpa.
1.2 067a8 6e3oNaChocTb
How to install your Electrolux Induction Hob - Worktop installation

4.ОПИSCAHNE ПРИБОРА
IyoymoIaHnOHaBapouHNo nanei 3aJaHa MaKcImaJIbHO DoNPCTMma MOUHOCTb.
YMeHbSeHne IIN yBeJIuYe Hne yPoBHa MOUHOCTN:
1.BoiNTeBMeHo:HaXMnTeu ydepKnBaITe①B TeueHne3cekyHd. 3aTEM HaXMnTeu ydepKnBaITe
2. HauKmTe n ydePknBaaiTe Ha nepeDHeM TaIMepe, noka He NoaBnTcR P.
3. HauKMITE /+Ha nepeDhem TaImepe, YTO6bl 3aDaTb yPoBeHb MOUHOCTN.
4. HaKMMTe ①, YTO6bI BbIaTn. UPOBHN MOUHOCTN
Cm.ΓaBy «TexHnueckne daHHbIe»
I PENEyPPEXKDEHNE
Y6eIHTecb, YTO Bb6paHHbI yPOBeHb MOUHOCTN COOTBETCTBYET HOMHaJIy IpeOxpaHNTeJIe, yCTaHOBJeHHbIX Ha DOMaSHem 3JIeKTPoUnte.
I PENEyPPEKDEHNE
EcJIN yPOBeHb MOUHOCHTn HNKe 2000 Bt, aKTHBnPoBaTb npOrpamMy SenseBoil@ HeBO3MOXHO.
/ / ,pa3dacTc8BykoBoCnHnI 3aynckaФyHKuMn He npOn3oJdT.
3TaФункци He pa6oTaet nocydoi c aHTINpRarHbIM NOKpbTInem.

IPEyIpyEKeJdEHNE
He nCnoJIb3yIte 3Tu FyHKnIc npCToI nocyuOn.
He octabJnIe BapOHyo nAHeJIb 6e3 npncMOTpa BO BpeMa pa60tI daHHOI cyHKcIN.
- NocTaBbTe KactpIOnn C 1-5 JXoJIoHNoB OdbI Ha KOHΦOpKn,ДЯ KOTopbIX Tpe6yEtc BKNIOuHTb 3Ty ΦyHKUHO.
EcIn NoCTaBntb KAcTPhNIO ToJIbKO Ha OdHy KOHΦOpKy, 3Ta ΦyHKuIN BKNIOHTCn ABTomAtUneCKn. - KocHTecb ①ДЯВКЛЮЧЕняВарочи npaHEni.
- KocHTecb to, yTO6bl BKLIOHTb cyHKUHO.
KoHΦopKn,Ha KOTOpbIX B HAcTOraIIM MOMENT MOXHO NcONJb3OBA Tb DaHHyO ΦyHKUHIO, 6yDyT OTMeHeBIMiRaHOUIm 3HaYKOM P.
- KocHTecb IIO60I O6JIaCTn Ha non3yHKe BbIbpaHHoKOHΦOpKn.
HaHHeTcBbINOJIHeHne yHKmN.
6.10 CtpyKtypa MeHIO
Tablina OTo6paKaet OCHOBHyO CTpyKTypy MeHIO.
Ponb3OBaTeJbckne HacTpoKn
CoothoeseHne ypOBnHaRpeBa INBpemEn, no nCTeueHN KOTOPORA BapouHnaHeN bByIKNoUaETc:
cekyH, noka HnDnKaTOp HaI CmB0JOM He noracHeT. BbKlnOuHTe BapOChyO NOBepxHOCTb c NOMoUbO ①.
PpnoTOBJIeHne npn BkJIIOUeHHoI cyHKuIMn: HaxMnte ① n yIepKINBaIte B TeueHne 3 cekyHd, IOKa He Ncye3HeT INDkaTOP hAD CmMBONOM. BapOHOI NOBepXHOCTbIO MOxHO NOpJb3OBaTbcr. Ipn BBKJIIOUeHnB apOCHN IOBepXHOCTn C NOMoubIO ① cyHKUma CHOba pa60Taet.
7.5 Bridge
i
Функця DeiCTByET, KOrda nocya нakрьBaet ZeHTpbI DByX KOHΦopOK. Доноителыну Инфopmaцио Оправильnom pa3Meшени nOCydi CB.В pa3delen «ИспOLS3OBaHne KOHΦopOK». При pa6ote SenseBoil® Функця He ВКЛючаetcra.
3TaФункця сnykntДЯOBbeDINHeHnI DByx JIeBbIX KOHΦopOK, BpezIbTaTe Yero OOn pa6OtaIOT KAK OJHa KOHΦopKa.
ChauJa CneJyET yCTaHOBt b yPoBeHb HarpeBa ONDH N3 JEBbIX KOHΦopOK.
BkHoueHne fynKcun: KOCHNTecb 1. YTo6bl 3aJaTb INI IN3MeHnTb yPoBeHb HarpeBa, KOCHNTecb OJHOH IN3 CeHCOPHbIX KHOJOK ynpabJIeHna.
BbIKJIoueHne cyHKnKoCHNTecb:
KoCHInTeCb J. KoHΦopKn pa6OtaIOT He3aBnCmO dpyr OT dpyra.
7.6 Hob²Hood
3TO COBpeMeHHaФyHKUЯ C
NCNOb3OBaHnEM aBTOMaTnK,
CB83bBAoUeB BapOCHyIO NOBepxHOCTb C
BbITJCKo. Kak BApOHa NaHeNb, TAK N
BbITJkA NOIdepXnBaOT CoeINHeHneYepe3
IopTb INΦpKaPaPacHoi CBzRi. CkOpocTb
BpaUeHn BEHTNJrTopa 3aJaTeCt
aBTOMaTIuCeKn B 3aBcUmOCTn OT HAcTpoE
peKUMa pa60Tb I TeMnepaTpybl cAmO
ropeYn NocSybl Ha BapOCHn NaHeJI.
BeHTNJrTopom TaKke MoKHo ynpabJIrTa
BpyHyU.
i
B 60JIbIHHCTBe BbITJxek CnCTema
IINCTaHcIIOHHOrO ynpabJeHnI NO
yMOJIaHnIO BbIKNoUeHa.IpeEd
IcNOJIb3OBaHnEM fYHKuN BKJIIOHTe ee.
IOnONHInTeIbHyU INΦOpMauno CM.B
pyKOBOdCTBe IOnb3OBaTeIaIg
BbITJxKKn.
A B T M A T N C E C K A P a b o t a f y h k c n n
I I B A B T O M A T N C E C K O M p e x i m e y c t a H O B I T e
3 h a y e h n e a b t o m a t n u c e c k o r o p e x i m a h H 1 - H6. I I h a u n b h o y c t a h o B l e n p e x i m H 5
B a p o u h o n n a h e n . B b t j k k a p a r g u p e r p u r y e n p n
k a k d o m B k l u o c h e n n b a p o u h o n n a h e n .
B a p o u h a n a h e n b p e r y l n p y e t c k o p o c t b
b p a u s e h n e B e h t n l a T o p a , a b t o m a t n u c e c k n
o n p e d e l a r y T e m n e p a T y p y k y x o h o n n o c y d b l .
ABTOMaTHuecknepekIMbI
8.4 YnpoueHHoe pyKOBODCTBO no npnroTOBJeHIO
CoOTHOWeHne yCTaHOBKn yPOBnHa HArpeBa n 3HeprONoTpe6JIeHnKoHΦOpKn He YABJAreTcR JInHeNbI.M. PnYyBeINuYeHnU yPOBnHa HArpeBa nOtpe6JIeHnE 3NeKTpo3Heprn B03pactaET He B OOnHaKOBn IpnOpOpznn. 3To 03NaHaaET, YTO Ha CpeDnem yPOBHe
HarpeBa KOHΦopka IOTpe6IaTe MeHee NOJIOBnHbI OT CBOeHOMHaJIbHOI MOUHOCHT.
i
8.5 Yka3aHnI n peKoMeHdaCnI no IcNoJIb3OBAHnIO Hob²Hood
Ppi nCpOJIb3OBAHn BapOuHoi paHeJIc cyHKUneI:
- 06ecneythe 3aunTy naHEni BbITJxKn OT npramoro coJIHeHOro CBeta.
He naprabJnTe Ha naHeJIb BbITaJkN raIoreHObyIO JAMny.
He nakpbBaIte naHelb ynpabJIeHnB aBoUHOI naHenn.
He nepeKpbIbaiTe ciHnJI MEXy BapOCHo IaHJIbIu N BbITJxKoI (HaNPIMep, pyKO, pyKoI KcyXOHHO nocSyblI INI BbICOK KaCTpIone). CM. pncyHok.
N3o6paKeHne BbITaXKn npNbEdeHo HnXe ToJIbKO B KaYeCTBe npUmepa.

i
IcnoJIb3OBAHHe npuNX npu6OpOB C dNCTaHcUOnHHbIM ynpaBLeHnEM MOKet npuBeCTn K 6JoknPoBaHnIO cRHaJa. He nCNoJIb3yIte TaKHe npu6Opbl prdOM C bapouHoi paHelbIO BO Bpempa6oTbI Hob?Hood.
BbIraKn,poIepXnBaIOuIe yHKcHOBb2Hood
ДяЯОзHAKOMJIeHЯС NOЛHBIM ACCOPTImeHTOM BbITRAJKe,pa6OtaIOUxxC 3TOI ΦyHKUeN, npOCMOrTpTe NaH Be6-caNT. BbITRAKn Electrolux, noДepeKxNBaIOUne 3Tu ΦyHKUIO,doJKNbI IMMeTb CmBOJ AUTO.
9. yXoI N YnCTKA

BHIMAHHE!
Cm. rnaBb, coepkaune CbeHnno texnke 6e3oNaChocn.
9.1 Ośzań Hópopmaṇy
Ouetae Bapouhyo napeHb noCte KaJDoTO uCnObl3OBaHn.
CneIte 3a TEM, YTO6bI INHO nOcybl Bcerda 6bIIO YNCTbIM.
LapanHbI JIN TeMHbIe IaTHa Ha NOBepxHOCTn He BInyIOt Ha pa6OToY BApOCHoN PaHeJI.
IcnoJIb3yIte IЯ OuNCTKn CneuaIbHoe cpeIcTBO, IpEHa3HaueHHOe IЯ OUHCTKn BapOuHbIX NOBepxHOCTe.
- IcnoIb3yIte ToJIbKO cKpe6oK, npedHa3NaYeHHbI DnI BapOuHbIX naHeJeC O CTeKJIaHHoN NOBepXHOCTbIO. IcnoIb3yIte cKpe6oK ToJIbKO B KaueCTBe DOJOnHITeJIbHOrO INCHTpymEHTa Nocne npOBeDEHnI CTAHdAPTHOJ ONUCTKn CTeknA.

BHIMAHNE!
He nCnoJIb3yIte HOKn I pyrIe OCTpbIe MeTaNIIueckne INHCTpyMeHTbI JIA OYNCTK CTKeJIaHHoN NOBepXHOCTn.
9.2 OuInctka BapouHoi nAHeJIi
- YdaJIeHHe cIeIyUOuX 3aRpa3HeHn CNeIyEt BbINONHrTb He3aMeIINTeIbHO: paCpNlaBHeHHa nIaCTMaCCa, pONIa3TInJeHOBa IJIeHka, caxap NIIuSeBbIe npOdyKtbl, copejKaUme caxap. B npOTnbHOM clyuae 3TN 3aRpa3HeHn MOrYT npINBeCTn K NOBpeJxDeHIO NOBepxHOCTn BAPoCHOH naHEII. Co6JIuDAIte OCTOpOxHocTb, qTO6bl He o6KeUcBcA. PaCpNOkxtne cIeUaJIbHbIK Cre60K IOd OCTpbIM yrLOM K CTekJIaHHoN NOBepxHOCTn I DvIRaITe erO no 3ToI NOBepxHOCTn.
- YdaIeHne cIeIyUOxN 3aRpa3HeHn CNeIyEe TBbIIOJNHrTb, TOnbKO ecJI NOBepXHOCTb BapOCHo IaHEJI
IOCTaTOUHO OCTbIa: N3BecTKOBbl HaJIeT, KpyrO NT BOdIbI, PnTHa Jknpa, PnTHa C MeTaJIINueCKM OITINBOM. BapOHyo NOBepXHOCTb CNeDyET YNCTNTb BlaJxHOI TpRAnKoC Hea6pa3INBbIM MOUcIM CpeDCTBOM. Iocne OChCTKn BbITPnte BapOHyo NaHeIb HAcyxo MfKOr TKaHbI.
Дя удалени пяten cMeTaNJIuYeCKM OTJINBOM,ИЗМЕнЯЮшIMпepBOHaayaJIbHbI YCBETNOBepxHocTN:ПOTPnTE CTeKJIaHHyIO NOBepxHOCTb TkaHbI,CMOyeHHoB BpactBope BoDE C yKCycOM.
10. YCTPAHEHNE HENCINPABHOCTEIN

BHIMAHHE!
Cm. rIaBbI, coeepkaune CbepeHnno TeXnke 6e3oNaChOCTn.
10.1 YuTo DeJaTb, ecJn...
10.2 Ecnn npo6jemy He ydaJocb peuNTb...
Ecni camocToarTeIbHO cnpaBnTbcr C np6JIeMoH He ydaETcR, o6paTIteCb B Mara3INH, B KOTOpOM 6bl pIno6peTeH np6Op, INN B ABTOpI3OBAHHb CEpBnCHbI ueHtp. Coo6UInTe CBeDeHnry, yKa3aHHbIe Ha Ta6JIuYKe CTexHnueCKmN daHHbIMN. Y6eInTeCb, yTO BapOuHa nAHeJIb
3KcnpnyatnpoBaalac npabnIbHo. B clyuae HenrpabInbHOn 3Kcnpnyataun np6opa Texnueckoe obcnykubane, npedocTabIeMoE cneuaJIncTamIM cepBnCHOrO ceHTpa IIN npOdaBua, 6ydet PnaTHbIM, daKe ecIn CpOK rapaHTmU eUe He nCTeK. INΦopMaun O rapaHTmHOM cPoke n ABTOPN3OBaHHbIX cepBnChbIX ceHTpax npNBedeHa B rapaHTmHOM CBnDeTeJbCTBe.
11. TEXHnueCKne DAHHbIe
11.1 Ta6JIuKa c TexHnueCKnMn DaHHbIMN
Modèle EIS82453
Tun 62 D4A 01 AA
INdykuoHna7.35 KBT
CepnHbI N
ELECTROLUX
V3rotOBJeHOB:TePmaHn
7.35 kBt
C∈
11.2 CneunФнkaця конфорok
Pnuctyn MpexHOM yTtKaCyHaKOH UHCTanaIJe.
Ako je 3nHa yTuHnHa Za naababa, HEmoJTe da npNKbuyjete MpeXHN yTuKaU.
He ByuNTe Ka6I 3a HanajaJIbe KaKo 6nCTe NCKJbUyHIn ypehaj. Ka6I NCKJbUyHTe TaKO 7TO hETe H3ByHn YtNkau n3 yTtNHNJIe.
Kopncntte camo ncpabHe paCTabHe npeknlaue: 3aHTnThe npekndaue, ocirpyaue (ocirpyaue ca haBojem tpeba ckHyTu ca Hocau), ayTomatCke 3aHTnThe npekndaue N KOHTaKTope.
Y eNeKtpnHoj IHcTaIaIuJn Mopa nocTojATn paCTaBnI pKeNJaU KoJn Bam OMOryhaba Da IckbYuHte CBe Pa3e HanajaHa ypehaja. Pa3MaK n3MeHy KOHTaKaTa Ha paCTaBHom IpeKnDaUy Mopa da N3HOcN HajMaHe 3 mm.
Ako ce E3 kód nojabn ha ekpaHy, oImax nCKbYuHTe pIooy 3a KyBaHe n npOBepnte da JI cy eJIeKtprHn Be3a n rJaBn HanoH nCnpabHn.
2.3 ynoptpe6a

yN03OPEHbE!
Ioctoj np3nk oJ noBpe,oneKOTnHa n cTpyjHOr ydapa.
Hemojte da MeBaTe cneuФkaunjy OboI ypehaja.
- YKJIOHNTe CBO nakOBaHbe, HajiENHnIe I 3aWTHTHy fOJIny (aKO je nMa) npe npBor KOpuShHeBa.
Bodnte paunha da oTbOpn 3a BeHTnlaunjhe 6ydu 3anyuHeH.
He octabajte ypehaj 6e3 na3opa TOKOM pada.
IOnecnte30Hy3a KyBaHbHeHa "NCKJbUyeHO"NaKOH CBAke yNoTpe6e.
Hemojte ctabbata npnbop 3a jeeno nnnnoknonje uepnna ha 30he 3a kybahe. OHHMOry noCTATN BpeIN.
Hemojte pykOBaTu ypehajem kaJa cy Bam MOKpe pyke nn KaJa je OH y KOHTaKTy ca BOJOM.
Hemojte Kopnctntuypehaj kao paHy noBpunHy nnn npocstop 3a oDnarahe.
Ako je noBpHnHa ypehaja hanykna, oJmax ra nckbuynte n3 3nHe yTuHnCe.To cnpeyaba cTpyjHn yap.
Kopncnucn ca nejcmejkepm Mopajy da odpkaabajy pactojahe od hajmahe 30 cm
OД ИДУКИОПИХ 3Она 3a КУВаБe KaДaуpeиaj ради.
- Kaça CTaBHTe xpaHy y BpyHe yIbe, MoKe Da npChe.
Hemojte KopncntnAnyumnjuymcky fOnjy nI npTre Maepnjae n3mehy nobprsinhe 3a KyBaHe n nocyHa 3a KyBaHe, ocIM aKO npOn3Bohaj ypehaja Hnje dpyraHJe Habeo.
Kopuncte camo npnbop kojn poun3bohay npenopyyje 3a obaj ypehaj.

YIIO3OPEHbE!
How to install your Electrolux Induction Hob - Worktop installation

4.ОПИС ПОНЗВОДА
4.1 ŠeMa noBpUnHe 3a KyBaHbE

1 IHykCnOHa 30Ha 3a KyBaHe
2 KomaHnHa Ta6na

3a DeTaBnije HNΦopMaunje O BeJIuHnHaMa 3OHa 3a KyBaHe nOrIeJaTe OeJbak, "TexHnKn IOnaU".
4.2ИЗгледКомандHeТабЛe

YnOTope6bTe cEh3OpcKa noBa da 6bcTe pykoBaN ypehajem. DncPnejN, INHdNkAToPn n 3ByHn CnHaHn ynyhjy ha To koje cy fynKcJne akTnBHe.
2. BEZPEČNOSTNÉ POKNY
2.1 Montáz

VAROVANIE!
Tento spotrebič može nainštalovat' len kvalifikovaná osoba.

VAROVANIE!
How to install your Electrolux Induction Hob - Worktop installation

4. POPIS VYROBKA
4.1 Rozlozenie varnej plochy

1 Indukcná varná zona
2 Ovladacic panel

How to install your Electrolux Induction Hob - Worktop installation

4. OPIS IZDELKA
How to install your Electrolux Induction Hob - Worktop installation

4. DESCRIPCION DEL PRODUCTO
IChye pIn3IK POoiKOJKeHnI npInaNy.
He trpmaTe rapaunn noCyd Ha naHeJI KepyBaHHa.
He KnapiB kpiuKy rapaoyi Kactpyni HaCKnHy BapnilbHy NOBepxHIO.
He donyckaiaTe, 06 noCyrdpiBcR, KOnn B HbOMy HeMaE pDHH.
Будьтобереки,иб HeДопуckaTN naДиня пededmetiЧи посуДу на рипад. ПоверхнЯ може 6уТи пошкогжena.
He BMkaite 3OHN BapiHn, JaKUo nocyD npoxhni a6o BiDcyTHni.
KyxonHHn nocyd i3 yabyHy a6o 3 noxKOJKeHIM DNOM MOKe NOprNaTn cKnO/cKnOkepAmiKy. 3aBKnPiNImaTe ci npEmdTn, KOJI NOTpi6H oX nepemictHTn Ha BapNJbHi NiOBepxHi.
2.4 Dorigla Ta ouhieneHH
PereyIpaHNoOuNcUyTe npnlaI, 106 3aNo6irTn nooKoJxehHIO MaTepiany nobepxhi.
- Ppeed uHHe HnBmKHiTb npuJa i daTe Iomy oxoJOnHyTN.
He BnKOpNCTOBuYte napooUyBaCi Ta BOJaHi pO3PiJIOBaui DJIa OUYIeHHn npNJaday.
BntpiTb npnlaM'koTO BONoroTo raHcyIPOIO. 3acTOcOByTe JnIe HeNTPaIbHi MInOci 3aco6n.He BVKOpNCTOByTe a6pa3uVBHI 3aco6n, abpa3uVBHi cepBetKn dJa OChUeHHra, po3vHHNK a6o MeTaJIeBi IpeDMeTI, kIso He BkA3aHO iHHe.
2.5 CepBic
Дя ремонту пидау 3евтаюdo abtopиизовано ratbichoro ueHTpy.
3. BCTAHOBJIEHHH

NONEPEDXEHHRA
IINB. po3diH 3 iHΦopMaζieJU zoTo texhikn 6e3neK.
3.1 PpeB BCTaHOBJIeHHJM
Iepu Hix BCTaHOBJIIOBaTn BapnIbHy
noBepxHIO, 3aIIuIb HAcTyNHy IHOpMaJIO 3
Ta6nUcK3 TeXHiYHMn DaHIMN. Lg
Ta6nUcKa po3aUoBaHa Bn3y BapInbHoI
noBepxHi.
CepiHnH oHomep
BukopncToByuTe Nlue opurihbHi 3apanachi yactnHn.
CTOCOBHO lamn BCEpeDiHni CbOro Bnpo6y Ta 3anaChnx lamn, 0 npOdaTbcra Okpemo: Lj lamnn npn3naeHi DnB VBNKOpNCtAHn y NobTyOBHX npnIaDax 3 ekCTpeMaJIbHMn fI3NCHMn yMOBaMn, TAKIMn Jk TemnpaTypa, Bi6paiz, BOIorictb, a60 npn3Naehi DnHaadHn iHfOpMaui npo stah pObotn npnIady. BOHI ne npn3Naehi DnB VBNKOpNCtAHn 3 IHsIO MeTOO Ta He npndaTHi DnA OCBiTJeHHn NobTyOBHX npmIueHb.
2.6 Ytunliziaj

NONEPEJXEHH!
IChyE He6e3neKa TpaBMyBaHHa 60 3aDyWeHH.
- Ioi iHopmaui 3 halexhoi ytniiaui npnilauy 3BepTaaiTecra do Micuebux opranib Bnadi.
Bid'ednai Te npuiad bi eektpomepeksi.
BidpiKTe KaebJeKtpuHOro KJbEnHHa 6bn3bko Do npnaTy tyni3ynte noro.
Ley npdykT no BmicTy He63neuHx peoBnB BiINOBiAcBIMoram TexHiyHoro perIaMeHTy o6mKeHHN BnKOpNCtAHn deAeKnx He63neuHx peoBnB eJeKtpnHOMy Ta eJeKTPoHHOMy o6laHaHH (noCTaHOb Ka6IneTa MinicTpB YkpaIH N9139 BiD 10 6pe3hry 2017p.)
3.2 B6ydoBahi Bapnilbhi nobepxHi
EknpnyatbN B6ydoBahi BapnIbHi NOBepxHIMOxHa JIiue NiCnPaBnIbHOro B6yOBOvBaHHa Y uAΦKn Ta pOboCi NOBepxHi, AkiPiXoJrTb DnI cyBoI bIDNoBIDAOTb HOpMaM.
3.3 3'εdhyBaIbHn Ka6eIb
Bapnilbny nobepxHIO OchaueHO 3'6dhyBaIbHM Ka6eJem
LIO6n 3amHHTN NOUKOJKeHm Ka6eJIb KINBHeHHa, BnKOpNCTOByTe Ka6eJIb TnIy:
H05V2V2-F,Якni 3daTeH BnTpmyBaTn TeMnepaTyP 90°C nBnIe. OOnn DpIT NOBHeH MaTI MIniMHaJIbHNI NOppeuHNI nepepi3 BiNIOBiDNo Do Ta6nIci HIXKYe. 3BepHiTbcra Do MiCueBOrO cepBICHORO ueHTpy. 3'cHyBaJIbHNI Ka6Ib MaE 3aMIHOBaTncra LiIe KBAJIiΦIKOBaHm EJKeTpIKOM.

NONEPEDJEHHRA
Yci nikJIOUeHnI Do eJIeKTpOmepeXi MaE BIKOHYBaTn KBaJIoIΦIOBaHn IeKTpNK.

YBAGA
3'εДнаннчеетз'εДнУВальништencelii 3a6oboponeho.

YBAGA
He npocBepdHouTe Ta He npnauoTe KInci dpoTIB. Lc 3a6bOpOHeNo.

YBAGA
He niiKnHouaIte Ka6eJIb 6e3 KInCeBOI Ka6eJIbHOI MyΦTn.
Ondoza3He nIDKnHoueHHa
- 3HimiTb KInCeBy Ka6eJIbHy MyΦTy 3 UOpHOrO, KopuHHeBOrTa CnHbOrO IpoTIB.
- 3HIMITb YactnHy i3OJIaIIO 3 KInCIB KOpNHeBOrO, OporHO Ta CInHbOrO Ka6eJIb.
- 3'eɪdhaɪte Kɪnʒi YopHOrO Ta KɔpɪuHæBOrO Ka6enɪb.
- YctaHOBITb HOBy KInCeBy MyfTy DpoTy Ha cnIbHn KIneCb DpoTy (NOTPI6eH CneUiaIbHn IHCTpyMeHT).
- 3'εdhaɪte Kɪnci Dɒx Cɪnɪx Ka6eɪb.
- YctaHOBITb HOBy KInCeBy MyfTy IpoTy Ha cnIiNbHn KIneCb IpoTy (NtOpiBeH CneuiaIbHn IHCTpyMeHT).
Dbofa3He nikJIOueHHa
- 3HimiTb KInCeBy Ka6eIbHy MyΦTy 3 CnHix dpoTiB.
- 3HIMITb qactnHy i3OJIaIIO 3 KInCJIB CNHIX Ka6eJIb.
- 3'εdhaɪte Kɪnci Dɒx Cɪnɪx Ka6eɪb.
- YctaHOBITb HOBy KInCeBy MyfTy DpoTy Ha cnIiNbHn KIneCb DpoTy (NOTPI6eH CneuiaIbHn IHCTpyMeHT).
How to install your Electrolux Induction Hob - Worktop installation

4. ONIC BIVPOB
4.1 OshaeHnBaBapInbHoI nobepxHi

1IHykuiHa3OHaHarpiBaHHa
2 PanaHJI KepyBaHHa

6.1 YbIMKHeHH Ta BmMKHeHH
HaTnCHiB i yTpMnyIe ①, uo6 yBIMKHyTu a60 BmKHyTu BapuNbHy NOBepxHIO.
6.2 BnBnEnnnoocdy
Lz yHKzIg Bk3aye Ha hAByHbIcTB nocdy Ha BapnIbHi IOBepxHi Ta BmNkae 30HN roTyBaHH, kIO pIic Yac npOecy roTyBaHH He BnBJeHO nocdy.
JaKIO BV NocTabnN Nocyd Ha 3OHy roTyBaHnI nepei BnBopom CTyneHn HarpiBy, Ha cekTopi KepyBaHHa 3'ABNTbcra IHnKaTOp HnD 0.
JaKo BV TmUcAoBO npu6epTe nocyd 3 yBIMKHeHOi 3OHN rOTyBaHHn, iHnkaTOpn HaD BiINOBiHm CekTopOM KepyBaHHn NOHyTb 6JIImaTn. JaKo BV He NoCTaBnTE nocyd Ha3aHa aKTNUBOBAHy 3OHy rOTyBaHHn npotrrom 120 ckyHd, 3OHa rOTyBaHHn ABTMaTHO BIMKHETbcR.
IiO6n BiINHOBNTn rOTyBaHHn, He 3a6yDbTe 3HOBy NOCTaBHTn NocuHa 3OHy rOTyBaHHn B Mekxaz3a3NaueHOro Yacy.
6.3 KopncTyBaHHa 3OHaMn roTyBaHHa
IocTaBTe nocyd y ceHTp o6paHoi 30HN. IHykuiHi 30HN HarpiBaHHa ABTomaTuHOpnpCTOCOBYIObCdo pO3mipy DHa nocdy.
3a donomoroi yHKuii Bridge moKha roTyBaTu y BEnIKOMy nocyuDi, po3MiueHOMy Ha DBOX 30hax HarpiBaHHn OndHouacHO.
IocydMaHakpnbatn ceHtpn 06030H,ane He BxOHTN 3a No3HaUKN 30HN. JaKIO nocyd po3TaOBOHAHO MIX DbOMa CEHTPamn, yHKcijr Bridge He aKTINByETbcra.

6.4 CtyneHi HarpiBy
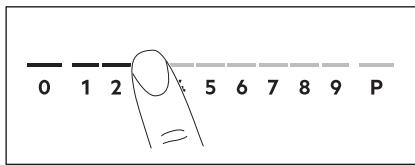
- Hataichi Topti6hmy CtyniHb HarpiBaHHa Na CeKTopi KepyBaHHa.
IHNKaTOpN HaD CeKToPOM KepyBaHnH 3'ABJIaIObCra BiINoBiIDHO BbpaHomy CTynHeH OHarpiBaHH. - Lio6B BmKHyTu 3OHy rOtuBaHHa, HATnCHITb 0.
6.5 PowerBoost
Lz cyHKzj3a6e3neueyec iDyKzhi 3OHN harpiBaHHN DOaTkoBOIO NOTxHicTIO. FyHKzIO MOXHa BBIMKHTn DnA ODNHei iDyKzIHOI 3OHN HarpIBaHHN IINHe Ha obmexhen nepioD yacy.PicraZboro iDyKzIHa 3OHa HarpIBaHHN ABTomTuHo nepemikacTbcra Ha HauBnucn CTynihb harpiBaHHN.
i
ДиВ.po3diN«ТExhiNdiHi»
Uo6 yBIMKHyTn FyHKciIO dIa 30Hn HarpiBaHH:TopKHiTbCp P.
BumKHeHHaФyHKuII: 3MiHiTb CTyniHb HarpiBaHHa.
6.6 OptiHeat Control (3-cTyneHeBn iHdNkaTOp 3aannkoBoro TenJa)
PONPEJXEHH
三/三/10KnBnHoi iNdkaTOp,epu3nK OTpIMaHnO nIKiB Bd3aIIuKOBOro TenJa.
TenIIO InI npOecCy roTyBaHHI iXi
TReHepyETbCry IHNyKcIHHMn 3OHaMn
HarpiBaHHN 6e3nocepEdhBo B dHi nocdy.
CKnlokepamika HarpiBaETcbrBd TenJa
nocdy.
IHNkataOpn 3'ABJIOJBcR, KOJI 30Ha HarpiBaHHra rapa.BoH nOka3yIOb pIBeHb 3aIIuKOBORo TennBa B 3OHax HarpiBaHHra, kI BIKOPNCOTByIOJBcB DaHn Yac:
- npoIOBxHtN FOyBaHHa,
- niiTpmaHn TenIm,
-3aJIIMKOBETENIO.
Takok Moke 3'YBUNCSI INDkatop:
ДЯсусicdHIX3OHHarpiBaHHa,HaBtBuKIO Bnix He BnKOpNCTOByETe,
KoJIN Nocuyd CTOiTb Ha XOJIODHI 3OHi HarpiBaHH,
KoJIN BapNJbHa NOBepXnB BmKHeHa, aJe 30Ha HarpiBaHH Ye rapa.
IhdkaTop 3Hkae, KOJI 3OHa HarpiBaHHoXOJIOHe.
6.7 HanauTyBaHnTaMepa
6.10 CtpyKtypa MeHIO
Y tabnizipoka3aHOb 6a3OBy cTpykTypy MeHIO.
HanaaHTyBaHHKOpNCtYBaHa
10.2 RaKuo Bn He MoXeTe 3HaHTPiueHHa...
JaKIO Bu He MoKeTe yCyHyTu npo6JIeMy, 3BepHITbcr Do 3aKlaNy, De Bu npuIb6aIi npuIaI, a6O Do cLyKb6 TeXHiUHOi niIDTPMkn. NObiOMTe iHΦopMaIIO 3 Ta6NIuCKn 3 TexHiUHMn DaHIMN. IpekeOnaIteCra, 0o Bu npaBnIbHo
KopncTyBaJIncb BapnIbHOIO NOBepxHeIO.
KaIO Bu Hn HnpaBnIbHO KOpncTyBaIncs
npuaIaOM, Bi3NT MaIcTpa a6o DnIepa 6yde
PIIaTHM HabITb y rapaHTiHn nepioJ.
Infopmaiz npo rapaHTiHn nepioJ ta
aBTOpN3OBaHn cepBicHn ceHTp BkazHi y
rapaHTiHOMy 6yKnTei.
11. TEXHIUHIDAHI
11.1 Ta6nquka 3 TexHiuHmN daHmN
Mодь EIS82453
Tun 62 D4A 01 AA
Indyukij7.35 kBt
CepiHnH Homep
ELECTROLUX
HomepBipo6y(PNC)94959929400
220-240B/400B2N,50T
Bvpo6IeNo B: HimeyuHi
7.35 kBt

11.2 Cneunphiakia30n roTyBaHHa
| 3онa roтуваньn | Hominahьna no- t胶囊(MacC. ctynihb harpiban- н.) [Вт] | PowerBoost [Вт] | PowerBoost maksimьнabha trpvbanicTB [XB] | Дiametр поуд [MM] |
| Передnia пibe | 2300 | 3200 | 10 | 125 - 210 |
| Задnia пibe | 2300 | 3200 | 10 | 125 - 210 |
| Середnia поедnia | 1400 | 2500 | 4 | 125 - 145 |
| Задnia права | 2300 | 3600 | 10 | 205 - 240 |
IotyKnicb 30H roTyBaHH MoKe DeuO BiDpi3HnTcB BID 3NaueHb, HabeDeHNx y Ta6Nci.BoHa 3MiHcEbC3aJeXHo Bi MaTepiAny Ta po3MipiB nocdy.
3aIIOI ONTUMaJIbHnX pe3yIbTaIIB roTyBaHHHe BVKOpNCtOByTe Nocyd, iAmEtpr koro nepeBnUe BkazAHn y Ta6nzi.
12. EHEPΓΟΕΦEKΤΥBHICTb
12.1 InΦopMaζιρον Biπiδ
| IdentuφikaTOP mondieli | EIS82453 | |
| Тип вареньои поерхни | Вбухова на вареньи по- верхни | |
| КількICTь зон дlya rotyванna | 4 | |
| Текhalorigia niidirpiyu | Иndу龟яя | |
| Дiametр круглих зон дlya rotyванna (Ø) | Середnia поедnia | 14.5 cm |
| Задnia права | 24.0 cm | |
| Довжina (Д) taширина (Ш) некуглой зони дlya ro- туванna | Передnia liba | Д 22.3 cm |
| Ш 21.8 cm | ||
| Довжina (Д) taширина (Ш) некуглой зони дlya ro- туванna | Задnia liba | Д 22.3 cm |
| Ш 21.8 cm | ||
| Сnéожав<nηе点点头儿 тува<nηе ( EC electric cooking) | Передnia liba | 189.1 Bt•iod/kr |
| Задnia liba | 189.1 Bt•iod/kr | |
| Середnia пedingуя | 187.5 Bt•iod/kr | |
| Задnia пара | 185.2 Bt•iod/kr | |
| Сnéожав<nηе点点头儿 тува<nηе ( EC electric hob) | 187.7 Bt•iod/kr | |
IEC / EN 60350-2 - Enejtpnhi nobytobi npnilaDiIra roTyBaHnHa iKi - cactnHa 2: BapnlbHi nobepxHi - Cnoc6bi BmipjOBaHHn npodykTNBHOCTi.
Ioka3HnKc nOxKuBaHHe eEeKtpoeHeprii, nob'raaHI i3 3oHOIO dIra roTyBaHH, no3HaueHO no3HaUkam dIra BIDNOBIDHX 3OH HarpibaHH.
12.2 ehepro36epexeHHa
Iotpmyuocnb HabeDeHnx HnKye npaI, BmOxte 36epiratn eHepriu niJ vacUoJeHHoro roTyBaHHra.
- PiiirpiBaIOuN BDOy, HAnBaIe IINe neTPOpiHnO6'EM.
JAKIO MOKINBO, HAKPUNBaIte NocyD KPNUKOIO. - P03miuYte nocSy 6e3nOcepeHbO B ceHTpi 3OnH harpibaHHa.
BnKOpncToByIte 3aIIuKOBe TepNo IJI npITpIMMaHnC TcPABN TepIOo a60 po3TOnPiBOHaHH npOdyKTiB.
13. OXOPOHA IOBKINJIЯ
3daBaIte Ha noBToPHy nepepo6ky MaTepiAIn, POnHaueHb BiDnOBiDnM CmBBOJOM BnKnJaTe yNaKOBky y BiDnOBiHi KOHTeHepn IpnBTOpHHOc CnpOBHN. DOnOMoXiTb 3axNCTNTn HABKOJIuNHc cepEOBNUSe Ta 3dOpOB' iHUN JIOJe i 3a6e3NeuHTn BTOpHNY nepepo6ky eJeKTPnuHnx i eJeKTPoHnx npuiAib.He
BKNiDaIe npnIaI, nO3HaueHi BiIIOBiHIM CmBONOM ,pa3OM 3 iHUM DOMaUHIM CMIITAM. NObepHITb npOdyKT do 3aBOy i3 BTOPINHOI nepepo6kN y BauiM icuEBOcTi a6o 3BePHTc8o MiCzebNx MyHicnPabHnx OprAHIB BlaIaI.
.
…………
.
…………
…………
…
…………
··
…………
…
.
.
…………
…………
…………
…………
…
…………
··
…………
…
.
.
…………
…………
…………
…………
…
…………
··
…………
…
.
electrolux.com
