FINECUT - String trimmers GLORIA - Free user manual and instructions
Find the device manual for free FINECUT GLORIA in PDF.
| Product type | Battery-powered edge trimmer (grass shear) |
| Brand | GLORIA |
| Model | FINECUT 18V |
| Article numbers | 001300.0000 (with battery/charger) / 001301.0000 (without battery/charger) |
| Battery | Lithium-Ion, 18.0 V, capacity 2.5 Ah (option 4.0 Ah) |
| Charger | Input 220-240 V~ 50/60 Hz, output 14.4-18.0 V DC / 1.0 A, charging time 154 min |
| Runtime | 60 min (battery 2.5 Ah) / 95 min (battery 4.0 Ah) |
| Cutting width | 250 mm |
| Cutting height | 30 / 40 / 50 mm (adjustable via wheels) |
| Max. strokes | 1100 strokes/min |
| Device weight | approx. 2.7 kg |
| Angle adjustment | Yes, 9 positions |
| Battery status display | Green LEDs (3 levels + red for temperature/low voltage) |
| Safety devices | Anti-engage lock, blade guard, overheat protection, low voltage cutoff |
| Cleaning | Damp cloth or soft brush, do not immerse |
| Blade maintenance | Oil before and after use (machine oil or lubricating spray), replace if worn |
| Main spare parts | Blade set (ref. 729250.0000), batteries (2.5 Ah: 729101.0000; 4.0 Ah: 729102.0000), charger |
| Manufacturer warranty | 24 months (subject to conditions, see www.gloriagarten.de) |
| Permissible charging temperature | 0 °C to +45 °C |
| Protection class (charger) | II |
Frequently Asked Questions - FINECUT GLORIA
User questions about FINECUT GLORIA
0 question about this device. Answer the ones you know or ask your own.
Ask a new question about this device
Download the instructions for your String trimmers in PDF format for free! Find your manual FINECUT - GLORIA and take your electronic device back in hand. On this page are published all the documents necessary for the use of your device. FINECUT by GLORIA.
USER MANUAL FINECUT GLORIA
natural_image
Exterior view of a modern cleaning brush with adjustable handle and black base (no text or symbols visible)979 696-00 200223
CE

text_image
Warning symbol image with exclamation mark inside triangle
natural_image
Icon of a person reading a book inside a circle (no text or symbols)Translation of the German user manual
text_image
A B C D* E F G H I J K M* F1 H1 L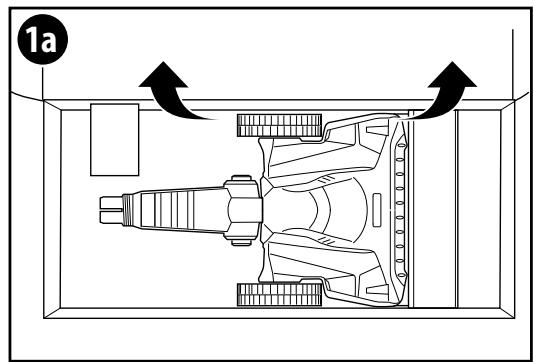
text_image
1a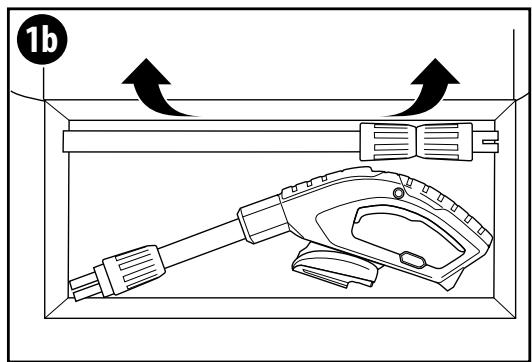
text_image
1b
natural_image
Mechanical assembly diagram showing a pipe fitting with a black arrow indicating a component (no text or symbols present)
text_image
Diagram showing a lock mechanism with labeled components and directional arrow, marked with number 3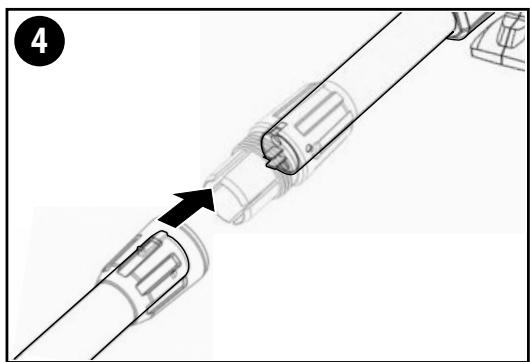
natural_image
Mechanical assembly diagram showing a pipe connection with a black arrow indicating direction (no text or symbols present)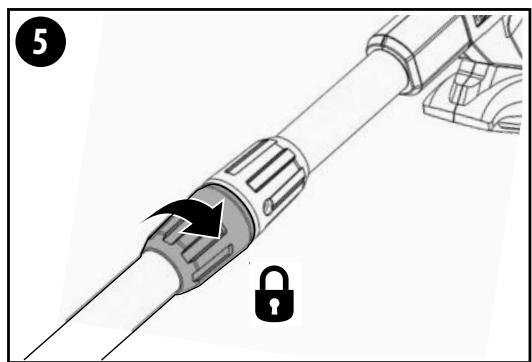
natural_image
Diagram of a cable connector with a lock and padlock, showing mechanical assembly (no text or symbols)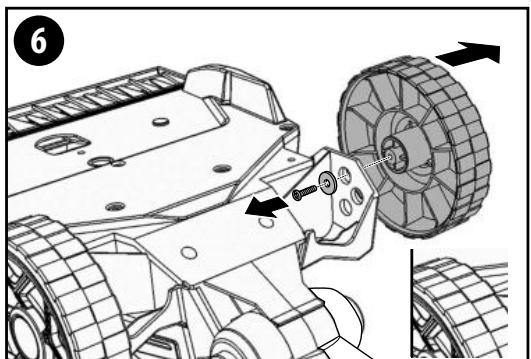
text_image
6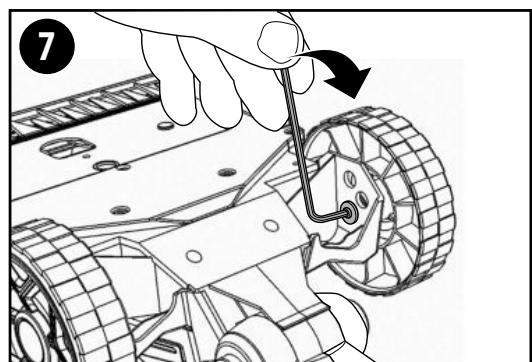
natural_image
Illustration of a hand using a tool to adjust or install a tracked vehicle (no text or symbols visible)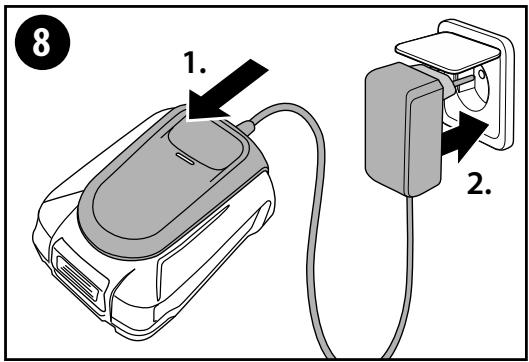
text_image
8 1. 2.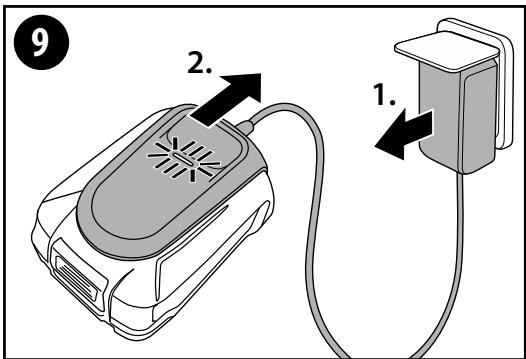
text_image
9 2. 1.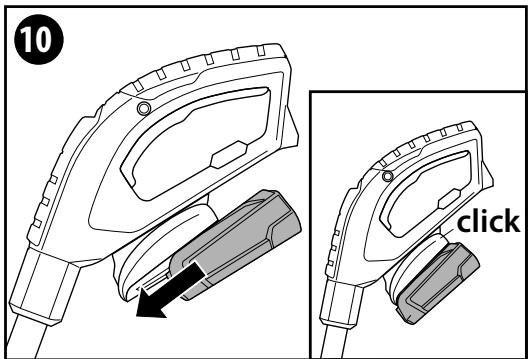
text_image
10 click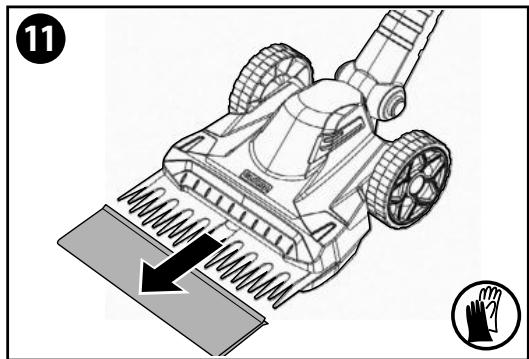
text_image
11
text_image
12 12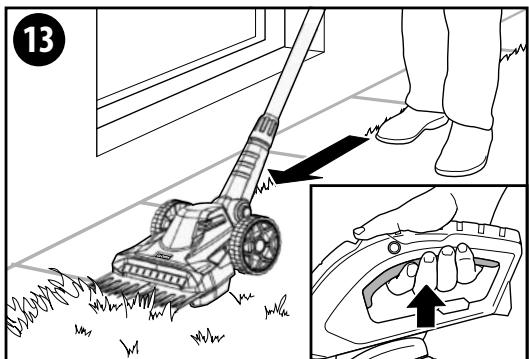
text_image
13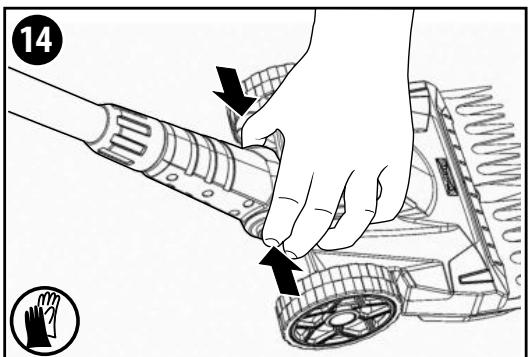
text_image
14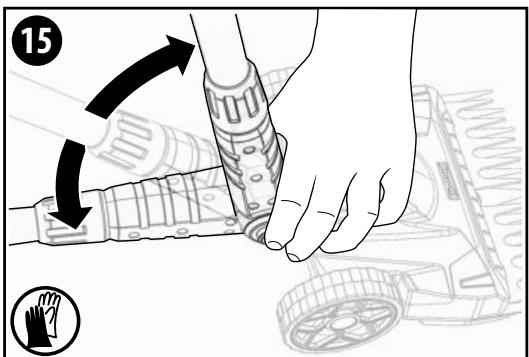
text_image
15 15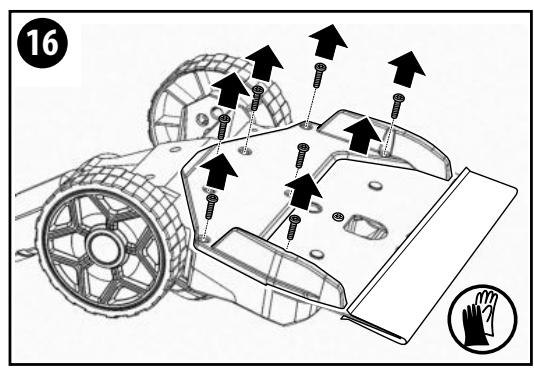
text_image
16 m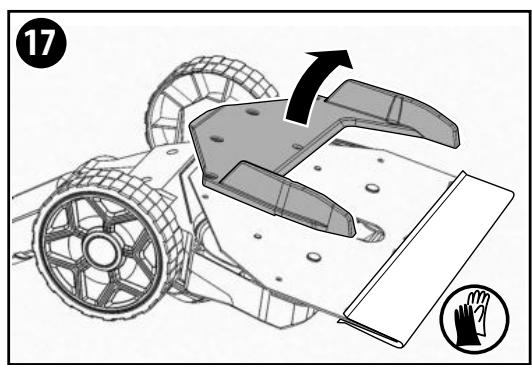
text_image
Diagram illustrating a robotic vehicle's mechanical assembly with directional arrow and labeled parts, including a hand gesture icon.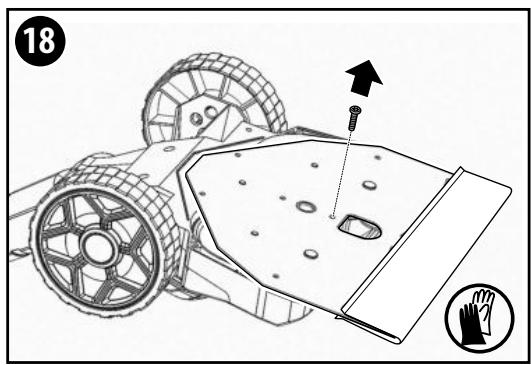
text_image
18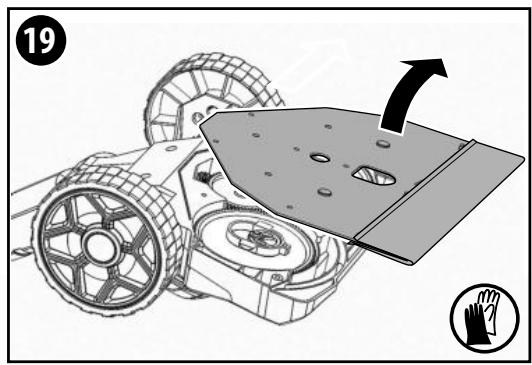
text_image
19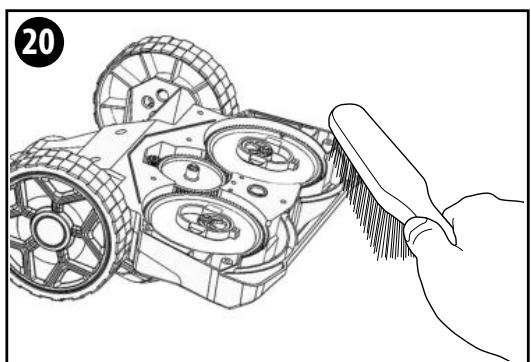
natural_image
Illustration of a robotic vehicle with three wheels and a hand brushing it (no text or symbols)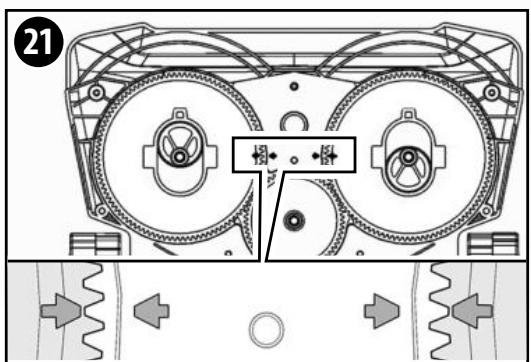
text_image
21 43 45 47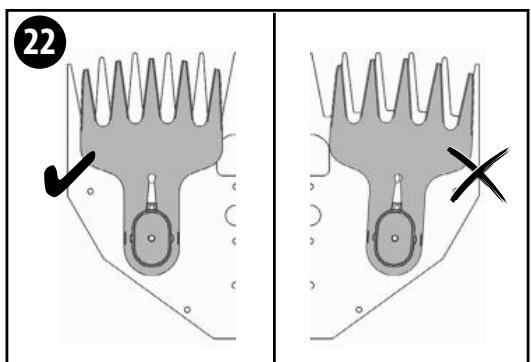
text_image
22 ✓ ✗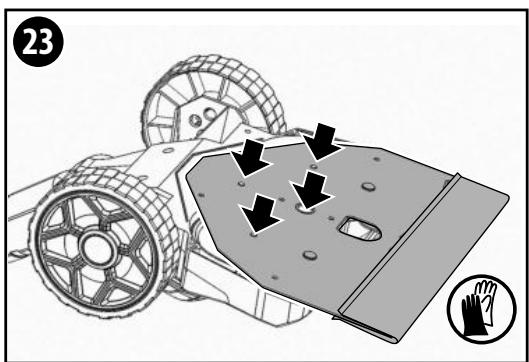
text_image
23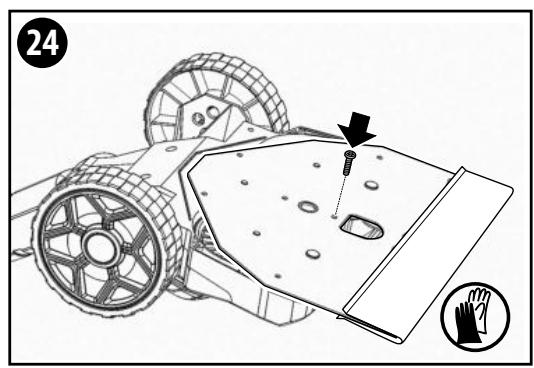
text_image
24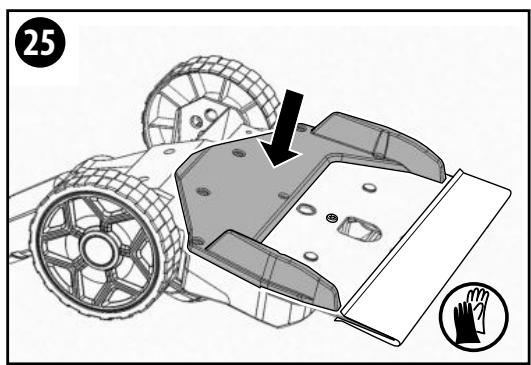
text_image
25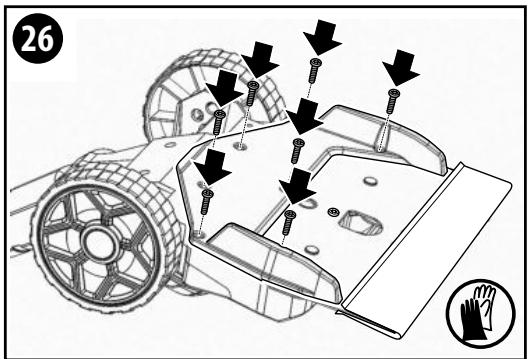
text_image
26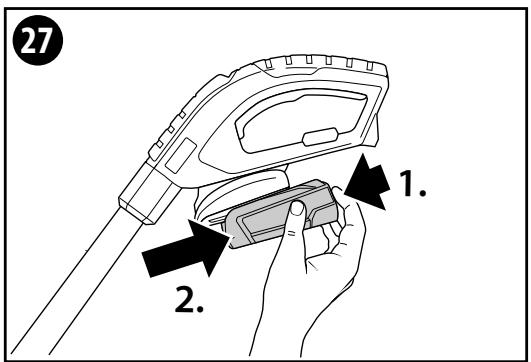
text_image
27 1. 2.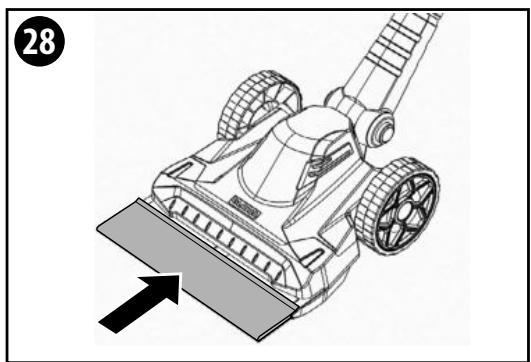
natural_image
Technical line drawing of a mechanical robotic device with a base plate and wheels, no text or symbols present
natural_image
Line drawing of a cleaning or cleaning tool setup with a broom, ladder, and pusher next to a wheel (no text or symbols)INHALTSVERZEICHNIS
text_image
Five black-and-white safety symbols: head, helmet, hand gesture, triangular warning sign, and shoe! WARNING
text_image
Reserve ≤ 30% ≤ 60% 100%Temperaturschutz:
1 General information about this user manual....22
1.1 Symbols on the device and in the user manual 23
1.2 Warning notices....23
1.3 Intended use....23
1.4 Reasonably foreseeable misuse 24
1.5 Residual hazards 24
1.6 Limitation of liability....24
2 For your safety....24
2.1 Basic safety instructions 24
2.2 Safety instructions for handling charger and battery....25
2.3 Safety instructions for operating the device 26
3 Before using the device....27
3.1 Delivery status 27
3.2 Elements of the device 27
4 Technical data 28
5 Unpacking....28
6 Assembling the grass trimmer 28
6.1 Assembling the connecting tube 28
6.2 Height adjustment 28
7 Prior to initial commissioning....29
7.1 Charging procedure....29
8 Use and commissioning 30
8.1 Inserting the battery....30
8.2 Commissioning 30
8.2.1 Angle adjustment 30
8.2.2 Battery status indicator 31
8.2.3 Battery runtime 31
9 Maintenance & Cleaning 31
9.1 Replacing the blades....31
9.2 Cleaning....32
10 Decommissioning and storage 32
10.1 Decommissioning 32
10.1.1 Removing the rechargeable battery....32
10.2 Storage 32
10.2.1 Correct battery and charger storage 32
11 Problems with the device 33
11.1 Troubleshooting the FINECUT 18V and the AI 1810 CV battery charger ... 33
12 Accessories / Spare parts 34
13 Environmental protection 34
13.1 Disposal of the device 34
13.2 Battery disposal 34
13.3 Battery transport....34
13.4 Disposing of the packaging....35
14 Warranty & Guarantee ....35
1 General information about this user manual
This user manual is an integral part of the GLORIA device and must be continually available on or near the device. This user manual contains important instructions and information required for ensuring the safe use of the device!
This user manual must be read in full by any person assigned with operating / using / maintaining the unit.
This user manual must be kept safe and passed on to any new owner!
All warning notices are there to protect your personal safety!
1.1 Symbols on the device and in the user manual

Read the user manual!

Cutting hazard!

Charger for indoor use only! Protect the charger and FineCut 18 V from rain and moisture!

Wear safety goggles!

Wear ear protection!

Wear protective gloves!

Wear safety shoes!
Cutting equipment continues to rotate after motor is switched off!

Oil the cutters!

Keep your distance! Danger from flying parts!

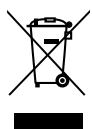
Do NOT dispose of old electrical and electronic equipment as normal domestic waste.

Environmentally appropriate disposal!

Recyclable packaging materials!
1.2 Warning notices

DANGER
This level of warning notice indicates a life-threatening situation. Follow the instructions accompanying this warning notice in order to avoid serious injury or death.

WARNING
This level of warning notice indicates a potentially hazardous situation. Follow the instructions accompanying this warning notice in order to avoid serious injury or death.

CAUTION
This level of warning notice indicates a potentially hazardous situation which, if not avoided, may result in serious injury. Follow the instructions accompanying this warning notice in order to avoid serious injury.
ATTENTION
This level of warning notice indicates a potentially hazardous situation which, if not avoided, may result in material damage. Follow the instructions accompanying this warning notice in order to avoid material damage.

NOTE!
A note indicates additional information or illustrations that help you operate and facilitate the understanding of the device.
1.3 Intended use
This GLORIA device is intended for domestic use outdoors to trim lawn edges in the outside yard and garden.
Compliance with the accompanying instructions is a prerequisite for the prop-
er use of the device. The user manual also contains the operating, maintenance and servicing conditions.

CAUTION
DANGER CAUSED BY IMPROPER USE!
This device can be dangerous if not used for its intended purpose. You should therefore observe the following safety instructions:
■ Use the device for its intended purpose only.
■ Note all instructions and information in the user manual.
1.4 Reasonably foreseeable misuse
The grass trimmer is not suitable for applications other than those areas of use specified. Do not use the grass trimmer to cut materials other than grass. The device must not be used in wet weather conditions, rain and in/under water. The manufacturer does not accept liability for any damage or injury resulting from unauthorised modifications to the device or its improper use.
1.5 Residual hazards
This grass trimmer complies with the accepted rules of technology and the relevant safety requirements! However, use of the device may present:
■ Danger to life and limb of the operator or other persons.
■ Damage to the device.
■ Damage to the other items of property.
1.6 Limitation of liability
We expressly point out that according to product liability law we do not accept liability for damage caused by our device, insofar as this has been caused by non-compliance with the operating instructions, improper use, improper repair or replacement of parts with non-genuine parts, or if repairs have not been carried out by the customer service team or an authorised expert. This also applies to accessories.
2 For your safety
This chapter contains important warning and safety instructions which must be observed when handling and using the device.
2.1 Basic safety instructions
Observe the following basic safety instructions to ensure the safe handling and use of the device:


- Repairs to devices for the home and garden must only be carried out by the service centres. Spare parts should be ordered from your dealer. If the parts are not in stock, the dealer will procure them as soon as possible.
■ This device complies with the accepted rules of technology and the relevant safety requirements! - This device may be used by children from 16 years and above and by persons with diminished physical, sensorial or mental capacities or lack of experience and knowledge if supervised or if they have been instructed with respect to safe use of the device and understand the risks that result from using it. Children must not play with the device. Cleaning and user maintenance must not be performed by children without supervision.
■ This device must not be used if the operator is tired, ill or under the influence of alcohol or other drugs or medicines. - Do not leave the device unattended while it is in operation.
- In order to prevent damage and hazards resulting from improper use, you must observe the user manual and store it in a safe place!
- Wear suitable work clothing such as safety goggles, long trousers and, if necessary, gloves during trimming. Do not work barefoot or in light sandals.
■ If the device is passed on to other persons, they must also be given the user manual!
■ Only use GLORIA original spares and accessories for the device. Never use worn, modified or defective replacement parts / accessories!
2.2 Safety instructions for handling charger and battery


DANGER
DANGER OF ELECTRIC SHOCK!
Contact with energised cables/wires or components may result in serious injury or death! You should therefore observe the following safety instructions:
■ Mains voltage must be in compliance with voltage specification (V\~) on type plate of charger!
- The battery voltage must match the battery charging voltage of the battery charger. Do not try to charge up any batteries that are not of a rechargeable type. In such a case, there is a risk of fire and explosion. GLORIA and Bosch offer a wide range of suitable batteries with different charges (Ah) (see Chapter 12 "Accessories / spare parts").
■ Children and persons with reduced physical, mental or sensory capabilities or who are lacking the requisite knowledge and experience are not allowed to use the charger or its battery.
- If the power cord of the charging station is damaged, it must only be replaced by a repair shop designated by the manufacturer in order to prevent a hazard! Please contact the manufacturer or the customer service department.
■ Only connect the charging station to alternating current.

DANGER
RISK OF INJURY FROM ELECTRIC SHOCK, AS WELL AS RISK OF FIRE AND EXPLOSION! To avoid life-threatening situations:
■ ensure that charger, charging plug and mains plug are in proper working condition before use.
■ the contacts must never be touched.
■ protect charger as well as battery against heat and humidity exposure.
■ do not immerse charger or battery in fluid.
■ operate device only with corresponding original Li-Ion batteries.
■ use charger only to charge original Li-Ion batteries.
- keep charger as well as battery sealed.
■ never operate charger on a flammable surface.
■ never perform charging near easily inflammable substances.
■ protect battery against heat, permanent sunlight and fire exposure. Store battery only at a temperature range between 0 °C to max. +45 °C. Never place battery on a radiator.
■ the supply terminals are not be short-circuited.
■ should the device be operated using a residual-current-operated protective device (RCD) with a trigger current of max. 30 mA. Ask your electrician!

CAUTION
RISK OF INJURY! Insert battery only when the device is switched off. Connecting battery to an activated device can result in accidents.

CAUTION
RISK OF INJURY FROM CAUSTIC LIQUIDS OR VAPOURS! Never expose battery to extreme conditions, such as heat and impact. There is a risk of injury from discharged electrolyte solution or caustic vapours! If battery acid gets in contact with skin or eyes, rinse the affected area thoroughly with water and consult a doctor. Ensure adequate fresh air and consult a doctor if you experience irritation of respiratory tracts, skin or eyes.
2.3 Safety instructions for operating the device
! DANGER
DANGER OF ELECTRIC SHOCK!
- Keep all power cords and cables away from the cutting area. Power cords or cables could be accidentally cut by the blade.
- Hold the grass trimmer by the insulated handle surfaces only, as the blade may come in contact with hidden power lines. Contact of the blades with a live cable can energize metal parts of the grass trimmer and result in an electric shock.
WARNING

RISK OF BURNS CAUSED BY HOT PARTS!

RISK OF CUTTING INJURY FROM SHARP / POINTED METAL BLADE BARS!
Parts of the device can become hot during use and may cause burns.
■ Wear protective gloves during assembly and cleaning work!
Some parts of the grass trimmer have sharp edges and could cause injury.
■ Only switch on the grass trimmer when your hands and feet are not near the cutting blades. Protect yourself from injury to your feet and hands from the cutting blades.
- When removing trapped clippings or carrying out maintenance on the grass trimmer, make sure the on/off switch (E) is turned off and the power lock is engaged or the battery is removed. Unexpected start-up of the grass trimmer when removing trapped clippings or carrying out maintenance can result in serious injury.
■ Always attach the blade guard when transporting or storing the grass trimmer. Careful handling of the grass trimmer reduces the risk of injury from the blades.
■ Wear protective gloves during assembly and cleaning work!
TEMPERATURE PROTECTION
- Your FINECUT 18V has protection against excessively high temperatures of the rechargeable battery. The battery cells can overheat if you use the unit constantly over a longer period of time or if it is exposed to high ambient temperatures. Discharge is no longer possible above 60 °C. In such a case, the device switches itself off automatically (all 4 displays flash, see also section 8.2.2). Allow the rechargeable battery (D) to cool down again before switching on again.
LOW VOLTAGE CUTOFF DEVICE!
- Your FINECUT 18V has a low voltage cut-off device for the rechargeable battery. This functions switches the unit off immediately if the voltage falls below a specified value (1 display flash, see also section 8.2.2). In such a case you should recharge the battery (D) or else put a fully charged battery into the unit.
Observe the following safety precautions to prevent injuries and material damage due to misuse and unsafe handling of the product. Misuse can result in INJURIES.
WARNING
RISK OF INJURY DURING OPERATION!
■ Use the device as intended! Work only within the specified performance range.
■ Before each use, make sure that the device is in perfect condition; operation is prohibited if:
- the safety devices (start switch) are damaged or worn.
- the device shows visible signs of damage.
- the device may have been dropped before.
Never disable any safety devices.
■ Only use the device during daylight or with adequate artificial lighting.
■ Never use the device in the rain.
■ Never use the device if others, in particular children or animals, are in the area!
- Check the lawn you want to work on beforehand to avoid damage to device / objects or injuries to living beings. Power lines, stones, pieces of
wood, wires or the like, as well as other foreign objects must be removed. Objects that the grass trimmer pick up can be cut. Keep bystanders away from the danger zone. In order to prevent injuries, pay attention to safety in the work area.
■ Ensure that the ventilation slots are free of dirt.

CAUTION
RISK OF INJURY FROM OSCILLATING METAL BLADES!


■ Never start the device in a tilted position!
- Never put your hands or feet near to the blades! Ensure that sufficient distance is kept between hands, feet and the blade bars. The blade bar continues to rotate after motor is switched off.
- Never lift or carry the device with running motor! Switch the motor off and disconnect the battery when moving the device to and from a work area, or tilting the device. Switch the motor off and slide the blade guard (K) on when moving the device to and from a work area, or tilting the device.

CAUTION
RISK OF INJURY FROM FLYING PARTS!

■ Do not start or operate the device if bystanders are in the danger zone.
■ Start or operate the device as described in the operating instructions.
■ The start switch must never be fixed or short-circuited.
■ Never use the device during rain.
■ Never use if others, in particular children or animals, are in the area!
■ During working, pay attention to safe and solid position.
■ Guide device only at walking pace.

CAUTION
RISK OF INJURY FROM UNINTENTION- AL SWITCH ON!
Accidental activation can cause injuries. To prevent this, remove battery when:
– leaving device unsupervised.
- maintaining, checking or cleaning device.
– device shows signs of malfunction.

3 Before using the device
This chapter contains information about the delivery status.
3.1 Delivery status
The device is shipped as standard as follows:
■ FINECUT 18V Device
■ Connecting tube
■ Handle with On/Off safety switch and battery compartment
■ 18,0 V battery with charger (only item no. 001300.0000)
■ 1 x Allen key (3 mm)
■ 1 x user manual and product information
Any accessory parts are individually packed.
3.2 Elements of the device
A Ergonomic handle
B Switching-on lock
C Charge level indicator
D* Battery: 18.0 V / 4.0 Ah (NOT included with article no. 001301.0000)
E On/Off safety switch
F Upper tube screw connection
F1 Upper plug-in contacts
G Connecting tube
H Lower tube screw connection
H1 Lower plug-in contacts
I Angle adjustment
J Blade set consisting of lower blade with 2 fitted upper blades)
K Blade guard
L Wheel mounting holes for height adjustment
M* Charger (NOT included with article no. 001301.0000)
4 Technical data
FINECUT 18V
Set – Item number(s): 001301.0000
Set incl. battery with charger – Item number(s): 001300.0000
Battery
Type: Lithium-ion
Nominal voltage: 18.0 V
Rating: 2.5 Ah
Charging station (AL 1810 CV)
Input voltage: 220-240 V\~ / 50/60 Hz
Output voltage: 14.4-18.0 V / DC / 1.0 A
Battery charging time: 154 Min.
Battery life 2.5AH / 4.0AH: 60 Min. / 95 Min.
Per. charging temp. range: 0 - +45 °C
Protection class: II
FINECUT 18V
Cutting width: 250 mm
Height adjustment: 30 / 40 / 50 mm
Max. stroke rate: 1.100 strokes per min.
Weight of device: approx. 2.7 kg
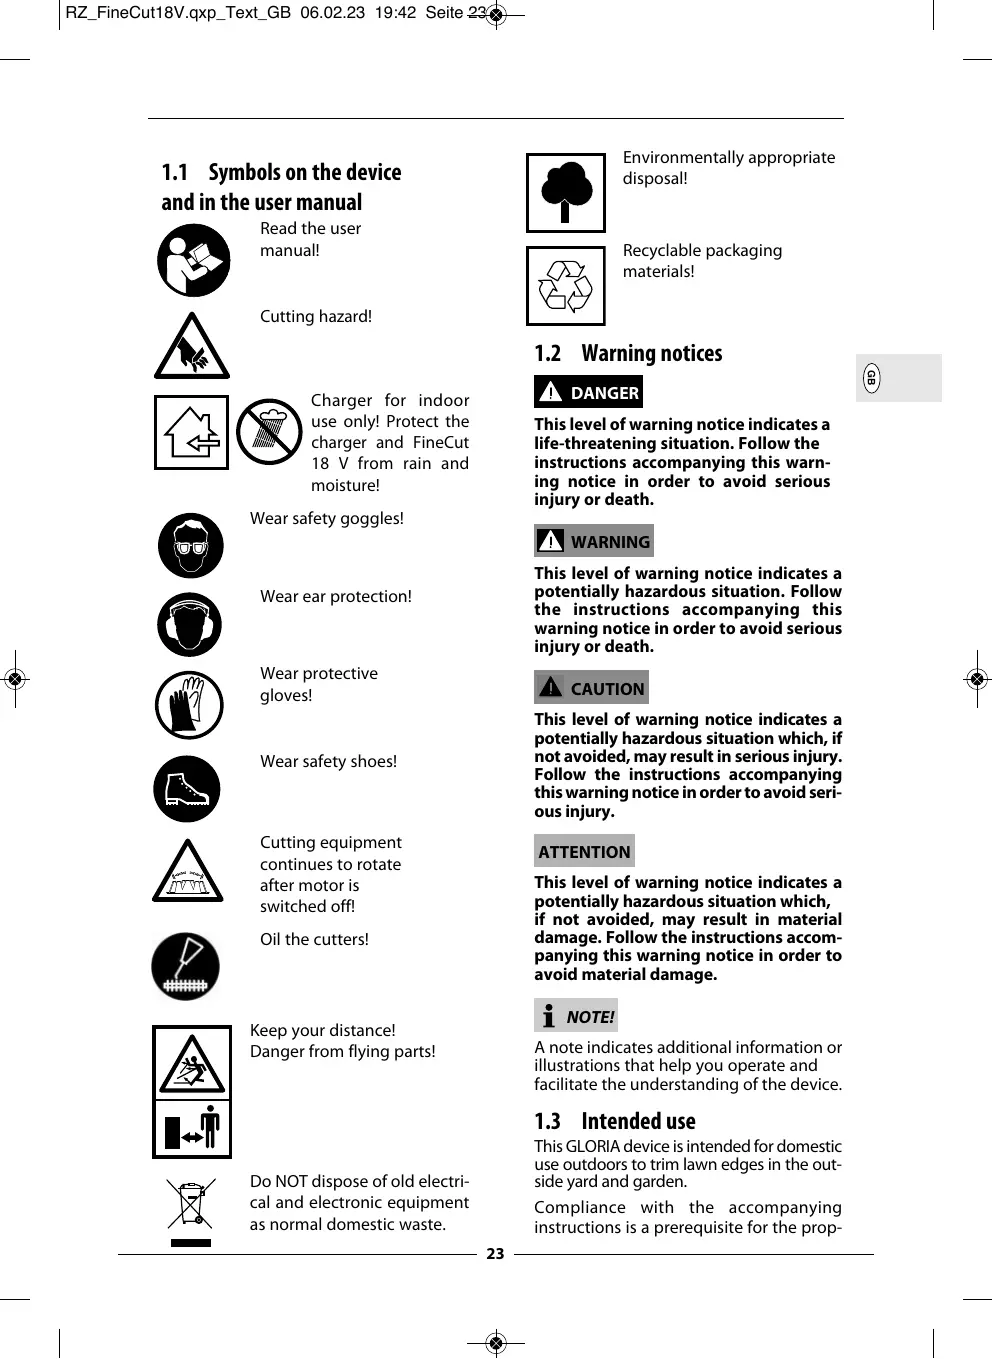
5 Unpacking
Figures 1a - 1b
1a - 1b Your FINECUT 18V is supplied pre-assembled. The loose parts that are included must be installed accordingly, depending on the application.
6 Assembling the grass trimmer
Figures 2 - 7

WARNING

RISK OF CUTTING INJURY FROM SHARP / POINTED METAL BLADE BARS!
Some parts of the grass trimmer have sharp edges and could cause injury.
■ Wear protective gloves during assembly and cleaning work!
■ Do not reach into the knife blades!
■ Only assemble with the blade guard attached (K)!
■ Slide the blade guard (K) onto the blade bar (J)!
6.1 Assembling the connecting tube
Figures 2 - 5
2 After removing the packaging, connect the connecting tube (G) to the device. When joining, make sure that the fixing lug is seated in the groove as shown, and that the contacts (H1) are inserted. This ensures that the connection is mechanically and electrically intact.
3 Manually tighten the lower screw connection.
4 Now connect the connecting tube (G) to the handle. When joining, make sure that the fixing lug is seated in the groove as shown, and that the contacts (F1) are inserted. This ensures that the connection is mechanically and electrically intact.
5 Now manually tighten the upper screw connection.
6.2 Height adjustment
- Your FINECUT18V is delivered with the wheels fully assembled. The factory-set cutting height is 3 cm. However, proceed as follows if you wish to adjust the cutting height to 4 cm or 5 cm:
Figures 6 - 7
6 - 7 Use the Allen key supplied (3 mm) to remove both wheels from the wheel mountings and then mount them in one of the 2 other wheel mountings. Make sure that both wheels are mounted at the same height. The respective cutting heights are marked on the mountings.

CAUTION
RISK OF INJURY DUE TO INCORRECT ASSEMBLY!
Make sure that all parts and screws are securely tightened so that the device is in a safe working condition. Do not start the device until it has been fully assembled!
7 Prior to initial commissioning

WARNING
BEFORE USE OBSERVE CHAPTER 2 "FOR YOUR SAFETY". You should aslo note the following safety instructions:
- The mains voltage must be in compliance with the voltage specification (V\~) on the type plate of the charger.
■ Use only the supplied charger with corresponding original Li-Ion battery (only item no. 001300.0000).
Operate charger only in dry rooms.

NOTE!
■ The battery (D) is only partially charged. Before initial use, fully charge battery. Please ensure that the charging procedure is performed at room temperature. This is the only way to ensure a long battery life.
- A significantly decreased runtime in spite of charging indicates that the battery is dead and must be replaced. Use only original Li-Ion batteries, which you can purchase from manufacturer's customer service.
- Charger and battery can heat up during charging. This is normal and not a sign of a technical defect.
■ The Lithium-Ion battery can be charged at any time, regardless of charge state. Premature interruption of charging does not cause damage to the battery. A protective circuit on the battery prevents depth discharge of battery.
■ The battery is equipped with temperature monitoring that only permits charging over a temperature range between 0 °C and 45 °C. This ensures a long battery life.
- Do not press the On/Off switch again if the FineCut 18V has switched itself off automatically. The battery can be damaged. Note the details concerning disposal of the battery.
7.1 Charging procedure
Figures 8 - 9
Remove battery (D) from packaging (only item no.
001300.0000).
3 The charging process starts as soon as the plug has been plugged into the power outlet and the battery (D) has been placed in the charger (M).
Due to the intelligent charging method, the charging condition of the battery is automatically detected and the battery is charged with the optimum charging current, depending on battery temperature and voltage. This gives longer life to the battery and always leaves it fully charged when kept in the charger for storage.
Indicator statuses:

The charging process is indicated flashing of the battery charge indi-

A solid light on the battery charge is not for signals that the battery is fully charged or that the temperature of the battery is not within the permitted charging temperature range, and can therefore be charged. The battery is charged as it is the allowable charging temperature is reached. When the battery is inserted, a solid light on the battery is indicator signals that the mains are inserted in the plug socket and the charger is ready for operation.
9 Following a successful charging procedure, first disconnect the charger plug from the power outlet, then remove the battery from the charger.
8 Use and commissioning
Figures 10 - 15

text_image
Five black-and-white safety symbols: person wearing glasses, helmet, hand gesture, triangular warning sign, and shoe.
WARNING
BEFORE COMMISSIONING OBSERVE CHAPTER 2 "FOR YOUR SAFETY".
8.1 Inserting the battery
ATTENTION
10 When inserting the battery, ensure that the contacts at the device and the battery itself are dry. Insert the charged battery into the device as shown into place.
■ Make sure that the surface to be cut is free from debris e.g. stones, screws etc., which could be flung up.
8.2 Commissioning
ATTENTION
Improper use of the device poses a risk of damage to property! You should therefore observe the following safety instructions:
- When working on the lawn border, make sure that you do not damage the edge of the curb (e.g. when tilting or tipping the device) or that the edge of the curb damages or bends the blade bar.
- The knife blades are precisely adjusted for grass cutting. Cutting branches and bushes will result in a loss of pre-tension and thus reduce the quality of the grass cut.
- Check the lawn surface to be trimmed beforehand to avoid damage to device/objects or injuries to living beings. Power lines, stones, pieces of wood, wires or the like, as well as other foreign objects must be removed. Objects that the grass trimmer pick up can be cut.

NOTE!
11 Remove the blade guard (K).
12 Clean the grass trimmer before or after each use. Oil the blades with machine oil or spray lubricating oil before or after use.
■ Before using the grass trimmer, first mow the lawn using the lawnmower / lawn robot.
■ Adjust the cutting height (3/4/5 cm) as described in section 6.2.
■ Place the FINECUT18V on the lawn and switch the device on.
13 Now move the device once slowly forwards and back on the lawn. Do not apply pressure to the device. Leaving the grass trimmer at one position for too long can damage the turf

NOTE!
If too much cut grass settles on the blade bar, switch off the device, lift it slightly and shake off the grass.
ATTENTION
Improper use of the device poses a risk of damage to property! You should therefore observe the following safety instructions:
- When cutting around curbs, fences, or trees, make sure the blade bar does not come into contact with them.
12 Oil the blades at least once an hour (machine oil or spray lubricating oil).
8.2.1 Angle adjustment
Your FINECUT18V is equipped with an angle adjustment mechanism (I) which allows you to trim your lawn even in hard-to-reach areas. Proceed as follows to adjust the angle of the tube:

CAUTION
RISK OF INJURY FROM OSCILLATING METAL BLADES!


■ Switch off your device when adjusting the angle!
Figures 14 - 15
14 - 15 Press both angle adjustment buttons (I) simultaneously to adjust the tube. The angle (I) can be adjusted in 9 stages. You can therefore work under obstacles when it is set flat.
8.2.2 Battery status indicator
The device is equipped with a battery charge indicator (C) that displays the charging status of the battery. The displays only light up when the device is switched on.
Battery capacity (green LEDs):

text_image
Reserve ≤ 30% ≤ 60% 100%Temperature protection:

Low voltage cutoff

i NOTE!
In rare cases, after the battery has been removed and then reinserted, the battery status indicator (green LEDs) can display a higher battery power than before battery removal. The reason is that the last battery power during operation is saved in the device. Once the battery has been removed and reinserted into the device, the battery power is re-measured and a higher power can therefore be displayed on the indicator.
8.2.3 Battery runtime
The battery operating time essentially depends on the load on the device and can lead to shorter battery operating times. Another factor is overly frequent starting and stopping during cutting, which can also reduce battery operating time.
9 Maintenance & Cleaning
Figures 16 - 26

WARNING
RISK OF INJURY DUE TO UNINTENTIONAL SWITCHING ON AND SHARP/POINTED BLADES!
Some parts of the grass trimmer have sharp edges and could cause injury.
- Switch off the device and remove the battery.
■ Wear protective gloves during maintenance and cleaning!
■ Slide the blade guard (K) onto the blades (J).
CAUTION
RISK OF BURNS CAUSED BY HOT PARTS!
During assembly or conversion work the drive parts of the device or components can still be very hot and may cause burns. It is therefore important to observe the following safety instruction:
■ Wear protective gloves during maintenance and cleaning!
9.1 Replacing the blades
WARNING
RISK OF CUTTING INJURY FROM SHARP / POINTED METAL BLADES!
■ Only assemble with the blade guard attached (K)!
i NOTE!
Tools required:
Phillips screwdriver
16 Loosen and remove the 7 marked base cover screws on the underside of the device.
17 Lift the base cover from the device and remove it.
18 To remove the blade set, loosen and remove the remaining screw indicated.
19 Lift the blade set from the device and remove it.
20 If necessary, use a brush to clear away any dirt from the housing and the two seals.
21 Before fitting the new blade set, make sure that the marks on the two large cog wheels line up with the marks on the housing. The two cams must be positioned as shown.
22 Before inserting the new blade set, check the correct position of the upper blades. The upper blades need to be positioned centrally and pointing straight forward as shown. You may need to align the cams of the upper blades as shown in the figure.
$$ (\checkmark = \text { correct } / \times = \text { incorrect }). $$
23 Now attach the new blade set. The central large stud and the 3 indicated shafts of the cog wheels, which need to sit in the openings of the blade set, can be used as a positioning aid.
24 Fix the blade set by screwing it at the position indicated.
25 Replace the base cover on the device as shown.
26 Then use the 7 screws indicated to screw the base cover in place.
■ Lubricate the new blade with machine oil or lubricating oil spray before using.
The blade set has now been replaced.
9.2 Cleaning
ATTENTION
Improper use of the device poses a risk of damage to property! You should therefore observe the following safety instruction:
■ Remove the battery each time before cleaning the device.
- Do not immerse the device in water or spray or clean it with water. The device must be protected against moisture.
- Clean the outside of the device with a damp cloth or soft brush. Do not use abrasives or harsh cleaning agents.
- Dismantle the grass trimmer for a thorough clean if it is seriously dirty. Use a brush to clean the cutting unit, the housing and the two seals, then oil the blades (J).
■ Only use original GLORIA spare parts for repairs.
■ Further accessories can be found at https://shop.gloria-garten.com/de/.
10 Decommissioning & Storage
10.1 Decommissioning
Take the device out of operation by releasing the On/Off switch (E) in the handle.
10.1.1 Removing the rechargeable battery
Figure 27
ATTENTION
Improper use of the device poses a risk of damage to property! You should therefore observe the following safety instruction:
27 To prevent battery discharge, remove the battery from the device when not in use for a prolonged time.
10.2 Storage
Figures 28-29

CAUTION
You may be exposed to hazards that could injure you when handling the device. You must therefore store the device away from children.
■ Remove any dirt and debris.
28 Slide the blade guard (K) onto the blades (J).
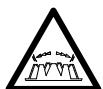
29 Store the device hung up, dry and protected from frost.
10.2.1 Correct battery and charger storage
It is essential that you also follow the "Safety instructions for handling charger and battery" in chapter "Important safety instructions".
ATTENTION
Improper use of the device poses a risk of damage to property. The battery should not be stored uncharged. Though self discharge is minimal, an empty battery can be destroyed if stored for an extended period. Thus, observe the following instructions if not in use for an extended period (e.g. during winter):
■ store battery at a charge status of approx. 40 - 60 %.
■ store battery in a dry, elevated, closed, frost-protected space at a temperature between 0 °C and +45 °C. When storage temperature is +15 °C, self-discharge and chemical ageing is at its lowest. Avoid direct sunlight.
■ if the battery is not used for more than 6 months, use the status indicator to check the charging status in the charger. Recharge the battery to approx. 40-60% capacity if required.
11 Problems with the device
11.1 Troubleshooting the FINECUT 18V and the AI 1810 CV battery charger
Faults usually occur if the device has not been handled, cared for or maintained properly. The following table contains the most common faults and remedies to eliminate these faults. If you have any other problems, please contact your nearest service centre authorised by the manufacturer, or your nearest authorised specialist dealer.
| Fault | Cause | Remedy |
| Device does not start | Battery not inserted properlyBattery capacity too lowFaulty batteryBattery overheating, battery status indicator lights up red | Insert the battery into the holder until it clicks into placeCharge the batteryBattery defective or at the end of its life. Replace the battery!Allow the battery to cool down |
| Status display batt.; 4 displays flash | Temperature protection | Allow the device and the battery to cool down for around 5 minutes and do not use them in that time |
| Status display batt.; 1 display flash | Low voltage cutoff | Charge the battery |
| Battery charging display continuously lit, charging is not possible | Battery not inserted properlyBattery contacts dirtyFaulty battery | Insert the batt. correctly into the chargerClean the battery contacts, e.g. by plugging in and unplugging the battery several times, if necessaryReplace the battery |
| Battery charging display does not light up | Mains plug for the charger has not been plugged in (properly)Mains outlet, power cable or charger defective | Insert the mains plug (fully) into the mains outletCheck the mains voltage. If necessary, have the charger checked over by an authorized repair shop for GLORIA electrical power tools |
| Cutting unit blockedCutting unit is stiff | Cutting unit is blocked by cut material, twigs or foreign objectsCutting unit is not sufficiently lubricated | Clean the blade on the cutting unit and move itLubricate the cutting unit |
| Grass is cut is too long / too short | Incorrect height adjustment | Adjust the height of the wheels |
12 Accessories / Spare parts
- Part No. 729101.0000 Lithium-Ion battery 2.5Ah (BOSCH PBA 18V 2.5Ah W-B)
- Part No. 729102.0000 Lithium-Ion battery 4.0Ah (BOSCH PBA 18V 4.0Ah W-C)
- Part No. 729250.0000 Replacement blade FineCut 18V
More batteries from BOSCH
- BOSCH AKKU POWER FOR ALL 18V 1.5Ah, Typ: PBA 18V 1.5Ah W-A
- BOSCH AKKU POWER FOR ALL 18V 2.0Ah, Typ: PBA 18V 2.0Ah W-A
- BOSCH AKKU POWER FOR ALL 18V 3.0Ah, Typ: PBA 18V 3.0Ah W-B
- BOSCH AKKU POWER FOR ALL 18V 5.0Ah, Typ: PBA 18V 5.0Ah W-C
- BOSCH AKKU POWER FOR ALL 18V 6.0Ah, Typ: PBA 18V 6.0Ah W-C
Further accessories can be found at www.gloriagarten.de
13 Environmental protection


13.1 Disposal of the device
■ These symbols on the product, user manual or packaging indicates that this product must not be disposed of in regular household waste at the end of its service life.
- Do not dispose of electrical appliances through household waste! In accordance with European Directive 2012/19 / EU on old electrical and electronic appliances and its implementation in national law, electrical tools that are no longer suitable for use must be separately collected and sent for environmentally responsible recycling. Recycling alternative for the return request: Alternatively, the owner of an electric or electronic appliance is obligated to cooperate in proper recycling in the event of a property task instead of returning. Old equipment can also be handed over to a collection facility carrying out disposal as defined on the national recycling and waste management laws. This does not apply to the accessories and auxiliaries included in old equipment, which do not contain electrical components.
■ The Lithium-Ion battery must be disposed of separately from the rest of the device.

NOTE!
■ Please check with your local government to find the appropriate disposal point.
13.2 Battery disposal


As consumer you are required by law to dispose of used batteries and charger as hazardous waste.

CAUTION
RISK OF INJURY FROM DEFECTIVE, LEAKING BATTERY!
The applied battery contains sub- stances that can result in injuries when getting in contact with skin or when inhaled.
Should your device have a drained battery, you must use rubber gloves to remove it from the device and properly dispose of it in a closed container.
■ According to the European Directive 2013/56/EU, faulty batteries must be collected separately and reused or recycled in an environmentally friendly manner.
Disposal possibilities are as follows:
- by dealer
– at a GRS recycling centre
– in special waste containers provided by the communities
Obtain additional disposal information from your community or city.
13.3 Battery transport
■ The contained lithium-ion batteries are subject to the Dan- gerous Goods Legislation requirements. The batteries are suitable for road-transport by the user without further re- strictions.
When shipping by third parties (e.g.: by air transport or for- warding agency), special requirements on packaging and labelling must be observed.
Dispatch battery packs only when the housing is undam- aged. Tape or mask off open contacts and pack up the bat- tery in such a manner that it cannot move around in the packaging. Please also observe the possibility of more de- tailed national regulations.
Please be sure to observe the information under www.gloriagarten.de/returns
13.4 Disposal of packaging
■ The packaging materials have been selected according to environmentally-suitable and disposal-related aspects and are therefore recyclable.
Returning the packaging to the material circulation saves raw materials and reduces the level of waste.
■ Please dispose of unwanted packaging materials according to applicable local regulations.
14 Warranty & Guarantee
GLORIA gives a 24 month guarantee as per of the terms and conditions of the warranty (www.gloriagarten.de).
This does not affect your legal rights to claims under warranty with regard to the seller.
Technical changes reserved!
SOMMAIRE
Porter protection auditive!

Porter des gants de protection!

Station de charge (Al 1810 CV)
https://shop.gloria-garten.com/de/
text_image
Reserve ≤ 30% ≤ 60% 100%https://shop.gloria-garten.com/de/
13 Milieubescherming


text_image
Five black-and-white safety symbols: head, helmet, hand gesture, triangular warning sign, and shoeAVVERTENZA
PRIMA DELLA MESSA IN FUNZIONE, FARE RIFERIMENTO AL CAPITOLO 2 "PER LA VOSTRA SICUREZZA".
text_image
Riserva ≤ 30% ≤ 60% 100%Protezione termica:
https://shop.gloria-garten.com/de/
14,4-18,0 V / DC / 1,0 A
154 Min.
60 Min. / 95 Min.
0 - +45^
||
250 mm
30 / 40 / 50 mm
1.100 zdvihů/min
ca. 2,7 kg
5 Rozbalení
Obrázky 1a - 1b
https://shop.gloria-garten.com/de/
https://shop.gloria-garten.com/de/
13 Környezetvédelem

m = 311


Nazivna napetost: 18,0 V
Nazivna zmogljivost: 2,5 Ah
text_image
Rezerva ≤ 30% ≤ 60% 100%https://shop.gloria-garten.com/de/
13 Varovanje okolja


13.1 Odstranjevanje naprav
https://shop.gloria-garten.com/de/
INNEHÅLLSFÖRTECKNING
https://shop.gloria-garten.com/de/
13 Skydd av miljön