Clean 500 - Garden sprayer GLORIA - Free user manual and instructions
Find the device manual for free Clean 500 GLORIA in PDF.

| Brand | GLORIA |
| Model | Clean 500 |
| Category | Garden sprayer |
| Type | Manual pressure sprayer |
| Tank capacity | 5 liters (total capacity 7 liters) |
| Empty weight | 1.66 kg |
| Maximum working pressure | 3 bar |
| Optimal spray pressure | 1.5 to 3.0 bar |
| Average flow rate | 0.68 l/min |
| Nozzle type | Flat jet nozzle (plastic) |
| Spray angle | 90° |
| Seal material | EPDM |
| Extension | Yes (included) |
| Operating temperature | 0 °C to +30 °C |
| Power supply | Manual (pump) |
| Use | Spraying liquids pH 2 to 12 |
| Safety | Overpressure valve, handle lock |
| Maintenance | Clean after each use, lubricate seals |
| Spare parts | Seals, nozzles, etc. available |
| Service life | 10 years max |
Frequently Asked Questions - Clean 500 GLORIA
User questions about Clean 500 GLORIA
0 question about this device. Answer the ones you know or ask your own.
Ask a new question about this device
Download the instructions for your Garden sprayer in PDF format for free! Find your manual Clean 500 - GLORIA and take your electronic device back in hand. On this page are published all the documents necessary for the use of your device. Clean 500 by GLORIA.
USER MANUAL Clean 500 GLORIA
Original operating instructions
Page 8
natural_image
Line drawing of a GLORIA CLEAN spray gun with attached vertical actuator (no text or symbols on the device itself)
flowchart
graph LR
    A["Tool"] --> B["Valve"]
    B --> C["Valve"]
    C --> D["Valve"]
natural_image
Diagram of a device with a rotating component and directional arrows, labeled A3 (no text or symbols on the diagram itself)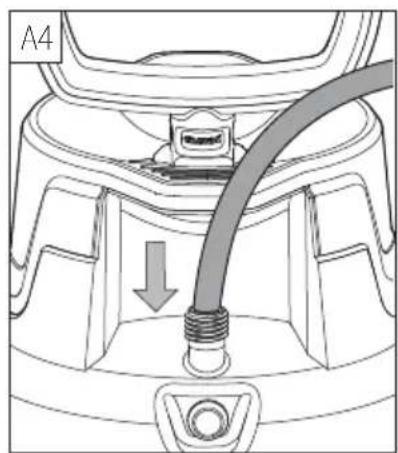
natural_image
Technical diagram of a mechanical component with a coiled cable and threaded end (no text or symbols)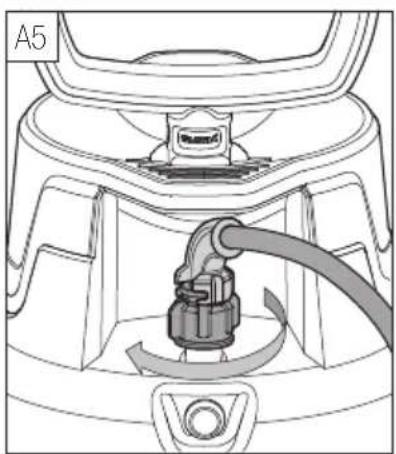
natural_image
Technical line drawing of a mechanical device with a cable and housing (no text or symbols)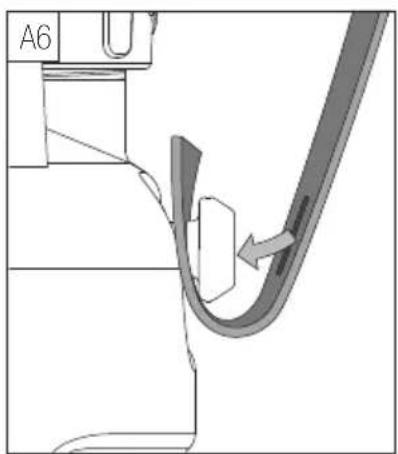
natural_image
Technical diagram of a mechanical component with a curved pipe and directional arrow (no text or symbols)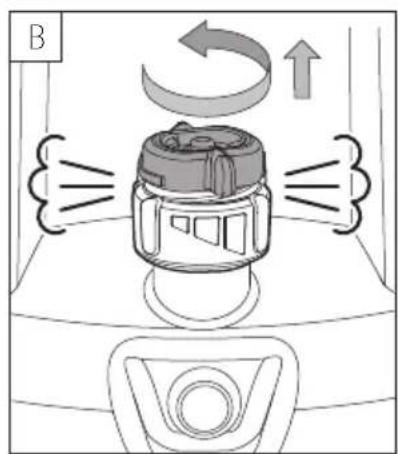
natural_image
Diagram of a car interior showing airflow around a device with arrows indicating direction (no text or symbols)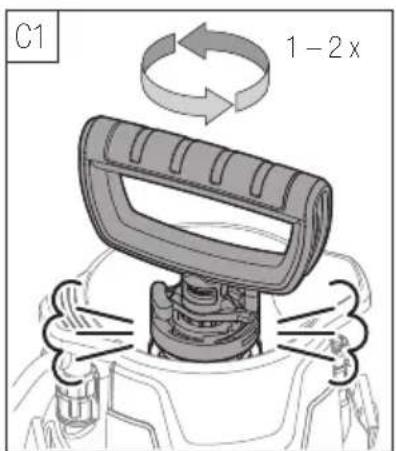
natural_image
Diagram of a handheld electric shaver tool with no visible text or symbols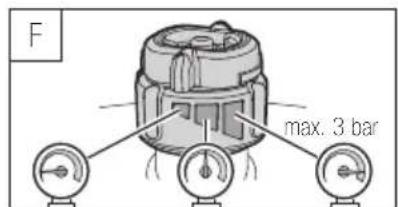
natural_image
Technical line drawing of a hair gun assembly with exploded view and spray nozzle (no text or symbols)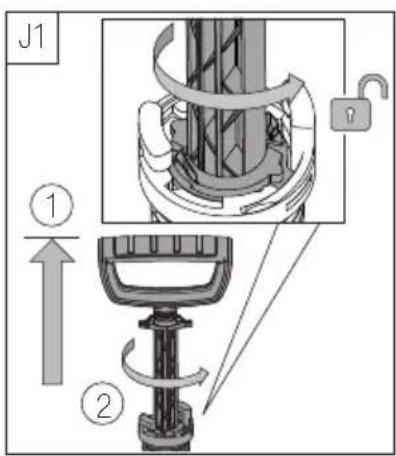
natural_image
Cross-sectional diagram of a mechanical component with layered structure (no text or symbols)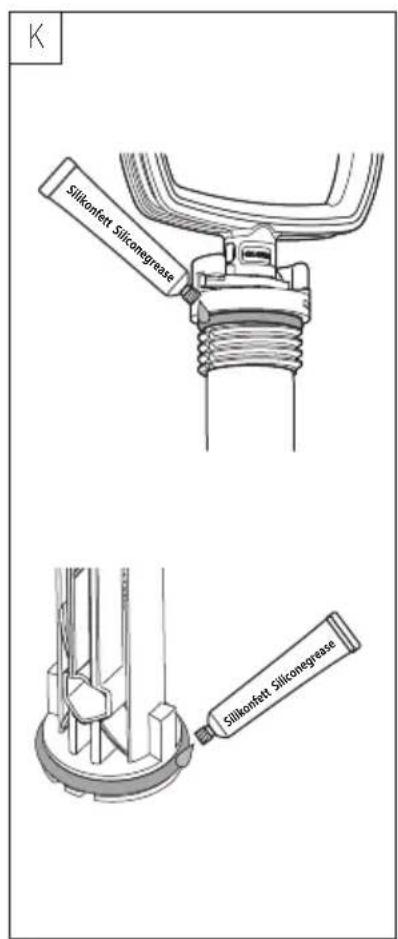
natural_image
Mechanical assembly diagram showing a gear-like component mounted on a base (no text or symbols visible)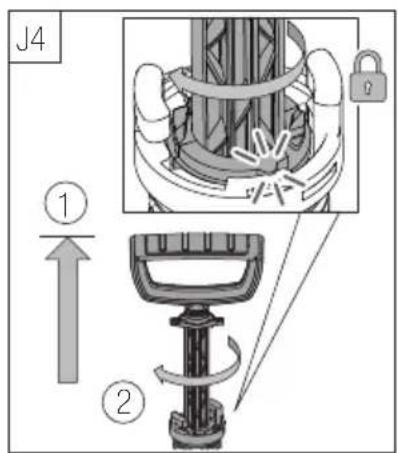
Deutsch
The pressure sprayer is designed for applying commercially available, low-viscosity spraying agents for the purpose of cleaning surfaces. The pressure sprayer may be used for private, professional and industrial applications.
Only spraying agents with a pH value between 2 and 12 may be used.
Exceptions apply to specific acids and alkaline solutions:
■ Acetic acid, nitric acid, hydrochloric acid, propionic acid ≤ 10 %
■ Acetic acid, nitric acid, hydrochloric acid, propionic acid ≤ 10 %
■ Sulfuric acid, phosphoric acid ≤ 30 %
■ Soda lye, potash lye ≤ 20 %
Higher concentrations and mixtures may not be used.
You may only operate the pressure sprayer within the operating temperature range. (see Chapter "10 Technical data" on page 11).
Any other use is considered improper.
2 Information for safe use

Read and observe the operating instructions and follow all safety instructions. Keep the operating instructions in a safe place for later use. If you hand over the
pressure sprayer to someone else (for example, sell it), you must also include the operating instructions.

Spraying agents are mixtures of different substances whose composition is only known by the spraying agent manufacturer. Check the suitability of the spraying
agent before use. If you have any questions about the suitability of a spraying agent or you are unsure, please contact the spraying agent manufacturer or the Gloria Service department.
Do not fill the container with any spraying agents that contain solvents or are highly caustic. Do not mix different spraying agents. Unexpected, dangerous chemical reactions can occur.
Never use the following spraying agents:
- Oils and fuels
■ Flammable liquids with a flash point below 60°C
■ Formic acid and hydrofluoric acid in any concentration
■ Pesticides
■ Spraying agents with a temperature above 30°C
■ Viscous spraying agents that leave sticky residues
■ Wetting agents (surface-active agents) that cause or promote cracking in the plastics used.

Observe the safety instructions of the spraying agent manufacturer. Always request a safety data sheet from the spraying agent manufacturer. Observe the specified maximum concentration of the spraying agent. Some spraying agents require that you wear filter masks, protective goggles, protective gloves and a protective suit. Wear the required protection equipment. Do not try to clear blocked nozzles by blowing them out with your mouth.
If you come into contact with caustic or skin-irritating spraying agents, rinse the affected areas with plenty of clean water and consult a doctor.
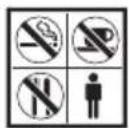
Only eat, drink or smoke after removing your protective equipment and carefully cleaning your hands and face.
Do not modify or repair the pressure sprayer yourself. Do not modify or remove safety devices.
Faulty pressure sprayers may only be repaired by an authorised workshop.
Do not allow children to play with the pressure sprayer. Keep minors under the age of 16 away from the pressure sprayer. The pressure sprayer may be used by minors over the age of 16 and by persons with reduced physical, sensory or mental capabilities or a lack of experience and knowledge, but only if they are supervised or have been instructed in using the pressure sprayer safely and understand the risks involved. Cleaning and maintenance must not be undertaken by minors under the age of 16. Minors over the age of 16 must be supervised during cleaning and maintenance.
Residual risks: The pressure sprayer complies with the recognised rules of technology and the relevant safety regulations. Nevertheless, some residual risks remain. Observe all safety instructions.
Limitation of liability: According to the Product Liability Act, the manufacturer is not responsible for damage caused by failure to comply with these operating instructions, by improper use or by unauthorised repairs.
3 Overview
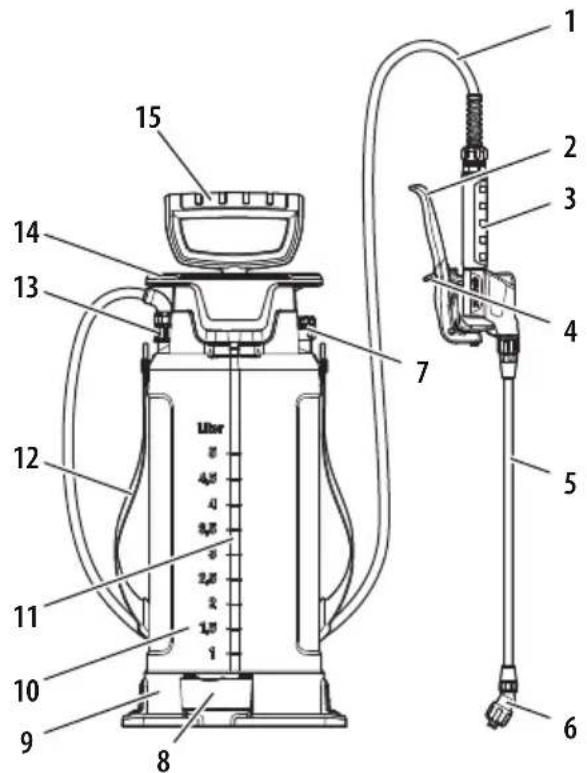
Parts of the pressure sprayer
| 1 Hose line | 9 Base ring |
| 2 Lever | 10 Shoulder strap |
| 3 Quick-acting valve | 11 Container |
| 4 Lock | 12 Filling level indicator |
| 5 Spray lance | 13 Union nut with kink protec- |
| 6 Nozzle | tion |
| 7 Overpressure valve | 14 Filling funnel |
| 8 Receptacle | 15 Pump handle |
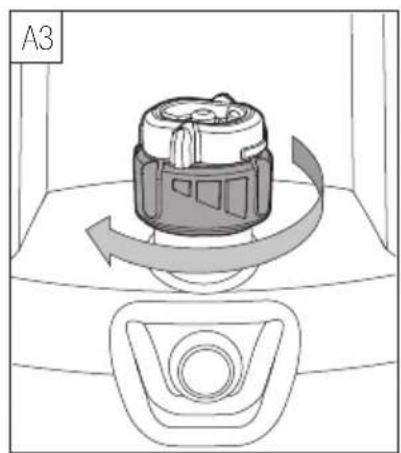
4 Assembly
Assemble the pressure sprayer as shown in Figures A. Make sure that you fit the union nuts on straight. The union nuts must not be cross-threaded.
After assembly, check all screw connections are secure. In particular, make sure the overpressure valve is screwed tight.
5 Operation
Opening the container
Observe the following safety information:
- You may only open the container if it has been depressurised.
- Release the pressure from the container by turning the overpressure valve left to the stop (see Fig-
ure B). Allow the pressurised air to escape completely.
- Turn the pump handle slowly to the left. Allow any pressurised air remaining in the container to escape (see Figure C1).
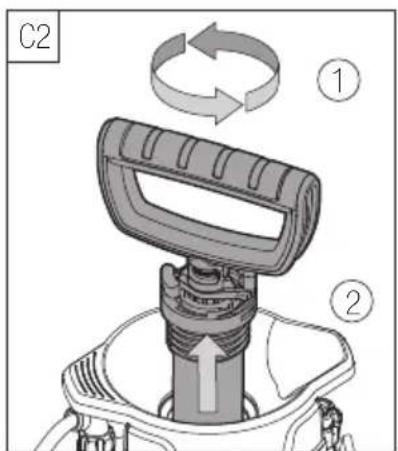
- Turn the pump handle further to the left to screw out the pump (see Figure C2).
Filling the tank
Observe the following safety instructions:
-
Check that the overpressure valve moves freely before filling.
■ Do not hold the overpressure valve closed. -
Place the pressure sprayer on a flat and level surface.
- Release the pressure from the container and open the container.
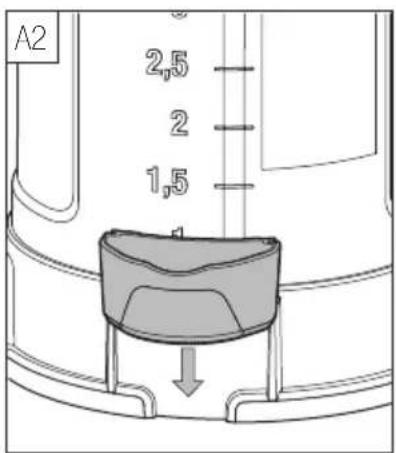
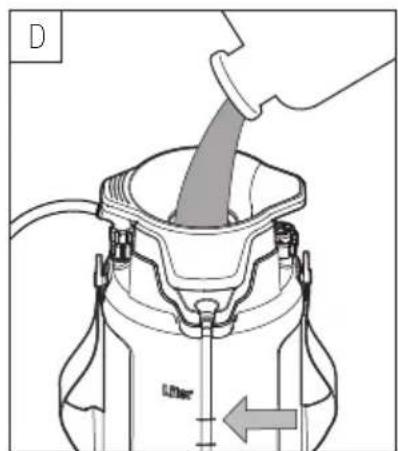
- Pour the spray liquid into the container. Observe the maximum filling quantity (see Figure D).
- Insert the pump in the filling funnel.
- Screw the pump into the container using the pump handle.
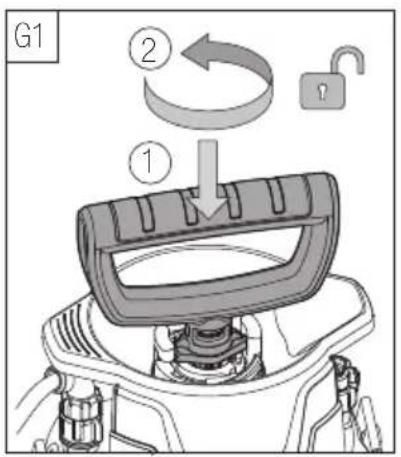
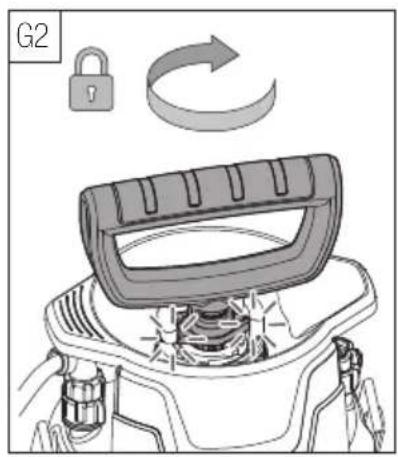
- Release the catch on the pump handle (see Figure G1).
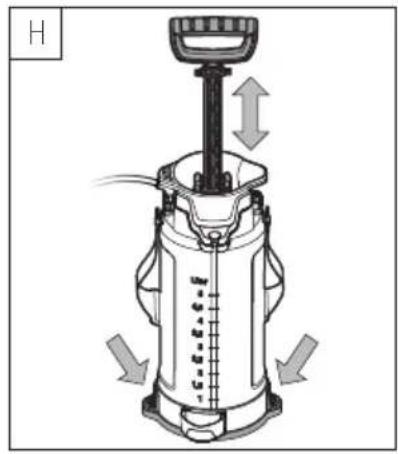
- Place both feet on the extended part of the base ring and hold the container securely between your legs.
- Press the pump handle until a pressure of 3 bar is reached (see Figures H). Observe the pressure indicator on the overpressure valve (see Figures F). As the pressure rises, the overpressure valve rises and you will hear the overpressure valve release air when the maximum pressure of 3 bar is exceeded.
- Lock the pump handle (see Figure G2).
Spraying
Observe the following safety instructions:
■ Before use, check that all screw connections are secure. Tighten any loose screw connections.
■ Before every use, check the pressure sprayer for any damage, leaks and proper working order. Do not use the pressure sprayer if it is faulty.
- Note the direction of the wind. Do not spray into the wind.
■ Never direct the spray jet at people or animals.
- If possible, spray the whole contents of the container.
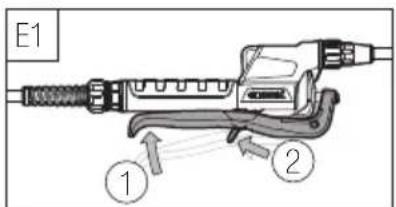
Direct the nozzles at the object being sprayed and operate the lever on the quick-acting valve. The ideal spraying distance is 40 to 50 cm.
To spray continuously, you can lock the lever on the quick-acting valve (see Figure E1).
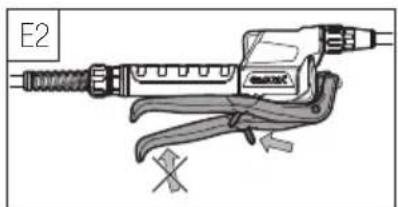
To prevent accidental spraying, you can lock the lever on the quick-acting valve in the initial position (see Figure E2).
Press the pump handle if spraying pressure drops.
Emptying the container
- Release the pressure from the container and open the container.
- Pour the remaining spraying agent into a suitable vessel.
- Dispose of the remaining spraying agent in accordance with applicable laws and regulations. Also, follow the disposal instructions on the spraying agent packaging.
- Clean the pressure sprayer.
6 Cleaning and maintenance
Clean the pressure sprayer thoroughly after each time you use it.
- Release the pressure from the container and open the container.
- Empty the container.
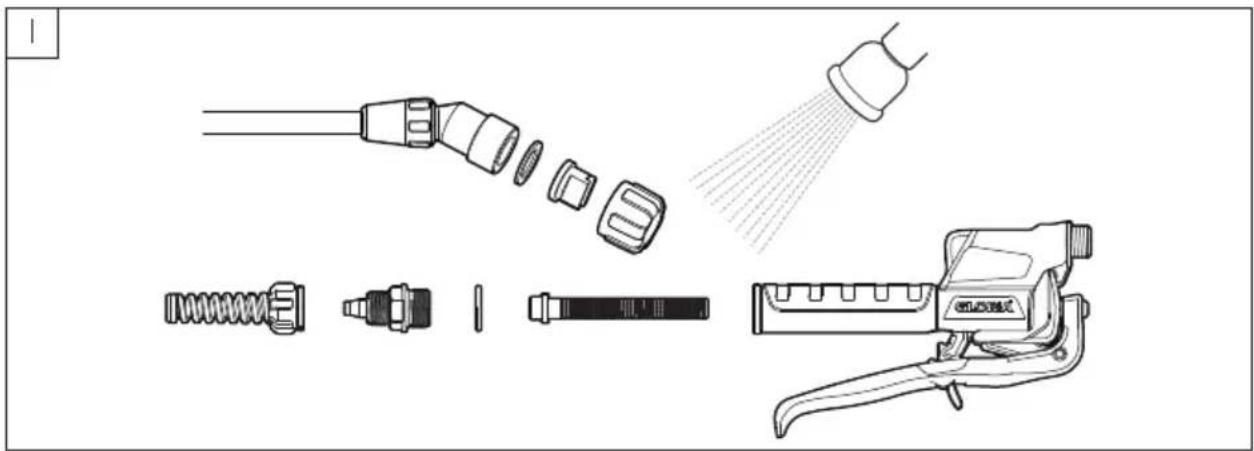
- Clean the container, the hose line, the spray lance and the filters with a suitable cleaning fluid (see Figure I). Also, follow any cleaning instructions on the spraying agent packaging.
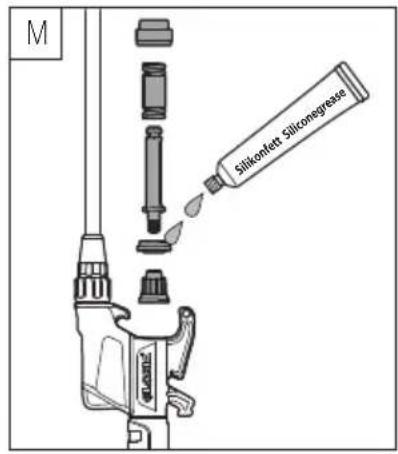
Grease the seals on the pump and on the quick-acting valve on a regular basis, but at the latest when the pressure sprayer function is impaired (see Chapter "9 Troubleshooting" on page 11).
You may only use resin- and acid-free greases. You can obtain a suitable silicone grease from GLORIA (item number 728781.1111).
7 Storage
Only store the pressure sprayer once the container has been depressurised and no longer contains any spraying agent. Store the pressure sprayer in opened state. Protect the pressure sprayer from prolonged exposure to sunlight and frost.
Keep the pressure sprayer and spraying agents out of reach of children.
8 Disposal
The pressure sprayer may be used for a maximum of 10 years.
Old sprayers must not be disposed of in normal household waste. Dispose of the pressure sprayer in accordance with applicable local regulations.
Check with your local authority to find out how to recycle the individual materials properly.
9 Troubleshooting
Spare parts
Use only original GLORIA spare parts.
Accessories and spare parts can be found at service.gloriagarten.de.
You can also use the QR code on the back of this user manual.
Table of faults
| Fault Remedy | |
| Screw connection is leaking | Tighten screw connection.Renew seal if present. |
| Spraying pattern of nozzle is uneven | Clean nozzle. |
| Pump does not build up pressure | Renew pump seals. |
| Pump handle is stiffGrease pump seals. | Renew pump seals. |
| Lever on quick-acting valve is stiff or quick-acting valve does not close fully and the device continues to spray. | Clean valve in quick-acting valve.Grease seals in quick-acting valve.Renew seals in quick-acting valve. |
Renewing the seals
Release the pressure from the container.
Open the screw connection where the leak is and renew the worn seal.
Cleaning the nozzle
Release the pressure from the container.
A blocked nozzle can be carefully pierced with a pointed object.
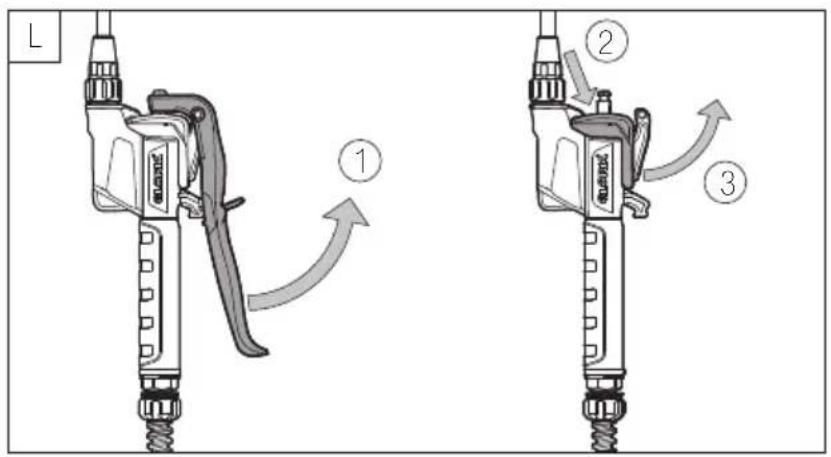
Servicing the quick-acting valve
Release the pressure from the container.
Disassemble the quick-acting valve. Pull and press firmly in the directions indicated (see Figures L). Clean, grease or renew the seals (see Figures M).
Servicing the pump seals
- Release the pressure from the container and open the container.
- Screw the pump out of the container.
- Pull the pump out completely and turn it firmly to the left to release the catch in the pump housing (see Figure J1).
- Grease or renew the pump seals (see Figure K).
Proceed as follows to assemble:
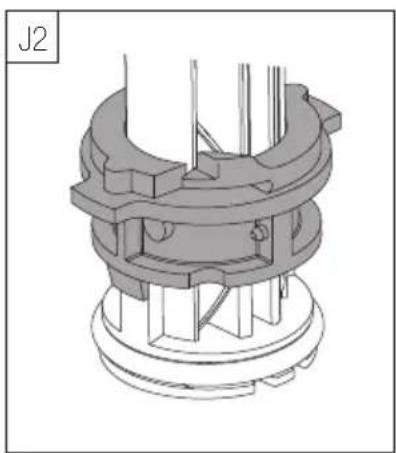
- Fit the half shells again on the pump handle (see Figure J2).
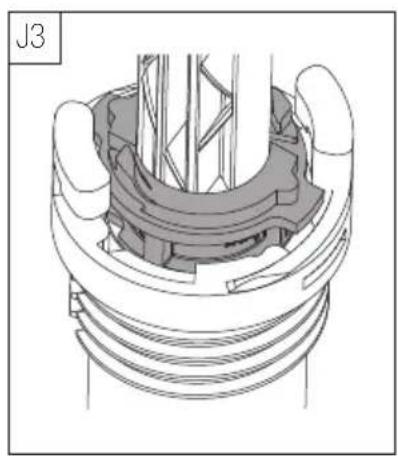
- Hold the half shells securely and push only the end of the pump handle into the pump housing. The two lugs need to engage in the guides (see Figure J3).
- Press the half shells downwards and turn the pump handle firmly to the right (see Figure J4). Make sure that you do not push the pump handle into the pump housing. The catch in the pump housing can be released or locked only when the pump handle has been pulled out fully.
10 Technical data
| Item number 003450... | |
| Filling capacity 5 litres | |
| Total container capacity 7 litres | |
| Empty weight 1.66 kg | |
| Operating temperature 0 °C to +30 °C | |
| Maximum operating pressure | 3 bar |
| Optimum spray pressure | 1.5 bar to 3.0 bar |
| Average output | 0.68 l/min |
| Nozzle | Flat jet nozzle |
| Nozzle material | Plastic |
| Nozzle spray angle | 90° |
| Seal material | EPDM (ethylene propylene diene monomer) |
| Extension | yes |
11 Declaration of Conformity
We hereby confirm that the pressure sprayers with item nos. 003450... comply with all relevant provisions from Directive 2006/42/EC.
Furthermore, all pressure-retaining components comply with Directive 2014/68/EU, Article 4, paragraph 3.
Authorised to compile the technical documentation:
Daniel Lademann, Design Manager
Witten, 2025-09-01
Dr. Andreas Mesch, Technical Manager
Français
Accessories and spare parts
natural_image
Simple line drawing of a shopping cart inside a square frame (no text or symbols)