
MMB6654B - Blender BOSCH - Free user manual and instructions
Find the device manual for free MMB6654B BOSCH in PDF.
| Product type | Blender |
| Brand | Bosch |
| Model | MMB6654B |
| Mixing bowl capacity | 2000 ml (max) |
| Travel mixing bowl capacity | Not exactly specified, but flask included |
| Max hot liquids | 1800 ml in the mixing bowl |
| Maximum food temperature | 70°C in the mixing bowl, 50°C in the flask |
| Number of speeds | Progressive adjustment from min to max, plus Pulse function |
| Automatic programs | Clean, Smoothie, Ice Crush, Hot Soup, Shake, Ice Cream |
| Features | Pusher plunger, ingredient addition during operation, safety lock |
| Safety | Anti-start, overload protection, automatic stop if lid is open |
| Cleaning | Clean program, dishwasher-safe parts (max 60°C) |
| Bowl material | Glass? (not specified, estimated plastic or glass) |
| Included accessories | Mixing bowl, lid with measuring cup, pusher plunger, flask with blade mount, flask lid |
| Dimensions (approx.) | Not specified, approximately 20 x 20 x 40 cm |
| Weight (approx.) | Not specified, approximately 3-5 kg |
| Power supply | Mains, standard plug |
| Cord length | Adjustable, retractable into compartment |
| Spare parts | Available via after-sales service (bowl, lid, blades, seals) |
| Repairability | Repairs by qualified personnel only, original parts |
Frequently Asked Questions - MMB6654B BOSCH
User questions about MMB6654B BOSCH
0 question about this device. Answer the ones you know or ask your own.
Ask a new question about this device
Download the instructions for your Blender in PDF format for free! Find your manual MMB6654B - BOSCH and take your electronic device back in hand. On this page are published all the documents necessary for the use of your device. MMB6654B by BOSCH.
USER MANUAL MMB6654B BOSCH
Register your new device on MyBosch now and get free benefits: bosch-home.com/ welcome

VitaPower Serie | 6
MMB66...
[de] Gebrauchsanleitung Standmixer 9
[en] Information for Use Blender 25
[fr] Manuel d'utilisation Blender 41
[1it] Manuale utente Frullatore 57
[n] Gebruikershandleiding Mixer 73
[da] Betjeningsvejledning Blender 89
[no] Bruksanvisning Blender 104
[sv] Bruksanvisning Blender 119
[fi] Käyttoohje Tehosekoitin 134
[es] Manual de usuario Batidora 150
[pt] Manual do utiliser Triturador 167
[el] Evyεiipio xρηση Mπλεντερ 183
[tr] Kullanim kilavuzu Mikser 200
[p] Instrukcja obslugi Mikser 217
[uk] KepiBnTBo 3 ekPnyataui CtaioHapN 6JeHdep 235
[ru] PynoBIOCTBOIpoJIb3OBaTeH NnKoeP 251
[ar] 269
3
4
6
8
5
7
9
10

11
12
13
14
16


15
17
18
19
20
21
22
23
24
25
26
27
28
29
| MIN-MAX | 00:00 | ||||
| 60% + 40% | √ | √ | 350 - 2000 g | Smoothie | |
| 70% + 30% | √ | √ | 350 - 2000 g | Smoothie | |
| 40% + 60% | √ | √ | 350 - 2000 g | Smoothie | |
| 60% + 40% | √ | √ | 350 - 2000 g | Smoothie | |
| 40% + 60% | √ | √ | 350 - 2000 g | Shake | |
| <70°C | √ | X | 350 - 1800 g | Shake | |
| √ | X | 600 g (3m) - 1200 g (6m) | Hot Soup | ||
| 60% + 40% | √ | √ | 350 - 2000 g | max | |
| <50°C | √ | √ | 350 - 1500 g | max | |
| X | √ | 600 - 1000 g | Ice Cream | ||
| √ | X | (5 - 10) x 10 g | Ice Crush | ||
| 21-25°C | √ | X | min/max 2 x ○ | min | |
| 180°C 10 min | X | √ | 400 - 700 g | max | |
| √ | X | 200 - 1000 g | max | ||
| √ | X | 100 - 1000 g | max | ||
| √ | X | min/max 200 g | min | ||
| min | |||||
| max | |||||
| 1cm | √ | X | min/max 200 g | max |
31
| 1x1 cm + → | MIN-MAX | 00:00 | |
| 60% + 40% | 200 - 500 g | Smoothie | 1 - 2 x |
| 70% + 30% | 200 - 500 g | Smoothie | 1 - 2 x |
| 40% + 60% | 200 - 600 g | Smoothie | 1 - 2 x |
| 60% + 40% | 200 - 600 g | Smoothie | 1 - 2 x |
| 40% + 60% | 200 - 600 g | Shake | 1 - 2 x |
| 60% + 40% <50°C | 200 - 600 g | max | 45 - 60 s |
| (2 - 4) x 10 g | Ice Crush | 1 x |
Further information and explanations are available online:

Table of contents
1 Safety 26
1.1 General information 26
1.2 Intended use 26
1.3 Restriction on user group..... 27
1.4 Safety instructions 27
2 Avoiding material damage. 30
3 Environmental protection and saving energy 30
3.1 Disposing of packaging 30
4 Unpacking and checking 30
4.1 Unpacking the appliance and parts 30
4.2 Scope of delivery 30
4.3 Setting up the appliance 30
5 Familiarising yourself with your appliance. 31
5.1 Appliance 31
5.2 Symbols 31
5.3 Rotary switch 31
5.4 Control panel 31
5.5 Standby 32
5.6Programme buttons.. 32
5.7 Safety systems 32
6 Basic operation 32
6.1 Preparing the blender jug and appliance 32
6.2 Using the manual speed setting 33
6.3 Using pulse function 33
6.4 Using programmes 33
6.5 Using the pusher 33
6.6 Adding more ingredients 33
6.7 Emptying the blender jug..... 34
6.8 Processing food using the To-Go blender jug 34
6.9 Placing the lid on the To-Go blender jug 34
7 Cleaning and servicing. 34
7.1 Cleaning products 35
7.2 Overview of cleaning 35
7.3 Using cleaning programme..... 35
7.4 Preparing for cleaning 35
8 Application examples 35
8.1 Retrieve more recipes 37
9 Troubleshooting 38
10 Transportation, storage and disposal 40
10.1 Disposing of old appliance ... 40
11 Customer Service 40
11.1 Product number (E-Nr.) and production number (FD) 40

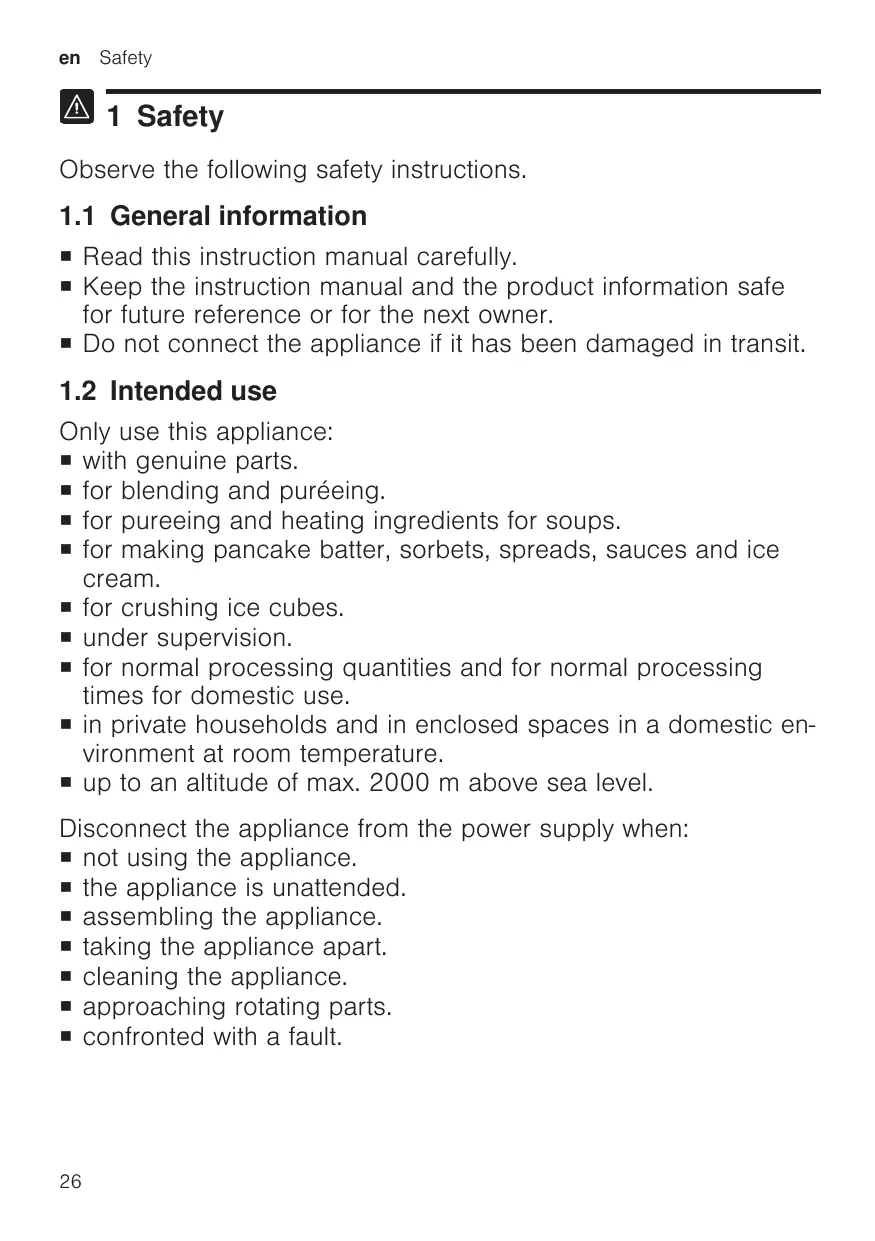
1 Safety
Observe the following safety instructions.
1.1 General information
- Read this instruction manual carefully.
- Keep the instruction manual and the product information safe for future reference or for the next owner.
- Do not connect the appliance if it has been damaged in transit.
1.2 Intended use
Only use this appliance:
with genuine parts.
for blending and puréeing.
for pureeing and heating ingredients for soups.
■ for making pancake batter, sorbets, spreads, sauces and ice cream.
for crushing ice cubes.
under supervision.
- for normal processing quantities and for normal processing times for domestic use.
- in private households and in enclosed spaces in a domestic environment at room temperature.
up to an altitude of max. 2000 m above sea level.
Disconnect the appliance from the power supply when:
not using the appliance.
the appliance is unattended.
assembling the appliance.
taking the appliance apart.
- cleaning the appliance.
approaching rotating parts.
confronted with a fault.
1.3 Restriction on user group
This appliance can be used by persons with reduced physical, sensory or mental capabilities or a lack of experience and/or knowledge if they have been given supervision or instruction concerning use of the appliance in a safe way and if they understand the hazards involved.
Do not let children play with the appliance.
Cleaning and user maintenance must not be performed by children.
The appliance must not be used by children. Keep children away from the appliance and power cable.
1.4 Safety instructions
WARNING - Risk of electric shock!
If the appliance or the power cord is damaged, this is dangerous.
- Never operate a damaged appliance.
- Never operate an appliance with a cracked or fractured surface.
- Never pull on the power cord to unplug the appliance. Always unplug the appliance at the mains.
- If the appliance or the power cord is damaged, immediately unplug the power cord or switch off the fuse in the fuse box.
Call customer services. Page 40
Incorrect installation is dangerous.
- Connect and operate the appliance only in accordance with the specifications on the rating plate.
Improper repairs are dangerous.
- Repairs to the appliance should only be carried out by trained specialist staff.
- Only use genuine spare parts when repairing the appliance.
- If the power cord of this appliance is damaged, it must be replaced by the manufacturer, the manufacturer's Customer Service or a similarly qualified person in order to prevent any risk.
An ingress of moisture can cause an electric shock.
- Never immerse the appliance or the power cord in water or clean in the dishwasher.
- Only use the appliance in enclosed spaces.
en Safety
- Never expose the appliance to intense heat or humidity.
- Do not use steam- or high-pressure cleaners to clean the appliance.
If the insulation of the power cord is damaged, this is dangerous.
- Never let the power cord come into contact with hot appliance parts or heat sources.
- Never let the power cord come into contact with sharp points or edges.
- Never kink, crush or modify the power cord.
WARNING - Risk of fire!
Intense heat may cause the appliance and other parts to catch fire.
- Never place the appliance on or near hot surfaces.
WARNING - Risk of scalding!
Hot food may splash out during processing and steam can escape from the lid.
- Add a maximum of 1800 ml of hot or frothing food.
Be careful when processing hot food.
Do not lean over the appliance. - Do not process food that is hotter than 50^ C in the To-Go blender jug.
- Be careful if hot liquid is poured into the blender as it can be ejected out of the appliance due to a sudden steaming.
- Do not process food that is hotter than 70^ C in the blender jug.
WARNING - Risk of injury!
Operating the appliance with damaged parts may result in injury.
- Parts which show cracks or other damage or do not fit correctly must be replaced with genuine spare parts.
Improper use may cause injuries. - Only use the appliance once it is fully assembled.
WARNING - Risk of cutting!
The blender knife has sharp blades.
-
When cleaning and emptying the blender jug, watch out for the sharp blades.
-
Never touch the edges of the blades with bare hands.
WARNING - Risk of suffocation!
Children may put packaging material over their heads or wrap themselves up in it and suffocate.
- Keep packaging material away from children.
- Do not let children play with packaging material.
Children may breathe in or swallow small parts, causing them to suffocate.
- Keep small parts away from children.
- Do not let children play with small parts.
WARNING - Risk of harm to health!
Soiling on surfaces may be harmful to health.
Follow the cleaning instructions.
- Clean surfaces which come in contact with food before each use.
2 Avoiding material damage
ATTENTION!
Improper use may cause material damage.
- Do not operate the appliance at no-load.
- Do not exceed maximum processing quantities.
- Never use the blender jug in the microwave or oven.
Before use, check the blender jug for foreign objects and remove. - Do not insert any objects in the blender jug except the pusher, e.g. knife or spoon.
- Never expose the blender jug to temperatures above 80^ C .
3 Environmental protection and saving energy
3.1 Disposing of packaging
The packaging materials are environmentally compatible and can be recycled.
- Sort the individual components by type and dispose of them separately.
4 Unpacking and checking
Find out here what you need to note when unpacking the appliance.
4.1 Unpacking the appliance and parts
- Take the appliance out of the packaging.
- Take all other parts and the accompanying documents out of the packaging and place them to hand.
- Remove any packaging material.
- Remove any stickers or film.
4.2 Scope of delivery
After unpacking all parts, check for any damage in transit and completeness of the delivery.
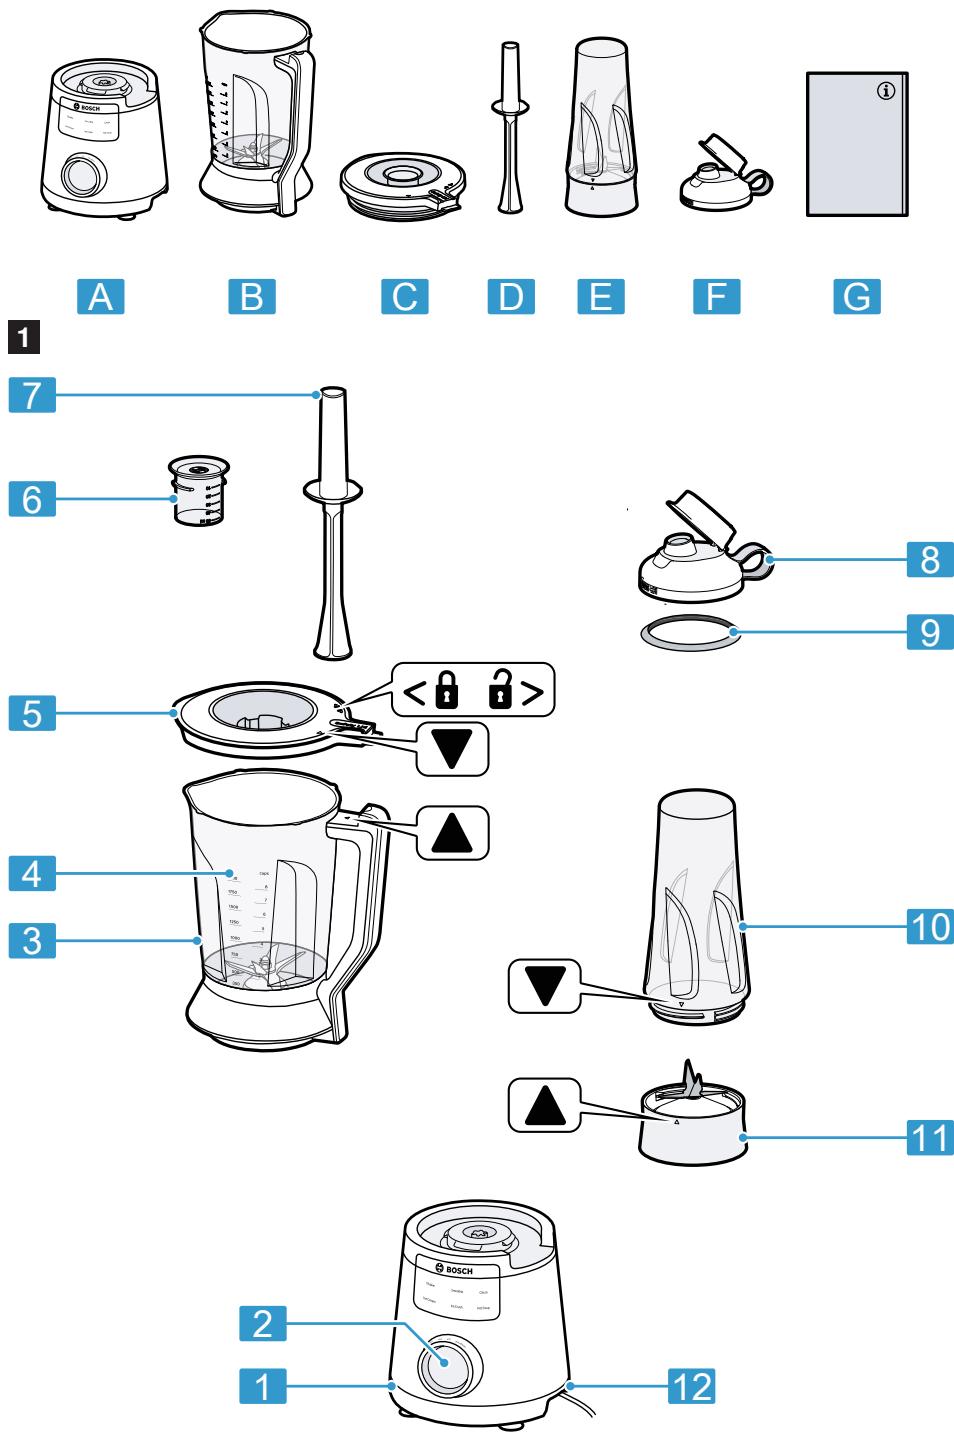
$$ \rightarrow \text {F i g .} 1 $$
A Main unit
B Blender jug
C Lid and measuring cup
D Pusher
E To-Go blender jug with blade insert
F Lid with seal and closable mouthpiece
G User manual
1 Depending on the appliance specifications
4.3 Setting up the appliance
- Place the appliance on a stable, level, clean and flat work surface.
-
Adjust the power cable to the required length.
-
To shorten the cord, push it into the cord storage compartment.
-
To lengthen the cord again, pull it out of the cord storage compartment.
-
Do not insert the mains plug.
5 Familiarising yourself with your appliance
5.1 Appliance
You can find an overview of the parts of your appliance here.
Fig. 2
| 1 | Main unit |
| 2 | Rotary switch |
| 3 | Blender jug |
| 4 | Scale |
| 5 | Lid with filling opening |
| 6 | Measuring cup |
| 7 | Pusher |
| 8 | Lid with closable mouthpiece¹ |
| 9 | Seal¹ |
| 10 | To-Go blender jug¹ |
| 11 | To-Go blade insert¹ |
| 12 | Power cord storage compa- ment |
1 Depending on the appliance specifications
Note: If an accessory is not included in the scope of supply, it can be ordered from customer service.
5.2 Symbols
You can find an overview of the symbols used on your appliance here.
| Symbol | Explanation |
| ▲▼ | Position markings |
| 3> | Open locking mechanism. |
| Symbol | Explanation |
| <\bigtriangleup> | Close locking mechanism. |
| max 80°C | Never expose the blender jug to temperatures above 80 °C. |
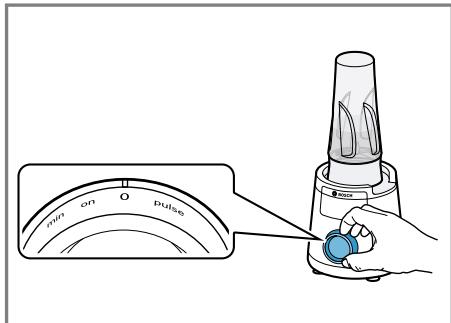
5.3 Rotary switch
The rotary switch is used to start and stop processing and select the speed.
| Symbol | Description |
| 0 | Switch off the appliance. |
| on | Switch on the appliance. |
| min | Lowest speed: Emulsifying and processing food that should not be blended too fine. |
| max | Highest speed: Blending, puréeing and frothing food. |
| pulse | Instantaneous switching (pulse function): Highest speed as long as the rotary switch is held in this position. |
Tip: You can adjust the speed steplessly between min and max.
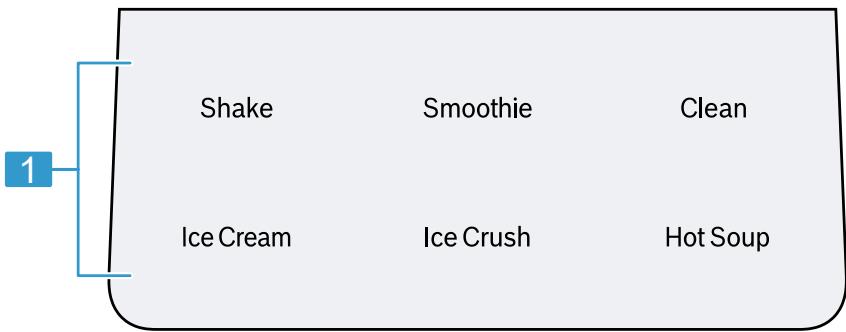
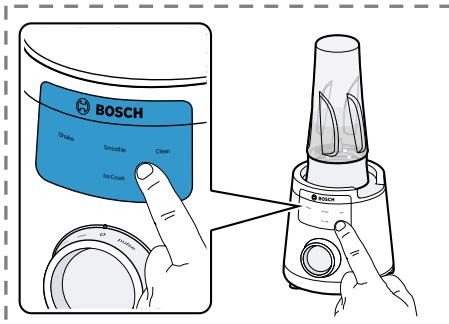
5.4 Control panel
The control panel allows you to use certain functions of your appliance. Only the programs that are suitable for the accessory light up in the control panel.
Note: If the touch display is wet or soiled, this can restrict functioning.
→Fig. 3
1 Programme buttons
5.5 Standby
If the rotary switch is set to on and you do not operate the appliance, your appliance will enter standby after 10 minutes. The control panel is not illuminated on standby. Operating the appliance will end standby, e.g. touch the control panel, turn the rotary switch or open/close the lid.
5.6 Programme buttons
When you switch on the appliance, only the program buttons available for the relevant accessory will light up.
| Program: Function | |
| Clean | Precleaning blender jug. |
| Smoothie | Making smoothies. |
| Ice Crush | Chopping ice cubes. |
| Hot Soup | Making soups. |
| Shake | Preparing milkshakes and protein shakes. |
| Ice Cream | Making ice cream and sorbets. |
Notes
- For blending dry fruits, fibrous foodstuffs or seeds use Smoothie program.
- With Hot Soup program the ingredients heat up during high-speed blending.
5.7 Safety systems
You can find an overview of your appliance's safety systems here.
Start lock-out
Start lock-out prevents your appliance from being switched on accidentally.
You can switch on and operate the appliance once the blender jug has been correctly positioned.
Overload protection
The overload protection system prevents the motor and other components from being damaged through being overloaded.
6 Basic operation
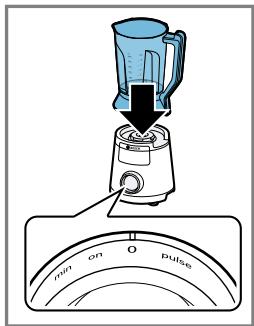
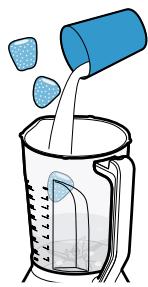
6.1 Preparing the blender jug and appliance
- Prepare the food, e.g. cut up large items of food into pieces.
- Set the rotary switch to 0.
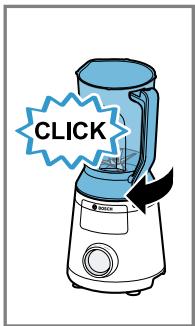
- Place the blender jug on the main unit and rotate clockwise until it engages. Fig. 4
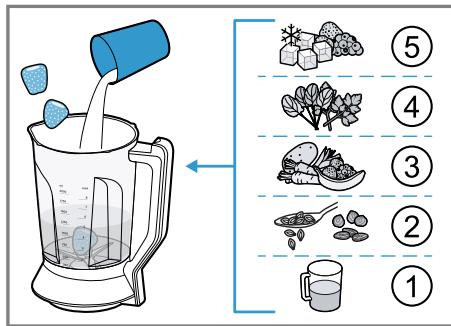
- Add the food to the blender jug.
Fig. 5
Never fill the blender jug above the 2000 ml mark.
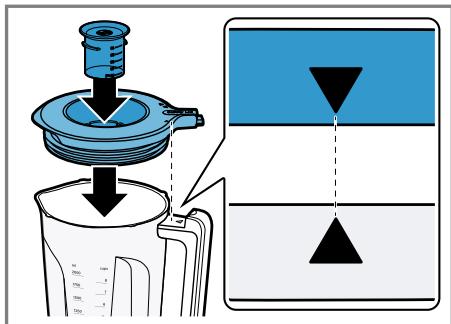
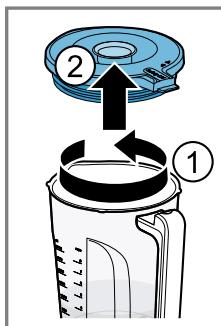
- Insert the measuring cup in the lid and place the lid on the blender jug.
Fig. 6
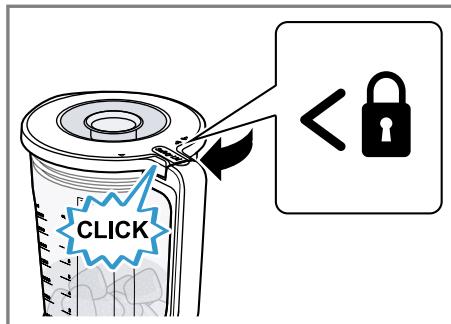
The and markings must match up. - Turn the lid in the direction < until it clicks into place.
→ Fig. 7
The lid must be completely closed. - Insert mains plug.
6.2 Using the manual speed setting
Requirement: Blender jug and appliance are prepared.
"Preparing the blender jug and appliance", Page 32
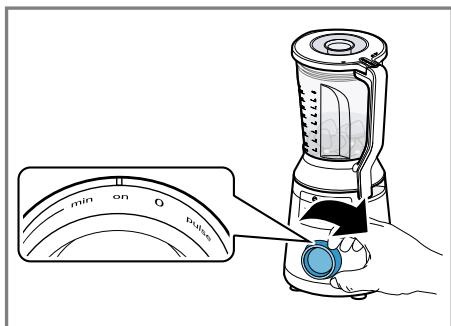
- Set the rotary switch to on.
Fig. 8 - The control panel lights up and the appliance is ready for operation.
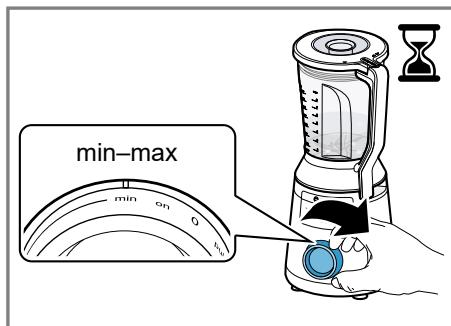
- Set the rotary switch to the recommended speed.
Fig. 9 - Process the ingredients until you achieve the required result.
Tip: In order to prevent unwanted heating of food, process the ingredients for a shorter time or at a lower speed.
- To end operation, set the rotary switch to 0.
Fig. 10
6.3 Using pulse function
Requirement: Blender jug and appliance are prepared.
"Preparing the blender jug and appliance", Page 32
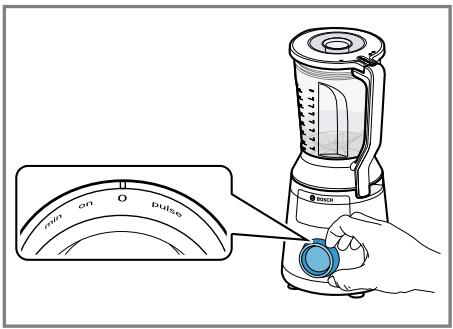
- Set the rotary switch to pulse and hold it there.
Fig. 11 - The ingredients are processed at maximum speed.
- Release the rotary switch.
The rotary switch jumps to 0.
Processing stops.
6.4 Using programmes
Requirement: Blender jug and appliance are prepared.
"Preparing the blender jug and appliance", Page 32
- Set the rotary switch to on.
→Fig. 8
-
The control panel lights up and the appliance is ready for operation.
-
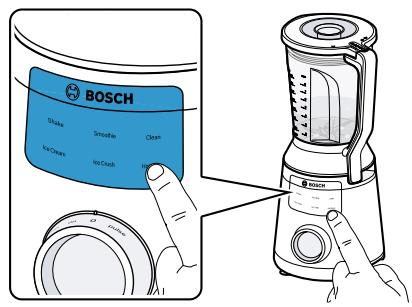
Press the required programme button.
Fig. 12
-
Wait until the appliance stops.
-
To end operation, set the rotary switch to 0.
Fig. 10
Tip: To pause the program, press the program button. To continue processing, press the program button again.
To stop the program prematurely, either press the selected program button for 3 seconds or set the rotary switch to 0.
6.5 Using the pusher
- Remove the measuring cup and insert the pusher into the filling opening.
Fig. 13 - Push the food down.
Fig. 13
6.6 Adding more ingredients
- During processing, remove the measuring cup and add the ingredients through the opening in the lid.
Fig. 14 - To add greater quantities of ingredients, open the lid during processing.
- The appliance pauses.
- Add the ingredients.
Fig. 15 - Close the lid and continue processing.
en Cleaning and servicing
At manual speed setting, the appliance automatically continues processing.
To continue processing when using a program, press the program button.
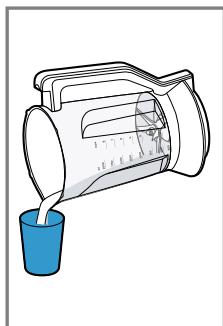
6.7 Emptying the blender jug
Requirement: The appliance has stopped.
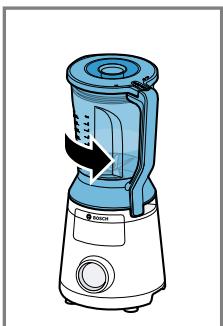
- Turn the blender jug anticlockwise and remove it from the main unit. Fig. 16
- To pour out the processed food, remove the lid. Fig. 17
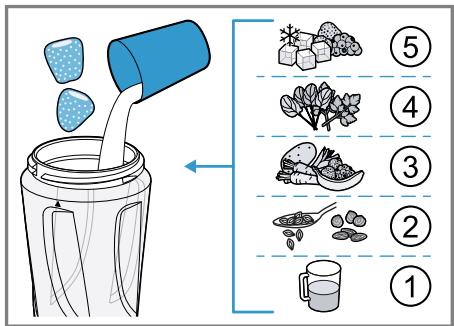
6.8 Processing food using the To-Go blender jug
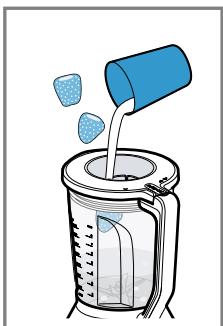
- Prepare the food.
For example, cut large items of food into pieces.
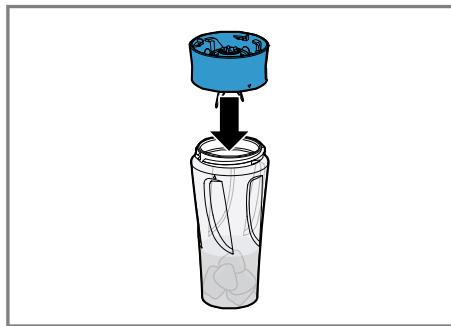
- Add the food to the To-Go blender jug.
$$ \rightarrow \text {F i g .} \quad 1 8 $$
Observe the minimum and maximum processing quantities.
- Place the To-Go blade insert on the To-Go blender jug. Fig. 19
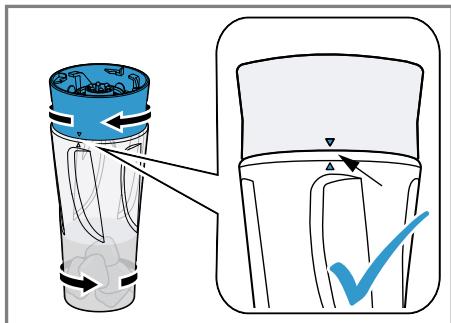
- Screw the To-Go blade insert and the To-Go blender jug in tightly.
$$ \rightarrow \text {F i g .} \quad 2 0 $$
- The and markings must match up.
-
You can only connect the To-Go blade insert to the main unit when the To-Go blender jug is screwed on fully.
-
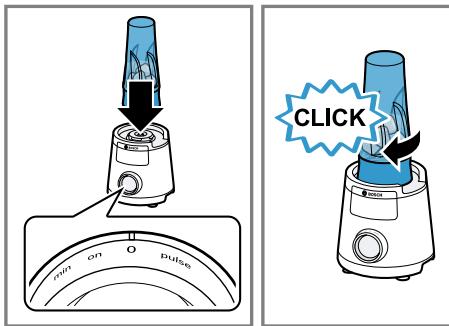
Set the rotary switch to 0.
- Turn the To-Go blender jug upside down.
$$ \rightarrow \text {F i g .} \boxed {2 1} $$
-
Place the To-Go blade insert on the main unit and rotate it in a clockwise direction until it locks into place. Fig. 21
-
Insert mains plug.
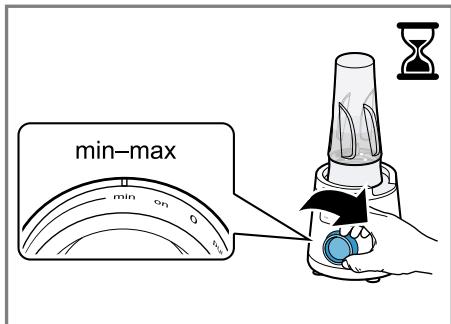
- Set the rotary switch to the recommended speed or use a program.
$$ \begin{array}{c}\rightarrow F i g.\\rightarrow F i g.\end{array}\begin{array}{c}2 2\2 3\end{array} $$
- Process the ingredients until you achieve the required result.
- To end operation, set the rotary switch to 0. Fig. 24
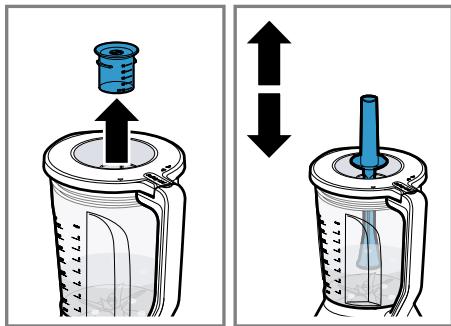
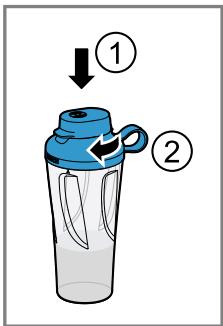
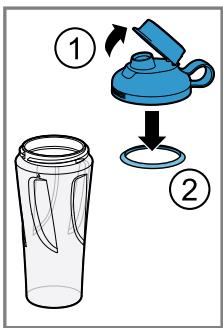
6.9 Placing the lid on the To-Go blender jug
Requirement: The appliance has stopped.
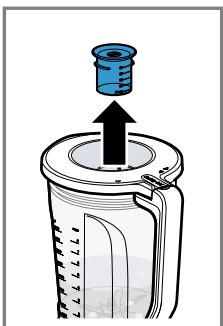
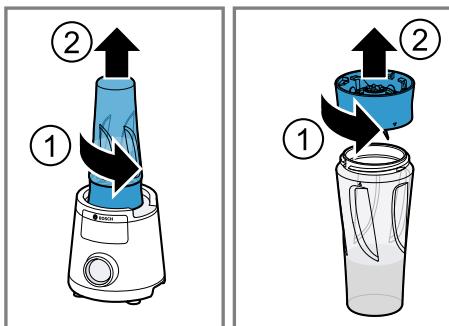
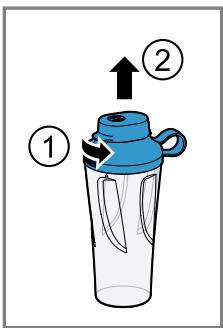
- Turn the To-Go blender jug anticlockwise and remove it from the main unit. Fig. 25
- Turn the To-Go blender jug and unscrew the To-Go blade insert. Fig. 25
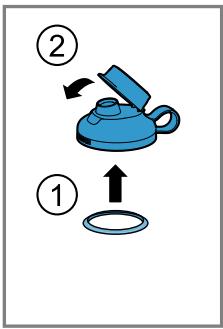
- Insert the seal for the lid. Fig. 26
- Close the mouthpiece on the lid. Fig. 26
- Screw the lid and the To-Go blender jug in tightly. Fig. 26
7 Cleaning and servicing
To keep your appliance working efficiently for a long time, it is important to clean and maintain it carefully.
7.1 Cleaning products
Find out here which cleaning products are suitable for your appliance.
ATTENTION!
Using unsuitable cleaning agents or incorrect cleaning may damage the appliance.
- Do not use cleaning agents containing alcohol or spirits.
- Do not use sharp, pointed or metal objects.
- Do not use abrasive cloths or cleaning agents.
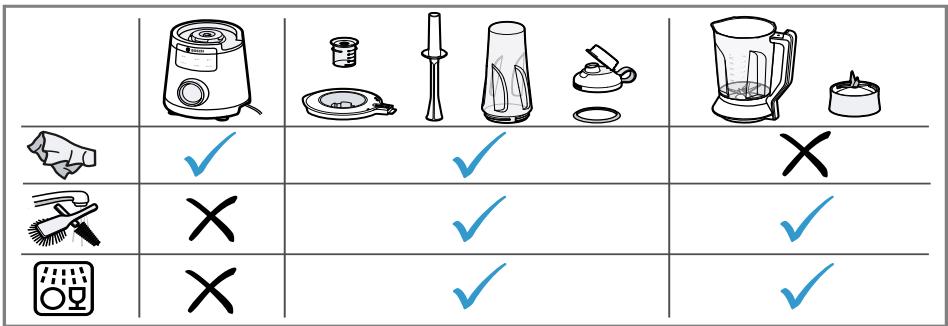
7.2 Overview of cleaning
Clean all parts immediately after use so that residues do not dry on.
ATTENTION!
Some parts may be damaged if they are put in a dishwasher.
- Only put dishwasher-safe parts in the dishwasher.
- Only use programmes that do not heat the water above 60^ C .
- Do not wedge plastic parts in the dishwasher.
Clean the individual parts as indicated in the table.
$$ \rightarrow \text {F i g .} \boxed {2 7} $$
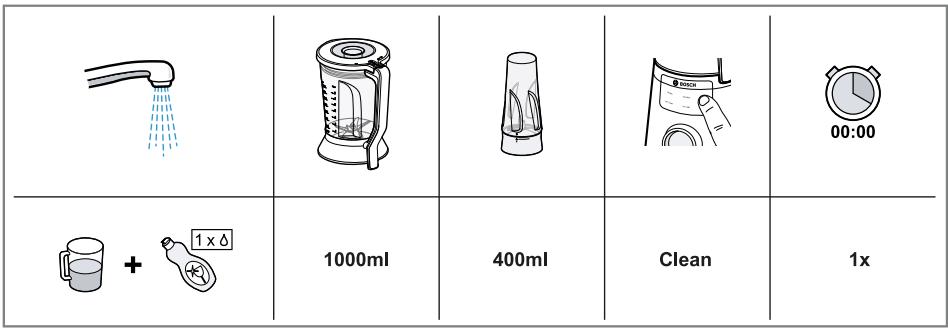
7.3 Using cleaning programme
You can use the cleaning programme to preclean the blender jug and the blade insert.
- Follow the cleaning instructions in the table.
$$ \rightarrow \text {F i g .} \boxed {2 8} $$
-
Dispose of the cleaning fluid.
-
The most stubborn food residues are removed.
- Clean the parts.
7.4 Preparing for cleaning
Separate the assembled parts before cleaning.
ATTENTION!
Improper handling may damage the blades or the surface.
- Never set the blade insert down with the blade facing downwards.
$$ \rightarrow \text {F i g .} \boxed {2 9} - \boxed {2 9} $$
8 Application examples
Always observe the maximum quantities and processing times in the tables. When processing the maximum quantity, use the maximum recommended time.
Fig. 30
Fig. 31
Fig. 32
Note
Restrictions on processing in the blender:
It is only possible to mix spreads, such as peanut butter, coconut butter or nut spreads, with the pusher.
- Mayonnaise can only be made with 2 whole eggs.
Use enough liquid when mixing solid food.
en Application examples
- Mix powdered food with sufficient liquid before blending, or dissolve it entirely in liquid. Examples of
powdered food include icing sugar, cocoa powder, roasted soybeans, flour, protein powder.
| Baklava | 1000 g Chopped walnuts 1 tsp Cinnamon 6 tbsp Sugar 350 g Butter 1500 g Filo pastry 1250 g Sugar 1000 ml Water | Sugar syrup: Add 1250 g of sugar to the blender jug. Blend sugar for 15 seconds at level max. Add water and blend for 5 seconds at level max. Processing: Mix the chopped walnuts with 6 tbsp sugar and 1 tsp cinnamon. Melt the butter. Grease a 33 x 40 cm baking dish with melted butter. To create a stable base, stack 8 layers of filo pastry on top of each other and spread butter in between the layers. Sprinkle with 1/2 of the walnut mixture. Cover with 2 layers of filo pastry, brush each layer with butter, then sprinkle on the walnut mixture. Repeat this process a few more times, until the walnut mixture is used up. Cover with another 4 layers of filo pastry and brush each layer with butter. Cut the baklava into diamonds or squares down to the bottom of the baking dish. Bake for 10 minutes at 200 °C, then bake for 80 minutes at 150 °C until the baklava is golden yellow and crispy. Take the baklava out of the oven and immediately pour the sugar syrup over it. Leave to cool before serving. |
8.1 Retrieve more recipes
To retrieve more recipes online, scan the following QR code.

9 Troubleshooting
You can rectify minor faults on your appliance yourself. Read the troubleshooting information before contacting after-sales service. This will avoid unnecessary costs.
WARNING
Risk of electric shock!
Improper repairs are dangerous.
- Repairs to the appliance should only be carried out by trained specialist staff.
- Only use genuine spare parts when repairing the appliance.
- If the power cord of this appliance is damaged, it must be replaced by the manufacturer, the manufacturer's Customer Service or a similarly qualified person in order to prevent any risk.
| Fault | Cause and troubleshooting |
| The appliance is not working. | The mains plug of the power cord is not plugged in. ► Connect the appliance to the power supply. |
| The circuit breaker in the fuse box has tripped. ► Check the circuit breaker in the fuse box. | |
| There has been a power cut. ► Check whether the lighting in your room or other appliances are working. | |
| The lid or blender jug are not locked or were removed during processing. 1. Place the blender jug on the main unit and turn clockwise until it engages. 2. Turn the lid in the direction <θ until it engages. | |
| To-Go blade insert is not locked into place. ► Place the To-Go blender jug with the To-Go blade insert onto the main unit and rotate in a clockwise direction until it locks into place. | |
| Programme was cancelled using the rotary switch. ► Set the rotary switch to 0. | |
| Appliance has a humming sound. | The blade is blocked or stiff. ► Set the rotary switch to 0. ► Remove the blockage. |
| Appliance switches off during use. | Processing quantity is too big or processing time was too long. • Disconnect the appliance from the electricity. • Set the rotary switch to 0. • Reduce the processing quantity. • Allow the appliance to cool down to deactivate the overload protection device. |
| The programme does not start. | The rotary switch is not set to on. • Set the rotary switch to on. |
| The assembled To-Go blender jug cannot be placed on the main unit. | To-Go blade insert is not screwed on correctly and the safety catch prevents it from being put on. • Screw the To-Go blade insert and the To-Go blender jug in by turning them in a clockwise direction. • The To-Go blender jug and To-Go blade insert are fully and tightly screwed in. • The ▼ and ▲ markings match up. |
| Lid on To-Go blender jug is leaking. | Seal is missing from the lid. • Insert the seal. |
10 Transportation, storage and disposal
10.1 Disposing of old appliance
Valuable raw materials can be reused by recycling.
- Unplug the appliance from the mains.
- Cut through the power cord.
- Dispose of the appliance in an environmentally friendly manner.
Information about current disposal methods are available from your specialist dealer or local authority.

This appliance is labelled in accordance with European Directive 2012/19/EU concerning used electrical and electronic appliances (waste electrical and electronic equipment - WEEE). The guideline determines the framework for the return and recycling of used appliances as applicable throughout the EU.
11 Customer Service
Function-relevant genuine spare parts according to the corresponding Ecodesign Order can be obtained from Customer Service for a period of at least 7 years from the date on which your appliance was placed on the market within the European Economic Area.
Note: Under the terms of the manufacturer's warranty the use of Customer Service is free of charge.
Detailed information on the warranty period and terms of warranty in your country is available from our after-sales service, your retailer or on our website.
If you contact Customer Service, you will require the product number (E-Nr.) and the production number (FD) of your appliance.
The contact details for Customer Service can be found in the enclosed Customer Service directory or on our website.
11.1 Product number (E-Nr.) and production number (FD)
You can find the product number (E-Nr.) and the production number (FD) on the appliance's rating plate.
Make a note of your appliance's details and the Customer Service telephone number to find them again quickly.
Sécurité anti-surcharge
WAARSCHUWING - Kans op letsel!
WAARSCHUWING - Kans op verstikking!
6 General betjening. 96
ADVARSEL – Brandfare!
6.5 Anvendelse at stopper
7.4 Klargjore for rengjoring
Ta fra haverandre monterte deler f-ro rengjoring.
OBS!
Ukyndig händtering kan skade eggene eller underlagsflaten.
1 Allt after apparatens utrusting
1 Allt after apparatens utrusting
- Vrid locket at < , tills det snapper fast.
$$ \rightarrow \text {F i g .} 7 $$
1.1 Advertencias de character general
1.4 Yπoδεiξεις ασφαλειας
A IPOEIANOIOIHSH - Kivouo nEkTponaIac!
Mia ouokeuñ ñ eva kaλωdio ouvδeongc nou exouv unooTei ζημia εIvai επikivovα.
Mn I toupyeite note uia ouokenu nou exi unoetie zmuia.
Mn Ieitoupyeite Tote mia ouokcun e payioevn n oiaouevn EIN- ^ via.
MnV TpaβaTE IOTe TO kaλδIO OuvδεoNc, VIA VA aIIOOuvδεoEe Tn OuaKεuñ aIIO ToI Diktuo Tou pεUμaTOc. TpaβaTE IAVTOTE TO φιC Tou Kαλδoiou OuvδεoNc.
OTav n ouokεun n To kαλδio ouvδεοnc exei ζημia, TpaβnξTe αεωc To φις Tou kαλωδiou ouvδεοnc n KατεβαoTE Tnv αφαλεiα OTO KβwTIO TWV ασφαλεiωv.
Kαλεστηνιπρεοία εξυπρετησός πελατών. → Σελίδα 199
Oi un eVdEeiyuevEc ykataoataoeic ivai EpiikivduvEc.
SuvoTe kai xpooiopoieiTn ouoku n ovo ouoawva t a 0toixia Tou avaepovtai OTNV IVAKiD a tuou.
Oi akataaanae c eiokeuec ivai epiikivduvc.
81739 Munchen, Germany
www.bosch-home.com
- YnCTaHn i cnpoXHIOUOn yauSy 6JeHepa, 3BaJaIte Ha roctpi Je3a.
Hikon He TopkaTeca Iez roIpyu.
yBArA! - He6e3peKa yDyuShenHn!
Tyt Bn Di3HaTeC, Jkux npaBnI CJIiDIOtpmYBaTnC, PO3naKOByOuN PrnilaI.
4.1 Po3naKOBvBaHnЯ npHJaNy n DeTaJIeN
- BnIMiTb npinad 3 ynaKOBkn.
- BnmiTb 3 ynpaKOBKn PiIroTuYnte BcI DoJaTkoBi DeTaIi N cynpoBIDHy DOKyMeHTaCiIO.
- 3Himitb HaBnI NaKyBaIbHn MaTepiAn.
- 3HIMITb HaBHi HAcJIeIKn Ta NIIbKN.
4.2 KomnjeKT NOCTABKN
IicIpaO3naKaYBaHHnepeBipTe, uKOMnJIeKT NOBHN i uH He NIOuKOJINo RaKiCb YactHNI niD qac TpaHCnpOpTyBaHHa.
→ Man. 1
3axnct Bi nepeBaHTaKeHHA
3axnCT BiD nepeBaHTaKeHHrae N0WKoJKeHHIO DBNrHyNa iHUnx UactINupe3 3aBnCOke HaBaHTaKeHH.
6 OchoBhi BiDomocTi npo KopnctyBaHHa
He 3aNoBnIOIte yauSy 6JeHepa nOHaI nO3HaKy 2000 mI.
- BCTaBTe B KpUShKy MIPHy CkJIaHKy Ta BCTaHOBITb KpUShKy Ha YaShy 6JeHdepa.
→MaJI. 6
I03HaUKn i MaHb po3TaUyBaTnCn OJHa HABnPoTn OJHOi. - ПовернiTь кршky у наразмку <До Фikcaцii.
→MaJI. 7
Kpnska Mae 6ytn NOBHicTIO 3aKpnTa. - BCTaBTe ⅢTeIeCJIbHy BnIKy B po-3ETky.
6.2 Викорисанна ручноpeгуларopaшвдковостi
BHMora: Yasha 6JIeHepa I npnlaI niIroTOBJIeHI.
6.3 3acToCyBaHHa MoMeHTaJIbHOrO BBIMKHeHHa
Bmora: Yasha 6JIeHepa I npnlaI niIroTOBneHi.
Bmora: Yasha 6JIeHepa I npnaI nnroTOBneHi.
6.5 BnKOpncTaHHaTObXaUa
- BnIMiTb MIPHy CkJIHky Ta BCTaBTe ⅢTOBxAu y 3aBaHTaJxUyBaIbHnI OTBip. →MaI. 13
- ПpoштOBxунTe поДуКТи BHN3. →MaJ. 13
6.6 DojaBaHnI iHrpeJeHTiB
1.ПдчacпгOTOBиВиMiTbМiPHyCKлЯнкуТаДоJaNTeiHpeDiEHTuYepe3OTBipyKpNiUci.→MaI. 14
2. Σοδ Σοδατην Bελικу KijlbкICTb iHrpeiεntiB, BiДuHHTb KpNiшky πiД уac oБрбкИ.
Пилад пиЗунНь роботу.
3. 3aBaHTaXTe iHrpeDiEHTN. → Man. 15
4. 3aunHITb KpnsKv BIDHOBITb obo6ky. Y pa3i puHoro peYIIOBaHHa WBN-IdKoCTi npJIAu BiHOBtB obo6ky ABTomatnHo. UoB biHOBtN obo6ky B pa3i BuKOpNCtAHnOdHiEi 3 npOrpaM, HATINCHiTb BiIOBIDHy KHONKy pO-rgpamn.
6.7 CnpoJHHeHHaushi 6JIeHepa
Bmora: Pnpiaad 3ynnHBCa.
9 YcyHeHHa HeCnpaBHOCTeH
He3NaHHi HeCnpaBHOCTI npnlaNy moKHa yCyBaTn BlnachOpyu. Nepu HiX 3BeptaTnca Do cepBicHOi Cnyk6n, CKOpNCtaTecr BiIOMOCTAmN IpO yCyHeHHr HeCnpaBHOCTe. TaK MoKHa yHNKHyTN 3aIBNX BNtpaT.
YBATA!
He6e3neKa ypaXeHH eNeKTpHuHm cTpyMOM!
PemOHTIpoBOTN, BnKoHaHI HeHaJIeXHIM YINOM, MOKyTb CklaIaTNI He6e3IeKy IJN KOpNCtUBaVa.
- PemOHtYBaTn npuJa dO3BOLHeo TiIbKn faxiBzM.
-Для ремоHTу пиладу ДОЗВОЛЯЕТСВИКОПИСТОВУВАТИ ЛИше opигIHальни занчacTNH.
yHnKHyTN He6e3neK, y pa3i nOuKoJKeHHKa6eJIIO KINBHeHHa bOTo npIaNy Ioro 3amHy MaE BnKOHyBaTn BnPo6HnK, cepBicHn CHTp a60 ocOba 3 BiIDNoBIDHOU KBaJIiΦiKauiieIo.
I P E D U N P E X J D E H N E - O n a c h o c t b B 0 3 r o p a n h y!
He noDnyscKaIe Te DeTeK ypaKOBoHOMy MaTePnAly.
He no3BolnyTe DeTm nIgpaTb C yPaKOBouHbIM MaTePnaJIoM.
IeTN MOryT BdoXHyTb IIN IpOrlOTnTb MeJkHe JeTaJIH, B pe3yJIbTaTe ueTo 3aDOxHyTbcra.
He noDnyscakaiTe DeTeK MeKIM DeTaJAM.
He nO3BOLJIte DeTm INrpaTb C MeJKNIMn DeTaJIaMn.
I P E D U N P E X J D E H N E - P n c k h a n e c e n i r B p e d a 3 n o p o b b l o!
3aRpa3HeHnHa NOBepxHOCTX MOryT PpeDcTaBnTb ONaCHOCTb DnA 3doPoBb.
4.2 KomnJIeKT nOCTaBKN
Iocne paacnakOBKn npOBepbTe Bce DeTaJIH Na OTCyTCTBVe TpaHCnOpTHbIX NOBpeKdEHHa TaKHe KOMNJIeKTHOcTB NoCTaBKn.
→Pnc.1
Ecn 6IeHep yCTaHOBHe npaBnIbHo, ycTpoIcTBo MOJHo BkJIIOHTb I NcNoJIb3OBaTb.
3aunTa OT neperpy3KN
3aunTa oT nepeRpy3Kn npenrTCTByeT NOBpeKdEHHO 3NeKTPoMoTopa NdpyIcx KOMnHOHeTOB BcneDCTBnE CInuKOM BbICOKo Harpy3Kn.
6 CtaHdapThoe ynpaBneHne
Tpe6oBaHne: ChaHa 6IeHepa n np6op NOIroTOBHeHbI.
"PtoIroTOBka yaun 6JIeHepa n npIbopa", CtpaHnca 259
- YctaHOBHTe NOBOPHTbI NpeKJIouaTeNb Ha on.
→Pnc.8
PaHEnb ynpaBneHnCBeTHTcN np6Op roTOB K paOte.
2. YctaHOBInTe IOBOpTHbI IpeKeKIIouaTeJIb Ha peKOMeHdyEmyIO CKOpocTb.
→Pnc.9
- NpepeabaBaiTe INHpreDneHTbI Do noIyueHnJKeJaEMOro pe3yNbTaTata.
PekomeHdau:UTo6bI N36eKaTb He-KeJateJIbHOrO HarpeBaHH npOdyKTOB, nepepa6aTaBbAte INHrpeJeNHTb HE TaK DoJIo HnHa 60Jee Hn3KoK CKOpocTH.
4.Длзавершени ржима певебиповоротьпегеклочаелв поожене 0.
Pnc. 10
6.3 Исpenьзоване мomen-TaibHOrO BKJIQUOHeHnA
Tpe6oBaHne:Ua7a 6IeHepa n np6bop NOdrotOBJIeHbl.
"PojrotoBka yaun 6JIeHepa n npbopa", Ctrpauca 259
- YctaHOBInTe NOBOpOTbI INpeKJIouaTeNbHa pulse N yDePxNBAITe B 3TOM NOJIOXKeHN.
Pnc. 11
HrpeIeHTbI nepepaTaBIAOTcHa MaKcMaJIbHoN CKOpocTn.
2. Otnyuctte noBopOThbI nepeKluvaTeJIb.
VIOBOPOTbI IpeekHIOUaTeJIb BO3Bpa- 1aEcTcB NIOJOKeHHe O.
Perepapobotka ocTaHaBnBaetcA.
Tpe6oBaHne:UaHa 6IeHepa n np6op noDroTOBHeHbI.
"PojrotoBka yaun 6JIeHepa n npbopa", Ctrpauca 259
- YctaHOBHTe IOBOPOTbI nepeKJIouaTeNb Ha on.
Pnc. 8
PaHEnb ynpaBneHnCBeTHTcN npnbop roTOB K pa6ote. - Haxmnte KhoNky BbI6opa Heo6xoJMoI nporpaMMbl.
PnC. 12
3.Дождntecbполногозавершенира-бOTы пибopa.
4.ДяЗавршени ржима певебиповоротьnipekeknioateJBnnoJOKeHne 0.
PnC. 10
PekomeHdaa: TTo6bI npnoctaHOBntb nporpaMMy, HAnKMITE KOnKy BbIbopa nporpaMM. TTo6bI npoJIoNkHTb nepepa60Ky, HAnKMITE KOnKy BbIbopa nporpaMM eue pa3.
ДлЯ OCTaHOBKN BbIOnJIHeHINЯpoIpaMMbIdo ee 3aBepWeHINЯIbO NaXmITE KHOJIkyBbl6paHHo INpOgPAMMbI Ha 3 cekyHdbI,ЛИбОу yCTaHOBnTe NOBOpTHbI nepeKJIIOuHaTeNbHa 0.
- CHIMITE KpbIUKy, YTO6bI BblNTb nepepa6oTaHHyO Maccy.
$$ \rightarrow P n c. \quad 1 7 $$
6.8 Перетабтка прodyков в стаканe To-Go
- NpOToTOBbTe npOdyKTbl.
Hanpimep, nopeKbTe npOyktbl 60JIbIoro pa3Mepa Ha KycouKn.
- NomecHTe npOdyKtB v CtaKaH To-Go.
$$ \rightarrow P n c. \quad 1 8 $$
Co6IIOdaIte MHNIMaJIbHoe IMaKcIMaJIbHoe KOJIuYeCTBO nepepaTaTbIBaEMbIX IPOdYKTOB.
- BCTaBbTe HOJKeByIO BcTaBky To-Go B cTaKaH To-Go.
$$ \rightarrow P n c. \quad 1 9 $$
- HadejKho 3aФИКСИРУТЕ HOЖЕВЮ BCTaBky To-Go и CTaKaHe To-Go.
$$ \rightarrow P n c. \quad 2 0 $$
- MeTkn N △ДолЖнbl yKa3bIbTaBdpyr Ha pyra.
BbMOKeTe NIOKIIHouaTb HOKeByIO BcTaBky To-Go K OCHOBHomy 6IOKy TOJIbKO C NOJIHOCTbIO 3aKpyeHHbIM cTaKaHOM To-Go.
-
YctaHOBInTe IOBOpTHbI nepeKJIIOUa-TeJb Ha 0.
-
Перевернite стаkan To-Go Вьерх Дом.
$$ \rightarrow P n c. \quad 2 1 $$
- BCTaBbTe HOxKeByIO BCTaBky To-Go BO OCHOBHoi 6IOK I NOBepHnTe No yacoBOI CTpeJIke Do UeJIyka.
$$ \rightarrow P n c. \quad 2 1 $$
- BcTaBbTe BnKy ceTeBoro shHypa B po-3eTKy.
- YcTaHOBnTe NOBOpTHbI nepeKJIouaTeIb Ha peKOMeHdyEmyO cKOpocTb IINNCNoJIb3yIte npOrpamMy.
$$ \begin{array}{l} \rightarrow P n c. \quad 2 2 \ \rightarrow P u c. \boxed {2 3} \ \end{array} $$
6.9 3aKpoIte cTaKaH To-Go KpbIshKoI
Tpe6oBaHne: Pnp6op 3aBepunil pa6Oty.
- ПовернITE стakaн To-Go потув acobоь CTpeлки и ChIMITE ero c 6лoka DBИгаTeЯ.
$$ \rightarrow P n c. \boxed {2 5} $$
2.Пелевернite CTaKaHTo-Goи OTKpyTHe HOKeByIO BCTaBky To-Go.
$$ \rightarrow P u c. \boxed {2 5} $$
- YcTaHOBInTe yIJIOTHTeINb KpbIiIKN.
$$ \rightarrow P u c. \boxed {2 6} $$
- 3aKpoIte OTBepCTne IJIa NITbHa KpbIuKe.
$$ \rightarrow P u c. \boxed {2 6} $$
- ПлOTно 3aKpyTnTe KpbIshKy Ha cTaKaHe To-Go.
$$ \rightarrow P n c. \quad 2 6 $$
7 OuHCTKa n yXoJ
Длд длговремению ncnpabHон pa6obtbl np6bopa tpe6yetc ero TuaTeNbHa Ouchstka n yxod.
7.1 ChstTae cpeIcTba
Hnke yka3aHbI YnCTaIue cpeIcTba, npnroDhbIe IaBaJero npnbopa.
BHIMAHNE!
PnncnoB3OBAHn HneoXoAunx YnCTaunxCpeDcTBnnn npn HenpaBnBHO ouNCTke BO3MOXHo nOBpeJXDeHne npn6opa.
He nCnoB3yIte MOIOUne cpeCDtBa, coedePkaune aNkoTobn CnnpT.
He nCnoB3yIte MeTaJIInueCeNne I ocTpoKoHeuHbIe npEaMeTbI, a TaKKe npEaMeTbIC octPbIMn KpOMKaMn.
He npimEnHnIe rpy6yIO TkAhb nnIa 6bpa3nBhIe YnCTaIe cpeDCTBa.
7.2 063op ouhcTkn
Cpa3y nocne nCnoB3oBaHnOuNuaTe BCE qactn np6oopa, yTo6bIOCTaTKn pOdyKTOB He npncbixan.
BHIMAHNE!
HeKoTOpbIe qaTn npi6opa npn MbITbe B nocydomooeHoi MaunHe MoYr 6bITb NOBpeXKeHbl.
B nocydomoeyHm MaHHe MoTe ToIbKO npiroDhbIe IJI 3TOrO YactN.
HcnoJIb3yIteToJIbKO npOrpamMbI,He HarpeBaIOUne BODy Bblwe 60^
He 3aJxImaIte IpaCTMaCCOBbIe YacTn B nocydomoeyHoi MaunHe.
OTeIbHbIe DeTaIIOn OUnIaHTc corIaCHO Ta6JIuIe.
$$ \rightarrow P n c. \quad 2 7 $$
7.3 Исторьанец погаммьочески
C nOmoIbI npOrpaMMbl OunchTKn Bbl MoJKeTe 3aynCTnTb OunchTky qaun 6JIeHdepa HOKJEBOB BCTaKN.
- CnéduyTe yKa3aHnI M HnCTpyKcI N O ouhctke, pnpBeDeHHbIM B Ta6nIe.
PnC. 28
- CneIte YnCTaIyU XnIkoCTb.
13BneKeTe caMbIe KpyNbIe ocTaTKn nI-
3. Ouicntte DetaII npio6opa.
bllll lsswll sdo nolul Ugs
joc jlc jlgus uowu
.ugj
sicdoI suiwgl jqJl Uusu
JSSWbLJI Lc g uSj
Jlll llllll
jgljjlll jnol
Ld aauu juiugog Jaaal
aLJIeJoo
wI 6
jIg bI I I I I I 6.1
gfoi,ajl jol goll 1
gbo 11 aai jai gai
.0 Lc jg Jj elaoJbdu 2
wIwJlqJI Jc bJLslcg 3
jLac aJolal oJlg
aJlso Jooow LAcLwJ
4 JSwJ1
Lc g aui jol jgal 4
.blaJl
5 JSwJ1
aOlc gg 1bLJI Lc g
jilu 2000
g 5
b21J1 Lc9 Lc 1b2
6 JSwJ1
AgVJUoJIgU
.520
jaiu Lg<0oLgX1 g 1aJl J
.duSo
7 ≤ /
Lb20.Lb21gS u
Jou
JUeJUuUaUUuaGg u.7
Jswg 5.5
on Lc Jg JI eLiaol jgS lo sic
jgl jai jil jusw 2 wlg
11 10
aag 1 2 3 4 5 6 7 8
Jlaosu21
zg jgljIJuswI Js zbo.g
aJUJUJUJUJUJUJUJUJU
g|lgJl glaolj oJsl g,laswXl
.dalc g1 1b2j1 2
oljllljj5.6
15gW 8 jIqJl Jw lo sic
jai jai aai jai jji
aBgl aUJl
C
.b)Jl
Clean
Smoothie
LluluSo Ice Crush
Hot Soup
UJI Ugao sds! Shake
.1gJU Ugao
Iice Cream
. l l g
U
Smoothe 0u
aJdJlglgJglddJlJd
. gglg,lglj
Hot Soup 2013
acjwJ lIc bIJI Joo
aJluIg JloXlaBj 5.7
jlo8laobijlrcdoclcobjliu
JglJ aOuJUg
oljI p|awl 6.4
jLgbld:lcg j
"JgljJlg bJlJI lgc Jnu
276 a
.on 1Jc Jlg JJ eliaol bdu .1
8 ≤ /1
ugugUloaiwlaagUo
JU
.ugjoljoljjb2
12 」SuaJl
jIqJl caggu jzjbu 3
jIgJJI eLiaol Ibuol,Usuill Lqjy 4
.0 Lc
10
LggooljUuOogJ Ls:da
aiiuiuS. soljuljjlc bdo
.1320 0oljUjj b2o1 aJll201
bouj jI loi, jSyo ooiu jll aogj L
g1 jlg3 oJ JluJJuJj
.0lcljglalai
wJl p|ddwI 6.5
UuSJI UJdIg UUdJI UgS JdI.1
aill aig
13
Jawz aJl Jgol 2
13
Ug6.6
wull gS jai 1
aiaJI uC UgSoll aes g
.1bJU oJg:gal
14 JSuJ1
UgSJU Jus 2
aJlloJI aIoc 1 1b21
.
acjmuI pbi0 6.2
#
jLgblJl:lcg j:bl
"Jgljg b2lJI1cIg juov
276 a
.on 1Jc Jlg Jl eIioaI bdu .1
8 ≤ /
ugugUaueiWxI aegLz
.1JwU|jLjQJI
gLSJI gagaw, jgabol Jswll
gJgUaalIgAIIg
.uggugwog
[sga]I UaSJI JgJgJU jjU
Lguc yogaiol lsc sog
aouSJI lJI loJ lo sic. Ug|sJl
aJlalj0j pdoaiw15g2o
d. yIgQJIgQJI
30 1Sau/1
31
32
abdo
:bll l g
ooauiJglgaiIb
sijll jgooj gglgswllgagll
abwlgbaagjSao jgJl oJgI
.
:JswJb
b)1111c9g 1sw 1250
gwwll 15 oJswllblal
.max
jglg5oJolblalgloJIc
.max{5gwiJl}
:la
aolo 6 zo ñgaboll jgllblal
. j o o l o 1 g j w o S
JJJ
40x33 1a b j d Jd
.1JJJjJl
8 oj.ojiuao quoJI Uc JuaJ S
gag oalgl gluac no la
jJlLglo
.jgllb15
us uolg glug unc uo uuaa b
jgJl blaIguc gog jJlu aIb
山
elguu uI U, o o d aalss
.jgall bla
glg jucjoo gai lal 4 sbs bc
jll aab uJ uolg
jgbsjgs1000
aolo 1
aagoo
Jsw oJsS aoslo 6
j350
gugjuc 1500
Jω 1250
lo 1000
og
jg jg oJg Jb
jU Ug E Lg
aJdaJgLd10ddj
aJg 80 oJp°200
jooogaiuoi 150jIa
aoojao g aow
Lc lojolg jollo oogkaiy
JswJIbba jgol
aai1j
sJai Lao g 8.1
and electronic equipment
-
- WEEE
aaaolgall
scglgJpIJI|bK
JgS 2a. 5mu
yogaa yjjgX1 sX1
aaii jqj 1 oai
LjIolowol oclcg


Thank you for buying a Bosch Home Appliance!
Register your new device on MyBosch now and profit directly from:
- Expert tips & tricks for your appliance
- Warranty extension options
- Discounts for accessories & spare-parts
- Digital manual and all appliance data at hand
- Easy access to Bosch Home Appliances Service
Free and easy registration - also on mobile phones: www.bosch-home.com/welcome
BOSCH HOME APPLIANCES SERVICE
Looking for help? You'll find it here.
Expert advice for your Bosch home appliances, help with problems or a repair from Bosch experts.
Find out everything about the many ways Bosch can support you: www.bosch-home.com/service
Contact data of all countries are listed in the attached service directory.
BSH Hausgeräte GmbH
Carl-Wery-Straße 34
81739 München, GERMANY
www.bosch-home.com
A Bosch Company

8001318732 (040507)
de, en, fr, it, nl, da, no, sv, fi, es, pt, el, tr, pl, uk, ru, ar
Valid within Great Britain:
Imported to Great Britain by
BSH Home Appliances Ltd.
Grand Union House
Old Wolverton Road
Wolverton, Milton Keynes
MK12 5PT
United Kingdom