36DaRryBERKELTRANCHEUSEREDLINE250 - Food slicer DARTY - Free user manual and instructions
Find the device manual for free 36DaRryBERKELTRANCHEUSEREDLINE250 DARTY in PDF.
User questions about 36DaRryBERKELTRANCHEUSEREDLINE250 DARTY
0 question about this device. Answer the ones you know or ask your own.
Ask a new question about this device
Download the instructions for your Food slicer in PDF format for free! Find your manual 36DaRryBERKELTRANCHEUSEREDLINE250 - DARTY and take your electronic device back in hand. On this page are published all the documents necessary for the use of your device. 36DaRryBERKELTRANCHEUSEREDLINE250 by DARTY.
USER MANUAL 36DaRryBERKELTRANCHEUSEREDLINE250 DARTY
FR MANUEL D'INSTRUCTIONS
CS NÁVOD K POUŽITÍ
DA BETJENINGSVEJLEDNING
USER MANUAL: Electrical Slicers Red Line
MODELS:
RL220, RL250, RL300.
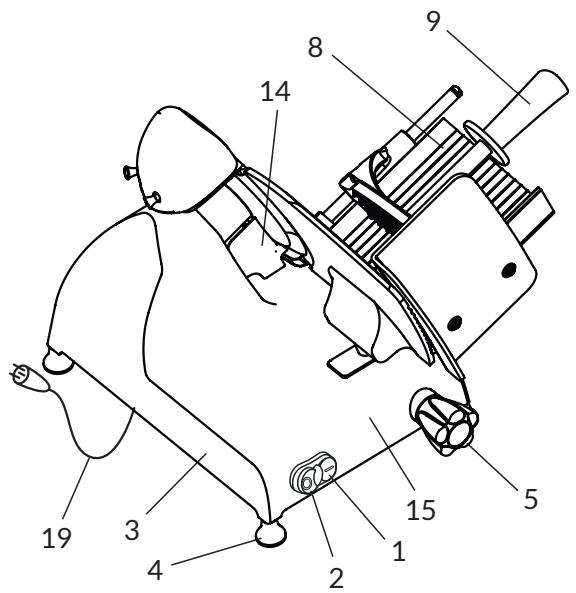

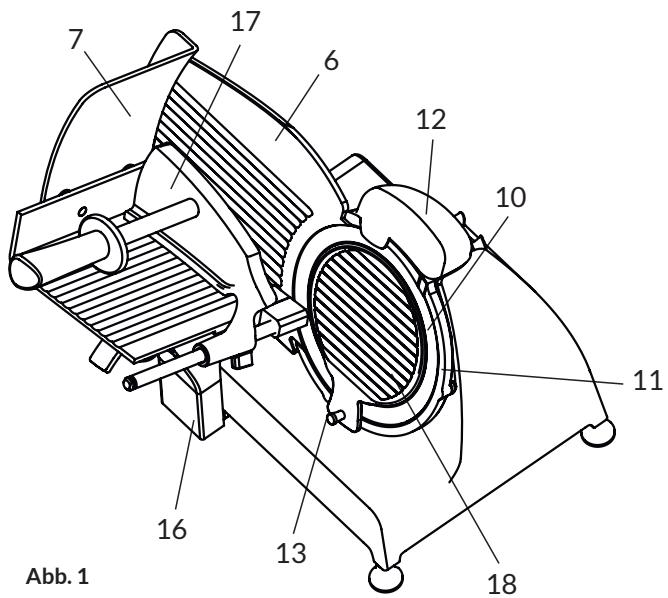
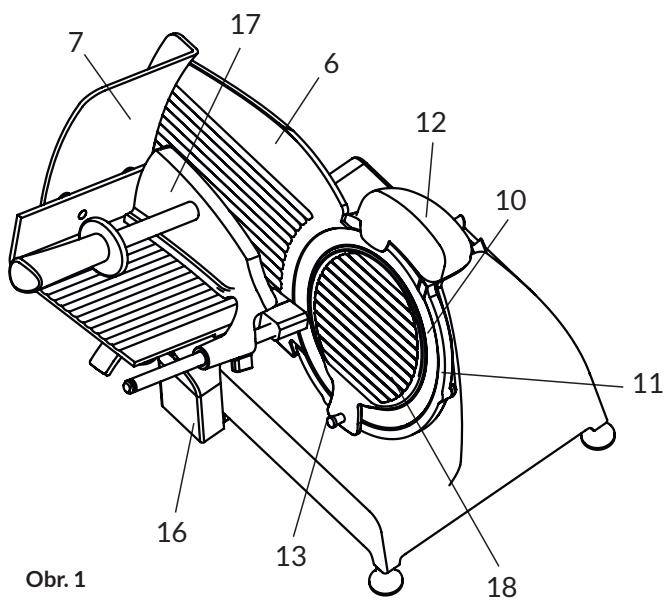
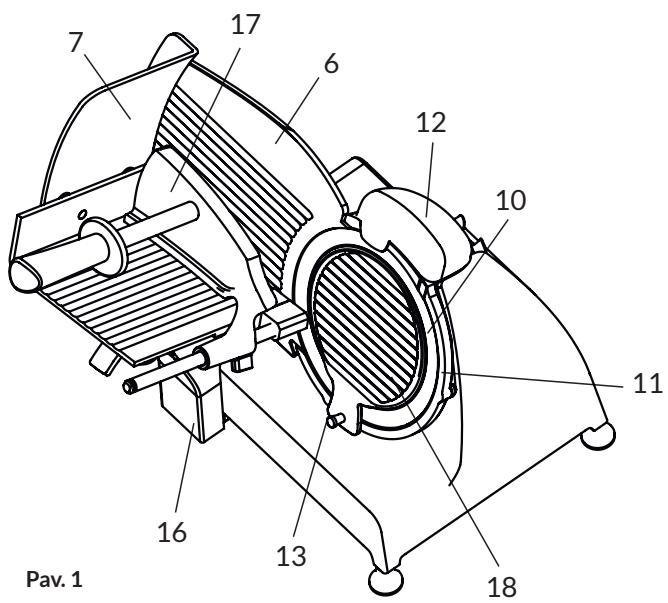
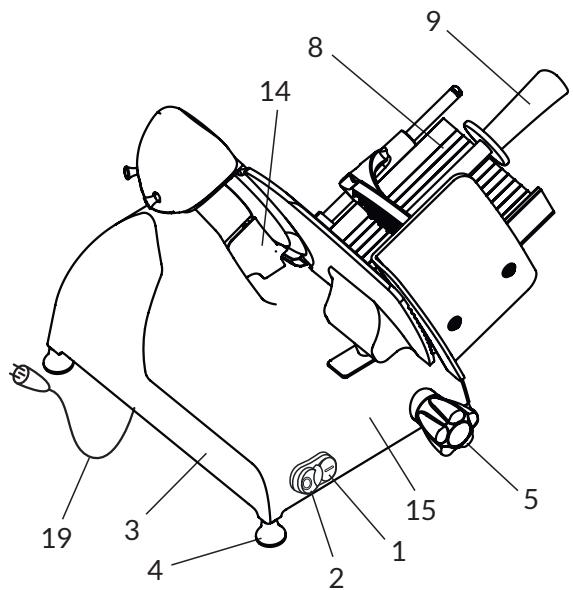
Fig.1
GENERAL PLAN OF THE MACHINE
- Start button (white)
- Stop button (red)
- Identification plate, technical informations
- Foot
- Thickness adjustment knob
- Thickness gauge plate
- Safety guards
- Meat table
- Product press holder
- Blade
- Safety ring (blade guard)
- Sharpener
- Blade cover knob
- Slice guard
- Baseplate
- Plate support
- Product holder
- Blade guard disk
- Power cable
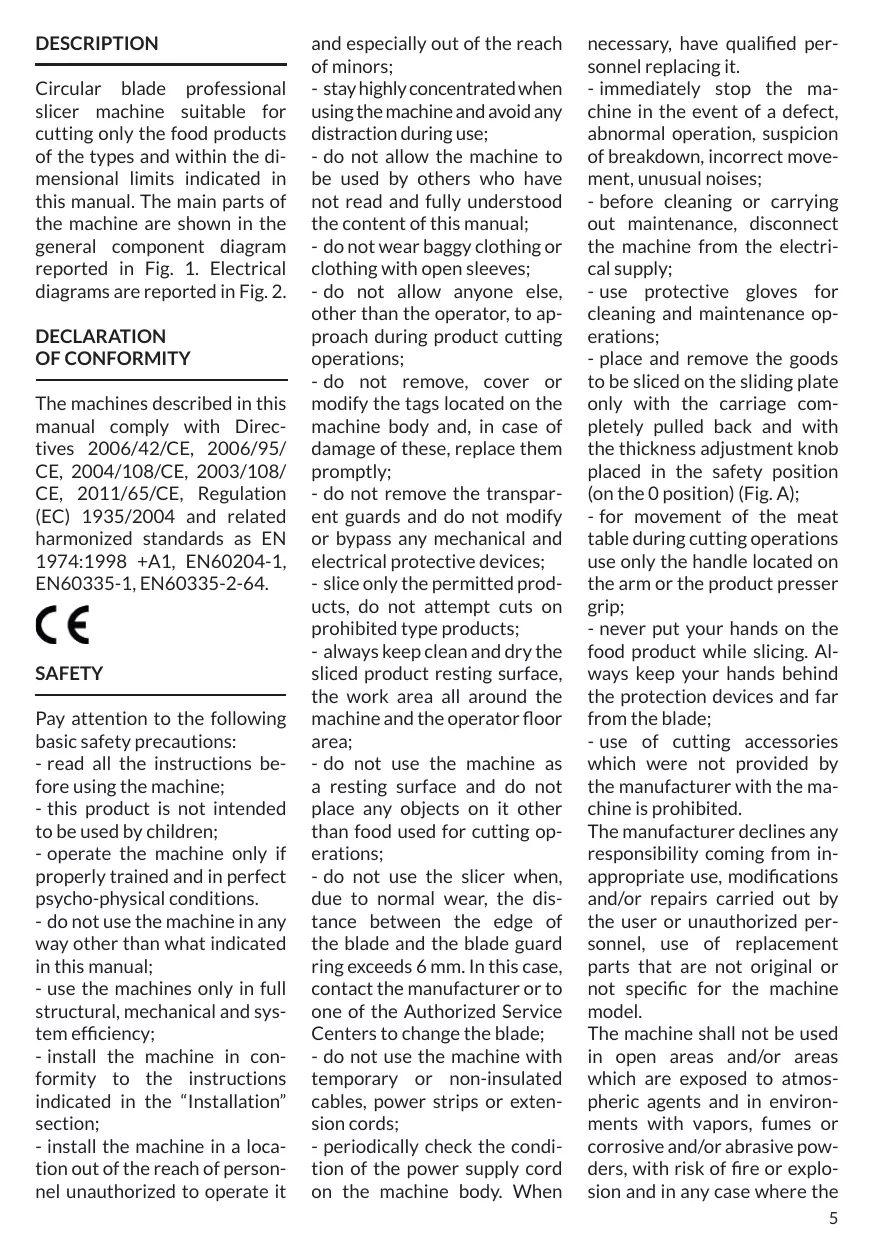
DESCRIPTION
Circular blade professional slicer machine suitable for cutting only the food products of the types and within the dimensional limits indicated in this manual. The main parts of the machine are shown in the general component diagram reported in Fig. 1. Electrical diagrams are reported in Fig. 2.
DECLARATION OF CONFORMITY
The machines described in this manual comply with Directives 2006/42/CE, 2006/95/CE, 2004/108/CE, 2003/108/CE, 2011/65/CE, Regulation (EC) 1935/2004 and related harmonized standards as EN 1974:1998 +A1, EN60204-1, EN60335-1, EN60335-2-64.

SAFETY
Pay attention to the following basic safety precautions:
- read all the instructions before using the machine;
- this product is not intended to be used by children;
- operate the machine only if properly trained and in perfect psycho-physical conditions.
- do not use the machine in any way other than what indicated in this manual;
- use the machines only in full structural, mechanical and system efficiency;
- install the machine in conformity to the instructions indicated in the "Installation" section;
- install the machine in a location out of the reach of personnel unauthorized to operate it
and especially out of the reach of minors;
- stay highly concentrated when using the machine and avoid any distraction during use;
- do not allow the machine to be used by others who have not read and fully understood the content of this manual;
- do not wear baggy clothing or clothing with open sleeves;
- do not allow anyone else, other than the operator, to approach during product cutting operations;
- do not remove, cover or modify the tags located on the machine body and, in case of damage of these, replace them promptly;
- do not remove the transparent guards and do not modify or bypass any mechanical and electrical protective devices;
- slice only the permitted products, do not attempt cuts on prohibited type products;
- always keep clean and dry the sliced product resting surface, the work area all around the machine and the operator floor area;
- do not use the machine as a resting surface and do not place any objects on it other than food used for cutting operations;
- do not use the slicer when, due to normal wear, the distance between the edge of the blade and the blade guard ring exceeds 6mm . In this case, contact the manufacturer or to one of the Authorized Service Centers to change the blade;
- do not use the machine with temporary or non-insulated cables, power strips or extension cords;
- periodically check the condition of the power supply cord on the machine body. When
necessary, have qualified personnel replacing it.
- immediately stop the machine in the event of a defect, abnormal operation, suspicion of breakdown, incorrect movement, unusual noises;
- before cleaning or carrying out maintenance, disconnect the machine from the electrical supply;
- use protective gloves for cleaning and maintenance operations;
- place and remove the goods to be sliced on the sliding plate only with the carriage completely pulled back and with the thickness adjustment knob placed in the safety position (on the 0 position) (Fig. A);
- for movement of the meat table during cutting operations use only the handle located on the arm or the product presser grip;
- never put your hands on the food product while slicing. Always keep your hands behind the protection devices and far from the blade;
- use of cutting accessories which were not provided by the manufacturer with the machine is prohibited.
The manufacturer declines any responsibility coming from inappropriate use, modifications and/or repairs carried out by the user or unauthorized personnel, use of replacement parts that are not original or not specific for the machine model.
The machine shall not be used in open areas and/or areas which are exposed to atmospheric agents and in environments with vapors, fumes or corrosive and/or abrasive powders, with risk of fire or explosion and in any case where the
use of antiexplosive components is required.
Operating conditions:
- Temperature from
-5°C to +40°C - Max. humidity 95%
DO NOT SLICE:
- frozen food products;
- food products with bones;
- any other product not intended for food use.
WARNING! Motor may overheat! After a maximum 15 minutes of continuous use, switch OFF the machine and allow to cool down.
RESIDUAL RISKS
The safety ring around the blade is made in conformity to European standards EN 1974:1998 +A1 but, in order to allow the sharpening operations, the protection in the sharpening area may not entirely eliminate the risk of cutting.
WARNING! During the blade cleaning and sharpening operations, pay extra attention to keep your hands as far as possible from the unprotected area. Use of protective gloves is recommended.
INSTALLATION OF THE MACHINE
Install the machine on a flat, smooth and dry surface suitable for supporting the weight of the machine itself plus the products to be sliced.
WARNING! Verify that there are no obstacles to the meat table travel and to the loading of products.
The machine must be installed in the immediate vicinity of an EEC standard outlet connected to an electrical supply system which is in conformity with the prevailing regulations for: - magneto-thermic protection; - automatic differential switch; - earthing system.
Before carrying out electrical hook up verify that the characteristics of the electrical power supply is in accordance with those indicated on the machine information plate.
OPERATION
WARNING! Risk of injury from sharp blade! Check that the thickness adjustment knob (5) is in the safety position (on the O position) (Fig. A).
1.Pull the meat table (8) all the way back (towards the operator) in the loading position (Fig. L);
2. lift the product holder (17) into the standby position;
3.place the product to be sliced on the meat table near the operator side wall. Block it with the product holder applying slight pressure;
4. adjust the slice thickness. Activate the blade (10) by pressing the start button. Grip the product holder handle (9) and start an alternative cutting motion;
5.at the end of the cutting operations return the thickness adjustment knob to the safety position and pull the meat table back. Stop the blade motion by pressing the stop button (2).
CLEANING
Before using, clean the ma
chine at least once a day - or more often if necessary - and always after a long period of inactivity.
WARNING! Risk of electric shock! Before cleaning, disconnect the plug from the electrical mains socket and place the thickness adjustment knob in the safety position.
WARNING! Risk of injury from sharp blade! Check that the thickness adjustment knob (5) is in the safety position (on the O position) (Fig. A).
Products for cleaning:
use only water and biodegradable mild detergent, using a soft, spongy cloth and a semi-rigid nylon brush for the sharp areas of the plate and the product holder. Do not clean the machine with jets of water or steam or similar methods.
Dismantling:
- the meat table (only for the machine equipped with the meat table removable mechanism):
1) with the thickness adjustment knob in the safety position, pull back the carriage all the way until the travel limit toward the operator; 2) use the meat table release lever, keeping the support at the travel limit in order to free the meat table from its support. To correctly carry out the operation it may be necessary to act simultaneously also on the thickness adjustment knob, rotating it slightly with respect to the safety position; 3) extract the product holder unit sliding the meat table from its support (Fig.B);
- the blade cover: 1) rotate the blade cover 90^ counter clock-wise using the special knob; 2) a spring facilitates the extraction of the blade cover (Fig. C);
- the slice deflector: remove the slice deflector following the direction shown in the figure (Fig. D);
- the sharpener: remove the complete sharp unit pulling it upward (Fig. E).
WARNING: Risk of injury from sharp blade! For the cleaning operations of the sharp areas of the plates, the product holder and the blade, use of protective gloves is also recommended.
Cleaning:
- the blade: press a damp cloth on the surface of the blade and move it slowly from the center toward the outside on the blade cover side and the opposite side (Fig. F). In the same way dry, it using a dry cloth. NEVER turn on the machine while cleaning the blade;
- the safety ring: use a soft brush to clean the area between the blade and the safety ring. Be careful NOT to put your hands close to the blade;
- the machine body: use a damp cloth or a sponge, rinsing water. Dry carefully.
Reassembling:
- the sharpener: insert the sharpener unit as shown in the figure (Fig. G) until it comes to a stop in the correct position;
- the slice deflector: position the slice deflector in its seat (Fig. H);
- the blade cover: reassemble the blade cover
and rotate it 90^ clockwise until it locks into its initial position (Fig.1);
- the meat table (only for the machine equipped with the meat table removable mechanism):
insert the meat table on the carriage, verify that the securing lever returns to the initial position, verify that the carriage slides freely and check the correct operation of the thickness adjustment knob.
MAINTENANCE
Blade Sharpening
Frequency and duration of sharpening depend on the use of the equipment.
WARNING! If the machine is equipped with its specific optional sharpener, follow the instructions. Otherwise, contact the manufacturer or to one of the Authorized Service Centers (see SERVICE).
For sharpening, follow the instructions:
- position the thickness adjustment knob in the safety position (Fig. A);
- pull the meat table all the way back (Fig. L);
- raise the sharpener (Fig. M), and rotate it to position it in the sharpening configuration (Fig. N);
- release the sharpener;
- activate the blade by pressing the start button;
- carry out sharpening of the blade pressing sharpening spring button for 10-15 seconds (Fig. O - 1);
- release the above-mentioned button;
- pull and hold the finishing spring button for 2-3 seconds
(Fig. O-2);
- release the button;
- stop the blade motion by pressing the stop button;
- raise the sharpener and rotate it to its original position;
- release it until it stops;
- proceed with cleaning the slicer.
Lubrication
After a regular period of use, it may be necessary to lubricate the carriage guides. We recommend executing this operation every 3 months. For lubrication, only use acid free oil (we recommend Vaseline oil). Do not use vegetable oil.
SERVICE
No user-serviceable parts are inside. Refer servicing to qualified personnel. All the repair and replacement operations (like blade replacement, replacement of the motor belt, replacement of the sub-basaplate electrical system components, repair of structural parts, repair and/or re-placement of sub-baseplate components, or similar) shall be executed exclusively by personnel authorized by the manufacturer.
In the event service is needed, you may return your food slicer to the manufacturer or to one of the Authorized Service Centers.
For information about service centers please contact us at: service@berkelinternational.com.
WARNING! The blade replacement is mandatory if distance between the edge of the blade and the internal edge of the guard exceeds 6 mm.
WARRANTY
AND RESPONSIBILITY
The manufacturer supplies machines with a limited warranty of 24 months from the purchasing date. The warranty is extended only to defects that arise under intended use conditions and proper use. The warranty does not cover defects resulting from faults caused by transport, purchaser's incompetence or negligence, improper installation or earthing, unauthorised interventions, natural wear and tear, voltage variations greater than 10% of the nominal value. Moreover, the warranty does not cover components intrinsically subject to wear, such as blades and grinders, except in the event of evident manufacturing defects. The manufacturer declines any direct and indirect responsibility coming from:
- failure to observe the instructions in this manual;
- use which does not conform to prevailing specific regula
tions in the country of installation;
- unauthorised modifications and/or repairs carried out on the machine;
- use of non original accessories and replacement parts;
- exceptional events.
Transfer of ownership of the machine automatically defaults the manufacturer's liability for the machine in question with the exception of observance of directive 2006/42/CE (liability for any manufacturing defects of the product).
The Identification tag on the base-plate indicates manufacturer, machine, technical information and CE marking.
DEMOLITION OF THE SLICER
The machines are comprised of: - aluminum/magnesium alloy structure;
- inserts and various components and stainless steel;
- electrical parts and electrical cables;
- electric motor;
- plastic material, etc.
If dismantling and demolition are entrusted to third parties, use only companies authorized for disposal of the above-mentioned materials.
The appliance complies with the EU Directive 2012/19/UE. Packaging materials and appliances contain recyclable materials. Your appliance contains valuable materials that can be recovered or can be recyclable. Separation of the remaining waste materials into different types facilitates the recycling of valuable raw materials. Leave the appliances at a collection point. You can obtain information on disposal from your local authorities.
Troubleshooting
| PROBLEM | REASON | REMEDY |
| The machine does not start when the on button is pressed | Lack of power or defective control circuit | Check that the plug has been correctly inserted. If the machine still does not start, contact the Service Center |
| The machine starts when the on button is pressed but the operation indicator light does not turn on | The indicator light may be defective | Do not use the machine with the indicator light off. Contact the Service Center |
| Excessive resistance to cutting of the product | The blade is dull | Sharpen the blade |
| The blade slows down or stops while cutting the product | The drive belt may be loose or damaged | Contact the service center in order to tension or replace the belt |
| The machine does not stop when the stop button is pressed | The control circuit may be defective | Immediately stop the machine, removing the plug from the mains outlet. Contact the service center |
| Excessive resistance in motion of the sliding components (product holder, carriage) | The lubrication of the sliding guide may not be sufficient | Carry out periodical lubrication as described in this manual |
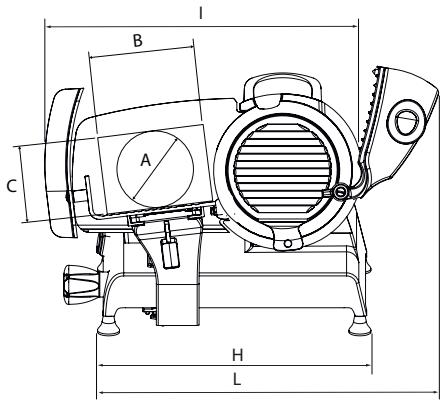
| MODEL | 220 | 250 | 300 |
| A | 168 mm | 178 mm | 230 mm |
| B | 185 mm | 185 mm | 245 mm |
| C | 160 mm | 175 mm | 225 mm |
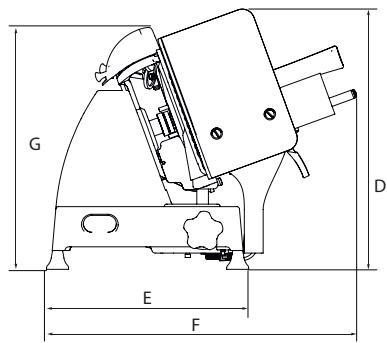
| D | 395 mm | 395 mm | 480 mm |
| E | 320 mm | 320 mm | 380 mm |
| F | 505 mm | 505 mm | 475 mm |
| G | 390 mm | 390 mm | 430 mm |
| H | 435 mm | 435 mm | 485 mm |
| I | 490 mm | 515 mm | 635 mm |
| L | 580 mm | 570 mm | 630 mm |
| SPECIFICATIONS | |||
| Circular cutting capacity | 168 mm | 178 mm | 230 mm |
| Rectangular cutting capacity | 185x160 mm | 187x175 mm | 245x225 mm |
| Max slice thickness | 14 mm | 14 mm | 12 mm |
| Blade diameter | 220 mm | 250 mm | 300 mm |
| Weight | 22 Kg | 22 Kg | 27 kg |
| Motor raiting | 0,19 kW | 0,19 kW | 0,31 kW |
Note: As we actually strive to improve our products, specifications are necessarily subject to change without notice.
RL220, RL250, RL300.


Fig. 1
COMPONENTI PRINCIPALI
RL220, RL250, RL300.

HAUPTBESTANDTEILE
RL220, RL250, RL300.

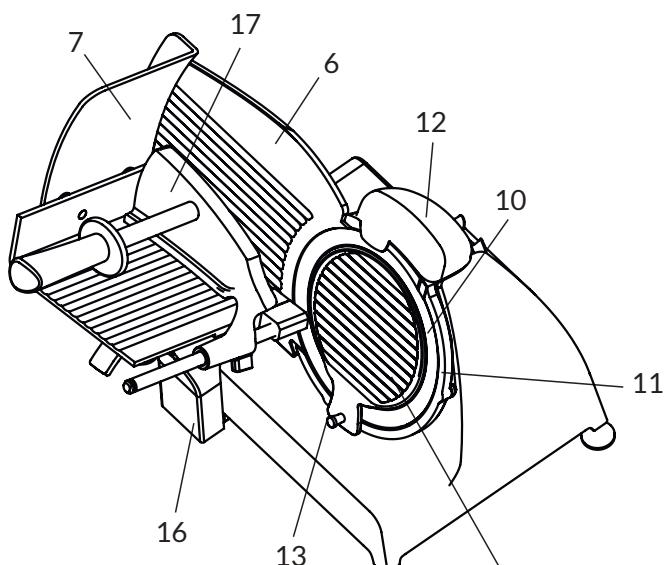
Fig. 1
ÉLÉMENTS PRINCIPAUX
PRODUITS QI NE PEUVENT PAS ETRE DÉCOUPEs:
RL220, RL250, RL300.

ČASTI STROJE
RL220, RL250, RL300.


Fig. 1
MASKINDELE
RL220, RL250, RL300.

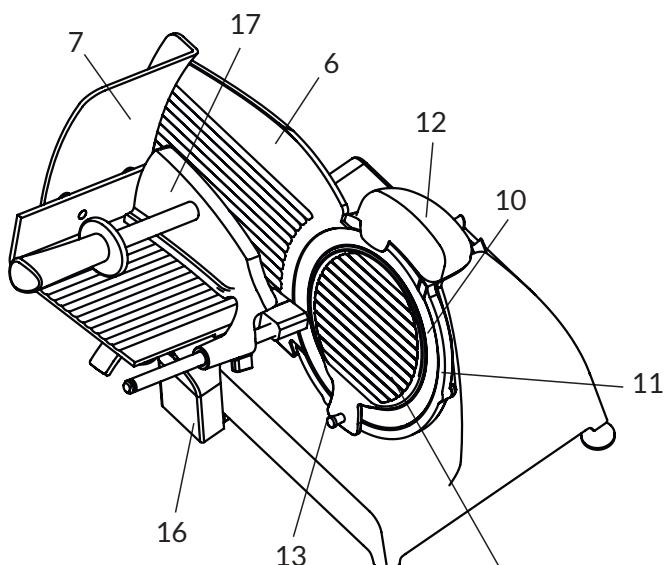
Fig. 1
COMPONENTES PRINCIPALES
RL220, RL250, RL300.

ČASTI STROJE
RL220, RL250, RL300.

ONDERDELEN
VAN DE MACHINE
RL220, RL250, RL300.


Fig. 1
MASKINDELER
- Startknapp (hvit)
- Stopknapp (rdd)
- Typeskilt, tekniske data, CE-merking
- Fot
- Bryter for regulating av skivetykkelse
- Tykkelsenplate (plate)
- Sikkerhetsbeskyttelse
- Produktholderplate
- Händtak for produktskyver
- Skjaereblad
- Sikkerhetsring (skjaerebladdeksel)
- Slipeenhet
- Bryter for skjaerebladdeksel
- Skiveleder
- Sokkel
- Platestotte
- Produktskyver
- Skive for skjærebladdeksel
- Strömkabel
BESKRIVELSE
RL220, RL250, RL300.


Fig. 1
PARTES DA MAQUINA
DEMOLICAO E ELIMINAGAO
A这其中的“金属性”是:
RL220, RL250, RL300.
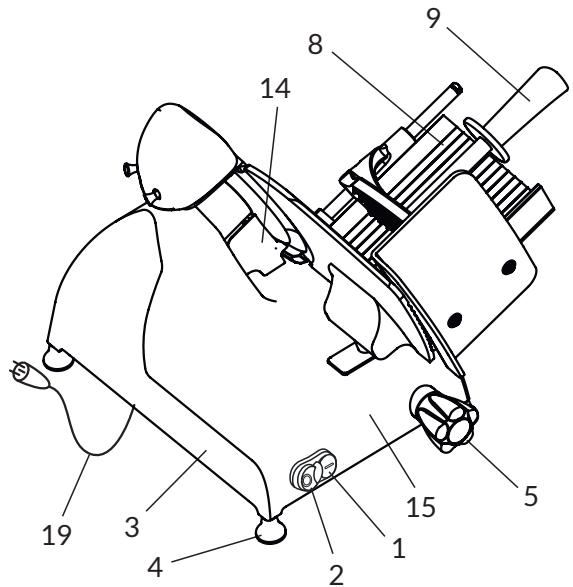
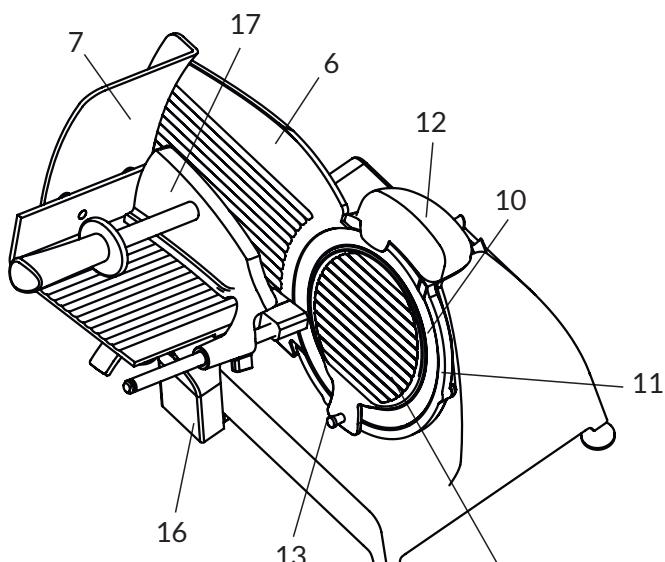
Fig. 1
PARTI ALE MAŞINII
- Buton de pornography (alb)
- Buton de oprire (rosu)
- Placuta de identificare, date tehnice, Marcaj CE
- Picior
- Buton de reglare grosime felie
- Placă calibu princtu grosime (pânză)
- Protecté pentru siguranta
- Platou produse
- Buton dispositiv de impingere
- Lama
- Inel de siguranta (protectie lamă)
- Dispositivul de ascutire
- Buton protectie lamă
- Deviator felli
- Soclu
- Suport platou
- Dispositiv de impingere
- Disc de protectie lam
- Cablu de alimentare
DESCRIERE
RL220, RL250, RL300.


CASTI STROJA
RL220, RL250, RL300.