
DPG7340B - Cooking DARTY - Free user manual and instructions
Find the device manual for free DPG7340B DARTY in PDF.


| Product Type | Mixed gas/electric hob |
| Brand | Darty |
| Model | DPG7340B |
| Number of gas burners | 4 (large rapid, semi-rapid, auxiliary) |
| Ignition type | Built-in spark ignition |
| Gas safety | Safety thermocouple (automatic shut-off in case of extinction) |
| Electrical supply | 220-240 V ~ 50 Hz single-phase, 3-conductor cable (phase, neutral, earth) |
| Gas supply | Natural gas (G20) or butane/propane (G30/G31) with adapted injectors |
| Gas connection | G1/2 threaded connection, flexible or rigid hose according to standards |
| Electric plate | 1 electric burner (depending on model) |
| Surface material | Glass ceramic or stainless steel (depending on version) |
| Control type | Rotary knobs with child safety (push and turn) |
| Number of positions | Off position "0", maximum position, reduced positions |
| Installation class | Class 3 (built-in into heat-resistant cabinet) |
| Cut-out dimensions | Not specified (estimated: 560 x 490 mm) |
| Weight | Not specified (estimated ~12 kg) |
| Burner maintenance | Clean grids, caps and heads with soapy water; unblock injectors with a pin |
| Electric plate maintenance | Wipe with a greasy cloth after use; use a high-temperature renovating product if rust |
| Glass surface maintenance | Clean with sponge and hot water, then specific glass ceramic products |
| Stainless steel surface maintenance | Clean with sponge and soapy water or a special stainless steel product |
| Safety instructions | Do not use a steam cleaner; do not cover the knobs; use suitable cookware |
| Gas conversion | Possible by changing injectors and adjusting low flame settings (kit provided) |
| After-sales service | Contact De Dietrich (consumer service) at 0892 08 88 04 |
| Warranty | Not specified (generally 2 years) |
| Manufacturer | De Dietrich (distributed by Darty) |
Frequently Asked Questions - DPG7340B DARTY
User questions about DPG7340B DARTY
0 question about this device. Answer the ones you know or ask your own.
Ask a new question about this device
Download the instructions for your Cooking in PDF format for free! Find your manual DPG7340B - DARTY and take your electronic device back in hand. On this page are published all the documents necessary for the use of your device. DPG7340B by DARTY.
USER MANUAL DPG7340B DARTY
FR GUIDE D'INSTALLATION ET D'UTILISATION ENGUIDE FOR INSTALLATION AND USE
TABLE DE CUISSON
TABLE DE CUISSON GAZ COOKING GAS HOB

0.1

0.1.1

0.1.2

DPG7549*

DPE7549*
0.1.3

DPG7640*M
0.1.4

1,5 kW / G20

0,85 kW / G20

2,25 kW / G20

1,50 kW - 0 145

3,10 kW / G20

3,6kW / G20
1

1.1
1.1.1
1.1.3
1.1.2
1.1.4
1
1.2
1.2.1
1.3
1.3.1
1.3.2
1.4
1.4.1
1.4.2
1.4.3
1
1.4.4
1.4.5

FR/EN/ES/PT/DE/DA/EL/IT/SV/CS/NL/PL/SK
| G20 / G25 | Gaz naturel / Natural gas / Gas natural / gás natural / Erdgas / Naturgas / Φιουκό αέριο / Gas naturale / Naturgas / Zemni plyn / Aardgas / Gaz ziemny / zemmý plyn |
| G30 | Butane / Butane / Butano / Butano / Butan / Butangas / Boutαviou / Butano / Butan / Butan / Butaan / Butan / Bután |
| G31 | Propane / Propane / Propano / Propano / Propangas / Propangas / Προπαviou / Propano / Propan / Propan / Propaan / Propan / Propán |
| FR............ cat : II2E+3+ | Gas | mbar | Σ Qn (kW) | Σ l/h | Σ g/h | |
| a | G30 | 28-30 | 4,65 | 338 | ||
| G31 | 37 | 4,65 | 332 | |||
| G20 | 20 | 4,60 | 438 | |||
| G25 | 25 | 4,60 | 509 | |||
| b | G30 | 28-30 | 7,50 | 545 | ||
| G31 | 37 | 7,50 | 536 | |||
| G20 | 20 | 7,70 | 733 | |||
| G25 | 25 | 7,70 | 852 | |||
| c | G30 | 28-30 | 7,10 | 516 | ||
| G31 | 37 | 7,10 | 507 | |||
| G20 | 20 | 8,40 | 738 | |||
| G25 | 25 | 8,40 | 858 | |||
| d | G30 | 28-30 | 6,00 | 436 | ||
| G31 | 37 | 6,00 | 429 | |||
| G20 | 20 | 6,20 | 590 | |||
| G25 | 25 | 6,20 | 686 | |||
| Gas | mbar | Qn (kW) | l/h | g/h | Qr (kW) | ||
| D | G30 | 28-30 | 45 | 0,70 | 51 | 0,30 | |
| G31 | 37 | 45 | 0,70 | 50 | |||
| G20 | 20 | 63 | 0,85 | 81 | 0,35 | ||
| G25 | 25 | 63 | 0,85 | 94 | 0,35 | ||
| A | G30 | 28-30 | 62 | 1,50 | 109 | 0,62 | |
| G31 | 37 | 62 | 1,50 | 107 | |||
| G20 | 20 | 94 | 1,50 | 143 | 0,65 | ||
| G25 | 25 | 94 | 1,50 | 166 | 0,65 | ||
| B | G30 | 28-30 | 7R | 2,15 | 156 | 0,83 | |
| G31 | 37 | 7R | 2,15 | 154 | |||
| G20 | 20 | 1R | 2,25 | 214 | 0,87 | ||
| G25 | 25 | 1R | 2,25 | 249 | 0,87 | ||
| C | G30 | 28-30 | 88A | 3,15 | 229 | 0,83 | |
| G31 | 37 | 88A | 3,15 | 225 | |||
| G20 | 20 | 137 | 3,10 | 295 | 0,87 | ||
| G25 | 25 | 137 | 3,10 | 343 | 0,87 | ||
| F | G30 | 28-30 | 60/37/60 | 3,25 | 236 | 1,65 | |
| G31 | 37 | 60/37/60 | 3,25 | 232 | |||
| G20 | 20 | 092/055B/092 | 3,80 | 362 | 1,45 | ||
| G25 | 25 | 092/055B/092 | 3,80 | 421 | 1,45 |
1.5
1.5.2
1
2
2.1
2.1.2
2.1.3
2.1.4
2.3
2.3.1

2.3.2
3
3.1
3.1.1
3.1.2
5
6
6.1
6.1.1

CHÈRE CLIENTE, CHER CLIENT
RELATIONS CONSOMMATEURS FRANCE
Discovering a De Dietrich product means experiencing the range of unique emotions.
The attraction is immediate, from the moment you set eyes on the product. The sheer quality of the design shines through, thanks to the timeless style and outstanding finishes which make each component an elegant and refined masterpiece in its own right, each one in perfect harmony with the others. Next, comes the irresistible urge to touch it.
De Dietrich design makes extensive use of robust and prestigious materials, where the accent is place firmly upon authenticity. By combining state-of-the-art technology with top quality materials, De Dietrich produces beautifully crafted products to help you get the most from the culinary arts, a passion shared by all lovers of cooking and fine food. We hope that you enjoy using this new appliance.
Thank you for choosing a De Dietrich product.
TABLE OF CONTENTS
EN
SAFETYINSTRUCTIONS 19
0/ IDENTIFICATION 23
1/ INSTALLATION
Fitting 23
Electric connection 24
Gas connection 24
- Changing of gas supply 25
- Gas properties 26
2/ USE
- Lighting the gas burners 27
Cookware suitable for the gas burners 28 - Switching on the electric plate (depending on model) 28
Cookware for electric plate (depending on model) 28
3/ DAILY CARE OF YOUR APPLIANCE
- Maintaining your appliance. 29
4/ PROBLEMS & SOLUTIONS 30
5/ ENVIRONMENT 31
7/ AFTER-SALES SERVICE 35
IMPORTANT SAFETY INSTRUCTIONS - READ CAREFULLY AND RETAIN FOR FUTURE USE.
This guide can be downloaded from the brand web site.
o WARNING : this appliance may be used by children aged 8 years and older, and by persons with impaired physical sensorial or mental capacities, or without experience or knowledge, if they are supervised or have received prior instructions on how to use the appliance safely and have understood the risks involved.
Children must not be allowed to play with the appliance.
○ Cleaning and maintenance operations must not be carried out by children without supervision.
Children must be supervised to ensure that they do not play with the appliance.
- It must be possible to disconnect the appliance from the power supply, either using a plug or by fitting a switch on the fixed wiring system in accordance with installation rules.
The electrical plug must remain accessible after installation.
- If the power cable is damaged, it should be replaced by the manufacturer, its after-sales service department or by a similarly qualified person in order to avoid danger.
o Do not use steam cleaning appliances.
- The appliance is not designed to be switched on using an external timer or a separate remote control system.
irc WARNING : leaving a hob unattended when cooking with fat or oil can be dangerous and could cause a fire. - Never try to extinguish a fire with water but switch off the appliance, then cover the flame with a lid or a fire blanket.
irc WARNING : fire risk: do not store any items on the cooking surfaces.
o Prior to installation, ensure that the local distribution conditions (type of gas and gas pressure) and the appliance's settings are compatible. - The settings for this appliance are stated on the label inside the wallet or on the information plate.
- This appliance is not connected to a system for evacuating combustion products. It must be installed and connected in compliance with current regulations. Particular attention should be given to applicable ventilation requirements.
The use of a gas hob produces both heat and humidity in a room. Ensure that the kitchen is well ventilated: keep mechanical ventilators open. Prolonged, intensive use of the hob may require additional ventilation, by opening a window, for example, or ventilating the room more efficiently by increasing the setting on mechanical ventilation, where installed.
o Do not use cookware that overhangs the edge of the hob.
This hob has been designed for use by private persons in their homes.
- This appliance must be installed in compliance with current regulations and only used in a well ventilated area. Consult this guide before installing and using your appliance.
O You should never leave cooking unattended.
These hobs are designed exclusively for cooking drinks and foodstuffs and do not contain any asbestos-based component parts.
o Never leave any or products in the cupboard beneath your hob (aerosols or other pressurized cans, papers, recipe books, etc.).
If you have a drawer underneath the hob, we recommend avoiding placing objects in it that are temperature sensitive (plastics, paper, aerosols, etc.).
- Disconnect your hob from both electrical and gas supplies before carrying out any maintenance operations.
- When connecting electrical appliances to a nearby socket, ensure that the power supply cable is not in contact with any hot surface on the appliance.
If a knob is difficult to turn, call your installer immediately.
SAFETYINSTRUCTIONS
EN
For safety reasons, after use, do not forget to close the main gas valve for mains gas lines or the valve on the top of your butane/propane gas cylinder.
The conformity CE mark is applied to all these hobs.
This appliance should be installed by a qualified technician / installer.
This hob complies with standard EN 60335-2-6, as it applies to heat build-up in class 3 appliances and the implications for their installation (in compliance with standard EN 30-1-1).
- Never use aluminium foil for cooking. Never place products wrapped in aluminium foil or in aluminium trays on your hob. The aluminium will melt and permanently damage your appliance.
To find your appliance's references easily, we recommend that you note them on the "After sales Service and Customer Relations" page (this page also explains where to find them on your appliance).
- WARNING: If a crack appears in the surface of the glass, disconnect your appliance from the power supply to avoid electric shock.
- WARNING : Use only hob guards designed by the manufacturer of the cooking appliance or indicated by the manufacturer of the appliance in the instructions for use as suitable or hob guards incorporated in the appliance. The use of inappropriate guards can cause accidents.
·IDENTIFICATION
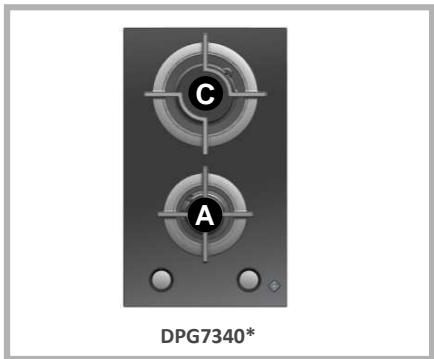
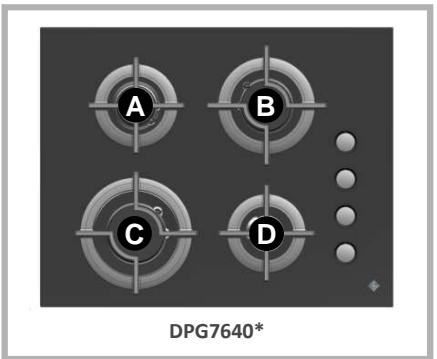
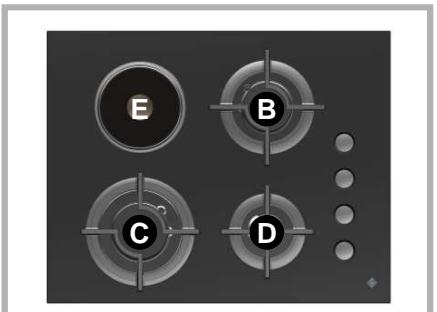
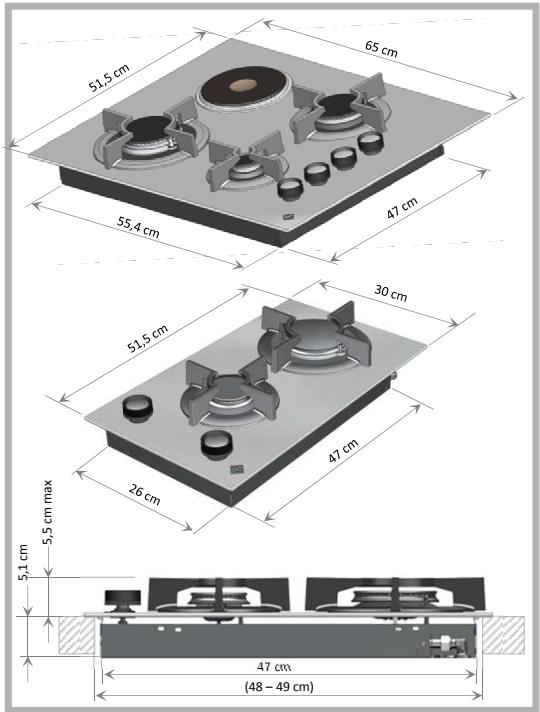
Identify your type a b c d of hob by comparing the number and layout of the burners on your appliance with the illustrations (0.1.1), (0.1.2), (0.1.3) et (0.1.4).
1 INSTALLATION
Make a note of the references of your appliance on the "After-Sales Service and Customer Relations" page so that you can readily find them in future (6.1.1). This page also explains where to find them on your appliance.
1.1-FITTING:
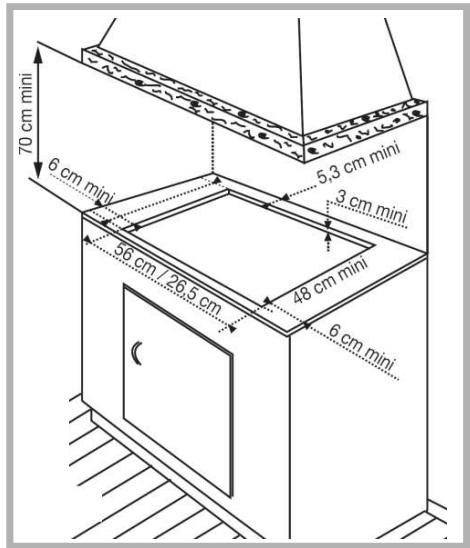
This worktop must be at least 3 cm thick and heatresistant or else coated with a heat resistant material.
If a horizontal partition is installed under the hob, it must be positioned between 10 and 15 cm below the worktop.
Under no circumstances keep any sprays or pressurised containers in any compartment below the hob (see "Safety guidelines" chapter).
Follow the guidelines in the sketch (1.1.1).
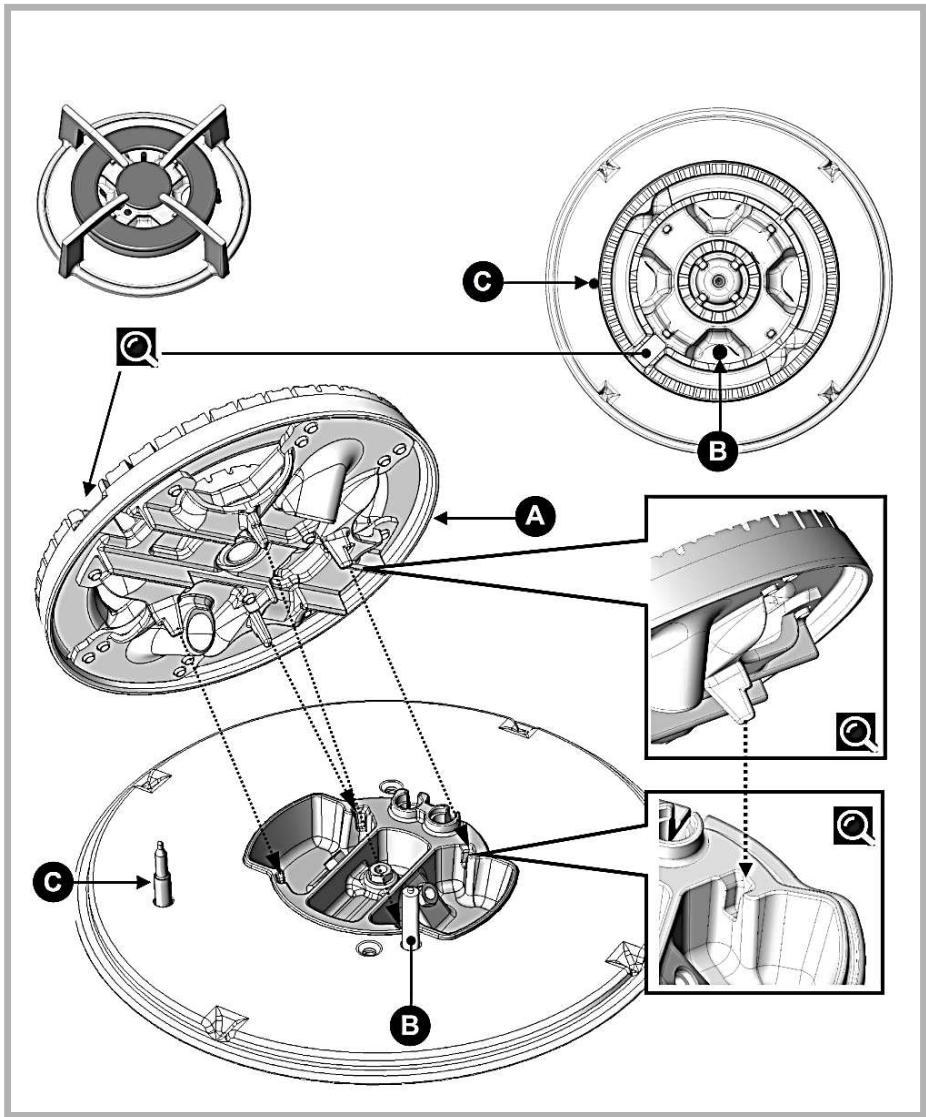
○ Remove the "pan supports", burner caps and burner heads, noting their original positions.
Turn the hob upside down and place it carefully over the top of the base unit, so as not to damage the knobs or igniters.
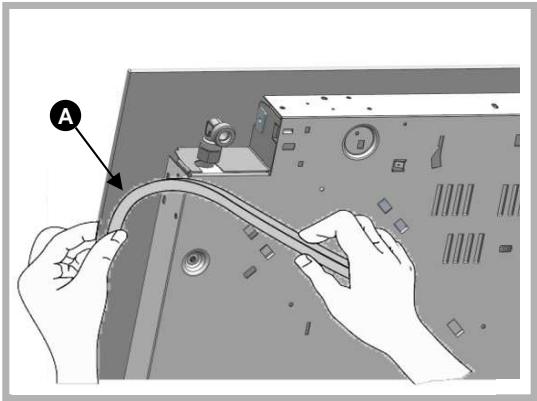
To ensure a good seal between the body of the hob and the worktop, stick the foam seal around the edge of the body, before installing the hob (1.1.4).
Place the hob over the opening in the base unit, taking care to pull the hob towards you.
Fit the burner heads, caps and pan supports.
Connect your hob to the gas (see "Gas connection" section) and to the electricity (see "Electrical connection" section).
If you wish,
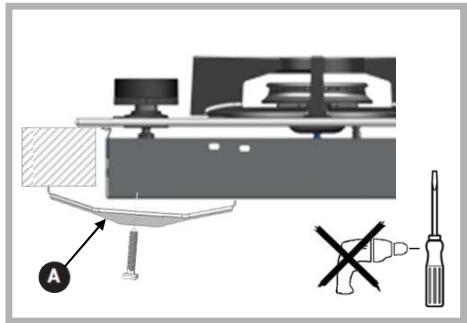
you can secure the hob in position, using the two fixing clamps A and screws supplied supplied (1.1.5) fixing them to the two corners of the housing. It is essential that you use the holes provided for the purpose, as per the drawing (1.1.3).
Stop screwing when the clamp starts to bend.
Do not use a power screwdriver.
1 INSTALLATION
1.2 - ELECTRICAL CONNECTION :
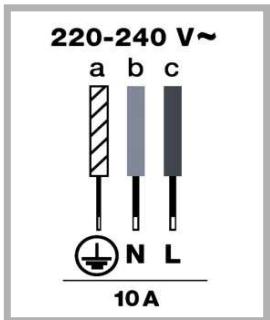
Your hob is supplied with a H05V2V2F - T90 3-core (phase, neutral + earth) mains cable, section 1 mm2) after sales and must be connected to a 220-240 V~single phase mains supply via a phase, neutral +earth socket meeting standard IEC 60083 or an omnipolar isolator with a contact air gap of at least 3.5 mm.
The plug must be accessible after the hob is installed.
| Cross section of the cable to be used | |
| 220-240 V-- 50 Hz gas and mixed | |
| Cable H05V2V2F - T90 | Three conductors, one of which is an earth |
| Cross section of conductors in mm2 | 1 |
| Fuse | 10 A |

The protective conductor
(green/yellow) is connected to the earth terminal 12 on the hob and must also be connected to the installation's earth terminal 12 . The fuse for the installation should be 10 amperes (1.2.1).
If the supply cable is damaged, it must be replaced by a cable or special set available from the manufacturer or its after-sales department.
So that you can find the references for your appliance without difficulty in the future, we recommend that you make a note of them on page (6.1.1) "After-sales service and customer relations" (that page also tells you where to find them on your appliance).
If the hob is to be installed above an oven or if other nearby heating appliances could heat and damage the gas hose, then it is essential that a rigid pipe is installed instead.
If a flexible hose is used (as is the case of butane gas) then it must not be installed in a place where it may be in contact with a moving part of the kitchen unit or a location likely to get cluttered.

No flexible hoses with a limited
service life may be longer than 2 metres and must be accessible for inspection along their entire length. They must be replaced before their expiry date (printed on the hose). Whatever means of connection is chosen, make sure that it is gastight when installed, using soapy-water. In France, you must use a hose or pipe stamped NF Gaz .
The gas connection must comply with the regulations in force in the country where it is installed.
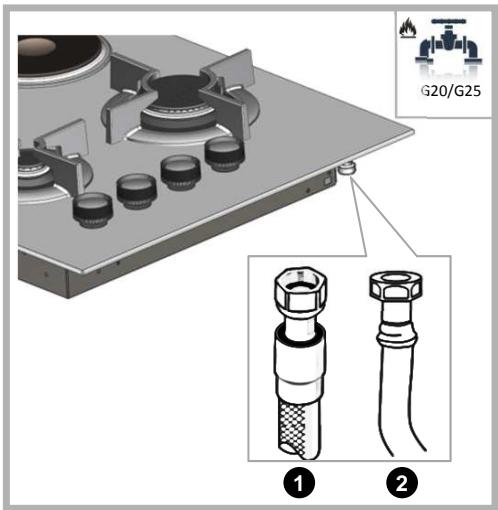
- Mains natural gas (1.3.1).
For your safety, you must choose only one of the following three connections:
-
Connection via a rigid copper pipe with mechanical screw connectors ( 12 " gas standard).
-
Connect directly on to the elbow on the appliance.
1 INSTALLATION
1 Connection via a flexible metal hose (stainless steel) with screw connectors (meeting standard NF D 36-121); the life of such hoses is not limited.
Connection with a flexible reinforced rubber hose with mechanical screw connectors (meeting standard NF D 36-103) with a 10-year life.
When connecting the gas to your hob, if you have to change the direction of the elbow fitted into the appliance:
- Change the seal.
- Tighten the nut on the elbow ensuring that you do not exceed a tightening torque of 17 N.m.
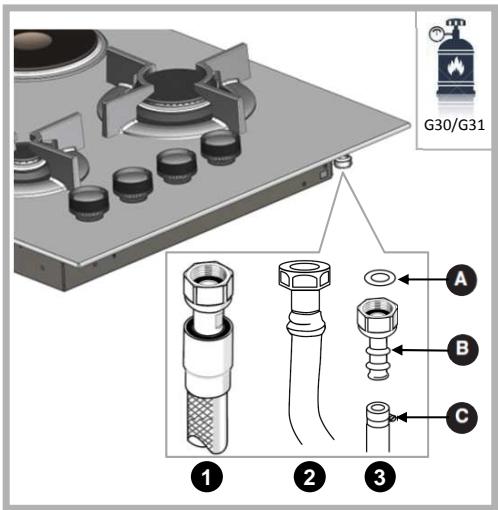
Gas supplied from a cylinder or tank (butane/propane gas) (1.3.2).
For your safety, you must choose only one of the following three connections:
1 Connection via a rigid copper pipe with mechanical screw connectors (12'' gas standard). Connect directly to the elbow on the appliance.
Connection with a flexible metal hose (stainless steel) with screw connectors (to standard NF D 36-125); the life of such hoses is not limited.
3 Connection with a reinforced flexible rubber hose with mechanical screw connectors (meeting standard NF D 36-112) with a 10-year life.
In an existing installation, a flexible hose fitted with jubilee clips (meeting standard XP D 36-110) whose service life is limited to 5 years may be used. In this case an end connector must be used with a sealing washer A fitted between the end connector B and the elbow on the hob.
You can purchase the end connector and the sealing washer from your after-sales department.
Tighten the end connector to a torque not exceeding 25 N.m.
1.4 - CHANGING THE TYPE OF GAS :
Your appliance is supplied ready for use with natural gas. The injectors required for adapting it to butane/propane can be found in the plastic bag containing this guide.
Whenever you change the gas type, you must follow these steps in turn:
- Change the gas connection,
- Change the injectors,
- Adjust the retarder on the taps.
1) To change the gas connection: refer to the "Gas connection" paragraph.
2) Change the injectors, proceeding as follows:
- Remove all the supports, burner caps and heads.
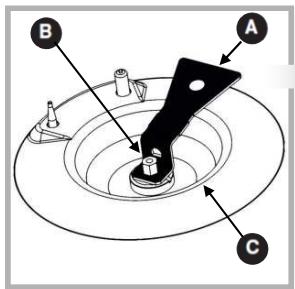
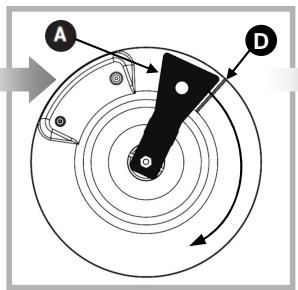
- Unscrew the injectors B, in the bottom of each well, using the spanner provided A and remove them (1.4.1).
1 INSTALLATION
- Replace them with injectors for the gas to be used, as shown in the gas characteristics table (2.2.4); for this:
- Tighten them by hand as far as possible.
- Position the spanner fully on the injector.
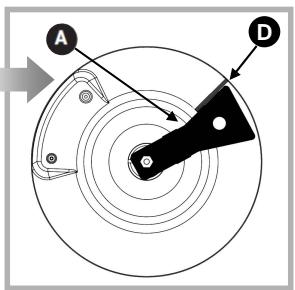
- With a pencil, draw a line ① on the base plate at the location shown (1.4.2).
- Turn the spanner clockwise until the line D appears on the other side (1.4.3).
Do not go beyond this limit; you could to damage the product.
- Re-fit the burner heads, caps and pan supports.
Every time you change the type of gas used, tick the appropriate box on the label in the wallet. Refer to the "corresponding gas connection" paragraph.
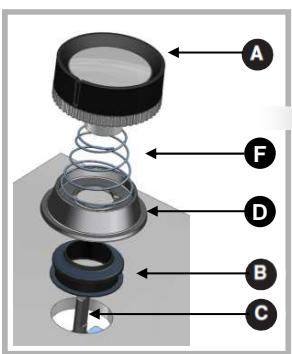
3) Set the retarders on the taps : these can be found under the handles A (1.4.4).
Adjust each tap in turn.
- Remove the knobs A and sealing washers B by pulling them upwards.
- Changing from natural gas to butane/propane :
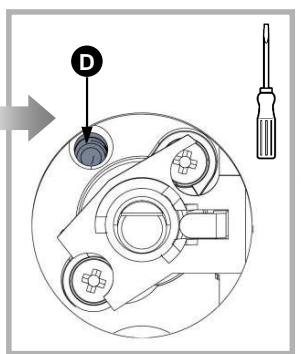
- Using a small flat screwdriver, fully tighten the brass retarders (yellow) D (1.4.5), in a clockwise direction (1.4.5.1).
- Re-fit the sealing washers and knobs, ensuring that you orient them correctly and that the 3 knobs are pushed on fully.
- Changing from butane/propane to natural gas
-
Loosen the adjusting screws in the brass retarders (yellow) (1.4.5), using a small, flat screwdriver, by 2 turns anti-clockwise (1.4.5.2).
-
Refit the knob A,
- Light the burner in the maximum position and then move to the low position.
- Remove the knob A again, then turn the adjusting screw clockwise as far as the lowest possible position before the flame goes out.
- Re-fit the sealing washer B and the knob A.
- Move the knob from maximum to minimum a few times: the flame should not go out; if it does, loosen the adjustment screw so that the flame stays alight during these movements.
1.5 - MARKINGS ON THE INJECTORS:
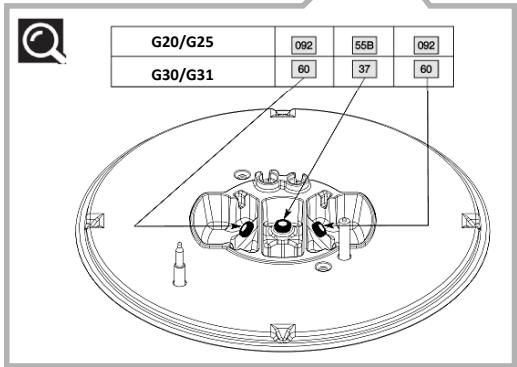
The table (1.5.2) shows where the injectors are positioned on your appliance according to the type of gas used.
Each number is marked on the injector.
2.1 - SWITCHING ON THE GAS BURNERS
The gas burners operate safely due to a metal tab right next to the flame. Each burner is controlled by a tap fitted with a safety system which, if the flame accidentally goes out (spills, draughts, etc.) the gas inlet is quickly and automatically switched off and gas is prevented from escaping.
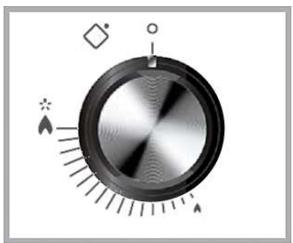
Each burner is supplied from a tap, which is opened by pressing and turning the knob anti-clockwise.
The "O" point corresponds to the tap being off.
- Choose the desired burner by using the symbols located near the knobs (e.g.: right rear burner) (2.1.1).
To light a burner:
- Press the knob and turn it a counterclockwise direction to the maximum setting.
- Holding the knob pressed will cause a series of sparks until the gas lights.
- Adjust the setting by turning to between the symbol and symbol .
If the flame goes out, light it again normally, following the lighting instructions.
The burner flames are smaller near the grid supports to protect the enameled grid.
The noise made by some burners is the result of their high power and burning gas; this in no way adversely affects cooking quality.
If the flow is interrupted, place a match
close to the previously lit burner.
Hold the knob pushed in fully for a few seconds after the flame appears, so as to trigger the safety system.
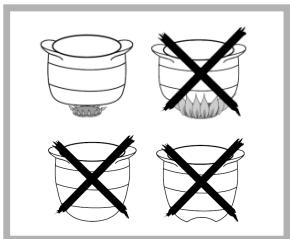
- Adjust the ring of flames so that it does not overflow the edge of the pan (2.1.2).
- Do not use a pan with a concave or convex bottom (2.1.2).
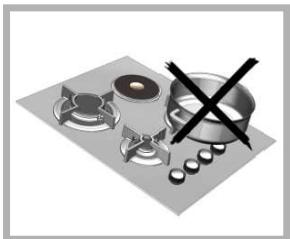
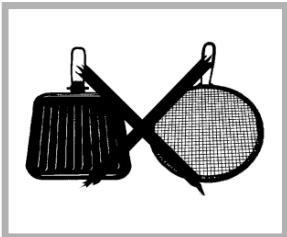
- Do not use pans that partly cover the knobs (2.1.3).
- Do not leave the gas on under an empty pan.
Keep all natural air-vents in the room open or have a mechanical ventilation system installed (a mechanically ventilated hood). Prolonged, intensive use of the hob may require extra ventilation, for example, by opening a window, for example, or more efficient ventilation by increasing the level of mechanical ventilation, where fitted (a minimum air input of 2 m3 per hr per kW of gas power is required).
Example: 60 cm - 4 gas burners.
Total power:
1. 5 + 2. 2 5 + 3. 1 + 0. 8 5 = 7. 7 kW
7.7kW× 2 = 15.4m3 per hr minimum flow.
2.2 - Cookware for gas burners
| Pan diameter | Burner | Use |
| 20 to 30cm | Triple crown | |
| 18 to 28cm | Super Fast | Frying - Boiling |
| 16 to 22cm | Fast | Searing foods |
| 12 to 20cm | Semi-Fast | Sauces - Reheating |
| 8 to 14cm | Auxiliary | Gentle simmer |
2.3 - Switching on the electric hotplate (depending on model).
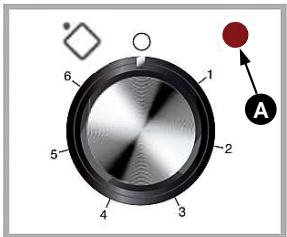
Turn the knob to the mark for the required cooking (2.3.1)
The plate's power on A indicator lights.
When using for the first time, allow the plate to heat at maximum speed with no pan on it for three minutes to harden the coating.
Use the right size pan: the bottom of the pan should be no smaller than the diameter of the hotplate (2.3.2).
-
Do final cooking with the knob turned to the "0" position, to get the benefit of the heat built up in the plate.
-
Use a lid on your pan whenever possible, to reduce heat loss through evaporation.
Do not leave an electric hotplate on without a pan on it (except when using for the first time) or with an empty pan on it.
- An electric hotplate stays hot for some time after turning the knob to the "0" position. Do not touch this area; you could burn yourself.
2.4 - The pans best suited to an electric hot plate (depending on the model)
Use flat-bottomed pans that sit perfectly on the plate :
o stainless steel with a thick tri-metal or "sandwich" bottom,
o aluminium with a thick (smooth) bottom,
enamelled steel
3.1 - MAINTAINING YOUR APPLIANCE
Ignoters and injectors:
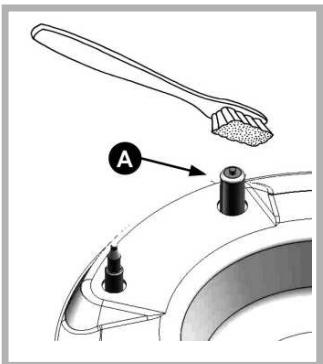
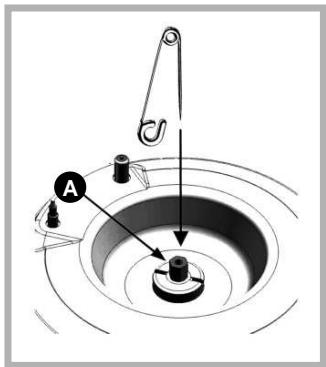
If the igniters become dirty A, clean them with a small, stiff (non-metallic) brush (3.1.1).
The gas injectors are located in the centre of each burner in the well shape. Ensure that you do not block them during cleaning, which could impair your hob's performance.
If you do block them, use a safety pin to unblock the injector (3.1.2).
Pan holders and gas burners:
For persistent stains, use a non-abrasive cream, and then rinse with clean water. Carefully wipe each part of the burner before using your hob again.
Electric hotplate:
The hotplate is protected with a black coating; the use of any abrasive product should be avoided. After each use, wipe it with an oily rag.
If the plate starts to rust, remove the rust (with emery cloth, for example) and replace the black coating with a commercially available high temperature renovating product.
Enamel or stainless steel:
Use a scouring cream to clean the hob's enamel. Shine using a dry cloth.
Glass worktop :
Clean with warm water and then wipe. For tough stains, use products designed for vitroceramic glass (e.g.: Cera-clen).
Do not allow acid liquids such as lemon juice, vinegar, etc. to remain on the enamel
To clean the hob's stainless steel, use a sponge and soapy water or a commercially available stainless steel cleaner.

- Your hob will be easier to maintain if prior to use. Turn off all electrical and controls.

Preferably clean hob components by rather
than in the dishwasher,
do not use scourers to clean your hob,
o do not use steam cleaners.
4 PROBLEMS & SOLUTIONS
Lighting burners.
There are no sparks when I push down on the knobs:
Check that your hob is electrically connected; check that the igniters are clean-,
- Check that burners are clean and properly assembled,
Of the hob is fixed to the worktop, make sure that the fixing clamps have not been twisted,
Check that the sealing washers under the knobs have not come out of their locations.
□ When I press a knob, there are sparks on all burners at
Once.
This is normal. The lighting system is centralised and all the burners spark at the same time.
There are sparks but the burners do not light.
Check that the gas inlet is open,
If you use gas tanks or cylinders check that they are not empty.
If you have just installed your hob or changed a gas cylinder, keep the knob fully pressed for a few seconds to allow gas to arrive at the burners.
Check that the injector is not blocked and, if it is, unblock it with a safety pin.
- When lighting, flames ignite but go out when the knob is released.
Press the knobs as far as they will go and maintain the pressure for several seconds after flames appear.
- Check that the burner components are correctly positioned.
Check that the sealing washers under the knobs have not come out of their locations.
○ Avoid strong draughts in the room.
Light the burner before placing a pan on it.
In the low position, the burner goes out or flames remain too high.
o Void strong draughts in the room.
- Check that the injectors fitted are the right ones for the gas being used (see the identification on the injectors in the "Changing gas type" section).
Reminder: Remember that gas hobs are delivered set up for use with mains gas (natural gas).
Check that the retarder screws are properly adjusted (see "Changing gas type" paragraph).
The flames have an irregular appearance.
Check that the burners and injectors underneath them, burner assemblies, etc. are clean.
Knobs become hot during cooking
- Use smaller pans on the burners close to the knobs. Put large pans on the larger burners, further away from the knobs.
- Place the pan in the centre of the burner. It should not sit over the knobs.
5.1 - CARING FOR THE ENVIRONMENT
This appliance's packing materials are recyclable.
Recycle them and help to protect the environment by disposing of them in the council receptacles provided for this purpose.
Your appliance also contains various recyclable materials. It is therefore marked with this logo to indicate that, in European Union countries,
used appliances must not be mixed with other waste. Appliance recycling organised by your manufacturer will thus be carried out in optimum conditions, in accordance with European directive 2002/96/EC on waste electrical and electronic equipment. Consult your local authority or your retailer to find the drop-off points for used appliances nearest to your home. We thank you for your help in protecting the environment.
PERSONAL NOTES
PERSONAL NOTES
PERSONAL NOTES
6 SERVICE CONSOMMATEURS
6.1 - SERVICE CALLS
Any maintenance on your equipment should be undertaken by:
- either your dealer,
- or another qualified mechanic who is an authorized agent for the brand appliances.
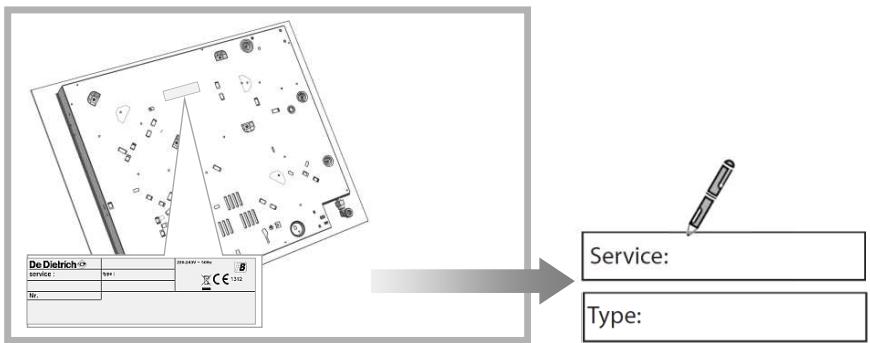
When making an appointment, state the full reference of your equipment (model, type and serial number). This information appears on the manufacturer's nameplate attached to your equipment (6.1.1).
Find full information about the brand at :
www.de-dietrich.com



- TABLE DE CUISSON
- 1
- 2
- 3
- 5
- 6
- CHÈRE CLIENTE, CHER CLIENT
- RELATIONS CONSOMMATEURS FRANCE
- TABLE OF CONTENTS
- EN
- IMPORTANT SAFETY INSTRUCTIONS - READ CAREFULLY AND RETAIN FOR FUTURE USE.
- SAFETYINSTRUCTIONS
- ·IDENTIFICATION
- INSTALLATION
- 1.1-FITTING:
- - ELECTRICAL CONNECTION :
- - Mains natural gas (1.3.1).
- - CHANGING THE TYPE OF GAS :
- Do not go beyond this limit; you could to damage the product.
- Every time you change the type of gas used, tick the appropriate box on the label in the wallet. Refer to the "corresponding gas connection" paragraph.
- - Changing from natural gas to butane/propane :
- - Changing from butane/propane to natural gas
- - MARKINGS ON THE INJECTORS:
- - SWITCHING ON THE GAS BURNERS
- - Cookware for gas burners
- - Switching on the electric hotplate (depending on model).
- - The pans best suited to an electric hot plate (depending on the model)
- - MAINTAINING YOUR APPLIANCE
- Ignoters and injectors:
- Pan holders and gas burners:
- Electric hotplate:
- Enamel or stainless steel:
- Glass worktop :
- PROBLEMS & SOLUTIONS
- Lighting burners.
- □ When I press a knob, there are sparks on all burners at
- Once.
- - When lighting, flames ignite but go out when the knob is released.
- In the low position, the burner goes out or flames remain too high.
- The flames have an irregular appearance.
- Knobs become hot during cooking
- - CARING FOR THE ENVIRONMENT
- PERSONAL NOTES
- SERVICE CONSOMMATEURS
- - SERVICE CALLS
Brand : DARTY
Model : DPG7340B
Category : Cooking