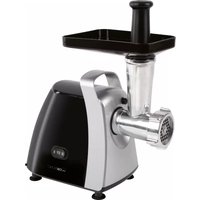
KM 3067 - Food Processor CLATRONIC - Free user manual and instructions
Find the device manual for free KM 3067 CLATRONIC in PDF.
| Brand | Clatronic |
| Model | KM 3067 |
| Product type | Food processor |
| Power supply | 230 V, 50 Hz |
| Rated power | 600 W |
| Maximum power | 1000 W |
| Protection class | II |
| Bowl capacity | 2 kg dough (max) |
| Number of speeds | 6 speeds + Pulse function |
| Pulse function | Yes, interval operation |
| Main functions | Mixing, kneading, whisking, mincing meat, making sausages, cookies |
| Included accessories | Dough hooks, mixing beaters, whisk beaters, meat grinder with knife and discs, sausage attachment (large/small), cookie attachment, pusher |
| Maintenance | Motor unit cleaned with damp cloth; food contact parts washable with soapy water; do not put in dishwasher; dry and oil discs after washing |
| Safety | Splash protection, bowl lock, automatic shutdown not mentioned, do not leave unattended |
| Warranty | 24 months |
| Continuous operation time | 10 minutes max (thick dough) then 10 minutes rest |
Frequently Asked Questions - KM 3067 CLATRONIC
User questions about KM 3067 CLATRONIC
0 question about this device. Answer the ones you know or ask your own.
Ask a new question about this device
Download the instructions for your Food Processor in PDF format for free! Find your manual KM 3067 - CLATRONIC and take your electronic device back in hand. On this page are published all the documents necessary for the use of your device. KM 3067 by CLATRONIC.
USER MANUAL KM 3067 CLATRONIC
Mincer accessory/ assembly
D-47906 Kempen/Germany

General Safety Instructions
Read the operating instructions carefully before putting the appliance into operation and keep the instructions including the warranty, the receipt and, if possible, the box with the internal packing.
- The appliance is designed exclusively for private use and for the envisaged purpose. This appliance is not fit for commercial use. Do not use it outdoors (except if it is designed to be used outdoors). Keep it away from sources of heat, direct sunlight, humidity (never dip it into any liquid) and sharp edges. Do not use the appliance with wet hands. If the appliance is humid or wet, unplug it immediately. Do not put it in water.
- When cleaning or putting it away, switch off the appliance and always pull out the plug from the socket (pull on the plug, not the cable) if the appliance is not being used and remove the attached accessories.
- Do not operate the machine without supervision. If you should leave the workplace, always switch the machine off or remove the plug from the socket (pull the plug itself, not the lead).
- Check the appliance and the cable for damage on a regular basis. Do not use the appliance if it is damaged.
- Do not try to repair the appliance on your own. Always contact an authorized technician. To avoid the exposure to danger, always have a faulty cable be replaced only by the manufacturer, by our customer service or by a qualified person and with a cable of the same type.
Use only original spare parts. - Pay careful attention to the following "Special Safety Instructions".
Children
In order to ensure your children's safety, please keep all packaging (plastic bags, boxes, polystyrene etc.) out of their reach.
Caution! Do not allow small children to play with the foil as there is a danger of suffocation!
- To protect children from the dangers posed by electrical appliances, make sure that the cable is hanging low and that children do not have access to the appliance.
Special safety Instructions for this Machine
Only operate this machine under supervision.
- Do not interfere with any safety switches.
- Do not insert anything into the rotating hooks while the machine is working.
- Place the machine on a smooth, flat and stable working surface.
- Do not insert the mains plug of the machine into the power socket without having installed all the necessary accessories.
Only the pusher should be used for refilling the mincer.
- Danger of overloading! Please use the device either as a mincer or mixer, but never both functions at the same time.
Symbols in these Instructions for Use
Important information for your safety is specially marked. It is essential to comply with these instructions in order to avoid accidents and prevent damage to the machine:
WARNING:
This warns you of dangers to your health and indicates possible injury risks.
CAUTION:
This refers to possible hazards to the machine or other objects.
NOTE: This highlights tips and information.
Overview of the Components
1 Drive shaft
2 Helix drive cover
3 Mixing bowl
4 Arm
5 Lever for raising and lowering the arm
6 Machine housing
7 Pulse operation and level regulator
8 Mixing bowl splash guard
9 a Kneading hook
9b Whisk
9c Stirrer
10 Spiral Housing
11 Spiral
12 Blades
13 Sieve
14 Lock
15 a Sausage attachment, large
15 b Sausage attachment, small
15 c Adapter for 15
16 Screw
17 Filling Tray
18 Presser Meat Mincer
19 Biscuit Attachment
20 Biscuit Attachment
21 Slide
Using the Mixing Bowl
- Place the mixing dish into its holding device and turn the dish in the direction of LOCK until it locks into place.
- In order to lift the arm, press the lever (5) downwards in the direction of the arrow. The arm will now move upwards.
- Mount the required utensil by inserting the top into the drive shaft and locking the cotter pin in the shaft by turning to the right.
- Now fill in your ingredients.
Do not overfill the machine - the maximum quantity of ingredients is 2kg .
- Lower the arm using the lever (5).
-
Insert the mains plug into a properly installed 230V / 50Hz safety power socket.
-
Switch the machine using the level regulator to a speed between 1 and 6 (corresponding to the mixture).
- For pulse operation (kneading at short intervals), turn the switch to the "PULSE" position. The switch has to be held in this position according to the desired interval length. When the switch is released it returns automatically to the "0" position.
Adjusting the Levels and Using the Hook for not more than 2kg of Mixture
| Levels | Use | Type of Mixture |
| 1-2 | Kneading hook | Heavy mixtures (e.g. bread or short pastry) |
| 3-4 | Stirrer | Medium-heavy mixtures (e.g. crepes or sponge mixture) |
| 5-6 | Whisk | Light mixtures (e.g. cream, egg white, blanc mange) |
| PULSE | Whisk | Interval (e.g. for mixing under sponge, egg white) |
i NOTE:
- Short operation time: With heavy mixtures, do not operate the machine for more than ten minutes, and then allow it to cool down for a further ten minutes.
-
Use the splash guard to protect against liquid mixtures.
-
After kneading/stirring turn the switch (7) back to the 0^ position as soon as the mixture has formed a ball. Then remove the mains plug.
- Press the lever (5) downwards and the arm will be raised.
- The mixture can now be released with the help of a spatula and removed from the mixing bowl.
- The mixing bowl can now be removed by turning to the left.
- Clean the parts as described under „Cleaning".
Suggested Recipes
Sponge Mixture (Basic Recipe) Level 3-4
Ingredients:
250 grams soft butter or margarine, 250 grams sugar, 1 packet vanilla sugar or 1 bag Citro-Back, 1 pinch of salt, 4 eggs, 500 grams wheat flour, 1 packet baking powder, approx. 1/8 litre milk.
Preparation:
Transfer the wheat flour and the remaining ingredients to the mixing bowl, stir with the stirrer for 30 seconds on level 1, then for approximately 3 minutes on level 3. Grease a tin or cover with baking paper. Fill in the mixture and bake. Before the cake is removed from the oven, test to see if it is done. With a sharp wooden stick pierce the centre of the cake. If no mixture sticks to it, the cake is cooked. Turn the cake on to a cake grid and allow to cool.
Traditional Oven
Insertion height: 2
Heating: electric oven, top and bottom heat
175-200° Celsius;
gas oven: level 2-3
Baking time: 50-60 minutes
Depending on taste, this recipe can be changed, for example with 100g raisins or 100g nuts or 100g grated chocolate. In fact, the possibilities are endless.
Linseed Bread Rolls
Level 1-2
Ingredients:
500-550g wheat flour, 50g linseed, 3/8 litre water, 1 cube of yeast (40g), 100g low-fat curds, well drained, 1 tsp salt. For coating: 2 tbsp of water
Preparation:
Soak the linseed in 1/8 litre of lukewarm water. Transfer the remaining lukewarm water (1/4 litre) into the mixing bowl, crumble in the yeast, add the curds and mix with the kneading hook on level 2. The yeast must be completely dissolved. Put the flour with the soaked linseed and the salt into the mixing bowl. Knead thoroughly on level 1, then switch to level 2 and continue kneading for 3-5 minutes. Cover the mixture and allow to rise in a warm place for 45-60 minutes. Knead thoroughly once more, remove from the bowl and form sixteen rolls. Cover the baking tin with wet baking paper. Place the rolls on this and allow to rise for 15 minutes. Coat with lukewarm water and bake.
Traditional Oven:
Insertion height: 2
Heating: electric oven: top and bottom heat 200-
220^ Celsius (preheated for 5 minutes),
gas oven level 2-3
Baking time: 30-40 minutes
Chocolate Cream
Level 5-6

Ingredients:
200 ml sweet cream, 150g semi-bitter chocolate coating, 3 eggs, 50-60g sugar, 1 pinch of salt, 1 packet of vanilla sugar, 1 tablespoon cognac or rum, chocolate flakes
Preparation:
Beat the cream in the mixing bowl with the whisk until stiff.
Remove from the bowl and place somewhere to cool.
Melt the chocolate coating in accordance with the instructions on the packet or in the microwave at 600W for 3 minutes. In the meantime, beat the eggs, sugar, vanilla sugar, cognac or rum and salt in the mixing bowl with the whisk on level 3 to form a foam. Add the melted chocolate and stir in evenly on level 5-6. Leave a little of the cream for decoration. Add the remaining cream to the creamy mixture and stir in briefly using the pulse function.
Decorate the chocolate cream and serve well cooled.
Meat mincer
IInitial Operation - General
- Remove the cover (2) from the helix drive and take out the screw (16).
- Place the spiral housing (10) with the filler neck facing upwards into the spiral drive and turn the screw (16) clockwise until it is closed.
- Place the filling tray on the filler neck in such a way that the receptacle of the tray is positioned under the arm.
- Push the spiral into the horizontal section of the spiral housing until the axle locks in place.
Please see the sections on "Operating the Mincer" and "Sausage Attachment".
Operation Meat mincer (see illustration A)
NOTE:
Cut the meat into pieces of about 2.5cm . Please take care that the meat does not contain any bones or sinews.
- First place the blade on the end of the helix and then a screen of your choice. Please pay attention to the screen and the recesses on the helix housing. Screw the lock (14) on until it is ,hand tight".
- Put the pieces of meat on to the filling tray (17) and into the filler neck.
- Place a vessel under the exit.
- Please ensure that the function switch (7) is turned to „Off".
- Connect the device to a 230 V, 50 Hz safety contact power socket.
- Turn the mincer on by the switch (7).
- If necessary push the meat with the presser (18). Please do not follow this up with your fingers.
Operation Sausage Attachment (see illustration B)
- Place the adapter (15c) on the axle of the spiral auger.
- Insert a sausage attachment (15a or b) into the lock. Attachment a is for thick sausages, attachment b for thin sausages.
- Turn the lock, hand tight on to the spiral housing.
- Push the sausage skin (using either real or synthetic skin) over the sausage skin and knot the end.
- Fill the sausage paste on to the filling tray and into the filler neck.
- Repeat steps 4 to 7 as described in „Operation Meat Mincer".
- The sausage mixture is pressed through the sausage attachment and filled into the sausage skin.
- When the first sausage has reached the desired length, squeeze it together with your fingers at the end of the sausage top. Turn the sausage around its own axis once or twice.
I NOTE:
Levels 1 to 4 are suitable for mincer operation.
- Do not operate the device for more than 10 minutes and then allow it to cool down for a further 10 minutes.
I NOTE:
- You can turn off the device after each single sausage length until you are more experienced.
- Carry out step 8 as described. Then turn on the meat mincer again.
If you decide to use real skin, let it soak in water for a while before use.
Take care that the sausage skin is filled „loosely“ as during boiling or frying the sausage expands and the skin might tear.
Operation with Biscuit Attachment (see illustration C)
- Please follow points 1 to 4 as described under "Initial Operation".
- Unscrew the biscuit attachment and select the desired biscuit cutter.
- Put the mixture on to the filling tray and the filler neck.
- Please ensure that the function switch (7) is turned to „Off".
- Connect the device to a 230 V, 50 Hz safety contact power socket.
- Turn the mincer on by the screw (7).
- If necessary, push the mixture further down with the pusher (18). Do not touch with your fingers.
- Hold the elongated mixture at the exit and cut it off at the desired length.
Cleaning
Before cleaning remove the mains lead from the socket.
- Never immerse the housing with motor in water!
- Do not use any sharp or abrasive detergents.
Motor Housing
Only a damp rinsing cloth should be used to clean the outside of the housing.
Mixing Bowl, Mixing Equipment and Components of the Mincer
CAI
The components are not suitable for cleaning in a dishwasher. If exposed to heat or caustic cleaners they might become misshapen or discoloured.
- Components that have come into contact with food can be cleaned in soapy water.
!
WARNING:
The blade of the mincer is very sharp! Danger of injury!
- Allow the parts to dry thoroughly before reassembling the device.
- Please apply a small quantity of vegetable oil likely to the screens after they have dried.
Noise development
The sound pressure level in the ear of an operator (LpA) was measured according to DIN EN ISO 3744.
Sound pressure level detected: 86.2 dB(A) (no limit)
Technical Data
Model: KM 3067
Power supply: 230 V, 50 Hz
Power consumption:
Pnom. 600W
Pmax: 1000 W
Protection class: II
Short operation time: 10 Min.
This device has been tested according to all relevant current CE guidelines, such as electromagnetic compatibility and low voltage directives, and has been constructed in accordance with the latest safety regulations.
Subject to technical changes without prior notice!
Guarantee
The device supplied by our Company is covered by a 24 month guarantee starting on the date of purchase (receipt).
During the life of the guarantee any fault of the device or its accessories ascribable to material or manufacturing defects will be eliminated free of charge by repairing or, at our discretion, by replacing it. The guarantee services do not entail an extension of the life of the guarantee nor do they give rise to any right to a new guarantee!
Proof of the guarantee is provided by the proof of purchase. Without proof of purchase no free replacement or repair will be carried out.
If you wish to make a claim under the guarantee please return the entire machine in the original packaging to your dealer together with the receipt.
Defects to consumables or parts subject to wearing as well as cleaning, maintenance or the replacement of said parts are not covered by the guarantee and hence are to be paid!
The guarantee lapses in case of unauthorized tampering.
After the expiry of the guarantee
After the expiry of the guarantee repairs can be carried by the competent dealer or repair service against the payment of the ensuing costs.

Meaning of the "Dustbin" Symbol
Protect our environment: do not dispose of electrical equipment in the domestic waste.
Please return any electrical equipment that you will no longer use to the collection points provided for their disposal.
This helps avoid the potential effects of incorrect disposal on the environment and human health.
This will contribute to the recycling and other forms of reutilisation of electrical and electronic equipment.
Information concerning where the equipment can be disposed of can be obtained from your local authority.
Ipeed nauJAmO 3KcNpyaTuHnPb6oBa BHNMaTeNbHO npouHTaIe PnpHaAeMyU HNCTPyUcHNO NO 3KcNpyaTuAChn IN COxpaHNTe ee B HAeJXHM OMeCTe, BMeCTe C rapaHTnHBtM TaHONOM, KACCobBt YKeHm, N, PO Bo3MOXHOCTN, KAPTOHHO KoPO6kOc C yNAKOBOCHbM MaTePNaHOM.
Пльзутесь пиборм только частьим образим И по насточени. Пибор He рпеднастен Дд КСММерческо Истльстен. He nolьштесь пиборм пОД оТКрытим НБСМ (ИСКИLOЧА рпборы, 3КСПЛУТАЦИ KOTOPBIX ПОД OTKРытим НБСМ ДОпсТМ). Ппedoхангte пибор OT karpy, рпмьх солн electhы Л ueь, Влжноctи (НВ в Koem сные He norgpykaite erO B vody) И у导航Ов ectPBye rylb. He pnpkacaiTeC k Pnpi6pby BlaKhbIM pykam. EcIn pnp6p byBnaJHnIcR nINI HAMOK, TUT XE BvHbTe BINKy I3 pO3eTKn. He npnkacaiTeC b MOKpbIM MeCTAm.
Iocne 3KcNpyatauMn,MOHTaKe npHaJaEeKHOCTeY,CHCTKe HnnoJIOLOMKpePb60pa BcERda BbHMaTe BnKy n3 pO3eTKn (TtHNTE 3a BNky,a He 3a Ka6ebnl).
He octabnIte BkHoueHHbIe 3KeTPOnpN6Opbl 6e3 npcMOTpa.EcnB Bo3NHKHT Heo6XoDHMOCTb OTyUHTbC, TO BbIKIOHTe 3KeTPOnpN6Op UIN BbIHbTe BNk Ky n3 pO3ETKN (TANHTE 3a BNkky,a He 3a Ka6EJIb).
- PergyIaRHO oCMAtpnBaIte pnp6Op n KaIeIb Ha npEiMet BO3MOxHbIX NOBpeXJeHNI. Hn B KOem Cnyuae He BKIOUaYte pnp6Op, IMHeOUIN NOBpeXJeHNI.
HnB KoeM cnyae He peMOHTnpyIte npN6Op camocToTbHo, a 0baPauJIteScb B TAKOM clyuae 3a NOMUbIO K CNEUHaNCTY, MHeOUEmy COOTBTCTBYOUsI duynck. N3 CoobpaKeHN 6eONacHOCTN, ZAMHa CTeBOrO Uhypa H naPBNO3NaHbI DOnySCAETC ToIbKOpe3 3aBOJ-N3FTOBtEN, NaUY CeRNCHy MoCTepCKyU INI COOTBTCTBYUoE KOBAINPHINPOBaHORO CNEuaJaNCTA.
IcnoIb3yIteToIbKOOpnIHNaJIbHbIe3aHaCTN.
IooKanyIcTa,coBIOdaJIte HNKeCneJeUOuIe ,CneuaJIbHbIe yKa3aHHn ITO texHnke 6e3oNaCHocHT".
Дети
ИЗ coobpaженибezоноасочдпддетeн He octabnite lekaTb yapokBky (Пл actikOBbIe MeLsK, KapTOH, nehoPnactи T.D.) Be3 npICMOTpa.
BHMaHHe! He nO3BOJIaIe DeTnM rIpaTb C pONlNTnEHOB0 PJIeHkoI.
Onachoctb ydyubra!
ДЯЗашты deteOTnpaKeHm3eKtpoTOKOM,CneJnte 3aTeM,yTObI Ka6eBHe BnCen Ige NpAnIO Ndetn He HMeEN DoCTyPa K npBoppy.
CneuaJIbHbIe yka3aHnI IO TEXHnke 6e3ONaChOcTH
He octabJIaIe BkIIIOueHHyIO TcTeOMecITbHyIO MaIINHy 6e3 npICMOTpa.
3aPpeaaeTcMaHnIpynpoBaTb npedoxpaHntBhIe yctpOCTBa.
3anpeuataeTc npkaacbca K bpaauoemyckpoky.
- YctahOBInTe TECTOMeCNTeJIbHyIO MaLIHHy HA POBHOe, HeCKOJIb3KOE pa6OoHcE MecTo.
HnB Koem Cnyuae He BtlyaKeIte BnIKy Bpo3eKy, noka He 6ydyT yctaHOBNEHHb BCE HeoXOIMMbIe DetanHn HacaKn.
Длгдлгдлгдлгдлгдлгдлгдлгдлгдлгдлгдлгдлгдлгдлгдлгдлгдлгдлгдлгдлгдлгдлгдлгдлгдлгдлгдлгдлгдлгдлгдлгдлгдлгдldg
Oanachocb neperpy3kn!NcnoIb3oBaTb yctpoCTBO n60 KaK Mncopy6ky,n60 kaK MnKcep,HO NIKOrda He Obe fYHKsU OJHOBpeMeHHO.
CIMBOJbI pRmHeMaBle B DaHHOM pyKOBoDCTBe NOlb3OBaTeJI
BaxKbIe peKoMeHdaunn DnI O6cpeHnna BaUe 630aNacOCTn 603NaueHb IIO Ooc6EHOMy. O63aTeJIbHO cIeJyTe 3TNM peKoMeHdaunm, TTO6bl pIpeOTbpaTtB HeCuaCTHb Cnyau NII NIOLOMKY I3DeJIINrA:
PNEUYPENKDEHIE:
Ipeynpejdaet o6 onachoctn dny 3doopobby n Bo3MOxHOM pncke noJyehnra TpaMbly.
BHIMAHHE:
Yka3bIbAeHT Ha BO3MOKHyIO ONaCHOCTb DIn I3dEINH INpyrNX OKpyKaHOxN pEaMeTOB.