
MUM5934D - Food Processor BOSCH - Free user manual and instructions
Find the device manual for free MUM5934D BOSCH in PDF.
| Product type | Food processor |
| Brand | Bosch |
| Model | MUM5934D |
| Power supply | Mains, 220-240 V ~ 50/60 Hz |
| Power | 1000 W |
| Mixing bowl capacity | Up to 750 g flour |
| Number of speeds | 7 speeds + pulse (M) |
| Main functions | Mixing, kneading, whisking, grating, slicing, blending |
| Included accessories | Profi Flexi whisk, Profi balloon whisk, dough hook with deflector, stainless steel mixing bowl, lid, grating/slicing attachment with discs (Profi Supercut, reversible grating disc, medium slicing disc, disc for pancakes), blender, accessory bag |
| Mixing bowl material | Stainless steel |
| Safety | Anti-tangle, anti-restart, overload protection, protective covers |
| Cleaning | Bowl and accessories dishwasher-safe (except plastic parts), base wipe with damp cloth |
| Cord length | 1.00 m (automatic rewinder) |
| Weight | Approx. 6.5 kg |
| Dimensions (W x D x H) | Approx. 280 x 280 x 360 mm |
| Swing arm | Easy Armlift function |
| Drives | 3 drives: for accessories, for grating/slicing, for blender |
| Warranty | According to conditions of country of purchase |
Frequently Asked Questions - MUM5934D BOSCH
User questions about MUM5934D BOSCH
0 question about this device. Answer the ones you know or ask your own.
Ask a new question about this device
Download the instructions for your Food Processor in PDF format for free! Find your manual MUM5934D - BOSCH and take your electronic device back in hand. On this page are published all the documents necessary for the use of your device. MUM5934D by BOSCH.
USER MANUAL MUM5934D BOSCH
Register your new device on MyBosch now and get free benefits: bosch-home.com/ welcome
Universal kitchen machine
MUM59...
[de] Gebrauchsanleitung Universal-Küchenmaschine 3
[en] Instruction manual Universal kitchen machine 16
[fr] Mode d'emploi Robot menager universel 29
[i] Istruzioni per l'uso Robot da cucina universale 43
[nl] Gebruiksaanwijzing Universele keukenmachine 57
[da] Brugsanvising Universalalkokkenmaskine 70
[no] Bruksanvising Universal kjokkenmaskin 83
[sv] Bruksanvisning Universalalkoksmaskin 96
[fi] Käytöohje Yleiskone 109
[es] Instrucciones de uso Robot de cocina universal 122
[pt] Instruções de service Maquina de cozinha universal 137
[el] O\$nyiec x\r#oan KouzivoumXavn 151
[tr] Kullanim kilavuzu Universal mutfak robotu 166
[uk] IHCtpyKzI3 ekCnIyatauii YHIBepCaIbHN KxOHHN KOM6aH 182
[ru] HNCTpykUINIIO 3KcIIyatauIN YHnBepcaIbHa KxOHNa MaHHa 197
[kk] ΠaHdaHaHy HcKaybIbI ΘM6e6aT KOMTaKTbI acXaHa MaunHacbl 215
[ar] 242
This appliance is intended for domestic use only. Use the appliance only for processing normal amounts of food and for normal amounts of time for domestic use. Do not exceed permitted maximum quantities ( "Application examples" see page 25).
The appliance is suitable for mixing, kneading and beating food. The appliance must not be used for processing other substances or objects. Additional applications are possible if the accessories approved by the manufacturer are used. Only use the appliance with approved genuine parts and accessories. Never use the accessory parts for other appliances. Only use the appliance indoors at room temperature and up to 2000m above sea level.
Important safety information
Read and follow the instruction manual carefully and keep for later reference! Enclose these instructions when you give this appliance to someone else. If the instructions for correct use of the appliance are not observed, the manufacturer's liability for any resulting damage will be excluded.
This appliance can be used by persons with reduced physical, sensory or mental capabilities or lack of experience and/or knowledge if they have been given supervision or instruction concerning use of the appliance in a safe way and if they understand the hazards involved. Keep children away from the appliance and connecting cable and do not allow them to use the appliance. Do not let children play with the appliance. Cleaning and user maintenance must not be performed by children.
Risk of electric shock and fire!
- Connect and operate the appliance only in accordance with the specifications on the rating plate. Do not use the appliance if the power cord and/or appliance are damaged. Only our customer service may repair the appliance, e.g. by replacing a damaged power cord, in order to avoid hazards.
- Use only the rotary switch to switch the appliance on or off. Never connect the appliance to timer switches or remote-controllable sockets. Never leave the appliance unattended while it is switched on!
- Do not place the appliance on or near hot surfaces, e.g. hobs. The power cord must not come into contact with hot parts or be pulled across sharp edges.
-
Never immerse the base unit in water or place it in the dishwasher. Do not steam-clean the appliance. Do not use the appliance with damp hands.
-
After each use, whenever the appliance is unsupervised, prior to assembly, prior to disassembly, prior to cleaning and in the event of an error, the appliance must always be disconnected from the mains.
Risk of injury!
Before replacing accessories or additional parts which move during operation, the appliance must be switched off and disconnected from the power supply. After switching off, the drive continues for a short time. Wait until the drive has come to a standstill.
- Do not adjust the swivel arm while the appliance is switched on.
- Only use tools when the bowl is inserted, the lid is fitted and the protective drive covers are in place! When using accessories, fit the bowl, lid and drive covers according to the instructions!
- While operating the appliance, never reach into the bowl or filling shaft with your hands. Do not insert any objects (e.g. wooden spoon) into the bowl or filling shaft. Keep hands, hair, clothing and other utensils away from rotating parts.
- Never use tools and accessories or 2 accessories at the same time. When using the accessories, follow the individual operating instructions enclosed.
- The accessory must be completely assembled before use. Never assemble the accessory on the base unit. The accessory should only be used in the intended operating position.
- Do not grip the sharp blades or edges of the cutting discs. Take hold of cutting discs by the edge only.
- Do not touch blender blades with bare hands.
- Never reach into the attached blender! Never use the blender without the lid in place.
Care shall be taken when handling the sharp cutting blades, emptying the container and during cleaning.
Risk of scalding!
If processing hot liquids, steam escapes through the funnel in the lid. Add a max. 0.5 litres of hot or frothing liquid.
Risk of suffocation!
Do not allow children to play with packaging material.
Caution!
We recommend that the appliance is never switched on for longer than is necessary to process the ingredients. Do not operate at no-load.
Important!
It is essential to clean the appliance thoroughly after each use or after it has not been used for an extended period (→ “Cleaning and servicing” see page 23).
Explanation of the symbols on the appliance or accessory

Follow the instructions in the operating instructions.

Caution! Rotating blades.

Caution! Rotating tools. Do not place fingers in the feed tube.
Congratulations on the purchase of your new Bosch appliance. You can find further information about our products on our website.
Contents
Intended use 16
Important safety information. 16
Safety systems 18
Overview. 18
Operation 20
Cleaning and servicing 23
Storage 24
Troubleshooting 24
Application examples. 25
Disposal. 26
Guarantee. 26
Optional accessories 27
Safety systems
Start lock-out
See "Operating positions" table.
The appliance can be switched on in position 1 and 3 only:
- when the bowl (11) has been inserted and turned until it locks into place.
Restart lock-out
If the power is interrupted, the appliance remains switched on but the motor does not start running again when the power is restored. To switch the appliance on again, turn the rotary switch to 0/off, then switch on.
Overload protection
If the motor switches itself off while the appliance is being used, the overload protection feature has been activated.
A possible cause may be that too much food was processed at one time.
If a safety system is activated, see "Troubleshooting".
The appliance requires no maintenance.
Overview
Please fold out the illustrated pages.
Figure A:
Base unit
1 Release button
2 Swivel arm
"Easy Armlift" function to support the upward movement of the arm (see "Work positions").
3 Rotary switch
When the appliance has been switched off (position 0/off), the appliance runs automatically to the optimum position for changing the tools.
$$ 0 / o f f = S t o p $$
M = Instantaneous switching at maximum speed, hold switch for required blending duration.
Settings 1-7, Operating speed:
1 = low speed - slow,
7 = high speed - fast.
4 Operating indicator
Is lit while the appliance is operating (rotary switch on M or 1-7). Flashes if the appliance has been operated incorrectly, the electronic fuse has tripped or the appliance is defective - see section "Troubleshooting".
5 Drive cover
To remove the drive cover, press on the rear area and remove cover.
6 Drive for
- continuous-feed shredder and
- citrus press (optional accessory*). When not in use, attach the drive cover.
7 Drive for tools
(stirrer, whisk, kneading hook) and mincer (optional accessory*)
8 Blender drive cover
9 Drive for blender
(optional accessory*) When not in use, attach the blender drive cover.
10 Automatic cord winder
Bowl with accessories
11 Stainless steel stirring bowl
12 Lid
Tools
13 Professional flexi stirring whisk
14 Professional beating whisk
15 Kneading hook with dough deflector
16 Accessories bag
For storage of the tools and cutting discs.
Continuous-feed shredder
17 Pusher
18 Cover with filling shaft
19 Cutting discs
a Professional Supercut reversible disc - coarse / fine
b Reversible shredding disc – coarse / fine
c Grating disc - medium-fine
d Potato fritter disc*
20 Disc holder
21 Housing with outlet opening
Blender*
22 Blender jug
23 Lid
24 Funnel
- If an accessory is not included in the product package, it can be purchased via the trade or customer service.
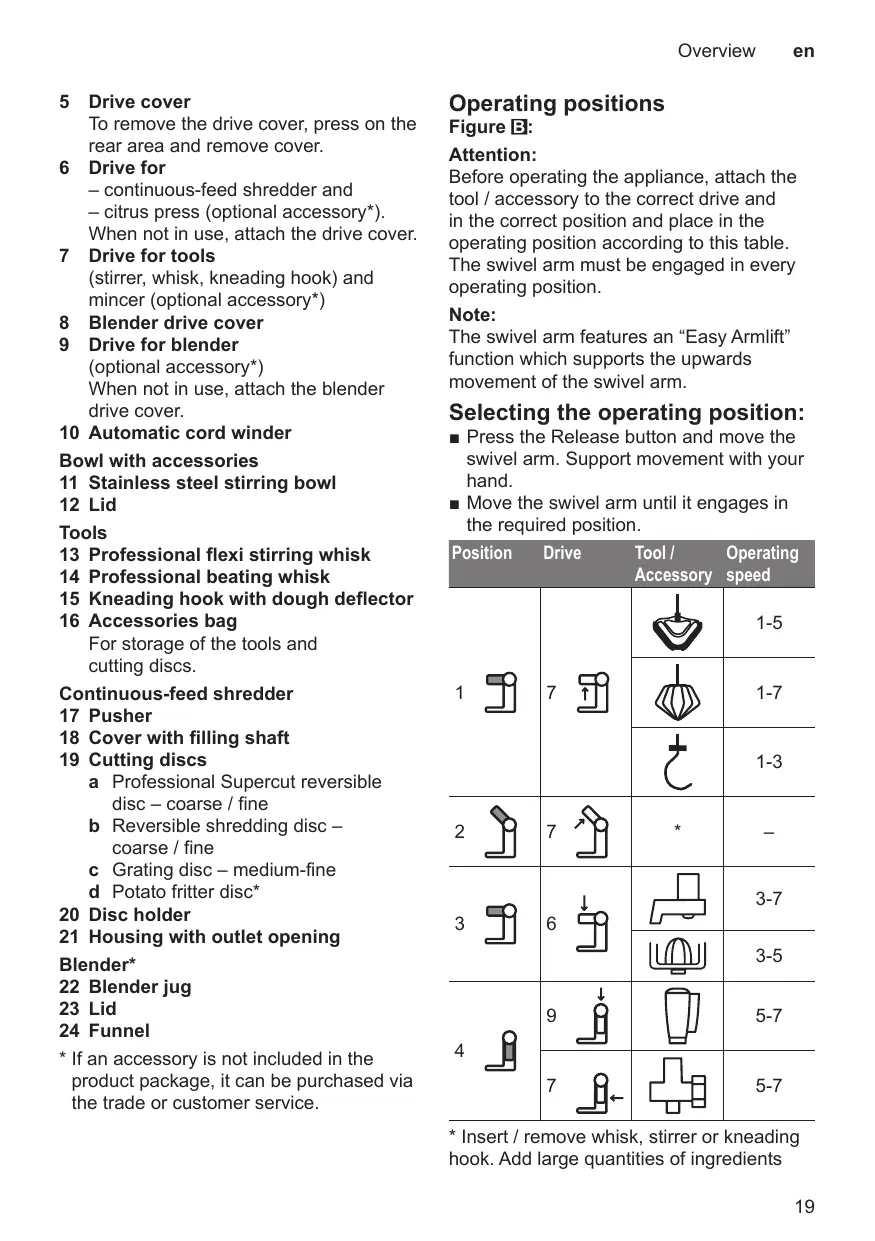
Operating positions
Figure 3:
Attention:
Before operating the appliance, attach the tool / accessory to the correct drive and in the correct position and place in the operating position according to this table. The swivel arm must be engaged in every operating position.
Note:
The swivel arm features an "Easy Armlift" function which supports the upwards movement of the swivel arm.
Selecting the operating position:
Press the Release button and move the swivel arm. Support movement with your hand.
- Move the swivel arm until it engages in the required position.
| Position | Drive | Tool / Accessory | Operating speed |
| 1 | 7 | ↑ | 1-5 |
| 1-7 | |||
| 1-3 | |||
| 2 | 7 | - | |
| 3 | 6 | ↓ | 3-7 |
| 3-5 | |||
| 4 | 9 | ↓ | 5-7 |
| 7 | ← | 5-7 |
- Insert / remove whisk, stirrer or kneading hook. Add large quantities of ingredients
Operation
Risk of injury!
Do not insert mains plug until all preparations for working with the appliance are complete.
Attention!
Do not operate the appliance without an accessory / tool in the operating position. Do not operate the appliance empty. Do not expose appliance or accessories to heat sources. Parts are not microwave-safe.
Before operating the appliance and accessories for the first time, clean thoroughly; see "Cleaning and servicing".
Important information
These operating instructions contain a sticker with reference values for the operating speed of the appliance when using the tools or accessories. We recommend attaching this sticker to the appliance (Figure C).
Preparation
- Place the base unit on a smooth, clean surface.
Pull out the cord in one go to the required length (max. 100cm and slowly release; the cord is locked (Figure D). - Reducing the cord length: Pull gently on the cord and allow it to roll up to the required length. Then gently pull the cord again and slowly release; the cable is locked.
Warning!
Do not twist the cord when inserting it. If the appliance features an automatic cord winder, do not insert the cord manually. If the cord jams, pull out the cord all the way and then allow it to wind up.
Insert the mains plug.
Bowl and tools
Risk of injury from rotating tools!
While the appliance is operating, never place fingers in the mixing bowl. Attach the cover (12) before operating the appliance! Do not change tools until the drive has come to a standstill - when the appliance is switched off, the drive continues running briefly and stops in the tool change position. Do not move the swivel arm until the tool has come to a standstill.
Always secure unused drives with protective drive covers.
Attention!
Use bowl with this appliance only.
Professional flexi stirring whisk (13)
for stirring dough, e.g. cake mixture
Professional beating whisk (14)
for whisking egg whites, cream and light dough, e.g. sponge mixture
Kneading hook (15)
for kneading heavy dough and mixing ingredients that ought not be cut (e.g. raisins and chocolate chips)


Important information concerning the use of the whisk
Figure 1:
The whisk should almost touch the bottom of the bowl to ensure that the ingredients are optimally mixed. If not, adjust the height of the whisk as follows:
Remove mains plug.
Press the Release button and move the swivel arm to position 2.
Insert the whisk into the drive until the whisk locks into position.
Hold whisk in place and loosen nut clockwise using open-ended wrench (size 8).
- Set the whisk to the optimum height by rotating the whisk:
- Turn clockwise: Raise
- Turn anti-clockwise: Lower

Press the Release button and move the swivel arm to position 1.
- Check the height of the whisk and, if required, correct.
- When the height has been set correctly, press Release button and move the swivel arm to position 2.
Hold whisk in place and tighten nut anticlockwise using open-ended wrench (size 8).
Working with the bowl and the tools
Figure 1:
Press the Release button and move the swivel arm to position 2.
Insert the bowl: Tilt the bowl forwards and then set it down. Turn anti-clockwise until it locks into place.
Depending on the processing task, insert the stirrer, whisk or kneading hook until it locks into position.
Note:
If using the kneading hook, rotate the dough deflector until the kneading hook can lock into position (Figure E-4b).
Put the ingredients to be processed into the bowl.
Press the Release button and move the swivel arm to position 1.
- Attach the cover.
- Set the rotary switch to the desired setting.
Our recommendation:
- Professional flexi stirring whisk: First mix at setting 1-2, then setting 3-5 as required
Professional beating whisk: setting 7, mix in at setting 1 - Kneading hook: first stir in at setting 1, knead at setting 3
Adding more ingredients
- Switch off the appliance with the rotary switch.
- Add more ingredients through the feed tube in the cover.
or
Remove lid.
Press the Release button and move the swivel arm to position 2.
Add ingredients.

After using the appliance
- Switch off the appliance with the rotary switch.
Remove mains plug.
Remove lid.
Press the Release button and move the swivel arm to position 2.
Take the tool out of the drive.
Remove the bowl.
Clean all parts, see "Cleaning and servicing".
Continuous-feed shredder
Risk of injury!
Do not grip the sharp blades or edges of the cutting discs. Take hold of cutting discs by the edge only. Before attaching / removing the continuous-feed shredder, wait until the drive has come to a standstill and pull out the mains plug. Do not reach into the feed tube.
Warning!
The continuous-feed shredder must be completely assembled before use. Never assemble the continuous-feed shredder on the base unit. Operate the continuous-feed shredder in the indicated operating position only.
Predetermined breaking point
Figure 6:
The built-in predetermined breaking point protects the drive of the appliance. If an overload occurs, the drive shaft of the continuous-feed shredder breaks. However, the drive shaft can easily be replaced. A new disc holder with drive shaft is available from customer service.
Professional Supercut reversible disc - coarse / fine
for slicing fruit and vegetables.
Process at setting 5.
Designation on the reversible slicing disc: "Grob" for the coarse cutting side "Fein" for the fine cutting side
Warning!
The reversible slicing disc is not suitable for slicing hard cheese, bread, rolls or chocolate. Slice boiled, waxy potatoes only when they are cold.
Reversible shredding disc - coarse / fine
for shredding vegetables, fruit and cheese, except for hard cheese (e.g. Parmesan). Process at setting 3 or 4.
Designation on the reversible shredding disc:
"2" for the coarse shredding side
"4" for the fine shredding side
Warning!
The reversible shredding disc is not suitable for shredding nuts. Shred soft cheese with the coarse side only at setting 7.
Grating disc - medium-fine
for grating raw potatoes, hard cheese (e.g. Parmesan), cooled chocolate and nuts. Process at setting 7.
Warning!
The grating disc is not suitable for grating soft cheese and cheese slices.


Potato fritter disc

For grating raw potatoes for rostis and potato fritters, for cutting fruit and vegetables into thick slices.
Grating: Process at setting 7.
Cutting: Process at setting 5.
Working with the continuous-feed shredder
Figure H:

Press the Release button and move the swivel arm to position 2.
Insert the bowl:
Tilt the bowl forwards and then set it down. Turn anti-clockwise until it locks into place.

Press the Release button and move the swivel arm to position 3.
Remove drive cover from the drive of the continuous-feed shredder (Figure H-5a).
Hold disc holder at the lower end, ensuring that the two tips are face up.
Carefully place the required slicing or shredding disc onto the tips of the disc holder (Figure H-6a). In the case of reversible discs, ensure that the required side is face up.
Grip disc holder at the upper end and insert into the housing (Figure H-6b).
- Attach the cover (note mark) and turn all the way in a clockwise direction.
- Place continuous-feed shredder on the drive and rotate all the way in a clockwise direction, as illustrated in Figure H-8.
Turn rotary switch to recommended setting.
Put food to be processed in the feed tube and push down with the pusher.
Warning!
Prevent the cut ingredients from building up in the outlet opening.
Tip: To ensure even cutting results, process thin ingredients in bunches.
Note: If the food to be processed sticks in the continuous-feed shredder, switch food processor off, pull out mains plug, wait until the drive comes to a standstill, remove cover from the continuous-feed shredder and empty feed tube.
After using the appliance
- Switch off the appliance with the rotary switch.
- Rotate the continuous-feed shredder in an anti-clockwise direction and remove.
Rotate the lid in an anti-clockwise direction and remove. - Remove disc holder with disc. To do this, press finger from below against the drive shaft (Figure 1).
Clean parts.
Blender
Risk of injury from sharp blades / rotating drive!
Never place fingers in the attached blender! Do not remove / attach the blender until the drive is at a standstill! Operate the assembled blender only and with the lid attached.
Risk of scalding!
If processing hot liquids, steam escapes through the funnel in the lid. Add a max. 0.5 litres of hot or frothing liquid.
Warning!
Blender may be damaged. Do not process deep-frozen ingredients (except ice cubes). Do not operate blender when empty.
Working with the blender
Figure K:
Press the release button and move the swivel arm to position 4.
Remove the blender drive cover.
- Attach blender jug (mark on the handle on mark on the base unit) and turn all the way in an anti-clockwise direction.

Add ingredients.
Maximum capacity - liquid = 1.25 litres; maximum capacity frothing or hot liquids max. 0.5 litres; optimal processing capacity - solids = 50-100 g;
- Attach the cover and turn anti-clockwise all the way into the blender handle. The cover must be locked in position.
- Set the rotary switch to the desired setting.
Adding more ingredients
Figure K-8:
- Switch off the appliance with the rotary switch.
Remove the lid and add ingredients.
or
remove the funnel and gradually add solid ingredients through the refill opening.
or
- pour liquid ingredients through the funnel.
After using the appliance
- Switch off the appliance with the rotary switch.
- Rotate the blender in a clockwise direction and remove.
Tip: It is recommended to clean the blender immediately after use.
Cleaning and servicing
The attachments and accessories used must be thoroughly cleaned after each use.
Attention!
Do not use abrasive cleaning agents. Surfaces may be damaged.
Cleaning the base unit

Risk of electric shock!
Never immerse the base unit in water or place under running water. Do not use a steam cleaner.
Remove mains plug.
- Wipe the base unit and drive cover with a damp cloth. If required, use a little detergent.
Then dry the base unit.
Cleaning the bowl and tools
The bowl and tools are dishwasherproof. Do not wedge plastic parts in the dishwasher, as they could be permanently deformed during the washing process!
Cleaning the continuous-feed shredder
Risk of injury from sharp blades!
Do not grip the sharp blades or edges of the cutting discs. Clean them with a brush.
All parts of the continuous-feed shredder are dishwasher-proof.
Tip: To remove the red film after processing e.g. carrots, pour a little cooking oil on a cloth and rub the film off the continuous-feed shredder (not the cutting discs). Then rinse the continuous-feed shredder.
Cleaning the blender
Risk of injury from sharp blades!
Do not touch blender blades with bare hands.
The blender jug, lid and funnel are dishwasher-proof.
Tip: After processing liquids, it is often sufficient to clean the blender without removing it from the appliance. Pour a little water and washing-up liquid into the attached blender. Switch on the blender for several seconds (setting M). Pour out the water and rinse out the blender with clear water.
Important information
If required, clean accessories bag. Follow care instructions in the bag.
Storage
Risk of injury!
When the appliance is not in use, pull out the mains plug.
Figure L:
- Store tools and cutting discs in the accessories bag.
- Keep accessories bag in the bowl.
Troubleshooting
Risk of injury!
Before eliminating a fault, pull out the mains plug.
Note:
The Operating indicator flashes if the appliance has been operated incorrectly or the electronic fuse has tripped or the appliance is defective.
The swivel arm must be engaged in every operating position.
Initially try to eliminate the problem which has occurred with the help of the following information.
Troubleshooting
Appliance does not start.
Remedial action
Check the power supply.
Check the mains plug.
- Check swivel arm. Correct position? Engaged?
Screw on blender or bowl as far as possible.
- Attach the blender cover and screw on as far as possible.
- Attach drive cover to unused drives.
The safety lock is active. Switch appliance to 0/off and then back to the required setting.
Troubleshooting
Appliance switches off during use. The overload protection feature has been activated. Too much food was processed at one time.
Remedial action
Switch off the appliance.
- Reduce processing quantity. Do not exceed permitted maximum quantities (see "Application examples").
Troubleshooting
While the drive was running, the release button was inadvertently pressed. The swivel arm moves up. The drive switches off, but does not stop in the tool change position.
Remedial action
Set the rotary switch to 0/off.
Move swivel arm to position 1.
Switch on appliance (setting 1).
Switch off appliance again.
Tool stops in tool change position.
Troubleshooting
Blender does not start working or stops during use, the drive is "humming". Blade is blocked.
Remedial action
- Switch off the appliance and pull out the mains plug.
- Detach the blender and remove the obstruction.
Re-attach the blender.
Switch on the appliance.
Important information
If the fault cannot be eliminated, please contact customer service.
Application examples
Whipped cream
- 100-600 g
Whip cream with the whisk for 112 to 4 minutes at setting 7 - depending on the quantity and properties of the cream.
Egg white
- 1 to 8 egg whites
Beat egg white with the whisk for 4 to 6 minutes at setting 7.
Sponge mixture
Basic recipe
- 2 eggs
- 2-3 tbs. hot water
- 100 g sugar
- 1 packet of vanilla sugar
- 70 g flour
- 70 g cornflour
- Baking powder if required
Beat the ingredients (except flour and cornflour) with the whisk for approx. 4-6 minutes at setting 7 until frothy.

- Rotate switch to setting 1 and spoon in the sifted flour and cornflour within approx. 12 to 1 minute.
Maximum quantity: 2 × basic recipe
Cake mixture

-6eggs
- 500 g sugar
- 1 pinch of salt
- 2 packets of vanilla sugar or peel from 12 lemon
- 500 g butter or margarine (room temperature)
- 1000 g flour
- 1 packet of baking powder
- 250 ml milk
Mix the eggs, sugar, salt and vanilla sugar or lemon peel with the stirrer for approx. 10 seconds at setting 1.
Set to setting 5 and process for approx. 120 seconds.
- Add butter and process for approx. 60 seconds at setting 3.
- Add flour and baking powder and process for approx. 2 minutes at setting 1.
Set to setting 3 and gradually add the milk within 2 minutes.
Maximum quantity: 1 x basic recipe
Short pastry
Basic recipe
- 125 g butter (room temperature)
- 100-125 g sugar
-1 egg - 1 pinch of salt
- A little lemon peel or vanilla sugar
- 250 g flour
- Baking powder if required
Mix all ingredients with the stirrer for approx. 12 minute at setting 1, then for approx. 2-3 minutes at setting 3.
From 500g flour: - Knead the ingredients with the kneading hook for approx. 12 minute at setting 1, then for approx. 3-4 minutes at setting 3.
Maximum quantity: 2 × basic recipe


Yeast dough
Basic recipe
- 500 g flour
-1 egg
-
80 g fat (room temperature)
-
80 g sugar
-
200-250 mlukewarm milk
-
25 g fresh yeast
-
or 1 packet of dried yeast
-
Peel of 12 lemon
-
1 pinch of salt
Mix all ingredients with the kneading hook for approx. 12 minute at setting 1, then for approx. 3-6 minutes at setting 3.
Maximum quantity: 2 × basic recipe
Pasta dough
Basic recipe
-
300 g flour
-
3 eggs
-
1-2 tbs. (10-20 g) cold water as required
Process all ingredients for approx. 3-5 minutes at setting 3 until a dough forms.
Maximum quantity: 1.5 × basic recipe
Bread dough
Basic recipe
- 1000 g flour
- 3 packets of dry yeast
- 2 tsp. salt
- 660 ml warm water
Mix all ingredients with the kneading hook for approx. 12 minute at setting 1, then for approx. 4-5 minutes at setting 3.
Mayonnaise
- 2 eggs
- 2 tsp. mustard
- 1 / 4 oil
- 2 tbs. lemon juice or vinegar
- 1 pinch of salt
- 1 pinch of sugar
Ingredients must be at the same temperature.

Process the ingredients (except the oil) in the blender for several seconds at setting 3 or 4.
- Switch the blender to setting 7 and slowly pour the oil through the funnel and mix until the mayonnaise emulsifies.
Eat the mayonnaise immediately, do not store.
Disposal

Dispose of packaging in an environmentally-friendly manner. This appliance is labelled in accordance with European Directive 2012/19/EU concerning used electrical and electronic appliances (waste electrical and electronic equipment - WEEE). The guideline determines the framework for the return and recycling of used appliances as applicable throughout the EU. Please ask your specialist retailer about current disposal facilities.
Guarantee
The guarantee conditions for this appliance are as defined by our representative in the country in which it is sold. Details regarding these conditions can be obtained from the dealer from whom the appliance was purchased. The bill of sale or receipt must be produced when making any claim under the terms of this guarantee.
Changes reserved.
Optional accessories
| MUZ5ZP1 Citrus press | For squeezing oranges, lemons and grapefruits. | |
| MUZ5CC1 Dicer | For cutting fruit and vegetables into equally sized cubes | |
| MUZ5FW1 Mincer | For cutting fresh meat for steak tartare or meat loaf. | |
| ∅3 | MUZ45LS1 Perforated disc set fine (3 mm), coarse (6 mm) | For the mincer MUZ5FW1. Fine disc for pasties and spreads, coarse disc for sausages and bacon. |
| MUZ45SV1 Viennese whirl attachment | For the mincer MUZ5FW1. With metal template for 4 different pastry moulds. | |
| MUZ45RV1 Grater attachment | For the mincer MUZ5FW1. For grating nuts, almonds, chocolate and dried bread rolls. | |
| MUZ45FV1 Juicer attachment | For the mincer MUZ5FW1. For pressing soft fruit, except raspberries, tomatoes and rose hips, to a pulp. At the same time e.g. currants are automatically stemmed and pitted. | |
| MUZ45PS1 Chipper disc | For the continuous-feed shredder MUZ5DS1. For slicing raw potatoes for chips. | |
| MUZ45AG1 Asian vegeta-ble disc | For the continuous-feed shredder MUZ5DS1. Slices fruit and vegetables into fine strips for Asian vegetable dishes. | |
| MUZ45RS1 Grating disc coarse | For the continuous-feed shredder MUZ5DS1. For grating raw potatoes, e.g. for potato pancakes or dumplings. | |
| MUZ45KP1 Potato fritter disc | For the continuous-feed shredder MUZ5DS1. For grating raw potatoes for rostis and potato fritters, for cutting fruit and vegetables into thick slices. | |
| MUZ5ER2 Stainless steel stirring bowl | Up to 750 g of flour plus ingredients can be processed in the bowl. | |
| MUZ5KR1 Plastic mixing bowl | Up to 750 g of flour plus ingredients can be processed in the bowl. | |
| MUZ5MX1 Plastic blender attachment | For blending drinks, for pureeing fruit and vegetables, for preparing mayonnaise, for cutting fruit, nuts, for crushing ice cubes. | |
| MUZ5MM1 Multi-mixer | For chopping herbs, vegetables, apples and meat, for shredding carrots, radishes and cheese, for grating nuts and cooled chocolate. |
If an accessory is not included in the product package, it can be purchased via the trade or from customer service.
Prudence! Lames rotatives.

Sécurité anti-surcharge
(ACCESSOR EN OPTION*).
A Fare for skoldning!
"2" for den grove riverside
4" for den fine riverside
OBS!
A Fare for skolding!
Ved bearbeiding av varme mikseprodukter, kommer det damp ut gjennom tractken i lokket. Det må maksimalt fylles på 0,5 liter varm eller skummende væske.
Obs!
"Profi Supercut" - paksu / ohut
Plntote to TlAnkTpo aTiaoqalI- ons kai the to oTpefoevo bpaXiova otn thc2.
ToTIOtheTou :Iepaote To Kekaievo TPOc Ta EITPOc MIOkai eTc EvantoTheoTe TO,OTpeTO evAVTIa OTn QopáTwv DcIKTwv Tou poLoyiou MEXPI va aOpaalioi.
IaTnOte TO TAIhKTPO aTTaOgAIAI- ONG KAI ΚEOT To OTPeΦoEvO βpaXiova OTN ΘEoN 3.
Apaipote To kattaki TPOoTaiaC TOU mXavioou KIVnOc aTOV KIVntnpa TOU TIOluKoaptn OUVExoUs λEITouyiaC (Eikova H-5a).
KpatnoTe Otaepa To popea Tou diokou OTo KATw Akpo, OuyxpoVosduomuTc TIPETTEVAeixvovTPoC Ta TAvw.
TToTHeTneTOVETIuMntoDIOKO KOTnC n GuaIaTOC TPOOeTKIKA EITAVW OTIC TOU FOpea Tou DIOKou (EIKovA H-6a). Tousdiokoucduo oEvw TTPOeTe va IXVEI TIU^ TIAEPUPa TPOC Ta TAVW.
IiaoTe Tov opea Tou biokou OTo ETTAVW akpo kai toTtoeTnOte Tov 0To TepiBAnu (Eikova H-6b).
TToTHeTnOte aTo TAVW To KAtaKi (TPO-SeTe To Osnu) KAI OtpePsi To OTn FopTaWbEiKTuPoLoyiou MEXIto Tepua.
TToTHeTnTe Tov TIOluKoptn OuvExOus λεI toupyiac, OTwG paivetai OTNV Eikova H-8 TTAVW OTO mXavioMo KIVnOns KAI OTpeyTe TOV OTN φopα Twv δeiktuw Tou poλoyiou μexpi To Tepua.

ΓupioTe Tov TepiOtpoikó δiaKOTtn OTn ouviotwEvn βaθμiδa.
BaIe Ta TPOc ETEEpyaOia TPOpIa OTNV UTOOxN TTnPwOanC KAI OTPwTe Ta ME TO EApTnMa WOnns.
IpooOx!
Atopeuyete n ouoawpuon twv Teaxioevw Tpoqiuw oTo avoiya Eóou.
TANEAAAIKO THAEQNO EeyHPETHEH NEAATON
www.bosch-home.com/tr
www.bosch-yetkiliservisi.com
PeKOMeHdUyEbCra Hi B YkOMy pa3i He 3aJIuShaTu npuJaB BBIMKHeHm DoBwe, HIX CE NotPi6Ho DnIpepeo6Kn PpOdyKTIB. He BMnKaIte npuJaB BXOJIOCTy.
BaxJInBo!
Пися Кожног ВИКОРИСТАНHA, a TAKOЖ пicя ТрИВалORHeВИКОРИСТАнHA npINAД Heo6xIDHо OuHuaTn (→ «OчшeENHЯ madoэлд» duE. cmop. 190).
He BCtpormIaTn pyk Do 3aBaHTaKyBaJIbHOro OTbOpY.
Unpo Bitaembo i3 nokynkoHOHOBOnpnilaDy fipmBosch. DogaTkoByiHOpmaio npo Hauy npodykciIO BN3haJeTe Ha Hauomy caTi.
3mict
BukopncTaHnHa 3a npn3HaueHHam.182
Ppabnna texhikn 6e3nekn. 182
CnCTemN 6e3neKn 185
CTnCnI orJ.. 185
Po6oqui noIoxKeHHra 186
Unpablinnna 186
OuHcHnTaDorJd.. 190
36epirahnna 191
UcyHenHHeCnPaBHoCTeI 191
PpiknlaBnKOpncTaHHa 192
Ytuniana 194
YMOBN rapaHTii 194
CneuiJIbHe npuJaIaIaI 195
CnCTem6e3neKn
3axnct BiD yBIMKHeHHa
INB. Ta6JnIIO «Po6oOi nIoXeHHa>.
Y noIoxeHHx 1 i 3 npIpaB MInKaeTbcra,JIiue:
KoJIyUaHa(11)BcTaBJeHa NIOBepHyTa B3aΦiKCoBaHe NOIIOKeHHJ.
TayokdnyamiybaHHa (15)
ДязamiybaHHBaxkoro ticTa Ta nidiMiyBaHHIHRpeiEHTIB,Як He nobunHnI NOpi6HOBaTnCn (Ha npKlaI,pO3nHOK,WOKoNAdHnx PnaC


BaxnBa Bka3iBka 0do 3acToCyBaHHa BInuKa-3bBaNKn (MaI. E)
Дя ONТИМаЛьНО поЕмИшУВАнг IHrpeIeHITB BInuKo-3bUBAJIka MaE MaJxe TopKaTnCЯ Дна чaSi.Якso ue He TAK, BIDperyIbIte BucOTy BInuKa-3bUBAJIKN,ЯК ONICAHO HIXKYe.
BnIMtB wTeNceIbHy BnIKy 3 pO3eTkn.
HaTnchTyN KhoNkPy po3bNoKyBaHHa Ta nepeBecTu NOBOpOTnBaxijb y nOJoxeHHra 2.
BCTaBTe BInHuyK-36nBaIky y npNBOd do fikcaii.
MiCuHO BTPmMyTe BiHnOcK-3bBaJky Ta BiDnyctiB raKy 3a roDHHNKOBoHO CTpiIkoIO raIKOBIM KInOyem (po3Mip 8).
■IobepTaIe BInuOck-36BuaJIky,Uo6 BipeRyIIOBaTn ONTImaJIbHy BNCOTy.IobepTaHn 3a roDINHHNKOBOIO CTpiIKOIO:PiJOM.IobepTaHn IpOTn roDINHHNKOBOI CTpiKN:OnyckaHn.
HaTnchTy NkHOnKy po36Joky-BAHHa Ta nepeBecTu NOBOPOTnBaxjIb y noJoxKeHHa 1.
IpeBipTe BnCOTy BiHnUka-36nBaKn, 3a Notpe6n BiDpeRyIIOHe.
KuBnBTO BIDpeYnbObaH npaBnIbHO,HaTNCiTh Ha KhoNkpyo36nOKyBaHHra TepeBeDiTb NOBOPHTH Baxijb y noJoxeHHr 2.


MiCHo BTPmMyUOu BiHnUOK-36nBaJky, 3aTgHiTb rAky IpOTn RoDnHHNKOBoi CTpiIKn rAkoBIM KJIIOHeM (po3Mip 8).
Po6ota 3 yaueTo Ta HacaKamn (MaI. F)
HaTnchTyN KhoNkPy po3bNoKyBaHHa Ta nepeBecTu NOBOpOTnBaxijb y nOToxKeHHa 2.

YcTaHOBka YaSi: yCTaHOBiTb YaSi, HaxINIBuN II BpePe, a Notim NoCTaBtpe PiBHo; NObepHITb npOTn roDHHNKOBoi CTpiKn Do fikcaii.
3aIexHoBIDMeTINpepeo6KnBCTaBte y npIBoDdoΦiKcaui BInHuOK-MiuaIky,BiHnOyK-3bMaJIkyu rAuyok DnraMiUyBaHHa.
Bka3iBka
OuHHeHH OCHOBHOro 6JIOky
He6e3neka ypaXeHHra eJeKtpnUHM cTpymOM!
Y kOJHOMy pa3i He 3aHypIte OCHOHN 6bOK B BOy Ta He TpImaIte NOro NiD npOTouHO BOIO. He KopnCTuTecra napooCHNIKOM.
BnmiTb 1tTeNceIbHy BnIky 3 po3eKn.
IpoptbOCHOBHm6JOKi3axnchy KpNUKy npINBOda BONORo raHupkoIO. 3a Notpe6n cKOpNCtaItec HBeJIHKoIO KJIbKicTTO MmHOrO 3ac06y.
■Писяцboro npotpiTB npuJaHacyxo.
OuichiHnHaWi Ta Hacadok
YaWy Ta HacaKn MoXHa MNTu B NocydomnHm MaunHi. He 3aTncKaIe TnactMacobi eJeMeHTN B NocyDomnHi MaunHi; ce MOKe pIn3BecTu Do IX Be3NoBOPoTHoI DeOpMauii NiD Yac MNTT!
OuHsEHHaCKpi3HoI waTkivHnci
He6e3neka nopaHeHHra roCTpIMN HOxAMn!
He TopkaTnca roctpnx HoxiB i kaHTiB dNcKiB dIa npoDi6HeHH. IJIy OunIeHHK KopNCtYBaTnca 1IITKOIO.
Yci DeTani HacKpi3HOI WaTkiBHNi MoXHa MNTN B NOCyDOMNHi MaUNHi.
Iopada:ДЯВДАЛЕнHЯЧЕВОНOrHaJIbOуnicЯперрбкМорКВиaboIHHxNPOIDHINPpOdyKTIBcIdHaJIHTnTPOXnOnIIHa raHчIPkyTa npOteTpNHeUHACKpi3Hy wATKIBHnCIO(3a BUNYTKOM DnCKiBДЯNoDpi6HHeHNA.ПICЯцboro npomnTeHACKpi3Hy wATKIBHnCIO.
Ouichienhna 6JeHdepa
He6e3neka npaHeHHraOCTpIMN HOxAMn!
He TopkaTec8 HoxiB 6IeHepa roIIMn pykam.
Ua7y 6JIeHepa, KpIuKy Ta BOpOHky MoXHa MNTN B NocyDomNHi MaunHi.
Iopapa: nicn nepepo6kn piinu hacto DoCTaTHbO npocTo nouncTtN 6neHdep, He 3HimaOnu NiOro 3 npunaNy. Iy IcBoro HauInTe TPOXn BOIN 3 MmHm 3ac06om Do BCTaHOBLeHORo 6leHepa. YbIMKnHt b6HeHdep Ha KJIbKa cekyHd (piBeHb M). BuInNe To BDOy nCn MaTT Ta npomnTe 6beHdep YNCTOU BOIOO.
BaxJINBa Bka3iBka
Cymky npnlaqcnid ouhatauB pa3i notpe6n. DotpmytecBkazIBOK i3 dOgIy, po3aUOBAHx y cymci.
36epiraHnHa
Ybara! IChyE He6e3neKa TpaBMByBaHH!
JaKIO npnlaH He BnKOpncTOByeTbCry, BnIMtB WTeNcEhBy BnIKy 3 pO3ETKn.
MaJIHOK L:
■Poknajitb HacaKn Ta Dnckn Dnna npdi6HeHHa Do cymkn Dnna npjnaDna.
36epiraate cymky npnilaandb yaa.
YcyHeHHa HecnpaBHOCTeH
Ybara!IChyE He6e3neKa TpaBMvBaHH!
BnMItb 7TeNceIbHy BnIky 3 po3eTkn, nepH HIX NOuHaTu yCyHeHHa HecnpaBHOcti.
BaxnBa Bka3iBka
Ypa3i HenonlaKn NiJvac ynpaBnHH npuJaOM, cnpaIOBaHH eNEKTPoHHOro 3anobixHnka a6o deeEeTy npuaNy 6bnmae iHdkatop p60oHoro cTaHy.
Pobopothn Baxinb y koxhomy po6oohmy noIooxeHHi Mae 6ytu 3aikcoBaHn y na3i.
CnoaTky cnpo6ynte ycyHytn npo6nemy, 10 BnHnKla, 3a DOnOMOrO HacTyNHnx BkazBok.
HecnpabHicTb
PnlaH He 3anyckaetbcra.
yCyHeHHa
IpebeBipTe eNeKtpnHe KINBneHHa.
■IpepeBipTe wTeCenbHy BnIKy.
IpeBipTe NOBOPOTNMBaxiNb. UnpaBnJIbHe NOJIOXKeHHa? U3afikcObaHo cei eJeMeHt?
■Поверніт bбпендерaboуашуdoуnpу.
UcTaHOBiTb KpnuKy 6nEHepa Ta 3akpyiTb Do ynopy.
3aKpNTe 3axNCHMn KpNUkAmn npNBODn, kKi He BKNOPNCOTBOYIOBcR.
AKTUBOBAHe 6IOKyBaHHn IOBTOpHOro BBIMKHeHH. IOBepHiTb nepemKaU npIaNy B IonoJKeHHr O/off, a Notim Ha3ad Ha 6axaHnI CTyniHb.
HecnpabHicTb
PpnaB BmMkaeTbcn iD yac BkOpncTaHH.CnpaCbOBye 3axNCt BiI nepeBaHTaKeHH.3aHaTo 6araTo npOdyKtIB nepepo6nncs OndHouacHO.
UcHn
BvMknHtbpnna.
3MeHtTe KJIbKicTb nepepoBnOBaHnx npoDyKtIb.
He nepeBnUyIte MaKcImaJIbHO dOnyCTmMy KInbKiCTb npOdyKTiB (INB. «PpNKlaIaN BnKOpNCtAHHra)
HecnpabhnicTb
BleHep He nouHae npaIobatn abo 3yHHaTbCn iD Yac BkOpncTaHHn, npBOd rye. Hix 3a6IOKOBaHn.
UcHn
Bumkhitb npnlaDi BmMitb wTeNceIbHy BnIky 3 po3eTkn.
3HimiTb mikcep i ycyhTe nepeWkoDy.
3HOby BCTaHObitb 6JeHep.
YbIMKHiTbnPnnaI.
BaxJInBa Bka3iBka
JaKuo yCyHyTu HecnpaBnICTb B ONuCaHn cnocio He Bdaetbcra, 3BepHiTbcra Do cepBicHOi Cnyk6n.
Pon3BODnITb OunchkU IN TexO6cnyXnBaHne DeTAM He pa3pe7aetc.
OnachocThb nopaxeHnra TOKOM n BO3ropaHnra!
He nckJIIOUeHa onaCHOCTb TpaBMnPOBaHna!
Ipeed 3aMeHOn npHaJneJXHocTe nIIN DOONJIHNTeNbHbIX DeTaJeN, KOToPbIe BO BpeMpa6Otbl PpNBODrTcB DVBxHeHne, PpIBOp DoJIxeh 6bITb OTKJIuOyeH N OTCoEiHHeH OT cETn. IocNe BbIKJIOUeHn PpNBOD eIe DBNXeTcR HeKOToPOe BpeM. DoJntecb pONHOJ octaHOBKn pnpBOda.
He n3MeHЯITe noJIOKeHne noBOpOTHOro KPOHSTeHa, noka np6op BKJIouYeH.
■ПользуйТecь НасадКамп Только пр ВСТаВЛЕнHОс CмecNTeЛьНоуше,с установлений Крblшкови 3aшHTьIMN КрblшКамп рпвда! Пп пльзовани НасадКаму UCTaHOBNTe CmecNTeЛьнHyюЧашу,КрblшkyИЗaшNTьIE КрblшКп рпвда соглacHo Инстукши!
Bo BpeMa pa6oTbI np60pa Hn B Koem cJyae He onyckaTe pyKn I naJIbCuB CMEcHTeHbHyO yAaUy NIn B 3arpy3OuHbI CTBOJ. He BBOdnte KaKHe-Jn6o PpeDMeTbI (HaPnPmEp, pa3JIbBaTeHbHyIOxKy) B CMEcHTeHbHyO yAaUy NIn B 3arpy3OuHbI CTBOJ. Bepernte pyKn, BOJocbl, PpeDMeTbI Odekbl I dpyrHe PpeDMeTbI OT KOHTaKTa C BpaUaHOUIIMNCJeTaJAMN.
Kateropnueckn 3anpeuaeTcN cnoJb3ObaTb HacaKn I npHaIeXHocTn IIn6o2 npHaIeXHocTn OndHOBpeMeHHO. Ppr nCNoJIb3OBAHn npHaIeXHocTey pykoBOdCTByntecb DaHHo INHCTpyKUneI NO 3KcPiyaTaun N dpyrIMN INHCTpyKUnaMn, BXODaUMN B KOMnEKT NoCTaBKn.
■Пинадлжно MoЖНО ИСпОЛьЗВаТь TOЛБКВ ПОЛHOCТьСобразнOM BИДe! НВ КОЕСCityae He COБИрайTe Пинадлжно Na OCHOВHom 6bloke npi6opa.ИспОЛьЗуЛTe ПинадлжноTOЛБКВпpeДуСМOTpeHHom pa6oyem ПОLOЖЕнN.
He TporaTb OCTpbIe HOxN I BbICTyPbI DnCKOB-N3MeJIbChTeJIeN. DnCKN-N3MeJIbCHTeJI6paTb TOJbKO 3a KpaI!
He tporatb Hoxn 6neHepa roIbIM npKaMn.
Hn B koem cnyae He onyckaTb pykn B yctaHOBneHHbI 6JIeHep! Kateropueckn 3anpeuaeTcra nIb3ObaTbcra 6JIeHdepom 6ez yCTaHOBNeHHoKpbIuKn.
CobnIouaTe octopoxKHOCTb npn ObaueHn C ocTpblMn HOxamn, npn onopoxHeHH pe3epByapa n npn ouNCtke.
OnachocTb ownpBaHnra!
He n03BOJrTb DeTm IrgaTb C yNaKOBOHybIM MaTePnaJIOM.
BHIMaHne!
PekomeHdyeTcH N B KOem CJIyae He OCTaBnTb np6op BKIIOUeHHbIM DoJIbSe, YEM 3TO HeO6XoIMo DЯпpepa6OTKn npOdyKToB. He BKIIOuayTe np6op BXOJocTyO.
BaxHo!
Co6nIaTb yka3aHnB INHCTpyKcH N IO 3KcnJIyataCIN.

OcToPoJxHo!BpaUaHUsneC Hoxn.

OctopoJHo! BpaUaIooJIeScn HacaIKn. He onyckaTb pyky B 3arpy30uHoe OTBepCTne.
OT BCero cepda no3dpabnem Bac c nokynkoi HOBOr npnbopa hnpmbi Bosch. DOnonHntelbHyu INΦopMaunO hawei npoduknn Bbl HaJeTe Ha haewe CTpaHnce B INHTepHete.
OrnaBHeHne
IcnoJIb3OBAHnE nHa3HaueHnU 197
BaxKbIe npaBnla
TexHnKn 6e3oNaChOcTn. 197
CnCTembl 6e3oNaCHOCTn 200
KomJIeKTHbI o63op. 200
Pa6oue noloxheny 201
3KcPnyatauia 202
UncTka u yxo.. 206
XpaHeHne 207
Pomoub npu yctpaHnN
HEnCpabHocTei 207
PpIMepbI nCNoJIb3OBAHnra 208
Ytuln3aunr 209
UcIIOBnra rapaHTnHOro o6CJyXnBaHnra .. 209
CneuaJIbHbIe npHaJdJeXHoCTn 210
CnCTeMbI 6e3OnaCHOCTN
Блорва Влоченя
Cm. Ta6nCy «Pa6OuNe nOLOKeHnA»
PpB6op BkIIOUaEaTcB NIOJIOKeHn1N3
TOJIbKO B Cnyae:
ecnCmecnteIbnaHa YaIa (11) BcTaBneHa n NOBepHyTa Do fNkcaun.
Блоровka nobTopHOROBKIOUeHn
PnpepepbIbeB3JIeKtpoCha6xHm
Pn6opOCTaETCBKNIOUeHHbIM,HO 3JIeKTPOMOTPOCNE3TOTOHe3aNyckaETc CHOBa.ДЯ NOBTOPHORBKNIOUeHIN NOBepHyTB NOBOPoTHbI INpeKlnOuHaTeNb B IIOJIOKeHne0/off,a3aTeM BKNIIOHTb.
YcTpoIcTB0 3aUNTbI OT neperpy3Kn
Ecnn 3neKtpomToP Bo BpeM nCnOJIb3OBaHnna CamocToTEnBHO BbIKNIOUaETcra, To 3TO 3NaHT, YTO cpa6oTano yCTpoINCTBO 3auNTbIOT neperpy3Kn. Bo3MOxHNo pnuHNOI 3TORO MOKeT 6bITb OndHOBpeMeHHa nepepa6oTKCa CInuHKOM 60JIb7Oro KOJINUeCTBa npOdyKTOB.
O npabHbHom NOBeHeHH npn cpa6aTbIBaHH OndHou n3 CnCTeM 6e30NaChocHTcM. B pa3JeIe «POMoUb npu ycTaPaHeHH HeCnpaBHOcTeH
Данньи рпбор He hyжdaetcB
TEXHnueckOM o6cnyxNBaHN.
KOMPJIeKTHbI O63Op
OTKpoITe CtpaHnUbI C pncyHKamN. PncyHok A
OCHOBH06JOK
1 Khonka pa36noknpobHna
2ПobopoTHbI KPOHHTeHФУнкцЯ «Easy Armlift» -ДпяпоДерЖКи DBИЖЕнЯ KPOHSTeHaBBepx (cM.«Pa6Oчne nIoJoxHeNIA').
3 NOBOPOTHbI nepeKJIIOUaTeNb Pocne BbIKJIOUeHnra (noJIOXeHne 0/off) np6op aBTOMaTNUeCKN OCTaHaBJIINBaETCRA B ONTMaJIbHOM NOJIOXeHn dJa CMeHbI HacaDOK. 0/off = cTOn M = MRHOBeHHoe BKJIOUeHne Ha MaKcIMaJIbHoe YncNo o6OpOTob, yDePXIBaTB nepeKJIIOuAteJIb B TeHeHne Heo6xOJmOrO BpeMeHn nepepa6OTKn. Pexm1-7, pa6Ouaer CKOpOCTb: 1 = Hn3Koe YncNo obOpOTOB - MeIJIeHHO, 7 = BBICOKOE YncNo obOpOTOB - bIcTpo.
4 ИнданkaTop pa6ocho ro co6tOHHa
Topnt Bo Bpemra pa60tbl (noBopoTHbI nepeKluOaTeIb B noLOXKeHIM M nII 1-7).Mnraet B cnyae oOn6ok ynpabLeHnna pIn6Opom, npi cpa6aTbIBaHIN 3JeKtpoHnHO npedoxpaHnTeIa nn npn HeNCnPapBnOCTn pIn6opa, cm. pa3dien «POMoUb pnYcTpaHeHn HncnPapBnOCTeI»
5 3aunTHa KpbIka npBbOda
ДяСЯТЯЗАПИТНКрБИШК INPиВОДанХаТьHa3aДнЮЧаСТьИСЯТьКрБИшКУ.
6 PnBODIa
-yHnBepcaIbHoI pe3Kn I COKOBblIIMaJIKN
(cneuHaBhIe npHuaJnEkhOcTn*).
При Н ecnoIb3ObaHn yctaHOBNt b 3aUHTHyKpbIuKy pInBOJa.
7 PnBOD nIaHacAoK (BeHcIK IJIpeMeuBaHnI, BeHcIK IJIe B3bUbaHnI, MeCINbHaJ HaCaJaKa) mAcopy6Kn (CpeuaJIbHbIe PnHaIeXHoCTN)
8 3aunTHa Ka npBODa 6JeHepa
9 PpNBOD IJIg 6JIeHJepa (cIeUHaJIbHbIe npHnAdJIeXKHOCTN) Ppi HeICNoJIb3OBAHN yCTaHOBNTb 3aIHTHyIO KpbIiKy pNBODa 6JIeHJepa.
10 ABTomatueckoe CmTabiBaHne Ka6eJra
CmeCNTelbna Yaasa c npHaadnExKHOCTaM
11 CmecnteIbHaJaIaHa I3 HepXaBeHooJe CTaJIIN
12 Kpbioka
Hacaikn
13 PpoceccnoHaJIbHbIy HnBepCaJIbHbI BeHcNk IpnpeMeuBaHn
14 PiooceccnoHaJIbHbI BeHcNk IJnB36uBaHnA
15 MecnJIbHaj HacaJa C OTKNOHTeJEM Tecta
16 CymkaДЯпprinhaIeXHocTei Дяхангин haCaIOK n DnCKOB-N3MeJIbHITeJIe.
YHnBepcaJIbHaJa pe3ka
17 TonkaTeJIb
18 Kpbiuka c 3a rpy30hblIM CTBOJOM
19ДиСКИ-N3MeIbUHTeJIH
aДBycTOPOHHNДИСК «Profi Supercut» - TOJICTbIe /TOHKe JOMTNKIN
b DBycSTOPOHHHДИСК-ШИнКOBKa - KpyПная /MeЛКая
cДИСК-Теркa-COTBepCTNЯМn CpeDHeN BeIINHbI dДИСКДЯ KapToΦeNBbIX OJaDn*
20 DepeKaTeIb DnCKOB
21 Kopnyc c BbInyckHbIM OTBepCTneM
BleHedp
22 CtaKaH 6IeHepa
23 Kpbilka
24 BopoHka
- Пинадлnexнocт,在 KOTOpbIe He BxOДТВКOMПЛЕТ NOCTaBKN,MOXHO pnpo6peCTNTOptroBNe IN B cepBnCHOn cnJyK6e.
Pa6oyne noJoxKeHnA
PucyHok
BhimaHne!
Pnboop MoXHO NcNoIb3ObA Tb TOnbKO B TOM Cnyae, ecHn HacaIka / npHaIaNekHoCTb 6blna yctaHOBIeHa Ha NaIeJkaIeM PnBBoE n HaxoDITcB pabOeym IonoJKeHN corglaCHO daHNO TaBNIue. NobopoTHbIKPOHTeH DoJIkeH 6blTb 3aΦnKcnpoBaH B KaKdOM paOoyem IonoJKeHN.
Yka3aHne
ПоворOTьй кроншTeин Oсацeн ФунК-циeн «Easy Armlift》,KOTOPа подерхиBaET DBИХеп NOВОРТHorO КроншTeин ВБepx.
UcTaHOBka pa6oOero nOJoxHeNHa:
HaxaTb Ha KhoNkPy pa36NoKInpObaHn I N3MeHNtB NOLOXKeHne NOBOPOTHO KPOHHTeHa. POnDePxNBA Tb DnIXKeHne OdHOJ pyKoI.
IIOBOPOTbIK KPOHHTeH NpeBecTN B XeHaemoe NIOXKeHne Do QnKcaUN.
Ecnn Ka6eB 3aKnHnHIO, cneyET BbITryb eTO NnHOCTbIO N 3aTeM DaTb emy CMOTaTbCra.
BcTaBnTb BnIky Bpo3eTky.
CmecntelbHaayaHaHaacadkn
AnachocTb TpaBMnpoBaHnBpaaUoUMncHaCakamn!
Bo Bpem 3KcnpyaTaunn Hn B Koem cnUyae He onyckatb pykN B CmecnteHnyu qauy. Pa6oTaTb ToIbKO C yctaHOBNeHHo KpbIshko (12)! HacaKy MoXNo 3aMeHraTb ToIbKO Nocne OCTaHOBKn PpINBODa - PpINBOD DBNXKeTcE eEe HeKOTOpoe Bpem NocJe BbIKJIOUeHn IocTaHaBJIbNAeTCR B NpOKeHn DJIg CMeHbI HacADOK. N3MeHrTb POLOXKeHne NOBOPOTHO KPOHHTeHa MoXHo TOnbKO NocNe OCTaHOBKn HacaDN. HenCNoIb3yEmble PpINBObl OBaTeNbHO DoJnxHbI 6blTB 3aKpbITb 3aUHTbIMN KpbIShKaMn.
Bhumahne!
CmecntbHyu qaUy nCnObn30BaTb TOnbKO dIpa6oTbIC daHbIM npN6opom.
PpoceccnoHaJIbHbIy HnBepcaJIbHbI BcHvnK dIy nepemuBaHn (13)
PekomHdaun:IJIIOJUyeHnpaBHO-MephblXpe3yJbTaTOB TOHKne IpoDyKTbI JnA Hape3Knpepepa6aTbIBaTbIyKaMn.
Yka3aHHe: B Cnyae 3aKINHBAHnI nepepa6aTbIBaEMbIX npOdyKTOB BVHNBepcaJIbHOI pe3Ke BblIKJIOHTb KXYOHbIH KOMbaH, N3BJIeYb ITeNCEJIbHYIO BUNKy I3 pO3eTKI, DOXdA TbC8 OCTaHOBKn PpNBODa, CHrTB KpbIuKcY HYNBepcaJIbHOI pe3KN I ONP0OXHnTb 3aRpy3OHybI CTBOJ.
IIO OKOHuaHn pa6OtbI
BbIKJIOUHTb npIbOp c NOMOUIbIO NOBOPOTHOpeKJIIOUaTeJIa.
IIOBepHyTb YHINBepCaJIbHyU pe3Ky npOTNB. YacOBoY CTpeJIKN IN CHaTb.
■NoBepHyTb KpbIuKy npOTnB YacOBn CTpeJIKN I CHrTb.
I3Bneueb depKaeTJIb IJIy INCKOB BMeCTe C INCKOM. IIJy 3TOHO HaxKaTb Ha npuBOJHOI BaI CNH3y NaJIbUeM (pncyHOK J).
IpoBecTu NcTky DeTaJIeN.
Бленьдер
OnachOCTb TpaBMPOBaHn8 06 OCTpbIe HOKN/BpaUaIOuNc npNBoD!
HnB Koem cnyae He onyckaTb pykn B yctaHOBHeHHbI 6JIeHep! BJIeHep MOXHO CHIMMaTb/YcTaHaBnBaTb TOJbKO NocJe OCtAHOBKn IprBOda! BJIeHep MOXHO IcNOJb3OBA Tb TOnbKO B C6paHHOM BInDe IN C yCTaHOBJIeHHo KpbIuKoN.
Onachoctb ounpaBnHa!
Pn nepepa60Tke B 6neHdepe ropaynx npOdyKTOB uepe3 BOPOHKy B KpbIuKe BbIXoNT nap. 3aIINBaT he 6oJIee 0,5 nITpa ropaye nnCINbHO peHaeCra KNDKoCTN.
BHUMAHne!
Bo3MOxHNO IOBpeKdEHNHe 6IeHdepa. He nepepa6aTbIBaTb 3aMOpoxKeHHbIe INHrpeDIneHTbl (3a NCKIIOUeHNEm Ky6IKOB JbDa). He BkJIIOuATb IyCToN 6JIeHdep.
Pa6ota c 6Jenepom
PncyHOK K:
HaKaTaB Ha KhoNkpya36nOKuPoBaHnI NpeVeCtNKPOHHTeH B NOJIOKeHne 4.
CnTb 3aIHTHyIO KpbIuKy npNBOda MUKcepa.
UcTaHOBnTb cTaKaH 6JIeHdepa (MeTKy Ha pyuKe COBMecTnTb C MeTKoI Ha OCHOBHOM 6Noke) nIOBePHyTb IpoTnB YacOBoi CTpeKNi Do yNopa.
3aRpy3nTb INHrpeDneHTbl. MaKcImaJIbHOe KOJIuYeCTBO KJIOKoCTN 1,25 nITpa; MaKcImaJIbHOe KOJIuYeCTBO CINbHO PeHЯIUXCЯ IINI rOpAUX XJIOKoCTe =0,5 nITpa; ONTIMaJIbHOe KOJIuYeCTBO TBepDbIX Nepepa6aTbIBaEmbIX npOdyKTOB =OT 50 Do 100r;
YcTaHOBnTb KpbIuKy I3aBepyHytbe ee npOTNB YacoBOI CTpeIKN Do yNopa B pyKy 6IeHepa. KpbIuKa DOnxHa 3aΦnKcnpoBaTcR.
YCTaHOBNTb NOBOPOTbI BblKJIIOHaTeJIb Ha HyXhBI pEKIM.

OchOBHO6IOK HN B KOEM clyuae He norgpyJkaTb BV OBOy N He DePkaTb POn IpTOUHO BOIo. He nCnONb3OBA Tb napooHCTnteJIb.
13BJIeYbBNIkyI3pO3eTKN.
IpoTepeTb OCHOBH06nOK 3aUHTbIE KpbIuKINJNIIpINBOIOB BnaXHOO MaTePnei. Ipn Heo6xOAnMocTn INcNoJIb3OBAtB He6OJIbUOE KOJInuEcTBo CpeDCTBa DJIaMbITbIPOcybl.
B 3aKJIuOHeHne BbItepeTb npu6op Hacyxo.
He Tporatb octpbIe HOxN BblCTynbl IINCKOB-N3MeBnHTeJe. IJIa YnCTKN NcNOJb3OBAt b 1eTKy.
BceIeTaHn yHnBepcaIbHoN pe3Kn MoKHO MbITb B IocydomoeyHoM MaIInHe.
PekomeHdaun:IyuctpaHeHHKpachHOro HanaTea nocne nepepa60TKn,HaNPmep, MOPKOBN,CMOuHTb MaTePNHO He6oNBusM KOnUcEChBOM pactTteJbHoro Macna N IpOTepeTb yHINBepcaJIbHyIO pe3Ky (He DNCKN-N3-MeJIbHTeJI).Piocne 3TOrO npomblb yHNBepcaJIbHyIO pe3Ky.
UncTka 6JIeHdepa
Anachoctb TpaBMnpoBaHnaOCTpbIMNe3BnMn HOxa!
He TporaTb Hoxn 6IeHepa roJIbIMn pykamn. CtaKan 6IeHepa, KpbIshky n BOPOHky MOxHOMbITb B IocydomoeuHOn MaunHe.
Pekomehdaun: nocne nepepa60kn
JnkocTe 3aacTyIO DOCTaTOUHO ONUCTb
6IeHep, He cHIma erO c npnbopa. Iyra
3Toro 3aNTb B yCTaHOBNeHHbI 6IeHep
HEMHoro BObl CO cpeCTBOM dIyMbITb
nocdybl. BkIOuHTb 6IeHep Ha HeCKoJIbKO
cekynd (peKIM M). BblNTb MbIJbHyIO BDOy
I pOMbITb 6IeHep YNCTOIBOdoi.
BaxHoe yka3aHne:
Cymky Дяп ринадлесхостей чстntь рпн Heo6xOДIMOCtN.СоьЮдъ указань по yxOу, IMeJOUneecв Cymke.
XpaHeHne
Onachoctb TpaBMnpoBaHnI!
EcnTakmM o6pa3OM He ydaIocb ycTpaHnTb HncPpABHOCTb, 6paNTecb B cepBnCHyO cnKy6y.
Maiohe3 cIeJeTyIyOTpe6HTb B CxKaTbIe cPOKn, He xpaHNTb erO.
YTNIN3aun

YtJIN3npyIte ynpaKOBky c nCnOJIb30BAAHnEM 3KOJOnrueckn 6e3OpaChbIXMeTODOB. DaHbI npNbOp ImeTeOTMeTKy O COoTBETCTBn EBPoneiCKm HOpMaM 2012/19/EU yTIN3aCUN 3JeKTPnuecknx I 3JeKTPoHNbIX npNbOpobw (waste electrical and electronic equipment - WEEE). DaHbIe HOpMbI ONpeDJIaHT DeIcSTByIOuNe Ha TepnTOpNN EbpocOHO3a PpABNJa BO3BpTa N yTIN3aCUN CTapBX npNbOpob. INΦopMaUnO o6 akTy-aJIbHbIX BO3MOXHOCTx yTIN3aCUN Bbl MoKTe IOnyNTB M mRa3InHe, B KOTOpOM Bbl pPiNo6peNi npNbOp.
YcNoBna rapaHTnHoro 06cJyXnBaHn
Ionyntb nChepeBbIbAIOUyIO INHfOpMaUHO 6 yCNoBnX rapaHTnHOrO 6cLyKuBaHn Bbl MoKeTe B BaIeM 6nIXaWem ABTopN3OBaHHOM cepBnCHOM 9eHTpe, IIN B cepBnCHOM 9eHTpe OT pOn3BOJNTeI Y OOO «BCX BbITobBle PpN6Opbl», IIN B cOpBoDInTBJHO JOKMeHTaUH.
Mbl octabJlem 3a cO6oI npaBO ha BHeceHne NImeHEni.
CpeuaJIbHbIe npHaIaJIexHoCTn
3.DanHHHnHnHnHnHnHnHnHnHnHnHnHnHnHnHnHnHnHnHnHnHnHnHnHnHnHnHnHnHnHnHnHnHnHnHnHnHnHnHnHnHnHnHnHnHnHnHnHnHnHnH n HmBcB, KxOHHNbMOMcbHNbMkCepb, Mbcceb, pToceb, yTOHT, FcEB, paPcRMAeTNIaI BONOC, 3EKNPOaAHNINKoCCKOBHXMMANIL, 3MENbYtEN, 6bnHepe, TnaDhBbte DcOcN, BahnOCHy, HanoNBbBe BeCb, yTOHT, NaOpBBte CTAHNu, TaNHNbTe DockN aHaONOrHMHe IM IaEDIn.

- Ybaaembe lamblnrcnoaam Bama, nooTbepkne HcobotctBnna hauen pOdyckun 6b3aetbHbmpTeBOAHHM B COOTBCTCNH C aKohOnatBETCBOM OCUcHTBNTBCR a FOpme 6b3aetbHbONc TepTHKnKaunu n EeklanpApOBAAHm COOTBCTBN
HnΦopMaIOO 6o63aIbHTbNOJOTBtBpeJHcENHOOTCBTBeN aHuaN pInbOpOB, B TOM nCIE dAnhB o Homepe ceptnHcNATA coTBTCTBBa (deNaKapAIO O COBTBCTBeN) n CPOE eo (ee) DeCTBBa BMOKeontyNouyntby O OO ECbTbOnBePbIopOB).
Haau npdykun npnnoBHTTcnpoKtponen TpnaonHbno Kopnpaee 6CX Xaycrepe TM6X, apec sta6-kbapntnb: 81739 MoHenck, Kapn-Bepi UTrs4ce 3e, Hegmuna (BSH Haagerste GmbH, Carw-Wer-Str. 34, 81739 Munchen, Germany).
OprHm3auHb, bIyNnHRIoue HfYHKMHN HIOCTpAHNO ITOBOTBENTH, YN0HOMOueHHo ITOBOTBENTEN HA OCHOBAHIN DOROBOPa C HMM, RBNETcA OOO 《E5CX BtOBoIe PInb6Opbl, 198515, CaHT-PTepe6pyr, r. TepeproФ, yn. Kapna CmmeHca, d.l nTt. A, fHnHnA B r. MockBa, 119071, yn. Mana Kanyxckaa, d.l3, tenePho (495) 737-2777, foacx (495) 737-2798.
5.068aTeNTbHbteCBeDnOeTnxOpNtKxHApakTePncTHKxAnpNbOpaPnBEdHeHaTNIOBOTaBnKe pNbOpaHnHaero 3NtKetke H/INBNBcPOBnTDbHO DOKMHTaUN
6. AkceccyapbI n cpeDCTBa no yxody
Ia 163eynpuohrO OyHNUOHNHOBAA Baeu TeKHHN uYxOda 3 ne HPOn3BDoHntelpeKMOEHyEToNcHbOaTbONHbAe Taeeccsaypbr cnpctBaTNO xOydu. OprInHnAHbIe AkeCCHApby papaobotahnpo3BDHTenMe, OHn IeAaHbIO NOxdoTHmENHO daBawero npDObpa. OprInHnAHbIe AkeCCsApby n CpeCTBA no xOydu coOTBcETBYOT CAMBM lbcocHMTreboBHAnM KauetBa T oBaPBOH 3haka Bosch, OHn npOxAOTABoDCNk McbTIaHnn for ObceCNUEHMA KMcHbH NAOH hAdEHXoTH b Pabote. PO BCEM Bonpocam, CB3AHHM C aCeCCsApamri n CpTeBAMNI NO xOydu faBaei BbToBOn TeXnHK, Bb MoKeTe 60pAtbnBcA B aTOpOHIOBANHbCe cepBNChSeCtbpHnINno TneFehOy CyKbbl NoepdEpkKn.
7. rapaHTnHa3ROTOBtEnA
Φnma nrotoBHTenb npoctabTne H na pnoobetehn Bamm B PoCCNCKO Φepeaun 6bToBp o np6bp rapaTHNO C cEeCTyBOUHm 3aKHOJatbctBOM PΦ cpoKOM 1 ro. Ha npnoobepetHHn BPeCybnKNE EApnybc 6bTOBnPbnp, K toporomy pni nokynke bbl BydanapartHHnbalTOH,DeTcYBOITOPaHRTHINHcy cNoBN, He npTOBpeauae 3aKHOJatbctBCTBy PeCybnKIn 6bENpybc.
8. BhmamHe! Baxhna HOpMaunn nIe notpe6nte ne
DnHb npn60 npndna3aueh nIy nCnoB5ObaHn IcknoHTbeHBO nIae HbX, CEmeHbX, DOMaHINx INHbX NHyd, HeCB3AHHbX cOy- ictBeTNHEHM npnePnHmATEbCKOn dTeHNbHOCTn N6o YOBNDBcEME6bTOBbNpTNOpt6HbE ObHnce npnpdrtnr, yupekdeHnI prOraH3aun. IcNoBbOBAHn pnpBc BzEny, OTNnHbY bOtBuWeyKa3aHbNN, ABNtETc HApuyHeM npBnN hadJeKaaee 3kCnnpyataun npnp60a.
HaHnuehe dnpmeHHo 3aBODcKo HnTOOB TaBnukn Ha npbOpe oB3aTeNbHO! PoXanyIcTa, y6eIITecB e ee HnHnHm H coXPanHte ee na pHbope B teueHne Bcero cPoka cnKb npbOpa. YdaenHe TaBnukn Beed K o6e3nmuHnIO npbOpaN K Bo3MOxHbM HapUeHNMa PpaBnE rO 3ckCnpyataun.
N3r08oBHTIE HcEeHOTOBCTBEHNHOCTa 3a NEOCTOATKIN B PnHObOe, cNtCepBCHOnO CNYoDOKA3HO, OTO OHNOB3HNHNO NCNE pHepeaunnp6oBa nOHT6BETHEIO BNCdCTBEHAPUHNEHm I PABIN NIOB3OBAHN, TpAHCNOPTHPOBKN, XPAHEHNN, DEIcBTNI TPEBHXIu, HENPeODONMOI CNbIy (nojapa, nproDhoH KATAcTPObI y H.T.n.), nonaDaHH bToBTOx HaceKOMbIX nRpl3yHOB, BO3JeDCTBNI HhIXb NOCTOPOHNNX paKTOpOB, a TaKke BCNECTBNT CYueCTBEHNbH NApUHMeH NTEuCKeHNX TpeBOaHN, OROBOEPHNbIX B INHCTpyKcNIO NO EKcNlYtauCIN, B TOM HCNE HeCTaBnIbHOCTN napAMetB eNeKTPocTeiY, yctahONBHNbIX FOCT 32144-2013.
IaonnoTbePexDHHaDatbOkyKNHnPbnpaRapAHTHIOHMpeMOHTHeINNppeBBAHNHmHInhnpEyDCMOTpeHNH3aKHOEMTOpeB0aHMy y6eIbnTeBHO npocIM BacoCpaOHrBdoKOpyMeHToO pOKNYke (NeK,KBtAHTuHIO, hInbE doKOpMeY, noTBeDPXkAIOueDatY aKoEHoNQKNH).
C6oJIbOHeHKe PcOKOMaHauN yK3aHn, cOepeKzAunxCB N HtCTpyKuIN NO 3KcPnYatauIN (npabHnXn pONb3OBAHn), nOMOxETn6EkaTb np6oMeB B 3ckpnuatau np6bopa n er ofo KyKBaHnn.
HeNcPABHbIe yIaJI np6OBpB RpaHHTINHHepNOID 6cePNATHOPEMOHTHPYOTCR HNN3aMEHRTOR HOBBMn.PeueHne BONPOCAOEOBPAHOCTH Nx 3AMEHNI pEMOHTA OCTAETCR 3aCNYKAMCBEPBCNA.
9.Инфорmaцьосярвиce
B nepno n noce hcteyenra pantnHoro cpoka haa Cnyk6a Cepbica, a tako me pactepckhe hauinx napthepor bcerda rotoBn npedonokhtb Bam cbon ycynr. CnKoc adpcob yonlonohouhenhixn 3rTOBHTENEM nyHKTOB ABTOHNBOAHORO cepBHORO oCbnkyHBANHAHXoNDTCHa ofnHnabHom caite B INTEPHTe: www.bosch-home.ru.
Cpok cnkyb MaIbX b6TobXb np6BOP (KoPOMe KxOHNbX KOM6HOB n lyncocOB) cOCTaBnRE 2 rDa. Cpok cnkyb kXyOHbX kOMaHOB n lyncocOB coTbAET 5 net. Cpok cnkyb H3NENH NcHcNtEeC T dAty erO noKynKn, n60 npri HeBO3MOKHOCTte enopeDeneH, C dTaY hroTOBHeH H3NENH HaneceHNO HA TINIOBYU TaNbNkU H3NENH. B COOTBETCBN Co CTaNaptOrm H3rOToBHTEna dat A hrotobnneMapkpyetcFD IT MM, de IIT - roH3rOToBHeHnMnuc 1920, a MM - mecaH3rOToBHeHn.Дну onpeDeneH roHa3rOToBHeHn pnp6bAphe6xoHmO KG 1920 np6BaBntu ChnO KG
- BéccnnaThbI KpyrnoCyToHy bTepeoH dIa 3BOHkoB Ha TeppntOpH PΦ.
B34C065N1-1M00 03/2017
Инфорmaця O 6bIToBOI TEXHnke,прОиЗВeДeEHNoI NOД KOHTpoJIem KOHcePHa BCX XaycrepeTe Γm6X, KapI-Bepn-IIItp.34,81739 MIOHXeN,Германь COOTBeTCTBnC Tpe6ObaHnЯMn ΦeDEpaJIbHorO 3aKoHA PФ OT 23 HOJ6pR 2009 r. № 261-Φ3,ЗakOHoDaTeJIbCTBa O TEXHnuecKOM peRylnipOBaHn N 3aKoHOdaTeJIbCTBa O 3aUInTe npaBNotpe6bTeJIeN PocsnckOfФeDEpaZn
Ipoodykui: cokobbljxImaJIKN, MmKcepbI, 6neHdepbI, pe3Kn, kXoHHbIe KOM6aHbI, KofoMeJOLKn, Mscopy6Kn, n3MeJIbHTeTI
TOBAPHbI 3HaK Bosch
BHIMAHIE!AccoptmHtnpDyKunnoocHOOBHnRETC. TaeXHEcKne XapAeTcNTHnnpOkyuB,TOUMCNE3HEpO200HbOHTNOOCIOHO CooBepHCTBcyOTOKI.PnpOdyKunnopeYnpyRnpoHOPOxOHT6a3aTeHbNyPoPouEuyPONDTEBpEOOOCTBETBNCOrnanHO CHEOHDECTBOUeMy 3akohoe 10kncce X npopmaio O pekBn3tax AkyaIbHybcert KpOeJyIOhApOmaio HnKacce X npopmaio HnKacce 198511 Caht-Tepe6ypr, r. Tepeoop, np. Kapna CimHeCA, d.1 nit. A, fnninBnB R. MckBa, 119071, ym. Mana Kanyckca, d.15, teneOpOH (495) 737-2777, pfacK (495) 737-2798.
KomiHaNoo OOO «BCX BItObIe PIn6Opby》,198515,CAnKIT-PTepe6ypr. r.ITepeprof,yn.Kapna CImHeNca,d.l.INT.A.PhiHnB A R.MockBa,119071, yM.Nanam KanykXpK,d.15,Tepeoho(495)737-2777,paKc(495)737-2798 ocUeCTBnRt cBOO dTeJIbHOCTNO NO tIOBtEKNHO COOTCTBNNPOJyDKNOT OIMEHNI POIN3BIDENTHE NA EDHNIO TAMOXEHHOR TepETOPINTB EBaP3AIKKORO KOHMONIKO COO3A BOOTCTBNC D CEJETBQYUMNH TEXHUYCKHMIPerrnAmEHTAMBI,BAKCTBE YNOLHOMOeHHOR U3r0TOBITENEM NIIa,aTAKe BbIOnIHReT Pte6OBHnRA,npEDCMOTpeHHbIE 3aOHOM PH No184-Φ3 «O TEXHUYCKOM PERylnipobAHmN INI IINu,BbIOnHNoIeOfo FHyKnIM INHOCTPAHHOR IN3OTOBITNA H TePPITOPINPOccnKO Fedepaunin.
Hmnpoptepom B Pocckcyu Hpdepaunu npdyukun, ceptnduuupbaaohno B kaneCTbe cepnno npou3bdoum, 8bnetaeC O0O «5CX BbyToBbte PInb6bpy》,19851,CanKt-TepeBypr,r. Tereprof, yn. Kapna Cmmeca, d.l nT. A, pfniMaB r. MockBa, 119071, yn. Manra Kanyxckar, d.15, TeneOp (495) 737-2777.
Oprnnaauei, yka3baeMOH na pOdyuKIM b cIeRx nEIDHTNfMkaUIN npOdykUM IN oCuyIeCTBnHOUIe nePbMvHoe pa3MeUHe Hne npOdyuKIM ha BpHke EOpncKOto co3a, JpaJIeTc Po6ep BoU Xaycrepe TmX Kapn-Bepu-IIItp. 34, 81739 MOnHXe, TepMaHria (Robert Bosch Hausgerate GmbH, Carl-Wery-Str. 34, 81739 Munchen, Germany).
OpDnHueckm NIMOM (N3OTOBITEENM), OCUJcETBnHIOUIM OT CBOEOR IMeHN H3OTOBIEHNE PNOyKUNIN NT BETCTBEHbIM 3a ee COOTBETCTBME tpe6obAHmnpneMHbX TeHHeCKx pernaMeTOB, ABJIETC5 CX XaycrepeTe M6X, Kapn-Bepn-UItp. 34, 81739 MoHXen, FepMaHIna (BSH Hausgerate GmbH, Carl-Wery-Str. 34, 81739 München, Germany).
Pnpepeb03ke, nporpyke, paarhenin npodkycn cneyet pykoBDCTBOBATcB, NOMIO nIIOXeHHbX B INHCTpykun no 3KcNpYatauun, cndeynkumr Tpe6oabaHnn
3AnpeaeTaCnNoBeparbIpoDyKmIO CyueCTBeHbIM MExAHUeCEcM HarpzKam, KOTOpBEy PrpBeCTN KOBPeXKeHIO pOdoKmN IINH npArySeHIO eY naOKoBk.
- Heo6xOuMo n36eRaTb nonaDaHn Ha ynaKOBky npOduKun BOdy n Dpyrnx XnDkoCTe.
Perepe nepebo3okm nnepeaane h xpaenene 6bIeB E 3Kcnpyataun npOdykun pnn Optnatehno Temnpatype Heo6xdoMo y6edntcb AOTCYTBWn B npOdykun BDObl.
Ipoodykua npedha3naeHa K nCnoB3oBaHnO B yCIOBnX TempeatpybI Bblie 0^ n OTHOCNTeHOB BlaxHoCTn, He npebblaHOse 93%.
Pereh Hanyom 3KcNpytaatun PnpdyuKn, nIeHbneBpeM haoDnBueyoeaon Oo3dEeTbnEM OTPiauTeBHO TEMepaTpybl, hO60xDIMO BByDEkTaBt eB yCNOBANKOMAHOT NEMETAPybl HECKONBko YacOB.
Pnabna peanmaznn npdykunonpeydenlortc ppeynnoTHOPBnB CootBETCTBN C tpe6oBAHm DeyeCTbUooero 3aKHO-datenbCTBa.
Yka3aHnO yTuHn3aCnPiPOdUkCm COePcKATCB INHCTpykCmIO KcNpIyATAuCm I MOrTy 6bIt yTOChHebl y MyHnIaJIaNbHbX OPAHOB NcONHITeBHOB bIaCTn.
In pnoDyku,peaHIOBAAHHIOBTOBINTENEM B TceHHe cPcoka DeJIeTBCTBNA COOTBCTBNA, 3OT CPTHIKATK IeBCTBNTENIM PHE oNCTABK,poJADKeA (npmIoBbAHOHN (pnpMeHEnHIN) B TceHne cPcoka Cnyk6bl, yctAHOBHENHO B COOTBCTBNA CO tateB 183KaOHPO A 3aUHNTe npab NpOBeHTenEe. CpOK cyNk6bl h aoPNOuHIOY kya3ahpnO3bOJNDENTEN M bIOCTOBE «INHOpMaUZI HIOBOTENE O rApaHTNHOM I eCBPHOCO 06CnynBAHNHAI”.
PpOyDmKoM6t 6bIb IeHTNnHPOBaHOa No moEbnHbOMy 063nHaehnIO (nonne E-Nr.), anpObaHNOHOMy TnHy (nonne Type) n TobaHOMY 3NaKy Bosch, hnaeehnhm I naPcUHIO, ynaOBky u (nn) coepjkaunxCBA kcnpyauonHHix dokymTeA. B COOTBCTBN m C bHTpyHMM CTahADPTM 3mTOBHTIELb 6bTobar TeXHKMAI eHTNnHUPyETcNo cndyouuien cxeMe:
E-Nr.
MATEpAaHbN HOMep npEctBaTnep Coob 6kyBHeHO-undPBOe Oo3HaueHne pOpykUHN DnHNO He bOoe 10 CMMOB, nCtOb3yEmoe npnpOpaKe (mHemyOE moBbHM oO3HaueHem mI MoDcBb 6bTOBOro pIbOba) topROB mapK Bosh. MATEpAaHbN HOMep (MoEb) yka3BaETc MExdy KoDBOM cTbOMB E
HnEeKc cepBnCn cyN6bI -Dy3NaHoeu HpncBaHbAeOe 06o3aHene, pncBaHbAeMOe eHnHtpe npOyKlM B npoceCE pOw3BOpCTBa H nOIpnlbYeMoE cepBnCn cyN6bI.
3KcnpIyatauONHbIe DOKymEMTbI paap6aBtBAoTcB Y HnDmUPOBOAHNOH FOpeJrA LIMPOKOTO ACCOTHMHeTAPODyUKN, NOSTOMY INGOTOBENTENPEpDCMOTPeH aHOIOBTO BDOHNEHApBbX 3KcnPlyatauONHbIX DOKYMEmTAX KAK NONHOCTbO, TAK NACTMHOO, PNI yCLOBNN, YTO 3TO N03BONET ONpEaNHTbPnHADHO 3KcnPlyatauONHOb DOKYMEmTAX K bTOBOMY pNpOBOx MEOMY 3TNM 3KcnPlyatauONHbIM DOKYMEMT. YCTaOHBeHE B npoceCE ldHNTMkAuaQCBTeBTX XAPaRTECPKNTbIK bTOBOTO pNpObaNo INONOKeHN, COePKaZAMCMBC INP1aRaAeMbX K HEMY 3KcnPlyatauONHbIX DOKYMEmTAX, pNOBDITcY NTem AHAINlA IHNOFPAUMAn, INKHOEKENBHX B 3KcnPlyatauONHbIX DOKYMEMTAX
B CoCTAB 3KcNpATAUONHbX DOKYMHTOB, PnpyEDCMPTBHeHbIX INOTOBOTENEM IINPOJNYKUNM, MORYT BXOJNTb HACTORIaH INHOPMAUNA, INCHPTKUIA (pyKBODCTBO) NO 3KcNpATAUaTN, INHOPMAUNA O YCNOIBAYRAPAHINTHO R cepBNCHO RCBNKNBAHUM
MaproBAAHMe npOyKmN OcyUeCTbIaTcE T3ROTOBtIeHn Ma TINOBo TaBnUe KpIbOpa,Ha YNAKOBOH N3TIKETKe, HENOPCECTBEHHo HA YNAKOBKe pIbOpa, A Toke MoKet npOu3BOuITbcn HbIMn CnOCoBaMn, ObceNeuBaIOUMn DOctynHoe n HartnaHoe PpeDCTabJIne HmFopMaun o npIbOpBe MceTx npOdaK.
PpOdykunia, KOTOPaR npOoIa NPOUeDpynpTBePckDHeNn COOTBCTBnCOrNaCHO Tpe6oBaHmE TxHueCkXn pernaMeHTOs TaMOKeHHo roco3a WmNIO pAeHIOEbPAOeHIOO Epa3iNIOKHOHMeCkoC03a, MaKVPyETcEINHbIM 3AnKOM o6paHEnrpoOykuNn ApbHkerocaydptb-CHeHOB TaMoKeHoro HOOeHNOE CKOHOUMcHcKOc03a).
IpoDyKzna COOTBETCTBYeT CNeDyUOzIM TexHnueckm perNaMeHTam TaMOxKeHHoro COHO3a:
TP TC 020/2011 3JektpomarHHTHAR COBMECTMIOCTb TEXHnuecknx CpeIcTB
- TP TC 004/2011 O 6e3oNaChOCTn Hn3KOBoBtHOrO o6OpyDoBaHnA
TP EA3C 037/2016 O6 orpauHneHHn primeHHneHHn oanaBbX BeueCTB INaIeHHx nEKeTPOExHHKn IN paDIO3NeKtPOHKn C DaTb BYCTyJIeHHN ero B cHny
3KcnpyaatauONHbIe DOyMEnbIa H npOdykUIno BblonTHIOHTOA H ypcCKOM RbIke. 3KcnpyaTauONHbIe DOyMeHbIa H roCydApCTBnHbX I b3bIXaTOcYDAPCTbIe HEBpAinmckCRO3KOHNMMeCKOrO Co30a,OTNINHbX OTRyCCKO, pHn HANmHCOBETCTBYOuHX TeP6BaOHm B zAKHOJADTeBtE MoKHO63B03Me3HO NpOHyTuBt y oTpRyouChOp rOphAunmuae-PE3dHeTA COOBETCTBYOuHO rOcydApCTa-HueHa EbpAinmckCko3 KOHNMOHcCKOrO Co30a.
NfHopmaa o KOMNEKtaeua npOyukn pnpTeCTAonBTOBb3xanox,MOKet bItb3anpoueha NO tenePOhY 8ocnTahno ITOPAHmIINH (800) 200-2961, a Tokeo dctynHa B INHTEPHe Na Caitre npOnBodInetae htp://www.bosch-home.ru
| Toproboe obsochny- nhe | Anopba- zoonnchyn TNI | Ceptnikfakat cootbctctbn | Ctpana- mtoTOBIV- TEL | ||
| Pertncrtpaoion- hny HOMep | Deta Bvldau | Dejctbyet do | |||
| Cokovbukman | |||||
| MCP3000 | CNZP3 | C-DE A46. B7.3451 | 08.02.2016 | 07.02.2021 | CnoBENH |
| MES25A0 | CNCJ03 | C-DE A46. B7.3451 | 08.02.2016 | 07.02.2021 | Ktari |
| MES25C0 | CNCJ03 | C-DE A46. B7.3451 | 08.02.2016 | 07.02.2021 | Ktari |
| MES25G0 | CNCJ03 | C-DE A46. B7.3451 | 08.02.2016 | 07.02.2021 | Ktari |
| MES3500 | CNCJ03 | C-DE A46. B7.3451 | 08.02.2016 | 07.02.2021 | Ktari |
| MES4000 | CNCJ04 | C-DE A46. B7.3451 | 08.02.2016 | 07.02.2021 | Ktari |
| MES4010 | CNCJ05 | C-DE A46. B7.3451 | 08.02.2016 | 07.02.2021 | Ktari |
| Pezhi | |||||
| MAS4000W | CNAS11ST1 | C-DE A46. B7.3634 | 19.02.2016 | 18.02.2021 | CnoBENH |
| MAS4104W | CNAS11EV1 | C-DE A46. B7.3634 | 19.02.2016 | 18.02.2021 | CnoBENH |
| MAS4201N | CNAS11ST1 | C-DE A46. B7.3634 | 19.02.2016 | 18.02.2021 | Typu# |
| MAS4601N | CNAS11EV1 | C-DE A46. B7.3634 | 19.02.2016 | 18.02.2021 | Typu# |
| MAS6151M | CNAS12 | C-DE A46. B7.3634 | 19.02.2016 | 18.02.2021 | CnoBENH |
| MAS6151R | CNAS12 | C-DE A46. B7.3634 | 19.02.2016 | 18.02.2021 | CnoBENH |
| MAS620ON | CNAS12 | C-DE A46. B7.3634 | 19.02.2016 | 18.02.2021 | Typu# |
| MAS9101N | AS9ST | C-DE A46. B7.3634 | 19.02.2016 | 18.02.2021 | Typu# |
| MAS9454M | AS9ST | C-DE A46. B7.3634 | 19.02.2016 | 18.02.2021 | CnoBENH |
| MAS9555M | AS10EH | C-DE A46. B7.3634 | 19.02.2016 | 18.02.2021 | CnoBENH |
| Mnckcrp, fengndryi, knmelnynten | |||||
| MFQ2100 | CNHR30 | C-DE A46. B7.6049 | 17.08.2016 | 16.08.2021 | CnoBENH |
| MFQ221D | CNHR30 | C-DE A46. B7.6049 | 17.08.2016 | 16.08.2021 | CnoBENH |
| MFQ221OP | CNHR30 | C-DE A46. B7.6049 | 17.08.2016 | 16.08.2021 | CnoBENH |
| MFQ221OY | CNHR30 | C-DE A46. B7.6049 | 17.08.2016 | 16.08.2021 | CnoBENH |
| MFQ24200 | CNHR30 | C-DE A46. B7.6049 | 17.08.2016 | 16.08.2021 | CnoBENH |
| MFQ242OB | CNHR30 | C-DE A46. B7.6049 | 17.08.2016 | 16.08.2021 | CnoBENH |
| MFQ3010 | CNHR19 | C-DE A46. B7.7304 | 30.12.2015 | 29.12.2020 | CnoBENH |
| MFQ3020 | CNHR19 | C-DE A46. B7.7304 | 30.12.2015 | 29.12.2020 | CnoBENH |
| MFQ3030 | CNHR19 | C-DE A46. B7.7304 | 30.12.2015 | 29.12.2020 | CnoBENH |
| MFQ3520 | CNHR17 | C-DE A46. B7.7304 | 30.12.2015 | 29.12.2020 | CnoBENH |
| MFQ3555 | CNHR18 | C-DE A46. B7.7304 | 30.12.2015 | 29.12.2020 | CnoBENH |
| MFQ36300D | CNHR27 | C-DE A46. B7.7304 | 30.12.2015 | 29.12.2020 | CnoBENH |
| MFQ36300I | CNHR27 | C-DE A46. B7.7304 | 30.12.2015 | 29.12.2020 | CnoBENH |
| MFQ36300Y | CNHR27 | C-DE A46. B7.7304 | 30.12.2015 | 29.12.2020 | CnoBENH |
| MFQ36440 | CNHR27 | C-DE A46. B7.7304 | 30.12.2015 | 29.12.2020 | CnoBENH |
| MFQ36460 | CNHR27 | C-DE A46. B7.7304 | 30.12.2015 | 29.12.2020 | CnoBENH |
| MFQ366GOLD | CNHR27 | C-DE A46. B7.7304 | 30.12.2015 | 29.12.2020 | CnoBENH |
| MFQ4020 | CNHR22 | C-DE A46. B7.7304 | 30.12.2015 | 29.12.2020 | CnoBENH |
| MFQ40301 | CNHR22 | C-DE A46. B7.7304 | 30.12.2015 | 29.12.2020 | CnoBENH |
| MFQ40302 | CNHR22 | C-DE A46. B7.7304 | 30.12.2015 | 29.12.2020 | CnoBENH |
| MFQ40303 | CNHR22 | C-DE A46. B7.7304 | 30.12.2015 | 29.12.2020 | CnoBENH |
| MFQ4070 | CNHR22 | C-DE A46. B7.7304 | 30.12.2015 | 29.12.2020 | CnoBENH |
| MFQ4080 | CNHR22 | C-DE A46. B7.7304 | 30.12.2015 | 29.12.2020 | CnoBENH |
| MMB21POR | CNSM10 | C-DE A46. B7.3592 | 17.02.2016 | 16.02.2021 | Ktari |
| MMB21PWI | CNSM10 | C-DE A46. B7.3592 | 17.02.2016 | 16.02.2021 | Ktari |
| MMB42G0B | CNSM11 | C-DE A46. B7.3592 | 17.02.2016 | 16.02.2021 | Ktari |
| MMB42GB1 | CNSM11 | C-DE A46. B7.3592 | 17.02.2016 | 16.02.2021 | Ktari |
| MMB43GB2 | CNSM11 | C-DE A46. B7.3592 | 17.02.2016 | 16.02.2021 | Ktari |
| MMB64G3M | CNSM13 | C-DE A46. B7.3592 | 17.02.2016 | 16.02.2021 | Ktari |
| MMB65GOM | CNSM13 | C-DE A46. B7.3592 | 17.02.2016 | 16.02.2021 | Ktari |
| MMR08A1 | CNMC13ST1 | C-DE A46. B7.3343 | 29.01.2016 | 28.01.2021 | CnoBENH |
| MMR15A1 | CNMC13ST2 | C-DE A46. B7.3343 | 29.01.2016 | 28.01.2021 | CnoBENH |
| MSM14000 | CNHR12C | C-DE A46. B7.3592 | 17.02.2016 | 16.02.2021 | CnoBENH |
| MSM14100 | CNHR12C | C-DE A46. B7.3592 | 17.02.2016 | 16.02.2021 | CnoBENH |
| MSM14200 | CNHR12C | C-DE A46. B7.3592 | 17.02.2016 | 16.02.2021 | CnoBENH |
| MSM14500 | CNHR12C | C-DE A46. B7.3592 | 17.02.2016 | 16.02.2021 | CnoBENH |
| MSM24100 | CNHR12C | C-DE A46. B7.3592 | 17.02.2016 | 16.02.2021 | CnoBENH |
| MSM241P0 | CNHR12C | C-DE A46. B7.3592 | 17.02.2016 | 16.02.2021 | CnoBENH |
| MSM241V0 | CNHR12C | C-DE A46. B7.3592 | 17.02.2016 | 16.02.2021 | CnoBENH |
| MSM241V1 | CNHR12C | C-DE A46. B7.3592 | 17.02.2016 | 16.02.2021 | CnoBENH |
| MSM241V2 | CNHR12C | C-DE A46. B7.3592 | 17.02.2016 | 16.02.2021 | CnoBENH |
| MSM241V3 | CNHR12C | C-DE A46. B7.3592 | 17.02.2016 | 16.02.2021 | CnoBENH |
| MSM24500 | CNHR12C | C-DE A46. B7.3592 | 17.02.2016 | 16.02.2021 | CnoBENH |
| MSM2450B | CNHR12C | C-DE A46. B7.3592 | 17.02.2016 | 16.02.2021 | CnoBENH |
| MSM2610B | CNHR12C | C-DE A46. B7.3592 | 17.02.2016 | 16.02.2021 | CnoBENH |
| MSM2610Y | CNHR12C | C-DE A46. B7.3592 | 17.02.2016 | 16.02.2021 | CnoBENH |
| MSM26602B | CNHR15 | C-DE A46. B7.3592 | 17.02.2016 | 16.02.2021 | CnoBENH |
| MSM26623G | CNHR15 | C-DE A46. B7.3592 | 17.02.2016 | 16.02.2021 | CnoBENH |
| MSM26650UR | CNHR15 | C-DE A46. B7.3592 | 17.02.2016 | 16.02.2021 | CnoBENH |
| MSM26651U | CNHR15 | C-DE A46. B7.3592 | 17.02.2016 | 16.02.2021 | CnoBENH |
| MSM26653G | CNHR15 | C-DE A46. B7.3592 | 17.02.2016 | 16.02.2021 | CnoBENH |
| MSM26655U | CNHR15 | C-DE A46. B7.3592 | 17.02.2016 | 16.02.2021 | CnoBENH |
| MSM26657UR | CNHR15 | C-DE A46. B7.3592 | 17.02.2016 | 16.02.2021 | CnoBENH |
| MSM26658U | CNHR15 | C-DE A46. B7.3592 | 17.02.2016 | 16.02.2021 | CnoBENH |
| MSM26659U | CNHR15 | C-DE A46. B7.3592 | 17.02.2016 | 16.02.2021 | CnoBENH |
| MSM26660Y | CNHR15 | C-DE A46. B7.3592 | 17.02.2016 | 16.02.2021 | CnoBENH |
| MSM26661U | CNHR15 | C-DE A46. B7.3592 | 17.02.2016 | 16.02.2021 | CnoBENH |
| MSM26661U | CNHR15 | C-DE A46. B7.3592 | 17.02.2016 | 16.02.2016 | CnoBENH |
| MSM26661Y | CNHR15 | C-DE A46. B7.3592 | 17.02.2016 | 16.02.2016 | CnoBENH |
| Toporoboe obsozha- nhe | Anopba- zoonnbl TNI | SeptkФнKat COOTBCTBn | 17.02.2016 | 16.02.2021 | Ctpana- H30TOBNO- TOnb |
| Релостраци- нь homeр | Дата Быдоч | Дерstуев do | |||
| Minceperi, Блendорь, Камлелитри | |||||
| MSM6B250 | CNHR11 | C-DE-A46.B.73592 | 17.02.2016 | 16.02.2021 | Cnobemn |
| MSM6B300 | CNHR12 | C-DE-A46.B.73592 | 17.02.2016 | 16.02.2021 | Cnobemn |
| MSM6B500 | CNHR12 | C-DE-A46.B.73592 | 17.02.2016 | 16.02.2021 | Cnobemn |
| MSM6B700 | CNHR12 | C-DE-A46.B.73592 | 17.02.2016 | 16.02.2021 | Cnobemn |
| MSM87130 | CNHR28 | C-DE-A46.B.73592 | 17.02.2016 | 16.02.2021 | Cnobemn |
| MSM87140 | CNHR28 | C-DE-A46.B.73592 | 17.02.2016 | 16.02.2021 | Cnobemn |
| MSM87160 | CNHR28 | C-DE-A46.B.73592 | 17.02.2016 | 16.02.2021 | Cnobemn |
| MSM87165 | CNHR28 | C-DE-A46.B.73592 | 17.02.2016 | 16.02.2021 | Cnobemn |
| MSM87180 | CNHR28 | C-DE-A46.B.73592 | 17.02.2016 | 16.02.2021 | Cnobemn |
| MSM88190 | CNHR29 | C-DE-A46.B.73592 | 17.02.2016 | 16.02.2021 | Cnobemn |
| MSM881X1 | CNHR29 | C-DE-A46.B.73592 | 17.02.2016 | 16.02.2021 | Cnobemn |
| MSM881X2 | CNHR29 | C-DE-A46.B.73592 | 17.02.2016 | 16.02.2021 | Cnobemn |
| Koхонны komбайы | |||||
| MCM3100W | CNCM12 | C-DE-A46.B.73522 | 12.02.2016 | 11.02.2021 | Cnobemn |
| MCM3110W | CNCM12 | C-DE-A46.B.73522 | 12.02.2016 | 11.02.2021 | Cnobemn |
| MCM3200W | CNCM12 | C-DE-A46.B.73522 | 12.02.2016 | 11.02.2021 | Cnobemn |
| MCM3201B | CNCM12 | C-DE-A46.B.73522 | 12.02.2016 | 11.02.2021 | Cnobemn |
| MCM3401M | CNCM12 | C-DE-A46.B.73522 | 12.02.2016 | 11.02.2021 | Cnobemn |
| MCM3501M | CNCM12 | C-DE-A46.B.73522 | 12.02.2016 | 11.02.2021 | Cnobemn |
| MCM4000 | CNCM20 | C-DE-A46.B.73522 | 12.02.2016 | 11.02.2021 | Cnobemn |
| MCM4100 | CNCM20 | C-DE-A46.B.73522 | 12.02.2016 | 11.02.2021 | Cnobemn |
| MCM4250 | CNCM21 | C-DE-A46.B.73522 | 12.02.2016 | 11.02.2021 | Cnobemn |
| MCM4260 | CNCM30 | C-DE-A46.B.73522 | 12.02.2016 | 11.02.2021 | Cnobemn |
| MCM46051 | CNCM30 | C-DE-A46.B.73522 | 12.02.2016 | 11.02.2021 | Cnobemn |
| MCM46085 | CNCM30 | C-DE-A46.B.73522 | 12.02.2016 | 11.02.2021 | Cnobemn |
| MCM68840 | CNCM30 | C-DE-A46.B.73522 | 12.02.2016 | 11.02.2021 | Cnobemn |
| MCM68885 | CNCM30 | C-DE-A46.B.73522 | 12.02.2016 | 11.02.2021 | Cnobemn |
| MUM4406 | CNUMSST | C-DE-A46.B.73522 | 12.02.2016 | 11.02.2021 | Cnobemn |
| MUM4426 | CNUMSST | C-DE-A46.B.73522 | 12.02.2016 | 11.02.2021 | Cnobemn |
| MUM4657 | CNUMSST | C-DE-A46.B.73522 | 12.02.2016 | 11.02.2021 | Cnobemn |
| MUM4855 | CNUMSST | C-DE-A46.B.73522 | 12.02.2016 | 11.02.2021 | Cnobemn |
| MUM4875EU | CNUMSST | C-DE-A46.B.73522 | 12.02.2016 | 11.02.2021 | Cnobemn |
| MUM4880 | CNUMSST | C-DE-A46.B.73522 | 12.02.2016 | 11.02.2021 | Cnobemn |
| MUM52131 | CNUM50 | C-DE-A46.B.73522 | 12.02.2016 | 11.02.2021 | Cnobemn |
| MUM54020 | CNUM51 | C-DE-A46.B.73522 | 12.02.2016 | 11.02.2021 | Cnobemn |
| MUM54240 | CNUM51 | C-DE-A46.B.73522 | 12.02.2016 | 11.02.2021 | Cnobemn |
| MUM54620 | CNUM51 | C-DE-A46.B.73522 | 12.02.2016 | 11.02.2021 | Cnobemn |
| MUM54720 | CNUM51 | C-DE-A46.B.73522 | 12.02.2016 | 11.02.2021 | Cnobemn |
| MUM54920 | CNUM51 | C-DE-A46.B.73522 | 12.02.2016 | 11.02.2021 | Cnobemn |
| MUM54D00 | CNUM51 | C-DE-A46.B.73522 | 12.02.2016 | 11.02.2021 | Cnobemn |
| MUM54G00 | CNUM51 | C-DE-A46.B.73522 | 12.02.2016 | 11.02.2021 | Cnobemn |
| MUM54I00 | CNUM51 | C-DE-A46.B.73522 | 12.02.2016 | 11.02.2021 | Cnobemn |
| MUM54P00 | CNUM51 | C-DE-A46.B.73522 | 12.02.2016 | 11.02.2021 | Cnobemn |
| MUM54Y00 | CNUM51 | C-DE-A46.B.73522 | 12.02.2016 | 11.02.2021 | Cnobemn |
| MUM56S40 | CNUM51 | C-DE-A46.B.73522 | 12.02.2016 | 11.02.2021 | Cnobemn |
| MUM57830 | CNUM51 | C-DE-A46.B.73522 | 12.02.2016 | 11.02.2021 | Cnobemn |
| MUM57860 | CNUM51 | C-DE-A46.B.73522 | 12.02.2016 | 11.02.2021 | Cnobemn |
| MUM58020 | CNUM51 | C-DE-A46.B.73522 | 12.02.2016 | 11.02.2021 | Cnobemn |
| MUM58225 | CNUM51 | C-DE-A46.B.73522 | 12.02.2016 | 11.02.2021 | Cnobemn |
| MUM58243 | CNUM51 | C-DE-A46.B.73522 | 12.02.2016 | 11.02.2021 | Cnobemn |
| MUM58244 | CNUM51 | C-DE-A46.B.73522 | 12.02.2016 | 11.02.2021 | Cnobemn |
| MUM58252RU | CNUM51 | C-DE-A46.B.73522 | 12.02.2016 | 11.02.2021 | Cnobemn |
| MUM58420 | CNUM51 | C-DE-A46.B.73522 | 12.02.2016 | 11.02.2021 | Cnobemn |
| MUM58720 | CNUM51 | C-DE-A46.B.73522 | 12.02.2016 | 11.02.2021 | Cnobemn |
| MUM59855 | CNUM51 | C-DE-A46.B.73522 | 12.02.2016 | 11.02.2021 | Cnobemn |
| MUM59890 | CNUM51 | C-DE-A46.B.73522 | 12.02.2016 | 11.02.2021 | Cnobemn |
| MUM59950 | CNUM51 | C-DE-A46.B.73522 | 12.02.2016 | 11.02.2021 | Cnobemn |
| MUM59955 | CNUM51 | C-DE-A46.B.73522 | 12.02.2016 | 11.02.2021 | Cnobemn |
| MUM59A5SS00 | CNUM618 | C-DE-A46.B.73522 | 12.02.2016 | 11.02.2021 | Cnobemn |
| MUM59A5SS500 | CNUM618 | C-DE-A46.B.73522 | 12.02.2016 | 11.02.2021 | Cnobemn |
| MUM59A5SS700 | CNUM618 | C-DE-A46.B.73522 | 12.02.2016 | 11.02.2021 | Cnobemn |
| MUM59Y5SS24 | CNUM618 | C-DE-A46.B.73522 | 12.02.2016 | 11.02.2021 | Cnobemn |
| MUM59Y5SS12 | CNUM618 | C-DE-A46.B.73522 | 12.02.2016 | 11.02.2021 | Cnobemn |
| MUM59X5O0 | CNUM618 | C-DE-A46.B.73522 | 12.02.2016 | 11.02.2021 | Cnobemn |
| MUM59X5O40 | CNUM618 | C-DE-A46.B.73522 | 12.02.2016 | 11.02.2021 | Cnobemn |
| MUM59X5O40 | CNUM618 | C-DE-A46.B.73522 | 12.02.2016 | 11.02.1999 | Ktari |
| MUM59X5O40 | CNUM618 | C-DE-A46.B.73522 | 12.02.2016 | 11.02.1999 | Ktari |
| MUM59X5O40 | CNUM618 | C-DE-A46.B.73522 | 12.02.2020 | Ktari | |
| MUM59X5O40 | CNUM618 | C-DE-A46.B.73522 | 12.02.2020 | Ktari | |
Tnicti peTte naIdaIaHy
Бул Крьлгы Тек Хе Уде пайдалиа hyfa apHaIFaH.БуИьIMды Тек KaHa a3bIK-TyЛIK eHIMdepiH KaЛьIntы TypMbICTbIK KeJIeMDE MeH YaКыПТа eHdey YшIH KОДаНыHьИЗ.
PyKcat etiIreH MaKcImMaIbIK KeJIeMdepeH acbIPMaHbI3 ( «KondaHy Mbicaandapbl»MbHa 6emmi KapaHbI3:225).
Булбүйым a3ык-Тулік eнIMдерін apалacMbpy, Иneyжэ He KaFyfa apHaflfah. Күрьлгын bɑacka 3aTTeKTepei Hemece 3aTTapDbI eHdey yшin колданfyfa 6oJMaДы.ШыfapyшI TapaBlnH KOLdaHy yшin рykcat etilreн bɑacka kocalkbI 6eIlweKTeepiH KOLdaHfAHaDA KOCbIMsa KOLdaHy Typnei De MymkiH 6oJadbl. Күрьлгы TEk pyKcT etilreH 6eIlweKTeP MeH Kepek-JxapakTapMeH naДaNaHbIbI3. Eшkaшan Kepek-JxapakTapDbI bɑacka Kүрьлгылap yшin naДaNaHbAbl3. Kүрьлгы 6eJIme TemnepaTypacbIaMbI iшкIжamnapda fanaЖэHe TeHi3 DeHreInHEn 2000 M deiHri 6nIKtikTe KOLdaHyfa apHaflfah.
MaHbI3IbI Kayinci3ik TypaJIbI MaFJyMaTTap
Ocbl naIdaIaHy HsCKayIbIFbIH MyKnT OKbl 11 11 bIfbIHb3 JxHe CaKTan KOyIbIbI3! KypblfblbIb6acka 6ipeyre 6epren Ke3de OcbI HsCKayIbIK Ta 6epiIyi Kepek. ByIMDbI NaBikTBI Tpyde KOnDaHy TypaIbI HsCKaynapra caI apekeT etinmeReHne OcbI apekeTTepDeH 11bFAbIH 11bIFbIHap ywiH eHdpuyi TapaBHaH KeniNik 6epiImei.i ByIbIM DeHe, ce3im XeHe aKbl-ON KaBilTePipweKteyli, cohBImeH 6ipre Taxipnbeci XeHe 6iimi XeTKiInkci3 aadamap TapaBHaH TeK 6akblay actbIHda BonFaHapbIHDA, HeMece 6yIMdbI Kayinc3 Tpyde KOnDaHy 6oBbIHwa MAnimetterpH 3depiHe XayantbI TyfapanaH aBtIN, OcbI 6yBIMbl KOnDaHydAn naJa 6oJa anatbH kayintepdi TycHReHepiHne fHa KOnDaHBla aJalbl. BaIaIapdbI Kypblfblfa XeHe KaBbIH DaTnaHb3 XeHe onap KypblfblHbI naIdaIaHbAcBH. BaIaIapra OcbI KypblfblMeH oHayfa pyKcat etneHi3. BaIaIapra Ta3aIayfa XeHe TexHnkaJIbIK KbIMET KepcTyre 60MaIdbI.
Optehy XaHe 3JekTp TOrbHa Tycy Kayni!
БунымдыTek КаHA Фирмалытakтайшада керсетинг Мэл IMТЕп 6оьынша icke KOCbIN KОДанынbl3.Егр 6уныIM Hemece OьИн КуАТ CBIMbl 3aKbIMdAnca, OьИ NaДанHaбанbl3. Kayinti КafДaнлар TybHdATnac yushi, 3aKbIMdaHfah XeNiire Kocy CBIMbl aybICTbpy CЯКТыбapЛыk XeHDey XyMbICTapblN 6i3iH KbI3MeT KepCETy XeHInDei GiliKTi KbI3MeTKepePImi3 Opbldavbl Kepek.
BvIbIMDbI TeK KaHa aHHaMaJIbI aXbIpaTKblI apKbIJbI KocblI eWipiHi3.
KypbIfblHbI eWKaHaT TaMep HeMece KaUbIKTaH 6ackapblNaTbIH po3eTKaJnapfa KocnahB13. KypbIfblHbI NaJaHaHy Ke3iHde 6akblan TypblHbI3!
KypbIINfbIHbI bICTbIK 6eTTep yCTiHe Hemece KaCbHa KOIMaHbI3, MbICaJIbI, pNTaFa. XKeI kaBeJIH bICTbIK 6eNIkTepre TnIR36eHI3, eTKip WETTEpiHE TaPTNaHbI3 Hemece TaCbIMaJday TyTKacbl peTIHde naJaIaN6aHbI3.
Heri3ri Kypblfba f eikkaaah cy Turi36eH3 HeMece bIbIC JyfbI MaunHaFcaJMaHaB3. ByMeH Ta3aJay KpaIbIH KOJaHa6aHbI3. KypblfbiHbblJFaJdbI KOIme KOndaHyfa 6oJMaJdbI.
BiybIMdbI eP naJaIaHaHydaH coH, OHbl 6aKblIaycbI3 KaIdbIpFaHbIHbI3Da, KypacTbIpbIn opHaTydaH aIdbIH, 6eIweKeTeReHi3de HeMeCe Ta3aJaRaHbIHbI3Da JxHe KaTeJIk NaJa 6oIfAHDa ePkawah JeIiDeH axbipaTbIHbI3.
:KapaKaTTaHy kayni 6ap!
Kymbic icTeiIreH Kemeki KpaJI He KocalkbI 6JIWeKTePdi aImacTbipy aIdbIHda, 6yIbIMbl eWipin, JeIeH aXbIpaTy KepeK. XTeK eWipiIreHHeH KeiH bipa3 yaKbIT JxMbIC icTeI TpyaDbI. XTeK ToJIbIFbIMeH TOKtaFaHwa KyTiHi3.
BvIbIM Kocylb6oJFaH Ke3Je, aHaJIMaJIbTIyTKaHbI peTTMeHi3.
AcnTapDbI TeK opHaTbINFaH KeCE, opHaTbINFaH KaKnaK JHe opHaTbINFaH JeTEK KaNTaMaCbIMeH NaJaTaHaHBi3! KepeKJXapaKTapDbI NaJaTaHaFAn Ke3Je KeceHi, KaKnaKTbI JxHe JeTeK KaNTaMaCbIH Hcckaylbk 6oBbHwa opHaTbIHb3!
KoIaHy 6apbIcblHa KOImeH KeceHi HemeCe TOITbIpy WaxTacblH yCTaMaHbI3. Kecere Hemece ToITbIpy WaxTacblHa eWkaHdai 3aTTbl (MbicaJIbl, KaCbIK) Kipri36eHJ3. Kon, WAs, KInIM XeHe backa JxabIbIKTapdbI aHaJIbIN TpyFaH 6eJIWeKTepeH aNbIC YCTaHbI3.
EwkaaahacnapanenKepeK-kaapakapbIHeMece2KepeK- kapaKtbI bipdei naDanaHbaHbI3.KepeK-kaapakapdbI KOJaHaH Ke3De OnapdbI XHe OHbIMeH bipre bepiInreH KOJaHy TypaBl HcayNbIKTbI YCTaHbIHbI3.
KepeK-kaapakTapdbI TeK TOnbIK XINHaIFaH KyIe NaJaIaHaHbIHb3. KepeK-kaapakTapdbI eShKaUaH Heri3ri KypblfblJa XINHaMaHbI3. KepeK-kaapakTapdbI TeK e3iHe Tnicti XyMbIC KyiHne naJaIaHaHbIHb3.
MaJaIaIaIbIw DnckiHIn eTkip NbiIwaKTapbl MeH JxneKeTpIH yCTaMaHbI3.MaJaIaIaIbIw DnckiNepre TK 6yuiPiHeH KOJ TURi3iHi3!
ApajactbipfbiNbliwaKkaKaJahKoJIMeH TImeHi3.
OpHaTbIJFaH apaJnactbIipfbIUtBtI yCTaMaHbI3! ApaJaactbIipfbIUtBtI eWkaJhaH opHaTbIJFaH KaKnaKcbI3 NaJdaNaH6aHbI3.
ÖTKip nbIshaKaTapMeH icTeReHde, bIDbICTa 6ocatKaHda JxHe Ta3aIayda aIbai 6OJIbIHbI3.
Kyu kayni 6ap!
blctbik apaJnacTbipblaTbIH eHIMdi eHDey Ke3iHne KaKnaKTaTbI KyfblTah 6y bfaDbI. EHN K0bi 0,5 nItp bICTbIK He Kcnipwireh CybIKtBk TOITbIPbIHbI3.
TyHusbiry Kayni!
BaIaIapFa opam MaTePnaIapbIMeH OiHayFa pyKcAt etneHi3.
Ha3ap aydapbHbI3!
KypbIfbl eIkaaHaH a3bIK-TyJIkTepdi eHney ywiH KepeKTi yaKbITbIHah Y3aFbIpaK yaKbIT 6oBbl Kocblbn KOnblmaybl Na3bIM. Boc TypiHde Icke KocPnAHbl3.
MaHbI3DbI!
KypblfblbI eP naJaIaNahdAn COH HeMece y3aKa yaKbIT naJaIaNbA JyprHe 66eH Ta3aIaNbI3 (→ «Ta3anay XeHe Kymy» MbiHa bemmi KaPAhB3: 223).
Бунымдаfts He Kemekei Kypaandafts 6eJrIepdIn TycihikTeMeci

KoIaHy TypaIbI HxCKaynbITarfbl HxCKaynapdbI opbIHdaHbI3.

A6aB 60JIbIbI3! AInHaJIMaJIbI PbIshaK.

A6aB 60JIbIbI3! AHaJIMaJIbI KypaJI.
TOnTbIpy caHbIaYbIh YcTaMaHbI3.
Bosch nnpMacbHbIH JkaHa 6ymbIMbIcTaTbIaJIfAhbHbI36eH KyTbIKTaIMbI3. Bi3iH 6ymbIMdApbIMbI3 TypaJIbI KocbIMwa MJIImeTTepDi Be6-caTbIMbI3da Ta6a aJacbI3.
Ma3MyHbI
Tnicpi peTpe naDalaHny. 215
MaHbI3dI kayinci3dk
TypaIbIMafJMyMaTTap 215
Kayinci3ik kyyieci 218
Kannbl maniMeTep 218
Kymblc kynepi 219
KoIdAny 219
Tazanay KHe KyTy 223
CaKay 224
AkaynbIKTap opbIH aJfAH
kaFdaaDaftiKeMeK. 224
KoIdaHyMbIcIaIapbl 225
Kokbicka Tactay. 226
Keninik wapTapbl 227
KocankbI Kepek-kaKaTap. 227
Kayinci3dkxyneci
KeheT icke KocbIyuaH KopFaHbIC
《Kymblc KynJIepi》KECTecIH KapaHbI3.
BiyibIMdbI TeK KaHa 1 XeHe 3 KyJnepeHde Kocyfa 6oJaBl:
blbic (11) opHaTbIraHda XaHe TipeIreHne 6ypaIraH Ke3e.
UipinHHe KeiH (0/off Kyi) 6yibIM Kpaanbl anMaTbIpy yuH aBTOMaTTbI Tpye OHtaNbl KyJde JxMbIC iTeiDi. 0/off = TOkTaTy
M = xKorapbipaKaHaHanyXbIJaMaMbIfbHa
apHaJIFaH JeDeJ aYbICTbipy,
aXbIpaTKbIUtB KaJaYbI apaNaCTbipy
y3aKTbIFbI yUiH YCTan TypbIHbI3.
1-7 KaJaMbbl, Kymblc KblJdaMbblfbl:
1=TEmeHaHaNyXbIJaMdIbIfbl-6aay,
7=KoFapbl aHany KblIaMdbIfbl - KblIaM.
4 Kymbic HndkaTopbi
Kymbc6apbcihda xahadbl (aHannMaIb aXbipaTkbiM Hemece 1-7 KyiHne).BiybIM KymbcihDa KaTelep opbIH aIFaHda, 3NeKTPOHdbIK CaKaTaHDbIPbIiAxxbPaTbJfHaHda XHe 6yibIM 6yJIiHReH XaFdaJa KaIIbIbIKaTaN, «AkaYbIKTap opbIH aIFaH XaFdaJaDaIbIKeMeK» MaKaJaacbIH KapaHbI3.
5 XeTeKtiH KopFaHbIC KaKaNaFbI
KTeKTiH KOpFaHbIC KaKaNaBbIaNbIn Tactay yuH, apTKbl KaFbIH 6acbIn, KaKaNaTbI aNbIN TactaHbI3.
6 XeTeK:
- acynik MaiaJaNaIbIiX He
- IblpbiH CbIKbIi (apHaaij Xa6dbIiK)
Biyibmbl KoJdaHbFaH Ke3Je XeTeKTiH
KopfahbIC KaKnafbiH opHaTbIHbI3.
7 Kypaflfa apHaIfAn XeTeK (6yNFayblsi, KaKKblSi, NJIerIi) XHe eTTapTkbls (apHaBjXa6bIK)
8 ApaNaactbIpBbI W KeTeeriH KopFaHbIC KaKnafbl
9 ApaJAcTbIPfBIIka apHaJIFaH XeTeK (apHaIbI Xa6DbIK*) KonJaHbIMaFAH Ke3Je apaJAcTbIPfBIIXeTerIH KOpFaHbIC KaKnafBih OpHaTbIH3.
10 Ka6eJIbdi opay aBTOMaTHKaCbl
Kemekwi Kypanbi 6ap bibic
11 Tot 6acnaiTbIH 60JaTTaH apanaactbipfbiW bIdbc
12 KaNaK
Kypanap
13 PpocceccnoHaIdbi hiImeni 6yfraybiu
14 PpoececcnHaJIbI KaKkblI
15 KaMbipKaanKbIb6ap nJIerii
16 Kemekei kypan dopba bI
KypaIap MeH MaIaIaNfBiW dNcKiIepPi caKaTayFa apHaIaNFaH.
AcyNJik MaJdaJafbiw
17 Ntepriu
18 KyuRbIbIbIbIbIbIbIbIbIbIbIbIbIbIbIbIbIbIbIbIbIbIbIbIbIbIbIbIbIbIbIbIbIbIbIbIbIbIbIbIbIbIbIbIbIbIbIbIbIbIb
19 MaJaIaFbIw DnckInep
a IpocecnoHaIdbi Supercut 6ypamaJIbI DnCKI - KaJIbIH /KUka
b Ykkii 6pyamaJIb IuCKImeH - depeki / maJa
C YIKeJIMe DnCK - opTaWa
d Kapton KIyMaftbHbH dNckci*
20 Dnck YcTaftbIwbl
21 WbIrbc caHbInayb6ap Kopnyc
ApaJnactbipfblw
22 ApaJaTbIpFbIi Caybl
23 KaNaK
24 Kyrfbiw
*Kocajkbl 6eIweek KeTki3iImbymacihda 6oJMaFAH JkaFdaIa, oFaH cayda opHbMeH Kbl3MeT Kepcety opTaIbIFbIHah Tancbipbc 6epyre 6oJaNbl.
Kymblc Kynnepi
cypeti:
Ha3ap aydpbIhbl3!
BiybIMbI TeK KpaJI/KeMeKUJI KpaJI OcbI KeCTere caI dypbIC KeTeKTe JHe DypbIC Kynde KOJaHaBJIFaH Ke3De JHe KymbIC KyiHIDE 6oRaHa fAHa KOJaHaBJIHbI3. AHaHaMaJIbTIyTKa ap6ip KymbIC KyiHDe eHri3ijYi Kepek.
Hyckay
AinMaTbTyKa «Easy Armlift' cyHKnraCbImeJka6blkTaIHaH, on aHaMaBbTyKaHbIH KblKByHa KOJaay KepcTei.
Kymblc KyinH petTey:
Bocaty TuMecin 6acbl, aHaJImaNbl TyTKaHbI XblXblTbIbI3. XblKyuIbI 6ip KOJMeH OpblHaHbI3.
AHaHMaJIbI TyTKaHbI TipeIReHHe KaJAYbI KYIe KbJIKbITbIHbI3.
| Кин | Жетек | Аспаптар/Жабдыктар | Жуmbіс Жылдан- ды沫ыl |
| 1 | 7 | 1-5 | |
| 1-7 | |||
| 1-3 | |||
| 2 | 7 | * | - |
| 3 | 6 | 3-7 | |
| 3-5 | |||
| 4 | 9 | 5-7 | |
| 7 | 5-7 |
* KaKbI, 6yNfaybI, nJIeIiTi oPhaTy/aIbn Tactay; YnKeH eHdEnetIH KeJemdeepdi Kocy.
KoIdaHy
KapakaTahi kayni 6ap!
JKei aWacbIH TeK 6yNbIMMeH XyMbIC icTeY yuH KaXeTTI apeKeTETep eTKi3iIN JxHe eHIMdep MeH 3aTTap daBbHdaNbIn KOnbJIFaHa fAHa 3JeKTp po3EtKacbHa XaNFaHbI3.
Ha3ap aydpbIhbl3!
BvibIMdb TeK KEmekui Kypal/NpaJMeH KyMbIC KYiHHe KOJaHaHbIHbI3. BvibIMdb 6oc KyiHHe KOJaHaHbAHyI3. BvibIM MeH KocankbI 6eJWeKTePre Xblny Ke3depiH TycipMeHi3. BeJWeKTeP MkpoTKnBHyI neWTePre apHaJMaHaH.
BvIMbIgHe KEmekuI KypanapdbI aFaW pet KOJaHy aNDbIHda KaKcbInaT a3aJAN aNbHb3, «Ta3aJAY JHe KyTy» TaaybIH OKbIHb3.
MaHbI3NbI HycKay
Bny KOndaHy TpyaIbI HcyKaynbIkaTkypan He KEmekuI KypaIbI KoNJaHraH Ke3e6yIbIMapdbIH XMbIC KbIJaMaDbIbI BoiBuHa waMaIbI MAnHepeMeh 3atBeJIri 6epinre. Bi3 ocbl 3atBeJIri Hi yIbIMfa KaIcBiPyduI cybHaMbI3 (Cyperi).
Dai bIHday
Herizhi6yibimdbI teric JxHe Ta3a 6eTKe KOhyHb13.
Katapdaftka6ebnjkanaynbly3bHdbkKa deiH (MaKc.100cm) uhrapbl,6aay 6ocatblHbI; ka6eJIb TOKtaTbnaDbI (D cypetI).
Ka6eNbDIn JxMbIC y3bHDbIbIH a3aIbIbIbI3: Ka6eNbDi cEn TaPbIb, KaayIbIy3bHDbIKKa DeiH KaibIbI3. Coan Kein Ka6eNbDi KaTaNan TaPbIb, 6aay 6ocatbIbI3; Ka6eNb ToKtaTbJaIbI.
Ha3ap ayadapbIHyI3!
Ka6eJIb KblcIbnFaH Ke3De, OHbl TOnIbIbIMeH WbIFapBn, KaibJybiHa MymkiHik 6epiH3.
AshaHbI po3eTkara XaNfAhbI3.
blbcxKHe KypaI
AaHaJMaJIbI KypanDaH JkapaKaTTaHy Kayni!
KoIaHny 6apbcbIHda bIDbcITbYCTMaHbI3.
Tek Jaa6blfAH KaKaNakHe (12) KymbIC
icteHiz! KypaIdb/KeMeKuI KypaIdb
Ktek ToKtaTbIrfan KyiHne BoIraHa faHa
aIImactbIpbHbI3 - JeTeK eUipIreHHeH KeiH
6ipa3 yaKbIT KymbIC icTe NTypaDb IxHe
KypaIdb aIImactbIpy KyiHne TypaDbI.
AInHaIImaBl TyKaHbI aIdbIMeH KypaIdbIh
6oc xypic KyiHe XblXkbITbIHbI3.
PaIdaIaN6faHn KTeKTePdi KopraHbIC
KaKnaFbIMe Hxa6blHbI3.
Ha3ap ayadapbIHyI3!
bldbctbtekocbi6ymbmmeJxmbicictereh Ke3de faha KoIdaHbIHbI3.
PpoceccnoHaandbi nImMeJI 6yfraybI (13)
Kamblpbl6yflayra apHaIaH, Mbicnbl, KeKC KaMbplbl
PpocecnoHaIbI KaKbIa (14)
KyMbipTk akyb3bH, KInereiKi Karf
XHe XeHJ KaMbpDbl 6yfrayfa
aPhaJFaH, MbCaJIb, BnCKBNTKaMbipbl
Nneriw (15)
aybipKaMbIpDbl INney XHe MaIdaanHbaiTbIH INHrpeJeNeHTTePdi apaIacTbpyfa apHaIraH (MbIcAnbl, KJy3IM, WOKOJaD KOHKacbl)
KaKbIHTbI naiJaIaHy BoiBInHaMaHbI3DbI HycKay (cypET):
KaKbIbIbIc TByIhe a3 TnIO Kepek, OcbIaN IHrpeIeHHTep ONTImaJIbI apaIaNcAbl. BoImaca, KaKbIbIbIKtirIH TeMeHdErIepeTteyKepek:
AshaHbipo3eTkaDahIbIfapblb13.
Bocaty TuMecin 6acbln, aHaMaJIbI TuTKaHbI 2 KyiHe XblJXblTbIHbI3.
KaKbIi He nIerii JTeKeKke TipenreHne eHri3iH3.
KaKbIbIyCTan COMbIHbI COMbIH KJIITIme (eIwemi 8) caFAT TINIme 6ypaHbI3.
KaKbIi6nIKTirIH KaKbIuTbI ONTImaNdbI 6nIKtikke bypan petTeHi3: caFat tiImen 6ypaHbI3: KTeepiH3. CaFat tiInHe KapcbI 6ypaHbI3: Tycipy
Bocaty TuMecin 6acbIn, aHaMaJIb TuTKaHb1 KyniHe XblKblTbIH3.
KaKbIi6bnikTirinTekepi,KepeK 6oNfAHaDypbICTaHb3.
Erep6niktiri DpybcpeTTeIreH 60nc,6ocaty nephecih 6acbln Kaibpy TyTkblBbH 2 KyiHe anapblb3.
KaKbIITbI YCTaN COMbIHDbI COMbIH KIIITIMeH (eJIWeMI 8) caFat TiJIHe KapcbI TapTbIN KOJIbIHbI3.


blbicneH XaHe KypaJImeH XyMbIC icTeY (E cypeTI):

Bocaty TuMecin BacIn, aHaMaJIbI TuTKaHbI 2 KyiHe XblJXblTbIHb3.
■bldbicbI opHaTy: AnfakapaeHKeTITInRehbldbcTbEhr3in TipeH3,coaH KeiH caFat 6afbltbHa KapcbTIpeJREHwe 6paHb3.
Hny TaNcbipMacbHa 6aaiNaHbICTbl 6yIaybIi, KaKbIi He nIeiriTi JKeTeKKe TipeIreHne eHri3iH3.
Hyckay:
InneriXkaIaIbIHdaKaMbIpKaIkbIHTbl InneriEHHrReHne6ypaH3
(4b cyperi).
HnIeTIn HnIpeJeHnTEpIi bIbICka caIbIbI3.
Bocaty TuMecin 6acbIn, aHaMaJIbI TuTKaHb1 KnyiHe XblJXblTbIHb3.
KaKaNaTbI opHaTbIHbI3.
AHaJaMaJbI aKbIpaTkblTbI KaJaYbl KaJaMfa KOJIbHbI3.
B3dIn ycbHbC:
- PpoeccnoHaIbni iImeni 6yrraybi: andbimeh 1-2-6ackbiTa apanaactbipin, coaah KeiH 3-5-6ackbiTb TaHdaHbI3
-ПрофессноHaJIды KaKKbIi7-KaДam,1-KaДamda apaJnactbIpblHbI3 - Nleri: anIbIMeH 1-6ackblTa apaJaCTbIpBIn, 3-6ackblTa KaftbHb3
IhprpeJeHHTepMeH TOITbipy
BvibMbblaHaJMaJIbI aXbIpaTkblw apKblbI eWipiH3.
INHrpEneHTTepi KaKaNaTaFbI KyfBIIAPKblbl TOnTbIpblHb3. Hemece
KaKnaKtbl anbIn TactaHbI3.
Bocaty TuMecin 6acbIn, aHaMaJIbI TuTKaHbI 2 KyiHe XblJXblTbIHb3.
IHHpeDneHTEepDi TOnTbIpbHbI3.
KymbICTaH KeiH
BvibMbbl aHaImaJIbI axbipaTkbiw apKblbl eWipiH3.

AshaHbipo3eTkaDahIbIfapblb13.
KaKnaKtbl anbIn TactaHbI3.
Bocaty TuMecin 6acbIn, aHaMaJIbI TuTKaHbI 2 KyiHe XblJXblTbIHb3.
KypaJIdbI JxTeKTeH LbIfapbIbI3.
bldbictbajbInTaTahbl3.
BapnbK 6eepTa3aHaHb3, «Ta3anay KHe KYTu» TapaybIH OKbIHbI3.
AcyNilik MaiaIanaIbIi
Kapakatanykayni!
MaJdaIaFbIu DnckiHIn ETkip PbIaKaTapbl MeH XKeTEpiH YCTaMaHb3.
MaJdaIaFbIu DNCKJIepre TeK 6yNipiHeH KOn TURi3IH3!
AcyIik MaIdaIaNafblTb TEK KaHa 6yIbIM JeTeRI TOkTan TyPraHbIHDa XeHe Ka6eni 3JIeKtp po3EtKaCbIHaH bIbFapblfAHbIHda eHri3iH3/5bIbFapblHbI3.
KyIbIi iWiHe KOJIbIbI3DbI caJMaHbI3.
Ha3ap aydaebHb13!
Acynlik MaJdaIaNfblbTbI TeK ToIbIbImeH KInHaKTaIaNfAH KyiHHe KOJaHaBbIb3. AcynlIK MaJdaIaNfblWbI eUkaWah Heri3r6yNbIMFa KypacTbIPMaHbI3. AcynlIK MaJdaIaNfblWbITb TEK KypacTbIPbIraH XyMbIC KyiHDe KOJaHaBbHbI3.
ApTbIK KxKTeMeDeH KopFay
Cypeti:
AcyIiK MaIdaJaFbIiKa apTkbl KytMe TycipyeH 6yIbIMhIH aybIp 3aKbIMdaHybIH 6oIbIpMay yuH, acyIiK MaIdaJaFbIiTbIH KTeKuI 6iirHne Keptk (BaIapnAmalHaHfA H 6y3blny opHb) 6ap. ApTbIK KytMe TYcKeH KaIdai Ja XeTeKuI 6ilk Ocb I JepDeH 6y3bladJI. XeTeKuI 6iliri 6ap xHa dNcK YCTaFbIiB Kbl3Met KepceTy opTaIbIFbIH Da KOnJxetimdi.
PpoepccnoHaJIdb Supercut

6ypaMaBbI DnCKi-KaNbIH/KyKa
JEMIC peH KeKHeHicTi TypayFa apHaIraH. 5-6ackbIHTa eHdey.
AHaHMaIbI KeckiU DnckiDi er 6enri: KaIbIH KeckiU XaFbI yuHIn «Grob» KiiHlUke KeckiU XaFbI yuHIn «Fein»
Ha3ap aydpbIhbl3!
AHaHMaNbI KeckiU DNCK KaTbI ipIMwiK, HaH, 6eJIke HAn MeH WOKOJaTbI TypayFa apHaJMaFah. NicipinreH, KaTbI niCipinreH KapToNTbI TEK cybIK KInHne TpaHbI3.
AHaHMaJIbI YKKIIW DnCK - YJKeH/ShaftH

Kekhic, KneMIC neH ipIMuikTi yryre
apHaJIFaH, KaTbI ipIMuIKTeH 6aCKa (MbICaJIb, NapMe3aH).
3-6acKbIHTa Hemece 4-6acKbIHTa eHdey.
Ain Manbly Kkiu Dncki eri 6eIri: YKeH YKkU XaFbY WlIH «2» WafBIn YKKU XaFbY WlIH «4»
Ha3ap ayadapbIHyI3!
AHaJIMaIbI yKkIi DNCK KaHfAKTapDbI yYrE apHaJIMaFaH. Kymcak ipIMUkiTt yNKeH KaFBImeH 7-6aCKbIUtTa yriHi3.
YiKeJIme DnCK - opTaWa

Mki KapTOn, KaTbI ipIMiK (MbCaJIbI, napMe3aH), CyblTbnFaH 10KOJaD neJxHaFkTapDbI yryre apHaNfA H. 7-6ackblTa eHdey.
Ha3ap ayadapbIHyI3!
YiKeMe DnCK KymCaK KHe TiIm ipIMuKiTi YyRe aPhaMaFaH.
Kapton KIIMAfBihBIn DnCKici

KyIMaK peh KapTOn KyMaFbI yWih
WNI KAPTONTBI rgy,KeKeHic peh JxNdeKTi
KaJIbIH DnCKImeH TypayFa apHaJFaH.
Yry: 7-6ackbllTa eHnDEy.
Kecy: 5-bacbIwTa eHdey.
Acynik MaiaaIaNfblIuHxMblc icTey Cypet H:
Bocaty TuMecin BacIn, aHaMaJIb TYKaHb2 KyiHe XblJXblTbIHb3.
■bldbicbI opHaTy: Anfa kapaenHKeTIInReh bIDcTbEhr3in TipeH3,coaH KeiH caFat 6afblbHa KapcbI TipeJIreHwe 6paHb3.
Bocaty TuMecin BacIn, aHaMaJIb TYKaHbI 3 KyiHe XblJXblTbIHbI3.
KeTeKtiH KopFaHbIC KaKnafBIn acy MaJaIaNfBbIbIH KeTeIHeH anbIn TaTaHb3 (H-5a cypeti).

■NCKYCTaftbIbIHactbIHfblWetiHeH YCTaHbI3,ONyUHHekIyUHTbIKOFapbI KapaTyKepeK.
KanaynbkeckiHneYkkiuDnCKHI DnCK YCTaFbIbHbIH YuTapbHa MyKnT opHaTbIb3 (H-6a cyperi).
AHaHMaMaBb DnckInepDe KaIaybI XaRbI XOfapbI KapaTbINFaHbIHa Ke3 JeKTeKi3iHi3.
■ДИСК YCTaFbIWBiH XKOFaPfB I WTeIHEN YCTaN, KOpNycTbI OPhTaBHB3 (H-6b cypeti).
KaKaNaTbI opHaTbI (6eJIriHa KaJaFaHaHbI3), caFaT 6aFbITbIMeTIpeJIreHwe 6ypaHbI3.
Acy maiandaanfbiHTbI H-8 cypetinHe KepcetireHneJe KTeKKe opHaTbIn, caFaT 6aftbIme TipeIreHwe 6paHb3.
AиHaJImaJIbI aKbIpaTKblTbI YcblHblJFaH KaJaMaFka KOBbHbI3.
EHeJeTeIH a3bIK-TyNk eHIMH KyfblIka caIbIn, XaNkbllneH XblNkblTbIbI3.
Ha3ap ayadapbIHyI3!
TypaIaTbIH eHIMHiI bIbIc caHbIJaYbIHa KaJIyBaHa JOK bepMeH3.
Kehe: Bipkeki Typay Hetnkeine He kety yuiin kihiuke TypanaatbH eHimdi baiNam boiBHua eHdeH3.
Hycay: OHeJeIeTih a3bIK-TyNik eHIMdepi acyJIK MaJaIaNfBiWtTa 6itEniin KeTce, acyJIK KOM6aHnDbI eUipiH3, aUaHbI po3eTKaDaH WbIFapBbH3, XeTEK TOKaTaHaHa KaTIH3, acyJIK MaJaIaNfBiWtBtIH KaKnFaBH aJIbIN TaCTaHbI3 XaHE KyNfBiWtBb 6ocaTbIH3.
XymbictaH KeiH
BiyibMbiaaHaJMaJIbIaXbipaTkblw apKbIbIeUipiH3.
AcyNilk MaIdaIaNbIUtbl caFat 6aBtIbHa Kapcbl 6ypan, anbln TactaHb3.
KaKnaKTbI caraT 6aftbItbHa KapcbI 6ypan, anbln TactaHb3.
■ДИСК YCTaFbIbIH DINGKIMeH 6ipre aIbIn TAcTaHbI3.ОЛ yIiH cayCaKneH actbHaH XeTeKJI 6IiIKKe Kapcbl 6acbIbI3 (U cyperi).
BeliueKteriTa3aHaHbI3.
ApanacTbipfblw
A Tkip nbiwa/kaiHaJIbIn TypaTbIH JKeTeKTeH JkapaKaTTaHy Kayni!
OpahtbIJFaH apaJaCTbIPfBiIITbI YcTamaHbI3! ApaJaCTbIPfBiIITbI TEK KaHa 6yNbIM XeTeri TOKTan TypFaHbIHda eHri3iHi3/UbIfapbIHbI3! ApaJaCTbIPfBiIITbI TEK XInHaKTaJIFaH Kynde XHe Xa6bIJFaH KaKaNpEn NaJaDaJaHbIHbI3.
Kyuin kany kayni 6ap!
blcTBk apanaactbipbIaTbH eHimDi eHney Ke3iHe KaKaNtAfb KyfBliTuH 6y IbIaDbI. EK 0,5 nITp bCTbIK He Kepiwiren cybIKbIK TOnTbIPbIHbI3.
Ha3ap aydpbIhbl3!
ApaIaCTbIPfBII 63bIbn KeTyI MymKiH.
KakbIHda My3aTbINFaH INrpeJeHTepi
(BlIFapblfAH My3 TeKlEci) eHdEmeH3.
ApiaCTbIPfBIIbI 6oc KyHHe
KoIaHa6aHbI3.
Apanactbipfbwnen Kymbcic ictey
K cypeti:
Bocaty TuMecin 6acbln, aHaMaJIbI TuTKaHbI 4 KyiHe XblJXblTbIHbI3.
ApanaactbipfblIxKeTeeriH KOpfaHbICKaKNaFbIH aJIbIN TaCTaHbI3.
ApajacTbipfbiCaybitbOpHaTbIn (ycTaftiTaftb6enri,Heriz6yibIMaftb 6enri),caFat6afttHaKapcbItipenreHwe 6ypaHb3.
INHrpEIneHTTepDi TOnTbIpBbHb3. CynbIK MaKcImaIdbI KeJeM = 1,25 nITp; KeiipuikTi HeMece bICTbIK CynbIKTBkTapDbIH MaKcImaIdbI KeJeMi = 0,5 nITp; OHtaIbI eHdey KeJeMi, KaTbI = 50-100 rpaMM;
KaKnaTbI opHaTbIN caFt 6aftbHa Kapcbl tipenreHwe apanacTbIPfbiU yCTaBbHa 6paHb3. KaKna eHriiznyi Tnic.
AиHaJIMaJbI aKbIpaTKblTbI KaNayIbI KaJaMfa KObIhbl3.

HnrpeJeHnHTepMeH TOITbipy
Cyper K-8:
BvibMbblaHaJMaJIbI aXbIpaTkblw apKblbI eWipiH3.
KaknaTbI aIbIn Tactan, INHpeDneHTepdi TOITbIPbIHbI3 HEMeCE
KyIbIITbI aIbI n TacTaHbI3 XeHe KaTTbI INrpeJeHTTepDi KyIbIi CaHbIayfa 6iptiHdien ToJIbIPbIHbI3 Hemece
CynbIK INHpeIeIeHTTepI KInfblIaPkblIbI TOITbIPbIHb3.
XymbictaH KeiH
BvibMbbl aHaImaIbI axbipatKbIw apkblb eWipiH3.
ApanaactbipfbilTbla cafat 6aftbItbImEH 6ypan, aIbIn TactaHbI3.
KeHec: ApaIacTbIpFbIuTbI KOJaHaH coH 6ipDeH Ta3aHaHbI3.
Ta3aJay KHe KyTy
PaiDanaHFaH KepeK-KapaKaTapDbI eP
PaiDanaHydAn COH Ta3anay Tnic.
Ha3ap ayadapbIhbl3!
Ew6ip Kbipa aIaTbIH Ta3aIay 6yIbIMapbIH KOJaH6aHbI. YcTIinePdiH 6y3bJIbIN KeTyIHe anapbyI MymKiH.
Heri3ri 6yibIMdbTa3aJaly
3NeKtp KyaTbHa Tcy Kayni 6ap!
Herizhi6yHbIMdbIeWkaaHaCyiichihe 6aTbIpMaHb3XHeaFbIHdbCyactbIHda YcTaMaHb3.EuKaHdaB6Ta3aJaFbIbHnaiDaJaHa6aHb3.
AshaHbipo3eTkaDahIbIfapblb13.
Herizri 6yibim MeH XeTeKTH KOpFaHbIC KaNaFbIH bIrlaIbI uSybepeKeHn CyptiHi3. KaXet 6oIca, 6ipa3 bIbIc Kyfblkypan KonDaHbIHbI3.
Coadan KeinH 6yIbIMdbKypfKaTaN CypTiH3.
blbc nen KypaIbI Ta3aJay
blbICxHe Kpyan bIbIC-aK XyaTbIH MaunHada xyy yuH japaMdbI. PnaCTNK 6eJIweKTEpDi bIDc-ayK XyaTbIH MaunHaDa kbcnHaB3, c6ebi wao 6apbcihda KaIbIKTap naJa 6oNybl MyMKH!
AcyNilik MaIdaIaNfblbTbI Ta3aJlay
A ΘTkip nbIwaKaTah XapaKaTTaHy Kayni!
MaJdaIaFbIuNckiHIn ETkip NbIaKaTapbl MeH XKeNTepIH YcTaMaHbI3. OJ YuHi Ta3aIay KbIlaHaFBiH KOnJaHaBbI3.
AcyIik MaJaIaIaFbIUtBtH 6apIbIK
6eJIWeKTePiDbic-aK KyaTbIH MaUHaDa
Kyy UsiH XapaMDbI.
Kehec:MbicaIb, c6i3 eHdeyeh KeiHa KaIaTbIH KbIbIN TuHbAHI KeTipy yuH, u6bepeke bip3 ecIMik MaBbH KafBIn, acy MaJaNafBIsbH (MaJdaNafBIsdNckijepdi emec) cyptiH. COnaH KeiH acyIK MaJaNafBIsWbTbI WauBbH3.
ApaJaactbIpfbIiHTbI Ta3aJAY
ΘTkip nbIwaKaTah JkapaKaTTaHy Kayni!
ApaJaacTbIpFbIi NblIaKka JkaNaH KOJMeH TImeHi3.
ApaIaCTbIpFbIbIbIDcBIn,KaKnaKTbIXeH KyIFbITbI bIDbc-aIK JyMy MaUNHaCbIHJa KyyFa 60NaIbI.
KeheC: CyBbIKbIKTapdbI eHderenHHe KeiH
aTe apanaactbipfblWtbl Ta3anay ywiH
bIMHaH aBnTacay KaKet Emec.
6ip3 cyblx KpaIme
6pRe opHaTbIFAH apalaactbipfblWka
kYbIHb3.ApaAnaactbipfblWtbl 6ipHewe
cekyndKa KocbIHb3 (M backbIb). Ilaora
KoJaHaBnFaH cybl Teir, apalaactbipfblWtbl
Ta3a CyMeH Waihbl3.
MaHbI3dbIHyckay:
Kemekui Kypan Dop6acbH KaKeTInHe Ta3aNaHbI. Dop6aHaBf KyTu BoiBHa HcKaynapDbOpbIHDaHbI3.
CaRTay
KapaKaTTaHy kayni 6ap!
BiyibIMdbKoJdaH6aFaH Ke3de aHaHbI p03eTKaDaH WbIFapbIHbI3.
CypTe L:
Kypannap MeH MaJdaNafBbIu NcckJIepDi KEMekwi Kypan dop6acbHa caNbHb3.
Kemekui Kypan Iop6acbH bIbIc iuHne caKaTah3.
AkaayIbIKTap opbIH aJFaH XaFdaIJaRbI KEMeK
KapaKaTTaHy kayni 6ap!
AkaynbIKtbI KOIO aIbIHda aHaHbIp03eTKaJaH bIfapbHb3.
MaHbI3dblHyckay:
BiybIMhBiH XyMbICbIHDafti KaTe,
3JIeKTPoHDbIK CaKTaHDbIPfBiIITapDbIH
axbipTaBnIyI HeMece 6yibIM 6yniHyI XyMbIC
INHINKaTOPbIH H XbINbIKTaybl apKbIbl
KepcTeJIeJI.
AinHaMaIbI TyTKa ap6ip Kymblc KyiHde eHri3inyi KepeK.
Bipinuien naJa 6oJFaH mCseIeHi TeMeHdI HiYcaynapdbI KOJaHbIN WcWyTre TbIPbICbl3.
AkaayIbIK
Биьim icke kocblmaTyp.
Uewim
Tok Ke3iH TeKcepiHj3.
AshaHbI TeKcepiHj3.
■AHaIImaJIbI TyTkaHbI KaJaFaIaNbI3. Kyi IypbIc opHaTbIaNfAH 6a? EHHrIsIn Typ Ma?
ApanaactbipfblH He bIbICTbI tipenreHue 6ypan 6ekitih3.
ApanaactbipfbiW kaKaNaFBiH opHaTbIn, tipenreHwe 6ypan 6ekitih3.
KeTeKtiH KopFaHbIC KaKaNaFbIH KOJaHaBbIMaFaH KeTeKke OPhaTbHbI3.
KaTAtickeKocbIyDAnKopFaHbIC 6enCeHdi.ByIbIMdb0/off KyiHe opHaTbIHb3da,coDaHKeiH KaJaybl KaadamKaaTapbIHb3.
Akaaylbik
Буйым Колдану KeziHne eшipin KaIaIbI. ApTbIK KxKTeMeDeH KOpFaHbIc 6eJIceHdi.
Bip yaBItTa TbIM KeI a3bIK-TyNik eHIMdepi eHdJIreH.
Uewim
Biyiblmbl eulpiipj3.
Ehney KeJemIH a3aIbIbI3.
PyKcat erinreH MaKcImMaIdbI KeJeMepdEeN(KoJaHy MbIcAaIapbl MaKaIaN KaPaHbI3) acbIpMaHbI3!
AkaayIbIK
KTeK icke Kocybl Ke3iHde Bocaty TyMeci
Kate 6acbl. AHaMaIbI tyTka Kofapbl
Kapa JbIXbITbIbI.KeTEK TOKtaTbIJaH,
6ipak KypaIbI aImacTbIpy KyiHne
KaImaiDbI.
Uewim
AHaJaMaJIbI aKbIpaTkblUHbI 0/off KaJaMbIHa KOJIbIHbI3.
AиHaJaMaJIbI TyKaHbI 1 KnyiHe XblJXblTbIHbI3.
BiyibMbI KocbIH3 (1 KaIaMbI).
BvIbIMbl KaTaNah eWipiH3. KypaJI KypaJIbI aNMaCTbIpy KyiHNe Typ.

AkaayIbIK
ApaanactbipfbiW Kymblc icTeMei bactaIbI HeMece KOJaHy 6apbcihDa TypbIn KaIaNbI, JKeTeK «Dipijden» Typ. PbIwaK 6JokTaNFaH.
Uewim
BvIbIMdbI eWipiH3 KHe aHaHbI po3eTKaDaH WbIFapbIHbI3.
Apajactbipfbltbl anbIn TactaHb3 XHe 6eretti ketipiH3.
ApaJnactbIpfbIUtbKaIraHaOpHaTbIHbI3.
BvIbIMbI KcObIHbI3.
MaHbI3dblHyckay
Erepakaynbiktb36betihweXOARIMacHb3, KbI3MeT KepeTy opTaNbIFbHa xa6apJiacbHb3.
KoIdaHyMbIcIaIapbl
Shaikafan kijerei
-100-600r
■KinereriDi 1% 4 MNHy t iwiHne 7-6ackbiuTa KinereriDiH MEnIwepi MeH KaCneTepiHe 6aJnHaBlcTbI KaKKblNeH eHdeH3.
KymblpTk akybl3bl
-1-8 kYMbIpTk a kYbI3bl
KyMbIpTKa akybI3bIH 4-6 MNHyT iHne 7-Kaamda KaKKblIeH eHdeHi3.


БиCKBNTKaMbIPbI
Herizri peuert
-2KymblptKa
-2-3acKacbblbIcTbIKcy
-100rKaHT
-1 nakET BaHnINH Iekepi
-70rYH
-70rKpaxMaJ
- KONcblkblw (KOCblMlu)
IHHpeDneHTEpDi (YH MeH KpaXMaIaH 6aca) WAM.4-6 MInHyT iWInHe7-KaJaMaDa KaKKbIWeH KepiTin KaFbIHb3.
AиHaImaJIbI aKbIpaTkbIuTbI 1-KaIamFa opHaTbI, eNEHReH yH MeH KpaxMaJIbI Iwam. 1 / 2 - 1 MInHy tIiHiJe KaCbIKneH apaIacTbIpbIhB3.
MakcmaJIbI MeJIseP: 2X Heri3ri peIeNT
Kekcke aphaJFaH kambip
Herizri pecentr
-6KmblptKa
-500rKaHT
-1caJbIM T3
-2 naket BaHJIIN HWeKepi HeMece 1/2 NIMOH Ka6bIfbl
-500rmaHHeMaprapuH
- (6eIme TeMnepaTypacbl)
-1000rH
-1 naket KaMbIP KONcbITKblUbl
-250 mJI cYT
KymbiptKa, KaHT, Tz3 6eH BaHnIb WekepiH Hemece JIMMOH KaBtfBih WAM.10 ceKyHd iUHne 1-Kaamda 6yfraybIuNeH apaJnactbIpbHbI3.
5-kaamfopaopHaTbIn,waam.120cekyHdiwiHde eHneHi3.
Maikocbi,iam.60cekynd iuiHde 3-kaamda eHneHi3.
MaM MeH KOncbITkblKocbIn, IaM. 2 MnHyT iwiHne 1-kaamda eHndeH3.
3-kaamfopHaTbIn,2MnHyT iuHne cyTTi 6iptiHdien KocblbI3.
MakcmaJIbI MeJIseP: 1 x Heri3ri peIeNT


Yrilmeni Kambip Herizri pezent
- 125 r mai (6eIme TemnepaTypacbl)
-100-125 r KaHT
-1KyMbIPTKa
-1caJIbIM T¥3 - KIIUKeHe JIMoH KaBbIbI He BaHINb UeKepi
-250rYH - KONcblkblw (KOCbIMLwa)
BapIbIK INHrpEiNeHTepDi IaM. 1 / 2 MInHyT iWiHne 1-KaJaMaD, cOaN KeiH IaM. 2-3 MInHyT iWiHne 6-KaJaMaD 6yNfayblIwneH eHdeHi3.
500 r yH:
IINHrpEiNeENTepDi IIneriIiNeH 7aM. 1 / 2 MInHyT iWiHne 1-KaIaMda, coDaH KeiH 7aM.3-4 MnHyT iWiHne 3-KaIaMda nJeH3.
MakcmaIbI MeIsep: 2X Heri3ri peIeNT
AusbikTb KaMbp Herizri pecnt
-500rYH
-1KxMblptKa
-80rma(6eImTeempeaTypacbl)
-80rkaHT
-200-250MЛЖыЛысYT
- 25 rЖаHa aUshIrkbl Hemece 1 naKeT
Kypfak aIbblkbl
-1½JIMMOHKa6bIfbl
-1caJIbIM T¥3
BapIbIK INHrpeINHeHTepDi IaM. 1 / 2 MNHyT iIiHne 1-kaamda, cOaH KeiH IaM. 3-6 MNHyT iIiHne 3-Kaamda nIerIiNeH eHDeHi3.
MakcmaJIbI MeJIseP: 2x Herizri peIeNT
Kecne KaMbipby Herizri pecent
-300rYH
-3KmblptKa
- kaxet 60nca, 1-2 ac kacbIK (10-20 r) cybk cy
BapIbIK INHrpeIeNHTepIi IaM.3-5 MnHyT iWiiHne 3-KaIaMda KaMbIPFa DeiH eHNeHi3.
MaKcHMaJIdbI MEnIeP: 1,5 x Heri3ri peuNT

HaH kambipbI Herizri peuent

-1000rYH
-3 naKet Kypfak aWbITkbl
-2 1aKacbIK T¥3
-660MЛЖылсу
BapnbIK INHrpEINHeHTepDi WAM. 1 / 2 MNHyT iWInDe 1-Kaamda, cOan Kein WAM. 4-5 MNHyT iWInDe 3-Kaamda nIeriWneH eHdeHi3.
Maiohe3

-2KyMbIPTKa
-2waKacbIKbIwa
-14Ma
- 2ac KaCbIK JIMMOH UbIpbHb He cipKe
-1caJIbIM TY3
-1caIbIMKaHT
IhprpeHnHTep 6ipdei TeMnpaTpaFa ne 6oJybl Tnic.
■ INHrpEiNeHTTepi(MaIaHb6aKa) 6ipHeWe cekyHdi iwiHne 3-Kaamda (2) Hemece 4-kaamda (3) apanactbipfbluTa eHdeHi3.
ApaIaCTbIPfBt7-KaIamra (4) KocbHb3 XHe MaIdb6ay KyfblapKbIbI KyblnOTbIPbHb3 XeHe MaIOHe3 naJa 6onFaHsa apanactbipa6epiH3.
Maiohe3di JkaKbIH apada KOndaHbIHbI3, caKTamaHbI3.
Kokbicka TacTay

Opam MaTePnAJaDapbIH KOkBICKa TaCTayDbIH 3KOJIoRnIbIK epexeepiH caKaTbI3. ByJ KypblIbI 3NeKtpNik XHe 3NeKtpOnHdbIK KypblIbIaP TypaJIbI 2012/19/EU EyponaIbIK DnpeKTNbAcbHa caT nicti TaH6aMeH bEnrIeHReH (waste electrical and electronic equipment - WEEE). ByJ DnpeKTNa BcYpaMbIHd EO aymarbIHda KOnDaHbIaTbIH KOnDaHbICTaH ShfapbIJFaH KypblIbIaPdbI eTKi3y XHe KOkbICKa TaCTay TpyaJIbI yFapbIMdap 6ap. KoKbICKa TaCTayDbIH HaKTbl ādiCtepi TypaJIbI aKnapaT aJIy YwiH caTyuBIme H xaBapNaCbIHbI3.
KeniДik wapTapbl
Ocb KpbJfBihH KeniJNik WapTTapbl 63diH eKIN apKbJIbI KpbJfbl caTbJaTbH enJe aHbIKTaIaDbI. Ocb WapTTapFa KaTbICTbTONbIK MJIIMETTEpDi KpbJfblHc TaBn anFaH denDaanH binyre 60JaBc. Ecen-WOT Hemece Ty6ipTeK ocB KeniJNik WapTTapbl 6oBHwa WaBIMdaHfHaNda KepcTeJIeJI.
O3repicTep caKaTaNbl.
Kocajkbi kepek-kaKaTap
| MUZ5ZP1 Шырьн сбIKьш | Аpenьсin, лимон жэно грейфруты сбIFуга apHAлfasн. | |
| MUZ5CC1 Текшелен тураftыш машина | Жемп по көөнICTi Бордө төшелермэн Турауга apHAлfasн | |
| MUZ5FW1 ЕтарTekыш | Тарлар He уNTаКТалган et ушIN кас.etтɪ Tурауга apHAлfasн. | |
| 03 06 | MUZ45LS1 Санылayны дис Жиьны шafын (3 MM), Улkeн (6 MM) | MUZ5FW1 eTTapTKышына apHAлfasн. Паштет жэно habга жаflатун сEHIM ушIN кш, nicipilген shжык кэншпк ушIN улkeн. |
| MUZ45SV1 Пechенbe КONдырьсы | MUZ5FW1 eTTapTKышына apHAлfasн. 4 ортулі пechенbe пшINине apHAлfasн металл Улгинерi бар. | |
| MUZ45RV1 Уkkiiш кONDырьсы | MUZ5FW1 eTTapTKышына apHAлfasн. Жангak, bадam, shokолад жэно кent tipinreн бeлke нанды угre apHAлfasн. |
| MUS245FV1 Шырьн сбійки Кондьрьсы | MUZ5FW1 eTTapTKbIbSHA apHaJIFaH. Езbe ушin танкураи, кьзанak кэне NTmUpbIHnH Бacka жиджтэрдIn,шырьнсыуfa apHaJIFaH. Сонымен kaTap, Мысалы, karapaKaTы abTomaTTbI Tpyde Ta3aIayfa Болады. |
| MUZ45PS1 Фри дискici | MUZ5DS1 acyilik майдаларышына apHaJIFaH. Шык karpoTNы Фри ушin Туpayfa apHaJIFaH. |
| MUZ45AG1 АзmaльдКеkeнic ДиSCkici | MUZ5DS1 acyilik майдаларышына apHaJIFaH. АзmaльдКеkeнic taramdapы ушin Кekeнicti shaын тілімерmen Туразы. |
| MUZ45RS1 Улken.Yнkeлme дисck | MUZ5DS1 acyilik майдаларышына apHaJIFaH. Шык karpoTNы, мьсалы, karpoTи Кekeнfы He Домбai ушin ууге apHaJIFaH. |
| MUZ45KP1 Картог Кчмafын ДиSCkici | MUZ5DS1 acyilik майдаларышына apHaJIFaH. Кчмak пен karpoTи Кчмafы ушin Шу уг, Кekeнic пen Кчdekti Калын Дincімен Tуpayfa apHaJIFaH. |
| MUZ5ER2 Тot bасайын Болattan apanaactbIPfbls ыdibIC | ыdibic iшinDE 750 r ун мени INHр徳иHTterdi eHdeyeRE 6olaDbI. |
| MUZ5KR1 Пл actik apanaactbIPfbls ыdibIC | ыdibic iшinDE 750 r ун мени INHр徳иHTterdi eHdeyeRE 6olaDbI. |
| MUZ5MX1 Пл actik apanaactbIPfbls КOHdbIPfblcIb | CycbIhДары apanaactbIPу, кekeнпен КekeнICTi дярпay, майоэндайу, кekeнпen Жангakтары майдалay, МуЗTekшелерIN ycaTyfa apHaJIFaH. |
| MUZ5MM1 Муlttn apanaactbIPfbls | ДэмdeyuIstep, кekeнic, anma мени eTTi kecy, karpoTи, shombyр мени ipimuikti уу, кaнгak пen СуытьлFaH ShOKoJaTы ууге apHaJIFaH. |
Kocajki b6eJIweK JTeKtiim 6yMaCbIHda 6oJMaHaJ XaFdaJa, OFaH caydaOpHbI He Kbl3MeT Kepcety optaBIFbIH aH Tancbipbc 6epyre 6oJaNbl.
a a a a a a a a a a a a a a a a a a a a a
juaa! jz. jzaiia iuiy jzj
g jjglal jglg jlll
julal 4 jbi
iLi
aalil
| الإستعمال الحرفية الإستعمال الحرفية الإستعمال الحرفية الإستعمال الحرفية الإستعمال الحرفية الإستعمال الحرفية الإستعمال الحرفية الإستعمال الح註冊 الإستعمال الح註冊 الإستعمال الح註冊 الإستعمال الح註冊 الإستعمال الح註冊 الإستعمال الح註冊 الإستعمال الح註冊 الإستعمال الح註冊 الإستعمال الح註冊 الإستعمال الح註冊 الإستعمال الح註冊 الإستعمال الح註冊 الإستعمال الح註冊 الإستECHANGES الإستعمال الح註冊 الإستECHANGES الإستECHANGES الإستECHANGES الإستECHANGES الإستECHANGES الإستECHANGES الإستECHANGES الإستECHANGES الإستECHANGES الإستECHANGES الإستECHANGES الإستECHANGES الإستECHANGES الإستECHANGES الإستECHANGES الإستECHANGES الإستECHANGES الإستECHANGES الإستECHANGES الإستECHANGES الإستECHAGES الإستECHAGES الإستECHAGES الإستECHAGES الإستECHAGES الإستECHAGES الإستECHAGES الإستECHAGES الإستECHAGES الإستECHAGES الإستECHAGES الإستECHAGES الإستECHAGES الإستECHAGES الإستECHAGES الإستECHAGES الإستECHAGES الإستECHAGES الإستECHAGES الإستECHAGES الإستECHANGES الإستECHANGES الإستECHANGES الإستECHANGES الإستECHANGES الإستECHANGES الإستECHANGES الإستECHANGES الإستECHANGES الإستECHANGES الإستECHANGES الإستECHANGES الإستECHANGES الإستECHANGES الإستECHANGES الإستECHANGES الإستECHANGES الإستECHANGES الإستECHANGES الإستECHASE الإستECHASE الإستECHASE الإستECHASE الإستECHASE الإستECHASE الإستECHASE الإستECHASE الإستECHASE الإستECHASE الإستECHASE الإستECHASE الإستECHASE الإستECHASE الإستECHASE الإستECHASE الإستECHASE الإستECHASE الإستECHASE الإستECHASE الإستECHase الإستECHASE الإستECHASE الإستECHASE الإستECHASE الإستECHASE الإستECHASE الإستECHASE الإستECHASE الإستECHASE الإستECHASE الإستECHASE الإستECHASE الإستECHASE الإستECHASE الإستECHASE الإستECHASE الإستECHASE الTABLA الTABLA الTABLA الTABLA الTABLA الTABLA الTABLA الTABLA الTABLA الTABLA الTABLA الTABLA الTABLA الTABLA الTABLA الTABLA الTABLA الTABLA الTABLA الTABLA الTABLA الTABLA الTABLA الTABLA الTABLA الTABTA الTABTA الTABTA الTABTA الTABTA الTABTA الTABTA الTABTA الTABTA الTABTA الTABTA الTABTA الTABTA الTABTA الTABTA الTABTA الTABTA الTABTA الTABTA الTABTA الTABTA الTABTA الTABTA الTABTA الTABTA الTABZA الTABZA الTABZA الTABZA الTABZA الTABZA الTABZA الTABZA الTABZA الTABZA الTABZA الTABZA الTABZA الTABZA الTABZA الTABZA الTABZA الTABZA الTABZA الTABZA الTABZA الTABZA الTABZA الTABZA الTABZA الTABZ الTABZA الTABZA الTABZA الTABZA الTABZA الTABZA الTABZA الTABZA الTABZA الTABZA الTABZA الTABZA الTABZA الTABZA الTABZA الTABZA الTABZA الTABZA الTABZA الTABZA الTABZA الTABZA الTABZA الTABZA الTABZE الTABZA الTABZA الTABZA الTABZA الTABZA الTABZA الTABZA الTABZA الTABZA الTABZA الTABZA الTABZA الTABZA الTABZA الTABZA الTABZA الTABZA الTABZA الTABZA الTABZA الTABZA الTABZA الTABZA الTABZA الTABZR الTABZA الTABZA الTABZA الTABZA الTABZA الTABZA الTABZA الTABZA الTABZA الTABZA الTABZA الTABZA الTABZA الTABZA الTABZA الTABZA الTABZA الTABZA الTABZA الTABZA الTABZA الTABZA الTABZA الTABZA الTABZN الTABZA الTABZA الTABZA الTABZA الTABZA الTABZA الTABZA الTABZA الTABZA الTABZA الTABZA الTABZA الTABZA الTABZA الTABZA الTABZA الTABZA الTABZA الTABZA الTABZA الTABZA الTABZA الTABZA الTABZA الTABAZ الTABZA الTABZA الTABZA الTABZA الTABZA الTABZA الTABZA الTABZA الTABZA الTABZA الTABZA الTABZA الTABZA الTABZA الTABZA الTABZA الTABZA الTABZA الTABZA الTABZA الTABZA الTABZA الTABZA الTABZA الTABEZ الTABZA الTABZA الTABZA الTABZA الTABZA الTABZA الTABZA الTABZA الTABZA الTABZA الTABZA الTABZA الTABZA الTABZA الTABZA الTABZA الTABZA الTABZA الTABZA الTABZA الTABZA الTABZA الTABZA الTABZA الTABZY الTABZA الTABZA الTABZA الTABZA الTABZA الTABZA ALIBERT ALIBERT ALIBERT ALIBERT ALIBERT ALIBERT ALIBERT ALIBERT ALIBERT ALIBERT ALIBERT ALIBERT ALIBERT ALIBERT ALIBERT ALIBERT ALIBERT ALIBERT ALIBERT ALIBERT ALIBERT ALIBERT ALIBERT ALIBERT ALIBERT ALIBRT ALIBRT ALIBRT ALIBRT ALIBRT ALIBRT ALIBRT ALIBRT ALIBRT ALIBRT ALIBRT ALIBRT ALIBRT ALIBRT ALIBRT ALIBRT ALIBRT ALIBRT ALIBRT ALIBRT ALIBRT ALIBRT ALIBRT ALIBRT ALIBRT ALIB RT ALIBRT ALIBRT ALIBRT ALIBRT ALIBRT ALIBRT ALIBRT ALIBRT ALIBRT ALIBRT ALIBRT ALIBRT ALIBRT ALIBRT ALIBRT ALIBRT ALIBRT ALIBRT ALIBRT ALIBRT ALIBRT ALIBRT ALIBRT ALIBRT ALIBR ALIBRT ALIBRT ALIBRT ALIBRT ALIBRT ALIBRT ALIBRT ALIBRT ALIBRT ALIBRT ALIBRT ALIBRT ALIBRT ALIBRT ALIBRT ALIBRT ALIBRT ALIBRT ALIBRT ALIBRT ALIBRT ALIBRT ALIBRT ALIBRT ALIBRTC ALIBRTC ALIBRTC ALIBRTC ALIBRTC ALIBRTC ALIBRTC ALIBRTC ALIBRTC ALIBRTC ALIBRTC ALIBRTC ALIBRTC ALIBRTC ALIBRTC ALIBRTC ALIBRTC ALIBRTC ALIBRTC ALIBRTC ALIBRTC ALIBRTC ALIBRTC ALIBRTC ALIBRTC ALIBRT ALIBRTC ALIBRTC ALIBRTC ALIBRTC ALIBRTC ALIBRTC ALIBRTC ALIBRTC ALIBRTC ALIBRTC ALIBRTC ALIBRTC ALIBRTC ALIBRTC ALIBRTC ALIBRTC ALIBRTC ALIBRTC ALIBRTC ALIBRTC ALIBRTC ALIBRTC ALIBRTC ALIBRT ALIBRT ALIBRTC ALIBRTC ALIBRTC ALIBRTC ALIBRTC ALIBRTC ALIBRTC ALIBRTC ALIBRTC ALIBRTC ALIBRTC ALIBRTC ALIBRTC ALIBRTC ALIBRTC ALIBRTC ALIBRTC ALIBRTC ALIBRTC ALIBRTC ALIBRTC ALIBRTC ALIB RTC ALIBRTC ALIBRTC ALIBRTC ALIBRTC ALIBRTC ALIBRTC ALIBRTC ALIBRTC ALIBRTC ALIBRTC ALIBRTC ALIBRTC ALIBRTC ALIBRTC ALIBRTC ALIBRTC ALIBRTC ALIBRTC ALIBRTC ALIBRTC ALIBRTC ALIBRTC ALIBRTC ALIBRTC ALIB RTC ALIBRTC ALIB RTC ALIBRTC ALIBRTC ALIBRTC ALIBRTC ALIBRTC ALIBRTC ALIBRTC ALIBRTC ALIBRTC ALIBRTC ALIBRTC ALIBRTC ALIBRTC ALIBRTC ALIBRTC ALIBRTC ALIBRTC ALIBRTC ALIBRTC ALIBRTC ALIBRTC ALIBRTC ALIB RTC ALIBRTC ALIBRT ALIBRTC ALIBRTC ALIBRTC ALIBRTC ALIBRTC ALIBRTC ALIBRTC ALIBRTC ALIBRTC ALIBRTC ALIBRTC ALIBRTC ALIBRTC ALIBRTC ALIBRTC ALIBRTC ALIBRTC ALIBRTC ALIBRTC ALIBRTC ALIBRTC ALIBRTC ALIB RTC ALIB RTC ALIBRTC ALIBRTC ALIBRTC ALIBRTC ALIBRTC ALIBRTC ALIBRTC ALIBRTC ALIBRTC ALIBRTC ALIBRTC ALIBRTC ALIBRTC ALIBRTC ALIBRTC ALIBRTC ALIBRTC ALIBRTC ALIBRTC ALIBRTC ALIBRTC ALIBRTC ALIBRTC ALIB RTC ALIB RTC ALIB RTC ALIBRTC ALIBRTC ALIBRTC ALIBRTC ALIBRTC ALIBRTC ALIBRTC ALIBRTC ALIBRTC ALIBRTC ALIBRTC ALIBRTC ALIBRTC ALIBRTC ALIBRTC ALIBRTC ALIBRTC ALIBRTC ALIBRTC ALIBRTC ALIBRTC ALIBRTC ALIB RTC ALIB RTC ALIBRT ALIBRTC ALIBRTC ALIBRTC ALIBRTC ALIBRTC ALIBRTC ALIBRTC ALIBRTC ALIBRTC ALIBRTC ALIBRTC ALIBRTC ALIBRTC ALIBRTC ALIBRTC ALIBRTC ALIBRTC ALIBRTC ALIBRTC ALIBRTC ALIBRTC ALIBRTC ALIBRTC ALIB RTC ALIBRT ALIBRTC ALIBRTC ALIBRTC ALIBRTC ALIBRTC ALIBRTC ALIBRTC ALIBRTC ALIBRTC ALIBRTC ALIBRTC ALIBRTC ALIBRTC ALIBRTC ALIBRTC ALIBRTC ALIBRTC ALIBRTC ALIBRTC ALIBRTC ALIBRTC ALIBRTC ALIB RTC ALIBRT ALIB RTC ALIBRTC ALIBRTC ALIBRTC ALIBRTC ALIBRTC ALIBRTC ALIBRTC ALIBRTC ALIBRTC ALIBRTC ALIBRTC ALIBRTC ALIBRTC ALIBRTC ALIBRTC ALIBRTC ALIBRTC ALIBRTC ALIBRTC ALIBRTC ALIBRTC ALIBRTC ALIBRTC ALIBRT ALIB RTC ALIBRTC ALIBRTC ALIBRTC ALIBRTC ALIBRTC ALIBRTC ALIBRTC ALIBRTC ALIBRTC ALIBRTC ALIBRTC ALIBRTC ALIBRTC ALIBRTC ALIBRTC ALIBRTC ALIBRTC ALIBRTC ALIBRTC ALIBRTC ALIBRTC ALIBRTC ALIB RTC ALIBRT ALIBRT ALIBRTC ALIBRTC ALIBRTC ALIBRTC ALIBRTC ALIBRTC ALIBRTC ALIBRTC ALIBRTC ALIBRTC ALIBRTC ALIBRTC ALIBRTC ALIBRTC ALIBRTC ALIBRTC ALIBRTC ALIBRTC ALIBRTC ALIBRTC ALIBRTC ALIBRTC ALIBRT ALIBRTC ALIBRT ALIBRTC ALIBRTC ALIBRTC ALIBRTC ALIBRTC ALIBRTC ALIBRTC ALIBRTC ALIBRTC ALIBRTC ALIBRTC ALIBRTC ALIBRTC ALIBRTC ALIBRTC ALIBRTC ALIBRTC ALIBRTC ALIBRTC ALIBRTC ALIBRTC ALIBRTC ALIBRT ALIBRT ALIBRT ALIBRTC ALIBRTC ALIBRTC ALIBRTC ALIBRTC ALIBRTC ALIBRTC ALIBRTC ALIBRTC ALIBRTC ALIBRTC ALIBRTC ALIBRTC ALIBRTC ALIBRTC ALIBRTC ALIBRTC ALIBRTC ALIBRTC ALIBRTC ALIBRTC ALIB RTC ALIBRTC ALIBRTC ALIB RTC ALIBRTC ALIBRTC ALIBRTC ALIBRTC ALIBRTC ALIBRTC ALIBRTC ALIBRTC ALIBRTC ALIBRTC ALIBRTC ALIBRTC ALIBRTC ALIBRTC ALIBRTC ALIBRTC ALIBRTC ALIBRTC ALIBRTC ALIBRTC ALIBRTC ALIB RTC ALIBRTC ALIBRTC ALIBRT ALIBRTC ALIBRTC ALIBRTC ALIBRTC ALIBRTC ALIBRTC ALIBRTC ALIBRTC ALIBRTC ALIBRTC ALIBRTC ALIBRTC ALIBRTC ALIBRTC ALIBRTC ALIBRTC ALIBRTC ALIBRTC ALIBRTC ALIBRTC ALIBRTC ALIB RTC ALIBRTC ALIB RTC ALIB RTC ALIBRTC ALIBRTC ALIBRTC ALIBRTC ALIBRTC ALIBRTC ALIBRTC ALIBRTC ALIBRTC ALIBRTC ALIBRTC ALIBRTC ALIBRTC ALIBRTC ALIBRTC ALIBRTC ALIBRTC ALIBRTC ALIBRTC ALIBRTC ALIBRTC ALIB RTC ALIBRTC ALIB RTC ALIBRT ALIBRTC ALIBRTC ALIBRTC ALIBRTC ALIBRTC ALIBRTC ALIBRTC ALIBRTC ALIBRTC ALIBRTC ALIBRTC ALIBRTC ALIBRTC ALIBRTC ALIBRTC ALIBRTC ALIBRTC ALIBRTC ALIBRTC ALIBRTC ALIBRTC ALIB RTC ALIBRTC ALIBRT ALIBRT ALIBRTC ALIBRTC ALIBRTC ALIBRTC ALIBRTC ALIBRTC ALIBRTC ALIBRTC ALIBRTC ALIBRTC ALIBRTC ALIBRTC ALIBRTC ALIBRTC ALIBRTC ALIBRTC ALIBRTC ALIBRTC ALIBRTC ALIBRTC ALIBRTC ALIB RTC ALIB RTC ALIBRTC ALIB RTC ALIBRTC ALIBRTC ALIBRTC ALIBRTC ALIBRTC ALIBRTC ALIBRTC ALIBRTC ALIBRTC ALIBRTC ALIBRTC ALIBRTC ALIBRTC ALIBRTC ALIBRTC ALIBRTC ALIBRTC ALIBRTC ALIBRTC ALIBRTC ALIBRTC ALIB RTC ALIB RTC ALIBRTC ALIBRT ALIBRTC ALIBRTC ALIBRTC ALIBRTC ALIBRTC ALIBRTC ALIBRTC ALIBRTC ALIBRTC ALIBRTC ALIBRTC ALIBRTC ALIBRTC ALIBRTC ALIBRTC ALIBRTC ALIBRTC ALIBRTC ALIBRTC ALIBRTC ALIBRTC ALIB RTC ALIB RTC ALIB RTC ALIB RTC ALIB RTC ALIB RTC ALIB RTC ALIB RTC ALIB RTC ALIB RTC ALIB RTC ALIB RTC ALIB RTC ALIB RTC ALIB RTC ALIB RTC ALIB RTC ALIB RTC ALIB RTC ALIB RTC ALIB RTC ALIB RTC ALIB RTC ALIB RTC ALIB RTC ALIBRTC ALIB RTC ALIB RTC ALIB RTC ALIB RTC ALIB RTC ALIB RTC ALIB RTC ALIB RTC ALIB RTC ALIB RTC ALIB RTC ALIB RTC ALIB RTC ALIB RTC ALIB RTC ALIB RTC ALIB RTC ALIB RTC ALIB RTC ALIB RTC ALIB RTC ALIB RTC ALIB RTC ALIBRTC ALIBRTC ALIBRTC ALIBRTC ALIBRTC ALIBRTC ALIBRTC ALIBRTC ALIBRTC ALIBRTC ALIBRTC ALIBRTC ALIBRTC ALIBRTC ALIBRTC ALIBRTC ALIBRTC ALIBRTC ALIBRTC ALIBRTC ALIBRTC ALIB RTC ALIB RTC ALIB RTC ALIBRTS |
E
#
auiuui 1
1000 -
S OBC = S COD + S_ BOC
2
660 -
1/2 1/2
4-5 1
. 125 34

jglal
2
S_ OBC = 12 · CO · BC = 12 × CD × 5
中j 1/4
S OBC = S COD + S BOC - S BOC
all 1 -
Sum 1 1
auii iiaaii aiee
bllg(yjj12c)clglall !
(3)4 (2)3 4a
1
aLae aee
a a a a a a a a a a a a a a a a a
Jgai
gian. 8
.
jglsl no jalil
1
aol gall glba jglal lla aull glc
a a 19/2012
ai ≤ bi
a_i s| 1,2,3,4 | .
(waste electrical and electronic equipment - WEEE).
gall jll 1
()
sole!
gall jgo o Juiuui yos .
Jolll lll aiee iiei ie
每年冬季 d ≥ 20 且 d I
a 1/2 1/2
2-3 144
a
| x - 2| = 100
12 1/2 1/2 all
3-4 1
1.25 34
Jlllal 2 1
aoww
#
#
auiuui 1
500
1
(a)j8 80
80
200-250
1 25
a#
ii 1/2 a
ai a ai 的最小值为 k .
1/2 1/2
3-6 14 14 14
- 125 a.s.u. 3 a.s.u
aal 2 1
aow
#
aigall
auiuui 1
300
3
10-20 1-2 all
2
5 3dol calgall
- i.e. c is a 3 is jall
1.5 15
aoww
1 1 1 1 1 1 1 1 1 1 1 1 1 1 1 1 1 1 1 1 1 1 1 1 1 1 1 1 1 1 1 1 1 1 1 1 1 1 1 1 1 1

aallll 1
6
500 -
Cull 1
j 1 j 1 j 1 j 1 j 1 j 1 j 1 j 1 j 1 j 1 j 1 j 1 j 1 j 1 j 1 j 1 j 1 j 1 j 1 j 1 j 1 j 1 j 1 j 1 j 1 j 1 j 1 j 1 j 1 j 1 j 1 j 1 j 1 j 1 j
(a)j500
1000 -
1
250 -
Sswgclllglwglswllglwl:clgSallbl
10 10dol jyj yj
120 5 jj 120
60 2d jj j j j j j j j j j
2 1
1yjy jyj 3 yjy jyj yj
J 1 1 1

a
(a)j10 125
100-125
1
1 1 Llaia 1
250
Jy
Jaa Jaa Jaa Jaa
.
Jusua Juswll
yjll jll jol jol jol jol jol jol jol jol jol jol jol jol jol jol jol jol jol jol jol jol jol jol jol jol jol jol jol jol jol jol jol jol jol jol jol jol jol jol jol jol jol jol jol jol jol jol jol jol
Juaaia
bLiLi j
jie jie
pala 1
ellizao Juaillil jlll llaill jaii
S木弟形 COBD = S COD + S_ BDO
auiuui

= ( x1,y1) , = ( x2,y2)
1>100-600 -
C
17-7a 4 12
S OBC = S COD + S BOC - S BOC

J 1
18 164 20
7a 的一个

= ( x1,y1) , = ( x2,y2)
auiuui 1 auiu
2
jLwclJc2-3
100
1
70
j1 70
Jy
(1)
6 4 2d jzj
Cuaia 1 yuul 1ydu 7 a jull
A
ja = j · jb = 1
e 1y jll jll jll jll
J 1
S ACD = S COD + S BDO - S CDO
a a a a a a a a a a a a a
J 41 J bbl 15bc j
j 1
y
yj.
0/off 1
j 1i i j 1i j j j j j j j j j j j j j j j j j j j j j j j j j j j j j j j j j j j j j j j j j j j
12g 12g 12g 12g 12g
j
Lgaiia 5jaiaiyai
alol Jail)
( ± ) = 2
e 1 1 1 1 1 1 1 1 1 1 1 1 1 1 1 1 1 1 1
a
2 1 2
Jaaal 1
.0/off 215
9
cgl jllg jilb
1
(1) x 有
jll jil 10o! oie
Jaaill 1ol Juiu G
ab( x) = x + ax^
1
a
a:Slco jIwll aill goll ll bll ll cIg
1
aJis Jil gW 12c! gBldll plaiiui 1:
1
j 1
eclg 1 1
blll llll lll lll lll
y (M 2015)
clalblllcbn pipbllc
:pda
ailll lalll 5 5 jill
ai = a1 + 3d ai = a1 + c_i
S ACD = S COD + S_ DCE
jieai jieai
!Lla!
jglal llacll jglal piaiie
y
:
S
ailll
aill lal
.
JbcI 11y oclua Clae
!Lla!
jglal jla l j 1 11 all j g
ySly ayjizill jao
:pda
j11 1 j11 1 1 1
Jbc 2g jic g jgi jisj jnolill cldao
jLx jLx jLx jLx jLx
Jilll lll
aagaa 1juaa aagaa jg jglal
aikaiill allj! algoo
a1 + a2 + a_3 = 6 .
yjg jgl
aiaiinaii iiaaiia
- i.e. of which JS
!pa 4
aaiis 15sla aibii 1go 1alaii iie
a
wulwJgai
jll jall
jie jie jie jie jie jie jie jie jie jie jie jie jie jie jie jie jie jie jie jie jie jie jie jie jie jie jie jie jie jie jie jie
cluaia ciai jiaaiyj g cial
jgl jgl jgl jgl jgl jgl jgl jgl jgl jgl jgl jgl jgl jgl jgl jgl jgl jgl jgl jgl jgl jgl jgl jgl jgl jgl jgl jgl jgl jgl jgl jgl jgl jgl jgl jgl jgl jgl jgl jgl jgl jgl jgl jgl jgl jgl jgl jgl jgl jgl jgl
.
gill 11 bll gwl lgl
ii 1i. g. all o iia aia o jai gl
10 10
dlls loiainn jglll iaiy; ell 1
ab > ac > a_d > 0
Jaaal 1gale gai
Jieie 1150
aiee aee eae ee eae
aai 1
111111111111111
a
1
aallllglglllglblai
aljoljolaiul 1
a1 = b1 = 1
Jusell aIyIa yIyIyIyIyIyIyIyIyIyIy
J 1
a 1000
j j j j j j j j j j j j j j j j j j j j j j j j j j j j j j j j j j j
a a a a a a a a a a a a a a a a a a a a
(1)
a aal alal alal alal
.
!pa 4
p 1
()()
jg jg jbjdl j
ai a ai 分母最小值为 k .
K

jLeyIyIeIyIeIyIeIyIeIyIeIyIeIy
e 1
.4
aalalil 1y1 y1 y1 y1 yll lll
billy
jss jolr
aaiia aiee
pia (gulw) jgl 1c s gall
aellw yjoc jolol jil 5c aijl
a
Cullsall 2
1.25 = aibi
j 10g jll afoa dllo 1go aasll
ailllal 12yla aysjil0.5=iais
100 50 =
aallll lllllllllllll
cillgssll
:K-8 3
jglallll lalil jglallll
cilll l 100
aai jia jia jia jia jia jia jia jia jia jia jia jia jia jia jia jia jia jia jia jia jia jia jia jia jia jia jia jia jia jia jia jia jia jia jia jia jia jia jia jia jia jia jia jia jia jia jia jia jia jia jial
aaiial ciisall aaii
ii 11 i 11 i 11 i 11
g
g
m = 311
aall 12n aalll aalll aal
Jaae aeg
jglal 1aai jglal
a clll 1 jie oolj
A
18a bdlil 1j 1 j
Aoluiiui i o ci
jia 1000000000000000000000000000000000000000000000000
.
1pda 4
aall
iYyAa iLx!
Ji jiyaiyia 1000
iGlc balec! gbball aai jai jai jai jai
aalall gall 1jla 4
aBgl aBgl aBgl aBgl aBgl aBgl
cJzjy y jy 1y jy
1
.0
JooJI Joo jgiJ1
jglal 1aalabw jglal laiy pi
oaiy
jLslal jclll jlae JdJdSlaall
j = 0
i jie jj jwslal o jy jg bll
jieill ie alolai ealoll
ailll. 10j jll lal jai
aegle biaiall lai
(II)
- j = 1 i.i.e. j = 1
由
Jd d
a1 = 23,a2 = - 43,b1 = 58,b2 = - 78
y1blll l 1p 1plllnss
111 111 111 111 111 111 111
Adele is so
1.
eall j0 0j j 1000000000000000000000000000000000000000000000000000000000000000000

a
a a a a a a a a a a a a a a
a
A
.7 aJallgl Jau:
5.a joll gl Jauell:
a
H

pSOL ojto jj bia pi
y
.2
:clg
45 120 120 120
a a a a a a a a a a a a a a
iH-8 8
a aalll jac oai jaiy
a
-
- ( a + b) ( a^2 + ab + b^2) = a^3 + b^3 .

-1gall all gbiell
1 1
a
- = ( x1,y1) , = ( x2,y2)
jgl jgl jgl jgl jgl jgl jgl jgl jgl jgl jgl jgl jgl jgl jgl jgl jgl jgl jgl jgl jgl jgl jgl jgl jgl jgl jgl jgl jgl jgl jgl jgl jgl jgl jgl jgl jgl jgl jgl jgl jgl jgl jgl jgl jgl jgl jgl jgl jgl jgl
:
aill bail 《
1
1
a a a a a a a a a a a a a a a a a a a a a a a a
Ubball aas glwll (uBbll) Ubball ay Sall
y
ooj u jsi loic yI gai bi

- 1
gill eiiiluiuui juii gai iail
(1)
4.3 aJall 50
jai jia glc jgall jao jol jao
1,2,3 ÷ 1,2,4 ÷ 1,3 ÷ 2,4 ÷ 3,4
jul 1
a1 = 2,an + 1 = n1 + n2
1
jlll jn nn nnnn nnnn nnnn
jJ.
.7 1

aegill bsig -
aall j 1
()
.
7 9 #
!pda
ailll lglg 1
a
Jaae Jaae
Jgall Clllal Aabw jglal Jgwl
1
.

pksj jzjj jbspi
1
2.2 golg j
.
.
jglj jil jil jil jil jil
(《A. 与 j_1 = j_2 = = j_n - 1
a 1
i#
a
a
jby 10y jcbail al jbl slwry
1.
a a a a a a a a a a a a a a a a a
plll jssswg 2000000000000000000
aieill jao aai jai jai jai jai jai jai
S ACD = S COD + S_ BDO
Culisallalil
1pda 4
y 1
oJgJgJgJgJgJgJgJgJgJgJgJgJgJgJgJgJgJgJgJgJgJgJgJgJgJgJgJgJgJgJgJgJgJgJgJgJgJgJgJgJgJgJgJgJgJgJgJgJgJgJ
jglllgcl glllgllllgllllgllllgllll
aaii aai iiaai iiaai
4 4
0.000000000000000
:6 0
jie jie jie jie jie jie jie jie jie jie jie jie jie jie jie jie jie jie jie jie jie jie jie
abj jslg djl j lssdi jy jolld
e g aag aag aag aag aag aag aag
jzdo jie. (laoo 200 jukil gao) jzoo
12a die yksj jrgall gac jla dl j dss
a
aalalalalalalalalalalalalalal
gill 1a
aalwal yIyRgSll Jus gill llw Ugs Jlaia p 1. yIyball Uyball 4. aIy Iy jy p o s d o yo ay Sll ySgill sll w y p s lds 2. yIy Iy jy p o s d aalwal

jcb jc jcll lglb jcb
eXaII aIiS jSj
aill jll lalil
j 1 j 1 j 1 j 1 j 1 j 1 j 1 j 1 j 1 j 1 j 1 j 1 j 1 j 1 j 1 j 1 j 1 j 1 j 1 j 1 j 1 j 1 j 1 j 1 j 1 j 1 j 1 j 1 j 1 j 1 j 1 j 1 j 1 j 1 j
aaleo
Jgall gie yjgaiiaai aai 2j clj
A
j
jz 1
2
EJJI 45 JEAJ (Easy Armlift) g. ((Jzillg) jil) 3
jI (0/off g) jIiill oai J
oiJ iJl lll 15i I
一 一 一 = 0 / off
1 1 1 1 1 1 1 1 1 1 1 1 1 1 1 1 1 1 1 1 1 1 1 1 1 1 1 1
A. a|b|aB|b|c|d|e|f|g|h|i
1 7-1 j 12
1 7
(1-7M 1-7 jj j j j j j j j j j j j j j j j j j j j j j j j j j j j j j j j j j j j j j j j j j j j j j j j j j j j j j
5
ar-12 jaii joiuaiill
ar-13
ar-13
aalgl jalil aai
J 1
aJlac! Jsall no oys 1 jll 3 1
111 111 111 111 111 111
Jy
jll jll jll jll jll jll jll jll jll jll jll jll jll jll jll jll jll jll jll jll jll jll jll jll jll jll jll jll jll jll jll jll jll jll jll jll jll jll jll jll jll jll jll jll jll jll jll jll jll jll jll
aaii
iiis 1i jie iie iie iie iie iie iie iie iie
aai jial jai jie 1 g aolizai Jui jiu ci jiai
jia jia jia jia jia jia jia jia jia jia jia jia jia jia jia jia jia jia jia jia jia jia jia jia jia jia jia jia jia jia jia jia jia jia jia jia jia jia jia jia jia jia jia jia jia
. jiliy 11 y jiei Jiawei 2 . jiuji
Jg 1
jiee 1ie e bdi jydi aia 5i
!cla!
Jl 1
a j 11 11 11 11 11 11 11 11 11
a aal 30y1 20g jn gai y bii y cui aai o jui Jai
pill sswll
J 1
DE Deutschland, Germany
AE United Arab Emirates,
BSH Home Appliances FZE
Round About 13,
Plot Nr MO-0532A
Jebel Ali Free Zone – Dubai
Tel.: 048814401
mailto:service.uae@bshg.com
www.bosch-home.com/ae
AL Republika e Shqiperise, Albania
ELEKTRO-SERVIS sh.p.k
Rr. Shkelqim Fusha, Selite,
Pallati "Matrix Konstruktion",
Kati 0 dhe +1
1023 Tirane
Tel.: 42278130, -131
Fax: 4 2278 130
mailto:info@elektro-servis.com
EXPERT SERVIS
Rugae Kavages,
Kulla B Nr 223/1 Kati I
1023 Tirane
Tel.: 44806061
Tel.: 42274941
Fax: 4 227 0448
Cel: +355 069 60 45555
mailto:info@expert-servis.al
Gate 1, 1555 Centre Road
Clayton, Victoria 3168
Tel.: 1300 369 744*
Fax: 1300 306 818
mailto: aftersales.au@bshg.com
www.bosch-home.com.au
- Mo-Fr: 24 hours
BA Bosna i Hercegovina, Bosnia-Herzegovina
"HIGH" d.o.o.
Gradačačka 29b
71000 Sarajevo
Tel./Fax: 033 21 35 13
mailto:centralniservis@yahoo.com
BE Belgique, Belgie, Belgium
BSH Home Appliances S.A. - N.V.
Business center FPI, floor 5,
Cherni vrah Blvd. 51B
1407 Sofia
Tel.: 0700 208 17
mailto:informacia.servis-bg@bshg.com
www.bosch-home.bg
BH Bahrain,
Khalafat Est.
P.O.Box 5111
Manama
Tel.: 01 7400 553
mailto:service@khalaifat.com
BY Belarus, Benapycb
OOO“ECX BbITOBaTeXnKa
ten.: 495 737 2961
mailto:mok-kdhl@bshg.com
CH Schweiz, Suisse, Svizzera, Switzerland
BSH Hausgeräte AG
To arrange an engineer visit, to order
spare parts and accessories or for
product advice please visit
www.bosch-home.co.uk
or call Tel.: 0344 892 8979*
- Calls are charged at the basic rate, please check with your telephone service provider for exact charges.
GR Greece, Eλας
BSH Ikiakes Siskeves A.B.E.
Central Branch Service
17 km E.O. Athinon-Lamias & Potamou 20
14564 Kifisia
Tnλeφωνo: 181 82
Unit 1 & 2, 3rd Floor,
North Block, Skyway House,
3 Sham Mong Road
Tai Kok Tsui, Kowloon
Hong Kong
Tel.: 2626 9655 (HK)
Toll free 0800 863 (Macao)
Fax: 2565 6681
mailto:bosch.hk.service@bshg.com
www.bosch-home.com/hr
HU Magyarorszag, Hungary
www.bosch-home.com/hu
IE Republic of Ireland
BSH Home Appliances Ltd.
M50 Business Park
Ballymount Road Upper
Walkinstown
Dublin 12
To arrange an engineer visit, to order spare parts and accessories or for product advice please call
Tel.: 01450 2655*
www.bosch-home.ie
- Calls are charged at the basic rate, please check with your telephone service provider for exact charges
IL Israel
C/S/B/ Home Appliance Ltd.
1, Hamasger St
North Industrial Park
Lod, 7129801
Tel.: 08977222
Fax: 08 9777 245
mailto:csb-serv@csb-ltd.co.il
www.bosch-home.co.il
IN India, Bharat,
BSH Household Appliances Mfg. Pvt. Ltd.
Arena House, Main Bldg, 2nd Floor,
Plot No. 103, Road No. 12
MIDC, Andheri East
Mumbai 400 093
Toll Free 1800 266 1880*
www.bosch-home.com/in
- Mo-Sa: 8.00am to 8.00pm (exclude public holidays)
IS Iceland
Smith & Norland hf.
Noatuni 4
105 Reykjavik
Tel.: 0520 3000
Fax: 0520 3011
www.sminor.is
IT Italia, Italy
www.bosch-home.com/it
KZ Kazakhstan, Ka3aKCTAH
IP Anackiy A.N. PTN-Service
Kuyshi Dina str.23/1 N3
Astana
Tel.: 717 236 64 55
mailto:ptnservice@mail.ru
Technodom Service
Utegen Batira Str. 73
480096 Almaty
Tel.: 727 258 8544
mailto:lsr@technodom.kz
www.technodom.kz
Kombitechnocentr
Zhambyl st. 117
480096 Almaty
Tel.: 727 338 45 55
mailto:cts_pavel@bk.ru
www.cts.kz
TOO Evrika Service
Shimkent, Riskulova 22.
Shimkent 160018
Tel.: 727 252 44 63 75
mailto:evrika_kz@mail.ru
www.evrika.com
AV SERVICE
Abulhair hana Str. 51
Uralsk 090000
Tel.: 711 293 99 49
mailto:oastafiev@avservice.kz
www.avservice.kz
LB Lebanon,
Teheni, Hana & Co.
Boulevard Dora 4043 Beyrouth
P.O.Box 90449
Jdeideh, 1202 2040
Tel.: 01 255 211
mailto:Info@Teheni-Hana.com
LT Lietuva, Lithuania
Senuku prekybos centras UAB
Jonavos g. 62
44192 Kaunas
Tel.: 037 212 146
Fax: 037 212 165
www.senukai.lt
UAB "AG Service"
R. Kalantos g. 32
52494 Kaunas
Tel.: 070055655
Fax:037331363
mailto:servias@agservice.lt
www.agservice.lt
Baltic Continent Ltd.
Luksoq.23
09132 Vilnius
Tel.: 870 055 595
Fax: 052741722
mailto:info@balticcontinent.It
www.balticcontinent.It
UAB Emtoservis
Savanoriu pr. 1 (Centrine bustine)
03116 Vilnius
Tel.: 870 044 724
Fax:052737368
mailto:svc@emtoservis.lt
www.emtoservis.lt
LU Luxembourg
S.R.L. "Rialto-Studio"
yn. Lycceba 98
2012 KIshinHeB
ten./ΦaKc:022238180
mailto:bosch-md@mail.ru
ME Crna Gora, Montenegro
Elektronika komerc
Unit F 2, 4 Orbit Drive
Mairangi Bay
Auckland 0632
Tel.: 0800 245 700*
Fax: 0800 256 535
mailto:aftersales.nz@bshg.com
www.bosch-home.co.nz
- Mo-Fr: 8.30 am to 5.00 pm
(exclude public holidays)
PL Polska, Poland
SA Kingdom Saudi Arabia,
i00011 i00011 iSlaas
Abdul Latif Jameel Electronics
and Airconditioning Co. Ltd.
BOSCH Service centre,
Kilo 5 Old Makkah Road
(Next to Toyota), Jamiah Dist.
P.O.Box 7997
Jeddah 21472
Tel.: 800 127 9999
mailto:palakkalin@aj.com
www.aljazeera.com.sa
SE Sverige, Sweden
BSH Home Appliances AB
Landsvagen 32
169 29 Solna
Tel.: 0771 19 70 00 local rate
Tel.: 0771 11 22 77 local rate
mailto:Bosch-Service-SE@bshg.com
www.bosch-home.se
SG Singapore, 新加坡
BSH Home Appliances Pte. Ltd.
Block 4012, Ang Mo Kio Avenue 10
01-01 Techplace 1
Singapore 569628
Tel.: 6751 5000
Fax: 6751 5005
mailto:bshsgp.service@bshg.com
www.bosch-home.com.sg
- Mo-Fr: 8.30am to 7.00pm, Sa: 8.30am to 5.30pm
(clude public holidays)
SI Slovenija, Slovenia
BSH Hišni aparati d.o.o.
Litostrojska 48
1000 Ljubljana
Tel.: 015830700
Fax: 01 583 08 89
mailto:informacije.servis@bshg.com
www.bosch-home.com/si
SK Slovensko, Slovakia
Ital Thai Tower, 2034/31-39, 1st floor,
New Petchburi Road
Bangkapi, Huay Kwang
Bangkok, 10310
Tel.: 02 975 5353*
www.bosch-home.com/th
- Mo-Sa: 8.00am to 6.00pm
(exclude public holidays)
TR Türkiye, Turkey
BSH Ev Aletteri Sanayi
ve Ticaret A.S.
Fatih Sultan Mehmet Mahallesi
Balkan Caddesi No: 51
34771 Umraniye, Istanbul
Tel.: 02164446333*
Fax: 0 216 528 9188*
mailto:careline.turkey@bshg.com
www.bosch-home.com/tr
BSH Home Appliances Private Limited
台北市內湖區洲子街80號11樓
11F., No.80, Zhouzi St., Neihu Dist.
Taipei City 11493
Tel.: 0800 368 888
Fax: 02 2627 9788
mailto:bshtzn-service@bshg.com
Service-General SH.P.K.
rr.Magjistralja Ferizaj Prishtine
70000 Ferizaj
Tel:00381(0)290330723
Tel.: 00377 44 172 309
mailto:servicegeneral527@gmail.com
XS Srbija, Serbia
BSH Kučni aparati d.o.o.
Milutina Milankovica br. 9ž
11070 Novi Beograd
Tel.: 0113537008
Fax: 011 205 23 89
mailto:informacije.servis-sr@
bshg.com
www.bosch-home.rs
ZA South Africa
BSH Home Appliances (Pty) Ltd.
15th Road Randjespark
Private Bag X36, Randjespark
1685 Midrand-Johannesburg
Tel.: 086 002 6724
Fax: 086 617 1780
mailto:applianceserviceza@bshg.com
www.bosch-home.com/za
Thank you for buying a Bosch Home Appliance!
Register your new device on MyBosch now and profit directly from:
- Expert tips & tricks for your appliance
- Warranty extension options
- Discounts for accessories & spare-parts
- Digital manual and all appliance data at hand
- Easy access to Bosch Home Appliances Service
Free and easy registration – also on mobile phones:
www.bosch-home.com/welcome

Looking for help? You'll find it here.
Expert advice for your Bosch home appliances, need help with problems or a repair from Bosch experts.
Find out everything about the many ways Bosch can support you:
www.bosch-home.com/service
Contact data of all countries are listed in the attached service directory.
- Universal kitchen machine
- Important safety information
- Risk of electric shock and fire!
- Risk of injury!
- Risk of scalding!
- Risk of suffocation!
- Caution!
- Important!
- Explanation of the symbols on the appliance or accessory
- Contents
- Safety systems
- Start lock-out
- Restart lock-out
- Overload protection
- Overview
- Figure A:
- Base unit
- Drive cover
- Drive for
- Drive for tools
- Blender drive cover
- Drive for blender
- Automatic cord winder
- Bowl with accessories
- Stainless steel stirring bowl
- Lid
- Tools
- Professional flexi stirring whisk
- Professional beating whisk
- Kneading hook with dough deflector
- Accessories bag
- Continuous-feed shredder
- Pusher
- Cover with filling shaft
- Cutting discs
- Disc holder
- Housing with outlet opening
- Blender*
- Blender jug
- Lid
- Funnel
- Operating positions
- Figure 3:
- Attention:
- Note:
- Selecting the operating position:
- Operation
- Risk of injury!
- Attention!
- Important information
- Preparation
- Warning!
- Bowl and tools
- Risk of injury from rotating tools!
- Professional flexi stirring whisk (13)
- Professional beating whisk (14)
- Kneading hook (15)
- Important information concerning the use of the whisk
- Figure 1:
- Working with the bowl and the tools
- Our recommendation:
- Adding more ingredients
- After using the appliance
- Predetermined breaking point
- Figure 6:
- Professional Supercut reversible disc - coarse / fine
- Reversible shredding disc - coarse / fine
- Grating disc - medium-fine
- Potato fritter disc
- Working with the continuous-feed shredder
- Figure H:
- Blender
- Risk of injury from sharp blades / rotating drive!
- Risk of scalding!
- Working with the blender
- Figure K:
- Figure K-8:
- or
- Cleaning and servicing
- Cleaning the base unit
- Risk of electric shock!
- Cleaning the bowl and tools
- Cleaning the continuous-feed shredder
- Risk of injury from sharp blades!
- Cleaning the blender
- Storage
- Figure L:
- Troubleshooting
- The swivel arm must be engaged in every operating position.
- Remedial action
- Application examples
- Whipped cream
- Egg white
- Sponge mixture
- Basic recipe
- Maximum quantity: 2 × basic recipe
- Cake mixture
- Maximum quantity: 1 x basic recipe
- Short pastry
- Yeast dough
- Pasta dough
- Bread dough
- Mayonnaise
- Disposal
- Guarantee
- Sécurité anti-surcharge
- A Fare for skoldning!
- OBS!
- A Fare for skolding!
- "Profi Supercut" - paksu / ohut
- IpooOx!
- TANEAAAIKO THAEQNO EeyHPETHEH NEAATON
- BaxJInBo!
- 3mict
- CnCTem6e3neKn
- 3axnct BiD yBIMKHeHHa
- TayokdnyamiybaHHa (15)
- BaxnBa Bka3iBka 0do 3acToCyBaHHa BInuKa-3bBaNKn (MaI. E)
- Po6ota 3 yaueTo Ta HacaKamn (MaI. F)
- Bka3iBka
- OuHHeHH OCHOBHOro 6JIOky
- He6e3neka ypaXeHHra eJeKtpnUHM cTpymOM!
- OuichiHnHaWi Ta Hacadok
- OuHsEHHaCKpi3HoI waTkivHnci
- He6e3neka nopaHeHHra roCTpIMN HOxAMn!
- Ouichienhna 6JeHdepa
- He6e3neka npaHeHHraOCTpIMN HOxAMn!
- BaxJINBa Bka3iBka
- 36epiraHnHa
- Ybara! IChyE He6e3neKa TpaBMByBaHH!
- MaJIHOK L:
- YcyHeHHa HecnpaBHOCTeH
- Ybara!IChyE He6e3neKa TpaBMvBaHH!
- BaxnBa Bka3iBka
- Pobopothn Baxinb y koxhomy po6oohmy noIooxeHHi Mae 6ytu 3aikcoBaHn y na3i.
- HecnpabHicTb
- yCyHeHHa
- UcHn
- HecnpabhnicTb
- OnachocThb nopaxeHnra TOKOM n BO3ropaHnra!
- He nckJIIOUeHa onaCHOCTb TpaBMnPOBaHna!
- OnachocTb ownpBaHnra!
- BHIMaHne!
- BaxHo!
- OrnaBHeHne
- CnCTeMbI 6e3OnaCHOCTN
- Блорва Влоченя
- Блоровka nobTopHOROBKIOUeHn
- YcTpoIcTB0 3aUNTbI OT neperpy3Kn
- KOMPJIeKTHbI O63Op
- OCHOBH06JOK
- CmeCNTelbna Yaasa c npHaadnExKHOCTaM
- Hacaikn
- YHnBepcaJIbHaJa pe3ka
- BleHedp
- Pa6oyne noJoxKeHnA
- PucyHok
- Yka3aHne
- UcTaHOBka pa6oOero nOJoxHeNHa:
- CmecntelbHaayaHaHaacadkn
- AnachocTb TpaBMnpoBaHnBpaaUoUMncHaCakamn!
- Bhumahne!
- PpoceccnoHaJIbHbIy HnBepcaJIbHbI BcHvnK dIy nepemuBaHn (13)
- IIO OKOHuaHn pa6OtbI
- Бленьдер
- OnachOCTb TpaBMPOBaHn8 06 OCTpbIe HOKN/BpaUaIOuNc npNBoD!
- Onachoctb ounpaBnHa!
- Pa6ota c 6Jenepom
- PncyHOK K:
- UncTka 6JIeHdepa
- Anachoctb TpaBMnpoBaHnaOCTpbIMNe3BnMn HOxa!
- BaxHoe yka3aHne:
- XpaHeHne
- Onachoctb TpaBMnpoBaHnI!
- YTNIN3aun
- YcNoBna rapaHTnHoro 06cJyXnBaHn
- AkceccyapbI n cpeDCTBa no yxody
- rapaHTnHa3ROTOBtEnA
- BhmamHe! Baxhna HOpMaunn nIe notpe6nte ne
- 9.Инфорmaцьосярвиce
- Инфорmaця O 6bIToBOI TEXHnke,прОиЗВeДeEHNoI NOД KOHTpoJIem KOHcePHa BCX XaycrepeTe Γm6X, KapI-Bepn-IIItp.34,81739 MIOHXeN,Германь COOTBeTCTBnC Tpe6ObaHnЯMn ΦeDEpaJIbHorO 3aKoHA PФ OT 23 HOJ6pR 2009 r. № 261-Φ3,ЗakOHoDaTeJIbCTBa O TEXHnuecKOM peRylnipOBaHn N 3aKoHOdaTeJIbCTBa O 3aUInTe npaBNotpe6bTeJIeN PocsnckOfФeDEpaZn
- Tnicti peTte naIdaIaHy
- MaHbI3IbI Kayinci3ik TypaJIbI MaFJyMaTTap
- Optehy XaHe 3JekTp TOrbHa Tycy Kayni!
- :KapaKaTTaHy kayni 6ap!
- Kyu kayni 6ap!
- TyHusbiry Kayni!
- Ha3ap aydapbHbI3!
- MaHbI3DbI!
- Бунымдаfts He Kemekei Kypaandafts 6eJrIepdIn TycihikTeMeci
- Ma3MyHbI
- Kayinci3dkxyneci
- KeheT icke KocbIyuaH KopFaHbIC
- Kypanap
- AcyNJik MaJdaJafbiw
- Kymblc Kynnepi
- cypeti:
- Ha3ap aydpbIhbl3!
- Hyckay
- Kymblc KyinH petTey:
- KoIdaHy
- KapakaTahi kayni 6ap!
- MaHbI3NbI HycKay
- Dai bIHday
- Ha3ap ayadapbIHyI3!
- blbcxKHe KypaI
- AaHaJMaJIbI KypanDaH JkapaKaTTaHy Kayni!
- PpoceccnoHaandbi nImMeJI 6yfraybI (13)
- PpocecnoHaIbI KaKbIa (14)
- Nneriw (15)
- KaKbIHTbI naiJaIaHy BoiBInHaMaHbI3DbI HycKay (cypET):
- blbicneH XaHe KypaJImeH XyMbIC icTeY (E cypeTI):
- Hyckay:
- (4b cyperi).
- B3dIn ycbHbC:
- IhprpeJeHHTepMeH TOITbipy
- KymbICTaH KeiH
- AcyNilik MaiaIanaIbIi
- Kapakatanykayni!
- Ha3ap aydaebHb13!
- ApTbIK KxKTeMeDeH KopFay
- PpoepccnoHaJIdb Supercut
- 6ypaMaBbI DnCKi-KaNbIH/KyKa
- AHaHMaJIbI YKKIIW DnCK - YJKeH/ShaftH
- YiKeJIme DnCK - opTaWa
- Kapton KIIMAfBihBIn DnCKici
- Acynik MaiaaIaNfblIuHxMblc icTey Cypet H:
- XymbictaH KeiH
- ApanacTbipfblw
- A Tkip nbiwa/kaiHaJIbIn TypaTbIH JKeTeKTeH JkapaKaTTaHy Kayni!
- Kyuin kany kayni 6ap!
- Apanactbipfbwnen Kymbcic ictey
- K cypeti:
- HnrpeJeHnHTepMeH TOITbipy
- Cyper K-8:
- Ta3aJay KHe KyTy
- Ha3ap ayadapbIhbl3!
- Heri3ri 6yibIMdbTa3aJaly
- 3NeKtp KyaTbHa Tcy Kayni 6ap!
- blbc nen KypaIbI Ta3aJay
- AcyNilik MaIdaIaNfblbTbI Ta3aJlay
- A ΘTkip nbIwaKaTah XapaKaTTaHy Kayni!
- ApaJaactbIpfbIiHTbI Ta3aJAY
- ΘTkip nbIwaKaTah JkapaKaTTaHy Kayni!
- MaHbI3dbIHyckay:
- CaRTay
- KapaKaTTaHy kayni 6ap!
- CypTe L:
- AkaayIbIKTap opbIH aJFaH XaFdaIJaRbI KEMeK
- MaHbI3dblHyckay:
- AinHaMaIbI TyTKa ap6ip Kymblc KyiHde eHri3inyi KepeK.
- AkaayIbIK
- Uewim
- Akaaylbik
- MaHbI3dblHyckay
- KoIdaHyMbIcIaIapbl
- Shaikafan kijerei
- KymblpTk akybl3bl
- БиCKBNTKaMbIPbI
- Herizri peuert
- Kekcke aphaJFaH kambip
- Herizri pecentr
- Yrilmeni Kambip Herizri pezent
- AusbikTb KaMbp Herizri pecnt
- Kecne KaMbipby Herizri pecent
- HaH kambipbI Herizri peuent
- Maiohe3
- Kokbicka TacTay
- KeniДik wapTapbl
- Kocajkbi kepek-kaKaTap
- aalil
- E
- #
- auiuui 1
- jglal
- jglsl no jalil
- aigall
- yjg jgl
- wulwJgai
- jll jall
- Jaaal 1gale gai
- a
- 1
- GR Greece, Eλας
- HU Magyarorszag, Hungary
- IE Republic of Ireland
- IL Israel
- IN India, Bharat,
- IS Iceland
- IT Italia, Italy
- KZ Kazakhstan, Ka3aKCTAH
- AV SERVICE
- LB Lebanon,
- LT Lietuva, Lithuania
- UAB Emtoservis
- LU Luxembourg
- ME Crna Gora, Montenegro
- PL Polska, Poland
- SA Kingdom Saudi Arabia,
- SE Sverige, Sweden
- SG Singapore, 新加坡
- SI Slovenija, Slovenia
- SK Slovensko, Slovakia
- TR Türkiye, Turkey
- XS Srbija, Serbia
- ZA South Africa
- Thank you for buying a Bosch Home Appliance!
- Looking for help? You'll find it here.
Brand : BOSCH
Model : MUM5934D
Category : Food Processor