
MULTI STILLO CE4497 - Coffee machine SOLAC - Free user manual and instructions
Find the device manual for free MULTI STILLO CE4497 SOLAC in PDF.
| Product type | Multifunction coffee machine (espresso and filter) |
| Brand | Solac |
| Model | MULTI STILLO CE4497 |
| Color | Black / Stainless steel |
| Dimensions (approx.) | 30 x 25 x 35 cm |
| Weight (approx.) | 5 kg |
| Power supply | 220-240 V ~ 50/60 Hz |
| Power (approx.) | 1350 W |
| Water tank capacity | 1.5 L (max) |
| Pump pressure | 15 bars |
| Coffee type | Ground for espresso and filter |
| Main functions | 1 or 2 cups espresso, filter coffee, steam for cappuccino, hot water |
| Display | LED with icons |
| Filter holder | Stainless steel, removable |
| Included filters | 1 cup filter, 2 cup filter, permanent filter for filter coffee |
| Thermal carafe | Included for filter coffee |
| Steam wand | Articulated, cleanable |
| Automatic shut-off | Yes, after inactivity |
| Cleaning and maintenance | Descaling recommended every 6 to 12 weeks depending on water hardness |
| Safety | Shut-off in case of water shortage, overheat protection |
| Accessories | Measuring spoon, filter holder, filters, thermal carafe |
| Warranty | In accordance with current legislation |
| After-sales service | http://solac.com |
Frequently Asked Questions - MULTI STILLO CE4497 SOLAC
User questions about MULTI STILLO CE4497 SOLAC
0 question about this device. Answer the ones you know or ask your own.
Ask a new question about this device
Download the instructions for your Coffee machine in PDF format for free! Find your manual MULTI STILLO CE4497 - SOLAC and take your electronic device back in hand. On this page are published all the documents necessary for the use of your device. MULTI STILLO CE4497 by SOLAC.
USER MANUAL MULTI STILLO CE4497 SOLAC
- Do not use the appliance if its accessories are not properly fitted.
- Do not switch the appliance on without water.
- Do not use the appliance if the on/off switch does not work.
- Do not move the appliance while in use.
- Respect the MAX and MIN levels.
- Disconnect the appliance from the mains when not in use and before undertaking any cleaning task.
- Unplug the appliance from the mains before refilling the water tank.
- Store this appliance out of reach of children and/or persons with physical, sensory or reduced mental or lack of experience and knowledge.
- Do not store the appliance if it is still hot.
- Only use water with the appliance.
- The use of bottled mineral water adapted for human consumption is recommended.
- Never leave the appliance connected and unattended if it is not in use. This saves energy and prolongs the life of the appliance.
- Do not remove the filter holder when coffee is being made, as at that time it is under pressure.
- CAUTION: Water condensation may appear on the surfaces and objects around this appliance.
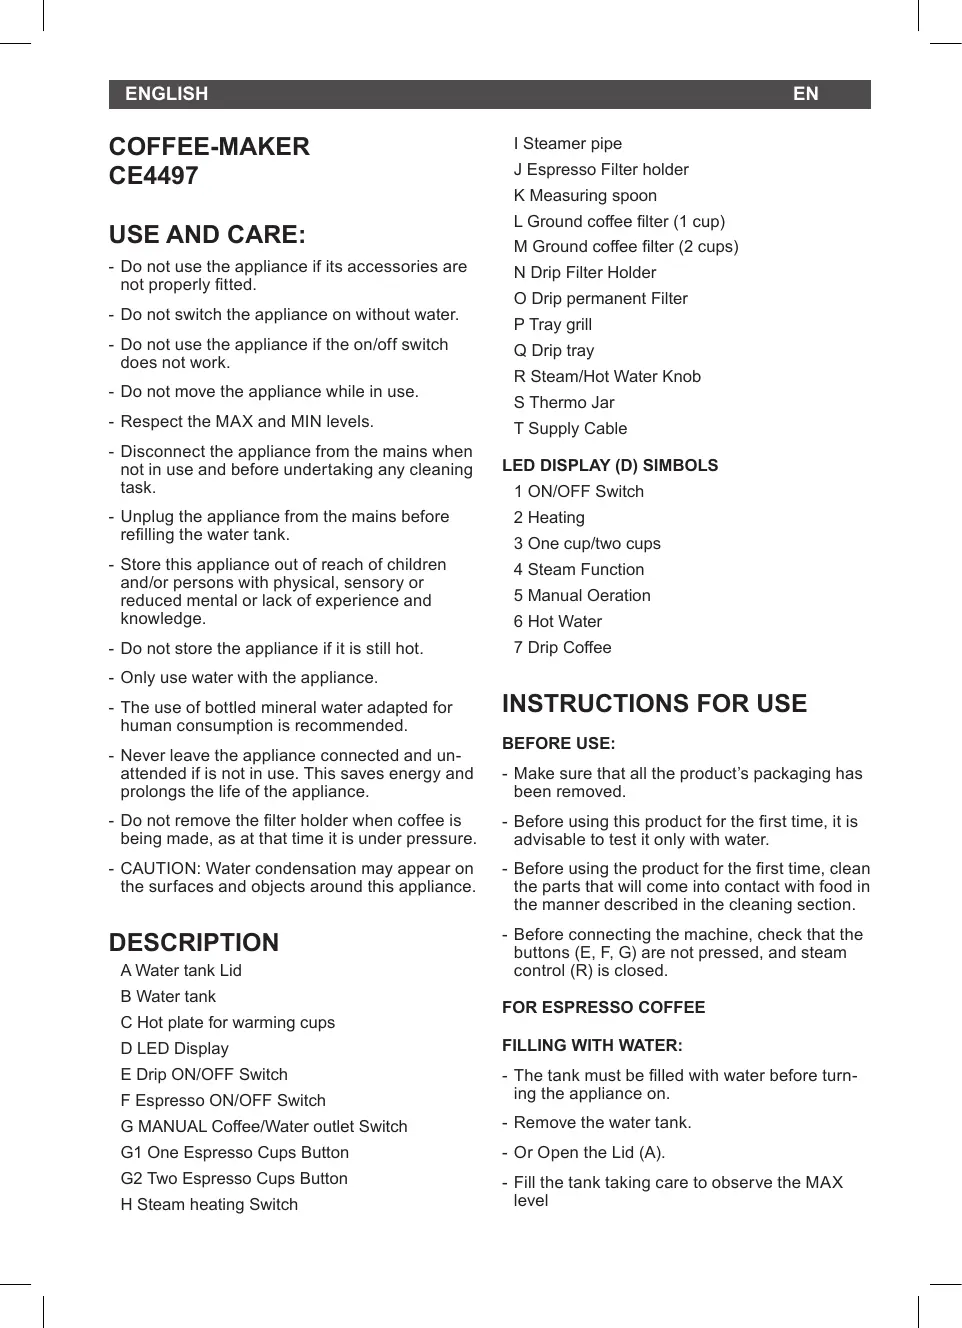
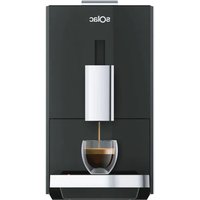
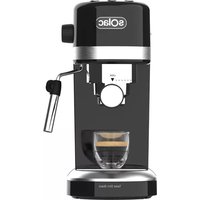
DESCRIPTION
A Water tank Lid
B Water tank
C Hot plate for warming cups
D LED Display
E Drip ON/OFF Switch
F Espresso ON/OFF Switch
G MANUAL Coffee/Water outlet Switch
G1 One Espresso Cups Button
G2 Two Espresso Cups Button
H Steam heating Switch
I Steamer pipe
J Espresso Filter holder
K Measuring spoon
L Ground coffee filter (1 cup)
M Ground coffee filter (2 cups)
N Drip Filter Holder
O Drip permanent Filter
P Tray grill
Q Drip tray
R Steam/Hot Water Knob
S Thermo Jar
T Supply Cable
LED DISPLAY (D) SIMBOLS
1 ON/OFF Switch
2 Heating
3 One cup/two cups
4 Steam Function
5 Manual Oeration
6 Hot Water
7 Drip Coffee
INSTRUCTIONS FOR USE
BEFORE USE:
- Make sure that all the product's packaging has been removed.
- Before using this product for the first time, it is advisable to test it only with water.
- Before using the product for the first time, clean the parts that will come into contact with food in the manner described in the cleaning section.
- Before connecting the machine, check that the buttons (E, F, G) are not pressed, and steam control (R) is closed.
FOR ESPRESSO COFFEE
FILLING WITH WATER:
- The tank must be filled with water before turning the appliance on.
- Remove the water tank.
- Or Open the Lid (A).
-
Fill the tank taking care to observe the MAX level
-
Replace the tank in its housing, ensuring that it is well fitted.
- Close the lid.
FILLING OF COFFEE (FOR ESPRESSO):
- Remove the Espresso filter holder (J).
- Position the ground chosen coffee filter (Ló M) in the filter holder
- We recommend using natural toastcoffee,as using roasted coffee may affect the operation of the machine.
- Fill the removable filter with ground coffee (6 to 7 gr per cup to be prepared).
- If you wish to make 1 coffee, use 1 filter coffee, fill the ladle (1 spoonful) and take the capacity of the measuring spoon as the measure for one coffee.
- For 2 coffees, use 2 cups filter (M), and put in 2 spoonfuls.
- Next lightly press down the ground coffee with the back of the spoon.
- Fit the filter holder in the appliance once more.
- Position the filter holder in the coffee assembly by inserting the assembly downwards and turning it from left to right until it locks.
USE
- In normal use, with primed circuit (See below "Priming Circuit")
- Before connecting the machine, check that the buttons (F, G) are not pressed, and steam control (R) is closed.
- With filled tank as per "Filling with water"
- Connect the appliance to the mains.
- Turn the appliance on using the Espresso on/off switch (F).
- The heating icon (2) will blink on the LED display (D).
- Blinking means it has started to heat up.
- The other icons will be on. (If they were not lit, close the tap control (R) by turning and tightening clockwise)
- When (2) remains fixed, it indicates that it has reached the proper temperature.
- Place one or two pre-heated cups at the filter holder outlet.
-
Press the coffee switch (G1, G2), depending on the cups you want to fill. With G1, coffee will come out to fill 1 cup and with G2, for 2 cups.
-
With G1 a cup from set (3) will flash and with G2, both will flash (from set 3).
- Using G1 and G2 options, coffee will stop automatically.
- You can also press the Manual Operation button (G), and the Manual Operation icon (5) will flash.
- Using Manual option, coffee will come out until you press it (G) again to stop it.
- Once serving has finished, wait a few seconds and remove the cups with the coffee.
- Remove the filter holder and empty the grounds from it.
- Wash the filter holder with running water and dry it well.
- Check that the removable filter is perfectly fitted into the filter holder.
- Fit the filter holder in the appliance once more.
PRIMING THE CIRCUIT
- (Only necessary when first starting, or when for any cause there is not enough water in the circuit)
- Fill the receptacle as per "Filling with water"
- Connect the appliance to the mains.
- Without fitting the filter holder (or with the filter holder fitted, but without coffee), place a recipient under the steam pipe (I).
- Turn the appliance on using the Espresso on/off switch (F).
- Open the steam knob (R) by turning counterclockwise.
- The pump will start working.
- Water will exit through the steam pipe. Wait until approximately one cupful has exited
- To finish serving, close the steam knob (R) by turning clockwise.
- This will complete the priming operation.
OBTAINING STEAM:
- The steam is used to foam milk for cappuccino, and also to heat other liquids.
- With the machine hot, that is, with the Heating Icon (2) fixed (or flashing)
- For Steam, press the Steam heating button (H) and continue heating until the steam temperature has been reached.
-
While heating, the Steam Function Icon (4) will be flashing.
-
That Icon (4) will remain lit, fixed indicating that the water has reached the necessary temperature for generating steam.
- Place a recipient under the steam tube.
- Open Steam knob (R) anticlockwise.
- Steam only will begin to exit.
- When you have enough, close the control and remove the recipient.
MPORTANT
- When you finish doing steam, you must refill the water used to make steam, because the temperature of making steam, is very high, and reduced the water in the boiler. While you refill the boiler, at same time, you get the right temperature (lower) for making coffee.
- To do it, do as per "Getting Hot water"
GETTING HOT WATER:
- Put the device in ON situation, pressing the knob Espresso ON/OFF (F).
- The heating icon (2) will blink on the display (D).
- Blinking means it has started to heat up.
- When (2) remains fixed, it indicates that it has reached the appropriate temperature.
- Place a container under the nozzle.
- Open the steam control (R), turning him to the left, counterclockwise.
- The hot water began to come out of the vaporizer.
- Once obtained the desired amount of hot water.
- Close The turning knob (R) to the right, clockwise.
- The machine will stop supplying water.
FOR DRIP COFFEE
- Make sure there is enough water in the tank.
- Fill the Permanent Filter (O) for drip coffee, using a measuring spoon.
- Use a maximum of 2 spoonful of coffee, not too fine.
- Properly place the Drip Filter Holder (N) with the Drip Filter (O) in the machine.
- Place the thermos jug (S) under the coffee spout.
-
Press the Drip Coffee Switch (E).
-
On Display (D), the Drip Coffee Icon will light up (7).
- The machine will start making coffee.
- When you have finished making coffee, the machine will emit a warning sound 3 times and then the machine will automatically turn off.
- You can take out the thermos jug (S) when the coffee has stopped coming out.
AUTO-OFF FEATURE:
- The SOLAC machines are designed to save energy
- To that end, after some minutes from the last operation, the unit switches to energy saving mode
- To return to normal operation you should just Switch OFF and Switch ON the connect button (F)
ONCE YOU HAVE FINISHED USING THE APPLIANCE:
- Turn the appliance off, using the on/off switch (F) to OFF
- Unplug the appliance to the mains.
- Remove the water from the water tank.
- Clean the appliance
CLEANING
BASIC CLEANING
- Disconnect the appliance from the mains and let it cool before undertaking any cleaning task.
- Clean the equipment with a damp cloth with a few drops of washing-up liquid and then dry.
- Do not use solvents, or products with an acid or base pH such as bleach, or abrasive products, for cleaning the appliance.
- Do not let water or any other liquid get into the air vents to avoid damage to the inner parts of the appliance.
- Neither parts of this appliance are suitable for cleaning in the dishwasher.
- After washing, dry all the parts before fitting them together and storing.
CLEANING THE FROTHING WAND
-
CAUTION! The frothing wand, and frothing sleeve may be VERY HOT.
-
It is recommended to purge and wipe the frothing wand after steaming milk to prevent deposits of dirt and before turning off the machine.
- To do this, pull the frothing sleeve down and clean under warm running water.
- Fill a cup with a bit of water, immerse the frothing wand into the water.
- Drain hot water through the pipe, following the instructions "Obtaining hot water".
- Use a cloth to dry the frothing wand and replace the frothing sleeve.
- In case no steam comes out of the frothing wand, hardened milk blocks its path. Carefully use a needle to loosen the milk residue from the opening of the frothing tip to remove any blockage,
- Once clean, rinse with running water from the tap and reassemble it. Then steam again.
HOW TO DEAL WITH LIME SCALE INCRUSTATIONS:
- For the appliance to work correctly it should be kept free of lime scale or magnesium incrustations caused by the use of hard water.
- To prevent this kind of problem, we recommend the use of water with low lime or magnesium mineralisation.
- However, if it is not possible to use the kind of water recommended above, you should periodically remove the lime scale from the appliance:
- Every 6 weeks if the water is "very hard".
- Every 12 weeks if the water is "hard".
- To do so, we recommend the use of a specific Decal product for this kind of machine which can be found in specialised shops and authorised technical services.
- Homemade solutions are not recommended in the de-scaling of this appliance, such as the use of vinegar.
ANOMALIES AND REPAIR
- If you detect any anomalies, refer to the following table:
| Anomaly | Possible cause | Solutions |
| - Neither water nor steam comes out | - There is no water The water tank is not properly placed. - Heating is not finished | - Fill the water tank - Make sure the tank is properly seated. - Open the steam / water knob for the pump to work - Wait for heating finish, and the Heating Icon (2) stops flashing and stay steady |
| - The machine does not work, with the Hot Water (5) and Steam (4) icons on, but the others not illuminated | - Steam control (R) is not properly closed | - Close the knob clockwise |
| - Water flows out of the side of the holder | - The filterholder is not fitted correctly. - The Edge of the sieve is covered coffee. - The brewing group is dirty. | - see Section "filling coffee" - Clean the sieve around the edge and clean the brewing of coffee group - Clean With a damp cloth. |
| - No coffee comes out | - The filter holes are clogged, the coffee is ground too fine or has been pressed too much | - Empty the filter basket and clean with water. Clean the brewing unit with a damp cloth. Fill the sieve again and press the coffee slightly |
| - The coffee comes out slowly or drop by drop | - The coffee grinding is too fine or too pressed | - Make sure grinding is OK and it's not too pressed. |
| - The coffee comes without cream | - The used Coffee is out of date - The Coffee has not been pressed enough. - the Ground coffee is too coarse. | - Use Fresh coffee and once opened store in an airtight container. Press slightly the coffee. Grind finer the coffee |
| - The coffee comes out too fast | - The ground coffee is too coarse. - There is not enough coffee in the sieve. - The Coffee has not been pressed enough | - Grind coffee finer - Ensure that it's the right amount of coffee in the sieve. - Press slightly the coffee |
| - No steam escapes from the evaporator tube | - The Tube is clogged | - Clean the steam tube with a damp cloth to remove any traces of milk have dried and unblock holes using a needle. Press the corresponding switch and remove "hot water" until it goes out continuously |
| - When making Drip coffee, the coffee overflows over the Filter | - The coffee is too fine or there is too much coffee | - Use a coarser ground - Do not put more than 3 spoonful of ground coffee |
CAFETIÈRE CE4497
UTILISATION ET PRECAUTIONS :
C Surface chauffe tasses
PRODUCTIE VAN HEET WATER:
SYMBOLY LED DISPLEJE (D)
NIEPRAWIDŁOWOSCI I NAPRAWA
LED DISPLEJ (D) SYMBOL
1 Vypinač ON/OFF
2 Ohrievanie
3 Jedna sáltka/dve sáltky
4 Funkcia Para
5 Ručné ovládanie
6 Horúca voda
7 Odkvapkávacia káva
NAVOD NA POUZITIE
PREDPOUZITIM:
G ByToH ,MANUAL "I3TtuaHe Ha KaFe/ Boda
G1 BytoH 1 kaede
G2 ByToH 2 kaPeTa
H Byton 3a 3arpaBaHe Ha npapaTa
I Tpb6a 3a noDaBaHe Ha npa
J Hocau ha qniltbpa ecnpeco
K Dozina Ta bXnca
LJIeKa 3a MJIHo KaFe (1 yaWa)
M Lékka 3a MmnaHo KaΦe (2 yαψι)
N Hocau Ha ueKaTa 3a KaNKoBO noDaBaHe
O Léɪka 3a noctɔrHNo kaɪkoB IOndaBaHe
P PeweTka Ha cbda 3a cbbnpaHe Ha Kaiknte
Q KaKocb6npaa TaBa
R KOnTpOJep „napa/ropeuBa Boda"
S TepMOKaHa
T Ka6eI 3a Cbvp3BaHe KbM MpeKaTa
CIMBOJIN 3A EKPAH LED (D)
1 EbyToH,ON/OFF"
2 3aŋpəBaHe
3 Eda qaa/ Dbe qaun
4 Pekim ,napa"
5PbHNO DeIcTBnE
6 Fopeza Boda
7 Kafe kankonodaBaHe
HACHIN HA YNOTPEBA
3A6EJIEXKNIPEI NYOTPEBA:
- YBepete Ce, Ye CTe OTCpaHnI HAnbJNHO BcKaKbVBuD ONAKObKa Ha ypeJa.
-Ппсдпьрваунотpeба淘汰урда, сппөрөрьчыда се Изллзв eдинстveho c Вoga.
-Преди nда n3норзbaTe eJ.уразда 3a nbpbn NBt,почисте BCNчКЧачТ,ВииЗаши B KOHTAKСхрантENHNTе рюдУкТи,Cлевдай Куьтваима орадел "ПочистсbaHe"
-П配电и BKJIQUBaHTo Ha KaFe-MaUnHaTa, yBepTe ce, ye 6yTOHnTe (E,F,G) Ha ca HATnCHaTn, n Ye KOHTpOJepbT 3a npa (R) He e 3aTBopeH.
3A KAΦE ECΠPECO
Пьлесенс BOДА:
-Ппдддддддддддддддддддддддддддддддддддддддддддддддддддддддддддддддддддддддддддддддддддддддддддддддддддд徳аааааааааааааааааааааааааааааааааааааааааааааааааааааааааааааааааааааааааааааааааааааааааааааааааааа
- ɪnəbaɪtepe3eβpBoaŋeTo O T ypeɪda.
-ИлnotbopeteKanaka.
- HanbJHHePe pe3epBoapYeTo cbc cTyeHa BOa mekdy 03haueHnraTa MAX n MIN
-Пoctabete OTHOBo pe3epBoapyeTo HaЯcto KaTo ce yBepnte, Ye pe3epBoapyeToa e npiIerHan do6pe.
- 3atbopete kanaka.
ПьлHEСКАФES(3AECNPECO)
-ИзbaTeHocaHa uekata3aecnpco(J).
-Пoctabete uedkata 3a JeknaHOTo CMJIHO kafe (L o M)В држача на uedkata.
-Пренирьча сиЗползваеHa ecTeCTBeHo n3пecheноKaфe.ИзпecheноHa orbн Kaфe можеДа nobpeDN MaшиннаТ.
- HanbJnHeTe C MmHaHO KaFe n3BaXdaemata ceIka, (CIOKeTe no 6 do7 r MmHaHO KaFe Ha yaSha).
-Ako JeIaTe Da HanpaBIne 16p. KaFe, 3nOJIb3BaIte ZeIckata 3a 1 KaFe Iro Ha- nblHeTe (1 JbXnUka), B3eMeTe KaTo MApKa 3a 1 KaFe BmecTmOcTTa Hdo3npaUaTa Ta IIbXnUka.
-3a2KaΦeTa n3nOJ3BaIte ceIkaTa 3a 2 KaΦeTa n CIOKTe 2 JbXkUKN.
- Cnéi TOBa, JéKO cBniTe cMnHOTO kaΦe CdbHOTO Ha NbXnUKaTa.
- OTHOBOpnKpeNeTe Ib pKaaHa Na uekKaTa KbM ypea.
-Пoctabete Дьрkaча Н ФиNTьра В komплеска 3а Ксе,КATO ГВарета OTДОЛУ Иго 3авртITE B NOСOKA,IponBONOLOKHA Na淘汰OBHnKOBATA CTpeLJa DOKaTO Г NOCTabNTeNo3uIGN"6bOKupaN".
YNOTPEBA:
-Пиообuaиhaуnotpe6a,pn3axpaHEnKpb(Bnxno-dony:"3axpaHbHeHaKpbra")
-Ппсди BKЛIOUbaHTo Ha KaФe-MaUNHaTа, yBepTe ce, Ye 6yTOHnTe (F, G) Ha ca HATNCHaTn, И Ye KOHTpOJIepbT 3a napa (R) He e 3aTBOpEN
-Припьлелов ВОЕн КОТе� Нер,ВсьOTБETCTBNE C,пьленье CBODа"
-BkIIOUeTe ypeDa B eIeKtpuYeckaTamaMpexa.
- BkIIOUe Te ypea OI pKeBcBaay 3a BkIIOUBAHe/IMKIIIOUBaHe Espanso (F).
- Ha ekpana LED (D) 闪电 CBeTne n3o6paJehneTo 3a 3arpaBahe (2), KaTo npMnRBA.
-ToBa,Ye npimurBa 03nauBa,Ye e 3anOuHaNo Da 3aqrpa.
-Дуг范围内иобрахеня ue ca CBetHaHn.(Ako He ca CBetHaHn 3aTbOpete KOHTpOnePbK pKaH (R),3abTpaKN 3aTatraKN B NOcOKa Ha YacOBHNKObATA CTpeNka).
-Korato(2)npctaHe da TpeNTu TOBa 03HaBa,Ye e IOCTUNHATA Heo6XODImata Tempepatya.
-Пoctabete ДБе пededварпелно 3arpeTNаши НИЗХODа Н.HOCaан ZaEkKaTa.
- Hatachete npekbcbaay3a kaΦe (G1, G2) cnopei 6p0ra ha yauhnte, konTo jxelaeTe da hantbnHte. Ako Hatachete G1 ue n3teue kaΦe 3a hantlbvahe Ha eHa ya; npn G2, 3a dBe yauh.
-AkoHaTnchTeG1,ue3aNoUhe da npMmRbEeHa YaHa oT KOMnIeKca (3), a npu G2 ue 3aNoUHe da npMmRBaT u DBeTe (OT KOMnIeKc 3).
- C nomoueta ha onuun G1 and G2 npocebt 3a npiroTbHe Ha Kahe cnpa abTomuueckn.
- Cbio Taka MoKe Da HATnChTe 6yToH ,PbUHO DeIcTBne" (G). Ⅲe 3aNoUHe Da npMmRBa n3o6paXeHneTO 3a pBuHo DeIcTBne (5).
-ПиТаиOnциЯЗлочиДаИЗТУСКафдOTOraBA,ДOKATO OTHOBHe HATINCHETe (G)6byToHa,3aДагocPte.
- CneI KaTo Kafo Tpe Da n3TuHa, n3aKaaiTe HnKoJIKO cekyHdi, npeDi Da OTterJInTe YaWnte C kafo.
-ИЗвадеТдьржачаHa ueДКаТи Го поис-te OT ИЗПОЛЗВАНОТ Кафe.
- I3mIte DbpxkaHa Ha uekata C ToIIa Boda n ro n3cuywe Te do6pe.
-Пювовете дали n3вждама тцка e noctabeha павино в дьржача 3aцдкata.
-ПрикpenTe OTHOBOДьрkaHa Na ZedkaTa KbM ypeda.
3AXPAHBAHE HA BOJOHANOPHNY Kpbl
- (Ta3n onepaun e Heo6xOdma cmo npn npbPBOTo 3aedcTBaHe Ha ypeDa IJIN KOrato NO KaKBATO n Da 6NJIo pnpuHa BvB BvTpeHnKpBn HMa DoCTaBvHO B0da.)
- HanbJIHHepepeepBoapcTo cB0da, KaTO ce
CTapaete Da He HauXbPJIte O3HaueHneTo 3a paBnIe "MAX".
-BkIIOUye UpeDa B eIeKtpnueckaTa mpeka.
- -Be3 da noctabraye Hocaya Ha uekata (HIn npn noctabeha TakaBA, Ho 63 kaFe), noctabete Cbdkm KpaHa Ha naponoadaTena (I).
- Hatnche TpeKbcbaay Bk#.n3Kn. Espanso (F) n ro noctabete B noJIOXeHne "BKnIooHeo".
- OTBopete KOHTpOJIepa 3a napata (R), KaTo ro 3aBbPITNe B NocOka, O6paTHa Ha YacOBHn-KOBaTa CTpeJIka
-Помпanta如期 ce 3adeiCTBa.
- OT trpbba 3a npapa 3e 3anohe da n3n3a npapa. N3yaKaaiTe, DOKATo N3teue BOda C o6em OKOJ E ENHa YaaHa.
- 3a cnipané Ha noIpaHAneto 3aTbOpTe KOHTpOJIpea 3a npa (R), 3aBbPtaiKn B nocKa ha YacOBHNIKObA tCTpeJka.
- C TOBA e 3aBbPmna onepaunra no 3axpaHBaHe.
ПОЛУСЕВАЕ НА ПAPA:
-ПаразслужизаразинваеHa Mяко 3a KaanyuHNo,И СьюТаКа,ЗаагрЯВаHe Ha Дугп TeUHOCtN.
-Прип толлma машина, t.e. пriн Ненримигваю Или римигваю Изобрахенье 3a 3аграванe (2).
- 3a noJaBaHe Ha napa, HATnCHeTe ByToHa 3a 3aRpaBaHe Ha npa(H). YpeBt Ue npOblnKu Da 3aRpaBA, DOKaTO BbDe OocTnHata TempePaTypata 3a npa.
-Дokato 3a\rpaBa,ИЗобразжениTo „РекIM "napa"(4) ue npMnIFBa.
- Toba n3o6paXeHne (4) ① Με ΚιαHη NoCTOJHNO CBETHaTOnpNi DIOCTUHaNE Ha Heo6xOДмATA 3a NOJyUaBaHé Na Inpa TempePaTypa.
- IocTabete cbln noTp6aTa 3a npa.
- 3abpTeTe KOHTPOIepa 3a npa (R), B nocoKa, obaTHa Ha yacOBHnKOBaTa CTpeJIka.
- Ⅲe 3anoyhe da n3n3a camo npapa.
-Korato NOLyUHe IOCTaTbUHO napa,3aTBopeTe KOHTPONePA U OTTERNE TcBda.
BAXHO!
-Korato npnroTbHeTo Ha napa npnbBpshn, DOnbJIHete BoDaTa, N3PON3BaHa 3a npnroTbHe Ha napa, Tb KaTO TempepaTata 3a nponnpriOTbHe e MHOBO BcOka N BoDaTa B KOTeJueTo HAMJaBA. DoKATO PbJHInTe
KOTeJUeTO NO CbUTo BO BpeMe Ue NOCTnHHeTe IO-HNcKa, NOxOJaTa TEMpePaTypa 3a npI-rotBHe Ha KaΦeTo.
- 3a ueTHaHnpaBte yka3aHOTOB,IIOnyuaBaHe Ha ropeuBa Boda".
ПОЛУЧАВЕН HA ГELSHA BOДA:
- Bклчeteуpeda,kaToHaTиСеTe npeKbCba-ya 3a BклчuaBe/H3KlnuOvaHeEspresso(F).
- Ha ekpana LED (D) 闪电the n3o6paXeHneTo 3a 3arpaBaHe (2), Kato npMnRBA.
-ToBa,Ye npIMrBa 03NaUaBa,Ye e 3aNoUHaJIO da 3aRpaBa.
-Korato (2) octaHe Ha MAcTo, TOBa 03NaUba, Ye e DCtHrHaTHeo6xOdImaTe TMnepaTy- pa. - NocTabete HЯkaKBb CbД NOД naponodateJIa.
- OTBopete perynatopa ha napa (R), 3abptaikn KI HO NAIBO, B NOcOKA, npOTINBOJIOXHa HaacOBHNIKOBATA CTpeJIKA.
- TOnnata Boda Ⅲe 3anOuHe da n3Tnua OT BAnOpn3atopa.
- Cnéi noJiyuBaHaTo Ha JxenHTo KOnUYeCTBO TOnJa BOna.
- 3aTbOpete KOHTponepa (R) KaTo ro 3aBbP-taTe HaJaCHO, B NocOka Ha YacOBHnKOBaTa CTpeNkA.
- MaunhaTcnpa da noDaBa BOna.
3A KAΦE UPE3 KAIKONODABAHE
- Ybepete ce, Ye B pe3epboapa IMa IOCTaTBUHO BOJa.
-ПосpeДСТВOMДОЗИРацATAЛБЖИЧАнНЛ-нетоctяннata zuKDAkafeчpe3 KaNKo-норадаhe(O).
-ИЗнолзайтейн-Много 2 пьжунки кафе (He npekailehoФино CMляно). - NocTaBeTe B MaunHaTa npaBnHOb HocauHa Ha ceKaTa 3a KaKoNoDaBaHe (N) C ceKaTa 3a KaKoNoDaBaHe (O).
-Пoctabete TepmokaHaTa (S) поиЗхoJa 3a Kaafe. - Hatachete npekbcbaya 3a kafe ype3 kaKo-noIaBaHe (E).
- Ha ekpaHa (D) iche CBetHe n3o6paKeHneTo 3a Kaape Ype3 KanKonoDaBaHe (7).
- Maunhata ue 3anoyhe da npabn kafe.
- Cnéi npriroTbHTo Ha KaΦeTo MaunHaTa ige H3dAe TpIKpATHo PDEvPpeNTeHcHHa.
CJIeI KOeTo MaunHaTa 1ue N3rache ABTomaTNUH0.
-MoKeTe Da n3BbDnTe TepMOKaHaTa (S), CneI cnIPAHeTo Ha n3TnUaHETo Ha KaΦeTo.
ФУHKLЯ ABTOMATNUHOr N3KJIIOUBAHE:
- Ypeinte SOLAC ca nporpamipanu Taka, ye da necta t eheprna.
-3a Ta3n ZeI, CJIeN HЯKoIKO MInHyTu,OT N3BbP-WeHaTa Opeaqur, ypeJbT ce camOn3KJIIOuHBa.
-Ako jenaete da ce BbpheTe KbM obuauHaTa pa6oTa ha ypeDa, npocTo cneDbA da n3KIO-HTe/BKIOUHTe nyCKOBn 6yTOH(F)
CJIeI IPINKIOUBAHE HA PABOTATA C YPeDA:
- Cnpete ypeda, kaTo hATncHete 6byToHa 3a nyck/ctOn Ha IIOJKeHne"N3KJIouYBaHe".
-ИЗключeteурдаOTeNEKtpuueckaTAmpeka.
-ИЗтуе Te BoDAТа OT pe3epBoapYeTo.
-Почистусяа.
ПОЧИСТBAHЕ
A. OБИKHOBЕНО ПОЧИNTBAHE
-ИЗклоче урда OT 3axpaHbauata Мржа И Го OCTabete ДА ИЗТинЕ,прдДа пиuctьпптЕ КБМ NOЧТВаHETO MY.
-Почисте урета с влжна Кьрп, наюета с Някову калки мпш пpenapat И пося посушete.
-3a nouchteBaHTo My He n3noJI3BaIte pa3TBOpHTeIN I npenapatn C KInceJIInHeN IINOCHOBEN pH qakTop, KaTO BeJIInHa N a6pa3NBHN PPOdykTN.
- He donyckaite npohkbaHeTo Ha Boda nIIN dpyra TeuHcOt npe3 BeHTnlaauHOHHte OTBOp n, 3a da n36BerHeTe NobpeiB paobothnte Yactn BBb BbTpewHocT Ta H ypea.
-He ce donycka koaTo n da e qact OT to3n ypeI da 6bde n3MnBaHa B cbdomnlaHa MaunHa.
-Подсушete BCNчки части пешида crлоби te n CBxpanHTe ypeda.
B. NOUICTBAHE HA NAPONODATEJIA
-BHIMAHHE!БbTeTe n3KnHouTteJHO BHIMaTeHN, TbKaTO qACTNeHa napOnoDaTeJI MoKe Da ce OKaxkAT CnHNo HaRopeuEHI.
-Прешидя ИЗКИЧУТЕ Машинна,Tпрорьча ceда поочитete napоюдаацataТрба
Cnei nprirotbHTo Ha napata C cIeI da I3-6berheTe HacJIarBaHTo Ha HeuCTOTnI.
-3a ceIra n3BaIeTe KaIbΦa Ha napoIpaTeJIa.
-ПoctabeteчасиЗвеснгКоИчecТВ BOda IOI Tpb6aTЯЯ NOTOneTe NOI BODa.
-Пуснete ropeша Вда npe3Трбараз,кato cJIeДВate yka3aHЯТа "Получаване на ТОппа Вда".
-Подсушete cbc cyx napcaJIи NOCTabete OTHOBOKaIbФa.
-Bcnya,Ye He n3nna npa,Toba moke da CeDbNkna HToBa,Ye nXoDbTe 3anyuHen CbC n3cbxHaNo MJIko.B TaKbB cnya BnMaTeIHO n3PON3BaJte BOda,3a Da OTnyuHtE NaKpaHnKa Ha napOnOdaTeJ.
- Cnéд кato ro поиспге, Измініte стуаша BOДа и ro поставе OTHOB. Подаіті па OTHOB
OBPABOTKA HA KOTJIEHN KAMbK:
-3a da 6bnde nbHNoeHna pa6oTaHa hypeDa, no Hero He 6nBa Da nMa OTnaraHnA O T Bap NIN MarHe3N, NOnyabaun Ce ot ynpTe6a Ha BOda C BnCOKA TBbpDocT.
-3a da npedotbpaTte To3n npo6Jem, npenopbUbame Bn Da n3noJ3BaTe BOda C hNcKOcbDbpKaHne Ha BapOBuK NJI MArHe3NI.
-BbnpeknTOBA,akoHeeBb3MOXHOI3NOJ3-BAHEToHa npenOpbUaHnO-rope BnD BOda, Tp6Ba Da npncTbInTe KbM nepNoOnuHaTa 06pa6OTKa HyePa 3a HaMaJIaBaHe Ha KOTJeHnT KaMbK,C nepNoOnuHcOT OT:
-6ceMnucn,akoBoDaTaeC BncoKa TBbpOCT.
- 12 ceMnucn, aKo BOaTa e TBbpda.
-3a ueINa npenOpbUBaMe da ce n3noI3Ba npoDyKT npOTNb KOTnEH KAMbK 3a TO3n BVd ypei. PnpapaTb c npOdaB CpeuHaJIzIpaHn Maar3HH N OTOp3nIPaHnTe cepBn3.
- He ce npenopbubat domaunpa3TbOpn, taKa KaKTo n3non3BaHEnoHa oUe Tprn o6pa60KaTa 3a npemaxbaHEno Ha KaJIuN OYpeDa.
HEN3ПРABHOCTN I PEMOHT
-Bcnyaay,ye3a6eJekTe HEn3npabHocT, HanpaBeTe cnpaBka CbC cJeHaTa Ta6nua:
| Helen npabnoctn | Възможна р�чиna | Рeшени |
| - He n3tua nito boda, nto npapa | - Нama boda - Контейнерчесу вордае noctabeho npabnilho. - 3a rapiвано he e npesc-tahano. | - Налейte boda в В контейнера. - Поверетe, дали pezerboapчесу до obpe noctabeho. - Отворетe kohtponepera 3a napa/BOda, 3a da може nomnata da kabotи. - Изчakайte zatravbahefo до npectanee, и n3obpaxenieto 3a zatravbahe (2)(npctanee da trpeni n octane He noodvnkno. |
| - Мшинatable ne rabotni pri scbentahlii n3obpaxenhya 3a ropeza boda (5) in npapa(4), korato dpyrmite He ca ocbeteni. | - КонтPORpbT 3a npapa (R) He e 3atbopen npabnilho | - 3aTbOpTe KOHTponepera, kaTo ro 3aBbPntite B noCOKaHa uacOBnIKOBATA cTrpeIka. |
| - Otrstpanu ha noctabVkata 3a Фпгьра. | - ПocstabKata Na Фпгьра He e noctaben npabnilho. - По рбба на kancheto Ima hacnoeNo Kape. - KomplcksbT 3a noDabAne Ha Kape e 3ambpcen. | - Разледаite pa3delen "Пьлende c Kape" - Почистетe рьба на kancheto и посstete 6lOKa 3a noDabAne Ha Kape. - Почистетe CBnajna KBypna. |
| - He n3tua kafe | - OTrbOPite Ha Kaucheto sa 3aunyeshu, 3bprnata kaFe ca npekalneho cHt-Ho cMJIeHи iIN kaFeTo e npekalneho npecobao. | - Изралдоте kaucheto и посstete c BoDA. Почистетe CBnajna KaPbna 6lOKa 3a n3nyc-kanhe Ha KaPe. HanbIhete OTHO BO Kaucheto n npecobaiTe leko KaFeTo. |
| - KaFeTo n3tina 3abHNO, nTO kaNka no KaNka. | - KaFeTo e npekalneho cHTHO cMJIaHNo, iIN ppe-kalneho npecobao. | - Yberete ce, ye 3bprnata sa cMJIeHи do pod-xodЯш pa3mep Ha qactmiiTe, a cbsoич KaFeTo He e 6bHIO npecobao n npekalneho. |
| - KaFe n3tina, Ho 6e3 kaIMak. | - Изралдоте kaFeTo c cnpocpoeha roJNDoct iIN ce e i3cuynilno. - KaFeTo He e doCTaTBuHNo npecobao. - KaFeTo e cMJIaHNo Ha npekalneho roJelmi chactniz. | - Изралдоте kaFeTo b cspok Ha roJNDoct. CpeIOTbparayeho Ha onakobkata, cbxpanjabaiTe KaFeTo B xermetnueH cbd. - ПовераяITE duObe KaFeTo. -Сmjetete kaFeTo do no-ФinH nuctnzi. |
| - KaFeTo n3tua npekalne- Ho 6bP30. | - KaFeTo e cMJIaHNo Ha npekalneho roJelmi chactniz. - B kaChyeto He e npoctabe-Ho doCTaTBuHNo KaPe. - KaFeTo He e doCTaTBuHNo npecobao. | -Сmjetete kaFeTo do no-ФinH nuctnzi. - Yberete ce, ye cte noCTabuHIn TOUHOTO KolniyeCTBO KaFe B KaCHetO. - ПовераяITE no-dobpe KaFeTo. |
| - Ot naponodabaasata trb6a He n3tina napa. | - Tpb6a t e 3aDpBCTena. | - Почистетe naponodabaasata trb6a c BlaJXHa KBypna, 3a da OTCTpaHnite Bb3MOxHn 3acXHnAI NCTaTBuNi MJIko, сеД Koeto npokapaiTe OTHO BO OTBopitE c NOMOuTa Na ngla. HATsCHete CSbOTBETNH npeKbCBau n n3tOHe "ropeuca BOda",doKATO zanOchne da n3tINA nocTOnHINO n cBc Cnla. |
| -При пiroтвянын KaFeч re3 kaKonoDABaHne KaFeTo npeliva npe3 uekata | - KaFeTo e npekalneho cHTHO iIN iMa npekalne- HO mHOro KaFe. | - Изралдотe no-EdpocmLnHo KaFe. - He noCTabaiTe nobeve ot 3 nbjxuKn CMJIHO KaFe |
CAFETIERA CE4497
UTILIZARE Şİ INGRIJIRE:
SIBBOLURI (D) ECRAN LED
1 Intrerupator ON/OFF (PORNIRE/OPRIRE)
2 Incalzire
3 O ceasca/doua cesti
4 Functie pentru aburi
5 Operatiune manua
6 Apa fierbinte
7 Cafea prin picurare
INSTRUCTION DE UTILIZARE
INAINTE DE UTILIZARE:
PENTRU CAFEA ESPRESSO
INTRODUCEREA CAFELEI (PENTRU ESPRESSO):
J. J. J. J. J. J. J. J. J. J. J. J. J. J. J. J. J. J. J. J. J. J. J. J. J. J. J. J. J. J. J. J. J. J. J. J. J. J. J. J. J. J. J. J. J. J. J. J. J. J. J.
.(2)jIaIJIaIbIgIgJgJgJgJgJgJgJgJgJgJgJgJgJgJgJgJgJgJgJgJgJgJgJgJgJgJgJgJgJgJgJgJgJgJgJgJgJgJgJgJgJgJgJgJgJg
.1JgU JgUauu aJyUaJyUaJyUaJyUaJyUaJyUaJyUaJyUaJyUaJyUaJyUaJyUaJyUaJyUaJyUaJyUaJyUaJyUaJyUaJyUaJyUaJyUaJyUaJyUaJyUaJyU
.1JdUgulooIcog 20
p a
J 1000000000000000000000000000000000000000000000000
.ogai jai (j3)ai aaii 0j,ai ai a
"jolll 161 jg200" 34 j1u glo la Jusl. u
:JluuUcU 1
.(F) gssy! sylly/ jzdyu ySoll paie dc bdoally uug jzglal Jz
.(D) aLalgl gaooglu (Y) jauuui dgi
aolilb oolal 0g 11
360^ = 25
. aLwJyIaIgolJySc JyIyOyIyUdG.R) yIyIyIyIyIy
.
jLwI sbl jz aJbIaI aJy JgJooJI yoe -
.1LJWJzJc0jIg jnJyJyJyJyJyJyJyJyJyJy
a11dujgjsd1y1uag
nabuI ogai I
.1201 13 14 15 16 17 18 19 20 21 22
ydaia aaoa oiaowu wog (O) yabiluy ogayu uJU
- 10 2. 10 3. 10 4. 10
. djd (O) jzill gao go woull Jswy (N) jzill cawl lolo
.ogall yoo (S) uoojjg
lalal jalal lalal yolll aolal yolll aolal yolll 100000000000000000000000000
.(F)JusaaJJJusog/JusgawuLcLaJssallJusaaJI Jdsasall
jIJIJIJIJIJIJIJIJIJIJIJIJIJIJIJIJIJIJIJIJIJIJIJIJIJIJIJIJIJIJIJIJIJIJIJIJIJIJIJIJIJIJIJIJIJIJIJIJIJIJIJIJIJIJIJIJIJIJIJIJIJIJIJIJIJIJIJIJIJIJIJIJIJIJIJIJIJIJIJIJIJIJIJIJIJIJIJIJIJIJIJIJIJIJIJIJIJIJIJIJIJ
(R) jolly sall o1g (G g E f) jjll d jolll jolll
gnuu!ogg yauo
:clb1
jglal jzai jdzj 1000
joll joljoll
| x - 2| = | y - 3|
MIN MAX (s)
aall 1500000000000000000000000000000000000000
1
a 1 a a a a a a a a a a a a a a a a a a a a a a a a a a a a a a a a a a a a a
This product enjoys the recognition and protection of the legal guarantee in accordance with current legislation. To enforce your rights or interests you must go to any of our official technical assistance services.
You can find the closest one by accessing the following web link: http://solac.com
You can also request related information by contacting us by phone.
You can download this instruction manual and its updates at http://solac.com
DE) GARANTIE UND TECHNIS-CHER SERVICE
Unit 25 & 26, San Croy Office Park, Die Agora Road, Croydon, Kempton Park, 1619
Johannesburg
(+27) 0113925652

sOlac
what we do, we do well
Espanol / ES
English/EN
Français / FR
Deutsch / DE
Portugues / PT
Italiano / IT
Català / CAT
Nederlandsl/NL
Cesky / CS
Polski/PL
Slovenský / SK
Magyar/HU
6bIrapck / BG
Româna / RO
/AR
- DESCRIPTION
- LED DISPLAY (D) SIMBOLS
- INSTRUCTIONS FOR USE
- BEFORE USE:
- FOR ESPRESSO COFFEE
- FILLING WITH WATER:
- FILLING OF COFFEE (FOR ESPRESSO):
- USE
- PRIMING THE CIRCUIT
- OBTAINING STEAM:
- MPORTANT
- GETTING HOT WATER:
- FOR DRIP COFFEE
- AUTO-OFF FEATURE:
- ONCE YOU HAVE FINISHED USING THE APPLIANCE:
- CLEANING
- BASIC CLEANING
- CLEANING THE FROTHING WAND
- HOW TO DEAL WITH LIME SCALE INCRUSTATIONS:
- ANOMALIES AND REPAIR
- CAFETIÈRE CE4497
- UTILISATION ET PRECAUTIONS :
- PRODUCTIE VAN HEET WATER:
- SYMBOLY LED DISPLEJE (D)
- NIEPRAWIDŁOWOSCI I NAPRAWA
- LED DISPLEJ (D) SYMBOL
- NAVOD NA POUZITIE
- PREDPOUZITIM:
- CIMBOJIN 3A EKPAH LED (D)
- HACHIN HA YNOTPEBA
- 3A6EJIEXKNIPEI NYOTPEBA:
- 3A KAΦE ECΠPECO
- Пьлесенс BOДА:
- ПьлHEСКАФES(3AECNPECO)
- YNOTPEBA:
- 3AXPAHBAHE HA BOJOHANOPHNY Kpbl
- ПОЛУСЕВАЕ НА ПAPA:
- BAXHO!
- ПОЛУЧАВЕН HA ГELSHA BOДA:
- 3A KAΦE UPE3 KAIKONODABAHE
- ФУHKLЯ ABTOMATNUHOr N3KJIIOUBAHE:
- CJIeI IPINKIOUBAHE HA PABOTATA C YPeDA:
- ПОЧИСТBAHЕ
- OБИKHOBЕНО ПОЧИNTBAHE
- NOUICTBAHE HA NAPONODATEJIA
- OBPABOTKA HA KOTJIEHN KAMbK:
- HEN3ПРABHOCTN I PEMOHT
- CAFETIERA CE4497
- UTILIZARE Şİ INGRIJIRE:
- SIBBOLURI (D) ECRAN LED
- INSTRUCTION DE UTILIZARE
- INAINTE DE UTILIZARE:
- PENTRU CAFEA ESPRESSO
- INTRODUCEREA CAFELEI (PENTRU ESPRESSO):
- DE) GARANTIE UND TECHNIS-CHER SERVICE
- sOlac
Brand : SOLAC
Model : MULTI STILLO CE4497
Category : Coffee machine