
CRUISE - Kitchen hood ELICA - Free user manual and instructions
Find the device manual for free CRUISE ELICA in PDF.




| Product type | Cooker hood |
| Brand | Elica |
| Model | CRUISE |
| Use version | External evacuation or recirculation (active charcoal filter) |
| Power supply | 220-240 V ~ 50 Hz |
| Maximum lighting power | 2 x 20 W max (halogen G4, 12 V) |
| Number of motor speeds | 4 (including 1 timed intensive speed) |
| Controls | Push buttons: light on/off, motor on/off, speed increase/decrease |
| Display | Yes, displays speed and filter maintenance indicators |
| Grease filter saturation indicator | Yes, after 40 hours of use (flashing "1") |
| Charcoal filter saturation indicator | Yes, after 160 hours of use (flashing "2"), can be activated in recirculation mode |
| Temperature alarm | Yes, activates motor at speed 3 if excessive temperature (flashing "t" display) |
| Grease filter type | Metal, dishwasher safe (gentle cycle) or hand washable |
| Charcoal filter type (recirculation) | Washable (every 2 months) or non-washable (replacement max every 4 months) |
| Minimum safety distance | 50 cm for electric hob, 65 cm for gas or mixed hob |
| Exhaust duct diameter | Same as connection flange diameter (not supplied) |
| Installation type | Wall-mounted or under cabinet (depending on configuration) |
| Regular maintenance | Monthly exterior and interior cleaning, degreasing of grease filters |
| Weight | Approx. 10-15 kg (estimate) |
Frequently Asked Questions - CRUISE ELICA
User questions about CRUISE ELICA
0 question about this device. Answer the ones you know or ask your own.
Ask a new question about this device
Download the instructions for your Kitchen hood in PDF format for free! Find your manual CRUISE - ELICA and take your electronic device back in hand. On this page are published all the documents necessary for the use of your device. CRUISE by ELICA.
USER MANUAL CRUISE ELICA
EN - Instruction on mounting and use
Closely follow the instructions set out in this manual. All responsibility, for any eventual inconveniences, damages or fires caused by not complying with the instructions in this manual, is declined. The extractor hood has been designed exclusively for domestic use.
The hood can look different to that illustrated in the drawings in this booklet. The instructions for use, maintenance and installation, however, remain the same.
It is important to conserve this booklet for consultation at any moment. In the case of sale, cession or move, make sure it is together with the product. ! Read the instructions carefully: there is important information about installation, use and safety. ! Do not carry out electrical or mechanical variations on the product or on the discharge conduits.
Note: the elements marked with the symbol (*) are optional accessories supplied only with some models or elements to purchase, not supplied.

Caution
WARNING! Do not connect the appliance to the mains until the installation is fully complete.
Before any cleaning or maintenance operation, disconnect hood from the mains by removing the plug or disconnecting the mains electrical supply.
Always wear work gloves for all installation and maintenance operations.
The appliance is not intended for use by children or persons with impaired physical, sensorial or mental faculties, or if lacking in experience or knowledge, unless they are under supervision or have been trained in the use of the appliance by a person responsible for their safety.
This appliance is designed to be operated by adults, children should be monitored to ensure that they do not play with the appliance.
This appliance is designed to be operated by adults. Children should not be allowed to tamper with the controls or play with the appliance.
Never use the hood without effectively mounted grating!
The hood must NEVER be used as a support surface unless specifically indicated.
The premises where the appliance is installed must be sufficiently ventilated, when the kitchen hood is used together with other gas combustion devices or other fuels.
The ducting system for this appliance must not be connected to any existing ventilation system which is being used for any other purpose such as discharging exhaust fumes from appliances burning gas or other fuels.
The flaming of foods beneath the hood itself is severely prohibited.
The use of exposed flames is detrimental to the filters and may cause a fire risk, and must therefore be avoided in all circumstances.
Any frying must be done with care in order to make sure that the oil does not overheat and ignite.
Accessible parts of the hood may become hot when used with
cooking appliance.
With regards to the technical and safety measures to be adopted for fume discharging it is important to closely follow the regulations provided by the local authorities.
The hood must be regularly cleaned on both the inside and outside (AT LEAST ONCE A MONTH).
This must be completed in accordance with the maintenance instructions provided in this manual). Failure to follow the instructions provided in this user guide regarding the cleaning of the hood and filters will lead to the risk of fires.
Do not use or leave the hood without the lamp correctly mounted due to the possible risk of electric shocks.
We will not accept any responsibility for any faults, damage or fires caused to the appliance as a result of the non-observance of the instructions included in this manual.
This appliance is marked according to the European directive 2002/96/EC on Waste Electrical and Electronic Equipment (WEEE). By ensuring this product is disposed of correctly, you will help prevent potential negative consequences for the environment and human health, which could otherwise be caused by inappropriate waste handling of this product.

The symbol on the product, or on the documents accompanying the product, indicates that this appliance may not be treated as household waste. Instead it should be taken to the appropriate collection point for the recycling of electrical and electronic equipment. Disposal must be carried out in accordance with local environmental regulations for waste disposal.
For further detailed information regarding the process, collection and recycling of this product, please contact the appropriate department of your local authorities or the local department for household waste or the shop where you purchased this product.
Use
The hood is designed to be used either for exhausting or filter version.

Ducting version
In this case the fumes are conveyed outside of the building by means of a special pipe connected with the connection ring located on top of the hood.
Attention! The exhausting pipe is not supplied and must be purchased apart.
Diameter of the exhausting pipe must be equal to that of the connection ring.
In the horizontal runs the exhausting pipe must be slightly slanted (about 10° ) and directed upwards to vent the air easily from the room to the outside.
Attention! If the hood is supplied with active charcoal filter, then it must be removed.
Connect the hood and discharge holes on the walls with a diameter equivalent to the air outlet (connection flange).
Using the tubes and discharge holes on walls with smaller dimensions will cause a diminution of the suction performance and a drastic increase in noise.
Any responsibility in the matter is therefore declined.
Use a duct of the minimum indispensable length. ! Use a duct with as few elbows as possible (maximum elbow angle: 90° ). ! Avoid drastic changes in the duct cross-section. Use a duct with an as smooth as possible inside. The duct must be made of certified material.

Filter version
One active charcoal filter is needed for this and can be obtained from your usual retailer.
The filter removes the grease and smells from the extracted air before sending it back into the room through the upper outlet grid.
The models with no suction motor only operate in ducting mode, and must be connected to an external suction device (not supplied).
The connecting instructions are supplied with the peripheral suction unit.
Installation
The minimum distance between the supporting surface for the cooking equipment on the hob and the lowest part of the range hood must be not less than 50 cm from electric cookers and 65 cm from gas or mixed cookers.
If the instructions for installation for the gas hob specify a greater distance, this must be adhered to.

Electrical connection
The mains power supply must correspond to the rating indicated on the plate situated inside the hood. If provided with a plug, connect the hood to a socket in compliance with current regulations and positioned in an accessible area, after installation. If it is not fitted with a plug (direct mains connection) or if the plug is not located in an accessible area, after installation, apply a double pole switch in accordance with standards which assures the complete disconnection of the mains under conditions relating to over-current category III, in accordance with installation instructions.
Warning! Before re-connecting the hood circuit to the mains supply and checking the efficient function, always check that the mains cable is correctly assembled.
The hood is provided with a special power cable; if the cable is damaged, request a new one from Technical Service.
Mounting
Before beginning installation:
- Check that the product purchased is of a suitable size for the chosen installation area.
- To facilitate installation, remove the fat filters and the
other parts allowed and described here, dismantle and mount it.
To remove see also the relative paragraphs.
- Remove the active carbon (*) filter/s if supplied (see also relative paragraph). This/these is/are to be mounted only if you want to use the hood in the filtering version.
- Check (for transport reasons) that there is no other supplied material inside the hood (e.g. packets with screws, guarantees, etc.), eventually removing them and keeping them.
- If possible, disconnect and move freestanding or slide-in range from cabinet opening to provide easier access to rear wall/ceiling. Otherwise put a thick, protective covering over countertop, cooktop or range to protect from damage and debris. Select a flat surface for assembling the unit. Cover that surface with a protective covering and place all canopy hood parts and hardware in it.
- In addition check whether near the installation area of the hood (in the area accessible also with the hood mounted) an electric socket is available and it is possible to connect a fumes discharge device to the outside (only suction version).
- Carry out all the masonry work necessary (e.g. installation of an electric socket and/or a hole for the passage of the discharge tube).
Expansion wall plugs are provided to secure the hood to most types of walls/ceilings. However, a qualified technician must verify suitability of the materials in accordance with the type of wall/ceiling. The wall/ceiling must be strong enough to take the weight of the hood. Do not tile, grout or silicone this appliance to the wall. Surface mounting only.
Operation
Use the high suction speed in cases of concentrated kitchen vapours. It is recommended that the cooker hood suction is switched on for 5 minutes prior to cooking and to leave in operation during cooking and for another 15 minutes approximately after terminating cooking.
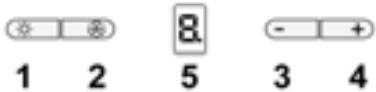
1. Lights ON/OFF
- Motor ON/OFF
When key "2" is pressed the motor passes to speed 1. If the key is pressed during working, the hood passes to OFF state.
- Speed decrease
When key "3" is pressed the speed decreases from 4 (intense) to 1.
- Speed increase
When key "4" is pressed with the hood in OFF state, the hood passes to speed 1.
If the key is pressed during working, the speed increases from 1 to 4 (intense).
The intense speed is timed. The standard timing is 5 minutes, at the end of which the hood sets at speed 2.
To deactivate the function before the end of the time, press key "3", the hood sets at speed 3, when key "2" is pressed the hood turns off.
A signal on the display corresponds to each speed:
OFF: No signal Speed 1:1 Speed 2:2 Speed 3:3 Speed 4: 4 flashing
5. Display
Grease filter signalling
The grease filter is signalled by the display with number 1 flashing after 40 hours of use.
This means that the grease filter needs to be washed.
The signalling is visible with the hood in ON state.
To eliminate the grease filter signalling, press key "2" for more than 3 seconds, until it turns off.
The signalling can be eliminated with the hood in ON state.
Carbon filter signalling (only for filtering version)
The carbon filter is signalled by the display with number 2 flashing after 160 hours of use.
This means that the grease filter installed must be replaced.
The signalling is visible with the hood in ON state.
To eliminate the carbon filter signalling, press key "2" for more than 3 seconds, until it turns off.
The signalling can be eliminated with the hood in ON state.
In case both filters are signalled at the same time, numbers 1 and 2 flash on the display alternately.
The signalling can be reset by carrying out the above-described procedure twice.
First it resets the grease filter signalling, then the carbon filter signalling.
In the standard mode the carbon filter signalling is not active.
In case the filtering version hood is used, it is necessary to enable the carbon filter signalling.
Activation of carbon filter signalling:
Set the hood to OFF and keep keys "2" and "3" pressed contemporaneously for 3 seconds.
Numbers 1 and 2 flash alternately for 2 seconds.
Deactivation of carbon filter signalling:
Set the hood to OFF and keep keys "2" and "3" pressed contemporaneously for 3 seconds.
Number 1 flashes for 2 seconds.
Temperature Alarm
The hood is equipped with a temperature sensor which activates the motor at speed 3 in case the temperature in the display zone is too high.
The alarm condition is indicated by the display with the letter t flashing.
This condition remains as such until the temperature falls
below the alarm threshold.
This mode can be quit by pressing key "2", "3" or "4".
Every 30 the sensor checks the ambient temperature of the display zone.
Display Symbols
| Symbol | State |
| 1 | Speed 1 |
| 2 | Speed 2 |
| 3 | Speed 3 |
| 4 | Speed 4 (intense) |
| 5 | Grease filter maintenance |
| 6 | Carbon filter maintenance |
| 7 | Grease filter and carbon filter maintenance |
| 8 | Temperature Alarm |
Maintenance
ATTENTION! Before performing any maintenance operation, isolate the hood from the electrical supply by switching off at the connector and removing the connector fuse.
Or if the appliance has been connected through a plug and socket, then the plug must be removed from the socket.
Cleaning
The cooker hood should be cleaned regularly (at least with the same frequency with which you carry out maintenance of the fat filters) internally and externally. Clean using the cloth dampened with neutral liquid detergent. Do not use abrasive products. DO NOT USE ALCOHOL!
WARNING: Failure to carry out the basic cleaning recommendations of the cooker hood and replacement of the filters may cause fire risks.
Therefore, we recommend observing these instructions.
The manufacturer declines all responsibility for any damage to the motor or any fire damage linked to inappropriate maintenance or failure to observe the above safety recommendations.
Grease filter
Traps cooking grease particles.
This must be cleaned once a month (or when the filter saturation indication system - if envisaged on the model in possession - indicates this necessity) using non-aggressive detergents, either by hand or in the dishwasher, which must be set to a low temperature and a short cycle.
When washed in a dishwasher, the grease filter may discolour slightly, but this does not affect its filtering capacity.
To remove the grease filter, pull the spring release handle.
Fig. 11-28
Charcoal filter (filter version only)
Fig. 27
It absorbs unpleasant odours caused by cooking.
The activated charcoal filter can be one of these types:
- Washable activated charcoal filter.
- Non-washable activated charcoal filter.
Washable activated charcoal filter
The charcoal filter can be washed once every two months using hot water and a suitable detergent, or in a dishwasher at 65°C (if the dishwasher is used, select the full cycle function and leave dishes out).
Eliminate excess water without damaging the filter, then remove the mattress located inside the plastic frame and put it in the oven for 10 minutes at 100°C to dry completely.
Replace the mattress every 3 years and when the cloth is damaged.
Non-washable activated charcoal filter
The saturation of the charcoal filter occurs after more or less prolonged use, depending on the type of cooking and the regularity of cleaning of the grease filter.
In any case, it is necessary to replace the cartridge at least every four months.
The charcoal filter may NOT be washed or regenerated.
Assembly
Hook the charcoal filter at the back on the metal tongue of the hood first, then on the front with the two knobs.
Disassembly
Remove the charcoal filter by turning the knobs fixing it to the hood by 90 degrees.
Replacing lamps
Fig. 29
Disconnect the hood from the electricity.
Warning! Prior to touching the light bulbs, ensure they are cooled down.
- Using a flat head screwdriver or equivalent tool, carefully pry loose the light cover.
- Remove the damaged light and replace with a new 12 Volt, 20 Watt (Maximum) halogen light made for a G-4 base suitable for use in open luminaires. Follow package directions and do not touch new light with bare hands.
- Reinstall the light cover. (It will snap shut.)
If the lights do not work, make sure that the lamps are fitted properly into their housings before you call for technical assistance.
The saturation of the carbon filter occurs after a few minutes, and the man is able to do so. The man's name is a man of Italian origin, who has been in the house for many years. He is also a good man, but he does not have time to be with him.
Before starting installation:
He octabnne Detey 63 npncmotpa, YTObO Hn He nrgpnn C npnbopom.
He nCnoJIb3yIte BbITaKky, ecIn peWetka HnPaBnIbHo CMOHTnPoBaHa!
Kateropnueckn 3anpeuetaTcNcnoIb3ObaTb BbITaJKyB KaueCTBe ONOPHON PIOCKoCTN,ecn3TO CNEuaJIbHO He OROBOpeHO.
Oe6ceyte HaIeKaun Bo3DyXoo6MeH NomeuHn, KOrDa BbIcNoJIb3yIe BbITaKky B KxHHe OJHpeMeHHo C DpyrMn npIbOpamCra30BbIM CkIgAHHem INI C PNTAHm DpyrMn ropUHMN.
BbITrnaembBo3dyHe DoJnKeH BbI6pcBaTbCn Hapyky uepe3 Bo3dyXOBOD,NCIObn3yeMbn DnBbIbOca DmOB OT np6obopcBra3OBbIM CxNtAHMe Mnn C nHTaHMe Dpymnm ropUQHM.
Kateropuueckn 3anpeaetcra roTOBn6bHoa "noi pIamHeM"POCKoJIbky CBO6OdHoe PIIaM MoKeT NOBpeINbФIbTpbl nCTaT npUHHoN noXapa; N03tOMy, BO3depKJBaiTeCb OT 3TOR B LIO6om clyuee.
KapeHbe B 60JIbWOM KOJNUeCTBe MacJa DOJIKHO npOn3BOuNTbcra IOI NOCTOARHHbIM KOHTPOJeM, IMeB BVNu, yTO nepepeToe MACIO MOKET BOcTIaMeHrAryc.
PnncnoJIb3OBoAHm BmEcTe C npOuHMn annapataMn IJRABKn,OTKpbIbIe Yactn npN6opa MOrY cINbHO HArpeBaTbc. 1To Kacaetc TexNHueckx MeP nUCOBn NO TexHKe 6Be3onacNoCTn npOTbOE dblMOB,TO npNepKNaBteCb CTporo npABin, npEycMOptEHbIX pERnAmETOM MeCTHbIX KOMNETHTbX BnActE.
Ipon3BODInTe nepnoDnueckyUOChTky BbITJkN KAK BHyTpN, TaK n ChapyKn (IO KPAHNEI MEPE PA3 B MECJIU, BdaJIHTn C coBNoDeHNem ycNoBm, KOToPbIE cneuaNbHO npEduCMOTpeHb INHCTpyKunrNo 06cNpyKnbAHHo DaHnHO np6bopa).
Heco6IHOeHHe IHCTpyKuI No OChTke BbITaKKn I no 3aMeHe N OChTke fNtBtPOB MoKET CTaTB PnUHHO NOXapa. He nCIOJIb3yIte N He OCTaJIte BeITaRkky Be3 npAunIbHo yCTAHOBIIeHHbIX JAMIOueK B CBy3N C BO3MOXHbIM PNCKOM yDAPA 3NeKTPNueCeKIM TOKOM.
Mblchimaem C c6eBcKky OTOBTBCTBEHOCt 3a HeNoIaJkn, yUepnCropaHne pNbopa BCNECTBHe HecobJIOJeHna HCHTpyKlpi, pNbBeDEHHbIX B DAHNOM pyKOBOcCTBe.
This product is marked in accordance with the European Directive 2002/96/EC on waste electrical and electronic equipment (WEEE).
By ensuring proper disposal of this product, you will help prevent potential negative consequences for the environment and human health, which could otherwise occur due to inappropriate handling.

The symbol on the product or its accompanying documentation indicates that this product must not be treated as household waste. Instead, it should be handed over to the appropriate collection point for the recycling of electrical and electronic equipment.
Disposal must be carried out in accordance with local regulations for waste disposal.
For more detailed information on the treatment, recycling, and disposal of this product, please contact your local authorities, the waste disposal service, or the store where you purchased the product.
The hood is designed for operation in the air extraction mode, drawing air out of the room.
Installation with air exhaust duct
In this mode, the hood expels air to the outside through a flexible duct connected to the connecting ring.
The diameter of the exhaust duct must match the diameter of the connecting ring.
Attention! The exhaust duct is not included in the delivery and must be purchased separately.
The horizontal part of the duct should be slightly inclined upwards (about 10 degrees) so that the air
can exit more quickly. If the hood is equipped with a charcoal filter, make sure
to connect the hood to the exhaust duct with a diameter corresponding to the air outlet opening (connecting flange).
Installing ducts with a smaller diameter will reduce the suction power of the air and sharply increase the noise level.
The manufacturer is not responsible for the above.
Use the pipe with the minimum necessary length. Use the pipe with the fewest bends (maximum bend angle: 90°). Avoid sharp changes in the pipe section. The inner surface of the pipe used must be as smooth as possible. The pipe material must be rigid, according to standards.

Exhaust with air
Press the "4" button with the switch in the OFF state, the switch will go to speed 1.
Press the button during operation, increasing the speed and from speed 1 we go to speed 4 (intensive).
The intensive speed is programmed over time. Standard programming is 5', after this time the switch switches to speed 2. To disable this function, it is necessary to press the "3" button before the time elapses, the switch switches to speed 3, pressing the "2" button, the switch turns off.
Each speed corresponds to its own signal on the display:
OFF: no signal
Speed 1: 1
Speed 2: 2
Speed 3: 3
Speed 4: 4 flashing
- Display
Filter signal
The filter signal turns on after 40 hours of use of the hood, the display starts flashing L1.
When the carbon filter alarm appears, it is necessary to replace it.
The alarm is activated when the hood is switched on.
To reset the carbon filter alarm, press and hold the "2" button for more than 3 seconds.
Until the alarm turns off.
The alarm is deactivated when the hood is switched on.
Carbon filter alarm (only for models with recirculation of air)
The carbon filter alarm is activated after 160 hours of use of the hood. The display starts to flash.
When the carbon filter alarm appears, it is necessary to replace it.
The alarm is activated when the hood is switched on.
To reset the carbon filter alarm, press and hold the "2" button for more than 3 seconds until the alarm turns off.
The alarm is deactivated when the hood is switched on.
If the alarms of both filters are activated simultaneously, the display will show the symbols 1 and 2 alternately.
To reset the alarms, perform the above procedure twice.
The first time resets the carbon filter alarm, the second time resets the carbon filter alarm.
In standard mode, the carbon filter alarm is not activated.
The hood uses a filter in conjunction with the air recirculation, it is necessary to activate the carbon filter signal.
Activating the carbon filter signal:
Turn the hood OFF and hold the "2" and "3" buttons simultaneously for 3 seconds.
The signal will flash 2 times.
Deactivating the carbon filter signal:
Turn the hood OFF and hold the "2" and "3" buttons simultaneously for 3 seconds.
The signal will flash 2 times.
Temperature increase alarm
The hood is equipped with a temperature sensor that activates the motor at speed 3 if the temperature near the hob is too high.
The alarm is indicated by the display showing the letter "t".
The alarm state remains until the temperature drops below the alarm activation level.
To exit this mode, press the "2", "3" or "4" button.
Every 30 seconds, the sensor measures the ambient temperature near the hob.
Display indications
Retains grease particles coming from cooking.
Filter for SPDU ET... (If your model has this, indicate the need for it). Do not use aggressive agents, manually or in a dishwasher at low temperature and in an economical cycle.
Rinsing in a dishwasher may cause some discoloration of the filter retaining the dirt, but its filtering characteristics remain absolutely unchanged.
Do not use or leave the aspirator without properly installed filters! Danger of electric shock!
We do not accept any liability for damage, defects, or fire caused by failure to follow these instructions.
The manufacturer's liability is excluded in the following cases:
- European Directive 2002/96/EC
- Waste Electrical and Electronic Equipment (WEEE).
Make sure that this product has been recycled properly, in accordance with the requirements for environmental protection and your health.

Refer to the product documentation or the product itself to confirm that this product should not be treated as household waste, but must be disposed of at a designated collection point for recycling of electrical and electronic equipment. Consult your local regulations for waste processing. For more information on the disposal, collection, and recycling of this product, please contact your local authorities, the household waste collection service, or the store where you purchased this product.
Use
The aspirator is intended for: suction and removal of dust and filter air, as well as for recycling.

Aspiration
The dust container is emptied by means of an air hose connected to the vacuum cleaner. The diameter of the air hose must match the diameter of the vacuum cleaner. Attention! The air hose is not included.
The appliance has been purchased for heating.
In the horizontal part, the pipe must be slightly inclined upwards (about 10°) to facilitate the removal of air upwards.
If the appliance is equipped with an active carbon filter, the filter must be removed.
Connect the appliance to the air exhaust pipe and open the vent. The diameter of the pipe must correspond to the diameter of the connection flange for air exhaust.
Connecting to the air exhaust pipe and vent with the help of a diameter reducer may increase noise and reduce performance.
In this case, the manufacturer accepts no responsibility.
Use pipes with the necessary cross-section. Use pipes with as few bends as possible (maximum bend angle: 90°; do not sharply bend the pipes!). Use pipes with as smooth an inner surface as possible. The material from which the pipes are made must comply with the standards.

Filter version
The extracted air is filtered and purified before being returned to the room. To use the appliance in this mode of operation, you must install a complete filter system on the base of the active carbon filter.
Models without extraction motor are intended for operation only in the extraction version and must be connected to a central extraction unit, which is purchased separately.
Instructions for connection are provided together with the central extraction unit.
Installation
The minimum distance between the surface on which the cooking appliances are placed and the lowest part of the kitchen extractor must be not less than 50 cm for electric cookers and not less than 65 cm for gas or combined cookers.
If the instructions for the gas cooking appliances specify a greater distance, this must be taken into account.

Electrical connection
Connect the appliance to the mains in accordance with the data on the rating plate, supplied by the manufacturer. If it is fitted with a plug, connect it to a suitable socket. If it is not fitted with a plug (direct connection to the mains), or if the plug is not in a suitable position, proceed with the installation of the plug.
When connecting, use a two-pole switch with a contact gap of at least 3 mm, so that the appliance can be completely disconnected from the mains when installing, in accordance with the installation rules.
Warning! Before connecting the appliance to the mains and checking that it functions correctly, check that it has been installed as required.
Appliances fitted with a plug for connection; if the plug is damaged, contact the after-sales service to obtain a new one.
INSTALLATION
Before proceeding with installation:
Make sure that the product you have purchased corresponds in size to the chosen installation location. To facilitate installation, we recommend that you temporarily remove the filters for grease and odours, and any loose parts.
Place the appliance in the installation position.
For the start of installation, see the relevant paragraph.
- Remove the filters/grease filters with the activated carbon filter (if your model is equipped with them). To do this, follow the operations in the relevant paragraph. Refit the filters only if you intend to use the appliance in the filtering version.
- Make sure that during transport the internal parts of the appliance have not been damaged by loose objects, such as screws, warranty cards, etc. If you find any, remove them and dispose of them. If possible, move and reposition any furniture that is in the immediate vicinity of the installation location. This will give you better access to the wall or cabinet where the installation will take place. In any case, be careful not to damage the furniture and any other objects during installation. Choose a flat surface and cover it with a suitable cloth, on which to place the appliance and its accessories.
- Make sure that near the installation location there is an easily accessible electrical outlet and that it is possible to connect the appliance to the mains (only for the suction versions).
- Perform all necessary operations, such as installing the appliance. Connect the electrical outlet or make the hole for the passage of the inlet pipe. The appliance is equipped with a suitable outlet for discharging the air from the walls or cabinets.
For all this, we recommend that you consult a qualified technician to ensure that the supplied accessories are suitable for the installation. The wall, according to the cabinet, must be able to support the weight of the appliance.
Start of use
If the appliance is switched on, it will operate at maximum mode. It is recommended to turn on the aspirator 5 minutes before cooking and to let it run for about 15 minutes after switching off.
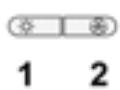

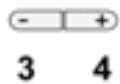
1. ON/OFF Light
2. ON/OFF Motor
Pressing button "2" starts the aspirator at the first speed.
Pressing the button again during operation of the aspirator switches it off (returns to OFF mode).
3. Speed decrease
Pressing button "3" decreases the operating speed, from the fourth speed (intensive) the aspirator switches to the first speed.
4. Speed increase
Pressing button "4" in OFF position starts the aspirator at the first speed.
Pressing the button during operation of the aspirator increases the speed and switches from the first to the fourth speed (intensive).
The intensive speed is limited to an operating interval, which is automatically set to 5 minutes, after which the aspirator switches to the second speed.
To deactivate this function before the set time, press button "3", the aspirator switches to the third speed. Pressing button "2" switches off the aspirator.
When activating each speed, the corresponding indicators light up on the display:
OFF: no indicator is lit
Speed 1: 1
Speed No 2:2
Speed No 3:3
Speed No 4: 4 times
5. Operation
Oil filter indicator
The oil filter indicator is activated every 40 hours of operation as the number 1 appears on the display, which reminds you to replace it.
When this warning appears, the oil filter must be replaced.
The warning appears when the vacuum cleaners are switched on (in position ON).
To reset the warning from the display, press button "2" and hold it for about 3 seconds until the warning disappears.
The warning can be reset when the vacuum cleaners are switched on (in position ON).
Filter indicator active carbon (only for active carbon filter versions)
The active carbon filter indicator is activated every 160 hours of operation as the number 2 appears on the display, which reminds you to replace it.
When this warning appears, the active carbon filter must be replaced.
The warning appears when the vacuum cleaners are switched on (in position ON).
To reset the warning from the display, press button "2" and hold it for about 3 seconds until the warning disappears.
The device can be switched on when the aspirator is switched on (in position ON).
When simultaneously pressing the buttons for switching the filter above the display, signals 1 and 2 are sent sequentially.
The filling is done by pressing the burner procedure twice.
After the burner procedure for the first time, the carbon filter for odors is activated, and after the second time, the filter with active carbon is activated.
In standard operating mode, the carbon filter with active carbon is not activated.
If you use the aspirator in the version with filtration, you must activate the carbon filter with active carbon.
Activating the carbon filter with active carbon:
Switch off the aspirator (position OFF), press buttons "2" and "3" and hold for 3 seconds.
Signals 1 and 2 will not be sent sequentially for 2 seconds.
Deactivating the carbon filter with active carbon:
Switch off the aspirator (position OFF), press buttons "2" and "3" and hold for 3 seconds.
Signal 1 will not be sent for 2 seconds.
Temperature alarm
The aspirator is equipped with a temperature sensor that activates the motor at 3 speeds in case the temperature in the display area is too high.
In this case, the display will show the letter "T", which will not disappear until the temperature drops to acceptable values.
Make sure to turn the knob to position "2", "3" or "4".
At all times, the temperature in the appliance is monitored.
Cleaning the appliance
| Изпсван Върх диспег | Състори Бьл Бьл Бьл Бьл Бьл Бьл Бьл Бьл Бьл Бьл Бьл Бьл Бьл Бьл Бьл Бьл Бьл Бьл Бьл Бьл Бьл Бьл Бьл Бьл Бьл Бьр Бьр Бьр Бьр Бьр Бьр Бьр Бьр Бьр Бьр Бьр Бьр Бьр Бьр Бьр Бьр Бьр Бьр Бьр Бьр Бьр Бьр Бьр Бьр Бьр Бьл Бьл Бьл Бьл Бьл Бьл Бьл Бьл Бьл Бьл Бьл Бьл Бьл Бьл Бьл Бьл Бьл Бьл Бьл Бьл Бьл Бьл Бьл Бьл Бьц Бьц Бьц Бьц Бьц Бьц Бьц Бьц Бьц Бьц Бьц Бьц Бьц Бьц Бьц Бьц Бьц Бьц Бьц Бьц Бьц Бьц Бьц Бьц Бьц Бь- Бь- Бь- Бь- Бь- Бь- Бь- Бь- Бь- Бь- Бь- Бь- Бь- Бь- Бь- Бь- Бь- Бь- Бь- Бь- Бь- Бь- Бь- Бь- Бь- Бь- Бь- Бь- Бь- Бь- Бь- Бь- Бь- Бь- B B B B B B B B B B B B B B B B B B B B B B B B B B B B B B B B B B B B B B B B B B B B B B B B B B B |
Defrosting
Warning! Before cleaning or servicing the appliance, disconnect it from the power supply. Also, remove the food and shelves or drawers.
Cleaning
The appliance should be cleaned regularly (at least once a month), as well as whenever it is dirty. Use a soft cloth and neutral cleaning agents.
Avoid abrasive cleaners that contain abrasive particles.
Warning! Never clean with a steam cleaner!
Warning! Failure to follow the cleaning instructions for the appliance and the replacement of the filters may result in fire. Follow the instructions strictly!
No liability is accepted for any damage to the motor or fire caused by improper defrosting or failure to follow these instructions.
Grease filter
The grease filter filters the grease particles released during cooking.
It should be cleaned every month or when the filter saturation indicator shows it (if your model is equipped with such an indicator).
Use a mild detergent and cleaning agents, and clean the filter in the dishwasher, but at a low temperature and a short washing cycle.
The filter for the washing machine can be cleaned, but this in no way limits its filtering capabilities.
To clean the filter, remove the cap with the mechanism.
Fig.11-28
Active carbon filter (for filter version)
Fig.27
Check the gaskets, which are removed when cleaning.
There are two types of active carbon filters:
Active carbon filter, disposable. Active carbon filter, reusable.
Reusable active carbon filter
The active carbon filter must be replaced every 6 months with hot water and suitable detergents in the washing machine at 65°C (remove the detergent drawer, the washing machine does not need to have other laundry).
Rinse the filter thoroughly, remove the holder from the plastic frame and leave it for 10 minutes at 100°C to dry completely.
The holder must be replaced every 3 years or when you notice it is damaged.
Reusable active carbon filters
The active carbon filter is activated approximately after the first period of use, depending on the water hardness and how often you use the filter.
In any case, it is necessary to replace the active carbon filter every 6 months or when the filter clogging indicator shows that it is necessary.
This manual must be read again.
Mounting
The filter is active. Before mounting, the rear side of the aspirator must be aligned with the mounting surface, and the mounting holes must be drilled.
Demounting
The filter with active carbon is mounted by turning it 90 degrees to the mounting holes, which are located on the aspirator.
Replacing the lamp cover
Fig. 29
Disconnect the device from the mains.
Warning! Before you take the lamp cover in your hands, check that it has cooled down.
- Using a small screwdriver or similar tool, remove the clips on the cover. 2. Replace the burnt-out lamp.
Use only 12V, max 20W G4 halogen lamps, and make sure not to touch the glass.
- Close the cover (press it until it clicks).
If the lamp does not light, check that it is mounted correctly before contacting a specialist.
OFF: No signal
Speed 1:1
Speed 2:2
Speed 3:3
DO NOT USE ALCOHOL!


- EN - INSTRUCTION ON MOUNTING AND USE
- CAUTION
- USE
- DUCTING VERSION
- FILTER VERSION
- INSTALLATION
- ELECTRICAL CONNECTION
- MOUNTING
- OPERATION
- LIGHTS ON/OFF
- DISPLAY
- GREASE FILTER SIGNALLING
- CARBON FILTER SIGNALLING (ONLY FOR FILTERING VERSION)
- ACTIVATION OF CARBON FILTER SIGNALLING
- DEACTIVATION OF CARBON FILTER SIGNALLING
- TEMPERATURE ALARM
- DISPLAY SYMBOLS
- MAINTENANCE
- CLEANING
- GREASE FILTER
- TRAPS COOKING GREASE PARTICLES
- CHARCOAL FILTER (FILTER VERSION ONLY)
- WASHABLE ACTIVATED CHARCOAL FILTER
- NON-WASHABLE ACTIVATED CHARCOAL FILTER
- REPLACING LAMPS
- BEFORE STARTING INSTALLATION
- INSTALLATION WITH AIR EXHAUST DUCT
- EXHAUST WITH AIR
- FILTER SIGNAL
- CARBON FILTER ALARM (ONLY FOR MODELS WITH RECIRCULATION OF AIR)
- ACTIVATING THE CARBON FILTER SIGNAL
- TEMPERATURE INCREASE ALARM
- DISPLAY INDICATIONS
- RETAINS GREASE PARTICLES COMING FROM COOKING
- ASPIRATION
- BEFORE PROCEEDING WITH INSTALLATION
- START OF USE
- ON/OFF LIGHT
- ON/OFF MOTOR
- SPEED DECREASE
- SPEED INCREASE
- OIL FILTER INDICATOR
- FILTER INDICATOR ACTIVE CARBON (ONLY FOR ACTIVE CARBON FILTER VERSIONS)
- ACTIVATING THE CARBON FILTER WITH ACTIVE CARBON
- DEACTIVATING THE CARBON FILTER WITH ACTIVE CARBON
- CLEANING THE APPLIANCE
- DEFROSTING
- WARNING! NEVER CLEAN WITH A STEAM CLEANER
- ACTIVE CARBON FILTER (FOR FILTER VERSION)
- REUSABLE ACTIVE CARBON FILTER
- REUSABLE ACTIVE CARBON FILTERS
- DEMOUNTING
- REPLACING THE LAMP COVER
- DO NOT USE ALCOHOL
Brand : ELICA
Model : CRUISE
Category : Kitchen hood