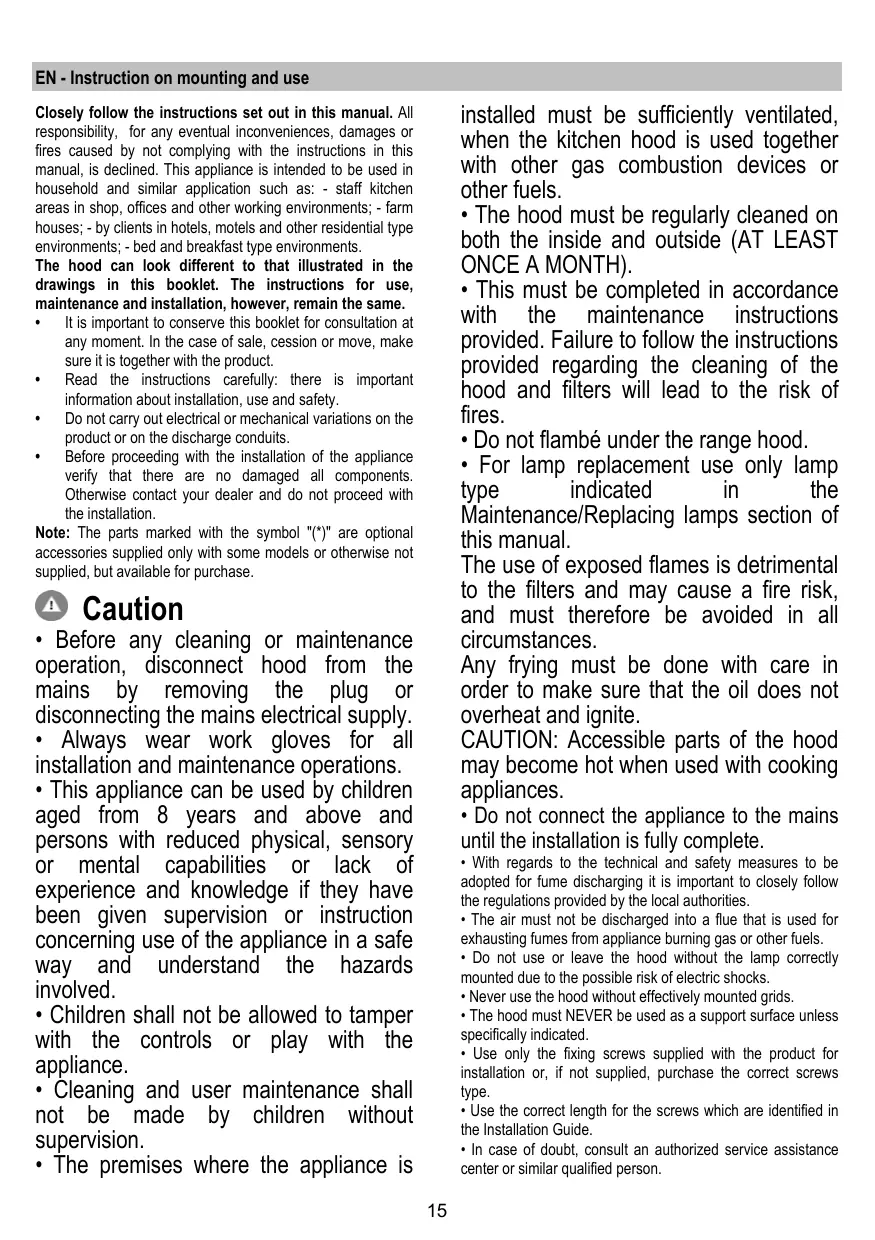
USER MANUAL WISE ELICA
EN Instruction on mounting and use
Closely follow the instructions set out in this manual. All responsibility, for any eventual inconveniences, damages or fires caused by not complying with the instructions in this manual, is declined. This appliance is intended to be used in household and similar applications such as: - staff kitchen areas in shops, offices and other working environments; - farm houses; - by clients in hotels, motels and other residential type environments; - bed and breakfast type environments.
The hood can look different to that illustrated in the drawings in this booklet. The instructions for use, maintenance and installation, however, remain the same.
It is important to conserve this booklet for consultation at any moment. In the case of sale, cession or move, make sure it is together with the product. - Read the instructions carefully: there is important information about installation, use and safety. - Do not carry out electrical or mechanical variations on the product or on the discharge conduits. - Before proceeding with the installation of the appliance verify that there are no damaged all components. Otherwise contact your dealer and do not proceed with the installation.
Note: The parts marked with the symbol "(^)" are optional accessories supplied only with some models or otherwise not supplied, but available for purchase.
Caution
- Before any cleaning or maintenance operation, disconnect hood from the mains by removing the plug or disconnecting the mains electrical supply.
- Always wear work gloves for all installation and maintenance operations.
- This appliance can be used by children aged from 8 years and above and persons with reduced physical, sensory or mental capabilities or lack of experience and knowledge if they have been given supervision or instruction concerning use of the appliance in a safe way and understand the hazards involved.
- Children shall not be allowed to tamper with the controls or play with the appliance.
- Cleaning and user maintenance shall not be made by children without supervision.
- The premises where the appliance is
installed must be sufficiently ventilated, when the kitchen hood is used together with other gas combustion devices or other fuels.
- The hood must be regularly cleaned on both the inside and outside (AT LEAST ONCE A MONTH).
- This must be completed in accordance with the maintenance instructions provided. Failure to follow the instructions provided regarding the cleaning of the hood and filters will lead to the risk of fires.
- Do not flambe under the range hood.
- For lamp replacement use only lamp type indicated in the Maintenance/Replacing lamps section of this manual.
The use of exposed flames is detrimental to the filters and may cause a fire risk, and must therefore be avoided in all circumstances.
Any frying must be done with care in order to make sure that the oil does not overheat and ignite.
CAUTION: Accessible parts of the hood may become hot when used with cooking appliances.
- Do not connect the appliance to the mains until the installation is fully complete.
- With regards to the technical and safety measures to be adopted for fume discharging it is important to closely follow the regulations provided by the local authorities.
- The air must not be discharged into a flue that is used for exhausting fumes from appliance burning gas or other fuels.
- Do not use or leave the hood without the lamp correctly mounted due to the possible risk of electric shocks.
- Never use the hood without effectively mounted grids.
- The hood must NEVER be used as a support surface unless specifically indicated.
- Use only the fixing screws supplied with the product for installation or, if not supplied, purchase the correct screws type.
- Use the correct length for the screws which are identified in the Installation Guide.
- In case of doubt, consult an authorized service assistance center or similar qualified person.
WARNING!
- Failure to install the screws or fixing device in accordance with these instructions may result in electrical hazards.
- Do not use with a programmer, timer, separate remote control system or any other device that switches on automatically.
- This appliance is marked according to the European directive 2012/19/EC on Waste Electrical and Electronic Equipment (WEEE).
- By ensuring this product is disposed of correctly, you will help prevent potential negative consequences for the environment and human health, which could otherwise be caused by inappropriate waste handling of this product.

- The symbol on the product, or on the documents accompanying the product, indicates that this appliance may not be treated as household waste. Instead it should be taken to the appropriate collection point for the recycling of electrical and electronic equipment. Disposal must be carried out in accordance with local environmental regulations for waste disposal.
- For further detailed information regarding the process, collection and recycling of this product, please contact the appropriate department of your local authorities or the local department for household waste or the shop where you purchased this product.
Appliance designed, tested and manufactured according to:
- Safety: EN/IEC 60335-1; EN/IEC 60335-2-31, EN/IEC 62233. Performance: EN/IEC 61591; ISO 5167-1; ISO 5167-3; ISO 5168; EN/IEC 60704-1; EN/IEC 60704-2-13; EN/IEC 60704-3; ISO 3741; EN 50564; IEC 62301.
- EMC: EN 55014-1; CISPR 14-1; EN 55014-2; CISPR 14-2; EN/IEC 61000-3-2; EN/IEC 61000-3-3. Suggestions for a correct use in order to reduce the environmental impact: Switch ON the hood at minimum speed when you start cooking and keep it running for a few minutes after cooking is finished. Increase the speed only in case of large amount of smoke and vapor and use boost speed(s) only in extreme situations. Replace the charcoal filter(s) when necessary to maintain a good odor reduction efficiency. Clean the grease filter(s) when necessary to maintain a good grease filter efficiency. Use the maximum diameter of the ducting system indicated in this manual to optimize efficiency and minimize noise.
Use
The hood is conceived for the suction of cooking fumes and steam and is destined only for domestic use.
The hood is designed to be used either for exhausting or filter version.

In this case, the fumes are conveyed outside the building by means of a special pipe connected to the connection ring located on top of the hood.
CAUTION!
The exhaust pipe is not supplied and must be purchased separately.
The diameter of the exhaust pipe must be equal to that of the connection ring.
CAUTION!
If the hood is supplied with an active charcoal filter, it must be removed.
Connect the hood and the discharge holes on the walls with a diameter equivalent to the air outlet (connection flange).
Using tubes and discharge holes on walls with smaller dimensions will cause a reduction in suction performance and a drastic increase in noise.
Any responsibility in this matter is therefore declined.
Use a duct of the minimum indispensable length. Use a duct with as few elbows as possible (maximum elbow angle: 90°). Avoid drastic changes in the duct cross-section.

Filtration version
The aspirated air will be degreased and deodorised before being fed back into the room.
In order to use the hood in this version, you have to install an additional filtering system based on activated charcoal.
Installation
The minimum distance between the supporting surface for the cooking equipment on the hob and the lowest part of the range hood must be not less than 55 cm from electric cookers and 70 cm from gas or mixed cookers.
If the instructions for installation for the gas hob specify a greater distance, this must be adhered to.
As described in the installation drawings, perform 6 holes (8 mm diameter, 40 mm deep) in the positions shown in the drilling template to fix the hood support bracket and the exhaust flue. After installation, check that the hood and exhaust flue are perfectly aligned.
The range hood is intended to be installed over a hob having 6 heating elements.
! Electrical connection
The mains power supply must correspond to the rating indicated on the plate situated inside the hood. If provided with a plug, connect the hood to a socket in compliance with current regulations and positioned in an accessible area after installation. If it is not fitted with a plug (direct mains connection) or if the plug is not located in an accessible area after
installation, apply a double pole switch in accordance with standards which assures the complete disconnection of the mains under conditions relating to over-current category III, in accordance with installation instructions.
WARNING!
Before re-connecting the hood circuit to the mains supply and checking the efficient function, always check that the mains cable is correctly assembled.
Warning! If the supply cord is damaged, it must be replaced by the manufacturer, its service agent or similarly qualified persons in order to avoid hazard.
Mounting
Before beginning installation:
- Check that the product purchased is of a suitable size for the chosen installation area.
- Remove the charcoal (*) filter/s if supplied (see also relative paragraph). This/these is/are to be mounted only if you want to use the hood in the filtering version.
- Check (for transport reasons) that there is no other supplied material inside the hood (e.g. packets with screws ( ), guarantees ( ), etc.), eventually removing them and keeping them.
Expansion wall plugs are provided to secure the hood to most types of walls/ceilings. However, a qualified technician must verify suitability of the materials in accordance with the type of wall/ceiling. The wall/ceiling must be strong enough to take the weight of the hood.
Do not tile, grout or silicone this appliance to the wall. Surface mounting only.
Operation
Model with 5-key keyboard
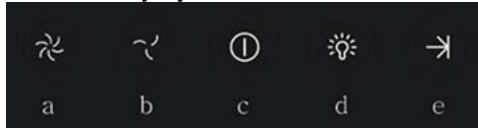
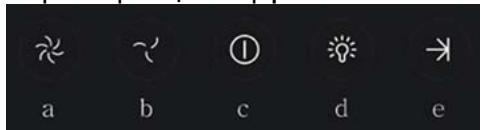
To select the functions of the hood, simply touch the commands:
a. Button to increase suction speed (power):
Suction speed (power) 1
Suction speed (power) 2
Suction speed (power) 3
Note: suction speed (power) 3 is timed, after approximately 5 minutes the hood returns to suction speed (power) 2.
b. Button to decrease suction speed (power). c. Button ON/OFF hood d. Button ON/OFF lighting e. Button ON/OFF programmed switching off: it programs switching off of the active suction speed (power) after approximately 3 minutes.
Models with mechanical control panel
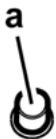
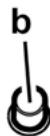


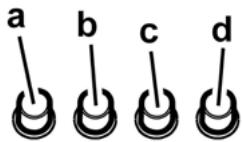
a. ON/OFF light switch b. Speed 1/OFF switch c. 2-speed selection d. 3-speed selection
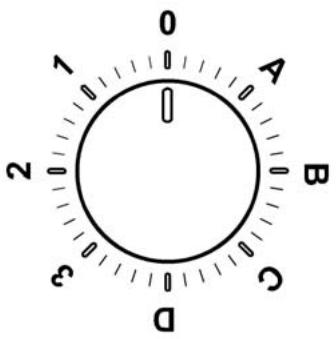
Models with knob
a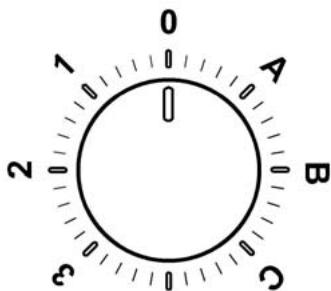
| 0 | OFF |
| 1 | Speed 1
Light OFF |
| 2 | Speed 1
Light OFF |
| 3 | Speed 1
Light OFF |
| A | Light ON |
| B | Speed 1
Light ON |
| C | Speed 1
Light ON |
| D | Speed 1
Light ON |
To select the functions of the hood just touch the commands.

Light key ON/OFF

Intensive speed selection key (suction power) - duration 5 minutes: the hood sets this power and at the end of the 5 minutes returns to the previous setting.

High-speed selection key (suction power).

Medium-speed selection key (suction power) - when flashing it indicates the need to wash or replace the carbon filter. This signal is normally deactivated. To activate the alarm, disable the electronic by pressing the 0 button for 3 seconds.
Next, simultaneously press buttons 1 and 2 for 3 seconds; at first, only button 1 will flash, then both buttons 1 and 2 will flash to indicate activation. Repeat the procedure to deactivate the alarm; at first buttons 1 and 2 will flash and subsequently only button 1 to indicate deactivation.

Low-speed selection key (suction power) -- when flashing it indicates the need to wash the fats filter.

Motor key OFF (stand by) - excludes the electronics - reset wash/replace filters signals. MOTOR OFF
Press briefly to switch the motor off.
RESET FILTERS SIGNALS
In functioning mode, after carrying out filter maintenance, press the key until hearing the sound signal. The flashing LED 1 (grease filter) or 2 (carbon filter) stops flashing.
EXCLUDING THE ELECTRONICS
Press the key for 3 seconds. The hood command electronics will be excluded.
This function can be useful during the product cleaning operations.
Just repeat the operation to reinsert the electronics.
If the hood fails to operate correctly, briefly disconnect it from the mains power supply for almost 5 sec. by pulling out the plug. Then plug it in again and try once more before contacting the Technical Assistance Service.
Maintenance
Cleaning
Clean using ONLY a cloth dampened with neutral liquid detergent. DO NOT CLEAN WITH TOOLS OR INSTRUMENTS. Do not use abrasive products. DO NOT USE ALCOHOL!
Grease filter
Fig. 11
Traps cooking grease particles.
The grease filter must be cleaned once a month using non aggressive detergents, either by hand or in the dishwasher, which must be set to a low temperature and a short cycle. When washed in a dishwasher, the grease filter may discolor slightly, but this does not affect its filtering capacity.
To remove the grease filter, pull the spring release handle.
Charcoal filter (filter version only)
Fig. 12 It absorbs unpleasant odors caused by cooking.
The saturation of the charcoal filter occurs after more or less prolonged use, depending on the type of cooking and the regularity of cleaning of the grease filter.
In any case it is necessary to replace the cartridge at least every four months.
The charcoal filter may NOT be washed or regenerated.
Circular charcoal filter
Apply one on each side as cover to both the shield grids of the motor impeller, then turn clockwise.
For the disassembly, turn counter-clockwise.
Replacing lamps
Fig. 10
Disconnect the appliance from the electricity.
Warning! Prior to touching the light bulbs ensure they are cooled down.
Replace the old light bulb with the one of the same type as specified in the feature label or near the light lamp on the hood.
- Using a flat head screwdriver or equivalent tool, carefully pry loose the light cover.
- Replace the damaged LED or halogen lamp, with one having the same characteristics, as specified in the label features or near the lamp:
LED lamp: For replacement, contact the technical service.
Halogen lamp: 12V - 20W max - G4 (take care not to touch them with your hands)
- Reinstall the light cover. (it will snap shut).
If the lights do not work, make sure that the lamps are fitted properly into their housings before you call for technical assistance.
MOTOR OFF button
Before starting installation:
Models with mechanical push-button panel
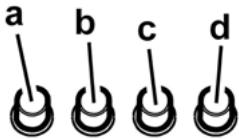
a. Light switch ON/OFF. b. Light switch OFF/speed 1 c. Speed selection 2 d. Speed selection 3
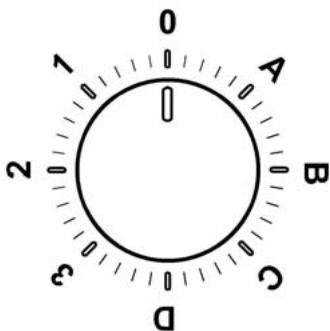
Models with knob
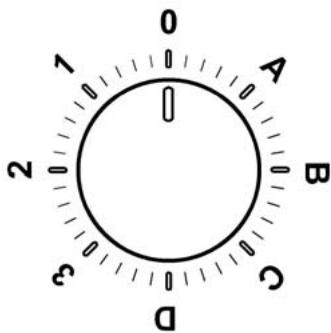
| 0 | OFF |
| 1 | Rychlost' 1
Osvetlenie OFF |
| 2 | Rychlost' 2
Osvetlenie OFF |
| 3 | Rychlost' 3
Osvetlenie OFF |
| A | Osvetlenie ON |
| B | Rychlost' 1
Osvetlenie ON |
| C | Rychlost' 2
Osvetlenie ON |
| D | Rychlost' 3
Osvetlenie ON |
Control panel with 6 buttons
Control panel with 6 buttons
INSTRUCTIONS FOR SAFE USE OF THE APPLIANCE AND ITS RELATED HAZARDS.
Do not allow children to play with the appliance! - Cleaning and maintenance must not be performed by children without adult supervision. - The room must be adequately ventilated when the hood is used simultaneously with other gas or other fuel-burning appliances. - The hood must be cleaned both internally and externally (at least once a month). - Follow the instructions for maintenance given in the manual! - Failure to follow the instructions for cleaning the hood and for cleaning and replacing the filters may result in a fire hazard. - Strictly forbidden is the use of open flames under the hood. To replace the lamps, use only those specified in the "Lamp replacement/Maintenance" section, as indicated in this instruction manual for operation. The use of open flames is harmful to the filters and may cause a fire, so they must be replaced at any cost. Cooking of food on the surface must be done under supervision, as overheated oil may catch fire. ATTENTION: When the hood is operating, accessible parts may become hot. Do not connect the appliance to the electrical mains until installation is complete.
Complete with installation.
- European Directive 2012/19/EC
- Waste Electrical and Electronic Equipment (WEEE).
Make sure that this appliance is recycled according to the regulations for this purpose, thereby contributing to the protection of the environment and your health.

The symbol on the appliance or on the accompanying documentation indicates that this product must not be treated as household waste, but must be delivered to the appropriate collection points for recycling of electrical and electronic equipment. Refer to local regulations for waste disposal. For more detailed information on the treatment, recovery, and recycling of this product, please contact your local city office, your household waste disposal service, or the shop where you purchased the appliance.
The appliance is designed, tested, and manufactured in
ACCORDANCE WITH:
- Safety: EN/IEC 60335-1; EN/IEC 60335-2-31, EN/IEC 62233.
- Performance characteristics: EN/IEC 61591; ISO 5167-1; ISO 5167-3; ISO 5168; EN/IEC 60704-1; EN/IEC 60704-2-13; EN/IEC 60704-3; ISO 3741; EN 50564; IEC 62301.
- EMC - Electromagnetic compatibility: EN 55014-1; CISPR 14-1; EN 55014-2; CISPR 14-2; EN/IEC 61000-3-2; EN/IEC 61000-3-3.
Recommendations for correct use, to reduce the impact on the environment: Switch on (ON) the vacuum cleaner at minimum speed, when you have finished vacuuming, leave it running for a few more minutes after switching off the motor. Increase the speed again only if a large amount of dirt or steam is used. Use the speed increase only in extreme situations. Change the filters when necessary, to maintain good efficiency of the appliance and the motor. Clean the filters when necessary, to maintain good efficiency of the motor filter. Use the maximum diameter of the air exhaust system, as described in this manual for optimizing efficiency and reducing noise.
Use
The vacuum cleaner is designed for vacuuming dry dirt and dust that is released during cooking, and is intended for household use.
The vacuum cleaner has a special purpose: it sucks in and filters the air, while at the same time it is a cooker hood.

Extraction with vacuum
The appliance is vented outside through an air duct connected to the connecting flange.
WARNING!
The air duct is not included in the accessories and must be purchased separately.
The diameter of the air duct must correspond to the diameter of the connecting flange.
WARNING!
If the vacuum cleaner is equipped with a carbon filter, the filter must be removed.
Connect the vacuum cleaner to the air duct and the wall opening. The diameter of the duct must correspond to the diameter of the connecting flange for air exhaust.
Connection to the air duct and the opening with the help of the diameter reduces the suction power, increases the noise and causes malfunction.
In this case, the appliance does not help with cooking odors.
Use a pipe with the required length. Use a pipe with the minimum possible number of bends (with maximum bends at 90°). Do not sharply reduce the pipe cross-section!

Connection with filter
The extracted air is discharged through the pipe before being released into the room. To use the aspirator in this operating mode, the pipe must be installed with the filter system on the base of the aspirator.
Installation
The minimum distance between the surface on which the cooking appliances are placed and the lower part of the kitchen aspirator must be no less than 55 cm in the case of electric cookers, and no less than 70 cm in the case of gas or combined cookers.
If the instructions for the gas cooking appliance specify a greater distance, this must be taken into account.
Drill the holes as indicated on the drawing (Ø 8 mm for the wall, Ø 40 mm for the ceiling), keeping the drill perpendicular to the marked points on the template, to fix the aspirator and the support bracket for the chimney. After drilling, make sure that the aspirator and the chimney are perfectly aligned with each other.
The device is intended for installation above a cooking appliance.

Electrical connection
The voltage in the electrical network must correspond to the voltage indicated on the rating plate of the aspirator, located on its inner side. If the aspirator is equipped with a plug and is connected to a socket, the corresponding standards must be observed, and the socket must be easily accessible after installation. If it is not equipped with a plug (direct connection to the network), or if the socket is not easily accessible after installation, use a double-pole switch with a contact opening of at least 3 mm, in accordance with the installation rules.

WARNING!
Before connecting the aspirator to the mains and checking that it functions correctly, check that the cable is installed as required.
WARNING! If the power cord is damaged, it must be replaced by the manufacturer, its service agent, or similarly qualified persons to avoid any risk.
Installation
Before proceeding with installation:
- Check that the product you have purchased is complete.
according to the dimensions of the selected installation location.
- Remove the filter/filters with activated carbon (check if the model you have chosen is equipped with such). To do this, follow the instructions in the corresponding paragraph. Mount the filter/filters back only if you intend to use the aspirated version of the filter.
- Make sure that during transport, no foreign objects have entered the inside of the aspirator, such as screws, protective cardboard, etc. If you find any, remove them and keep them.
For all this, we recommend that you consult a qualified technician to ensure that the supplied accessories are suitable for the installation. The wall, or the corresponding surface, must be sufficiently stable to support the device.
Instructions for use
Model: Pulse modulator 56
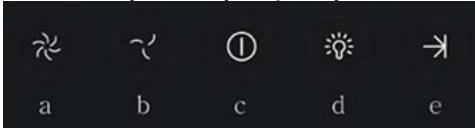
To set the desired functions, it is sufficient to press some commands:
a. Button for increasing the speed (power) of aspiration:
1st speed (power) of aspiration 2nd speed (power) of aspiration 3rd speed (power) of aspiration
Note: The 3rd speed (power) of aspiration with a set time duration and approximately 5 minutes of aspiration is automatically reduced to the 2nd speed (power) of aspiration.
b. Button for decreasing the speed (power) of aspiration. c. ON/OFF button of the aspirator d. ON/OFF button of the lighting e. ON/OFF button for programmed shutdown: Used for programmed shutdown of the speed (power) of aspiration; it activates after approximately 3 minutes.
Mechanical buttons
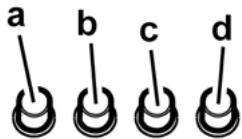
a. Lighting ON/OFF. b. Lighting OFF/speed 1 c. Speed 2 d. Speed 3
Model: Scrubber cone
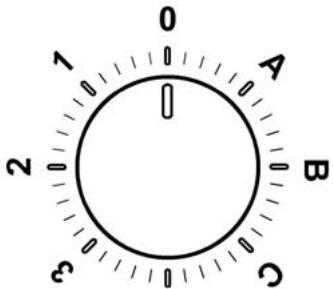
a
HaTncheteJeKeO3aJaN3KInouHTeMoToPA.
HUYINPAHE HA CUNHAN3AUJRA 3A
ΦNJTPNTE
PnBKnIOUeH acNpapOt n CTe KTo CTe N3BbPunnn NOdPbXkata Ha FNTPntE, HATNCHTe 6yTOHa 3aDpXte DOKATO YETe 3ByKOB CnHAn. PmMnRBaIuNT CBeTOnIDo1 (Ha FNITbpa 3a Ma3HNH) mN 2 (Ha FNITbpa c AKTINBEH BbIeH) pectaba da npemrba.
N3KJIIOUBAHE HA EJEKTPOHNKATA
HaTnCHete 3aDpBxTe HATnCHat 6yToHa B npOdbJIxKeHne Ha 3 cekyHn, n0 To3n HaunCe N3KnIOyBa KOMaHdHaTa eJNeKTPOHnKa Ha acnupatopa.
Ta3nФyHKUmaMoKe Da Bn 6bDe nOle3Ha npn ONUcTBaHe Ha ypeda.
3a da aKTHBnPate oTHOBeNEKTPoHnKaTa Tp86Ba da NOBtOpnte Opeauyra.
Ako 3a6eKnTe HeN3npabHoctn No BpeMe Ha pa60THna Ukbl, m3KnOyete Ka6eTa OT KOHTaKa, m3uKaIte MmHMym 5 cekyni n ro BKIOyete OTHOB. Ako TOBa He pa3peHn npoBnema, Bn CbETBaMe Da ce o6bPHe T KbM CbOTBeTHna rahpunOHen cepBN3.
NoDpBxkKa
Почистванe
3a nouchtaBHeTo n3noJI3BaIte EINHCTBEHO Kbpna, HABJXHEHa C HeYtpaIIH TeuH NIOCTBaIIN PpenapTn. HE I3NO3BAIte INCHTPMEHTN INI INPIBOPN 3A IOUChTBAHE!
Избгаваite npenapatn,KoNTO sbdbypkaT a6pa3nBnHuactu.н.HEИЗПОЛЗВАITEСПНТ!
ΦnTbP 3a Ma3HnHH
Fig. 11
Replace the filter element when it is dirty.
The filter element can be cleaned with neutral detergent. It is not recommended to clean it with hot water or in a washing machine.
Replacing the filter element is possible without tools, but this does not affect the filter's performance.
To remove the filter elements, press the release button with the mechanism.
The filter element is activated (only for filter version).
Fig. 12
Close the inlet valve when removing the filter.
The filter element should be replaced periodically after a period of use, depending on the type and degree of contamination, and on how often the filter is used.
In any case, it is necessary to replace the filter element at least every four months or when the clogging indicators show that it is necessary.
Do not reuse the filter element.
Cover the filter element
Place the filter element on the entire side so that it covers the front of the working wheel of the motor, then turn it clockwise.
When installing, turn in the direction of the clockwise arrow.
Length of the cable.
I3knHouTe ypea ot en.Mpekata.
Warning! Before taking the lamp in your hands, check that the hooks are intact.
Replace the damaged lamp with a new one of the same type as indicated on the characteristics label near the lamp on the aspirator.
- Using a small screwdriver or similar tool, remove the grille clips. 2. Replace the damaged lamp with a new lamp with the same characteristics as those indicated on the label near the lamp. Hooks:
Lamp: For lamp replacement, contact service for technical support.
Halogen lamp: 12V-20W max-G4 (do not touch directly with fingers).
- Close the circuit breaker (when closing the appliance).
If the hooks do not light, check that they are installed correctly before reassembling by a specialist.
The device is developed, tested and manufactured in accordance with:
- Safety: EN/IEC 60335-1; EN/IEC 60335-2-31,
EN/IEC 62233.
- Performance characteristics: EN/IEC 61591; ISO 5167-1; ISO 5167-3; ISO 5168; EN/IEC 60704-1; EN/IEC 60704-2-13; EN/IEC 60704-3; ISO 3741; EN 50564; IEC 62301. EMC: EN55014-1; CISPR 14-1; EN55014-2; CISPR 14-2; EN/IEC61000-3-2; EN/IEC61000-3-3. Recommendations for use to reduce environmental impact: Use the hood at minimum speed when starting cooking and leave it running for a few minutes after finishing. After cooking, increase speed only when necessary for large amounts of smoke. Use only the required speeds. Replace charcoal filter(s) when necessary to maintain good efficiency and reduce odor. Clean grease filter(s) when necessary to maintain good efficiency of grease filtration. Use maximum duct diameter as indicated in this manual to optimize efficiency and minimize noise.
Use
The hood is intended for domestic use only, for extracting fumes during cooking.
The hood is designed to operate in air extraction mode or recirculation mode.

Using the air extraction mode
In this mode, vapors are discharged outside through flexible pipes connected to the connecting flange.

WARNING!
The exhaust pipe is not included and must be purchased separately.
The hood is designed for installation above a hob with no more than 6 heating elements.

Electrical connection
The mains voltage must correspond to the voltage indicated on the technical data plate located inside the appliance. If the hood is equipped with a plug, connect the hood to a socket that complies with current regulations and is located in an accessible place. Switch on the hood only after installation. If the hood is not equipped with a plug (direct connection to the mains) or if the socket is not located in an accessible place after installation, use a bipolar switch that ensures complete disconnection from the mains under overvoltage category III, in accordance with installation instructions.

WARNING!
Before connecting the electrical system of the hood to the power supply and checking its proper functioning, make sure that the power cable is correctly installed.
WARNING! To avoid any risks, operations for replacing the power cable must be carried out by qualified service personnel.
Installation
Before starting installation:
Check that the dimensions of the hood you purchased are suitable for the chosen installation location. - Remove the charcoal filters, if present (see also the relevant section). The filters are reinstalled only if you use the hood in recirculation mode.
Use the hood in recirculation mode.
- Remove any objects placed inside the hood during transport (e.g., packaging with filters, warranty cards, etc.), if any, and keep them.
The hood is supplied with dowels and screws for fixing it to most walls/ceilings. However, it is necessary to contact a qualified technician to make sure that the materials are suitable for this type of wall/ceiling. The wall/ceiling must have sufficient strength to support the weight of the appliance.
Operation
Control panel
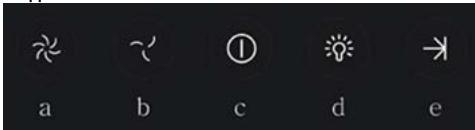
To select the extraction function, simply touch the buttons:
a. Button to increase speed (power) of suction: speed (power) 1, speed (power) 2, speed (power) 3. Note: speed (power) 3 is temporary, approximately after 5 minutes, the hood will return to speed (power) 2. b. Button to decrease speed (power) of suction. c. Button to turn the hood on/off. d. Button to turn the light on/off. e. Button to turn on/off the programmed shutdown:
The programmed shutdown automatically reduces the suction speed (power) approximately after 3 minutes.
Control panel with mechanical buttons
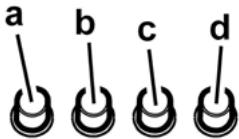
a. Light switch ON/OFF. b. Switch OFF/Speed 1. c. Speed switch 2. d. Speed switch 3.
Control panel with remote control
Do not use the hood without the filters or with the filters not properly installed.
Do not use the hood without the filters or with the filters not properly installed. Do not use or install the hood without the correctly installed lamps, risk of electric shock. Never use the hood without the correctly installed grille! The hood must never be used on a surface that is not indicated. Use the screws provided for installation; if they are not included, use screws of the correct type. Use the correct length screws as indicated in the installation manual. - If in doubt, consult an authorized service center or qualified personnel.

WARNING!
- Failure to install the screws and devices for fixing in accordance with these instructions may result in electrical hazards. Do not use with a programmer, timer, separate remote control, or any other device that turns on automatically.
This product is marked in accordance with European Directive 2012/19/EC on waste electrical and electronic equipment (WEEE). By ensuring proper disposal of this product, you will help prevent potential negative consequences for the environment and human health, which could otherwise be caused by inappropriate waste handling.

This appliance can be disposed of together with the accompanying document, but it cannot be treated as ordinary household waste. It must be handed over to the appropriate collection point for electrical and electronic equipment for further recycling. Disposal must be carried out in accordance with local waste disposal regulations. For more detailed information on the correct disposal and recycling of this product, contact your local authorities, the waste disposal service, or the store where you purchased the product.
The product is designed, manufactured, and produced in accordance with:
- Safety: EN/IEC 60335-1; EN/IEC 60335-2-31, EN/IEC 62233.
- Performance: EN/IEC 61591; ISO 5167-1; ISO 5167-3; ISO 5168; EN/IEC 60704-1; EN/IEC 60704-2-13; EN/IEC 60704-3; ISO 3741; EN 50564; IEC 62301. EMC: EN 55014-1; CISPR 14-1; EN 55014-2; CISPR 14-2;
EN/IEC 61000-3-2; EN/IEC 61000-3-3. For proper operation and to reduce impact on the environment: Turn the hood to the minimum speed during cooking and let it run for a few minutes after cooking. Increase the speed in case of large amounts of smoke and steam, and use the boost speed in extreme cases. For optimal odor extraction efficiency, if necessary, replace the charcoal filter(s). For optimal grease filter efficiency, if necessary, clean the grease filter(s). Use the maximum diameter of the exhaust duct, as indicated in the instructions, to optimize efficiency and minimize
use
The hood is designed for domestic use and for use in the kitchen during food preparation and is intended for household use only.
The hood is designed for use in recirculation mode, with the air discharged outside or in filtration mode with air recirculation.

Installation variants
When connecting the exhaust pipe to the exhaust outlet, the flange connection must be sealed.

WARNING!
The exhaust pipe is not supplied and must be purchased separately.
The diameter of the exhaust pipe must match the diameter of the connection ring.

WARNING!
If the hood has charcoal filters, they must be removed.
The exhaust pipe and exhaust outlet must have the same inlet diameter (unified flanges).
Using partial exhaust pipes and outlets with a smaller diameter will lead to reduced efficiency and significantly increased noise levels.
Therefore, we disclaim any liability for the aforementioned.
! Use the shortest exhaust channel. ! Use an exhaust channel with the minimum number of bends (maximum bend angle: 90°). ! Avoid sharp changes in the cross-sectional area of the exhaust channel.

Variant with filtration
The exhaust pipe is removed, cleaned, and inspected, then reinstalled in the appliance. In this mode, it is necessary to install a filter system with activated carbon.
Installation
The installation height of the lower part of the exhaust hood above the hob must be at least 55 cm for electric hobs, and 70 cm for gas and combination hobs.
It is necessary to take into account the heights specified in the installation instructions for the specific hob.
As shown in the figure, drill 6 holes (8 mm diameter, 40 mm deep) at the locations indicated on the template to secure the exhaust duct and the flue. After drilling, install the duct and flue securely.
The hood is intended for installation above a hob with no more than 6 heating elements.

To adjust the hood functions, briefly press the buttons:
a. Speed (power) increase button: Speed (power) 1, Speed (power) 2, Speed (power) 3. Note: Speed (power) 3 is temporary; after approximately 5 minutes, the hood returns to Speed (power) 2. b. Speed (power) decrease button. c. Hood ON/OFF button. d. Light ON/OFF button. e. Programmed activation ON/OFF button: The activation program of active speed (power) is approximately 3 hours.
Models with mechanical control
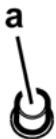
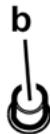


a. ON/OFF switch. b. OFF/Speed 1 switch. c. Speed 2 switch. d. Speed 3 switch.
HE niDnIrae MmTTH QN noHOBneHHIO.
Kpyrnn Byrinalnni nPhiJbtp
PnKnactn pInbTp n no 0nbDi CTOpOH nIa NOKpTTT 3axnchnx pnwiitok potopa dBnryha, nicna yoro NOBepHytn pInbTp 3a roHHNKOBOHO CTpiIKIO.
ДяЗ加热-оверунpinpoTnroDHHNKOBOcTpirIKN.
3amiHa JAmn
Man. 10
BidknouHT npnlaB iD eIeKtpomepexi.
Ybara! Iepi HiK TopKatn lamnn Heo6xIDHO BneBHTncs IO BOHNOXOJONI.
3amHHTn IOwKOJKeHy IaMNoKHy Ha HOb TYAKO JTKny,JK 3a3HaHeHo Ha eTKeTci, a6o NOpuy 3JaAMNoKIOu HA BtRkIi.
- BnMItb 3axncn enMeHt 3a DOnOMrOHO HeBEnKoI BnKpyTkn abo nOi6HOro IHcPymeHTy.
- 3aMIHInNoI nowKoJxey NaMnoUky iHIOO NoMnOkoLED a60 ranoRcHKO, 3 TakIMn cAMMM xapaKTepNCTkAMn IIO BKA3aHa eTKeTci XapAKTePncTnk a60 no6n3y naMNOOKy
JAmnoka LED:Udoix 3amHH 3BepTaTeCnO cnYk6n TexnHoro 06cnyroByBaHH.
TanoerHnIaMnoUka:12V-20WMaKc-G4 (HamarauOuChbHeDToTopKaTmCpYkAmn).
- 3akpiTe piafoh (KpInJeHHa 3acyBkoHO).
Kkio cntema nicBtkn He npaioe, nepebipTe BipHy yctahOBky lamn B rHizda, neped TmK 3BeptaTcra Do ceHTpy texhiHO donOMOrn.
The device is intended for use in household and similar applications, such as staff kitchens in shops, offices, and other working environments, as well as by guests in hotels, motels, and other residential-type environments.
The appearance of the device may differ from the images shown in these instructions. However, the method of use, operation, and maintenance instructions remain the same.
Before using this device, read the manual carefully. If the device is sold, transferred, or moved, ensure that the manual is passed on to the new owner. The manufacturer is not responsible for any damage resulting from improper use or failure to follow the instructions. Do not attempt to modify the electrical or mechanical construction or the ventilation channels of the device. Do not use the device if the power cord or plug is damaged.
Note: (*) Some models may be equipped with additional accessories (not included in the standard package), which can be purchased separately.

Instructions
When cleaning or performing maintenance, always disconnect the device from the power supply. Do not allow children to operate the device without supervision. - This device can be used by children aged 8 and above, as well as by persons with reduced physical, sensory, or mental capabilities, or lack of experience and knowledge, if they have been given supervision or instruction concerning use of the appliance in a safe way and understand the hazards involved. Children must not play with the device. Cleaning and user maintenance must not be performed by children without supervision.
If the device is dropped, it must be checked. Do not allow children to touch the control elements or play with the device. Cleaning and user maintenance must not be performed by children without supervision. - If the device is used with other gas or electrical appliances, ensure that the room is adequately ventilated. The device must be cleaned regularly, both inside and outside, with a soft cloth (not using abrasive agents). Follow the instructions provided for maintenance. Cleaning standards and detergents must be used in accordance with the manufacturer's recommendations. Do not use the device if the power cord or plug is damaged. - For cleaning, use only the cleaning agents specified in the "Maintenance/Cleaning" section of this manual. For other cleaning purposes, use only water and a soft cloth.
Do not allow the device to come into contact with water.
To prevent the device from being accidentally turned on or off, always unplug it when not in use.
CAUTION: The metal parts of the device may become hot during use. Do not touch them.
- Do not connect the device to the power supply without proper grounding.
- This appliance can be used by children aged from 8 years and above and persons with reduced physical, sensory or mental capabilities or lack of experience and knowledge if they have been given supervision or instruction concerning use of the appliance in a safe way and understand the hazards involved. Children shall not play with the appliance. Cleaning and user maintenance shall not be made by children without supervision. If the supply cord is damaged, it must be replaced by the manufacturer, its service agent or similarly qualified persons in order to avoid a hazard.
- Warning: To avoid a hazard due to inadvertent resetting of the thermal cut-out, this appliance must not be supplied through an external switching device, such as a timer, or connected to a circuit that is regularly switched on and off by the utility.
- For installation, follow the instructions provided with the hood. If the instructions are missing, order them from the manufacturer. Installation must be done by a qualified technician. If you have any questions, contact the service center or the nearest authorized dealer.
WARNING!
- The hoods or their components must be installed according to the instructions and connected to the electrical supply by a qualified electrician. - Do not use the hood if it is damaged, or if the power cord or plug is damaged, or if it has been dropped or otherwise damaged.
Electrical and electronic appliances are marked with the crossed-out wheeled bin symbol in accordance with the European Directive 2012/19/EC (WEEE).
Disposal of the appliance
By ensuring this product is disposed of correctly, you will help prevent potential negative consequences for the environment and human health.

The symbol on the product or its packaging indicates that this product shall not be treated as household waste. Instead it shall be handed over to the applicable collection point for the recycling of electrical and electronic equipment.
The recycling of this product will help to conserve natural resources and protect the environment.
For more detailed information about recycling of this product, please contact your local city office, your household waste disposal service or the shop where you purchased the product.
The hoods are designed for use in domestic kitchens and are manufactured in accordance with the following standards:
Safety: EN/IEC 60335-1; EN/IEC 60335-2-31, EN/IEC 62233. - Performance: EN/IEC 61591; ISO 5167-1; ISO 5167-3; ISO 5168; EN/IEC 60704-1; EN/IEC 60704-2-13; EN/IEC 60704-3; ISO 3741; EN 50564; IEC 62301. EMC: EN 55014-1; CISPR 14-1; EN 55014-2; CISPR 14-2; EN/IEC 61000-3-2; EN/IEC 61000-3-3.
KopuafAn optara acepi a3aIy yuH nypbic naandaany TypaBn Hcckaynap:
3ipnydi bactaHaJa KaKaTbI eH a3 KbldAmdbkneh KocbHb3 XaHe a3ipney aAraTaNFaHnAH KeiHbipa3 MNHyT BoBb JxMbIC icteTI3. KbldAmdbkTa TcK TyTHHH XaHe 6yDbH yKeH MeNlpei XaFdaBnHda apTTbIPbHb3 XaHe KyuweTy KbldAmdbfBnH(KTabpBn) TeK WeKti KaFdaNapda naDaIaNbHb3. XaKcbS JxaBIMCb3 nicti a3aYt TmimDinirih CaTay YwiH KaKeT 6oIFaHa kMip cy3rici(NepiH) aybICTbPbHb3. XaKcbMa mCy3rici TmimDinirih CaTay YwiH KaKeT 6oIFaHa ma Csy3rici(NepiH) aybICTbPbHb3. TmimDinikTi OHtaNaHdbpy XeHe WSyDb bapbHnHa a3aTu YwIH OcB HycKayNbTKa KpcTeiTnReH eTKi3y XyueciHnEH YKEN DnaMeTpH naDaIaNbHb3.
PaiDanaHy
CopfblTAMAK 33ipIeHne naJaDa 60NaTbIH TYTIH MEH 6yDbI copbl anyFa XHe TEK TpyMbICTbIK MaKcatta KOnJaHyFa apHaJIraH.
Copfblu cblptka aya 6ypfblb6ap TaTpY keIeTkiu petiHne, Hemece iuKi kaTa aHaNy cy3riu petiHne naJaIaNHyra apHaIraH.

ECKEPTY!
Copfblu K6bipbIn DnAmetpi 6ipiKtpyui CaKHaHbIn DnAmetpimeh TeHdec 60ny Kepek.

ECKEPTY!
Copfblu Kbybplb copfblu XnHaKTamacbIme HKeTki3iImeNiDi, OHb6eK catbn any KepeK.
CopfbltBkabfpadaBf copfblkkybipnapbMeh aya 1bIfapatbH TecikTepde, con dnaMetpderi TecikTepre Kocblb3 (bipiktipyi pfnaheu).
Ka6bipraaBc copBtI K6bipnapbI MeH KeMDey DnAmetprderi Teciknti naDanahy, copy KyaTbIH HaWapnatbIn, rypindeYiH KyweTei.
! Kaxketti MmHmMaJIbI Y3blHbIKTaFbI TYtikTI KOJaHbIHbI3. !BapbHwa KEN iINIiMi 6ap tyTki KOJaHbIb3 (NIIMHiMakcImaJIbI b6pyblbI:90°). ! TytkiTH KENDeHeK KIMacbHaTa TY6ereNti e3repictepdi 60JdbIpMaHbI3.

Cy3y Hyckacbl
On yuiship kEmip cyrici kaxet, Ohbl eDetteri caTyshilapdah anyfa 60ana.
Cy3ri 1bIapbnfah ayanbl Jxofapflb Iyblfc TOpbl apkblb 6eMnere KaTata biepby anbda Obla Mm MeH icTepeH TaapaTbIa.
The cover must be at least 55 cm for gas stoves and 70 cm for electric stoves, and for gas and other fuels, it must be at least 70 cm.
If the gas stove is installed at a distance greater than the specified gap, check it. To protect against splashes and moisture, at the installation site, make a hole (diameter 8 mm, depth 40 mm) at the marked locations. After installation, check that the splash guard is in place.
The cover must be installed on the top surface.

Electrical connections
All installation work must be carried out in accordance with the technical requirements specified in the installation instructions. If the cover is not connected to the mains, after installation it will not work, so
The plug must be accessible, and the connected wires must be connected to the mains in accordance with the instructions. If the cover is not connected to the mains (or is connected incorrectly), or if after installation the plug is not accessible, then the installation must be carried out by a qualified electrician in accordance with the requirements and safety regulations.

WARNING!
Before connecting the electrical plug, make sure the cable is properly installed.
WARNING! The power supply must be disconnected or the appliance must be unplugged before any maintenance.
Installation
Before installation:
- Remove the supplied screws (if any) (see figure). If the screws are not needed, remove them. All brackets, mounting plates, etc. that are attached to the appliance for shipping purposes (to prevent damage during transport) must be removed. Remove them and keep them in a safe place.
The screws must be tightened with the supplied brackets (fasteners) to secure the appliance to the wall/ceiling. Then, using the materials provided, tighten the screws to the wall/ceiling. The screws must be tightened to the wall/ceiling before installation.
For selecting the functions, press the corresponding button.
a. Copy quantity (Qty) setting procedure:
1st copy quantity (Qty) 2nd copy quantity (Qty) 3rd copy quantity (Qty)
Example: If the 3rd copy quantity (Qty) is not set, after 5 minutes the 2nd copy quantity (Qty) will be applied.
b. Copy quantity (Qty) reset procedure. c. Sorting procedure d. Staple sorting procedure e. Output tray selection procedure
Procedure:
After 3 minutes, the copy quantity (Qty) will be reset to the default value.
For machines with a mechanical control panel
a. Sorting key b. 1-sided/2-sided key c. 2-sided original detection d. 3-sided original detection
Procedure keys
ON/OFF (ON/OFF)

If the original detection key (copy key) is not pressed within 5 minutes, the machine will return to the default setting.

The main battle tank (copy of the manual)

The main battle tank (copy of the manual) - In the event of a fire, it is necessary to use the fire extinguishing system. This signal is deactivated. To activate the signal, press the button for 3 seconds, then press the electronic signal. Then press buttons 1 and 2 for 3 seconds, and only button 1 will be active. Then press buttons 1 and 2 again, this will activate the signal. To deactivate the signal, press the operation button, and then buttons 1 and 2 will be active, and only button 1 will be active, this will deactivate the signal.

The main battle tank (copy of the manual) - In the event of a fire, it is necessary to use the fire extinguishing system.

The fire extinguishing system OFF button (reset mode) - Electronic signal - The fire extinguishing system is turned off.
FIRE EXTINGUISHING SYSTEM
Press the button briefly to turn off the fire extinguishing system.
SIGNAL TURNED OFF BY THE FIRE EXTINGUISHING SYSTEM
In the event of a fire, it is necessary to press the button quickly before the fire extinguishing system is activated. The fire extinguishing system will be activated by pressing button 1 (main extinguishing) or 2 (secondary extinguishing).
ELECTRONIC SIGNAL
Press the button for 3 seconds, then the electronic signal will be activated.
This function may be used in case of emergency.
To turn off the electronic signal, press the operation button.
In case of fire, before maintenance, disconnect the battery, wait at least 5 seconds, then remove the battery. If the fire is not extinguished, maintenance is required.
Technical maintenance
Emergency
Use only the original spare parts. Using counterfeit or low-quality spare parts may damage the device. Do not use abrasive pastes.
Oil filter
Figure 11
Install the filter elements in the reverse order.
If the filter is heavily contaminated with abrasive dust, oil, or fuel, it must be replaced with a new one, regardless of the maintenance schedule.
It is possible to clean the filter element with compressed air, but its service life will be reduced.
To remove the oil filter, unscrew the drain plug.
Oil filter (only in the filter-sump version)
Figure 12
Install the filter in the reverse order.
If the filter element is damaged or clogged, replace it with a new one. In any case, replace the filter element at least once a year.
Do not wash the filter element with fuel or other solvents.
Fuel filter
Install the fuel filter in the reverse order, and tighten the bolts securely.
For this, refer to the instructions in the manual.
10 cypet
AcnantbI 3JIeKtp KJyEciHEn eUpiH3
Eckepy! lammahby yctaydaH 6ypbH, oIap cybFAHdbfBHa Ke3 xetK3iHi3.
KacneTlep JanaCbipMacbIHda Hemece KopnyctaBblam lamnacbIHda KepcetinreHde, ecki lam lamnacbH 6ipDe Tpyderi lamnamen aJMaCTbIPbIHb3.
- KiükeHTaB 6ypaybI H HeMece yKcac acnan apKblbl KOpraTbIH nAHeJI WbIFapbln aIbIHbI3.
- Ka ncbipma CnnaTtamanaapbHnda Hemece lamnahhJxHaHbHda KepcetinreHde3aKbIMdaIraH JxapbIK DIObIH Hemece raOReHdi lamnabHdAeON COHDAJ XapbIK DIObIMeh Hemece lamnameH aybCTbIPbHb3. XapbIK DIObHbHJ lamnacbI: Abyctbpy yuhiTexnkaJIbK bI3MeT Kepcety 6enimihe xaBapnacbIHb3. ranoerndi lamna:12B-20BTMaKC.-G4 (oIapdbKOJmEHyCTAmAbH3)
- KopraTbH naHenDi kaybl KOBbIHb3 (ФИКСТОР кЕмERIMeH).
Kemecki Japbik icTemereh XaFaDnDa TexHnKaIbIK Kbl3MeT KepceTy opTaIbIbHa XoJIbIKNaCTaH 6ybpH, WAmdapDbIH Dypbc OpHaTbIJFaHbIH TEKcepin KepiH3.
Ohu valjatombega version
| 0 | OFF |
| 1 | Âtrums 1
Gaisma OFF |
| 2 | Âtrums 2
Gaisma OFF |
| 3 | Âtrums 3
Gaisma OFF |
| A | Gaisma ON |
| B | Âtrums 1
Gaisma ON |
| C | Âtrums 2
Gaisma ON |
| D | Âtrums 3
Gaisma ON |
Kontroles panelis ar 6 taustiem
a a a a a a a a a a a a a a a a a a a a a a a a a a a a
1 1111111111111111
Aiiill sucell
J
a a
a 1
1
a 15 1
glll 1
aiaaa aie gill laii
()
- bai, 1. 1. j 1.
a 1000 1000 1000 1000 1000 1000 1000 1000 1000 1000 1000 1000 1000 1000 1000 1000 1000 1000 1000 1000 100
laill jiej jjla
Jiai jai iai li Jaiui oolcljoi
1
jlll lal pi jlll jlll jlljial
yall lgygai yjil jy
EN/IEC 60335-2-31 EN/IEC 60335-1
EN/IEC 62233
ISO 5167-3 ISO 5167-1: EN/IEC 61591
EN/IEC 60704-1:5168
IEC EN 50564: ISO 3741. EN/IEC 60704-2-13
CISPR EN 55014-1:62301
EN/IEC 61000-3-2: CISPR 14-2: EN 55014-2:14-1
EN/IEC 61000-3-3
i j 1000
aill jll a jll bll i j 1
Aeia 1i 1i 100
ailllll 1
Jdall lgl aal glg /ai al o j
- a s c : c is 2b + d .
pkiuuii
Electrical and Electronic Equipment (WEEE)


i j 1
jll jolg bai bc la
y
Jssall
JooJI Joo
jolil jll
8 8
aannnnnne
aaii
a|la|la|la|la|la|la|la|
a aal o aai
pao 1000
i j k l a b c d e f g h i j k
Therefore, a_i = 70%.
Therefore, the area of triangle OBC equals the area of triangle COD plus the area of triangle BOC.