
A6500 - Camera SONY - Free user manual and instructions
Find the device manual for free A6500 SONY in PDF.



User questions about A6500 SONY
0 question about this device. Answer the ones you know or ask your own.
Ask a new question about this device
Download the instructions for your Camera in PDF format for free! Find your manual A6500 - SONY and take your electronic device back in hand. On this page are published all the documents necessary for the use of your device. A6500 by SONY.
USER MANUAL A6500 SONY
Refer to "Help Guide" for
in-depth instructions on the
many functions of the camera.
The "Help Guide" is an on-line manual that you can read on your computer or smartphone. Refer to it for details on menu items, advanced usage, and the latest information on the camera.
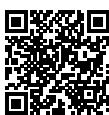
Scan here
http://rd1.sony.net/help/ilc/1640/h_zz/
ILCE-6500 Help Guide

Instruction Manual (this book)

This manual introduces some basic functions.
For the quick start guide, see "Startup guide" (page 21). The "Startup guide" introduces the initial procedures from when you open the package until you release the shutter for the first shot.
In-Camera Guide

The [In-Camera Guide] shows explanations of the menu items on the monitor of the camera.
You can quickly pull up information during shooting. To use the [In-Camera Guide] function, some settings must be made beforehand. For details, search "In-Camera Guide" in the Help Guide.
Owner's Record
Record the model and serial number (which are located on the product) in the space provided below. Refer to these numbers whenever you call your Sony dealer regarding this product.
Model No. ILCE- Serial No.
WARNING
To reduce fire or shock hazard, do not expose the unit to rain or moisture.
IMPORTANT SAFETY INSTRUCTIONS -SAVE THESE INSTRUCTIONS DANGER TO REDUCE THE RISK OF FIRE OR ELECTRIC SHOCK, CAREFULLY FOLLOW THESE INSTRUCTIONS
If the shape of the plug does not fit the power outlet, use an attachment plug adaptor of the proper configuration for the power outlet.
CAUTION
Battery pack
If the battery pack is mishandled, the battery pack can burst, cause a fire or even chemical burns. Observe the following cautions.
- Do not disassemble.
- Do not crush and do not expose the battery pack to any shock or force such as hammering, dropping or stepping on it.
- Do not short circuit and do not allow metal objects to come into contact with the battery terminals.
- Do not expose to high temperature above 60^ ( 140^ ) such as in direct sunlight or in a car parked in the sun.
- Do not incinerate or dispose of in fire.
- Do not handle damaged or leaking lithium ion batteries.
- Be sure to charge the battery pack using a genuine Sony battery charger or a device that can charge the battery pack.
- Keep the battery pack out of the reach of small children.
- Keep the battery pack dry.
- Replace only with the same or equivalent type recommended by Sony.
- Dispose of used battery packs promptly as described in the instructions.
- Do not expose to extremely low temperatures of -20^ (-4^) or lower or extremely low pressures of 11.6kPa or lower.
Use a nearby wall outlet (wall socket) when using the AC Adaptor/battery charger. If any malfunction occurs, disconnect the plug from the wall outlet (wall socket) immediately to disconnect from the power source. If you use the product with a charge lamp, note that the product is not disconnected from the power source even when the lamp turns off.
The power cord (mains lead), if supplied, is designed specifically for use with this equipment only, and should not be used with other electrical equipment.
Power Cord
For the customers in the UK, Ireland, Malta, Cyprus and Saudi Arabia Use the power cord (A). For safety reasons, the power cord (B) is not intended for above countries/regions and shall therefore not be used there. For the customers in other EU countries/regions Use the power cord (B).
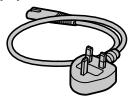
(A)
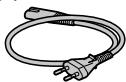
(B)
Notice
If static electricity or electromagnetism causes data transfer to discontinue midway (fail), restart the application or disconnect and connect the communication cable (USB, etc.) again.
This product has been tested and found compliant with the limits set out in the EMC regulation for using connection cables shorter than 3 meters (9.8 feet).
The electromagnetic fields at the specific frequencies may influence the picture and sound of this unit.
For Customers in the U.S.A. and Canada
RECYCLING LITHIUM-ION BATTERIES
Lithium- ion batteries are recyclable. You can help preserve our environment by returning your used rechargeable batteries to the collection and recycling location nearest you.

For more information regarding recycling of rechargeable batteries, call toll free 1-800-822-8837, or visit http://www.call2recycle.org/
Caution: Do not handle damaged or leaking Lithium-lon batteries.
This equipment complies with FCC radiation exposure limits set forth for an uncontrolled environment and meets the FCC radio frequency (RF) Exposure Guidelines. This equipment has very low levels of RF energy that is deemed to comply without testing of specific absorption rate(SAR). The available scientific evidence does not show that any health problems are associated with using low power wireless devices. There is no proof, however, that these low power wireless devices are absolutely safe. Low power Wireless devices emit low levels of radio frequency energy (RF) in the microwave range while being used. Whereas high levels of RF can produce health effects (by heating tissue), exposure of low-level RF that does not produce heating effects causes no known adverse health effects. Many studies of low-level RF exposures have not found any biological effects. Some studies have suggested that some biological effects might occur, but such findings have not been confirmed by additional research. This equipment has been tested and found to comply with IC radiation exposure limits set forth for an uncontrolled environment and meets RSS-102 of the IC radio frequency (RF) Exposure rules.
For Customers in the U.S.A.
If you have any questions about this product, you may call:
Sony Customer Information Center 1-800-222-SONY (7669).
The number below is for the FCC related matters only.
Regulatory Information
Declaration of Conformity
Trade Name:SONY
Model No.: WW213019
Responsible Party: Sony Electronics Inc.
Address: 16535 Via Esprillo, San Diego, CA 92127 U.S.A.
Telephone No.: 858-942-2230
This device complies with Part15 of the FCC Rules. Operation is subject to the following two conditions: (1) This device may not cause harmful interference, and (2) this device must accept any interference received, including interference that may cause undesired operation.
This device complies with Part 15 of the FCC Rules. Operation is subject to the following two conditions:
(1) This device may not cause harmful interference, and (2) this device must accept any interference received, including interference that may cause undesired operation.
This equipment must not be collocated or operated in conjunction with any other antenna or transmitter.
CAUTION
You are cautioned that any changes or modifications not expressly approved in this manual could void your authority to operate this equipment.
Note:
This equipment has been tested and found to comply with the limits for a Class B digital device, pursuant to Part 15 of the FCC Rules.
These limits are designed to provide reasonable protection against harmful interference in a residential installation. This equipment generates, uses, and can radiate radio frequency energy and, if not installed and used in accordance with the instructions, may cause harmful interference to radio communications. However, there is no guarantee that interference will not occur in a particular installation. If this equipment does cause harmful interference to radio or television reception, which can be determined by turning the equipment off and on, the user is encouraged to try to correct the interference by one or more of the following measures:
- Reorient or relocate the receiving antenna.
-Increase the separation between the equipment and receiver. - Connect the equipment into an outlet on a circuit different from that to which the receiver is connected.
- Consult the dealer or an experienced radio/TV technician for help.
The supplied interface cable must be used with the equipment in order to comply with the limits for a digital device pursuant to Subpart B of Part 15 of FCC Rules.
For Customers in Canada
This device complies with Industry Canada's licence-exempt RSSs.
Operation is subject to the following two conditions:
(1) This device may not cause interference; and
(2) This device must accept any interference, including interference that may cause undesired operation of the device.
CANICES-3B/NMB-3B
For Customers in Europe
Manufacturer: Sony Corporation, 1-7-1
Konan Minato-ku Tokyo, 108-0075
Japan
For EU product compliance: Sony Belgium, bijkantoor van Sony Europe Limited, Da Vincilaan 7-D1, 1935 Zaventem, Belgium
CE
Hereby, Sony Corporation, declares that this equipment is in compliance with the essential requirements and other relevant provisions of Directive 1999/5/EC. For details, please access the following URL:
http://www.compliance.sony.de/
Disposal of waste batteries and electrical and electronic equipment (applicable in the European Union and other European countries with separate collection systems)

This symbol on the product, the battery or on the packaging indicates that the product and the battery shall not
be treated as household waste. On certain batteries this symbol might be used in combination with a chemical symbol. The chemical symbols for mercury (Hg) or lead (Pb) are added if the battery contains more than 0.0005% mercury or 0.004% lead. By ensuring these products and batteries are disposed of correctly, you will help prevent potentially negative consequences for the environment and human health which could otherwise be caused by inappropriate waste handling. The recycling of the materials will help to conserve natural resources. In case of products that for safety, performance or data integrity reasons require a permanent connection with an incorporated battery, this battery should be replaced by qualified service staff only. To ensure that the battery and the electrical and electronic equipment will be treated properly, hand over these products at end-of-life to the applicable collection point for the recycling of electrical and electronic equipment. For all other batteries, please view the section on how to remove the battery from the product safely. Hand the battery over to the applicable
collection point for the recycling of waste batteries.
For more detailed information about recycling of this product or battery, please contact your local Civic Office, your household waste disposal service or the shop where you purchased the product or battery.
For Customers in Singapore
Complies with IDA Standards DB00353
GB
For Customers in U.A.E.
TRA
REGISTERED No:
ER42682/15
DEALER No:
DA0073692/11
For Customers in Malaysia

MCMC
CIDF15000002
For Customers in India
Battery Pack
IS 16046/IEC 62133

R-41022659
Notes on using your camera
Along with this section, also see "Precautions" in the Help Guide (page 2).
Screen language
You can select the language displayed on the screen using the menu (page 41).
Notes on recording/playback
- Once you format the memory card, all the data recorded on the memory card will be deleted and cannot be restored. Before formatting, copy the data to a computer or other device.
- Before you start recording, make a trial recording to make sure that the camera is working correctly.
Notes on handling the product
- This camera is designed to be dust and moisture-resistant, but is not waterproof or splash-proof.
- Do not leave the camera, the supplied accessories, or memory cards within the reach of infants. They may be accidentally swallowed. If this occurs, consult a doctor immediately.
No compensation for damaged content or recording failure
Sony can provide no guarantees in the event of failure to record or loss or damage of recorded images or audio data due to a malfunction of the camera or recording media, etc. We recommend backing up important data.
Notes on the monitor, electronic viewfinder, lens, and image sensor
- The monitor and electronic viewfinder are manufactured using extremely high-precision technology, and over 99.99% of the pixels are operational for effective use. However, there may be some small black dots and/or bright dots (white, red, blue or green in color) that constantly appear on the monitor and electronic viewfinder. These dots are normal due to the manufacturing process and do not affect the images in any way.
- Do not hold the camera by the monitor.
-
When using the power zoom lens, be careful not to get your fingers or any other objects caught in the lens.
-
Do not leave the lens or the viewfinder exposed to a strong light source such as sunlight. Because of the lens's condensing function, doing so may cause smoke, fire, or a malfunction inside the camera body or the lens. If you have to leave the camera exposed to a light source such as sunlight, attach the lens cap to the lens.
- When you shoot with backlighting, keep the sun sufficiently far away from the angle of view. Otherwise, the sunlight may enter the focus inside the camera and cause smoke or fire. Even if the sun is slightly away from the angle of view, it may still cause smoke or fire.
- Do not directly expose the lens to beams such as laser beams. That may damage the image sensor and cause the camera to malfunction.
- Do not look at sunlight or a strong light source through the lens when it is detached. This may result in unrecoverable damage to the eyes or cause a malfunction.
- Do not use the camera in areas where strong radio waves or radiation are being emitted. Recording and playback may not function correctly.
Images may trail across on the screen in a cold location. This is not a malfunction. - The recorded image may be different from the image you monitored before recording.
Notes on using lenses and accessories
It is recommended that you use Sony lenses/accessories designed to suit the characteristics of this camera. Using this camera with products from other manufacturers may affect its performance, leading to accidents or malfunction. Sony bears no responsibility for such accidents or malfunction.
Notes on the Multi Interface Shoe
- When attaching or detaching accessories such as an external flash to the Multi Interface Shoe, first turn the power to OFF. When attaching the accessory, confirm that it is firmly fastened to the camera.
- Do not use the Multi Interface Shoe with a commercially available flash that applies voltages of 250V or more or has the opposite polarity of the camera. It may cause a malfunction.
Notes on shooting with the viewfinder
-
The image may be slightly distorted near the corners of the viewfinder. This is not a malfunction. When you want to see the full composition with all its details, you can also use the monitor.
-
If you pan the camera while looking into the viewfinder or move your eyes around, the image in the viewfinder may be distorted or the color of the image may change. This is a characteristic of the lens or display device and is not a malfunction. When you shoot an image, we recommend that you look at the center area of the viewfinder.
-
When shooting with the viewfinder, you may experience symptoms such as eyestrain, fatigue, travel sickness, or nausea. We recommend that you take a break at regular intervals when you are shooting with the viewfinder. In case you may feel uncomfortable, refrain from using the viewfinder until your condition recovers, and consult your doctor as necessary.
Notes on continuous shooting
During continuous shooting, the monitor or viewfinder may flash between the shooting screen and a black screen. If you keep watching the screen in this situation, you may experience uncomfortable symptoms such as feeling of unwellness. If you experience uncomfortable symptoms, stop using the camera, and consult your doctor as necessary.
Notes on recording for long periods of time or recording 4K movies
Depending on the camera and battery temperature, you may be unable to record movies or the power may turn off automatically to protect the camera. A message will be displayed on the screen before the power turns off or you can no longer record movies. In this case, leave the power off and wait until the camera and battery temperature goes down. If you turn on the power without letting the camera and battery cool enough, the power may turn off again or you may be unable to record movies.
Under high ambient temperatures, the temperature of the camera rises quickly.
- When the temperature of the camera rises, the image quality may deteriorate. It is recommended that you wait until the temperature of the camera drops before continuing to shoot.
- The surface of the camera may get warm. This is not a malfunction.
- If the same part of your skin touches the camera for a long period of time while using the camera, even if the camera does not feel hot to you, it may cause symptoms of a low-temperature burn such as redness or blistering.
Pay special attention in the following situations and use a tripod, etc.
- When using the camera in a high-temperature environment
- When someone with poor circulation or impaired skin sensation uses the camera
-
When using the camera with the Auto Pwr OFF Temp. set to [High]
-
Especially during 4K movie shooting, the recording time may be shorter under low temperature conditions. Warm up the battery pack or replace it with a new battery.
Notes on playing back movies on other devices
Movies recorded with this camera may not be played back correctly on other devices. Also, movies recorded with other devices may not be played back correctly on this camera.
Warning on copyright
Television programs, films, videotapes, and other materials may be copyrighted. Unauthorized recording of such materials may be contrary to the provisions of the copyright laws.
On the data specifications described in this manual
The data on performance and specifications are defined under the following conditions, except as described in this manual: at an ordinary ambient temperature of 25^ (77^) , and using a battery pack that has been fully charged until the charge lamp has turned off.
How to turn off wireless network functions (Wi-Fi, NFC and Bluetooth function, etc.) temporarily
When you board an airplane, etc., you can turn off all wireless network functions temporarily.
Select MENU button (Wireless) [Airplane Mode] [On].
If you set [Airplane Mode] to [On], an (airplane) mark will be displayed on the screen.
Notes on wireless LAN
If your camera is lost or stolen, Sony bears no responsibility for the loss or damage caused by illegal access or use of the registered access point on the camera.
Notes on security when using wireless LAN products
Always make sure that you are using a secure wireless LAN to avoid hacking, access by malicious third parties, or other vulnerabilities.
- It is important that you set the security settings when using a wireless LAN.
- If a security problem arises because no security precautions are in place or due to any inevitable circumstances when using a wireless LAN, Sony bears no responsibility for the loss or damage.
Checking the camera and the supplied items
The number in parentheses indicates the number of pieces.
- Camera (1)
- Power cord (mains lead) (1)^* (supplied in some countries/ regions)

- Multiple power cords may be supplied with your camera. Use the appropriate one that matches your country/region. See page 4.
- Rechargeable battery pack NP-FW50 (1)

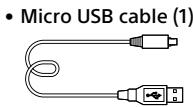
- AC Adaptor (1)
Shoulder strap
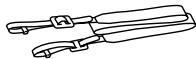
- Eyepiece cup (1)

- Body cap (1) (attached to the camera)
- Shoe cap (1) (attached to the camera)
- Instruction Manual (this manual) (1)
Wi-Fi Connection/One-touch (NFC) Guide (1)
Identifying parts
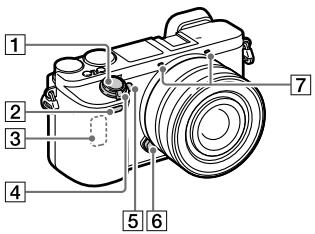
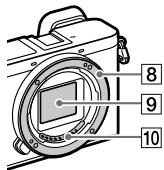
When the lens is removed
1 Shutter button
Remote sensor
3 Wi-Fi antenna (built-in)
4 ON/OFF (Power) switch
Self-timer lamp/AF illuminator
6 Lens release button
7 Microphone*
8 Mount
9 Image sensor
Lens contacts
- Do not cover this part during movie recording. Doing so may cause noise or lower the volume.
** Do not touch this part directly.
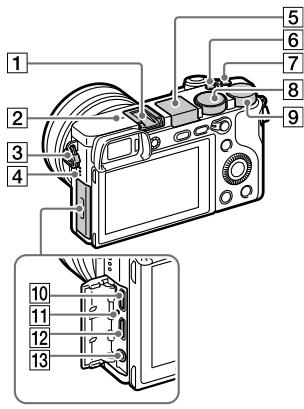
1 Multi Interface Shoe*
Some accessories may not go in all the way and protrude backward from the Multi interface shoe. However, when the accessory reaches the front end of the shoe, the connection is completed.
2 Image sensor position mark
The image sensor is the sensor that converts light into an electric signal. The mark shows the location of the image sensor. When you measure the exact distance between the camera and the subject, refer to the position of the horizontal line. The distance from the lens contact surface to the image sensor is about 18 mm (23/32 in.).
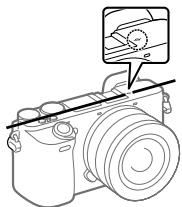
If the subject is closer than the minimum shooting distance of the lens, the focus cannot be confirmed. Make sure you put enough distance between the subject and the camera.
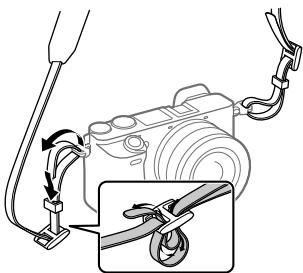
3 Hook for shoulder strap
Attach both ends of the strap onto the camera.
4 Speaker
5 Flash
- Press the (Flash pop-up) button to use the flash.
The flash does not pop up automatically.
- When not using the flash, press it back into the camera body.
C2 button (Custom button 2)
C1 button (Custom button 1)
Mode dial
AUTO (Auto Mode)/
P(Program Auto)/
A (Aperture Priority)/
S (Shutter Priority)/
M(Manual Exposure)/
1/2 (Memory recall)/
(B)(Movie/S&Q Motion)/
(Sweep Panorama)/
SCN (Scene Selection)
9 Control dial
You can quickly adjust the settings for each shooting mode.
10 Multi/Micro USB Terminal* This terminal supports Micro USB-compatible devices.
Charge lamp
12 HDMI micro jack
13 (Microphone) jack When an external microphone is connected, the internal microphone turns off automatically. When the external microphone is a plugin-power type, the power of the microphone is supplied by the camera.
- For details on compatible accessories for the multi interface shoe and the Multi/Micro USB Terminal, visit the Sony web site, or consult your Sony dealer or local authorized Sony service facility.
Accessory Shoe
ni Multi Interface Shoe
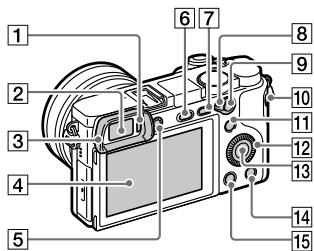
1 Eye sensor
Viewfinder
3 Eyepiece cup
GB
Not attached to the camera at the factory. It is recommended that you attach the eyepiece cup when you intend to use the viewfinder.
Attaching/removing the eyepiece cup
Match the eyepiece cup to the groove on the viewfinder and slide it into place.
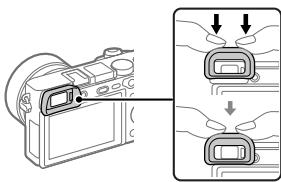
To remove the eyepiece cup, grasp it on the left and right sides and lift it up.
- Remove the eyepiece cup when you attach an accessory (sold separately) to the Multi Interface Shoe.
Monitor (For touch operation: Touch panel/Touch pad) You can adjust the monitor to an easily viewable angle and shoot from any position.
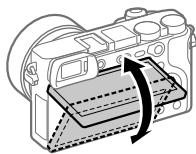
You may not be able to adjust the monitor angle depending on the type of a tripod you use. In such a case, release the tripod screw once to adjust the monitor angle.
5 Diopter-adjustment dial Adjust the diopter-adjustment dial according to your eyesight until the display appears clearly in the viewfinder. If it is hard to operate the diopter-adjustment dial, remove the eyepiece cup before operating the dial.
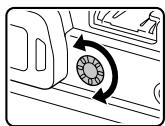
6 $(Flash pop-up) button
7 MENU button
8 AF/MF/AEL switch lever
For shooting: AF/MF button/AEL button For viewing: (Enlarge) button
MOVIE (Movie) button
11 For shooting: Fn (Function) button For viewing: (Send to Smartphone) button You can display the screen for [Send to Smartphone] by pressing this button.
12 Control wheel
13 Center button
For shooting: C3 button (Custom button 3) For viewing: (Delete) button
15▶ (Playback) button
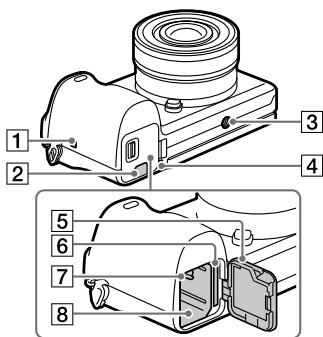
1 N (N mark) This mark indicates the touch point for connecting the camera and an NFC-enabled Smartphone.
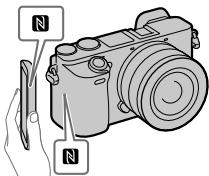
- NFC (Near Field Communication) is an international standard of the short-range wireless communication technology.
2 Connection plate cover Use this when using an AC-PW20 AC Adaptor (sold separately). Insert the connection plate into the battery compartment, and then pass the cord through the connection plate cover as shown below.
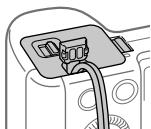
Make sure that the cord is not pinched when you close the cover.
3 Tripod socket hole Use a tripod with a screw less than 5.5mm (7/32 inches) long. Otherwise, you cannot firmly secure the camera, and damage to the camera may occur.
4 Access lamp
5 Battery/memory card cover
Memory card slot
7 Battery lock lever
8 Battery insertion slot
Using the control wheel
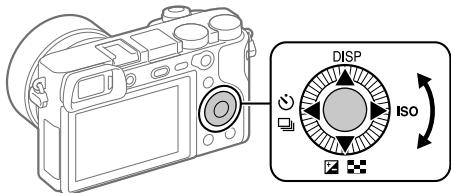
- You can select setting items by turning or pressing the top/bottom/ left/right side of the control wheel. Your selection is determined when you press the center of the control wheel.
- The default settings for the top/bottom/left/right side and the center of the control wheel are as follows.
Top side:DISP(Display Setting)
Bottom side: Exposure Comp./Image Index (2/3)
Left side: Drive Mode (O/马)
Right side: ISO
Center: Eye AF
You can also assign the desired functions to the bottom/left/right side or the center of the control wheel.
- During playback, you can display the next/previous image by pressing the right/left side of the control wheel or by turning the control wheel.
Using the Fn (Function) button
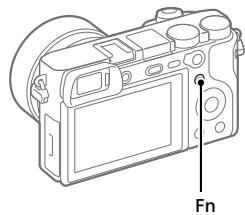
You can register frequently used functions to the Fn (Function) button and recall them while shooting. Up to 12 frequently used functions can be registered to the Fn (Function) button.
1 Press the DISP button repeatedly to display a screen mode other than [For viewfinder], and then press the Fn (Function) button.
GB
2 Select the desired function by pressing the top/bottom/left/right side of the control wheel.
3 Select the desired setting by turning the control wheel, and press the center of the control wheel.
- Some functions can be finetuned using the control dial.
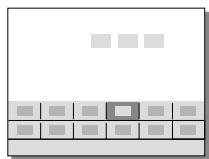
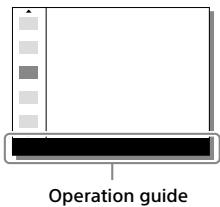
To adjust settings from the dedicated setting screens
Select the desired function in step 2, then press the center of the control wheel. The dedicated setting screen for the function will appear. Follow the operating guide to adjust settings.
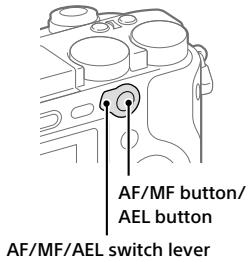
Using the AF/MF/AEL switch lever
You can switch the function of the AF/MF/AEL button to AF/MF or AEL by changing the position of the AF/MF/AEL switch lever.
When you move the AF/MF/AEL switch lever to the AF/MF position and press the button, the focusing mode temporarily switches between auto and manual (AF/MF control). When you move the AF/MF/AEL switch lever to the AEL position and press the button, the exposure is locked (AE lock).
Startup guide
Step 1: Inserting the battery pack/memory card into the camera
For details on memory cards that can be used with this camera, refer to page 44.
1 Open the battery/memory card cover.
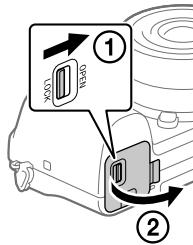
GB
2 Insert the battery pack while pressing the lock lever with the tip of the battery until the battery locks into place.
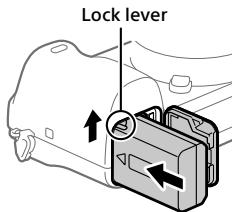
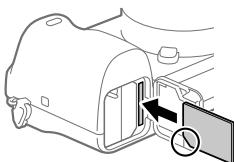
3 Insert the memory card.
- With the notched corner facing in the direction illustrated, insert the memory card until it clicks into place. Otherwise, it may cause a malfunction.
4 Close the cover.
Hint
- When you use a memory card with the camera for the first time, it is recommended that you format the card on the camera for more stable performance of the memory card (page 42).
To remove the battery pack
Make sure that the access lamp (page 17) is not lit, and turn off the camera. Then, slide the lock lever and remove the battery pack. Be careful not to drop the battery pack.
To remove the memory card
Make sure that the access lamp (page 17) is not lit, and then push in the memory card once to remove it.
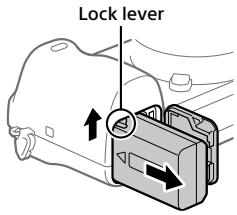
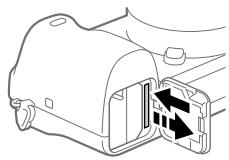
Step 2: Charging the battery pack while it is inserted in the camera
1 Turn the power off.
2 Connect the camera with the battery pack inserted to the AC Adaptor (supplied) using the micro USB cable (supplied), and connect the AC Adaptor to the wall outlet (wall socket).
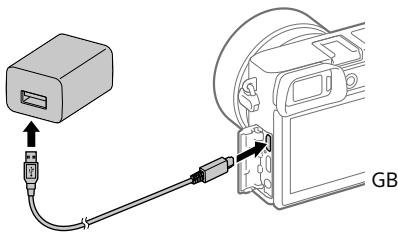
Charge lamp on the camera (orange)
Lit: Charging
Off: Charging finished
Flashing: Charging error or charging paused temporarily because the camera is not within the proper temperature range
- Charging time (full charge): approximately 150 min (when charging a fully depleted battery pack at a temperature of 25^ C ( 77^ F )
- When you use a completely new battery pack or a battery pack that has not been used for a long time, the charge lamp may flash quickly when the battery is charged. If this happens, remove the battery pack or disconnect the USB cable from the camera and then re-insert it to recharge.
- Be sure to use only genuine Sony brand battery packs, micro USB cables (supplied) and AC Adaptors (supplied).
Step 3: Attaching a lens
1 Remove the body cap from the camera and the rear lens cap from the rear of the lens.
- When changing the lens, work quickly in a dust-free environment to keep dust or debris from getting inside the camera.
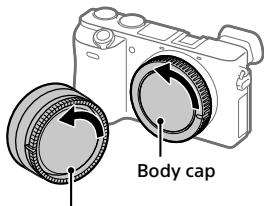
Rear lens cap
2 Mount the lens by aligning the two white index marks (mounting indexes) on the lens and camera.
- Hold the camera with the lens facing down to prevent dust or debris from entering the camera.
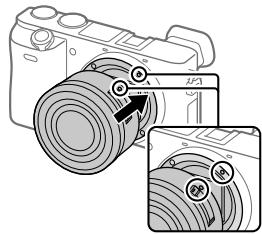
3 While pushing the lens lightly toward the camera, turn the lens slowly in the direction of the arrow until it clicks into the locked position.
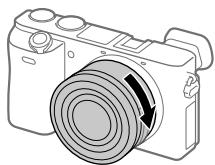
Note
- Be sure to hold the lens straight and do not use force when attaching a lens.
- Do not press the lens release button when attaching a lens.
- The Mount Adaptor (sold separately) is required to use an A-mount lens (sold separately). For details, refer to the operating manual supplied with the Mount Adaptor.
- When carrying the camera with a lens attached, hold both the camera and the lens firmly.
- Do not hold the part of the lens that is extended for zoom or focus adjustment.
To remove the lens
Keep pressing the lens release button and turn the lens in the direction of the arrow until it stops.
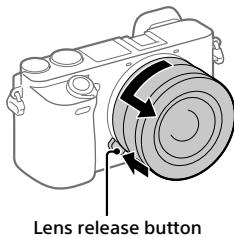
Step 4: Setting the language and the clock
1 Set the ON/OFF (Power) switch to "ON" to turn on the camera.
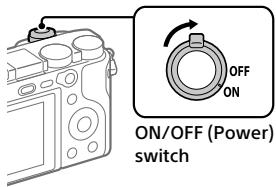
2 Select the desired language and then press the center of the control wheel.
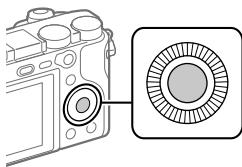
3 Make sure that [Enter] is selected on the screen and then press the center.
4 Select the desired geographic location and then press the center.
5 Select a setting item using the top/bottom of the control wheel or by turning the control wheel, and then press the center.
6 Select the desired item by pressing the top/bottom/left/right side of the control wheel, and then press the center.
7 Repeat steps 5 and 6 to set other items, then select [Enter] and press the center.
Hint
- If you want to set the date and time later, you can cancel the date and time setting procedure by pressing the MENU button. In this case, the setting screen for the date and time will reappear the next time you turn on the camera.
- To reset the date and time setting, use MENU (page 42).
Note
- This camera does not have a function for inserting the date into images. You can insert the date into images and then save and print them using PlayMemories Home (for Windows only).
Step 5: Shooting images in auto mode
GB
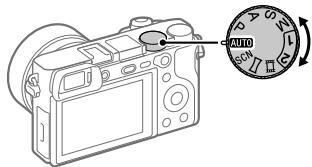
1 Turn the mode dial to set to AUTO.
2 Look through the viewfinder and hold the camera.
3 Set the size of the subject by rotating the zoom ring of the lens when a zoom lens is attached.
4 Press the shutter button halfway down to focus.
- When the image is in focus, an indicator (such as ) will light up.
5 Press the shutter button all the way down.
To shoot movies
Press the MOVIE button to start/stop recording.
To play back images
Press the (Playback) button to play back images. You can select the desired image using the control wheel.
To delete displayed image
Press the (Delete) button while an image is displayed to delete it. Select [Delete] using the control wheel on the confirmation screen, and then press the center of the control wheel to delete the image.
To shoot images in various shooting modes
Set the mode dial to the desired mode depending on the subject or the functions you want to use.
Using the Wi-Fi / One-touch (NFC) / Bluetooth functions
You can perform the following operations using the camera's Wi-Fi, NFC One-touch, and Bluetooth functions.
- Saving images to a computer
- Transferring images from the camera to a smartphone
- Using a smartphone as a remote control for the camera
Viewing still images on a TV - Recording location information from a smartphone to images
For details, refer to the "Help Guide" (page 2) or to the attached document "Wi-Fi Connection/One-touch (NFC) Guide."
PlayMemories Mobile
PlayMemories Mobile is required to connect the camera and a smartphone. If PlayMemories Mobile is already installed on your smartphone, be sure to update it to the latest version.
For details on PlayMemories Mobile, refer to the support page (http://www.sony.net/pmm/).
Recording location information to captured images
By using PlayMemories Mobile, you can obtain location information from a connected smartphone (via Bluetooth communication) and record it to captured images.
Introduction to computer software / PlayMemories Camera Apps
We offer the following computer software and PlayMemories Camera Apps to enhance your enjoyment of photos/ movies.
To take advantage of the computer software, access one of the following URLs using your Internet browser and then download the software by following the onscreen instructions. If one of these programs is already installed on your computer, update it to the latest version before use.
Windows:
http://www.sony.co.jp/imsoft/Win/
Mac:
You can check the recommended operating environment for the software from the following URL:
http://www.sony.net/pcenv/
PlayMemories Home
PlayMemories Home allows you to import still images and movies to your computer and view or use them.
You need to install PlayMemories Home to import XAVC S movies or AVCHD movies to your computer.
You can access the download website directly from the following URL:
http://www.sony.net/pm/
- When you connect the camera to your computer, new functions may be added to PlayMemories Home. Connecting the camera to your computer is therefore recommended even if PlayMemories Home has already been installed on the computer.
Image Data Converter
You can develop and edit RAW images using various adjustment functions like tone curve and sharpness.
Remote Camera Control
With Remote Camera Control, you can change the camera settings or release the shutter from a computer connected via a USB cable. To use Remote Camera Control, first select MENU (Setup) [USB Connection] [PC Remote], then connect the camera to a computer via a USB cable.
GB
PlayMemories Camera Apps
You can add the functions of your choice to your camera by connecting to the application download website (PlayMemories Camera Apps) using your computer or the Wi-Fi function of the camera.
http://www.sony.net/pmca/
- After installing an application, you can call up the application by touching an NFC-enabled Android smartphone to the N mark on the camera, using the [One-touch(NFC)] function.
List of MENU items
For details on each MENU items, refer to the Help Guide.

1 (Camera Settings1)
Red tab
| Quality/Image Size | |
| Quality | Sets the image quality for still images. ([RAW] / [Fine], etc.) |
| Image Size | Selects the size of still images. (L / M / S) |
| Aspect Ratio | Selects the aspect ratio for still images. |
| Panorama: Size | Selects the size of panoramic images. |
| Panorama: Direction | Sets the shooting direction for panoramic images. |
| Long Exposure NR | Sets noise reduction processing for shots with a shutter speed of 1 second or longer. |
| High ISO NR | Sets noise reduction processing for high-sensitivity shooting. |
| Color Space | Changes the color space (range of reproducible colors). |
| Lens Comp. | Selects the type of lens compensation. |
| Shoot Mode/Drive | |
| Auto Mode | You can shoot selecting either Intelligent Auto or Superior Auto. |
| Scene Selection | Selects pre-set settings to match various scene conditions. ([Portrait] / [Sports Action], etc.) |
| S. Auto Img. Extract. | When the shooting mode is set to [Superior Auto] and the camera recognizes the scene to be shot with multiple images, this sets whether to extract an image automatically and save it. |
| Drive Mode | Sets the drive mode, such as for continuous shooting. ([Self-timer] / [Cont. Bracket], etc.) |
| Bracket Settings | Sets self-timer shooting in bracket mode, shooting order for exposure bracketing, and white balance bracketing. |
| 1/2 Recall | Calls up settings pre-registered to [1/2 Memory]. |
| 1/2 Memory | Registers the desired modes and camera settings. |
| AF | |
| Focus Mode | Selects the focus mode. ([Single-shot AF] / [Continuous AF], etc.) |
| Priority Set in AF-S | Sets the timing of the shutter release when [Focus Mode] is set to [Single-shot AF], [DMF] or [Automatic AF] with a still subject. |
| Priority Set in AF-C | Sets the timing of the shutter release when [Focus Mode] is set to [Continuous AF] or [Automatic AF] with a moving subject. |
| Focus Area | Selects the area of focus. ([Wide] / [Flexible Spot], etc.) |
| AF Illuminator | Sets the AF illuminator, which provides light to aid focusing in dark scenes. |
| Center Lock-on AF | Sets the function to track a subject and continue focusing when pressing the center of control wheel in the shooting screen. |
| AF System | Sets the auto focus method when an LA-EA1/LA-EA3 Mount Adaptor (sold separately) is attached. |
| AF w/ shutter | Sets whether to perform auto focusing when the shutter button is pressed halfway down. This is useful when you want to adjust the focus and exposure separately. |
| Pre-AF | Sets whether or not to perform auto focus before the shutter button is half pressed. |
| Eye-Start AF | Sets whether to use auto focus when you look through the viewfinder if an LA-EA2/LA-EA4 Mount Adaptor (sold separately) is attached. |
| AF Area Auto Clear | Sets whether the focus area is displayed all the time or disappears automatically shortly after focusing. |
| Disp. cont. AF area | Sets whether or not to display the focus area in [Continuous AF] mode. |
| AF Micro Adj. | Finely adjusts the autofocused position, when using the LA-EA2 or LA-EA4 Mount Adaptor (sold separately). |
| Exposure | |
| Exposure Comp. | Compensates for the brightness of the entire image. |
| ISO | Sets the ISO sensitivity. ([ISO AUTO], etc.) |
| ISO AUTO Min. SS | Sets the slowest shutter speed at which ISO sensitivity will start to change in [ISO AUTO] mode. |
| Metering Mode | Selects the method for measuring brightness. ([Multi] / [Spot], etc.) |
| Spot Metering Point | Sets whether to coordinate the spot metering point with the focus area when [Focus Area] is set to [Flexible Spot] or [Expand Flexible Spot]. |
| Exposure step | Selects the size of the increment step for shutter speed, aperture, and exposure compensation. |
| AEL w/ shutter | Sets whether to lock the exposure when the shutter button is pressed halfway down. This is useful when you want to adjust the focus and exposure separately. |
| Exposure Std. Adjust | Adjusts the standard for the correct exposure value for each metering modes. |
| Flash | |
| Flash Mode | Sets the flash settings. |
| Flash Comp. | Adjusts the intensity of flash output. |
| Exp.comp.set | Sets whether to reflect exposure compensation value to flash compensation. |
| Red Eye Reduction | Reduces the red-eye phenomenon when using flash. |
| Color/WB/Img. Processing | |
| White Balance | Corrects the tone effect of the ambient light to shoot whitish objects in a white tone. ([Auto] / [Daylight], etc.) |
| Priority Set in AWB | Selects which tone to prioritize when shooting under lighting conditions such as incandescent light with [White Balance] set to [Auto]. |
| DRO/Auto HDR | Analyze the contrast of light and shadow between the subject and the background by dividing the image into small areas, and creates an image with the optimal brightness and gradation. |
| Creative Style | Selects the desired image processing. You can also adjust contrast, saturation, and sharpness. ([Vivid] / [Portrait], etc.) |
| Picture Effect | Shoots images with a texture unique to the selected effect. ([Toy Camera] / [Rich-tone Mono], etc.) |
| Picture Profile | Changes settings such as color and tone when recording images. * This function is for skilled movie creators. |
| Soft Skin Effect | Sets the Soft Skin Effect and the effect level. |
| Focus Assist | |
| Focus Magnifier | Enlarges the image before shooting so that you can check the focus. |
| Focus Magnif. Time | Sets the length of time the image will be shown in an enlarged form. |
| AF in Focus Mag. | Sets whether or not to autofocus when an enlarged image is being displayed. While the enlarged image is being displayed, you can focus within a smaller area than the flexible spot. |
| MF Assist | Displays an enlarged image when focusing manually. |
| Peaking Level | Enhances the outline of in-focus areas with a specific color when focusing manually. |
| Peaking Color | Sets the color used for the peaking function. |
| Face Detection/Shoot Assist | |
| Smile/Face Detect. | Selects to detect faces and adjust various settings automatically. Sets to automatically release the shutter when a smile is detected. ([Off] / [On (Regist. Faces)] / [On] / [Smile Shutter]) |
| Face Registration | Registers or changes the person to be given priority when focusing. |
GB

2 (Camera Settings2)
Purple tab
| Movie | |
| Movie/S&Q Motion | Sets the exposure mode when shooting movies or slow-motion/quick-motion movies. |
| File Format | Selects the movie file format. ([XAVC S 4K] / [AVCHD], etc.) |
| Record Setting | Selects the bit rate and frame rate for the movie size. |
| S&Q Settings | Changes the settings for slow-motion and quick-motion movie shooting. |
| Dual Video REC | Sets whether to simultaneously record an XAVC S movie and MP4 movie or an AVCHD movie and MP4 movie. |
| AF drive speed | Switches focusing speed when using autofocus in movie mode. |
| AF Track Sens | Sets the AF tracking sensitivity for the movie mode. |
| Auto Slow Shut. | Sets the function that automatically adjusts the shutter speed following the brightness of the environment in movie mode. |
| Audio Recording | Sets whether to record audio when shooting a movie. |
| Audio Rec Level | Adjusts the audio recording level during movie recording. |
| Audio Level Display | Sets whether to display the audio level. |
| Wind Noise Reduct. | Reduces wind noise during movie recording. |
| Marker Display | Sets whether to display markers on the monitor when recording movies. |
| Marker Settings | Sets which markers to displayed on the monitor when recording movies. |
| Shutter/SteadyShot | |
| Silent Shooting | Shoots images without a shutter sound. |
| e-Front Curtain Shut. | Sets whether to use the electronic front curtain shutter function. |
| Release w/o Lens | Sets whether to release the shutter when the lens is not attached. |
| Release w/o Card | Sets whether to release the shutter when a memory card is not inserted. |
| SteadyShot | Sets whether to activate SteadyShot for shooting. |
| SteadyShot Settings | Sets SteadyShot settings. |
| Zoom | |
| Zoom | Sets the zoom scale for zoom functions other than the optical zoom. |
| Zoom Setting | Sets whether to use the Clear Image Zoom and Digital Zoom when zooming. |
| Zoom Ring Rotate | Assigns the zoom in/out to the rotational direction of the zoom lens. This function is only available with a power zoom lens that is compatible with this function. |
| Display/Auto Review | |
| DISP Button | Sets the type of information to be displayed on the monitor or in the viewfinder when the DISP button is pressed. |
| FINDER/MONITOR | Sets the method for switching the display between the electronic viewfinder and the monitor. |
| Finder Frame Rate | Sets the frame rate for the viewfinder when shooting still images. |
| Zebra | Displays stripes to adjust brightness. |
| Grid Line | Displays grid lines for adjusting the image composition. |
| Exposure Set. Guide | Sets the guide displayed when exposure settings are changed in the shooting screen. |
GB
| Live View Display | Sets whether to reflect settings such as exposure compensation in screen display. |
| Auto Review | Sets auto review to display the captured image after shooting. |
| Custom Operation | |
| Custom Key(Shoot.) | Assigns functions to the various keys so that you can perform operations more quickly by pressing the keys when shooting images. |
| Custom Key(PB) | Assigns functions to the keys so that you can perform operations more quickly by pressing the keys when playing back images. |
| Function Menu Set. | Customizes the functions displayed when the Fn (Function) button is pressed. |
| Dial/Wheel Setup | Sets the function of the control dial and the control wheel when the exposure mode is set to M. You can adjust the shutter speed or aperture with this setting. |
| Dial/Wheel Ev Comp | Adjusts the exposure compensation with the control dial or the control wheel. |
| MOVIE Button | Enables or disables for the MOVIE button. |
| Dial/Wheel Lock | Sets whether to disable the control dial and the control wheel temporarily by using the Fn button when shooting. You can disable/disable the control dial and the control wheel by pressing and holding down the Fn button. |
| Audio signals | Selects whether to sound a beep during auto focus or self-timer operations. |

(Wireless)
Green tab
| Send to Smartphone | Transfers images to display on a smartphone. |
| Send to Computer | Backs up images by transferring them to a computer connected to a network. |
| View on TV | Allows you to view images on a network-enabled TV. |
| One-touch(NFC) | Assigns an application to One-touch (NFC). You can call up the application when shooting by touching an NFC-enabled smartphone to the camera. |
| Airplane Mode | Disables wireless communications from the device such as Wi-Fi, NFC, and Bluetooth function. |
| Wi-Fi Settings | Allows you to register your access point and check or change the Wi-Fi connection information. |
| Bluetooth Settings | Controls the settings for connecting the camera with a smartphone via a Bluetooth connection. |
| ☐Loc. Info. Link Set. | Obtains location information from the paired smartphone and records it to captured images. |
| Edit Device Name | Changes the device name under Wi-Fi Direct, etc. |
| Reset Network Set. | Reset all the network settings. |

(Application)
Light Green tab
| Application List | Displays the application list. You can select the application you want to use. |
| Introduction | Displays instructions on using the application. |

(Playback)
Blue tab
| Delete | Deletes an image. |
| View Mode | Plays back images from a specified date or specified folder of still images and movies. |
| Image Index | Displays multiple images at the same time. |
| Display Rotation | Sets the playback orientation for images shot vertically. |
| Slide Show | Plays a slide show. |
| Rotate | Rotates the image. |
| ⊕ Enlarge Image | Enlarges the playback images. |
| Protect | Protects recorded images against accidental erasure. |
| Specify Printing | Specifies in advance on the memory card which still images to print out later. |
| Photo Capture | Captures a chosen scene in a movie to save as a still image. |

(Setup)
Yellow tab
| Monitor Brightness | Adjusts the brightness of the screen. |
| Viewfinder Bright. | Sets the brightness of the electronic viewfinder. |
| Finder Color Temp. | Sets the color temperature of the viewfinder. |
| Gamma Disp. Assist | Converts an S-Log image into an image with contrast equivalent to a normal gamma setting when it is displayed to assist monitoring. |
| Volume Settings | Sets the volume for movie playback. |
| Upload Settings | Sets the upload function of the camera when using a commercially available Eye-Fi card. |
| Tile Menu | Sets whether to display the tile menu every time you press the MENU button. |
| Mode Dial Guide | Turns the mode dial guide (the explanation of each shooting mode) on or off. |
| Delete confirm. | Sets whether [Delete] or [Cancel] is preselected in the delete confirmation screen. |
| Display Quality | Sets the display quality. |
| Pwr Save Start Time | Sets the time intervals to automatically switch to power save mode. |
| Auto Pwr OFF Temp. | Sets the camera temperature at which the camera turns off automatically during shooting. When shooting in hand-held mode, set to [Standard]. |
| NTSC/PAL Selector1 | Changes the TV format of the device so that you can shoot in a different movie format. |
| Cleaning Mode | Starts the cleaning mode to clean the image sensor. |
| Touch Operation | Sets whether or not to activate the touch operation of the monitor. |
| Touch Pad (vertical) | Sets whether to operate the camera using the touch pad when you use the viewfinder in the vertical position. |
| Touch Pad Area Set. | Sets the area to be used in the touch pad operation at the time of shooting by viewfinder. |
| Demo Mode | Sets demonstration playback of movies to on or off. |
| TC/UB Settings | Sets the time code (TC) and user bit (UB). * This function is for skilled movie creators. |
| Remote Ctrl | Sets whether to use the infrared remote control. |
| HDMI Settings | Sets the HDMI settings. |
| 4K Output Sel. | Sets how to record and output 4K movies via HDMI when the camera is connected to an external recorder/player that supports 4K. |
| USB Connection | Sets the USB connection method. |
| USB LUN Setting | Enhances compatibility by limiting the functions of USB connection. Set to [Multi] in normal conditions and to [Single] only when the connection between the camera and a computer or AV component cannot be established. |
| USB Power Supply | Sets whether to supply power via USB connection when the camera is connected to a computer or USB device using a micro USB cable. If you use the supplied AC Adaptor, power will be supplied regardless of whether this setting is on or off. |
| PC Remote Settings | Controls the PC remote shooting settings. |
| Language | Selects the language. |
GB
| Date/Time Setup | Sets the date, time, and daylight savings. |
| Area Setting | Sets the location of use. |
| Copyright Info | Sets copyright information for still images. |
| Format | Formats the memory card. |
| File Number | Sets the method used to assign file numbers. |
| Set File Name | Changes the first 3 characters of the file names for still images. |
| Select REC Folder | Changes the folder selected for storing still images and movies (MP4). |
| New Folder | Creates a new folder for storing still images and movies (MP4). |
| Folder Name | Sets the folder format for still images. |
| Recover Image DB | Recovers the image database file and enables recording and playback. |
| Display Media Info. | Displays the remaining recording time of movies and the recordable number of still images on the memory card. |
| Version | Displays the camera software version. |
| Certification Logo*2 | Displays certification information for the camera (only some of the certification logos are displayed). |
| Setting Reset | Restores settings to their defaults. Select [Initialize] to restore all settings to their default values. |
1 If you change this item, you will need to format the memory card for compatibility with the PAL or NTSC system. Also, note that it may not be possible to play back movies recorded for the NTSC system on PAL system TVs.
^2 Overseas models only.
Specifications
Battery life and number of recordable images
| Battery life | Number of images | ||
| Shooting (still images) | Screen mode | — | Approx. 350 |
| Viewfinder mode | — | Approx. 310 | |
| Actual shooting (movies) | Screen mode | Approx. 70 min. | — |
| Viewfinder mode | Approx. 65 min. | — | |
| Continuous shooting (movies) | Screen mode | Approx. 105 min. | — |
| Viewfinder mode | Approx. 105 min. | — | |
- The above estimates for battery life and number of recordable images apply when the battery pack has been fully charged. The battery life and number of images may decrease depending on the conditions of use.
-
The battery life and number of recordable images are estimates based on shooting under the following conditions:
-
Using the battery pack at an ambient temperature of 25^ (77^) .
- Using an E PZ 16 - 50mm F3.5 - 5.6 OSS lens (sold separately)
- Using a Sony SDXC memory card of UHS Speed Class 3 (L3) (sold separately)
- [Viewfinder Bright.]: [Manual] [± 0]
- [Monitor Brightness]: [Manual] [ ± 0 ]
-
The numbers for "Shooting (still images)" are based on the CIPA standard and shooting under the following conditions:
(CIPA: Camera & Imaging Products Association)
DISP: [Display All Info.]
- [Focus Mode]: [Automatic AF]
- One picture is taken every 30 seconds.
- The flash strobes once for every two pictures.
- The power is turned on and off once every ten times.
-
The number of minutes for movie shooting is based on the CIPA standard and shooting under the following conditions:
-
The image quality is set to XAVC S HD 60p 50M Super 35mm/50p 50M Super 35mm.
- Actual shooting (movies): Battery life based on repeatedly shooting, zooming, shooting stand-by, turning on/off, etc.
- Continuous shooting (movies): Battery life based on non-stop shooting until the limit (29 minutes) has been reached, and then continued by pressing the MOVIE (Movie) button again. Other functions, such as zooming, are not operated.
Memory cards that can be used
You can use the following types of memory cards with this camera. The mark indicates that these memory cards can be used for shooting still images or movies.
When using Memory Stick Micro media or microSD memory cards with this camera, make sure to use with the appropriate adaptor.
| Memory card | For still images | For movies | ||
| MP4 | AVCHD | XAVC S | ||
| Memory Stick PRO Duo | ✓ | ✓(Mark2 only) | ✓(Mark2 only) | - |
| Memory Stick PRO-HG Duo | ✓ | ✓ | ✓ | ✓*1 |
| Memory Stick Micro (M2) | ✓ | ✓(Mark2 only) | ✓(Mark2 only) | - |
| SD memory card | ✓ | ✓*2 | ✓*2 | - |
| SDHC memory card | ✓ | ✓*2 | ✓*2 | ✓*3 |
| SDXC memory card | ✓ | ✓*2 | ✓*2 | ✓*3 |
| microSD memory card | ✓ | ✓*2 | ✓*2 | - |
| microSDHC memory card | ✓ | ✓*2 | ✓*2 | ✓*3 |
| microSDXC memory card | ✓ | ✓*2 | ✓*2 | ✓*3 |
1 Movies cannot be recorded in 100 Mbps or more.
2 SD Speed Class 4 (CLASS④) or faster, or UHS Speed Class 1 (LJ) or faster
*3 SD Speed Class 10 (CLASS⑩), or UHS Speed Class 1 (L) or faster When recording in 100 Mbps or more, UHS Speed Class 3 (L) is required.
Note
- When an SDHC memory card is used to record an XAVC S movie over extended periods of time, the recorded movies will be divided into files 4 GB in size. The divided files can be handled as a single file by importing them to a computer using PlayMemories Home.
Number of recordable images
When you insert a memory card into the camera and set the ON/OFF (Power) switch to "ON," the number of images that can be recorded (should you continue to shoot using the current settings) is displayed on the screen.
Note
GB
- When "0" (the number of recordable images) flashes in orange, the memory card is full. Replace the memory card with another one, or delete images from the current memory card.
- When "NO CARD" flashes in orange, it means no memory card has been inserted. Insert a memory card.
The number of images that can be recorded on a memory card
The table below shows the approximate number of images that can be recorded on a memory card formatted with this camera. The values are defined using Sony standard memory cards for testing. The values may vary depending on the shooting conditions and the type of memory card used.
Image Size]: [L: 24M]
(Units: Images)
| Quality | 8 GB | 16 GB | 32 GB | 64 GB |
| Standard | 1300 | 2700 | 5400 | 10500 |
| Fine | 820 | 1650 | 3300 | 6600 |
| Extra fine | 405 | 810 | 1600 | 3250 |
| RAW & JPEG | 215 | 435 | 880 | 1750 |
| RAW | 295 | 600 | 1200 | 2400 |
- When Aspect Ratio is set to other than [3:2], you can record more images than the numbers shown in the table above (except when [RAW] is selected).
Note
- Even if the number of recordable images is higher than 9999 images, "9999" will appear.
- When an image shot with another product is played back on this camera, the image may not appear in its actual size.
- The numbers shown are when using a Sony memory card.
Recordable movie times
The table below shows the approximate total recording times using a memory card formatted with this camera. The values may vary depending on the shooting conditions and the type of memory card used. The recording times for when [File Format] is set to [XAVC S 4K], [XAVC S HD], and [AVCHD] are recording times when shooting with [Dual Video REC] set to [Off].
(h (hour), m (minute))
| File Format | Record Setting | 8 GB | 16 GB | 32 GB | 64 GB |
| XAVC S 4K | 30p 100M/ 25p 100M Super 35mm | 9 m | 15 m | 35 m | 1 h 15 m |
| 30p 60M/ 25p 60M Super 35mm | 15 m | 30 m | 1 h | 2 h 5 m | |
| 24p 100M Super* / - | 9 m | 15 m | 35 m | 1 h 15 m | |
| 24p 60M Super* / - | 15 m | 30 m | 1 h | 2 h 5 m | |
| XAVC S HD | 120p 100M/ 100p 100M | 9 m | 15 m | 35 m | 1 h 15 m |
| 120p 60M/ 100p 60M | 15 m | 30 m | 1 h | 2 h 5 m | |
| 60p 50M Super 35mm/ 50p 50M Super 35mm | 15 m | 35 m | 1 h 15 m | 2 h 35 m | |
| 30p 50M Super 35mm/ 25p 50M Super 35mm | 15 m | 35 m | 1 h 15 m | 2 h 35 m | |
| 24p 50M Super* / - | 15 m | 35 m | 1 h 15 m | 2 h 35 m | |
| AVCHD | 60i 24M (FX) Super 35mm/ 50i 24M (FX) Super 35mm | 40 m | 1 h 25 m | 3 h | 6 h |
| 60i 17M (FH) Super 35mm/ 50i 17M (FH) Super 35mm | 55 m | 2 h | 4 h 5 m | 8 h 15 m | |
| 60p 28M (PS) Super 35mm/ 50p 28M (PS) Super 35mm | 35 m | 1 h 15 m | 2 h 30 m | 5 h 5 m | |
| 24p 24M (FX) Super 35mm/ 25p 24M (FX) Super 35mm | 40 m | 1 h 25 m | 3 h | 6 h | |
| 24p 17M (FH) Super 35mm/ 25p 17M (FH) Super 35mm | 55 m | 2 h | 4 h 5 m | 8 h 15 m |
GB
| File Format | Record Setting | 8 GB | 16 GB | 32 GB | 64 GB |
| MP4 | 1920×108060p 28M Super35mm/50p 28M Super35mm | 35 m | 1 h 15 m | 2 h 35 m | 5 h 20 m |
| 1920×108030p 16M Super35mm/25p 16M Super35mm | 1 h | 2 h | 4 h 10 m | 8 h 25 m | |
| 1280×72030p 6M Super35mm/25p 6M Super35mm | 2 h 35 m | 5 h 20 m | 10 h 55 m | 22 h |
- Only when [NTSC/PAL Selector] is set to NTSC
- Continuous shooting is possible for approximately 29 minutes (a product specification limit). The continuous recordable time may differ in the following situations:
- When the file format is set to MP4 (28M): Approximately 20 minutes (limited by file size of 4 GB).
- When shooting slow-motion/quick-motion movies: Recording will automatically stop when the recorded file reaches approximately 29 minutes (the played back movie reaches approximately 29 minutes).
(Recording will automatically stop when the recorded file reaches approximately 15 minutes if [S&0 Record Setting] is set to [60p/50p] and [S&0 Frame Rate] is set to [30fps/25fps].)
- The times for slow-motion/quick-motion movies are playback times, not recording times.
Note
- The recordable time of movies varies because the camera is equipped with VBR (Variable Bit-Rate), which automatically adjusts image quality depending on the shooting scene. When you record a fast-moving subject, the image is clearer but the recordable time is shorter because more memory is required for recording. The recordable time also varies depending on the shooting conditions, the subject or the image quality/size settings.
- The times shown are recordable times using a Sony memory card.
Notes on continuous movie recording
- It requires a lot of power to perform high quality movie recording or continuous shooting. Therefore, if you continue to shoot, the temperature inside the camera will rise, especially that of the image sensor. In such cases, the camera will turn off automatically because the surface of the camera is heated to a high temperature that can affect the quality of the images or the internal mechanism of the camera.
- The following values are the continuous times from when the camera starts recording until the camera stops recording.
| Ambient temperature | Continuous recording time for movies (HD) | Continuous recording time for movies (4K) |
| 20°C (68°F) | Approx. 29 min. | Approx. 20 min. |
| 30°C (86°F) | Approx. 29 min. | Approx. 20 min. |
| 40°C (104°F) | Approx. 29 min. | Approx. 20 min. |
HD: XAVC S HD (60p 50M/50p 50M, not connected via Wi-Fi)
4K: XAVC S 4K (24p 60M, not connected via Wi-Fi)
- The duration of time available for movie recording varies with the temperature, file format/record setting for movies, Wi-Fi network environment, or condition of the camera before you start recording. If you frequently recompose or shoot images after the power is turned on, the temperature inside the camera will rise and the recording time available will be shorter.
- When the icon appears, the temperature of the camera is too high.
- If the camera stops recording due to the temperature, leave it for some time with the power turned off. Start recording after the temperature inside the camera drops fully.
-
If you observe the following points, the recording time will be longer.
-
Keep the camera out of direct sunlight.
-
Turn the camera off when it is not being used.
-
When [File Format] is set to [AVCHD], the file size of movies is limited to approx. 2 GB. If the movie file size reaches approx. 2 GB during recording, a new movie file will be created automatically.
- When [File Format] is set to [MP4], the file size of movies is limited to approx. 4 GB. If the movie file size reaches approx. 4 GB during recording, recording will stop automatically.
Specifications
Camera
[System]
Camera type
Interchangeable Lens Digital Camera
Lens
Sony E-mount lens
[Image sensor]
Image sensor
APS-C format (23.5 mm × 15.6 mm)
CMOS image sensor
Effective pixel number of camera
Approx. 24 200 000 pixels
Total pixel number of image sensor
Approx. 25 000 000 pixels
[SteadyShot]
System
In-camera sensor shift image
stabilization system
[Anti-Dust]
System
Charge protection coating on optical filter and image sensor shift mechanism
[Auto focus system]
System
Phase detection system/Contrast detection system
Sensitivity range
EV-1 to EV20 (at ISO 100 equivalent, with F2.0 lens)
[Exposure control]
Metering method
1200-segment metering by the image sensor
Metering range
EV-2 to EV20 (at ISO 100 equivalent, with F2.0 lens)
ISO sensitivity (Recommended exposure index)
Still images: AUTO, ISO 100 -
ISO 25 600 (Extended ISO: Maximum ISO 51 200)
Movies: AUTO, ISO 100 - ISO 25 600 equivalent
Exposure compensation
±5.0 EV (switchable between 1/3 and 1/2 EV steps)
[Shutter]
Type
Electronically-controlled, verticaltraverse, focal-plane type
Speed range
Still images: 1/4 000 second to
30 seconds, BULB
Movies: 1/4000 second to
1/4 second (1/3 EV step)
-1080 60i-compatible device: up to 1/60 second in AUTO mode (up to 1/30 second in Auto slow shutter mode)
-1080 50i-compatible device: up to 1/50 second in AUTO mode (up to 1/25 second in Auto slow shutter mode)
Flash sync speed
1/160 second
[Recording media]
Memory Stick PRO Duo media, SD card
[Monitor]
LCD monitor
Wide, 7.5 cm (3.0 type) TFT drive, touch panel
Total number of dots 921600 dots
[Electronic viewfinder]
Type
Electronic viewfinder
Total number of dots
2359296 dots
Frame coverage 100%
Magnification
Approx. 1.07x
Approx. 0.70 × (35 ~mm -format equivalent) with 50 ~mm lens at infinity, -1 ~m^-1 (diopter)
Eye point (CIPA compliant)
Approx. 23mm from the eyepiece, approx. 21.4mm from the eyepiece frame at -1m^-1
Diopter Adjustment
-4.0 m ^-1 to +3.0 m ^-1
[Input/output terminals]
Multi/Micro USB Terminal*
Hi-Speed USB (USB 2.0)
- Supports Micro USB compatible device.
HDMI
HDMI type D micro jack
![SONY A6500 - [Input/output terminals] - 1](/content/2024/11/221207/images/d499960d8c1e2b1c1bddf5a6fc56794adb8ee6572561f72203803188bb46bd7c.jpg)
(Microphone) Terminal
Rechargeable battery pack NP-FW50
Power consumption (while shooting)
When using an
EPZ 16 - 50 mm F3.5 - 5.6 OSS lens
Approx. 2.8 W (during shooting with the viewfinder)
Approx. 2.5 W (during shooting with the monitor)
[Others]
Exif Print
Compatible
PRINT Image Matching III
Compatible
DPOF
Compatible
Dimensions (CIPA compliant) (Approx.)
120.0mm× 66.9mm× 53.3mm
(4 3/4 inches × 2 3/4 inches ×
21/8 inches) (W/H/D)
Mass (CIPA compliant) (Approx.) 453 g (1 lb)
(including battery and SD card)
410 g (14.5 oz) (camera only)
Operating temperature
0^ to 40^ (32°F to 104°F)
Storage temperature
-20^ to +60^ (-4^ to +140^)
[File format]
Still image
JPEG compliant (DCF Ver. 2.0, Exif Ver. 2.31, MPF Baseline), RAW (Sony ARW 2.3 Format)
Movies (XAVC S format)
MPEG-4 AVC/H.264 XAVC S ver.1.0
format compliant
Video:MPEG-4AVC/H.264
Audio: LPCM 2ch (48 kHz 16 bit)
Movie (AVCHD format)
AVCHD format Ver. 2.0 compatible
Video:MPEG-4AVC/H.264
Audio: Dolby Digital 2ch
Dolby Digital Stereo Creator
Manufactured under license from Dolby Laboratories.
Movie (MP4 format)
Video: MPEG-4 AVC/H.264
Audio: MPEG-4 AAC-LC 2ch
USB communication
Hi-Speed USB (USB 2.0)
[Flash]
Flash guide number 6 (in meters at ISO 100)
Recycling time Approx. 4 seconds
Flash coverage Covering 16mm lens (focal length that the lens indicates)
Flash compensation ± 3.0 EV (switchable between 1/3 and 1/2 EV steps)
[Wireless LAN]
Supported format IEEE 802.11 b/g/n
Frequency band 2.4 GHz
Supported security protocols WEP/WPA-PSK/WPA2-PSK
Configuration method Wi-Fi Protected Setup™ (WPS)/ Manual
Access method Infrastructure mode
[NFC]
Tag type NFC Forum Type 3 Tag compliant
[Bluetooth communications] Bluetooth standard Ver. 4.1
Frequency band 2.4 GHz
Model No. WW213019
AC Adaptor AC-UUD12/UE12
Power requirements AC 100 V to 240 V, 50 Hz/60 Hz, 0.2 A
Output voltage DC 5 V, 1.5 A
Rechargeable battery pack NP-FW50
Nominal voltage DC 7.2 V
Design and specifications are subject to change without notice.
On focal length
The picture angle of this camera is narrower than that of a 35 mm-format camera. You can find the approximate equivalent of the focal length of a 35 mm-format camera, and shoot with the same picture angle, by increasing the focal length of your lens by half.
For example, by using a 50~mm lens, you can get the approximate equivalent of a 75~mm lens of a 35 mm-format camera.
Trademarks

- Memory Stick and MEMBRANE are trademarks or registered trademarks of Sony Corporation.
XAVC S and XAVC S are registered trademarks of Sony Corporation. - "AVCHD Progressive" and the "AVCHD Progressive" logotype are trademarks of Panasonic Corporation and Sony Corporation.
Mac is a registered trademark of Apple Inc. in the United States and other countries. - IOS is a registered trademark or trademark of Cisco Systems, Inc.
- iPhone and iPad are registered trademarks of Apple Inc. in the United States and other countries.
- Blu-ray Disc^TM and Blu-ray™ are trademarks of the Blu-ray Disc Association.
- DLNA and DLNA CERTIFIED are trademarks of Digital Living Network Alliance.
- Dolby and the double-D symbol are trademarks of Dolby Laboratories.
- Eye-Fi is a trademark of Eye-Fi, Inc.
- The terms HDMI and HDMI High-Definition Multimedia Interface, and the HDMI Logo are trademarks or registered trademarks of HDMI Licensing LLC in the United States and other countries.
- Microsoft and Windows are registered trademarks or trademarks of Microsoft Corporation in the United States and/or other countries.
-
SDXC logo is a trademark of SD-3C, LLC.
-
Facebook and the "e" logo are trademarks or registered trademarks of Facebook, Inc.
Android and Google Play are trademarks or registered trademarks of Google Inc.
YouTube and the YouTube logo are trademarks or registered trademarks of Google Inc. - Wi-Fi, the Wi-Fi logo and Wi-Fi Protected Setup are registered trademarks or trademarks of the Wi-Fi Alliance.
The N Mark is a trademark or registered trademark of NFC Forum, Inc. in the United States and in other countries. - The Bluetooth® word mark and logos are registered trademarks owned by the Bluetooth SIG, Inc. and any use of such marks by Sony Corporation is under license.
- In addition, system and product names used in this manual are, in general, trademarks or registered trademarks of their respective developers or manufacturers. However, the ^TM or ^ marks may not be used in all cases in this manual.

InfoLITHIUM

SERIES

MEMORY STICK


HIGH-DEFINITION MULTIMEDIA INTERFACE




Bluetooth
On GNU GPL/LGPL applied software
The software that is eligible for the following GNU General Public License (hereinafter referred to as "GPL") or GNU Lesser General Public License (hereinafter referred to as "LGPL") are included in the product.
This informs you that you have a right to have access to, modify, and redistribute source code for these software programs under the conditions of the supplied GPL/LGPL. Source code is provided on the web. Use the following URL to download it. http://oss.sony.net/Products/Linux/ We would prefer you do not contact us about the contents of source code.
Licenses (in English) are recorded in the internal memory of your product. Establish a Mass Storage connection between the product and a computer to read licenses in the "PMHOME" - "LICENSE" folder.
Additional information on this product and answers to frequently asked questions can be found at our Customer Support Website.
http://www.sony.net/
GB
Remote Camera Control
PlayMemories Camera Apps
(h (heures), m (minutes))
| Format deelier | Réglage de l'enregistrement | 8 Go | 16 Go | 32 Go | 64 Go |
| XAVC S 4K | 30p 100M/25p 100M Super35mm | 9 m | 15 m | 35 m | 1 h 15 m |
| 30p 60M/25p 60M Super35mm | 15 m | 30 m | 1 h | 2 h 5 m | |
| 24p 100M Super35mm*/- | 9 m | 15 m | 35 m | 1 h 15 m | |
| 24p 60M Super35mm*/- | 15 m | 30 m | 1 h | 2 h 5 m | |
| XAVC S HD | 120p 100M/100p 100M | 9 m | 15 m | 35 m | 1 h 15 m |
| 120p 60M/100p 60M | 15 m | 30 m | 1 h | 2 h 5 m | |
| 60p 50M Super35mm/50p 50M Super35mm | 15 m | 35 m | 1 h 15 m | 2 h 35 m | |
| 30p 50M Super35mm/25p 50M Super35mm | 15 m | 35 m | 1 h 15 m | 2 h 35 m | |
| 24p 50M Super35mm*/- | 15 m | 35 m | 1 h 15 m | 2 h 35 m | |
| Format de fiéchier | Réglage de l'enregistrement | 8 Go | 16 Go | 32 Go | 64 Go |
| AVCHD | 60i 24M (FX) Super 50i 24M (FX) Super 30mm | 40 m | 1 h 25 m | 3 h | 6 h |
| 60i 17M (FH) Super 50i 17M (FH) Super 30mm | 55 m | 2 h | 4 h 5 m | 8 h 15 m | |
| 60p 28M (PS) Super 50p 28M (PS) Super 30mm | 35 m | 1 h 15 m | 2 h 30 m | 5 h 5 m | |
| 24p 24M (FX) Super 25p 24M (FX) Super 30mm | 40 m | 1 h 25 m | 3 h | 6 h | |
| 24p 17M (FH) Super 25p 17M (FH) Super 30mm | 55 m | 2 h | 4 h 5 m | 8 h 15 m | |
| MP4 | 1920×108060p 28M Super 50p 28M Super 30mm | 35 m | 1 h 15 m | 2 h 35 m | 5 h 20 m |
| 1920×108030p 16M Super 50p 16M Super 30mm | 1 h | 2 h | 4 h 10 m | 8 h 25 m | |
| 1280×72030p 6M Super 25p 6M Super 30mm | 2 h 35 m | 5 h 20 m | 10 h 55 m | 22 h |
Batterie rechargeable NP-FW50
PRINT Image Matching III
Compatible
DPOF
Compatible
Dimensions (norme CIPA) (environ)
120,0 mm × 66,9 mm × 53,3 mm
(43/4po×23/4po×21/8po)
(L/H/P)
Wi-Fi Protected SetupTM (WPS)/
Manuel
Méthode d'accès
Mode Infrastructure
[NFC]
Type de balise
Conformé NFC Forum Type 3 Tag
[Communications Bluetooth]
Norme Bluetooth Ver. 4.1
Bande de fréquence
2,4 GHz
Model No. WW213019
Batterie rechargeable NP-FW50
Tension nominale 7,2 V CC
Remote Camera Control
PlayMemories Camera Apps
(CIPA: Camera & Imaging Products Association)
PRINT Image Matching III
Kompatibel
DPOF
Kompatibel
Audio: LPCM 2ch (48 kHz 16 Bit)
Film (AVCHD-Format)
Wi-Fi Protected SetupTM (WPS)/
Manuell
Zugangsmethode
Infrastruktur-Modus
[NFC]
Tag-Typ
NFC Forum Type 3 Tag-kanform
[Bluetooth-Kommunikation]
Bluetooth-Standard Ver. 4.1
Frequenzband
2,4 GHz
Model No. WW213019
Remote Camera Control
PlayMemories Camera Apps
Temperature operative
Da 0^ a 40^
Remote Camera Control
PlayMemories Camera Apps
Remote Camera Control
PlayMemories Camera Apps
Helpfunct. in camera

C1-knop (customknop 1)
8 Functiekeuzeknop
Remote Camera Control
PlayMemories Camera Apps
Remote Camera Control
PlayMemories Camera Apps
YTO Kacaetc pyKOBoDCTBa no b6bICTPOMy ncyk, CM. "PyKoBODCTBO no Naayy pa6oTb" (ctp.19). "PyKoBODCTBO no Naayy pa6oTb" npEeCTabnEe npEeBapnteHbIe npOeDpybl C MOMTE BCKpbITnYynakOBKn Do cnyska 3aTbOpA DnI neBpBOrO CHIMKA.
BctpoeHHa cnpaKa

[BcTpoeHHaC npabka] noka3bIbaet NocheHnnyHKTOB MeHIO Ha MOHTope KaMepbl.
BbMOKeTe b6IcTPO noJyUHTb
HΦoPmaZIO BO BpeMcBcEMKn.
ДЯ nCNoJIb3OBAHnA ΦYHKmN [BCTpoEHHa CnpaBAk]
HEKOTOpbIe HAcTPOKn DoJXhbl
6bItb CdaneHaJb 3apaHee.ДЯ
nOlyeHnnoPpOBhIX CbeDeHn CM.“BCTpoEHnA CnpaBA" B CnpaBOuHOe pyKOBoDCTBO.
HaBaanHe KaTeorOpn:UHpOBoi
FOToaAnnapat CO CmEHbIM
OBbekTIVoBOM
HaBaanHe moJeI:ILCE-6500
IPEDYIPEXDEHNE
ДяУмениOnaHocHTN BO3RopAHINI NIOpAkeHENI 3NeKtpnueckm TOKOM HeNoDBepraTe AnnpaT BO3DeiCTBNIOdoXkDiNII BLnM.

IPEДУПЕХДЕНМ
BatapeHbIb6Jok
HnnpabInbHoe o6paueHne c
6atapeHbIM 6bLOKOM MoXeT CStb
npuHnoI erO B3pBbA, Bo3rOpaHnI,
a TaKKe XMMUcckNx OXorOB.
CobJIoJaTe cJeDyUoJIne MePbI
npedocTopoXHocTNI.
- He pa36paaiTe 6JIOK.
He npBebprAte 6atapeHbI bLOK KAKM B6I TO HN B6JIO MEXAHINeCKM BO3DeiCTBnAM: YdApam, naJeHNaR NIn IOnaDAnHnO NO TjXeKBe IpeDMtbl. - Bo n36bexaHne kopoTkoR0 3amblkAHnHE dOyncsKaIte KOHTaMeTaJIInuYeCECKN pIepdMeTOB C KOHTAKTMi BatapeHOrHO bNOka.
He donyckaite Harpeba 6atapeHoro 6noka do Temnepatpyb bIwe 60°C: n36eeraite Bo3dJeCTBna Ha Hero npraMbx COlnYeBx IyuCh, a Takske He OcTABJIte B pinnapKOBaHOM Ha coINHue abOTMObIne.
3aapanepaetcXgntab6boknIb 6pocatb ero aOroh. - He cneyuET mNoJb3OBaBt nobpeXeHHeI npoTeKUHeJI NTmI-NOHHeB 6bataen.
Длзардкьбатерного6лoka nCPOIb3yIteOpINHJIbHoe 3apdHoeYCTpoiCTBOSonyИлpyroyeCOBMeCTUMoe3apdHoe YCTpoiCTBO.
XpAHNTe 6bAteHbN 6bnK HEOCTYHNOH fOETeT MeCtE
XpaHNTe 6aTapeiNb 6IOK B CxOM MECTe.
3aMeHy cIeNyET bIyoJIHbTb TOnkO h6atapeHbI bIoK ToRTO Je IINa HAnoIuHOrO TIna, peKoMeHNoBaHNb Hsy.
- YUINI3aJNIGCNOJIb3OBAHNHbIX 6batapeINbIX 6NOKOB DOJXHa HPOIN3BOIDITcB HAJIeXaJIM O6PABOM B COOTBETCTBNI C INHCTPYKUNJMM.
He nOBeprAe Bo3JeTcBIO OeHb H3Ko TEmpepatpyb -20°C INn INKe JIoO o6e Hb N3KOrO DaBHeHn 11,6 KPa INn HNKe.
BnDeo3aIncN, BblOnJIHeHbIe C nOMOoiBIO daHHoN KaMepbl, MOrYT BOCpON3BOoNTbC Ha npYrNX uCTPOiCTbX HnPaBnIbHO. TaKKe, BnDeo3aIncN, BblONJIHeHbIe C nOMOoiBIO dpyrNX uCTPOiCTB, MOrYT BOCpON3BOoNTbC Ha daHHoN KaMepe HnPaBnIbHO.
PpeDynpexdEHe o6 aBTopcknx npabax
Ha TeIeBn3IOHbIe IpOgpaMMbl,
fMbbl,BuJeOJIeHTbI u
dpyrne MaTePnaJIb MoKcET
pacnpocTpaHbTc8a ABTOpcKoe npaBO.
HenpaBOMoUH ape3aIncb TaKxu
MaTePnaIOB MoKcET pOTIBOpEChTb
noJIoKeHmM 3aKoHa o6 ABTOpcKOM
npabe.
O TexHnuecknx xapaKtepnctnKax, yKa3aHHbIX B daHHOM pyKOboDCTBe
3KcnpyatauONHbIe daHHbIe n
Texnueckne xapaKTepmNTNK
OnpedenheB npi cIeNDUoXn
YCLOBHX, 3a NCKLIOpHeM CnyuaEB,
ONHCANHbX B DAHNOM PYKOBODCTBe;
PpN obchyHoi TempepaType
OKpykaIOSeI cpebl 25°C n
NCNoJIb3OBAHNI AKKYMЛrTOpA,
KOTOpBI bJI IONHOb 3apJxKeH
DO BblKnIOUeHIn HINKaTOpA
3ApJKN.
Kak BpeMeHHO OTKIOHtB fYHKUIN 6ecnpoBOHOcTn (Функционрованe Wi-Fi, NFC, Bluetooth n.t.n.)
HaxoJcB ha 60pty caMoneta n T.n. MoKHO BpeMeHHO OTKnIOuHTb Cce
fYHKun 6ecnpoBOHn Cetn.
Bb6epnte KhONky MENU (BeCnpoBD- hA) [PexmNoIeta] [Bkn].
Pn yCTaHOBke [PexmNoTe] B [Bkn] Ha 3kpaHe 6ydet OTO6paKeH 3HaOK (camolTe).
PpimMeaHnno 6eCnpoBdoHn loKaJIbHOcTeN
B cnyae noteprn nn kpaXn KaMepbl
Sony He necet OTbETCTBEHOCNT 3a
ytpaTy nn yUepe6, npuNHeHHb
HecaHKUHOHNPOBaHHbIM
DOCTYONM nn NcNoIb3OBAHMeM
3apercTnpoBAHHb Na KaMepe
TOeK DoCTyna.
PpimMeyaHnO tHocnteIbHo 6e3oNaChOCTn pni NcNoJIb3ObaHn n3dJIeN b6ecnpoBODHO LOKaJIbHO cETn
Плзботьтесь O TOM,ЧТобьВсгдя ИСпОЛьЗОВыт 6БЗОпаСнУБecspOBOДИУ loKApIbHуIо ceTbДЯ ПпeДOTВрашени B3LOMa,Достуна 3ЮнамерEHbIx TpeTbIxПиц Iи Дурчи Наршени CNTeMbI 3aUHTbl.
- Baxho yctaHOBnlt hactpoiKn 6e3oanchoCTn npn nCIOJIbO3AHnB 6eCpOBOHOJn IokaJIbHOJ cTEN.
- EcI np6leMa 6e3oNaCHOCTn BO3HKnJIa NO pRNUHMe HeBbIOnJHeHne MEP npEdoTOPOXHOCTN INB C B3A n C KaKIMN-Ni6o HEn36eKbHMn O6CTOReTbCTBAMn pRn IcNoB3OBaHNb 6ecnpBOADHO JokAlbHO cTe, Sony He Hecet OTBeTCTBeHHOC7r 3a YtpaTy INI yUep6.
IyHKT 1: BCTaBka aKKymJrTopa/KapTbI naMaTn B KaMepy
Y6eDInTeScb B TOM, YTO INHdNkAtOp
DOCTyNa (CTP.18) He ropnt,
n BVIKHOnuTE KaMepy. 3aTeM
CdBINbTe pblaxKoF NkCaunn n
nBLeKnTe AKKymJrTOp. ByDbTe
OcTOpOxKnbl, YTObIh Ye yPOHnTb
AkkymJrTOp.
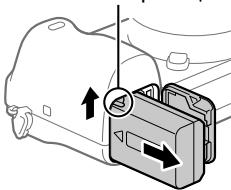
PbIaXkOΦnKcaUH
HaxmTe KhONkY (Bocnpoun3BeDeHne) dIy BOCnpoun3BeHn cHIMKOB. BblMOxTe BbIpaTb HxKbI CHIMOK C NOMOu KoJIecNka ynpaBLeHnA.
YCTaHOBNTe DnCKpeKIMOB B HUxHbIpeKIM B 3aBNCUMOCTN OT OBeKaT aJIuIyHKU, KOTOpBLE Bbl XOTNe IcNoIb3OBaTb.
Remote Camera Control
C nOmoIbIO Remote Camera Control MoXHO n3MeHЯrTb HacTpoKn KaMepbI IIN CnYcKaTb 3aTBOp C KOMNbIOTepa, POnDcoEiNHeHHOro Upe3 Ka6eJIb USB.
Дяи сproлььовая Remote Camera Control счача Л bblберпte MENU → (Hac troнka) → [USB-coeindене] → [YdaileнПК], a 3aTe m nodklioHTe Kaempy K kOMlbIoTepy uee3 ka6eIb USB.
PlayMemories Camera Apps
BbMOKeTe Ha CBoi BbIbOp Do6AbTb fYHKuNHa KaMepe, nOcOeHNHbWbnc K Be6-caTy dJa 3aRpy3Kn npInloJeHn
PlayMemories Camera Apps) c nOmoIbIO kOMnIbOTepa IJIu FyHKcII Wi-Fi kaMepbl.
http://www.sony.net/pmca/
IcnoJb3yeMbIe KapTbI NaMRTN
C daHHO KAMepoM OMO HO NcNoJb3OBAbT CNe dyUoiue Tnbl KapT namrtn. 3HaQOK Yka3bIaBET, YTO 3TN KaPTb I naTn MOXHO NCNoJb3OBAbT DnI FOToCbeMKn INI BUNdeOcBeMKN.
PnncnoJIb3OBAHnn c daHNo KAmepo KapT naMrtu Memory Stick Micro nnn microSD, o6a3aTeIbHO nCnoJIb3yIte nx C COOTBeTCTBHyUmm aadantepom.
KJIO BVKOPNCTOByeTbCByPi6 i3 HnDKATOPOM 3aPdKaHnHa, MaTe Ha yBa3i, Uo BnIPe He Bi'cHnyeTbCBy BID MepeXj KnuBHe NkOJIN BmNKaETbCBy TaKu iHNkATOp.
3aHaBHOCTI B KOMnJIeKTI Ka6JIIO XKNBENHry NOrO CnID BVKOPNCTOBYaTN LInSe 3 cIMM O6NaIaNHaHm. BiN He np3NaueHenn DnI BVKOPNCToHHa 3 IINHMn ENEKTPOHHMN pNcTPOAMN.
UHypXMBLeHHa
Data BnroTOBNeHnBnpo6y.
Даета ВИ�OTOBLOVENЗ 33aHaueHa hyaNakOBiHa eTNKTeI 3i UTpNXKOdOM yHaCTYNOMHOFomatI:
MM-YYYY,de MM-Micra乙,
YYYY-pik BurotoBneHHa.
Buro6HnK: CoHi Kopnpoeiun, 1-7-1
KoHaH, MiHaTo-Ky, Tokio 108-0075,
JnoHnI.
KpaIIHa-Bnpo6Hnk: TaiIaHd
Ppimitka
Jkso nip Bnllbom cTatmHoi eNektpkn a6o eNektpomarHITHO rnoI npocce nepedau daHnx 6yde nepepbaHni, nepe3anyctib npncptri a6o Bi'd'ednaTe Ta NOBTOPO npEcnHaTE KaebI, zo BVKOpNCTOBYcBcra dJa nepeadai daHnx (USB, toso).
Pe3yIbTaTn TectyBaHb 乙oro BnOby
dEmOHCTpyoHT bYO BIDNObiDHiCTb
BIMOrAM 10DO O6MExeHb,
3a3HaNeHx y DnpeKtNbI EMC,
rKi CTocYIObCra BIKOpNCtAHN
3'cHyBaJIbHx Ka6eJIb, KOpOTnx
3a 3 MeTpN.
Ha BIDnOBiDHN CHaCTOATeNEKTPOMaHITHi N0JI MOKyTbBnINBaNTu HAcTB 3O6paXeHHI3ByKA, BIDTBOpOBaHN BINO6OM.
Ipepeo6bA BnKOpCTaHIN eIeMeHTIB KMBLeHH, CTaporo eIeKtpuHORo Ta eIeKtPOHHORo 6bJaHAnHH (3aTocOBycBcA BcponeCbKOMy CO3i ta IhXN EbponeCkNX KpaJHX i3 CNTeMaMn Po3dJIbHO R6nPaHH CmTTA

InphiopmaiaIg cnoXnBauB VKpaH
YnOBHOBaXeHNI pEcdTaBnK B
YkpaIIi 3 nIHTaH bIIOBIOIHOCTI
BmOram TexHicHHx perlanMeHTIB:
TOB «CoHi YkpaIIHa', ByI. IInIcbKa,
8, M. KniB, O4070, YkpaIIHa.
06laHaHnHaBiDnOBiJa€ BmOram:
-TexhiHoro perIamenty
06MeXeHHB BkOpNCTaHH
deKaHX He6e3neuHx peoOBnB
eNeKtpnHOMy Ta eKeKtpOHOMy
06NaHaHHi (noCTaHOBA KMY biD
03.12.2008 N9 1057).
CnpabXHIM CoH KopnopeuH 3aBnIe, IIO TIN padioo6bHaDHann H ILCE-6500 BIDNObiAe TexHCHOMy perlanemHTy paioo6bHaDHnn i TelekomyHikauiHoro KIncEbo r (TepmHaJIbHO) o6DaHNH. POBHH NKT DeKnapaui npo BiNDobiHicb DocTyHNI B lHTepHeti 3a TaKOIO aDpecoU: info@sony.ua.

TexhihixapaKTePuctnkn
Poboya temnepatypa
BID 0^ do 40^
Diana3OH TemnepaTp 36epiraHH
BID-20°Cdo+60°C
Pozmipn (cymichctb 3i cthaprom CIPA) (npn6n.)
120,0 MM × 66,9 MM × 53,3 MM (LJ/B/Γ)
Maca (cymichictb 3i cTAndaptom CIPA) (np6n.)
453 r (3akymyntopomTa kaptkoio SD) 410r (nue foToanapat)
AaTep 3miHoro CTpyMy AC-UUD12/UE12
BmormndoXmbneHHA
3mHHn CTpym BID 100Bdo240B, 50T/60T,0,2A
BuxiHa Hanpyra
TociiHnCTpym5B,1,5A
AkymyIyTopHa 6aTapey NP-FW50
Homihalbna Hanpyra
IociiHn Ctpym 7,2B
UA
PpIMiTKn ⅢOIO BVKOpNCtAHNHa FOToanapata
Okpim cbo ro p0dijny TakoX nepereIbHte 3aCtepeXeHnry y DoiBIOKOBNI Noc6Hnik (ctop.2).
Moba ekpaHHoro MeHIO
BiJeO,3rHeTe 3a DOnOMoROU
ZbOrO fOToanapata,MOKe He
BiTbOPuBaTmCn PpaBunbHo Ha
IHUnx pNcTpoX. TaKoX, BiJeO,
3HReTe 3a DOnOMoROU IHUnx
PnpCTpOIB,MOKe HE BiTbOPuBaTmCn
PpaBunbHO Ha CbOMy fOToanapati.
PonepeJxHnIyIooaBTOpcbKnx npab
Ha TeIeBiz3iHNI npOrpamn, fIbMn, BIDoeOCTPcIKN Ta IHsI MaTePiAn MoKe pO3IOBcIOxJyBaTncA bTOPcbKe npaBO. HecanKzioHOBaHm nepe3aInc TAKnx MaTePiAnIB MoKe cypeuHTn NOJoxHeHm 3aKOHy npo aBTopcbKi npaba.
Ipo texhihi daHI, habeeni y zubomy nocihky
PoboChi xapaKtepncTnK Ta texHiNdiH Bn3HaHeHI 3a OINCAHNX HNKeYUMOB,OKIM BnIaNkIB,VBA3aHNXy CbOMy NociBnky: 3a 3BnuAHOI TemnepatypcepeoBnua25°C iBNKOpNCtAHN NOBHCTIO 3apJdxEHOI6bataei, Ika 3apJdxJaAnaL,pOKn He3rac IHnKaTop 3apJdxHaHH.
UA
TMMUCAOBBE BMMKHEHNAyHKcuIb6e3dpoToBOi MepeXi (Wi-Fi, NFCTa yHKcua Bluetooth too)
Y pa3i nocaikn B itraK TOUO MOXHa TmHMcAoB BMKNHTN BciФHKJI 6e3dpoTOBI mepeki.
Bn6epitb KhoNky MENU
→(Bε3προTObu)→
[Pexm nolbOty] [YBImK].
JaKoDnI npaMeTpa
[PeKIM IOnbOry] BCTaHOBUN
3haeHHa [YbIMK],HaekpaH
BIDobpaKaTImeTbcrNo3HaUka
(Jitak)
Ppimitkn zuo 6e3npotoboi lokaJIbHOI Mepexi
Ypa3iBtpaN a6o BnKpaJenHn foTOanapara KOMnaHn Sony He Hece kOJHOI BiINOBiAJIbHoCTI 3a MoXJIbI 3bNTKN YI KODy, 3aONDiHi HecAHKIOHOBAHm D0CTPNOm a6o BnOKOpICTAHNM 3apeCtPOBaHOI TOKN DOCTyn Ha foTOanapati.
Ppimitkn 6o0 6e3neKn npn BnKopncTahnn 6e3dpotOBoI lokaJIbHOI Mepeki
3aBxJn nepeBipRte, 20 BnKOpNCTOBYcTbca 3axUeHa 6e3dpoTOba JOKaJIbHa MepeXa, 2063anobigrr 3naMyBaHnHO, DocTyNy 3IOBmChNX Tpetix CTopiH aO bIuIM Ypa3INBOCTM.
- RAKUO BIKOPNCOTBycTbC863eIPOTOBA IOKaJIbHa Mepeka, BAKJIbIO BCTAHOBNTN HajaUHTyBaHHa 63neKn.
-якшо пд уас ВИКОпстаннг 6e3ДрOTOBOЛ NOKAlьНоI МEpexi ЧepeЗ BiDcYTHcTb 3aXoДВ 6e3NeKN a60 bYd-b-Як He3BOPOTHi obCTabuHn BvnHkaToT npOБлЕм i3 6e3NeKO, KOMNaHЯri Sony He Hece XODHoi BiDnOBiDAJIbHOCt 3a NoIrkOJKeHnA a60 3bUTkn.
Ipebipka fotoanapata ta npnilaand, 0doTaTbcra
UncnoBdyKkax Bka3yHa KJIbKICTb UTYK.
-Φotoanapat(1)
- Lhpy XnBHeHn (1)* (noctaAcTbcr y neBnHex kpaIhax a6o periohax)

* Do foToaapanapa MoKe 6yTn DOdAno DeKilbKa UHypiB KJbHeNHa. BkOpncTOByTe ToI UHyp, 10 BiNObiAe yMOBaM ekCnPyatauii y Baaii KpaHi I a6o perioHi. DInB. cTOp.4.
- AkymylnTopha 6aTapej NP-FW50 (1)

- Ka6eIb Micro USB (1)
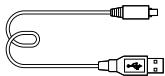
Aaantep 3mHHoro ctpymy (1)
-Плевовпемиb(1)
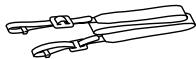
Haouhnik okyjra (1)

Kpnlka Kopnyca (1) (BCTaHOBJIeHa Ha foToanapatTi)
Kpnlka KonoJkn (1) (BCTaHOBLeHa Ha foToanapatI)
- Noc6HnK 3 ekcnnyatauii (eey noc6HnK) (1)
Wi-Fi Connection/One-touch (NFC) Guide (1)
UA
Elenentn fotoanapata
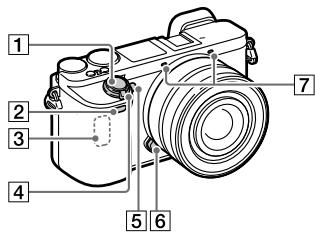
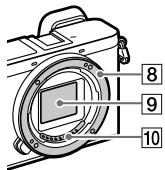
Bunla6e3 06'Ktmba
1 Khonka cnycky
2 CeHcOp npIyTa dNCTaHcIiHOrO KepyBaHHa
3 ANTeHa Wi-Fi (B6yDoBaHa)
4ПеремпачON/OFF (xINBJIeHnI)
[5]IhДиКаTOp aBTOcnycky/ nIDcbiUByaHnA F
6 Khonka φikcatopa 06'ekTnBa
7 MikpoΦoH
8 BaioHcT
[9]ДатчИК 30брахеннЯ
10 KOHTaKTn 06'ekTnBa*
* He 3akpmbaTe ue enemEnTn iD cac BideozNMKn. HeOpTrPMAHNn LiE BIMOrn MoKe cnpuHnHTn NOBBy uMmB uN 3MeHueHHn pIBHn ryHocTi.
** He Topkaɪteče 6beɪnocepeɪdɪhɒ zufo ro eɪneMeNTa.
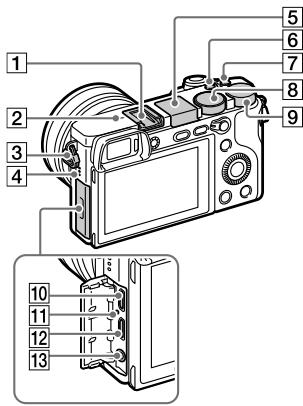
1 BaratoiInTepeeChn p03'EM* DeaKe npilaadma MoKe BCTaBIAITNCa He NOBHCIOI BUCTynATn 3 6aToiInTepeeCHOro po3'EMy. PIpote BCTaHOBHe 3'EDHNNHOCTaTHBO, Uo6 npinaJaDi DICTAIOcN nepeDhboro kpaio p03'EMy.
2 ΜΟЗначka nOLOXKeHnДaTчИKa 3O6paXKeHn
Kpok 5:3iomka 3o6paKeHb aBtOMaTHUHomy peXnMI
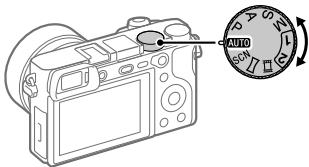
1 Поверніт b діСК пе demkaнг ржIMb y noJoxeHHA AUTO.
2ДиВiВьсаЧepeзВИДОшУКaчIТрИмайтфоToanapaT.
3 BCTAHOBiB pO3Mip 06'KtA 3HOMKn, O6epTaOuN KInbue MacUta6yBaHHa 06'KtNBa, Akuo npEHaHO 06'KtNB 3i 3MiHHoO FOkycHOI BiCTaHHIO.
4 Ⅲo6 BnKoHaTn fokycBaHHa, HATNCiTB KONky CnyCKy Do NIOOBHn.
- Koln 306paXeHHcΦOKycBaHO, 3acBicYeTBcI hDnKaTOp (rk-OT).
5 NobHicTIO HATnCHITb KHONKy cnycky.
3iomka bideo
Lio6 po3noatn/3ynnnntn 3annc, HataNCHiB kHonky MOVIE.
BiTbOpEnH3 3o6paXKeHb
Remote Camera Control
Remote Camera Control 03B0J8e 3mHIOBAtn HanaaTyBaHHa foToanapata cn cyckatn 3aTbop i3 KOMn'IOTepa, niKJIuyeHoRo 3a donomorOo USB-ka6eIIO.
PlayMemories Camera Apps
До ФOTOанapараз можна доатуnotриби Фуннкцii, BiDыдьши Всбсай Заботхаленяnporpam (PlayMemories Camera Apps) здомогю комп'tepa abo Фуннкцii Wi-Fi ФOTOanapapa.
http://www.sony.net/pmca/
-Пияв Встановленьпрогamy можна ВИКЛИКАТN, TOPКИВШСь смартфоном на 6а3i Android i3 niДТРUMКЮТExHOLOrIi NFC До пОЗнЧКи NHa phOTOanapati, ВИКOPИСТОВУЮчуФИКцIO [ОдINи ДOTИK(NFC)].
Tünni Kaprnam'äti, jaki moxha BnKOpNCTOByBaTu
I3 ZIM FOToanapaTOM MOxHa BnKOpNCTOByBaTn NpeJIueHi HNxHe TnNn KapT NaM'ЯТ. ПОЗнчka BkazyE Ha Te, lo zu KAPrN NaM'rti MoxHa BnKOpNCTOByBaTn ДЯ FOToRpaФyBaHnA abO BiJeOzHmKN.
Y pa3i BnKOpNCtAHnI i3 ZmM foToanapatom KapT nAm'JrTi Memory Stick Micro a6o microSD nepekoHaTeC8, Ioo BnKOpNCtOByTe BiNobiDnHn aadantep.
C2-knapp (specialknapp 2)
C1-knapp (specialknapp 1)
8 Lagesomkopplare
AUTO (Autoläge)/
P (Autoprogram)/
A (Blandarprioritet)/
S (Slutarprioritet)/
M (Manuell exponering)/
1/2 (Hämta frän minnet)/
Film/S&Q-motion)/
(Panorering)/
SCN (Scenval)/
9 Manoverratt
Remote Camera Control
PlayMemories Camera Apps
C2-painike (Mukautetupainike 2)
C1-painike (Mukautetupainike 1)
8 Tilapyorä
Remote Camera Control
PlayMemories Camera Apps
M (Man. Eksponering)/
1/2 (Hent minne)/
Film/S&R film)/
(Panorama fotografer.)/
SCN (Scenevalg)
9 Kontrollskive
Remote Camera Control
Med Remote Camera Control kan du endre kamerainstillingene erler utlose lukkeren fra en datamaskin som er tilkoblet via en USB-kabel. For a brute Remote Camera Control ma du frst velge MENU (Oppsett) [USB-tilkobling] [Fjern-PC], og deretter koble kameraet til en datamaskin med en USB-kabel.
PlayMemories Camera Apps
Producent: Sony Corporation, 1-7-1
Konan Minato-ku Tokyo, 108-0075
Japan
Overensstemmelse med EU
Iovgivning: Sony Belgium, bijkantoor van Sony Europe Limited, Da Vincilaan 7-D1, 1935 Zaventem, Belgien

Remote Camera Control
PlayMemories Camera Apps
logotypen "AVCHD Progressive"
Blu-ray Disc Association.
DLNA og DLNA CERTIFIED
Digital Living Network Alliance.