
BGL6FAM1 - BGL6FAM1 - Vacuum Cleaner BOSCH - Free user manual and instructions
Find the device manual for free BGL6FAM1 - BGL6FAM1 BOSCH in PDF.
| Product Type | Cylinder Vacuum Cleaner with Bag |
| Brand | Bosch |
| Model | BGL6FAM1 |
| Suction Power | 700 W (estimated) |
| Filter Type | Washable HEPA Hygiene Filter |
| Bag Capacity | Approx. 4 L (Bosch standard) |
| Noise Level | Approx. 75 dB (estimated) |
| Weight | Approx. 6 kg |
| Dimensions (L x W x H) | Approx. 400 x 250 x 250 mm |
| Power Supply | Mains, 220-240 V, 50-60 Hz |
| Cable Length | Approx. 8 m |
| Operating Radius | Approx. 10 m (with wand and hose) |
| Main Functions | Turbo mode, electronic power adjustment, infrared remote control, adaptable floor brush |
| Included Accessories | Floor brush, crevice tool, upholstery nozzle, Multi-Use-Brush, accessory holder |
| Maintenance | Disposable bag, washable motor filter, washable HEPA filter, regular cleaning of the handle |
| Safety | Emergency stop, overheat protection, automatic shut-off in case of clogging |
| Spare Parts and Repairability | Parts available for 7 years after marketing, repair by authorized service center |
| Warranty | 2 years (according to country conditions) |
Frequently Asked Questions - BGL6FAM1 - BGL6FAM1 BOSCH
User questions about BGL6FAM1 - BGL6FAM1 BOSCH
0 question about this device. Answer the ones you know or ask your own.
Ask a new question about this device
Download the instructions for your Vacuum Cleaner in PDF format for free! Find your manual BGL6FAM1 - BGL6FAM1 - BOSCH and take your electronic device back in hand. On this page are published all the documents necessary for the use of your device. BGL6FAM1 - BGL6FAM1 by BOSCH.
USER MANUAL BGL6FAM1 - BGL6FAM1 BOSCH
Register your new device on MyBosch now and get free benefits: bosch-home.com/ welcome

Bagged vacuum cleaner
BGB6 BGL6
[de] Gebrauchsanleitung 8
[en] User manual 26
[fr] Manuel d'utilisation 43
[i] Manuale utente 61
[n] Gebruikershandleiding 79
[da] Betjeningsvejledning 95
[no] Bruksanvisning 111
[sv] Bruksanvising 127
[fi] Käytöohje 142
[p] Instrukcja obstugi 158
[tr] Kullanim kilavuzu 176
[es] Manual de usuario 195
[pt] Manual do utiliser 213
[el] Evyειρίδιο χρηστη 231
[bg] PbKOBOdCTBO 3a ynoTpe6a 253
[ru] RykoBoDCTBO noJIb3OBATeIa 272
[ro] Manual de utiliser 294
[uk] KepiBnTBo 3 ekcnnyataii 313
[ar] 332
[fa] 350
A
B
C
D

E
F
G
H
1
J
K
L

M
N
3
4
5
6

7
8
9
10
11
12
13
14
15
16
17
18
19
20
21
22
23
24
25
26
27
28
29

30
31
Inhaltsverzeichnis
Sicherheit 9
Restriction on user group. 28
Safety instructions 28
Preventing material damage 31
Environmental protection and saving energy 31
Disposing of packaging 31
Unpacking and checking 31
Unpacking the appliance and parts 31
Contents of package 31
Familiarising yourself with your appliance. 32
Appliance 32
Overview of the controls 32
Overview of status displays. 33
Accessories 33
Before using for the first time..... 33
Installing the appliance 33
Inserting the batteries. 34
Basic operation 34
Setting the telescopic tube. 34
Switching on the appliance. 34
Switching off the appliance............ 34
Starting vacuuming. 34
Stopping vacuuming 34
Controlling the power 35
Starting turbo mode 35
Stopping turbo mode 35
Setting the floor tool 35
Parking the appliance 35
Stopping and carrying the appliance 35
Vacuuming with accessory 35
Vacuuming with the Multi-UseBrush1 35
Starting emergency mode 36
Stopping emergency mode 36
Removing the appliance 36
Cleaning and servicing. 36
Cleaning products 36
Cleaning the appliance 37
Cleaning the Remote-Power-Control handle 37
Opening the lid 37
Closing the lid 37
Cleaning the dust compartment..... 37
Changing the dust bag 37
Cleaning the motor protection filter 37
Removing the exhaust filter 38
Cleaning the exhaust filter 38
Inserting the exhaust filter 38
Changing the batteries. 39
Troubleshooting 40
Malfunctions 40
Transportation, storage and disposal 41
Disposing of old appliance 41
Disposing of batteries 41
Customer Service 41
Product number (E-Nr.) and production number (FD) 41
Warranty conditions. 41

Safety
Observe the following safety instructions.
General information
- Read this instruction manual carefully.
- Keep the instruction manual and the product information safe for future reference or for the next owner.
- Do not connect the appliance if it has been damaged in transit.
Intended use
Please read the information on intended use to ensure that you use the appliance correctly and safely.
Only use this appliance:
- With genuine parts and accessories. Damage caused by using third-party products is not covered under the warranty.
For cleaning surfaces. - In private households and in enclosed spaces in a domestic environment at room temperature.
Up to an altitude of max. 2000 m above sea level.
Do not use the appliance:
For vacuum-cleaning persons or animals.
- For vacuuming up harmful, sharp-edged, hot or burning substances.
- For vacuuming up damp substances or liquids.
- For vacuuming up highly flammable or explosive materials and gases.
- For vacuuming up ash or soot from tiled stoves and central heating systems.
- For vacuuming up toner dust from printers and photocopiers.
For vacuuming up building rubble.
Disconnect the appliance from the power supply when:
- cleaning the appliance.
Restriction on user group
This appliance may be used by children aged 8 or over and by people who have reduced physical, sensory or mental abilities or inadequate experience and/or knowledge, provided that they are supervised or have been instructed on how to use the appliance safely and have understood the resulting dangers.
Children must not play with the appliance.
Cleaning and user maintenance must not be performed by children unless they are being supervised.
Safety instructions
Follow these safety instructions when using the appliance.
WARNING - Risk of electric shock!
Incorrect repairs are dangerous.
- Repairs to the appliance should only be carried out by trained specialist staff.
- Only use genuine spare parts when repairing the appliance.
- If the power cord of this appliance is damaged, it must be replaced by the manufacturer, the manufacturer's Customer Service or a similarly qualified person in order to prevent any risk.
If the appliance or the power cord is damaged, this is dangerous.
- Never operate a damaged appliance.
- Never operate an appliance with a cracked or fractured surface.
- Never pull on the power cord to unplug the appliance. Always unplug the appliance at the mains.
- Never pull or carry the appliance by the power cord.
- If the appliance or the power cord is damaged, immediately unplug the power cord or switch off the fuse in the fuse box.
"Call Customer Service." Page 41 - Repairs to the appliance should only be carried out by trained specialist staff.
An ingress of moisture can cause an electric shock.
Only use the appliance in enclosed spaces.
- Never expose the appliance to intense heat or humidity.
- Do not use steam- or high-pressure cleaners to clean the appliance.
If the insulation of the power cord is damaged, this is dangerous.
- Never let the power cord come into contact with hot appliance parts or heat sources.
- Never let the power cord come into contact with sharp points or edges.
-
Never kink, crush or modify the power cord.
-
Improper installation is dangerous.
-
Connect and operate the appliance only in accordance with the specifications on the rating plate.
- Connect the appliance to a power supply with alternating current only via a properly installed socket with earthing.
The protective conductor system of the domestic electrical installation must be properly installed.
WARNING - Risk of burns!
-
The filter systems may become warm during operation and may catch fire when used in conjunction with flammable substances or substances that contain alcohol.
-
Do not apply flammable substances or substances containing alcohol to the dust bag or filter.
-
When cleaning the appliance, do not use flammable substances or substances that contain alcohol.
-
With an operating time of over 30 minutes, the wound power cord may overheat.
Pull out the power cord completely.
WARNING - Risk of injury!
-
Moving parts and openings on the appliance may cause injury.
-
Keep clothing, hair, fingers and other body parts away from the openings on the appliance and the moving parts.
en Safety
- Never point the pipe or the nozzles towards eyes, hair, ears or mouths.
An appliance that falls may endanger people.
- When vacuuming stairs, ensure that there are no persons underneath the appliance.
An extended power cord may lead to a tripping.
- When taking a break from vacuuming, switch off the appliance and pull out the mains plug.
Retract the power cord.
-
The automatic cable retraction may endanger the user.
-
When the cord is being rewound automatically, ensure that the mains plug is not thrown in the direction of persons, body parts, animals or objects.
Batteries may explode.
Do not charge the batteries.
Do not short-circuit the batteries.
Do not throw batteries into a fire.
WARNING - Risk of suffocation!
Children may put packaging material over their heads or wrap themselves up in it and suffocate.
- Keep packaging material away from children.
Do not let children play with packaging material.
Preventing material damage
To prevent material damage to your appliance, accessories or any other objects, follow these instructions.
ATTENTION!
-
Placing the appliance on the hose may damage the hose.
-
Never place the appliance on the hose.
Worn or sharp-edged outsides of nozzles may damage sensitive hard floors, such as parquet or li-noleum.
Regularly check the outsides of the nozzles for wear.
Replace the worn nozzle.
-
Dirt in the motor may damage the motor.
-
Never operate the appliance without a dust bag.
- Never operate the appliance without the motor protection filter.
-
Never operate the appliance without the exhaust filter.
-
Improper handling of batteries.
Do not short-circuit the terminals.
- Use the specified type of batteries only.
- Do not use different battery types together.
- Do not use new and used batteries together.
Leaking batteries may damage the handle.
- Remove the batteries if you are not using the handle.
- Safely dispose of the empty or defective batteries in an environmentally friendly manner.
Environmental protection and saving energy
Disposing of packaging
The packaging materials are environmentally compatible and can be recycled.
- Sort the individual components by type and dispose of them separately.
Unpacking and checking
Find out here what you need to note when unpacking the appliance.
Unpacking the appliance and parts
- Take the appliance out of the packaging.
- Take all other parts and the accompanying documents out of the packaging and place them to hand.
- Remove any packaging material.
- Remove any stickers or film.
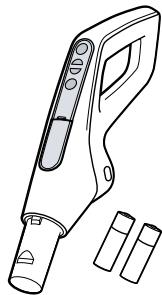
Contents of package
After unpacking all parts, check for any damage in transit and completeness of the delivery.
Note: The appliance comes with additional accessories depending on its features.
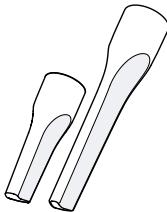
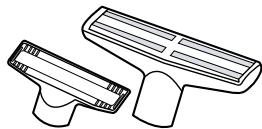
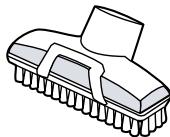
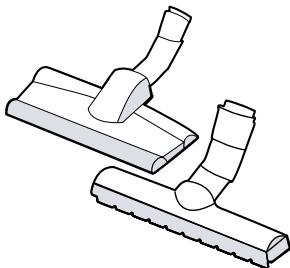
Fig. 1
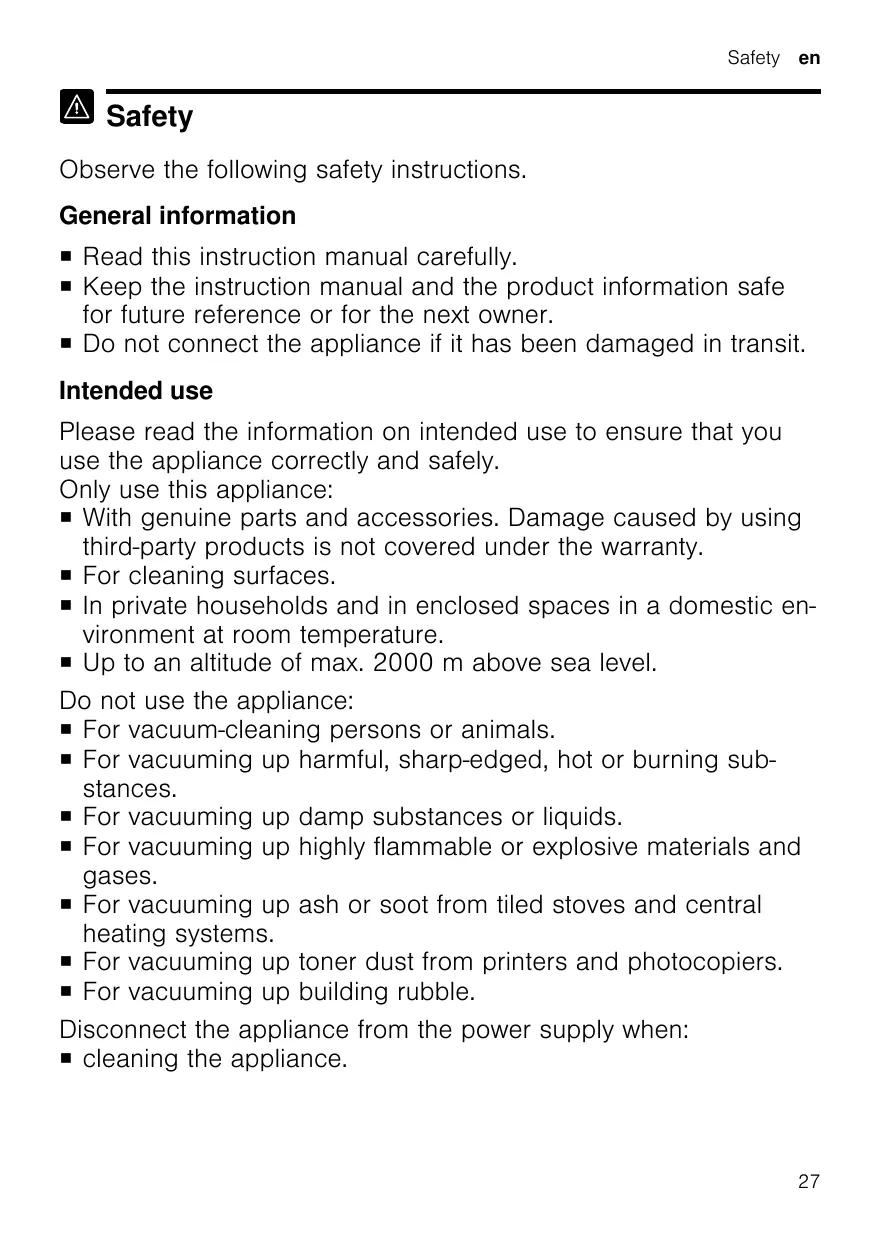
| A | Adjustable floor tool1 |
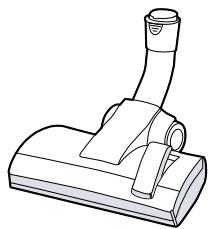
| B | Telescopic pipes1 |
1 Depending on the appliance specifications
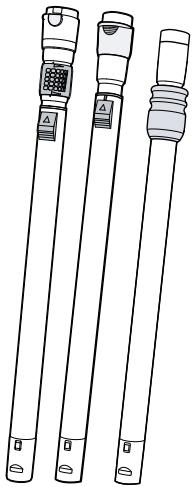
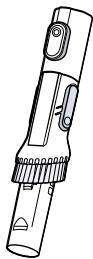
| C | Multi-Use-Brush1 |
| D | Remote-Power-Control handle with two AAA LR03 batteries |
| E | Dust bags |
| F | Motor protection filter |
| G | HEPA hygiene filter1 |
| H | Accessory support1 |
| I | Crevice nozzles1 |
| J | Upholstery nozzles1 |
| K | Upholstery nozzle with clip-on brush ring1 |
| L | Hard floor nozzles1 |
| M | Mattress nozzle1 |
| N | Drilling nozzle1 |
1 Depending on the appliance specifications
Familiarising yourself with your appliance
Appliance
Note: Individual details and colours may differ, depending on the appliance model.
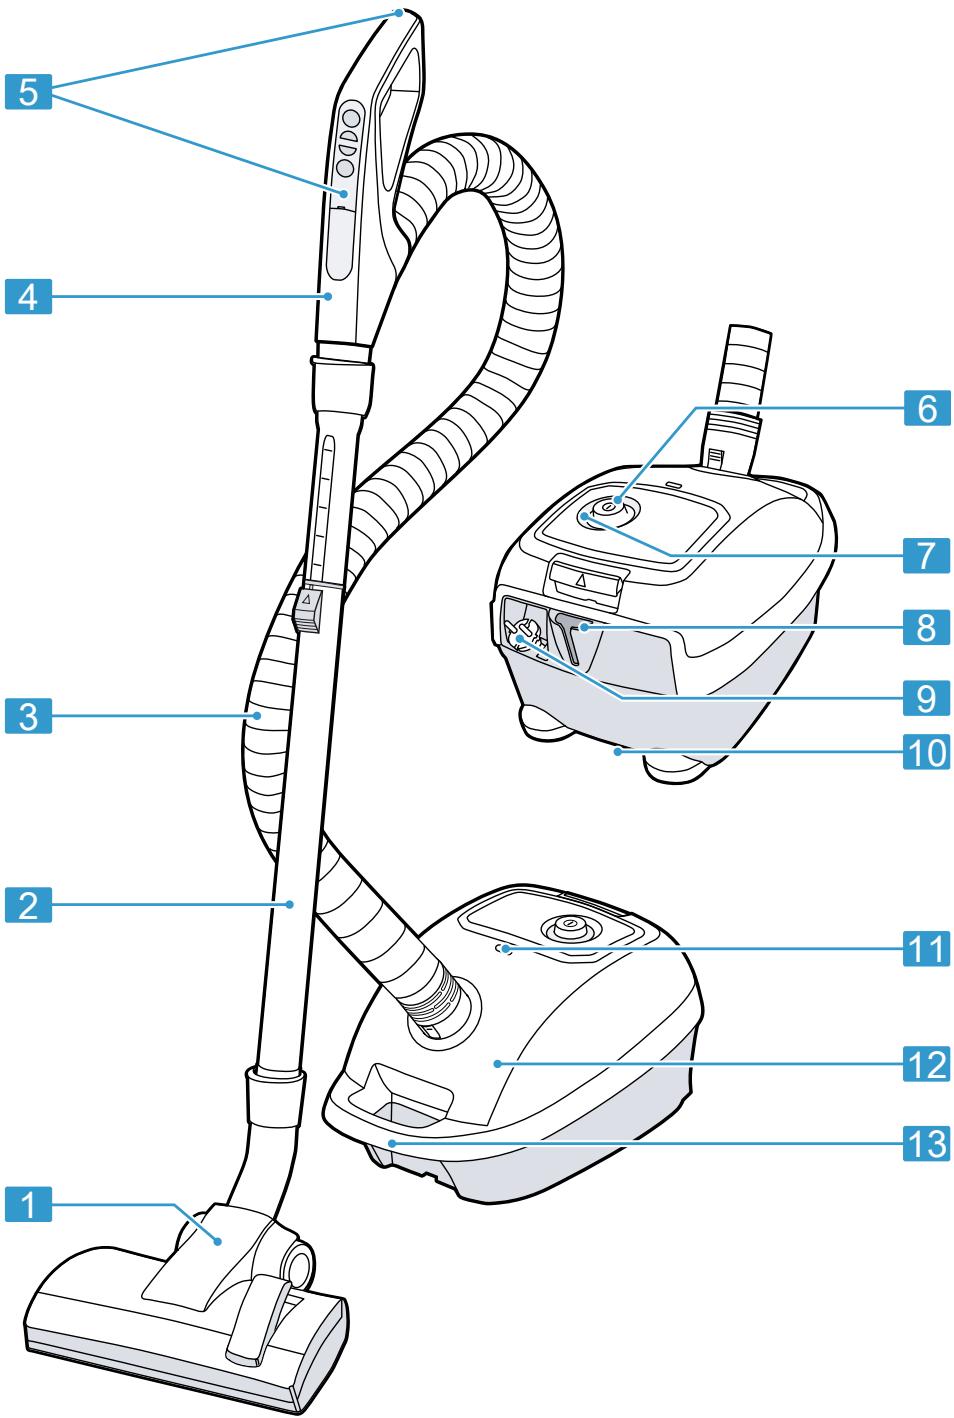
Fig. 2
| 1 | Adjustable floor tool1 |
| 2 | Telescopic tube with sliding switch1 |
| 3 | Hose |
| 4 | Remote-Power-Control handle with two AAA LR03 batteries |
| 5 | Infrared transmitter |
1 Depending on the appliance specifications
| 6 | On/Off switch with infrared receiver |
| 7 | Status display |
| 8 | Parking aid |
| 9 | Power cord |
| 10 | Storage aid |
| 11 | Bag change indicator |
| 12 | Lid |
| 13 | Handle |
1 Depending on the appliance specifications
Overview of the controls1
The controls are used to configure all functions of your appliance and to obtain information about the operating status.
Appliance controls
| Symbol | Use |
| ■ Switch on the appliance. ■ Switch off the appliance. |
Floor nozzle controls
| Symbol | Use |
| ○ | Vacuum rugs and carpets. |
| ◎ | Vaccum parquet and hard floors. |
Remote-Power-Control handle controls
| Symbol | Use |
| ◎ | ■ Start vacuuming. |
| ■ Stop vacuuming. | |
| ⊕ | Increase the power level. |
| - | Decrease the power level. |
| Turbo | ■ Start turbo mode. |
| ■ Stop turbo mode. |
Tip: Align the infrared transmitter on the Remote-Power-Control handle with the infrared receiver located on the On/Off switch.
Overview of status displays
The displays provide information about functions and statuses.
| Symbol | Use |
| ① | Display status. |
| ↑ | Change the dust bag. |
Status displays
| Operating status | Status display |
| Off | Display is off. |
| Standby | Display pulses white. |
| Vacuuming | Display lights up white. |
| Activate emergency mode. | Display rapidly flashes white three times. |
Accessories
Use original accessories. These have been made especially for your appliance.
| Accessories | Accessory number | Use |
| Replacement filter pack | BBZ41FGALL | Remove vacuumed material. |
| Replacement filter pack | BBZAFGALL | Remove vacuumed material. |
| Motor protection filter | BBZ02MPF | Protect the motor against contamination. |
| HEPA hygiene filter | BBZ154HF | Clean the exhaust air. |
| Hard floor nozzle with brush ring | BBZ123HD | Vacuum hard floors. |
| Hard floor nozzle | BBZ124HD | Vacuum hard floors and carpets. |
Before using for the first time
Prepare the appliance for use.
Installing the appliance
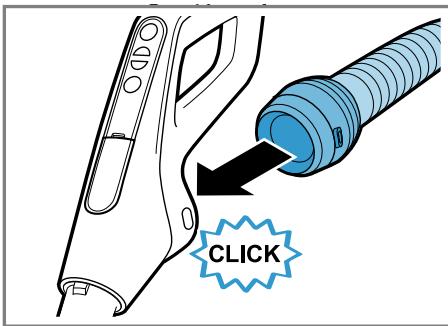
-
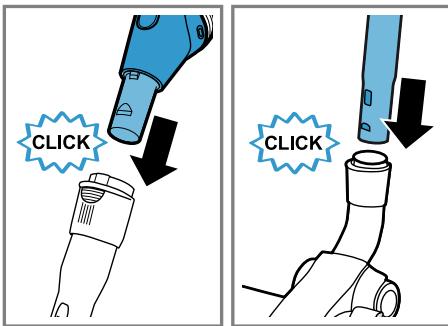
Push the handle onto the hose and lock it in place. Fig. 3
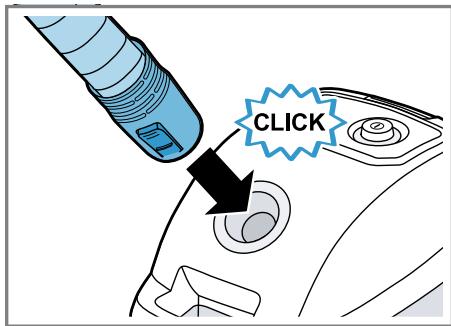
-
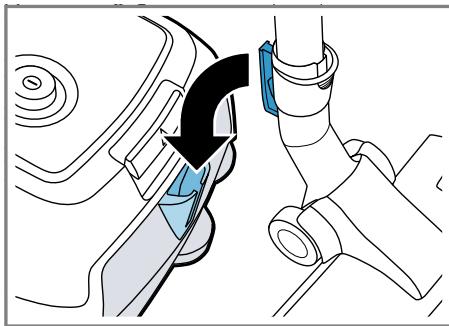
Insert the hose adapter into the air-intake opening in the lid and lock it in place. Fig. 4
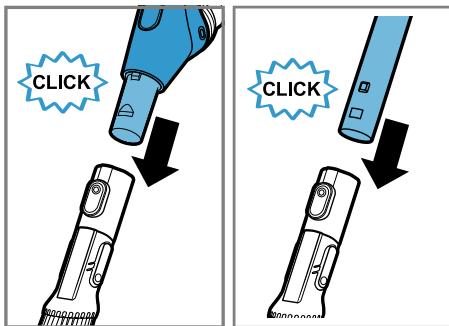
- Connect the handle to the telescopic tube. Fig. 5
- Connect the telescopic tube to the floor nozzle. Fig. 5
en Basic operation
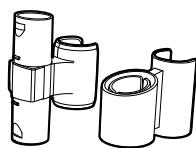
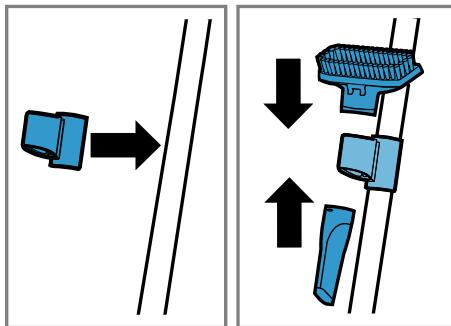
- Place the accessory support 1 onto the telescopic tube. Fig. 6
- Place the crevice nozzle from the bottom onto the accessory support Fig. 6
- Place the brush ring 1 onto the upholstery nozzle 1. Fig. 7
- Place the upholstery nozzle with the brush ring from above onto the accessory holder ^1 - Fig. 6
Inserting the batteries
- Insert the batteries into the Remote-Power-Control handle. "Changing the batteries", Page 39
Basic operation
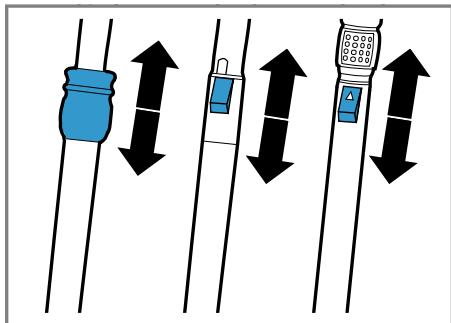
Setting the telescopic tube
- Unlock the telescopic tube.
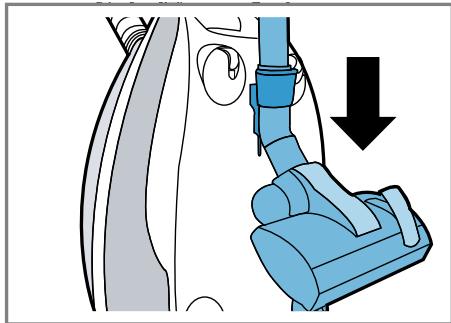
- Set the required length of the telescopic tube. Fig. 8
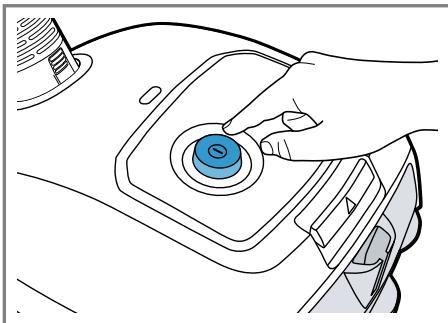
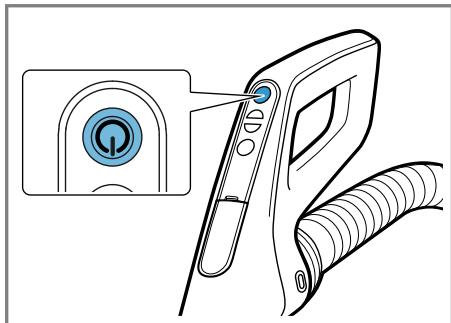
Switching on the appliance
- Hold the mains plug and pull it out to the required length.
- Insert the mains plug into the socket.
- Press ①. → Fig. 9
The status display pulses white. - The appliance is in standby mode.
Note: Risk of damage to the appliance caused by being in standby mode for too long. If you want to stop vacuuming for a longer period of time, switch off the appliance.
Switching off the appliance
-
Press ①.
-
The status display goes out and quickly flashes white three times after a short time.
- The appliance switches off. Any functions currently in progress are cancelled.
- Unplug the mains plug.
- Briefly pull on the mains power supply cord and then let go.
- The power cord retracts automatically.
Starting vacuuming
Requirement: The appliance is in standby mode.
"Switching on the appliance", Page 34
Press → Fig. 10
- The status display lights up white.
- The appliance starts at the highest power level.
- The appliance starts in the most recently selected power level if vacuuming was stopped previously.
Stopping vacuuming
Press
- The appliance stops and the status display pulses white.
- The setting for the power level is retained.
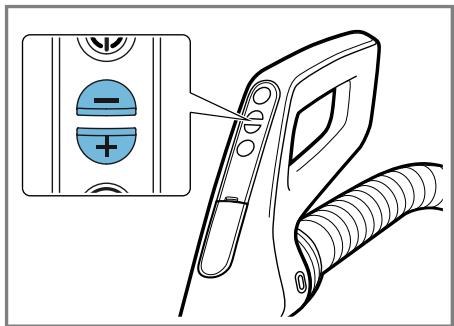
Controlling the power
- Press or .
Fig. 11
- The power level is increased or decreased.
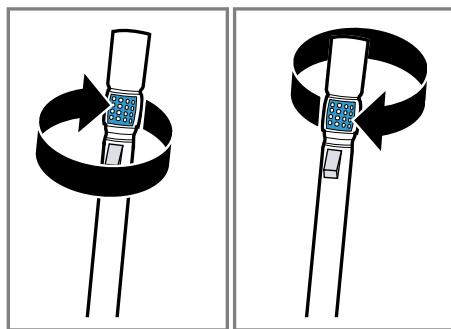
- Turn the telescopic tube with air flow regulator to the required position.
Fig. 12
The power is controlled continuously.
Starting turbo mode
For particularly stubborn dirt, you can use turbo mode.
Press
Turbo mode starts.
Stopping turbo mode
Press
- The appliance switches to the power level that was previously set.
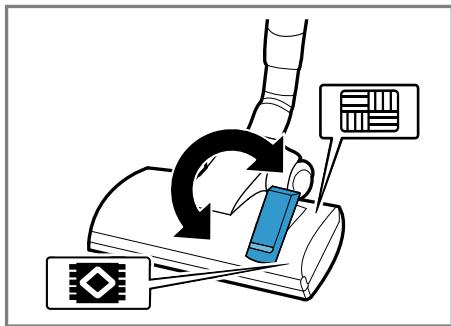
Setting the floor tool
- Use the switch to set the floor nozzle to the required base.
Fig. 18
Parking the appliance
Tip: When taking shorter breaks from vacuuming, the floor nozzle can be placed in the parking aid.
- Slide the hook on the floor nozzle into the parking aid.
Fig. 14
Stopping and carrying the appliance
- Switch off the appliance.
"Switching off the appliance", Page 34
2. Stand the appliance upright on its end.
3. Slide the hook on the floor tool into the parking aid.
Fig. 15
- To overcome obstacles, carry the appliance by the handle.
Vacuuming with accessory
- Place the required nozzle onto the telescopic tube or the handle.
- After use, take the nozzle that is used from the telescopic tube or remove from the handle.
Vacuuming with the MultiUse-Brush1
Note: Do not remove the Multi-UseBrush after use. The suction power is not restricted by the fitted Multi-UseBrush.
ATTENTION!
Vacuuming without the bristle ring pushed down can damage the surface.
-
Never vacuum with the bristle ring pushed up.
-
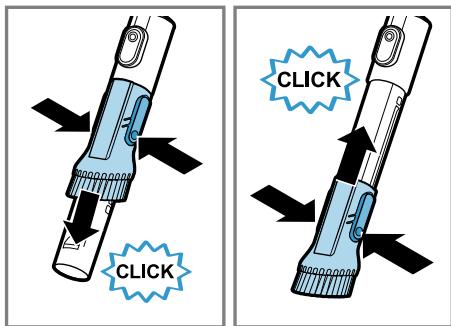
Push the Multi-Use-Brush onto the handle or the tube and lock it in place.
Fig. 16 - Press the two locking catches on the bristle ring.
en Cleaning and servicing
- Push the bristle ring down and lock it in place.
Fig. 17
The Multi-Use-Brush is ready to use.
- Vacuum using the Multi-Use-Brush.
"Starting vacuuming", Page 34
"Stopping vacuuming", Page 34
-
Press the two locking catches on the bristle ring.
-
Push the bristle ring upwards and lock it in place.
Fig. 17
- Push the floor tool or the tube onto the Multi-Use-Brush.
- Press the release button and remove the Multi-Use-Brush to remove.
Fig. 18
Starting emergency mode
If the Remote-Power-Control handle does not work, you can vacuum in emergency mode.
Requirement: The appliance is in standby mode.
"Switching on the appliance", Page 34
- Press ①.
- The status display goes out and quickly flashes white three times after a short time.
- Press ① while the status display is flashing.
- The appliance starts in turbo mode.
Stopping emergency mode
Note: After vacuuming, check the Remote-Power-Control handle.
"Troubleshooting", Page 40
Press ①.
- The status display goes out and quickly flashes white three times after a short time.
Removing the appliance
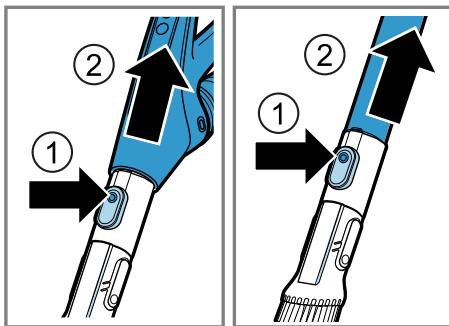
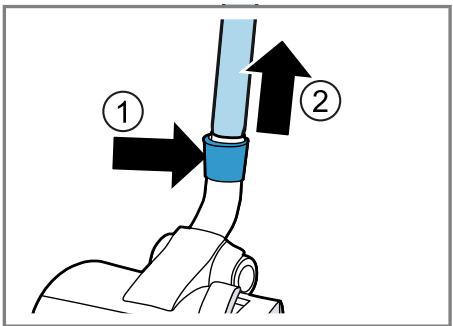
- Disconnect the connection between the floor nozzle and the telescopic tube.
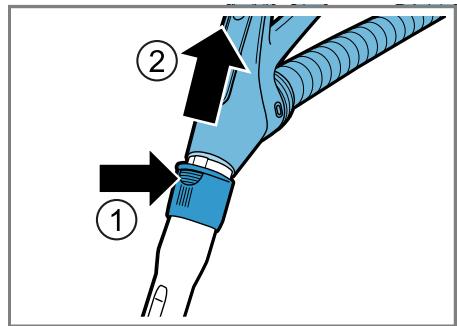
→Fig.19 - Disconnect the connection between the telescopic tube and the handle.
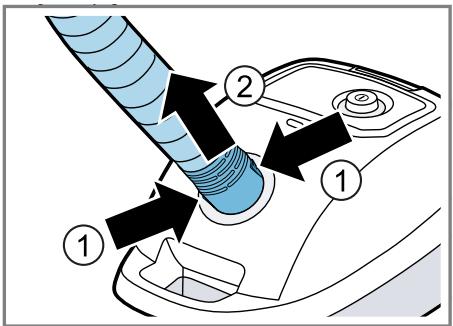
Fig. 20 - Press the two locking catches together and pull the hose out of the appliance.
Fig. 21
Cleaning and servicing
To keep your appliance working efficiently for a long time, it is important to clean and maintain it carefully.
Cleaning products
Only use suitable cleaning products.
ATTENTION!
Using unsuitable cleaning products or incorrect cleaning may damage the appliance.
- Do not use harsh or abrasive detergents.
- Do not use cleaning products with a high alcohol content.
- Do not use hard scouring pads or cleaning sponges.
- Wash sponge cloths thoroughly before use.
Cleaning the appliance
Requirement: The appliance is switched off.
"Switching off the appliance", Page 34
- Clean the appliance and the accessory with a soft cloth and a commercially available plastic cleaner.
- Clean the infrared receiver located on the On/Off switch.
Cleaning the Remote-Power-Control handle
Tip: Clean the infrared transmitter on the Remote-Power-Control handle regularly. A dirty Remote-Power-Control handle can lead to faults during operation.
Clean the Remote-Power-Control handle with a soft cloth and a commercially available plastic cleaner.
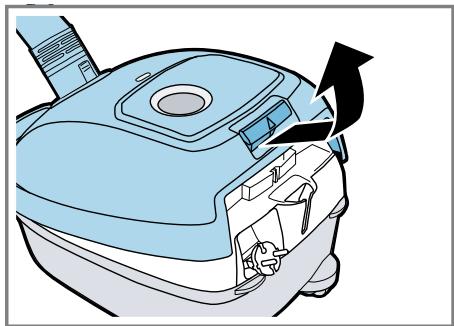
Opening the lid
Requirement: The appliance is switched off.
"Switching off the appliance", Page 34
- Open the lid.
Fig. 22 - Fold up the lid completely.
Closing the lid
Tip: Check that the dust bag is not trapped between the lid and the appliance.
Requirements
The dust bag has been inserted.
The motor protection filter has been inserted.
The exhaust filter has been inserted.
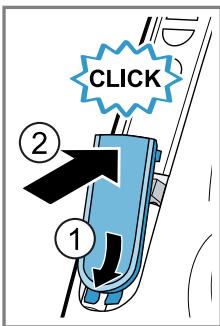
- Close the lid and lock it in place.
Cleaning the dust compartment
Requirement: The dust bag has been removed.
"Changing the dust bag", Page 37
If required, vacuum the dust compartment using a second appliance or clean it with a dry duster or dusting brush.
- The dust compartment has been cleaned.
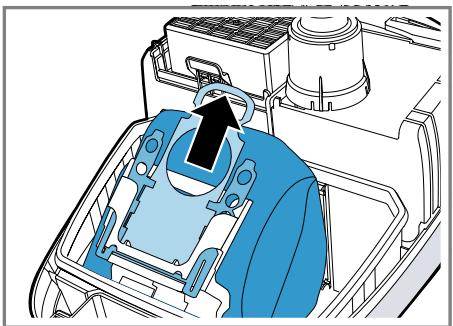
Changing the dust bag
If the inspection window of the filter change indicator lights up continuously when the nozzle is raised and at the highest power level, change the dust bag.
Requirement: The lid is open.
"Opening the lid", Page 37
- To close the dust bag, pull the locking tab.
Fig. 23 - Remove the full dust bag from the holder.
- Dispose of the full dust bag.
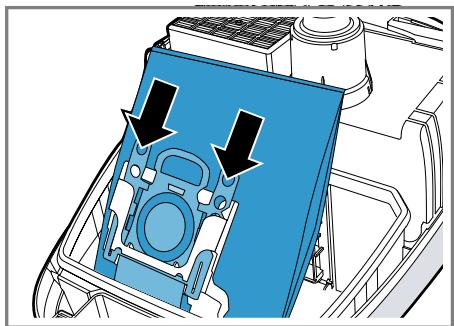
-
Push the new dust bag into the holder until it clicks into place.
-
Do not kink the dust bag.
Fig. 24 -
"Closing the lid", Page 37
Cleaning the motor protection filter
Tip: To achieve the best possible vacuuming results, tap out or wash the motor protection filter regularly. After vacuuming fine dust particles, clean
en Cleaning and servicing
or replace the motor protection filter in order to guarantee the appliance's suction.
Requirement: The dust bag has been removed.
"Changing the dust bag", Page 37
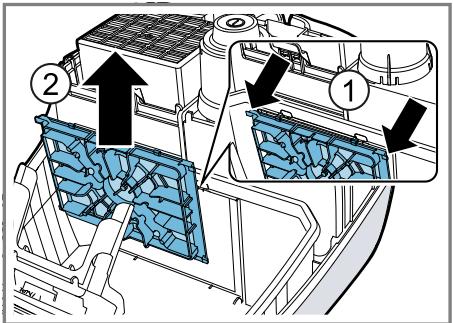
1. In order to release the motor protection filter from the catch mechanism, pull on the side tabs. Fig. 25
2. Remove the motor protection filter in the direction of the arrow.
3. Tap out the motor protection filter.
4. If the motor protection filter is very dirty, rinse it. Fig. 26
5. Leave the filter to dry for at least 24 hours.
6. Refit the motor protection filter into the appliance and lock it in place at the top.
7. Insert the dust bag. "Changing the dust bag", Page 37
8. "Closing the lid", Page 37
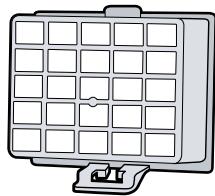
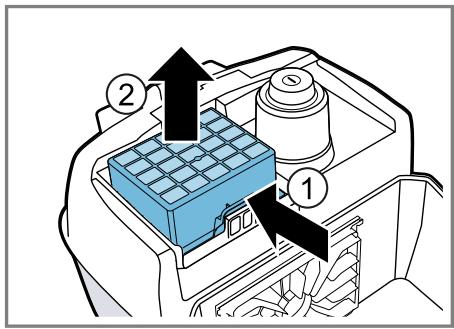
Removing the exhaust filter
Requirement: The lid is open. "Opening the lid", Page 37
- Push the locking tab in the direction of the arrow and release the exhaust filter.
- Remove the exhaust filter from the appliance. Fig. 27
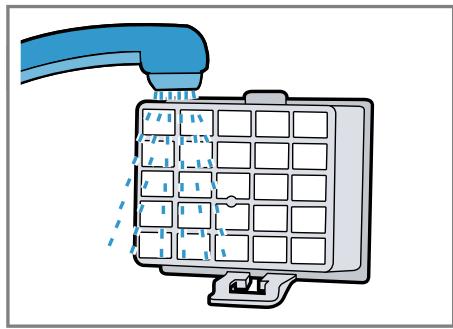
Cleaning the exhaust filter
For optimum performance, clean or replace the exhaust filter once a year.
Tip: After vacuuming fine dust particles, clean or replace the exhaust filter in order to guarantee the appliance's suction.
Note: The filtering effect of the exhaust filter is retained, even if the filter surface becomes discoloured.
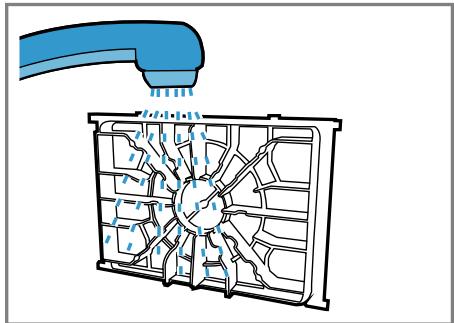
Cleaning the HEPA hygiene filter
The HEPA hygiene filter consists of a filter unit.
Tip: To clean the filter unit thoroughly, you can clean the filter unit in the washing machine. To protect the rest of the laundry, place the filter unit in a laundry bag. Wash the filter unit at 30^ using a gentle programme and the lowest spin speed.
Requirement: The exhaust filter has been removed.
"Removing the exhaust filter", Page 38
- Tap out the filter unit.
- Rinse the filter unit under running water. Fig. 28
- Leave the filter unit to dry for at least 24 hours.
- Insert the filter unit into the appliance. "Inserting the exhaust filter", Page 38
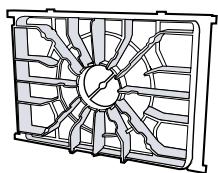
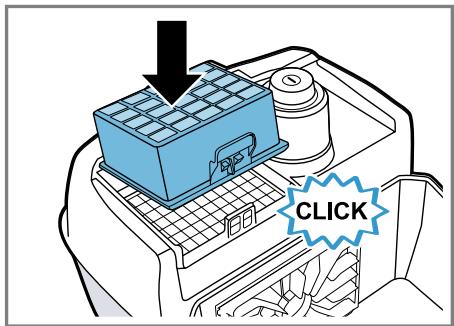
Inserting the exhaust filter
Requirement: The lid is open. "Opening the lid", Page 37
- Place the exhaust filter on the exhaust grille so that it clicks audibly into place. Fig. 29
- "Closing the lid", Page 37
Changing the batteries
- Remove the cover.
Fig. 30
Tip: Use an object such as a coin to open the cover.
-
Remove the empty batteries.
-
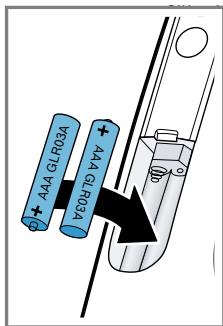
Insert the new batteries (AAA LR03).
Fig. 31
- Close the cover.
Fig. 31
- Dispose of the empty batteries in an environmentally friendly manner.
"Disposing of batteries", Page 41
Troubleshooting
You can rectify minor faults on your appliance yourself. Read the troubleshooting information before contacting after-sales service. This will avoid unnecessary costs.

WARNING
Risk of electric shock!
Incorrect repairs are dangerous.
Repairs to the appliance should only be carried out by trained specialist staff.
- Only use genuine spare parts when repairing the appliance.
- If the power cord of this appliance is damaged, it must be replaced by the manufacturer, the manufacturer's Customer Service or a similarly qualified person in order to prevent any risk.
Malfunctions
| Fault | Cause | Troubleshooting |
| The appliance is not work- ing. | The batteries are empty. | Change the batteries in the Remote- Power-Control handle. → "Changing the batteries", Page 39 |
| The Remote-Power-Control handle is not working. | ||
| Wireless connection is faulty. | The infrared transmitter on the handle and/or the in- frared transmitter on the On/ Off switch are/is covered. | 1. Remove any foreign objects.2. Clean the Remote-Power-Control handle and the appliance. → "Cleaning the appliance", Page 37 → "Cleaning the Remote-Power- Control handle", Page 37 |
| The communication channel is faulty. | Establish a direct connection between the infrared transmitter and the infrared receiver. | |
| Suction is reduced. | The dust bag is full. | Change the dust bag. |
| Filter change indicator is lit continuously. | Nozzle, telescopic tube or hose are blocked. | 1. Dismantle the appliance.2. Remove the blockage. |
| Exhaust filter is dirty. | Clean the exhaust filter. → "Cleaning the exhaust filter", Page 38 |
Transportation, storage and disposal
Find out here how to dispose of old appliances correctly.
Disposing of old appliance
Valuable raw materials can be reused by recycling.
- Unplug the appliance from the mains.
- Cut through the power cord.
- Dispose of the appliance in an environmentally friendly manner. Information about current disposal methods are available from your specialist dealer or local authority.
This appliance is labelled in accordance with European Directive 2012/19/EU concerning used electrical and electronic appliances (waste electrical and electronic equipment - WEEE). The guideline determines the framework for the return and recycling of used appliances as applicable throughout the EU.
Disposing of batteries
Batteries should be recycled in an environmentally friendly manner. Do not dispose of the batteries in the household rubbish.
- Dispose of batteries in an environmentally friendly manner. Only for EU countries:
According to the European Guideline 2006/66/EC, defective or used battery packs/batteries, must be collected separately and disposed of in an environmentally correct manner.
Customer Service
If you have any queries, are unable to rectify faults on the appliance yourself or if your appliance needs to be repaired, contact Customer Service. Function-relevant genuine spare parts according to the corresponding Ecodesign Order can be obtained from Customer Service for a period of at least 7 years from the date on which your appliance was placed on the market within the European Economic Area.
Note: Under the terms of the manufacturer's warranty the use of Customer Service is free of charge.
Detailed information on the warranty period and terms of warranty in your country is available from our after-sales service, your retailer or on our website.
If you contact Customer Service, you will require the product number (E-Nr.) and the production number (FD) of your appliance.
The contact details for Customer Service can be found in the Customer Service directory at the end of the manual or on our website.
Product number (E-Nr.) and production number (FD)
You can find the product number (E-Nr.) and the production number (FD) on the appliance's rating plate. Make a note of your appliance's details and the Customer Service telephone number to find them again quickly.
Warranty conditions
You can make warranty claims for your appliance under the following conditions.
en Customer Service
The guarantee conditions for this appliance are as defined by our representative in the country in which it is sold. Details regarding these conditions can be obtained from the dealer from whom the appliance was purchased. The bill of sale or receipt must be produced when making any claim under the terms of this guarantee.
Table des matieres
Sécurité 44
Stofcompartment schoonmake… 90
Stofzak verrangen 90
Motorbeschermingsfilter schoonmake 90
WAARSCHUWING - Kans op verstikking!
Stofcompartment schoonma-ken
General betjening. 103
Rengoring at apparatus 105
Rengoring af Remote-Power-Control handgreb 105
Abne lag 105
Lukke lag. 106
Rengoring af stovrum 106
ADVARSEL-Fare for forbranding!
Parkering of apparatus
Tip Ved korte pauser i stovsugingen kan gulvmundstykket anbringes i parkeringssystemet.
Skyd hagen på gulvmundstykket ind i parkeringssystemet. Fig. 14
Rengoring of apparatus
"Ring service!" Sid. 141
1 Allt after apparatents utrusting
Lär kenna
Enhet
Bosch
Bosch
Bosch
Bosch
Bosch
Bosch
Bosch
Bosch
Bosch
Bosch
Bosch
Bosch
Bosch
Bosch
Bosch
Bosch
Bosch
Bosch
Kahve Makinası
Dilim Kesici
Ekmek Kizartma Mak.
Su Isitici (Kettle)
Mikser
Mutfak Robotu
Kahye Degirmeni
Tost Makasi
Kiyma Makinasui
Sac Kurutma Mak.
Baskul
Saril El Supurgesi
Utu
Blender
Sac Sekillendirme cihazi
Meyva Sikacagi
Meyva ve Sebze Sikacagi
Masaj Aletleri
Degerli Musterimiz
www.bosch-home.com/tr
www.bosch-yetkiliservisi.com
Advertencias de character general
Colocar as pilhas 221
Operacao base 221
PpeaBaHe 3a OTNaTbUHa n3- Ie3nOT yNoTpe6a ypeu..270
I3xBpJHe Ha aKymyIaTopHn 6aTeepn/6aTeepn. 270
bg
OTdI IO o6cJyXBaHe Ha KIn- eHTN 270
He n3noJ3BaIte ypeJa:
3a n3cMyKbaHe Ha npax OT Xopa NIIJ KINBOTHn.
3a n3cmykbahe Ha BpeHn 3a 3dpabeto, ppeMETN C OCTpn pb-60be, ropeu nn ropau cy6ctanu.
3a n3cMyKbaHe Ha BlaJHn IJI TeuHn CyOCTaHcIIN.
3a I3CMyKBaHe Ha JeCHO 3aIaJIIMN IIN B3PnBHN BeIeCTBa I Ra3OBe.
3a n3cMyKBaHe Ha nepeI, CaJIN OT KaxJeHn peuKn I HCTaJaLznn 3a ceHTpaJIHO OTOpJIeHne.
3a I3cMkyKbaHe Ha npax OT TOHEp OT npHTEpn IN KOINPHN Ma- shHH.
3a 3acMyKBaHe Ha cTpOHTeHn OTnaIbCuN.
Pa3kaueTe ypeDa oT eJekTpO3axpaHbaHeTo, aKO:
Почистватура.
OrpaHnueHne Ha KpbTa oT nOtpe6nteJIi
To3n ypeJ moKe Ja ce N3noJ3Ba OT DeuHa BaB3pacT Haad 8 rOdiHn IOT LInCa C HamaJIeHN QIN3nueCKN, CETNBn IIn YMCTBeHn CNOco6HOCTn IIn IInCa Ha ONIT N/IIIn 3HaHnI, aKO ca IOn Ha6JIoDeHne IIn Ca INCTpyKTIpaHn OTHOcHO 6e3OpaCHaTa YN0TppeBa HaYpeDa I Ca pa36pAln IpON3TuUaUHTe OT YN0TppeBa Ta ONaCHOCTN. DeuTa He Tpr6Ba Da nIgPaRT c ypeJa.
Почиствано и подрьжкata от.stpaHa наnotpeбителу HeТразва за се ИЗвршват олеса Бe3 HablioDEнe.
YkaHnHa 3a 6e3oNaCHOCT
Ako n3noJ3BaIe ypeJa, cJeJeTe 3a Te3n yKa3aHn8 3a 6e3oNaCHOCT.
ПРЕДУПЕЖДЕНЕ - Onachoct OT TOKOB удap!
-
HeKOMnTeHTHO n3BbPseHnte peMOHTn npeDCTaBJIBaT onaCHOCT.
-
Camo obyuhen 3a ceIta cpeuHaun3npan nepcoHaJ Tp6Ba da n3BbPbWA peMOHTn Ha ypeJa.
3a peMoHTa Ha ypeDa TpIbBa Da ce N3POn3BaT cAmO opNnHaJIHn pe3epBHN qactn.
Ako Ka6eIbT 3a Cbbp3BaHe KbM MpeJkaTa Ha To3n ypeI b-De NOBpeIeH, TOI Tp8Ba Da ce CMeHn OT pON3BODITeJI nn HeROBnO TdEi NO O6CnyXBaHe Ha KJIneHTN, IIN OT dpyTO Lnue C PNO6Ha KBaIIuΦnKaUa, 3a Da Ce N36eHnat ONaCHOCTN.
■ПовреedingуредилкавелзacBbP3BaHeKbMmpexkaTAppeICTabJIaBATOnaCHOCT.
Hikora He nyskaite B ekcnloaataun noBpeDen ypei.
Hnkora He n3noJ3BaIte ypei C hanykaHa nn cyupeHa noBbpxHOCT.
Hnkora He nbpnaTe Ka6ela 3a Cbpb3BaHe KbM MpejkaTa, 3a Da OTdeJInte ypeJa OT eIeKtpo3axpaHbAaTa MpeJka. BnHaRn XbaaaiTe UenCeLa Ha Ka6ela 3a Cbpb3BaHe KbM MpejkaT.
Hikora He Hocete i He TerIe Te ypea 3a Ka6eJa 3a Cbbp3BaHe KbM Mpejata.
Ako ypeIbT nII Na6eJIbT 3a CBbp3BaHe KbM MpeJkaTa ca IOBpeIeHn, He3a6aBHO n3IbPnaIte IeIceHa Ha Ka6eHa 3a CBbp3BaHe KbM MpeJkaTa OT KOHTaKTA nII n3KJIIOUeTe IpeI Na3IteJI B KyTNaTc IpeIpa3IteJI.
"Свьржete ce c OTдela no obcnyxBaHe Ha KIneHTn." → CtrpaHnca 270
Camo obyuhen 3a ueIta cpeuaIIN3npan nepcoHaJ TpObA da N3BbPbBa peMOHTn Ha ypeDa.
- ПроннквашаТа Влага може на пpeДиЗВИКа TOKOB удap.
I3noJI3BaIte ypeJa cAmO B 3aTBoPeHn NOMEuEHNJ.
Hnkora He n3laarayte ypea Ha cnllHa TOnnHa N BnaRa.
3a nouchtbaHe Ha ypeHa He n3noJ3BaIte MaHnHa 3a nouchtbaHe C npapa NnC BnCOKo HnJaHe.
- HeKOMnTeHTHO n3BbPseHo nHCTaInpaHe npeDcTaBJIba ONaCHOCT.
Cbbp3BaIte n ekCnIooatnpaIte ypeDa cMo B CbOTBETCTBne C daHHnte Ha φa6pnuHaTa Ta6eIka.
YpeIbT TpIbBa Da Ce CBbp3Ba KbM eJIeKTpIuecka MpeJc C npOMeHJIIB TOK eDINHCTBeHO NOpCeIdCTBOM IHCTaJIupaH CnOpeI npaBnIaTa 3a3eMeH KOHTaKT.
CnCTeMaTa OT 3aUHTH N pOBOHnCi Ha eJeKtpnueckaTa CrpaHa IHCTaIaCnI Tp6Ba Da e INHCTaInpaHa CbflaCHO H3NCKBaHnIra.
PPEyIpeJDEHNE -OnachocT OT n3rapaHnI
■ФиNTbPHTe CnCTeMIMoT Da ce 3aIpeT npi paOToN B KOMbHaCnY CbC 3aIaJIIMN IJI N CbIbPjKaaN aIKOXOJI BeIecTBA Da ce 3aIaJIaT.
He noDaBaTe Bb3nIaMeHReMn IJI NcBbPkaU aIKOXOJI BeueCTBa Ha Top6aTa 3a npax nΦnITpnte.
- При поочьанeto Ha урета He Използвайт e залиши Или сьдьржаши aлькохол Вешесъв.
H3nCKBaHe:YpeIbTe BCTeHIOaI.
"BKNIOUbaHe Ha ypeJa", CtrpaHnua 263
- Hatnchete
→ΦnΓ.10
CTaTychata INHnKauNcCBETN B6rJIo.
YpeIbT CTapTnpa Ha MaKcImMaHaTa CTeIeH Ha MOUHOCT.
YpeIbT CTapTnpa B NocJIeIHO HAc- TPOeHATA CTeIeH Ha MOUHOCt, aKO I3CMyKBaHTo IpeIeT TOBa e 6nIO CnPraHO.
CnnpaHe Ha H3cMyKBaHeto
- Hatnchete
YpeIbT Cnnpa n CTatYcHaTa HNdkaCnIyLcnpa B6rNo.
HactpoeHaTa CTeneH Ha MOUHOCT ce 3aNa3Ba.
Perynpane Ha MozhoctTa
- HatnCHete uNUN
→ΦnΓ.11
CTepeHtHaMoUHOcCeYBeJIuHaBaIINHAMaJIbA.
2 3aBbPTeTe TeneCKOnuHata Tpb6a CdoNbHnTeHnpeYJlAToP 3a Bb3dUx Ha JKeJaHaTa N03uIy.
→ΦιΓ. 12
MoiHocTtacpepeyInpa6e3cte- nEHNO.
PerynipaHe Ha POnOBaTa IIO-3a
HactpoIte nOIOBaTa IIO3a c ppeBKJIouBaTeJIra 3a JKeJIaHnI IOJ.
→ΦnΓ.13
Napknape Ha ypeda
CbBET: PnI No-KpaTKn Nay3n Ha 3acMyKBaHe DIO3aTa 3a NOD MoKe Da cePnp6epe B NOMOuTa 3a NapKupaHe.
Bkapaite kykata Ha noIOBaTa IIO3a B NOMOuHaTa YAcT 3a napKInpaHe Ha ypeHa Ha eHnA cTpHa.
→ΦnΓ.14
CnnpaHe HocHe Ha ypeJa
1.ИЗКЛЮЧЕУрда.
"I3KJIIOUBaHe Ha ypeJa", CtrpaHnua 263
2. OctaBeTe ypeDa n3npaBeH.
3. BkapaIte kykaTHa Na IIOOBaTa DIO- 3a B NOMOuHaTa YaCT 3a NOCTaBHe Ha ypeDa Ha eDHa CTpaHa.
→ΦnΓ.15
4. 3a Да преоюлаяВATE преЯТСВИ, HOCTeуpeда 3a рькoxВаTKaTa.
Cmykahe c npHaJnEHHoCT
- Πьхhte Ланота Дюза Вьрху Телескогинота Трба Или рьков-Ваткata.
- Cné ynpotpeba cbaIyte n3noI3-BAHaTAtIO3a OT TeLEeCKoINuHata Tpb6a mnn OT pkoXBatkata.
Multi-Use-Brush n3cmyKbaHe
Белека: Multi-Use-Brush He trpa6ba Da ce DeMOHTnpa CSeI IN3NoJ3BaHeTo. MoUHOCTTa Ha IN3CMyKBAHe He ce orpaHnUbA ot MOHTnpaHaTa MultiUse-Brush.
BHIMAHNE!
I3CMyKBaHeTO C HeHaTbJIHO DoIOJU y 36yTaH YeTKOB BeHeu MoKe Ja NOBpeDN OCHOBaTa.
HnkoraHa n3cMyKBaITe c HaIrope n36yTah YeTKOB BeHeU.
1. Πьхhteи з actonopete Multi-UseBrush bbypxy pboxbaTkata ninn mapkyua. →ФИг. 16
2 HaTnCHHeTe DBeTe fNkCnpaun KpaueTa Bbpxy YeTKOBnBeneU.
3.ИЗБУТаYNTeЧETКOBиBABEHeцHAДОЛу
И Г OФИКСИРаYNTe.
→ФИГ.17
Multi-Use-Brush e rotoBO 3a pa6o-Ta.
4.ИЗСМУЧЕТСMulti-Use-Brush. →"CTapTиранe Ha ИЗСМУКВaH e", CтpaHицa 264
"CnnpaHe Ha N3cMyKBaHeTo", CtpaHnua 264
5. Hatnche Te DBeTe fNkCnpaun Kpaue Ta Bpxy YeTKOBnBHeuI.
6.ИЗБУТа�ТеЧЕТКOBИВBEHEUHaROpe nToФИКСИРаNTe. →ΦИΓ.17
7. Пьхhte Дюзата за под плтубatable в Multi-Use-Brush.
8. 3a ДемоHTаж НатиСHTe DeблOKИpaцья ByToH И OТСТРаНeTe MultiUse-Brush. →ФИг. 18
CTapTnpaHe Ha aBapHeN XoI
Ako pboKoxBaTkata Remote-PowerControl He yHKUHOHpa, MoKeTe daCTapTnpaTe n3cMkyKbaHeTo b aBapneHxOJ.
N3NCBaHe: YpeIbTe BCTeHIOba. "BKnIOUbaHe Ha ypeJa", CtrpaHnua 263
- Hatnuchete ①.
VHnkaunHa hCTaTyca yraBa mIgacneKpaTko BpeMe TpN IbTN 6bp30B6HIO. - HatncheTe ① JOKaTO CTaTychata INHdIKaCnMIGA.
YpeIbT cTapTnpa B Tpy6o peXIM.
CnnpaHe Ha aBapneH XoI
Белека: След Измукванeto поверete Remote-Power-Control ръковытkaраз.
"OTcTpaHЯBaHe Ha Heu3nPaBHoC-TN", CToPAHua 269
- Hatnuchete ①.
VHnkaunHa hCTaTyca yraBa mIgacneKpaTko BpeMe TpN IbTN 6bp30B6HIO.
Демонох Ha ypeña
- Pa3kayeTe CBbp3BaHETo MExkny IIO3aTa 3a NOI IN TeleCKOINuHaTa Tpb6a. ΦnIg. 19
- Pa3kayeTe Cbþp3BaHTo MEXky Te- neCKOINuHaTa Tpða N pBkoXBaT- KaTa. →ΦnΓ. 20
- CTiSCHeTe DBeTe ΦIκCnpaUu KpaIyeta N I3TeTlTe MapKya oT ypeJa. →ΦIg. 21
OTCTpaHЯBaHe Ha HeN3npaBHOCTN
Moxte da OTCTpaHnte cAmocToaTeJHO MaJIKN HeN3npaBHOCTn no Baun ypeI.
PpeIN da ce CBbpxte C OTdela NIO O6cnyXbaHe Ha KIneHTN, HApPaBeTe
CnpaBka c INΦOpMaUaHrTa 3a OTCTpaHbAHe Ha HeN3npaBHOCTN. TaKa Iue n3-
6eHete HeHyxHn pa3XoDn.
I P E D U N P E X H D E H N E OnachocOT TOKOB ydap!
HekomnteHTHO n3BbPseHte pemOnTn IpeIcTabIaBaT OnaCHOCT.
Camo obuhen 3a ueIta cneuaIIN3upaH nepcoHaJI TpR6Ba Ja n3BbPbBa peMOHTn Ha ypeJa.
3a peMoHTa Ha ypeJa TpR6Ba Da Ce N3POn3BaT CaMO OpiuHaJIH Pe3epBHN YactN.
Ako Ka6eJIbT 3a CbIbp3BaHe KbM MpeKaTa Ha To3n UpeD 6bIe NOBpeH, TOn TpOBA Da Ce CMeHr OT npOI3BOIDTeJr IIN HeROBn OToIeN IO O6ClyKBaHe Ha KJIneHTn, INIOT Dpyro JInCe C NOIO6Ha KBaIIINKauJr, 3a Da Ce N36erHAT ONaCHOCTn.
Функционалн HeH3пpaBHOCTN
UcTaHObKa 6aTapeeK. 281
CtaHapTHeO ynpaBLeHne 281
UcTaHOBka TeleckoNueeCKo Tpy6Kn... 281
BkJIoucheHne npIbopa. 281
Bbiklouehne npnbopa. 282
Haayano y6opkn. 282
PpekpaueHne y6opkn 282
PeryunpoBka MouHocTn 282
Ytuln3aun aKKyMnyTOpOB/6aTapei..289
CepBnchna Cnyk6a. 289
He ncpoIb3yIte np6op:
Для чистки Людень ИжовOTьх;
ДлЯ BCасьВаня ВpeДиBдЯ 3ДОрOBьЯ, OCTpbIX, rOрЯчnx Ип paKaJIeHHbIX cyбCTaHцИ;
ДлЯ BCасьВань ВlaЖьIx ИпжИдКИХ cyбCTaHци;
ДлЯ BCасьИВаня ЛergКOBOCПlaMeHЯЮШСЯ Или ВЗрьИЧаТых Be-шecтВи Г30В;
ДлЯ BCacbIBaHnЯ ПeПla, CaЖи n3 Kaфeьныx Neчey n ycTaHOBOK ueHTpaJIbHOrO OToPJIeHnЯ;
ДлЯ BCасьIBaHЯ TOHEpa n3 пиHTepOB Ил KОпрOBaJIbHbIX aПпapaTOB;
Длг BCaCbIbAHnI CTpoNTeHbHOrO Mycopa.
OToeHInTe np6Op ot nOdaun 3JeKtpo3Heprn, ecIn Bbl:
OuHuaTe Pnp6op;
OrpaHnueHne Kpyra noJb3oBaTeJe
Данныnpибор может ИсплььзоватбаядeтьмВВОЗрасе ot 8 leт Истаршe,а тakже ЛицамС огранчehнblIMФИЗЧЕСКIMN,сЕнсорыМИлу YMCTBEнhhIMCnOCOБHOCTЯМИЛС HeIOCTaTKOM ONbITAИ/Илл 3нани,ecln OHI HaxODЯТСЯПОД пprсмOTpOM IINI ПОСLE NOJUYe-HNYuka3aHni NO 6e3OpanachOMy Исплььзованю рибopaи NOСLE TOrO,ΚAK OHI OCO3HaJI NOnaCHOCTH,CBra3aHHbIe C HeINpaBnlbHbIM INcNoJIb3OBAHNem.
IeTAM 3aIpeSeHo IrgpaTb c npnbopom.
OuHCTky n o6cIyJxHBaHHe np6opa 3aIpeuaeTcBbIIOJIHTb DeTAM 6e3 Ha30pa B3pocblix.
Yka3aHnI NO TexHnke 6e3OnacHoCTN
CnCTeMbI ΦHbTpoB MOrTy HArpeBaTbCBy B IproUcEce 3KcnIyatauN n 3aRopaTbCBy pe3yJIbTaTe BO3dEiCTBnY BOCnIaMeHnIOxxCnI cInrTOcoDEpKaunx BeueCTB.
He donyckaTe nonaHa Ha MeIOK IJI N IINbTpBI rOpOuNX INCnptocOepKaUx BeueCTB.
He nCnoJIb3yIte BOCnIaMeHЯIOUneCra IIN CnIrpTOcoDEpJkaIe BeIeCTBa pRn OOnCTKe npIbopa.
He 3apKaaTe 6aTapeKn.
He 3aMbkaTe 6aTaapeKn.
He 6pocaiTe 6aTaapeKn B OroHb.
PPEyIpeJDEHNE-Onacnoctb yduBja!
IeTN MOryt 3aBepHyTbCBy B yPaKOBouHbI MaTePnaJI nIIi HaJeTbeero ce6e Ha roIoBy n 3aDOxHyTbCra.
He noDnyscKaIte DeTeK yynakoBOvHOMy MaTePnany.
He nO3B0JIeTe DeTm INrpaTb C yPaKOBouHbIM MaTePnaJIoM.
Bo n36eJHHe MaTePnaIbHorO yUepe6a
UTo6bI n36eKaTb NOBpeXJdeHn npu6opa, npinaDJIeKHOCTei N dpyrNX ppeMeTOB, co6JIIOaIte npNBedeHHbIe 3decb yka3a-HnI.
BHIMAHHE!
- Ipehenoc npnbopa 3a wlaHr MoKet npNBecTn K NOBpeXdEHIO WlaHra.
HnkOrda He nepeHocnte np6op 3a WlaHr.
I3HOeHHbIe, c 3aoocTpNBUnMmucKpaAMn pa6oue NoBepxHocTn HacaDNMOyT npVBecTn K NOBpeJdeHNIO Ya3BNMbIX TBepbIX HaNoJIbHbIX NOKpbITN, TaKHX KaK napKeT INI IINHOJeM.
- Peryulrpno npoBepnTe ypoBeHb n3-Hocapaboox nobepxHocTe hacaIKN.
3aMeHraTe H3HOWeHHbIe HacaIKN.
「Pra3bB DnBraTeNe MoKet PnBecTn Kero NOBpeXKeHNo.
Hnkorga He nCpObl3yIe np6op 6e3 MeuKa dIg IbIIN.
Hnkorga He nCnoB3yIe npn6op 6e3 MOTOPHO FOJIbTpa.
HnKoIa He nCnoIb3yIe npI6op 6e3 BblnyCKHO fNlIbTpa.
He npabnblhoe o6paueHne c 6aatapeiKaMn.
He 3aMbikaTe coeHnHTbHbIe KJIeMMbl.
HcnoB3yTe 6aTapeKn TOnbKO yKa-3aHHOrO Tnna.
He nCnoJIb3yIte oNHOBpeMeHHo 6aTapeKn pa3HbIX TINOB.
He nCnoJIb3yIte OJHOBpeMeHNO HO BbIe N obIBWne B nCNoJIb3OBAHN 6aTapeiKn.
IpoTeKsHe 6aTapeeKn NOBpeXdaIOT pyUcY cINCTaHUNOHbIM ynpaBLeHneM.
BbHMaTe 6aTapeKn,ecn He nCnoJIb3yeTe pyky cIncTaHcNoHHbIM ynpabJeHem.
YtIIN3npYte pa3pJKeHHbIe IIN HeNCpPaBHbIe 6aTapeKn 3KOLOrHuCeCKN 6e3OpNaChbIM cNoCobom C co6JIIODeHHeM Tpe6OBaHIn.
OxpaHa OkpykaIOUeN cpebl N 3KOHOMN
YTNIN3aunynaKOBKN
YnakoBochIbe MaTePnaJIbI 3KoJIoTHuYeCKN 6e3OJaChbI N MoRyT NcNoJIb3OBaTbcra NOBTOpHO.
- YtHnI3npyIte OTeJIbHbIe YacTn, npEiBapNTeJbHO paccOpTnPoBaB INX.
PacnaKobbIbAHne I KOHTpoJIb
3dec npBODNTc HΦopMaun, KOTopyu Heo6xOIMO yueCTb npn paCnakOBbA-HH.
PacnaKOBbIbAHne npH6opa n ero qaCTeI
- BbIbTe npnbop n3 ynaKOBKn.
- Bce ocTaIbHbIe YacTn I cOnpoBOIdTeIbHyIO DOKyMeHTaUIO BbIHbTe N3 yNaKOBKn I NOJIOXHTe pAOM.
- YdaJInte IMHeOuIcra ypaKOBouHbI MaTePnA.I
- YdaJInte NMeIOUInecr HaKJIeIKN I PJIeHKn.
KomnJIeKT NOCTaBKn
Pocne pacnakOBKn npOBepbTe Bce DeTaHn Ha OTCyTCTBVe TpaHCnOpThbIX NOBpeKdEHH N KOMJIeKTHOcTb NoCTaBKn.
3aMetka: B 3aBnCmOCTn OT OcHaUeHn np6Op nocTabIeTcB KOMJIeKTe CdoJIOJIHITeJIbHbIMn PpHaJIeXHOCTAmN.
→Pnc.1
O630p HnDnKaunn COCToHHN
HnDnKaun HNΦOpMnpyeT O yHKuNX TeKyuem CoCToAHIN pInbopa.
Perylnpobka MOUHOCTN
- HaxMMte 一 _ 一 NIN →Pnc. 11
VpOBeHb MOUHOCTN NOBblaETcH NIN CHIXKaETcR. - YcTaHOBInTe peRyIaTOp DoNOLHnTeJIbHo- ro Bo3dyxa Ha TeLeeCKoINuYeCKoN Tpy6Ke B HUxHHe NIOJXeHne.
Puc. 12
MoHocTb PnabHo peryIpyeTcA.
3anyck pexima Turbo
Пи Налічни OOCOБи INTEHСИВьIX 3aГРЗ- HeнМоЖно ИСПОЛБ3OBaТb peЖIM Turbo.
HaKMnTe
Pekm Turbo 3anyu.
OTKJIIOUeHne peXkMa Turbo
HaKMITE
Vπp6bop aBTOMaTnueckn nepeKJIuOaETcHa nocJeDHH yCTaHOBJIeHHbI peJxIM MOUHOCHTN.
YcTaHOBka HacaIKN IJIa YnCTKINoJa
- PereklnHouHTe HacaIky dIy IpoJa Ha HyKhbTIN NOBepxHOCTN.
Puc. 13
YcTaHOBka npH6opa B noJooKeHHne napKOBKN
PekomeHdaun:BoBpeM KopoTknx nepepbIOB B pOcece y6opKn BCTaBnTe HacaNk DnI nOla B nOLOKeHne napKOBKn Tpy6Kn.
BcTaBbTe KpOuKn Ha HacaIKe IJnI pOna B napKOBky Tpy6Kn.
Puc. 14
BbikloueHne n TpaHcnpTnpoBka npnbopa
- BbIKIIOHnTe npNoOp.
"BykIyueHne npnbopa",
CtpaHua 282 - NocTaBbTe npn6op BepTnKaJIbHo.
- BcTaBbTe KpOuKn HacaIkn IJIa NJa B NapKOBOUHbIe 0KCaTOpbl.
Puc. 15 - Пп пгедолениnpentcВи,пермшайтпрборза рук.
OuHcTka c npHaJdJIeXHoCTaMn
3aMeTka: He cHmMaTe Multi-Use-Brush nocIe HcNoJIb3OBAHn. YcTaHOBJIeHHaR Multi-Use-Brush he orpaHnUbaet Mou-HoCTb BCacbIBaHn.
BHIMAHNE!
Y6OpKa C He NpIHoCTbH Yo YcTaHOBJIeHHoB BCTaBKO C UeTINHO MOKeT PnIBecTH K NOBpeKdEHNO NOBepXHOCTN.
He naHnHaTe y6OpKy c BcTaBko C 8eTnHO, o6paueHHo BBepx.
1. YctaHOBInTe Multi-Use-Brush Ha pyuKny IIN Ha Tpy6ky N 3aΦnKcnpyIte Co CJIbI-IMMbIM UeJIYKOM.
PUC.16
2.ПиЖМЛТЕДВаФИКСАТОРаHaВCTaBKe CШETINHOH.
3.ПepeBepHnTe BCTaBky C ΜeTnHoB BnH3 n 3aФнксypuTe CO cIbIshmblIM ΜeJIyKOM.
Puc. 17
Multi-Use-BrushroTOB K 3KcPnyatauH.
4. HauHaiTe y6OpKy c nOmoIbIO MultiUse-Brush.
"Haayano y6opkn", CtpaHua 282
"PpeKpaueHne y6opKn", CtpaHua 282
3ameHa MeuKa IJIa IIJIH
Ecnn OKoWko INHdkaTopa 3aMehbI Φnbltpa NOnHocTbIO 3aOnJIHeNo pNnOJnHrToH hacaKe IMaKcImaIbHom yPoBHe MOUHOCTN, 3aMeHNTe MeWoK dJa PbIn.
Tpe6oBaHne: KpbIuKa oTKpbIta.
"OTKpbIbAHnHe KpbIiKIn",CTpaHnca 284
- 4To6b3aKpbTb MeWOk dIra Nbln, NotaHnte 3a 3acteKky. →Pnc.23
- BbIbTe 3aONHeHHbMeWOk dJIЯ nbIIN n3 depKaTeJIa.
- Ytuln3npyIte 3aOpHHeHHbI MeoK nIy Iblnn.
-
BctaBbTe HObBi MeWoK IaI NaIIN B KpePJIeHne Do cblIIMoRo UeJUka.
-
HedonyckaTe nepereBaaHna MeuKa DnA PbIiN. Pnc.24
-
"3aKpbIbAHne KpbIuKN", CtpaHua 284
OuHcTka MOTOpHOro HnIbTpTa
Pekomeha:ДлдIoCTNKeHnO nTmMaIbHOpe3yIbTaTAtBCacBHaHnPeYIrpHo BblKoNaUHBaIte NIN IpOMbHaIeMOTOpHbIΦnIbTp.PocLe BCacBHaHnMeNKoIbIIN,OuNCtIte NIN 3aMeHHTe MToPbHΦnIbTp IIN PoNDepXaHn MOuHOCTN BCacBHaHn PpNo6opa.
Tpe6oBaHne: Meuok nIy nbIyn 3BneueH. "3aMeHa MeUka dIy nbIIN", CtpaHua 285
- Notaryte 3a 3b4cN C 06eHX CTOPOH, YTO6bl OCB6OoHTb MOTOpHbI ΦnIbTp. → Pinc. 25
2.ИЗВЛЕКИТМOTOPНБИФИБТВ HANРавLEHINСтрелк. - Bbikolotnte motophbn nIbtp.
4.ПисиьHom 3aIpr3HeHn npOMOte MOTOPHbI ΦHbTp. →Pnc.26
5.ДaIteФильТуВыCOxHHTBTeueHHe MHHIMyM 24 yacOB. - BcTaBbTe MOTOpHbI ΦnIbTp n 3aΦnKcNpyIte cBepxu Do ueJIyka.
- YcTaHOBInTe MeUOK IJIЯ nbIIN. →"3aMeHa MeUka IJIЯ nbIIN", CtpaHnua 285
- "3aKpbIbAHne KpbIuKN", CtpaHua 284
H3BJeueHne BbInyCKHOro ФильТра¹
Tpe6oBaHne:KpbIiKhKaOTKpbIta. "OTKpbIBaHnE KpbIiKhN",CTpaHnua 284
1.ПижмITE 3aцeнkyВ ha npaBleHnCtpeIKNI pa3bNoKpyTe BblnyckHOfNlbTp.
2. BbIbTe BbInyckHoi FInIbTp n3 npN6opa. →Pnc. 27
OuHcTka BbInyckHoTo ΦHbTpTa
Длdoctижен ONTNMaJIbHOro ypoBnI npOn3BOdnteJIbHOCTN OUnIaITe N 3aMe- HJIte BblyckHoiФINbTp HepeXe OndHoro pa3aВ rOd.
PekomeHaJn: PocJe BCaCbIbAHnMEnKoN PbJIn, ONUCTHe NIN 3aMeHHTe BblyckHOH QJIbTp DnA COxpaHeHr MOUHOCTNBCaCbIBaHn.
3aMeTka:ФyHKUHOHaJIbHOCtB BbIpyCKHOrO ΦnIbTpca COxpaHReTcJaXe npN BO3MOK-HOM N3MeHeHHu CBeTa NOBepxHOCTn ΦnIbTpca.
OuHCTKa rHrHeHnueeCKOro ФильТра HEPA
TnHneHueckn HEPa npedCTaJIaET co6oHnIbTpObaIbHbI 6lOK.
PekomeHdaa:IJI6olee TuaTeNbHOO OHCTKN FIOJBTPoBaJbHOro 6Noka, BBI MOKeTe NocTnPaTb erO B CTnpaJbHOr MaUHe. YTO6bl He NOBpeDHTb OCTaJIbHOe 6eJIbe, NIOJOKHe FIOJBTPoBaJbHbI b 6NOK BMeJOK DnIa CTHPK. IJIa ONUCTKN FIOJBTPoBaJbHOro 6Noka yCTaHOBtte TEMpepaTyPy BOdbl 30 ^ C , peKIM bepeKHoN cTHPK IN MHNMaJIbHyO CKOpOcTB OTKIMa.
Tpe6oBaHne: BbInyckHoNΦnIbTp n3-BJeueH.
"I3BneueHne BbInyckHoro IIb Tpa^1 , CtpaHua 285
- BbIKoIOTnTe ΦnIbTpOBaJIbHbI 6JNoK.
2.ПомоITEФиltpoBaIbHbIб6LOKnoD CTpye BOdbl.
PnC. 28
3.ДаиTeФиьТрОВальHOMу 6лOKу BыСоХ-НУТБВ TeчЕне MИнHMуM 24 yapCoB.
4. YcTaHOBInTe ΦHbTpOBAhBn6JOK B npH6Op.
"YcTaHOBKa BbIyckHOrO _IIbTp a 1", CtpaHua 286
YcTaHOBka BbInyCKHOro ΦnIbTpα
1
Tpe6oBaHne: KpbIuKa oTKpbIta.
"OTKpbIbAHnHe KpbIuKN",CTpaHnca 284
- UcTaHOBInTe BbIyCKHoi ΦnIbTp Ha pe-WeTKy BeHTnJIrToPa n 3aΦnKcnpuYte 3a-ZeJky Do ZeJka.
Puc. 29
- "3aKpbIbAHne KpbIuKN", CtpaHua 284
3aMeHa 6aTapeek
- CHIMITE 3aunTHyIO KpbliKy.
→Pnc.30
PekomeHdaaun: HcnoJIb3yIte BCnOMoTaTeJIbHOe CpeICTBO IIN OTKpbITNKeBIIK,HaNPIMep,MOHeT.
2.ИЗВЕКИТe pa3рЯЖнBsIe 6aTapeiKn.
3. YcTaHOBnTe HOBbIe 6aTapeiKn (TIN AAA LR03).
Puc. 31
- 3aKpoIte 3aIHTHyIO KpbIiKy.
Pnc. 31 - YtJIn3npyIte pa3paJxHeHHbIe 6aTaapeKIN B COOTBeTCTBmC 3KoJIOnHueCKIMN HopMAMN.
"YtHn3aun aKKyMnyTOpOB/6atapei", CtpaHua 289
YcTpaHHe HeHcnpaBHOCTe
Bb moke camocToIeHbHo ycTaPahntb He3HaHTeIbHbIe HeNCpPaBHocTN BaIeO np6o-pa. BocnoJIb3yIteCb HfOpMaIeH nI rIaBbl «YcTaPaeHne HeNCpPaBHocTeN » nepeD o6paueHem B cepBnCHyO cnyK6y. 3To no3BoNt n36eKaTb dOnoJIHnTeIbHbIX pacxOIOB.

PPEyPPEKDEHNE
Onachoctb nopaxeHn 3JekTpneckm TOKOM!
Pn HeKbAInHnIuPoBaHHOM pEmoHTe Pnp6Op MoKET cTaB hctOuyHKOM ONaCHOCTN.
PemOHnpoBaTbpn6Op pa3peWaaetcToIbKO KBaJIHΦuNpOBoAHbIM CneuaJIInCTaM.
ДлгpeMOHTa npH6opa MoKHO ICNoJIb3OBAtToIbKO OpRHaJIbHbIe 3aIyactN.
Bo n36eXaHHe onaChocTe 3aMeHa NOBpeJdeHHoro cTeBOro Ka6eI daHHoro np60pa MoKet 6bITb BbIOnJIHeHa TOnbKO pON3BOdnteJeM IIN aBTopn3OBaHHo IM cepBcHoi cnJx6oB JIn6O liuO, MeIOUIM aHaIOrnHyIO KBaJIINΦNkaUIO.
C6oH Bpa6oTe
Pa3pa6oTaHO DAJXn3HN
HΦopMaζη O 6bIToBθ TeXhKe, IPOIN3BeDeHNo ΠOД KOHTpOJEM KOHcερHa BCX XaycrepeTe Γm6X, Kapn-Bepn-ⅢTp. 34, 81739 MIOHXeH, FepMaHn B COOTBETCTBnC Tpe6OBaHnM 3aKoHOdaTeNbCTBa O TeXHnueCKOM peYIpnoBaHn N 3aKoHOdaTeNbCTBa O 3aUnTe npab Notpe6bnteNei PoccnckO Φepeauin
Ipoodykua: nbIneocbI
ToBapHbI 3HaK:Bosch
BHIMAHIE! ACCOPTIMEH NPDQUYKUN NOCTHOHNO OBMOHTBETC. TENSHEKNECK XAPAKTEPCHN KNU, B TOUM CIE HREPO3FDEKNTBHOHCTO, NOCTHOHCOBOUEHCTBYOTOC. PNDQUYKUN PERPYTHKO NPOOCDYATOB3AEBTNHYIO NOUPDyE, NOPTBDKEXEHK COOTBEETCBNTO CORTLASHO DEBTYIKOHYE AOKHOQTAEYCTB. IHNOPOMAU KO EKBMTINAXT AKTYALHNX CEPTNIKATO COOTBETCTBNI U CPOAKX IIX DEITBTH, INHQOPMALIO 6 kTAYILHMON ACCOPTIMEH NPDQUYKUN MOXNYHUTU OYRAHAJNA, BIIIOHNJOOI QFNHYKUN INOHOTPAHNO HORI OTIBENBAH TEPMHOTOPN POCCKNKΦDeAEPAAO OEO "ECBXTOBBePnOBoBy PnOBoBy,1985a,CaNKT-Flereepypr. r. PeTeProd,yn. Kapna CImHeMaCA, d. n1rA. qvinanB r. Mocka, 119071, yn. Manal Kanykckaa, d. 15, teneodh (495) 737-2777, qacd (495) 737-2798.
KOMANHAI OOO 5CXTOBIOBEIPOBBOY),198515.CaHT-PIeTeR pT. IreTePROP,yn.Kapna CImHeA,DnIPT.ADmbr B.McRoBA,110971, yN.MaNAK KyckcaKB,15,tepeNO (495)737-2777, fAcQ 735-779y cUeCTBNET BCOO DEIET HOBCTNO NO TNDTEKDEHIN COOTCBETTBNOpOykUnsIO IMENHO PINO3AOBIOITNEA H aEiHON TAMOKEHNHO TERTOPINIO EespAHIKKOKO KEOHMIKCKO KO3A BOCTBTCTBNC DcIECTHYOMM NEXTECHKNCPEPAMELTAMTA, B KACHETE YNIOHMOHHOHIO IVTROBOTENEM PIIa, a TAKKE BbIOJIHNE TPEoBDOHNE 3AKOHOM Pn184-Φ3 IO TXEHNCKOM peYHIOPOBAHNI) dIPLI NIA, bIbONIOHKIO eFHyKIMNIOHOCPTAHORI IRTOTOBITNET HA TERTOPINIO PoCCNKCKO Febepara.
HMnOtePOMB R PoCCWcKyo DeepaLHPO npOdyuN, cepTnDyUPOBaHHo B KaueCTbe CepmnoH pOpm3BDOmmO, JaIeTcER OOO «ECX BtOBoHie PInp6bpyi, 198515, CaHt-TepeByr, r. Tpeprof, yn. Kapna CImenca, d. 1 nT.A, fMnian B r. Mockba, 119071, yn. Manan Kanjyckxra d.15, TeneOp (495) 737-2777.
Oprnnaaun, yka3baeMoHa n pnoDyKUImn bJeIax NdEHTNfKlauu mnpDyKUImn npOdyKUImn n OcuyIeCTBnIOUeJ nepeBnHoe pa3MeueHne npOdyKUImn ha pblHe Ebponeckoi c0o3a, anBaTecrTa PoBepr SoXayCrepere Tm5X Kapn-Bepur-ILtrp. 34, 81739 MInxHen, TepMaHn (Robert Bosch Hausgerate GmbH, Carw-Wery-Str. 34, 81739 München, Germany).
KOpJHNeKcM NlPOM (I3OTOBHTENEM), OCUJIETBNIOLIM OT CBOEOT IMMeHN I3OTOBENHE PNOJUKNI IN OTBTCTBEHbIM 3Ae Ee COOTBETBME TpeBoBaHnI pIneMbHsTeTbcNkXepHeRg peMaHbT, RaJIaTcERCA BX XaycrepTe Tm6X, KApI-Bepn-1tPr. 34, 81739 MOnxhen, TepMaHn (BSH Hauserge GmbH, Carl-Werly-Str. 34, 81739 München, Germany).
Ipipepeo3kge, npqyake, pargayr3e X npaehnnpooyklnn Cneynyert pykoobodctboabctc, noNMOH n3noxhenbXb B Hnctpyklnn o 3Kcnllnyatau1n, cnlyo1nMMA TpeoboeBnAHH
3AepaTceraeIIOpeRtBpOPOyKUHO CyUeCTBEHNNbM EMOxAHNEeKIM HApry3kAM, KOTOpBcN TPOBExeHINo PPOyKUHN W/NIH NAPuyEHINEO eeYIaNOKB.
Heo6xOIMO n36eRaTb nonaHaHn Ha ynaKOBky npOdykUu BOBHy npyMx KIOKCTe.
Peped nepebok30k nI nepeaahn ha xpaehene b6bueh B 3KcNpYatauPnnpOyuknn npri OtnpntelbHmTtempeatype Heo6xmo y6eBnBa COTCTybnB pOyuknn BOdi.
PpOyKmI npEHa3HaeHa KcN0JIb3OBaHIO BycnOBaIX TeMnepaTyblBIIe 0°C NOTHOCTbHbONBnBAAxHOCTN, He ppeBbIaHOJ93%.
Peped HanaHOM 3KcNtAaIPOuDyKIN, DnHIEbTHe BpMRAHOxADHbUEeB NOB OBOdEeBTHMeM OTOIaTeBbHO TMENpeTpbl, HeOBXOIM BoI-DePekbXb E y CNOYBAHXOMATHN TEMPeTApTyb HECKONQ YACOB.
PbBnAaepnAeIaIyIpnOpeIeIeIeIeITcpeIeIeIeIeIeIMPO3HNIHOITOPROBNCOOTBCTBNCtpeOBaHmNMeDaeCTbOIOEg3AOKHO- dantel
Uy3aannno 10 ytnnnnnae npndkynnn coepkata B n HCTpyknn no kcnnyataa n Moryt 8bty oTOuHbI y MyNnunabhix opraHOB INONHINHeBnBnBnAaT.
Ia npoDyukn, paeH3OBOHAnH n3OTOBHTENEM B TceHHeN CPOka dECTBHCAe cTERTKTHACA KooTBECTBHCA. 3OT cTERTKTHACA dEHTBHCEHEN Pnn ee Noctabek, pnoJake H nncb30BbHn (pNPMeHBeHn) bTeHHeN cPOka cCnykbsB, yctAHoBNeHO b COBTBETCMc O CTaBtEH 18 3AOKHO PΦ a 3auHite npabntop6EBTienen. CPOc cnlykbs H na npoDyukn U kyaahn npoVb3OBtENEM B ITOCTOBeK IH^ FOOPMAUg h3TOBOTBTEH o RapahTNHOM eBcHONCH OBcNHYBAHNH.
PnpOyKIMKoBt 6bIb NdeHTHcMUPPOBaHa No moEhOMy o633aHcHNO (nope eNr.). anpObaAHOHOMY TINy (nope "Type") n TOBAPOMY 3hky Bosch, haneCehEBHMn Ma npOyDIO. y a (n) cOpepKaXoCA B kCtIpyaLMOHbIX DOkMyeHTAn. B COOTBeTCTBN C BHytpeHHM CTaHApDM3r0TobITenB ToBbTaR AnHeTHcMIPUcyETo n CneJeKouJcXeMe:
E-Nr.
MaterpahnbHn Hmoper PnpctdabTnepoBkyBHeHO-kuPFOOBe 063aHHeHne npOyKuIM dHIOH He BNOE 10 CMBIOB, MCNBo3yEmoe npn pOdoane (HmEHEMO mOeBbHm 063aHHeHne Hm n MoeBb 6bTOBO rpoCopa) troPOB mapKm Bosch. MaterpHaBbHm HmOp (MoE) kya3BaBETc MEcky KoDobIM cIooBm eE-Nr. n KocO uptcr /x
HInEck cBpENCHOcIyKbI- Dzy3NHAHOe UzPPOBE O603HauHEHe, pNcBABaEMo EJINHIE PNOUkLI Bn POUCCE PNO3ABOCTBA INCNIOJIb3eMoe CEPBCNCHcIyKbI.
3KcnIyAIOHbONO DOKYMHTbI p3ap5aTbAbaTOcB YNHfKnIOPOBAHHO FOePME I yMnPOKO ACCOTIMHEA PNOQYHM, NTOMYI OTHOTOBENEM pNDyCMOTpEO HyaahmIE HO TPOBOB 063HAEHNE PPbOBA B KCNJyAATAOCHNbIX DOKYMHTAX KAN NOHCTbHO, TAK YCAHNTHO, PBN YCNOBIM, YTO 3No3083EgTNpOeHNbITbPbHADNkEKNoCTbD HAnHO R KCNJyAATAOCHNHO DOKYMHTK K BbTOBOM BYNPcOBy, COnPOBQKaEMOMY 3TNM KCNJyAATAOHHBM DOKYMHTM. YCTAHOBHBe B IpOeCE B ENHINPKAICAU cOoBTETCBX XAPKePTCKtBbSbTOBO rpoBnO POLOBPOPAO BNOXEHKM, CODeRkAIAUMCR BPNNAABeHMe H KEMY 3KCNJyAATAOCHNbIX DOKYMHTAX, PNOBQITCN TYTEM ANIHIN3 hINPHOPMAU, INHOEHOH K BcNATLIYAOHbX DOKYMHTAX
B Coctab 3KNYPLATAHNOHIXOkyMMAHOTN, npDEyPOMTENHxNIOIOTOBWENTENI PnIOPOYKUN, MOYTR BXOJNTNB HACTOJIAR NHIOFPMALIA, INHCTPYKLMRA (pyKObDCTBO) NO KCNPLATAHIN, INHOFPMALIA, RHOHNOPMILOR APaTHNIHO R CEBPIHORO OCBYKNBAHIMAN.
MapKipobAHme npoduyuohm ocuyectbnaetcHnTobOBtneHem Ha TnIOBor tabnHKe npboopa,Ha yNaIOBOHOH 3TNkETke, HENOCpEeCTBeHHo HA yNkoBKe npOBCa, a TAKKE MOKET npO3BODNTCB INHBM NTOC0GAMM, O6CeNEHBAQUCCMM NOCTyHOB n HArTHAOE npedctABeHNHE INHFOPMAUO m npOBoe M BECTXnpDaxk.

PpOydkUKN, KOTOPA pOLONA pOLONApyDnQoTBeDxHEna COOTBETCTBNr CoTnAHO Tpe6ObaHIM TExHINeCKNX, perMAENTHO BApKIO 303 WnTHNEXeCKNX pERMAENTHO EbpAaIKCKOKO 3KHOOMKHCKCOK OHO3OA, MAPKIPYETcE 1EINbIM 3hAKOM 0pOaENHn PpOydkUKN H aBbIeRocSydAPr3-UEHOB TAMOKeHNO C0HO3 (EbpAaIKCKO 3KHOOMKHCKCOK OHO3).
PpOdyKUa COOTBETCTByet CNeDyUoUm TEXHnueckm pernameHTam TaMOxKeHHOrO co03a:
TP TC 020/2011 3NeKtpomarHnTHa COBmecTmOCTb TexHnuecknx CpeIcTB
- TP TC 004/2011 O 6e3oNaCHOCTn Hn3KOBoJIbTHOrO o6OpydoBaHnA
TP EA3C 037/2016 O6 orpaHneHn npImeHnnaChbIX BeueCTB n3dennx 3JNEKtpoTeHNIK n paDnO3JNeKtpoHnIK
3KcnjyAHTaHIOHbE DOXMeHbTb H pOyoLkYIO BboNIOHOTc BA yPCCKOM bIyke. 3KcnjyAHTaHIOHbE DOXMeHbTb H oocdABCTBnHbIX bRkHXACOrcyADCTPBHOEBPcAaNKOcHcKO EKHOHcNECKO cOo3Oa, OTMHNbIcOT yPCCKO, nPi HANILN COOTBETCTBOUIOYx TpeBOBAHIN B3KQHOATDeTbc- TBE MOXHO 63803MEOHO NIOYt bTOpyIOeJeporAHsAIp-pz3EIDHaOTCOBTBCTNOUYIeBOEpaNKOcKOeOco3Oa.
INHOPMAJIO OM KONTEKTAIOI PNOYDIKNI PNPCTEBA NTOBROB 3ANZMOKETB 3ANZPOLENA NO TENEOFOH 6ECNATIHOM (ROPRAH LINIHO) (800-290-261A, A TAKKE OCTOHNIA B INTEPHETHE Na caitre POBOQDUTAHETI http://www.bosch-home.ru.
| Topologoe obsoaouhene | Anopbaouhounnien TIN | Cerptnphkat cootertctb | CTpna- MKTOTOBTEN | HH*, B | H***, Γι | H***, Br | ||
| Peg. Hoxep | Dasta bduan | Deictyuetao | ||||||
| 0608087000 | GLASV1AC | CE-DAF4B 6.06105/9 | 18.07.2019 | 17.07.2024 | Ktua | 3.6 | 50/60 | 0 |
| 0608087100 | GLASV1AC | CE-DAF4B 6.06105/9 | 18.07.2019 | 17.07.2024 | Ktua | 3.6 | 50/60 | 0 |
| 0608087200 | GLASV1AC | CE-DAF4B 6.06105/9 | 18.07.2019 | 17.07.2024 | Ktua | 3.6 | 50/60 | 0 |
| BBH21630R | VXA5013V1E | CE-DAF4B 8.82700 | 03.11.2017 | 02.11.2022 | Ktua | 200-240 | 50/60 | 0 |
| BBH216CR | VXA5013V1E | CE-DAF4B 8.82700 | 03.11.2017 | 02.11.2022 | Ktua | 200-240 | 50/60 | 0 |
| BBH216RIA | VXA5013V1E | CE-DAF4B 8.82700 | 03.11.2017 | 02.11.2022 | Ktua | 200-240 | 50/60 | 0 |
| BBH216RIB | VXA5013V1E | CE-DAF4B 8.82700 | 03.11.2017 | 02.11.2022 | Ktua | 200-240 | 50/60 | 0 |
| BBH21830L | VXA5012V1E | CE-DAF4B 8.86828 | 03.11.2017 | 02.11.2022 | Ktua | 100-240 | 50/60 | 0 |
| BBH218LTD | VXA5012V1E | CE-DAF4B 8.86828 | 03.11.2017 | 02.11.2022 | Ktua | 100-240 | 50/60 | 0 |
| BBH625M1 | VCAS010V2S | CE-DAF4B 7.3181 | 20.01.2016 | 19.01.2021 | Ktua | 100-240 | 50/60 | 0 |
| BBH21435 | VXA5012V14 | CE-DAF4B 8.86828 | 03.11.2017 | 02.11.2022 | Ktua | 100-240 | 50/60 | 0 |
| BBH21841 | VXA5012V14 | CE-DAF4B 8.86828 | 03.11.2017 | 02.11.2022 | Ktua | 100-240 | 50/60 | 0 |
| BSI1114 | VCAS020V18 | CE-DAF4B 8.86828 | 03.11.2017 | 02.11.2022 | Ktua | 100-240 | 50/60 | 0 |
| BSI1204 | VCAS020V18 | CE-DAF4B 8.86828 | 03.11.2017 | 02.11.2022 | Ktua | 100-240 | 50/60 | 0 |
| BSI120O | VCAS020V18 | CE-DAF4B 8.86828 | 03.11.2017 | 02.11.2022 | Ktua | 100-240 | 50/60 | 0 |
| BSI811POCK | VCAS020V18 | CE-DAF4B 8.86828 | 03.11.2017 | 02.11.2022 | Ktua | 100-240 | 50/60 | 0 |
| BSI812AM | VCAS020V18 | CE-DAF4B 8.86828 | 03.11.2017 | 02.11.2022 | Ktua | 100-240 | 50/60 | 0 |
| BSI812PCK | VCAS020V18 | CE-DAF4B 8.86828 | 03.11.2017 | 02.11.2022 | Ktua | 100-240 | 50/60 | 0 |
| BSS81PET | VCAS020V18 | CE-DAF4B 8.86828 | 03.11.2017 | 02.11.2022 | Ktua | 100-240 | 50/60 | 0 |
| BCH3ALL25 | VXA5014V2S | CE-DAF4B 8.86828 | 03.11.2017 | 02.11.2022 | Ktua | 100-240 | 50/60 | 0 |
| BCH3K25 | VXA5014V2S | CE-DAF4B 8.86828 | 03.11.2017 | 02.11.2022 | Ktua | 100-240 | 50/60 | 0 |
| BCH3P25 | VXA5014V2S | CE-DAF4B 8.86828 | 03.11.2017 | 02.11.2022 | Ktua | 100-240 | 50/60 | 0 |
| BCH625N1 | VCAS010V2S | CE-DAF4B 7.3181 | 20.01.2016 | 19.01.2021 | Ktua | 100-240 | 50/60 | 0 |
| BCH65POWER | VCAS010V2S | CE-DAF4B 7.3181 | 20.01.2016 | 19.01.2021 | Ktua | 100-240 | 50/60 | 0 |
| BCH65R125K | VCAS010V2S | CE-DAF4B 7.3181 | 20.01.2016 | 19.01.2021 | Ktua | 100-240 | 50/60 | 0 |
| BCH65R145 | VCAS010V2S | CE-DAF4B 7.3181 | 20.01.2016 | 19.01.2021 | Ktua | 100-240 | 50/60 | 0 |
| BCH65AT25 | VCAS010V2S | CE-DAF4B 7.3181 | 20.01.2016 | 19.01.2021 | Ktua | 100-240 | 50/60 | 0 |
| BCH65L25G1 | VCAS010V2S | CE-DAF4B 7.3181 | 20.01.2016 | 19.01.2021 | Ktua | 100-240 | 50/60 | 0 |
| BCH62OOO | VCAS010V2S | CE-DAF4B 8.82700 | 03.11.2017 | 02.11.2022 | Ktua | 100-240 | 50/60 | 0 |
| BCR1ACG | VBSX8RQ W | CE-DAF4B 0.0752/18 | 28.12.18 | 27.12.2033 | Герману | 100-240 | 50/60 | 0 |
| BCS1ALL | VCAS020V18 | CE-DAF4B 8.86828 | 03.11.2017 | 02.11.2022 | Ktua | 100-240 | 50/60 | 0 |
| BCS1LUTD | VCAS020V18 | CE-DAF4B 8.86828 | 03.11.2017 | 02.11.2022 | Ktua | 100-240 | 50/60 | 0 |
| BCS81EXC | VCAS020V18 | CE-DAF4B 8.86828 | 03.11.2017 | 02.11.2022 | Ktua | 100-240 | 50/60 | 0 |
| BGB2UCARP | VRSB07ZGV | CE-DAF4B 8.86828 | 18.07.2018 | 17.07.2033 | Герману | 220-240 | 50/60 | 200/ |
| BGB5OSAA2 | VBXGS3OSV2 | CE-DAF4B 8.84712 | 03.04.2018 | 02.04.2033 | Ktua | 220-240 | 50/60 | 700 |
| BGB5OL9G | VBA5013V1S | CE-DAF4B 8.86828 | 22.01.2016 | 21.01.2022 | Герmану | 220-240 | 50/60 | 150 |
| BLS26200 | VBXSSZGV | CE-DAF4B 8.76370 | 18.08.2016 | 17.08.2018 | Герmану | 220-240 | 50 | 200 |
| BGL262101 | VBXSSZGV | CE-DAF4B 8.76370 | 18.08.2016 | 17.08.2018 | Герmану | 220-240 | 50/60 | 200 |
| BGL262103 | VBXSSZGV | CE-DAF4B 8.76370 | 18.08.2016 | 17.08.2018 | Герmану | 220-240 | 50/60 | 200 |
| BGL35MOV24 | VBXSSZ53M | CE-DAF4B 8.73215 | 22.01.2016 | 21.01.2021 | Герmану | 220-240 | 50/60 | 220 |
| BGL35MOV25 | VBXSSZ53M | CE-DAF4B 8.73215 | 22.01.2016 | 21.01.2021 | Герmану | 220-240 | 50/60 | 220 |
| BGL35MOV26 | VBXSSZ53M | CE-DAF4B 8.73215 | 22.01.2016 | 21.01.2021 | Герmану | 220-240 | 50/60 | 220 |
| BGL35MOV27 | VBXSSZ53M | CE-DAF4B 8.73215 | 22.01.2016 | 21.01.2021 | Герmану | 220-240 | 50/60 | 220 |
| BGL35MOV28 | VBXSSZ53M | CE-DAF4B 8.73215 | 22.01.2016 | 21.01.2021 | Герmану | 220-240 | 50/60 | 220 |
| BGL35MOV29 | VBXSSZ53M | CE-DAF4B 8.73215 | 22.01.2016 | 21.01.2021 | Герmану | 220-240 | 50/60 | 220 |
| BGL35MOV30 | VBXSSZ53M | CE-DAF4B 8.73215 | 22.01.2016 | 21.01.2021 | Герmану | 220-240 | 50/60 | 220 |
| BGL35MOV31 | VBXSSZ53M | CE-DAF4B 8.73215 | 22.01.2016 | 21.01.2021 | Герmану | 220-240 | 50/60 | 220 |
| BGL35MOV32 | VBXSSZ53M | CE-DAF4B 8.73215 | 22.01.2016 | 21.01.2021 | Герmану | 220-240 | 50/60 | 220 |
| BGL35MOV33 | VBXSSZ53M | CE-DAF4B 8.73215 | 22.01.2016 | 21.01.2021 | Герmану | 220-240 | 50/60 | 220 |
| BGL35MOV34 | VBXSSZ53M | CE-DAF4B 8.73215 | 22.01.2016 | 21.01.2021 | Герmану | 220-240 | 50/60 | 220 |
| BGL35MOV35 | VBXSSZ53M | CE-DAF4B 8.73215 | 22.01.2016 | 21.01.2021 | Герmану | 220-240 | 50/60 | 220 |
| BGL35MOV36 | VBXSSZ53M | CE-DAF4B 8.73215 | 22.01.2016 | 21.01.2021 | Герmану | 220-240 | 50/60 | 220 |
| BGL35MOV37 | VBXSSZ53M | CE-DAF4B 8.73215 | 22.01.2016 | 21.01.2021 | Герmану | 220-240 | 50/60 | 220 |
| BGL35MOV38 | VBXSSZ53M | CE-DAF4B 8.73215 | 22.01.2016 | 21.01.2021 | Герmану | 220-240 | 50/60 | 220 |
| BGL35MOV39 | VBXSSZ53M | CE-DAF4B 8.73215 | 22.01.2016 | 21.01.2021 | Герmану | 220-240 | 50/60 | 220 |
| BGL35MOV40 | VBXSSZ53M | CE-DAF4B 8.73215 | 22.01.2016 | 21.01.2021 | Герmану | 220-240 | 50/60 | 220 |
| BGL35MOV41 | VBXSSZ53M | CE-DAF4B 8.73215 | 22.01.2016 | 21.01.2021 | Герmану | 220-240 | 50/60 | 220 |
| BGL35MOV42 | VBXSSZ53M | CE-DAF4B 8.73215 | 22.01.2016 | 21.01.2021 | Герmану | 220-240 | 50/60 | 220 |
| BGL35MOV43 | VBXSSZ53M | CE-DAF4B 8.73215 | 22.01.2016 | 21.01.2021 | Герmану | 220-240 | 50/60 | 220 |
| BGL35MOV44 | VBXSSZ53M | CE-DAF4B 8.73215 | 22.01.2016 | 21.01.2021 | Герmану | 220-240 | 50/60 | 220 |
| BGL35MOV45 | VBXSSZ53M | CE-DAF4B 8.73215 | 22.01.2016 | 21.01.2021 | Герmану | 220-240 | 50/60 | 220 |
| BGL35MOV46 | VBXSSZ53M | CE-DAF4B 8.73215 | 22.01.2016 | 21.01.2021 | Герmану | 220-240 | 50/60 | 220 |
| BGL35MOV47 | VBXSSZ53M | CE-DAF4B 8.73215 | 22.01.2016 | 21.01.2021 | Герmану | 220-240 | 50/60 | 220 |
- HH - HOMHHaHbHoe HapxHHe HIN DmHa3OH HOMHHaHbHOro HnpanxHn HnTaOe cTeN nepeMeHHoro ToKa B Obltax
HUY-HOMHNHbHaYactota HnDnHaN3OH HOMHNaHbHbX YactOT npemehHoro ToKa nTAtoae CetnB Tepax
*** HM-HOMHAnbHaNoTpe6nReMaMoUHocTbNIN DnAna3OH HOMHAnbHbX Ntpe6nReMbIX MoUHocTeB BBaTax
FB5858 / abryct 2019
Cuprins
Siguranta 296
OxopoHa IOBkIJIaN I OuaIINBe KOpHCTyBaHH 320
YtuliziayynaKobkn 320
Po3naKOByBaHHa nepeBipka ... 320
PoznaKOBvBaHnI npuJaNy IeTaJIeI 320
O6cIg noctaunna 321
3HaHOMCTBO 321
Ppnila.. 321
Ornnd eIemEnTb ynpabInHHa1.....321
OrIaI INdIkaTopiB cTaHy 322
Ppnila.. 322
BcTaHOBJIeHHI eJIeMeHTiB JIbJIeHHI 323
OchoBhi BiDomocTi npo KOpNCTyBaHHa 323
PeryuioBaHH TeileckoipHoi Tpyokn 323
YbIMKHeHHI npiNaIy. 323
BumKHeHH npnila.. 324
PouaTOK OUYIeHHN 324
3yvnHka npnbpaHH 324
PeryIIOBaHHn IOTyXHocTi. 324
3aynck typ6opekymy. 324
3yvnHka pO6OTn Typ6opexKmUy ... 324
PeryIIOBaHHaHacaKn IJI pI- IJorN 324
BcTaHOBHeHHI npuJaHy Ha 36e-pirAHH .324
BmKHeHH npuJaNy i nepeHeceHH 324
OuHHeHHa 3 BnKOpNCtAHHAM npHaIaI.. 325
PpnbipapHnraMulti-Use-Brush1.....325
3aynck abapiHoro peKmMy..... 325
3yvnHka abapiHoro pexmMy .... 325
Demontax npnila.. 325
UHHeHH Ta DOrJa3 326
3acobn Dn OunueHHa. 326
YiueHH npuJaNy. 326
OuHueHHa ryKn Remote-Power-Control 326
BidkpmbaHn Kpnskn 326
3aKpNbAHn KpNShk 326
OuichiHnB BiDciky Dny 326
3amihamaikdaIy 326
YiueHHa 3axnCHOro fIbTpa MoToPA 327
BnMaHH BnPyCKHOro fIbTp a..327
OuHHeHH BnIpyCKHOro 1JIbTpaa.327
BcTaHOBJIeHHB BnPyCKHOrO
fIbTp a1 328
3aMiHa eIeMeHTiB XuBHeHHra 328
UcyHeHH HeCnPaBHOCTeI 329
HecnpabHocti Bpo60ti 329
TpaHcnpTyBaHHa,36epiraHHa n ytniiauia 330
Ytuliziai crapnx npnilaib 330
Ytuii3aui akyumyIaTOpHnx 6atapei 330
uk
CepBicHi ueHtpn 330
He BnKOpncToBvIe IprnilaI:
Для Ушени Людаиabo TBapин.
ДлЯ BCMOKtyBaHHЯ ШкідлNBи XДЯ 3ДОРВ'я, rapaNYx a6O po3-JXapeHIX peYOBiN,пpeДmetiB i3 rOCTpIMN KpaMn.
Длг BCMOKТУВаHHЯ BOЛОГИХ aбо piДКИХ peчOBиH.
ДлЯ BCMOKtyBaHHЯ Лergko3aIMNCTnx a60 Bn6yXOHe6e3neuHx peuOBnH, 3OKpeMa ra3iB.
Для BCMOKtyBaHHЯ NOpeLy, caKi 3 neeey i npilanaB ceHTpaIbHOrO onaJIeHHra.
Для BCMOKtyBaHHЯ TOhepHOrO NOpoShky 3ПриNTepiB i KOniHOBaJIbHnx anapatIB.
ДлЯ BCMOKТУВаHHуДиBEЛьНО CMiTTI.
Bid'ednyTe npnilaB iD eIeKtpomepexi, KOJI N:
O6MeJKeHHa KOJa KOpHcTyBauiB
ДiTи bIKOM BiД 8 pOKiB, a TAKOJ OCO6n 3 O6mExeHIMN φi3nHIMN, CEHCOPHIMn a6o PO3yMOBIMN 3Di6HOCTaMn Ch 3 6paKOM DoCBiDy Ta/a6o 3HaNb MOKytb KOpNCYBaTINC4 ZIM PpIaNOM TiIbKN PiD HaJIaOM a6o NiCJ NtPImaHNN BkA3iBOK i3 6e3neuHoro KOpNCTyBaHHn PpIaNOM i NiCJ TOrO, JK BOH NycBIOMnIn MoXJIbBi NOB'3aHI 3 ZIM He6e3NeKn.
ДiTЯМ 3a6OporHeNo rpaTnC8 3 npUlaIOM.
ДiTЯМ 3a6OPOHeH OYCTHTN I OBCIyROByBaT N pRiJaD 6e3 HArJIaD Y DOpOCInx.
Bka3iBKN 3 Texhikn 6e3neKn
KopncTyUOuNcB npilaIOM, IOTpMMyITeCb npaBnI TexHiKn 6e3- neKn.

YBAGA! - He6e3neKa ypaJKeHH eJeKtpnHm CtpyMOM!
-
PemOHTHi po6OTn, BnKoHaHI HeHaJIeXHIM YINHOM, MOxKyTb CTaHOBHTn He6e3neky dIy KOpNCTyBaaya.
-
PemohTyBaTn npnilaI Do3BOJeHO TiIbKn φaxiBzA M.
Для ремонту пиладу ДОЗВOLЯТьСЕ ВИКОПICTOBYВАТИ ЛИше ориги�ьни зачacтун.
Lio6 yHnKHyTn He6e3neK, y pa3i NOnKoJKeHHaKeJIHO JN-BIeHHaCbOTo npnilaIy INoTO 3aMIny MaE BnKOHyBaTN BIpObHnK, cepBicHnI cEHTp a60 ocO6a 3 BiINOBiINO KBaJIi-phiKaUciEIO. -
ПошкоДженьпprилад abo пошкоДжень Мерекни Kaбель -джерени Hebe3пени.
Hikon He KopnctyTecr N0sKOJxHeNIM npnilaIOM.
3aboponeho KOpntyBaTnCn PnPnaDom, NOBepxHЯKOrToTrichyna uN 3Iamalacn.
He TarghItb 3a MepeXn KaeIb, 0o6 BiD'edHaTn npnilad BId MepeXi. 3aBXn TargHtB TiIbKn 3a MepeXn uTeKepe MepeXHoro Ka6eIIO.
Hikoli He TarghItb i He TpMaIte npicTpii 3a MepeKn Ka6eIb.
RaKIo npnilaI a6o MepeXHn KabeIb N0sKoJxHn, HeraHNO BiI'eDHaIte MepeXeBn ITeKepe pO3NoIJIbHOro 6loka a6o BIMKHiTb 3aNo6iXHnK y po3NoIInbHOMy 6loci.
"3aTeIefoHynto do cepBicHoro ueHTpy." CToP. 330
PemohTyBaTn npnilaI Do3BOJeHO TiIbKn faxiBcIaM.
■ PiДина, сц ВITEкla, може сприч_HNTи ураженья[eleКтп-чнIM CTpyMOM.
BnKOpncToByIe npnilaI an IInse B 3aKpnTnx npimiuenceHHx.
Bepexkitb npnilaB iD BnCOKO TeMpepatypi BOJOrn.
He MoXHa YnCTHTn PpUla3a DOnOMoTO npOBOrO a6o BnCOKOTnCKOBOrO PpUlaIy.
He donyckaIte notpaIIaHHHaMiOk dIra nnly Ta fiIbTpI rOpIOuHX a6o CnIrpTOBMcHnx peOBOHN.
He BnKOpNCToBvIe JereKo3aMnCTi a6o cnpTobMiCi peOuBHN npN OOnSeHHi npJlady.
Tyt Bn Di3HaTeC, JkNx npaBnI CJIiDOTpIMyBaTnC, PO3NaKOByOuN PrnJaI.
Po3naKOByBaHnI npHJaNy IeTaJIeI
- BnMItb npua3 ynaKOBkn.
- BnIMiTb 3 ynpaKOBki i niIroTyuIte Bci DoJaTkoBi DeTaIi N cynpoBIDHy DOkymeHTaCiIO.
- 3HIMiTb HABBnI NaKyBaJIbHn MaTepiAn.
- 3HimiTb HaABHi HAKJeIKN Ta NIIbKn.
O6cI nocTaayHn
Пия розакуваннervebipte,ч KOMпгКТ NOВин iЧИ He NOшКоДиLO YKICbЧаCTиHn ПiД qac TpaHcNoptyBaHHA.
3ayBaXeHnHa: 3aJIeXHo BiD KOMPJIeKTAUII pIuJaM OMe NOCTaUaTINcR 3IODaTKOBIM pIuJaIaIbM.
Man. 1
IiIroTyIe npIJaI Do 3aCTOCyBaHnHa.
Mонтajnpидау
- BCTaBTe pyuKy Ha ⅢaHr i 3aΦi-KcYIte.
→ Man. 3
- BCTaBTe NaTpy6oK BCMOKTyBaJIbHOro ⅢNaHra B OTBip KpNiShKn Ta 3aΦiKCyIte.
Man. 4
PerylIOBaHHa TeleckoIiHoi Tpy6Kn
- Pɔ36lOkyɪTe TeteCKoɪiHu Tpy6kY.
- BiDpeRyIIOHe IOTpi6Hy IOBxHHy TeIeckOJIuHOI Tpy6Kn.
Man. 8
YbimKHeHH npHnaNy
- Bi3bMitb MepexeBn uTekep i BnTARHITb Ka6eIb Ha Heo6XiHy DOBXINHy.
- BCTaBTe mepexeBn 1TKepeB po-3eTKy.
- HatnchItb Ha ①.
Man. 9
"YbIMKHeHnI npIaNy", CToP. 323
HaTnChiTb Ha ①. → Man. 10
√ Iндикатор сану сыитьсьблим.
Пилад 3ауckaetbс 3 МakcimalbHmCtYpeHem NToyKHOcti.
Пилад 3аунсkaeТбС 3 OCTaHHIM BCTaHOBJIeHIM CTyIeHem NOTyKHOCTi,ЯкsoДоцБОгпрИбИраннЯ 6уло 3уПиНЕHo.
3ynnHka npn6npaHHa
HaTnCiHb Ha
Пилад 3уннЯтбя, iДикатор CTaHy nyIbCye 6iINM KOJbOpOM.
Пдтугимуеть санаштован CTупинnotужноcti.
PeryllobaHHnoTuyxHocTi
- HatnciItb a6o Man. 11
CTyniHb nOtyxHoCTi 36iJbUHTbcra a60 3MeHUnTbcra. - NObepHiTb peRyIaTOp BCMOKTyBaHnHa pyuCi Ha TeJeCKoNiuHi TpyoCi B Notpi6He NoLoXeHHa Man. 12
VITyXHicTbpeRyJIHOeTbcraCTyniHa- cTO.
3anysk Typ6opeKHMy
Y pa3i cnilbHOrO 3a6pydHeHHr MOxHa BnKOpNCTOByBaTt Typ6OpEKM.
HaTnCiHtB Ha
Typöpexim 3aynckaetcb.
3yvnHka po6oTH Tpy6opeKnMy
BcTaHOBJIeHHI npIIaIy Ha 36epirAHn
Iopara:PiJ uac KopoTknx nepepb y npoueci npnbipaHHn HacaKy dny piIIOrMoXHa BCTaHOBHTu Y NOLOXeHHn napKyBaHHn.
BCTaBTe HacaIky InyPiIIOrgraKOMy KpIJIeHHNry Iny napKyBaHHN. Man. 14
BIMKHeHH npHJaI nepeHeceHH
- BümMKHItb pnpJlaI.
"BvMkHeHnI npIaIy", CToP. 324 - NocTaBTe NIIIOOC BepTnKaJIbHO.
- BCTaBTe HacaIky IJyPiIIOrgraKOM y fikcaTopn IJy npKyBaHHa. Man. 15
- Пп поюланні першкоД пер- нocьтпрILAД 3a рукy.
OuHSeHHa 3 BnKOpNCtAHHm npHaJa
- BCTaBTe nOtpi6Hy hacaIky Ha TeIeCKoIiyu ty6Ky a60 pyKy.
2ПиЯВИКОРИСТАнHA 3HIMITb BИKOPINCTAHy HacaIky 3 TeIeCKOJIuHOI Tpy6Kn a6o pyuKN.
"YbimKHeHnI npnIaIy", CToP. 323
- HaTnCHiB Ha ①.
IHДИКaTOP cTaHy 3racae i HeBIOB3i TpNiCi 6JImae 6IIM KOJIbOpOM. - HatncHItb ①, nOKn 6JIIMaE iHdN-KaTOp cTaHy.
Пилад 3ануckaetbcaу typборжимi.
3yvnHka aBapiHoro peKHMy
3ayBaXeHnHa:PiicI npi6upaHnnepeBipTe pyky Remote-PowerControl.
"YCyHeHHHeCnPaBHOCTeH", CToP. 329
HaTnCHiB Ha ①.
IHДИКaTOP cTaHy 3racae i HeBIOB3i TpNiCi 6JImae 6IIM KOJIbOpOM.
Демонтах прулаяду
- Bi'edha'ne pyuky Bi'd uitkn Ta TeleckoniuHOi Tpy6Kn. Man. 19
-
BiД'eДнайт epyky BiД Teileckoni- uHoi Tpy6kn. →MaI. 20
-
HatncHtB OJHOUacHO Ha ObuaBa IKCaTOpN Ta BnIMiTb IlaHr 3 npnaNy. MaI.21
UHHeHH Ta DOrJaI
Lio6 npnilaI npauOBAB IOBRO, cIi peTeJIbHO uNCTNTI NIOI NOI DOJIAATN 3a HIM.
3ac06n dIra ouHsEHHa
BnKOpncToByTe IInIe npIaTHi 3acO6n dIa OUnIeHHa.
YBAGA!
HeBIDNOBIiHi 3aO6n IJIy OUYIeHHa6o HeNpaBILbHe OUYIeHHaMOKyTbIpi3BeCTn Do NIOWKoJKeHHaPnla-ny.
He 3actocobyTe roctpi nn abpa3nBHi 3ac06n dIy OunuHn.
He 3acTOcOByIte 3aco6n IJN OUYIeHHa, IIO MAOTb BVCOKM BMICT CInrTpTy.
He 3acTocOByuTe JxOpCTki a6o MeTaJIeBi ry6Kn.
- Peréd BIVKOpNCTaHHaM peTeIbHo IpOMBaIte ry6Kn.
ChuHnHa npHaLy
Bumora:Прилад ВIMKHeHO.
"BumKHeHH npHnay", CToP. 324
- Ouncitb npnilaI i npnilaIIM'rkm pyushNKOM i 3BnuaHIM MIOUHM 3acO6om dIy INaCTMaCn.
- OuNCTiTb IHΦpauepeBOHn IprnMaHuBa BMnKaayi.
Ouichienhra puchn Remote-Power-Control
Iopapa: Perylaepno OunuynTe iHpauepeBOHn BnnpomHOBaH na pyuCi Remote-Power-Control. Upe3
3a6pydHeHy pyuKy Remote-PowerControl MoKe BnHnKHyTu He-cnpabHicTb NiD quc ynpabNlHH.
OuHyIe pyUky Remote-PowerControl M'JkIM puSHNkOM i3BnuaHnM OChnM 3aCo6oM dJaPnaCTMaCn.
BiKpNbHaHH KpnuKn
Bmora: PpnilaI BmKHeHO. "BmKHeHn npnilaNy", CToP. 324
- BiДкриптЕ кршky. → Man. 22
- BiDBeiItb KpiuKy noBHeTIO Bropy.
3aKpNbHaHH KpHsKn
Iopapa: IpepebiTe, cH He 3aUeMMB CBA MIIOK dJIY MIJy MIX KPNJKOHO Ta IIIOOCOM.
BHMORN
MiwoKdIaIyBCTaBHeHn.
3axinHnIbTp DnBnHyHa BCTaBHeHn.
BunyckHnΦijbTp DBNHyHa BCTaBHeHn.
3akpnIte KpnsKy Ta 3a6lokyTe.
OuHcENHa BiDciKy Ira nnly
Bmora:MiOKdIyNIIyBVHrTNI. "3amHaMiokaIy" CToP.326
3a notpe6n ouinctitb biicik dny nIy 3a donomoroIO iHwOro nnlo-cocca abo cyxio raHupkoIO u ni-TKOIO dny nIy.
Bičik „á ly oùnüe hén.
3aMiHa MiIka IЯ nIy
KUO OJIOBE BIKHO IHNKAtopa 3AmHn NINO36ipHnKa NOCTiHo 3aIOBHeNe Pn NiHrTiH HacaDi i MaKcImaIbHOMy CTyneHi NOTyXHOCtI, 3AmHiTb MiOK dny.
Bvmora: Kpnuika BiDkpanta.
"BiДКрИВаннЯ КрИшКи", CToP. 326
- 3aKpntmMiokIJIaIINy, NO-TaHITbBaJiB-3aCKOky.
→ Man. 23
2 BnMItb 3aNoBHeHm MiIooK IJIy 3 TpImaaya. - Ytulizyute 3aOBHeHmMiOk IJnIy.
-
BCTaBTe HOBNI MIWOK DIAI NIIY B TpIMaU Do UyTHOi fikcauii.
-
He 3mHaIe MioK dIa nnIy.
→ Man. 24
- →"3aKpUBaHHa KpUShKIn",
Ctop. 326
UHsEHHa3axnCHoro fIbTpa MoTopa
Nopa:ДлЯ ДОСАннэ.
ONTIMaJIbHO pe3yJIbTaTy
BCMOKTYBaHHpeRyIaRHO BnBnBaIte a6o npomBaIte 3axnCHn IbTp MOTopa. Picra BCMOKTyBaHH
dpiohnx qactOcK nIy OuncITb a6o
3amHtB 3axnCHn IbTp MOTopa,
IO6 NiItpmYBaTI HaJeKHy NOTyxHICTB BCMOKTYBaHH npuJaNy.
Bmora:MiOKdIaNlyBnHATn.
"3aMiHa MiIka dIy IINy",
Ctop. 326
- NotarytB 3a J3nukn 3 o6ox 60kib, Uo6 3Hrtn fikcatOpn, Aki TpuMaHTb 3axnchni fijltp MOTopa.
→MaJ. 25 - BntaHrHb 3axnchm fJIbTp MOTopa B HappMky CtrpiIKN.
- Bntpycitb 3axncnH pJIbTp mToTopa.
- Y paizi cnIbHOrO 3a6pydHeHHn IpnOMInTe 3axIncHn φiJIbTp MoTopa.
→MaJI. 26
5.ПicяцьогоЗалшteфльтдпгпрocушванг пинайMHi Ha 24 ГдиИн.
6. BCTaBTe 3axnChn fIbTp DBNyHa B NIIIOcO Ta 3aΦikCyInTe Bropi.
7. BctabTe miook nIy.
"3amHa miiKa dny nny", CToP. 326
- "3aKpUBaHHKaPmUKNI",
Ctop. 326
BnMaHnBnPyCKHOro iNbTpa
BHMora: KpnuKa BiDkpura.
"BiДКрИВаннЯ КрИшКИ", CToP. 326
- HatnchItb pyuKy-3aCKouky B HaprMky cTpiIkn i po36loKnyTe BnIyckHn fJIbTp.
- BuntarHitb BnpyckHn iJbTp 3 nIIOcOca.
→ Man. 27
OuHSeHHBnPyCKHOro phiTpa
ДлдяdoсгнногOTIMмьногОpiьнуKDTHBHOCTI OUNuYte a60 3amHIOHTe BnpyCKHnФЛbTp OHaMHeHSe OdIN Ha pIK.
Iopapa:PiicnBcMOKtYBaHHaDip6Hx qactOOK NmUy OunchTb BVnpyckHmΦilbTp, 0o63a6e3neuHTNaJleKHy NTuykHiCTb BcMOKtYBaHHa.
3ayBaXeHHa: Ioro fJIbTpByBaJbHaIi 3aJIInJaEtbcr He3MiHHO, He3aJeKHO BiD MOxJIInBOI 3MiH N KOJIbOpy NOBepxHi.
OuichiennririicHioro jlbtpa HEPA
TirieHicHyn HEPA cKlaJaTeBc3iJbTp-CNTemn.
Iopapa:IpaTeBnOro OunuHn HJIbTp-CnCTeMn MOxHa BnnpaTn II y npaBnMaunHi. Uo6 He no- uKoDHTn iHsU 6iN3Hy, NOKaJITb fIbTp-CnCTeMy B MiOk IJa nPaHHa. IJa OunuHnH aIbTp-CnCTeMn HaJauWtYtepeXIM DbaJINBOrO npaHHa 3a Tempeatypn 30 ^ C iMiHimaBHy WBnKiCTb BiJXImaHHa.
Bhmora: BnyncknФiNbTp BnHr-Tn.
"BnIMMaHHa BnIpyCKHOro iJbTpa^1'' CToP. 327
- Bntpycictb qinltp-cntemy HEPA.
2.ПомиTe ФльтсntEmу пд поTOUHO BOIOIO. →MaI. 23
3.Пися цього залишte ii COXHyTN цонаймение на 24 говин. - BCTaBTe fiJIbTp-CnCTeMy y nnIO-coc.
"BcTaHOBLeHHBnPyCKHO
φiNbTpα1", CToP. 328
BcTaHOBJIeHHBbNyCKHOro Ibtpa
Bmora: Kpnuka BiDkpnta.
"BiДКрИВаннЯ КрИшКИ", CToP. 326
- BCTaHOBITb BnIpyCKHn ΦIbTp Ha BnIpyCKHy peSiITky Ta 3a6IokyIte Do UyTHoro 3ByKy φikcaui. → Man. 29
2 "3aKpnuBaHHa KpuuKi", CToP. 326
3aMiHa eIeMeHTiB KHBJIeHHH
- 3HIMiTb 3axuCHy nAHeJIb.
→ Man. 30
YcyHeHHa HeCnpaBHOCTeH
He3NaHHi HeCnpaBHOCTI npuHaNy MOxHa yCyBaTn BlaChOpyu. Persh HIX 3BeptaTnca Do cepBicHOi CnyXbN, CKOpNCtaTecr BiIOMOCTAmn Ipo yCyHeHHr HeCnpaBHOCTe. TaK MoxHa yHNKHyTN 3aIBNX BVtpaT.
YBATA!
He6e3neKa ypaXeHH eNeKTpHuHm cTpyMOM!
PemOHTHi pO6OTn, BnKoHaHI HeHaJIeXHIM YInHOM, MOxKyTb CTaHOBHTn He6e3IeKy IJN KOpNCtUBaUa.
PemOHtYBaTn npuJa Do3BOJeHO tIbKn qaxiBzM.
Для ремоHTу пиlaу ДОЗВЯЕТбСВИКОПICTOBYВАТИ ЛИWE opNiHaJIbHi 3aIчаCTUH.
UIOy yHnKHyTN He6e3neK, y pa3i N0uKOJxHeHHaKeJIIO KxNBLeHHa CbOro npInaIy INoRo 3AmHy MaE BnKOHyBaTIN BnPo6HnK, cepBicHn CEHTp a6o ocO6a 3 BiIDNOBIDHOU KBaJIΦikaicio.
HecnpaBHOCTI Bpo6oTi
J 1 J 1 J 1 J 1 J 1 J 1 J 1 J 1 J 1 J 1 J 1 J 1 J 1 J 1 J 1 J 1 J 1 J 1 J 1 J 1 J 1 J 1 J 1 J 1 J 1 J 1 J 1 J 1 J 1 J 1 J 1 J 1 J 1 J 1 J
JlI Jslj
jIJI I pI sIiWl SiC oJIO JIOI I JI JI IcI PO U
1JyJgSllgssIj-
JbIgIgIgIgIgIgIgIgIgIgIgIgIgIgIgIgIgIgIgIgIgIgIgIgIgIgIgIgIgIgIgIgIgIgIgIgIgIgIgIgIgIgIgIgIgIgIgIgIgIgI g I J I J J J J J J J J J J J J J J J J J J J J J J J J J J J J J J J J J J J J J J J J J J J J J J J J J J J J J J J J J J J J J J J J J J J J J J J J J J J J J J J J J J J J J J J J J J J J J JJJJJJJJJJJJJJJJJJJJJJJJJJJJJJJJJJJJJJJJJJJJJJJJJJJJJJJJJJJ
. jj j j j j j j j j j j j j j j j j j j j j j j j j j j j j j j j j j j j j j j j j j j j j j j j j j j j j j j j j j j j j j j j j j j j j j j j j j j j j j j j j j j j j j j j j j j j j j j j j j j j jjjjjjjjjjjjjjjjjjjjjjjjjjjjjjjjjjjjjjjjjjjjjjjjjjjjjjjjjjjjjjjjjjjjjjjj
g g jyj yj yj yj yj yj yj yj yj yj yj yj yj yj yj yj yj yj yj yj yj yj yj yj yj yj yj yj yj yj yj yj yj yj yj yj yj yj yj yj yj yj yj yj yj yj yj yj yj yj yj
jlll lue wu lofo oai
pJjUg
.1JUULIguluI Jolal
jBjogjolJoojai
joo ljuIbpoIaowIgcjaig
jdoal 1gijl
aolio uIbglgipaae 120
oo 1jIb pss
.120 a1o2iwo9
jai jwjj qy yll lll
Joo
X ciS |j, U|U|u|
.
| ö gjo äblä ögswlo 1 ljbjl 2 | 2 |
| ρgj | 3 |
| Remote-Power-Control AAA LR03 jbjp | 4 |
| jgj JLJ | 5 |
| gjo jbjl/ajgj jbjw jbjw JLJ | 6 |
| bjan lal a | 7 |
| jclg JLJ | 8 |
| kjj JLJ | 9 |
| jzj JLJ | 10 |
| mijn jfj jLJ | 11 |
| g | 12 |
| d | 13 |
| jlgj jbjg jbjw jbjw jbjw jbjw jbjw jbjw jbjw jbjw jbjw jbjw jbjw jbjw jbjw jbjw jbjw jbjw jbjw jbjw jbjw jbjw jbjw jbjw jbjw jbjw jbjw jbjv jbjw jbjw jbjw jbjw jbjw jbjw jbjw jbjw jbjw jbjw jbjw jbjw jbjw jbjw jbjw jbjw jbjw jbjw jbjw jbjw jbjw jbjw jbjw jbjw jbjW jbjw jbjw jbjw jbjw jbjw jbjw jbjw jbjw jbjw jbjw jbjw jbjw jbjw jbjw jbjw jbjw jbjw jbjw jbjw jbjw jbjw jbjw jbjw jbjw jbjr jbjw jbjw jbjw jbjw jbjw jbjw jbjw jbjw jbjw jbjw jbjw jbjw jbjw jbjw jbjw jbjw jbjw jbjw jbjw jbjw jbjw jbjw jbjw jbjw jbjt jbjw jbjt jbjw jbjt jbjw jbjt jbjw jbjt jbjw jbjt jbjw jbjt jbjw jbjt jbjw jbjt jbjw jbjt jbjw jbjt jbjw jbjt jbjw jbjt jbjt jbjw jbjt jbjw jbjt jbjw jbjt jbjw jbjt jbjw jbjt jbjw jbjt jbjw jbjt jbjw jbjt jbjw jbjt jbjw jbjt jbjw jbjt jbjw jbj t jbjw jbjt jbjw jbjt jbjw jbjt jbjw jbjt jbjw jbjt jbjw jbjt jbjw jbjt jbjw jbjt jbjw jbjt jbjw jbjt jbjw jbjt jbjw jbjt jbjW jbjt jbjw jbjt jbjw jbjt jbjw jbjt jbjw jbjt jbjw jbjt jbjw jbjt jbjw jbjt jbjw jbjt jbjw jbjt jbjw jbjt jbjw jbjt jbjw jbjtt jbjw jbjt jbjw jbjt jbjw jbjt jbjw jbjt jbjw jbjt jbjw jbjt jbjw jbjt jbjw jbjt jbjw jbjt jbjw jbjt jbjw jbjt jbjw jbjt jbjr jbjw jbjt jbjw jbjt jbjw jbjt jbjw jbjt jbjw jbjt jbjw jbjt jbjw jbjt jbjw jbjt jbjw jbjt jbjw jbjt jbjw jbjt jbjw jbjt jbj w jbjt jbjw jbjt jbjw jbjt jbjw jbjt jbjw jbjt jbjw jbjt jbjw jbjt jbjw jbjt jbjw jbjt jbjw jbjt jbjw jbjt jbjw jbjt jbjw jbjr jbjw jbjt jbjw jbjt jbjw jbjt jbjw jbjt jbjw jbjt jbjw jbjt jbjw jbjt jbjw jbjt jbjw jbjt jbjw jbjt jbjw jbjt jbjw jbjtt jbjt jbjw jbjt jbjw jbjt jbjw jbjt jbjw jbjt jbjw jbjt jbjw jbjt jbjw jbjt jbjw jbjt jbjw jbjt jbjw jbjt jbjw jbjt jbjw jbjrt jbjw jbjt jbjw jbjt jbjw jbjt jbjw jbjt jbjw jbjt jbjw jbjt jbjw jbjt jbjw jbjt jbjw jbjt jbjw jbjt jbjw jbjt jbjw jbjt jbjy jbjw jbjt jbjw jbjt jbjw jbjt jbjw jbjt jbjw jbjt jbjw jbjt jbjw jbjt jbjw jbjt jbjw jbjt jbjw jbjt jbjw jbjt jbjw jbjt jbju jbjw jbjt jbjw jbjt jbjw jbjt jbjw jbjt jbjw jbjt jbjw jbjt jbjw jbjt jbjw jbjt jbjw jbjt jbjw jbjt jbjw jbjt jbjw jbjt jbjwa jbjt jbjw jbjt jbjw jbjt jbjw jbjt jbjw jbjt jbjw jbjt jbjw jbjt jbjw jbjt jbjw jbjt jbjw jbjt jbjw jbjt jbjw jbjt jbjw jbjtg jbjw jbjt jbjw jbjt jbjw jbjt jbjw jbjt jbjw jbjt jbjw jbjt jbjw jbjt jbjw jbjt jbjw jbjt jbjw jbjt jbjw jbjt jbjw jbjt jbjv jbjw jbjt jbjw jbjt jbjw jbjt jbjw jbjt jbjw jbjt jbjw jbjt jbjw jbjt jbjw jbjt jbjw jbjt jbjw jbjt jbjw jbjt jbjw jbjt jbjc jbjw jbjt jbjw jbjt jbjw jbjt jbjw jbjt jbjw jbjt jbjw jbjt jbjw jbjt jbjw jbjt jbjw jbjt jbjw jbjt jbjw jbjt jbjw jbjt jbjs jbjw jbjt jbjw jbjt jbjw jbjt jbjw jbjt jbjw jbjt jbjw jbjt jbjw jbjt jbjw jbjt jbjw jbjt jbjw jbjt jbjw jbjt jbjw jbjt jbjwt jbjw jbjt jbjw jbjt jbjw jbjt jbjw jbjt jbjw jbjt jbjw jbjt jbjw jbjt jbjw jbjt jbjw jbjt jbjw jbjt jbjw jbjt jbjw jbjt jbjwo jbjt jbjw jbjt jbjw jbjt jbjw jbjt jbjw jbjt jbjw jbjt jbjw jbjt jbjw jbjt jbjw jbjt jbjw jbjt jbjw jbjt jbjw jbjt jbjw jbjtc jbjw jbjt jbjw jbjt jbjw jbjt jbjw jbjt jbjw jbjt jbjw jbjt jbjw jbjt jbjw jbjt jbjw jbjt jbjw jbjt jbjw jbjt jbjw jbjt jbjwc jbjw jbjt jbjw jbjt jbjw jbjt jbjw jbjt jbjw jbjt jbjw jbjt jbjw jbjt jbjw jbjt jbjw jbjt jbjw jbjt jbjw jbjt jbjw jbjt jbjwe jbjt jbjw jbjt jbjw jbjt jbjw jbjt jbjw jbjt jbjw jbjt jbjw jbjt jbjw jbjt jbjw jbjt jbjw jbjt jbjw jbjt jbjw jbjt jbjw jbjts jbjw jbjt jbjw jbjt jbjw jbjt jbjw jbjt jbjw jbjt jbjw jbjt jbjw jbjt jbjw jbjt jbjw jbjt jbjw jbjt jbjw jbjt jbjw jbjt jbjwu jbjt jbjw jbjt jbjw jbjt jbjw jbjt jbjw jbjt jbjw jbjt jbjw jbjt jbjw jbjt jbjw jbjt jbjw jbjt jbjw jbjt jbjw jbjt jbjw jbj,t jbjw jbjt jbjw jbjt jbjw jbjt jbjw jbjt jbjw jbjt jbjw jbjt jbjw jbjt jbjw jbjt jbjw jbjt jbjw jbjt jbjw jbjt jbjw jbjt jbjx jbjt jbjx jbjt jbjx jbjt jbjx jbjt jbjx jbjt jbjx jbjt jbjx jbjt jbjx jbjt jbjx jbjt jbjx jbjt jbjx jbjt jbjx jbjt jbjx jbjtt jbjx jbjtt jbjx jbjtt jbjx jbjtt jbjx jbjtt jbjx jbjtt jbjx jbjtt jbjx jbjtt jbjx jbjtt jbjx jbjtt jbjx jbjtt jbjx jbjtt jbjx jbjtt jbj x jbjx jbjtt jbjx jbjtt jbjx jbjtt jbjx jbjtt jbjx jbjtt jbjx jbjtt jbjx jbjtt jbjx jbjtt jbjx jbjtt jbjx jbjtt jbjx jbjtt jbjx jbjtt jbjX jbjtt jbjx jbjtt jbjx jbjtt jbjx jbjtt jbjx jbjtt jbjx jbjtt jbjx jbjtt jbjx jbjtt jbjx jbjtt jbjx jbjtt jbjx jbjtt jbjx jbjtt jbjx jbjt jbjx jbjtt jbjx jbjtt jbjx jbjtt jbjx jbjtt jbjx jbjtt jbjx jbjtt jbjx jbjtt jbjx jbjtt jbjx jbjtt jbjx jbjtt jbjx jbjtt jbj x jbjtt jbjx jbjtt jbjx jbjtt jbjx jbjtt jbjx jbjtt jbjx jbjtt jbjx jbjtt jbjx jbjtt jbjx jbjtt jbjx jbjtt jbjx jbjtt jbjx jbjtt jbjx jbjTT jbjx jbjtt jbjx jbjtt jbjx jbjtt jbjx jbjtt jbjx jbjtt jbjx jbjtt jbjx jbjtt jbjx jbjtt jbjx jbjtt jbjx jbjtt jbjx jbjtt jbjx jbjtt jbjxc jbjtt jbjx jbjtt jbjx jbjtt jbjx jbjtt jbjx jbjtt jbjx jbjtt jbjx jbjtt jbjx jbjtt jbjx jbjtt jbjx jbjtt jbjx jbjtt jbjx jbjtt jbjx jbj tt jbjx jbjtt jbjx jbjtt jbjx jbjtt jbjx jbjtt jbjx jbjtt jbjx jbjtt jbjx jbjtt jbjx jbjtt jbjx jbjtt jbjx jbjtt jbjx jbjtt jbjx jbjtt jbjw jbjtt jbjx jbjtt jbjx jbjtt jbjx jbjtt jbjx jbjtt jbjx jbjtt jbjx jbjtt jbjx jbjtt jbjx jbjtt jbjx jbjtt jbjx jbjtt jbjx jbjtt jbjx jbj TT jbjx jbjtt jbjx jbjtt jbjx jbjtt jbjx jbjtt jbjx jbjtt jbjx jbjtt jbjx jbjtt jbjx jbjtt jbjx jbjtt jbjx jbjtt jbjx jbjtt jbjx jbjtt jbjy jbjx jbjtt jbjx jbjtt jbjx jbjtt jbjx jbjtt jbjx jbjtt jbjx jbjtt jbjx jbjtt jbjx jbjtt jbjx jbjtt jbjx jbjtt jbjx jbjtt jbjx jbjtt jbjr jbjx jbjtt jbjx jbjtt jbjx jbjtt jbjx jbjtt jbjx jbjtt jbjx jbjtt jbjx jbjtt jbjx jbjtt jbjx jbjtt jbjx jbjtt jbjx jbjtt jbjx jbjtt jbj{x} jbjtt jbjx jbjtt jbjx jbjtt jbjx jbjtt jbjx jbjtt jbjx jbjtt jbjx jbjtt jbjx jbjtt jbjx jbjtt jbjx jbjtt jbjx jbjtt jbjx jbjtt jbjx jbjtt |
aalJlauiyIyjmuSJu pao
.1c3 abgdo aJswll
Lc Multi-Use-Brush 1.1
. ddofo g diolg g
16
aoll lcc oI Ijblaw b2o1 2
.
gJowwUaewI aolI b3
.igoo g Ig qaiolii
17
jwL Multi-Use-Brush g
10
.Multi-Use-Brush 15
"ddjUgS//auiS//uio
341dd
"ddJJJSLJdduisJlgl"
341dd
aall lcc jolow 5
.
p9g Lc aJewll aolll b61.6
.igoo g Ig qaiolii
17
g|ufoj8l cabijolbdoi .7
.Multi-Use-Brush Lc oJgWlJI
Multi-Use- 1000000000000000000000000000000000000000000000000
Lglal Brush
18 1SwI
Remote- 一 一 一 一 一 一 一 一 一 一 一 一 一 一 一 一 一 一 一
1
.oggio jgl:bluJl
340 a, "j l q _ j / / 管 L _ j / "
.1
22 ≤ |
.1olai 1c2 1b211 2
LbI Iglc
jlaiaol poac joo sli:aaai
jIgUJU
ülbuJI
JusuUsS JuaJp
.ajall ayas julg Jusj p
pJjUaS
gaiyipgIbJgl
. dωg
Jj
JusUusg 1b
343ddoo,
JUJI Oa aaii oogjll SiC
aobiu ggljlgplssu
gla juc aol oiau
J Lc oo ool
JUJI JUJU UUUUUUUUU
JUJI Uus JU
o] aUa Jusu
jll jj j j j j j j j j j j j j j j j j j j j j j j j j j j j j j j j j j j j j j
acggoaogolgSloicjIawl
.ogg gagol saiw siicg
gao:bljIbmuI
343 a'oo, "Ib2j//aio"
aLiJIg bIJI
jbyS,agdyuiclg jlgao
algbdoaiaabgoljlcjld
aikaiI sgo
UlaiaI pI aai I Jc jgi
.
!
1g0 jjglal
auiI gaiuWliJ uC auiI
GbJ1
sIgogaiawla lobioo
.
343ddoo, (\prime \prime \prime \prime \prime \prime \prime \prime \prime \prime \prime \prime \prime \prime \prime \prime \prime \prime \prime \prime \prime \prime \prime \prime \prime \prime \prime \prime \prime \prime \prime \prime \prime \prime \prime \prime \prime \prime \prime \prime \prime \prime \prime \prime \prime \prime \prime \prime \prime \prime \prime
JdAa Jg J 1 .1
JgJn o JdJ, CwWd AJ 0
.aaJl
25
oljI 9 JooJl aJooJgJ2 .ogwJ
.3
Laaa aal jla jl 15 4 .abwpa9,oo
26
Jc Jai 2 oJol jolll 5 .aclw 24
J 6
dgo dio o g jLj
.
jg jj jolal oag abw 2
.
28 S
Jai 3
acw24jc
jIJIg jIJI JOGJAD 4
345ddoo,0JlJIjIeUSSJ"
1pJlI jLg
gao: [b2] :bmuJl
343 aao, [b± j] / a0^
pJlJIaSawLc pJlJI jIg .1
gdo do go
Egann
29 _i = 1^n1i!
343 aaaa, "IbssIgIc" 2
UjIbUJ
1.1234567890
30 _i = 1^n1i!
alosolipoaiul:aaoi
.1b2jI 2aiJ Lio aJ 320
aaiwll aclulul 2
0dJUJIbJUJdJ3
.(AAA LR03)
31 ≤ -
4
31
aiwll acluljll jolal .5
ailll lcl abglo aab
UJJbU//UJJbUJ Joo UaJI"
348ddw,”,jduWJ oJlcy dU laJI
| ### |
| ### |
| ### |
| ### |
| ### |
| ### |
| ### |
| ### |
| ### |
| ### |
| ### |
| ### |
| ### |
| ### |
| ### |
| ### |
| ### |
| ### |
| ### |
| ### |
| ### |
| ### |
| ### |
| ### |
| ### |
| ### |
aaggl
| الإستعمال | الإستعمال | ||
| .rajبى بعس بعس بعس بعس .Remote-Power-Control , "بعس"← 345 صف . | .rajبى بعس بعس بعس بعس . | .rajبى بعس بعس بعس . | .rajبى بعس بعس بعس . |
| .rajبى بعس بعس بعس . | .1 | .1 | .1 |
| .rajبى بعس بعس بعس . | .2 | .2 | .2 |
| Remote-Power-Control .jالع !g , "jالع!g, "الع !g"← 343 صف . | .1 | .1 | .1 |
| Remote- مصحيى !Power-Control . | .2 | .2 | .2 |
| .rajبى بعس بعس بعس . | .1 | .1 | .1 |
| .rajبى بعس بعس بعس . | .2 | .2 | .2 |
| .rajبى بعس بعس بعس . | .343 صف . | .343 صف . | .343 صف . |
| .rajبى بعس بعس . | .1 | .1 | .1 |
| .rajبى بعس بعس . | .2 | .2 | .2 |
| .rajبى بعس بعس . | .343 صف . | .343 صف . | .343 صف . |
| .rajبى بعس بعس . | .1 | .1 | .1 |
| .rajبى بعس بعس . | .2 | .2 | .2 |
| .rajبى بعس بعس . | .343 صف . | ||
| .rajبى بعس بعس . | .343 صف . | ||
| .rajبى بعس بعس . | .343 صف . | ||
| .rajبى بعس بعس . | .343 صف . | ||
| .rajبى بعس بعس . | .343 صف . | ||
| .. . . . . . . . . . . . . . . . . . . . . . . . . . . . . . . . . . . . . . . . . . . . . . . . . . . . . . . . . . . . . . . . . . . . . . . . . . . . . . . . . . . . . . . . . . . . . . . . . . . . . . . . . . . . . . . . . . . . . . . . . . . . . . . . . . . . . . . . . . . . . . . . . . . . . . . . . . . . . . . . . . . . . . . . . . . . . . . . . . . . . . . . . . . . . . . . . . . . . . . . . . - . . . . . . . . . . . . . . . . . . . . . . . . . . . . . . . . . . . . . . . . . . . . . . . . . . . . . . . . . . . . . . . . . . . . . . . . . . . . . . . . . . . . . . . . . . . . . . . . . . . 、 . . . . . . . . . . . . . . . . . . . . . . . . . . . . . . . . . . . . . . . . . . . . . . . . . . . . . . . . . . . . . . . . . . . . . . . . . . . . . . . . . . . . . . . . . . . . . . . . . . . ? . . . . . . . . . . . . . . . . . . . . . . . . . . . . . . . . . . . . . . . . . . . . . . . . . . . . . . . . . . . . . . . . . . . . . . . . . . . . . . . . . . . . . . . . . . . . . . . . . . . ; . . . . . . . . . . . . . . . . . . . . . . . . . . . . . . . . . . . . . . . . . . . . . . . . . . . . . . . . . . . . . . . . . . . . . . . . . . . . . . . . . . . . . . . . . . . . . . . . . . . • • • • • • • • • • • • • • • • • • • • • • • • • • • • • • • • • • • • • • • • • • • • • • • • • • • |
/UnUJbU| no JnJnJnJnJnJnJnJnJnJnJnJnJnJnJnJnJnJnJnJnJnJnJnJnJnJnJnJnJnJnJnJnJnJnJnJnJnJnJnJnJnJnJnJnJnJnJnJnJnJnJn
UJUJI/ UJUJIUJIUJI
jSloJoo
X. aull aoJouI pJooJx JcI
aLJI UJUJI/U JUJI LJI
.ajioaolaoalj
UjUJIJI/UnJUJIJIJIJIJI
a a j 100
auiui ic abglo
:gjgljgJb
aaggaiolgallo
pE EC/2006/66
aJUU UUU
ooLc alasiusuIg
jclgJd2iwlg
aoo jg uill oJsc!
.

slojdo
IjLg j gaiwJ Lc|
aai jlaI 1o Ula! Lc
elio y jglal 1e lcl c jy g
JaoJd oJuijSjo Jda gill
aagai aulolj lglglc Jss
Llul paaaull aal lao g ao bgl
aaii iiaaiiaaiiaai
j01 7 oJgW
aabioJIJlJgGw
.aa gjg 21 aJ Lai
aaijwJgSj:abdo
U|jw|U|g aJLsoJL
aaiJ aqNJ jla
Ig jn Ig
oo aaii aoiS lc li o
.aaoo ojgoo aoo sll ojq
paJlJI JnJUaJI
pIJI slgJI JgJooLc! jSaa
jlll no yalil lla aaiill
Uloglall Ulc Ugann elSa
J 1
gJ 1
ii iai sall gai slll oJl! 5J
Lg
gJb0jI1J
aui gai aolgai
dgaol/2012/19
aJgJl aJsIgK
oJgJy aUJl
auijjiSjlg auijgl
and electronic equipment
(--WEEE
aaaolgall
aIgJpJI JbK
Jg 2a J5mu
yogaa yjg81 sJx
aai jqj 1
lJlloiWi oJlcg


aagaaagaaagaaagaaagaaagaaagaaagaaagaaagaaagaaagaaagaaagaaagaaagaaagaaagaaagaaagaaagaaagaaagaaagaaagaaagaaagaaagaaagaaagaaagaaagaaagaaagaaagaaagaaagaaagaaagaaagaaagaaagaaagaaagaaagaaagaaagaaagaaagaaagaaagaaa
gJ (E-Nr.) aJ (FD)
gJg (E-Nr.) gJg Jd j. jUg Ug Uf (FD) Ug Ug UjUu Uu Uu Uu Uu Uu Uu Uu Uu Uu Uu Uu Uu Uu Uu Uu Uu Uu Uu Uu Uu Uu Uu Uu Uu Uu Uu Uu Uu Uu Uu Uu Uu Uu Uu Uu Uu Uu Uu Uu Uu Uu Uu Uu Uu Uu Uu Uu Uu Uu Uu
Jn
jI jI JI JI JI JI JI JI JI JI JI JI JI JI JI JI JI JI JI JI JI JI JI JI JI JI JI JI JI JI JI JI JI JI JI JI JI JI JI JI JI JI JI JI JI JI JI JI JI JI JI JI
#
358 1
358
358
358
359 Remote-Power-Control
359
359 1
359
359
359 1
359 ....
360 1
360 1
360 1
360
361
361
362
362
362
362 0. (E-Nr)
362 (FD)
362
351
351
351
351
352
354
354
354
354
j 1 j cda b g ofo
354
354
355
355
355 1olss
355
356
356
356
356
356
356
357
357
357
357
357
357 1
357 1
357
357
357
358
358 .........1Multi-Use-Brush J
358
14
gagclicxbl
.
i 1
.
O
jbi jbi jbi jbi jbi jbi jbi jbi jbi jbi jbi jbi jbi jbi jbi jbi jbi jbi jbi jbi jbi jbi jbi jbi jbi jbi jbi jbi jbi jbi jbi jbi jbi jbi jbi jbi jbi jbi jbi jbi jbi jbi jbi jbi jbi jbi jbi jbi jbi jbi jbi
=
Jiai 1
=
j
yla 1 y a oaii iipie 1 1 1 1 1 1 1 1 1
ii
jliy 5i y 24 k 1000000000000000000000000000000000000000
ii
J 30 j
L
!
Sjia cibab g j r j slgaiw y w juiy i la go
ii
j 1 j 1
1 45
aaii i 1
J 1
1j 1 j 1 j 1 j 1 j 1 j 1 j
S OBC = S COD + S_ BOC
山
a
a 1
i 1
.
1
J 1 J 1 J 1 J 1 J 1 J 1 J 1 J 1 J 1 J 1 J 1
jg 42 g
m = 311
| 1 L K L L L L L L L L L L L L L L L L L L L L L L L L L L L L L L L L L L L L L L L L L L L L L L L L L L L L L L L L L L L L L L L L L L L L L L L L L L L L L L L L L L L L L L L L L L L L L L L L L L L L |
| 2 L L L L L L L L L L L L L L L L L L L L L L L L L L L L L L L L L L L L L L L L L L L L L L L L L L L L L L L L L L L L L L L L L L L L L L L L L L L L L L L L L L L L L L L L L L L L L L L L L L L l |
| 3 L L L L L L L L L L L L L L L L L L L L L L L L L L L L L L L L L L L L L L L L L L L L L L L L L L L L L L L L L L L L L L L L L L L L L L L L L L L L L L L L L L L L L L L L L L L L L L L L L L L I |
| 4 L L L L L L L L L L L L L L L L L L L L L L L L L L L L L L L L L L L L L L L L L L L L L L L L L L L L L L L L L L L L L L L L L L L L L L L L L L L L L L L L L L L L L L L L L L L L L L L L L L L E |
| 5 L L L L L L L L L L L L L L L L L L L L L L L L L L L L L L L L L L L L L L L L L L L L L L L L L L L L L L L L L L L L L L L L L L L L L L L L L L L L L L L L L L L L L L L L L L L L L L L L L L L W |
| 6 L L L L L L L L L L L L L L L L L L L L L L L L L L L L L L L L L L L L L L L L L L L L L L L L L L L L L L L L L L L L L L L L L L L L L L L L L L L L L L L L L L L L L L L L L L L L L L L L L L L D |
| 7 L L L L L L L L L L L L L L L L L L L L L L L L L L L L L L L L L L L L L L L L L L L L L L L L L L L L L L L L L L L L L L L L L L L L L L L L L L L L L L L L L L L L L L L L L L L L L L L L L L L C |
| 8 L L L L L L L L L L L L L L L L L L L L L L L L L L L L L L L L L L L L L L L L L L L L L L L L L L L L L L L L L L L L L L L L L L L L L L L L L L L L L L L L L L L L L L L L L L L L L L L L L L L F |
| 9 L L L L L L L L L L L L L L L L L L L L L L L L L L L L L L L L L L L L L L L L L L L L L L L L L L L L L L L L L L L L L L L L L L L L L L L L L L L L L L L L L L L L L L L L L L L L L L L L L L L G |
| 10 L L L L L L L L L L L L L L L L L L L L L L L L L L L L L L L L L L L L L L L L L L L L L L L L L L L L L L L L L L L L L L L L L L L L L L L L L L L L L L L L L L L L L L L L L L L L L L L L L L L S |
| 11 R 12 W 13 |
1
105
aai jui 1jiiS gls aS j iilji o jlr cIcIb ciS g jgoln gls JSLac .iS oalui jgl JSLAC
| ### | ### |
| ### | ### |
| ### | ### |
| ### | ### |
#
Jiai iieu lao oui uuaa jgl jj 0aiuuiuui jil jil j bii
=
1
Saaa aaiy aay
.
a
121 J 1
2( x - 1) = ( x + 2) ( -6)
19
2
20
j1j jilij jiljj jj j 3
1
21
ii 2j 0j j j j j j j
ii 1
g
iiS olaaluiu 1s jssjai algo j I bia
yol
J 1
J 1
41 1
a j 1 r a d a i w 2 r s o j li , j s p a i l j 2.2
iiS 124wL y
1Multi-Use-Brush
J Multi-Use-Brush 1
Multi-Use-Brush 2
.2gai 2gao
1
a 1
i 1
Jusd A J L y 1 Multi-Use-Brush .1
Jd 2000
16
2
jld jz jz jz jz jz jz jz jz jz jz jz jz jz jz jz jz jz jz jz jz jz jz jz jz jz jz jz jz jz
y 1
j j
000000000000000000000000000000000000000
.
,
359 a2a, 1 a
Joo j 1 Jnnnss L J Jnns
ii j 0j j j j j j j j j j j j
25
1
J 1 J 1 J 1 J 1 J 1 J 1 J 1 J 1 J 1 J 1 J 1 J 1 J 1 J 1 J 1 J 1 J 1 J 1 J 1 J 1 J 1 J 1 J 1 J 1 J 1 J 1 J 1 J 1 J 1 J 1 J 1 J 1 J 1 J 1 J
d
/2006 1JLJI JIJI 1JLJI 1JLJI 1JLJI 1JLJI 1JLJI 1JLJI 1JLJI 1JLJI 1JLJI 1JLJI 1JLJI 1JLJI 1JLJI 1JLJI 1JLJI 1JLJI 1JLJI 1JLJI 1JLJI 1JLJI 1J5E EC/66
e i j J I J I J I J I J I J I J I J I J I J I J I J I J I J I J I J I J I J I J I J I J I J I J I J I J I J I J I J I J I J I J I J I J I J I J I J I J I J I J I J I J I J I J I J I J I J I J I J I J I J I J
Service worldwide
Central Service Contacts
AE United Arab Emirates,
BSH Home Appliances FZE
Round About 13, Plot Nr MO-0532A
Jebel Ali Free Zone - Dubai
Tel.: 04 881 4401*
mailto:service.uae@bshg.com
www.bosch-home.com/ae
*Sun-Thu 8am to 5pm (exclude public holidays)
AM AM Armenia, Ruwuunuwu ZIG ZAG LLC
Charenci str. 25
Yerevan 375025
Tel.: 010 55 60 10
mailto.service@zigzag.am
www.zigzag.am
Gate 1, 1555 Centre Road
Clayton, Victoria 3168
Tel.: 1300 369 744*
mailto:customersupport.au@bshg.com
www.bosch-home.com.au
*Mon-Fri 24 hours
BE Belgique, Belgie, Belgium
BSH Home Appliances S.A.-N.V.
Avenue du Laerbeek 74 Laarbeeklaan 74
1090 Bruxelles - Brussels
Tel.: 02 475 70 01
mailto:bru-repairs@bshg.com
www.bosch-home.be
BG Bulgaria
BSH Domakinski Uredi Bulgaria E00D
Business center FPI, floor 5, Cherni vrah
Blvd. 51B
1407 Sofia
Tel.: 0700 208 17
mailto:informacia.servis-bg@bshg.com
www.bosch-home.bg
BH Bahrain,
Khalaifat Est.
BLD 898, R 533, TASHAN 405
Manama
Tel.: 017400553*
mailto:service@khalaifat.com
*Sat-Thu 7am to 5pm (exclude public
holidays)
BY Belarus, Benaapycb
000"BCXbITOBaTeHHka"
TeN.: 4957372961
mailto:mok-kdhl@bshg.com
CH Schweiz, Suisse, Svizzera, Switzerland
BSH Hausgeräte AG
Turkish Rep. Of North Cyprus
Argas Limited Company
37 Osman Paşa Cad. K Çiltlik
Lefkosa
Tel.: 0228 40 70
mailto:argas.tenik@yar-group.com
Turkish Rep. Of North Cyprus
Semson Ticaret Sti. Ltd.
Bedrettin Demirel Cad. no 17
Girne
Tel.: 0816 04 94
mailto:m.defterali@ercantangroup.com
DE Deutschland, Germany
BSH Home Appliances Ltd. Grand Union House, Old Wolverton Road, Wolverton
Milton Keynes MK12 5PT
To arrange an engineer visit, to order spare parts and accessories or for product advice please visit www.bosch-home.co.uk Or call Tel.: 0344 892 8979*
*Calls are charged at the basic rate, please check with your telephone service provider for exact charges.
GR Greece, EMMAC
BSH Ikiakes Siskeves A.B.E.
Central Branch Service
17 km E.O. Athinon-Lamias & Potamou 20
14564 Kifisia
IE Republic of Ireland
BSH Home Appliances Ltd.
M50 Business Park, Ballymount Road Upper, Walkinstown
Dublin 12
To arrange an engineer visit, to order spare parts and accessories or for product advice please call Tel.: 01450 2655*
www.bosch-home.ie
*Calls are charged at the basic rate, please check with your telephone service provider for exact charges
IT Italia, Italy
www.bosch-home.com/it
LB Lebanon,
Teheni, Hana & Co.
Boulevard Dora 4043 Beyrouth, P.O. Box 90449
Jdeideh 1202 2040
Tel.: 01 255 211
mailto:Info@Teheni-Hana.com
LU Luxembourg
Level 3, Air NZ Building, Smales Farm
Business Park, 74 Taharoto Road, Takapuna
Auckland 0622
Tel.: 0800 245 700*
mailto: aftersales.nz@bshg.com
www.bosch-home.co.nz
*Mon-Fri 8.30am to 5pm (exclude public
holidays)
PL Polska, Poland
SA Kingdom Saudi Arabia, all
Abdul Latif Jameel Electronics and Airconditioning Co. Ltd.
BOSCH Service centre, Kilo 5 Old Makkah
Road (Next to Toyota), Jamiah Dist., P.O.
Box 7997
Jeddah 21472
Tel.: 800 127 9999
mailto:ALJECC8@ALJ.COM
www.aljazeera.com.sa
*Sat-Thu 8am to 11pm (exclude public
holidays)
SE Sverige, Sweden
BSH Home Appliances AB
Landsvagen 32
169 29 Solna
Tel.: 0771 197 000 local rate
mailto:Bosch-Service-SE@bshg.com
www.bosch-home.se
SG Singapore, 新加坡
BSH Home Appliances Pte. Ltd.
38C Jalan Pemimpin, #01-01
Singapore 577180
Tel.: 6751 5000*
mailto:bshsgp.service@bshg.com
www.bosch-home.com.sg
*Mon-Fri 9am to 6pm, Sat: 9am to 1pm
(exclude public holidays)
TR Türkiye, Turkey
www.bosch-home.com/tr
Thank you for buying a Bosch Home Appliance!
Register your new device on MyBosch now and profit directly from:
- Expert tips & tricks for your appliance
- Warranty extension options
- Discounts for accessories & spare-parts
- Digital manual and all appliance data at hand
- Easy access to Bosch Home Appliances Service
Free and easy registration – also on mobile phones: www.bosch-home.com/welcome

Looking for help? You'll find it here.
Expert advice for your Bosch home appliances, help with problems or a repair from Bosch experts.
Find out everything about the many ways Bosch can support you: www.bosch-home.com/service
Contact data of all countries are listed in the attached service directory.
- Bagged vacuum cleaner
- Inhaltsverzeichnis
- Sicherheit 9
- Preventing material damage 31
- Environmental protection and saving energy 31
- Unpacking and checking 31
- Familiarising yourself with your appliance. 32
- Accessories 33
- Before using for the first time..... 33
- Basic operation 34
- Cleaning and servicing. 36
- Troubleshooting 40
- Transportation, storage and disposal 41
- Customer Service 41
- Safety
- General information
- Intended use
- Restriction on user group
- Safety instructions
- WARNING - Risk of electric shock!
- WARNING - Risk of burns!
- WARNING - Risk of injury!
- en Safety
- WARNING - Risk of suffocation!
- Preventing material damage
- ATTENTION!
- Environmental protection and saving energy
- Disposing of packaging
- Unpacking and checking
- Unpacking the appliance and parts
- Contents of package
- → Fig. 1
- Familiarising yourself with your appliance
- Appliance
- Overview of the controls1
- Overview of status displays
- Accessories
- Before using for the first time
- Installing the appliance
- en Basic operation
- Inserting the batteries
- Basic operation
- Setting the telescopic tube
- Switching on the appliance
- Switching off the appliance
- Starting vacuuming
- Stopping vacuuming
- Controlling the power
- Starting turbo mode
- Stopping turbo mode
- Setting the floor tool
- Parking the appliance
- Stopping and carrying the appliance
- Vacuuming with accessory
- Vacuuming with the MultiUse-Brush1
- en Cleaning and servicing
- Starting emergency mode
- Stopping emergency mode
- Removing the appliance
- Cleaning and servicing
- Cleaning products
- Cleaning the appliance
- Cleaning the Remote-Power-Control handle
- Opening the lid
- Closing the lid
- Requirements
- Cleaning the dust compartment
- Changing the dust bag
- Cleaning the motor protection filter
- Removing the exhaust filter
- Cleaning the exhaust filter
- Cleaning the HEPA hygiene filter
- Inserting the exhaust filter
- Changing the batteries
- Troubleshooting
- WARNING
- Risk of electric shock!
- Transportation, storage and disposal
- Disposing of old appliance
- Disposing of batteries
- Customer Service
- Product number (E-Nr.) and production number (FD)
- Warranty conditions
- en Customer Service
- Table des matieres
- Sécurité 44
- WAARSCHUWING - Kans op verstikking!
- Stofcompartment schoonma-ken
- ADVARSEL-Fare for forbranding!
- Parkering of apparatus
- Rengoring of apparatus
- Lär kenna
- Enhet
- Degerli Musterimiz
- Advertencias de character general
- OrpaHnueHne Ha KpbTa oT nOtpe6nteJIi
- YkaHnHa 3a 6e3oNaCHOCT
- ПРЕДУПЕЖДЕНЕ - Onachoct OT TOKOB удap!
- PPEyIpeJDEHNE -OnachocT OT n3rapaHnI
- CnnpaHe Ha H3cMyKBaHeto
- Perynpane Ha MozhoctTa
- PerynipaHe Ha POnOBaTa IIO-3a
- Napknape Ha ypeda
- CnnpaHe HocHe Ha ypeJa
- Cmykahe c npHaJnEHHoCT
- Multi-Use-Brush n3cmyKbaHe
- BHIMAHNE!
- CTapTnpaHe Ha aBapHeN XoI
- CnnpaHe Ha aBapneH XoI
- Демонох Ha ypeña
- OTCTpaHЯBaHe Ha HeN3npaBHOCTN
- I P E D U N P E X H D E H N E OnachocOT TOKOB ydap!
- OrpaHnueHne Kpyra noJb3oBaTeJe
- Yka3aHnI NO TexHnke 6e3OnacHoCTN
- PPEyIpeJDEHNE-Onacnoctb yduBja!
- Bo n36eJHHe MaTePnaIbHorO yUepe6a
- BHIMAHHE!
- OxpaHa OkpykaIOUeN cpebl N 3KOHOMN
- YTNIN3aunynaKOBKN
- PacnaKobbIbAHne I KOHTpoJIb
- PacnaKOBbIbAHne npH6opa n ero qaCTeI
- KomnJIeKT NOCTaBKn
- O630p HnDnKaunn COCToHHN
- Perylnpobka MOUHOCTN
- 3anyck pexima Turbo
- OTKJIIOUeHne peXkMa Turbo
- YcTaHOBka HacaIKN IJIa YnCTKINoJa
- YcTaHOBka npH6opa B noJooKeHHne napKOBKN
- BbikloueHne n TpaHcnpTnpoBka npnbopa
- OuHcTka c npHaJdJIeXHoCTaMn
- 3ameHa MeuKa IJIa IIJIH
- OuHcTka MOTOpHOro HnIbTpTa
- H3BJeueHne BbInyCKHOro ФильТра¹
- OuHcTka BbInyckHoTo ΦHbTpTa
- OuHCTKa rHrHeHnueeCKOro ФильТра HEPA
- YcTaHOBka BbInyCKHOro ΦnIbTpα
- 3aMeHa 6aTapeek
- YcTpaHHe HeHcnpaBHOCTe
- PPEyPPEKDEHNE
- Onachoctb nopaxeHn 3JekTpneckm TOKOM!
- HΦopMaζη O 6bIToBθ TeXhKe, IPOIN3BeDeHNo ΠOД KOHTpOJEM KOHcερHa BCX XaycrepeTe Γm6X, Kapn-Bepn-ⅢTp. 34, 81739 MIOHXeH, FepMaHn B COOTBETCTBnC Tpe6OBaHnM 3aKoHOdaTeNbCTBa O TeXHnueCKOM peYIpnoBaHn N 3aKoHOdaTeNbCTBa O 3aUnTe npab Notpe6bnteNei PoccnckO Φepeauin
- Cuprins
- uk
- CepBicHi ueHtpn 330
- O6MeJKeHHa KOJa KOpHcTyBauiB
- Bka3iBKN 3 Texhikn 6e3neKn
- YBAGA! - He6e3neKa ypaJKeHH eJeKtpnHm CtpyMOM!
- Po3naKOByBaHnI npHJaNy IeTaJIeI
- O6cI nocTaayHn
- Mонтajnpидау
- PerylIOBaHHa TeleckoIiHoi Tpy6Kn
- YbimKHeHH npHnaNy
- 3ynnHka npn6npaHHa
- PeryllobaHHnoTuyxHocTi
- 3anysk Typ6opeKHMy
- 3yvnHka po6oTH Tpy6opeKnMy
- BcTaHOBJIeHHI npIIaIy Ha 36epirAHn
- BIMKHeHH npHJaI nepeHeceHH
- OuHSeHHa 3 BnKOpNCtAHHm npHaJa
- 3yvnHka aBapiHoro peKHMy
- Демонтах прулаяду
- UHHeHH Ta DOrJaI
- 3ac06n dIra ouHsEHHa
- YBAGA!
- ChuHnHa npHaLy
- Ouichienhra puchn Remote-Power-Control
- BiKpNbHaHH KpnuKn
- 3aKpNbHaHH KpHsKn
- BHMORN
- OuHcENHa BiDciKy Ira nnly
- 3aMiHa MiIka IЯ nIy
- UHsEHHa3axnCHoro fIbTpa MoTopa
- BnMaHnBnPyCKHOro iNbTpa
- OuHSeHHBnPyCKHOro phiTpa
- OuichiennririicHioro jlbtpa HEPA
- BcTaHOBJIeHHBbNyCKHOro Ibtpa
- 3aMiHa eIeMeHTiB KHBJIeHHH
- YcyHeHHa HeCnpaBHOCTeH
- YBATA!
- He6e3neKa ypaXeHH eNeKTpHuHm cTpyMOM!
- JlI Jslj
- 1JyJgSllgssIj-
- 1
- LbI Iglc
- Jj
- JUJI Uus JU
- aLiJIg bIJI
- aikaiI sgo
- /UnUJbU| no JnJnJnJnJnJnJnJnJnJnJnJnJnJnJnJnJnJnJnJnJnJnJnJnJnJnJnJnJnJnJnJnJnJnJnJnJnJnJnJnJnJnJnJnJnJnJnJnJnJnJn
- slojdo
- Ig jn Ig
- paJlJI JnJUaJI
- gJ (E-Nr.) aJ (FD)
- Jn
- #
- 105
- d
- Service worldwide
- Central Service Contacts
- Thank you for buying a Bosch Home Appliance!
- Looking for help? You'll find it here.
Brand : BOSCH
Model : BGL6FAM1 - BGL6FAM1
Category : Vacuum Cleaner