BROADBAND ROUTER - Broadband Router US ROBOTICS - Free user manual and instructions
Find the device manual for free BROADBAND ROUTER US ROBOTICS in PDF.
User questions about BROADBAND ROUTER US ROBOTICS
0 question about this device. Answer the ones you know or ask your own.
Ask a new question about this device
Download the instructions for your Broadband Router in PDF format for free! Find your manual BROADBAND ROUTER - US ROBOTICS and take your electronic device back in hand. On this page are published all the documents necessary for the use of your device. BROADBAND ROUTER by US ROBOTICS.
USER MANUAL BROADBAND ROUTER US ROBOTICS
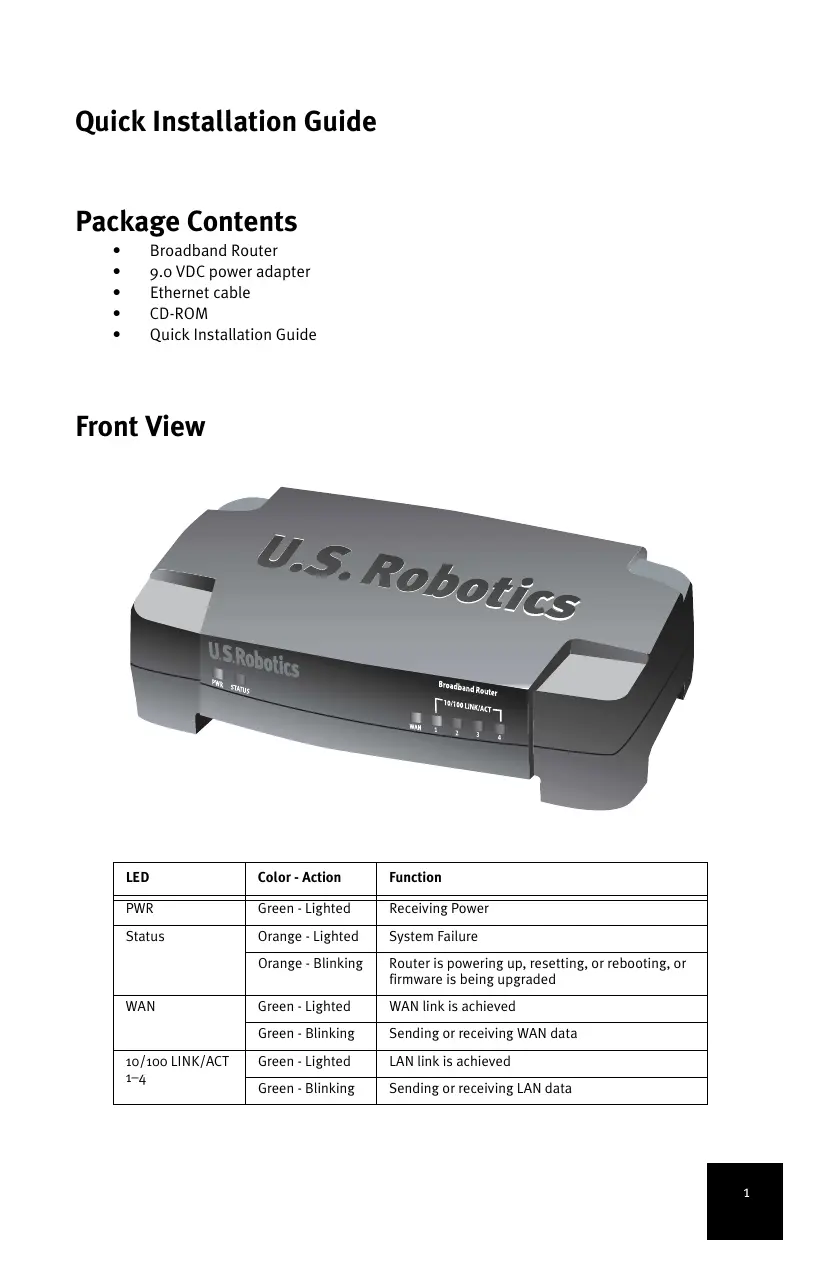
| LED | Color - Action | Function |
| PWR | Green - Lighted | Receiving Power |
| Status | Orange - Lighted | System Failure |
| Orange - Blinking | Router is powering up, resetting, or rebooting, or firmware is being upgraded | |
| WAN | Green - Lighted | WAN link is achieved |
| Green - Blinking | Sending or receiving WAN data | |
| 10/100 LINK/ACT 1-4 | Green - Lighted | LAN link is achieved |
| Green - Blinking | Sending or receiving LAN data |
Rear View
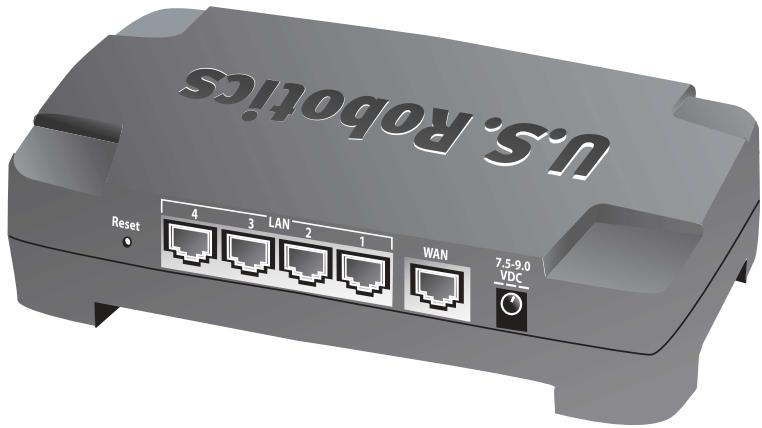
| Port | Function |
| Reset | To reboot the Broadband Router, press in and release the Reset button. To reset the BroadbandRouter to the factory default settings, press in and hold the Reset button for seven second |
| LAN 1-4 | RJ-45 ports to connect devices to the Local Area Network |
| WAN | RJ-45 port to connect the router to a broadband modem or to a WAN |
| 7.5-9.0 VDC | Power supply connection port |
Router Installation
The Broadband Router can easily be connected to any Ethernet-based cable or DSL modem. To verify compatibility, look at the existing connection between your modem and your computer. If the connection is made with an RJ-45 Ethernet cable, your modem can be connected to the BroadbandRouter.
What You Need to Begin
PC with an Ethernet adapter (NIC) installed
A functioning Ethernet-based cable or DSL modem
- HTML 4.01-compliant Web Browser (such as Internet Explorer 5.5 or later or Netscape 7.0 or later)
- Your CD-ROM drive letter (for example, D)
- Your router product number and serial number, located on the bottom label of the router. If you ever need to call our Technical Support department, you will need this number to receive assistance.
| Product Number | Serial Number |
| 8004 |
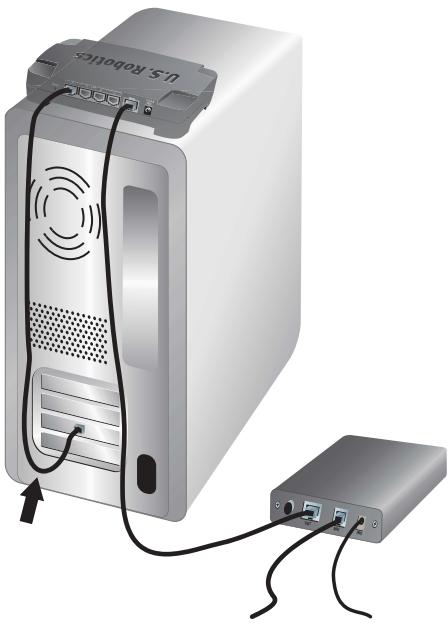
Step 1: Connect your modem to the router.
- Turn off your computer and your modem.
- Locate the Ethernet cable that connects your modem to your PC's Ethernet adapter, and disconnect it from the PC only.
Do not disconnect the cable from your modem.
- Connect the free end of the Ethernet cable to the WAN port on the rear of the router.
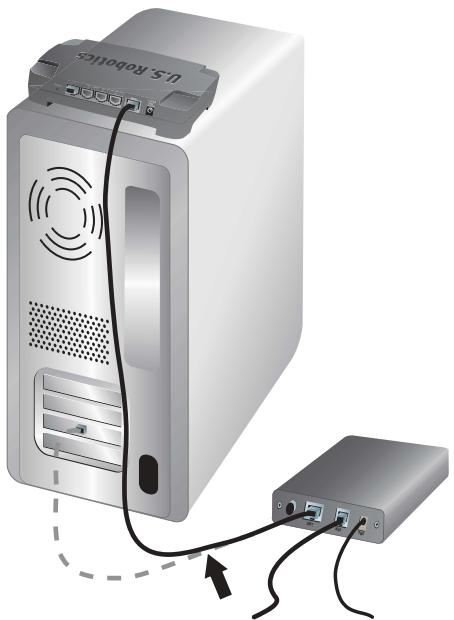
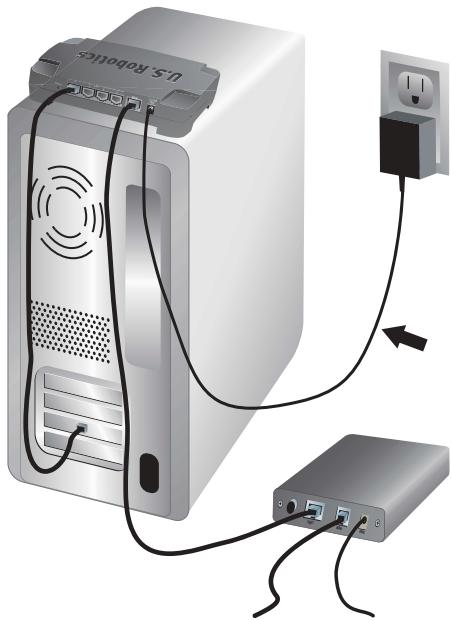
Step 2: Connect the router to your computer and power supply.
- Connect one end of the supplied Ethernet cable to your PC's Ethernet adapter.
- Connect the other end to one of the router's LAN ports.
- Turn on your modem.
- Connect the supplied power adapter to the power jack on the router.
- Plug the power adapter into a standard power outlet.

UK Users: Replace the plug on the power adapter with the UK standard plug that is supplied in your
U.S. Robotics package. Apply enough pressure to cause a click and firmly seat the new plug.
- Turn on your computer.
Step 3: Configure the basic connection settings.

Windows XP and Me users: If Universal Plug and Play launches, follow the on-screen instructions instead of steps 1 and 2 below, then start with step 3.
- Launch your Web browser.
- In the location or address line, type http://192.168.123.254 and press ENTER to start the router Web User Interface.
- Click Log in—there is no default password.
- Select Primary Setup from the menu, and then click Change.
- Select your WAN type. Depending on your WAN type, you may need to enter connection information. If you are unsure about any connection information required by the setup process, contact your Internet Service Provider. When finished, click Save.
- Verify your Internet connection by launching a Web browser and going to www.usr.com/productreg
If your Internet connection is not successful, refer to "Troubleshooting" in this guide. If your Internet connection is successful, register your product. U.S. Robotics also recommends that you make a backup of your new configuration settings as follows:
1) Select the Toolbox menu.
2) Click Backup Setting.
3) Your system will prompt you to save or open the file. Select Save.
4) Browse to the location at which you want the backup file saved and click Save.
Congratulations! The installation procedure is complete!
For configuration details, regulatory information, and warranty information, refer to the User Guide on the U.S. Robotics CD-ROM.
Troubleshooting
I can't connect to the router's Web User Interface.
Possible Solution 1:
Make sure that all the Ethernet cables are properly and securely connected and that the power cord is plugged in.
Possible Solution 2:
Make sure that you correctly performed all the steps in the "Before You Begin" section of the User Guide on the U.S. Robotics CD-ROM. If your computer was configured to use a static IP address, you must now reconfigure it to Obtain an IP address automatically.
Possible Solution 3:
Make sure that your PC is using an IP address that is within the default range of 192.168.123.xxx. Make sure the address of the subnet mask is 255.255.255.0. If necessary, the Default Gateway should be 192.168.123.254. To verify these settings, perform the following steps:
Windows XP, 2000, or NT users:
- Click Windows Start, and then click Run.
- Type cmd and click OK.
- At the DOS prompt, type ipconfig /all and press ENTER.
- Check the IP Address, Subnet Mask, Default Gateway, and DNS server data to make sure they are correct.
If the information is not correct:
1) Type ipconfig /release and press ENTER.
2) Type ipconfig /renew and press ENTER.
Windows Me, 98, or 95 users:
- Click Windows Start, and then click Run.
- Type winipcfg and click OK.
- Check the IP Address, Subnet Mask, Default Gateway, and DNS server data to make sure they are correct.
If the information is not correct, click Release All, and then click Renew All.
Possible Solution 4:
Follow the instructions below to verify the connection setting of your Web browser and to verify that the HTTP Proxy feature of your Web browser is disabled. This procedure ensures that your Web browser can read the configuration pages inside your router.
Internet Explorer users:
- Launch Internet Explorer.
- Click Tools, Internet Options, and select the Connections tab.
- Select Never dial a connection and click Apply.
- Click the LAN Settings button.
- Clear all the check boxes and click OK.
- Click OK.
Netscape Navigator users:
- Launch Netscape Navigator.
- Click Edit, Preferences.
- In the Category window, double-click Advanced.
- Click Proxies, click Direct connection to the Internet, and then click OK.
I can't access the Internet.
Possible Solution 1:
Make sure that the power cord and both Ethernet cables are connected correctly. This includes the cables connecting the router, the modem, and all the PCs.
Possible Solution 2:
Reboot the router by unplugging and plugging in the power supply.
I don't know whether my IP address is static or dynamic.
Possible Solution:
If you have broadband Internet service, you probably have a dynamic IP address. However, you should verify this information with your Internet Service Provider, because some providers assign static IP addresses.
While trying to check my network configuration settings in Windows Me, I can't find the Network icon.
Possible Solution:
The default setting in Windows Me is to not show all of the icons within the Control Panel. To change the default setting to show all icons:
- Click Windows Start, Settings, Control Panel.
- Within Control Panel, click View all Control Panel options on the left side of the screen.
All the Control Panel icons should now be visible.
I don't know how to configure the TCP/IP protocol to work with the router.
Possible Solution:
You have the TCP/IP protocol installed, but it is not configured to work with the router.
Windows XP users:
- Click Windows Start, Control Panel.
- Double-click the Network and Internet Connections icon.
- Right-click the icon that represents your LAN or high-speed Internet connection, and select Properties.
- Click the General tab, and select the TCP/IP line that has been assigned to your network card.
- Click the Properties button.
-
Configure IP addressing:
-
Preferred method—To obtain the IP address automatically through the DHCP server: Click the General tab, select Obtain an IP address automatically, and click OK. Click OK again.
-
For instructions on specifying the IP address manually, refer to the User Guide on the U.S. Robotics CD-ROM.
Windows 2000 users:
- Click Windows Start, Settings, Network and Dialup connections.
- Double-click the Local Area Connections icon and select Properties.
- Select the TCP/IP line that has been assigned to your network card and select Properties.
-
Configure IP addressing:
-
Preferred method-To obtain the IP address automatically through the DHCP server:
Click the IP Address tab, select Obtain an IP address automatically and click OK. Click OK again.
- For instructions on specifying the IP address manually, refer to the User Guide on the U.S. Robotics CD-ROM.
Windows Me, 98, or 95 users:
- Click Windows Start, Settings, Control Panel.
- Double-click the Network icon.
- Click the Configuration tab and select the TCP/IP line that has been assigned to your network card.
- Click the Properties button.
-
Configure IP addressing:
-
Preferred method-To obtain the IP address automatically through the DHCP server:
Click the IP Address tab, select Obtain an IP address automatically and click OK. Click OK again.
- For instructions on specifying the IP address manually, refer to the User Guide on the U.S. Robotics Installation CD-ROM.
Windows NT users:
- Click Windows Start, Settings, Control Panel.
- Double-click the Network icon.
- Click the Protocols tab and select the TCP/IP line that has been assigned to your network card.
- Click the Properties button.
-
Configure IP addressing:
-
Preferred method-To obtain the IP address automatically through the DHCP server:
Click the IP Address tab and select Obtain IP address from a DHCP server and click OK. Click OK again.
- For instructions on specifying the IP address manually, refer to the User Guide on the U.S. Robotics Installation CD-ROM.
You can use the ping command to verify whether your PC has successfully connected to the router. For ping command instructions, refer to the User Guide on the U.S. Robotics CD-ROM.
Are You Still Having Trouble?
- Refer to the User Guide on the U.S. Robotics CD-ROM.
- Go to the Support section of the U.S. Robotics Web site at www.usr.com
The most common difficulties that users experience have been addressed in the FAQ and Troubleshooting Web pages for your product. The product number of the Broadband Router is 8004. You may need to know this to obtain information from the U.S. Robotics Web site.
- Contact the U.S. Robotics Technical Support Department.
Technical questions about U.S. Robotics products can also be answered by our expert team of technical support specialists.
| Country | Voice | Webmail | Support Hours |
| United States | (888) 216-2850 | http://www.usr.com/emailsupport | 9:00 A.M.-6:00 P.M. central time, M-F |
| Canada | (888) 216-2850 | http://www.usr.com/emailsupport | 9:00 A.M.-6:00 P.M. central time, M-F |
| Austria | 07 110 900 116 | http://www.usr.com/emailsupport/de | 9:00A.M.-17:00P.M.,M-F |
| Belgium (Flemish) | +32 (o)70 233 545 | http://www.usr.com/emailsupport/ea | 9:00A.M.-17:00P.M.,M-F |
| Belgium (French) | +32 (o)70 233 546 | http://www.usr.com/emailsupport/ea | 9:00A.M.-17:00P.M.,M-F |
| Denmark | +45 7010 4030 | http://www.usr.com/emailsupport/uk | 9:00A.M.-17:00P.M.,M-F |
| Finland | +358 98 171 0015 | http://www.usr.com/emailsupport/ea | 10:00A.M.-18:00P.M.,M-F |
| France | 082 507 0693 | http://www.usr.com/emailsupport/fr | 9:00A.M.-17:00P.M.,M-F |
| Germany | 01805671548 | http://www.usr.com/emailsupport/de | 9:00A.M.-17:00P.M.,M-F |
| Hungary | 01805671548 | http://www.usr.com/emailsupport/hu | 9:00A.M.-17:00P.M.,M-F |
| Ireland | 1890-252-130 | http://www.usr.com/emailsupport/uk | 9:00A.M.-18:00P.M.,M-F |
| Italy | 848 80 9903 | http://www.usr.com/emailsupport/it | 9:00A.M.-17:00P.M.,M-F |
| Luxembourg | +352 342 080 8318 | http://www.usr.com/emailsupport/bn | 9:00A.M.-17:00P.M.,M-F |
| Middle East/Africa | +44 870 844 4546 | http://www.usr.com/emailsupport/me | 9:00A.M.-17:00P.M.,M-F |
| Netherlands | 0900 20 25 857 | http://www.usr.com/emailsupport/ea | 9:00A.M.-17:00P.M.,M-F |
| Norway | +47 23 50 0097 | http://www.usr.com/ emailsupport/ea | 9:00A.M.-17:00P.M.,M-F |
| Poland | http://www.usr.com/ emailsupport/pl | 8:00A.M.-18:00P.M.,M-F | |
| Portugal | +351 (o)21 415 4034 | http://www.usr.com/ emailsupport/pt | 9:00A.M.-17:00P.M.,M-F |
| Russia | 8-800-200-200-1 | http://www.usr.com/ emailsupport/ru | 10:00A.M.-18:00P.M.,M-F |
| Spain | 902 117 964 | http://www.usr.com/ emailsupport/es | 9:00A.M.-17:00P.M.,M-F |
| Sweden | +46 (o) 77 128 1020 | http://www.usr.com/ emailsupport/ea | 9:00A.M.-17:00P.M.,M-F |
| Switzerland | +0848 840 200 | http://www.usr.com/ emailsupport/de | 9:00A.M.-17:00P.M.,M-F |
| UK | 0870 844 4546 | http://www.usr.com/ emailsupport/uk | 9:00A.M.-17:00P.M.,M-F |
For current support contact information, go to the following Web site:
http://www.usr.com/support