USR8710 - Network Equipment US ROBOTICS - Free user manual and instructions
Find the device manual for free USR8710 US ROBOTICS in PDF.

| Product Type | Mini NAS Adapter (Network Attached Storage) |
| Brand | US ROBOTICS |
| Model | USR8710 (uShare™ Mini NAS Adapter) |
| Dimensions | Approximately 12 x 8 x 3 cm (estimated) |
| Weight | Approximately 200 g (estimated) |
| Power Supply | 5V DC power adapter (included) |
| Interfaces | 1 Ethernet port 10/100/1000 Mbps, 1 USB 2.0 port for storage, 1 USB 2.0 port for printer, Reset button |
| LED Indicators | Power (PWR), System (O/S), Network (LNK) |
| Supported Disk Formats | FAT32, NTFS, FAT64 (capacity from 4 GB to 2 TB) |
| Main Functions | SMB file server, WebDAV server, UPnP/iTunes media server, USB print server, BitTorrent client, DHCP server, DHCP client, Static IP, PPPoE, DDNS |
| Compatible Operating Systems | Windows 7, Vista, XP SP3, Mac OS X 10.5.4 and later |
| Management | Web interface (NAS Manager), SyncQuick™ NAS Manager software |
| Security | Password management for web access and SMB/WebDAV shares |
| Maximum Samba Users | 16 user accounts, 8 simultaneous connections, 64 TCP connections |
| Operating Temperature | 0°C to 40°C (estimated) |
| Maintenance and Cleaning | Clean with a dry, soft cloth. Avoid liquids and solvents. |
| Safety | Do not expose to moisture, unplug before maintenance, use the supplied adapter |
| Spare Parts and Repairability | No spare parts available. Contact USRobotics support for repair. |
| General Information | Limited warranty, compliant with FCC Class B, CE, WEEE directive. Manual available in multiple languages. |
Frequently Asked Questions - USR8710 US ROBOTICS
User questions about USR8710 US ROBOTICS
0 question about this device. Answer the ones you know or ask your own.
Ask a new question about this device
Download the instructions for your Network Equipment in PDF format for free! Find your manual USR8710 - US ROBOTICS and take your electronic device back in hand. On this page are published all the documents necessary for the use of your device. USR8710 by US ROBOTICS.
USER MANUAL USR8710 US ROBOTICS
Hardware Installation....2
NAS Manager 2
NAS Web User Interface 3
Map to Shared Folders on Your uShare™ Mini NAS Adapter (Windows 7, Windows Vista and XP) ....13
WebDAV Server....14
UPnP Media Server (Xbox 360, PS3, iTunes) ......21
Printer Server (Windows 7, Windows Vista and XP)....23
P2P Server 27
Mac Installation (Mac 10.5.4 and above) 29
Troubleshooting 32
Warranty 35
Regulatory 35
Français....36
Présentation 36
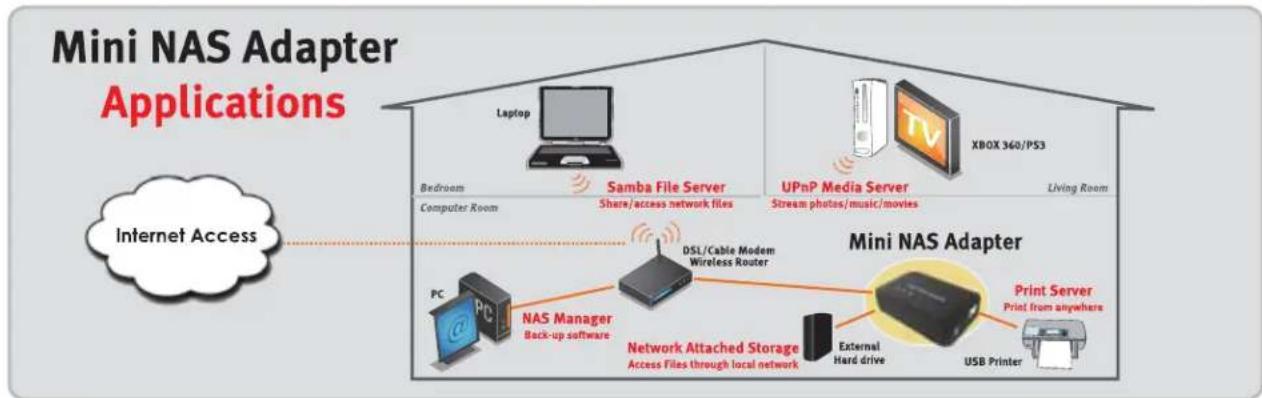
The uShare™ Mini NAS Adapter lets you turn an external USB storage drive into a network attached storage (NAS) device, or let you connect a USB printer to the uShare™ Mini NAS Adapter to share the printer over your network.
Supported Operating Systems
• Windows 7, Windows Vista, Windows XP SP3
• Mac OSX 10.5.4 and above
Key Features
• Supports USB mass storage device (Capacity: Minimum 4GB, Maximum 2TB)
• Supports Auto IP (DHCP server or DHCP Client)/Fixed IP
• Supports 10/100/1000Mb Ethernet port
- Password management provides secure access to HDD and web management
• Supports SAMBA (SMB)
• Supports WebDAV server
• Supports Bit Torrent download
• Supports UPnP AV media Server & Apple iTunes music server
• Supports USB Printer server
Network environment
You can set your device one of three ways:
- Setup the uShare™ Mini NAS Adapter as DHCP Client: If your uShare™ Mini NAS Adapter operates under a built-in DHCP server router (ex. Internet Sharing Hub), it will obtain an IP from DHCP Server automatically.
- Setup the uShare™ Mini NAS Adapter as DHCP Server: If your operating environment does not support DHCP server, the uShare™ Mini NAS Adapter will immediately act as DHCP server and assign an IP address for installation.
- In Static IP environment: First, you need to configure the IP for the uShare™ Mini NAS Adapter to operate in the static IP environment. For configuration details, please refer to “LAN Configuration” on page 6.
flowchart
graph TD
    A["Internet Access"] --> B["Laptop"]
    A --> C["Samba File Server"]
    A --> D["UPnP Media Server"]
    A --> E["XBOX 360/PS3"]
    A --> F["PC"]
    A --> G["NAS Manager"]
    G --> H["Back-up software"]
    H --> I["DSL/Cable Modem Wireless Router"]
    I --> J["Network Attached Storage Access Files through local network"]
    J --> K["External Hard drive"]
    J --> L["Print Server"]
    L --> M["Print from anywhere"]
    L --> N["USB Printer"]
    L --> O["PC"]
    style A fill:#f9f,stroke:#333
    style B fill:#ccf,stroke:#333
    style C fill:#ccf,stroke:#333
    style D fill:#ccf,stroke:#333
    style E fill:#ccf,stroke:#333
    style F fill:#cfc,stroke:#333
    style G fill:#fcc,stroke:#333
    style H fill:#cff,stroke:#333
    style I fill:#ffc,stroke:#333
    style J fill:#ffc,stroke:#333
    style K fill:#cfc,stroke:#333
    style L fill:#cfc,stroke:#333
    style M fill:#cfc,stroke:#333
    style N fill:#cfc,stroke:#333
Hardware Installation
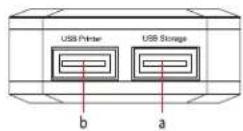
- Connect your USB storage drive to the adapter (a). * And/Or
Connect your USB printer to the adapter (b).
-
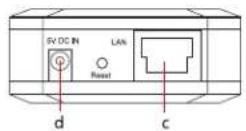
Connect an Ethernet cable to the adapter (c) and to your router or gateway.
-
Connect the power adapter (d) and plug it in.
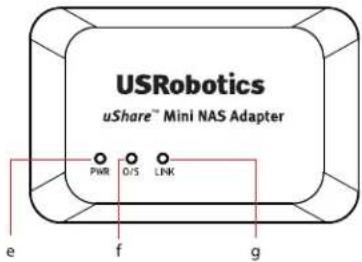
• (e) Power LED
• (f) Operating System LED
• (g) LAN LED
*. The uShare™ Mini NAS Adapter supports FAT32/NTFS/FAT64 file systems. Make sure your USB storage drive has been pre-formatted to one of these system files. Then simply plug your USB storage into the USB storage port and the system will automatically recognize and initialize the drive.
NAS Manager
The SyncQuick™ NAS Manager is a NAS device search and backup software that has been specifically developed for NAS Client users to provide simple, fast and reliable backups for personal information including photos, MP3 files, and other documents.
Search for your uShare™ Mini NAS Adapter with SyncQuick™ NAS Manager
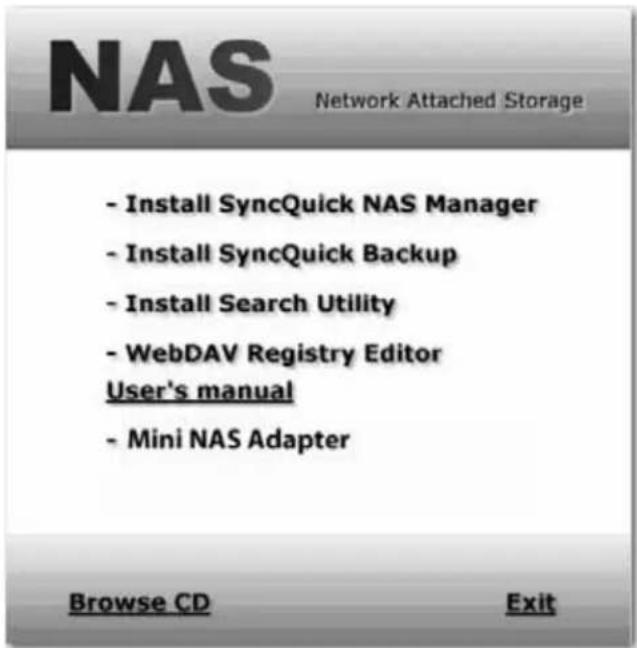
- Insert the USRobotics Installation CD-ROM. Click Install SyncQuick™ NAS Manager.
English
- Select Auto Search, then click the green arrow. When the NAS is found, right-click and select Open NAS Control Page.
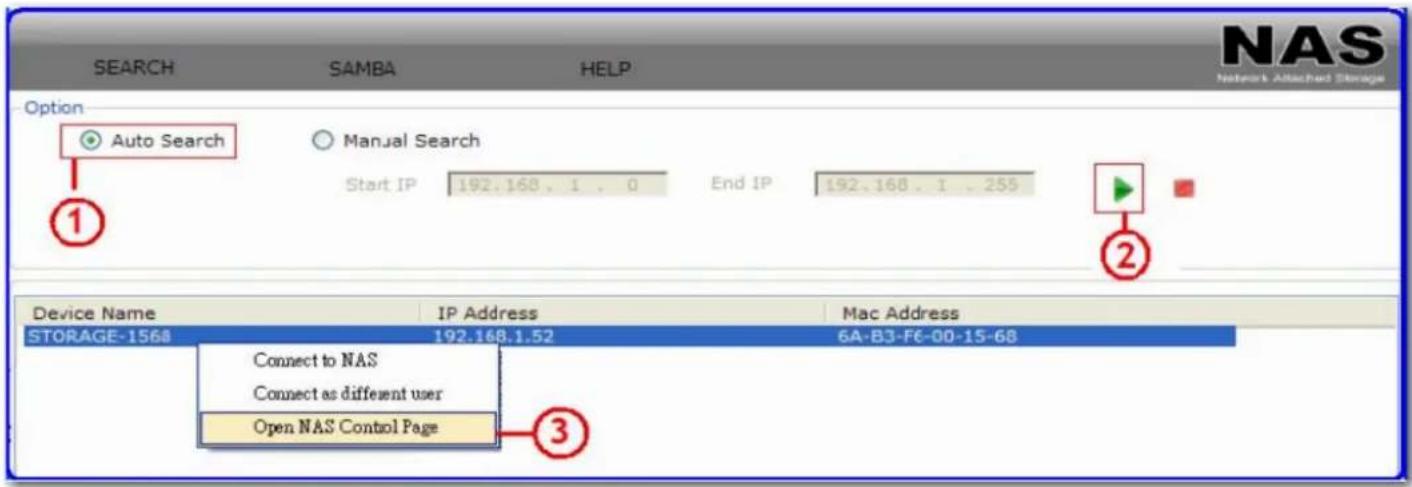
- The default user name and password is admin. Click OK to open the configuration page to set up your NAS device.
To manually search for your uShare™ Mini NAS Adapter using a web browser
- To search for the IP address of your uShare™ Mini NAS Adapter, open a web browser and enter storage in the address bar to locate your uShare™ Mini NAS Adapter and see the IP address.
- The default user name and password is admin. Click OK to open the configuration page.
NAS Web User Interface
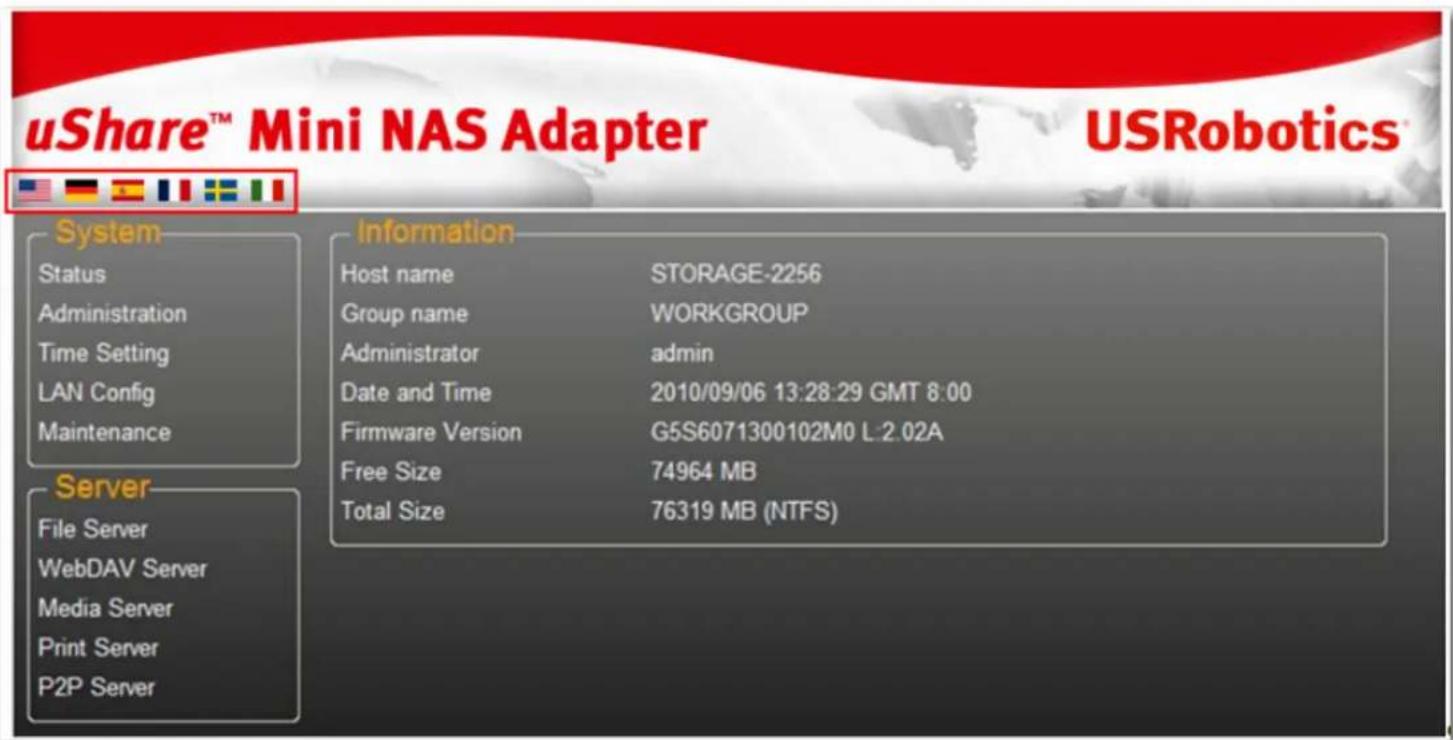
To open NAS Web user interface, launch the SyncQuick NAS Manager to locate the device.
The uShare™ Mini NAS Adapter supports a localized user interface. Click on a flag to select your language.
Hard Disk Format Support
The uShare™ Mini NAS Adapter supports FAT32/NTFS/FAT64 file systems. Make sure your USB storage drive has been pre-formatted to one of these system files. Then, simply plug your USB storage into the USB storage port and the system will automatically recognize and initialize the drive.
Status
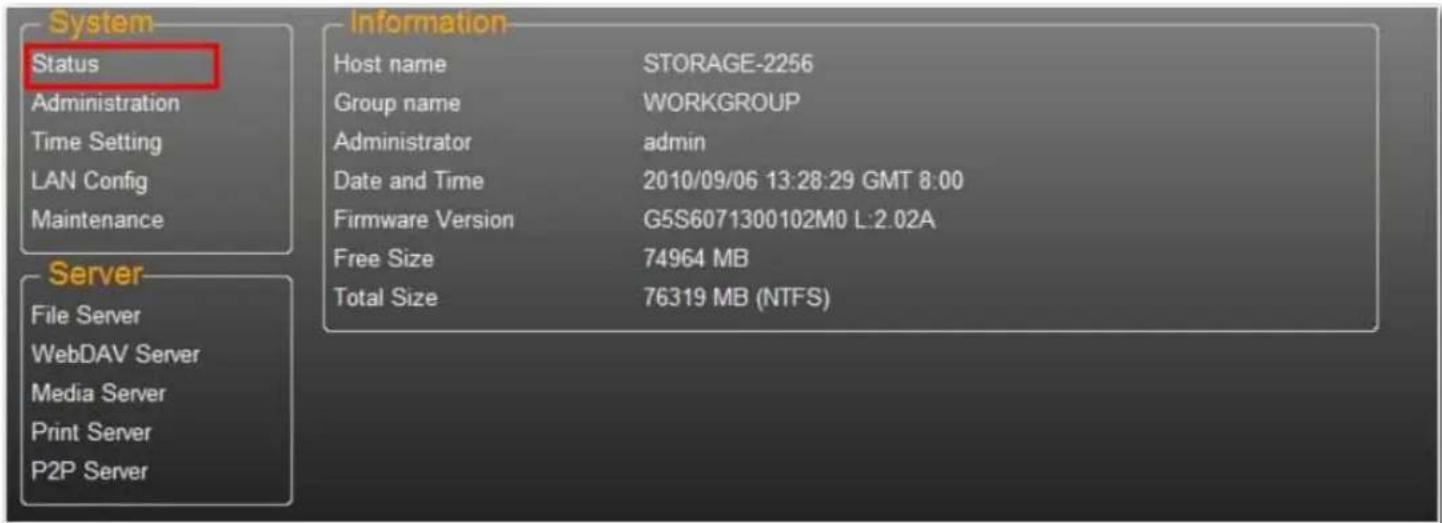
This page provides basic information for the uShare™ Mini NAS Adapter. You can check your firmware version and available HDD capacity from this page.
Administration
You can change and modify your host name, group name, and password from this page. Click Apply to save your settings.
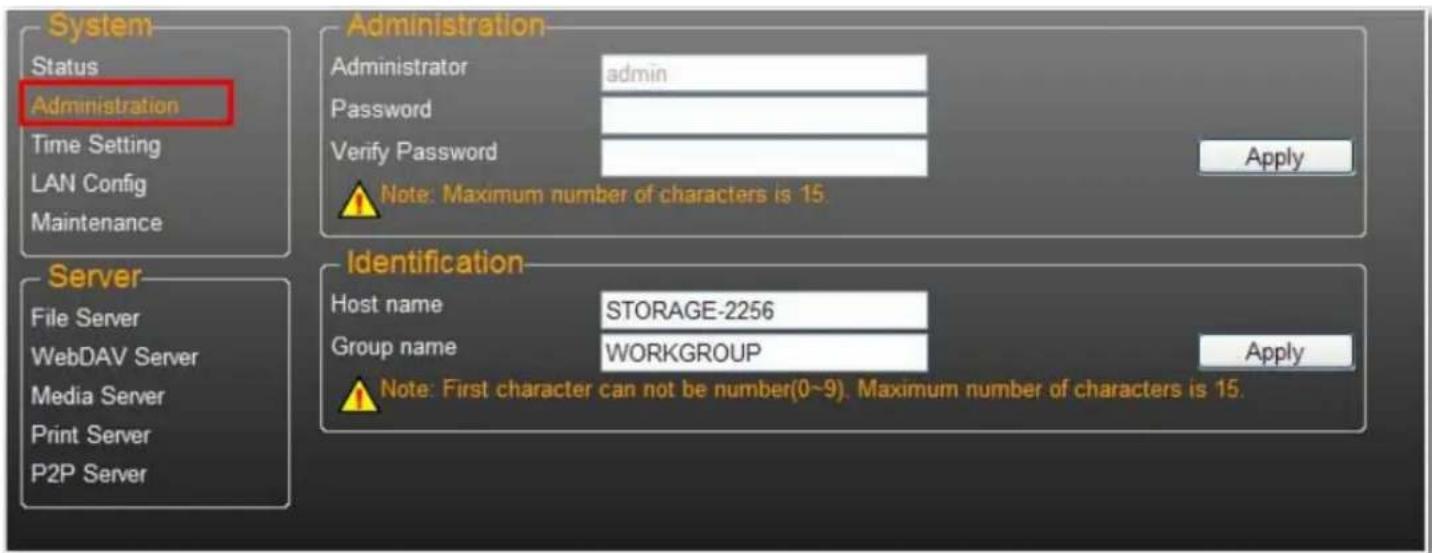
- Host name: This is used to identify your device on the network. If you prefer a different name, type in the new name and click Apply.
English
- Group name: This should be same as your workgroup. Unless you have manually configured workgroups on your network, the default is "WORKGROUP". If your workstation belongs to different workgroup, enter the correct group name to modify.
In Windows, right-click My Computer, select Properties, and go to the computer name tab to see your current workgroup.
Date/ Time Setting
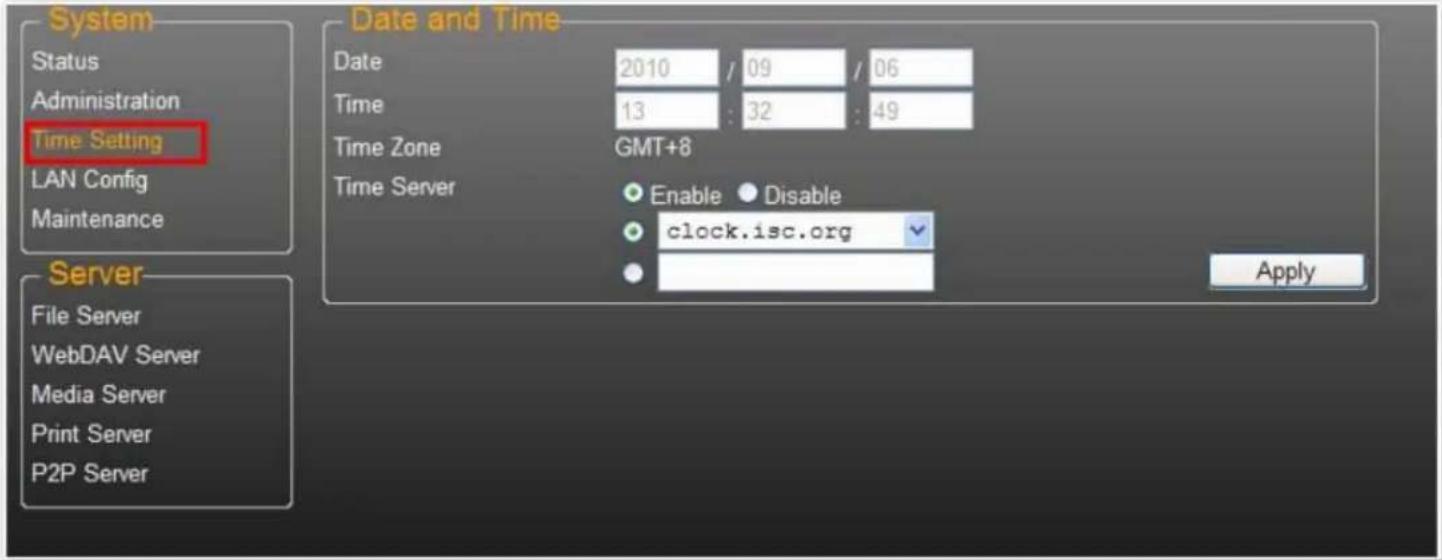
You can change date/time settings from this page. Click Select Enable and click Apply to enable the Time Server. By default, SNTP is set to the Network time service clock.isc.org. You can also select Synchronize to PC from the dropdown list. If Internet access is available, we recommended setting SNTP to Network time service.
To disable the time server, select Disable and click Apply. You may need to manually update your Date and Time information.
LAN Configuration
English
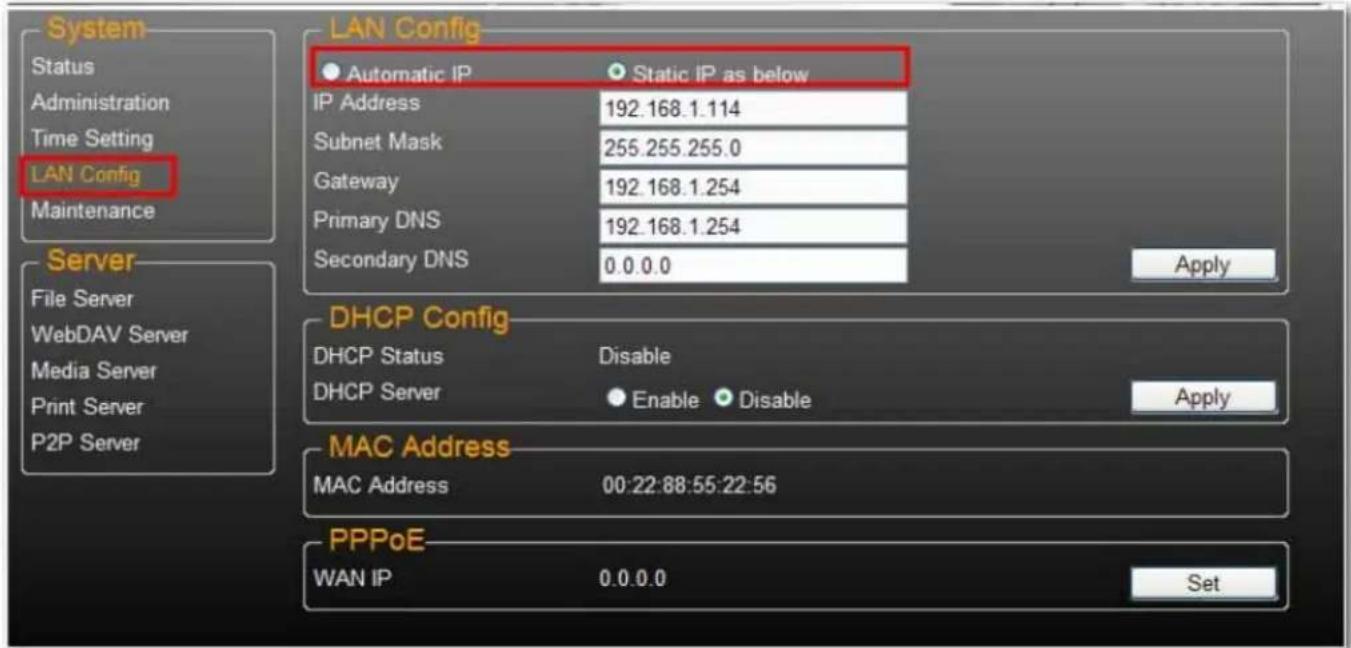
By default, the IP Setting is set to Automatic IP. This is the recommended setting and will allow the uShare™ Mini NAS Adapter to obtain its IP address automatically.
If you prefer, select Static IP and enter your IP address, Subnet Mask, Gateway and Primary DNS server information, then click Apply. Static IP addresses are useful when mounting network drives or using with port forwarding.
PPPoE Settings
PPPoE (Point-to-Point Protocol over Ethernet) is an Internet connection protocol that lets users to connect to the Internet without a router. All local users can share one PPPoE connection to access the Internet.
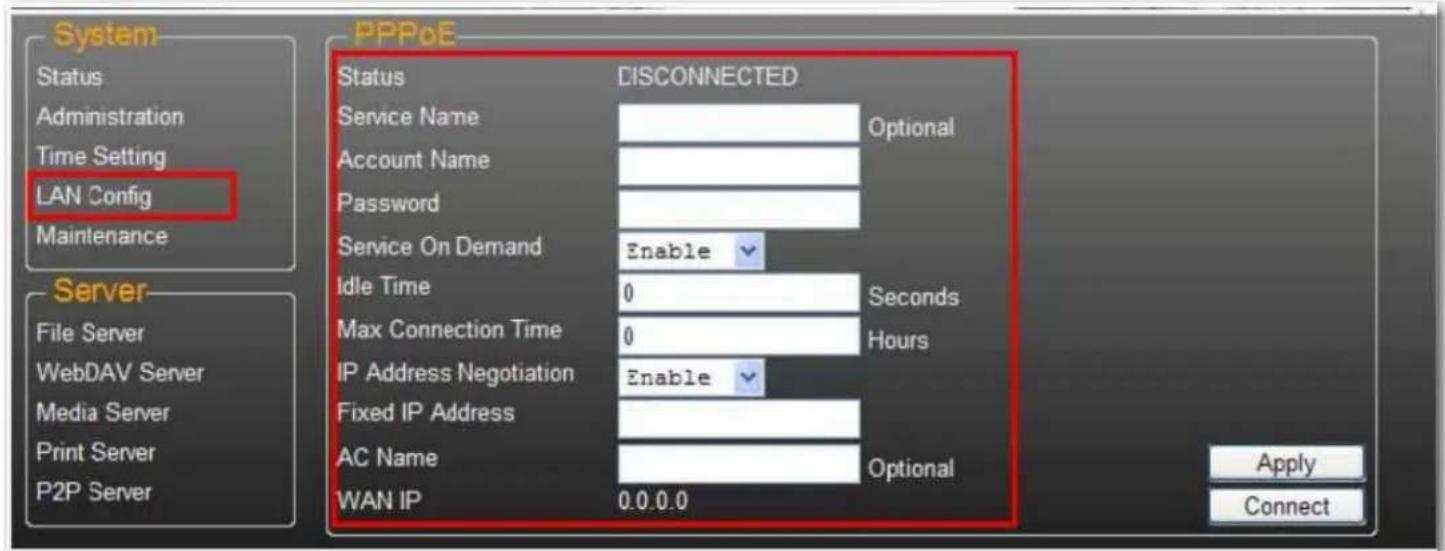
If you want to configure the setting of PPPoE for your NAS, click the Set button and enter the information for your connection to you ISP.
• Status: Display PPPoE connection status.
• Service Name: Optional field.
- Account Name: Enter your user name provided by your ISP.
- Password: Enter your password provided by your ISP.
- Service on Demand: The router will ONLY connect itself to your ISP when there is an Internet request demanded by any LAN user and disconnect itself when the transaction is done.
- Idle Time (Seconds): Idle time means the adapter will disconnect itself from the ISP after being idle for a specific time. If the time is set to 0, the adapter will not disconnect itself.
- Max Connection Time (Hours): A specific time that indicate how long the storage can stay connection with ISP.
- IP Address Negotiation: IP Address and Subnet Mask should be assigned within the same network as the PPPoE-enabled DSL modem.
- Fixed IP Address: Use to assign an IP address manually.
- AC Name: Optional field. Used to configure an access concentrator (AC) name on the PPPoE interface.
- WAN IP: This is the current IP address for the storage device.
DDNS Settings
DNS service (Domain Name System) is used for the translation of IP addresses from domain names to the numeric IP address format. Translation of the domain name into the set of numbers is performed by the appropriate DNS server.
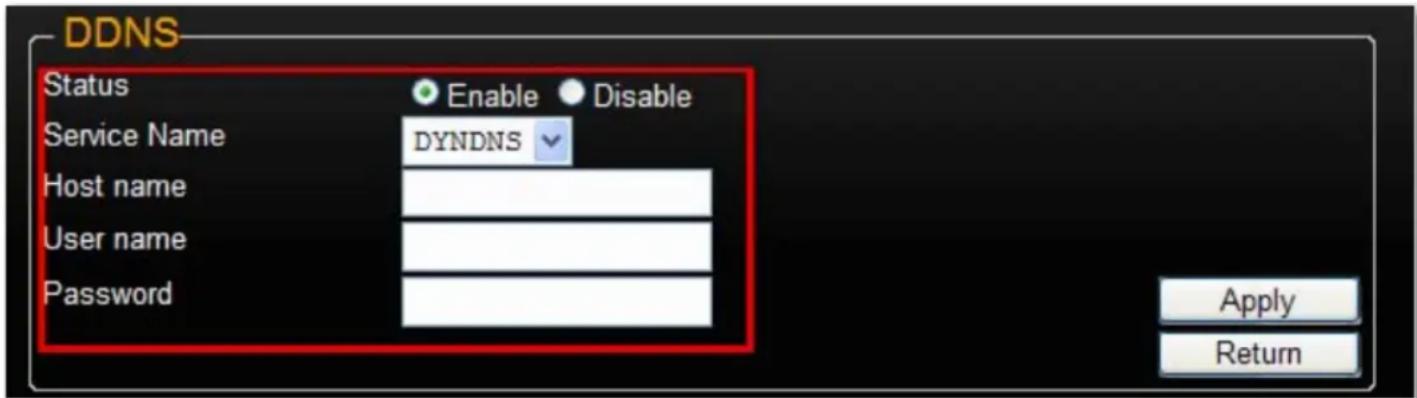
The uShare ^TM Mini NAS Adapter supports dynamic DNS from the following providers:
- http://www.dyndns.com (DYDNS)
- http://www.2mydns.com (2MYDNS) - Note: 2MYDNS is no longer supported
To enable the dynamic DNS service for the uShare™ Mini NAS Adapter, select a dynamic DNS service and enter the appropriate Host name, User name and Password and click Apply. To exit, press Return.
Maintenance
This page allows you to update your uShare™ Mini NAS Adapter firmware, reboot the system, or restore the uShare™ Mini NAS Adapter to its factory default settings.
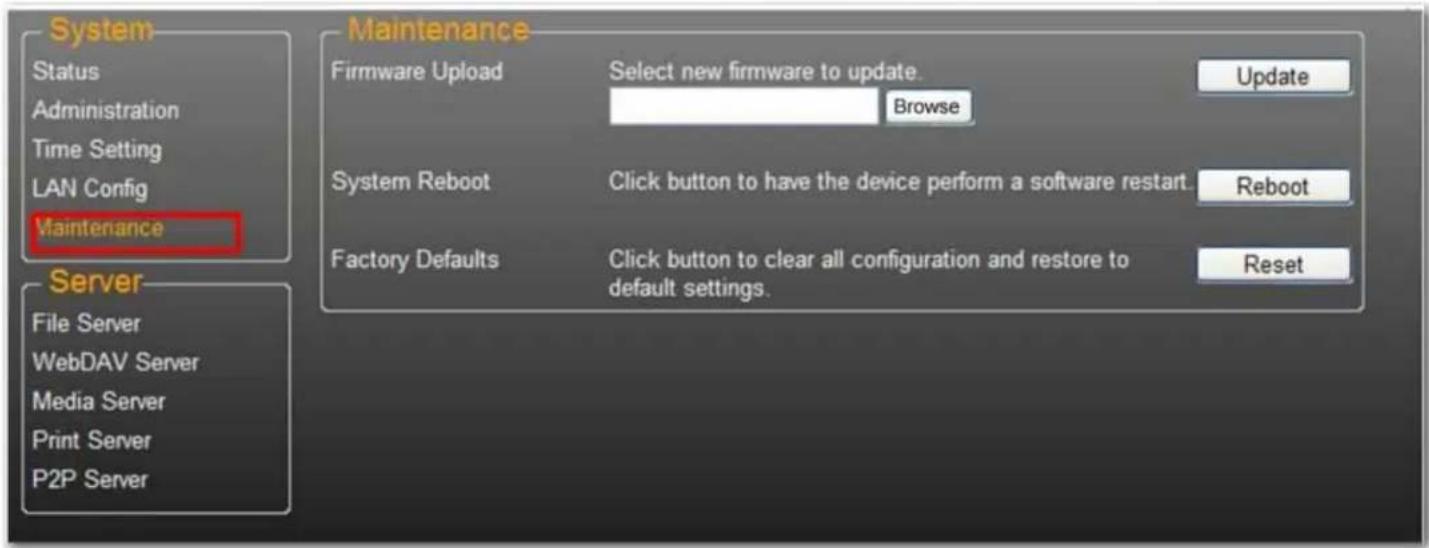
Firmware Upload
- Download the latest firmware from USRobotics: www.usr.com/support
- Save the firmware file to your computer, and unzip the file (if needed).
- From the Maintenance page, click Browse and navigate to the folder where you have the unzipped firmware update file.
-
Click the Update button.
-
Confirm the pop-up message to start the update.
The firmware update begins. It may take several minutes to complete.
Caution: Do not power off or unplug the uShare™ Mini NAS Adapter during firmware update.
- Once the update is done, your uShare™ Mini NAS Adapter will reboot.
Factory Defaults
Click the Reset button to restore factory default settings. SAMBA/WebDAV account setting will still remain in the uShare™ Mini NAS Adapter. All other system settings will go back to factory default.
System Reboot
This can be used to manually restart the network drive after a firmware update, or if you having problems with your uShare™ Mini NAS Adapter. Click Reboot to restart the uShare™ Mini NAS Adapter.
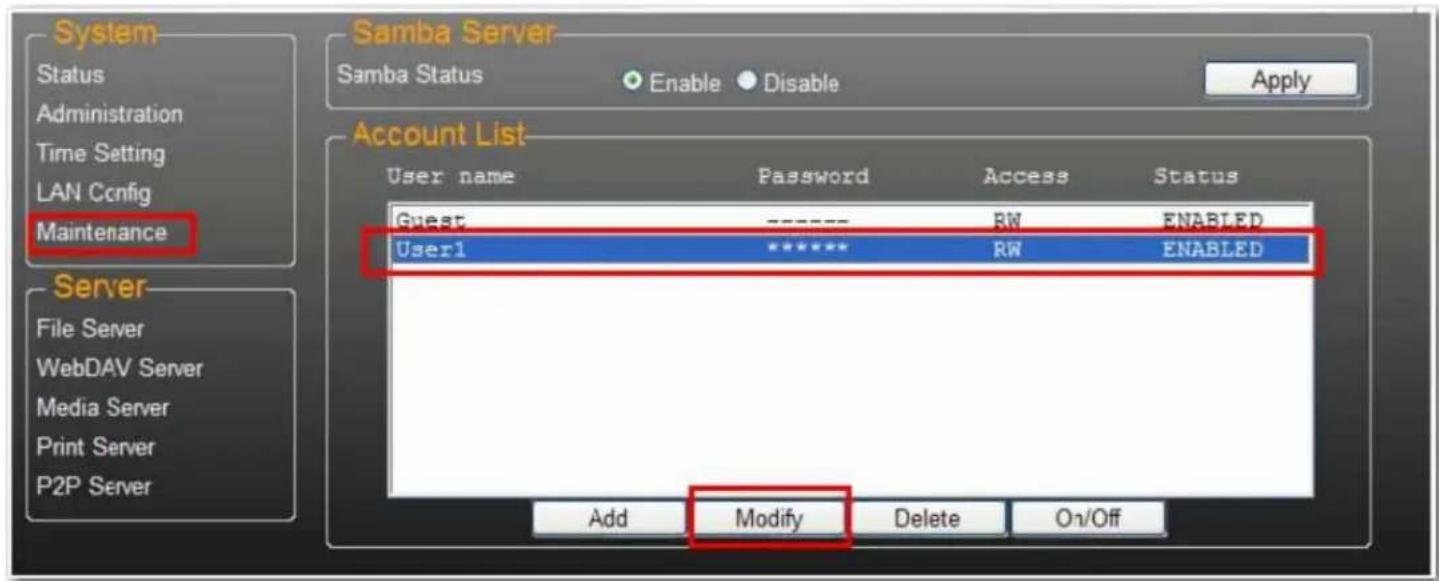
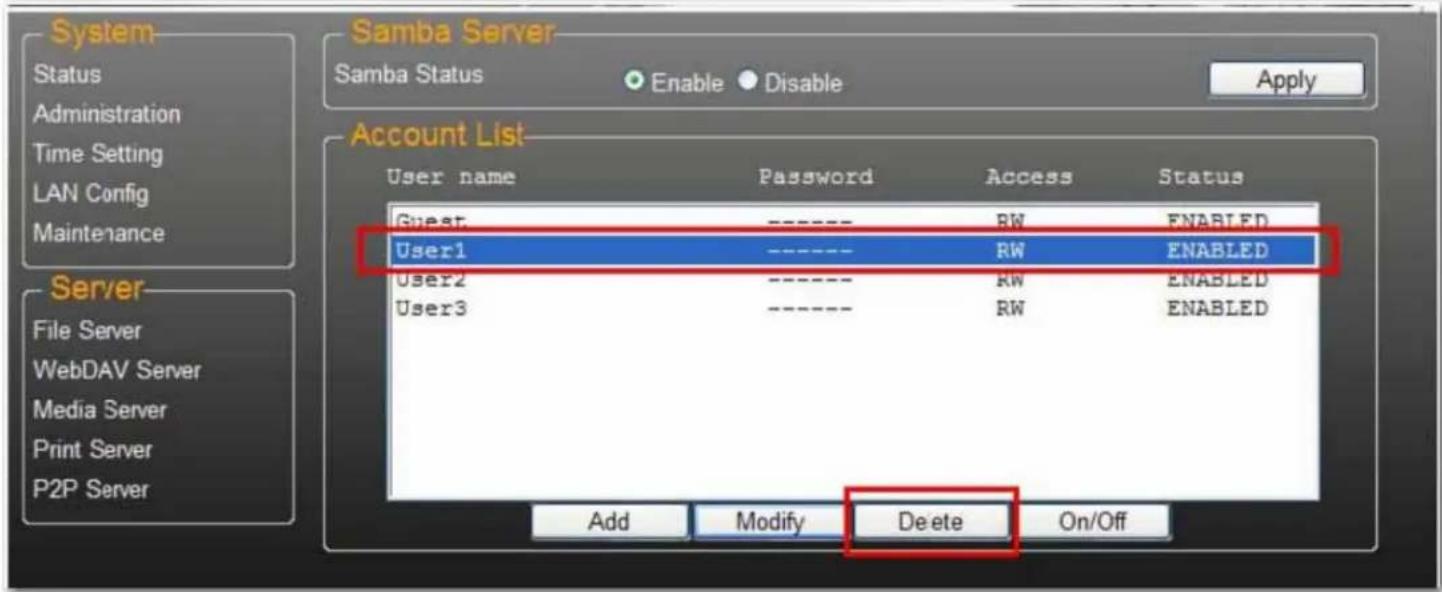
SMB server allows you to share data or files through LAN environment. A default "Guest" account is created and the "Public" folder is accessible to the guest account by default.
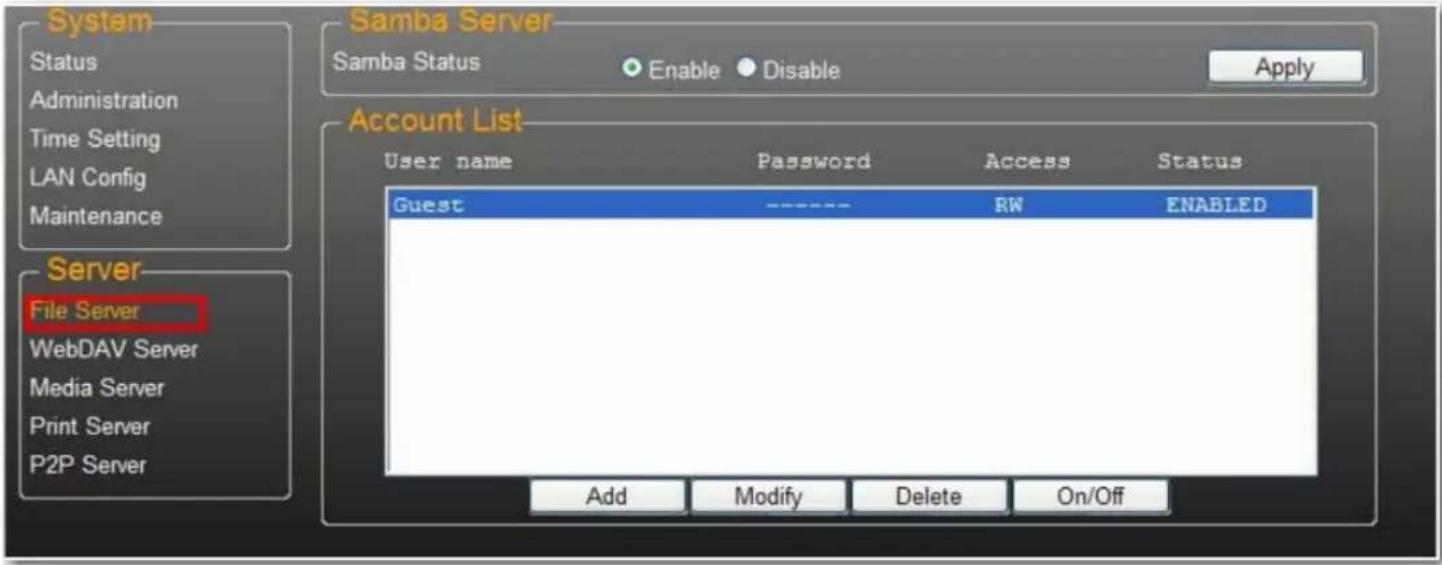
Note: To avoid language support issues, use only standard English characters to create/share folders.
Create Additional User Accounts for the uShare™ Mini NAS Adapter
English
1. Click the Add button.

2. Enter a new Account Name and Password, set the Access level (Read only or Read/Write), then click Add.
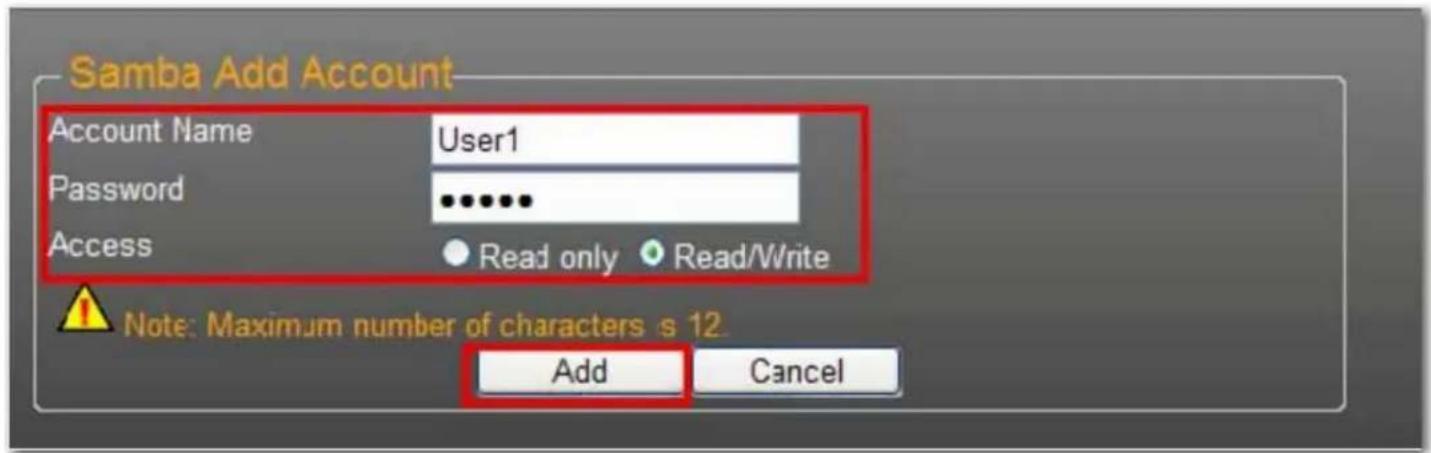
3. The uShare™ Mini NAS Adapter will create a SAMBA folder with the same name as the Account Name.
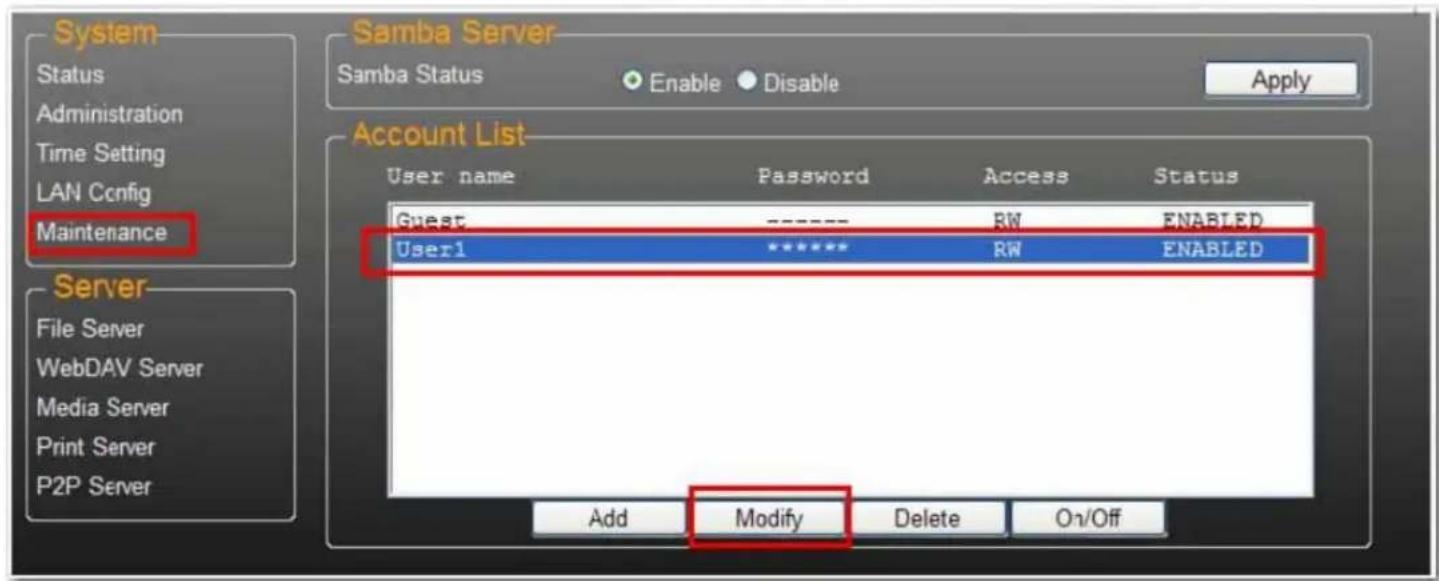
Modify User Accounts
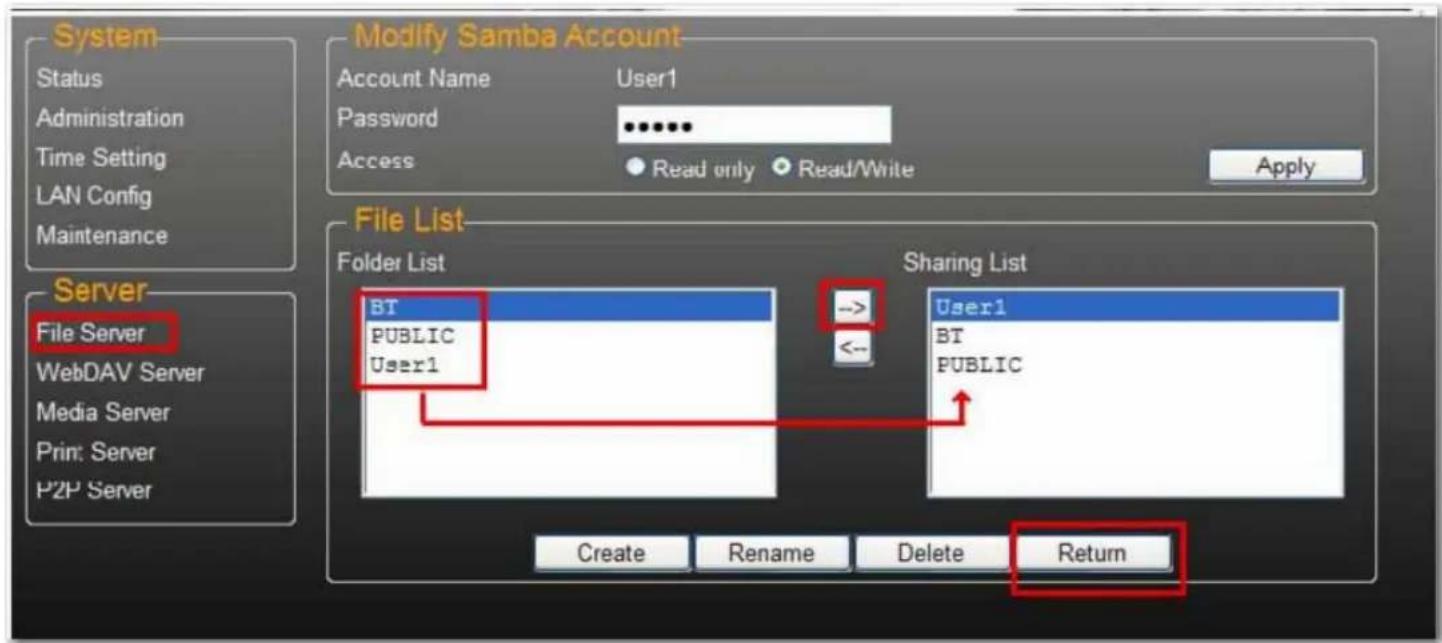
- Highlight the account name, then click Modify.
- From this page, you can either add a folder share list for the selected user, or create a new folder. Click Return to save your settings.
Modify a User Account Password
- Select the account name and click Modify.
- Enter the new Password and click Apply to save your settings.

Delete a User Account
Note: All the data inside the account name folder will be lost after the account is deleted.
Select the account you wish to delete, then click Delete to proceed.
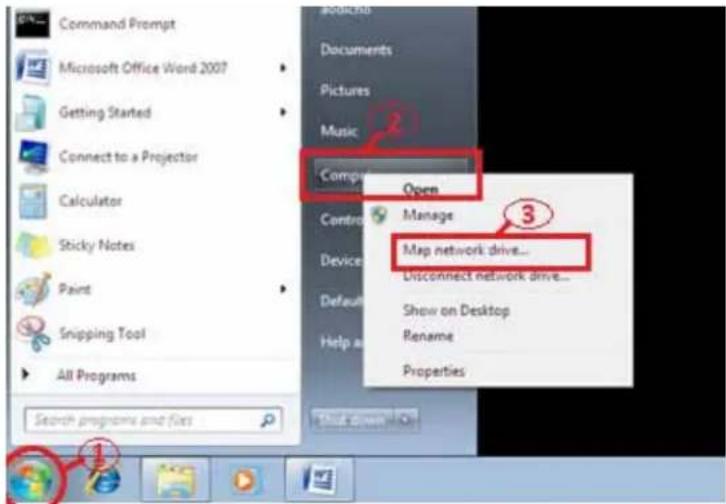
Map to Shared Folders on Your uShare™ Mini NAS Adapter (Windows 7, Windows Vista and XP)
You can map to shared folders on your uShare™ Mini NAS Adapter as Network Drives on your computer system (Showing NAS disk drive in network). For faster connection and usability, it is recommend that you map folders that you use constantly as network drives. This creates direct access to the shared folders on your uShare™ Mini NAS Adapter from My Computer.
Note: You need to know the IP address of your uShare™ Mini NAS Adapter to map drives. To search for the IP address of your uShare™ Mini NAS Adapter, open a web browser and enter storage in the address bar to locate your uShare™ Mini NAS Adapter and see the IP address.
- Click Windows Start, then right-click Computer and select Map Network Drive.
English
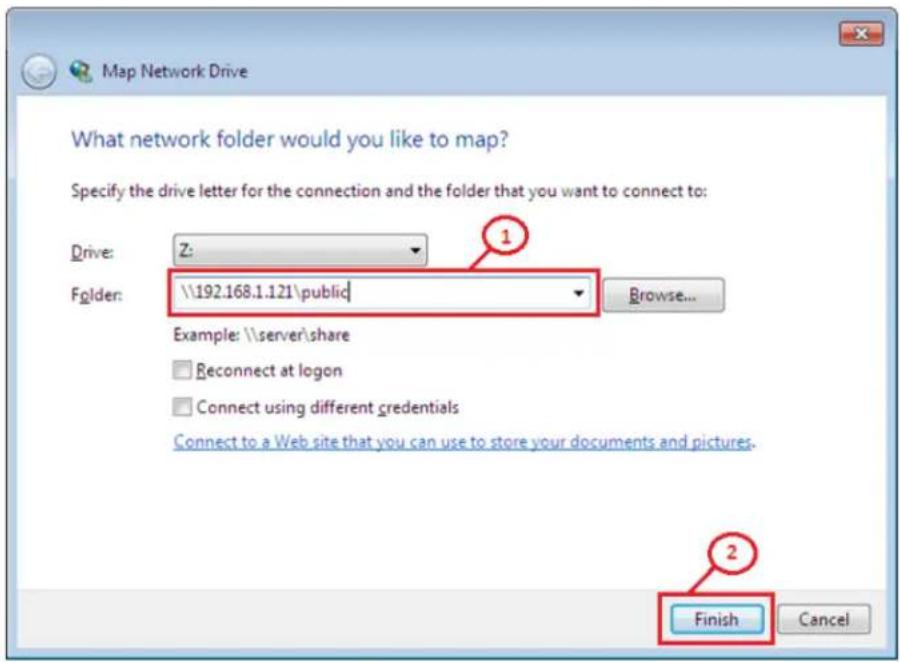
- Enter the host name or IP address of the uShare™ Mini NAS Adapter followed by the shared folder name, and click Finish.
Example: Enter storage\public (host name) or \192.168.1.121\public (IP address)\
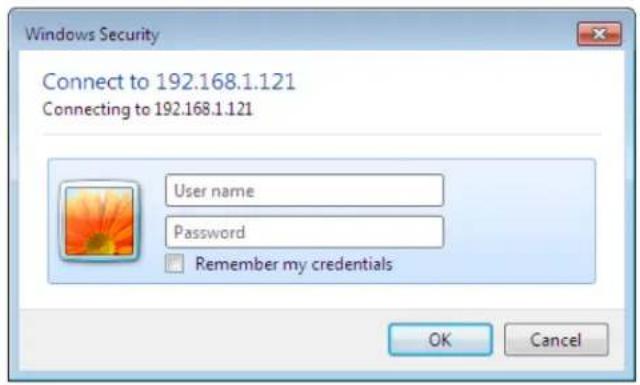
- Enter a user name and password to access this shared folder, and click OK.
WebDAV Server
WebDAV is a set of extensions to the HTTP protocol that allows a web server to appear as a standard network drive. With WebDAV support, users will be able to access the share folders via the HTTP protocol remotely.
Create WebDAV Account
- A default Guest account is created. The Public folder is accessible to the guest account by default.
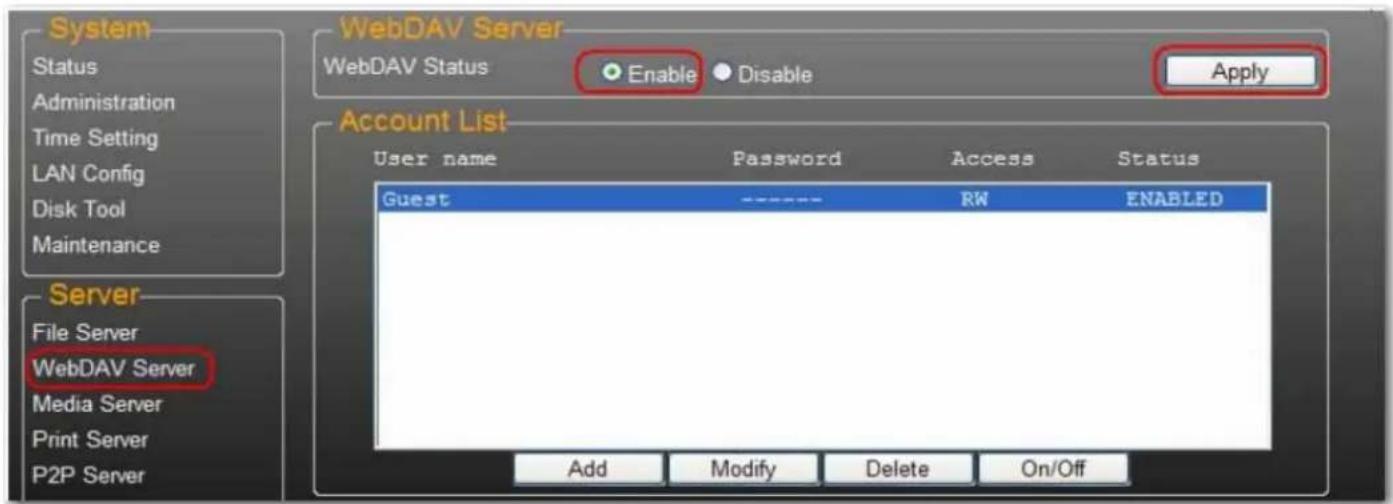
- Next, you need to create a WebDav share account. Click the Add button.
- Enter a new Account Name and Password, set the Access level (Read only or Read/Write), then click Add

English
- After the WebDav Share account is created, click Modify to set up the WebDAV access right for each share folder. Here we add "Public" folder into account. Click Return to save your settings.

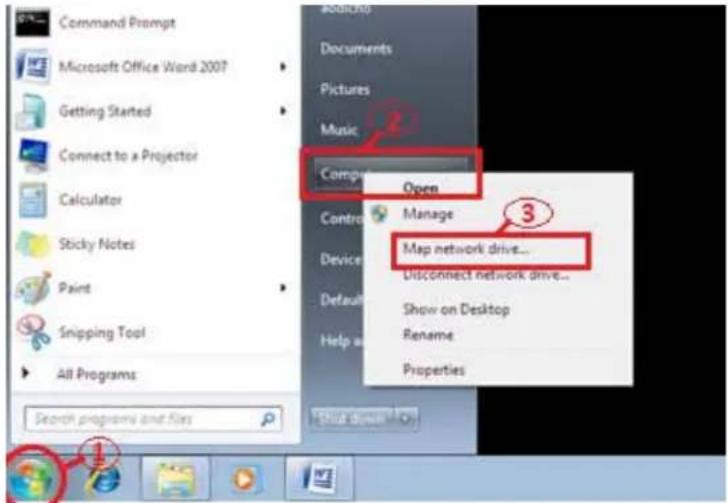
Map a Network Drive to WebDAV in Windows 7
The step-by-step guide below demonstrates how to connect to your NAS via WebDAV on Windows 7.
- Click Windows Start, the right-click Computer and select Map Network Drive.
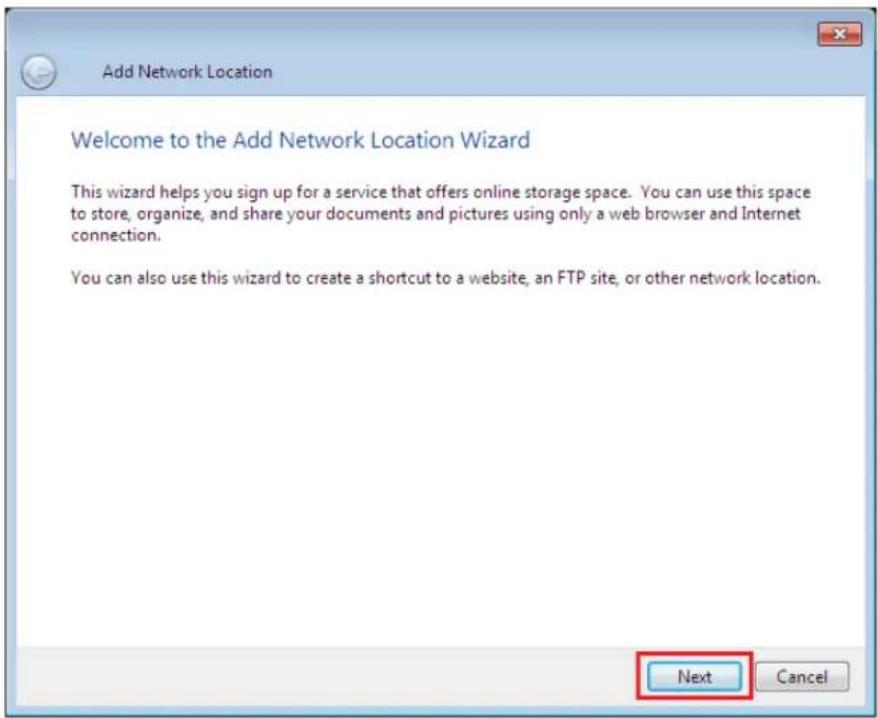
- Click Connect to a Web site that you can use to store your documents and pictures.

- Click Next.
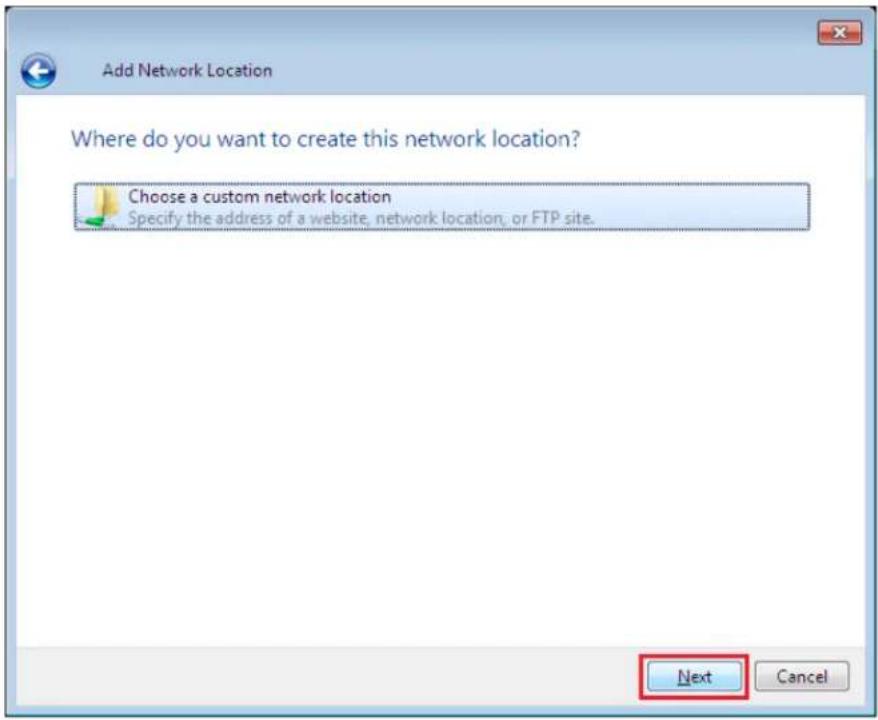
- Click Next to choose a custom network location.
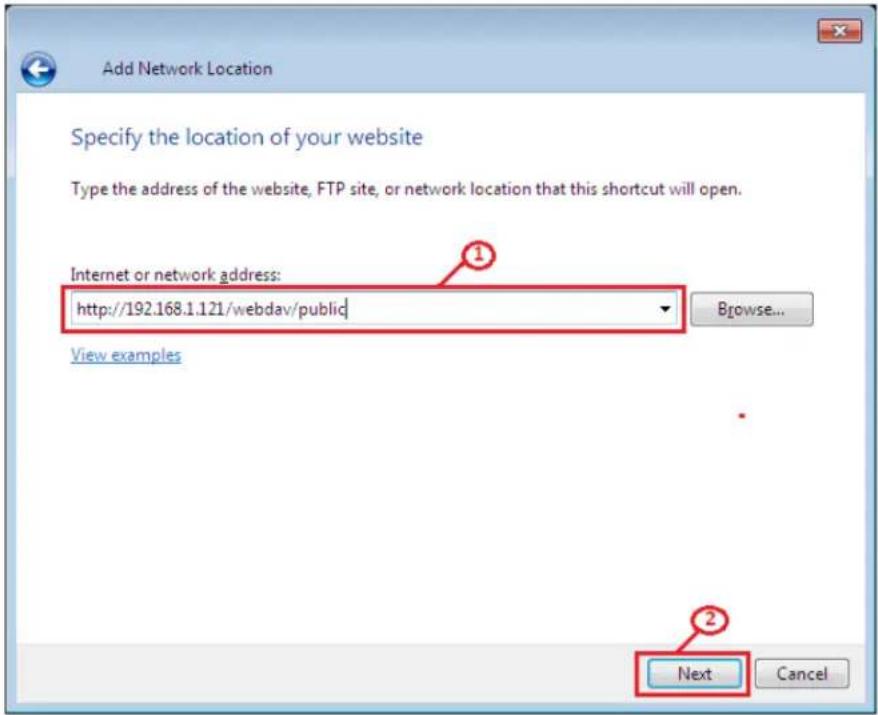
English
- Enter the URL of your uShare™ Mini NAS Adapter with the share folder name and click Next. Example: http://192.168.1.121/webdav/public
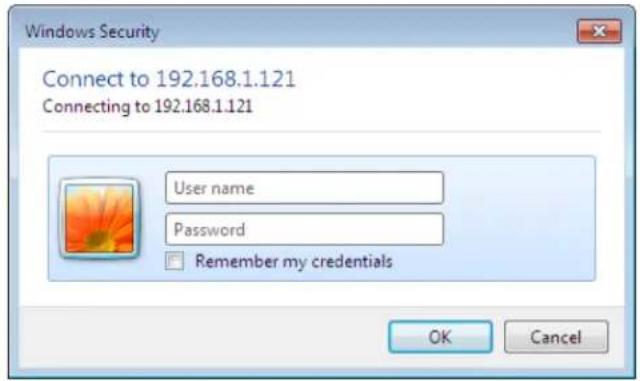
English
- Enter a user name and password that has WebDAV privilege to access this shared folder, and click OK.
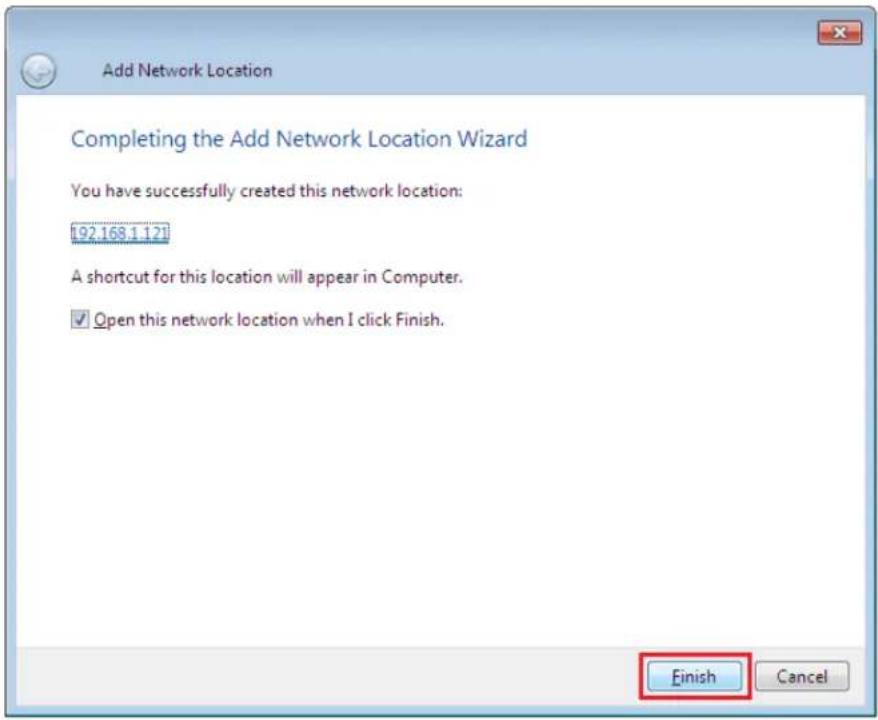
- Enter a name for this network location. Click Next.

- Click Finish. The network place has been created and is ready to use.
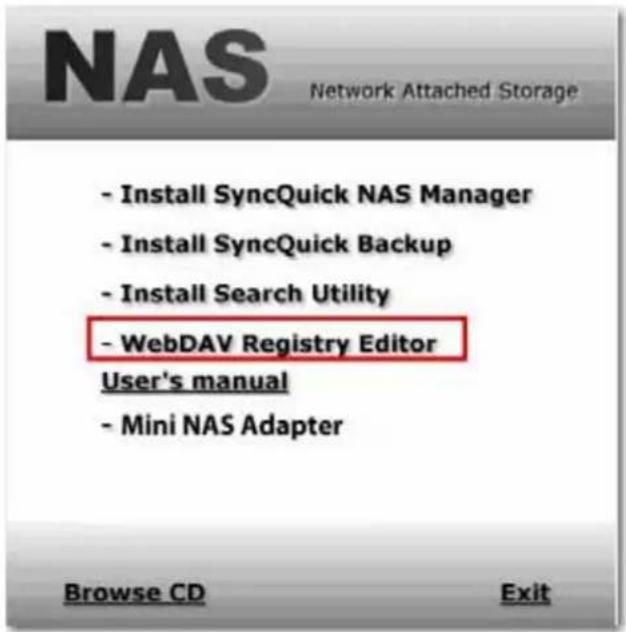
Note: Current Windows default capacity for WebDAV is 500MB only. In order to change this limitation, please run the USRobotics Installation CD-ROM and click WebDAV Registry Editor to run the program. This will allow users to access data more than 500MB in windows O/S.
Remotely Accessing WebDav Shared Folder
You will need to forward port 80 in your router or firewall to the IP address of the NAS Adapter to be able to access WebDav shares remotely. Forwarding port 80 allows access to the WebDAV enabled share. Review your router or firewall documentation for instructions on port forwarding.
Port forwarding in some routers or firewalls may also be referred to as "Local Servers" or "Virtual Servers."
English
Once port forwarding is configured in your firewall or router, you will need to determine your external IP address assigned by your ISP. This information can be obtained in your router's or firewall's user interface. You can also use third party websites that can provide this information. Use the search term "what is my IP address" as an example to locate these websites.
Write down your external address. Example: 12.34.56.78
Accessing a WebDav folder remotely, uses the same procedure as accessing a WebDav folder locally. The only change is the external IP address.
Using the IP address above, the WebDav URL will be http://12.34.56.78/webdav/(folder name)
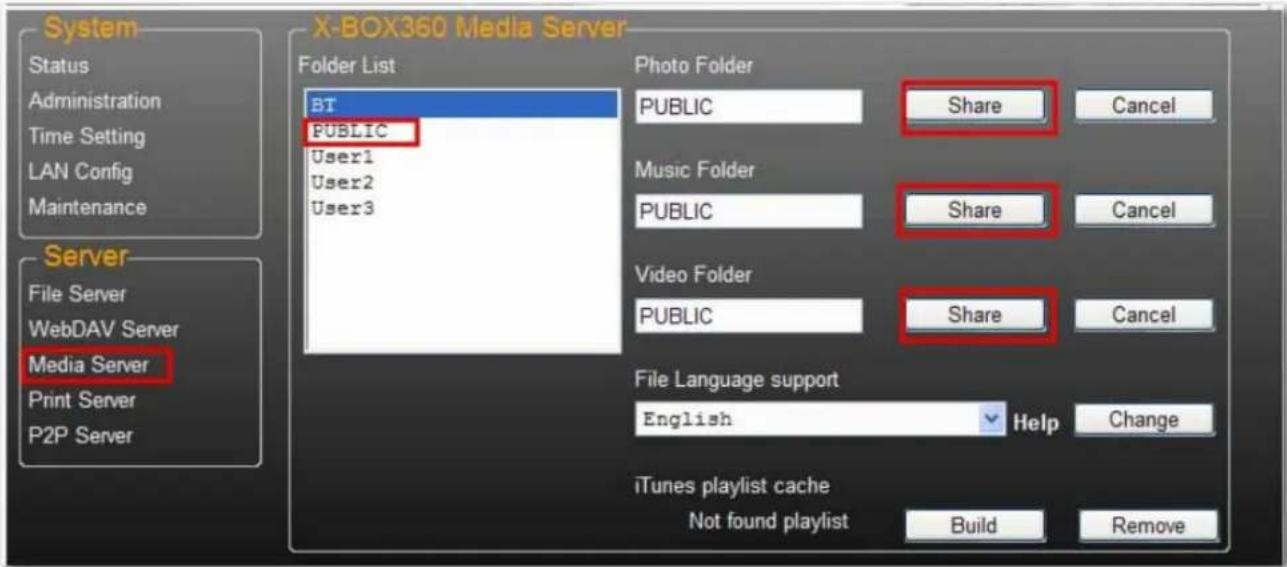
UPnP Media Server (Xbox 360, PS3, iTunes)
The Media server on the uShare™ Mini NAS Adapter can be used to share your mutlimedia content (photographs, music and video) with an Xbox 360 video game console that is connected to the same local network.
Note: Before you start, make sure both devices are connected to the same local network and powered on.
- Go to the Media Server page and select the folder where you have the multimedia content and click Share.
English
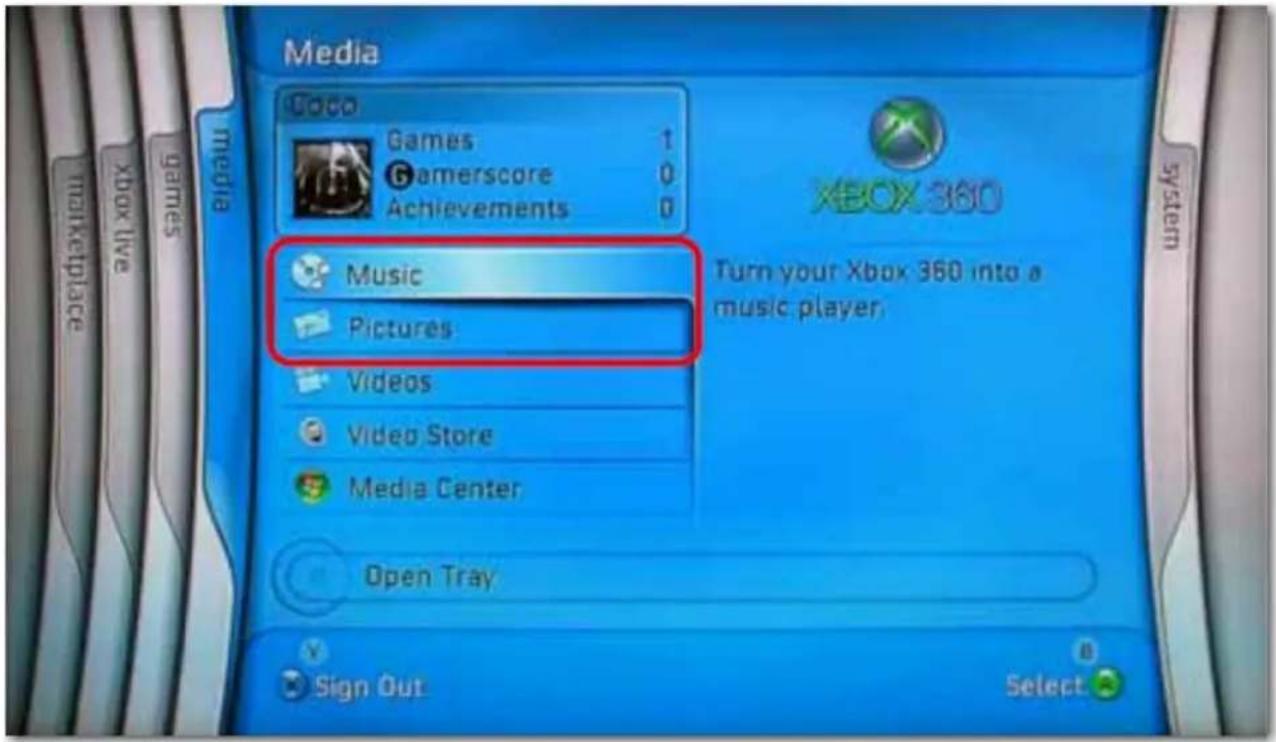
- After the uShare™ Mini NAS Adapter media server is enabled, go to the Xbox 360 media page, select either Music or Pictures, and press A to continue on your Xbox 360.
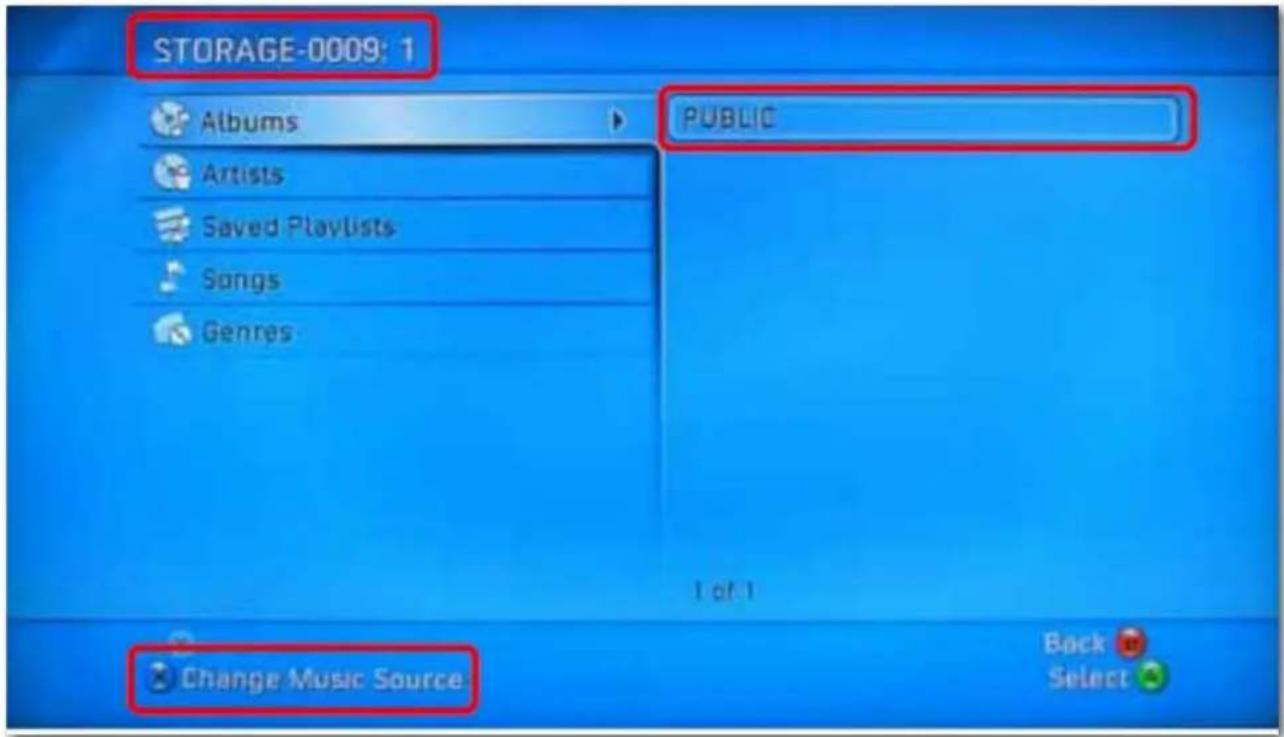
- Press X to change the source and select your network drive. It should display as storage-xxx and display the folder your enabled for sharing from your uShare™ Mini NAS Adapter.
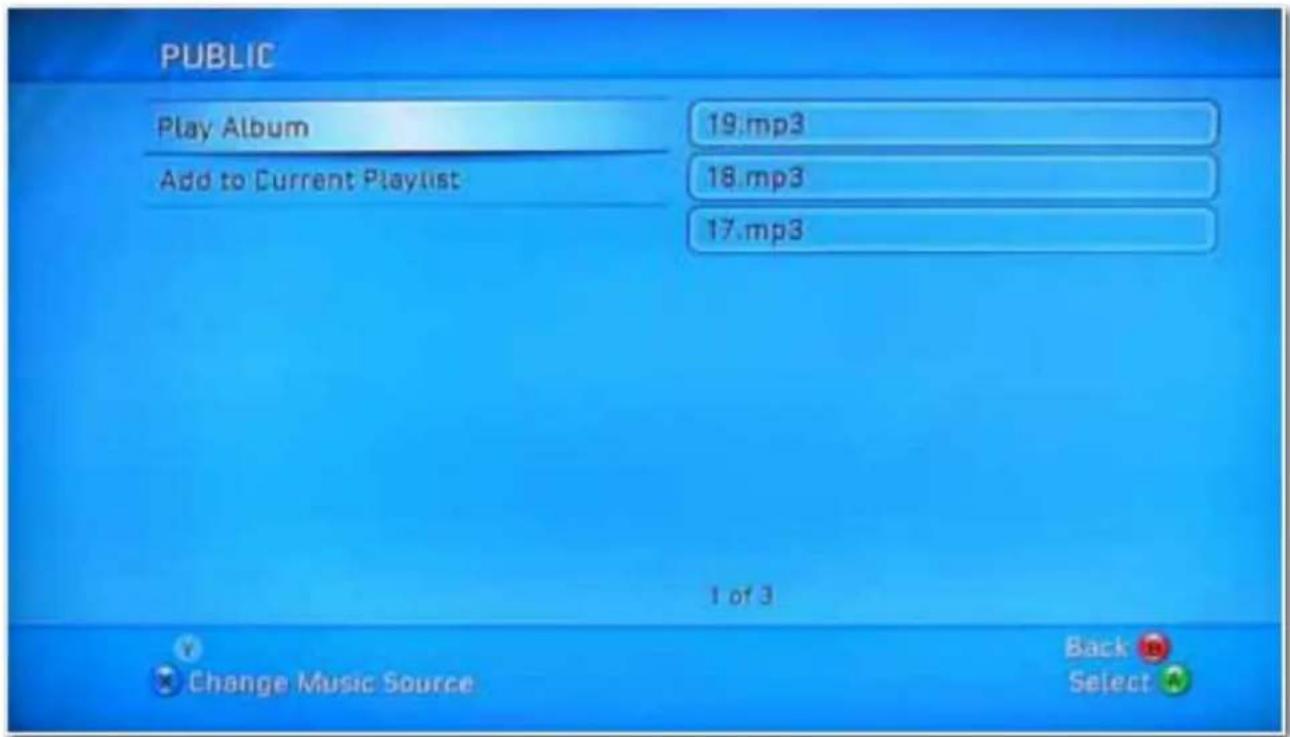
Inside the shared folder, you can access your shared multimedia files.
Printer Server (Windows 7, Windows Vista and XP)
Note: You need to know the IP address of your uShare™ Mini NAS Adapter to use the adapter as a printer server. To search for the IP address of your uShare™ Mini NAS Adapter, open a web browser and enter storage in the address bar to locate your uShare™ Mini NAS Adapter and see the IP address.
- Connect your USB printer to USB printer port on the uShare™ Mini NAS Adapter.
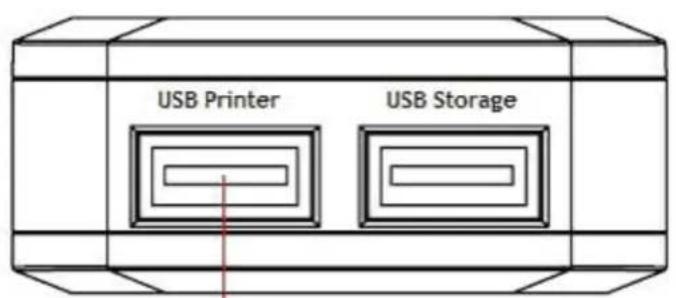
Connect USB Printer
-
Install the printer driver on your computer(s). To use a printer attached to the uShare™ Mini NAS Adapter, the printer drivers need to be installed locally on computer(s).
-
After printer driver installation, click Windows Start > Setting > Printer and Faxes > Add a printer > Next.
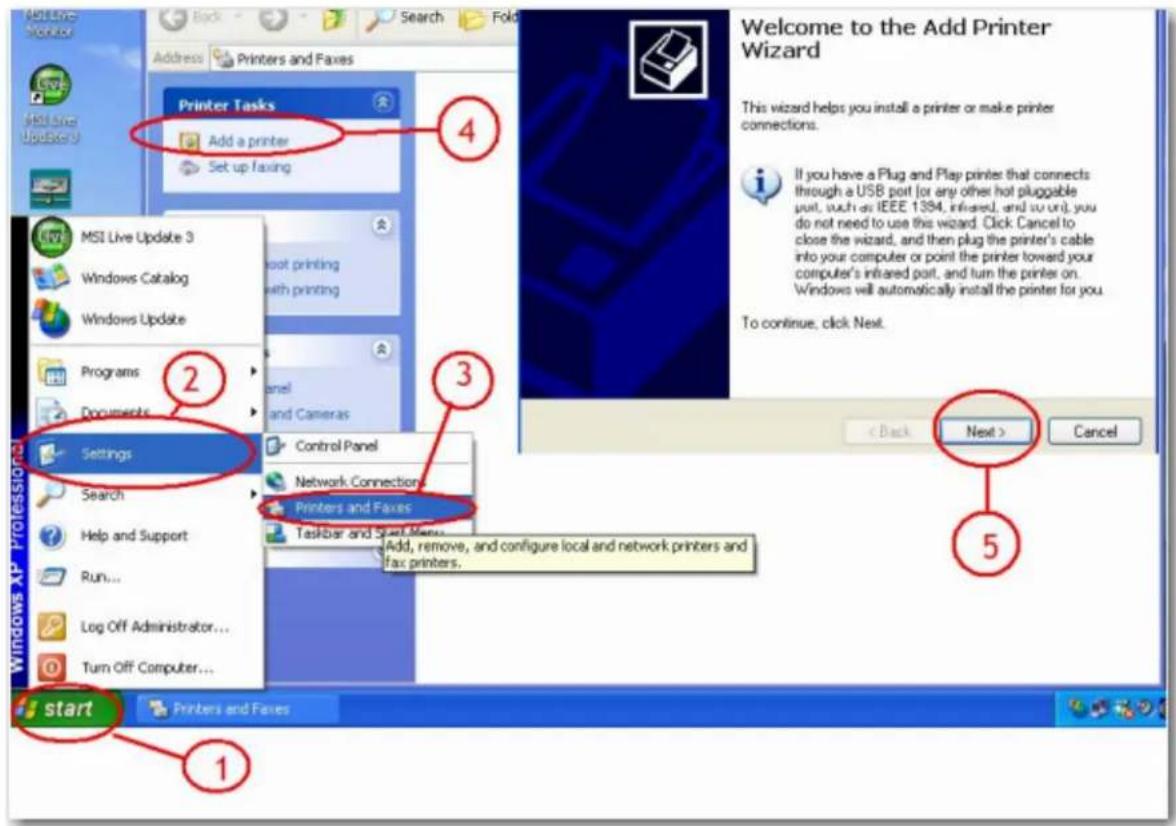
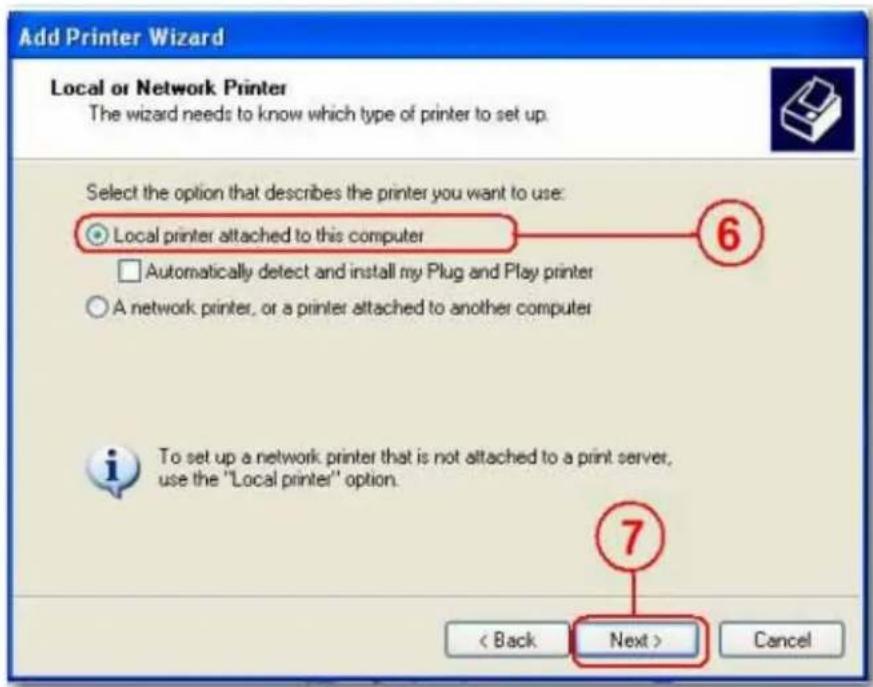
- In the Add Printer Wizard, select Local printer and click Next.
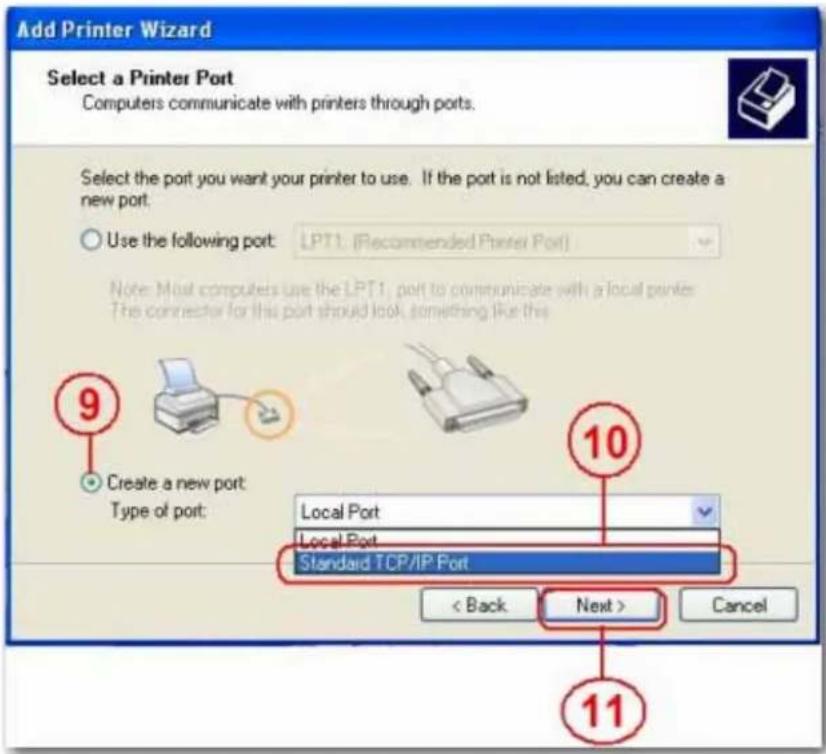
- Select Create a new port type of port:, then select Standard TCP/IP Port, and click Next.
- Enter IP address of your uShare™ Mini NAS Adapter and click Next.
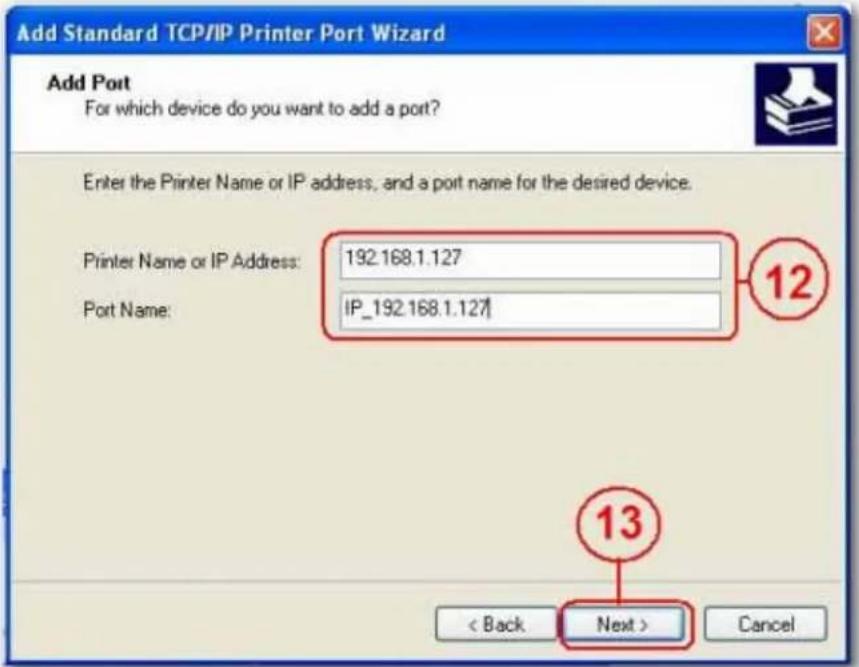
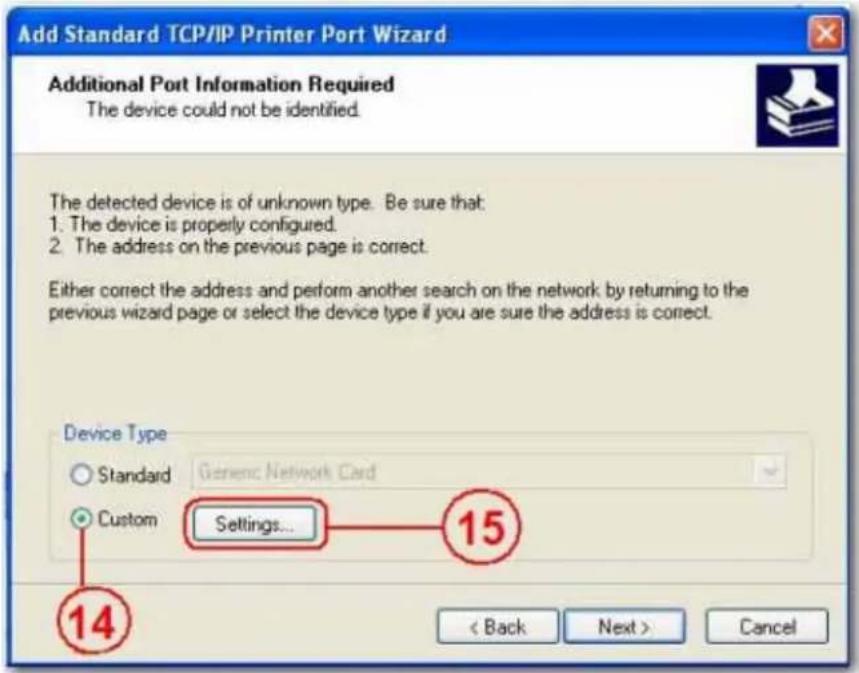
- Select Custom and go to Setting. Click Next.
English
- Select LPR for the protocol, and enter a queue name (example: LRxxx) and select LPR byte enable.
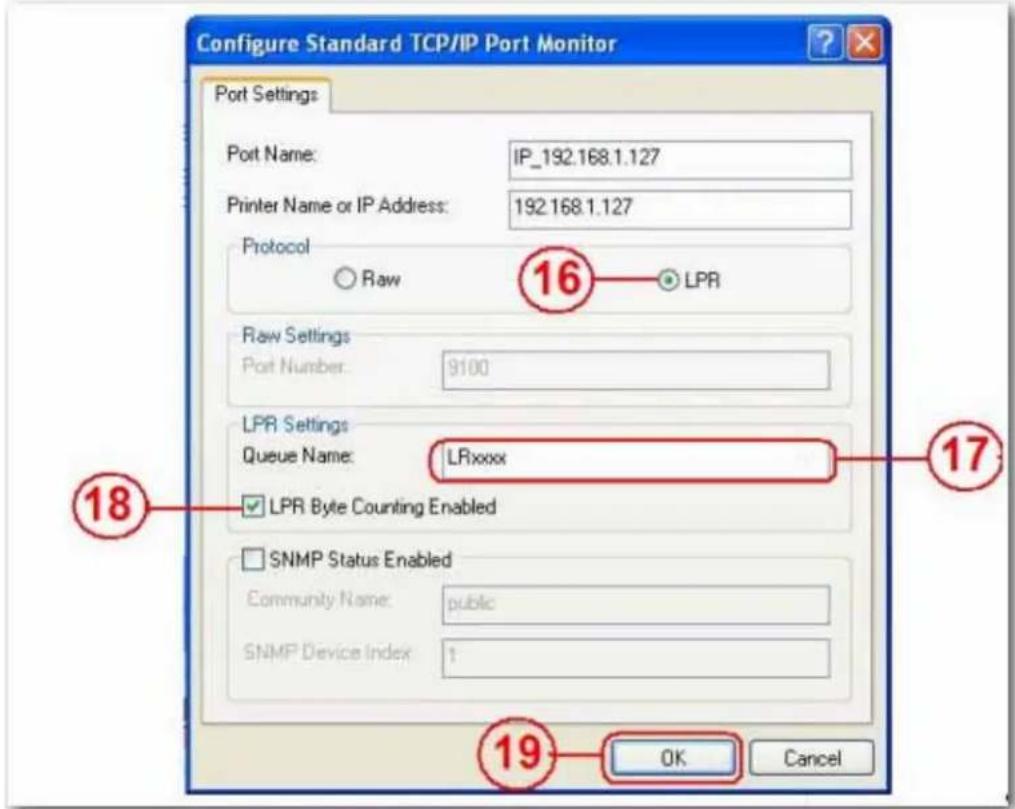
- Click OK to save the port setting.
10.Click Finish.
English
- Go to the Print Server page and check the printer status. If status shows ok, the printer has been successfully set up.

Note: The print server in the uShare™ Mini NAS Adapter does not support GDI/Host-based printers. For some Multi Function Printers (MFP), scanning functions may not work. Please contact the printer manufacturer for detailed specifications.
P2P Server
The uShare™ Mini NAS Adapter supports Bit Torrent download independently without using PC resources. A maximum of 4 bit torrent downloads can be running at the same time.
- Select P2P Server. Select the Download Path you wish to use. Click Apply to save your settings.
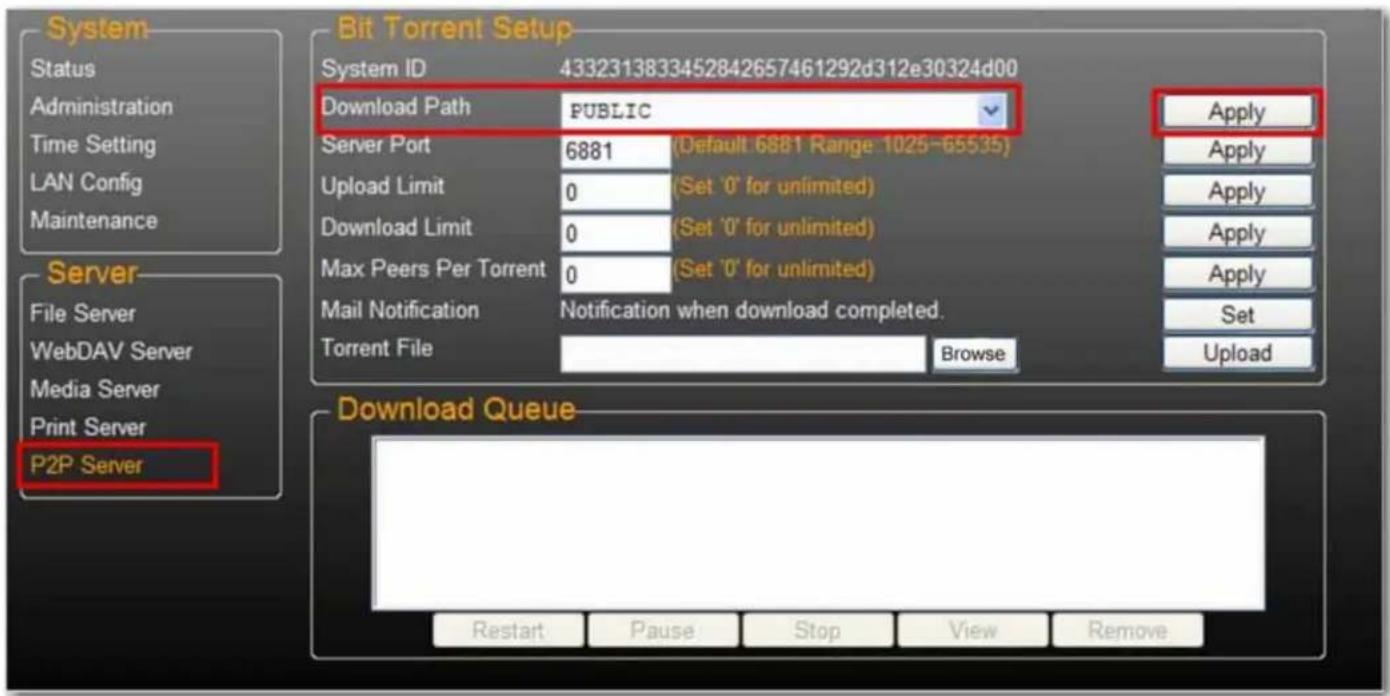
Note: Do not change the path setting while any Bit torrent downloads are active. If you change the path setting while downloads are in progress, the downloads will fail.
- Set the Server port range. The Server port range can be chosen from 6881 to 65535 (default is 6881).

- Create an upload speed limit: 0=unlimited upload speed (4 KBps is the minimum speed), and click Set to save your setting.

- Click Browse, select the .torrent file, and click Upload to place the torrent in the download queue.
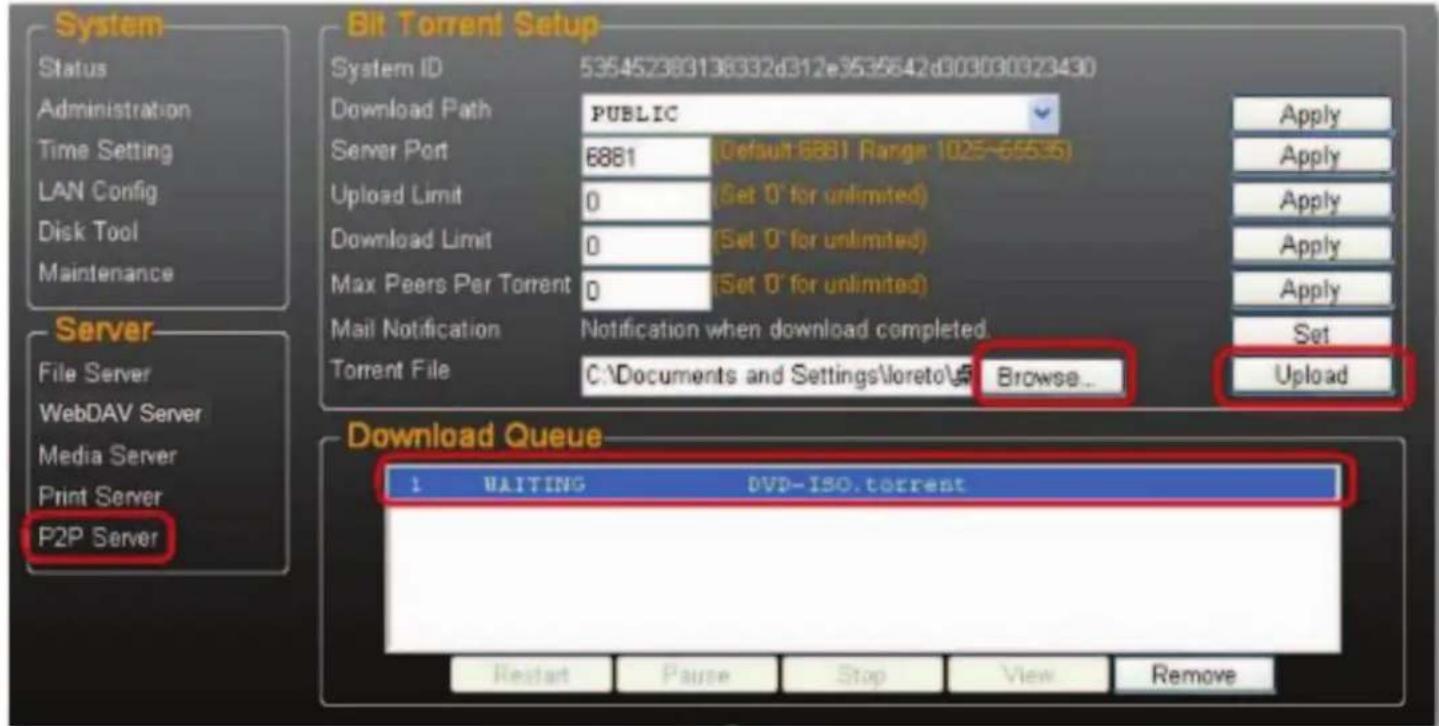
Note: Any jobs listed in the Download Queue will be removed when the uShare™ Mini NAS Adapter is turned off or the USB drive connected to the uShare™ Mini NAS Adapter is removed.
- To delete Bit Torrent jobs after the download is complete, click Remove to delete the download jobs from the queue.
E-mail Notifications
The uShare™ Mini NAS Adapter can send an e-mail notification to a designated e-mail address after each successful download.
- Go to Mail Notification and click the Set button.
2. Select Enable.
English
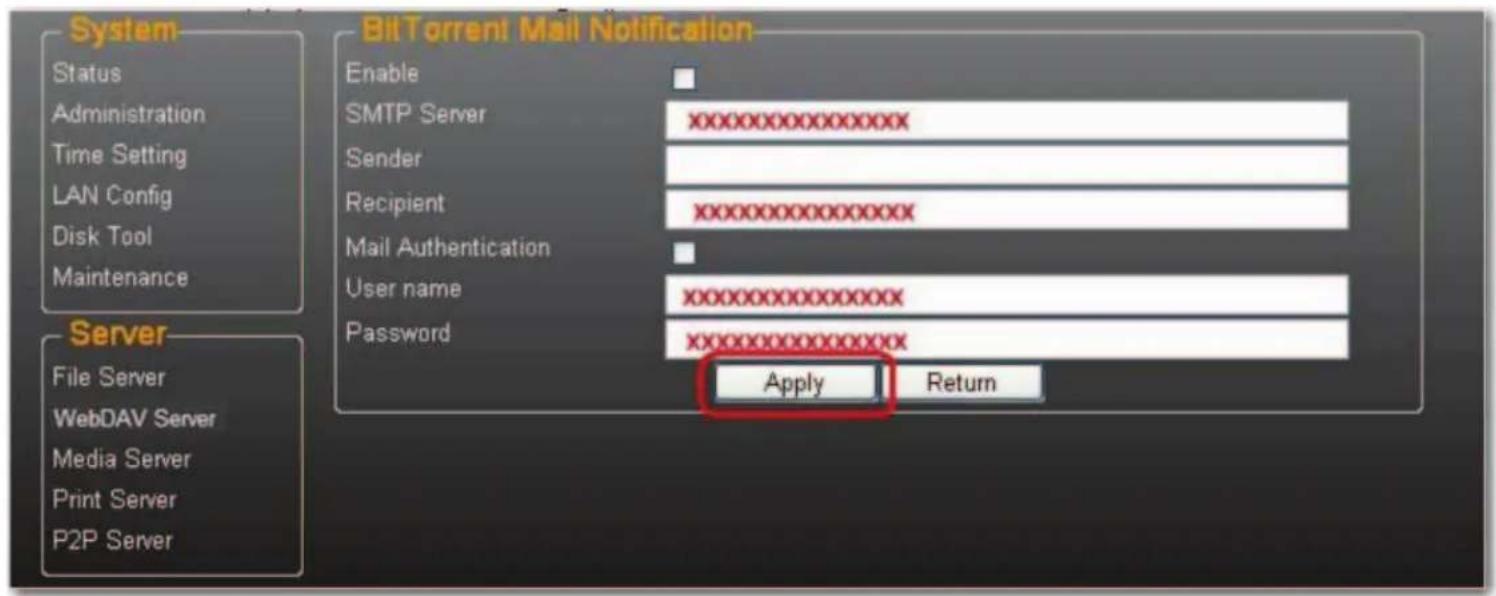
- Enter your SMTP Server, Recipient e-mail address, SMTP User name and Password.
- Click Apply to save your settings.
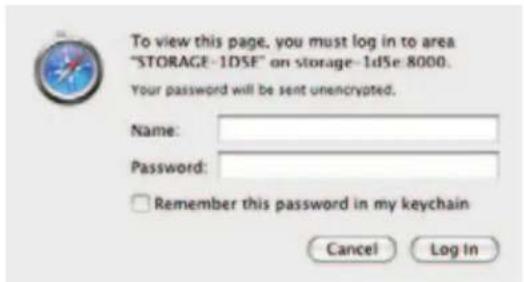
Mac Installation (Mac 10.5.4 and above)
- Open your browser and enter the host name or IP address of the uShare™ Mini NAS Adapter.
Example: Enter http://storage-1d5e (host name) or http://192.168.1.121 (IP address)
- The Default user name and password is admin. Click Login to open the configuration page to set up your uShare™ Mini NAS Adapter.
Access SAMBA Share in Mac OS X
English
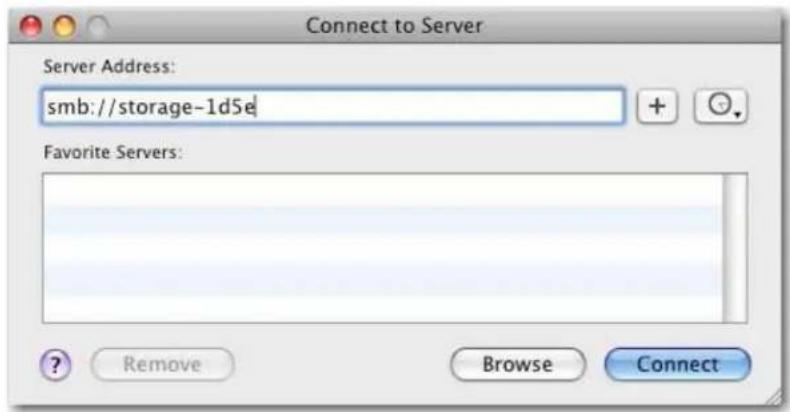
- Click Go on the toolbar, and select Connect to Server.
- Enter the host name or IP address of the uShare™ Mini NAS Adapter and click Connect. Example: Enter smb://storage-1d5e (host name) or smb://192.168.1.121 (IP address)
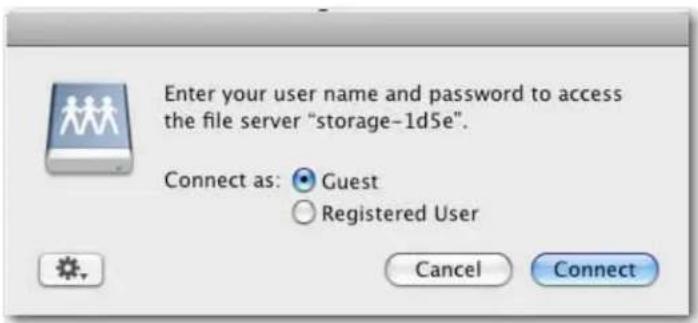
- Connect as a Guest or Registered User, then click Connect.
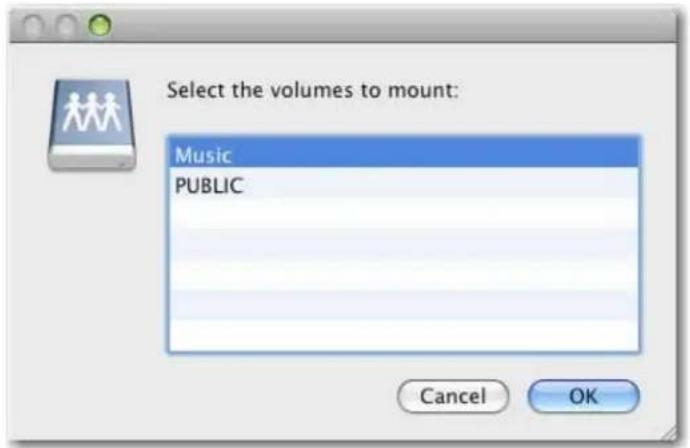
- Select the shared volumes to mount, and then click OK.
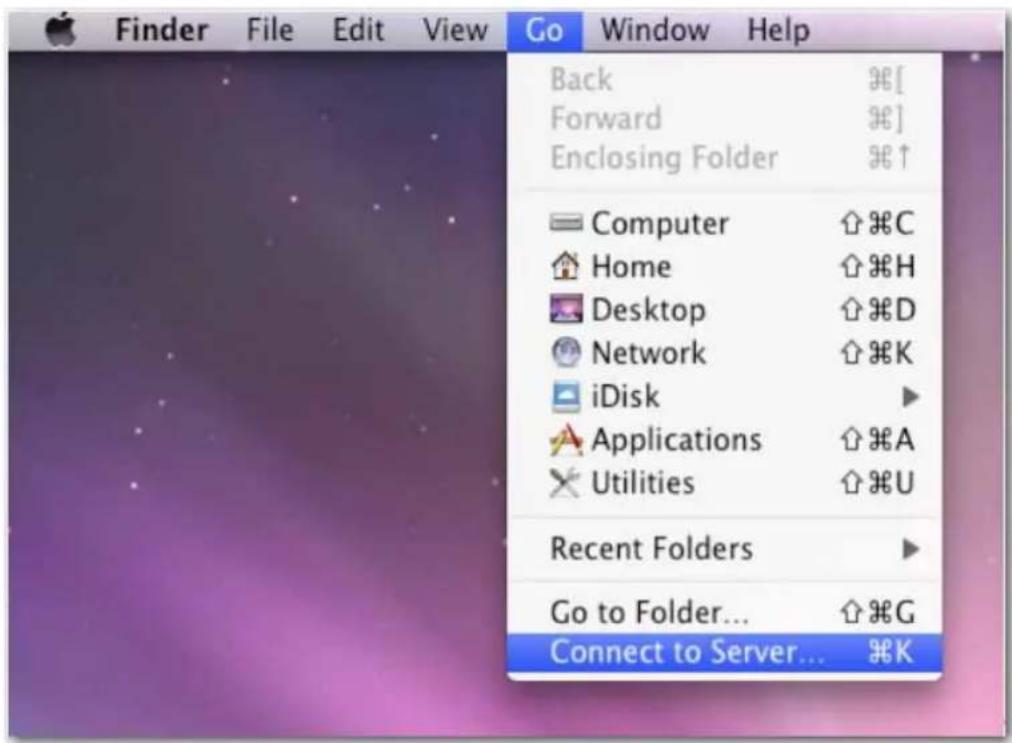
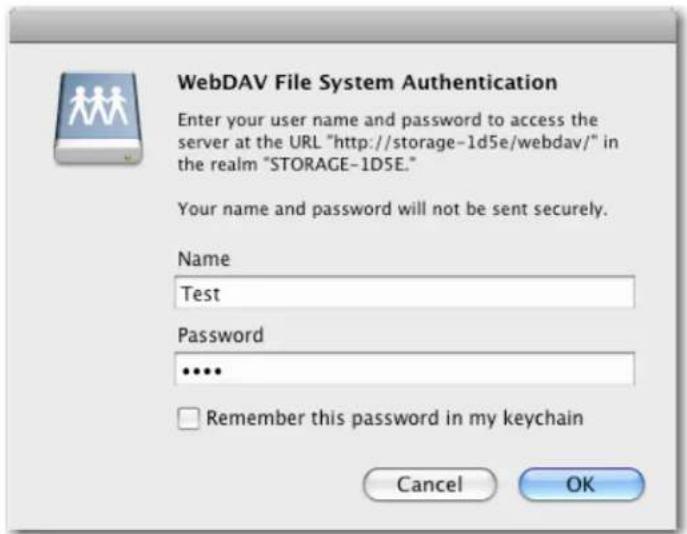
Access WebDAV Share in Mac OS X
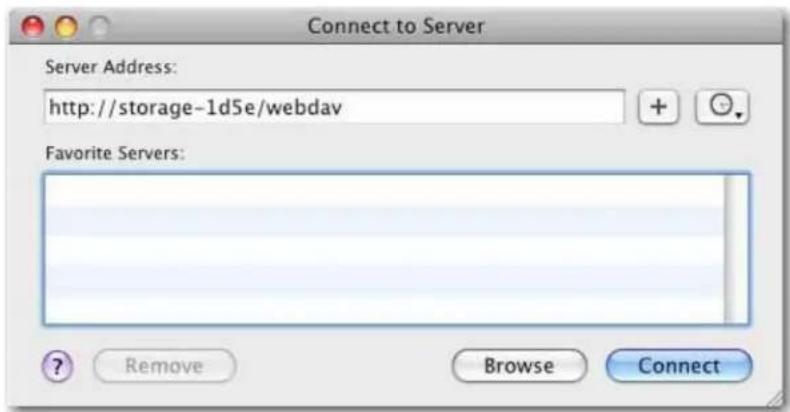
- Click Go on the toolbar, and select Connect to Server.
![Finder File Edit View Go Window Help Back ⌘[ Forward ⌘] Enclosing Folder ⌘↑ Computer ⌘C Home ⌘H Desktop ⌘D Network ⌘K iDisk ▶ Applications ⌘A Utilities ⌘U Recent Folders ▶ Go to Folder... ⌘G Connect to Server... ⌘K](/content/2026/04/615074/images/537edfcc7d26a8ac7da22477fef09b1251ea9c157ec18234ca567d09ce1c0e57.jpg)
- Enter the host name or IP address of the uShare™ Mini NAS Adapter and click Connect.
English
Example: Enter http://storage-1d5e/webdav (host name) or http://192.168.1.121/webdav (IP address)
- Enter the WebDAV username and password, and then click OK.
Troubleshooting
What is the default IP address of the uShare™ Mini NAS Adapter?
Solution:
The default IP address for the uShare™ Mini NAS Adapter is 169.254.0.1. To search for the IP address of your uShare™ Mini NAS Adapter, open a web browser and enter storage in the address bar to locate your uShare™ Mini NAS Adapter and see the IP address.
What is the default user/login name and password?
Solution:
The default user name and password is admin.
I forgot my login and/or password, what should I do?
Solution:
If you forgot your login and/or password, you will need to reset the uShare™ Mini NAS Adapter to its factory default settings.
Note: Only the SAMBA/WebDAV account settings will remain in the uShare™ Mini NAS Adapter hard disk. All other settings will return to factory default.
- Press and hold down the reset button.
- Disconnect and the reconnect the power to the uShare ^TM Mini NAS Adapter.
-
Continue to hold down the reset button for 30 seconds, and then release the reset button.
The uShare ^TM Mini NAS Adapter will return to its factory default settings. -
Repeat the steps in the installation procedure(s) to set up you uSharc™ Mini NAS Adapter again.
Why can't I create Accounts in SAMBA or WebDAV?
Solution:
You may be using unsupported characters. To avoid language support issues, use only standard English characters to create/share folders.
Why can't I upload files via LAN connection?
Solution:
Make sure you have a proper network connection and privileges read & write access) to the folders.
My uShare™ Mini NAS Adapter did not adjust for Daylight Savings time.
The uShare™ Mini NAS Adapter does not support Daylight Savings time settings. You will need to manually adjust the time for Daylight Savings.
I can not enter a SMB folder with a password via the uShare™ Mini NAS Adapter in Windows XP.
Solution:
SAMBA is supported in XP SP2 or higher. This adapter requires Windows XP SP3 or higher. Please update Windows XP to SP3 or above. After the update, if you have installed Norton Internet Security, check with Norton service center.
What Operating Systems does the uShare™ Mini NAS Adapter support?
Solution:
The uShare™ Mini NAS Adapter supports Windows 7, Windows Vista, XP SP3 and Mac OS 10.5.4 and above.
What are the limitations user logins with the Samba server?
Solution:
- Samba Server: User Level Access (maximum create 16 user accounts, 16 folders shared by one account)
• Maximum User Login: Samba 8 User (Total 64 TCP connection at the same time)
What are the limitations for uShare™ Mini NAS Adapter file name lengths?
Solution:
The limitation of file name length is 12 bytes.
Can I use the uShare™ Mini NAS Adapteras DHCP server?
Solution:
You can setup the uShare ^TM Mini NAS Adapter as a DHCP server if there is no other DHCP server in your local network. Otherwise, the uShare ^TM Mini NAS Adapter will automatically turn off its DHCP server function and become a DHCP client.
Does WebDAV support Win XP SP1?
Solution:
Microsoft started WebDAV support with Windows XP SP2. If you still using SP1, please download and install file the XP Service Pack 3 from Microsoft.
Why Can't I create new a WebDAV link in my windows computer? It always connects to the link that I deleted previously.
Solution:
Please go to the recycle bin in your computer and clean the WebDAV link that you have deleted previously.
Does the Bit Torrent client seed (upload) the file during an active download?
Solution:
Yes. When the download has completed, Bit Torrent seeding (upload) completes.
Warranty
This product is subject to the U.S. Robotics Corporation Limited Warranty.
To view a copy of the Limited Warranty and for information on how to contact USRobotics Technical Support, please see the USRobotics corporate web site at:
www.usr.com/support
Regulatory
FCC Conditions
This equipment has been tested and found to comply with Part 15 of the FCC Rules. Operation is subject to the following two conditions:
- This device may not cause harmful interference.
- This device must accept any interference received, including interference that may cause undesired operation.
CE
This equipment is in compliance with the requirements of the following regulations: EN55022: CLASS B
WEEE Information
For EU (European Union) member users: According to the WEEE(Waste electrical and electronic equipment) Directive, do not dispose of this product as household waste or commercial waste. Waste electrical and electronic equipment should be appropriately collected and recycled as required by practices established for your country. For information on recycling of this product, please contact your local authorities, your household waste disposal service or the shop where you purchased the product.

Présentation
Français
Français
Serveur WebDAV
Français
Français
Dépannage
Übersicht
Firmware Upload
WebDAV-Server
Deutsch
Deutsch
Fehlerbehebung
Información general
flowchart
graph TD
    A["Internet Access"] --> B["PC"]
    B --> C["NAS Manager"]
    C --> D[" Nashville System"]
    D --> E["DSL/Cable Modem Wireless Router"]
    E --> F["Network Attached Storage"]
    F --> G["Access Files through local network"]
    G --> H["External Hard drive"]
    H --> I["Print Server"]
    I --> J["Print from anywhere"]
    K["Laptop"] --> L["Samba File Server"]
    M["XBOX 360/PS3"] --> N["UPnP Media Server"]
    O["PC"] --> P["Back-up software"]
    Q["PC"] --> R["Computer Room"]
    S["PC"] --> T["Desktop Computer Room"]
    U["PC"] --> V["Desktop Computer Room"]
    W["PC"] --> X["Desktop Computer Room"]
    Y["PC"] --> Z["Desktop Computer Room"]
Español
Firmware Upload (Carga de firmware)
Español
Servidor WebDAV
Español
Español
Español
Servidor de impresora (Windows 7, Windows Vista y XP)
Español
Introduzione
Italiano
Firmware Upload (Upload firmware)
Italiano
Server WebDAV
Italiano
Italiano
Accesso remoto a cartelle condivise WebDav
Italiano
Server per stampante (Windows 7, Windows Vista e XP)
WebDAV supporta Win XP SP1?
Soluzione:
Italiano
Italiano