Pumba 2000 Totalmenu Vision - Vacuum Cleaner CECOTEC - Free user manual and instructions
Find the device manual for free Pumba 2000 Totalmenu Vision CECOTEC in PDF.


User questions about Pumba 2000 Totalmenu Vision CECOTEC
0 question about this device. Answer the ones you know or ask your own.
Ask a new question about this device
Download the instructions for your Vacuum Cleaner in PDF format for free! Find your manual Pumba 2000 Totalmenu Vision - CECOTEC and take your electronic device back in hand. On this page are published all the documents necessary for the use of your device. Pumba 2000 Totalmenu Vision by CECOTEC.
USER MANUAL Pumba 2000 Totalmenu Vision CECOTEC
4,5L pet feeder and 2,5L pet fountain pack

EN • The coding in this manual is generic and applies to all code variants of the appliance.
https://cecotec.es/es/information/declaration-of-conformity
1. PARTS AND COMPONENTS
Fig. 1
Feeder overview
- Protective cover
- Hopper lid
- Food hopper
- Control panel
- Food outlet
- Food dish
- Hopper lid latch
- Hopper fixing clip
- Main unit
- Stainless steel bowl
Feeder underside view
- Speaker grille
- Battery compartment cover
- Base
- Anti-slip foot (x4)
Detailed feed view
Fig. 2
- Protective cover
- Desiccant compartment seal
- Hopper lid
- Hopper lid latch
- Food hopper seal
- Three-blade stirrer
- Food container
- Cleaning brushes
- Dispensing rotor
- Hopper fixing clip
- Main unit
- Control panel
- Stainless steel bowl
- Food dish
Feeder control panel
Fig. 3
-
Indicator light
-
Wi-Fi connectivity button
- Audio recording button
- Camera
- Settings button
Water dispenser
Fig. 4
- Cover
- Filter holder
- Smart pump
- Water tank
- Water guide piping
Note:
The graphics in this manual are schematic representations and may not exactly match the product.
2. BEFORE USE
- This appliance comes in a packaging designed to protect it during transport. Remove the appliance from its box. You can keep the original box and other packaging materials in a safe place to prevent damage to the appliance if you need to transport it in the future. If you wish to dispose of the original packaging, make sure all items are recycled properly.
- Check that all parts and components are included and in good condition. If any of them are missing or damaged, please contact Cecotec's Official Technical Support Service immediately.
Box content:
- Automatic pet feeder
- Automatic water dispenser
- Instruction manual
- Do not remove the product's serial number in order to keep proper traceability if technical assistance is required.
- Before first use of both products, clean, rinse and thoroughly dry all removable parts that come into contact with food and water.
3. FEEDER OPERATION
Feeder positioning
- Place the feeder on a flat, stable and level surface. Do not tilt, shake or tip.
- Position it indoors, preferably against a wall, in a dry area away from direct sunlight or damp areas. Avoid placing it in elevated locations to prevent damage from falls.
- Ensure there are no obstacles above or around the food dish that could prevent the pet from feeding normally or damage the device.
Food hopper assembly
- Insert the dispensing rotor into the feeder's dosing compartment.
- Invert the food hopper and attach the three-blade stirrer to its underside.
Protective cover opening method and markings
- Protective cover lock position: 📄.
- Protective cover unlock position: 🔍.
- Current protective cover position indicator: ▽.
Interpretation:
- If the position indicator points to the closed padlock icon, the cover is locked.
- If the position indicator points to the open padlock icon, the cover is unlocked.
Food refilling
- Remove the food hopper and empty any remaining food.
- Wash the hopper, allow it to dry completely in air and reinstall it.
- Refill with fresh food.
Manual dispensing
Press and hold the settings button (SET) for 3 seconds to run a manual serving and dispense 1 portion (approximately 12 ± 2 g per portion; actual value depends on food size and density). Each subsequent prolonged press adds 1 additional portion. Manual servings do not modify the programmed schedule.
Meal programming
Meal programming is carried out through the mobile application.
WiFi reconfiguration
Press and hold the WiFi connectivity button for 3 seconds. The status indicator light will flash quickly, indicating the feeder has entered WiFi reconfiguration mode.
Battery mode
When the feeder operates on battery power only, WiFi and camera functions are not available. Scheduled meals are performed normally.
Voice recording
Press and hold the audio recording button for more than 2 seconds. After hearing the tone, recording will begin. The duration of each message is approximately 10 seconds.
Indicator lights (Indicator light, Figure 29)
| Mode | Colour/pattern | Meaning |
| Power adapter mode | Flashing blue light | Network configuration (Wi-Fi pairing) in progress |
| Solid blue light | Connected to the network and operating normally | |
| Flashing red light | Food jam alarm, low food alarm, motor failure | |
| Battery mode | Solid red light for 1 minute and then off | Battery operation; enters standby mode to save power |
| Flashing red light | Low battery |
4. WATER DISPENSER OPERATION
Water dispenser positioning
- Place the water dispenser on a flat, stable and level surface. Do not tilt, shake or tip.
- Position it indoors, preferably against a wall, in a dry area away from direct sunlight or damp areas. Avoid placing it in elevated locations to prevent damage from falls.
- Ensure there are no obstacles around that could prevent the pet from drinking water normally or damage the device.
Initial setup
Fill the tank with drinking water up to the MAX mark.
Ensure that the pump is completely immersed (do not allow it to run dry).
Connect the power adapter to a mains socket; the water dispenser will begin water circulation.
Daily use
Refill daily to maintain the minimum level and keep the pump immersed.
Replace all water completely according to usage conditions:
- Households with multiple pets, abundant hair or hot climate: every 1–3 days.
- Households with a single pet and good maintenance: at least twice per week.
Use only drinking water. Do not add additives (milk, broths or others).
Safety notes
Do not allow dry running; this could damage the pump.
Disconnect the power adapter before removing or fitting the pump and filter.
Keep the power cable and adapter out of reach of pets and away from damp areas.
Water level alerts/indicators (LED)
- Blue light on: normal water level.
- Blue light on: low water level.
5. WI-FI CONNECTIVITY AND MOBILE APP
Connect the feeder to the mains. The indicator light will illuminate:
- Flashing blue light: ready to connect to the app.
- Solid blue light: the device is already linked to an account; it will be necessary to unlink it from the previous mobile phone/account before adding it to a new one.
6. FEEDER CLEANING AND MAINTENANCE
Important
- Disconnect the power cable and remove the batteries from the lower compartment before cleaning the equipment.
- Do not immerse the main unit or base in water or other liquids. This could cause a short circuit and irreparable damage.
- Do not reassemble any parts until completely dry (including the food hopper, three-blade stirrer, dispensing rotor, hopper lid, protective cover, stainless steel bowl and food dish). Residual moisture can dampen the food and cause blockages, mould or deterioration.
- Do not store food in the hopper for extended periods to prevent it exceeding its service life. Consult the food packaging for storage periods. Do not mix old food with new food to avoid contamination.
- Regular cleaning and maintenance extend the device's service life and help maintain food freshness.
Cleaning the food hopper
- After removing the three-blade stirrer, extract the food hopper vertically.
- Pull the dispensing rotor upwards.
- Rinse the food hopper, three-blade stirrer and dispensing rotor with clean water. Do not use metal scouring pads or abrasive cleaning products that could damage the surface or
compromise seal integrity.
- After washing, dry all components with a soft cloth and allow them to air completely in a ventilated place, away from direct sunlight.
Cleaning the stainless steel bowl
Wash the stainless steel bowl with clean water and dry it completely with a soft cloth.
Cleaning the main unit
Use a soft cloth slightly dampened with a small amount of water to clean the main unit. Do not immerse the device in water or use an excessively wet cloth.
Replacing the desiccant
Open the desiccant compartment in the protective cover and replace the desiccant with a new one. It is recommended to replace it once per month.
Replacing the batteries
Disconnect the power cable, open the battery compartment cover located on the underside and replace the three size D batteries.
Note: when operating on batteries only, the Wi-Fi function is disabled and the feeder will only run scheduled meals according to the programme.
7. WATER DISPENSER CLEANING AND MAINTENANCE
Recommended frequency
Daily: Check the water level and refill up to the MAX mark. Remove hair or visible debris from the surface. (The pump must not run dry).
Weekly (minimum): Empty and change all water. Disassemble and clean the tank, filter holder, filter (rinse only) and pump. Dry and reassemble.
Monthly: Replace the filter. Rinse the new one before installation.
Bi-monthly: Check the water piping; replace if opaque, rigid or with persistent biofilm. As a reference, replace every 2 months.
Weekly cleaning procedure
- Unplug the power adapter and empty the water dispenser completely. Do not immerse the main unit in water.
- Remove the pump and wash the parts and tubing with warm water and mild soap. For limescale or mineral deposits, soak for 15–20 minutes in a 1:1 solution of water and white vinegar; brush and rinse thoroughly. Do not use bleach or abrasives.
Usage and care tips
If the mains water is hard and white deposits appear, increase the pump cleaning frequency and consider using filtered/bottled water to reduce limescale.
In humid environments or with multiple pets, cleaning should be more frequent (every 1–2 weeks or even every few days if biofilm appears).
- TROUBLESHOOTING
| Problem | Solution |
| The device cannot connect to the Internet | 1) Reset the device: press and hold the SET button for 3 seconds until the blue light flashes (settings mode).2) Check that it is connected to the power adapter and switched on.3) Check that you have entered network configuration mode (flashing blue light).4) Connect it to a 2.4 GHz WiFi network (not 5 GHz). Keep your mobile phone's Bluetooth enabled during pairing.5) Move the trough closer to the router ( ≤ 10 m) and confirm that the signal is sufficient. |
| All lights are off | 1) If operating in battery mode, it may go into sleep mode and turn off all indicators: this is normal.2) Check the power adapter/USB and the connection to the device; replace if damaged. |
| The battery indicator light is red | 1) Low battery: replace the batteries in the lower compartment.2) You can also use external power supply (5 V adapter). |
| When I press and hold SET for 3 seconds, it does not dispense | 1) If running on batteries, check that they are sufficiently charged; if using a power adapter, confirm that it is the original one and that it is properly connected.2) Verify that the equipment status is normal (see light table).3) Check the food size: it should be dry, approx. 5-15 mm. Out-of-range sizes may jam.4) Check that the dispensing rotor (23) and the three-blade stirrer (20) are correctly assembled; if they have come loose, reinstall them. |
| Inaccurate dosage | 1) Food size and shape may vary slightly between brands/batches.2) Adjust portions according to your pet's actual intake (recalibrate if you change feed).3) Check that the rotor (23) and food hopper (21) are in position and free of play; if they have moved, reinstall them. |
| Dispensing time deviation | 1) Confirm that the feeding schedule is correctly configured.2) A deviation of a few seconds is normal.3) Verify that the app's time zone matches the phone's local time. |
| Flashing blue light | 1) The device is in network configuration mode.2) Check the stability of the Wi-Fi network.3) If the network connection is unstable, try using a mobile phone hotspot temporarily, then reconnect to your WiFi. |
| Alarm in app: motor failure | 1) Switch off the device and remove any food residue or foreign objects from the food outlet/conduit.2) Regularly clean the dispensing channel (recommended once a week).3) Open the food hopper, remove excess food, take out the rotor (23), clean it and reinstall it. |
| Alarm in app: food jam | 1) Switch off the device and remove any debris or foreign objects; clean the food outlet/conduit (recommended once a week).2) Check that there are no foreign objects in the rotor “teeth” positions; clean carefully (recommended once a week). |
| Alarm in app: lack of food | 1) Fill the food hopper.2) Avoid moisture, direct sunlight and vibrations; place the feeder in a stable, shaded location.3) If the food is insufficient or too fine, add suitable food. |
| No image is visible in the app (camera version) | 1) Check that the feeder is connected to the mains.2) Check that the camera's privacy setting is not enabled. |
9. TECHNICAL SPECIFICATIONS
Product: Pumba 2000 TotalMenu Vision
Product reference: EU01_122001
Voltage: 5 V DC
Current: 1 A
Power: 5 W
Feeder batteries: 3 D-size batteries
To recharge the battery, it is recommended to use an adapter with the following characteristics:
Input: 100-240 V\~, 50/60 Hz
Output: 5 V =, 1 A
Technical specifications may change without prior notice to improve product quality.
Made in China | Designed in Spain
10. RECYCLING OF ELECTRICAL AND ELECTRONIC EQUIPMENT

This symbol indicates that, according to the applicable regulations, the product and/or batteries must be disposed of separately from household waste. When this product reaches the end of its service life, you must remove the batteries/accumulators and take it to a collection point designated by local authorities.

For detailed information on how to properly dispose of electrical and electronic equipment and/or the corresponding batteries, consumers should contact their local authorities.
Information regarding national packaging recycling systems and their
marking can be found on our website.
Compliance with the above guidelines will help protect the environment.
11. TECHNICAL SUPPORT AND WARRANTY
Cecotec shall be liable to the end user or consumer for any lack of conformity that exists at the time of product delivery under the terms, conditions and deadlines established by applicable regulations.
Repairs should be carried out by qualified personnel.
If you detect any problem with the product or have any queries, please contact Cecotec's Official Technical Support Service at +34 96 321 07 28.
12. INFORMATION ON DATA STORED BY CONNECTED PRODUCTS IN ACCORDANCE WITH REGULATION (EU) 2023/2854 (“DATA REGULATION”)
Cecotec's connected products and related services are those that generate different data and information during use. In accordance with the provisions of the Data Regulation, through this document Cecotec provides you with information about your rights concerning the data generated and about how to access such data.
This right allows you to use the data for any lawful purpose, including, among others, product and/or service optimisation or contracting post-sale services with third parties.
As a user, you may exercise your right of access, within the limits provided for by the Data Regulation, through the email address data.act@cecotec.es. To protect the generated data—and in order to prevent fraud or identity theft—CECOTEC may require additional information to verify your status as a user.
Data is stored for a determined period of time.
13. COPYRIGHT
The intellectual property rights over the texts in this manual belong to CECOTEC INNOVACIONES, S.L. All rights reserved. The content of this publication may not, either in part or in its entirety, be
reproduced, stored in a retrieval system, transmitted or distributed by any means (electronic, mechanical, photocopying, recording or similar) without prior authorisation from CECOTEC INNOVACIONES, S.L.
14. EU DECLARATION OF CONFORMITY

Cecotec Innovaciones hereby declares that this pet feeder, model EU01_122001 – Pumba 2000 TotalMenu Vision, is in conformity with the Radio Equipment Directive 2014/53/EU.
The full text of the EU Declaration of Conformity can be found on the following website: https://cecotec.es/es/information/declaration-of-conformity
1. PIÈCES ET COMPOSANTS
Image 1
5. CONNETTIVITÀ WI-FI E APP
https://storececotec.it/it/information/declaration-of-conformity
1. PEÇAS E COMPONENTES
Figura 1
https://cecotec.pt/pt/information/declaration-of-conformity
1. ONDERDELEN EN COMPONENTEN
Figuur 1
https://cecotec.es/es/information/declaration-of-conformity
1. CZĘŚCI I KOMPONENTY
Rysunek 1
https://cecotec.es/es/information/declaration-of-conformity
1. SOUČÁSTI A KOMPONENTY
Obrázek 1
https://cecotec.es/es/information/declaration-of-conformity
1. PARÇALAR VE BILEŞENLER
Şekil 1
https://cecotec.es/es/information/declaration-of-conformity
1. MEPH KAI EΞAPTHMATA
Σχήμα 1
https://cecotec.es/es/information/declaration-of-conformity
1. PECES I COMPONENTS
Figura 1
https://cecotec.es/es/information/declaration-of-conformity
therefore it is an important problem.
زامجلا رمع قلاطا يف قمظتنملا قنای صلاو فيظنتلا تایلمع مهاست
https://cecotec.es/es/information/declaration-of-conformity


Fig./Img./Abb./Afb./ Rys. 1

Fig./Img./Abb./Afb./Rys.2
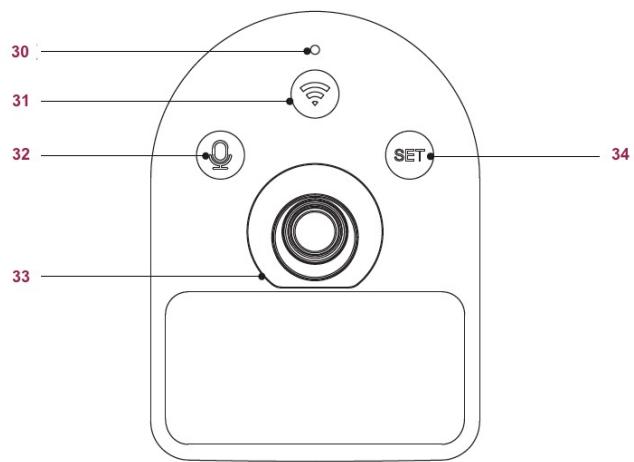
Fig./Img./Abb./Afb./ Rys. 3
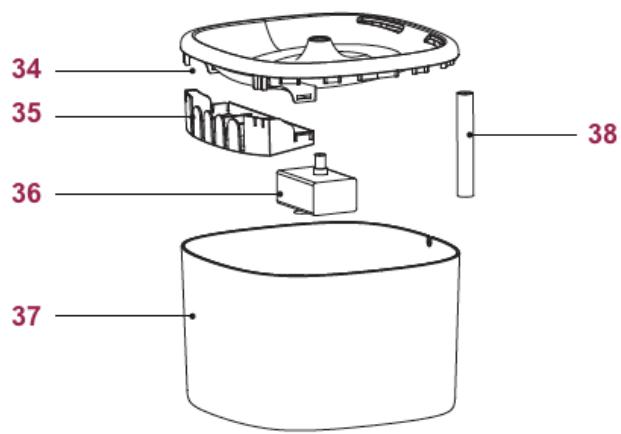
Fig./Img./Abb./Afb./ Rys. 4
www.cecotec.es
- PARTS AND COMPONENTS
- FIG. 1
- BEFORE USE
- BOX CONTENT
- FEEDER OPERATION
- FEEDER POSITIONING
- FOOD HOPPER ASSEMBLY
- PROTECTIVE COVER OPENING METHOD AND MARKINGS
- FOOD REFILLING
- MANUAL DISPENSING
- MEAL PROGRAMMING
- WIFI RECONFIGURATION
- BATTERY MODE
- VOICE RECORDING
- WATER DISPENSER OPERATION
- SAFETY NOTES
- WI-FI CONNECTIVITY AND MOBILE APP
- FEEDER CLEANING AND MAINTENANCE
- IMPORTANT
- CLEANING THE FOOD HOPPER
- CLEANING THE STAINLESS STEEL BOWL
- CLEANING THE MAIN UNIT
- REPLACING THE DESICCANT
- REPLACING THE BATTERIES
- WATER DISPENSER CLEANING AND MAINTENANCE
- RECOMMENDED FREQUENCY
- WEEKLY CLEANING PROCEDURE
- TECHNICAL SPECIFICATIONS
- RECYCLING OF ELECTRICAL AND ELECTRONIC EQUIPMENT
- TECHNICAL SUPPORT AND WARRANTY
- INFORMATION ON DATA STORED BY CONNECTED PRODUCTS IN ACCORDANCE WITH REGULATION (EU) 2023/2854 (“DATA REGULATION”)
- COPYRIGHT
- EU DECLARATION OF CONFORMITY
- PIÈCES ET COMPOSANTS
- IMAGE 1
- CONNETTIVITÀ WI-FI E APP
- PEÇAS E COMPONENTES
- FIGURA 1
- ONDERDELEN EN COMPONENTEN
- FIGUUR 1
- CZĘŚCI I KOMPONENTY
- RYSUNEK 1
- SOUČÁSTI A KOMPONENTY
- OBRÁZEK 1
- PARÇALAR VE BILEŞENLER
- ŞEKIL 1
- MEPH KAI EΞAPTHMATA
- ΣΧΉΜΑ 1
- PECES I COMPONENTS
Brand : CECOTEC
Model : Pumba 2000 Totalmenu Vision
Category : Vacuum Cleaner