Pumba 8600 Double Meal Vision - Vacuum Cleaner CECOTEC - Free user manual and instructions
Find the device manual for free Pumba 8600 Double Meal Vision CECOTEC in PDF.


User questions about Pumba 8600 Double Meal Vision CECOTEC
0 question about this device. Answer the ones you know or ask your own.
Ask a new question about this device
Download the instructions for your Vacuum Cleaner in PDF format for free! Find your manual Pumba 8600 Double Meal Vision - CECOTEC and take your electronic device back in hand. On this page are published all the documents necessary for the use of your device. Pumba 8600 Double Meal Vision by CECOTEC.
USER MANUAL Pumba 8600 Double Meal Vision CECOTEC
Safety instructions 8
-
Before use 59
-
Installation 60
-
Operation 61
-
Troubleshooting 63
-
Cleaning and maintenance 65
-
Recycling of electrical
and electronic equipment 65
-
Copyright 65
-
EU Declaration of Conformity 65
SOMMAIRE
EN • The coding in this manual is generic and applies to all code variants of the appliance.
Read the following instructions carefully before using the appliance. Keep this instruction manual for future reference or new users.
- Remove the product and its parts from the packaging. Bags may cause asphyxia; keep away from children or pets.
- Always unplug the appliance when not in use or for cleaning.
- Do not immerse the product in water as this may damage the electronic components.
- Do not disassemble the product beyond what is indicated in this manual.
- Do not use this product for anything for which it was not intended or designed.
- This appliance is intended for domestic use only and is not suitable for use in commercial establishments such as bars, restaurants, farms, hotels, motels, and offices.
- The mains plug of the power cable must be removed from the base before cleaning or maintenance operations.
- Unplug the feeder every time you handle it.
- The feeder must not be used outdoors.
-
If the cable or plug of the dispenser is damaged, the appliance must not be used.
-
If the plug gets wet, turn off the power at the socket to which it is plugged in and unplug it.
- Make sure the plug is not wet. The power socket should be located higher than the location of the feeder.
- Do not use the product if it is malfunctioning or damaged. Do not attempt to repair this appliance yourself, please contact the Technical Support Service.
- Responsible use:
- Cleaning and user maintenance should not be carried out by unsupervised children.
- Do not allow pets to chew or swallow any part of the product. To avoid problems, you can pass the cable through a resistant conduit.
- Do not install or store this product in locations that are exposed to precipitation and/or temperatures below 4 °C.
- Frequently check the amount of food in the compartments to ensure that the feeder is dispensing food correctly.
- Monitoring and training:
- This appliance can be used by children aged 8 years and above and people with reduced physical, sensory, or mental capabilities or lack of experience and knowledge if they have been given supervision or instruction concerning use of the appliance in a safe way and understand the hazards involved.
- Do not let children play with the appliance.
- If you have visitors to your home, be sure to provide them with information about the automatic feeder and how to interact with it safely, especially if they have pets of their own.
-
When introducing your pets to the automatic feeder for the first time monitor their initial interaction to make sure they adapt and understand the feeding process safely.
-
If you are introducing your pets to the feeder for the first time, use a gradual training process to get them used to the device before leaving it running unsupervised.
- If you have pets with aggressive or playful behaviour, consider additional training to ensure that the automatic feeder is not subject to nibbling or hitting.
- Operation and maintenance:
- Checking loose parts: Before each use, check that all parts and components of the feeder are securely fastened and in place, avoiding any risk of accidental ingestion by pets.
- Appropriate food: Only use manufacturer's recommended dry food to prevent clogging of the feeder mechanism and to ensure that pets receive adequate nutrition.
- Clean the feeder at least once a week.
- Conduct regular inspections of the feeder, ensuring that moving parts are functioning properly and that there is no build-up of food debris that could affect performance.
- Regular maintenance: In addition to weekly cleaning, perform more thorough maintenance at least once a month to ensure optimal long-term performance.
- Timely replacement of worn parts: If you notice signs of wear on parts of the feeder, such as the lid or dispenser tray, replace them immediately to avoid potential safety hazards.
- Batteries:
- Requires 4 "AA" batteries. Batteries are NOT included. Only use alkaline batteries.
- Check the low battery indicator light frequently to ensure that the feeder has battery.
- You must remove the batteries from the device before disposing of it.
-
The device must be disconnected from the power supply when the battery is removed.
-
New and used batteries should not be mixed.
- Batteries must be inserted according to the correct polarity.
- Discharged batteries must be removed from the appliance and disposed of safely.
- If the appliance is to be stored without being used for a long period of time, the batteries should be removed.
- The supply terminals must not be short-circuited.
INSTRUCTIONS DE SÉCURITÉ
https://cecotec.es/es/information/declaration-of-conformity
1. PARTS AND COMPONENTS
Fig. 1
- Safety lock
- Lid
- Desiccant
- Desiccant compartment
- Food container
- Control panel
- Camera
- Food outlet
- Food separator
- Extension base
- Stainless steel feeding bowls
- Bowl trays
Display (Fig. 2)
- Food dispensing icon
- Wi-Fi reset icon
- Status indicator light
- Microphone icon
NOTE:
The graphics in this manual are schematic representations and may not exactly match the product.
2. BEFORE USE
- This appliance comes in a packaging designed to protect it during transport. Remove the appliance from its box. You can keep the original box and other packaging materials in a safe place to prevent damage to the appliance if you need to transport it in the future. If you wish to dispose of the original packaging, make sure all items are recycled properly.
- Check that all parts and components are included and in good condition. If any of them are missing or damaged, please contact Cecotec's Official Technical Support Service immediately.
Box content:
- Pet feeder
- USB cable
ENGLISH
- Power adapter
- Safety lock
- Desiccant sachet
- Stainless steel bowls
- Instruction manual
- Do not remove the product's serial number in order to keep proper traceability if technical assistance is required.
3. INSTALLATION
1. Connect the device to the power supply. Fig. 3
- Plug in the 5 V adapter and connect the power cord to the feeder. (1)
- Open the battery compartment located on the bottom of the device (2) and install 4 AA alkaline batteries (not included) as a backup in case of power outage or power supply failure. (3) (3)
- The display will automatically illuminate, indicating that the feeder is powered on. (4) (4)
2. Install the food container by following the steps below:
- The food inlet must align with the dispensing outlet. Fig. 4
- Note the direction of the food propellers. Fig. 5
3. Install the food bowl. Fig. 6.
- Align the holes of the feeder and extension base to make the connection, then insert the food separator.
- Install the two food trays from bottom to top and place the two stainless steel bowls.
4. Add pet food to the container.
- Fill the food container with pet kibble. Place the lid on the food container and install the safety lock. Fig. 7
Note:
- Do not use wet or canned food.
- Recommended kibble size: 5-12 mm.
4. OPERATION
Icon and display operation
| Fig. 2.1 | Dispense food | Pressing the button will dispense one portion. With voice recording enabled, the device will play the recording before dispensing food. |
| Fig. 2.2 | Wi-Fi reset | Reset the Wi-Fi by pressing and holding the corresponding icon for 10-30 seconds. When you hear a beep and the LED starts flashing blue, the device is attempting to connect. |
| Fig. 2.4 | Microphone | Press and hold the microphone icon continuously for voice recording. After 3 seconds, you will hear a beep and can begin recording (10-second recording limit). When you hear two beeps, it means that the recording has been saved successfully. Voice recordings cannot be deleted directly but can be overwritten with new recordings.To check recordings: press the icon once to play the recording. |
Installing the app

Download and install the "CECOTEC" app by scanning the following QR code. This app is available for both operating systems (iOS and Android). You can also download it by searching in Google Play (Android) or the App Store (iOS).
Note: Ensure both Bluetooth and Wi-Fi are activated on your mobile phone before attempting to connect the device.
Logging into the app and pairing the feeder
1. Log into the app
Open the "Cecotec" application on your mobile phone and click "Register" to create an account. If you already have an account, simply log in.
Note: You can only log in to the app from one associated account, but you can connect to multiple devices and use it on multiple mobile phones.
2. Add the feeder to the app
After logging into the application, click the [+] option in the top right corner to add the feeder. Navigate to the “Pets” section, locate our product “Pumba 8600 Double Meal Vision”. Finally, follow the pairing steps.
Note: Ensure your mobile phone is connected to a Wi-Fi network with optimal 2.4 GHz network speeds.
3. Connect the device to a Wi-Fi network
- When the blue indicator light is lit, press and hold the Wi-Fi reset icon on the feeder's display until you hear a beep.
- Click on "Ensure the indicator light is flashing rapidly, or a prompt tone is heard" and click "Next".
- Select the Wi-Fi network and enter the password, then click "Next".
- A QR code will be generated on your mobile phone. Use the feeder's camera to scan it from a distance of 10–20 cm until you hear a beep.
- Confirm that you heard the beep in the app.
- Wait for the device to pair with the mobile phone and app.
4. Once connected, click "Done" to enter the feeder's video and control interface:
- Click "Schedule" to set feeding times.
- Then access the meal settings interface.
5. How to remove the device:
- Press and hold the feeder option in the app for 3 seconds to access the device removal interface.
- The warning message "Remove device" will appear on the display.
Note: To protect all users' personal data, a device can only be connected to one account. If you want others to control the feeder from the app, remember to first remove the device from your mobile phone.
Status indicator light description
| Indicator light status | Description |
| Flashing blue | Connecting to Wi-Fi |
| Solid blue | Successfully connected to Wi-Fi |
| Solid green | Wi-Fi disconnected (with fully charged battery) |
| Flashing red | Low battery |
Note:
After the blue light starts flashing, complete connecting your mobile phone to the device within five minutes, otherwise the blue light will turn off. If the time limit is exceeded, reset it by pressing and holding the Wi-Fi reset button for 15 seconds.
Recommended portions
Regarding food portions depending on your pet's breed, size, and type of food, it is advised to follow the food manufacturer's guidelines or consult a veterinary professional.
Warning:
Do not use wet or canned food.
5. TROUBLESHOOTING
1. Why am I having trouble pairing the device with my mobile phone?
- Check that the device is operating correctly. To do this, observe the colour and status of the indicator light. If it is flashing or solid blue, it is attempting to connect to Wi-Fi.
- Keep the device near the router to ensure good Wi-Fi signal strength.
- Check if the feeder is connected to Wi-Fi. Search for the feeder's Wi-Fi signal on your mobile phone and check if there is a signal.
- Uninstall and reinstall the app. Accept location permissions during installation.
- Check if the router has any restrictions regarding the number of connected devices. It is recommended to protect the network with WPA/WPA2 PSK system. Remember to use only the 2.4 GHz network.
2. How do I quickly reconnect the device to the Wi-Fi network after disconnection?
Exit the app, re-enter it and wait for the data to update.
3. Why can't I log in to my account?
- Ensure the network is functioning and check if your account is already logged in on another mobile phone.
- Remember to remove the device from the mobile phone if you wish to use another phone to control the feeder.
| Problem | Possible cause | Solution | |
| 1 | The feeder does not dispense food | Food blocked in the mechanism | Check for and clear any blockages. |
| Make sure the food is dry and loose. | |||
| 2 | Food spills from the feeder | Unbalanced or unstable feeder | Place the feeder on a level surface. |
| Check if the parts are correctly assembled. | |||
| 3 | Low battery indicator light on | Batteries depleted | Replace the batteries with new ones. |
| Use quality alkaline batteries. | |||
| 4 | The feeder makes unusual noises | Loose or worn parts | Inspect and tighten loose parts. |
| Replace worn parts. | |||
| 5 | The feeder does not work | Electrical or electronic issue | Contact the Technical Support Service. |
| 6 | Damp or stuck food | Moisture in the storage area | Place the feeder in a dry place. |
| Store the feeder indoors. | |||
| Lid not closed properly | Ensure the lid is properly fitted. | ||
| 7 | The indicator lights do not work | Light issue | Check for power outages. |
| Check if the indicator function is disabled in the app. | |||
| 8 | Live video is not displaying | Connectivity issue | Switch to a stronger Wi-Fi signal. |
| If the network is poor, change the video quality from HD (high definition) to SD (standard definition). | |||
| 9 | Where are the photos and videos stored? | Photo location issue | Screenshots and video clips are stored in the app gallery. |
6. CLEANING AND MAINTENANCE
- Both the feeder and desiccant holder can be disassembled for cleaning.
- Use a damp cloth to clean dirt from the inside of the feeder and the dispensing outlet.
- Rinse the parts and air dry them thoroughly before reassembling the device.
Important:
- For your pet's health, it is recommended to clean the feeder regularly.
- The washable parts of the feeder are as follows: safety lock, food container, stainless steel bowl and plastic holder, lid (without the desiccant sachet), and the desiccant compartment.
- These parts are also dishwasher-safe and can be submerged in water.
7. RECYCLING OF ELECTRICAL AND ELECTRONIC EQUIPMENT

This symbol indicates that, according to the applicable regulations, the product and/or battery must be disposed of separately from household waste. When this product reaches the end of its shelf life, you should dispose of the batteries/accumulators and take them to a collection point designated by the local authorities.
For detailed information on how to properly dispose of electrical and electronic equipment and/or the corresponding batteries, consumers
should contact their local authorities.
Compliance with the above guidelines will help protecting the environment.
8. COPYRIGHT
The intellectual property rights over the texts in this manual belong to CECOTEC INNOVACIONES, S.L. All rights reserved. The content of this publication may not, either in part or in its entirety, be reproduced, stored in a retrieval system, transmitted or distributed by any means (electronic, mechanical, photocopying, recording or similar) without prior authorisation from CECOTEC INNOVACIONES, S.L.
9. EU DECLARATION OF CONFORMITY

Cecotec Innovaciones hereby declares that this pet feeder, model EU01_117511 - Pumba 8600 Double Meal Vision is in conformity with the Radio Equipment Directive 2014/53/EU.
The full text of the EU Declaration of Conformity can be found on the following website:
https://cecotec.es/es/information/declaration-of-conformity
1. PIÈCES ET COMPOSANTS
Img. 1
https://storececotec.de/de/information/declaration-of-conformity
1. PARTI E COMPONENTI
Fig. 1
https://storececotec.it/it/information/declaration-of-conformity
1. PEÇAS E COMPONENTES
Fig. 1
https://cecotec.pt/pt/information/declaration-of-conformity
1. ONDERDELEN EN COMPONENTEN
Afbeelding 1
5. PROBLEEMOPLOSSING
https://cecotec.es/es/information/declaration-of-conformity
1. CZĘŚCI I KOMPONENTY
Rys. 1
https://cecotec.es/es/information/declaration-of-conformity
1. MEPH KAI EΞAPTHMATA
Σχήμα 1
https://cecotec.es/es/information/declaration-of-conformity
1. PECES I COMPONENTS
Fig. 1
https://cecotec.es/ca/information/declaration-of-conformity
قيب Minority Minority Minority Minority Minority Minority Minority Minority Minority Minority Minority Minority Minority Minority Minority Minority Minority Minority Minority Minority Minority Minority Minority Minority Minority Minority Minority Minority Minority Minority Minority Minority Minority Minority Minority Minority Minority Minority Minority Minority Minority Minority Minority Minority Minority Minority Minority Minority Minority Minority Minority Minority Minority Minority Minority Minority Minority Minority Minority Minority Minority Minority Minority Minority Minority Minority Minority Minority Minority Minority Minority Minority Minority Minority Minority Minority Minority Minority Minority Minority Minority Minority Minority Minority Minority Minority Minority Minority Minority Minority Minority Minority Minority Minority Minority Minority Minority Minority Minority Minority Diversity


Fig./Img./Abb./Afb./ Rys. 3

Fig./Img./Abb./Afb./ Rys. 4
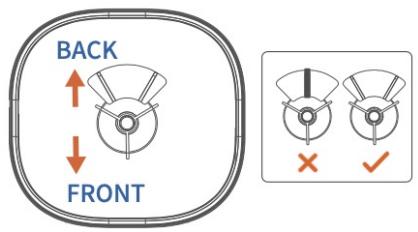
Fig./Img./Abb./Afb./ Rys. 5
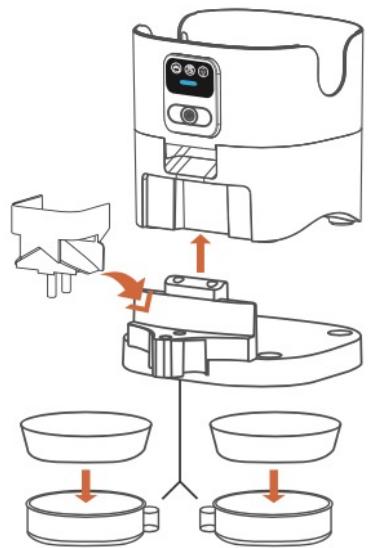
Fig./Img./Abb./Afb./ Rys. 6

Fig./Img./Abb./Afb./Rys. 7
www.cecotec.es
- SOMMAIRE
- INSTRUCTIONS DE SÉCURITÉ
- PARTS AND COMPONENTS
- FIG. 1
- DISPLAY (FIG. 2)
- BEFORE USE
- BOX CONTENT
- ENGLISH
- INSTALLATION
- CONNECT THE DEVICE TO THE POWER SUPPLY. FIG. 3
- INSTALL THE FOOD CONTAINER BY FOLLOWING THE STEPS BELOW
- INSTALL THE FOOD BOWL. FIG. 6
- ADD PET FOOD TO THE CONTAINER
- OPERATION
- INSTALLING THE APP
- LOGGING INTO THE APP AND PAIRING THE FEEDER
- LOG INTO THE APP
- ADD THE FEEDER TO THE APP
- CONNECT THE DEVICE TO A WI-FI NETWORK
- ONCE CONNECTED, CLICK "DONE" TO ENTER THE FEEDER'S VIDEO AND CONTROL INTERFACE
- HOW TO REMOVE THE DEVICE
- RECOMMENDED PORTIONS
- TROUBLESHOOTING
- WHY AM I HAVING TROUBLE PAIRING THE DEVICE WITH MY MOBILE PHONE
- HOW DO I QUICKLY RECONNECT THE DEVICE TO THE WI-FI NETWORK AFTER DISCONNECTION
- WHY CAN'T I LOG IN TO MY ACCOUNT
- CLEANING AND MAINTENANCE
- IMPORTANT
- RECYCLING OF ELECTRICAL AND ELECTRONIC EQUIPMENT
- COPYRIGHT
- EU DECLARATION OF CONFORMITY
- PIÈCES ET COMPOSANTS
- IMG. 1
- PARTI E COMPONENTI
- PEÇAS E COMPONENTES
- ONDERDELEN EN COMPONENTEN
- AFBEELDING 1
- PROBLEEMOPLOSSING
- CZĘŚCI I KOMPONENTY
- RYS. 1
- MEPH KAI EΞAPTHMATA
- ΣΧΉΜΑ 1
- PECES I COMPONENTS
Brand : CECOTEC
Model : Pumba 8600 Double Meal Vision
Category : Vacuum Cleaner