Pumba 1600 Purrfect Meal - Vacuum Cleaner CECOTEC - Free user manual and instructions
Find the device manual for free Pumba 1600 Purrfect Meal CECOTEC in PDF.


User questions about Pumba 1600 Purrfect Meal CECOTEC
0 question about this device. Answer the ones you know or ask your own.
Ask a new question about this device
Download the instructions for your Vacuum Cleaner in PDF format for free! Find your manual Pumba 1600 Purrfect Meal - CECOTEC and take your electronic device back in hand. On this page are published all the documents necessary for the use of your device. Pumba 1600 Purrfect Meal by CECOTEC.
USER MANUAL Pumba 1600 Purrfect Meal CECOTEC
- Parts and components 32
- Before use 32
- Installation 32
- Operation 33
- Cleaning and maintenance 34
- Troubleshooting 34
- Technical specifications 35
- Disposal of old electrical and electronic appliances 35
- Technical support and warranty 35
- Copyright 36
SOMMAIRE
Read these instructions thoroughly before using the device. Keep this instruction manual for future reference or new users.
- Remove the product and its parts from the packaging. Bags may cause asphyxia; keep away from children or pets.
- This appliance can be used by children aged 8 years and above and people with reduced physical, sensory, or mental capabilities or lack of experience and knowledge if they have been given supervision or instruction concerning use of the appliance in a safe way and understand the hazards involved. Children must not play with the appliance.
- Cleaning and user maintenance should not be carried out by unsupervised children.
- Always unplug the appliance when not in use or for cleaning.
- Do not use the appliance if your pets do not reach the feeder or if they have a physical disability.
- Do not immerse the product in water as this may damage the electronic components.
- Do not disassemble the product beyond what is indicated in this manual.
- Do not use this product for anything for which it was not intended or designed.
- This device is designed for domestic use only and is not intended for bars, restaurants, farmhouses, hotels, motels, and offices.
- The mains plug of the power cord must be removed from the base before cleaning or maintenance operations.
- Unplug the feeder every time you handle it.
- Never pull the cable to unplug the dispenser.
- The feeder must not be used outdoors.
- If the cable or plug of the dispenser is damaged, the appliance must not be used.
- If the plug gets wet, turn off the power at the socket to which it is plugged in and unplug it.
- Make sure the plug is not wet. The power socket should be located higher than the location of the feeder.
- Do not use the product if it is malfunctioning or damaged. Do not attempt to repair this product yourself, please contact the Technical Support Service.
- Clean the feeder at least once a week.
- Do not allow pets to chew or swallow any part of the product. To avoid problems, you can pass the cable through a resistant conduit.
- Do not install or store this product in locations that are exposed to precipitation and/or temperatures below 4 °C.
- The estimated lifespan of the batteries is one year.
- To avoid trapping your fingers, keep your hands away from the turntable.
- Always switch off the feeder before cleaning.
-
Always switch off the feeder before adding food.
-
Always switch off the feeder before removing the cover or tray.
- Frequently check the amount of food in the compartments to ensure that the feeder is dispensing food correctly.
About the batteries
- The appliance requires 3 "D" size batteries. Batteries are NOT included. Only use alkaline batteries.
- Check the low battery indicator light frequently to ensure that the feeder has battery.
- You must remove the batteries from the device before disposing of it.
- The device must be disconnected from the power supply when the battery is removed.
- New and used batteries should not be mixed.
- Batteries must be inserted according to the correct polarity.
- Discharged batteries must be removed from the appliance and disposed of safely.
- If the device is to be stored unused for a long period of time, the batteries should be removed.
- The supply terminals must not be short-circuited.
INSTRUCTIONS DE SÉCURITÉ
- On/Off switch
- Speaker output
- Power supply *3 "D" battery covers (not included)
Fig.3
- Food feeder protective cover
- Feeder body and rotating mechanism
- Food tray with 5 separate compartments
NOTE:
the graphics in this manual are schematic representations and may not exactly match the device.
2. BEFORE USE
- This appliance is packaged in a way as to protect it during transport. Take the device out of its box and remove all packaging materials. You can keep the original box and other packaging elements in a safe place. This will help you prevent damage to the device when transporting it in the future. In case the original packaging is disposed of, make sure all packaging materials are recycled accordingly.
- Make sure all parts and components are included and in good conditions. If there is any piece missing or in bad conditions, contact the official Cecotec Technical Support Service immediately.
Box content
- Food feeder
- USB cable
- Instruction manual
3. INSTALLATION
- Turn the cover as shown in the picture to open it. After pouring in the food, replace the cover and turn it to lock it in place.
To open the cover
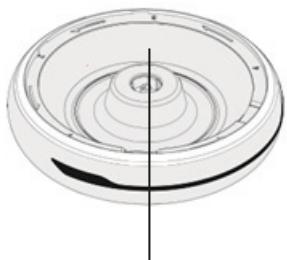
- Pull the handle to open the cover. Fig 4.
- Do this as shown in the picture. Fig. 5
- Lift the cover upwards. Fig. 6
To close the cover:
- Align position A with position B. Fig.7
-
Insert the tabs of the cover into the holes. Fig.8
-
Close the cover by pressing down. Fig.9
- Operates with AC adapter and 3 "D" size batteries as optional power supply. If you prefer not to use the power adapter, you can install 3 new "D" size alkaline batteries in the base. NOTE
- Batteries and power adapter not included.
- Make sure that the on/off switch is in the "I" position and that the positive and negative marks on the batteries match.
- Set up the feeder according to the instructions below.
4. OPERATION
Fig. 10
Quick Setup Guide
1. Manual mode
Hold down the ⏻ button for 3 seconds. If the tray rotates one compartment, it means that the feeder is working properly. You can also use this function to feed your pet manually.
2. Current time setting
Press and hold the ⏻ button and press the h min buttons at the same time to set the current time.
3. Schedule "Meal 1"
- Press and hold the 1 button and press the On/Off button at the same time.
- Schedule "Meal 1" time
- Press and hold the 1 button and press, at the same time, the h and min buttons to set the time in which "meal 1" will be served.
- On= dispense "Meal 1".
- Off= do not dispense "Meal 1".
4. Schedule "Meals 2, 3 and 4"
- Use the first example to configure "meal 1".
- Unlike, in this case, you will have to press the 2,3 and 4 buttons to set the different meals.
- Please note that the setting cycle is a maximum of 24 hours.
5. Voice recording and playback
Recording
Press and hold the 📋 button until the digital display flashes and, next, record a voice message. You can say “Bobby, let’s eat” into the microphone. When you have recorded the message release the button.
Cancel recording
Press and hold the 📋 button until the digital display flashes and release without saying anything.
Playback recording
Press and hold the 📁 button until the digital display flashes to play back the voice recording. NOTE:
ENGLISH
The reproduced voice recording may sound too low for people, but the animal's hearing is more sensitive than ours, so there is no need to speak too loudly. Otherwise, the recording will be distorted and your pet will not understand it.
5. CLEANING AND MAINTENANCE
WARNING: do not immerse the feeder body in water.
- Remove the cover and the food tray.
- Clean and dry the appliance with a soft cloth.
WARNING: under no circumstances immerse the feeder body in water, as the electronic components may get damaged, and the warranty would be void.
- The cover can be washed.
- The food tray can be washed.
6. TROUBLESHOOTING
The "low battery" indicator light flashes.
Replace the 3 batteries with new "D" size alkaline batteries. Typically, this type of battery lasts about 1 year.
WARNING:
- The appliance requires 3 "D" size batteries. Batteries are NOT included. Only use alkaline batteries.
- The estimated lifespan of the batteries is one year.
- To avoid trapping your fingers, keep your hands away from the turntable.
- Always switch off the feeder before cleaning.
- Always switch off the feeder before adding food.
- Always switch off the feeder before removing the cover or tray.
- Check the low battery indicator light frequently to ensure that the feeder has battery.
- Frequently check the amount of food in the compartments to ensure that the feeder is dispensing food correctly.
NOTE:
- The low battery indicator light is located on the right side of the control panel. When leaving home or travelling, make sure that the feeder is dispensing food and that the indicator light is not on or flashing. If so, please replace the batteries to prevent your pet from starving.
- Do not insert your fingers into the turntable under any circumstances.
- On/off switch. The on/off switch is located on the bottom part of the appliance. If it remains off for more than 10 seconds, the default settings will be restored.
- This product uses 3 "D" size batteries. Alkaline batteries usually last about 1 year.
Warning:
- Used batteries must be recycled at the appropriate collection points in accordance with current environmental protection regulations.
- If the feeder is not to be used for a long period of time, remove the batteries to prevent
them from rusting.
- If you have any questions, please contact Cecocare.
FAQs
- My pet feeder dispenses food imprecisely
Due to daily and prolonged use, it is possible that after a while the batteries may degrade and last less time, so it is recommended to replace them.
- My pet feeder is not working properly or is working in an unusual way
This problem may also be due to battery degradation and battery replacement is recommended.
- How can I check the power settings I have configured?
To consult the settings, simply check whether the corresponding icons are programmed (on/off) (1, 2, 3 and 4). If you wish to change the settings, reset them by switching off the feeder.
7. TECHNICAL SPECIFICATIONS
Product reference: 09562
Product: Pumba 1600 Purrfect Meal
Input DC 5 V / *3 "D" 1.5 V batteries
*Batteries are NOT included.
Technical specifications may change without prior notification to improve product quality.
Made in China | Designed in Spain
8. DISPOSAL OF OLD ELECTRICAL AND ELECTRONIC APPLIANCES
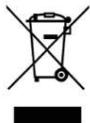
This symbol indicates that, according to the applicable regulations, the product and/or batteries must be disposed of separately from household waste. When this product reaches the end of its shelf life, you should dispose of the cells/batteries/accumulators and take them to a collection point designated by the local authorities.
Consumers must contact their local authorities or retailer for information
concerning the correct disposal of old appliances and/or their batteries.
Compliance with the above guidelines will help protecting the environment.
9. TECHNICAL SUPPORT AND WARRANTY
Cecotec shall be liable to the end user or consumer for any lack of conformity that exists at the time of delivery of the product under the terms, conditions, and deadlines established by the applicable regulations.
It is recommended that repairs be carried out by qualified personnel.
If at any moment you detect any problem with your product or have any doubt, do not hesitate to contact the official Cecotec Technical Support Service at +34 963 210 728.
ENGLISH
10. COPYRIGHT
The intellectual property rights over the texts in this manual belong to CECOTEC INNOVACIONES, S.L. All rights reserved. The contents of this publication may not, in whole or in part, be reproduced, stored in a retrieval system, transmitted, or distributed by any means (electronic, mechanical, photocopying, recording or similar) without the prior authorization of CECOTEC INNOVACIONES, S.L.
1. PIÈCES ET COMPOSANTS
Img. 1
6. PROBLEEMOPLOSSING
Product: Pumba 1600 Purrfect Meal
Input DC 5V/ *3 batterijen type "D" 1,5V
1
2

3
Fig./Img./Abb./Afb./ Rys. 3

Fig./Img./Abb./Afb./Rys. 4

Fig./Img./Abb./Afb./ Rys. 5

Fig./Img./Abb./Afb./ Rys. 6
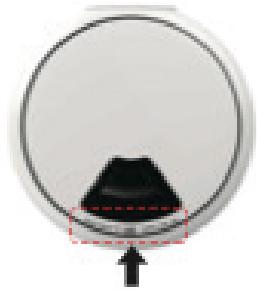
Fig./Img./Abb./Afb./ Rys. 7

Fig./Img./Abb./Afb./ Rys. 8
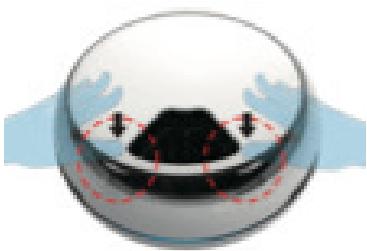
Fig./Img./Abb./Afb./ Rys. 9
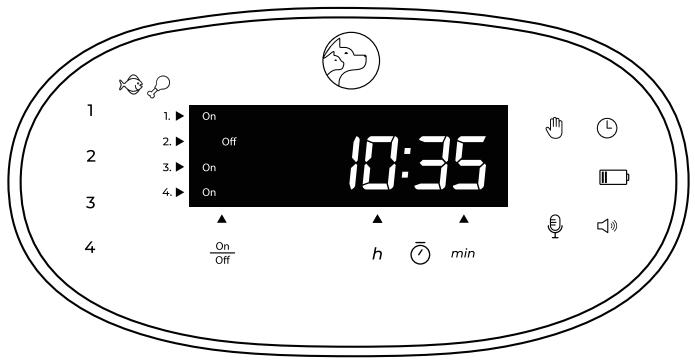
Fig./Img./Abb./Afb./Rys.10
www.cecotec.es
- SOMMAIRE
- ABOUT THE BATTERIES
- INSTRUCTIONS DE SÉCURITÉ
- FIG.3
- NOTE
- BEFORE USE
- BOX CONTENT
- INSTALLATION
- TO OPEN THE COVER
- TO CLOSE THE COVER
- OPERATION
- QUICK SETUP GUIDE
- MANUAL MODE
- CURRENT TIME SETTING
- SCHEDULE "MEAL 1
- SCHEDULE "MEALS 2, 3 AND 4
- VOICE RECORDING AND PLAYBACK
- RECORDING
- CANCEL RECORDING
- PLAYBACK RECORDING
- ENGLISH
- CLEANING AND MAINTENANCE
- TROUBLESHOOTING
- THE "LOW BATTERY" INDICATOR LIGHT FLASHES
- WARNING
- TECHNICAL SPECIFICATIONS
- DISPOSAL OF OLD ELECTRICAL AND ELECTRONIC APPLIANCES
- TECHNICAL SUPPORT AND WARRANTY
- COPYRIGHT
- PIÈCES ET COMPOSANTS
- IMG. 1
- PROBLEEMOPLOSSING
Brand : CECOTEC
Model : Pumba 1600 Purrfect Meal
Category : Vacuum Cleaner