Powerforce 4000 Atomic - Drill CECOTEC - Free user manual and instructions
Find the device manual for free Powerforce 4000 Atomic CECOTEC in PDF.


User questions about Powerforce 4000 Atomic CECOTEC
0 question about this device. Answer the ones you know or ask your own.
Ask a new question about this device
Download the instructions for your Drill in PDF format for free! Find your manual Powerforce 4000 Atomic - CECOTEC and take your electronic device back in hand. On this page are published all the documents necessary for the use of your device. Powerforce 4000 Atomic by CECOTEC.
USER MANUAL Powerforce 4000 Atomic CECOTEC
POWERFORCE 4000 ATOMIC
Martillo percutor / Hammer drill

Safety instructions 12
-
Parts and components 103
-
Before use 103
-
Operation 104
-
Cleaning and maintenance 107
-
Recycling of electrical and electronic equipment 107
-
Copyright 107
SOMMAIRE
EN · The coding in this manual is generic and applies to all code variants of the appliance.
General power tool safety instructions
WARNING!
- Read all the safety indications and instructions. Failure to follow the safety guidelines and instructions provided may result in electric shock, fire, or serious injury.
- Keep all safety instructions and directions for future reference.
- The term ‘power tool’ used in the safety instructions refers to both mains-powered (corded) and battery-powered (cordless) power tools.
1. Safety in the workplace
a) Keep the work area clean and well lit. Clutter and poor lighting in the workplace can cause accidents.
b) Do not operate the power tool in a potentially explosive environment where flammable liquids, gases, or dust are present. Power tools generate sparks that can ignite dust or vapours.
c) Keep children and other people away while operating the power tool. If you get distracted, you could lose control of the device.
2. Electrical safety
a) The plug of the power tool must fit securely into the electrical socket. The plug must not be modified in any way. Do not use any plug adapters with earthed power tools. Using unmodified plugs connected to a suitable electrical outlet reduces the risk of electric shock.
b) Avoid physical contact with any grounded surfaces, such as pipes, heating systems, cookers, and refrigerators. If your body makes contact with the earth connection, there is a greater risk of electric shock.
c) Keep power tools away from rain or moisture. Water ingress into a power tool increases the risk of electric shock.
d) Do not use the cable for other purposes, e.g. to transport and hang the power tool or to disconnect the plug from the socket. Keep the cable away from heat, oil, sharp edges or moving parts of the tool. A damaged or tangled cable increases the risk of electric shock.
e) If you wish to use the power tool outdoors, only use extension cords that are approved for outdoor use. Its use reduces the risk of electric shock.
f) If the use of the power tool in a damp environment cannot be avoided, use a residual-current device. Its use reduces the risk of electric shock.
3. Personal safety
a) Always be alert, pay attention to what you are doing, and proceed with caution when working with a power tool. Do not use any power tools if you are tired or under the influence of drugs, alcohol, or medication. A single moment of distraction while using power tools can cause serious injury.
b) Always use personal protective equipment and safety goggles. The use of personal protective equipment, such as a dust mask, non-slip safety footwear, a helmet or hearing protection depending on the type of power tool in question, reduces the risk of injury.
c) Prevent the device from starting up accidentally.
Make sure that the power tool is switched off before connecting it to the mains or battery, gripping it or carrying it. Carrying the power tool with your fingers on the switch or connecting the device to the mains while it is already switched on may cause accidents.
d) Before switching on the power tool, remove any adjusting tools or wrenches. Tools or spanners within reach of the rotating part of the appliance may cause injury.
e) Avoid maintaining an awkward body position. Try to maintain a safe posture and keep your balance at all times. This will enable you to control the power tool better, especially in unexpected situations.
f) Wear appropriate clothing. Do not wear loose clothing or jewellery. Keep hair, clothing and gloves away from moving parts. Loose clothing, jewellery or long hair may get caught in moving parts.
g) If the installation of dust extraction and collection devices is permitted, ensure that they are connected and verify that they are used correctly. The use of a dust extraction device can reduce the risks caused by dust.
4. Use and handling of the power tool
a) Do not overcharge the tool. Use the appropriate power tool for the task. This will enable you to work more effectively and safely within the specified power range.
b) Do not use any power tool with a faulty switch. A power tool that cannot be switched on or off is dangerous and must be repaired.
c) Disconnect the mains plug or remove the battery before making any adjustments to the appliance, changing accessories or leaving the appliance unattended. These safety measures prevent the power tool from accidentally turning on.
d) Store power tools that you are not using out of the reach of children. Do not allow people who are unfamiliar with the tool or who have not read these instructions to use it. Power tools are dangerous when used by inexperienced people.
e) Keep power tools in perfect condition. Check that moving parts are working properly and are not jammed, and ensure that no parts are broken or damaged in a way that could affect the operation of the tool. Have damaged parts repaired before using the tool. Many accidents are caused by tools being in poor condition.
f) Keep cutting tools clean and sharp, as this reduces jamming and makes them easier to guide.
g) Use the power tool, accessories, interchangeable tools, etc. as specified in these instructions. Please note the working conditions and procedures to be followed. The use of power tools for purposes other than those intended may result in hazardous situations.
5. Service
a) Have your power tool repaired by a qualified technician using only original replacement parts. This will ensure that the power tool remains safe.
6. General precautions
- Hold the power tool by the insulated gripping surfaces when performing an operation where the tool may come into contact with exposed wiring. The tool must not come into contact with live wires. This may result in electric shock.
-
Keep the power tool and its accessories away from hot surfaces.
-
Do not allow untrained people use the power tool and its accessories.
- People with physical or mental disabilities must not use power tools or accessories without supervision.
- Children must not play with, clean or try to repair the power tool and its accessories.
- Allow the tool to cool down completely after use before touching it.
- Always wait until all moving parts have stopped after working with the tool.
Specific safety instructions for hammer drills
- Use hearing protection. Noise exposure can cause hearing loss.
- Use the additional handle supplied with the tool. Loss of control can lead to injury.
- Hold the tool by its insulated handles if you intend to use it for work where the tool may come into contact with hidden electrical connections or the mains cable itself. Contact with live wires may also subject the metal parts of the appliance to electrical stress and cause an electric shock.
- Wear a dust mask.
WARNING! TOXIC DUST! The processing of toxic/harmful dusts poses a risk to the health of the user or people nearby.
WATCH OUT FOR CABLES AND PIPES! DANGER! Ensure that you do not hit any electrical cables or gas or water pipes when working with the power tool. If necessary, check the surface with a cable detector before drilling or punching a wall.
Original accessories/additional equipment
Use only the specified accessories and additional equipment that are compatible with the tool.
| Symbol | Meaning |
 | Warning |
 | Warning, flammable material |
 | Information |
 | For indoor use only |
 | Class II tool |
 | DC voltage |
 | Refer to the instruction manual/brochure |
 | Wear eye protection |
 | Wear hearing protection. |
 | Wear dust mask |
INSTRUCTIONS DE SÉCURITÉ
- Keyless quick-change chuck for conventional drill bits
- SDS-plus quick-change drill chuck
- Quick-change drill chuck locking ring
- Right/left turn switch
- Lock button
- On/off switch with speed control function
- Operating mode selection switch
- Auxiliary handle button
- Depth stop
- Auxiliary handle
NOTE:
The graphics in this manual are schematic representations and may not exactly match the product.
2. BEFORE USE
- This appliance comes in a packaging designed to protect it during transport. Remove the appliance from its box. You can keep the original box and other packaging materials in a safe place to prevent damage to the appliance if you need to transport it in the future. In case the original packaging is disposed of, make sure all packaging materials are recycled accordingly.
- Check that all parts and components are included and in good condition. If any of them are missing or damaged, please contact Cecotec's Official Technical Support Service immediately.
Box content:
- Hammer drill
- Conventional drill chuck adapter
- Drill bits
- Chisels
- Carrying case
- Instruction manual
- Do not remove the product's serial number in order to keep proper traceability if technical assistance is required.
3. OPERATION
Auxiliary handle
Fig. 2
- Operate the machine using only the auxiliary handle. Turn the auxiliary handle to a position that is comfortable for you. This will allow you to work in a body position that is fatigue-free and therefore safe.
- Loosen the auxiliary handle anticlockwise and adjust it to the desired working position. Ensure that the fastening strap for the auxiliary handle is located in the slot provided for this purpose on the housing.
- Next, tighten the auxiliary handle again by turning it clockwise.
Selection of chucks and tools
- For hammer drilling and chiselling, SDS-plus drill bits and chisels are required, which are inserted into the SDS-plus chuck.
- For drilling in steel or wood, for screwdriving and for cutting threads, drill bits without SDS-plus are used (e.g. drill bits with cylindrical shanks, conventional drill bits). For these tools, you need a keyless quick-change chuck, such as the one included, or a ratchet chuck.
- IMPORTANT: Do not use conventional drill bits (without SDS-plus) for hammer drilling or chiselling! Tools without SDS-plus and their chucks get damaged when drilling with percussion or chiselling.
- The SDS-plus quick-change chuck can be easily replaced by the supplied keyless chuck.
Drill chuck placement/replacement
Attaching the chuck for working with non-SDS-plus tools
- To work with drill bits without SDS-plus shanks (e.g. drill bits with cylindrical shanks, conventional drill bits), a suitable drill chuck must be used.
- Clean the adapter shaft and lightly grease the insertion end before inserting it.
- Insert the mounted chuck shank into the SDS Plus tool holder with a twisting motion until you hear it lock in place.
- The adapter shaft locks itself in place. Check the lock by pulling the chuck.
Removing the quick-change chuck
Fig. 3
- Pull the SDS Plus chuck locking ring back (a), hold it in this position and remove the quick-change chuck from the SDS Plus chuck housing (b).
- Protect the quick-change chuck so that it does not become dirty after removal.
Insert/replace tool
When changing the tool, take care not to damage it.
SDS-plus tools and drill bits
- The SDS-plus tool is designed to move freely. This causes eccentricity when the machine is not loaded. However, the drill bit is automatically centred during operation. This does not affect the drilling accuracy.
Placement of an SDS-plus tool
Fig. 4
- Insert the drill bit into the SDS-plus quick-change chuck.
- Clean the tool before insertion and lightly grease the insertion end.
- Insert the tool into the tool holder with a twisting motion until it clicks into place.
- The tool locks itself. Check the lock by pulling the tool.
SDS-plus tool removal
Fig. 5.
Pull the locking cap backwards (a), hold it in this position and remove the tool from the tool holder (b).
Tools without SDS-plus
Do not use non-SDS-plus drill bits for hammer drilling or chiselling! Drills without SDS-plus and their chucks get damaged when drilling with percussion or chiselling.
Drill or tool placement
- Fit the quick-change chuck for conventional drill bits (accessory).
- Turn the quick-change chuck sleeve for conventional drill bits counterclockwise until the tool holder is sufficiently open. Insert the tool into the centre of the tool holder and secure it with the chuck key evenly in all three holes.
Removal of the drill bit or tool
Turn the quick-change chuck sleeve for conventional drill bits counterclockwise until the tool can be removed.
Adjusting the drilling depth
- The depth stop can be used to set the desired drilling depth.
- Press the button on the auxiliary handle and insert the depth stop into the auxiliary handle so that the slotted side of the depth stop points downwards.
- Insert the SDS-plus tool all the way into the tool holder. Otherwise, the freedom of movement of the SDS tool may result in incorrect adjustment of the drilling depth.
- Remove the depth stop until the distance between the tip of the drill bit and the tip of the depth stop corresponds to the desired drilling depth.
Start-up
Always use the correct supply voltage!
- The power supply voltage must match the value indicated on the machine's rating plate.
Set the operating mode
- Use the operating mode selection switch to select the machine's operating mode.
- Only change the operating mode when the machine is switched off! Otherwise, the tool may get damaged.
- To change the operating mode, press the lock button and turn the operating mode selector switch to the desired position until it clicks into place.
| Setting | Function |
 | For hammer drilling in concrete and stone |
 | For drilling into steel or wood, for screwing and cutting threads |
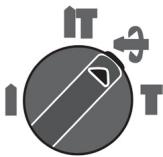 | To adjust the chiselling position by turning the chisel |
 | For chiselling |
Adjusting the direction of rotation
- The right/left rotation switch can be used to change the direction of rotation of the tool.
-
Only change the direction of rotation when the machine is switched off! Otherwise, the tool may get damaged.
-
Right turn: turn the right/left turn switch on both sides to the stop in the position.
- Left turn: turn the right/left turn switch on both sides to the stop in the position.
- Set the direction of rotation for hammer drilling and chiselling always to the right.
4. CLEANING AND MAINTENANCE
- WARNING! RISK OF INJURIES. Always switch off the tool and disconnect it from the power supply before carrying out any work on it.
- The tool must always be kept clean, dry and free of oil or grease.
- Use a soft, dry cloth to clean the casing. Never use petrol, solvents or cleaners that may damage plastic.
- Never allow liquids to enter the tool.
- Clean the tool holder regularly.
- To do this, pull the locking collar back and pull off the protective dust cap from the tool holder.
- Before placing a tool in the tool holder, lightly grease it.
5. RECYCLING OF ELECTRICAL AND ELECTRONIC EQUIPMENT

This symbol indicates that, according to the applicable regulations, the product and/or battery must be disposed of separately from household waste. When this product reaches the end of its shelf life, you should dispose of the batteries/accumulators and take them to a collection point designated by the local authorities.
For detailed information on how to properly dispose of electrical and electronic appliances and/or batteries, consumers should contact their local authorities.
Compliance with the above guidelines will help protecting the environment.
6. COPYRIGHT
The intellectual property rights over the texts in this manual belong to CECOTEC INNOVACIONES, S.L. All rights reserved. The content of this publication may not, either in part or in its entirety, be reproduced, stored in a retrieval system, transmitted or distributed by any means (electronic, mechanical, photocopying, recording or similar) without prior authorisation from CECOTEC INNOVACIONES, S.L.
FRANÇAIS
1. PIÈCES ET COMPOSANTS
Image 1
Pour buriner
Per la scalpellatura
Para cinzelar
Για σμίλευση
Fig./Img./Abb./Afb./Rys.1
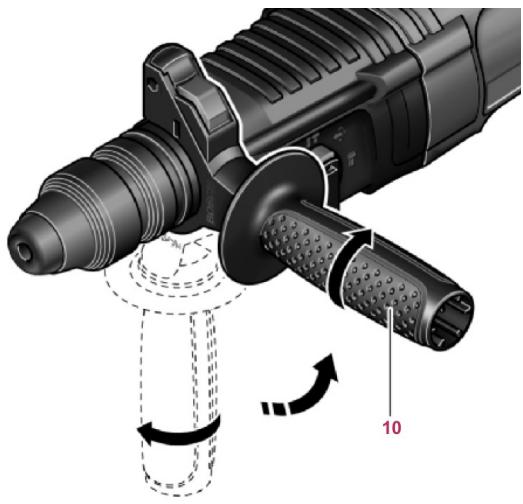
Fig./Img./Abb./Afb./Rys. 2

Fig./Img./Abb./Afb./Rys. 3

Fig./Img./Abb./Afb./Rys. 4
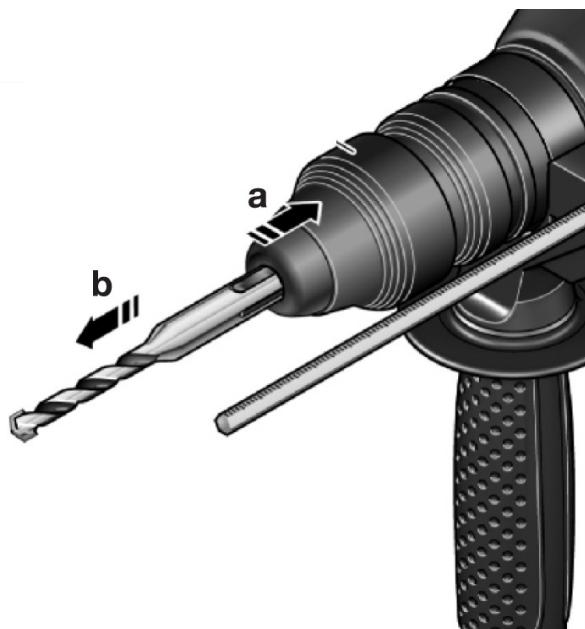
Fig./Img./Abb./Afb./ Rys. 5
www.cecotec.es

- SOMMAIRE
- GENERAL POWER TOOL SAFETY INSTRUCTIONS
- WARNING
- SAFETY IN THE WORKPLACE
- ELECTRICAL SAFETY
- PERSONAL SAFETY
- USE AND HANDLING OF THE POWER TOOL
- SERVICE
- GENERAL PRECAUTIONS
- SPECIFIC SAFETY INSTRUCTIONS FOR HAMMER DRILLS
- ORIGINAL ACCESSORIES/ADDITIONAL EQUIPMENT
- INSTRUCTIONS DE SÉCURITÉ
- NOTE
- BEFORE USE
- BOX CONTENT
- OPERATION
- AUXILIARY HANDLE
- FIG. 2
- SELECTION OF CHUCKS AND TOOLS
- DRILL CHUCK PLACEMENT/REPLACEMENT
- ATTACHING THE CHUCK FOR WORKING WITH NON-SDS-PLUS TOOLS
- REMOVING THE QUICK-CHANGE CHUCK
- FIG. 3
- INSERT/REPLACE TOOL
- SDS-PLUS TOOLS AND DRILL BITS
- PLACEMENT OF AN SDS-PLUS TOOL
- FIG. 4
- SDS-PLUS TOOL REMOVAL
- FIG. 5
- TOOLS WITHOUT SDS-PLUS
- DRILL OR TOOL PLACEMENT
- REMOVAL OF THE DRILL BIT OR TOOL
- ADJUSTING THE DRILLING DEPTH
- START-UP
- ALWAYS USE THE CORRECT SUPPLY VOLTAGE
- SET THE OPERATING MODE
- ADJUSTING THE DIRECTION OF ROTATION
- CLEANING AND MAINTENANCE
- RECYCLING OF ELECTRICAL AND ELECTRONIC EQUIPMENT
- COPYRIGHT
- FRANÇAIS
- PIÈCES ET COMPOSANTS
- IMAGE 1
Brand : CECOTEC
Model : Powerforce 4000 Atomic
Category : Drill