
SPRAY STATION_ - Painting Equipment EARLEX - Free user manual and instructions
Find the device manual for free SPRAY STATION_ EARLEX in PDF.
| Product Type | HVLP Paint Equipment |
| Brand | EARLEX |
| Model | SPRAY STATION_ (HV6900) |
| Power | 1100 W |
| Tank Capacity | 1 Liter |
| Supply Voltage | 230 V |
| Air Hose Length | 4.5 m |
| Dynamic Air Pressure | 0.14 bar |
| Sound Pressure Level | 96 dB (A) |
| Maximum Viscosity | 250 DIN/s |
| Turbine | Triple Turbine |
| Spray Patterns | Horizontal, vertical, round |
| Nozzle Included | 2 mm (fine) + wide nozzle (interchangeable) |
| Flow Control Knob | On gun and iris on hose |
| Electrical Class | Class II (double insulation) |
| Warranty | 24 months |
| Maintenance | Clean after each use, lubricate needle tip |
| Safety | Wear mask, gloves, goggles; ventilation; no flame; disconnect before cleaning |
| Applications | Paints, varnishes, stains (water or solvent based) |
| Optional Accessories | 4L Backpack Tank (HVA0015) |
Frequently Asked Questions - SPRAY STATION_ EARLEX
User questions about SPRAY STATION_ EARLEX
0 question about this device. Answer the ones you know or ask your own.
Ask a new question about this device
Download the instructions for your Painting Equipment in PDF format for free! Find your manual SPRAY STATION_ - EARLEX and take your electronic device back in hand. On this page are published all the documents necessary for the use of your device. SPRAY STATION_ by EARLEX.
USER MANUAL SPRAY STATION_ EARLEX
^
EARLEX SPRAY STATION
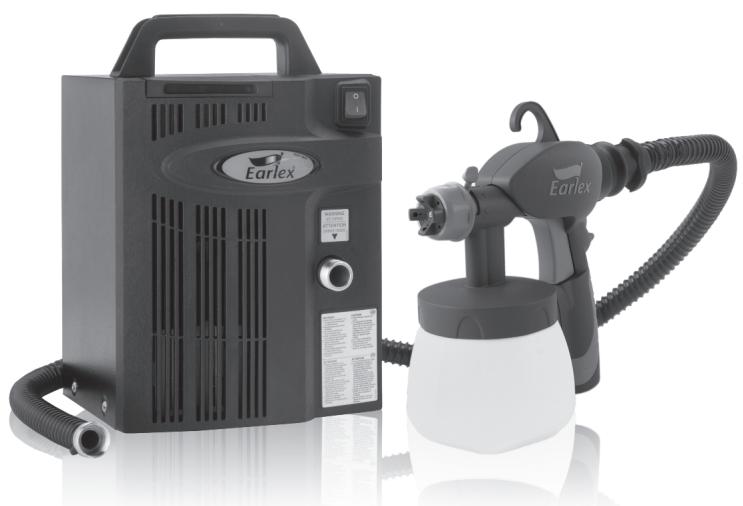
HV6900

SPRAYPACK (OPTIONAL ACCESSORY)
GB OPERATING INSTRUCTION MANUAL
FR MODE D'EMPLOI
ES MANUAL DE INSTRUCCIONES
IT MANUALE DI ISTRUZIONI OPERATIVE
DE BEDIENUNGSPANLEITUNG
PT MANUAL DE INSTRUÇÉS DE UTILIZAZão
PL INSTRUKCJA OBSLUGI
RU INHCTPYKUINI NO 3KCIJIYATAUINI
UA IHCTPYKU3 EKCJIYATAU
GR EFXEPIIIO OADHΓIΩN ΑEITOYPTIΔ
DK BETJENINGSVEJLEDNING
NL GEBRUISHANDLEIDING
TR KULLANIM TALIMATI KILAVUZU
SE BRUKSANVISNING
BEFORE USE - PLEASE READ THE MANUAL AND SAFETY INSTRUCTIONS. Please retain for future reference FOR SPRAYPACK ASSEMBLY PLEASE REFER TO SPRAYPACK MANUAL AND SAFETY INSTRUCTION MANUAL. HOSE ADAPTOR (19) - DO NOT THROW AWAY, ADAPTOR IS FOR USE WITH THE OPTIONAL SPRAYPACK ACCESSORY HVA0015.
AVANT UTILISATION MERCI DE BIEN LIRE CE MANUEL AINSI QUE LES CONSIGNES DE SECURITE.
- Never under any circumstances aim the Spray Gun at another person or animal. In the event of injury occurring seek expert medical advice immediately.
The Spray Gun must only be used with paints and solvents that have a flash point suitable for spraying. If in doubt, consult the paint or solvent manufacturer's data. - Always ensure there is adequate ventilation when spraying.
- NEVER spray near a naked flame, including appliance pilot light.
- NEVER smoke whilst spraying.
- NEVER allow children to operate or play with the Spray Gun.
- Always read the solvent manufacturer's instructions before use.
- Always disconnect unit from mains supply when filling the paint container.
Always wear a suitable protective mask when spraying. We would also recommend the use of gloves, goggles and overalls.
After each use, thoroughly clean the Spray Gun.
This appliance is not intended for use by persons (including children) with reduced physical, sensory or mental capabilities, or lack of experience and knowledge, unless they have been given supervision or instruction concerning use of the appliance by a person responsible for their safety. - Use only genuine manufacturer replacement parts.
- Always disconnect the Spray Station from the mains supply before cleaning the appliance.
- Warning: The use of any accessory or attachment, other than those recommended in this instruction manual, may present a risk of personal injury.
- Use the Spray Gun for the job it was designed for only. Mis-use of the Spray Gun will invalidate the guarantee.
- Wear ear protection.
WARNING: The substances used with this Spray Gun (paints, solvents, etc.) may contain dangerous, harmful, explosive or corrosive materials. ALWAYS COMPLY WITH THE SAFETY INSTRUCTIONS ISSUED WITH THIS PRODUCT AND THE MATERIAL BEING USED.
FOR SPRAYPACK ASSEMBLY PLEASE REFER TO SPRAYPACK MANUAL AND SAFETY INSTRUCTION MANUAL.
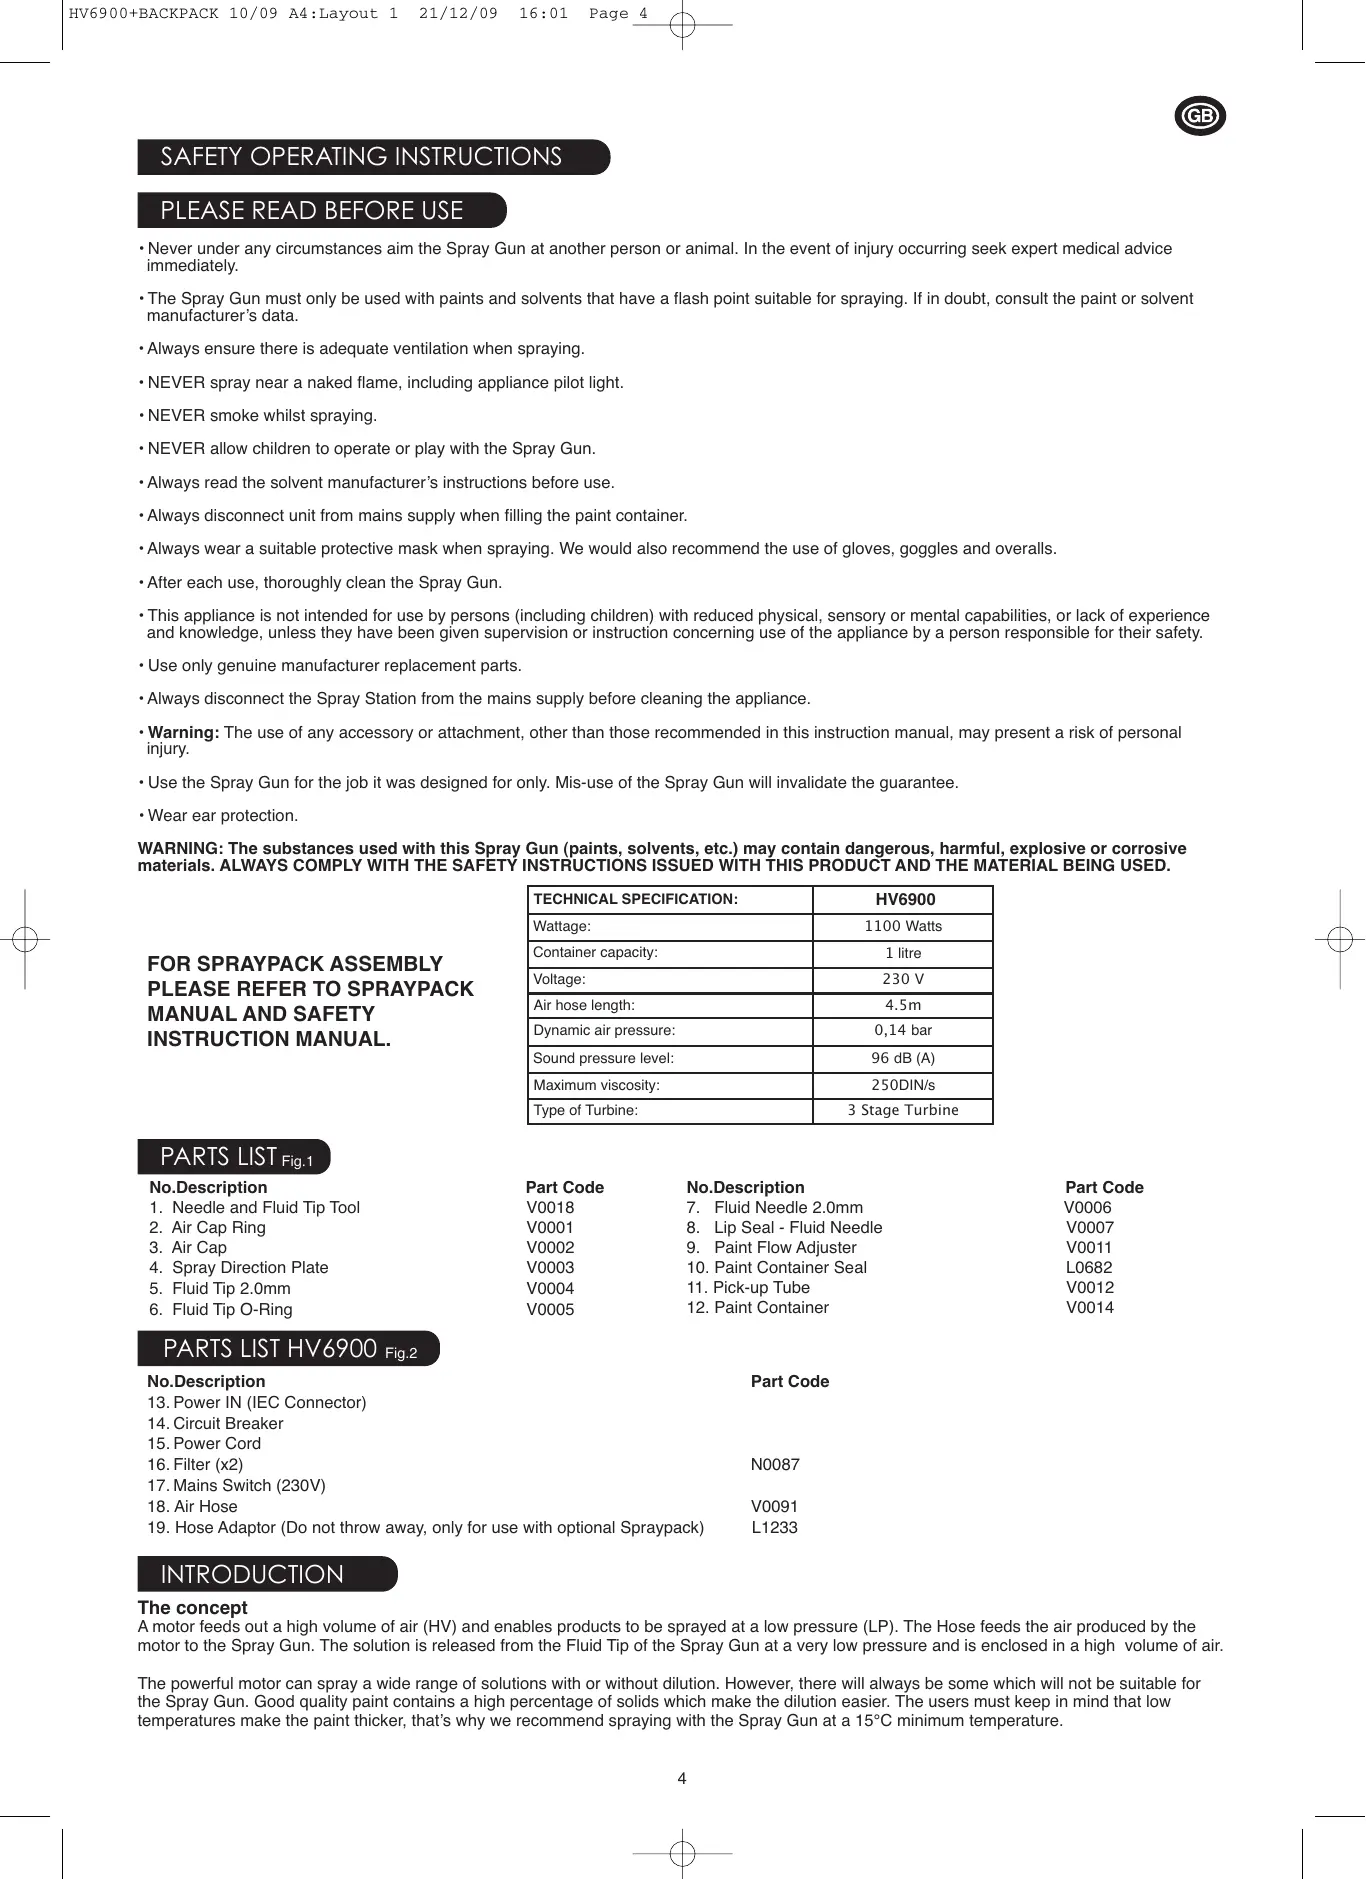
| TECHNICAL SPECIFICATION: | HV6900 |
| Wattage: | 1100 Watts |
| Container capacity: | 1 litre |
| Voltage: | 230 V |
| Air hose length: | 4.5m |
| Dynamic air pressure: | 0,14 bar |
| Sound pressure level: | 96 dB (A) |
| Maximum viscosity: | 250DIN/s |
| Type of Turbine: | 3 Stage Turbine |
PARTS LIST Fig.1
No.Description
- Needle and Fluid Tip Tool
- Air Cap Ring
- Air Cap
- Spray Direction Plate
- Fluid Tip 2.0mm
- Fluid Tip O-Ring
Part Code
V0018
V0001
V0002
V0003
V0004
V0005
No.Description
- Fluid Needle 2.0mm
- Lip Seal - Fluid Needle
- Paint Flow Adjuster
- Paint Container Seal
- Pick-up Tube
- Paint Container
Part Code
V0006
V0007
V0011
L0682
V0012
V0014
PARTS LIST HV6900 Fig.2
No.Description
- Power IN (IEC Connector)
- Circuit Breaker
- Power Cord
16.Filter (x2)
17.Mains Switch (230V) - Air Hose
- Hose Adaptor (Do not throw away, only for use with optional Spraypack)
Part Code
N0087
V0091
L1233
INTRODUCTION
The concept
A motor feeds out a high volume of air (HV) and enables products to be sprayed at a low pressure (LP). The Hose feeds the air produced by the motor to the Spray Gun. The solution is released from the Fluid Tip of the Spray Gun at a very low pressure and is enclosed in a high volume of air.
The powerful motor can spray a wide range of solutions with or without dilution. However, there will always be some which will not be suitable for the Spray Gun. Good quality paint contains a high percentage of solids which make the dilution easier. The users must keep in mind that low temperatures make the paint thicker, that's why we recommend spraying with the Spray Gun at a 15^ minimum temperature.
PREPARATION
- Carefully cover areas which are not to be painted with a plastic cover and protective tape.
- Wear a suitable mask when spraying products (and make sure there is adequate ventilation in the room when working indoors).
- Clean the surface you are going to paint. As well as being clean, it must also be dry and smooth.
- Practice first on some old wooden planks to make sure you are holding the Spray Gun correctly.
- We recommend you wear protective clothing.
- Stir the paint well using a mixer where possible.
- Make sure there are no solid particles in the paint.
- Many products can be sprayed without being thinned. However, if the application is not good, thin the product progressively in stages of 5% .
- Most paints can be sprayed by being thinned just a little, e.g. by 5% or 10% .
- Some thick paints such as outer wall paints and certain undercoats will need to be thinned by 20% or 25% .
- Use water to thin a water-based product.
- Use appropriate thinner to thin solvent-based products.
- Certain manufacturers will indicate on the can whether a specific thinner is to be used.
- Certain paint manufacturers have specific paints available for HVLP application.
Your Spray Station, is a powerful and versatile solution, and comes with two sizes of Needle and Fluid Tip:
- The smaller Needle and Fluid Tip is the most commonly used size for decorative paints.
- The larger Needle and Fluid Tip, which can be easily assembled to the Spray Gun (with the Needle and Fluid Tip Tool (1), is for thick paints such as undercoats and smooth masonry paints.
There are other optional Needle and Fluid Tip sizes available to purchase for more specific applications.
FOR SPRAYPACK ASSEMBLY PLEASE REFER TO SPRAYPACK MANUAL AND SAFETY INSTRUCTION MANUAL.
SETUP
- Fill the Paint Container (12) with the product to be sprayed. Stir well (as mentioned previously) and strain to remove any bits which will interfere with a smooth consistent spray.
- Make sure the Paint Container Seal (10) and Pick-up Tube (11) are firmly fitted into the base of the Spray Gun.
- Screw the Paint Container (12) to the base of the Spray Gun and tighten accordingly.
- Before starting, check if the Air Flow Adjuster on the hose is open at maximum.
- Start with the Paint Flow Adjuster (9) at its minimum setting so the Trigger can not be pulled. Do not forget that the Paint Flow Adjuster controls the quantity of paint sprayed (Fig.5).
- Uncoil the air Hose and attach it to the back of the Spray Gun and the other end to the Spray Station.
- Uncoil the power cable and attach the plug to the mains supply.
- Switch the Spray Station on. This will immediately cause some air to be produced, which is quite NORMAL. However, none of the product will be sprayed until the Spray Gun Trigger is pulled.
- Very important: when spraying for the first time, we recommend that you always leave the motor unit to run for 1 to 2 minutes before applying the product. Do not forget that the Paint Flow Adjuster controls the quantity of paint sprayed (Fig.5).
HINT: The air iris is there to help control the air pressure. By reducing the air pressure the paint flow will be reduced, and if you open the air at maximum, the paint flow will be increased.
ALWAYS MAKE SURE THAT THE MOTOR UNIT IS ON A RIGID SURFACE AND FREE FROM DUST.
| 3 spray patterns | |
| Horizontal and Vertical Spray with varying widthsVertical and Horizontal for normal sized jobs | Round SprayRound for small and precise jobs |
The most commonly used technique for painting a large surface is the 'crisscross' technique, i.e. you apply the product in a horizontal strips and then cross over these strips by applying the product in a vertical strips (Fig.4).
1) To achieve a horizontal strip adjust the Spray Direction Plate to the vertical position then pull the Trigger and move your arm across to the right.
2) When you get to the end of the line, release the Trigger for a moment and then apply the product in the opposite direction just beneath the line you have sprayed.
3) Next, to achieve a vertical strip adjust the Spray Direction Plate to the horizontal position then pull the Trigger and move your arm up and down over the horizontal strips you just have sprayed.
Through gradual movement of the Spray Direction Plate (4) between Horizontal, Vertical and Round spray pattern you can vary the width of the pattern (Fig.4)
HINT: To obtain the best results always keep your Spray Gun level and at an equal distance from the object you are spraying, ideally 25-30cm (10"-12") (Fig.7/8). Let your arm control the movement rather than your wrist (Fig.7/8). This will help give you an even paint distribution.
HINT: HVLP technology produces warm air through the Air Cap allowing the paint to dry quicker which can enhance the final effect.
HINT: For ceilings and floors make sure the Pick-up Tube is properly oriented towards the handle of the Spray Gun.
CLEANING INSTRUCTIONS
SPRAY GUN
FOR SPRAYPACK CLEANING PLEASE REFER TO SPRAYPACK MANUAL AND SAFETY INSTRUCTION MANUAL.
| Type of paint | Cleaning |
| Water based paint | Clean with water |
| Oiled based paint | Clean with appropriate thinner e.g. White Spirit |
HINT: Before removing or re-inserting the Needle and Fluid Tip ensure the Spray Gun has been flushed through with water or the appropriate thinner so the inner tube is clean.
HINT: When done immediately the cleaning operation can take you less than 5 minutes. If taking a break, leave the Spray Gun in a plastic bag to prevent the paint from drying.
- Remove the Paint Container (12).
- Pour any leftover paint into its container so that it can be used for the future. Pull the Trigger to allow paint to run out of the Pick-up Tube (11).
Pour a quantity of the respective thinner into container, shake the Spray Gun lightly, reassemble the Spray Gun, then spray this liquid though the Spray Gun. Repeat this until the thinner being sprayed is coming through with no traces of paint. - Clean any traces of paint off the outside of the Spray Gun.
- Clean the Paint Container Seal (10).
FLUID TIP AND NEEDLE
- Unscrew Air Cap Ring (2).
- Remove the Air Cap (3).
- Remove the Spray Direction Plate (4).
- Using the Needle and Fluid Tip Tool - pincer end A (1) remove the Fluid Tip (5).
- Insert the Needle and Fluid Tip end B (1) into the inner tube and unscrew the Needle anticlockwise, then pull to release the Needle.
- Place all of these items into a container and clean, then using a brush and the respective thinners.
- Clean the inside of the body of the Spray Gun.
Thoroughly dry all parts before reassembling. - Reassemble parts in reverse order.
- Ensure the Air Cap Ring (2) is fully tightened and the Fluid Tip is pushed into place so that the Spray Gun Needle will shut off. NB: Ensure the Spray Direction Plate is free to move. If necessary loosen the Air Cap Ring (2) slightly.
- NEVER DISPOSE OF PAINTS OR SOLVENTS DOWN THE DRAIN. ALWAYS USE YOUR LOCAL WASTE COLLECTION SITE.
- The motor unit itself does not require any specific maintenance apart from checking that the filter is not clogged up (the filter can be removed and washed). The filter can be found in the front face of the motor turbine.
Important: Each Fluid Needle is manufactured to fit the size of the corresponding Fluid Tip. Do not try to fit a 2.0mm Fluid Needle to a 3.0mm Fluid Tip.
FOR SPRAYPACK TROUBLESHOOTING PLEASE REFER TO SPRAYPACK MANUAL AND SAFETY INSTRUCTION MANUAL.
TROUBLESHOOTING
| PROBLEM | CAUSE | ACTION REQUIRED |
| The paint drips onto item being painted | Paint too diluted | Add undiluted paint |
| Paint output too high | Reduce the paint output by adjusting the Paint Flow Adjuster (9) | |
| Moving too slowly | Increase speed of application | |
| Spray Trigger held for too long | Release Trigger sooner | |
| Spray Gun too close | Increase the distance between the Spray Gun and the work surface | |
| Paint is too thin or irregular | Paint too diluted | Add undiluted paint |
| Paint output too low | Increase the paint output by adjusting the Paint Flow Adjuster (9) and check if the Air Flow Adjuster on the hose is open at maximum | |
| Moving too fast | Reduce speed of application | |
| Spray Gun clogged | Clean the Spray Gun | |
| Spray Gun too far away | Move the Spray Gun closer to the work surface | |
| No paint being released | Paint too thick | Add thinner |
| Fluid Tip clogged | Clean the Fluid Tip (5) | |
| Pick-up Tube clogged | Clean Pick-up Tube (11) | |
| Air Hose split | Replace air Hose (13) | |
| Grainy paint | Filter the paint | |
| Paint Container almost empty | Refill Paint Container (12) | |
| Spray Gun at an angle | Check that the Pick-up Tube (11) is pointing towards the paint | |
| Air inlet blocked | Check the condition of the Filter (14) and clean if necessary | |
| Lack of air flow | Check if the air flow adjuster on the hose is open at maximum | |
| Too much paint in an area | You move your wrist | Move your fore arm instead |
| Application | Either too much or not enough paint | Use the Paint Flow Adjuster (9) to control the flow |
Please note: We have done all we can to ensure that when used correctly and in accordance with these instructions the spray gun has a long and fault-free life. We accept no responsibility for damage caused by the use of incorrect or unsuitable substances, paints or liquids which have not been thinned correctly or which are not suitable for the surfaces to which they are applied, health hazards arising from a lack of ventilation when working in confined spaces or equipment which is faulty due to inadequate cleaning of the components after use. If in doubt, test a small inconspicuous area first. Always read the manufacturer's instructions before use. Neither our guarantee nor the above statement affects your statutory rights.
MAINS CONNECTION
This unit is a Class II appliance which means it is double insulated for your protection, no earthing wire is necessary. If the supply cord is damaged, it must be replaced by Earlex Ltd or our appointed agents.
If you are using an extension lead it must be rated at a minimum of 6 amps and fully unwound. Do not operate with a lead rated at less the 6 amps as this will cause premature failure of the motor which is not covered by the guarantee.
If the plug is cut off from the mains lead, it must be disposed of safely. NEVER under any circumstances insert a plug which is cut off from the mains lead into socket.
INFORMATION ON THE DISPOSAL OF WASTE ELECTRICAL EQUIPMENT KNOW AS WEEE.
Please do not dispose of tools with your household waste collected by the council. It is your responsibility to dispose of this type of waste by handing it over to a special designated collection point for recovery and recycling.
EC Declaration of Conformity
We declare that the unit: HV6900 Conforms to LVD 2006/95/EC, EN60335-1, EMC 2004/108/EC, EN55014-1, EN55014-2, EN61000-3-2, EN61000-3-3, EMF EN50366.

Tim Hopper Technical Director
All rights reserved © 2010
Design Registrations and Patents:
Spray Gun Patent Spray Gun Design Registration
GB 0903275.6 ECD 001096218-0001
CN 200930004457.X
US Applied For
EARLEX LTD. WILL ACCEPT NO RESPONSIBILITY FOR THE USE OF THIS PRODUCT IF USED FOR ANY OTHER PURPOSES THAN THOSE DETAILED HEREIN.
GUARANTEE and HELPLINE
This product is guaranteed for a period of 24 months against faulty manufacture or materials. It is not guaranteed for industrial or hire purposes. This guarantee does not affect your statutory rights. For further information or any user advice, please phone our helpline between 9am to 12am and 2pm to 5pm Mondays to Fridays (excluding Bank Holidays), or visit our website www.earlex.fr.
Earlex Ltd.
Earlex Ltd, Tel: +44 (0)1483 454666
Email: enquiries@earlex.co.uk Website: www.earlex.co.uk
Earlex Sarl.
Earlex Sarl, Tel: +33 (0)4 76 67 18 46
Email: contact@earlex.fr Website: www.earlex.fr
CONSIGNES DE SECURITE
VEUILLEZ LIRE CES CONSIGNES AVANT UTILISATION
ENSEMBLE BUSE POINTEAU
RACCORDEMENT AU SECTEUR
Tim Hopper Technical Director
Copyright & design reserve © 2010 design déposé
Email: contact@earlex.fr Website: www.earlex.fr
Tim Hopper Technical Director
Todoosdedearesthoservados ©2010Registradosdedisenos
Email: contact@earlex.fr Website: www.earlex.fr
Tim Hopper Technical Director
Email: contact@earlex.fr Website: www.earlex.fr
Tim Hopper Technical Director
Email: contact@earlex.fr Website: www.earlex.fr
INSTRUÇÉS PARA UTILizar COM SEGURANÇA
POR FAVOR LEIA ANTES DE UTILizar
Tim Hopper Technical Director
Email: contact@earlex.fr Website: www.earlex.fr
ZASADY BEZPIECZNEGUZYTKOWANIA
Tim Hopper Technical Director
Email: contact@earlex.fr Website: www.earlex.fr
ПРавиля БЕЗОПACHОУ ERTКСПЛYATALUIN
CAMODEHbI KPACKOITbT
CHCTKY PACIbJIInTEJIa SPRAYPACK CM. B INHCTPYKcNIN IIO 3KcIIyATAcN IN IHCTPYKcNIN IIO TEXHnke 6E3OpACHOCTNI SPRAYPACK
Baxhble cbeHn. KaJdA KndKocTHa 0pcyHka COOTBeTCTByeT pa3mepam ONpeJeHoro cOnla KpackOpacbIInTeIa. He nItae TcBCTabJIbT b KndKocTHyo 0pcyHky 2,0 MM B cOnlO KpackOpacbIInTeIa 3,0 MM.
IONCK I YCTPAHEHNE HENCIPABHOCTEI PACIIINTEJIa SPRAYPACK CM. B INHCTPYKUNI IO 3KCIJYATAUINI INHCTPYKUNI IO TEXHIKE BE3ONACHOCTN SPRAYPACK
YCTPAHEHNE HENCINPABHOCTE
| Самодьский Красковский Красковский Красковский Красковский Красковский Красковский Красковский Красковский Красковский Красковский Красковский Красковский Красковский Красковский Красковский Красковский Красковский Красковский Красковский Красков性疾病 Красков性疾病 Красков性疾病 Красков性疾病 Красков性疾病 Красков性疾病 Красков性疾病 Красков性疾病 Красков性疾病 Красков性疾病 Красков性疾病 Красков性疾病 Красков性疾病 Красков性疾病 Красков性疾病 Красков性疾病 Красков性疾病 КраСков性疾病 КраСков性疾病 КраСков性疾病 КраСков性疾病 КраСков性疾病 КраСков性疾病 КраСков性疾病 КраСков性疾病 КраСков性疾病 КраСков性疾病 КраСков性疾病 КраСков性疾病 КраСков性疾病 КраСков性疾病 КраСков性疾病 КраСков性疾病 КраСков性疾病 KраСков性疾病 KраСков性疾病 KраСков性疾病 KраСков性疾病 KраСков性疾病 KраСков性疾病 KраСков性疾病 KраСков性疾病 KраСков性疾病 KраС鞘 КраС鞘 КраС鞘 КраС鞘 КраС鞘 КраС鞘 КраС鞘 КраС鞘 КраС鞘 КраС鞘 КраС鞘 КраС鞘 КраС鞘 КраС鞘 КраС鞘 КраС鞘 КраС鞘 КраС鞘 КраС鞘 КраС鞘 КраС鞘 KраС鞘 KраС鞘 KраС鞘 KраС鞘 KраС鞘 KраС鞘 KраС鞘 KраС鞘 KраС鞘 KраС鞘 KраС鞘 KраС鞘 KраС鞘 KраС鞘 KраС鞘 KраС鞘 KраС鞘 KраС鞘 KраС鞘 KраС鞘 КраС鞘 KраС鞘 KраС鞘 KраС鞘 KраС鞘 KраС鞘 KраС鞘 KраС鞘 KраС鞘 KраС鞘 KраС鞘 KраС鞘 KраС鞘 KраС鞘 KраС鞘 KраС鞘 KраС鞘 KраС鞘 KраС鞘 КраС鞘 КраС鞘 KраС鞘 KраС鞘 KраС鞘 KраС鞘 KраС鞘 KраС鞘 KраС鞘 KраС鞘 KраС鞘 KраС鞘 KраС鞘 KраС鞘 KраС鞘 KраС鞘 KраС鞘 KраС鞘 KраС鞘 КраС鞘 KраС鞘 КраС鞘 KраС鞘 KраС鞘 KраС鞘 KраС鞘 KраС鞘 KраС鞘 KраС鞘 KраС鞘 KраС鞘 KраС鞘 KраС鞘 KраС鞘 KраС鞘 KраС鞘 KраС鞘 KраС鞘 KраС鞘 КраС鞘 КраС鞘 КраС鞘 KраС鞘 KраС鞘 KраС鞘 KраС鞘 KраС鞘 KраС鞘 KраС鞘 KраС鞘 KраС鞘 KраС鞘 KраС鞘 KраС鞘 KраС鞘 KраС鞘 KраС鞘 KраС鞘 КраС鞘 KраС鞘 KраС鞘 КраС鞘 KраС鞘 KраС鞘 KраС鞘 KраС鞘 KраС鞘 KраС鞘 KраС鞘 KраС鞘 KраС鞘 KраС鞘 KраС鞘 KраС鞘 KраС鞘 KраС鞘 KраС鞘 KраС鞘 КраС鞘 KраС鞘 КраС鞘 КраС鞘 KраС鞘 KраС鞘 KраС鞘 KраС鞘 KраС鞘 KраС鞘 KраС鞘 KраС鞘 KраС鞘 KраС鞘 KраС鞘 KраС鞘 KраС鞘 KраС鞘 KраС鞘 KраС鞘 КраС鞘 КраС鞘 KраС鞘 КраС鞘 KраС鞘 KраС鞘 KраС鞘 KраС鞘 KраС鞘 KраС鞘 KраС鞘 KраС鞘 KраС鞘 KраС鞘 KраС鞘 KраС鞘 KраС鞘 KраС鞘 KраС鞘 KраС鞘 КраС鞘 КраС鞘 КраС鞘 КраС鞘 KраС鞘 KраС鞘 KраС鞘 KраС鞘 KраС鞘 KраС鞘 KраС鞘 KраС鞘 KраС鞘 KраС鞘 KраС鞘 KраС鞘 KраС鞘 KраС鞘 KраС鞘 КраС鞘 KраС鞘 KраС鞘 KраС鞘 КраС鞘 KраС鞘 KраС鞘 KраС鞘 KраС鞘 KраС鞘 KраС鞘 KраС鞘 KраС鞘 KраС鞘 KраС鞘 KраС鞘 KраС鞘 KраС鞘 KраС鞘 KраС鞘 КраС鞘 KраС鞘 KраС鞘 КраС鞘 КраС鞘 KраС鞘 KраС鞘 KраС鞘 KраС鞘 KраС鞘 KраС鞘 KраС鞘 KраС鞘 KраС鞘 KраС鞘 KраС鞘 KраС鞘 KраС鞘 KраС鞘 KраС鞘 КраС鞘 KраС鞘 КраС鞘 KраС鞘 КраС鞘 KраС鞘 KраС鞘 KраС鞘 KраС鞘 KраС鞘 KраС鞘 KраС鞘 KраС鞘 KраС鞘 KраС鞘 KраС鞘 KраС鞘 KраС鞘 KраС鞘 KраС鞘 КраС鞘 KраС鞘 КраС鞘 КраС鞘 КраС鞘 KраС鞘 KраС鞘 KраС鞘 KраС鞘 KраС鞘 KраС鞘 KраС鞘 KраС鞘 KраС鞘 KраС鞘 KраС鞘 KраС鞘 KраС鞘 KраС鞘 KраС鞘 КраС鞘 КраС鞘 KраС鞘 KраС鞘 КраС鞘 KраС鞘 KраС鞘 KраС鞘 KраС鞘 KраС鞘 KраС鞘 KраС鞘 KраС鞘 KраС鞘 KраС鞘 KраС鞘 KраС鞘 KраС鞘 KраС鞘 KраС鞘 КраС鞘 КраС鞘 KраС鞘 КраС鞘 КраС鞘 KраС鞘 KраС鞘 KраС鞘 KраС鞘 KраС鞘 KраС鞘 KраС鞘 KраС鞘 KраС鞘 KраС鞘 KраС鞘 KраС鞘 KраС鞘 KраС鞘 KраС鞘 КраС鞘 КраС鞘 КраС鞘 KраС鞘 КраС鞘 KраС鞘 KраС鞘 KраС鞘 KраС鞘 KраС鞘 KраС鞘 KраС鞘 KраС鞘 KраС鞘 KраС鞘 KраС鞘 KраС鞘 KраС鞘 KраС鞘 KраС鞘 КраС鞘 КраС鞘 КраС鞘 КраС鞘 КраС鞘 KраС鞘 KраС鞘 KраС鞘 KраС鞘 KраС鞘 KраС鞘 KраС鞘 KраС鞘 KраС鞘 KраС鞘 KраС鞘 KраС鞘 KраС鞘 KраС鞘 КраС鞘 KраС鞘 KраС鞘 KраС鞘 KраС鞘 КраС鞘 KраС鞘 KраС鞘 KраС鞘 KраС鞘 KраС鞘 KраС鞘 KраС鞘 KраС鞘 KраС鞘 KраС鞘 KраС鞘 KраС鞘 KраС鞘 KраС鞘 КраС鞘 KраС鞘 KраС鞘 KраС鞘 КраС鞘 КраС鞘 KраС鞘 KраС鞘 KраС鞘 KраС鞘 KраС鞘 KраС鞘 KраС鞘 KраС鞘 KраС鞘 KраС鞘 KраС鞘 KраС鞘 KраС鞘 KраС鞘 КраС鞘 KраС鞘 KраС鞘 КраС鞘 KраС鞘 КраС鞘 KраС鞘 KраС鞘 KраС鞘 KраС鞘 KраС鞘 KраС鞘 KраС鞘 KраС鞘 KраС鞘 KраС鞘 KраС鞘 KраС鞘 KраС鞘 KраС鞘 КраС鞘 KраС鞘 KраС鞘 КраС鞘 КраС鞘 КраС鞘 KраС鞘 KраС鞘 KраС鞘 KраС鞘 KраС鞘 KраС鞘 KраС鞘 KраС鞘 KраС鞘 KраС鞘 KраС鞘 KраС鞘 KраС鞘 KраС鞘 КраС鞘 KраС鞘 КраС鞘 KраС鞘 KраС鞘 КраС鞘 KраС鞘 KраС鞘 KраС鞘 KраС鞘 KраС鞘 KраС鞘 KраС鞘 KраС鞘 KраС鞘 KраС鞘 KраС鞘 KраС鞘 KраС鞘 KраС鞘 КраС鞘 KраС鞘 КраС鞘 KраС鞘 КраС鞘 КраС鞘 KраС鞘 KраС鞘 KраС鞘 KраС鞘 KраС鞘 KраС鞘 KраС鞘 KраС鞘 KраС鞘 KраС鞘 KраС鞘 KраС鞘 KраС鞘 KраС鞘 КраС鞘 KраС鞘 КраС鞘 КраС鞘 KраС鞘 КраС鞘 KраС鞘 KраС鞘 KраС鞘 KраС鞘 KраС鞘 KраС鞘 KраС鞘 KраС鞘 KраС鞘 KраС鞘 KраС鞘 KраС鞘 KраС鞘 KраС鞘 КраС鞘 KраС鞘 КраС鞘 КраС鞘 КраС鞘 КраС鞘 KраC鞘 KраC鞘 KраC鞘 KраC鞘 KраC鞘 KраC鞘 KраC鞘 KраC鞘 KраC鞘 KраC鞘 KраC鞘 KраC鞘 KраC鞘 KраC鞘 KраC鞘 KраC鞘 KраC鞘 KраC鞘 KраC鞘 KраC鞘 KраС鞘 KраC鞘 KраC鞘 KраC鞘 KраC鞘 KраC鞘 KраC鞘 KраC鞘 KраC鞘 KраC鞘 KраC鞘 KраC鞘 KраC鞘 KраC鞘 KраC鞘 KраC鞘 KраC鞘 KраC鞘 KраC鞘 KраC鞘 КраC鞘 KраC鞘 KраC鞘 KраC鞘 KраC鞘 KраC鞘 KраC鞘 KраC鞘 KраC鞘 KраC鞘 KраC鞘 KраC鞘 KраC鞘 KраC鞘 KраC鞘 KраC鞘 KраC鞘 KраC鞘 KраC鞘 KраC鞘 КраС鞘 KраC鞘 KраC鞘 KраC鞘 KраC鞘 KраC鞘 KраC鞘 KраC鞘 KраC鞘 KраC鞘 KраC鞘 KраC鞘 KраC鞘 KраC鞘 KраC鞘 KраC鞘 KраC鞘 KраC鞘 KраC鞘 KраС鞘 KраС鞘 KраC鞘 KраC鞘 KраC鞘 KраC鞘 KраC鞘 KраC鞘 KраC鞘 KраC鞘 KраC鞘 KраC鞘 KраC鞘 KраC鞘 KраC鞘 KраC鞘 KраC鞘 KраC鞘 KраC鞘 KраC鞘 KраС鞘 КраС鞘 KраC鞘 KраC鞘 KраC鞘 KраC鞘 KраC鞘 KраC鞘 KраC鞘 KраC鞘 KраC鞘 KраC鞘 KраC鞘 KраC鞘 KраC鞘 KраC鞘 KраC鞘 KраC鞘 KраC鞘 KраC鞘 КраС鞘 KраС鞘 KраC鞘 KраC鞘 KраC鞘 KраC鞘 KраC鞘 KраC鞘 KраC鞘 KраC鞘 KраC鞘 KраC鞘 KраC鞘 KраC鞘 KраC鞘 KраC鞘 KраC鞘 KраC鞘 KраC鞘 KраC鞘 КраC鞘 KраС鞘 KраC鞘 KраC鞘 KраC鞘 KраC鞘 KраC鞘 KраC鞘 KраC鞘 KраC鞘 KраC鞘 KраC鞘 KраC鞘 KраC鞘 KраC鞘 KраC鞘 KраC鞘 KраC鞘 KраC鞘 KраC鞘 КраС鞘 КраC鞘 КраC鞘 KраC鞘 KраC鞘 KраC鞘 KраC鞘 KраC鞘 KраC鞘 KраC鞘 KраC鞘 KраC鞘 KраC鞘 KраC鞘 KраC鞘 KраC鞘 KраC鞘 KраC鞘 KраC鞘 KраC鞘 KраC鞘 КраC鞘 КраC鞘 KраC鞘 KраC鞘 KраC鞘 KраC鞘 KраC鞘 KраC鞘 KраC鞘 KраC鞘 KраC鞘 KerateC鞘 KerateC鞘 KerateC鞘 KerateC鞘 KerateC鞘 KerateC鞘 KerateC鞘 KerateC鞘 KerateC鞘 KerateC鞘 KerateC鞘 KerateC鞘 KerateC鞘 KerateC鞘 KerateC鞘 KerateC鞘 KerateC鞘 KerateC鞘 KerateC鞘 KerateC鞘 K泣E鞘 K泣E鞘 K泣E鞘 K泣E鞘 K泣E鞘 K泣E鞘 K泣E鞘 K泣E鞘 K泣E鞘 K泣E鞘 K泣E鞘 K泣E鞘 K泣E鞘 K泣E鞘 K泣E鞘 K泣E鞘 K泣E鞘 K泣E鞘 K泣E鞘 K泣E鞘 K泣F鞘 K泣F鞘 K泣F鞘 K泣F鞘 K泣F鞘 K泣F鞘 K泣F鞘 K泣F鞘 K泣F鞘 K泣F鞘 K泣F鞘 K泣F鞘 K泣F鞘 K泣F鞘 K泣F鞘 K泣F鞘 K泣F鞘 K泣F鞘 K泣F鞘 K泣F鞘 K泣E鞘 K泣E鞘 K泣E鞘 K泣E鞘 K泣E鞘 K泣E鞘 K泣E鞘 K泣E鞘 K泣E鞘 K泣E鞘 K泣E鞘 K泣E鞘 K泣E鞘 K泣E鞘 K泣E鞘 K泣E鞘 K泣E鞘 K泣E鞘 K泣E鞘 K泣 E鞘 K泣E鞘 K泣E鞘 K泣E鞘 K泣E鞘 K泣E鞘 K泣E鞘 K泣E鞘 K泣E鞘 K泣E鞘 K泣E鞘 K泣E鞘 K泣E鞘 K泣E鞘 K泣E鞘 K泣E鞘 K泣E鞘 K泣E鞘 K泣E鞘 K泣E鞘 K泣H鞘 K泣H鞘 K泣H鞘 K泣H鞘 K泣H鞘 K泣H鞘 K泣H鞘 K泣H鞘 K泣H鞘 K泣H鞘 K泣H鞘 K泣H鞘 K泣H鞘 K泣H鞘 K泣H鞘 K泣H鞘 K泣H鞘 K泣H鞘 K泣H鞘 K泣H鞘 K泣 H鞘 K泣H鞘 K泣H鞘 K泣H鞘 K泣H鞘 K泣H鞘 K泣H鞘 K泣H鞘 K泣H鞘 K泣H鞘 K泣H鞘 K泣H鞘 K泣H鞘 K泣H鞘 K泣H鞘 K泣H鞘 K泣H鞘 K泣H鞘 K泣H鞘 K泣H鞘 K泣E鞘 K泣E鞘 K泣E鞘 K泣E鞘 K泣E鞘 K泣E鞘 K泣E鞘 K泣E鞘 K泣E鞘 K泣E鞘 K泣E鞘 K泣E鞘 K泣E鞘 K泣E鞘 K泣E鞘 K泣E鞘 K泣E鞘 K泣E鞘 K泣E鞘 K泣A鞘 K泣A鞘 K泣A鞘 K泣A鞘 K泣A鞘 K泣A鞘 K泣A鞘 K泣A鞘 K泣A鞘 K泣A鞘 K泣A鞘 K泣A鞘 K泣A鞘 K泣A鞘 K泣A鞘 K泣A鞘 K泣A鞘 K泣A鞘 K泣A鞘 K泣A鞘 K泣 A 韩C 韩C 韩C 韬C 韬C 韬C 韬C 韬C 韬C 韬C 韬C 韬C 韬C 韬C 韬C 韬C 韬C 韬C 韬C 韬C 韬C 韬C 韬C 韬C 韬C 韬C 韬C 韬C 韻C 韬C 韬C 韬C 韬C 韬C 韬C 韬C 韬C 韬C 韬C 韬C 韬C 韬C 韬C 韬C 韬C 韬C 韬C 韬C 韬C 韬C 韬C 韬C 韬C 韪C 韬C 韬C 韬C 韬C 韬C 韬C 韬C 韬C 韬C 韬C 韬C 韬C 韬C 韬C 韬C 韬C 韬C 韬C 韬C 韬C 韬C 韬C 韬C 韬C 韷C 韬C 韬C 韬C 韬C 韬C 韬C 韬C 韬C 韬C 韬C 韬C 韬C 韬C 韬C 韬C 韬C 韬C 韬C 韬C 韬C 韬C 韬C 韬C 韬C 韴C 韬C 韬C 韬C 韬C 韬C 韬C 韬C 韬C 韬C 韬C 韬C 韬C 韬C 韬C 韬C 韬C 韬C 韬C 韬C 韬C 韬C 韬C 韬C 韬C 韼C 韬C 韬C 韬C 韬C 韬C 韬C 韬C 韬C 韬C 韬C 韬C 韬C 韬C 韬C 韬C 韬C 韬C 韬C 韬C 韬C 韬C 韬C 韬C 韬C 響C 韬C 韬C 韬C 韬C 韬C 韬C 韬C 韬C 韬C 韬C 韬C 韬C 韬C 韬C 韬C 韬C 韬C 韬C 韬C 韬C 韬C 韬C 韬C 韬C 韅C 韬C 韬C 韬C 韬C 韬C 韬C 韬C 韬C 韬C 韬C 韬C 韬C 韬C 韬C 韬C 韬C 韬C 韬C 韬C 韬C 韬C 韬C 韬C 韬C 韭C 韬C 韬C 韬C 韬C 韬C 韬C 韬C 韬C 韬C 韬C 韬C 韬C 韬C 韬C 韬C 韬C 韬C 韬C 韬C 韬C 韬C 韬C 韬C 韬C 韫C 韬C 韬C 韬C 韬C 韬C 韬C 韬C 韬C 韬C 韬C 韬C 韬C 韬C 韬C 韬C 韬C 韬C 韬C 韬C 韬C 韬C 韬C 韬C 韬C 韰C 韬C 韬C 韬C 韬C 韬C 韬C 韬C 韬C 韬C 韬C 韬C 韬C 韬C 韬C 韬C 韬C 韬C 韬C 韬C 韬C 韬C 韬C 韬C 韬C 韶C 韬C 韬C 韬C 韬C 韬C 韬C 韬C 韬C 韬C 韬C 韬C 韬C 韬C 韬C 韬C 韬C 韬C 韬C 韬C 韬C 韬C 韬C 韬C 韬C 韝C 韬C 韬C 韬C 韬C 韬C 韬C 韬C 韬C 韬C 韬C 韬C 韬C 韬C 韬C 韬C 韬C 韬C 韬C 韬C 韬C 韬C 韬C 韬C 韬C 韩C 韬C 韬C 韬C 韬C 韬C 韬C 韬C 韬C 韬C 韬C 韬C 韬C 韬C 韬C 韬C 韬C 韬C 韬C 韬C 韬C 韬C 韬C 韬C 韻C 韻C 韬C 韬C 韬C 韬C 韬C 韬C 韬C 韬C 韬C 韬C 韬C 韬C 韬C 韬C 韬C 韬C 韬C 韬C 韬C 韬C 韬C 韬C 韬C 韻C 韷C 韬C 韬C 韬C 韬C 韬C 韬C 韬C 韬C 韬C 韬C 韬C 韬C 韬C 韬C 韬C 韬C 韬C 韬C 韬C 韬C 韬C 韬C 韬C 韻C 韪C 韬C 韬C 韬C 韬C 韬C 韬C 韬C 韬C 韬C 韬C 韬C 韬C 韬C 韬C 韬C 韬C 韬C 韬C 韬C 韬C 韬C 韬C 韬C 韻C 韴C 韬C 韬C 韬C 韬C 韬C 韬C 韬C 韬C 韬C 韬C 韬C 韬C 韬C 韬C 韬C 韬C 韬C 韬C 韬C 韬C 韬C 韬C 韬C 韻C 韼C 韬C 韬C 韬C 韬C 韬C 韬C 韬C 韬C 韬C 韬C 韬C 韬C 韬C 韬C 韬C 韬C 韬C 韬C 韬C 韬C 韬C 韬C 韬C 韻C 韵C 韬C 韬C 韬C 韬C 韬C 韬C 韬C 韬C 韬C 韬C 韬C 韬C 韬C 韬C 韬C 韬C 韬C 韬C 韬C 韬C 韬C 韬C 韬C 韬C 韱C 韬C 韬C 韬C 韬C 韬C 韬C 韬C 韬C 韬C 韬C 韬C 韬C 韬C 韬C 韬C 韬C 韬C 韬C 韬C 韬C 韬C 韬C 韬C 韬C 韦C 韬C 韬C 韬C 韬C 韬C 韬C 韬C 韬C 韬C 韬C 韬C 韬C 韬C 韬C 韬C 韬C 韬C 韬C 韬C 韬C 韬C 韬C 韬C 韬C 韧C 韬C 韬C 韬C 韬C 韬C 韬C 韬C 韬C 韬C 韬C 韬C 韬C 韬C 韬C 韬C 韬C 韬C 韬C 韬C 韬C 韬C 韬C 韬C 韬C 韲C 韬C 韬C 韬C 韬C 韬C 韬C 韬C 韬C 韬C 韬C 韬C 韬C 韬C 韬C 韬C 韬C 韬C 韬C 韬C 韬C 韬C 韬C 韬C 韬C 韸C 韬C 韬C 韬C 韬C 韬C 韬C 韬C 韬C 韬C 韬C 韬C 韬C 韬C 韬C 韬C 韬C 韬C 韬C 韬C 韬C 韬C 韬C 韬C 韬C 韠�A 10-20 mm |
OBPATNTE BHUMAHNE: Hawa kompanhna npedpnpnHbA BCE BO3MOxHbIe ycHnIy dIg o6ecneueHn IINTeJbHO n 6e3OTka3HO pa60tby kpaKoynbTa npu yCNOBn npaBnIbHO rncOJIb3OBAHn yCTPOJCTBa n CO6JIIODeHn npINBeDEHHbIX INCHTpyKcN. Hawa kompanhna He npHNMaet Ha ce6y HnKaKoI OTBeTCTBeHHOCTNa IOBpeJXeHn, BO3HKnUWe B pe3yIbTaTe NCPOJIb3OBAHn HECOOBTCTBYUOnx BeSeCTB, KpaCOK nn JxIKDkoCTe, He pa36abNeHHbIX npaBnIbHbIM O6pa3OM nn He NOxDxoJxN Dn POBepxHocTe, Ha KOtOpbIe nx HAHeCIn, 3a ONaCHOCTn dIy 3dOpOBbY, BO3HKnUWe BCJeCDTBne OTCyTCTBn BEHTNJLznn pni pa6ote B 3AMKNHTbIX pOcSTpaHCTbax, nn 3a HeNCnPabHOCTHn O6OpYDoAHn B C8Zn C HeNPaBnJIbHO ouNCTKOJe TaeJe PONMeHn. B Clyuae comHenm nICnp6oyte obOpudOBaHne Ha ne6lonbWom He3aMeTHOM yAcTke. Do hauJa pa60tby npouHTaTe INCHTPkCnn npOn3BOdntela. Hr rapaHTnHawei Kompanhns, Hn npinBeDeHHoe Bblse 3aABLeHne He BnIyOT Ha BAHNz 3akOHbIe npaba.
ПОДКЛIOЧЕНЕ K ΘЛЕКТРИСECHКОВ CETN
DaHHe yCtpoCTBO npedctablaet c6oB o6OpydoBaHne BTOPOrO KnaCa, qTO O3Naaye erO DBOHyu n3OJaunIO (Jnra 3aunTbI onepaTopa). Heo6xoImocTb B 3a3emJIoUeM npOBoe OTCyTCTByeT. B Cnyae nobpejckenra Ka6eYnntaHnra 3ameHy npOn3BODNT KOMpanHry Earlex Ltd nn Ha3NaueHHb IToN KOmpaHne npedctabTeb.
EcnBbI nCnoNb3yeTe ydHnHtEnbHbI npoBOd, nocJeHm DOJxKeH 6bITb paCCHTaH KaK MHNUMy H a 6 A. KpOme TOrO, ydHnHtEnb Heo6xoDmIO nnHOCTbO pa3MToTaTb. He nCnoNb3yIte ydHnHtEnn, paCCHTaHHbIe MeHee Yem Ha 6 A: 3TO NOBLeYET 3a co6oI npexkDeBpeMeHHbI OTKa3 DBuRatJIa, Ha KOToPbI He paCnpocTpahReTc rapaHTnIa.
OTpe3aHnyo OT ceTeBoro npoBoDa BnIky CneIyet 6e3oNaChbIM o6pa3OM yTnIIn3npoBaTb. KATEGOpUcECKN 3AIPPEuAETCBACTabIbTB pO3eTKy BnIKy, OTpe3aHnyo OT ceTeBoro npoBoDa.
CBEDEHNAOB YTNJIN3AUINOTXODOB 3JEKTPOOBOPUOBAHNA COEPEKATCBI INPEKTNBECO6 OTXODAX 3JEKTPNUECKOTO N 3JEKTPOHHO OBOPOYIOBAHNA (WEEE).
He Bb6paBbAaTe npn6OpBb MecTax dIy c6opa 6bITOBbIX OTXoOB MyHnCnnaJbHbIMn CnyK6amN. Bbl 063aHbI yTIN3nPObBaTb OTXOdbI 3TORO BnDa NytEm INx nepedauN B CneuaJbHO ppeHa3HaueHHbI DJI ATOrO PyHKT dJI nocJeDyUoSei nepepa6oTKn.
3aBHeHne O COOTBeTCTBnN DnpeKTHBAM n CtaHapTaM EC
3aBJIaEM, yTO yCTpoiCTBO HV6900 COOTBeTCTBye T NipeKtNBe NO Hn3KOBoIbTHbIM yCTpoiCTBaM: LVD 2006/95/EC,
EN60335-1, EMC 2004/108/EC, EN55014-1, EN55014-2, EN61000-3-2, EN61000-3-3, EMF EN50366.

Tim Hopper Technical Director
Bce npaba 3aunuenehbl © 2010
Pernctpaunna n paentbHa npomblneHHb o6pa3e:
Паент пистолеТа-Кpackорapacпыntел GB 0903275.6
Perictpaunu nn3aHa nctoIeta-Kpackopacbllntela
ECD 001096218-0001
CN 200930004457.X
Email: contact@earlex.fr Website: www.earlex.fr
IHCTPYKl3 3 TEXHIKU B63NEKN
CINCOK DETAJIEN HV6900 Fig.2
No. OnncaHHa
- Bxid nla niikloueHHdo Mepek (IEC-po3'EM)
- Bvmkaay
- Hyp KInBneHH
- Φινβτρ (x2)
- Bumnkauch kublenhny bID eJekTpomepeksi (230B)
18.Шланг д借贷 постру V0091 - NepexiDnK ShaHa (He BkndaTe, nIse dJa BnKOpncTaHn 3 DoaTkoBOIO EmHicTIO dJa po3nneHH) L1233
BCTYI
3araJIbHI BiDOMOCTI
ΦAP5OITyJIbT
UCYHEHHH HECIPABHOCTE
Tim Hopper Technical Director
Yci npaba 3axucho © 2010
Peectpaia Ta nataeHTn Ha npomncobn 3pa3ok:
PnteHT Ha 4ap60nyIbT
GB 0903275.6
PeεctpaizipomncloBoro 3pa3ka φap6onylbTa
ECD 001096218-0001
CN 200930004457.X
Email: contact@earlex.fr Website: www.earlex.fr
ANAYTIKH NAPOYZIAZH EEAPTHMATQN
O△HΓIEΣ AΣΦΑΛΟΥΣ ΛΕΙΤΟΥΡΙΑΣ
- Noté μη στοχεδε, uno onoileδhniote συνθήκες, μe to ποτόλι ψεκασμού σε αλλο ὄτομο ἡώ. Στην περίπτωπ Πραματισμου, αναζηntηοτε αμέως την λατρική συμβουλή εἰδικόύ.
To ntoaiyekaoou (Spray Gun) npenei vxaonoiiteo movo e xpwata kai diautec nou exovkataa a o nmeio avxalegs yia tov yekao. Av exete auploie, ouuboueute iTe T a otoixei naou divei o katoakeuaotnc tou xpawatoc n Tou dxalutn. - iασραλiζεTE náVTOTE TOV έπαρκί αερισό O Θη διλρκελ TOUT ΨΕΚασμού.
MnyeKcETNEOTE KovTcOeYuunfoyox,ueouneIaouvoevofoyioTopo ouokenuc.
MnyKamviCetETNOTKEaTnDLapkelaTOUeKaOmou.
MnV aPnveTne NOTE nlaia vX npouoov To nroI yekaou v naizouv e auto. - navtoTE Tc odyieTou katakeuaoTou dlautko npiv ano th xphon.
AnouvdeTe nVToTe Tn movad a nTnv npoxn pUaTOc otav yeiCETe to doxieo xpuaTOc.
ΦopATE nVTOTE KAtaAaIηn npoTATEUkIn μαKa KaTAt η δIαρKeIα Tou Ψekασou. Σας Σιμβouλεύομε επιοις vα xρησιμοιeite γαντια, yαλια πoστασίας και φόρμα εργασίας.
-Metaxo koxon, KxOaipZeTne pooeKtko to mToIa yekaoou.
Autn n ouokun dev npoopieetai yia xpno ano atoqa (oumuepilaaibavovevwTwv naoliv) meeuwvecs oomegaatikcs, aonnpie c n vontukc icavotntec n xwpic emelpi kai yywo, ektoc k av enlneovtai n kaoobnyouvtai oxetikac e Tn xpnon Tns ouokun c no ato mo utuuvvoia tynxopaaleiouc.
Xpnoiounoleite movo yvnoia Tou kataokueaoTn.
AnouvdeTe nVToTe To ouTnSpray Station ano Tnv npoxn pouocntpoTuK aOaioTe tn oukeun. - Pinoel donoioi: n xpnon axllawb onnntkuvn suvoobutikwv Exaptnmuatwv ta onoi aevouotovtai e auto to yexelpidlo odnyuwv evexetal vEvexel kivduvo tpaumauuouo.
Xpnoiopoioite To mIoIy IeKoou mo'ov yia Tnv epyaoia yia Tnv onoi oxedtoNk. H avop0doGxpnTou nloaiou oekosou th aokupow tnv Eyyunon.
ΦopATE npoOaTeUkαAutuV.
IPOEI OIOIHs: O ouie c nou xpoi umolovvt a e To mToa (xpuoau (xpuuTa, dlautk k. an.) vdeexetai v npeloxuv emkvduv, bαβεpα, εκρηκτικα ἡιαβρωτικα uλικα. THPEITE IANTOTE TIZ ODHIEA ΑΦAIAEIA ΠOY ΣYNODEYOYN TH ΣYΣKEYH KAI TO YAIKO XPHSEΩ.
AIΣTA EΞAPTHMATΩN Fig.1
AIΣTA EΕAPTHMATΩN HV6900 Fig.2
Ap. περιγαφής Kωδικός
13. EIZOAOZ Tpoopodooiac (EuvdEtnpaoI EC)
14. Aαφαλειδιακόπτης
15. Kαλωδιο τροροδοσιας
16. Φίλτρο (x2)
17. 可 k (230 V)
18. EukamToc σwλναc αερα
19. Ppooaepooyeaec uokamttou oawlnu (myn to nptae, ppoopicetai yia xnpn movto paoipetko ouykpotaoukeunc yekaaou) L1233
EgopntmuTOG
ΣXEΔIATPAMMATA
H apxn IeIoupyiaC
Tim Hopper Technical Director
All rights reserved © 2010
Kataxwpnoeic oxediou kai dianwpua eupeotexviac:
EFTYHsH KcI I PAMMH BOHoeIAZ
To npoiov auto kaiutetao 24 nnuw yia eattwauata oTnv kaataokeun n otuaiká. H eyyunon dev kaiutel tlc Bloumxavikec epapouoye n tnv evolkiacn. H npouo ayyunon dev etnpaeei ta voumu dkaowatocg. Ia Tepiootepe c PAnpoopiecs n ouuboue c pocs Touc xnotes, kaleote tn ypaum biohelac aTO Tc 9:00 p.m. ewc tic 12:00 m.p. kai ano tic 2:00 m.p. wC tic 5:00 m.p., aTO n Tneptepa wTnv Ppaokeun (EKTOS apyuv) n ETIOKePTeTE Tnv loosleia ac: www.earlex.fr
Earlex Sarl.
Earlex Sarl, Tel: +33 (0)4 76 67 18 46
Email: contact@earlex.fr Website: www.earlex.fr
SPLITTEGNING
SIKKERHEDSVEJLEDNING
Tim Hopper Technical Director
Email: contact@earlex.fr Website: www.earlex.fr
OPENGEWERKTE TEKENING VAN ONDERDELEN
VEILIGHEIDSINSTRUCTIES
ONDERDELENLIJST HV6900 Fig.2
Nr. Omschrijving
Tim Hopper Technical Director
Email: contact@earlex.fr Website: www.earlex.fr
PAYLAYAN PARÇALARIN iNCELENMESI
GÜV ENLI KULLANIM TALIMATLARI
Tim Hopper Technical Director
Email: contact@earlex.fr Website: www.earlex.fr
Tim Hopper Technical Director
All rights reserved © 2010
Email: contact@earlex.fr Website: www.earlex.fr
Notes

Earlex Ltd.
Earlex Ltd, Tel: +44 (0)1483 454666
Email: enquiries@earlex.co.uk Website: www.earlex.co.uk
Earlex Sarl.
Earlex Sarl, Tel: +33 (0)4 76 67 18 46
Email: contact@earlex.fr Website: www.earlex.fr
V0093 12/09