
Spray Station 1900 - Paint gun EARLEX - Free user manual and instructions
Find the device manual for free Spray Station 1900 EARLEX in PDF.


| Product Type | Paint Sprayer (HVLP) |
| Brand | Earlex |
| Model | Spray Station 1900 |
| Power Source | Electric (corded) |
| Motor Power | 650 W |
| Maximum Pressure | 2.5 bar |
| Spray Cup Capacity | 1.5 L |
| Spray Pattern | Adjustable (horizontal, vertical, round) |
| Nozzle Sizes | 1.3 mm, 1.5 mm, 1.8 mm (interchangeable) |
| Air Flow | Up to 1.5 m³/min |
| Weight | 3.2 kg |
| Dimensions (L x W x H) | 30 x 20 x 25 cm |
| Cable Length | 2 m |
| Viscosity Range | 20-100 seconds (DIN cup) |
| Cleaning | Disassemble and flush with solvent or water |
| Maintenance | Lubricate moving parts regularly; clean air filter |
| Safety Features | Trigger lock; thermal overload protection |
| Spare Parts Availability | Replaceable nozzles, needles, cups, and seals |
| Warranty | 1 year limited warranty |
| Compatible Materials | Paints, varnishes, stains, primers, lacquers |
Frequently Asked Questions - Spray Station 1900 EARLEX
User questions about Spray Station 1900 EARLEX
0 question about this device. Answer the ones you know or ask your own.
Ask a new question about this device
Download the instructions for your Paint gun in PDF format for free! Find your manual Spray Station 1900 - EARLEX and take your electronic device back in hand. On this page are published all the documents necessary for the use of your device. Spray Station 1900 by EARLEX.
USER MANUAL Spray Station 1900 EARLEX
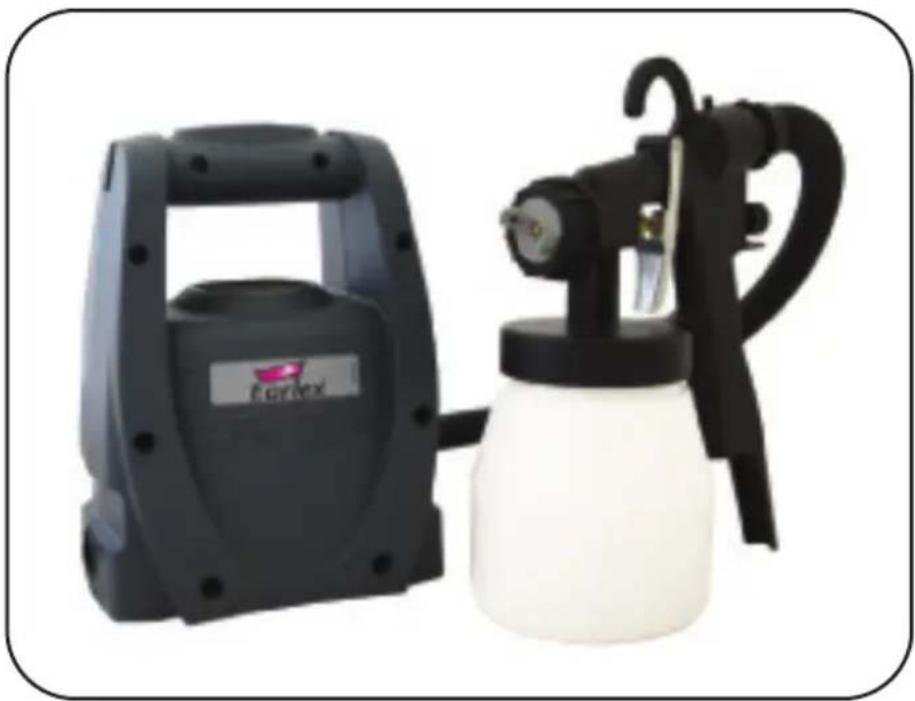
HVLP PAINT SPRAYING KIT
natural_image
Two spray sprayers, one black and one white, displayed against a plain background (no text or symbols visible)OPERATING INSTRUCTIONS
Thank you for purchasing the Earlex Spray System kit.
This is a highly versatile spray kit and can be used on a variety of applications.
BEFORE USE - PLEASE READ THESE SAFETY & OPERATING INSTRUCTIONS.
Please retain for future reference
INSTRUCTIONS D'UTILISATION
- CAUTION: TO REDUCE THE RISK OF ELECTRIC SHOCK OR INJURY, DO NOT EXPOSE TO RAIN. STORE INDOORS.
- The substances used with this spray applicator (paint, thinners etc) may contain hazardous, harmful, explosive or corrosive materials. ALWAYS COMPLY WITH THE SAFETY INSTRUCTIONS ISSUED WITH THIS PRODUCT AND THE MATERIAL BEING USED.
- The spray applicator must only be used with paints and solvents that have a suitable flash point for spraying. If in doubt, consult the paint or solvent manufacturer's data
● Always ensure there is adequate ventilation when spraying. - NEVER spray near an open flame, including an appliance pilot flame.
- NEVER smoke when spraying.
● Always disconnect the unit from the power supply when re-filling the paint container.
● Always disconnect the unit from the power supply when cleaning the spray applicator.
● Always ensure the spray area is safe and free from all debris that may present a fire or trip hazard. - NEVER, under any circumstances, point the spray gun at another person or animal. In the event of
injury occurring, seek expert medical advice immediately.
- NEVER allow children or unauthorized users to operate or play with the spray equipment.
● Always read the paint manufacturer's thinning instructions before use.
● Always wear the correct protective face mask when spraying. We also recommend wearing gloves, goggles and overalls.
● After every use ensure that you clean the spray gun thoroughly & grease the gland washer. - Use only genuine Earlex replacement parts.
- Only use the spray equipment as detailed in these instructions.
- Do not use the air hose or power cord to pull the HVLP unit.
- Check the hoses, hose connectors & power cord daily. Any worn or damaged parts should be replaced immediately.
- This appliance is recommended for household use only.
- This appliance is not intended for use by persons (including children) with reduced physical, sensory or mental capabilities, or lack of experience and knowledge, unless they have been given supervision or instruction concerning use of the appliance by a person responsible for their safety.
IMPORTANT ELECTRICAL INFORMATION
EXTENSION CORDS
Your Earlex HVLP is supplied with a power cord that is 6 feet long. Make sure your extension cord is in good condition. When using an extension cord, be sure to use one heavy enough to carry the current your product will draw. For lengths between 0 feet and 50 feet, No 18 AWG extension cords should be used.
DOUBLE INSULATED APPLIANCE
This is a double insulated appliance and as such, does not require three-way grounding. This product is equipped with a polarized alternating current line plug (a plug having one blade wider than the other) and does not require a grounding adapter. This plug will fit into the power outlet only one way. This is a safety feature.
If you are unable to insert the plug fully into the outlet, try reversing the plug. If the plug should still fail to fit, contact a qualified electrician to replace the obsolete outlet. Do not defeat the safety purpose of the polarized plug.
SERVICING OF A DOUBLE-INSULATED PRODUCT
In a double-insulated product, two systems of insulation are provided instead of grounding. No grounding means is provided on a double-insulated product, nor should a means for grounding be added to the product. Servicing of a double-insulated product requires extreme care and knowledge of the system, and should be done only by qualified service personnel. Replacement parts for a double-insulated product must be identical to those parts in the product.
A double-insulated product is marked with the words "DOUBLE INSULATION" or "DOUBLE INSULATED."
The symbol may also be marked on the product.

EXPLODED PARTS VIEW

PARTS LIST
.oN traPnoitpircseD yeK
.oN traPn
| 01. Air Cap Ring L0215 | 10. Gland Seal | L0272 | |
| pa20A | 5020L | 11. Paint Container Seal | L0335 |
| 03. Spray Direction Plate | L0206 | 12. Paint Feed Tube | L0214 |
| 04. Fluid Tip (0.08")(2mm) | L0237 | 13. Paint Container (Clear) | L0201 |
| 05. Fluid Tip Seal | L0211 | 14. Trigger | L0202 |
| 06. Fluid Needle (0.08")(2mm) | L0236 | 15. Trigger Pin | L0209 |
| 07. Spring | L0216 | 16. Hose Assembly | L0543 |
| 08. Fluid Adjusting Screw | L0210 | 17. Viscosity Cup | SG243 |
| tuN.006 | 8020L | 18. Filter | L0290 |
INTRODUCTION
HVLP stands for High Volume, Low Pressure. This is a type of spraying that allows you to spray accurately but without all the overspray that occurs with the high pressure tank type equipment. In fact, in some parts of the world the high pressure systems are banned by law on environmental grounds and HVLP type systems are the only alternative for professional type spraying. The HVLP Spray System is easy to use, safe and reduces the amount of paint used.
IMPORTANT SELECTING PAINT
This is a highly versatile spray system that can be used with several different spray mediums including varnishes, wood preservatives, enamels, oil and water based paints. However some materials cannot be sprayed so please check the recommendation of the manufacturer before buying the paint. If a material refers to brush application only then it usually cannot be sprayed.
THIS UNIT CANNOT BE USED FOR TEXTURED PAINTS. USE OF THESE MATERIALS WILL CAUSE PREMATURE WEAR, WHICH WILL VOID THE GUARANTEE.
TO OBTAIN THE BEST RESULTS FROM YOUR SPRAY SYSTEM PLEASE READ THE INSTRUCTIONS CAREFULLY BEFORE USE.
PREPARATION
Preparation of the surface and thinning of the paint are the two most important areas to be concerned with to obtain the best results from your spray system.
Ensure all surfaces are free from dust, dirt, rust and grease. If necessary rub down with sandpaper, or similar.
Masking of areas is important to ensure you do not spray those areas you wish to remain untouched.
THINNING
Your spray system is supplied with a viscosity cup. Viscosity is a technical term used to indicate if a product is very thin or very thick. If thin, the viscosity is said to be low, while if very thick the viscosity is said to be high. Viscosity is measured in seconds. In order to spray some materials they need to be “thinned” (diluted).
Thinning is very important when spraying. Most paints are supplied ready for brush application and may need to be thinned (diluted) for spraying purposes.
Follow the manufacturers guide for thinning in conjunction with a spray gun. If in doubt please contact the manufacturers of the paint. The viscosity cup supplied will help you determine the correct thickness of the paint. Paint is “thinned” by adding the substance which the paint is based upon. If a water based paint then water is added, if oil based then white spirit.
As some paints, wood preservatives and other sprayable materials contain particles that have grainy material, please ensure that when filling the paint container of the spray gun, that the paint is filtered through either a funnel with a filter on it or through nylon tights or stockings. This will ensure that no large particles enter the paint container, so preventing blockages and providing you with trouble free spraying. Ensure that a face mask, gloves and goggles are worn at all times when spraying.
IDEAL VISCOSITY
Water based paints, 25 - 50 seconds
emulsions and latex
Oil based paints 45 - 50 seconds
Wood preservatives No dilution
Primers 45 - 50 seconds
Varnishes No dilution
Aluminium paints No dilution
Wood stains No dilution
This spray gun can be used with products having a viscosity ranging from 25 to in excess of 50 seconds. Dip the viscosity cup into the material and fill up. Time how long it takes for the viscosity cup to empty (Fig 1). Using the above chart (or manufacturer's instructions) as a guide, determine if the material requires further thinning, if so then thin accordingly.
If the paint requires thinning, start with a 10% dilution of the paint. To do this, fill a 1quart container with the required paint. The viscosity cup supplied with the unit holds 1/10 of a quart, block the hole in the viscosity cup and fill up with the required thinner. Add the thinner to the paint and stir, measure the viscosity using the recommended viscosity chart above. If the paint requires further thinning, dilute the paint by another 5% (5% will be equal to half a viscosity cup) with the required thinner and measure the viscosity, if the paint is not at its recommended viscosity, repeat the above step.

natural_image
Illustration of a hand pouring liquid into a glass over a container, with a small inset showing a person interacting near the glass (no text or symbols)OPERATION
Fill the paint container with the material to be sprayed. DO NOT OVERFILL above MAX level indicator. Push the fluid tube firmly into the base of the spray gun body. Screw the container onto the gun body tightly.
Place the motor unit onto a clean surface, free from any loose debris or liquids. Connect the hose to the back of the spray gun. Uncoil the power cord and plug into a 120V outlet.
ALWAYS KEEP THE MOTOR UNIT AS FAR AWAY FROM THE SPRAYING AREA AS POSSIBLE TO PREVENT PAINT FROM CONTAMINATING THE MOTOR.
MASK ANY AREA YOU DO NOT WISH TO SPRAY.
Once you are set up ready to spray, switch on the unit. No paint will be sprayed until the trigger on the spray gun is gently pulled. Before starting any work on spraying actual objects we suggest you spend some time practicing on cardboard or newspaper until you have got used to how the spray gun works.
● An airtight seal is essential for the correct operation of this gun.
● Before operating the unit please ensure that the container is securely fixed to the gun body and the gland nut (9) is not loose.
● Over time the gland seal (10) will wear and need adjusting. To check the gland nut is correctly fitted you will need a small adjustable spanner. Pull the trigger back and gradually tighten the gland nut by turning it in a clockwise direction until the needle is not free to move when the trigger is released.
- To obtain the optimum setting gradually unscrew the nut by turning it in an anti-clockwise direction until the needle moves forward into the fluid tip (4). To check your settings are correct spray a container of water. Re-adjust if necessary.
SPRAY PATTERNS
The spray gun has 3 different spray patterns – Horizontal, Vertical and Round (Fig.2).
The horizontal and vertical are recommended for large surfaces. The Horizontal is suitable for spraying up and down and the vertical is suitable for spraying from side to side, while the round spray is used for small objects
or for areas - such as corners – that are difficult to reach.
To adjust the spray pattern, loosen the Air Cap Ring (1), adjust the position of the Air Cap (2) to obtain either a vertical, horizontal or round pattern then re-tighten the aircap ring.

PAINT VOLUME
The volume of paint sprayed is easily adjustable (Fig.3).
Completely close the Fluid Adjusting Screw (8) by turning this clockwise as far as it will go. While pulling the trigger, begin turning the adjustment screw counterclockwise until the volume of paint you require is obtained.
If the paint spray is too wide or contains too much paint turn the Fluid Adjusting Screw clockwise again. Once the correct spray pattern is obtained you are able to commence spraying. The paint volume needs to be adjusted every time you change the spray pattern especially when you use the round pattern, as this spray pattern can often contain too much paint.

natural_image
Hand using a spray gun to lift a white spray bottle, no text or symbols visibleSPRAYING TECHNIQUE
- To obtain the best results always keep your spray gun level and at an equal distance from the object you are spraying, ideally 10"-12" (side to side or up or down) from the surface. Avoid spraying at an angle as this will lead to runs on the surface (Fig.4a-4c).
- Let your arm control the left to right movement rather than your wrist as this will help to give you an even paint distribution over the whole area.
- Do not tip the spray gun to more than a 45° angle when the motor is switched OFF. You can tip the spray
gun at more of an angle when spraying celings and decking etc, providing that the motor is switched ON. For spraying at angles, please change the direction of the Paint Feed tube (12) to the opposite angle that you are spraying, where there is more paint in the container.

natural_image
Diagram showing two mechanical devices with directional arrows and a checkmark, labeled Fig.4c (no text or symbols on devices)

natural_image
Diagram showing two crossed lines with circular elements and a central triangular shape, labeled Fig.4b (no text or symbols on the diagram itself)HELPFUL HINTS
-
Evenly control the speed of movement of the spray gun. A fast speed will give a thin coat and a slow speed will give a thick coat.
-
Only apply one coat at a time. If an additional coat is required, follow the paint manufacturer's instructions for drying times.
-
If spraying small areas or objects keep the output setting low as this will avoid excessive use of paints and will minimize overspray.
-
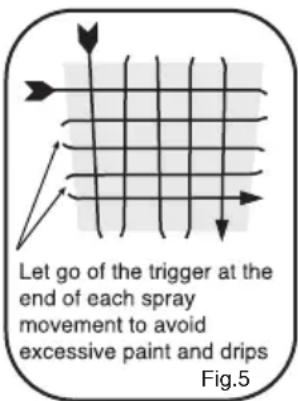
When spraying large areas or objects, it is best to use a criss-cross pattern, either from left to right then up or down or vice-versa. This will ensure maximum coverage (Fig. 5).
-
Avoid stopping and starting when spraying as this can lead to too much or not enough material on a surface.
-
To ensure edges are covered, commence spraying just to the side of area being sprayed.
-
CLEAN SPRAYER AFTER EVERY USE (SEE CLEANING INSTRUCTIONS)
CLEANING INSTRUCTIONS
THE SPRAY GUN MUST BE THOROUGHLY CLEANED IMMEDIATELY AFTER USE. IF THE PAINT DRIES INSIDE THE GUN, CLEANING WILL BECOME MUCH MORE DIFFICULT AND MAY RENDER THE GUN INOPERABLE. THIS IS NOT COVERED BY THE LIMITED WARRANTY.
The spray gun is the same as a paintbrush, if it is not cleaned the paint will go hard and can become useless. You must therefore clean this out after use.
SPRAY GUN
- Remove the gun container.
- Pour any leftover paint into its container so that it can be used for the future.
- Pour a quantity of the respective thinner into container, shake the spray gun lightly, reassemble the gun, then spray this liquid through the gun. Repeat this until the thinner being sprayed is coming through with no traces of paint.
● Clean any traces of paint off the outside of the spray gun.
● Clean the container Seal (11) inside the spray gun body.
FLUID TIP & NEEDLE
● Unscrew Air Cap Ring (1)
- Remove the Air Cap (2)
● Completely remove Fluid Adjusting Screw (8)
- Remove the Spring (7)
- Remove the Fluid Tip Needle (6) by gently pulling the trigger
- Remove the Fluid Tip (4)
- Remove Direction Plate noting the position of notches (3)
- Remove Fluid Tip Seal (5)
- Remove Paint Container Seal (11)
- Place all of these items into a container and clean them using a brush and clean thinners
● Clean the inside of the body of the gun
● Thoroughly dry these parts before reassembling
● Grease the Gland (10). (USE PETROLEUM JELLY. DO NOT USE SILICONE BASED GREASE.)
● Reassemble parts in reverse order.
It is recommended fitting the Fluid Tip (4) prior to the needle.
NEVER DISPOSE OF PAINTS OR SOLVENTS INTO DRAINS. CONTACT YOUR LOCAL AGENCY TO ARRANGE COLLECTION OR FOR DETAILS OF NEAREST REGISTERED DISPOSAL SITE.
HV1900 UNIT
The HV1900 unit requires minimal maintenance.
TROUBLE SHOOTING
| PROBLEM | CAUSE | ACTION REQUIRED |
| The paint drips on to item being painted | Paint too diluted | Add undiluted material |
| Paint volume too high | Reduce the paint flow by turning Fluid Adjusting Screw (8) | |
| Moving too slowly | Increase speed of application | |
| Spray gun trigger being held for too long | Release trigger earlier | |
| Spray gun too close | Increase the distance between gun and workpiece | |
| Paint is thin or irregular | Paint too diluted | Add undiluted material |
| Paint volume too low | Increase the paint flow by turning Fluid Adjusting Screw (8) | |
| Moving too fast | Reduce speed of application | |
| Spray gun clogged | Clean the gun | |
| Spray gun too far away | Reduce the distance between gun and work piece | |
| No paint being produced | Paint too thick | Add thinner |
| Gun clogged | Clean the spray gun | |
| Pick up pipe clogged | Clean pick up pipe | |
| Air hose split | Replace air hose | |
| Grainy paint | Filter the paint | |
| Container almost empty | Refill container | |
| Spray gun at an angle | Ensure Paint Feed Tube (12) is angled towards paint | |
| Air intake blocked | Check no paper or loose debris can block the Filter (18) |
PLEASE NOTE: We have done all we can to ensure that used correctly and according to these instructions, this spray gun will give long and trouble free life. We accept no responsibility for damage caused by the use of incorrect or unsuitable substances, paints or fluids which have not been thinned correctly or are unsuitable for the surfaces to which they are applied, health hazards arising from lack of ventilation when working in confined spaces or failure of the equipment due to inadequate cleaning of the components after use. If in doubt, always test a small inconspicuous area first. Always read the paint manufacturer's instructions first. Neither our limited warranty nor the above statement affects your statutory rights.
Design Reg. No: D536706
Copyright & Design Right Reserved © 2008
EARLEX INC. WILL ACCEPT NO RESPONSIBILITY FOR THE USE OF THIS PRODUCT IF USED FOR ANY OTHER PURPOSES THAN THOSE DETAILED HEREIN
LIMITED WARRANTY
This product is warranted for a period of 24 months against faulty manufacture and materials. It is not warranted for industrial or rental purposes. This limited warranty does not affect your statutory rights. Earlex Inc. will accept no responsibility for the use of this product if used for any purposes other than detailed herein.
If you require further assistance, please contact our helpline on
Tel: 704 827 7889 Fax: 704 827 7849
Customer Service: Toll Free 888-783-2612
Website: www.earlex.com

Earlex Inc, 8261 Hwy 73, Suite F, Stanley, N.C. 28164, USA


- OPERATING INSTRUCTIONS
- INSTRUCTIONS D'UTILISATION
- IMPORTANT ELECTRICAL INFORMATION
- EXTENSION CORDS
- DOUBLE INSULATED APPLIANCE
- SERVICING OF A DOUBLE-INSULATED PRODUCT
- EXPLODED PARTS VIEW
- INTRODUCTION
- IMPORTANT SELECTING PAINT
- THIS UNIT CANNOT BE USED FOR TEXTURED PAINTS. USE OF THESE MATERIALS WILL CAUSE PREMATURE WEAR, WHICH WILL VOID THE GUARANTEE.
- TO OBTAIN THE BEST RESULTS FROM YOUR SPRAY SYSTEM PLEASE READ THE INSTRUCTIONS CAREFULLY BEFORE USE.
- PREPARATION
- THINNING
- IDEAL VISCOSITY
- OPERATION
- ALWAYS KEEP THE MOTOR UNIT AS FAR AWAY FROM THE SPRAYING AREA AS POSSIBLE TO PREVENT PAINT FROM CONTAMINATING THE MOTOR.
- MASK ANY AREA YOU DO NOT WISH TO SPRAY.
- SPRAY PATTERNS
- PAINT VOLUME
- SPRAYING TECHNIQUE
- HELPFUL HINTS
- CLEANING INSTRUCTIONS
- SPRAY GUN
- FLUID TIP & NEEDLE
- HV1900 UNIT
- LIMITED WARRANTY
Brand : EARLEX
Model : Spray Station 1900
Category : Paint gun