
AGS120 - Paint gun EARLEX - Free user manual and instructions
Find the device manual for free AGS120 EARLEX in PDF.
| Brand | EARLEX |
| Model | AGS120 |
| Product type | Electric airless paint sprayer |
| Power supply | 230 V ~ 50 Hz |
| Power consumption | 120 W |
| Tank capacity | 1.0 liter |
| Weight | 2.0 kg |
| Cable length | 2 meters |
| Included nozzles | 0.6 mm (black), 0.8 mm (blue), 1.0 mm (yellow) |
| Max flow rate | Not specified |
| Spray pressure | Not specified |
| Main functions | Airless spraying, adjustable flow, flexible swivel tip, integrated remote pump system |
| Usable materials | Varnishes, stains, alkyd paints, acrylics, emulsions, etc. (except exterior textured paints) |
| Sound level | 90 dB(A) (acoustic pressure) |
| Vibrations | 12 m/s² |
| Electric shock protection | Class I (grounded) |
| Maintenance | Clean after each use with suitable thinner, regular piston lubrication |
| Safety | Do not use flammable liquids (flash point < 21°C), wear mask, goggles and hearing protection, do not point nozzle at people |
| Wear parts (not covered by warranty) | Nozzle, valve, piston, spring |
| Warranty | 24 months against manufacturing defects |
Frequently Asked Questions - AGS120 EARLEX
User questions about AGS120 EARLEX
0 question about this device. Answer the ones you know or ask your own.
Ask a new question about this device
Download the instructions for your Paint gun in PDF format for free! Find your manual AGS120 - EARLEX and take your electronic device back in hand. On this page are published all the documents necessary for the use of your device. AGS120 by EARLEX.
USER MANUAL AGS120 EARLEX
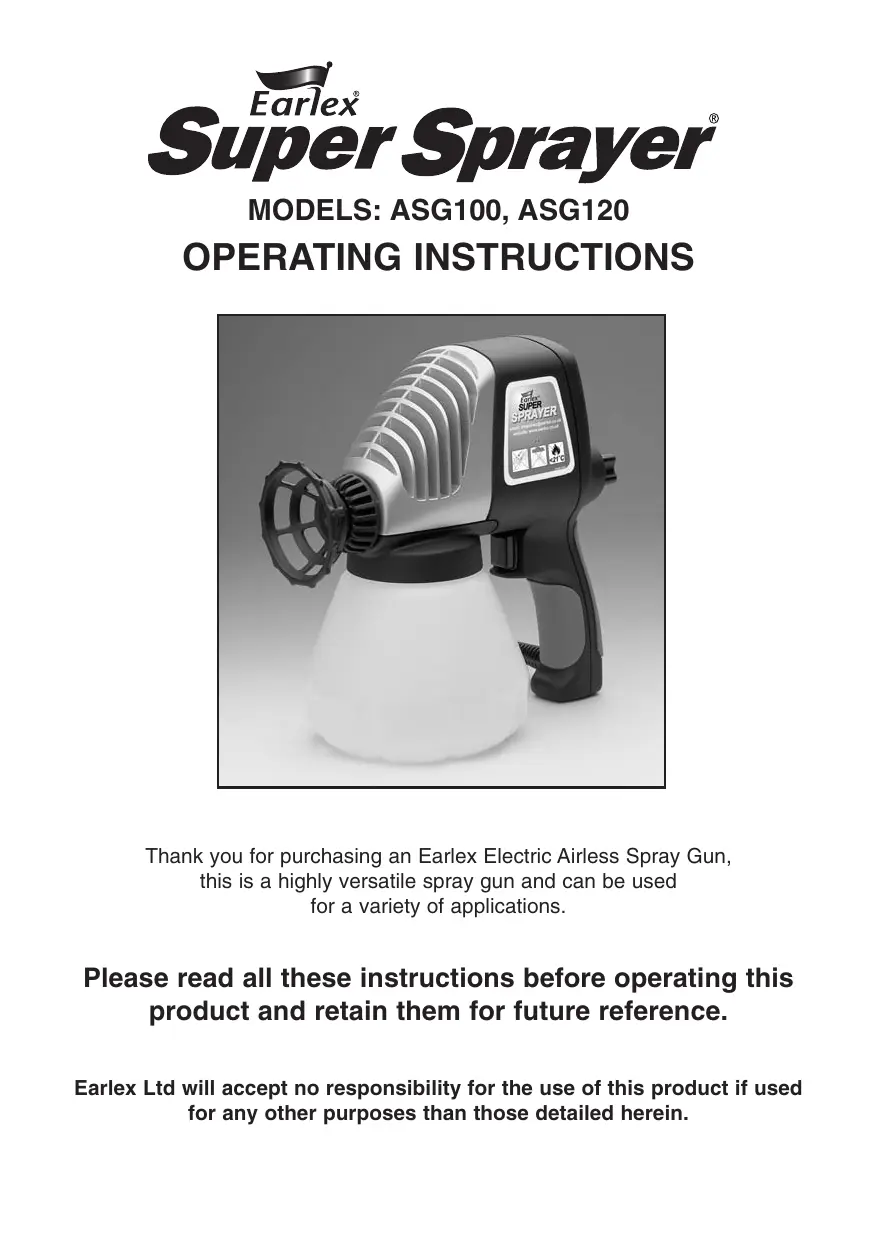
Thank you for purchasing an Earlex Electric Airless Spray Gun, this is a highly versatile spray gun and can be used for a variety of applications.
Please read all these instructions before operating this product and retain them for future reference.
Earlex Ltd will accept no responsibility for the use of this product if used for any other purposes than those detailed herein.
SAFETY OPERATING INSTRUCTIONS
WARNING: When using the spraygun, basic safety precautions, including the following, should always be followed to reduce the risk of fire, electric shock and personal injury.
- Keep work area clean - Cluttered areas and benches invite injuries.
- Consider work area environment - Do not expose the spray gun to rain. Do not use the spray gun in damp or wet locations. Keep work area well lit. Do not use the spray gun where there is risk to cause fire or explosion.
- Guard against electric shock - Avoid body contact with earthed or grounded surfaces (e.g. pipes, radiators, ranges, refrigerators).
- Keep children away - Do not let visitors touch the tool or extension cord. All visitors should be kept away from the work area.
- Store idle tools - When not in use, tools should be stored in a dry, high or locked place, out of reach of children.
- Do not force the tool - it will do the job better and safer at the rate for which it was intended.
- Dress properly - do not wear loose clothing or jewellery, they can be caught in moving parts. Rubber gloves and non-skid footwear are recommended when working outdoors. Wear protective hair covering to contain long hair.
Always wear a mask when spraying. - We recommend the use of eye protection to keep hazardous vapours out of eyes.
We recommend the use of ear protectors. - Do not abuse the cord - Never carry the tool by the cord or yank it to disconnect it from the socket. Keep the cord away from heat, oil and sharp edges.
- Do not overreach - Keep proper footing and balance at all times.
Always disconnect from mains supply when not in use, when refilling the paint container and before cleaning. - Avoid unintentional starting, do not carry a plugged in tool with a finger on the switch and ensure the switch is off when plugging in.
- When tool is used outdoors, use extension cords only intended for outdoor use.
- It is recommended that a RCD (residual current device) rated at 30mA is fitted into the mains supply socket for added protection against electric shock.
-
Stay alert - Watch what you are doing. Use common sense and do not operate tool when you are tired.
-
Never under any circumstances aim the nozzle at another person or animal. In the event of injury occurring seek expert medical advice immediately.
Always keep the spray basket nozzle in place during use. Never allow the spray to come in direct contact with the skin.
Always ensure there is adequate ventilation when spraying. - Never spray near a source of ignition, e.g. hot surfaces, sparks, cigarettes, glowing wires & open flames including appliance pilot flame.
- The spray gun must not be used for spraying flammable materials below flashpoint 21^ .
Always beware of any hazards presented by the material being sprayed and consult the markings on the container or the information supplied by the manufacturer of the material to be sprayed, including requirements for the use of personal protective equipment. Do not spray any material where the hazard is not known. - The spray gun must not be cleaned with flammable liquids below flash point 21^ .
- Check for damaged parts - Before further use of the tool, a guard or other part that is damaged should be carefully checked to determine that it will operate properly and perform its intended function. Check for alignment of moving parts, free running of moving parts, breakage of parts, mounting and any other conditions that may affect its operation. A guard or other part that is damaged should be properly repaired or replaced by an authorized service centre unless otherwise indicated in this instruction manual. Have defective switches replaced by an authorized service facility. Do not use the tool if the switch does not turn it on and off.
- Warning - The use of any accessory or attachment, other than those recommended in this instruction manual, may present a risk of personal injury.
- Maintain tools with care - Follow instructions for lubrication and changing the accessories, inspect tool regularly and if damaged, get repaired by an authorized service centre.
- Have your tool repaired by a qualified person - This electric tool is in accordance with the relevant safety requirements. Repairs should only be carried out by qualified persons using original spare parts, otherwise this may result in considerable danger to the user.
- Use genuine Earlex parts only.
WHAT IS INCLUDED WITH YOUR SPRAY GUN ASG100 & ASG120 kits include:
- Spray gun with 1.0mm spray nozzle (yellow) fitted, for spraying woodcare treatments.
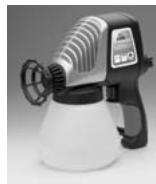
- Viscosity cup, which enables you to test your paint for thickness before painting.
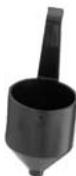
- Flexible Extension (with Swirl head), can be bent up to 45^ to paint horizontal or angled surfaces.
- 0.6mm general purpose spray nozzle (black).
- Replacement atomiser valve. Atomiser valves wear with use. See 'Maintenance and Repair'.
- Bottle of Lubricating Oil
- Piston Punch, to help free the piston in the unlikely event of a seizure.
ASG120 kits also include:
- Remote Pick Up system. For larger jobs, paint can be fed directly from a can. See section 'Remote Pick Up system'.
- 0.8mm spray nozzle (blue) for spraying emulsion and other thick materials.
NOISE AND VIBRATION LEVELS
The following values were measured in accordance with EN50144. Continuous A-weighted equivalent sound pressure level: 90 dB(A). A-weighted sound power level: 103 dB(A)
Vibration level: 12m / s^2
PLEASE NOTE
We have done all we can to ensure that used correctly and according to these instructions, the Earlex Electric Airless Spray Gun will give long trouble free service. We accept no responsibility for damage caused by the use of incorrect or unsuitable substances, paint or fluids which have not been thinned correctly or are unsuitable for the surfaces to which they are applied, health hazards arising from lack of ventilation when working in confined spaces, or failure of the equipment due to inadequate cleaning of components after use.
If in doubt, always test a small inconspicuous area first. Always read the paint manufacturers instructions first.
Neither our guarantee nor the above statement affect your statutory rights.
TECHNICAL SPECIFICATION
MODEL ASG100
Power Supply 230V 50Hz
Rated Input 100 Watts
Container Capacity 1.0 ltr
Spray Gun weight 2.0 kg
Cable length 2 mtr
MODEL ASG120
Power Supply 230V 50Hz
Rated Input 120 Watts
Container Capacity 1.0 ltr
Spray Gun weight 2.0 kg
Cable length 2 mtr
TO OBTAIN THE BEST RESULTS FROM YOUR SPRAY GUN READ THESE INSTRUCTIONS CAREFULLY BEFORE USE.
ABOUT THE SPRAY GUN
The Spray Gun is a highly versatile electric airless spray gun. It can be used to spray many different materials including varnishes, wood preservatives, enamel paints, oil based paints & water based paints.
Airless spraying reduces the mist associated with air spraying & reduces paint loss.
The spray gun can be used for a variety of applications including, fences, sheds, boats, furniture, radiators, models & louvre doors.
IMPORTANT - SELECTING THE PAINT
Many paints & other materials can be sprayed but some cannot. Always check the manufacturer's recommendations before using products with your spray gun.
THE SPRAY GUN MUST NOT BE USED FOR SPRAYING EXTERIOR TEXTURED WALL PAINTS OR TEXTURED COATINGS. USING THESE MATERIALS WILL CAUSE PREMATURE WEAR ON THE PISTON & WILL INVALIDATE YOUR GUARANTEE.
PREPARING THE PAINT (OR OTHER SPRAY MEDIUM)
It is most important to follow the paint manufacturer's recommendations for thinning. Most paints are supplied ready for brush application & must be diluted for use with the spray gun. If you are in any doubt about how much to thin the paint, consult the paint manufacturer.
The viscosity cup supplied with your spray gun & the viscosity guide below, can be used to help you determine the correct thickness of the paint.
The paint, or paint & thinners mixture, must be thoroughly stirred. We do not recommend the use of an electric stirrer as this can increase the volume of air in the paint, which will reduce the effectiveness of the spray gun.
VISCOSITY GUIDE
Water based paints 35-45secs
Oil Based paints 15-25secs
Enamel paints 15-25secs
Wood preservatives no dilution
Primers 20-30secs
Varnishes 20-25secs
Aluminium paints
Wood stains
Latex Emulsions
Smooth Masonry
Paint (non grit)
15-25secs
no dilution
*10-20% dilution
*5-10% dilution
- These paints cannot be measured in the viscosity cup. To spray them, remove the filter from the suction tube, thin according to manufacturer's recommendations and strain to remove any lumps or particles.
USING THE VISCOSITY CUP
Dip the viscosity cup into the paint (or other medium) to fill it.
Time how long the paint takes to empty from the cup (see fig.1) & refer to the viscosity guide on page 4 to compare the time. Thin the paint further until the recommended time is achieved.
PREPARING & USING YOUR SPRAY GUN
SAFETY WARNING!
DO NOT SPRAY FLAMMABLE MATERIALS (FLASH POINT < 21^ ). ALWAYS SPRAY IN A WELL VENTILATED AREA. NEVER SPRAY NEAR NAKED FLAMES.
ALWAYS WEAR PROTECTIVE FACE MASK, GOGGLES, GLOVES & EAR PROTECTORS WHEN USING YOUR SPRAYGUN.
MASK THE AREAS OF THE ITEM THAT YOU DO NOT WANT TO SPRAY & PROTECT ANY
ADJACENT AREAS THAT COULD BE AFFECTED BY OVERSPRAY.
Before fitting the paint container, turn the spray gun upside down & put a few drops of lubricating oil down the inlet and outlet spouts. (see fig.2)
Plug the spray gun into a power socket & run the motor for one or two seconds to distribute the oil around the cylinder & piston. Disconnect the power & push the Suction Tube & Filter firmly into the inlet spout, which is the longer of the two spouts.
Fill the container with the prepared paint or other medium, which as a precaution should be filtered through a suitable funnel that has a filter. As an alternative to a filter the paint can be poured through a nylon stocking or tights. This should ensure there is no contamination of the paint that could block or damage the spray gun. DO NOT FILL THE CONTAINER BEYOND THE MAXIMUM LEVEL INDICATED.
Screw the spray gun tightly onto the filled container. Plug the spray gun into a power socket and it is now ready to be set up.
SETTING UP THE SPRAY GUN FOR OPTIMUM PERFORMANCE
When setting up the spray gun we recommend that you spray the paint onto some scrap material, newspaper or cardboard. Purge the air from the spray gun by running it for a few seconds until the paint comes out of the gun.
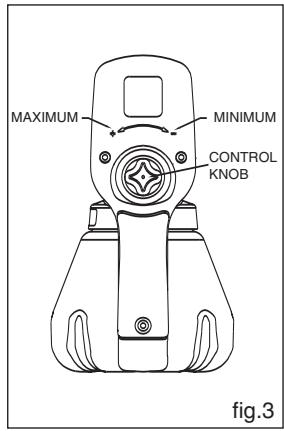
The volume of paint & the spray pattern is controlled using the Output Control Knob, (see fig. 3) Turn the knob anti-clockwise to increase the volume of paint sprayed & clockwise to decrease the amount of paint sprayed.
A good spray pattern is achieved when there is an even amount of paint in a fine spray throughout the pattern. A poor spray pattern will concentrate the paint in the centre of the spray & give a blotchy finish. To get the best spray performance, turn the Output Control Knob fully anticlockwise. Aim the gun at a piece of cardboard, or similar waste material, & press the switch to start the spray gun. With the spray gun running, turn the Output Control Knob clockwise until the best spray pattern is achieved. If you are unable to achieve an even, fine spray you will probably need to thin the paint further. Follow the thinning procedure as described under "Preparing the Paint".
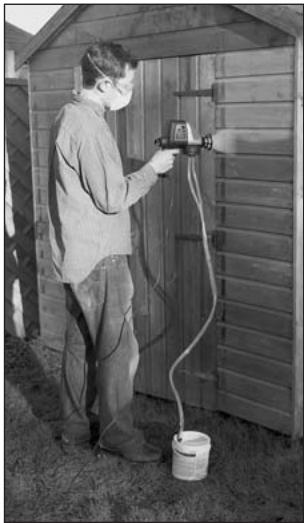
SPRAYING TECHNIQUE
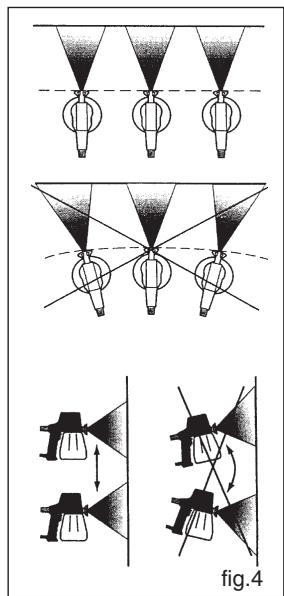
To obtain best results keep the spray gun level & square on to the surface being sprayed. The gun works best if the nozzle is kept about 25 - 30 cms (10" - 12") from the surface being sprayed. (See fig. 4) This will result in consistent, even coverage.
To avoid overlap of the paint & therefore uneven coverage, we recommend that the spray gun be momentarily turned off whenever you change direction.
Move the spray gun at an even speed. A fast speed will give a thin coat & a slow speed will give a thicker coat. Never tilt the spray gun more than 45^ as this could result in paint getting in to the motor & causing serious damage.
HELPFUL HINTS
1) Only apply one coat at a time. If more than one coat is required follow the paint manufacturers instructions for drying times.
2) If spraying small objects keep the output setting low as this will avoid excessive use of paint & will minimise overspray.
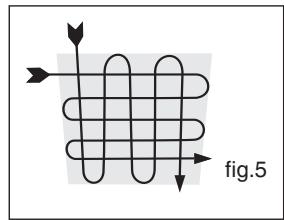
3) When spraying large areas or objects use a criss-cross pattern either left to right then up & down or vice-versa. Remember to momentarily stop spraying as you change direction. This will ensure maximum, even coverage. (See fig. 5)
4) Do not stop & start spraying while moving the gun in one continuous direction.
5) To ensure edges are covered begin spraying just outside the area being sprayed & do not stop until you have just passed the opposite edge.
SPRAY NOZZLE SELECTION
The ASG100 spray gun is supplied with 0.6mm and 1.0mm nozzles, the ASG120 spray gun is also supplied with a 0.8mm nozzle, these should be used as follows:
1) 0.6mm - This size works best for oil-based materials, stains, sealers, lacquers, water-proofers and enamels for small application areas.
2) 0.8mm - This is a general purpose nozzle that works best for materials such as emulsions, latex and thicker type paints.
3) 1.0mm - This nozzle is suitable for spraying woodcare treatments.
If when spraying you find that the spray pattern is small and splattery, and adjusting the output control knob does not solve the problem, try a different nozzle size before further thinning the material.
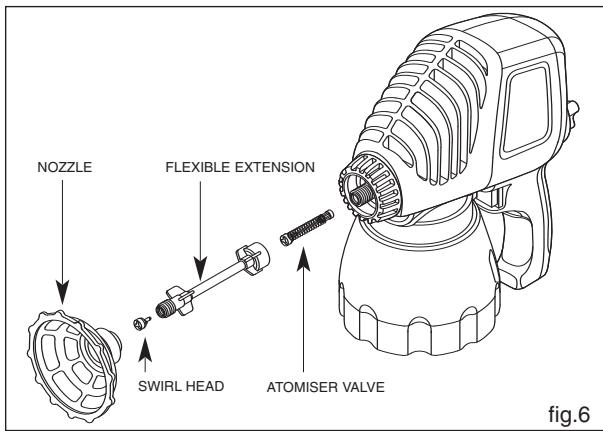
USING THE FLEXIBLE EXTENSION TUBE.
Using the Flexible Extension Tube makes the painting of ceilings, floors & all horizontal surfaces much easier. When fitted, the Flexible Extension Tube is bent to avoid tilting the spray gun. Tilting the spray gun excessively can cause paint to leak into the motor, causing serious damage.
TO FIT THE FLEXIBLE EXTENSION TUBE (see fig.6)
1) Unscrew the spray gun nozzle by turning it anti-clockwise. Be sure to leave the valve in place but check for wear.
2) Screw the end of the extension tube, with the internal thread, tightly onto the spray gun. Leaks may occur if the flexible extension is loose or if excessive force is used to fit it. e.g. using pliers.
3) Fit a swirl head into the end of the flexible extension tube with the external thread.
4) Screw a nozzle onto the end of the flexible extension tube.
5) Bend the flexible extension to the required angle (45° maximum). Do not bend the extension tube more times than necessary, as repeated bending can cause premature failure.
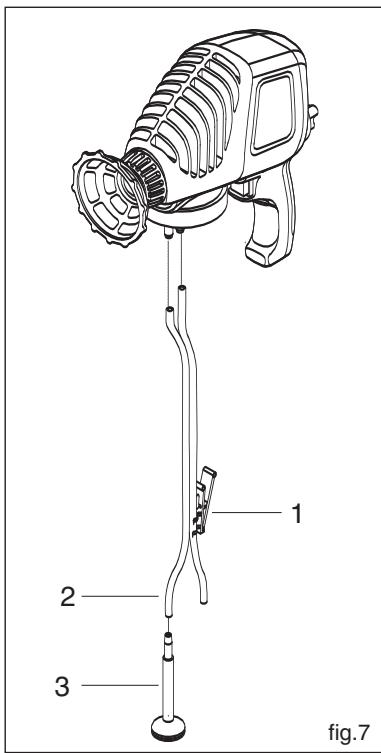
REMOTE PICK UP SYSTEM - (ASG120 only)
For larger painting tasks, use the Remote Pick Up System. This enables you to draw paint directly out of a large can instead of using the paint container supplied with the spray gun, thereby saving considerable time and making painting an even easier job. When using the remote pick up system secure the Remote Pick Up Tube to the can using the Remote Pick Up Clip provided. If working from a ladder, the can may be carefully hung from a rung on the ladder using a wire hook. We recommend a maximum continuous spray time of 30 mins, with a minimum break of 20 mins before spraying again to avoid fatigue.
Assembling the Remote Pick Up System (see fig.7)
- Unscrew and remove the paint container and remove the Suction Tube and Filter from the inlet spout. If the spray gun is being used for the first time, lubricate the piston and cylinder before continuing. See 'Preparing and Using your Spray Gun'
-
Push the remote Pick Up Tube (2) firmly over the two spouts of the cylinder moulding.
-
Fit the Suction Tube and Filter (3) securely to the same side of the Pick Up Tube that is connected to the inlet spout of the cylinder moulding.
- Immense the Suction Tube and Filter into the can of paint and secure the Pick Up Tube to the can using the Remote Pick Up Tube Clip (1).
- When using the spray gun with the remote pick up system, only use the gun in the normal upright position, to allow the residue paint to drain away down the Pick Up Tube.
Priming the Spray Gun
When using the remote pick up system you must remove all the air by priming the system as follows:-
- Turn the output control knob fully anticlockwise to the maximum position.
- Make certain the spray gun is plugged in.
- Hold the spray gun below the level of paint to speed the priming.
- Aim the spray gun at a piece of cardboard or old newspaper, squeeze the trigger and hold until all air is out of the system and material is flowing freely from the nozzle. This should take about two minutes.
WARNING- When using the Remote Pick Up system the filter, of the Suction Tube and Filter, must be completely submerged in the paint at all times. If not completely submerged, air will be sucked into the system and the piston may seize. If this happens, the sound of the gun will change to a low hum and it will quickly become hot. Stop using immediately. Allow the gun to cool, then clean and lubricate the gun thoroughly before re-using.
CLEANING THE REMOTE PICK UP COMPONENTS
Run an appropriate thinners through the tube until it is clean. Disassemble the fittings at both ends before any remaining paint dries, and thoroughly clean the remote pick up tube, suction tube and filter.
GENERAL CLEANING INSTRUCTIONS
After every use it is essential that you clean the spray gun thoroughly. This will prevent any blockages occurring and provide consistent performance when you next come to use it.
When you have finished spraying, empty any remaining material out of the paint container and clean it thoroughly using the thinners used for the last job.
Rinse the spray gun container with the thinners used for the last job and spray through the gun onto cardboard or newspaper, and follow the instructions below.
REMEMBER - DO NOT USE FLAMMABLE THINNERS (except white spirit & turpentine substitute)
- Disconnect the spray gun from the mains power.
- Remove paint container and pull out the suction tube.
- Unclip the filter from the suction tube.
- Unscrew the spray nozzle and remove the atomiser valve, making sure that the spring is not 'stretched' during removal.
- Unscrew the locking collar and remove cylinder housing from the motor housing, by pulling forward and down.
- Remove the piston and spring.
- Submerge all of the components into a cleaning fluid compatible with the material being sprayed.
Clean all parts thoroughly. - Lightly oil the piston and slide in and out of the cylinder to distribute the oil over the mating parts.
- Re-assembly is the reverse of the above.

MAINTENANCE AND REPAIR
Please be aware that certain parts of this spray gun will wear, requiring replacement and that these parts are not covered by guarantee. These parts include the valve, spray nozzle, piston and spring. The wear on these parts depends on the abrasiveness of the materials being sprayed. The more abrasive materials such as latex paint (emulsions) will cause these parts to wear much faster. You would normally expect to replace an atomiser valve after spraying between 25-45 litres of latex.
A worn valve will cause a poor spray pattern and will require replacing. Replacement valves are available from the Earlex Service Department.
You will need to check the spray nozzles, piston and spring from time to time to check for wear. Replace if necessary.
NEVER DISPOSE OF PAINTS OR SOLVENTS INTO DRAINS. CONTACT YOUR LOCAL COUNCIL TO ARRANGE COLLECTION.
| PROBLEM | CAUSE | ACTION REQUIRED (See Fig.8) |
| Spray gun hums but does not operate | Piston sticking | Remove the nozzle (8/9/10) and atomiser valve (11). Unscrew the locking collar (7) and remove the cylinder housing and piston assembly (3/4/5/6). Use the piston punch (18) provided in the spares pack to eject the piston. Clean and lubricate the piston and cylinder. Re-assemble carefully in reverse order. |
| No suction feed | No valve in pump Paint pick-up filter blocked Paint too thick | Insert atomiser valve (11) Clean filter (12) Thin paint as recommended. See 'Preparing the Paint'. |
| Spray Gun motor operates, but nothing comes out | Nozzle or atomiser valve blocked | Clean parts thoroughly see 'General Cleaning Instructions'. |
| Spray Gun motor operates but spluttering | Worn atomiser valve Worn nozzle Container almost empty Spray Gun Held at wrong angle Paint too thick Output control is incorrectly set | Replace atomiser valve (11) Replace nozzle (8/9/10) Refill container (13) Hold at correct angle see 'Spraying Technique' Thin paint as recommended see 'Preparing the Paint' Adjust output control knob see 'Setting up Spray Gun for optimum Performance' |
| Paint dripping from nozzle | Nozzle loose Spray Gun held at more than 45° | Tighten nozzle (8/9/10) Hold at correct angle see 'Spraying Technique' |
| Excessive fogging | Pressure too high Holding spray gun too far from surface | Use larger diameter nozzle Hold spray gun about 30cm (12") from workpiece |
| Runs and sags in paint | Arm movement too slow Spray Gun too close to work surface Applying too much paint in one go | See 'Spraying Techniques' and 'Helpful Hints' |
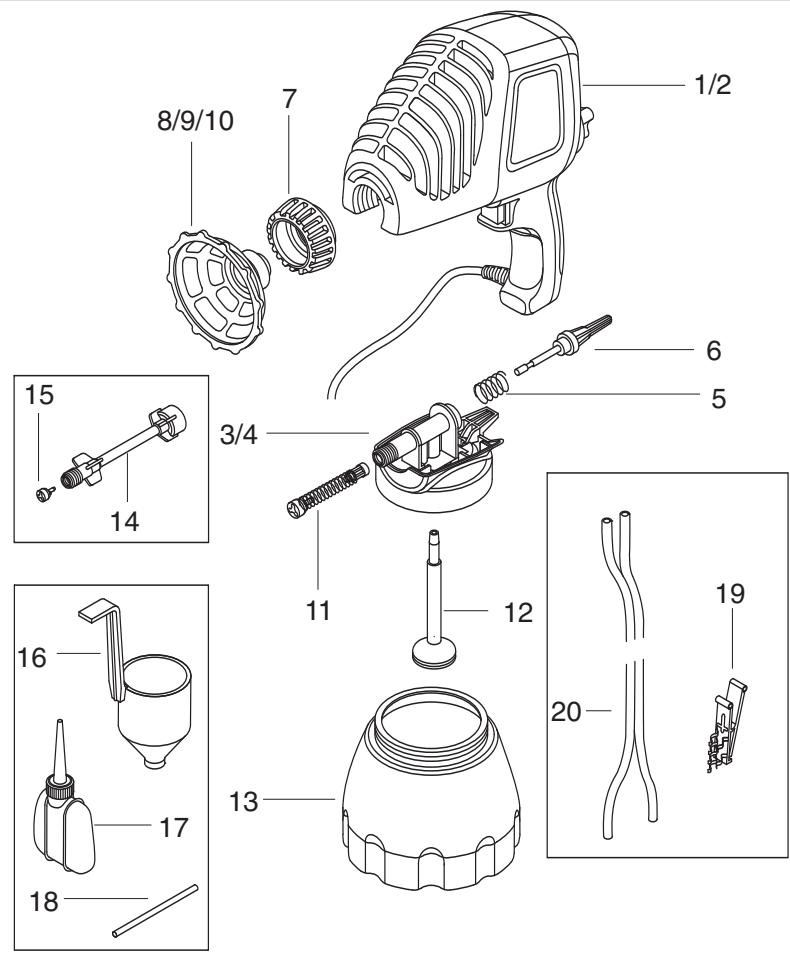
fig.8
- ASG100 Main Gun Assembly (including mains lead)
- ASG120 Main Gun Assembly (including mains lead)
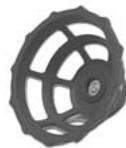
- Cylinder Housing (ASG100)
- Cylinder Housing (ASG120)
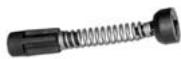
- Piston Spring
- Piston
- Locking Collar
- Nozzle 1.0mm (yellow)
- Nozzle 0.6mm (black)
- Atomiser Valve
SG435
SG436
SG453
SG434
SG442
SG395
SG400
SG414
SG416
SG473
- Suction Tube & Filter SG240
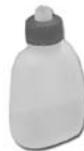
- Paint Container SG242
- Flexible Extension SG281
- Swirl Head SG200
- Viscosity Cup SG243
- Lubricating Oil SG244
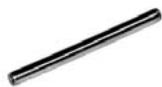
- Piston Punch SG318
ASG120 only
- Nozzle 0.8mm (blue) SG415
- Clip for Tube SG431
- Remote Pick Up Tube SG432
MAINS CONNECTION (WARNING-THIS APPLIANCE MUST BE EARTHED)
If the mains lead is damaged, it must be replaced by the manufacturer or its service agent or a similarly qualified person in order to avoid a hazard.
Your unit may have been supplied with a mains lead that has the plug moulded to it. This type of plug will have a fuse holder in its base. Please read the following safety instructions before use.
- If the moulded plug is cut off from the mains lead then the plug must be disposed of safely. It must NEVER under any circumstances be plugged into a live power socket.
- NEVER under any circumstances use the appliance without the fuse cover of the 13 amp plug fitted. This is the little cover fixed into the base of the plug to hold the fuse in place.
- If you lose the fuse cover then please contact any electrical dealer for a replacement or ring our helpline.
- A replacement fuse must be rated at 5amp. The fuse must be manufactured and approved to BS1362
5. IF IN ANY DOUBT PLEASE CONSULT AN ELECTRICIAN.
WARNING-If you are using an extension lead, it must be rated at a minimum of 6 amps and fully unwound. Do not operate with a lead rated at less than 6 amps as this will cause premature failure of the motor and will void your guarantee.
SAFETY WARNING LABEL
One of the labels on the spray gun is a warning label and shows three diagrams. If you are in any doubt about their meaning, please see the explanation below.
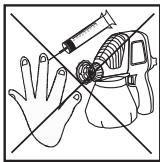
Do not direct the spray gun at yourself or anyone else. (Risk of injection)
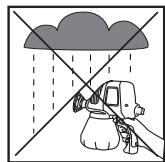
Do not use your spray gun in wet weather.

Do not use your spray gun for spraying flammable materials. i.e those with a flashpoint less than 21^
GUARANTEE
This product is guaranteed for a period of 24 months against faulty manufacture or materials. It is not guaranteed for hire purposes. This guarantee does not affect your statutory rights. In the event of any problem occurring please contact us on our helpline no:
01483-454666
Monday - Friday 08:30 - 18:00 (Except Bank Holidays)
EU Registered Design N^O 28071 Australian Registered Design N^O 152436 UK Registered Design N^O 3009595 Design registration applied for in USA Copyright & Design Right Reserved ©
EC Declaration of Conformity
We declare that the units ASG100 & ASG120 conform to: 73/23/EEC, EN50144-1,
EN50144-2-7 89/336/EEC, EN61000-3-2 & EN61000-3-3, EN55014-1, EN55014-2

Tim Hopper-Technical Director


- Please read all these instructions before operating this product and retain them for future reference.
- SAFETY OPERATING INSTRUCTIONS
- WARNING: When using the spraygun, basic safety precautions, including the following, should always be followed to reduce the risk of fire, electric shock and personal injury.
- WHAT IS INCLUDED WITH YOUR SPRAY GUN ASG100 & ASG120 kits include:
- ASG120 kits also include:
- NOISE AND VIBRATION LEVELS
- PLEASE NOTE
- TECHNICAL SPECIFICATION
- MODEL ASG100
- MODEL ASG120
- TO OBTAIN THE BEST RESULTS FROM YOUR SPRAY GUN READ THESE INSTRUCTIONS CAREFULLY BEFORE USE.
- ABOUT THE SPRAY GUN
- IMPORTANT - SELECTING THE PAINT
- THE SPRAY GUN MUST NOT BE USED FOR SPRAYING EXTERIOR TEXTURED WALL PAINTS OR TEXTURED COATINGS. USING THESE MATERIALS WILL CAUSE PREMATURE WEAR ON THE PISTON & WILL INVALIDATE YOUR GUARANTEE.
- PREPARING THE PAINT (OR OTHER SPRAY MEDIUM)
- VISCOSITY GUIDE
- USING THE VISCOSITY CUP
- SAFETY WARNING!
- SETTING UP THE SPRAY GUN FOR OPTIMUM PERFORMANCE
- SPRAYING TECHNIQUE
- HELPFUL HINTS
- SPRAY NOZZLE SELECTION
- USING THE FLEXIBLE EXTENSION TUBE.
- TO FIT THE FLEXIBLE EXTENSION TUBE (see fig.6)
- REMOTE PICK UP SYSTEM - (ASG120 only)
- Assembling the Remote Pick Up System (see fig.7)
- Priming the Spray Gun
- CLEANING THE REMOTE PICK UP COMPONENTS
- GENERAL CLEANING INSTRUCTIONS
- REMEMBER - DO NOT USE FLAMMABLE THINNERS (except white spirit & turpentine substitute)
- MAINTENANCE AND REPAIR
- NEVER DISPOSE OF PAINTS OR SOLVENTS INTO DRAINS. CONTACT YOUR LOCAL COUNCIL TO ARRANGE COLLECTION.
- ASG120 only
- MAINS CONNECTION (WARNING-THIS APPLIANCE MUST BE EARTHED)
- IF IN ANY DOUBT PLEASE CONSULT AN ELECTRICIAN.
- SAFETY WARNING LABEL
- GUARANTEE
- 01483-454666
Brand : EARLEX
Model : AGS120
Category : Paint gun