TORONTO 400 BT - Car stereo BLAUPUNKT - Free user manual and instructions
Find the device manual for free TORONTO 400 BT BLAUPUNKT in PDF.
| Brand | BLAUPUNKT |
| Model | TORONTO 400 BT |
| Product type | Car radio |
| Power supply | 10.5 - 14.4 V (max. current 10 A) |
| Standby consumption | < 3.5 mA |
| Sinusoidal output power | 4 x 26 W (14.4 V, 4 Ω) |
| Maximum power | 4 x 50 W |
| FM wavebands | 87.5 - 108 MHz (Europe/Thailand), 87.7 - 107.9 MHz (USA/South America) |
| AM wavebands | 531 - 1602 kHz (MW); 153 - 279 kHz (LW, Europe) |
| FM bandwidth | 30 - 15,000 Hz |
| CD bandwidth | 20 - 20,000 Hz |
| Supported formats | Audio CD, CD-R/RW, MP3, WMA, USB files (FAT32) |
| Bluetooth | Hands-free kit and audio streaming (short range, up to 5 paired devices) |
| Connectors | CD slot, front USB, front AUX-IN jack, rear AUX input, 4-channel preamp outputs (2 V) |
| Front panel | Detachable, with control buttons and backlit display |
| Radio functions | RDS, PTY, Travelstore, storage of 5 stations per level (FM1, FM2, FMT, AM, AMT) |
| Sound settings | Bass, treble, balance, fader, X-Bass, 3-band equalizer, presets Pop/Rock/Classic |
| Display | Backlit display with color adjustment (4096 colors) and day/night brightness |
| Dimensions | 1-DIN standard (182 x 53 x 160 mm, estimated) |
| Weight | Approx. 0.5 kg (estimated) |
| Safety instructions | Class 1 laser, do not open, moderate volume for road safety |
| Maintenance and cleaning | Clean with a dry or slightly damp cloth; alcohol for front panel contacts |
| Included accessories | Manual, front panel case, mounting frame, small hardware, removal tools, USB cable |
| Warranty | Manufacturer's warranty in the European Union; contact Blaupunkt for support |
Frequently Asked Questions - TORONTO 400 BT BLAUPUNKT
User questions about TORONTO 400 BT BLAUPUNKT
0 question about this device. Answer the ones you know or ask your own.
Ask a new question about this device
Download the instructions for your Car stereo in PDF format for free! Find your manual TORONTO 400 BT - BLAUPUNKT and take your electronic device back in hand. On this page are published all the documents necessary for the use of your device. TORONTO 400 BT by BLAUPUNKT.
USER MANUAL TORONTO 400 BT BLAUPUNKT
AM (MW): 531 - 1602 kHz
LW (nur Europa): 153 - 279 kHz
Wellenbereiche USA:
UKW (FM): 87,7 - 107,9 MHz
AM (MW): 530 - 1710 kHz
AM (MW): 530 - 1710 kHz
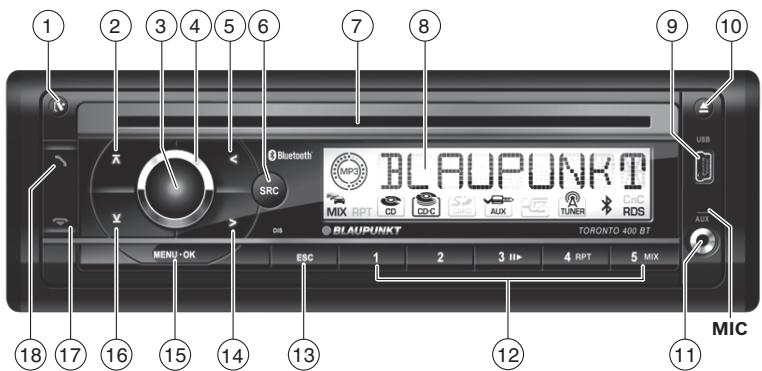
1 button Unlock the detachable control panel
② A button
In the menu: Call up menu item
Radio mode: Select memory bank
MP3/WMA/C'n'C/CD changer mode: Change to next folder / CD
On/Off button Short press: Switch on car sound system In operation: Mute car sound system (Mute) Long press: Switch off car sound system
(4) Volume control
5 <button In the menu: Change settings Radio mode: Adjust the stations Other operating modes: Track selection
⑥ SRC button Selecting an audio source
CD tray
⑧ Display
USB port
10 button (Eject) Eject a CD
(1) Front AUX-IN socket
12 Keys 1-5
DIS/ESC button In the menu: Exit menu In operation: Switch display
14> button In the menu: Change settings Radio mode: Adjust the stations Other operating modes: Track selection
15 MENU-OK button Short press: Call up menu, confirm settings Long press: Start scan function 16 v button In the menu: Call up menu item Radio mode: Select memory bank MP3/WMA/C'n'C/CD changer mode: Chang to previous folder / CD
17 button Ending/rejecting a phone call
18 button Answering a call, speed dial
Safety notes. 29
Symbols used 29
Road safety 29
General safety notes 29
Declaration of conformity 29
Cleaning notes. 30
Disposal notes. 30
Scope of delivery. 30
Optional equipment (not part of the scope of delivery) 30
Placing the device in operation 31
Attaching/detaching the control panel.....31
Setting the tuner region. 31
Switching on/off 31
Volume 32
Switching demo mode on/off 32
Displaying version numbers 32
Traffic information. 32
Radio mode 33
RDS 33
Changing to radio mode 33
Selecting the memory bank 33
Tuning into a station. 33
Storing stations/Calling stored stations.....34
Scanning stations. 34
Storing stations automatically (Travelstore) ...34
PTY. 34
Configuring the display. 35
CD/MP3/WMA/C'n'C/CD changer mode.....35
Basic information 35
Changing to CD/MP3/WMA/C'n'C/ CD changer mode. 36
Inserting a CD. 37
Ejecting a CD 37
Connecting/removing a USB data carrier ...37
Selecting tracks 37
Select a folder/CD (only in MP3/WMA/ C'n'C or CD changer mode) 37
Fast searching. 38
Interrupting playback 38
[ \text{Playlist mode (only in MP3/WMA mode)} ] .....38
Scanning all tracks. 38
Playing tracks in random order 38
Repeatedly playing individual tracks, CDs or directories 39
Configuring the display. 39
Bluetooth 39
Bluetooth® menu. 40
Registering and connecting a device.....40
Telephone functions 41
Bluetooth® streaming mode 42
Additional functions in the Bluetooth® menu. 43
External audio sources. 44
Front AUX-IN socket. 44
Rear AUX input. 44
Sound settings 45
Calling and exiting the audio menu 45
Performing settings in the audio menu.....45
Calling and exiting the enhanced audio menu. 46
Performing settings in the enhanced audio menu 46
User settings 47
Calling and exiting the user menu. 47
Performing settings in the user menu 47
Factory settings. 50
Useful information. 51
Warranty. 51
Service 51
Technical data 51
Installation instructions 381
Safety notes
The car sound system was manufactured according to the state of the art and established safety guidelines. Even so, dangers may occur if you do not observe the safety notes in these instructions.
These instructions contain important information to easily and safely install and operate the car sound system.
- Read these instructions carefully and completely before using the car sound system.
- Keep the instructions at a location so that they are always accessible to all users.
- Always pass on the car sound system to third parties together with these instructions.
In addition, observe the instructions of the devices used in conjunction with this car sound system.
Symbols used
These instructions employ the following symbols:

DANGER!
Warns about injuries

CAUTION!
Warns about damaging the CD drive

The CE mark confirms the compliance with EU directives.
Identifies a sequencing step
- Identifies a listing
Road safety
Observe the following notes about road safety:
-
Use your device in such a way that you can always safely control your vehicle. In case of doubt, stop at a suitable location and operate your device while the vehicle is standing.
-
Remove or attach the control panel only while the vehicle is standing an.
- Always listen at a moderate volume to protect your hearing and to be able to hear acoustic warning signals (e.g. police sirens). During mute phases (e.g. when changing the audio source), changing the volume is not audible. Do not increase the volume during this mute phase.
General safety notes
Observe the following notes to protect yourself against injuries:
- Do not modify or open the device. The device contains a Class 1 laser that can cause injuries to your eyes.
- Do not increase the volume during mute phases, e.g. when changing the audio source. Changing the volume is not audible during a mute phase.
Use as directed
This car sound system is intended for installation and operation in a vehicle with 12V vehicle system voltage and must be installed in a DIN slot. Observe the performance limits in the technical data. Repairs and installation, if necessary, should be performed by a specialist.
Installation instructions
You may only install the car sound system yourself if you are experienced in installing car sound systems and are very familiar with the electrical system of the vehicle. For this purpose, observe the installation instructions at the end of these instructions.
Declaration of conformity
The Blaupunkt GmbH declares that the car sound system Toronto 400 BT complies with the basic requirements and the other relevant regulations of the directive 1999/5/EG.
Cleaning notes
Solvents, cleaning and scouring agents as well as dashboard spray and plastics care product may contain ingredients that will damage the surface of the car sound system.
- Use only a dry or slightly moistened cloth for cleaning the car sound system.
- If necessary, clean the contacts of the control panel regularly using a soft cloth moistened with cleaning alcohol.
Disposal notes

Do not dispose of your old unit in the household trash!
Use the return and collection systems available to dispose of the old device.
Scope of delivery
The scope of delivery includes:
1 Car sound system
1 Operating/installation instructions
1 Case for the control panel
1 Support frame
1 Set of small parts
2 Disassembly tools
1 USB connecting cable
Note:
We recommend the use of original Blaupunkt accessories (www.blaupunkt.com).
Optional equipment (not part of the scope of delivery)
Contact your Blaupunkt specialised dealer or visit us on the Internet under www.blaupunkt.com for information about optional equipment, such as:
- The steering wheel or handheld remote control from Blaupunkt for safe and convenient operation of the basic functions (switching on/off not possible with the remote control)
- The C'n'C-ready interfaces from Blaupunkt (C'n'C = Command and Control) for connecting additional data carriers and devices (e.g. via the iPod®/USB interface)
- Blaupunkt CD changer
- Blaupunkt or Velocity amplifier
Placing the device in operation
Attaching/detaching the control panel
The car sound system is equipped with a detachable control panel (release panel) to protect your equipment against theft. In the delivery state, the control panel is in the supplied case. To start operating the radio after installation, you must first attach the control panel (see the section "Attaching the control panel" in this chapter).
Always take the control panel with you when leaving the vehicle. The car sound system is worthless to a thief without this control panel.
Caution
Damage to the control panel
Never drop the control panel.
Transport the control panel so that it is protected against impacts and the contacts cannot become dirty.
Do not expose the control panel to direct sunlight or another heat source.
Avoid direct skin contact with the control panel's electrical contacts.
Attaching the control panel
Push the control panel into the bracket at the right edge of the device.
Push the control panel carefully into the left bracket until it clicks into place.
Removing the control panel
Press the button 1 to unlock the control panel.
The left side of the control panel detaches from the device and is secured by a latch against falling out.
Grasp the control panel at the left side and pull it beyond the resistance of the latch and straight out of the bracket.
Note:
The car sound system automatically switches off as soon as the control panel is removed.
Setting the tuner region
This car sound system is designed for operation in different regions with different frequency ranges and station technologies. It is factory set to the tuner region "EUROPE". Other available tuner regions include "USA", "THAI" (Thailand) and "S AMERICA" (South America). If you operate the car sound system outside of Europe, you may first have to set a suitable tuner region:
Switch off the car sound system if it is not already turned off.
Press and hold the buttons MENU·OK 15 and 4 12 at the same time and press the On/ Off button 3.
The car sound system switches on. The currently set tuner region appears on the display.
Press the button ^(16) / ^(2) repeatedly until the desired tuning region is displayed.
Press the MENU-OK button 15.
Switching on/off
Switching on/off with the On/Off button
For switch-on, press the On/Off button ③. The car sound system switches on.
To switch off the device, press and hold down the On/Off button 3 for longer than 2 seconds.
The car sound system switches off.
Note:
If you switch on the car sound system while the vehicle ignition is switched off, it automatically switches off after 1 hour to preserve the vehicle battery.
Switching on/off via vehicle ignition
The car sound system will switch off/on simultaneously with the ignition if the device is correctly connected to the vehicle's ignition as shown in the installation instructions and you did not switch the device off by pressing the On/Off button ③.
Volume
Adjusting the volume
You can adjust the volume in steps from 0 (off) to 50 (maximum).
Turn the volume control 4 to change the volume.
Note:
If a telephone or navigation system is connected with the car sound system as described in the installation instructions, the car sound system is muted in case of a telephone call or navigation announcement so that you can hear the playback of the telephone or navigation system undisturbed. While it is muted, the display shows "TELEPHONE".
Muting the car sound system (Mute)
You can quickly reduce the volume to a preset level.
Briefly press the On/Off button ③ to mute the car sound system or to reactivate the previous volume.
While it is switched low, the display shows "MUTE".
To adjust the mute volume, please read the section "Performing settings in the user menu", "Mute LVL" menu item in the chapter "User settings".
Switching demo mode on/off
The demo mode shows the functions of the car sound system as scrolling text on the display. You can turn the demo mode on or off:
Switch off the car sound system if it is not already turned off.
Press and hold the buttons MENU-OK 15 and 2 12 at the same time and press the On/ Off button 3.
The car sound system switches on. The display briefly shows "DEMO MODE" if you switched on the demo mode. By pressing any button, the demo mode is interrupted and you can operate the device.
Displaying version numbers
You can display the version numbers of the different device components.
Switch off the car sound system if it is not already turned off.
Press and hold the buttons MENU-OK 15 and 1 12 at the same time and press the On/ Off button 3.
The car sound system switches on. The display shows the version number of the first component. The first character identifies the component: P = CPU, E = EPROM, A = Accordo, B = Bluetooth^® .
Press the button < 5 / > to display the version number of the other components.
Press the MENU-OK button 15 to return to the previously played audio source.
Traffic information
In the tuner region "EUROPE", an FM station can identify traffic reports by means of an RDS signal. If the priority for traffic announcements is switched on, a traffic announcement is automatically switched through, even if the car sound system is currently not in radio mode or if a station of the wavebands MW or LW is set.
If priority is switched on, the display shows the traffic jam symbol (一) . "TRAFFIC" is displayed during a switched-through traffic announcement.
To switch the priority on and off, please read the section "Performing settings in the user menu", "TRAF" menu item in the chapter "User settings".
Notes:
- The volume is increased for the duration of the switched-through traffic announcement. You can adjust the minimum volume for traffic announcements (see the ch. "User settings", section "Performing settings in the user menu", "TA VOLUME" menu item).
To cancel a switched-though traffic announcement, press the DIS/ESC button 13.
Radio mode
RDS
Many FM stations broadcast an RDS (Radio Data System) signal in addition to their programme in the tuner region "EUROPE" that allows the following additional functions:
- The station name is shown on the display.
- The car sound system recognises traffic announcements and news broadcasts and can automatically switch them through in any operating mode (e.g. in CD mode).
- Alternate frequency: If RDS is activated, the car sound system automatically selects the best receivable frequency for the station that is currently set.
Regional (REG): At certain times, some radio stations divide their programme into regional programmes providing different content. If the REG function is activated, the car sound system changes only to those alternate frequencies on which the same regional programme is being broadcast.
To switch the RDS or REG function on or off, please read the section "Performing settings in the user menu" in the chapter "User settings" (menu items "RDS", "REG").
Changing to radio mode
Press the SRC button 6 repeatedly until "TUNER" is displayed:
The current memory bank appears once as scrolling text on the display.
Selecting the memory bank
The following memory banks are available in the different tuner regions:
| Region | Memory banks |
| EUROPE | FM1, FM2, FMT, MW, LW |
| USA | FM1, FM2, FMT, AM, AMT |
| THAI | FM1, FM2, FMT, AM |
| SAMERICA | FM1, FM2, FMT, AM, AMT |
Press the button ^(16) / ^(2) repeatedly until the desired memory bank is displayed.
Note:
Up to 5 stations can be stored in each memory bank.
Tuning into a station
There are various ways of tuning into a station:
Tuning into stations manually
Briefly press the button < 5 / >14 once or several times to change the frequency in increments, or long to quickly change the frequency.
Notes:
- For the tuner region "EUROPE": In the FM waveband, the next station of the broadcasting network is automatically tuned into if the RDS function is switched on.
- For the tuner regions "EUROPE", "USA" and "SAMERICA": In the FM waveband, the current selected programme type is displayed and can be changed if the PTY function is activated (see the ch. "PTY").
Starting station seek tuning
Press the button < 5 / > 14 for approx. 2 seconds to start station seek tuning.
The radio tunes into the next receivable station.
Notes:
- For the tuner region "EUROPE": In the FM waveband, only traffic information stations are tuned into if the priority for traffic information (一) is switched on.
- For the tuner regions "EUROPE", "USA" and "S AMERICA": In the FM waveband, the next station with the currently selected programme type is tuned into if the PTY function is activated (see the ch. "PTY").
- The sensitivity of seek tuning can be adjusted (see the chapter "User settings", section "Performing settings in the user menu", menu item "SENS").
Storing stations/Calling stored stations
Select the desired memory bank.
If necessary, set the desired station.
Press the station button 1-5 (12) for approx. 2 seconds to store the current station under the button.
-or-
Briefly press the station button 1-5 to call up the stored station.
Scanning stations
The scan function is used to scan every receivable station of the current waveband.
Press the MENU-OK button 15 for approx. 2 seconds to start the scan, or long to continue playing the currently set station.
During the scan, the display alternately displays "SCAN" and the current frequency as well as memory bank or station name.
Note:
For radio mode, you can adjust the scan time for each station (see the ch. "User settings", section "Performing settings in the user menu", "SCAN TIME" menu item).
Storing stations automatically (Travelstore)
With Travelstore, you can automatically search for and store the 5 FM stations offering the strongest reception in the region in one memory bank, Any previously stored stations in this memory bank are deleted in the process.
In the tuner regions "EUROPE" and "THAI", you can store 5 FM stations in the FMT memory bank with Travelstore. In the tuner regions "USA" and "S AMERICA", you can also store 5 AM stations in the AMT memory bank.
- Select a memory bank of the desired waveband, e.g. FM1 or AM.
Press the button 16 / A2 for approx. 2 seconds.
The tuner starts the automatic station seek tuning; the display shows "FM TSTORE" or "AM TSTORE". After the storing is completed, the radio plays the station at memory location 1 of the FMT or AMT level.
Note:
For the tuner region "EUROPE": If the priority for traffic information is switched on (1), only traffic information stations are stored.
PTY
In the tuner regions "EUROPE", "USA" and "S AMERICA", an FM station can transmit its current programme type, e.g. CULTURE, POP, JAZZ, ROCK, SPORT or SCIENCE. Hence, the PTY function allows a targeted search for broadcasts of a certain programme type, e.g. for rock or sports broadcasts. Note that PTY is not supported by all stations.
Note:
To use the PTY function, you must activate it separately in the menu (see the ch. "User settings", section "Performing settings in the user menu", "PTY" menu item).
Selecting a programme type
Note:
In the tuner region "EUROPE", you can adjust the language in which the programme types are displayed (see the ch. "User settings", section "Performing settings in the user menu", "PTYLANG" menu item).
Briefly press the button < 5> / > 14
The currently selected programme type is briefly displayed, and you can select a different programme type.
If necessary, press the button < 5 / > 14 repeatedly until the desired programme type is selected.
Searching for stations
Press the button < 5 / >14 for approx. 2 seconds.
As soon as the seek tuning starts, the display briefly shows "SEARCH". Afterwards, the current programme type is displayed.
As soon as a station is found, "PTY FOUND" is briefly shown. As long as the programme type of the adjusted station corresponds to the currently selected programme type, the display alternately shows the programme type and the station name or frequency.
Notes:
-
If no station with the selected programme type is found, "NO PTY" is briefly displayed and a beep sounds. The radio will then retune to the station that it played last.
-
If the tuned radio station or another station on the broadcasting network broadcasts your selected programme type at a later point in time, the car sound system will automatically switch from the currently tuned station or from the current audio source (e.g. CD) to the station whose programme type matches the one you selected. Note that this function is not supported by all stations.
Configuring the display
Press the DIS/ESC button 13 to change between these two displays:
| Display | Meaning |
| ABCDEF or FM1 102.90 | Station name or memory bank/frequency |
| FM1 11:32 | Memory bank/time |
CD/MP3/WMA/C'n'C/ CD changer mode
Basic information
CD/MP3/WMA mode
This car sound system can be used to play audio CDs (CDDA) and CD-R/RWs with audio, MP3 or WMA files as well as MP3 or WMA files on USB data carriers.

Risk of severe damage to the CD drive!
Noncircular contoured CDs (shape CDs) and CDs with a diameter of 8 cm (mini CDs) must not be used.
We accept no responsibility for any damage to the CD drive that may occur as a result of the use of unsuitable CDs.
Notes:
-
To ensure proper functioning, use only CDs with the Compact-Disc logo.
-
Blaupunkt cannot guarantee the flawless function of copy-protected CDs and all CD blanks and USB data carriers available on the market.
Note the following information when preparing an MP3/WMA data carrier:
- Naming of tracks and directories:
Max. 16 characters (CD) or 24 characters (USB) incl. the file extension ".mp3" or ".wma" (if more characters are used, the number of tracks and folders that are recognisable by the car sound system is reduced)
- No umlauts or special characters
- CD formats: Audio CD (CDDA), CD-R/RW, 0:12 cm
- CD data formats: ISO 9669 Level 1 and 2, Joliet
- CD burn speed: Max. 16x (recommended)
- USB format/file system: Mass storage device/FAT32
-
File extension of audio files:
-
.MP3 for MP3 files
WMA for WMA files -
WMA files only without Digital Rights Management (DRM) and created with Windows Media Player version 8 or later
-
MP3 ID3 tags: Version 1 and 2
-
Bitrate for creating audio files:
-
MP3: 32 to 320 kbps
WMA:32 to 192 kbps -
Up to 20,000 entries can be administered depending on the file structure on the USB medium.
C'n'C mode
The C'n'C interface from Blaupunkt (C'n'C = Command and Control) allows an even more convenient control of devices and data carriers that are connected to the car sound system via a C'n'C-ready Blaupunkt interface.
Before connecting a C'n'C-ready Blaupunkt interface, check the mode of the rear AUX input. For
further details, please read the section "Rear AUX input" in the chapter "External audio sources".
CD changer mode
You can connect the following CD changers to the car sound system:
- Blaupunkt CDC A03
- Blaupunkt CDC A08
- Blapunkt IDC A09
Information on handling CDs, inserting CDs and operating the CD changer can be found in the operating instructions supplied with your CD changer.
Before connecting a CD changer, check the mode of the rear AUX input. For further details, please read the section "Rear AUX input" in the chapter "External audio sources".
Changing to CD/MP3/WMA/C'n'C/ CD changer mode
Press the SRC button 6 repeatedly until the desired audio source is displayed:
- "CD": Inserted CD.
- "MP3": Inserted CD that has already been recognised as MP3 CD.
- "USB": Connected USB data carrier.
Name of the device connected via C'nC - "CDC / AUX": Connected CD changer (if no other external audio source is connected).
Notes:
- The respective audio source can be selected only if a corresponding CD is inserted or a corresponding device (e.g. a USB data carrier or CD changer) is connected.
-
If the car sound system first has to read the data of a connected device or data carrier before the playback, the display shows "READING". For large data volumes, this may take up to 1 minute. If the device or data carrier is defective or the transferred data cannot be played back, a corresponding message appears on the display (e.g. "ERROR" or "USB ERROR").
-
If the connected CD changer first acquires the inserted CDs (e.g. after an interruption of the power supply or a change of the magazine), "MAG SCAN" is displayed. If the CD changer does not contain any CDs or magazine, "NO DISC" is displayed.
Inserting a CD
Note:
You must not hinder or assist the drive as it automatically draws in the CD.
Insert the CD with its printed side up into the CD tray ⑦ until you feel a slight resistance.
The CD is automatically pulled in and its data are checked (the display shows "READING" during this time). Afterwards, the playback starts in CD or MP3 mode. If a CD is inserted, the display shows the CD symbol.
Note:
If the inserted CD cannot be played back, "CD ERROR" is briefly displayed and the CD is automatically ejected after approx. 2 seconds.
Ejecting a CD
Notes:
- If a CD is ejected and not removed, the drive will automatically draw it back in again after approx. 10 seconds.
- You can also eject CDs while the car sound system is switched off or whilst another audio source is activated.
Press the button to eject an inserted CD.
Connecting/removing a USB data carrier
To be able to connect a USB data carrier, the supplied USB cable must be connected to the car sound system (see Installation Instructions).
- Switch of the car sound system so that the data carrier will be correctly registered and unregistered.
Connect the USB data carrier to the USB cable or pull it off.
If a USB data carrier is connected, the display shows the USB symbol. If the USB data carrier is initially selected as audio source after connecting it or after switching on the car sound system, the data are read in first (the display shows "READING" during this time).
Notes:
- If the connected USB data carrier cannot be seen, "USB ERROR" is briefly displayed.
- The time required for reading in the data depends on the design and size of the USB data carrier.
Selecting tracks
Briefly press the button < 5> / > 14 to change to the previous/next track.
Note:
If the current track plays longer than 3 seconds, pressing < 5 once restarts the track.
Select a folder/CD (only in MP3/WMA/C'n'C or CD changer mode)
Press the button 16 / 2 to change to the previous/next folder or CD.
Note:
This also allows you to change between playlists of a device connected via C'n'C.
Fast searching
Press and hold down the button < 5 / >14 until the desired position has been reached.
Interrupting playback
Press the button 3 to interrupt the playback ("PAUSE") or to continue.
[ \text{Playlist mode (only in MP3/WMA mode)} ]
The car sound system can play playlists that were created with an MP3 manager, such as WinAmp or Microsoft Media Player. The playlists must be stored in the root folder of the CD or USB data carrier. The following playlist formats can be recognised: M3U, PLS.
Selecting tracks in Playlist mode
Press the 2 button (12) for approx. 2 seconds to change to the Playlist mode:
"LIST MODE" briefly appears on the display. The first track of the first playlist is played.
Note:
If the data carrier does not contain any playlists, "NO LIST" is briefly displayed.
Briefly press the button < 5 / > to change to the previous/next track of the current playlist.
Press the button 16 / 2 to change to the previous/next playlist.
The display briefly shows the name of the selected playlist, and the first track of the playlist is being played.
Exiting the Playlist mode
Press the 2 button ① for approx. 2 seconds:
"LIST OFF" briefly appears on the display. The current track continues playing.
Scanning all tracks
The scan function scans all available tracks.
Press the MENU-OK button 15 for approx. 2 seconds to start the scan, or long to continue playing the currently scanned track.
During the scan, the display alternately displays "SCAN" and the current track number or file name.
Notes:
- In the CD changer mode, the scan time per track is approx. 10 seconds. For all other operating modes, you can adjust the scan time for each track (see the ch. "User settings", section "Performing settings in the user menu", "SCAN TIME" menu item).
- In the Playlist mode (MP3 mode), only the tracks of the current playlist are scanned.
Playing tracks in random order
Press the 5 MIX button to change between the playback modes:
| Opera- tion | Display | Meaning |
| CD | MIX ALL | Mixing tracks |
| MP3/WMA/C'n'C' | MIX DIR2 | Mixing tracks of the current folder |
| MIX ALL2 | Mixing tracks of the data carrier | |
| CDC | MIX CD | Mixing tracks of the current CD |
| MIX ALL | Mixing tracks of all CDs | |
| Gen. | MIX OFF | Regular playback |
1 In C'n'C mode, additional playback modes may be available depending on the connected device
2 Not in MP3 Playlist mode
If the MIX function is active, the MIX symbol appears on the display.
Repeatedly playing individual tracks, CDs or directories
Press the 4 RPT button to change between the playback modes:
| Opera- tion | Display | Meaning |
| CD | RPT TRACK | Repeating tracks |
| MP3/WMA/C'n'C'1 | RPT TRACK | Repeating tracks |
| RPT DIR2 | Repeating folders | |
| CDC | RPT TRACK | Repeating tracks |
| RPT DISC | Repeating a CD | |
| Gen. | RPT OFF | Regular playback |
1 In C'n'C mode, additional playback modes may be available depending on the connected device
2 Not in MP3 Playlist mode
If the RPT function is active, the RPT symbol appears on the display.
Configuring the display
Press the DIS/ESC button 13 once or several times to change between these displays:
| Opera- tion | Display | Meaning |
| CD | T 01 02:15 | Track number and playing time |
| T 01 18:33 | Track number and time | |
| MP3/WMA/C'n'C | 01 ABC | File name |
| ABCDEF | Artist¹ | |
| ABCDEF | Album name¹ | |
| PLAY 02:15 | Playing time | |
| CLK 18:33 | Time | |
| CDC | T 01 02:15 | Track number and playing time |
| T 01 18:33 | Track number and time | |
| CD 02T 03 | CD number and track number |
1 Artist and album name must be stored as ID3 tag and are displayed only for approx. 10 seconds and perhaps as scrolling text; otherwise, the file name is displayed.
Note
You can switch the display of CD text of an audio CD on and off (see the ch. "User settings", section "Performing settings in the user menu", "CD TEXT" menu item). If CD text is switched on, the corresponding CD text is displayed once as scrolling text at the start of a track.
Bluetooth®
You can connect the car sound system via Bluetooth® with other Bluetooth®-ready devices, such as cell phones or MP3 players. This allows you to use the car sound system with its integrated microphone as hands-free system for connected cell phones and control the audio output of other Bluetooth® devices and play them back via the loudspeakers of the car sound system (Bluetooth® streaming).
Bluetooth® technology is a wireless connection of short range. For this reason, Bluetooth® devices must be located near the car sound system (in the vehicle) to establish and maintain a connection.
To establish a Bluetooth connection, you must first register the car sound system and the Bluetooth device. When you register the devices, a Bluetooth connection is subsequently established automatically. This connection remains in effect as long as the Bluetooth device is within range. If the connection is interrupted, e.g. because you moved the cell phone outside the range, the connection is automatically re-established as soon as you are back within range.
You can connect only one cell phone and streaming device with the car sound system at a time. If you connect a new device with the car sound system, the connection to a currently connected device may automatically be interrupted. However, the car sound system leaves up to 5 different Bluetooth® devices registered, and you can quickly and easily connect any of these devices
with the car sound system again. If you register a sixth one, the Bluetooth® device registered first is unregistered.
Bluetooth® menu
In the Bluetooth® menu, you find all the functions for registering, connecting and managing Bluetooth® devices.
Calling the Bluetooth® menu
Press the MENU-OK button 15.
Press the v button 16 to select the "BLUE-TOOTH" menu item.
Press the >button 14 to open the Bluetooth® menu.
Press the button ^16 / A^2 repeatedly until the desired menu item is selected.
Notes:
- The Bluetooth® menu is automatically exited approx. 30 seconds after the last button activation and you are returned to the display of the current audio source.
- If a Bluetooth® process is running (e.g. re-establishing the connection to the last connected device), the functions of the Bluetooth® menu are blocked. If you attempt to open the Bluetooth® menu during this time, "LINK BUSY" appears on the display. To return to the current audio source, press the DIS/ESC button ⑬. To cancel the Bluetooth® process and open the Bluetooth® menu, press the + button ⑰.
Exiting the Bluetooth® menu
Briefly press the DIS/ESC button 13 to exit the Bluetooth® menu.
Registering and connecting a device
Registering and connecting a cell phone
In the Bluetooth® menu, select the "PAIR" menu item.
Press the >button 14 to open the submenu.
The "PHONE" menu item is selected.
Press the > button ⑭ to register a cell phone.
The display shows "PAIRING" and the Bluetooth® symbol is flashing. The car sound system can now be recognised by a Bluetooth® cell phone for approx. 2 minutes and connected.
Search the car sound system from your cell phone (Bluetooth® name: "TORONTO 400 BT").
As soon as the car sound system is found by the cell phone and should be connected, "ENTER PIN" appears on the display and the PIN "1234".
Establish the connection from your cell phone. Enter the PIN displayed by the car sound system.
The display may show "PAIRED", followed by "CONNECTED", as soon as the car sound system and the cell phone are registered and connected.
Note:
If no connection can be established, "CON FAIL" (connection failed) is briefly displayed.
Registering and connecting a Bluetooth® streaming device
In the Bluetooth® menu, select the "PAIR" menu item.
Press the > button ⑭ to open the submenu.
The "PHONE" menu item is selected.
Press the button to select the "STREAMING" menu item.
Press the button 14 to register a stream-ing device.
The display shows the currently stored PIN (default "1234"). If required, enter the PIN of the streaming device:
Press the button ^(16) / ^(2) repeatedly until the desired number appears at the respective current location.
Press the button < 5 / >14 to change between the 4 locations of the PIN.
Press the MENU-OK button (15) to confirm the PIN entered.
Note:
Not all streaming devices require the entry of a PIN on the car sound system. For some streaming devices, you have to enter the PIN of the car sound system instead. For those devices, you can simply confirm the current PIN of the car sound system by pressing the MENU-OK button (15) and then enter it on the streaming device.
The display shows "PAIRING" and the Bluetooth® symbol is flashing. The car sound system can now be recognised by the streaming device for approx. 2 minutes and connected.
Search the car sound system from your streaming device (Bluetooth® name: "TORONTO 400 BT") and establish the connection. Enter the PIN of the car sound system, if necessary.
The display may show "PAIRED", followed by "CONNECTED", as soon as the car sound system and the streaming device are registered and connected.
Note:
If no connection can be established, "CON FAIL" (connection failed) is briefly displayed.
Telephone functions
Answering/rejecting an incoming phone call
With an incoming call, the display alternately shows "INCOMING" and the number of the caller. The current audio source is muted and a ring tone is played via the loudspeakers of the car sound system.
Note:
If the number of the caller is not being transmitted, the display shows "PRIVATE NUMBER" instead of the number. If the number of the caller is stored together with a name, the name of the entry and the number are displayed (see the ch. "Storing a phone number").
Press the 一 button 18 to answer the call.
"CALL" and the duration of the ongoing call are displayed.
Press the + button to reject the call or to end the current call.
The display shows "CALL END".
Making a call
In the Bluetooth® menu, select the "DIAL NEW" menu item.
Press the button 14.
You can now enter a phone number with up to 20 digits:
Press the button 16 / A2 repeatedly until the desired number appears at the respective current location.
Press the button < 5 / >14 to change between the locations of the number.
Press the button to call the number entered.
"OUTGOING" and the dialed number are alternately shown on the display.
Note:
If the dialed number is stored together with a name, the name of the entry and the number are displayed (see the ch. "Storing a phone number").
As soon as your calling party answers the call, the display alternately shows "CALL" and the time of the current phone call.
Storing phone numbers
In the Bluetooth® menu, select the "DIAL NEW" menu item.
Press the button 14.
You can now enter a phone number with up to 20 digits:
Press the button 16 / A2 repeatedly until the desired number appears at the respective current location.
Press the button < 5> / > 14 to change between the locations of the number.
Press the desired memory button 1-5 12 for approx. 2 seconds to store only the number. - or -
Press the MENU-OK button (15) to enter a name for the entry.
You can now enter a name with up to 9 characters:
Press the button 16 / A2 repeatedly until the desired character appears at the respective current location.
Press the button < 5 / > 14 to change between the locations of the name.
Press the desired memory button 1-5 (12) for approx. 2 seconds to store the number and name.
Note:
A number previously stored on the memory button is replaced.
Speed dial
With speed dial, you can call the number dialed last or a stored number (see ch. "Storing a phone numbers").
Press the button 18.
The display shows the number dialed last.
Note:
If no cell phone is currently connected, the Bluetooth® menu is opened. The "PAIR" menu item is selected.
If necessary, press a memory button 1-5 (12) to call the number stored.
Press the button to call the number. "OUTGOING" and the dialed number are alternately shown on the display.
Bluetooth® streaming mode
Starting the Bluetooth® streaming mode
Press the SRC button ⑥ repeatedly until "BT STREAM" appears on the display.
The playback starts.
Notes:
- The Bluetooth® streaming mode can be selected only if a suitable streaming device is connected.
- If the connection to the streaming device is lost during playback, the display briefly shows "CON LOST" (connection lost) and the car sound system changes to the previous audio source.
Selecting tracks
Briefly press the button < 5 / > to change to the previous/next track.
Additional functions in the Bluetooth® menu
Changing the Bluetooth® PIN
The factory-set Bluetooth® PIN of the car sound system is "1234"; e.g. it must be entered on the cell phone when registering a cell phone. This PIN can be changed.
In the Bluetooth® menu, select the "PIN EDIT" menu item.
Press the >button 14 to open the submenu.
Press the button 16 / A2 repeatedly until the desired number appears at the respective current location.
Press the button < 5 / > to change between the 4 locations of the PIN.
Press the MENU-OK button 15.
Managing registered devices
In the Bluetooth® menu, you can manage the registered Bluetooth® devices (cell phones and streaming devices such as MP3 player).
The registered devices are displayed in the device lists for cell phones ("PHN LIST") and streaming devices ("STR LIST"). You can do the following:
- Connecting the connection to the currently connected Bluetooth® device
- Establishing a connection to one of the registered Bluetooth® devices
- Unregistering a Bluetooth® device
In the Bluetooth® menu, select the menu item "PHN LIST" or "STR LIST".
Press the >button 14 to open the submenu.
The first device on the list is displayed.
Note:
If no device is registered, "EMPTY" is briefly displayed.
If necessary, press the button 16 / 2 repeatedly until the desired device is displayed.
You have the following options:
Press the button 18 to connect the device displayed.
The display shows "CONNECTING". As soon as the device is connected, "CONNECTED" is briefly displayed and you are returned to the Bluetooth® menu. If the device is already connected, "CON EXIST" (connection exists) is briefly displayed and you are returned to the list of registered cell phones or streaming devices.
Press the button 17 to disconnect the connection to the device displayed.
The display briefly shows "DISCONNTD" and you are returned to the Bluetooth® menu. If the device was not connected, "NO CONNECT" (no connection) is briefly displayed and you are returned to the list of registered cell phones or streaming devices.
Press the button 17 for approx. 2 seconds to unregister the displayed device.
The display briefly shows "DELETED" and you are returned to the Bluetooth® menu.
Unregistering all registered devices
In the Bluetooth® menu, select the "DELETE ALL" menu item.
Press the button 14 to unregister all registered devices.
The display shows "CONFIRM".
Press the button 14 again.
The display briefly shows "DELETED".
External audio sources
Front AUX-IN socket

Danger! Increased risk of injury from connector.
In case of an accident, the protruding connector in the front AUX-IN socket may cause injuries. The use of straight plugs or adapters leads to an increased risk of injury.
For this reason, we recommend using angled jack plugs, e.g. the Blaupunkt accessories cable (7 607 001 535).
As soon as an external audio source, such as a portable CD/MiniDisc or MP3 player is connected to the Front-AUX-IN socket, it can be selected with the SRC button ⑥. "FRONT AUX" then appears on the display.
Rear AUX input
Different external audio sources can be connected to the car sound system via the rear AUX input (Rear-AUX-IN):
- C'n'C-ready devices from the Blaupunkt accessories programme (e.g. a C'n'C-ready Bluetooth®/USB or iPod®/USB interface; C'n'C = Command and Control).
- CD changer
- Other external audio sources, such as portable CD players, MiniDisc players, MP3 players or a non-C'n'C-capable Blaupunkt interface.
Note:
An adapter cable is needed to connect an external audio source via the rear AUX input. You can obtain this cable (Blaupunkt no.: 7607897093) from your Blaupunkt dealer.
Before you connect a certain device, first check the mode of the rear AUX input and, if necessary, change the setting (see ch. "User settings", section "Performing settings in the user menu",
"CDC" menu item). Ensure that you change the setting only as long as no device is connected to the rear AUX input. If necessary, remove connected devices first while the car sound system is switched off.
Starting C'n'C mode
Press the SRC button ⑥ repeatedly until the name of the device connected via C'n'C appears on the display.
The playback starts.
Notes:
- The C'n'C mode can be selected only if a suitable device is connected via a C'n'C-ready interface.
To operate the radio in C'n'C mode, please read the chapter "CD/MP3/WMA/C'n'C/CD changer mode". - When using suitable adapter cables, you can connect up to 3 C'n'C-ready Blaupunkt interfaces to the car sound system. For the car sound system to distinguish the different interfaces, you can assign an individual device number to every interface (see ch. "User settings", section "Performing settings in the user menu", "C'N'C" menu item).
Starting AUX mode
Press the SRC button ⑥ repeatedly until "CDC/AUX" appears on the display.
The playback starts.
Note:
You can enter a separate name for the rear AUX input that is shown on the display in AUX mode if you selected the connected audio source (see ch. "User settings", section "Performing settings in the user menu", "AUX EDIT" menu item).
Sound settings
The following sound settings can be changed in the Audio menu:
- Adjusting bass and treble
- Setting the left/right volume distribution (Balance) or front/rear (Fader)
- Setting the boost of bass at low volume (X-Bass).
In the Enhanced Audio menu, you can also perform the following settings:
-
Setting the 3-band equalizer:
-
Setting the middle level
- Selecting bass, middle and treble
- Adjusting quality factor for bass and middle
Performing advanced X-Bass settings (level and frequency)
- Selecting equalizer presettings
Note:
The settings for bass, middle and treble are each stored for the current audio source.
Calling and exiting the audio menu
- Briefly press the MENU·OK button (15) to open the User menu.
Press the button ^(16) / ^(2) repeatedly until the "AUDIO" menu item is selected.
Press the >button 14 to open the audio menu.
Press the button ^(16) / ^(2) repeatedly until the desired menu item is selected.
Perform the setting (see the next section). - Briefly press the MENU-OK button (15) to select a different menu item.
-or-
- Briefly press the DIS/ESC button 13 to exit the menu.
Note:
The menu is automatically exited approx. 15 seconds after the last button activation and you are returned to the display of the current audio source.
Performing settings in the audio menu
BASS
Bass level. Settings: -7 to +7.
Press the > button 14 to open the submenu.
Press the button 16 / A2 to perform the setting.
TREBLE
Treble. Settings: -7 to +7.
Press the > button ⑭ to open the submenu.
Press the button 16 / A2 to perform the setting.
BALANCE
Left/right volume distribution. Settings: L9 (left) to R9 (right).
Press the > button ⑭ to open the submenu.
Press the button 16 / A2 to perform the setting.
FADER
Front/rear volume distribution. Settings: R9 (rear) to F9 (front).
Press the > button ⑭ to open the submenu.
Press the button 16 / A2 to perform the setting.
X-BASS
Increase of bass at low volume. Settings: 0 (off) to 3 (highest increase).
Press the > button ⑭ to open the submenu.
Press the button 16 / A2 to perform the setting.
Calling and exiting the enhanced audio menu
In the audio menu, select the "ENHANCED" menu item.
Press the > button ⑭ to open the ENHANCED menu.
Press the button ^(16) / ^(2) repeatedly until the desired menu item is selected.
Perform the setting (see the next section).
- Briefly press the MENU-OK button (15) to select a different menu item.
-or-
- Briefly press the DIS/ESC button (13) to exit the menu.
Performing settings in the enhanced audio menu
E-BASS
Adjusting bass frequency and quality factor. Settings:
- Bass frequency: 60/80/100/200 Hz
Quality factor: 1.0/1.25/1.5/2.0
Press the button 14 to open the E-BASS submenu.
Press the button 16 /2 to change between the submenus "FREQ" (frequency) and "QFAC" (quality factor).
Press the button < 5 / > to change between the available settings of the submenu.
E-TREBLE
Setting the treble frequency. Settings: 10/12.5/15/17.5 kHz.
Press the button 14 to open the E-TREBLE submenu.
Press the button < 5 / > to change between the available settings of the submenu.
E-MIDDLE
Setting the middle level and frequency as well as quality factor. Settings:
- Middle level: -7 to +7
- Centre frequency: 0.5/1.0/1.5/2.5 kHz
Quality factor: 0.5/0.75/1.0/1.25
Press the button to open the E-MIDDLE submenu.
Press the button 16 / 2 to change between the submenus "GAIN" (level), "FREQ" (frequency) and QFAC (quality factor).
Press the button < 5 / >14 to change between the available settings of the submenu.
E-XBASS
Setting the X-bass level and frequency. Settings:
X-bass level: 0 (off) to 3
X-bass frequency: 30/60/100 Hz
Press the button 14 to open the E-XBASS submenu.
Press the button 16 / A2 to change between the submenus "GAIN" (level) and "FREQ" (frequency).
Press the button < 5 / > to change between the available settings of the submenu.
PRESETS
Selecting equalizer presettings. Settings: POP, ROCK, CLASSIC, P-EQ OFF (no presetting).
Press the button 14 to open the PRESETS submenu.
Press the button 16 / A2 to change between the settings.
User settings
Calling and exiting the user menu
- Briefly press the MENU·OK button (15) to open the menu.
Press the button ^(16) / A^(2) repeatedly until the desired menu item is selected.
Perform the setting (see the next section). - Briefly press the MENU-OK button (15) to select a different menu item.
-or-
- Briefly press the DIS/ESC button ⑬ to exit the menu.
Note:
The menu is automatically exited approx. 15 seconds after the last button activation and you are returned to the display of the current audio source.
Performing settings in the user menu
CDC
Setting the rear AUX input mode Settings: ON (to connect a CD changer or another external audio source), OFF (to connect a C'n'C-ready Blaupunkt interface).
Press the >button 14 to open the submenu.
Press the button 14 to change between the settings.
- Briefly press the MENU-OK button ⑤ to confirm the selected setting.
The car sound system automatically switches off and on again with the selected setting.
CN
Assigning an individual device number to connected C'n'C-ready interfaces (C'n'C = Command and Control). Length: 4 digits, characters: 0-9, A-F (hexadecimal).
Press the > button ⑭ to open the submenu.
Press the button ^(16) / ^(2) to select the interface ("DEV 1-3").
Press the button 14 to change the device number.
Press the button < 5 / > 14 to change between the positions.
The character at the selected position flashes if selected.
Press the button 16 / A2 to select a character at the selected location.
- Briefly press the MENU·OK button (15) to confirm the device number entered.
CDTEXT
Switching the display of CD text on or off. Settings: ON, OFF.
Press the > button ⑭ to open the submenu.
Press the button 14 to change between the settings.
- Briefly press the MENU-OK button (15) to confirm the selected setting.
TA VOLUME
(only for tuner region "EUROPE")
Setting the minimum volume for traffic announcements. Settings: 1 - 50.
Press the > button ⑭ to open the submenu.
Press the button 16 / A2 or turn the volume control ④ to perform the setting.
SENS
Only possible in radio mode: Setting the sensitivity of station seek tuning. Settings: LO1 (lowest) - HI6 (highest).
Press the > button ⑭ to open the submenu.
Press the button 16 / A2 to perform the setting.
SCAN TIME
Setting the scan time in 5-second increments. Settings: 5 - 30.
Press the > button ⑭ to open the submenu.
Press the button 16 / A2 to perform the setting.
CLOCK SET
Setting the time.
Press the > button ⑭ to open the submenu.
Press the button < 5> / >14 to change between minutes and hours.
The minute or hour display flashes if it is selected.
Press the button 16 / 2 to adjust the minutes or hours.
- Briefly press the MENU·OK button (15) to confirm the time entered.
Note:
In 12-hour mode (12H MODE), an "A" is displayed after the time for the time before noon or a "P" for the time after noon.
12H/24H MODE
Selecting the 12 or 24-hour time. Settings: 12H, 24H.
Press the >button 14 to open the submenu.
Press the button 14 to change between the settings.
CLOCK
Switching the display of time on or off with radio and vehicle ignition switched off. Settings: ON, OFF.
Press the > button ⑭ to open the submenu.
Press the button 14 to change between the settings.
- Briefly press the MENU-OK button (15) to confirm the selected setting.
BEEP
Switching the confirmation beep on or off. Settings: ON, OFF.
Press the > button ⑭ to open the submenu.
Press the button 14 to change between the settings.
- Briefly press the MENU-OK button (15) to confirm the selected setting.
MUTE LVL
Setting the volume for low volume. Settings: 0 - 50.
Press the > button ⑭ to open the submenu.
Press the button 16 / or turn the volume control to perform the setting.
ON VOLUME
Setting the power-on volume Settings: 0 - 50 or LAST VOL (volume set last before switching off the car sound system). With the "LAST VOL" setting, the power-on volume is limited to max. 25.
Press the button 14 to select the setting "LAST VOL".
-or-
Press the <button 5 to set the power-on volume between O and 50.
Press the button 16 / A2 or turn the volume control 4 to perform the setting.
REG
(only for tuner region "EUROPE")
Only possible in FM radio mode: Switching REG function on or off. Settings: ON, OFF.
Press the >button 14 to open the submenu.
Press the button 14 to change between the settings.
PTYLANG
(only for tuner region "EUROPE")
Only possible in FM radio mode: Selecting the language for the display of programme types. Settings: ENGLISH, FRANCAIS, DEUTSCH.
Press the >button 14 to open the submenu.
Press the button 16 / 2 to change between the settings.
PTY
(only for tuner regions "EUROPE", "USA", "S AMERICA")
Only possible in FM radio mode: Switching PTY function on or off. Settings: ON, OFF.
Press the > button ⑭ to open the submenu.
Press the button 14 to change between the settings.
DISP COL
Mixing the colour for the display illumination from the basic colours Red, Green and Blue (RGB). Settings: For R, G and B each 0 to 16.
Press the
The value of the selected colour flashes.
Press the button 16 / 2 to adjust the value of the selected colour.
- Briefly press the MENU-OK button ⑤ to confirm the selected setting.
SCAN
Switching the constant colour change of the display illumination on or off. Settings: ON, OFF.
Press the >button 14 to open the submenu.
Press the button 14 to change between the settings.
- Briefly press the MENU-OK button (15) to confirm the selected setting.
If the constant colour change is switched on, the colour of the display illumination changes constantly across the colour spectrum.
COL SCAN
Selecting the colour of the display illumination during a colour seek.
Press the >button ⑭ to start the colour seek.
The display alternately shows "SCANNING" and "OK (MENU)" and the colour of the display illumination changes constantly.
Briefly press the MENU-OK button 15 to select the currently set colour.
DIM DAY/DIM NIGHT
Setting the display brightness for the day (DIM DAY) or the night (DIM NIGHT). Settings: 1-16.
Press the > button ⑭ to open the submenu.
Press the button 16 / A2 to perform the setting.
If your car sound system is installed as described in the installation instructions and your vehicle features the corresponding connection, the display brightness for day and night is switched by switching the vehicle lighting on or off.
AUX EDIT
Entering names for the rear AUX input in AUX mode. Length: 9 digits; characters: A-Z, 0-9.
Press the >button 14 to open the submenu.
Press the button < 5 / > to change between the positions.
The character at the selected position flashes if selected.
Press the button 16 / A2 to select a character at the selected location.
- Briefly press the MENU-OK button (15) to confirm the name entered.
TRAF (only for tuner region "EUROPE")
Only possible in FM radio mode: Switching priority for traffic announcements on or off. Settings: ON, OFF.
Press the >button 14 to open the submenu.
Press the button 14 to change between the settings.
RDS (only for tuner region "EUROPE")
Only possible in FM radio mode: Switching RDS function on or off. Settings: ON, OFF.
Press the >button 14 to open the submenu.
Press the button 14 to change between the settings.
Factory settings
Factory settings in the user menu:
| ON VOLUME | LAST VOL |
| MUTE LVL | 0 |
| SENS | HI6 |
| SCAN TIME | 10 |
| CLOCK | OFF |
| BEEP | ON |
| DIM DAY | 15 |
| DIM NIGHT | 12 |
| CDTEXT | OFF |
| 12H/24H MODE | 24H |
| CLOCKSET | 00:00 |
| TA VOL | 20 |
| RDS* | ON |
| REG* | ON |
| TRAF* | OFF |
- Only in tuner region "EUROPE"
You can restore the original factory settings of the car sound system:
- Briefly press the MENU·OK button ⑤ to open the menu.
Press the button 16 / A2 repeatedly until the "NORMSET" menu item is selected.
Press and hold down the MENU OK button 15 for longer than 4 seconds.
"NORM ON" briefly appears on the display. The car sound system automatically switches off and on again with the factory settings.
Note:
If you press the MENU·OK button 15 for less than 4 seconds, "NORM OFF" appears on the display and the current settings are retained.
Useful information
Warranty
We provide a manufacturer's warranty for products bought within the European Union. For devices purchased outside the European Union, the warranty terms issued by our respective responsible domestic agency are valid.
The warranty terms can be called up under www.blaupunkt.com or requested directly from:
Blaupunkt GmbH
Hotline
Robert-Bosch-Str. 200
D-31139 Hildesheim
Service
In some countries, Blaupunkt offers a repair and pick-up service.
Information about the availability of this service in your country can be found at www.blaupunkt.com.
If you want to take advantage of this service, you may request a pick-up service for your car sound system via the Internet.
Technical data
Voltage supply
Operating voltage: 10.5 - 14.4 V
Current consumption
In operation: 10 A
10 sec. after switch-off: < 3.5 mA
Amplifier
Output power: 4 × 26 watts sine at
14.4V at 4 ohms.
4 x 50 watts max.
power
Tuner
Wavebands in Europe/Thailand:
FM: 87.5 - 108 MHz
AM (MW): 531 - 1,602 kHz
LW (Europe only): 153 - 279 kHz
Wavebands in the US:
FM: 87.7-107.9 MHz
AM (MW): 530 - 1,710 kHz
Wavebands in South America:
FM: 87.5-107.9 MHz
AM (MW): 530 - 1,710 kHz
FM frequency response:
30-15,000 Hz
CD
Frequency response:
20-20,000 Hz
Pre-amp out
4 channels: 2 V
Input sensitivity
Rear-AUX-IN: 1.2V / 10k
Front-AUX-IN: 500mV / 6k
Tel/Navi input: 10V / 1k
Dimensions and weight
WxHxD (mm): 182x53x155
Weight: approx. 1.30kg
Subject to changes
Mode Bluetooth® Streaming. 68
La lecture commence.
Remarque :
La lecture commence.
Remarque :
La lecture commence.
Remarque:
Rear-AUX-IN: 1,2V/10kΩ
Front-AUX-IN: 500mV / 6k
Entrée tel/navi: 10V / 1k
Dimensions et poids
IxHxP(mm): 182×53×155
Poids: env. 1,30 kg
AM (MW): 531 - 1602 kHz
OL (LW) (solo Europa): 153 - 279 kHz
Gamme d'onda USA:
FM: 87,7-107,9MHz
AM (MW): 530 - 1710 kHz
AM (MW): 530 - 1710 kHz
Rear-AUX-IN: 1,2 V / 10 kΩ
Front-AUX-IN: 500mV / 6k
Ingresso Tel/Nav: 10V / 1k
Dimensioni e peso
LxHxP (mm): 182 x 53 x 155
Peso ca. 1,30kg
AM (MW): 531 - 1602 kHz
LW (alleen Europa): 153 - 279 kHz
Golfgebieden USA:
FM: 87,7-107,9MHz
AM (MW): 530 - 1710 kHz
AM (MW): 530 - 1710 kHz
Frequentiebereik FM:
30-15000Hz
CD
Frequentiebereik:
20-20000Hz
Pre-amp out
Vierkanalen: 2V
Ingangsgevoeligkeit
Rear-AUX-IN: 1,2V / 10k
Front-AUX-IN: 500mV / 6k
Tel-/Navi-ingang: 10V / 1k
Stalla in stationer 134
Spara station/kalla fram en sparad station. 135
Presentera stationer 135
Spara stationer automatiskt (Travelstore) 135
PTY. 135
Visningsalternativ. 136
Stalla in tuner-region
RDS (endast for tuner-region "EUROPE")
Endast mögig i FM-radioläge: Aktivera aller avaktivera RDS-funktion. Installnigar: ON (på), OFF (av).
Sildenafil is used to treat erectile dysfunction in men. It is a natural product of the action of the Sildenafil receptor, which is thought to be an important part of the central nervous system.
Datasétécnicos
Modo de MP3/WMA/C'n'C/leitor multi-CD:
Sintonizar as estaceoes 183
Colocar opainffrontal
| Região | Níveis de memória |
| EUROPE | FM1, FM2, FMT, MW, LW |
| USA | FM1, FM2, FMT, AM, AMT |
| THAI | FM1, FM2, FMT, AM |
| S AMERICA | FM1, FM2, FMT, AM, AMT |
Sintonizar as estaceoes
AM (MW): 531 - 1602 kHz
LW (apenas Europa): 153 - 279 kHz
Bandas nos EUA:
FM: 87,7-107,9 MHz
AM (MW): 530 - 1710 kHz
Bandas América do Sul:
FM: 87,5-107,9 MHz
AM (MW): 530 - 1710 kHz
I drift: Skift visiting
14-tast
lmenu: Rediger indstlinger
Radiotilstand: Indstil station
Andre tilstande: Titelvalg
(15) MENU-OK-tast
Kort tryk: Abn menu, bekraeft indstlinger
Langt tryk: Start scanningsfungtion
16 V-tast
lmenuen: Hent menupunkt
Radiotilstand: Vaelg hukommelsesniveau
Mp3-/WMA-/C'n'C-/cd-skifter-tilstand: Skift
Taending/slukning. 206
Lydstyrke 207
Aktivering/deaktivering af demo-tilstand...207
Gem station/hent gemt station 209
scanne stationer 209
Automatisk lagring af stationer (Travelstore) 209
PTY. 209
Bortskaf违法犯罪 Bortskaf maybe a good candidate for the investigation of a possible criminal target.
Indstille station manuelt
Gem station/hent gemt station
AUX-indgang pa bagsiden
| Strefa | Pozimiy zapisu |
| EUROPE | FM1, FM2, FMT, MW, LW |
| USA | FM1, FM2, FMT, AM, AMT |
| THAI | FM1, FM2, FMT, AM |
| SAMERICA | FM1, FM2, FMT, AM, AMT |
Fale dlugie (LW), (tylko w Europe):
153-279kHz
AM (MW): 531 - 1602 kHz
LW (vain Eurooppa): 153 - 279 kHz
Aaltoalueet USA:
ULA (FM): 87,7 - 107,9 MHz
AM (MW): 530 - 1710 kHz
AM (MW): 530 - 1710 kHz
FM-toistovalue:
30-15000Hz
CD
Toistovalue:
20-20000Hz
Esivahvistimen lahto (Pre-amp Out)
4kanavaa: 2V
Tuloherkkyys
Rear-AUX-IN: 1,2V/10kΩ
Front-AUX-IN: 500mV / 6k
Puh./nav.-tulo: 10V / 1k
Mitat ja paino
LxKxS (mm): 182 x 53 x 155
Paino: n. 1,30 kg
AM (MW): 531 - 1602 kHz
LW (csak Europa): 153 - 279 kHz
Hullamsavok, USA:
UKW (FM): 87,7 - 107,9 MHz
AM (MW): 530 - 1710 kHz
Hullamsavok, Del-Amerika:
UKW(FM): 87,5-107,9 MHz
AM (MW): 530 - 1710 kHz
Yka3aHnI IO yTHAn3aunn 329
KOMTIAKT TIOCTABKN 329
AOTOANTeIbHbIe IINHAIAEKHOCTH (HE BXoAHT B O6bEM IOCTaBKN) 329
BkIoueHne yctpoiCtba. 330
CHTne/yctahOBka TaHeAn ytpaBHeHn ...330
Hac troika peRHOHa TIOhepa. 330
BkIoueHne/BbIKIOueHne 330
TpomKocTb 331
BkIoueHne/BbIKIoueHne
dEmOHCTpaUOnHOrOpeXIMa....331
OTo6paXaTb Homepa Bercn 331
Adoopxha Hhfoepmaunna 331
Pexnma332
RDS 332
IpeekloueHneBpeximpaanoo 332
Bb6op 6aHa KaMaTn CTaHcN 332
Hacrpoika paadocanu.. 332
3aTOMHHHe cTAHUN/BKIAUChHe 3aTOMHeHHx CTAHIN. 333
CkaHnroBaHne cTaHcNc
IpocLyuBbAHnEM. 333
ABTomatueckn TOnckn 3aONmHaHne cTahun (Travelstore) .........333
PTY. 333
Hactpoika dncnnae 334
Pexmm MP3/WMA/C'n'C/CD-ueHHxep ...334
Ba3OBa INHΦopMaζη 334
IpeekluoyHneBpexHMM3/WMA/ C'n'C/CD-uehDxep. 335
BcTaBka CD-△mCka 336
I3BaeHHe CD-△nCka 336
IopcoeHHeHne/ydaJIeHne USB-HocnteA daHHbIX 336
BbI6op TpeKa 336
Bb6op TpAnKn/CD-dnCsKa (ToIbKO dA
peKHMOB MP3/WMA/C'n'C nnn
CD-ueHdXep) .337
BbICTpbI IOHCK. 337
OctaHOBka BOCIPON3BeDeHn3 337
PexHM TIIe-ANCTa (TOIbKO B pexHMe BOCIPON3BeDeHnMP3/WMA) 337
CkaHnroBaHne BCex TpeKOBc
IPOCAUYBbAHmE. 337
BocpO3BeDHe TpeKOB CcUyAHOIIOcAIOBaTeAIBHOCHTN 338
BbIIOHHeHHe HaCTpoE K MeHIO ayHIO.....345
BbI3OB bBbIXoA n3 paCUnpeHHOrO MeHIO Audio 345
BbIIOAnHeHne HAcTpoeK BpacShIpEnHOM MeHIO Audio... 345
TIOb3OBAteAbckne HAcTpOKn 346
BbI3OB u BbIXoA n3 MEHIO IOA3OBATeAra....346
BbIIOAnHeHnE HAcTpoEK B MeHIO TIOAb3OBeAe. 346
3aBoDcKHe HacTpoKn 350
TToe3Ha HnΦopMaun. 351
CepBnc. 351
TexHHueckne xapaKTepehCTMkn. 351
Hnctpykunpo yctahOBke 381
Yka3aHHI IO TexHnKe 6e3oTacHOCTN
ABTomarHHTOla Ipon3BeDeHa B COOTBCTBm C COBPEmeHHbIM yOBHEM pa3BHnA HayKnI TexHNKnI pIn3HaHbIMn IpaBnAmm TexHNKn6-30TACHOCTm.Tem Me HeHee, Tnp Heco6LIODeHNn IpnBEHeHbIX B DaHHoN INCTpyKUcM Yka3aHN Bo3MOxHO BO3HNKHOBEHne ONaCHOCTn.
AaHHa HNCTpyKUa CODepxHt BaxHyIO HnΦopMaZNU DAI IPOCTOHO HADeXHOro MOHTaJa YtpabAeHnABTOMaTHOTAOJ.
- PIIpeXeDE YEM IPINCTUITb K IIOIb3OBaHnIO aBTOMaIgHnIToIOM, BHNMaTeIbHO IIOPOHTHe BCIO daHHyIO INHCTpyKcHIO.
XpaHHTe HNCTpyKUIO TaK, UTO6bI OHa 6bIa B NIO-60eBpEMA DOCTyTHA DA BCEX TIOBA3OBATeAEi.
IpeepaBaIe aBTOMO6nHbHyIO aBTOMaHHTOny ApyHM ANiAm TObKO BmCTe C daHHo HhC-tpknei.
Kpome TOrO,co6IIOaIe HNCTpyKUIN Ha yCtpoNC-TBa,KOTOpBle BbI NcIOaB3yEt BMeCTe C DaHHOABTOMaHHToAOI.
NCTIOa3yEmbIe CHMBOaI
B daHno INhctpyKcnn NcTIOb3yIOTCaLdYIOuNE CmMbObl:

OTIACHOCTb!
TpeDytpexdEneO tpaBMPOBaHHN

OCTOPOXHO!
PpeAynpeXeHne oIOBpeXeHn CD- npHBoDa

MapKnpoBka CE IIOaTBePkaaet cO6Ano-DeHne AnpekTNB EC.
0603HaayetonepaunIOytpaBHeHIO
- 0603hauaet TpeyuCaeHne
Be30TacHOCTbBHXKeHnA
Co6I0aIte CLeAyoIe yKa3aHnI IO 6e3oIac-HOCTN DmKHeHnI:
Плб3уTecbВaHIM yCTpoIcTBOM TAK,чTO-6bl Bbl BCERda MOrAN 6e3OITACHO YTPaBArTaB BaHIM aTOMo6HAm. B cLyueae COMHeHNI OCTaHOBtEcB TIOxOJaE MMeTe H BOC-TOlb3yHTecb yCTpoIcTBOM TpH OCTaHOBLeH-HOM TpaHCTIOpTHOM CpeAdTE.
- CHMMAnte HN yCTaHbAIBaTe TnAHeIb yTpaBLeHHr TOABKO TpH OCTaHOBLeHHOM ATOMo6Hne.
Bcerda yctahabHbAte ymeepHHy ypoBeHb rPOMKoCTN, uTo6bl CbIbTaTpeAITpeAHTeAbHbIe 3ByKObIe CNHaBl (HaIPmEp, FAH), uTo6bl y6epeh opraHb clyxa. B cayx ABykluOeyHraPOMKoCTN (HaIPmEp, pIn CMeHe ayDHOcTOHnKa) n3MeHene ypOBHraPOMKoCTN He CbIbHNo. He yBEaUNuBaTe ypoBeHb rPOMKoCTN BO BpEma DaHOrO OTKluOeHNr rPOMKoCTN.
06üne yka3aHnI IO texHnke 6e3oTachOCTn
Co6I0aIte CLeDyUOJIne Yka3aHnI, YTO6bI 3aIHTb camNX c6eOT TpaBMIpObaHH:
- He pa3pewaetcOtKpbIbTaB Hn BHOCTb N3MeHEnH B yctpoiCTBO! B yctpoiCTBe HmEeTcIa3ep KlaaccA 1, KOtopbI MOxET TOBpeNTb Baun rA3a.
- He yBeaHnBaIte yPoBHe b rPOMKoCTN BO BpemBaIKIoUeHnE 3Byka, HApIMep, Ipi CMeHe ayAnIOHcTouHnKa. NImeHne rPOMKoCTN Ipi BbIKIoUeHHom 3Byke He CbIbHo.
HcToA30BaHHe To Ha3HaueHHIO
DaHHa ABOMaHHTOla IIpeHa3HaueHa DA YCTAHOBKN IpaobTbI B ABTOMo6BnC HnPRAJxHeHEM 60ptOBoi CETn 12 B INdoXHa YCTaHabMBA tCBs C BOTcK DIN. Co6AnOaJIte PtePeAhbIe 3HaueHIna MoUChOtN, YaKaahBIIe BTexHueCKHX XapakTePnCThKax.PemOH T, IIPIH Heo6XoHmOCTN, yCTaHOBKA DoXHbI BblIOAHLrTBc CTEuHaNCTOM.
Hnctpykzna TPOyctaHObke
BbMoXeTe yCTaHaBnBaTb abTomarHHTOny caMoCTOReTaBHO ToIbKO eCAn Bb HmEeTe OITbY cTaHOBKn ABTOMaHHTOn, IN xopoIo pa3bnpaTecB bAeKtPnke abTomo6nna. CoIIOaJIte Yka3aHHN IO yCTaHOBKe B KOHc DaHHOH NCHTpKUnn.
3aBHeHneO COOTBeTCTBn
HactoIIM dnpma "Blaupunkt GmbH" 3aRBAeT, yTO abTomarHHTOla "Toronto 400 BT" coOTBeCTbYET OCHOBOITOLARAOIIM Tpe6OBAHNIM I pyrHM CYUcE7BeHHbIM TpeADINCAHNAM AnpeKTHBBI 1999/5/EG.
Yka3aHnI IO OuHcTKe
PactBopHTeH N CpeAcbTBA Dn OOnCTKn, a TaKke a3pO30An DAA YXoDa 3a TIAACTMACCOBbIMN 3AE-MeHTAMN BO4NTeABCKO3OHbI MOrY COePjKaTb BEiueCTBa, KOtOpbIe IOBpeJAdOT IOBepxHOctb ABOMTaHHTOaJIb.
- OYNCTKA BTOMaHHTOJI NCTOa3yTe TObKO CyXyIO HN CKeKa yBaXHeHHU TpI ToQky.
- Pn Heo6xOAMMOCTN, OUHuaTe KOHTaKtB1 NaHeu YItpaBLeHn MRAKOn, CMOueHHOn CTINPTOM DAO UCHCTKN TpTIKoN.
Yka3aHnI IO yTHaN3aCnI

He b6pa3bBaIte BaIe Otpa6OtaBIIee yctpoICTBO B6bITOBIe OTXoIb!
Aynytnn3aunnn TIOb3yHTecb CyuieCTByUOuMMN CnCTeMaMn BO3Bpata n c6opa Otpabotabweo 060pyoBaHna.
KOMIIaekTIOCTaBKn
B KOMTIAEKT TIOCTaBKN BXOADT:
1 ABToMaIgHITOnla
1 INCHTpykuznyTOKcIyatauny/uCTAHOBKe
1ФyTЯрДЯТЯнЕУптавALEHNA
1 KpeTexHna paMka
1 KomTaeKT MeaKHX dTeaNei
2 HCTpyMeHTbI DAЯ DeMOHTaxa
1 INCHpyKcHnI IOIOAKLIOeHnIO USB
Птумейанne:
Mbl pekomehayem HCTIOA30BaTb opnHnHaBhIe pInHaAaExHoCTn OT "Blaupunkt" (www.blaupunkt.com).
OToAhnTeAbHbIe TpHnHaIeXHoCTN (He BXoJrT B O6bEm IocTaBKn)
TOnyUHTe HnOopMaunHO O DToIaHInTeAhBbIX npHaAnExNoCTa y BaWero AnEpa TPOaYkUnn "Blaupunkt" mN B NHTepHete n aDpecy www. blaupunkt.com, hapmep:
PybT Y ha pyb nnpyuHoi PybT Y ot "Blaupunkt" dAe 63oIacHO n KOMΦopTHORO yIpaBAEHN OCHOBbIMnФyHKUaMn (BKIOueHne/BbIKIOUeHne IpiN TomOUs INyTa NCTaHtIOHOYIpaBAEHN HeBO3MOxHO)
Cobmctmbie C'nC Hntepfecbbl OT "Blaupunkt" (C'n'C = Command and Control) DAA IOAOEaHHeHHA OTOANHTeAbhBX HOCHTeJe DaHHbIX N yCTpoiCTB (HaIIpHMeP, uepe3 iPod/USB-HnTepeic)
- CD-yeiHdJep "Blaupunkt"
- Ychnteam (Amplifier) Blaupunkt mAn Velocity
BkIoueHne yctpoNCTBa
CHTHe/YcTaHOBKa THaEAn yTpBaLHeHn
Aa 3auntbot OTOXnueHnBaasa aBtOMarHnToLa Ochaueneh CbeMHOn PAeAbu ytpaBAeHn (ReleasePanel).PaeAby ytpaBAeHNIOCTABAEETCBΦyTAnpe.DaToro, UTO6bI NOcE MOHTaxa ABOmARHnTObl PON3BcTe BkUOeyHe, Bam HxNHO Chaala YctAHOBNTaHEAby ytpaBAeHN (CMOTRNEpa3dEYCTAHOBKa PAHeHn ytpaBAeHNB B 30TnIaBe).
PnTOKHaHn ABTOMOBnB CERda 6epnte PAnHeb yIpaBLeHn CcoBo. Be3 DaHHo TnHeaYIpaBLeHn ABTOMaHTHO He IpeCTabAerT DAnTOXHTeA HnKAOKUeHHOCTN.
OctopoxHo
TobpexdeneHn taHeAn ytpaBaeHHN
THaHeb yItpaBLeHnHaHe3a poHrTb.
THeB ynpaBLeHnCleAeYt IpeHocntb TaK, OTo6bI OHa 6bIa 3aunuHnOa YdapOB N 3aqr3- Hnnpo KOnTaKe.
THeBbYIpaBAAHnHEb3aTODBePraTbBO3- DeICTBIOIPIRMBIXCOAHEuHBIXAUYeINANAPyrNX NCTOCHIKOB TETAA.
CLeyETn36eTaTbIpyrMoTOIpyKoCHOBENHKOxN yeLoBeKa K KOHTaKTam TAnHeN yITpaBLeHn.
YctaHOBKa TnHeAynTpAbAeHHN
BCTaBbTe TaHeIb yIpaBLeHnB KpeIeHne C IpaBOrO kpaYcTpoIcTBa.
Octopoxho BCTaBte TaHelb UyPabAeHnBa IBe BOE KpeIeHne, TOKA OHa He 3aФнСиpyETc.
Chrthe Taheyn ytpabLeHna
HaKMMTe KHOITky ①, YTO6bI pa36IoKnpoBaTb IaHeMb yITpaBLeHnI.
AeBaCTopoHa TtHeH yItpaBHeHn OTCoeHn HReTcOyCTbA, aΦHKCaTOp IpEdoXpaHReT ee OT BbIaDeHn.
Bo3mTe THeMbYtpaBaeHn 3a IeByIO CTOpOHy, IN BbITrHbAte eeIpyMO, IpeoAoBeBaCoTPOTHBaeHne dKcATopa, H3 KpeTAEHn.
Птумейанно:
ABTomaHTHToTA aBOMaTHUeCKN BbIKIoUaETcN, KaT OToBKO TaHeIb UyPbAVeHINb 6yTeCT CHrTa.
Hactpoika pernoha Tiohepa
DaHHa aBTOMaHHTOla paccuHTaHa HaekTlyataUIO B pa3hBxpeRHOAHxCpa3nHbIMN DaIaTzoHMn YacTOT NTexHOARmN IpePeau. Ha 3abo-He3ROBHTeJe yctahabAIBaETcpeRHOIH TOHEPA "EUROPE" (EBpOnA). Kpome TOrO, BpacnopKeHN HMeIoTc eIe peRHObl ToHEPA "USA" (CLUA), "THAI" (TaHaN) and "S AMERICA" (IOXHaA MepnKa).EcAn BiKCTAYtpyete BaUy abTOMaHHTOly 3aIpeDeAAMn EBoPTb,ToTpi Heo6XoAMmCTn Bam HyJHo hAcTPOntb IOXoAHynnpeRHOH ToHEpa:
ChaayaA BbIKIOUHTe aBTOMaHHTOy.
HaxMNTe HyeepXnBaIte OAOHBpeMeHHO KHOTKHNENU-OK 15 H4 12 HaxMNTe KHTIKBYANBik
ABTomarHHTOa BkUoayetcHa DnCTIepe TOBAETcTekyuynyctaHOBaeHHb peHNO THOhepa.
HaxmMaTe KHOIky 16/ A2 Do Tex TOp, ToKa He 6yDat OTo6paXaTbCra XeLaembl perHoN TOHepa.
HaxMMte KhoTIky MENU-OK 15.
BklueyHne/BbIKluoyHne
BkluoyHne/BbikluoyHne KhoTkoBkA/Bbika
ABA BKIOHHe HAKMITE KHOITky Bk/Byk
ABTOMaHHTOVA BkAIOyaeTcA.
A BbIKIOHn HaxMNTe N yApexHBaHTe KHOIkyBk/Byk( 60oe2ceyHa.
ABTomaHHTOa BbIKAIOaETcA.
Пгимеанne:
ECN Bbl BKIOUaete abTOMaHHTOly Ipih BblKIOUeHHOM 3aJxRHaHH,TO Upe3 1 qac OHaABTOMaTHueCKN OTKIOUaETc C cIaBIO 3KOHOHmN 3Heprn ABTOMObHOro aKKyMaIaTopa.
BbIKIOUeyHNE/BKIOUeyHneOT3aXnraHHN aBTOMO6HJ
Ean abTomaHHToA TIOKaIoueHa K 3axnHaHIO aBTOMO6nA kak OTncaHO B INCTpyKuIN ITO yctaHOBKe Hne 6bila BbIKIoUeHa KhoTkoB Ka/BbIA
③,TO OHa 6yDET BkAIOuATbCn N BbIKAOUaTbCn ODAHOBpeMeHHO C3axHraHHem.
PpOMKoCTb
PeryAnpOBKa rpoMkoCTn
「pomkoctb moxho peynpoBaTb B dHaIa3OHe OT 0 (BbIKA)do50 (MaKcHmym)eHNHt.
ПоворачиBaHTe peRyAHTop rPOMKoCTH 4,уTO6bI n3MeHnTb yPoBeHr pOMKoCTH.
Птумецни: Следима.
Ecan Teleoh Hn HABRauOnHna CnCTema IIOkIoUeybI K ABTomarHHTOLe aBTOMo6nA kAK OTINcHoB B INCTpyKuNN IO yctaHOBe, TO Ha BpeM TelefoHHoro pa3rOBopa Hn CO- o6ueHn CnCTeMbI Habruaun 3Byk aBTOMarHHToJI bIKIAOuaTe, YTObI Bbl MoAN 6e3 TOMex IIPOCAtyauB BoCTpOH3BOAMMbI 3Byk TelefoHHoro pa3rOBOPa Hn HABraunOnHnoCnCTeMbI. Ha AnCIaee Ha BpeM OTKluOHeH 3Byka OTo6paXaaetc "TELEPHONE".
TpHrAyuIeHHe 3Byka aBtOMaRHTnToIbI (Mute)
BbMOKeTe MROBOEHHO yMeHbUNTb rPOMKoCTb DOyCTaHOBLeHHOro Bamn 3NaueHn.
HaXMMTe KpaTkoBpeMeHNO KHOIky BkA/BbIA ③,YTO6blIPINAYWHTb3BYK ABTomaHNTOJI bI HAN BepHyTBcObaTHo K IpexHemy yPobHIO 3Byka.
Ha BpemrPiNfUySeHn3Byka Ha DnCTTae oTo6paXaetc"MUTE".
Kak hactpoNTb ypOBeHr pOMKOCTn PnIpyWe Hn 3Byka YntaTe B rAabe "Tolb3OBaTeBcKne HacTPOKn" pa3dEe "BblIOHeHne HacTPOeK B MeHIO TOLb3OBaTeA", tyHKT MeHIO "MUTE LVL".
Bkluoyehne/BbIKluoyehne DemohctpaunOHoro pexHMa
DEmOHCTpaUHOHHbpeXIM TOKa3bIbAet Bam cyHKuHN ABTOMO6HbHOH aBTOMArHHTObI B VbAE 6eYuei CTPOKH Ha DCnTae. Bbl MoKeTe BKIoOyAtb/BbIKIoUaTb DEmOHCTpaUHOHHb peXIM:
Chaaala BbIKIAOHTe aBTOMaHHTOly.
HaxMMTe HyeepXnBaIte OAOHBpeMeHHO KHOTKIN MENU-OK 15 n 2 12 n HaxMMTe KHTIKy BkN/BbIKN 3.
ABTomaHHTOla BkHouaeTc. EcH y Bac BkUoeyen DEMOHCTpaUHOHHb peXIM, TO Ha DCIIeep KpAIOBpeMeHNO OTO6p3aNTcR "DEMO MODE". HaxKaTHe AIO60N KOIOKIN PnBBOADHTK OTMEHe DEMOHCTpaUHOHOpeXIMa, n Bbl MoKTe pIcHtynBaHnIOyCTPOHCTBM.
OTo6paXaTb HOpemaBepcn
Bb MoKeTe BkAIOUHTb OTo6paKHeHne HomepoB BepCn pa3AmuHbIX KOMTOHeHtOB yCTpOCTBa.
Chauaaa npn Heo6xOaHMOCTN BbIKIOHTe aBTOMaHHTOAY.
HaxMMTe uyeepKNaBte OAOHBpeMeHHO KHOTIKI MENU-OK 1 n 1 n HaxMMTe KHTIKY Bk/BykA 3.
ABTomarHHTOa BkIoUaetc. Ha NCTTae ToBHeAHTa HOpem BePCHIN TepBOrO KOMTOHETA. IePBbI CNMBOA 6o3Haauaet CmTOHeBTb: P = pnoceccop, E = EPROM (CTIT3Y), A = Accordo, B = Bluetooth®.
HaxMHTe KNOTky<5)/>14,TO6bI OTO6pa3HTb HOMep BepCN dpyTHX KOIMTOHETOB.
HaxMnTe KHOITky MENU-OK ⑤, YTO6bl B03-BpATINbCRA K TPOCAeHEmy TPOCAYuHBaEMOMy aydnoHCTOCHNKy.
Dopoxhna HOpmaun
Bpernohe TIOhepa "EUROPE" FM-paHocctaunn MOKET C IOMOuBIO CNrHaA RDS o6o3NaaTb CO- 06ueHnA DOPOXHOH HNΦOpMaUN. ECLN BKLIOUeH TPINOPHT CBOOK DOPOXHOH HNΦOpMaUN, TO IPONCXODNT ABOTAMTHUeCKOE TEpeKlIOUeHne Ha CBODKY DOPOXHOH HNΦOpMaUN, TAKXE N B TOM CAYae, ECNI ABOTAMHITOnA He HAXoNDTCB TEKUHNMOEMHT B PEXMME pAOH NAN HAcTPOEH TEpeDaTHNK dnaTaN3OHOB BON CB NAN DB.
TpiBkAUyEHOM TpHOpHTeHa DnCTIe OTo6paKaETc CNMBo "TPO6KN" (). Bo Bpemr TpHOpHTeTHO TEpeaun COo6IeHN DopoxHOH NΦoPmaUN Ha DnCTIe OTo6paXaETcRA"TRAFFIC".
O BKIOUoyEHIN N BbIKIOUeyHIN PEXHMa UHTaJIteB TlaBe "TIOb3OBateMbCKHe HAcTpoKn" pa3Je "BbIIOVAHEHn HAcTpoE K MeHIO IOb3OBATEeA", TynKT MeHIO "TRAF".
Птимechanical:
Ha Bpem TaPcAunn BkmoenHoo CBOaKn Dopoxho HhOpmaunu ypoBeHb rpomKoCTyBEaunHbaetc.Bbl Moxete HaCToPoTb AAnDopXHOH NHPoMaunu MmHmAbHyTO pOMkoCTb (CMOTPeBra. "Tolb3OBAteBaCKeH NaCTPOIn" pa3deJe "BblOnHeHne HAcTpoEe B MeHIO TOnb3ObaTeA,ITNKT MeHIO TA VOLUME").
- AIAOTMeHbBOCIPPOIN3BeEHHBKNIOUeHHOHADOPOXHOHNHOFOPMaUNHAXMITEKHOITkyDIS/ESC 13
Pexkma
RDS
B pernohe TIOhepa "EUROPE" MHOrne FM-ctaHnIepeaIoT HApA dy C paAnOpIporpAmMo CnHaRDS (Radio Data System), KOTOpbI o6ecTeuBaet cAeDyUOune DoIOANHeMbIe yHKun:
- HαBaHHe cTaHcHm OTo6paKaAeTcH a ἀνισπλe.
- AByOMaHHTOla paCIO3HaET DOpOxHbIe COo6- 1ItepeaU HOBCTeI, I MOXET ABTOMaTNUeCKH BKIAuOATb IN BIAIObOM pexHMe pa60TbI (HaIPmep, U pexHMe BOcPON3BeHEn CD).
AaBtePHaTHINBHAACTota:ECAN CNTeMa RDS BKNUOeHa,ABTOMaHTHToAaBtOMaTHueeCKn HaCTpaINBaETcH aHaCTOTy C HAnLyuSHM TpHemOMdHACTPOEHNOCTAHUN. - PernohaBhpie (REG): HeKOTOpbIe cTaHcNn B OITpeAeHenHO BpMa cyTOK pa3aEIAIOT CBoE BeuAHHe Ha perIOHaBbIe ITOPpAMMbIc Paa3HcHbIM coepJAAHem. PInb KBlOueHHO pHyKINR REG abTomAHTNoTA hAcTpaHBAeTc TOnb-Ko HA Te aAAbbTePHATINBHe YacCTOtbl, HA KOToPbIX TpePaEtCt Ta Xe PernoHaBHaT IIPOrpaMMa.
Дявкюочи И Вькюочи Функш RDS m REGУнaite,пхаунctа,лаву "TIOlb30BaTeBCKne HacToPouK" pa3deI"BbITIoHanHe Nactpoek B MEHIO TIOlb3OBaTeAЯ"(THyHKtBI MeHIO "RDS","REG").
IpekeKIOUOeHne BpeXm paAno
HaxnMaTe KHOITKY SRC ⑥ TOKa HaNCTTae He TOBHTcHaTINCb "TUNER":
Teyusb6aHKnTAMrTHCTaHsUOdHOKpTaHOTo6bpaKaETcH aNDCtAeB BVnde 6eYus CTPOKn.
Bb6op 6aHaKa TAmrTn CtaHcN
Bpa3hbxpeHnOaxTIOhepaB BaaempacpOApKeHHN cAeMyoUne 6aHKn TAMATN CTAHNI:
| Рergион | Банки памяты Stанци |
| EUROPE | FM1, FM2, FMT, CB, DB |
| USA | FM1, FM2, FMT, AM, AMT |
| THAI | FM1, FM2, FMT, AM |
| S AMERICA | FM1, FM2, FMT, AM, AMT |
HaxHMaIte KHOITKY 16/ A2 do tex TOp, Toka He 6ydet OTobpaXaTbCra XeAaEMbI 6aHK TAmrTH CTAHUIN.
Птимеанne:
BkaXaDM 6aHKe TaMaTn Bbl MoKeTe coXpaHrTa 05 CTaHcN.
OaHH Hn HeckoBko pa3 npOn3BeAHTe KpaT KOe HaxaTne Ha KhoTIky <5/>14, yTO6bI OCyUeCTBnTB nOoiAfROoe H3MeHHeNe YaCTObI Hn HAnTeABHOe HaxaTne, yTO6bI 6bICTp O3MeHNb TaCTOTy.
Птимеанн:
-ДяpernoHaTiohepa"EUROPE":BFMAna3OHeIPIN BkIoUeHEnHoФyHKuINRDSIponCXoAnIT abTomatuecka NaCTpoKaCleAyoIe paAdIOCTaHcUN cTeBeeAHHa.
Да ретенов тюнера "EUROPE", "USA"и "S AMERICA": B FM-дмалдано лрп вкючений суншим PTY отображаяси может ьть ИзменTekуши Вьбранhhы тпл погамMbI (смOTРпе Гаву "PTY").
3aynckponcka paadocanu
HaxkmaIte HydepKbAaTe B TeueHne TpIM. 2cekyHa KhoTnKy <5/>⑭,uTo6bl3aynC-TNTb TIOHC paADNOCTaHcN.
CnCTema HacTpOHTcHa 6LkKaIyU pINHMaemyIO CTaHIO.
Пгмочан:
-ДяpernoHaTiohepa"EUROPE":BdnaTaaOHe BOH FM TPN BkluoyehHom TpiOpHTe DopoxHNO HΦOpMaun () NaHCTpaBaIOCT TObKO Te paAnocTaHUN, KOTOpblteIpePDAIOCT CBOKn DOpOXHOHΦOpMaun.
-ДяpernohoB TIOhepa"EUROPE", "USA"и "S AMERICA":В ДИпаzoHe BOAN FM пriв BKLOUHNO ФункUn PTY NaCTPaNBAETСеДуюш радиocTaHUN C TeKyuIM BbIбраньIM TINOM ПОгразмblc (CMOTpITe rAaby"PTY").
UyBCTBHTeABoHCTb TIOCKa MOXHO HAcTpaHBaTb (CMOTPN IABY "TIOA3OBATeAeCKHe HAcTPOIKN",pa3deA "BbIIOAHEHne HAcTpoEK BMeHIO TIOA3OBATeA",TIyHKT MeHIO "SENS").
3aTOMHHaHHe cTaHcN/BCIAOueHne 3aTOMHeHHbIX cTaHcN
BbIbepnte HxhHb 6aHK TAmTn CTaHcN.
HactpoTe XeIaEmyO cTaIzHIO.
HaxMMTe HyePjKBaHTe TIPHM.2ceKYHDbI KHOITKyTAMATN CTAHUIN 1-5 (11),YTObIcOxpaHHTb TEKUYUO CTAHUIO IOJ30J KHOITKOJ.
-AN
HaxMMTE KpATKOBpeMeHHO KHTIKY TAmTnCTAHU1-5⑪,YTObblBKAIOHTb 3aIOMHeHHyIO CTAHUIO.
HaXMnTe KpaTKOBpeMeHHO KHOITky <5/ >14.
IpoHcXoANT KpaTkoBpeMeHHoe OTo6paKeHne TeKyuTeRo Bb6paHHOro TnTa IporpamM, N Bb MoKeTe IpoN3BeCTn Bb6Op dpyrOTo TnTa IporpamM.
HaxnmaTe IIO Mepe Heo6xOAMOCTH KHOITKY <5/> 14 Do Tex TOp, IOKa He 6yDet Bbl-6paH XeAaEMbI THTI pOrpaMMbI.
TOnck cTaun
HaxMnTe KHOIky<5/>14 nyapeKHBaI-Te ee IIpIM.2 cekyHdbl.
KaK ToIbKO NaUHETcI TIOCK,To Ha IINCTTae HeHaIaIro TIOBHTcI HADITcB "SEARCH".3aTEM OTo6pakaETcKyuIiTHn TIN TPOrpaMMbl.
KaK ToIbKO 6yEDt HauDeHa KaKaA-NbO CTaH ZnH, Ha DcITAAe KpAaTOBPeMeHH OTObpaXaTeC "PTY FOUND". Do Tex TIO, NIOA TINI ITOpAMMbI HACTPOEHHo PAHOCTAHUN COBIIaTe C TEKUIM BbOpaHHbIM TINOM ITOpAMMbI, HAnDCTAe OTObPaXaTeC TIOpeMeHH TINI ITOpAMMbI NIMM CTaHUN HN CHACTOTA.
Птимechан:
E can pinnemnHK He naet ctaunn, COOTBETCTBYIOe Bb6paHHOMY TINy Pporpam
MbI,TO HA DnCIIe Ha KopoTkoe Bpem IIOBHTCB HADINCb "NO PTY" N BBy CcAblWite 3bkyoBoi CnHaI. B 3tOM Csyuae PnpHEmNHK Bo3BaPaaTcK cTaHun, KOtopyU BBy CAYaAH DO 3TOTO.
EcnHactpoeHHa paAnocTaHnI Hn Dpyra CTahnIc cTeN BceauHnIO3dHee NaHETpePabTb IporpamMy b6paHnroBamITnI,TO abTOMaHHTOla ABOTMaTHuecknIpeKIAUHTC Tc Tekyu e CTahnI Nn TEkyuero ayDnoCTOyHnka (HaNPmep,CD)Na CTahnIO,TNI IPOrpaMMbl KOTOPo COBTBeCTBye Bb6paHnHOyUChTBaIte, YoHe BCE CTahnIIN IOdAepKbHbAIOT 3Ty fHyKNUIO.
HactpoikacnTae
HaKIMaTe OAnH HnHeCKoMbko pa3 KHOITky DIS/ESC 13, YTO6bI IpeKeAIOuATbcra Mekdy 3THMN oOHN HAnKaUHmN:
MeaTb Hn TmOratb aBtOMaTnecko 3a- rpy3e CD-Dncka He pa3pewaetc.
BCTABAAIte CD-ANCK CTOPHOH c HADTNCAMN BBEpx B CLOT DAJ CD-ANCKOB 7, TOKa HE IIOyBCTByeTE COPTPOTHVAEHE.
CD-dnck abTomatHueckn 3aTgHNaBaeTcN 0cuyIeCTbAAeTcN tpOBepKa Baunx DaHHbIX (B 3TO BpMa H aNcTIaee OTo6paKaeeTC"READING"). 3aTeM hauHnaAeTcN BocPOnhBeDeHne B pexHMe CD nMP3. Ha dNcTIaee Ppi 3aRpyKeHHOM CD-dncke OTo6paKaeeTC cMHBOAN CD.
HaxMHTe KpTaKOBpeMeHHO KHOPIKY <5> 14, TTo6bI Bbl6paTb IpeBldAun/CaeDy-IOUI TpeK.
Птумецни: Следима.
Ecn TekyuTpek IpoIrpblBaetc60Aee 3ceyH,TOoDHOKpaTHoe HaxaTne Ha<5 3aIyckaet Tpek Chauala.
BbI6Op pAnKu/CD-AncKa (ToAboKo IaIpeXHMoB MP3/WMA/ C'n'C Hn CD-ueHdxKe)
HaxmMaTe KHOtKyV16)A2, UTO6bI TepexoAnTb K TpeAWeCTBHyIOSei/CLeaDyIOSeI PtIke HAN TpeAWeCTBHyIOSeMcy/CLeaDyIOSeMy CD-DnCKy.
Птимеанne:
BbMOxTe TaKIM O6pa3OM TaKKe OcUeCTBAITb IepexoM MEXy TIAeH-NCTAMN IOaCOeHNHeHHOrO uepe3 C'nC yctpoCTBa.
BbICTpbI IONCK
HaxMMTE HyePExHBaTe HaxaToN KHOITK<5/>TO Tex TOp, Poka He 6yDet DOCTNHHYTO HYXHOE MECTO.
OctahOBka BOCIpON3BeDeHn
HaxMMTE KHOITKY 311, YTO6bI TpeBaTb BOCtPOn3BeDeHne ("PAUSE") IAN CHOBa Tpo-DOXKHTb.
PexnIM Tlai-AnCTa (ToAbo K Bo pexnme BocTpon3BeDeHnMP3/WMA)
ABTOMO6HbHa ABTOMaHHTOla MoKet BOCIpOn3BOADtB IIeI-ANCTbl, KOToPbIe 6blm COCTaBHeHb I MEHeXepax MP3-ФaIIOB, KAK HApIMpep, WinAmp Nn Microsoft Media Player. CnNckn BOCIpON3BeEHHa D0AnXbIb 6blTb CoXpaHeHb I KopHeBOI AnPeKToPn CD-AnCka Nn USB-HoCtNEAaHbIX. YUtaIoTc CAeAdyUoiNe FOpmAtbIIe-ANCTOB: M3U, PLS.
Bb6opTrekoB BpeKHeIe-ANCTa
Haxmnte KNOTky 2 12 n ydepxnBaJTe ee B TeeyHne TpIM. 2 cekyHa, YTObI IpeeHTB peXHM Taei-AHCTa:
Ha nncnlee KpaTkoBpeMeHHO OTo6paaetcN "LIST MODE".HauHnaeTc BocPOn3BeDeHne TepBOro TpeKa TepBOro PaeI-AMCTa.
Птумецни: Следима.
ECnHaHOCHTeAaHbXHeTIIaE-AMCTOB,TO kpaTKOBpeMeHHoOTbpaXaetc"NO LIST".
HaxMnTe KpaTkoBpeMeHHO KhoTIky <5/>14,YTObblbIbpaTbPiPeDbIaUyIcAeUYIOuIN TpEK TeKyuIero IaEi-AHCTa.
HaxMMTe KHOPIky 16/7A2, yTO6bI IpeeyTN K TpEabyUeMy/CLeyIOUeMy PAn-ANCTy. HaNCTTae HeHaOANO TOBBAETCn IMBaI BbI-6paHHOrO PAn-ANCTa, HBOCTPOH3BOADTCNIEPBbI TpEKNIAE-NCTa.
BbIXoH n3 pexkma Iaen-ANCTa
Haxmnte H yapedxmbaTe KhoTIky 2 12 B TeueHne TpIM. 2 cekyHa DnCTTae KpatKOBpeMeHHO OTo6paKaetcra "LIST OFF".Bocpon3BeDeHHe TekyIero Tpeka IPOdoXkaETcra.
СkaHnpoBaHne BCex TpeKOB C ТрocAушВаннem
C TOMOuBIO yHKnUIN CKaHnPoBaHnO cOyIeCTBAETCR TPOCAYUNBaHHe HauAaHbIX CeMHTOB BCEX NMEHOONCX TpeKOB.
Haxmte HyepxHBaTe Khotky MENU-OK 15B TeueHne Tpim.2 CekyHa, yTo6bl 3aIycTb CkAHnpOBaHne C TpOcAYuBHaHem, HN JE TPOn3BeHnte KpaTkoe HaXatne, YTo6bl PTOdoAaKHTB BOCIpOn3BeHene TEkyuero TPOCAYuINBaEMOTO Tpeka.
BoBpMa cKaHnroBaHn CTrPOcAunBaHnEmHa
AnCTTae IIOTepeMeHHO OTo6paKaaETCA"SCAN" H
HomeP TeKuIeTO TpeKa Hn HmA dAa.
Птимechanical:
B pexnme CD-ueHdxepa BpemI npoclyuWBahnKaJdoTpeka coctabAerok. 10 cekyHa. DAnB CExO octaIbHbIX pexmIOB paobtbo MoxHO HAcTpoHTb BpemI PteBaPnTeIbHoro IPOcAYuBHANHr TpeOB IIpi CkaHropBaHH (CMOTpHe rABy "TIOb3oBaTeABckne HAcTpoKN" pa3dEe "BbIIOHaHEHHe HAcTpoEK B MeHIO TIOb3oBaTeAea", IyHKT MeHIO"SCAN TIME").
BpeKIMeIeH-ANCTa (peKIMMP3)OcUSeCTBIAETCRIpeBApHTeALHoTIPOCAYuINBaHNE TpeKOB TObKO H3 TEKUYIero IeH-ANCTa.
BocIpOn3BeDeHne TpeKOB CayuHaHOH IOCAeOBATeAaHoCTN
HaxmMaTe KHOJky 5MIX⑫,yTO6bIpeKIAOuAtbcMEXdy peXmMaMn BOCpOn3Be-DeHn:
BbIXOaH3 MeHIO Bluetooth
UTo6bI BbIMTN N3 MeHIO Bluetooth, KpaTkoBpeMeHHO HaxMITE KHTIKY DIS/ESC 13.
CoTpRxKeHHe H coeAnHeHne yctpoiCTBa
CotpJxKeHn coeHHeHn Mo6HbHoro TeAeOHa
Bb6epnte B MeHIO Bluetooth® TynKT MeHIO "PAIR".
HaxMITE KHOITKy>14,TO6bl OTKpbITb IOA-MEHIO.
Пункт MeHIO "PHONE" (TeAeФОH) BbIbpaH.
HaxMnTe KHOITKy ≥ 14 ,YTO6bI yCTaHOBHT COITPRAKeHHe CMO6NAbHBiM TeAeFOHOM.
Ha nCtIe eOTo6paXaetcra"PAIRING" mHnae et CmBOA Bluetooth®. Teneb abTOMo6nB-Ha aTOMaHTHOa MOKET 6bITb B TeueHne IpHM. 2 MnHyT ObHapUyKeHa N CoeAnHeHa cMO6HbHBiM TEaEfoHOM CIOAdepKkObl Bluetooth®.
OcuyectBNTe TIOHCK ABTOMO6nIbHOABTOMaHTHObICBaWero MO6nIbHOToTeAefoHa (IMRAuTootho: "TORONTO 400 BT").
KaK ToIbKO MoBnAbHbT TeAeΦoH HaIaTe AB TomaHHTOAny HxJxHO 6yTeY cTaHOBnTb CoEaHHeNe,ToHa dNcTIIee TIOBnTcR "ENTER PIN" n PIN "1234".
YctahOBHTe CoeAHHeHHe C BaUero Mo6NAb-HOroTeAeOHa. BBeADTE PnI 3TOM OTo6paKa-embHa NcCTTae ABTOMaHHTOnlBI PIN-KoA.
KaK ToIbKO aBTOMaHHTOla 6yTeT cOpJxHeHa n CoeINHeHa C MoNbHbIM TelefoHOM, HaNCTIIee TIOBHTcra HAdTncb "PAIRED" (coPJAKeHo), a IOTOM "CONNECTED" (coeINHeo).
Ппмецане:
ECAN COeAHHeHHe yCTaHOBnTb He yDaIOCb,TO KpaTkoBpeMeHHo OTo6paKaJaETcra "CON FAIL" (coeAHHeHHe He yCTaHOBLeHo).
CoipraKeHHe H coeMHHeHne IOTOKOBo aayHOuyctPoIcTbA c PoIaepKkO Bluetooth
BbI6epHTe B MeHIO Bluetooth® TpyHKT MeHIO "PAIR".
HaxMNTe KHOITKy>14,TO6bl OTKpbITb IOA-MEHIO.
Пунгт MeHIO "PHONE" (TeAeФОH) BbIbpaH.
HaxMnTe KHOIky V 16, YTObblBbIpaTb IYHKt MeHIO"STREAMING".
HaXMMTe KHOPIKy>⑭,UTo6bl UcyTaNOBHTb COIITPRAKeHHe C ITOKOBbIM ayDNOyCTPOINCTBOM.
Ha dncTlue oTo6paxaetcTekyuun coxpaHennb PIN-KoA (ctaHapTHo "1234").Ipn Heo6xoAMOCTN BBeHNTe PIN-KoA ITOKOBORO ayHOuyCTpoHCTBa,
HaxHMaIte KHOITky 16/TA TOKa Ha DCNTAee He TPOBHTcXeLaemar Unppa Ha COOTBeTCTBYUoEM TEKyuem Mecte.
HaxmMaTe KHOITy <5/>14, yTO6bI TepeXoANTb MEXdy 4pa3pdaAM PIN-koDa.
Haxmnte KhoNTky MENU·OK 15, yTO6bl IIOA-TBepaTb BBeDeHHbI PIN-KoA.
Птимеанne:
He BCE ITOKOBIye aydnooyctpoCTBa Tpe6yIOT BBOda CBOero PIN-KoDA B ABTOMO6HbHOB ABOTMAHNTOAE. B HEKOTOpBXI IOKOBBIx aydnooyctpoiCTBax Bam BMEcTO 3T0RO HUYKHO BBOaNTb PIN-KoDA ABTOM6HbHOB aBTOMAHNTObl. B TaNX yCtPOiCTBax Bbl MoXeTe IIOA-TEBepXaTb TekyuINH PIN-KoDA ABTOMAHNTObl IPOCTbIM HnKaTHEM KHOITKN MENU-OK (15), a 3aTEM BBOaNTb ERO HA ITOKOBOB OAYdNOYc-TPoCTBE.
Ha nctTae oTo6pakaetc"PAIRING" mHraet cMBOB Bluetooth®. Tetepb ATObMObHbAABOTAMaHTOla MoKet 6bTb B TeueHneI pIM.2 MnHT o6hApUxHe h CoeAnHeHa C TOTOKOBm ayHOyCTpoiCTBOM.
OcuyectBNTe TIOHCK ABTOMo6MbHOABTOMaHTHObC BaaIero IOTOKOBORAOyHOcyCTPOINCTBA (mMBAuTeoth®:"TORONTO 400 BT"),NycTahOBHTe COeMHENHe.BBeHtE TPn HEo6XoDHMOCTHN PIN-KoAabTOMo6MbHOABTOAMHHTOAbI.
KaKToIbKoA bTOMaHrHITOna 6yAdeTcOPIJxHeHa COeAHHEHa C TIOKOBbIM ayHOuCTPOIcTBOM, Ha IINCTIIe TIOBHTcR HAITINCB "PAIRED" (coIIPJxHe), a TOTOM "CONNECTED" (coeAHHeHo).
TpimmeuHne:
ECAN CoeAHHeHHe yCTaHOBnTb He yDaIOcb,TO kpaTkoBpeMeHHo OTo6pKaJaetcra "CON FAIL" (coeAHHeHHe He yCTaHOBLeHo).
TelefoHHbIe yHKcH
TpHem/OTKIoHeHne BbI3Oba
TpiBxOaJIeM 3BOHKe Ha dncIe eIIOpeMeHHo OTO6paJaaetc "INCOMING" (BXOaIiN) HOMep 3BOHJIeO. 3Byk TekyIeO aydnoHCTOUYHnKa Bbl
KIAOuAETCn 3BOHOK BbIBOADITcRa HA K0AOHKn aBTOMO6hABHOH aBTOMaHTHNToBl.
Птумецни: Следима.
Ecan Homep 3BOHJUero He Ipeepaetc,TO BMEcTo HOMepa Ha AnCnIeae OTObpaXaETcR "PRIVATE NUMBER" (KOHAnDEHnAhbNHOmeP).Ecan Homep 3BOHJUero CoXpahanE BMeCTe CnHeM,TO OTObpaXaETcN Ma 3aTINCH HOMep (CMOTPnTe r."COxpaHeHne TeJeFOHHORo HOMep").
HaxMITE KHOITKY 18,TO6bl PnHArB Bbl3OB.
Ha nncnlee oTo6paKaeta "CALL" n Tekyuaa IpoDoXknteBHOCTb pa3roBopa.
HaxMNTe KHOITy ⑦,TO6bI OKKHOHTb Bbl3OB HAN 3aBepuHTb TeKUyIeTeAefoHHbI pa3roBOp.
Ha nCnTaeoTO6paXaETcA"CALLEND".
OcuyeeCTBAAHHe BbI30Ba
BbI6epHTe B MeHIO Bluetooth® TpyHKT MeHIO "DIAL NEW".
HaxmTe KHOtIKy> 14.
CeHuaC BbI MoKeTe BBeCTn TeleΦoHHbI Ho-MepdAHOHO 20pa3pAOB:
Haxmte KOnIKy 16/T ② Noka Ha HcTHe TOBTCJXeAemar CnΦpa Ha COOTBETCTBYUoEM TeKyuem MeCTe.
HaxmMaTe KHOITy <5/>14,TO6bl TepexOAnTb Mekdy pa3pAaMn HOMepa.
HaxMMTe KHTIKy 18, YTO6bl TIO3BOHNTb ITO BBeDeHHOMY Homepy.
Ha HcπIe e TIOtepeMeHHO OTo6paKaetcN "OUTGOING" N Ha6paHbHb HOMep.
Птумейанne:
Ecn HabpaHbHn Homep CoXpaHeh Bmecte C nmeHem,To OTO6paKaAetc HMa 3aTncn HoMep (cmOTprte rA. "CoXpaHHeH TeAefoHHoTo Homepa").
KaK ToIbKO BaIc SoBeCeAHH KIT PMET 3BOHOK, HAn DCIIae 6yDet IIOpeMeHHO OToBpaXaTb
ca "CALL" n Tekyuaa TpoAoKnTeIbHoctb pa3roBopa.
CoxpaheHne TeAefoHHoro Homepa
Bb6epnte B MeHIO Bluetooth® TynKT MeHIO "DIAL NEW".
HaxMHTe KHOHTKU> 14.
Ceyac Bbl moKeTe BBecTH TeAefoHbI Homep dAmHOHdo 20 pa3paOb:
HaxHMaIte KHOITKY 16/ A ② Noka Ha DCNTAee He TPOBHTCA XeAemaMa YnFpa Ha COOTBECTBYUOEM TEKUYEM MECTe.
HaxmMaTe KHOITy <5/>14, yTO6bl TepexOAnTb MEXy pa3pAaMn HOMepa.
HaxMMte HyepxHBaTe TIPM. 2 ckyHbI HyKHYIO KHOITKY TAMrTn 1-5 12, YTO6bl CoXpaHHTb HOMep.
-AN
HaxMMTe KNOTKY MENU·OK ⑤, qTobb BBeCTN HMR DAaTHCN.
Teepb Bbl MoKeTe BBecTH HMa DAnHOI DO 9pa3pAOB:
HaxmMaTe KHOtIKy 16/7 ② Noka Ha HcTlAee He TIOBITcR JXeIaEmbI CNMBOI Ha COOTBetCTByUOJEM TeKyuIeM MeCTe.
HaxmMaTe KHOITy <5/>14, yTO6bl TepexOAnTb MEXdy pa3pRdaMn HMeHN.
Haxmnte HyepxBaTe TpIM. 2 cekyHDbI HyxHyIO KHOITKy PAMrTH 1-5 (12), UTObI coXpaHHTb HOMe I NMR.
Ппмецанne:
Pahee coxpaheHHb IIOd 3ToI KHOITKOHomep 3aMeuaeTc.
BbICTpbnHa6op
C TOMOdbyfHKunb6bCTpOro Ha6opa Bb MoKeTe 3BOHHTb HIOcLAdHn HA6paHbHb HOpE HcOxpaHeHHb HOpE (CMOTPeT. "CoxpaHeHHe TeAeOHHoro HOpep").
HaXMMTe KHOPIKy 18.
Ha dncTlnee OTo6paXaetc TIOCAeHn H6paHHbHOMep.
Птумецни:
ECAN B TEKUIM MOMENT HET COEAMHEHHBIX MO6bHbIX TEAEFOHOB, TO OTKpbBaetcMeHO Bluetooth®.ПиHT MeHIO "PAIR" Bbl6paH.
HaXMMTE TpH HeO6XoAMnOCTN KHOITKY TaMHTN 1-5⑫,UTO6bI Bb3BaTb COxpaHeHHb IIOA HcH HOMep.
HaXMMITE KHOITKY 18, YTO6bI T03BOHHTb TO 3TOMY HOMepy.
Ha Anctiae IOTepemehno OTo6paKaetcN "OUTGOING" HnabpaHbHn Homep.
PexHM Ipeepaun IOtOKOBOro aydno To Bluetooth®
BkauennepeepaunnoTOKOBo aayno nO Bluetooth
HaxhMaIte KHOIIky SRC ⑥ TOKa Ha dNCTTae Ha TIOBNTcH HADINCb "BT STREAM".
BocpoH3BeDeHHe NaHHaETc.
Ппмочану:
PexHMBOCTPOIN3BeDHeHITOTOKOBORaydnoTIOBleuthoDcTyIeHTObKOITIPYNCAOBHNHaUNyIPOAOEHNHeHORO CObMeCTHMOrIO TOTOKOBORaYHOcyTPOINCTBA.
ECAH BO BPEMBOCIPON3BedeHNA CoeHNHeNc C ITOKOBbIM aydNOyCTPOICTBOMTePraTcra,TO KpATKOBpeMeHHO OTO6paKaaETcRA"CON LOST" (coeHNHeNc IIOTEpHa),n ABTomoBnAbHaN aBTOMaHHTOnla TpeKeAIOaETcHnHa IITpeDlAUYsIN aydNOHCTOuHNK.
Bb16op tpeka
HaxMnTe KpATKOBpeMeHHO KHOITky <5> 14, TTo6bblBbI6paTb IIpeAbIyUHIN/CaEDYIOUII TPEK.
OToAhnTeaBHbIe yHKmN B MeHIO Bluetooth®
Ha nctTlee OTo6pkaaetc npBoe yctpoic- TBO H3 CTINCKa.
TpimmeuHne:
PnO tcyTCTBn COIpyKeHbix yctPoHCTB, KpaTKOBpeMeHHO OTo6paxaetc "EMPTY" (CtncOK nyctoi).
HaxmMaTeIpn Heo6xoAMoCTN KHOITKY 16/ A 2 Do Tex TOp, Toka He 6yDet OTo6paXaTbCra XeLaemoe yCTpoHCTBO.
YBaCecTb CLeAyoUHne BO3MOXHOCTM:
HaxMMTE KHOITKY 18, YTO6bI IIOaCOeHNHTb OTO6paKaemoe yCTPOIcTBO.
Ha dnciie oTo6paKaetcna "CONNECTNG" (coeAnHnTb). KaK toIbKO yctpoJcTBO 6ydet
coeAnHeo, KpaTKOBpeMeHNO OTo6paaetcN CONNECTED" (coeAnHeo) N BbI Bo3BpaaTeceb o6pato B MeHO Bluetooth®. ECan yCtpoCTBO Yke coeAnHeo, To 0TOpaKaaeTcN KpaTkoBpeMeHNO "CON EXIST" (coeAnHeHneCyueCTBye) N BbI Bo3BpaaTeceb o6patoK CnICNQ COPTPRAKeHNbIX MO6MaNbHbIX TeAefoHOB/ TOTOKOBbx ayAnOyctPoIcTB.
HaxMMte KHOITKY 17, YTO6bI ydaANHT coeHNHeHne COTOBpaXaEMbIM YCTPOIcTBOM.
Ha dncnlee KpaTkoBpeMeHHO oTo6paxaetcra "DISCONNTD" (pa3beHHeHO) n OcyuectBAETcR B03BPaT B MeHO Bluetooth. ECanyctpoiCTBO He 6bIao CoEHNHeo, To KpaTKOBpeMeHHO oTo6paxaetcRA NO CONCT" (coeHNHeHne OTCYCTByeT) n BbI Bo3BaPauaTeceb 6bPathoN C tCNKU COPTPAKeHbIX MoNbHBx TeAeFOHOB / ITOKOBbIX ayAnoyctpoiCTB.
HaKMMte H ydepkBaIte pIM 2 cek. KHOIIky 17, uTO6bl ydaIbTb COIpaJKeHne C OTo6paxKaEMbl YCTPOIcTBOM.
Ha dncTlue KpatKOBpeMeHNO OTo6paJaaTeCra "DELETED" (yaaleho) NocuieCTBaeTcRBO3BpAT MeHIO Bluetooth®.
YdaaHHe COpRaeHHcO BcEMn COpRaeHHbIMN yCTpoIcTBAMN
Bb6epHTe B MeHIO Bluetooth® TynKT MeHIO "DELETE ALL".
HaxMITE KHOITKy ≥ 14 ,YTO6bI ydaAHTb COPTPRAXJHHe CO BcEMN COPTPRAXeHHbIMn YCTPOHCTBaMH.
Ha nHcTnEe oTo6paXaETcra "CONFIRM" (noA- TBepdntb).
HaxMMTe KhoTkiy> ⑭eue pa3.
Ha nncnlee KpaTkoBpeMeHHO OTo6pkaeTcN "DELETED" (coipjxeney ydaJeHo).
Bheunne aydnonctouhkn
Pazbem AUX-IN ha Anzeboi cstopone

Ottachoctb! TObbyIeHHaon OTtachoctb TpaBMnpoBaHnO tWekepa.
Tpiabapnn BbictypaOuim WTekep B pa3beMe AUX-IN Ha TpeaHne PaHeM MoXeT TpiuHHnTb TpaBMbl. NcToaB3OBaHne PpMaBix WTekepoB MAn aadTepa MoXeT TpNBecT K TIOBbIeHHo OITacHOCTN TpaBMnpoBaHnA.
TTOI pINHMeMb peKOMeHdyem HCTIOAb30BaTb yIAOBBLE KOHTAKThbe ITeKepeBHaIPnMep, Ka6eAb n3 akceccyapob "Blaupunkt" (7 607 001 535).
KaK ToIbKO BHeUNH ayADONCTOuyHK, HApPIMep, TpehoCHo CD/MiniDisc nM3-tnEeHep NToA KluOaTcN Ka pa3bemy AUX-IN Ha mNeBc0n CTOpOHE,eroMOXHO Bb6paTb KHOTIOK SRC 6.Ha DnCtIae IIOBHTcHaATINCb"FRONT AUX".
HaKIMaTe KHOITky SRC ⑥ TOKa HaNCTIae He TIOBNTc HAZBaHne TIOKIAUeHHOrO TIO HHTepFeCy C'n'C yctpoCTBa.
Bocpon3BeDeHne HaHnaETc.
Птимechаня:
Bo3MOxHocTb Bbl6opa C'n'C-pexMma PtncytCTByET ToIbKO B TOM CAYae, eCan Tc'nC-coBmectHMOMy INHTepFeey TIOKHOUEHO COOTBTCTBYIOOe yCTPOINCTBO.
- Toxaknycta, uHTaIte OtnHcAnHe yTnpaBAAENHb ABTOMaRHTOnoB B pexHMe C'n'C BrAabe "PexHM CD/MP3/WMA/C'n'C/CDYeHHJXep".
-Пин ИСТОВ3OBAHIN COOTBETCTBYUIOERO Ka6eIbHOrO aadITepa Bbl MoKTe ПОДcoEHNrHrTb K ABTOMo6HbHOH aBTOMaHHTOne Do 3 C'nC-COBmecTmBIX INHTpeFoeCB Blaupunkt.ДЯ TOTO,чTO6bl ABTOMo6HbHа ABTOMaHTOna MOla pa3ANuATb pa3HbIe INHTpeFoeCbI, Bbl MoKTe kaxDoMy INHTpeFey CaHaHuTb CB0N INHbNHyAaHBn HOpE yCTPOJcTBa (CMOTPte rAby "TOL3OBATEbckne HAcTPOKn"pa3DAE"BbIoTHHeHn EACPTOeB MeHIO IOb3OBaTeA",pyHKt MeHIO"C'N'C").
BkLIOUeHHepeXHaAUX
HaxnMaTe KHTIKy SRC ⑥, TOKa Ha DnCt- Aee He TIOBNTcHaADTncb "CDC/AUX".
Bocpoun3BeDeHneHaunHaeTc.
TpimmeuHne:
BbMOKeTe 3aDaTb C6ObTBeHHoe HmA Aa TbAlbHOrO BxOaA AUX, KOTOpoe 6yDet OTo6p aKaTaBcBAUX-PEKHeMa HnCnIeE, KOta DA BbBlbpaAN IOCoEOAHENHHb ayAnOnCTouH Nk (CMOTPnTE rABy "TIOb3OBaTeAckne HactpoKn" pa3dAe "BbIOAnHEHne Hactpoek B MeHO IOb3OBaTeAa", IyHKT MeHIO "AUX EDIT").
HacrpoK3Byka
B MeHIO "Audio" Bbl MoKeTe H3MeHrTb cLdYuOuNe HactpoKn 3Byka:
- HactpoiKa ypOBH Hn3KHX N BbICOKHX qACTOT
HacpoKa pacppeAeHnYPOBn3ByKaLeBb/tpaBb(6aIaHc)NTEpeA/3a(peIep) - Побем НИЗКИХ частот пи НИЗКOM уровец ромков(). (X-Bass).
Kpome TOrO, BpacuHpeHHOM MeHIO "Audio" BblMOxete OcyueCTBArTb CaeDyUoNe HAcTpoKN:
HactpoKa 3-ITIOLOsCHOrO 3KBaAaI3epa:
Hactponb ypoBeh cpeaHx qactOT.
- BbI6paTb yactOTy Hn3Knx, CpeAHHx H BblCOKHX yactOT.
- HactpoTb KO3ΦΦnIeH NT O6pOHTHOCTN DAA HN3KHX N CpeDHNX YACTOT.
OcyueCTBNTb paCUnpeHHyU hAcTpoKy X-Bass (ypoBeHb uacToTa)
BbI6paTb IpeDyuctaHOBky 3KBAaAaN3epa
Птимеанно:
HactpoKn Dn Hn3Knx, CpeDnX N BbICOKnx YactOT COxpaHJIOCT COOTBEcTcBHeHO DAy TEKyuIeO aydIoNcTOUHnKa.
Bb13OB N BbIXOa H3 MeHIO aydno
HaXMMTeKpaTkoBpeMeHHOKHOHTKy MENU-OK 15, yTO6bI OTkpbItb MEHIO TOAb3OBATeAe.
HaxmMaIte KOnIKy 16/T ② Toka He 6yET BbIbpaH TpyHKT MeHIO "AUDIO".
Haxmte KHOITky ≥ 14 ,TO6bl OTKpbITb MEHIO Audio.
HaxmMaTe KhoTIky 16/ A ② TOKa He 6ydt BbIbpaH HyXhBI ITYHKT MeHIO.
BbIIOHHe hactpoKy (cMOTPN cIeAIOUpa3aE).
HaXMMTeKpaTkoBpeMeHHOKHOHTKy MENU-OK 15,уTOбы ВьбpaТыpyroТуHKT MeHIO.
-AN
HaxMMTe KpaTkoBpeMeHHo KHOTky DIS/ESC
13)ДЯЯ ВьIXOdaи N3 MeHIO.
Птимеанne:
BbIXOaN3 MEHIO pIPOXoADHT aBTOMaTHueckn pIIM. Chepe3 15 cekyHa TOCAE TocAeDhero pIKNKOCHOBeHHa K KaIbNAType, n Bbl Bo3BaPa-aaTeCb KdCTAeIO TeKyuIeO ayDNIOCTOCHNuKa.
BbIIOAHeHHe HAcTpoE K MeHIO aydno
BASS
YpOBeHb Hn3Knx YacTOT. HAcTpoKn: OT-7do+7.
HaxMNTe KHOITKy>14,HTo6bl OTKpbITb POAD-MEHIO.
HaxMMte KHOITKy 16/ T②, YTO6bl Ocy-ⅢECTBnTb HaCTPOIKy.
TREBLE
YpOBeHb BblcOKHX qactOT. HactpoiKn: OT -7 00 +7.
HaxMITE KHOITKy>14,TO6bIOTKpbITb POA-MEHIO.
HaxMnTe KHOITKy 16/ T②, YTObI Ocy-ⅢECTBHTb HaCTPOIKy.
BALANCE
Pacpipealehenie rpoMKocTH aeBbI/npaBbI. Ha- cTpoKn: L9 (Aebbl) do R9 (papBbl).
HaxMNTe KHOITKy>14,HTo6bl OTKpbITb POAD-MEHIO.
HaxMnTe KHOITky 16/TA2, YTObI Ocy-ⅢECTBHTb HaCTPOHKy.
FADER
PacIpeAeIeHne rpoMkoCTn IpeA/3a. HactpOKn:R9(3a)do F9 (IpeA).
HaxMNTe KHOITKy>14,HTO6bIOTKpbITbIOA-MEHIO.
HaxMITE KHOITky 16/AT②,yTO6blOcy-ⅢECTBNTbHaCTPOIky.
X-BASS
TIOAbem Hn3KHX qACTOT TpH Nn3KOM ypOBHe rpoM-KoCTH. HAcTPOHKn: 0 (BbIK.) Do 3 (MaKcImaB-HbI IOAbem).
HaxMITE KHOITKY>14,TO6bIOTKpbITbIOA-MEHO.
HaxMMte KHOITky 16/ A 2, UTObI ocy- IeCTBnTb HaCTPOHKy.
BbI3OB IV BbIXOa I3 paCUnpeHHoro MeHIO Audio
BbI6epHTe B MeHIO Audio TpyHKT MeHIO "ENHANCED".
HaxMITE KHOITKy>14,TO6bI OTKpbITb MEHIO "ENHANCED".
HaxmMaTe KOnIpy 16/T ② Toka He 6ydt BbIbpaH HyxHbI TyHKT MeHIO.
BbIIOHHe HAcTpoKy (cMOTPN cAeAyoUpa3deA).
HaxMMTeKpaTKOBpeMeHHOKHOTKy MENU·OK 15,уTOбы ВьбрTaDpyГо ПУНК MEHIO. - HAN
HaxMMTe KpATKOBpeMeHHO KHOTKy DIS/ESC 13 DAy BbIXoDa I3 MeHIO.
BbIIOAnHeHne HacTpoek BpacShnPehHom MeHIO Audio
E-BASS
HactpoKa Hn3Ko YacToTbI N Ko3ΦmUneHTa △O6pOTHocTN.HactpoKn:
- Hn3ka yactota: 60/80/100/200
Ko3ΦΦnIeHNTa6poTHOCTH:1,0/1,25/1,5/2,0
HaxMHTe KHOITKy>14,HTO6bl OTKpbITb POA-MEHIO E-BASS.
HaxnMaIte KHOtKv 16/72, tO6bIpepeKIAUaTcMEXyIOMaMeHIO"FREQ"(acToTa) n QFAC (Ko3ΦmIeHT Do6pOthCtN).
HaxHMaIte KHOITky <5/>14, yTO6bI TepeXoADHTb MEXy AOCTYINHBIMN HAcTPOIKAMNTOAMEHIO.
E-TREBLE
HactpoKa BbICOKo yactObl. HactpoKn: 10/12,5/15/17,5kTc.
HaXMMTe KHOITKy>14,HTO6blOTKpbITbIOA-MeHIO E-TREBLE.
HaxHMaTe KHOITky <5/>14, yTO6bI TepeXoADtB MEXy DOCTYINHbIMN HAcTPOIKAMN IOdMeHIO.
E-MIDDLE
HactpoKa yPoBnA cpeHnX qaCTOT N Ko3ΦnIeHTa do6pOTHoCTN. HactpoKn:
- UpoBHeH cpeDHHx qactOT: OT-7 0 + 7
CpeaHne yactoTbI:0,5/1,0/1,5/2,5KtU
Ko3ΦΦHmUeHT Φo6pOTHoCTh:0,5/0,75/1,0/1,25
HaXMMTE KHOITKY>14,HTO6blOTKpbITb I0A-MeHIO E-MIDDLE.
HaxmMaTe KHTkY 16/7 2, yTO6bIpepeKIAOaTbCMAxdy IOAMHeo "GAIN" (ypoBeHb), "FREQ" (vaCTota) n QFAC (ko3Φn-HeHTdo6pOTHcTn).
HaxHMaIte KHOITky <5/>14),yTO6bI PepeXoADtB MEXdY DOCTYINHbIMN HAcTPOIKAMNIOAMHeIO.
E-XBASS
HaTpoNka ypoBnHa cactoTbX-Bass.HaTpoNkH:
- YpOBeHb X-Bass:0 (BbIa.)do 3
- Yactota X-Bass: 30/60/100 μ
HaxMMTE KHOITKY>14,HTO6blOTKpbITb TIOAMEHIO E-XBASS.
HaxmMaTe KhoTky 16/ A ②, yTo6bIpepeKIAUaTbcMEXdy TIOAmHeIO "GAIN" (ypoBeHb) n "FREQ" (caCTota).
HaXHMaIte KHOIIKy <5/>14, YTO6bI PepeXoADMbexydoCTyIHbIMn HAcTPOIKAMN IOAMHeIO.
PRESETS
Bb6op TpeyctaHOBKn 3Kbaalai3epa. HactpoiKn:POP,ROCK,CLASSIC,P-EQ OFF (OTcyTCTBnE TpeyctaHOBKn).
HaXMMTE KHOITKY>14,HTO6blOTKpbITbIOA-MeHIO PRESETs.
HaxmMaTe KOnKy 16/2, yTo6blIpeKIAUHTbCa MEJy HAcTPOKaMn.
ПоьзOBaTeMbckHe NaCTpoKn
BbI3OB N BbIXOa H3 MeHIO T0A630BaTeA
HaXMMTeKpaTkoBpeMeHHOKHOTKy MENU·OK 15, YTO6bl OTpbItb MeHO.
HaKIMaTe KHOITky 16/ A ② TOKa He 6ydt BbIbpaH HyXhBII TyHKT MeHIO.
BbIIOANHe hAcToHky (cMOTPN cIeAUYUAn pa3dE).
HaxMMTeKpaTKOBpeMeHHOKHOTKy MENU·OK 15,чTOбы ВьбраТ Дуго ПУКТ MEHIO. - HAN
HaXMMITE KpaTkoBpeMeHHO KHOTKy DIS/ESC 13 DAy BbIXoDa n3 MeHIO.
Пгимechанин:
BbIXoA N3 MEHIO PpONCXODANT ABTomATHeCKN pTmIM.uepez 15 cekyHd Tocae TocAEHero ptnkoCHOBENH K KlaBnAType, n Bbl Bo3BaPaaTeEcB K DCNTeIo TEkyUeO aYDnHOCTUHnKa.
BbIIOJIaHHeHne HAcTpoEK B MeHIO TIOAb3OBeTeA
CDC
Hactpoika pexima dA BxOda AUX Ha TBIbHOI CTOPHe. HactpoKn: ON (AAI IOKIAUeHn CDueHHkepa IAn DpyrO BHEWHe rayOnctouHnka), OFF (AAI IOKIAUeHn C'n'C-COBMeCTHmoro INTepeHca Blaupunkt).
HaxMITE KHOITKY>14,TO6bl OTKpbITb POA-MEHIO.
HaxmMaTe KhoTky>14,HTo6bI TepeKIAU-HTbCMAEXy HAcTPOKaMn.
HaxMMTe KpaTkoBpeMeHH KOHtky MENU-OK 15,TO6bI IIOaTBepaHTb BbIbpaHHyO HAcTpOHKy.
ABTomaHHTOla aBtOMaTHUeCKN BbIKIOu-yaTcN CHOBa BKIAOyaeTcN C BbIbpaHHoH NaCTpOkoN.
CN
Ha3haueHHe IOKIAUOeHHOMy C'n'C-COBMeCTHOMMy INTepeFecy HnAHBnAaIbHO HomepaycTroPcTBa (C'n'C = Command and Control).
DAHA:4pa3pda,unfpbl:0-9,A-F(JeCTHaIaTepuHbI).
HaxMMTe KHOITky>14,HTO6bI OTKpbITb IIOA-MEHO.
HaxMMTE KHOITky 16/ A②, yTO6bl Bbl-6paTb HHTeppeic("DEV 1 - 3").
HaxMMTE KHOITKY > 14, yTO6bl H3MeHHTb HOMepyCTpoCTBa.
HaxmMaTe KHOITy <5/>14, yTo6bl TepexOAnTb Mekdy pa3pdaMn.
CNMBOANBb6paHHoRa3pra,ecn OH Bbl-6paH,MIRaET.
HaxMMTE KHOITKY 16/ A2, YTO6bHa HbIbpaHOM pa3pAe BbIbpaTb uDpy.
HaxMMTe KpaTKOBpeMeHHo KHOTKY MENU-OK 15, yTO6bl IOATBepAHTb BBeDeH-HbI HOMeYCTpoiCTBa.
CDTEXT
BkIOuHTb/BbIKIOuHTb OTo6paKeHne CD-TeKCTa HAcTpoIKN: ON (BkA), OFF (BbIK).
HaxMNTe KHOITKy>14,TO6bIOTKpbITb POA-MEHIO.
HaxmMaTe KhoTky>14,HTo6bI TepeKIAU-HTbcrMEXy HAcTPOkAMN.
HaxMMTe KpaTKOBpeMeHHo KHOTKY MENU-OK 15, UTo6bI IIOATBepAnTb Bbl6paH-HyHO HAcTPOHky.
TA VOLUME
(TOʌbko DʌA perHɔHa TIOHepa "EUROPE")
HactpoKa MHHMaMbHOrO yPoBnI rPOMKoCTN DA DopoxHo INHΦopMaun. HactpoKn: 1-50.
HaxMNTe KHOITKy>14,HTO6blOTKpbITb I0A-MEHO.
HaxmMaTe KHOIIky 16/ A 2 Hn BpaIaIte peryIaTOp rPOMKocTN 4, YTObI ocY- IecETBNTb HaCTPOIKy.
SENS
Bo3MOxHO ToIbKO B pexHMe FM-paIHO: HAcTpoKa yBCTBHTeMbHocTH TIOHCs Ka paIHOCTaHcNl. HAcTPOKn: LO1 (MmHMaIbHa) - HI6 (MaKcHMaIbHa).
HaxMNTe KHOITKy>14,HTO6bl OTKpbITb POA-MEHIO.
HaxmMaTe KHOIky 16/ A2, YTObI OcyuieCTBnTb HAcTpoiKy.
SCAN TIME
HactpoKa IpoOaXHTeAhoCTn IpeBaPHTeAHOIIO pocayuHBnC 5 aqyHd. HactpoK:5-30.
HaxMITE KHOITKy>14,TO6bIOTKpbITbIOA-MEHO.
HaxnMaIte KHOITky 16/ A2, UTObI OcyIeCTBNTb HAcTPOKy.
CLOCK SET
Hacroka yacob.
HaxMNTe KHOITKy>14,HTo6bl OTKpbITb POA-MEHIO.
HaxmMaTe KHOIky < 5 > / > 14 ,TO6bl TepexOAnTb MEXdy YacAMN MNHyTAMN. Pn Bb6ope HndKaTop MNHyT NAN YacOB MnraeT.
HaxnMaTe KHOIky 16/ A2, yTO6bl HaCTPOnTb MNHyTb HAN YAcbl.
HaxMMTe KpaTKOBpeMeHHO KHOTKY MENU-OK 15, uTo6bl IIOaTBepAHTb BBeDeHHOe Bpem.
Птумецни:
B 12-yaocobom fopmatyacob (12H MODE) 3a HnHaKauney BpeMeHN TPOBAETcN "A" -do o6eDa nn "P" -TocLe o6eDa.
12H/24H MODE
Bb60ppeKIMa yacOB 12u nn 24u. HacTroKn: 12H, 24H.
HaxMMTe KHOITky>14,HTo6bl OTKpbITb IOA-MEHIO.
HaxmMaTe KhoTIky ≥ 14 ,YTO6bI TEpeKIO-HTbCMAKdy HAcTPOHAMN.
CLOCK
BkIoueHne/BbIKIoueHne HndnKaunn BpeMeHH pIn BbIKIoueHHo aBTOMaHTHOe N BbIKIoueHHom 3axnraHH aBTOMo6nA. HactpoKn: ON (Bk), OFF (BbIK).
HaxMMTe KHOITKy>14,HTO6bl OTKpbITb IOA-MEHO.
HaxmMaTe KhoNkpy ≥ 14 ,YTO6bIpepeKIO-HTbCMAEXyHaCTPOHAMN.
HaxMMTe KpaTKOBpeMeHHo KHOTKY MENU · OK (15),UTo6bl IIOATBepaHTb Bbl6paH-HyIO HAcTPOkY.
BEEP
BkIoueHne/BbKIOueHne IOaTBePJaIOeO CnHa. HAcToPkn: ON (BkA), OFF (BbK).
HaxMMTE KHOITKY>14,HTO6blOTKpbITb TIOA-MEHO.
HaxnMaTe KhoTIky>14,yTO6bI TEpeKIO-HTbCMAKdy HAcTPOHAMN.
HaxMMTe KpaTKOBpeMeHHo KHOITKY MENU-OK 15, UTo6bI IIOATBepAnTb BblOpAHHyU HAcTpOkiKy.
MUTE LVL
HactpoKa ypOBn rPOMKoCTn PnRyUWeHn. HactpoKn:0-50.
HaxMMTE KHOITKY>14,HTO6blOTKpbITb TIOA-MEHO.
HaxmMaTe KOnTIky 16/ANBpaIaItepeyAIToprpoMkOCTN4,TObIocUSeCTBnTbHAcTPOKy.
ON VOLUME
YctahOBka rPOMKoCTH pInBVKIoUeHHN. HAcTpoKn: 0-50 mN LAST VOL (nocAeDHH yCTaHOBLeHHb IpeEd BbKIAUeHHEm ABTOMaHHTOblIyPoBeHb rPOMKoCTH).Ipn HAcTpoKe "LAST VOL"rPOMKOCTb BKIAUeHHN OgrpAHueHa Do MaKc.25.
Hakmte KhoNkY ≥ 14 ,T06bl BbIpaTb HactpoNky"LASTVOL". -HAN
HaxmMaTe KHOIky <⑤,YTO6bHaCTpOHTb rPOMKoCTn TPN BkAIOueHn B IpeEaX OTo 0do50.
HaxmMaTe KHOtIKy 16/ A 2 HnBpaIaItepeYJrTOp rPOMKoCTN 4,TO6blOcyIeCTBHTb HaCTPOKy.
REG
(TOʌbko DAЯ perHOna TIOHepa "EUROPE")
BO3MOXHO TOIbKO B pexime FM-paHIO: BKIAOHTb HAN BBIAOHTb FyHKUIO REG. HaCTpoiKn: ON (BkA), OFF (BbIK).
HaxMITE KHOITKY>14,TO6bIOTKpbITb IOA-MEHIO.
HaxnMaIte KHOITKy>14,TO6bI IepExoAHTb Mekdy HacTpoKaMn.
PTYLANG
BxOHaH aYbCTbNTeA bHoCTb
TbIaHbI BxOa Rear-AUX-IN: 1,2B/10kΩ
TepeaHn BxAoAUX-IN: 500MB / 6k
BxoA TelefoHa/ HauRua: 10B/1kO
Fa6apntbH Bec
山 × B × (MM) : 182× 53× 155
Bec: npim.1,30K
Aeroupia MP3/WMA/C'n'C/CD changer:
Alambda'otov npoyoumevo 喜 kAo/CD
(17)Плкю →
Tepuatiooc/aonoppynKhohns
(18)Πιηκτρο
Anofoxn knaoc, ynpopn knan
Obnyiec aoppaleiac 357
357
O6ikn aopaaia. 357
Tevikéc odnyiecaaaepaiaac. 357
ouu ooppwoan357
Obnyiec kaogapoiou 358
Ynoeicvi aTn anokoib. 358
IIeipexojevo oukeuaoiac 358
Eioka aEeouaDP (6ev auineplaamabovotai otn ouakeuaoia) 358
Evcpyonoin. 359
TOnoTeTnO/aqaipeo npoooync. 359
Epyoataaekcpuioaeic. 378
XpoueC pnoopopiec 379
Eyyunon 379
Service 379
XpnoouoovuaeTnpoobaypapec
AutoTo pabiOvo exi oxediatoi va ia aeitoupynoe ie eva oxmae taon nkektipokou dikTuou 12 V ka npenei va tonoetn0ei oe ia unoox DIN.PnooTe Ta opia ioxc oTa texviKa xapaKnptiotka.Apote Tnv ekTeaean muc eniakeunc kai evdoxevewcnTnv tonoetan v yivei ano evav eioko.
Obnyiec tomOetmns
Ettetata va tootheetae To paiofovo movo eav exete emepiae tny tototheonpaoipowv auokivntou kai elote eoikeuveoc eTo nektpko ouatnau oynatoc. Pooee To autn Tny nepittwn tic obnyie cno tootheonc oTo teaoa utwuv onyiwv.
Anwon oumuopppwnc
Me to napov n Blaupunkt GmbH e ot to radiopwvo autokivntou Toronto 400 BT oumuwove iue tic baaikec anaitnaeic kai tic allec oxetikec diataeic tnc odnyiaac 1999/5/EE.
Osbnyiec kathetaapouo
Antoppunavtikakayevikaukaqatapiaoukaowkai otpeiyatauIko npoateutiko nlaotikovmnpoei va nepiexouovoaicnou mopoei va diaipowovuvtnv emipaveia tou pabiopwovou.
Xpnaiomoiote iaTov katoipaoTOu paOfouo eva oEv o eoappbaepyevo navi.
Kaapate av xpeiaetai tic enapec tic npooo- ync me eva maakok navi buthetave o ioonpo- nulikn alkooln.
Evpeyonoian/anevepyonoian to nAiktoPO ON/OFF
Tia nvy evepyonoinon moeTo nAikpo ON/ OFF ③.
To paIopovv eVeypoiaetra.
Tia nTv anevepyoioian kpatnoTe patnuevo to nAnktpo ON/OFF ③ nepiooTepo ano2 6eutepeletta.
To paiofovo anevepyoiaitei.
Yn#6eIq:
Eav evpyoioiOeTo pabiOpov o KLeiOt diakomn unxavnc, anevpyoioeiTa autouma t a noia wpa, ia va npootateute i n ma-tapia tou oxmuatoC.
Evcpyonoian/anevepyonoionn rou diakottn mnxavnic
Eav to pabiopwvo eivai ouvdepevo me to diakomtn mnxavnc tou oxmuatoc, ownc paivea otic odnyies
TOnOeTnOnc, kai dev teOnke ekToCLeIoupyiac Me to pAnKtpo ON/OFF 3) ovepyoointhetai kai Oa anevepyoointhetai me To diakonttn nuxavnic.
'Evraon hou
Pooan nC eVtoaoc touxou
H eYtaon mOpoe va puOtei ae otadia ano 0 (oiyaon) meXpl 50 (meYiotn).
Ipeipatpetye tov puthetai n evtaan nyou 4, ia va tponoioane Tnv evtaonnou.
Yniδειξη:
Av eivai auvdebeveo me to pabiopwvo tou autokivntou eva tnlepwvo n eva ouatma nlohyonc, onic nepiayapetai otc obnyiec tonotheonc, kata n diapkeia maac tnleawviiknc auovuiliac n iuaac avakoivoonnlohyonc tietaai to pabiopwvo tou autokivntou o Kaataaana ayic, wote va npopeiteva akoute aveoxlaeta tvuovuulia n tny avakoivwan. Kata tn diapkeia tnc ayaonc emaviietai otny o0ovn n evdeiEIN "TELEPHONE".
Σiayon paδiopovou autokivitou (Mute)
Mnopeite va xaunawoete yphyopa tvv evtaon oe ia tni nou exete puthetaiaei oecic.
Piote ouvtoa to nAnktpo ON/OFF ③,ya va theoTo pabiopwvo Tou autokivnTou oe aiayon h avtioxa va to enavaqepete otny nponyouevn evtaan hyou.
Kata nviyaan epaivietai otv oovn "MUTE".
Tn pOthion tnc evtaan cou kata naiao diaabaote oTo kepaiaio "PuthetaicxhoTn"tnv npaypao "IpaaypatoinonputhetaiaewvtoevoxhoTn",oetaeenuoynic MUTE LVL".
Evepyonoinan/anevepyonoinan Aletoupyiac emideiXnc
H letroupyia eni6iEiNc oac deixyve tic letoupyie tou pabiopwov wC kuioeva ypaumata otnyo0vN. Mnpoeite va eveyonoietae kai va aneyonoietae Tn letoupyia eni6iEiNc:
Anvepepyoioate avxpeiaZeai npwta to paBIO OPOVTOAU TOKIVNTOU.
Kpatnoge tauroxpova natnmuva Ta nAnktpa MENU-OK 15 kai 2 12 kalieote to nAnkpto ON/OFF ③.
To pabiopwvo evpyoioeiiai. Tnv obov n epaivietai yi liyo "DEMO MODE", eav exeTeevpyoiooei tnv leitoupyia enideiEnc. Patavtac eva onoiobnntote nktpo diaakotteai nleitoupyia enideiEnc kai npopeite va xnpoonnoae Te tn ouakeun.
Euρávion apiθμων ᵓκδοῦnc
Mnopeite va eupaviaete touc apioouc ekdoan. twdiapopwv Eapntmuw Tns oukeu.
Atevepyoioiote npwa av xpeiaetai to pabi- ophiwo TOU autOKivTou.
Kpatntote tautoxpova natnueva ta nAkntpa MENU-OK 15 kai 1 12 kai nieote to nAknpto ON/OFF 3.
To paiofovo evpyoioieiai. Tny oOvN eU paviietoi a apiOcEkooc tou npou Eapriatoc. O npotoc yapakntpac, yapakntpiei To EApntma: P = Prozessor (eEepyaoTnc), E = EPROM, A = Accordo, B = Bluetooth®.
Piote To nAHTPO < 5 > / > 14, yia va eIaViaeTe Touc apioouc ekdoan Tov aAAWv EapntmuTsw.
Theote to nAnktoPO MEnu-OK 15, yia va emiOtpepeTe oT TEaetia nnynnou ouakouyate.
Aetroupyia CD/MP3/WMA
Me auto to paodiopwo autokivntou mnpoeite va avanapayete CD nxou (CDDA) kai CD-R/RW e apxia hou, MP3 n WMA katheta cai MP3 n WMA o eaaa anothekeuoc USB.

KivduvoKaataoToPocnTou obnyou CD!
ev eitprntetai va xpnaiouiouvtai CD nou eivai otpoyula (Shape-CD) kai CD diapetpo 8 cm (Mini-CD).
Mnpoovivn unooxh AUX-IN

Kivduoc! Meyaloc kivduoc Tpaumiaou ano to pic.
AM (MW): 531 - 1602 kHz
LW (μóvo Eupwūn): 153 - 279 kHz
PepioxEc ouxovTiw H7A:
FM: 87,7-107,9 MHz
AM (MW): 530 - 1710 kHz
IepioxEc auvoTntw Nota AepiK:
FM: 87,5-107,9MHz
AM (MW): 530 - 1710 kHz
EuoczawncouxovntuwFM:
30-15000Hz
CD
Euoc zwnc ouxovntvW:
20-20000Hz
Pre-amp OUT
4 kavàla: 2 V
Euαθησια ειδδου
Onioθua AUX-IN: 1,2V/10kΩ
Eμροσθια AUX-IN: 500 mV / 6 kΩ
Eioo0cTnλ./IπIoynηoc: 10V/1kΩ
Aiaotaaoeic kai bapoc
× Y× B (mm): 182× 53× 155
Bapoc: περ. 1,30 kg
Eiupuaaaowmeo Tou bikaiwpatoc aalayov xwpic npoeioboinan
GB - Installation instructions

Safety instructions
When carrying out installation work and connections please observe the follow-ty instructions:
- Do not connect the vehicle's plug connectors to the radio!
- Disconnect the negative terminal of the battery! When doing so, please observe the vehicle manufacturer's safety instructions.
Make sure you do not damage vehicle components when drilling any holes. - The cross sections of the positive and negative cables must not be less than 1.5mm^2
You can obtain the adapter cable required for your vehicle type from any BLAUPUNKT dealer.
- Depending on the model, your vehicle may differ from the description provided here. We accept no responsibility for any damages due to incorrect installation or connection or for any consequential damages.
If the information provided here is not suitable for your specific installation requirements, please contact your Blaupunkt dealer, your vehicle manufacturer or our telephone hotline.
When installing an amplifier or changer, you must first connect the device earth connections before connecting the plugs for the line-in or line-out jacks.
Earth connection of external devices may not be connected to earth of car sound system (housing).
Supplied Mounting Hardware
AaYcTaHOBKnIToaCoeAnHeHHN

3.
Antenna connection
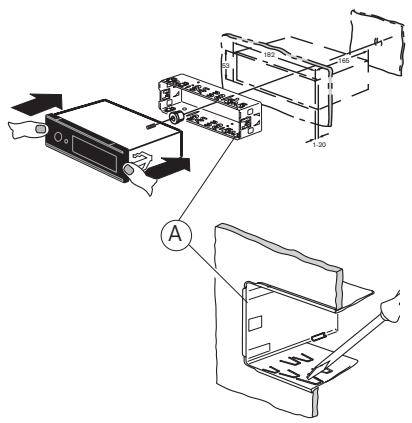
4.
- Ausbau · Removal · Demontage · Smontaggio · Demontage · Urmontering · Desmontaje · Desmontagem · Udbygning · Demontaz · Demontaz · Irrotus · Eltavolitas · Aemontax · Aqaipeon
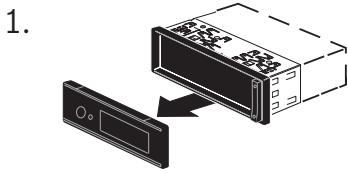
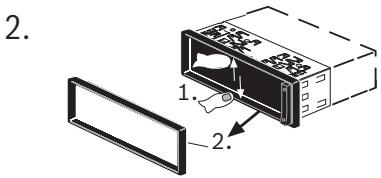
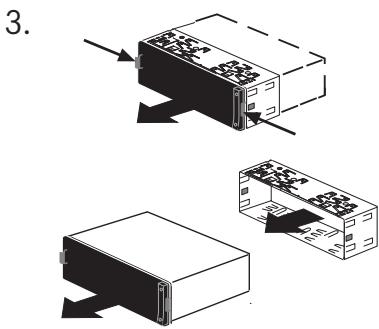
6.
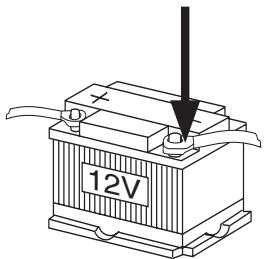
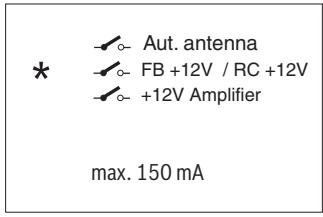
| A | B | ||
| 1 | NC | 1 | Speaker out RR+ |
| 2 | Radio Mute | 2 | Speaker out RR- |
| 3 | NC | 3 | Speaker out RF+ |
| 4 | Permanent +12V | 4 | Speaker out RF- |
| 5 | Aut. antenna* | 5 | Speaker out LF+ |
| 6 | Illumination | 6 | Speaker out LF- |
| 7 | KI.15/Ignition | 7 | Speaker out LR+ |
| 8 | Masse/GND | 8 | Speaker out LR- |
| C1 | C2 | C3 | |||
| 1 | Line Out LR | 7 | NC | 13 | CDC-Data In |
| 2 | Line Out RR | 8 | NC | 14 | CDC-Data Out |
| 3 | Line Out / Ground | 9 | Radio Mute | 15 | Permanent +12V |
| 4 | Line Out LF | 10 | SW Supply - RC +12V* | 16 | SW Supply +12V* |
| 5 | Line Out RF | 11 | Remote Control | 17 | Bus - Masse/GND |
| 6 | SW Supply +12V Amp. * | 12 | RC - GND | 18 | CDC/AUX1 Audio IN-GND |
| 19 | CDC/AUX1 Audio IN-L | ||||
| 20 | CDC/AUX1 Audio IN-R | ||||
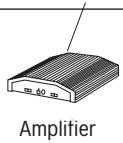
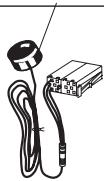
CD-Changer / AUX IN
Preamp-Out cable
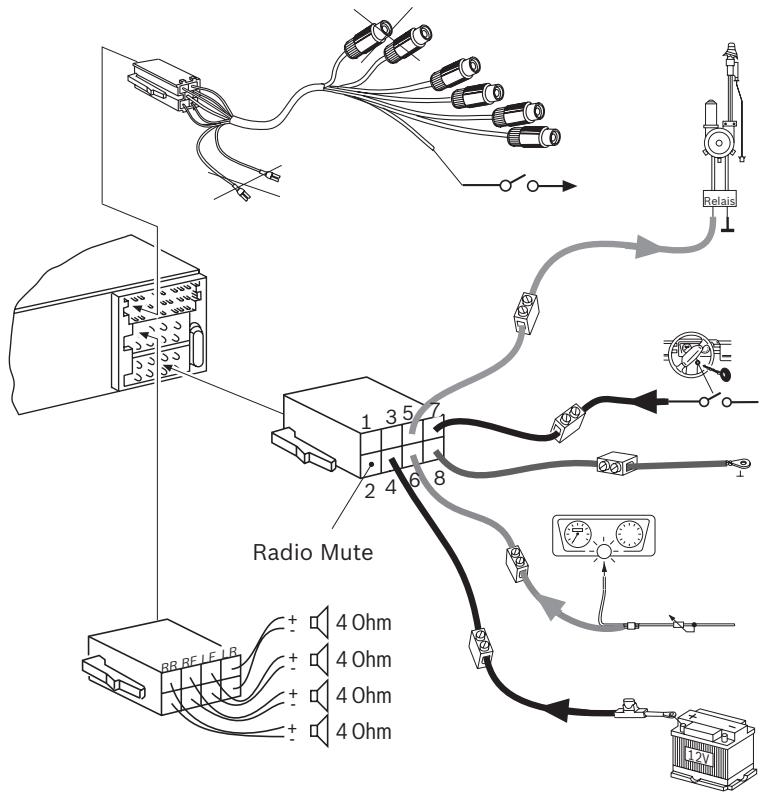
Änderungen vorbehalten! • Subject to changes! • Sous réserve de modifications! •
Modifiche riservate! · Wijzigingen voorbehonden! · Andringar forbehalles! · Modificaciones reservadas!
-Sob reserva de alteracoes! - Ret til eandringer forbeholdes! - Zmiany technicne zastrzezone! - Zmeny hyvrazeny! - Oikeus muutoksin pidetataan! - Podlozno promjenama! - 3aBOD- n3ROTOBtAEb octabTae3
c6oB npaBo Na BHeSeHne n3MeHEnH! ·Mnpoei va aAaEeI
© 2008 All rights reserved by Blaupunkt. This material may be reproduced, copied or distributed for personal use only.
This product is protected by certain intellectual property rights of Microsoft. Use or distribution of such technology outside of this product is prohibited without a license from Microsoft.
| Country: | Phone: | Fax: | WWW: | |
| Germany | (D) | 0180-5000225 | 05121-49 4002 | http://www.blaupunkt.com |
| Austria | (A) | 01-610 39 0 | 01-610 39 391 | |
| Denmark | (DK) | 44-898 360 | 44-898 644 | |
| Finland | (FIN) | 09-435 991 | 09-435 99236 | |
| Great Britain | (GB) | 01-89583 8880 | 01-89583 8394 | |
| Greece | (GR) | 210 94 27 337 | 210 94 12 711 | |
| Ireland | (ILR) | 01-46 66 700 | 01-46 66 706 | |
| Italy | (I) | 02-369 62331 | 02-369 62464 | |
| Luxembourg | (L) | 40 4078 | 40 2085 | |
| Norway | (N) | +47 64 87 89 60 | +47 64 87 89 02 | |
| Portugal | (P) | 2185 00144 | 2185 00165 | |
| Spain | (E) | 902 52 77 70 | 91 410 4078 | |
| Sweden | (S) | 08-7501850 | 08-7501810 | |
| Switzerland | (CH) | 01-8471644 | 01-8471650 | |
| Czech. Rep. | (CZ) | 02-6130 0446 | 02-6130 0514 | |
| Hungary | (H) | 76 889 704 | - | |
| Poland | (PL) | 0800-118922 | 022-8771260 | |
| Turkey | (TR) | 0212-335 07 23 | 0212-346 00 40 | |
| USA | (USA) | 800-950-2528 | 708-6817188 | |
| Brasil (Mercosur) | (BR) | 0800 7045446 | +55-19 3745 2773 | |
| Malaysia (Asia Pacific) | (MAL) | +604-6382 474 | +604-6413 640 | |
Passport
Name:
Type: 7649...
Serial no.: BP