Bass, mid, treble with frequency and Q-factor adjustment
Equalizer presets
Pop, Rock, Classic, Off
X-Bass
Bass boost at low volume (levels 0 to 3)
Clock
12h/24h display, adjustable, visible even when off
Mute function
Fast volume reduction (adjustable level)
Demo mode
Yes (scrolling display of functions)
Scan
Adjustable duration from 5 to 30 seconds
Traffic information priority (TA)
Yes (Europe, adjustable volume)
Mounting
DIN slot, adapter cable according to vehicle
Box contents
Car radio, manual, faceplate case, mounting frame, small hardware, removal tools, USB cable
Warranty
EU manufacturer, extension possible depending on country
Frequently Asked Questions - SAN FRANCISCO 300 BLAUPUNKT
How to set the time on the car radio?
Briefly press the MENU·OK button to open the user menu. Navigate to the CLOCK SET option using the V^ / A^ buttons. Press MENU·OK to enter the submenu. Use the < / > buttons to select hours or minutes (the value flashes). Turn the volume knob or use V^ / A^ to adjust. Confirm with MENU·OK. You can also choose the 12h or 24h display via the 12H/24H MODE option in the same menu.
How to activate traffic information (TA)?
Make sure the tuner zone is set to EUROPE. Briefly press MENU·OK to enter the user menu. Navigate to the TRAF option using the V^ / A^ buttons. Press > to open the submenu, then press > again to switch to ON. Confirm with MENU·OK. The traffic symbol () is displayed when the function is active. You can adjust the minimum volume for TA messages via the TA VOLUME option in the same menu.
How to store a radio station on a preset button?
First select the desired memory level (FM1, FM2, etc.) using the BND button. Tune to the station manually or by search. Press and hold one of the preset buttons 1 to 5 for about 2 seconds. The station is stored. To recall the station, briefly press the corresponding button.
Is the front panel detachable?
Yes, the front panel is detachable to protect the car radio from theft. To remove it, press the [1] button to unlock the left side, then pull the front panel outward. Always store it in the provided case when leaving the vehicle. To reattach, push it into the right mount until it clicks into place on the left.
Can I connect an iPod, phone or other Bluetooth device?
Yes, via the Blaupunkt C'n'C interface. You need to use a compatible interface (e.g. Bluetooth®/USB or iPod®/USB interface) sold separately. Connect the interface to the rear AUX input of the car radio and set the AUX input mode to OFF in the user menu (option CDC). Then select the corresponding audio source with the SRC button.
How to use the Scan function to browse stations?
In radio mode, press and hold the MENU·OK button for about 2 seconds. Scanning starts: each station is heard for a few seconds (adjustable via SCAN TIME in the user menu). To stop scanning on the current station, briefly press MENU·OK.
How to adjust the equalizer and sound presets?
Briefly press the AUD button to open the audio menu. Use the V^ / A^ buttons to access the BASS, TREBLE, etc. options, then press > to adjust. For the extended equalizer, select ENHANCED in the audio menu, then press >. You can adjust frequencies, levels and Q factors for bass, mid and treble. Presets are available via PRESETS (Pop, Rock, Classic, Off). Confirm each setting with MENU·OK.
What to do if a CD does not play or shows 'CD ERROR'?
Check that the CD is inserted with the printed side up and that it is clean. Only use CDs with the Compact Disc logo. Copy-protected or non-circular shaped CDs (shape CD, mini CD) may cause problems. If the error persists, eject the CD by pressing the EJECT button (the CD is automatically ejected after 2 seconds of error). Reinsert it gently. If the problem recurs, try another CD.
Can I play MP3 or WMA files from a USB stick?
Yes, connect a USB stick formatted in FAT32 using the supplied USB cable. The car radio recognises MP3 and WMA files (without DRM). It can handle up to 20,000 tracks. When first selecting the USB source, the unit reads the data (READING displayed). Use the < / > buttons to navigate between tracks, and V^ / A^ to change folders. Playlists (M3U, PLS) placed in the root directory are also supported.
How to reset the car radio to factory settings?
Briefly press MENU·OK to open the user menu. Navigate to the NORMSET option using the V^ / A^ buttons. Press and hold MENU·OK for more than 4 seconds. NORM ON is displayed briefly, then the car radio restarts with factory settings (start volume LAST VOL, Mute LVL 0, etc.). If you hold for less than 4 seconds, current settings are retained.
User questions about SAN FRANCISCO 300 BLAUPUNKT
1 question about this device. Answer the ones you know or ask your own.
Ask a new question about this device
How to connect a Bluetooth device to the BLAUPUNKT SAN FRANCISCO 300 car radio?
Frequently Asked Questions -22/03/2026
Response Notice-Facile
To connect a Bluetooth device to your BLAUPUNKT SAN FRANCISCO 300 car radio, follow the steps below:
Turn on the car radio: Make sure the car radio is powered on.
Access the Bluetooth menu: Use the navigation buttons to open the menu and select the Bluetooth option.
Activate pairing mode: Choose the option to make the car radio discoverable by other Bluetooth devices.
Turn on Bluetooth on your device (smartphone, tablet, etc.) and start searching for available devices.
Select "BLAUPUNKT SAN FRANCISCO 300" from the list of detected devices on your device.
Confirm pairing: If a PIN code appears, check that it matches on both devices and validate the connection.
Connection established: Once pairing is successful, you will hear a confirmation sound and your device will be connected to the car radio.
You can now listen to music or make calls via the Bluetooth system of your car radio.
Respond (be the first)
Download the instructions for your Car stereo in PDF format for free! Find your manual SAN FRANCISCO 300 -
BLAUPUNKT and take your electronic device back in hand. On this page are published all the documents necessary for the use of your device. SAN FRANCISCO 300 by BLAUPUNKT.
USER MANUAL SAN FRANCISCO 300 BLAUPUNKT
Radio | CD | MP3 | WMA
San Francisco 300
7649030110/7649031010
www.blaupunkt.com
Bedienungs- und Einbauanleitung
Operating and installation instructions
Mode d'emploi et de montage
Istruzioni d'uso e di installmente
Gebruiksaanwijzing en inbouwhandleiding
Bruks- och monteringsanvising
Instrucciones de manejo e instalacion
Instruções de service e de montagem
Betjenings- og monteringsvejledning
Instrukcja obšlugi i montažowa
Návod k obsslze a k montáži
Käytto- ja asennusohje
Kezelési és beszerelési utmutató
Инструкцяп по заци и установке
Осыуicçtospočnočnos kal xphonç
BLAUPUNKT
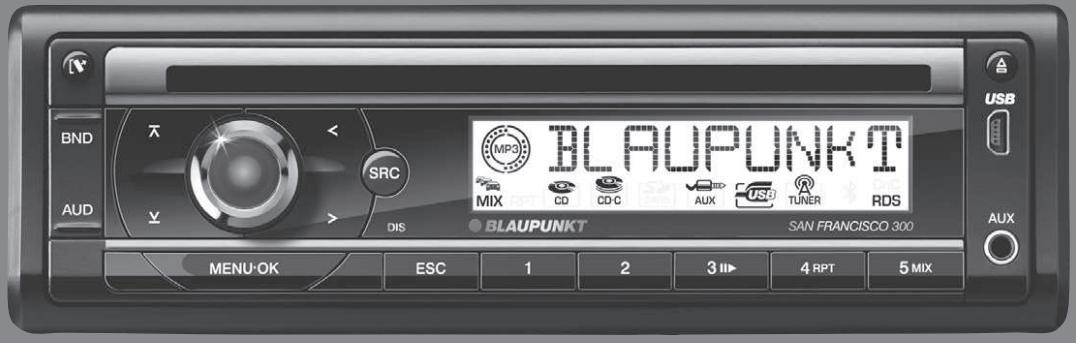
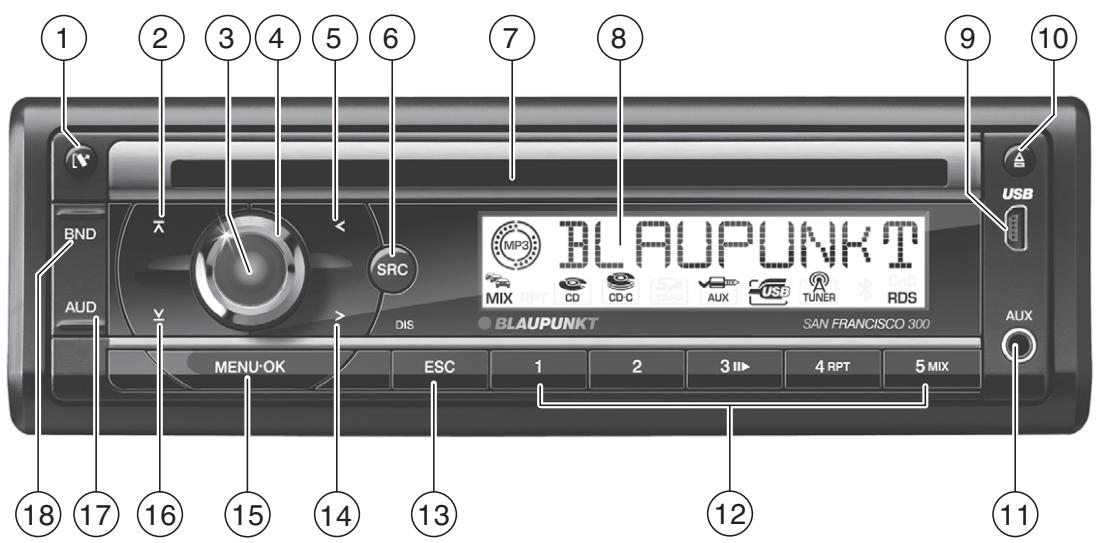
Bedienelemente
(1)【-Taste】
Region
Speicherebenen
EUROPE
FM1, FM2, FMT, MW, LW
USA
FM1, FM2, FMT, AM, AMT
THAI
FM1, FM2, FMT, AM
S AMERICA
FM1, FM2, FMT, AM, AMT
AM (MW): 531 - 1602 kHz
LW (nur Europa): 153 - 279 kHz
Wellenbereiche USA:
UKW (FM): 87,7 - 107,9 MHz
AM (/MW): 530 - 1710 kHz
Radio mode: Start the station seek tuning
MP3/WMA/C'n'C/CD changer mode: Change to next folder / CD
(3) On/Off button
Short press: Switch on car sound system
In operation: Mute car sound system (Mute)
Long press: Switch off car sound system
④ Volume control
(5) <button
In the menu: Change settings
Radio mode: Adjust the stations
Other operating modes: Track selection
⑥ SRC button
Selecting an audio source
CD tray
⑧ Display
⑨ USB port
(10) button (Eject)
Eject a CD
(11) Front AUX-IN socket
12 Keys 1-5
⑬ DIS/ESC button
In the menu: Exit menu
In operation: Switch display
(14) button
In the menu: Change settings
Radio mode: Adjust the stations
Other operating modes: Track selection
(15) MENU·OK button
Short press: Call up menu, confirm settings
Long press: Start scan function
16 v button
In the menu: Call up menu item
Radio mode: Start the station seek tuning
MP3/WMA/C'n'C/CD changer mode: Change to previous folder / CD
⑰ AUD button
Calling up the Audio menu
(18) BND button
Short press: Select memory bank in Radio mode
Long press: Start Travelstore function in Radio mode
Contents
Safety notes 25
Symbols used 25
Road safety 25
General safety notes 25
Declaration of conformity 25
Cleaning notes. 26
Disposal notes 26
Scope of delivery 26
Optional equipment (not part of the scope of delivery) 26
Select a folder/CD (only in MP3/WMA/ C'n'C or CD changer mode) 33
Fast searching. 33
Interrupting playback. 33
[ \text{Playlist mode (only in MP3/WMA mode) ....33} ]
Scanning all tracks. 34
Playing tracks in random order 34
Repeatedly playing individual tracks, CDs or directories 34
Configuring the display. 34
External audio sources. 35
Front AUX-IN socket 35
Rear AUX input. 35
Sound settings 36
Calling and exiting the audio menu 36
Performing settings in the audio menu.....36
Calling and exiting the enhanced audio menu. 37
Performing settings in the enhanced audio menu 37
User settings. 38
Calling and exiting the user menu. 38
Performing settings in the user menu ....38
Factory settings. 41
Useful information. 42
Warranty. 42
Service 42
Technical data 42
Installation instructions 317
Safety notes
The car sound system was manufactured according to the state of the art and established safety guidelines. Even so, dangers may occur if you do not observe the safety notes in these instructions.
These instructions contain important information to easily and safely install and operate the car sound system.
Read these instructions carefully and completely before using the car sound system.
Keep the instructions at a location so that they are always accessible to all users.
Always pass on the car sound system to third parties together with these instructions.
In addition, observe the instructions of the devices used in conjunction with this car sound system.
Symbols used
These instructions employ the following symbols:
DANGER!
Warns about injuries
CAUTION!
Warns about damaging the CD drive
The CE mark confirms the compliance with EU directives.
Identifies a sequencing step
Identifies a listing
Road safety
Observe the following notes about road safety:
Use your device in such a way that you can always safely control your vehicle. In case of doubt, stop at a suitable location and operate your device while the vehicle is standing.
Remove or attach the control panel only while the vehicle is standing an.
Always listen at a moderate volume to protect your hearing and to be able to hear acoustic warning signals (e.g. police sirens). During mute phases (e.g. when changing the audio source), changing the volume is not audible. Do not increase the volume during this mute phase.
General safety notes
Observe the following notes to protect yourself against injuries:
Do not modify or open the device. The device contains a Class 1 laser that can cause injuries to your eyes.
Do not increase the volume during mute phases, e.g. when changing the audio source. Changing the volume is not audible during a mute phase.
Use as directed
This car sound system is intended for installation and operation in a vehicle with 12 V vehicle system voltage and must be installed in a DIN slot. Observe the performance limits in the technical data. Repairs and installation, if necessary, should be performed by a specialist.
Installation instructions
You may only install the car sound system yourself if you are experienced in installing car sound systems and are very familiar with the electrical system of the vehicle. For this purpose, observe the installation instructions at the end of these instructions.
Declaration of conformity
The Blaupunkt GmbH declares that the car sound system San Francisco 300 complies with the basic requirements and the other relevant regulations of the directive 89/336/EWG.
Cleaning notes
Solvents, cleaning and scouring agents as well as dashboard spray and plastics care product may contain ingredients that will damage the surface of the car sound system.
Use only a dry or slightly moistened cloth for cleaning the car sound system.
If necessary, clean the contacts of the control panel regularly using a soft cloth moistened with cleaning alcohol.
Disposal notes
Do not dispose of your old unit in the household trash!
Use the return and collection systems available to dispose of the old device.
Scope of delivery
The scope of delivery includes:
1 Car sound system
1 Operating/installation instructions
1 Case for the control panel
1 Support frame
1 Set of small parts
2 Disassembly tools
1 USB connecting cable
Note:
We recommend the use of original Blaupunkt accessories (www.blaupunkt.com).
Optional equipment (not part of the scope of delivery)
Contact your Blaupunkt specialised dealer or visit us on the Internet under www.blaupunkt.com for information about optional equipment, such as:
The steering wheel or handheld remote control from Blaupunkt for safe and convenient operation of the basic functions (switching on/off not possible with the remote control)
The C'n'C-ready interfaces from Blaupunkt (C'n'C = Command and Control) for connecting Bluetooth®-ready cell phones and streaming devices (e.g. via the Bluetooth®/USB interface) as well as additional data carriers and devices (e.g. via the iPod/USB interface)
Blaupunkt CD changer
Blaupunkt or Velocity amplifier
Placing the device in operation
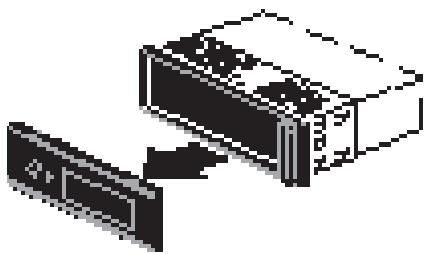
Attaching/detaching the control panel
The car sound system is equipped with a detachable control panel (release panel) to protect your equipment against theft. In the delivery state, the control panel is in the supplied case. To start operating the radio after installation, you must first attach the control panel (see the section "Attaching the control panel" in this chapter).
Always take the control panel with you when leaving the vehicle. The car sound system is worthless to a thief without this control panel.
Caution
Damage to the control panel
Never drop the control panel.
Transport the control panel so that it is protected against impacts and the contacts cannot become dirty.
Do not expose the control panel to direct sunlight or another heat source.
Avoid direct skin contact with the control panel's electrical contacts.
Attaching the control panel
Push the control panel into the bracket at the right edge of the device.
Push the control panel carefully into the left bracket until it clicks into place.
Removing the control panel
Press the button ① to unlock the control panel.
The left side of the control panel detaches from the device and is secured by a latch against falling out.
Grasp the control panel at the left side and pull it beyond the resistance of the latch and straight out of the bracket.
Note:
The car sound system automatically switches off as soon as the control panel is removed.
Setting the tuner region
This car sound system is designed for operation in different regions with different frequency ranges and station technologies. It is factory set to the tuner region "EUROPE". Other available tuner regions include "USA", "THAI" (Thailand) and "S AMERICA" (South America). If you operate the car sound system outside of Europe, you may first have to set a suitable tuner region:
Switch off the car sound system if it is not already turned off.
Press and hold the buttons MENU·OK ⑤ and 4 ⑫ at the same time and press the On/ Off button ③.
The car sound system switches on. The currently set tuner region appears on the display.
Press the button ^16 / ^2 repeatedly until the desired tuning region is displayed.
Press the MENU·OK button 15.
Switching on/off
Switching on/off with the On/Off button
For switch-on, press the On/Off button ③. The car sound system switches on.
To switch off the device, press and hold down the On/Off button ③ for longer than 2 seconds.
The car sound system switches off.
Note:
If you switch on the car sound system while the vehicle ignition is switched off, it automatically switches off after 1 hour to preserve the vehicle battery.
Switching on/off via vehicle ignition
The car sound system will switch off/on simultaneously with the ignition if the device is correctly connected to the vehicle's ignition as shown in the installation instructions and you did not switch the device off by pressing the On/Off button ③.
Volume
Adjusting the volume
You can adjust the volume in steps from 0 (off) to 50 (maximum).
Turn the volume control (4) to change the volume.
Note:
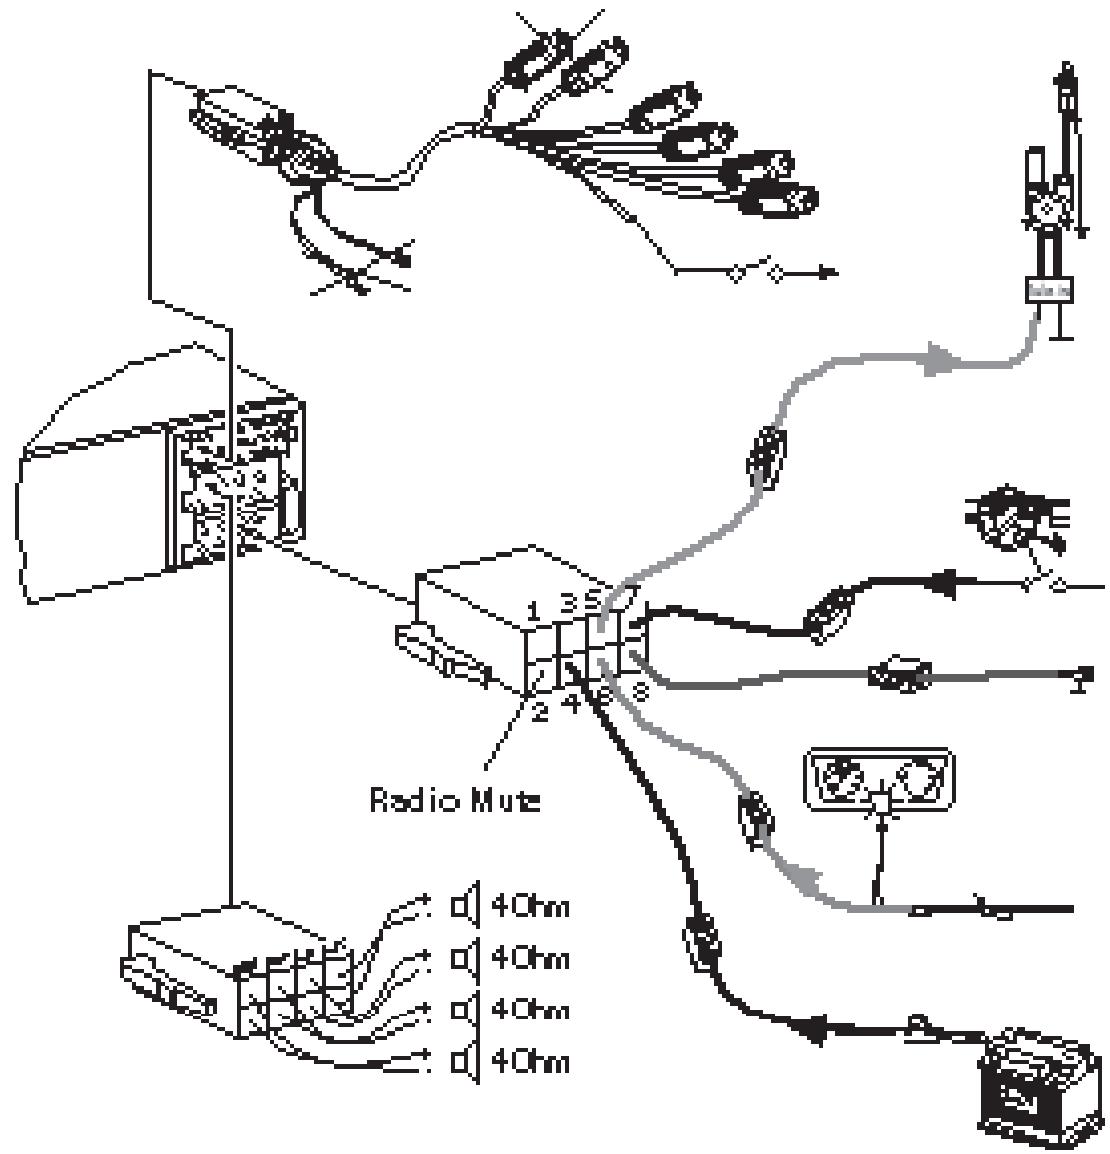
If a telephone or navigation system is connected with the car sound system as described in the installation instructions, the car sound system is muted in case of a telephone call or navigation announcement and the call or voice output is played via the loudspeakers of the car sound system. The display then shows "TELEPHONE".
Muting the car sound system (Mute)
You can quickly reduce the volume to a preset level.
Briefly press the On/Off button ③ to mute the car sound system or to reactivate the previous volume.
While it is switched low, the display shows "MUTE".
To adjust the mute volume, please read the section "Performing settings in the user menu", "Mute LVL" menu item in the chapter "User settings".
Switching demo mode on/off
The demo mode shows the functions of the car sound system as scrolling text on the display. You can turn the demo mode on or off:
Switch off the car sound system if it is not already turned off.
Press and hold the buttons MENU·OK (15) and 2 (12) at the same time and press the On/Off button (3).
The car sound system switches on. The display briefly shows "DEMO MODE" if you switched on the demo mode. By pressing any button, the demo mode is interrupted and you can operate the device.
Displaying version numbers
You can display the version numbers of the different device components.
Switch off the car sound system if it is not already turned off.
Press and hold the buttons MENU·OK (15) and 1 (12) at the same time and press the On/Off button (3).
The car sound system switches on. The display shows the version number of the first component. The first character identifies the component: P = C P U, E = E P R O M, A = A c c o r d o .
Press the button < 5 / > 14 to display the version number of the other components.
Press the MENU·OK button ⑤ to return to the previously played audio source.
Traffic information
In the tuner region "EUROPE", an FM station can identify traffic reports by means of an RDS signal. If the priority for traffic announcements is switched on, a traffic announcement is automatically switched through, even if the car sound system is currently not in radio mode or if a station of the wavebands MW or LW is set.
If priority is switched on, the display shows the traffic jam symbol (). "TRAFFIC" is displayed during a switched-through traffic announcement.
To switch the priority on and off, please read the section "Performing settings in the user menu", "TRAF" menu item in the chapter "User settings".
Notes:
The volume is increased for the duration of the switched-through traffic announcement. You can adjust the minimum volume for traffic announcements (see the ch. "User settings", section "Performing settings in the user menu", "TA VOLUME" menu item).
To cancel a switched-though traffic announcement, press the DIS/ESC button ⑬.
Radio mode
RDS
Many FM stations broadcast an RDS (Radio Data System) signal in addition to their programme in the tuner region "EUROPE" that allows the following additional functions:
The station name is shown on the display.
The car sound system recognises traffic announcements and news broadcasts and can automatically switch them through in any operating mode (e.g. in CD mode).
Alternate frequency: If RDS is activated, the car sound system automatically selects the best receivable frequency for the station that is currently set.
Regional (REG): At certain times, some radio stations divide their programme into regional programmes providing different content. If the REG function is activated, the car sound system changes only to those alternate frequencies on which the same regional programme is being broadcast.
To switch the RDS or REG function on or off, please read the section "Performing settings in the user menu" in the chapter "User settings" (menu items "RDS", "REG").
Changing to radio mode
Press the SRC button ⑥ repeatedly until "TUNER" is displayed:
The current memory bank appears once as scrolling text on the display.
Selecting the memory bank
The following memory banks are available in the different tuner regions:
Region
Memory banks
EUROPE
FM1, FM2, FMT, MW, LW
USA
FM1, FM2, FMT, AM, AMT
THAI
FM1, FM2, FMT, AM
S AMERICA
FM1, FM2, FMT, AM, AMT
Press the BND button 18 repeatedly until the desired memory bank is displayed.
Note:
Up to 5 stations can be stored in each memory bank.
Tuning into a station
There are various ways of tuning into a station:
Tuning into stations manually
Briefly press the button < 5 / >14 once or several times to change the frequency in increments, or long to quickly change the frequency.
Notes:
For the tuner region "EUROPE": In the FM waveband, the next station of the broadcasting network is automatically tuned into if the RDS function is switched on.
For the tuner regions "EUROPE", "USA" and "S AMERICA": In the FM waveband, the current selected programme type is displayed and can be changed if the PTY function is activated (see the ch. "PTY").
Starting station seek tuning
Press the button 16 / 2 to start the station seek tuning
The radio tunes into the next receivable station.
Notes:
For the tuner region "EUROPE": In the FM waveband, only traffic information stations are tuned into if the priority for traffic information () is switched on.
For the tuner regions "EUROPE", "USA" and "S AMERICA": In the FM waveband, the next station with the currently selected programme type is tuned into if the PTY function is activated (see the ch. "PTY").
The sensitivity of seek tuning can be adjusted (see the chapter "User settings", section "Performing settings in the user menu", menu item "SENS").
Radio mode
Storing stations/Calling stored stations
Select the desired memory bank.
If necessary, set the desired station.
Press the station button 1-5 ⑫ for approx. 2 seconds to store the current station under the button.
-or-
Briefly press the station button 1 - 5 (12) to call up the stored station.
Scanning stations
The scan function is used to scan every receivable station of the current waveband.
Press the MENU·OK button (15) for approx. 2 seconds to start the scan, or long to continue playing the currently set station.
During the scan, the display alternately displays "SCAN" and the current frequency as well as memory bank or station name.
Note:
For radio mode, you can adjust the scan time for each station (see the ch. "User settings", section "Performing settings in the user menu", "SCAN TIME" menu item).
Storing stations automatically (Travelstore)
With Travelstore, you can automatically search for and store the 5 FM stations offering the strongest reception in the region in one memory bank. Any previously stored stations in this memory bank are deleted in the process.
In the tuner regions "EUROPE" and "THAI", you can store 5 FM stations in the FMT memory bank with Travelstore. In the tuner regions "USA" and "S AMERICA", you can also store 5 AM stations in the AMT memory bank.
Select a memory bank of the desired waveband, e.g. FM1 or AM.
Press the BND button (18) for approx. 2 seconds.
The tuner starts the automatic station seek tuning; the display shows "FM TSTORE" or "AM TSTORE". After the storing is completed, the radio plays the station at memory location 1 of the FMT or AMT level.
Note:
For the tuner region "EUROPE": If the priority for traffic information is switched on ( ), only traffic information stations are stored.
PTY
In the tuner regions "EUROPE", "USA" and "S AMERICA", an FM station can transmit its current programme type, e.g. CULTURE, POP, JAZZ, ROCK, SPORT or SCIENCE. Hence, the PTY function allows a targeted search for broadcasts of a certain programme type, e.g. for rock or sports broadcasts. Note that PTY is not supported by all stations.
Note:
To use the PTY function, you must activate it separately in the menu (see the ch. "User settings", section "Performing settings in the user menu", "PTY" menu item).
Selecting a programme type
Note:
In the tuner region "EUROPE", you can adjust the language in which the programme types are displayed (see the ch. "User settings", section "Performing settings in the user menu", "PTY LANGUAGE" menu item).
Briefly press the button < 5 / > 14
The currently selected programme type is briefly displayed, and you can select a different programme type.
If necessary, press the button < 5 / > 14 repeatedly until the desired programme type is selected.
Searching for stations
Press the button 16 / 2
As soon as the seek tuning starts, the display briefly shows "SEARCH". Afterwards, the current programme type is displayed.
As soon as a station is found, "PTY FOUND" is briefly shown. As long as the programme type of the adjusted station corresponds to the currently selected programme type, the display alternately shows the programme type and the station name or frequency.
Notes:
If no station with the selected programme type is found, "NO PTY" is briefly displayed and a beep sounds. The radio will then retune to the station that it played last.
If the tuned radio station or another station on the broadcasting network broadcasts your selected programme type at a later point in time, the car sound system will automatically switch from the currently tuned station or from the current audio source (e.g. CD) to the station whose programme type matches the one you selected. Note that this function is not supported by all stations.
Configuring the display
Press the DIS/ESC button ⑬ to change between these two displays:
Display
Meaning
ABCDEF
or
FM1 102.90
Station name
or
memory bank/frequency
FM1 11:32
Memory bank/time
CD/MP3/WMA/C'n'C/ CD changer mode
Basic information
CD/MP3/WMA mode
This car sound system can be used to play audio CDs (CDDA) and CD-R/RWs with audio, MP3 or WMA files as well as MP3 or WMA files on USB data carriers.
Risk of severe damage to the CD drive!
Noncircular contoured CDs (shape CDs) and CDs with a diameter of 8 cm (mini CDs) must not be used.
We accept no responsibility for any damage to the CD drive that may occur as a result of the use of unsuitable CDs.
Notes:
To ensure proper functioning, use only CDs with the Compact-Disc logo.
Blaupunkt cannot guarantee the flawless function of copy-protected CDs and all CD blanks and USB data carriers available on the market.
Note the following information when preparing an MP3/WMA data carrier:
Naming of tracks and directories:
Max. 16 characters (CD) or 24 characters (USB) incl. the file extension ".mp3" or ".wma" (if more characters are used, the number of tracks and folders that are recognisable by the car sound system is reduced)
No umlauts or special characters
CD formats: Audio CD (CDDA), CD-R/RW, 0: 12 cm
CD data formats: ISO 9669 Level 1 and 2, Joliet
CD burn speed: Max. 16x (recommended)
USB format/file system: Mass storage device/ FAT32
CD/MP3/WMA/C'n'C/CD changer mode
File extension of audio files:
.MP3 for MP3 files
WMA for WMA files
WMA files only without Digital Rights Management (DRM) and created with Windows Media Player version 8 or later
- MP3 ID3 tags: Version 1 and 2
- Bitrate for creating audio files:
MP3: 32 to 320 kbps
WMA: 32 to 192 kbps
Max. number of tracks: 20,000
C'n'C mode
The C'n'C interface from Blaupunkt (C'n'C = Command and Control) allows an even more convenient control of devices and data carriers that are connected to the car sound system via a C'n'C-ready Blaupunkt interface.
Before connecting a C'n'C-ready Blaupunkt interface, check the mode of the rear AUX input. For further details, please read the section "Rear AUX input" in the chapter "External audio sources".
CD changer mode
You can connect the following CD changers to the car sound system:
Information on handling CDs, inserting CDs and operating the CD changer can be found in the operating instructions supplied with your CD changer.
Before connecting a CD changer, check the mode of the rear AUX input. For further details, please read the section "Rear AUX input" in the chapter "External audio sources".
Changing to CD/MP3/WMA/C'n'C/ CD changer mode
Press the SRC button 6 repeatedly until the desired audio source is displayed:
- "CD": Inserted CD.
"MP3": Inserted CD that has already been recognised as MP3 CD.
"USB": Connected USB data carrier.
Name of the device connected via C'n'C
"CDC / AUX": Connected CD changer (if no other external audio source is connected).
Notes:
The respective audio source can be selected only if a corresponding CD is inserted or a corresponding device (e.g. a USB data carrier or CD changer) is connected.
If the car sound system first has to read the data of a connected device or data carrier before the playback, the display shows "READING". For large data volumes, this may take up to 1 minute. If the device or data carrier is defective or the transferred data cannot be played back, a corresponding message appears on the display (e.g. "ERROR" or "USB ERROR").
If the connected CD changer first acquires the inserted CDs (e.g. after an interruption of the power supply or a change of the magazine), "MAG SCAN" is displayed. If the CD changer does not contain any CDs or magazine, "NO DISC" is displayed.
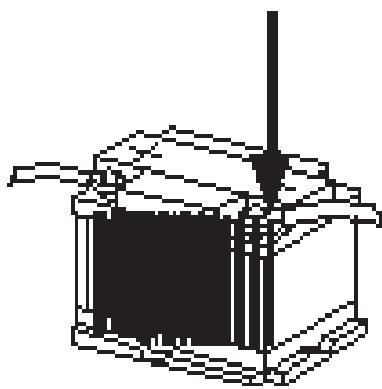
Inserting a CD
Note:
You must not hinder or assist the drive as it automatically draws in the CD.
Insert the CD with its printed side up into the CD tray (7) until you feel a slight resistance.
The CD is automatically pulled in and its data are checked (the display shows "READING" during this time). Afterwards, the playback starts in CD or MP3 mode. If a CD is inserted, the display shows the CD symbol.
Note:
If the inserted CD cannot be played back, "CD ERROR" is briefly displayed and the CD is automatically ejected after approx. 2 seconds.
Ejecting a CD
Notes:
If a CD is ejected and not removed, the drive will automatically draw it back in again after approx. 10 seconds.
You can also eject CDs while the car sound system is switched off or whilst another audio source is activated.
Press the button ⑩ to eject an inserted CD.
Connecting/removing a USB data carrier
To be able to connect a USB data carrier, the supplied USB cable must be connected to the car sound system (see Installation Instructions).
Switch of the car sound system so that the data carrier will be correctly registered and unregistered.
Connect the USB data carrier to the USB cable or pull it off.
If a USB data carrier is connected, the display shows the USB symbol. If the USB data carrier is initially selected as audio source after connecting it or after switching on the car sound system, the data are read in first (the display shows "READING" during this time).
Notes:
If the connected USB data carrier cannot be seen, "USB ERROR" is briefly displayed.
The time required for reading in the data depends on the design and size of the USB data carrier.
Selecting tracks
Briefly press the button < 5 / > 14 to change to the previous/next track.
Note:
If the current track plays longer than 3 seconds, pressing < 5 once restarts the track.
Select a folder/CD (only in MP3/WMA/C'n'C or CD changer mode)
Press the button 16 / A2 to change to the previous/next folder or CD.
Note:
This also allows you to change between playlists of a device connected via C'n'C.
Fast searching
Press and hold down the button < 5 / > 14 until the desired position has been reached.
Interrupting playback
Press the button 3 to interrupt the playback ("PAUSE") or to continue.
[ \text{Playlist mode (only in MP3/WMA mode)} ]
The car sound system can play playlists that were created with an MP3 manager, such as WinAmp or Microsoft Media Player. The playlists must be stored in the root folder of the CD or USB data carrier. The following playlist formats can be recognised: M3U, PLS.
Selecting tracks in Playlist mode
Press the 2 button ① for approx. 2 seconds to change to the Playlist mode:
"LIST MODE" briefly appears on the display. The first track of the first playlist is played.
Note:
If the data carrier does not contain any playlists, "LIST MODE" is briefly displayed.
Briefly press the button < 5 / > 14 to change to the previous/next track of the current playlist.
Press the button 16 / A2 to change to the previous/next playlist.
The display briefly shows the name of the selected playlist, and the first track of the playlist is being played.
Exiting the Playlist mode
Press the 2 button (12) for approx. 2 seconds:
"LIST OFF" briefly appears on the display. The current track continues playing.
Scanning all tracks
The scan function scans all available tracks.
Press the MENU·OK button 15 for approx. 2 seconds to start the scan, or long to continue playing the currently scanned track.
During the scan, the display alternately displays "SCAN" and the current track number or file name.
Notes:
In the CD changer mode, the scan time per track is approx. 10 seconds. For all other operating modes, you can adjust the scan time for each track (see the ch. "User settings", section "Performing settings in the user menu", "SCAN TIME" menu item).
In the Playlist mode (MP3 mode), only the tracks of the current playlist are scanned.
Playing tracks in random order
Press the 5 MIX button (12) to change between the playback modes:
Operation
Display
Meaning
CD
MIX ALL
Mixing tracks
MP3/WMA/C'n'C'1
MIX DIR2
Mixing tracks of the current folder
MIX ALL2
Mixing tracks of the data carrier
CDC
MIX CD
Mixing tracks of the current CD
MIX ALL
Mixing tracks of all CDs
Gen.
MIX OFF
Regular playback
1 In C'n'C mode, additional playback modes may be available depending on the connected device
2 Not in MP3 Playlist mode
If the MIX function is active, the MIX symbol appears on the display.
Repeatedly playing individual tracks, CDs or directories
Press the 4 RPT button ① to change between the playback modes:
Operation
Display
Meaning
CD
RPT TRACK
Repeating tracks
MP3/WMA/C'n'C'1
RPT TRACK
Repeating tracks
RPT DIR2
Repeating folders
CDC
RPT TRACK
Repeating tracks
RPT DISC
Repeating a CD
Gen.
RPT OFF
Regular playback
^1 In C'n'C mode, additional playback modes may be available depending on the connected device
2 Not in MP3 Playlist mode
If the RPT function is active, the RPT symbol appears on the display.
Configuring the display
Press the DIS/ESC button once or several times to change between these displays:
Opera-
tion
Display
Meaning
CD
T 01 02:15
Track number
and playing time
T 01 18:33
Track number
and time
MP3/WMA/C'n'C
01 ABC
File name
ABCDEF
Artist¹
ABCDEF
Album name¹
PLAY 02:15
Playing time
CLK 18:33
Time
Operation
Display
Meaning
CDC
T 01 02:15
Track number and playing time
T 01 18:33
Track number and time
CD 02T 03
CD number and track number
^1 Artist and album name must be stored as ID3 tag and are displayed only for approx. 10 seconds and perhaps as scrolling text; otherwise, the file name is displayed.
Note
You can switch the display of CD text of an audio CD on and off (see the ch. "User settings", section "Performing settings in the user menu", "CD TEXT" menu item). If CD text is switched on, the corresponding CD text is displayed once as scrolling text at the start of a track.
External audio sources
Front AUX-IN socket
Danger! Increased risk of injury from connector.
In case of an accident, the protruding connector in the front AUX-IN socket may cause injuries. The use of straight plugs or adapters leads to an increased risk of injury.
For this reason, we recommend using angled jack plugs, e.g. the Blaupunkt accessories cable (7 607 001 535).
As soon as an external audio source, such as a portable CD/MiniDisc or MP3 player is connected to the Front-AUX-IN socket, it can be selected with the SRC button (6). "FRONT AUX" then appears on the display.
Rear AUX input
Different external audio sources can be connected to the car sound system via the rear AUX input (Rear-AUX-IN):
C'n'C-ready devices from the Blaupunkt accessories programme (e.g. a C'n'C-ready Bluetooth®/USB or iPod®/USB interface; C'n'C = Command and Control).
CD changer
Other external audio sources, such as portable CD players, MiniDisc players, MP3 players or a non-C'n'C-capable Blaupunkt interface.
Note:
An adapter cable is needed to connect an external audio source via the rear AUX input. You can obtain this cable (Blaupunkt no.: 7607897093) from your Blaupunkt dealer.
Before you connect a certain device, first check the mode of the rear AUX input and, if necessary, change the setting (see ch. "User settings", section "Performing settings in the user menu", "CDC" menu item). Ensure that you change the setting only as long as no device is connected to the rear AUX input. If necessary, remove connected devices first while the car sound system is switched off.
Starting C'n'C mode
Press the SRC button ⑥ repeatedly until the name of the device connected via C'n'C appears on the display.
The playback starts.
Notes:
The C'n'C mode can be selected only if a suitable device is connected via a C'n'C-ready interface.
To operate the radio in C'n'C mode, please read the chapter "CD/MP3/WMA/C'n'C/CD changer mode".
When using suitable adapter cables, you can connect up to 3 C'n'C-ready Blaupunkt interfaces to the car sound system. For the car sound system to distinguish the differ
Sound settings
ent interfaces, you can assign an individual device number to every interface (see ch. "User settings", section "Performing settings in the user menu", "C'N'C" menu item).
Starting AUX mode
Press the SRC button ⑥ repeatedly until "CDC/AUX" appears on the display.
The playback starts.
Note:
You can enter a separate name for the rear AUX input that is shown on the display in AUX mode if you selected the connected audio source (see ch. "User settings", section "Performing settings in the user menu", "AUX EDIT" menu item).
Sound settings
The following sound settings can be changed in the Audio menu:
Adjusting bass and treble
Setting the left/right volume distribution (Balance) or front/rear (Fader)
Setting the boost of bass at low volume (X-Bass).
In the Enhanced Audio menu, you can also perform the following settings:
The settings for bass, middle and treble are each stored for the current audio source.
Calling and exiting the audio menu
Briefly press the AUD button (17) to open the audio menu.
Press the button 16 / 2 repeatedly until the desired menu item is selected.
Perform the setting (see the next section).
Briefly press the MENU·OK button ⑤ to select a different menu item.
-or-
Briefly press the DIS/ESC button (13) to exit the menu.
Note:
The menu is automatically exited approx. 15 seconds after the last button activation and you are returned to the display of the current audio source.
Performing settings in the audio menu
BASS
Bass level. Settings: -7 to +7.
Press the >button ⑭ to open the submenu.
Press the button ^16 / ^2 to perform the setting.
TREBLE
Treble. Settings: -7 to +7.
Press the >button 14 to open the submenu.
Press the button 16 / A2 to perform the setting.
BALANCE
Left/right volume distribution. Settings: L9 (left) to R9 (right).
Press the > button ⑭ to open the submenu.
Press the button ^16 / ^2 to perform the setting.
FADER
Front/rear volume distribution. Settings: R9 (rear) to F9 (front).
Press the button 14 to open the sub-. menu.
Press the button 16 / 2 to perform the setting.
X-BASS
Increase of bass at low volume. Settings: 0 (off) to 3 (highest increase).
Press the > button ⑭ to open the sub-. menu.
Press the button 16 / 2 to perform the setting.
Calling and exiting the enhanced audio menu
In the audio menu, select the "ENHANCED" menu item.
Press the > button ⑭ to open the ENHANCED menu.
Press the button 16 / A2 repeatedly until the desired menu item is selected.
Perform the setting (see the next section).
- Briefly press the MENU·OK button ⑤ to select a different menu item.
-or-
Briefly press the DIS/ESC button (13) to exit the menu.
Performing settings in the enhanced audio menu
E-BASS
Adjusting bass frequency and quality factor. Settings:
Bass frequency: 60/80/100/200 Hz
Quality factor: 1.0/1.25/1.5/2.0
Press the button 14 to open the E-BASS submenu.
Press the button 16 / to change between the submenus "FREQ" (frequency) and "QFAC" (quality factor).
Press the button < 5 / > 14 to change between the available settings of the submenu.
E-TREBLE
Setting the treble frequency. Settings: 10/12.5/15/17.5 kHz.
Press the button 14 to open the E-TREBLE submenu.
Press the button < 5 / > to change between the available settings of the submenu.
E-MIDDLE
Setting the middle level and frequency as well as quality factor. Settings:
Middle level: -7 to +7
Centre frequency: 0.5/1.0/1.5/2.5 kHz
Quality factor: 0.5/0.75/1.0/1.25
Press the button 14 to open the E-MIDDLE submenu.
Press the button 16 / 2 to change between the submenus "GAIN" (level), "FREQ" (frequency) and QFAC (quality factor).
Press the button < 5 / > 14 to change between the available settings of the submenu.
E-XBASS
Setting the X-bass level and frequency. Settings:
X-bass level: 0 (off) to 3
X-bass frequency: 30/60/100 Hz
Press the button 14 to open the E-XBASS submenu.
Press the button 16 / A2 to change between the submenus "GAIN" (level) and "FREQ" (frequency).
Press the button < 5 / >14 to change between the available settings of the submenu.
User settings
PRESETS
Selecting equalizer presettings. Settings: POP, ROCK, CLASSIC, P-EQ OFF (no presetting).
Press the button 14 to open the PRESETS submenu.
Press the button Y ⑥ / A ② to change between the settings.
User settings
Calling and exiting the user menu
Briefly press the MENU·OK button ⑤ to open the menu.
Press the button 16 / A2 repeatedly until the desired menu item is selected.
Perform the setting (see the next section).
Briefly press the MENU·OK button ⑤ to select a different menu item. - or -
Briefly press the DIS/ESC button (13) to exit the menu.
Note:
The menu is automatically exited approx. 15 seconds after the last button activation and you are returned to the display of the current audio source.
Performing settings in the user menu
CDC
Setting the rear AUX input mode Settings: ON (to connect a CD changer or another external audio source), OFF (to connect a C'n'C-ready Blaupunkt interface).
Press the >button 14 to open the sub-. menu.
Press the button 14 to change between the settings.
- Briefly press the MENU·OK button ⑤ to confirm the selected setting.
The car sound system automatically switches off and on again with the selected setting.
C'N'C
Assigning an individual device number to connected C'n'C-ready interfaces (C'n'C = Command and Control). Length: 4 digits, characters: 0-9, A-F (hexadecimal).
Press the > button ⑭ to open the sub-. menu.
Press the button 16 / A2 to select the interface ("DEV 1 - 3").
Press the button 14 to change the device number.
Press the button < 5 / > 14 to change between the positions.
The character at the selected position flashes if selected.
Press the button 16 / 2 to select a character at the selected location.
- Briefly press the MENU·OK button ⑤ to confirm the device number entered.
CDTEXT
Switching the display of CD text on or off. Settings: ON, OFF.
Press the >button 14 to open the sub-. menu.
Press the button 14 to change between the settings.
- Briefly press the MENU·OK button (15) to confirm the selected setting.
TA VOLUME
(only for tuner region "EUROPE")
Setting the minimum volume for traffic announcements. Settings: 1 - 50.
Press the button 14 to open the sub-. menu.
Press the button 16 or turn the volume control 4 to perform the setting.
SENS
Only possible in FM radio mode: Setting the sensitivity of station seek tuning. Settings: LO1 (lowest) - HI6 (highest).
Press the >button 14 to open the submenu.
Press the button ^(16) / ^(2) to perform the setting.
SCAN TIME
Setting the scan time in 5-second increments. Settings: 5 - 30.
Press the >button 14 to open the sub-. menu.
Press the button 16 / 2 to perform the setting.
CLOCK SET
Setting the time.
Press the >button 14 to open the submenu.
Press the button < 5 / > 14 to change between minutes and hours.
The minute or hour display flashes if it is selected.
Press the button 16 / A2 to adjust the minutes or hours.
- Briefly press the MENU·OK button (15) to confirm the time entered.
Note:
In 12-hour mode (12H MODE), an "A" is displayed after the time for the time before noon or a "P" for the time after noon.
12H/24H MODE
Selecting the 12 or 24-hour time. Settings: 12H, 24H.
Press the >button 14 to open the sub-. menu.
Press the button 14 to change between the settings.
CLOCK
Switching the display of time on or off with radio and vehicle ignition switched off. Settings: ON, OFF.
Press the >button ⑭ to open the sub-menu.
Press the button 14 to change between the settings.
- Briefly press the MENU·OK button ⑤ to confirm the selected setting.
BEEP
Switching the confirmation beep on or off. Settings: ON, OFF.
Press the >button 14 to open the submenu.
Press the button 14 to change between the settings.
- Briefly press the MENU·OK button (15) to confirm the selected setting.
TEL VOL
Minimum volume for navigation announcements and telephone calls. Settings: 1 - 50.
Press the >button ⑭ to open the submenu.
Press the button 16 / A2 or turn the volume control ④ to perform the setting.
MUTE LVL
Setting the volume for low volume. Settings: 0 - 50.
Press the >button ⑭ to open the sub-menu.
Press the button 16 or turn the volume control 4 to perform the setting.
ON VOLUME
Setting the power-on volume Settings: 0 - 50 on LAST VOL (volume set last before switching off the car sound system). With the "LAST VOL" setting, the power-on volume is limited to max. 25.
Press the button 14 to select the setting "LAST VOL".
-or-
Press the <button 5 to set the power-on volume between 0 and 50.
User settings
Press the button 16 or turn the volume control 4 to perform the setting.
REG
(only for tuner region "EUROPE")
Only possible in FM radio mode: Switching REG function on or off. Settings: ON, OFF.
Press the >button ⑭ to open the sub-. menu.
Press the button 14 to change between the settings.
PTYLANG
(only for tuner region "EUROPE")
Only possible in FM radio mode: Selecting the language for the display of programme types. Settings: ENGLISH, FRANCAIS, DEUTSCH.
Press the >button 14 to open the sub-. menu.
Press the button V^(16) / A^(2) to change between the settings.
PTY
(only for tuner regions "EUROPE", "USA", "S AMERICA")
Only possible in FM radio mode: Switching PTY function on or off. Settings: ON, OFF.
Press the >button 14 to open the sub-. menu.
Press the button 14 to change between the settings.
DISP COL
Mixing the colour for the display illumination from the basic colours Red, Green and Blue (RGB). Settings: For R, G and B each 0 to 16.
Press the
Press the button < 5 / > 14 to change between the colours.
The value of the selected colour flashes.
Press the button 16 / A2 to adjust the value of the selected colour.
- Briefly press the MENU·OK button (15) to confirm the selected setting.
SCAN
Switching the constant colour change of the display illumination on or off. Settings: ON, OFF.
Press the > button ⑭ to open the submenu.
Press the button 14 to change between the settings.
- Briefly press the MENU·OK button ⑤ to confirm the selected setting.
If the constant colour change is switched on, the colour of the display illumination changes constantly across the colour spectrum.
COL SCAN
Selecting the colour of the display illumination during a colour seek.
Press the > button ⑭ to start the colour seek.
The display alternately shows "SCANNING" and "OK (MENU)" and the colour of the display illumination changes constantly.
- Briefly press the MENU·OK button (15) to select the currently set colour.
DIM DAY/DIM NIGHT
Setting the display brightness for the day (DIM DAY) or the night (DIM NIGHT). Settings: 1 – 16.
Press the > button ⑭ to open the submenu.
Press the button 16 / A2 to perform the setting.
If your car sound system is installed as described in the installation instructions and your vehicle features the corresponding connection, the dis
play brightness for day and night is switched by switching the vehicle lighting on or off.
AUX EDIT
Entering names for the rear AUX input in AUX mode. Length: 9 digits; characters: A-Z, 0-9.
Press the >button 14 to open the submenu.
Press the button < 5 / > 14 to change between the positions.
The character at the selected position flashes if selected.
Press the button ^(16) / ^(2) to select a character at the selected location.
- Briefly press the MENU·OK button (15) to confirm the name entered.
TRAF
(only for tuner region "EUROPE")
Only possible in FM radio mode: Switching priority for traffic announcements on or off. Settings: ON, OFF.
Press the > button ⑭ to open the submenu.
Press the button 14 to change between the settings.
RDS
(only for tuner region "EUROPE")
Only possible in FM radio mode: Switching RDS function on or off. Settings: ON, OFF.
Press the >button 14 to open the submenu.
Press the button 14 to change between the settings.
Factory settings
Factory settings in the user menu:
ON VOLUME
LAST VOL
MUTE LVL
0
SENS
HI6
SCAN TIME
10
CLOCK
OFF
BEEP
ON
DIM DAY
15
DIM NIGHT
12
CDTEXT
OFF
12H/24H MODE
24H
CLOCKSET
00:00
TEL VOL
17
TA VOL
20
RDS*
ON
REG*
ON
TRAF*
OFF
Only in tuner region "EUROPE"
You can restore the original factory settings of the car sound system:
Briefly press the MENU·OK button ⑤ to open the menu.
Press the button 16 / 2 repeatedly until the "NORMSET" menu item is selected.
Press and hold down the MENU·OK button ⑤ for longer than 4 seconds.
"NORM ON" briefly appears on the display. The car sound system automatically switches off and on again with the factory settings.
Note:
If you press the MENU·OK button (15) for less than 4 seconds, "NORM OFF" appears on the display and the current settings are retained.
Useful information | Technical data
Useful information
Warranty
We provide a manufacturer's warranty for products bought within the European Union. For devices purchased outside the European Union, the warranty terms issued by our respective responsible domestic agency are valid.
The warranty terms can be called up under www.blaupunkt.com or requested directly from:
Blaupunkt GmbH
Hotline
Robert-Bosch-Str. 200
D-31139 Hildesheim
Service
In some countries, Blaupunkt offers a repair and pick-up service.
Information about the availability of this service in your country can be found at www.blaupunkt.com.
If you want to take advantage of this service, you may request a pick-up service for your car sound system via the Internet.
Technical data
Voltage supply
Operating voltage: 10.5 - 14.4 V
Current consumption
In operation: 10 A
10 sec. after switch-off: < 3.5 mA
Amplifier
Output power: 4 x 26 watts sine at
14.4 V at 4 ohms.
4 x 50 watts max.
power
Tuner
Wavebands in Europe/Thailand:
FM: 87.5 - 108 MHz
AM (MW): 531 - 1,602 kHz
LW (Europe only): 153 - 279 kHz
Wavebands in the US:
FM: 87.7 - 107.9 MHz
AM (MW): 530 - 1,710 kHz
Wavebands in South America:
FM: 87.5 - 107.9 MHz
AM (MW): 530 - 1,710 kHz
FM frequency response:
30-15,000Hz
CD
Frequency response:
20 - 20,000 Hz
Pre-amp out
4 channels: 2 V
Input sensitivity
Rear-AUX-IN: 1.2V / 10k
Front-AUX-IN: 500 mV / 6 k
Tel/Navi input: 10V / 1k
Dimensions and weight
W x H x D (mm): 182 x 53 x 155
Weight: approx. 1.30kg
Subject to changes
Sommaire
La lecture commence.
Remarque :
La lecture commence.
Remarque :
Regione
Livelli di memoria
EUROPE
FM1, FM2, FMT, OM (MW), OL (LW)
USA
FM1, FM2, FMT, AM, AMT
THAI
FM1, FM2, FMT, AM
S AMERICA
FM1, FM2, FMT, AM, AMT
AM (MW): 531 - 1602 kHz
OL (LW) (solo Europa): 153 - 279 kHz
Gamme d'onda USA:
FM: 87,7-107,9MHz
AM (MW): 530 - 1710 kHz
AM (MW): 530 - 1710 kHz
AM (MW): 531 - 1602 kHz
LW (alleen Europa): 153 - 279 kHz
Golgebieden USA:
FM: 87,7-107,9MHz
AM (MW): 530 - 1710 kHz
AM (MW): 530 - 1710 kHz
Frequentiebereik FM:
30-15000Hz
CD
Frequentiebereik:
20-20000Hz
Pre-amp out
Vierkanalen: 2V
Ingangsgevoeligheid
Rear-AUX-IN: 1,2V / 10k
Front-AUX-IN: 500 mV / 6 k
Tel./Navi-ingang: 10 ~V / 1 k
Radiolage: Stall in station
Andra driftlagen: Valja spar
(6) SRC-knapp
Välja ljudkälla
⑦ CD-haillare
⑧ Teckenfonster
⑨ USB-anslutning
(10) knapp (Eject)
Mata ut CD-skivan
(11) AUX-IN-uttag på fronten
(12) Knappsats 1-5
13 DIS/ESC-knapp
Bb6op PaKn/CD-AncKa (ToIbKO dA
peXHMOB MP3/WMA/C'n'C nA
CD-ueHdKepe) 282
BbICTpbI IOINCK. 282
OctaHOBka BocPOn3BeDeHn 282
PexHM TlEe-ANCTa (ToIbKO B pexHMe BocIpOn3BeDeHnM MP3/WMA) 282
CkaHnpoBaHne BCex TpeKOB C
IpcOaUshBaHnem 282
BocpnOn3BeDeHne TpeKOB B cLyuHaHOI TocLeOBATeAeHoCTn 283
Повторгов ВоспюнзВеДене OTдeльны
Т repeков, CD-дисков Или ПаПок................................283
Настояк дислег................................283
BHeuHne aydnoHcToUHKn 284
Pa3bem AUX-IN Ha AnuceBoi CTopoHe ....284
BxoAUXHaTbIbHOI CTOpOHe 284
HacrpoKn 3Byka. 285
BbI3OB IV BbIXOa I3 MeHIO ayAno. 285
BbIIOJIHHeHHe HAcTpoE K MeHIO aydno.....285
BbI3OB IN BbIXOa I3 paCUnpeHHOro MeHIO Audio 286
BbIIOJIeHHe NaCTpoE K BpacShnpeHHOM MeHIO Audio 286
TIOb3OBeTaBcKHe HacTpOiKN. 287
Bb3OB N BbIXOaN3 MeHIO TOnb3OBaTeA....287
BblIOAnHeHne HAcTpoEK B MeHIO TOnb3OBaTeA....287
3aBoDcKne HacTpoiKn 290
Tolé3nay HnΦopMaζη. 291
CepBnC 291
TexHHueckne xapaKtepcnCTHKN 291
Hnctpykunno ycTaHOBKe 317
Yka3aHnI IO TexHnKe 6e3oTnacHOCTN
ABTOMaHHTOla IpOn3BeDeHa B COOTBETCTBnC COBpeMeHHbIM yPoBHEm pa3BVITnHayKnI TexHNKn I Iprn3HaHHbIM IpaBnAmn TexHNKn 6e30IacHOCTn. Tem He MeHee, IIpn HecO6AIODeHNII pRbEeHHbIX B DaHHoINHCTpyKUnyKa3aHn BO3MOXHO BO3HNKHOBEHne OTAcHOCTn.
CLeyETn36eRaTbIpyrMoTOIpyKocHOBeHnKoKHeUeAOBeka K KOHTaKTam TaNHeAynYpBaEHHN.
YctaHOBKa TaaHeAn yItpaBLeHnA
BCTaBbTe IaHeIb yIpaBaIeHnB B KpeTIIeHne C IpaBOrO KpaYcTpoIcTba.
Octopoxho BCTaBbTe TaHeIb yIpaBHeHnBaBoE KpeTHe, Toka OHa He 3aФNKcPyeTc.
Chrtne panen ytpaBHeHn
Haxmte KhoTky 1, yTo6bI pa36IoKpoBaTb THeA b yTpaBaeHn.
AeBa CTOpOHa TnHeAn yTpaBLeHn OTCoeHN HReTcN OT YCTpOiCTBa, aΦHKCaTOP PpeDOxpaHReT ee OT BbITaDEHn.
Bo3bMnte TaHeIb yIpaBLeHn 3a IeByIO CTOpOHy, IN BbITraHbAte ee IIpRAmo, IIpeoDoJIeBaCOTPOTNBLeHne OHKCaTopa, n3 KPeTIeHn.
Птумецанne:
A B T O M a r h n t o l a a B T O M a t N u c e C K N B b i k A l o u y a e T C R, K a K T O L b K O T a H e A b y p a B A L e H N I 6 b d e T C H R T A.
Вкlioочи/Вьiologicals
BkIoueHne/BbIKIoueHne KhoTkoB Bk/BoiKa
AЯВКIoUeHЯнaxMnteKHOITkyBk/ByIKA ③.
ABTomaHHTOa BkIAOuaETcA.
AЯ BыКluоуня NaЖМTe n yApKnBaIte KhoTky BkN/BbIKn ③ 6oJIe 2 cekyHd.
A B T O M A R H N T O L A B K A I O U A E T C R. H a N C T P L e e T O R B A R E T C R H O M E P B E P C H N T E P B O R O K O M T O H E H T A. T E P B B I N C M B O L O 0603H a u e T K O M T O H E H T b: P = T P o u c c o p, E = E P R O M (C T I T 3 Y), A = A c c o r d o.
B pernohe TIOhepa "EUROPE" FM-paiooctaHnma MoKET C IOMObIc HHaA RDS 6o3HaaTb co06ueHnA DOPOXHOH INΦOPMaun. EcAn BkIoUeH nPnOpHTet CBOdOK DOPOXHOH INΦOPMaun, To TpOncxODNT aBTOMaTHueCKoe TEpeKluOeHne Ha CBOdky DOPOXHOH INΦOPMaun, TaKxe N B TOM CaUyae, eCAn aBTOMaHnToLa He haoDnTCB TeKyuNIMOMeHT B pexHmpe DaHNo Hn HacTpOeH TepeDaTuNK dNaTa3OHOB BOAN CB nn AB.
BbI6Op 6aHka PAMrTn CTaHcN
B pa3hblx pernoHax TIOhepa B BaIeM pactopjxeHHN cLeaYIOUne 6aHKn PAMrTn cTaHcN:
"CDC / AUX": Под_COeДинHeHьй CD-уeнДжер (ecAn He ПОДКIюЧЕpy罗ВHEшни ayДиONCTOчИК).
Птимechаня:
COOTBETCTBYUH aYADHOCTOCHNK MOXET 6bITb BbIbpaH TObKO B TOM CAYue, eCAn BCTaBAeH COOTBETCTBYUH CD-DNCK HAN ITOAKIQUHeO COOTBETCTBYUH ee UcTPONC-TBO (HaIIpIMep, USB-HOCHTeB DAHHbIX HAN CD-YeINHdKeP).
Ecan aBTOMaHHTOla DoJXHa TpeBaPHTeBHO TpeA BOCTPPOIN3BeDEHnEM TPOIN3BecTN CHTbIBAHNE DaHHbIX C ITOAOEHNHeHNOY UCTPOICTBA HAN HOCTeA DAHHbIX, TO HA 3TO BPEM HA DnCTTae TIOBAAETCRA "READING". Ppi60aIbIOM ObBeMe DaHHbIX 3TO MOKeT3aHIMaTB BTAOTb DO 1 MNHyTb.I. Ecan yCTPOINCTBO HAN HOCTeA DaHHbIX HENCTIPaBHb I HAN TpeAaHHbIe FaaJIbI He MoRyT 6bITb BOCTPPOIN3BeDEHbI, TO Ha DnCTTae TIOBAAETCRA COOTBETCTBYUoee COo6-ueHne (HaIIpIMep, "ERROR" (oUH6ka) HAN "USB ERROR" (oUH6ka USB)).
Пока пдбоевннь CD-чeнджер оврабatableваet Вставлени CDs-Dискп (надпrimер, посл лоребог пдачи пптаня ИИ посл смени магаши) на дсплес отобрахаетс "MAG SCAN".Еси в CD-чeнджер net CD-дисков ИИ магашиca с дискамп,TO отобрахаетс "NO DISC".
BCTaBka CD-ДИСКА
Птумецанne:
MeaTb HAN TOMoTaTb aBToMaTHueCKo 3a- rpy3ke CD-dncka He pa3pewaetc.
BCTaBAJTe CD-ANCK CTOPHOc cHaADINCAmNBbEpx B CLOT dAe CD-ANCKOB 7, POKa He POnyBCTByeTe COPTNVAeHne.
CD-нск abTomatnueckn 3aTЯngBaetc n Ocy
IeCTBIAeTc n PpOBepka Baunx DaHbIX (B 3TO
BpeMHa DCJIe e OTo6paJaeTc "READING").
3aTeM HaUNHaeTc BOCIpOuN3BeDeHne B pexn
Me CD nMP3. HaDCJIe e Pn 3aRpyKeHHom
CD-нсke OTo6paJaeTc cIMBOv CD.
Bыдьнутби И He n3bЯтби CD-ДИСК ппмерно чepe3 10 cekyHd aBtOMaTHuecknВТЯнBaETcI O6paTHO.
Bы можete ИЗВALEkaTb CD-DИСТТAKKE И В TOM cayue, ecAn aBTOMaHHTOla BbyIaIQUeHa IaKTHBEN dpyrOи ICTOuHnK aydNOCINHaIa.
HaKMnte KHOIIky 10, uTO6bl BblBnHyTb BCTaBHeHHbI CD-ACK.
TioaCoeAnHeHne/ydaIeHne USB-HocnteLaDaHHbIX
AIAIIOAKIIOUeHnRAUSB-HoCHTeAaHbIX Heo6XOAMIO IPOIN3BecTN IPIPNCoeAHHeHne IIOCTABJRE-MOTO B KOMIIAEKTe Ka6eA USB K aBTOMaHHTOAE (CMOTPNTe INHCTpyKcNIO IO MOHTaKy).
Aor KoprpeKTHOro IIOaCOeHNHeHnI OTCoeHNHeHn HocHTeA daHHbIX BbIKIoUHTe aBToMaHHTOy.
ПОДКИОЧТЕ HOCHTeЯ ДаHHbIX USB K Ka6eIIO USB ИИ OTCOeHINTe erO.
При Нашип ПОДКИОЕнHorO USB-HOCHTeЯ
ДaHHbIX Ha ДИСПLEE OTO6paxaETcR CHMBOI
USB.ЕсИ ПОСLE ПОДСоEДИНЕнЯ /ВКИОУ-
HЯ aBTOMO6nAlbHOB aBTOMaHITOnAbl USB
HOCHTeь DAHHbIX BITEPBbIe BbIbIPaETcR B
KaueCTBe ayDAHOHCTOUHnKa,TO CHaHa La Пю-
INCXODNT cUHbIbAHne DAHHbIX (B3TO BpeMЯ ha
ДИСПLEE OTO6paxaETcR "READING").
PexHM PAneH-ANcTa (ToIbKO B pexHMe BocTpOn3BeDeHnA MP3/WMA)
ABTOMO6nIbHa aBTOMaHHToA MOKeT BOCIpOn3BOADITb IeN-ANCTbl, KOTOpBIE 6blN COCTaBHeHb IMeHExepax MP3-ΦaIIoB, KaK HApPImep, WinAmp nn Microsoft Media Player. Cnckn BOCIpOn3BeDEHnI DOJXHbI 6blTB CoXpaHeHb I B KopHeBoI AnpeKTOpHN CD-AnsKa nn USB-HocTeAaHHbIX. UHTaOTc cAeDyUoSIne foopMaTBIeN-ANCTOB: M3U, PLS.
Bb6op TpeKOB B pexHMe PLei-AMcTa
HaxmTe KHOIIky 2 12 uyePknBaIte ee B TeueHne Iprn. 2 cekyHa, UTo6bl IpeeTn B peXHM PAn-ANCTa:
Ha dncTnlee KpaTkoBpeMeHNO OTo6paxaetcra "LIST MODE".HaunhaeTcBAocPOn3BeDeHne TepBOrO TpeKa TepBOrO TLei-AnCTa.
Птумецане:
EcaH Ha HocHTeIe DaHHbIX Het PIAeI-ANCTOB, To KpaTKOBpeMeHHO OTo6paxaetcra "LIST MODE".
BbIXoA n3 MeHIO IPOHcXoADT aBTOMaTHueCKn Iprm. Upee3 15 cekyHa IocAe IocAeHero IpiKoCHOBENK KlaBnaType, N Bby Bo3Ba- uzaTeCb K dNCTIeIO TeKyUeO aydnoHCTOuHN Ka.
BbIIOΛHeHne HacTpOeK B MeHIO TIOAb30BaTeA
CDC
Hactpoika pexima dA BxOda AUX Ha TbIbHOJ CTOpOHe. HactpoKn: ON (dA IPOkLIOUeHnC DChEHNKepa NAn APyRTO BHeIHero ayDnONCTouHnKa), OFF (dA IPOkLIOUeHnC'n'C-COBMeCTnMOro INTEPpeCa Blaupunkt).
ouvtuo natma: 5e leitoupyia paadiopowou eilovn eniine6ou mnuhnc
napaTeaIevo nAtnma: Se Ieioupyia paio- pfwov evapEg Ieioupyiac Travelstore
Tepiexoxeva
Osbnyiec aoppaaleiac 297
a 297
Odeltaaopaaia 297
Tevikc oobnyie c aopaaieiaac 297
297
Osbnyiec kaθaipioou 298
YnoideiEic yia TnV anokopiδñ. 298
Tepiexómevo ouokueuaiaç 298
AM (MW): 531 - 1602 kHz
LW (μóvo Eupωπη): 153 - 279 kHz
Tepioxec ouxovtow HHTA:
FM: 87,7-107,9 MHz
AM (MW): 530 - 1710 kHz
Iepioxec ouxovotntwv Notia Aepik:
FM: 87,5-107,9MHz
AM (MW): 530 - 1710 kHz
Eupoc zovnc ouxvotntow FM:
30-15000Hz
CD
Eupoc zwnc ouxvoTtwv:
20-20000Hz
Pre-amp OUT
4 kavàλια: 2 V
Euatoetaia eioδou
Onioθua AUX-IN: 1,2 V/10 kΩ
Eμροθια AUX-IN: 500 mV / 6 kΩ
Eioo0c Tnλ./Πλoynησε: 10 V / 1 kΩ
Aiaotaoec kalapoc
× Y × B (mm): 182 × 53 × 155
Bápoç: περ. 1,30 kg
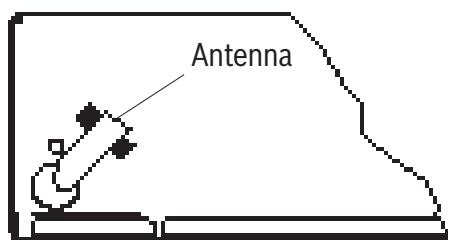
GB - Installation instructions
Safety instructions
When carrying out installation work and making connections please observe the following safety instructions:
- Do not connect the vehicle's plug connectors to the radio!
Disconnect the negative terminal of the battery! When doing so, please observe the vehicle manufacturer's safety instructions.
Make sure you do not damage vehicle components when drilling any holes.
The cross sections of the positive and negative cables must not be less than 1.5 mm^2 .
You can obtain the adapter cable required for your vehicle type from any BLAUPUNKT dealer.
Depending on the model, your vehicle may differ from the description provided here. We accept no responsibility for any damages due to incorrect installation or connection or for any consequential damages.
If the information provided here is not suitable for your specific installation requirements, please contact your Blaupunkt dealer, your vehicle manufacturer or our telephone hotline.
When installing an amplifier or changer, you must first connect the device earth connections before connecting the plugs for the line-in or out-jacks.
Earth connection of external devices may not be connected to earth of car sound system (housing).
This product is protected by certain intellectual property rights of Microsoft. Use or distribution of such technology outside of this product is prohibited without a license from Microsoft.
Country:
Phone:
Fax:
WWW:
Germany
(D)
0180-5000225
05121-49 4002
http://www.blaupunkt.com
Austria
(A)
01-610 390
01-610 39 391
Denmark
(DK)
44 898 360
44-898 644
Finland
(FIN)
09-435 991
09-435 99236
Great Britain
(GB)
01-89583 8880
01-89583 8394
Greece
(GR)
210 94 27 337
210 94 12 711
Ireland
(IRL)
01-46 66 700
01-46 66 706
Italy
(I)
02-369 62331
02-369 62464
Luxembourg
(L)
40 4078
40 2085
Norway
(N)
+47 64 87 89 60
+47 64 87 89 02
Portugal
(P)
2185 00144
2185 00165
Spain
(E)
902 52 77 70
91 410 4078
Sweden
(S)
08-7501850
08-7501810
Switzerland
(CH)
01-8471644
01-8471650
Czech. Rep.
(CZ)
02-6130 0446
02-6130 0514
Hungary
(H)
76 889 704
-
Poland
(PL)
0800-118922
022-8771260
Turkey
(TR)
0212-335 07 23
0212-346 00 40
USA
(USA)
800-950-2528
708-6817188
Brasil (Mercosur)
(BR)
0800 7045446
+55-19 3745 2773
Malaysia (Asia Pacific)
(MAL)
+604-6382 474
+604-6413 640
Passport
Name:
Type: 7649...
Serial no.: BP
BLAUPUNKT
Other manuals BLAUPUNKT
Discover other manuals and user guides for the brand BLAUPUNKT
💬 Hi! I'm your manual assistant.I know your BLAUPUNKT SAN FRANCISCO 300.
How can I help you? (use, settings, error codes, maintenance, explaining a step from the manual, etc.)💡 Examples :
• How do I use it ?
• Error code E3 ?
• How do I clean it ?