BeoLab 4 - Speaker BANG & OLUFSEN - Free user manual and instructions
Find the device manual for free BeoLab 4 BANG & OLUFSEN in PDF.

User questions about BeoLab 4 BANG & OLUFSEN
0 question about this device. Answer the ones you know or ask your own.
Ask a new question about this device
Download the instructions for your Speaker in PDF format for free! Find your manual BeoLab 4 - BANG & OLUFSEN and take your electronic device back in hand. On this page are published all the documents necessary for the use of your device. BeoLab 4 by BANG & OLUFSEN.
USER MANUAL BeoLab 4 BANG & OLUFSEN
WARNING: To reduce the risk of fire or electric shock, do not expose this appliance to rain or moisture. Do not expose this equipment to dripping or splashing and ensure that no objects filled with liquids, such as vases, are placed on the equipment.
To completely disconnect this equipment from the AC Mains, disconnect the power supply cord plug from the AC receptacle.
The lightning flash with arrowhead symbol within an equilateral triangle,
is intended to alert the user to the presence of un insulated "dangerous voltage" within the product's enclosure that may be of sufficient magnitude to constitute a risk of electric shock to persons.
The exclamation point within an equilateral triangle is intended to
alert the user to the presence of important operating and maintenance (servicing) instructions in the literature accompanying the product.
Français (French), 20
Italiano (Italian), 24
Svenska (Swedish), 40
Русский (Russian), 48
繁體中文 (Traditional Chinese), 52
简体中文 (Simplified Chinese), 56
한국어 (Korean), 60
日本語 (Japanese), 64
Important information,
When you have finished setting up the loudspeakers as described on the following pages, connect the entire system to the mains.
Cleaning the loudspeaker
You can clean the speaker panels with a vacuum cleaner set to the lowest suction level. Clean the other surfaces using a soft, lint-free cloth which you have dipped in luke warm water and wrung firmly.
Never use alcohol or other solvents to clean any parts of the loud speaker!
Switching on and off
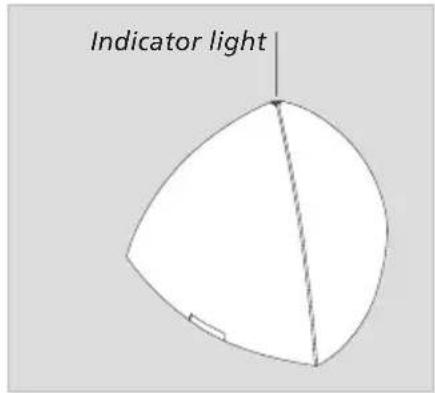
If you have set the LINE IN MODE switch to AUTO, the loudspeakers automatically switch on when they receive an input signal – indicated by green indicator lights. When you switch off your system, the loudspeakers will, after a few minutes, automatically switch to standby – indicated by red indicator lights.
However, if you have set the LINE IN MODE switch to ON, the loud-speakers are always switched on, even when you switch off your system.
In either setting of the LINE IN MODE switch, the loudspeakers can only be switched off completely by disconnecting them from the mains supply.
Cautions
- Make sure that the loud speakers are placed and connected in accordance with the instructions in this Guide. To prevent injury, use Bang & Olufsen approved stands and wall brackets only!
- Do not attempt to open the loud speakers. Leave such operations to qualified service personnel! The speaker panels, how ever, may be removed for cleaning.
text_image
Indicator light- The loud speaker is designed for indoor use in dry, domestic environments only, and for use within a temperature range of 10–40°C (50–105°F).
- For optimum sound quality, do not place the loud speaker enclosed in, for example, a small book case. Leave a minimum of 20 cm (8") free space at the sides, and never place anything directly in front of the loudspeaker.
- Do not block the sound emitting from the bass reflex port at the bottom of the loud speaker.
- Place the loudspeaker with its front (the Bang & Olufsen name plate) facing your favourite listening position.
We recommend that you follow this procedure:
- Disconnect your system from the mains.
- Connect the loud speakers and set the LINE IN MODE switch on each loud speaker as explained in 'Cable connections' (pp. 6–7).
- Connect the entire system to the mains again.
The loud speaker must be placed standing upright on its base, or fastened to one of the optional accessories. Make the connections, and set the switch before you fasten the loud speaker to one of the accessories.

natural_image
Technical line drawing of two triangular mechanical components with labeled points A and B, showing internal features and mounting brackets (no text or symbols beyond labels)Loudspeaker front and side panels
Each loudspeaker is equipped with one front panel and two side panels. These panels are fastened to the loudspeaker with three small pegs on the rear. The front panel is marked with a Bang & Olufsen name plate.
To remove the panels, for example for cleaning, just pry the three pegs in each panel free of the corresponding holes (A-B) in the loud speaker. Fasten the panels again by inserting the three pegs into the corresponding holes in the front and the sides of the loudspeaker.
Note: The product identification and CE labels are placed on the loud speaker body behind the side panels.
The loudspeakers are intended for use with a personal computer. They may also be used with non-Bang & Olufsen audio or video systems.
About the LINE IN MODE switch ...
The switch has two settings: ON and AUTO. We recommend that you set the switch to the same position on each loudspeaker.
When set to ON, the loud speakers will not auto matically switch to standby when the sound signal disappears. In this case, we recommend that you switch off at the mains supply, when not using the system. When set to AUTO, the loudspeakers automatically switch on when you switch on the system. When you switch off the system, the loudspeakers will, after a few minutes, switch to standby.

text_image
LINE IN ~ LINE IN MODE AUTO ONConnection to personal computers
Use the enclosed connector to connect the computer sound card out put to each of the loud speakers.
As the sound signal from a computer may vary (not constantly on), we recommend that you set the LINE IN MODE switch to ON. This will prevent the loudspeakers from switching off and on every few minutes.
The sockets and the switch are located in the base of each loudspeaker.
Connection to audio or video systems
Connect the system to the LINE IN socket on each loudspeaker (mini-jack – mono).
Set the LINE IN MODE switch to AUTO.
The supplied plug and mains cord are specially designed for the product. Do not change the plug and if the mains cord is damaged, you must buy a new one from your Bang & Olufsen retailer.
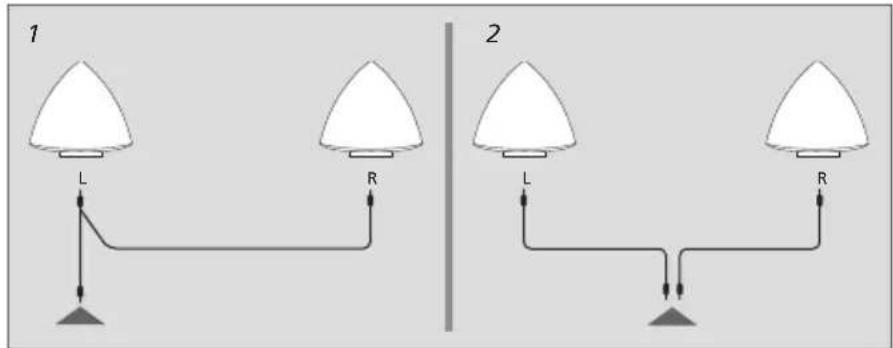
LINE IN connections: Output from computer sound cards often carry both the left and right sound channels in one socket. Therefore, use the enclosed connector when connecting the loudspeakers to a personal computer (fig 1). Connect the plug marked L to the left loudspeaker, and the plug marked R to the right loudspeaker.
If you connect the loudspeakers to, for example, a non-Bang & Olusen audio or video system with separate connections for the left and right sound channels, make the connections as shown in fig. 2.
Mains connections: Depending on the type of mains supply connector enclosed with your loud speakers, connect each loudspeaker to the mains as shown in either fig. 3 or fig. 4.
text_image
1 L R 2 L R
text_image
3 ~ 4
text_image
Diagram of a mechanical device with labeled components and an annotation box in ChineseCable Clamp: For safety reasons, the mains lead to each loud speaker must be secured with the cable clamp provided.
natural_image
Technical line drawings of two triangular mechanical components with labeled points A and B (no text or symbols beyond labels)text_image
1 L R 2 L R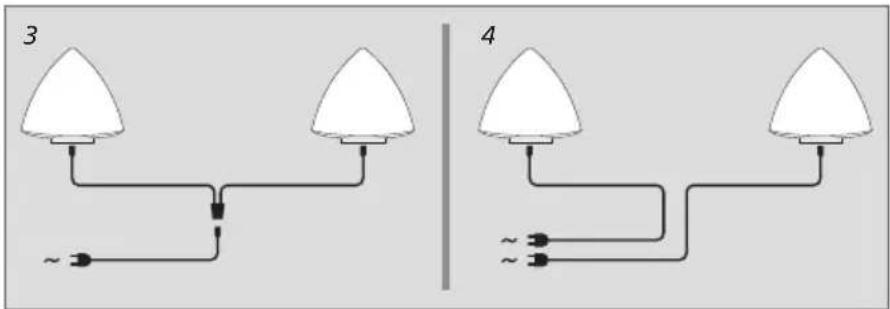
text_image
3 ~ 4
text_image
Diagram of a mechanical device with labeled components and an annotation box in Chinesenatural_image
Technical line drawings of two triangular mechanical components with labeled points A and B (no text or symbols beyond labels)text_image
1 L R 2 L R
text_image
3 ~ 4
text_image
Diagram of a mechanical or electrical component with labeled parts and an annotation box in Chinese.Kabelklemme:
natural_image
Technical line drawings of two triangular mechanical components with labeled points A and B (no text or symbols beyond labels)text_image
1 L R 2 L R
text_image
3 ~ 4
text_image
Diagram of a mechanical or electrical component with labeled parts and an annotation box in Chinese.natural_image
Technical line drawings of two triangular mechanical components with labeled points A and B (no text or symbols beyond labels)text_image
1 L R 2 L R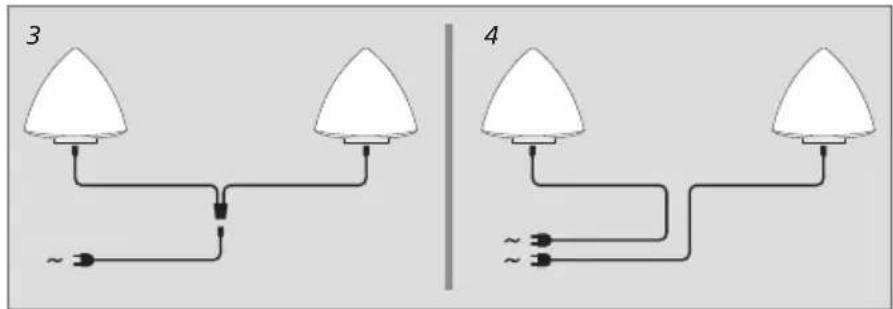
text_image
3 ~ 4
text_image
Diagram of a mechanical or electrical component with labeled parts and an annotation box in Chinese.natural_image
Technical line drawings of two triangular mechanical components with labeled points A and B (no text or symbols beyond labels)text_image
1 L R 2 L R
text_image
3 ~ 4 ~text_image
Diagram of a mechanical device with labeled components and an annotation box in Chinesenatural_image
Technical line drawings of two triangular mechanical components with labeled points A and B (no text or symbols beyond labels)text_image
1 L R 2 L R
text_image
3 ~ 4
text_image
Diagram of a mechanical or electrical component with labeled parts and an annotation box in Chinese.natural_image
Technical line drawings of two triangular mechanical components with labeled points A and B (no text or symbols beyond labels)Painéis frontais e laterais das colunas
text_image
1 L R 2 L R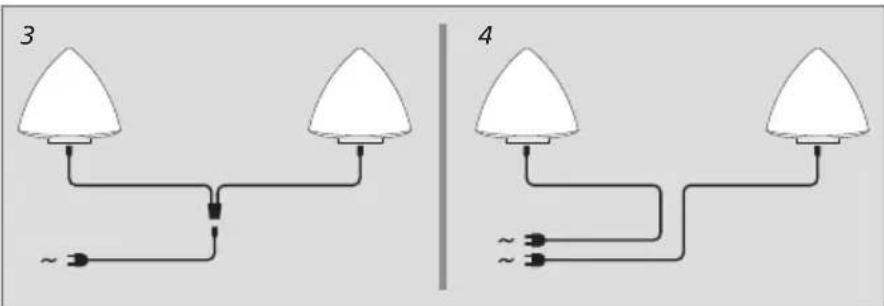
text_image
3 ~ 4 ~text_image
Diagram of a mechanical or electrical component with labeled parts and an annotation box in Chinese.natural_image
Technical line drawings of two triangular mechanical components with labeled points A and B (no text or symbols beyond labels)text_image
1 L R 2 L R
text_image
3 ~ 4
text_image
Diagram of a mechanical or electrical component with labeled parts and an annotation box in Chinese.natural_image
Technical line drawings of two triangular mechanical components with labeled points A and B (no text or symbols beyond labels)natural_image
Simple diagram of two white triangular bulbs connected by a black line with a small AC source, no text or symbols present.
natural_image
Pure electrical circuit lines without any symbols
text_image
Diagram of a mechanical device with labeled components and an annotation box in Chinesenatural_image
Technical line drawings of two triangular mechanical components with labeled points A and B (no text or symbols beyond labels)text_image
1 L R 2 L R
text_image
3 ~ 4
text_image
Diagram of a mechanical or electrical component with labeled parts and an annotation box in Chinese.natural_image
Technical line drawings of two triangular mechanical components with labeled points A and B (no text or symbols beyond labels)text_image
1 L R 2 L R
text_image
3 ~ 4
text_image
Diagram of a mechanical device with labeled components and an annotation box in Chinesetext_image
1 L R 2 L R
text_image
3 ~ 4
text_image
Diagram of a mechanical or electrical component with labeled parts and an annotation box in Chinese.text_image
Diagram of a mechanical or electrical component with labeled parts and an annotation box in Chinese.natural_image
Technical line drawings of two triangular mechanical components with labeled points A and B (no text or symbols beyond labels)라우드스피커의 전면과 측면 패널
text_image
1 L R 2 L R
text_image
3 ~ 4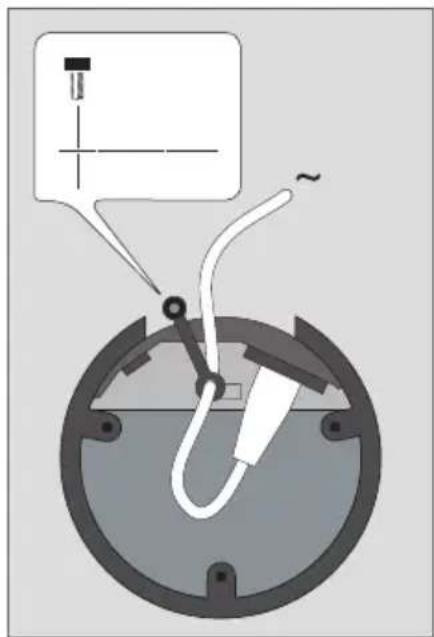
text_image
Diagram of a mechanical or electrical component with labeled parts and an annotation box in Chinese.natural_image
Technical line drawings of two triangular mechanical components with labeled points A and B (no text or symbols beyond labels)フロントパネルとサイドパネル
text_image
1 L R 2 L Rtext_image
Diagram of a mechanical device with labeled components and an annotation box in ChineseElectrical and electronic equipment, parts and batteries marked with this symbol must not be disposed of with normal household wastage, it must be collected and disposed of separately to protect the environment.
Your Bang & Olufsen retailer will advise you of the correct way of disposal in your country.
If a product is too small to be marked with the symbol, it will appear in the User Guide, on the Guarantee certificate, or on the packaging.
All Bang & Olufsen products comply with applicable environmental legislation throughout the world.
CE Hereby Bang & Olufsen declares compliance with the essential requirements and other relevant provisions of Directive 2009/125/EC (ErP), Directive 2004/108/EC (EMC) and Directive 2006/95/EC (LVD).
The Declaration of Conformity may be obtained by consulting Bang & Olufsen.
Technical specifications, features and the use thereof are subject to change without notice!
For the US-market only!
NOTE: This equipment has been tested and found to comply with the limits for a Class B digital
device, pursuant to part 15 of the FCC Rules. These limits are designed to provide reasonable protection against harmful interference in a residential installation. This equipment generates, uses and can radiate radio frequency energy and, if not installed and used in accordance with the instructions, may cause harmful interference to radio communications. However, there is no guarantee that interference will not occur in a particular installation. If this equipment does cause harmful interference to radio or television reception, which can be determined by turning the equipment off and on, the user is encouraged to try to correct the interference by one or more of the following measures:
—Reorient or relocate the receiving antenna.
—Increase the separation between the equipment and receiver.
—Connect the equipment into an outlet on a circuit different from that to which the receiver is connected.
—Consult the dealer or an experienced radio/TV technician for help.
Changes or modifications not expressly approved by the party responsible for compliance could void the user's authority to operate the equipment.
For the Canadian market only! This class B digital apparatus meets all require ments of the Canadian Interference-Causing Equipment Regulations.
This Class B digital apparatus complies with Canadian ICES-003.
This device complies with part 15 of the FCC rules. Operation is subject to the following two conditions: (1) This device may not cause harmful interference, and (2) this device must accept any interference received, including interference that may cause undesired operation.
Dansk