
BeoLab 4000 - Loudspeaker BANG & OLUFSEN - Free user manual and instructions
Find the device manual for free BeoLab 4000 BANG & OLUFSEN in PDF.


| Product Type | Active loudspeaker |
| Brand | Bang & Olufsen |
| Model | BeoLab 4000 |
| Dimensions (H x W x D) | 300 x 150 x 200 mm |
| Weight | 4.5 kg |
| Power Supply | 100-240 V AC, 50/60 Hz |
| Amplifier Power | 2 x 80 W (class D) |
| Frequency Response | 50 Hz – 20 kHz |
| Inputs | Line-level (RCA), optical Toslink |
| Outputs | Subwoofer pre-out |
| Controls | Volume, standby, input select |
| Connectivity | Wired only |
| Enclosure Material | Aluminum, lacquered |
| Grille Material | Fabric |
| Placement | Bookshelf, stand, or wall mount |
| Cleaning | Use soft, dry cloth. Avoid solvents. |
| Safety | Do not expose to moisture. Unplug when not in use. |
| Spare Parts | Available from Bang & Olufsen service |
| Repairability | Serviceable by authorized technicians |
| Compliance | CE, RoHS |
Frequently Asked Questions - BeoLab 4000 BANG & OLUFSEN
User questions about BeoLab 4000 BANG & OLUFSEN
0 question about this device. Answer the ones you know or ask your own.
Ask a new question about this device
Download the instructions for your Loudspeaker in PDF format for free! Find your manual BeoLab 4000 - BANG & OLUFSEN and take your electronic device back in hand. On this page are published all the documents necessary for the use of your device. BeoLab 4000 by BANG & OLUFSEN.
USER MANUAL BeoLab 4000 BANG & OLUFSEN
CAUTION: To reduce the risk of electric shock, do not remove cover (or back).
No User-serviceable parts inside. Refer servicing to qualified service personnel.
WARNING: To reduce the risk of re or electric shock, do not expose this appliance to rain or moisture. Do not expose this equipment to dripping or splashing and ensure that no objects lled with liquids, such as vases, are placed on the equipment.
To completely disconnect this equipment from the AC Mains, disconnect the mains plug from the wall socket. The disconnect device shall remain readily operable.

The lightning ash with arrowhead symbol within an equilateral triangle, is intended to alert the user to the presence of un-insulated “dangerous voltage” within the product’s enclosure that may be of sufficient magnitude to constitute a risk of electric shock to persons.

The exclamation point within an equilateral triangle is intended to alert the user to the presence of important operating and maintenance (servicing) instructions in the literature accompanying the product.
When you have finished setting up the loudspeakers as described on the following pages, connect the entire system to the mains supply. The indicators light up in red, indicating that the loudspeakers are in standby, ready to be used. The loud speakers are designed to be left in this stand-by mode when not in use.
Cleaning the loudspeaker
Clean dusty surfaces using a dry, soft cloth. If necessary, remove grease stains or persistent dirt with a soft, lint-free cloth which you have dipped in lukewarm water and wrung firmly.
You can clean the front cloth with a vacuum cleaner with a brush nozzle, and set to the lowest level. Clean the cooling fins on the rear using a soft brush or a vacuum cleaner.
Switching on and off
When you switch on your system, the loudspeakers switch on simultaneously, and the indicator lights turn green. When you switch the sys tem off again the loudspeakers also switch to standby.
If the loud speakers are connected to a non-Bang & Olufsen system they switch on when a signal is received from the sys tem. They switch off a few minutes after the signal has disappeared.

Never use alcohol or other solvents to clean any parts of the loud-speaker!
NOTE! Prolonged listening at high volume levels may cause hearing damage.
We recommend that you follow this procedure:
- Disconnect your system from the mains supply.
- Place the loud speakers according to the guidelines on these two pages. If you wish to hang the loud speakers on the wall, refer to 'Wall bracket' (pp. 8–9). If you have chosen one of the optional accessories, refer to the Guide enclosed with the accessory.
- Connect the loud speakers and set the LINE-L-R switch on each loud-speaker as explained in 'Cable connections' (pp. 6–7).
- Connect the entire system to the mains again.

The loud speakers must be placed standing upright on its base or fastened to the wall or ceiling – or fastened to one of the optional accessories.
Cautions
- Make sure that the loud speakers are placed and connected in accordance with the instructions in this Guide. To prevent injury, use Bang & Olufsen approved stands and wall brackets only!
- Do not attempt to open the loudspeakers. Leave such operations to qualified service personnel!
- The loud speakers are designed for indoor use in dry, domestic environments only, and for use within a temperature range of 10–40° C (50–105° F).
-
In order not to impede ventilation always leave at least 15 mm (0.5") space above the loud speakers.
-
Do not place any items on top of the loud speakers.
- Do not place the loud speakers enclosed, for example, in a small book case.
- When the loud speakers are placed in an upright position, make sure that the indicator light is at the base.
- When you place the loud speakers try to 'aim' the front cloth towards your preferred listening position.
The wall bracket
The wall brackets can be used to fasten the loud speakers in either a vertical or horizon tal position on a wall. They may also be used to fasten the loudspeakers to the ceiling.
To support the weight of the loudspeaker, always use the correct size and type of screws and wall anchors – taking into account the construction and condition of the wall or ceiling.
Use two screws and wall anchors each with a minimum load rating of 10 kg (22 lbs).
Refer to 'Wall bracket' (pp. 8–9) for further information.
Special notice about light partition walls and gypsum ceilings
Light partition walls and ceilings are of ten constructed of gypsum panels – known as drywall or wall board – secured to studs. Gypsum is not a satisfactory material to support the weight of the loud speaker. If you intend to hang the loud speaker on such a wall or ceiling, the wall bracket must be fastened to a stud.
Use screws as shown on page 9. The screws (∅ 5 mm - 0.2") must penetrate the gypsum and be screwed a minimum of 25 mm (1") into a stud.

Rubber pads: If you place the loud-speakers standing on a level surface, we recommend that you attach the enclosed rubber pads to the bottom plate of each loud speaker – in order to protect both your furniture and the loud speakers from being scratched.
The loudspeakers can be used with Bang & Olufsen audio, video and link systems. They may also be connected to non-Bang & Olufsen systems.
For specific information about the sockets on your system, refer to the Guide enclosed with your system. Connection panel
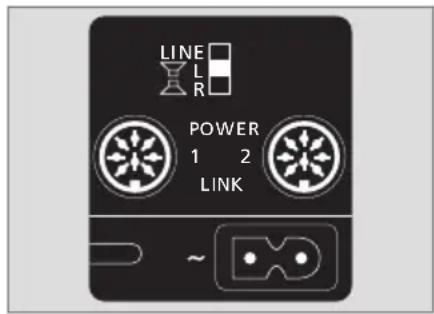
LINE-L-R switch
This switch has three settings. Set the switch to L or R when connecting the loudspeakers to a Bang & Olufsen system. Set the switch to LINE when connecting the loud speakers to a non-Bang & Olufsen system.
POWER LINK 1-2 sockets
These socket are used for connection to a Bang & Olufsen system. However, if the switch marked LINE-L-R is set to LINE, you may use one of the sockets to connect the loudspeaker to a non-Bang & Olufsen system.
Socket for connection to the mains supply.
The connection panel is located on the rear of the loudspeaker.
Connection to Bang & Oluf sen systems
Use a Power Link cable to connect each loudspeaker to your system.
Set the switch to L and R (the left and right sound channel), respectively.
Connection to non-Bang & Olufsen systems
Use a special adapter with an ordinary phono/RCA plug in one end, and a DIN-plug in the other ('Cable for line signal' – optional accessory, available from your Bang & Olufsen retailer).
Set the switch to LINE.
Power Link connections: These connections carry both the right and left sound signals. Therefore, you can:
1 Run a Power Link cable from your Bang & Olufsen system directly to each loudspeaker.
Or
2 Run a Power Link cable from your Bang & Olufsen system to the first loudspeaker, and then run another Power Link cable to the next loudspeaker. This will often help to minimise cable clutter.
![graph TD A["Block L"] --> C["Central Node"] B["Block R"] --> C["Central Node"] C --> D["Output"] style A fill:#f9f,stroke:#333 style B fill:#f9f,stroke:#333 style C fill:#ccf,stroke:#333 style D fill:#cff,stroke:#333](/content/2026/06/1252874/images/e363b4ae40d25b049d3691cc578682ebd2e992c216fef29b205a68a08bf50f9a.jpg)
![graph TD A["Block L"] --> B["Line"] C["Block R"] --> B B --> D["Downward Arrow"]](/content/2026/06/1252874/images/5ed272bfd7a6034da92cd1b8f80806b2dbfdfc11d5e175c9b17c1ab5db9c5794.jpg)


For safety reasons fasten the mains lead behind the small peg, before running it out from the socket compartment.
Power Link cables: The cables must be of the type which are marked with a triangle on the plug. Do not use any of the old type of Power Link cables, as this will cause noise, and thus not give optimum sound quality!
Mains cord: The supplied mains cord and plug are specially designed for the product. If you change the plug or damage the mains cord, you must buy another from your Bang & Olufsen retailer!
The wall bracket consists of two main parts. The bracket (A) must be secured to the wall, and the bracket (B) to the rear grille of the loud speaker:
- Separate the two parts (A - B). If necessary, loosen the two screws (D).
- Fasten the bracket (B) to the loud speaker, in the preferred position. Tighten the two screws (D) securely!
- Hold up the loud speaker where you want to place it on the wall, and mark up the outline of the bracket. Use the bracket (A) as a tem plate to mark up where to drill the holes.
- Fasten the bracket (A) to the wall through the holes (E), and hang the loud speaker onto the four hooks.
The lock will engage and thus secure the two parts. You can release the lock with a small screw-driver through the hole (C).


The placement of the bracket on the rear of the loud speaker deter mines the angle between the loud speaker and the wall.
Top-view of the loudspeaker and the bracket (B).

Light partition walls
If you intend to hang the loudspeaker on a gypsum wall or ceiling, the wall bracket must be fastened to a stud.

If mounted in a horizontal position, you must use three screws. Two screws of a type for gypsum panels through the holes (E), and one lag screw through the centre hole of the bracket.
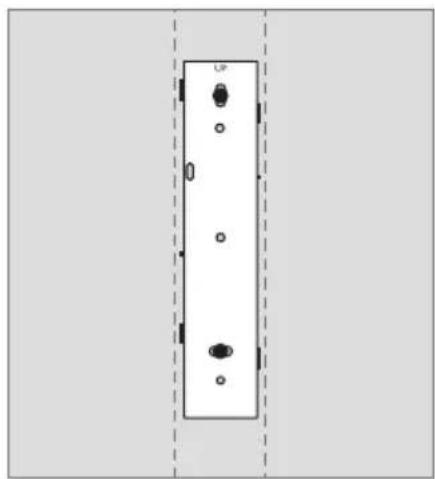
If mounted in a vertical position, two screws through the holes (E) will suffice.
Waste Electrical and Electronic Equipment (WEEE) –

Electrical and electronic equipment, parts and batteries marked with this symbol must not be disposed of with normal household wastage; all electrical and electronic equipment, parts and batteries must be collected and disposed of separately.
When disposing of electrical and electronic equipment and batteries by use of the collection systems available in your country, you protect the environment, human health and contribute to the prudent and rational use of natural resources. Collecting electrical and electronic equipment, batteries and waste prevents the potential contamination of nature with the hazardous substances which may be present in electrical and electronic products and equipment. Your Bang & Olufsen retailer will advise you of the correct way of disposal in your country.
If a product is too small to be marked with the symbol, it will appear in the User Guide, on the Guarantee certificate, or on the packaging.
All Bang & Olufsen products comply with applicable environmental legislation throughout the world.

This product is in conformity with the provisions of the Directives 2004/108/EC and 2006/95/EC.
Technical specifications, features and the use thereof are subject to change without notice!
For the Canadian market only! This class B digital apparatus meets all require ments of the Canadian Interference-Causing Equipment Regulations.
For the US-market only!
NOTE: This equipment has been tested and found to comply with the limits for a class B digital device, pursuant to part 15 of the FCC Rules. These limits are designed to provide reasonable protection against harmful interference in a residential installation.
This equipment generates, uses and can radiate radio frequency energy and, if not installed and used in accordance with the instructions, may cause harmful interference to radio communications. However, there is no guarantee that interference will not occur in a particular installation. If this equipment does cause harmful interference to radio or television reception, which can be determined by turning the equipment off and on, the user is encouraged to try to correct the interference by one or more of the following measures:
– Reorient or relocate the receiving antenna.
- Increase the separation between the equipment and receiver.
- Connect the equipment into an outlet on a circuit different from that to which the receiver is connected.
- Consult the retailer or an experienced radio/TV technician for help.

- CLEANING THE LOUDSPEAKER
- SWITCHING ON AND OFF
- WE RECOMMEND THAT YOU FOLLOW THIS PROCEDURE
- CAUTIONS
- THE WALL BRACKET
- SPECIAL NOTICE ABOUT LIGHT PARTITION WALLS AND GYPSUM CEILINGS
- LINE-L-R SWITCH
- POWER LINK 1-2 SOCKETS
- CONNECTION TO BANG & OLUF SEN SYSTEMS
- CONNECTION TO NON-BANG & OLUFSEN SYSTEMS
- LIGHT PARTITION WALLS
- FOR THE US-MARKET ONLY
Brand : BANG & OLUFSEN
Model : BeoLab 4000
Category : Loudspeaker