
WR-MG88U - Camera accessory JVC - Free user manual and instructions
Find the device manual for free WR-MG88U JVC in PDF.
| Product type | Underwater waterproof housing for camcorder |
| Brand | JVC |
| Model | WR-MG88U |
| Maximum immersion depth | 30 meters |
| Dimensions (L x D x H) | 233 mm x 172 mm x 132 mm |
| Weight (without handle) | Approximately 800 g |
| Buoyancy (with camcorder and battery) | +400 g |
| Filter diameter | 67 mm |
| Seal material | Rubber (spare seal included) |
| Accessible controls | Power/Mode, zoom, photo shutter, video start/stop |
| Compatible models | Base A: GZ-MG130~275; Base B: GZ-MG555~575 |
| Included accessories | Handle, strap, 2 seals, silica gel, silicone grease, lens cloth, cotton swab, cleaning liquid, intermediate piece, hex keys, lens cap (depending on model) |
| Maintenance kit (sold separately) | Ref. MG8_MTKIT: seals, grease, gel, cloth |
| Post-use maintenance | Rinse with fresh water, clean seal and groove, dry away from sunlight |
| Usage precautions | Perform a leak test before each use; check the condition of the seal |
| Extended storage (>1 month) | Remove the seal, grease, place in a plastic bag |
| Seal replacement | Every year (consumable part) |
Frequently Asked Questions - WR-MG88U JVC
User questions about WR-MG88U JVC
0 question about this device. Answer the ones you know or ask your own.
Ask a new question about this device
Download the instructions for your Camera accessory in PDF format for free! Find your manual WR-MG88U - JVC and take your electronic device back in hand. On this page are published all the documents necessary for the use of your device. WR-MG88U by JVC.
USER MANUAL WR-MG88U JVC
In order to use this product safely
Preparation (pg. 4)
- Check that there is no dirt, cracks, or damage to the O-ring.
Always apply grease to the O-ring.

Attaching the Marine Case to the Camera (F pg. 5)
- Make sure that the O-ring is not twisted, and that you do not forget to attach it.
- When tightening the seal, make sure there are no foreign objects caught in the seal.

Recording the Video/Still Image Files (pg. 6)
- Avoid opening and closing the marine case in the shooting location.
- When holding the marine case, lower it gently into the water.

Detaching the Marine Case/Maintenance (F pg.7)
Always wash the marine case in fresh water after use.
- Perform maintenance on the O-ring.
If water leaks into the case due to careless use of the marine case, JVC cannot accept responsibility for any damage that may occur to the internal equipment and materials (video camera, SD card etc), or any expenses incurred in taking the photographs/video. Therefore, please be careful when using the marine case.
Safety Precaution

Before use, this unit must be pretested to check if there is any water leakage.
Please read before use
This marine case is a precision instrument designed to permit safe video recording under high water pressure. Please pay careful attention when handling the unit before and after use, as explained in this user's manual.
Each part of the marine case has been subject to strict controls during the manufacturing process, and the individual functions have faced stringent tests during the assembly process. Each marine case has also had to pass waterproof inspections using high-pressure water testers. However, damage can sometimes occur during transport and distribution, or during storage after purchase, so before diving always carry out the following preuse test to verify safety.
Pre-use test
Be sure to perform the following pre-use test before diving.
- Before mounting the camera inside the marine case, dive with only the empty marine case and test for water leaks.
Allow 5 or 6 minutes to ensure there are no leaks. Be sure to perform this test to ensure the safety of your camera.
2. The following are some common causes of water leaks:
A. The marine case is used without attaching the O-ring.
B. The O-ring is not mounted in the correct position.
C. The O-ring is damaged or deformed.
D. There is sand, dirt, hair or other foreign matter on the O-ring.
E. There is sand, dirt, hair or other foreign matter on the contact surface of the O-ring or on the inside of the lid.
F. The provided strap or silica gel bag is pinched inside the marine case when the lid is closed.
3. Check that there are no scratches or cracks on the marine case every time you use it.
The marine case must withstand water pressure with use. Repeated exposure to pressure eventually leads to material fatigue, which may result in damage of the marine case. Every time you use the marine case, check in advance that there are no scratches or cracks. If you frequently use the marine case, be sure to ask for maintenance at the store of purchase. (There is a charge for maintenance.)
To protect your camera and ensure optimum use, keep the examples listed above in mind when using the marine case.
JVC accepts no responsibility for water leakage or damage to anything inside the marine case (camera, SD card, etc.) due to careless usage of this product. Be sure to follow correct procedures when using the marine case.
Accessories
Glass cleaner (to prevent "steaming up")
- Cleaning fluid (to remove dirt)
Silicone grease
Silicone cloth
Silica gel (Preservative)
- Lens tissue paper
- Swab
- Strap
- 2 O-rings : 1 Spare
- Base (A,B)
The attachment base differs depending on the model of camera that you have.
- Grip
Commercially available lights and weights can also be attached.
Pick
-
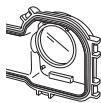
Screw tightening key
-
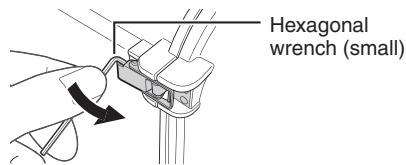
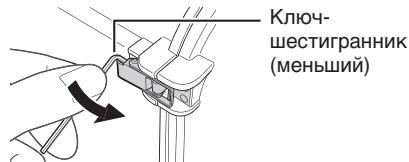
2 hexagonal wrenches Large: for assembling grip Small: buckle opener
- Lens hood
Only attached to certain types of cameras.


Maintenance Kit - Sold Separately (Part Number: MG8_MTKIT)
You can purchase the following set of expendable parts. Please contact your local JVC service representative.
- O-Ring x2
Silicone grease (5 g) x1
Silica Gel (preservative) (2g) x5
- Lens tissue paper (50 sheets) x1
Index

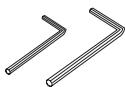
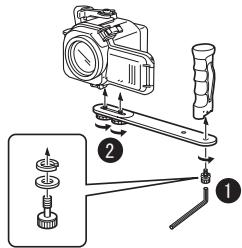
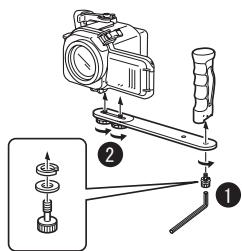
① Main casing grip:
Attach the included strap as shown in the diagram above.
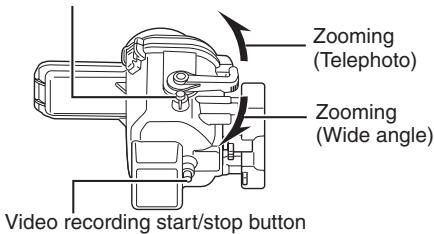
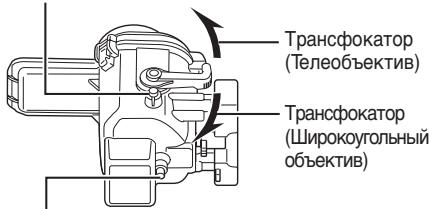
② Zoom lever
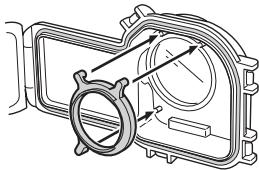
③ Ring:
Commercially available filters (67mm diameter) etc can be attached.
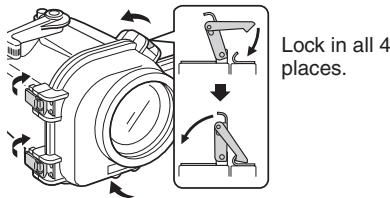
④ Buckles (4 places):
Seal the marine case.
⑤ Grip attachment holes:
You can attach the included grip, or commercially available weights etc.
⑥ Still image shooting button
⑦ Video recording start/stop button
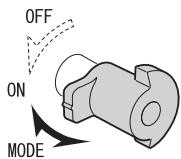
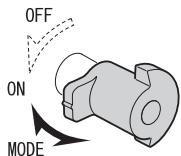
⑧ Power/mode switch lever:
Turns camera's power on/off, or switches video or still mode.
Preparation
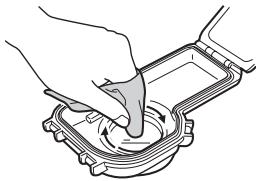
Inspect the main casing for scratches and cracks etc.
Apply 2 or 3 drops of the glass cleaner provided onto one of the lens tissues or a clean cloth, and wipe the inner side of the marine case front glass.

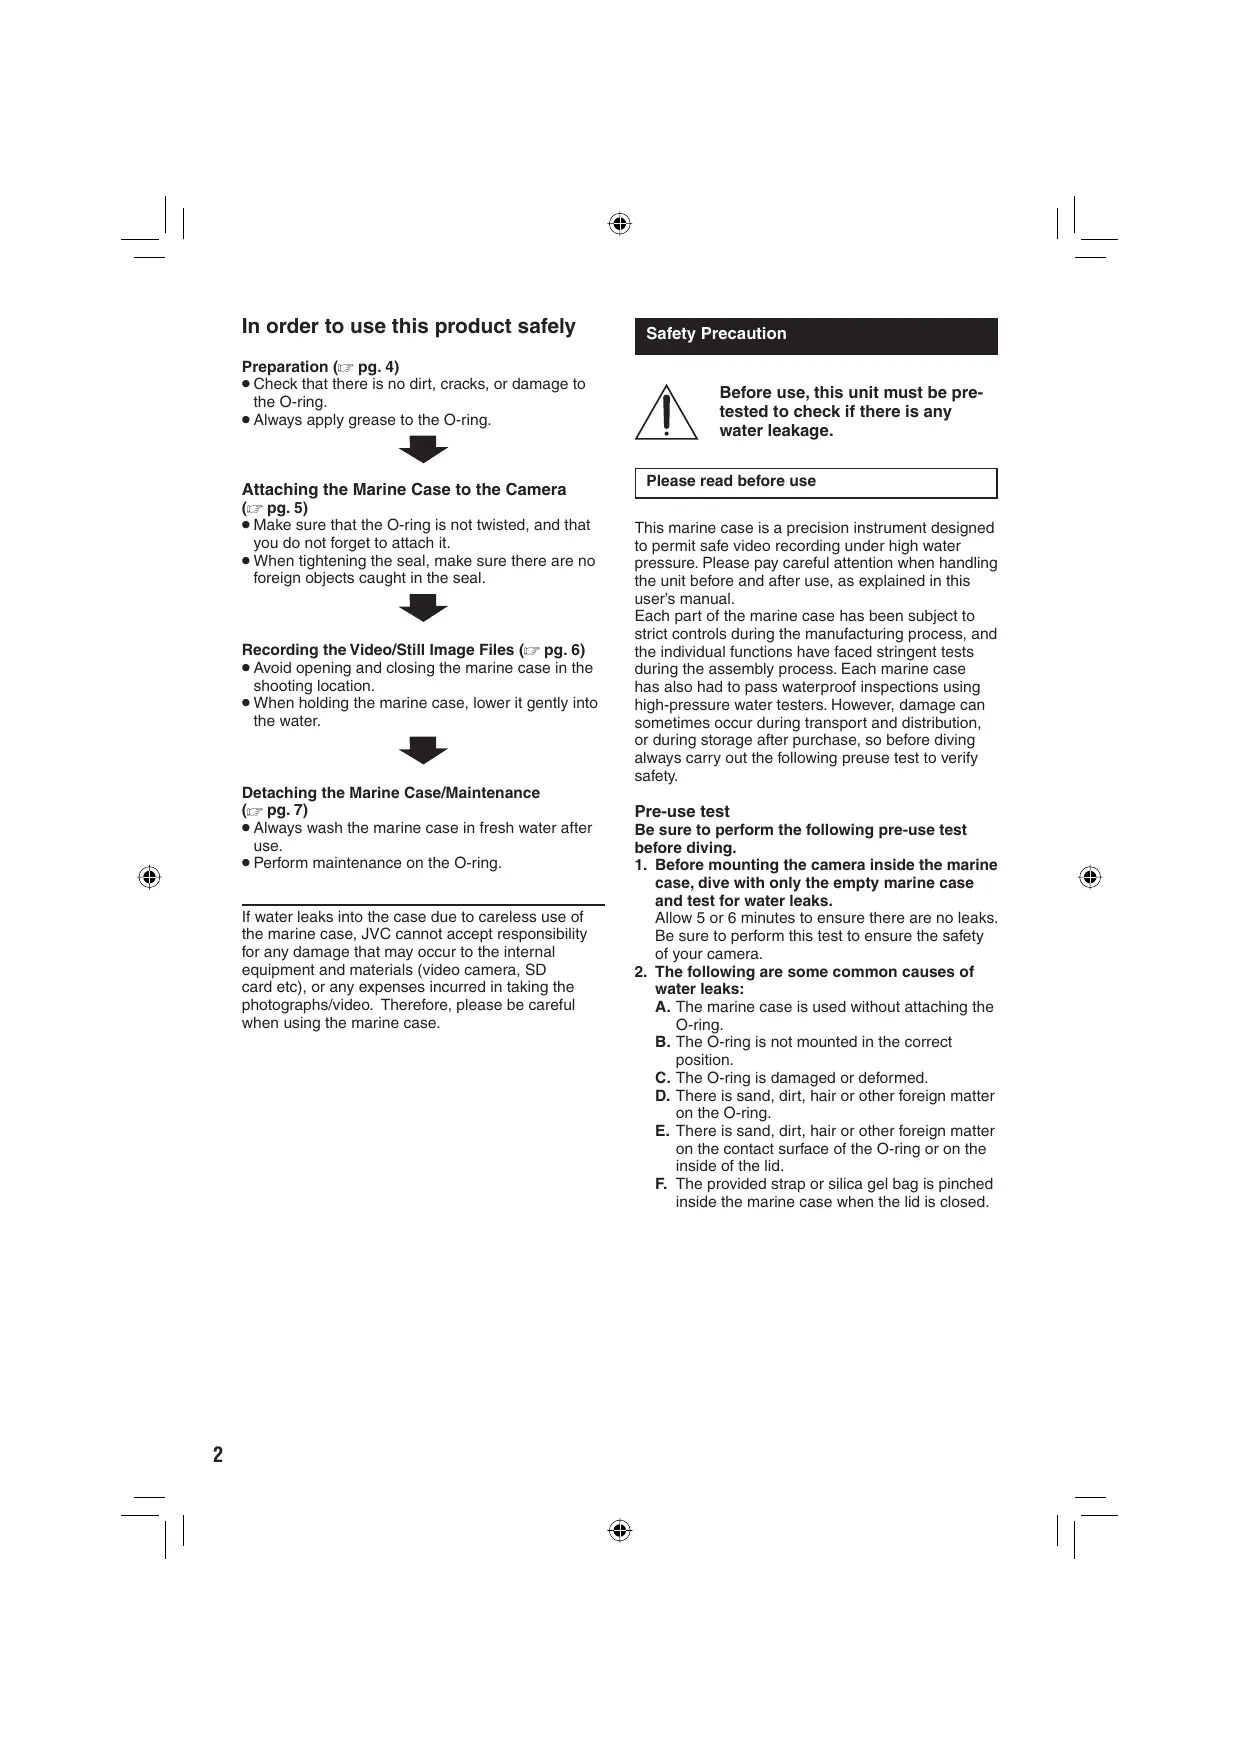
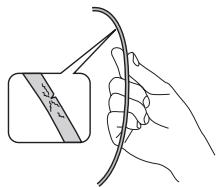
2 Check the O-ring.
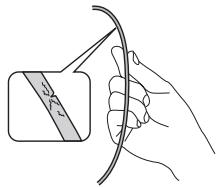
Using the supplied pick, remove the O-ring from the main case.
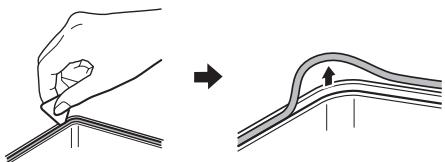
Check the O-ring, O-ring contact surface, and groove in which the O-ring fits for dirt, scratches, or damage etc. visually and by touching with your finger.
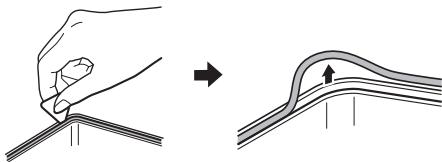
3 Apply grease to the O-ring and re-attach.
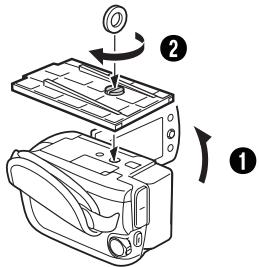
4 Close the empty marine case (no camera inside).
5 Place the marine case in water, and check that there are no water leaks.
Attaching the Marine Case to the Camera
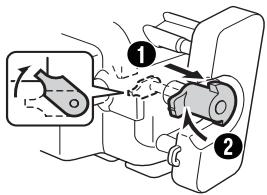
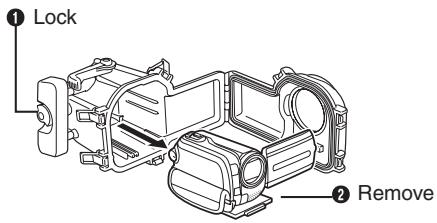
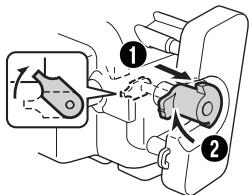
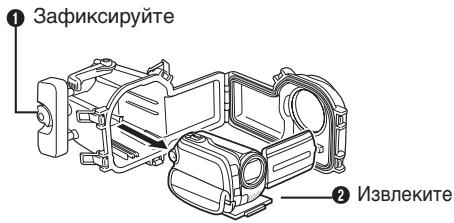
Pull the power/mode switch lever of the marine case in the direction of the arrow (0), and rotate it to lock it (2).
If the power/mode switch lever is not locked, it may touch or damage the camera when the camera is put into the case.
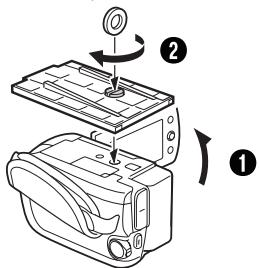
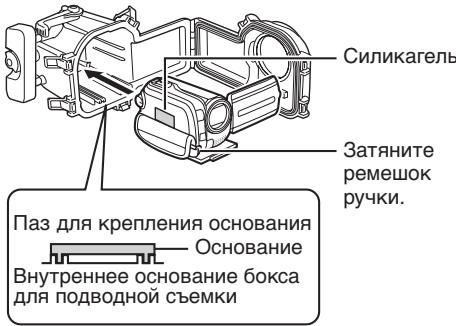
2 Attach the base in the correct way for your model of camera. (pg. 7)
- Line up the tripod screw hole on the base of your camera with the base holes of the case, and tighten the screw.
- Install the battery (and insert an SD card if needed) beforehand.
3 Setup the camera (please refer to your camera's instruction manual).
- Turn off the flash and light. (presence of a flash/ light differs according to the model.)
- Switch off the power.
It is recommended to set to the auto recording mode. - Open the lens cover.
4 Open the marine case.
If it is difficult to open buckles, use the buckle opener.
5 Insert the camera into the marine case.
Inserting the provided silica gel between the camera and marine case prevents the inside of the marine case from steaming up.
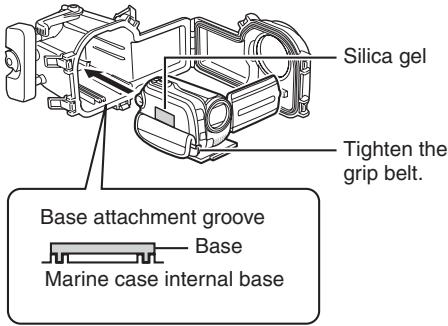
For cameras that are equipped with Base A, attach the lens hood.
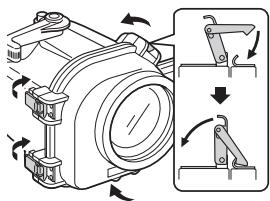
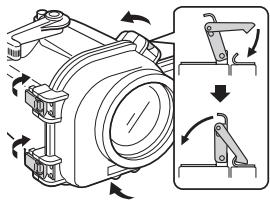
6 Seal the marine case, and attach the grips.
NOTE
The risk of water leakage is extremely high if the O-ring is twisted, if you forget to attach it, or if something is trapped in the seal.
Recording the Video/Still Image Files
Before recording
Submerge the marine case with the camera equipped into a bathtub or water tank full of fresh water.
Gradually increase the amount of time the marine case is submerged as shown below.
1st time: 5~10 seconds
- 2nd time: 30 seconds ~ 1 minute
- 3rd time: 3 minutes ~ 5 minutes (try operating the levers and buttons while the marine case is submerged).
NOTES
Always have someone hold the marine case for you when diving into, or getting out of water.
- If for any reason water leakage occurs, remove the camera battery. It may cause the camera to explode.
Pull the marine case power/mode switch lever to release the lock, and switch on the camera's power.
Rotate the lever to switch on the camera's power. The camera's power lamp lights.

Switching between video/still modes
Switch modes by rotating the lever.
2 Press the video recording start/stop button or the still image shooting button to start recording.
Still image shooting button
3 When you have finished recording, rotate the power/mode switch lever to turn the camera's power off.
The camera's power lamp goes out.
NOTE
Sometimes, due to sudden shaking or impact to the marine case, the camera's drop detection function operates to switch off the camera's power.
When [VIDEO MANAGEMENT FILE IS BROKEN. TO RECORD/PLAYBACK VIDEO, RECOVERY IS REQUIRED. RECOVER?] is displayed, press the REC button to recover the file.
Detaching the Marine Case/Maintenance
Always perform maintenance on the marine case after you have finished recording. Failing to perform maintenance on the marine case will allow dirt to build up on the case, causing water leaks.
1 Wash the marine case in water while it is still sealed.
- If the marine case was used in seawater, we recommend submerging the marine case in fresh water for a while to remove salt.
- Move the buttons and levers while the marine case is submerged, and rinse the salt out from any gaps or grooves etc.
2 Wipe off the water with a dry cloth, and allow the marine case to completely dry out.
3 Open the marine case, and remove the camera.
4 Remove the O-ring, and wipe off any salt, sand, and any other debris.
Also wipe the groove in which the O-ring was inserted, and the part of the marine case that was in contact with the O-ring, and allow them to dry.
5 Wipe the inside of the marine case with a dry cloth.
Drop a few drops of the cleaning fluid onto the inside of the front glass, and wipe it off using the silicone cloth etc.
NOTES
- Do not leave the marine case in direct sunlight. Doing so may cause discoloration to the case, and may cause the O-ring to deteriorate more quickly.
- When storing the marine case, unlock the power/ mode switch lever.
- If you cannot avoid opening the marine case at the diving point, make sure that drops of water from your hair or your body do not drop into the case.
Storing the O-ring
If you do not intend to use the marine case for longer than 1 month, remove the O-ring from the marine case, and spread a thin layer of the supplied silicone grease over the entire O-ring. After that, place the O-ring inside a clean plastic bag, and store it in the maintenance kit case.
The O-ring is an expendable part. Replace the O-ring with a brand new one every year.
NOTES
- When re-using an O-ring after storage, always check the condition of the O-ring.
- Never use an O-ring if it is deformed (crushed, distorted), cracked, or damaged in any way.
Main Specifications
| Maximum pressure | Water depth up to 30 meters |
| Operations | Power on/off Video recording start/stop Still image shooting Zoom (telephoto/wide angle) |
| Buoyancy | +400 g (with the camera inserted and the supplied battery pack attached) |
| Main unit dimensions (W x D x H) | 233 mm x 172 mm x 132 mm |
| Main unit weight | Approx. 800 g (not incl. grip) |
| Applicable model and base to be used | Base A: GZ-MG130 ~ 275 Base B: GZ-MG555 ~ 575 |
| Filter diameter | ø 67.0 mm |
Zur sicheren Verwendung deses Produtos
2 Controller de O-ring.
2 Verifique o O-ring.
Opbevaring at O-ringen
② Zoombryter
(3) Ring:
BkIIOUaET/BbIKIOUaET KaMepy,peXIM cBEmKIN BIVdeO INH HeNOdBIXHbIX N3O6paXeHn.
Nodrotobka
1 Ocmotpnte ochoBHOK KOpNc Ha HauHnue UapaHn, TpeuHn nT.n.
HaheCnTe 2-3 KaIIIN CTekNIOOChTtEnI Ha OndHy n3 CanPeTOK dN AnObEKeTNBa IINu YmCTyHO TKAH NPOTpNTe N3HyTPn NepeDHee CTeKNo BOKKa DnI PNOBDoHN CbEMKn.
2 IpoBepbTe yIIOHTnITbHoe KOBbO.
BbIbTe yIINOTHnTEbHOe KOJIbO n3 OCHOBHOro KOpNyca npri NpOMOni npinraeMoN nlaCTnHKn.
IpoBepbTe yNtHTnHbHOe KOblcO, NOBepXHOCbT KoNTaTKc C yNlTOHTnHbHBIM KOblcOM N KaHaBky POn yNlTOHTnHbHOe KOblcNo HA NaJHnue 3arpy3HeHn, ZaapanHH, NOBpeXdEHn n T.I. Bn3yaJIbHO n Ha OuYNb.
3 CmxaBTe yNIOHTHeIbHoe KOJIbO N BCTaBbTe Ha MecTO.
4 3akpoTe nyctOoi 60Kc IJIa NOBDOHOI CbEMKn (6e3 KAMepbl BHyTpNI).
5Iporpy3HTe 60Kc DnA IIOBODHO CBEMKIN B BOdy n npOBepbTe Ha HAnuHne IpoteueK BOdbl.
MONTAX KAMepbI B 6okce IJI NIOBODHOI CbeMKN
1IOTAHHTe pbyar BKJIOUeHn HNTAHN/ nepeKJIIOUeHn peXIMOB Ha 6OKce JnIy NOBODHOH CbEMKn B HapPaBHeHN CTpeKN (0), a 3aTEM NOBepHtE erO do fHKcaun (2).
He3aФнКсИрОваHHь рbIgar BKlIOUeHnI nITAHIN/NepeKlIOUeHnE pEXIMOB MOKeT 3aTeB 3a KaMepy IIN NOBpeDnTb ee npu yCTaHOBKe B KOpNc.
2 3akpeHNTe OCHOBaHHe NaJleXaUIM 6bpa3OM B COOTBeTCTBn C NcNoJIb3YeMoI kamepoi. (Ctp.91)
CObMCTTEOTBepCTNEIOUHTATINB OCHOBAHKAMepbCOTBepCTNMB OCHOBAHN BOKCAa3TAFHNTe BINT.
-П配电ВарптельноВсТаБТеakКуМЛЯТОр(И Карту SD, ecги Нжн).
3 HactpoIte KaMepy (cM. INHCTpyKcIIO NO 3KcNpIyatauKaMepbI).
-OTKJIIOUHTe BCNbIuKy u ΦoHaPb (HaJIuHne BCNbIuKN/ΦoHaPra 3aBnCt OT MoJeIN).
BbIKJIOUHTe NITaHne KaMepbl.
- PeKOMeHdyeTcB BKJIQUHTb aBTOMaTNUeCKn peKIM 3aInci.
CHMNITe KpbIiKu c o6beKTHBa.
4 OTKpoIte 6oKc dIa IIOBbOHOH CbEMKn.
Ecnn He ydaetc pacTeHnyb 3aTeKKn, OKpoTne IN npnnaaraembl KIOHOM.
5 BcTaBbTe KaMepy B 6oKc dIJI NOBODHOI CbeMKN.
Bloxknte npnilaraembl nakeTnK cnllnkareI MeKdy kameporu 60kcom IJnIOBDOHoi CbEMKn, yTO6bl 60kC He 3aONTeBaN u3HyTpN.
Дякамер, chабхенььх ochobahnem A, 3akpenite 6neHny obektnBa.

6 3akpoTe 6OKC IJRA NOBBOHOI CbEMKn I 3akpoTe 3aCTeKKn.
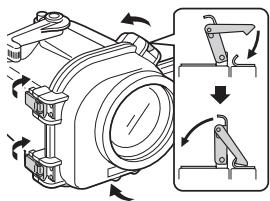
3acterhnte BO Bcex 4-x MeCTax.
ПРМЕЧАНЕ
Ecnn ynnnoTHnBHe KObnIoo nepeKpytnIOcb,
ecnn Bbl 3a6bIn BCTaBnTb eTo, nnn ecnn YTO-TO
3aCtprALO BynlOTHeHn, PNCK npocauBaHnBOdbl
MHOrOKpATHO Bo3paCTaET.
3aIINcB VInDeo/foaiIOB HeNoDVBHXHbIX n3o6paXeHn
Peped 3aunncbio
OkyHnTe 6oKc IJII NQBDoHNo CbEMKn BMeCTe CO BCTaBJIeHHo KAMepoB BAHNy INIb6ak Co CBExeB BOHO.
Постеонно уBERIMИВаITE npOДОЛЖпгьнoctь HAXOXYDEHNO 6OKca ДЯ NOДБОнь CheEMKn B NORpyKDEHOM COCTOHHM, KAK yKa3aHO HnIXe.
-1-n pa3: 5 ~ 10 cekyHd
-2-η pa3: 30 cekyHД ~ 1 mHyTa
-3-pa3:3MnHyTbI~5MNHyT (noDbBnaTepeHarN KHOKN,POKA6OKC DnA NOBDOHON CbEMKN HAXOINTcB N OPGyKHeHHOM COCTOHHN).
ПОНМЕЧАЦA
-Obraatbno npocnte Koro-H6yNb noepkatab 6okd nla noBDOHcBemKn, NOKa Bbl HbipaeTe INN BbIXOHTe IN3 BObl.
- Ecni no KaKoI-JI6O npuHne npOn30Una npoteYka BObl, CHMnTe aKKyMylAToP c KaMepbl. B npOTnHBOM cnyae kamepa MoKeT B3OpBATbCn.
1 BbITaHyB pIyar BKIOUeHnI nITaHnI/ nepeKIOUeHnI peXIMOB Ha 6OKce IJn IOBODHOcBeMKn,OCBOoOJeTe erO IN BKIOUHTe KaMepy.
ПовернITEpbiur,чTOбblBKNIOHTbпNTангКамерbl.HaunHaeT CBETNbCnHДNKATOPпNTаньКамерbl.

IpeKJIIOUHeHne peXIMOB cBemKn BnDeo/ HEnoDBNXhBx IN3o6paXeHn
IpeeknouaTepexmbi, nobopaunba pyuar.
2 BkIIOuayTe 3aIINcB HxKaTHeM KHOKN yNCKa/OCTaHOBa BVDeO3aIMCn INN KHOKN IJIa CBeMKn HEnoDBrXKbIX n3o6paJKeHn.
Khonka dna cbeMkn HenoDbxKhbix 1306paXeHn
Khonka nysca/octaHOBA BndeO3anci
3 NocIe 3aBepWeHn 3aPiNc BbIKJIOUHTe nITaHMe KaMepbl, NOBepHyB pbIcar BKJIIOUeHn PNTaHn/NepeKJIIOUeHn peXIMOB.
HnDkaTOp nTaHnKaMepbI noraChET.
ПРМЕЧАНЕ
I3-3a pe3kX TOnUKOB nIyUapOB nO60KcY
JnIPOBDOHON CbEMKN HOrda cpa6aTbIBaET
Функци ONpEdeLEHIN NaDeHry KaMepbl, KOTopar
BbIKJIOnAeT NITAHne KaMepbl.
KOrDa OTo6bPaxaeTcR coo6uHne [ФАЛУР.
BUNDEIO NOBPEXJDEHДЯ 3ANICN/BOCnP.
BUNDEO HYXHO BOCCT. BOCCTAHOBuTB?],
HakmTe KNOnKy REC, YTO6bl BOcCTaHOBuTB foAII.
CnTne 6okca nla nOdBNOH cBEmKn/ Yxod
Iocne 3aBepenHn 3aHnCn 6b3aTeNbHO
6eBceuHnBe yXoD 60KcY dner noBDOHn CbEmKn.
OCTCTBNE yXoDa pnpBOJNT K OTNOKeHIO Ha 60KcE
rPnH, KOTOPAR MOKET npMBecT N KpOteKe BODbI.
I PpOMoTe 60Kc IaI NaIOBDoHoi CbEmKn B BOe, OCTaBnB Ero B RepMeTuHO 3aKpbITOM NIOJOKeHn.
Ecnn 60Kc DnI nOBoDHO CbEMKn INoJIb3OBaBcH B MOpCKo BOe,TO dNn ydaJIeHn CoI npKeMehdyeTcN porpy3ntb ero Na HeKOTOpoe BPemB a CBexyU pncEHyo BOyd.
- Poka 60Kc Дяп поДВODнО сБЕМКи HAXOДТСВ
В рогужЕНHom NOLOЖЕHIM, DBNFAIte KHOПКИ
n pblaRn, BblONALACKINBArTe COJIb n3 BCex
3a3OpOB nII N KaHABOK n T.I.
2 BbItepeB Bovdy cyxO caJIpeTKoJ, daIte 6OKcY dIJI NOBDOH O CBEMKIOJIHOCTbIO BBICOXHYTb.
3 OtkpoIte 60Kc IaI IOBODHOJ cBEmKn n 3BJIeKITe KaMepy.
4 BbIbTe yNtOHnTeHbHOe KOJIbOu I ydaJIte C Hero BCE cJeBb CoN, Necka N dpyrnx 3aqrA3HeHn.
Takke npotpnte KaHaBky, B KOtopyO BCTaBJIraTeC yNJLOTHNTEnbHOE KONbIO, N aCTb 6OKCa dIa NIOBDoHc bEmKn, KOtOpAr KONTAKTIpye C yNJLOTHNTEnbHbIM KONbCuOM, N daITe IM BbICOXHYtB.
5 Cyxoi caIeTko npoTpne n3Hytpn 6okc dIy IOBDOHO CbEMKn.
HaheCnTe HeckoIbKO KaIeJIb MOIOSeJ XnIDKocTn Ha BNYTpEHHIO NOBepxHOCTb nepeDHeRo CTKeJa, a3aTeM bItPnte ee cNIkoHOBOc CanfetKoi n.T.I.
ПРМЕЧАЦA
He octabnIte 60Kc IJN IOBODHO CBEMKnIO npIpmbIMoCOnHEHbIMN Lyuam.3To MOXET npIbECTN K oecueBceHNIO 60Kca N yCKOpEHNO pOcecca CTapeHNAyNtOHNBOHorO KObnla.
HaBpMaXpAHENH6OkaDnIPOBBOHDbEmKNepeBoNDte BpArBkNIOChEnPiTaHn/peKNoCHEnpeKMOB BHe3aΦNCPCOBAAHOneNOJOKHe.
Ecln60KJIINIOBDOHNcBEMKNeHOEOXOIMO OTKpbITpOBOMCMeTOMNORpyKeHHNcTeHNTbbl B6OKe HONANKANBOBcBauHNCBONCINNETA.
XpaHHeHyeyIIOHTnTeIbHOKoJIbua
EcniyIIOHTHNTBHOe KOJIbOHe 6yDeT NcIOnb3OBaTbCa
6oJeE 1 MecaJa, BbIHbTe yIIOHTHNTBHOe KOJIbO
n3 60kCa DnI IOBDOH CbEMKn I IOJHOCTbIO
NOKpOte Eero NOBepXHOCTb TOKHM CNOEM
npINaeraMoI CNIKOHOB CMzAK. 3aTeM NIOOXtBe
yIIOHTHNTBHOe KOJIbO B cYCTbI pIACTNKOBI naKET
In XpaHITe B KOPo6ke C KOMPiJEKTOM dIy YXOA.
YnIOTHtBbHOe KOJIbO OTHOCITcK pacxOxDbIM MATEpnaIaM. EKeRoJHO 3aMeHraTe yNIOHTbHbEO KOnbO Ha HOBOE.
ПРIMEУАнЯ
-Пи NOBTOHOM ICSIOBN3OBOAHN YIINOTHTENbHO KOLkaNoCne XpaHEnHn O6a3TeNbHO npOBepaTe erO COCTOHNHe.
- Hénb3y IcN0B3Ob4y yIINOTHnTEbHoe KOBJIO, ecNI OHo DeOpOpMPOBaHO (CJIIOUeHO, INcKpNBHeO), NOTPeCKaONObI INI NOBpeX,DeHO INhIM Ob6a3OM.
OchOBhIeTexHnueeCKneXapaKTePncTUKn
- 0-頃用,再在上
- O-龍對藻藻藻藻藻藻藻藻藻藻藻藻藻藻藻藻藻藻藻藻藻藻藻藻藻藻藻藻藻藻藻藻藻藻藻藻藻藻藻藻藻藻藻藻藻藻藻藻藻藻藻藻藻藻藻藻藻藻藻藻藻藻藻藻藻藻藻藻藻藻藻藻藻藻藻藻藻藻藻藻

个云兑燥园克思斯普卡那拉蒙部部
This warranty is valid only in Rep of KOREA