
ENL60812X - Combined refrigerator AEG-ELECTROLUX - Free user manual and instructions
Find the device manual for free ENL60812X AEG-ELECTROLUX in PDF.
| Product type | Combined refrigerator |
| Brand | AEG-ELECTROLUX |
| Model | ENL60812X |
| Dimensions (W x D x H) | 903 x 721.5 x 1790 mm |
| Power supply | 220-240 V, 50 Hz |
| Refrigerant | R600a (isobutane) |
| Main functions | Electronic temperature control, super freeze, super cool, water and ice dispenser, automatic ice maker, door alarm, control lock |
| Dispenser | Water, ice cubes, crushed ice |
| Ice maker | Automatic, capacity of about 10 ice cubes per cycle, 7-8 cycles per day |
| Interior lighting | Specific bulbs for household appliances (replacement by technician) |
| Maintenance | Cleaning with soft cloth and mild detergent; vacuum the rear grille at least once a year |
| Safety | Mandatory grounding; do not use extension cord; avoid heat sources; flammable refrigerant gas |
| Spare parts and repairability | Bulbs, water filters, connection hoses available from after-sales service |
| Supplied accessories | Water supply kit, filtration housing, spacers, screws |
| Required water pressure | 2.0 - 12.5 bars |
Frequently Asked Questions - ENL60812X AEG-ELECTROLUX
User questions about ENL60812X AEG-ELECTROLUX
0 question about this device. Answer the ones you know or ask your own.
Ask a new question about this device
Download the instructions for your Combined refrigerator in PDF format for free! Find your manual ENL60812X - AEG-ELECTROLUX and take your electronic device back in hand. On this page are published all the documents necessary for the use of your device. ENL60812X by AEG-ELECTROLUX.
USER MANUAL ENL60812X AEG-ELECTROLUX
3 Police mraznicky a chladnicky
Fordu ringer after service... 39
Be sure to keep for safety! 49
Installation Guide 52
Control Panel 53
Temperature Control 54
How To change the Interior Light Bulb __ 55
How to use the interior parts 56
Magic cool zone (Option) 58
How to use the Dispenser 58
How to use the Automatic Icemaker 59
Care & Cleaning 60
Before You Call for Service... 62
Something strange? Don't worry.
Here is the answer 63
Installation Preparation 64
If the refrigerator cannot pass through a door during installation, follow these steps 67
Refrigerator Levelling & Door Adjustment (If needed.) 68
Disposal of Used Electrical & Electronic Equipment
The meaning of the symbol on the product, its accessory or packaging indicates that this product shall not be treated as household waste. Please, dispose of this equipment at your applicable collection point for the recycling of electrical & electronic equipments waste.
In the European Union and Other European countries: there are separate collection systems for used electrical and electronic product. By ensuring the correct disposal of this product, you will help prevent potentially hazardous conditions for the
environment and to human health, which could otherwise be caused by unsuitable waste handling of this product. The recycling of materials will help conserve natural resources.
Please do not therefore dispose of your old electrical and electronic equipment with your household waste.
For more detailed information about recycling of this product, please contact your local city office, your household waste disposal service or the shop where you purchased the product.

SAFETY WARNING (R-600a Models Only)

This appliance contains a certain amount of isobutane refrigerant (R600a) a natural gas with high environmental compatibility that is, however, also combustible. When transporting and installing the appliance, care should be taken to ensure that no parts of the refrigerating circuit are damaged.
Refrigerant squirting out of the pipes could ignite or cause an eye injury. If a leak is detected, avoid any naked flames or potential sources of ignition and air the room in which appliance is standing for several minutes.
- In order to avoid the creation of a flammable gas-air mixture if a leak in the refrigerating circuit occurs, the size of the room in which the appliance may be sited depends on the amount of refrigerant
used. The room must be 1m^3 in size for every 8g of R600a refrigerant inside the appliance. The amount of refrigerant is shown on the identification plate inside the appliance.
- Never start up an appliance showing any signs of damage. If in doubt, consult your dealer.
RoHS (Directive 2002/95/EC) Compliant

This environment-friendly product does not contain the EU RoHS restricted substances (Pb, Hg, Cd, Cr6+, PBB, and PBDE).
Be sure to keep for safety!

Read these safety instructions thoroughly and carefully before using. Please keep this user guide to hand for future reference.

Warning! Indicates the possibility of danger of death or serious injury.

Caution! Indicates the possibility of risk of personal injury or material damage.
Other Signs

DO NOT remove or disassemble!

NO., DO NOT...

Be sure to unplug from receptacle (outlet/mains)!

Be sure to keep and follow!

Caution!
- If the supply cord is damaged, it must be replaced by the manufacturer or its service agent or a similarly qualified person in order to avoid a hazard.
- The appliance must be positioned so that the plug is accessible.
Warning

Never let the power cord be crushed by the refrigerator itself or other (heavy) objects. Never bend power cord excessively.
If the cord is damaged or peeled, it can be a cause of fire and electric shock.

Do not plug several appliances into the same wall outlet (receptacle). It can be a cause of overheating and/or fire. Use an exclusive grounding receptacle for the refrigerator.

Never hold the power cord or plug with wet hands.
There is a risk of electric shock.

Never use a damaged power cord or plug, or loose main socket.
There is a risk of fire, electric shock or serious injury.

Be sure to ground. Check if your wall outlet is grounded (earthed).
There is a risk of electric shock hazards.

Never unplug by pulling only the power cord wire. Always grip the plug firmly.

Let the cord from the plug outlet be directed Downwards.
If it is directed up, the cord near the plug is bent and can be damaged, which can cause an electric shock or fire.

Do not install the refrigerator on a wet floor or in a place with much humidity moisture.
Electric insulation gets weakened, resulting in a risk of electric shock hazards.
| Warning | ||
| Never let the power cord touch or pass over heating appliances. Power cord can be damaged, resulting in a risk of electric shock hazards. | Check if plug is loose from the wall outlet. Electric insulation gets weakened, resulting in a risk of electric shock hazards. | |
| Never pour or spray water into the refrigerator (both interior and exterior). Electric insulation gets weakened, resulting in a risk of electric shock hazards. | Do not place containers with water or liquid on top of refrigerator. Water can be poured into the refrigerator and can cause electric shock hazards or damage. | |
| Do not let children hang on the refrigerator doors. Refrigerator can fall and do harm to them. | Do not move or remove compartment shelves/pockets while foods and containers are on them. Hard container (of glass, metal etc.) can fall to hurt you and can break shelf glass and interior parts. | |
| Never repair or disassemble or amend the refrigerator on your own. There is a risk of personal injury or damage to the refrigerator. It is recommended that any service be carried out by a qualified person. | Never store any flammable gas or liquid in the refrigerator. | |
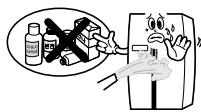
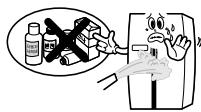
| Never use flammable gas, benzene, thinner, gasoline, spray etc. near the refrigerator. There is a risk of fire, explosion and personal injury or damage. | If a gas leak is found near the refrigerator or in the kitchen, ventilate it immediately without touching power plug or refrigerator. | |
| Do not store medicine, academic research samples which require strict temperature control in the refrigerator. | Never insert fingers or hands into the bottom of refrigerator, especially into the bottom back. You can be hurt by sharp metal edges or can receive an electric shock. | |
| Do not change fuse or light bulb on your own. Call the service agent to change them. | When you find the power cord damaged or cut, call the service agent immediately. | |
| When you get rid of your old refrigerator, be sure to remove the door packings first. Children can be entrapped and suffocated in an abandoned refrigerator. Leaving it for “just a few days” can be very dangerous! | ||
| CAUTION | ||
| Be sure to unplug when the refrigerator is not used for a long time. | Never touch foods and containers especially of metal with wet hands in the freezer compartment. You can be hurt by chilblains or cold burn. | |
| Never eat any decayed or deteriorated food at all. Foods stored too long in the refrigerator can be decayed or deteriorated. | Never place bottles and containers of glass in the freezer compartment. Glass containers and bottles can be broken so can hurt you. | |
| When moving the refrigerator (horizontally or tilted), more than 2 persons are required to hold it. (One to hold top back handles, the other, bottom holder.)If other parts gripped, it is very dangerous and likely to slip. | Be sure to turn up the wheel first before moving the refrigerator. ·The wheels can damage or scratch the floor. If you move it a long distance, never forget to fasten the interior parts tightly with tapes. ·The parts can collide and break each other. | |
Installation Guide

Read these safety instructions carefully before use and follow precautions for your safety.
Precautions in installation and power connection
To prevent fire, electric shock or leakage:
- Never install the refrigerator on a wet, watery floor or where water can easily gather.
-
Check the following before power connection.
-
Connect power plug only to a grounded wall receptacle (an earthed mains).
-
Do not plug refrigerator power together with other appliances to the same receptacle (socket).
-
Do not use an adapter plug or an extension cord.
-
Do not let power cord be crushed down by other (heavy) objects.
-
If you hear a strange noise or a strong chemical odour or find smog etc. from the refrigerator after power plugin, pull out the plug immediately and call the service agent or ELECTROLUX customer service Dept.
- Wait about 5 minutes before you plugin again in order to prevent any damage to the compressor and electrical devices of refrigerator.
- Wait 2~3 hours until the inside gets cold enough after the first power plugin, then store foods inside. (There can be some peculiar smell of plastic parts at initial operation of refrigerator after plugin. The smell fades away as the refrigerator works and doors are opened and closed.)
Precautions in use
To prevent personal injury, fire, electric shock etc. read this user guide carefully before use and keep it at hand for any reference.
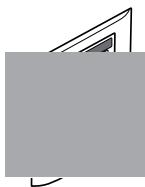
| Accessories | |
| Filter Box | |
| Water supply Kit | |
| User guide | |


After 6 month of first power input, "CHANGE FILTER" icon is ON.
When the time comes to change the filter or reset:
- Push the button.
- Push the button for 3 seconds. Then "CHANGE FILTER" icon is OFF.

Children may push any button on the panel for fun, resulting in disorder of temperature and function of refrigerator.
- Press this button to lock out this possibility and to keep temperature and function setting.
- Push Lock button again for more than 3 seconds to stop it.
For your convenience you can select WATER, CRUSHED ICE, CUBED ICE and ICE MAKER LOCK.
The icon lights up to indicate your selection is ON.

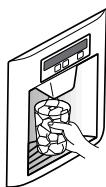
To obtain the water or ice, push the pad smoothly with your cup and your selection will come out 1~2 seconds later.
- Try to avoid placing the rim of your glass near the bottom of pad, otherwise Water or Ice cubes may spill or splash.
- You will hear a snap sound 2 seconds after the ice cubes come out. This is from the shut off ice-out valve.
- Wait 2~3 seconds after pushing the pad to get all the available water or ice cubes.

When cleaning the ice cubes case assembly or when you do not use for a long period of time, remove the ice cubes in the ice storage case and press the button to stop making ice cubes.

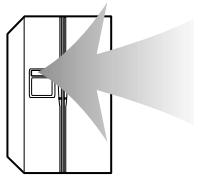
Note! Interior lights of refrigerator turn off when the doors are open for more than 10 minutes.
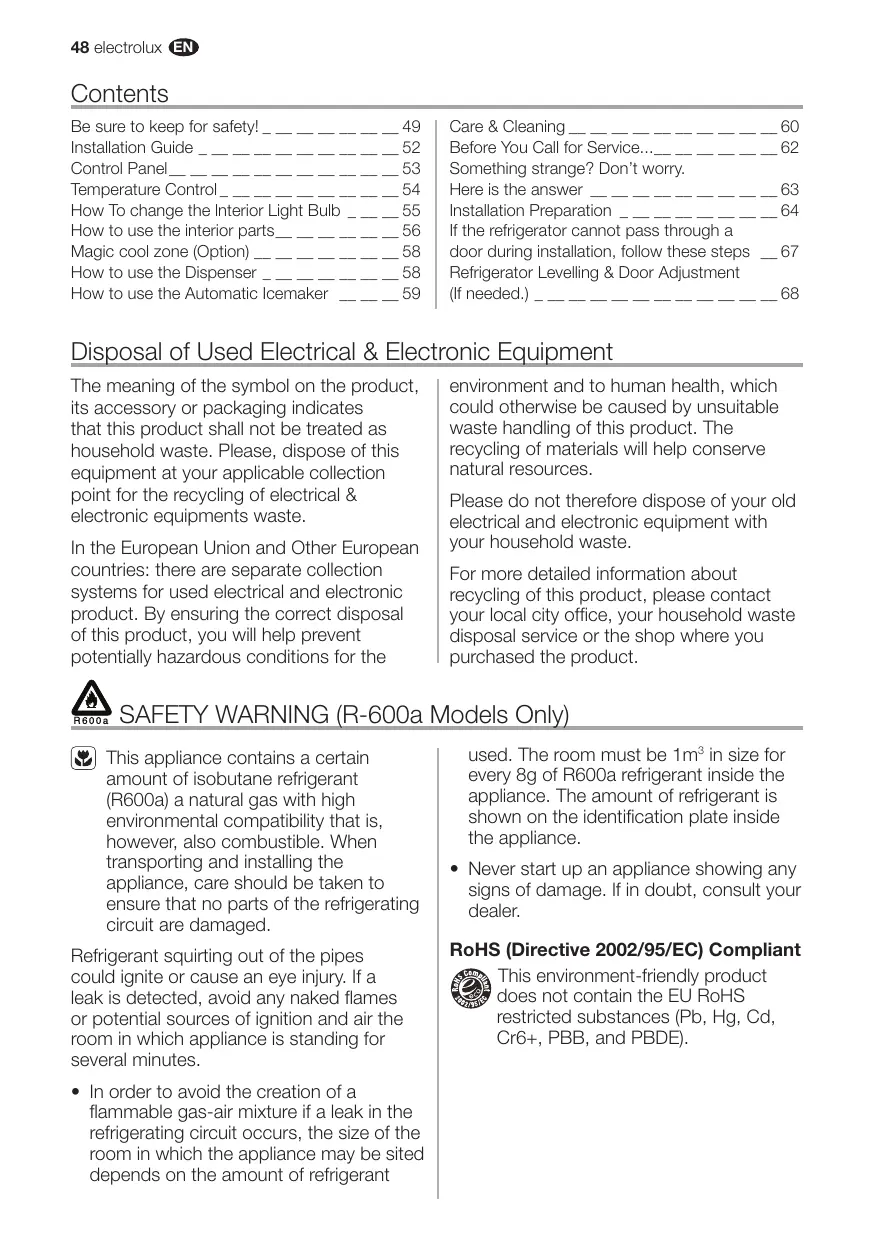
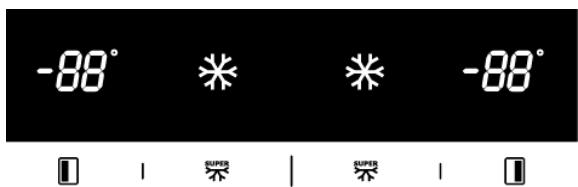
- In case either freezer or refrigerator door is open for more than a minute, door alarm rings for 5 minutes with 1 minute interval.

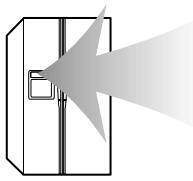
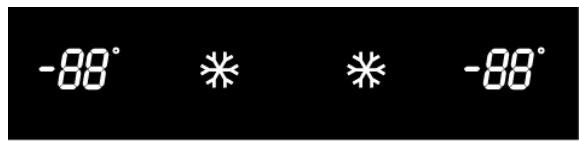
Temperature Control
When this refrigerator is first plugged in, the temperature mode is set to [Middle].

1 1 1 1 1 1
1 1
Freezer Compartment
Push the button and the setting temperature changes as the figure shows.
- Sequential Temperature Change

Faster Freezing...
When you want faster freezing, push the SUPER button. Just push the button once again when you want to stop the mode.
Refrigerator Compartment
Push the button and the setting temperature changes as the figure shows.
- Sequential Temperature Change

Faster Cooling or Refrigeration
When you want faster refrigeration, push the SUPER button. Just push the button once again when you want to stop the mode.
Caution! Foods in the refrigerator can be frozen if the ambient temperature of the refrigerator is below 5^ .
How To change the Interior Light Bulb
The lamp shall be replaced only by a service agent or similarly qualified person.
Change of Freezer Lights
- Remove the 2 screws retaining the light cover.
- Hold the bottom of the light cover and pull forward to remove.
-
Change the light bulb.
-
Follow the reverse order of disassembling after changing the light.
Change of Refrigerator Lights
Refrigerator Top Lights
- Remove the screws retaining the light cover.
- Hold the bottom of cover and pull forward to remove.
-
Change the light bulbs.
-
Follow the reverse order of disassembling when assembling back.
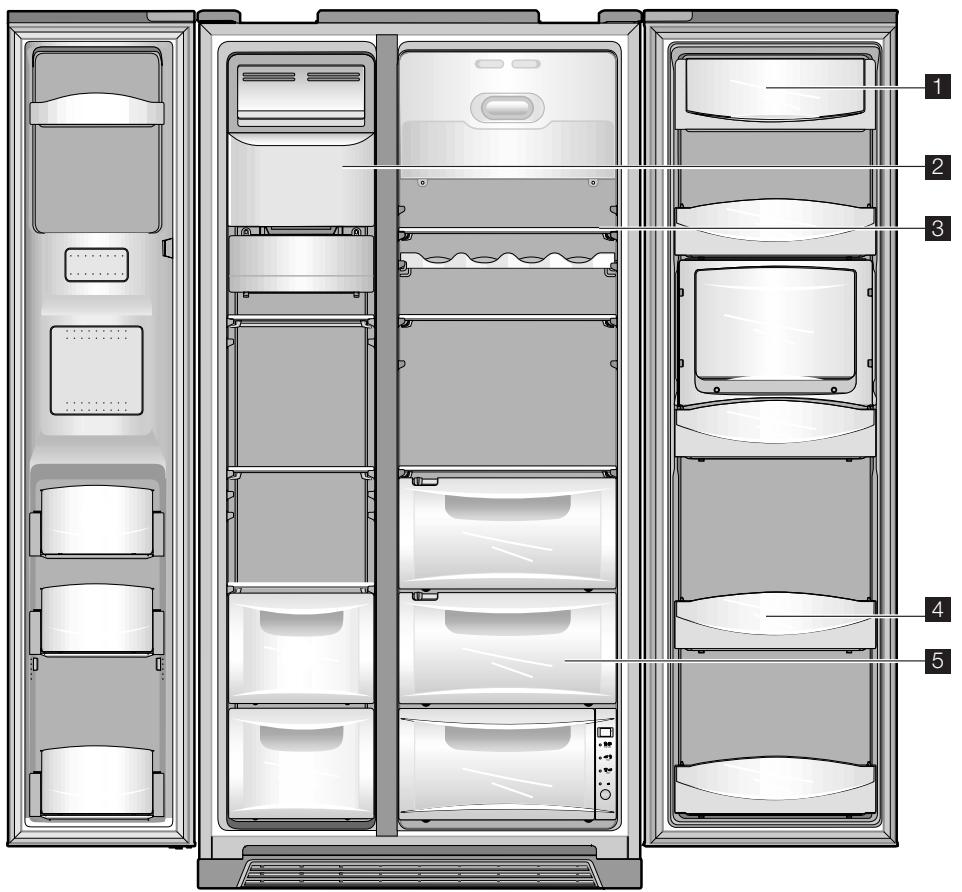
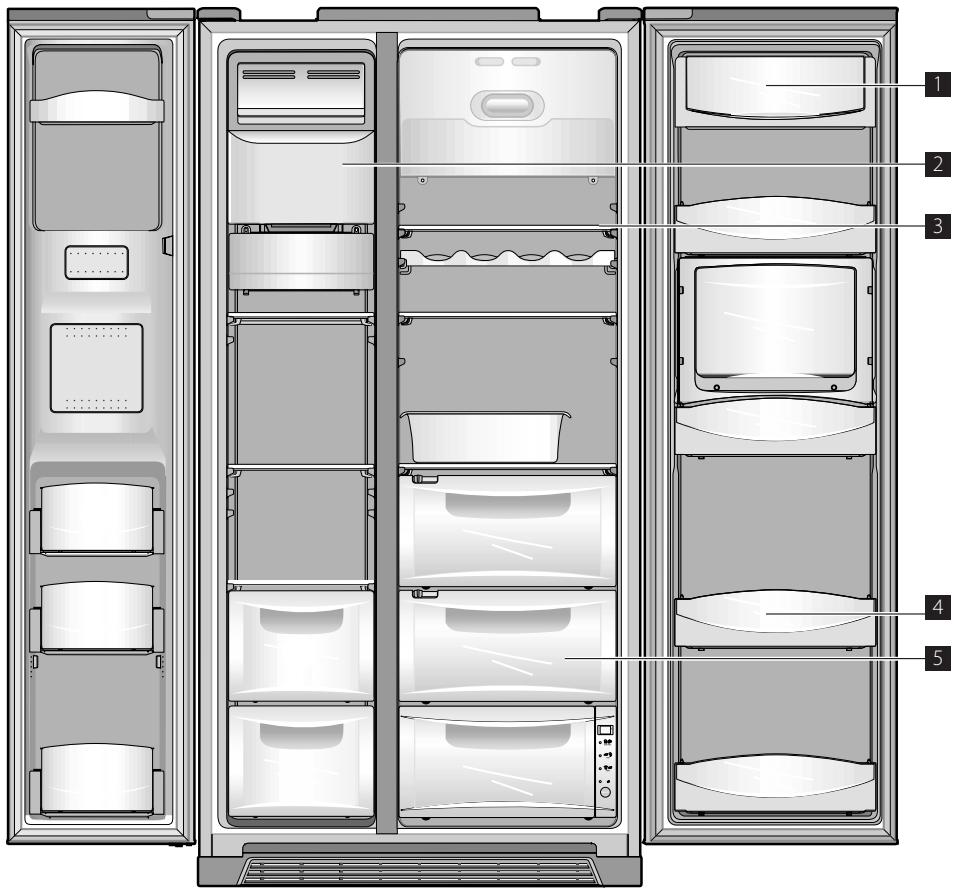
How to use the interior parts

Full-option models illustrated. Features are model-dependent.
Caution!
- Do not touch or hold with wet hands foods (foods container) in the freezer compartment.
There is a risk of chilblains (cold burn). - Do not store medicine, academic research samples etc. in the refrigerator.
- Do not store vegetables in the chilled room, for they can be frozen.
! Note! Egg case can be placed on a refrigerator shelf as you like.
- Freezer Pocket
For storing frozen foods
(Do not store ice cream or long stored foods on the top freezer pocket.)
- Freezer Shelf (tempered glass)
For storing frozen foods such as meat, fish, ice-cream...
- Drying Case of Freezer
For storing dried foods for so long (dried squid, dried anchovy etc.)
- Meat case of Freezer
For storing meat, fish, chicken with foil cover or vinyl wrap
- Refrigerator Shelf (tempered glass)
For storing common foods
-
Vegetable Case
-
Fruit Case
For storing fruits
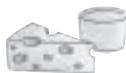
- Dairy Pocket
For storing dairy products such as butter and cheese
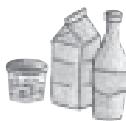
- Refrigerator Pocket
For storing refrigerating foods, milk, juice, beer bottle etc.
10.Wine Keeper (Option)
11.Magic Cool Zone (Option)
Refer to page 10.
- Refreshment Pocket (Refreshment Pocket Models Only)
For frequently used cans, drink water, beverages
| Food Storage Tips | ||
| Wash foods before storing. | Be careful in storing such tropical fruit as bananas, pineapples, tomatoes, for they can easily deteriorate in lower temperature. | |
| Divide and separate foods into smaller pieces. | Keep enough space between the foods as possible. If too tight or too close, cold air circulation is hindered, resulting in poor refrigeration. | |
| Place watery foods or foods with much moisture in front of shelves (close to door side). • If they are placed close to the cold air spout, they can be frozen. | Never forget to cover or wrap foods to prevent odour of foods. | |
| Warm or hot foods should be cooled down enough before storing to reduce power consumption and to enhance refrigeration performance. | ||
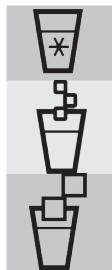
Magic cool zone (Option)
Magic cool zone Control graphic and Control function


VEGETABLE


FISH


MEAT

off
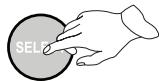
When you plug in first, "OFF" LED is ON.
You can choose "OFF" "VEGETABLE"
"FISH" "MEAT" by pushing the "SELECT" button.
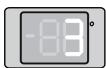
| Step | Display |
| OFF | - |
| VEGETABLE | 3° |
| FISH | -1° |
| MEAT | -3° |
The LEDs and temperatures indicate what you have selected.
- Displayed temperature means a target setting value, so it may differ from the actual room temperature.
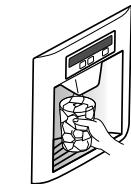
How to use the Dispenser
Select WATER / CRUSHED ICE / CUBED ICE and press the cup on the PUSH pad for your convenience.

Press the
select WATER and ICON lights up to show it is on.

Press the
select CRUSHED ICE and ICON turns on.

Press the
select CUBED ICE and ICON turns on.
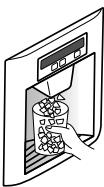
CRUSHED ICE
CUBED ICE
When you get [CUBED ICE] or [CRUSHED ICE], remove the cup from the pad when it is half full. (If you don't, the remaining ICES will make the cup overflow or the dispenser outlet will become blocked.)
Caution!
- Avoid using thin fragile cups or crystal glasses when taking (crushed) ice cubes.
- For your safety, never insert your fingers or other tools into the dispenser outlet.
- If you find the (crushed/cubed) ices discolored, stop using the dispenser and call the service agent.
- 1 hour after you get [CUBED ICE] or [CRUSHED ICE], the selection mode returns to [WATER] automatically.
How to use the Automatic Icemaker
- About 10 ice cubes (7~8 times a day) are made at one time. If the ice storage case is full, icemaking stops.
- It is normal for the icemaker to make banging sounds when the ice cubes are falling into the ice storage case.
- To prevent a bad odour or smells, regularly clean the Ice cubes Storage Case.
- If the amount of ice in the storage case is not sufficient, the ice may not be dispensed. Wait a day or so to make more ice.
- If the ice does not dispense easily, ensure the dispenser outlet is not blocked.
In case the icemaker doesn't work
-
If the ice cubes get stuck and not dispensed
-
Pull out the ice storage case and separate any ice cubes that may have stuck together.
-
If the amount of water which is supplied to the icemaker needs adjusting. Call for the service agent.
-
In case of power failure
-
The ice cubes in the case may melt to flow down to the freezer room. If long hours of power failure is predicted, pull out the case, remove the ice cubes in it and replace it back.
! Note! Use only the ices out of this refrigerator.
Care & Cleaning

Be sure to unplug first!
Full-option models illustrated.
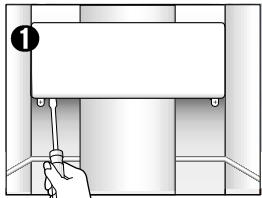
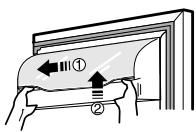
1 Diary Pocket
- Diary Pocket Cover; Open the cover a little, hold both ends and push left to remove.
- Diary Pocket; Hold both ends and pull upward to remove.
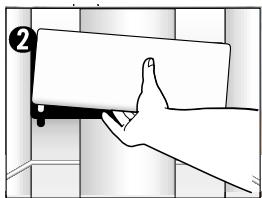
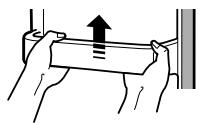
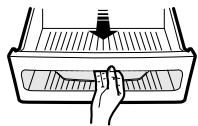
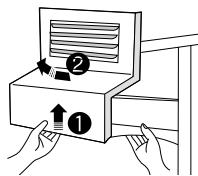
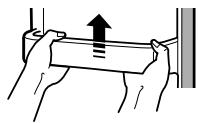
2 Ice cubes storage Case
- Removing; Pull up the case assembly forward to remove.

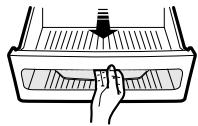
- Replacing; Fit to the side grooves and insert to the end. If it is difficult to fully insert the case, remove it, rotate the swirl coil in the case or drive mechanism a quarter turn and insert again. Do not store the ice cubes too long.
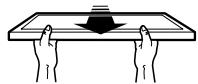
3 Freezer & Refrigerator Shelves

- Open the doors fully, then pull the shelves forward to remove.
4 Freezer & Refrigerator Pockets
- Hold both ends and pull up.
5 Vegetable Case & Fruit Case
- Pull forward and lift up a little to remove.
Dispenser Water Shelf
- Remove the spill grill and clean the water shelf regularly. (The spill shelf is not self-draining.)
! Note! Never use any other electrical appliances together in the inside of the refrigerator for fear of electric shock or fire.
Caution! For your safety, press the (ICE MAKER LOCK) once, when cleaning (removing & replacing) the ice cubes storage assembly.
- Be careful not to hurt your hands and fingers when cleaning the assembly.
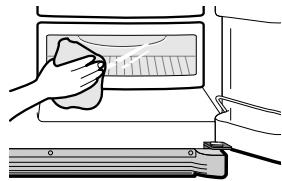
How to Clean
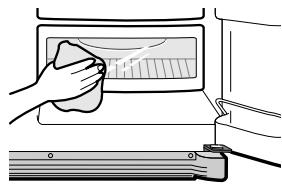
Interior Parts
- Use cloth with water and mild (neutral) detergent to clean.
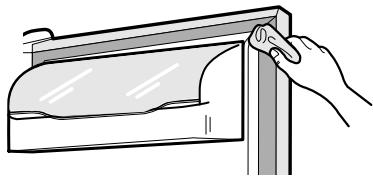
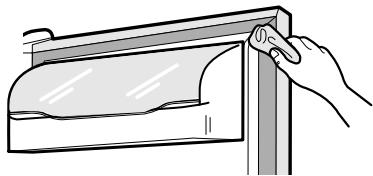
Door Packing
- Use cloth with mild (neutral) detergent.
Back (Machine Room)
- Remove dust on grill with a vacuum cleaner at least once a year.
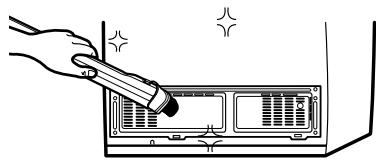
Caution! Never use gasoline (petrol), benzene (benzol), thinners etc., for they can damage the surfaces.
Before You Call for Service...

Please check up the following troubleshooting tips before you call for service!
| Problem | Checkup Point | Action |
| It never gets cold inside. Freezing & refrigerating is not so good. | ·Is the refrigerator unplugged? ·Is the temperature set to [Low Mode]? ·Is the refrigerator under direct sunlight or is any heat appliance placed near it? ·Is the space between refrigerator back and the wall too close? | ·Plug in the refrigerator. ·Set the temperature mode to Middle or High. ·Move to a place where there is no direct sunlight, no heat appliances around. ·Keep sufficient space (more than 10 cm) between refrigerator back and the wall. |
| Foods in the refrigerator get frozen. | ·Is temperature set to [Strong]? ·Is surrounding temperature too low? ·Is the food with much moisture stored close to the cold air spout? | ·Set the temperature to [Middle] or [Low]. ·Foods can be frozen if ambient temperature is below 5 °C. Move to a place where the temperature is over 5 °C. ·Place foods with moisture on the shelves close to the doors. |
| Strange sound from the refrigerator. | ·Is floor beneath the refrigerator uneven? ·Is the space between refrigerator back and the wall too close? ·Do any objects or other stuff touch the refrigerator? | ·Move the refrigerator to a level and even floor. ·Keep sufficient space. ·Remove any object away which touches the refrigerator. |
| Odour or disgusting smell from the inside. | ·Is the food stored uncovered or unwrapped? ·Are the shelves and pockets stained with food stuff? ·Is the food stored too long? | ·Be sure to cover and wrap the foods. ·Clean them regularly. Once smell gets soaked to those parts, it is not easy to remove. ·Do not store foods for so long. ·A refrigerator is neither a perfect nor a permanent foods keeper. |
Something strange? Don't worry. Here is the answer
| Case | Explanation |
| Heat Front and side of refrigerator feels warm or hot. | ·Pipes (refrigerant vessel) are placed beneath the surface to prevent moisture forming on it. |
| Door is sticky Doors do not open easily. | ·When you close the door and then open again immediately, the door is not easy to open. Warm air rushes into the inside to make the pressure difference. In this case wait for a minute, then it will open easily. |
| Strange Sound It sounds like water is flowing from the refrigerator. | ·When the compressor starts to run or stops, refrigerant which makes the inside cold flowing in the pipes can make such a sound. ·Defrosted water can also make such a sound. (This refrigerator adopts an automatic defrosting system.) |
| Something cracking or click sound. | ·Inside parts shrink and/or expand due to temperature change – When the inside gets cold or when the door is open – such sound can be made. |
| Humming or buzz sound. | ·Compressor or fans for cold air circulation can make such working sound. (If the refrigerator is not level, the sound can be louder.) |
| Frost & Dew Dew or frost on the wall and/or food container surface in the freezer and refrigerator compartment. | ·Frost and/or dew can be made in the following cases: ·High temperature and/or high humidity around the refrigerator. ·When doors are open too long. ·Foods with much moisture are stored uncovered or unwrapped. –You can see the same appearance when cold water is poured in a glass cup and dew is forming on the surface of it. |
| Dew on the interior lights cover. | ·The light bulb radiates heat while it is on, so when doors are open too long, dew can form on the light cover due to temperature difference. |
| Dew on the cabinet surface. | ·In case it is highly humid around the refrigerator, moisture in the air sticks to the surface to form the dew. |
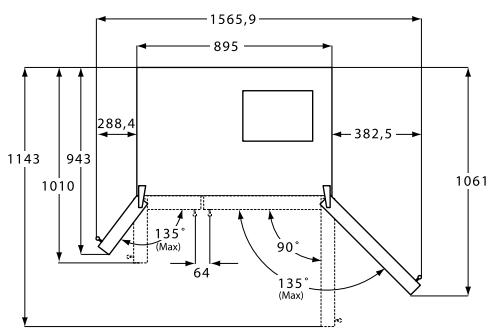
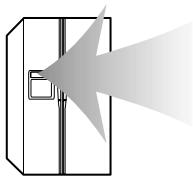
Installation Preparation
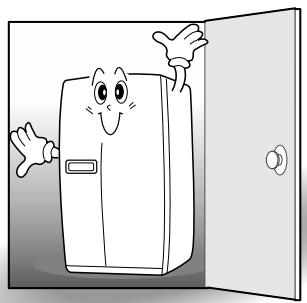
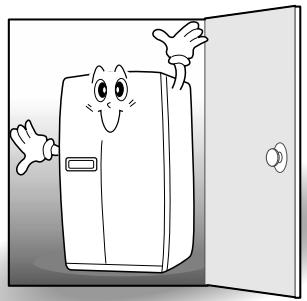
Check if the refrigerator can pass a doorway or enter a door first.
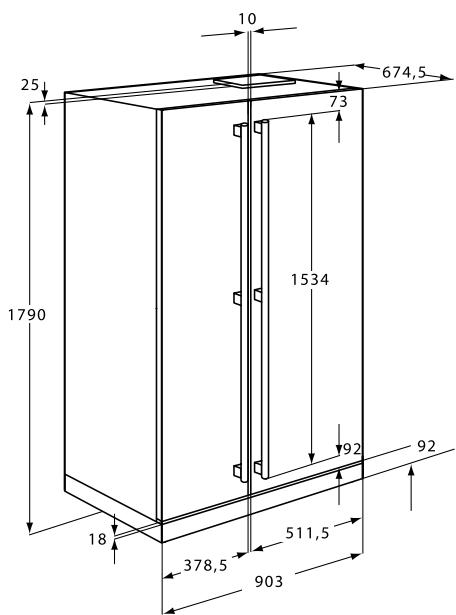
Dimensions (including Door Handles)
(WidthDepthHeight)
903 mm x 721.5 mm x 1790 mm
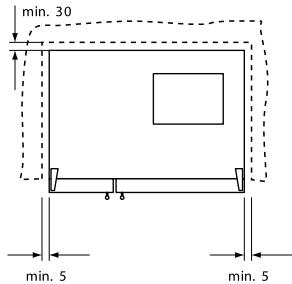
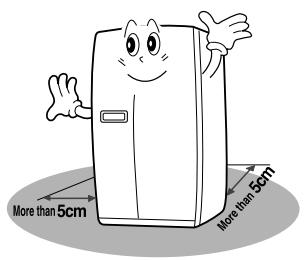
Find a suitable place to install
Sufficient space from refrigerator back to the wall for free air ventilation
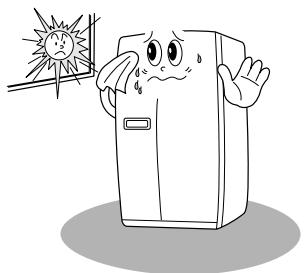
Avoid direct sunlight.

Note! Once the installation place is ready follow the installation instructions.
If surrounding temperature of refrigerator is low (below 5^ ), foods can be frozen or the refrigerator can work in abnormal way.

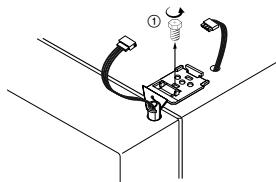
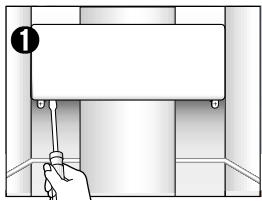
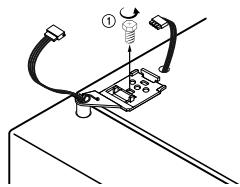
①

②
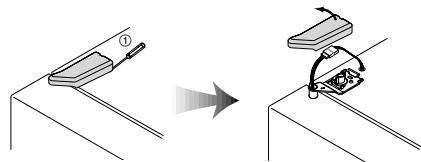
1 Spacer Kits
Screw
Notice!
"Place the enclosed spacers in the designed holder on the back of the appliance and screw them. This ensures that there is a minimum distance between the appliance and the wall".
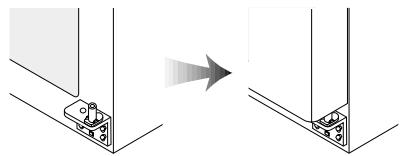
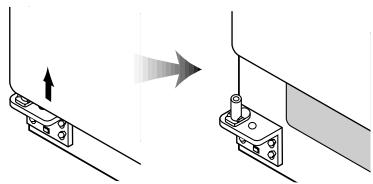
Replacing Freezer Door
- Insert the water tube into the hole of the bottom hinge pin first (Dispenser Models Only). Insert the bottom of freezer door into the bottom hinge pin.
- Insert the bottom hole of freezer door straight to the bottom hinge pin.
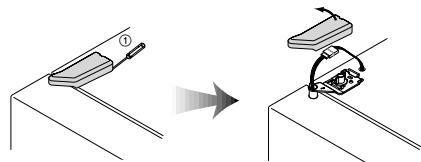
- Let the top of door close to the cabinet and insert the top hinge pin to the top hole of freezer door. (Insert the back of hinge to the groove of protrusion first, then front to the top hole of door.)
- Turn the hinge fastener tightly to the end.
Connect harness wirings and screw ground wire.
- Insert the water tube far into the coupling.
Dispenser Models Only

Replacing Refrigerator Door
- Insert the bottom hole of refrigerator door straight to the bottom hinge pin.
- Let the top of door close to the cabinet and insert the top hinge pin to the top hole of freezer door. (Insert the back of hinge to the groove of protrusion first, then front to the top hole of door.)

- Turn the hinge fastener tightly to the end.
Connect harness wirings and screw ground wire.
Click and screw the top hinge cover.
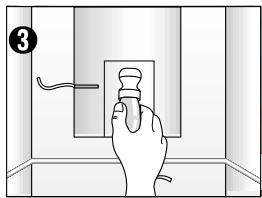
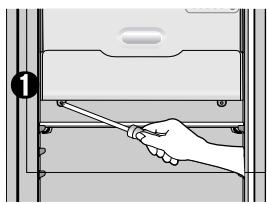
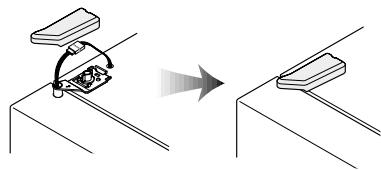
If the refrigerator cannot pass through a door during installation, follow these steps
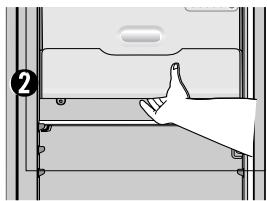
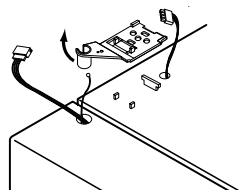
Removing Freezer Door
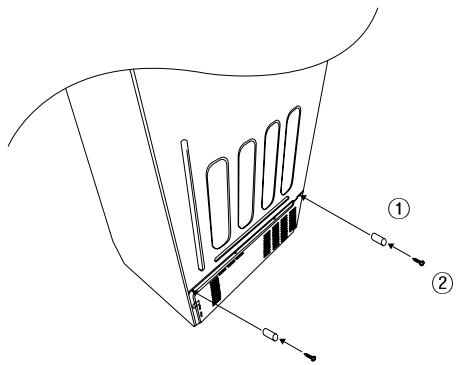
Remove front bottom cover first, if it is attached.
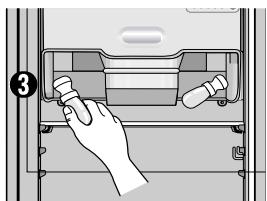
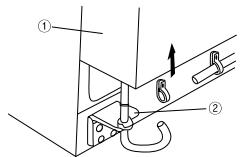
- Remove the bottom cover first. Pull out the left collar of the coupling first, then hold the coupling and pull out the left water tube. (Dispenser Models Only)

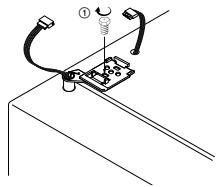
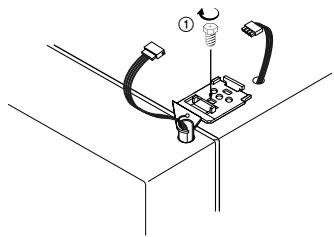
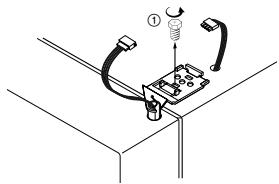
- Unscrew top hinge cover with a screwdriver.
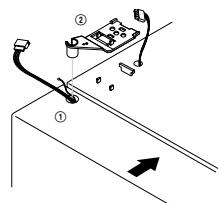
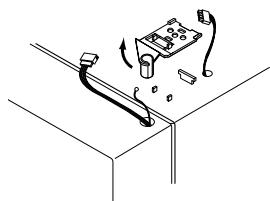
- Turn top hinge fastener counterclockwise 3~4 times. Disconnect the harness wires.

- Lift up the front of hinge to remove. (After the hinge is removed the door can fall down forward. Be careful!)

- Be careful not to damage the water line when removing the door.
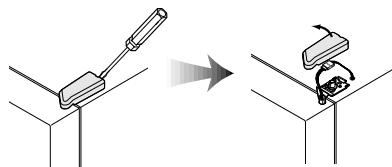
Removing Refrigerator Door
- Unscrew top hinge cover with a screwdriver. Insert a thin screwdriver into the side groove of the cover to remove.

- Turn top hinge fastener counterclockwise 3~4 times. Disconnect harness wires.
- Lift up the front of hinge to remove. (After the hinge is removed the door can fall down forward. Be careful!)

- Lift the door straight up to remove.

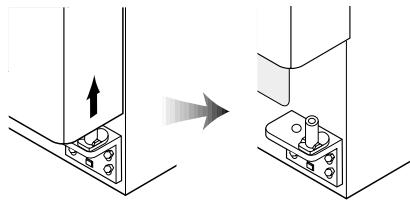
Refrigerator Levelling & Door Adjustment (If needed.)

Refrigerator must be level in order to maintain optimal performance and desirable front appearance. (If the floor beneath the refrigerator is uneven, freezer and refrigerator doors look unbalanced.)
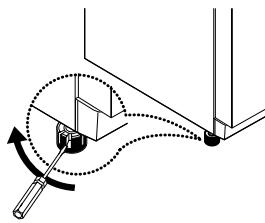
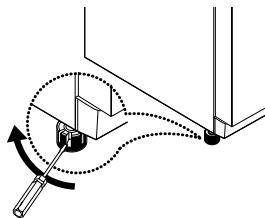
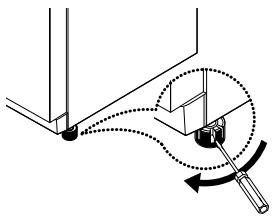
In case freezer door is lower than refrigerator door...
Insert a screwdriver (flat tip) into a groove of the left wheel (bottom of freezer) and turn it clockwise until the door is balanced. (Clockwise to raise freezer door; counterclockwise to lower).
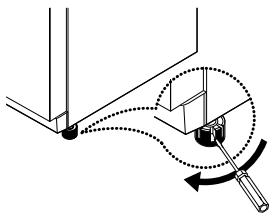
In case refrigerator door is lower than freezer door...
Insert a screwdriver (flat tip) into a groove of the right wheel (bottom of refrigerator) and turn it clockwise until the door is balanced. (Clockwise to raise refrigerator door; counterclockwise to lower).
Front Cover
After installation and/or door levelling, fasten front cover with screws. (Remove the screws on the front bottom panel first. Click and screw the cover.)

Caution! The front of refrigerator needs to be higher just a little than the back for easy door closing, but if the wheel is raised too much for door balance, i.e. front of refrigerator is higher than the back, it can be difficult to open the door.
How to install Water Line (Dispenser Models Only)
-
The water pressure should be 2.0 12.5kgf/cm^2 or more to run the automatic icemaker.
-
Check your tap water pressure; if a cup of 180 cc is full within 10 seconds, the pressure is OK.
-
When installing the water tubes, ensure they are not close to any hot surfaces.
- The water filter only "filters" water; it does not eliminate any bacteria or microbes.
- If the water pressure is not high enough to run the icemaker, call the local plumber to get an additional water pressure pump.
-
The filter life depends on the amount of use. We recommend you replace the filter at least once every 6 months.
-
When attaching the filter, place it for easy access (removing & replacing).
-
After installation of refrigerator and water line system, select [WATER] on your control panel and press it for 2~3 minutes to supply water into the water tank and dispense water.
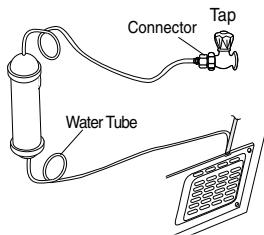
Installation Procedure (Dispenser Models Only)
- Join Connector to the tap water line
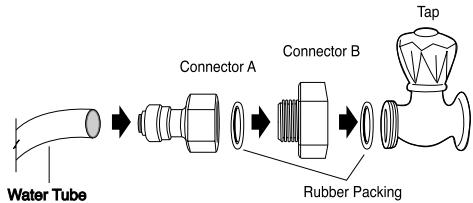
Figure A
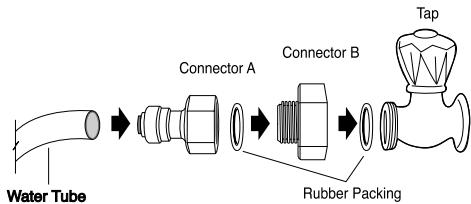
Figure B
- Use sealing tape to every connection of pipes/tubes to ensure there is no water leak.
- The water tube should be connected to the cold water line.
WATER SUPPLY KIT
Check the parts below for installing water supply. Some other necessary parts are available at your local service agents.
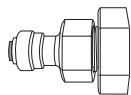
Connector (3014454520)

Holder (3012020700)
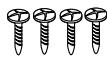
Screw × 4 ea (7112401211)

Fastener A×3ea (3011202000)
Filter Box (3019974100)

Water tube A/B
(A:3019503200
B:3019503300)
! Place the rubber washer inside the tap connector and screw onto the water tap.
-
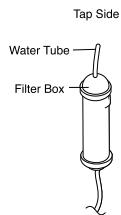
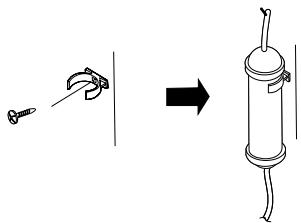
Get ready to install the Water Filter
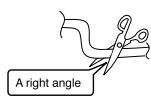
-
Measure an approximate distance between the filter and the Water Tube and cut the tube off filter vertically.
- Connect the tubes to the filter as the figure shows.
Leave a sufficient distance when cutting the tubes.
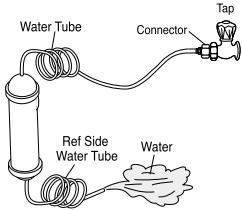
Ref Side
-
Remove any substances in the filter
-
Open the main tap water valve and check if water comes out of the Water Tube.
- Check if the Water Valve is open in case water does not come out.
-
Leave the valve open until clean water is coming out.
-
Initial water may contain some substances out of filter (manufacturing process).
-
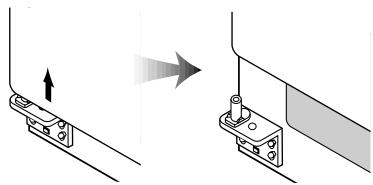
Attach the Filter Box
-
Screw and fasten the filter holder to the left/right side of the back of refrigerator.
- In case the holder is not fastened well, remove the back paper of the tape on the filter holder and attach it.
- Insert the filter box into the holder.
-
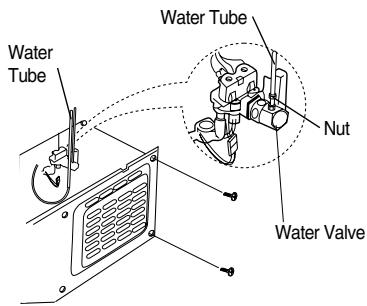
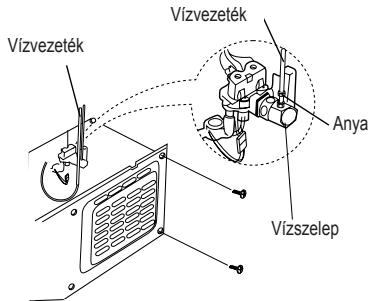
Connect the Water Tube to the refrigerator
-
Remove the rear cover at the bottom back of the refrigerator.
- Insert the fastening ring into the Water tube. (Be careful to follow the direction of the nut.)
- Insert the Water Tube into the top of the Water Valve, turn the nut clockwise to fasten it. (The Water valve is to the right of the motors.)
- Check for any bent tubes or water leaks; if so, re-check installation procedure.
- Replace the rear cover. (The Water Tube should be placed between the
groove of the refrigerator back and motor cover.)
! Set the tube upright as the figure shows.
-
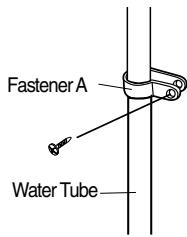
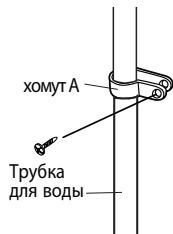
Fasten the Water Tube
-
Fasten the Water Tube with the [Fastener A].
- Check if the tube is bent or squeezed. If so, set it right to prevent any water leak.
-
After installation of Water Supply System
-
Plug in the refrigerator, press the [WATER] button on the control panel for 2~3 minutes to remove any air (bubble) in the pipes and drain out the initial water.
- Check for the water leaks again through the water supply system (tubes, connectors and pipes). Rearrange the tubes again and do not move the refrigerator.
Sisallysluettelo
Ruuvi x 4
(7112401211)

Kiinnitin A x 3
(3011202000)
Suodatinkotelo
(3019974100)

Vesiputki A/B
(A:3019503200
B:3019503300)
À respectfully imperativement!

Attention!
KIT D'ALIMENTATION D'EAU
! Set the tube upright as the figure shows.
Vite x 4ea (7112401211)
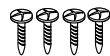
Parafuso x 4ea (7112401211)

Fixador A x 3ea (3011202000)
NO guitar ni desmontar

PROHIBICION. NO...

DAnHbI npOdyKT, 6e3oNaChbI dIy
OKpyXaUcEi CpeBIs, He CoepJxIT BWeIecCTB,
NCIOJIb3OBAHHe KOToPbIX OrpaHnUBaETCa
DInpeKtNbOi EC RoHS (Pb, Hg, Cd, Cr6+, P6D n
Pi5D).
O63aTeIbHcOxApaHnTe, yTo6bI o6eCneuTb 6e3oNaChyIO kCpNlyaTaunio!

Ipeep Tem KaK HauaTb NCNoB3OBA Tb np6oB, BHIMATEbHO npouHTaTE HACTOUIne INHCTyKUNI NO 6eONaCHOCtN. DePxNTe 3Ty INHCTpyKUnIO ND pyKoIN DnA NocJeDyUoEro NCNoJb3OBAHNA.

BhMaHHe!Yka3bIbaeT Ha BO3MOxHOCTb CmEpTeJIbHOro IXCoxOa INJIN IONUyehnA cepbe3HO TpaBMbl.

Octopoxh!yKa3bIaBET Ha BO3MOxHbI pNCK nOlyeHnTpaBM NINIOBpeKJeHnNIMyUcCTBa.
ApytncCmBOJIbI
He cTaBbTe B MOpO3nIbHyu KaMepy 6BytIkn N n EMcKoCTn N3 CTeKla.
CTeKJIaHHbIe EMKOCTn 6yTbJIKN MOrTy paa36bTuCBn HaHeCTn TpaBMbl.

4To6blI nepeMeCTnTb XoIoAnlbHnK (B rOp3HOHTaBHom IIN HAKIOHHOM noLoKeHN), Tpe6yEtcH He MeHee 2 qenOBek.
(OdHn dEpxnt 3a pyKn, pacnoJoxKeHHbIe HabePxy c3aI, BtOpoi — CH3y).
Держатыздугп чаtn onacho,pykn MOryT COCKOJIb3HyTb.

Ipejde yem nepemeaTb xoJouJIbHnK, y6eIntecb, yTO erO kOleca IOBepHytbl Bnepeid.
Koleca Moryt NOBpeiNbIINIOaapanaTbNl.PnI nepeMeueHnHa 6oJIbUne pacCTOHNr He 3a6bBaIte npOHO 3aKePntBbHTpeHHne YaCTNIINKOJNEToI.
- Oин могут ударитбя друг о друга паэбитбя.
PyKOBODCTBO NO yCTaHOBKe

Ipeep TEm, KaK npncTynaTb K kCkPnyaTaunBHNMaTeNbHO npOuHTne HAcToauneHCTpyKUnN PO6eONaChOCTn INcEynTe IM.
Mepbl npedoctopoxknoctn npu yctaHOBke npoekloueHH K cTeN 3JeKTPoNTaHIN
YTo6bI NCKIIOUHTB BO3rOpaHne, IopaxKeHne əJIeKtpruYeCKIM TOKOM UIN YTeKy Toka:
- HNkorda He yctaHaBnBaIte XOJOnIbHnK Ha MOKpbI INI BnAChbI NOI INI B MeCTax, rDe MOKeT 6bICTPO CkAnBaTbCBAoJa.
-
Перед подклоченем К сети заектpondыни роверпту слесуошee.
-
Bключай Te BИнky ceTeBorO ka6eЯ TOLьКВ 3a3eMЛeHHyI Opo3eTKy (B cTeb C 3a3eMЛeHnEМ).
-
He BKNIOUaIte XOLOINbHNK B ODNy PO3eTKy C DpyrIMN 6blTOBbIMn pnp6Opamn.
-
Пи подклочени Кэльсторети He ИспOLTьут eуДинHTeINи Ипп epexoDнКИ.
4.CneInte,yTo6bIcTeBoiKa6eJIbHe6blpa3dabIeHApYIMN(TajKeJIbMI)npEIMTaMn。 -
EcniyucbluHnTe Heo6bUHbI uym, NoYBCTByeTe CInbHbI «XIMnueckn» 3aIax, yBvNITe Dblm I.T.I. OT XONOJIbHbNka NocIe BkLIOHeHnE oE B CeTb, HEmeJdNeHHO BblKlIOHTe eo n3 CETn I O6paTntEc b K npedctabNTeIc cepBnCHOn cIyJx6bl IINI OTJeNaPobToBc NOKyNaTeJIaMn KOMnAHN ELECTROLUX.
- UTo6bI NCKJIIOUHTb NOBpeJxHeHn KOMPiPECCOPa N KOMNoHEHTOB 3JIeKTPuYeCKo CXEmbl XOLOdINbHnKa, IIOJOxJNTe 5 MNHyT, IpexKeJe CEM BkJIIOUHTb eRO CHOBA.
- Послеспервогов ВКLOчЕня рОJOxДиTe 2-3 уас,ЧТБы xOLOДиьнК ДОCTaTOчО OXlaДиLCBHTPy,ЗАtemВ Hero MOЖН OПОJOKNTb pNOДуKTbl. (В наразе ЗСКПИyaTациN XOLOДиьнКа BOМоЖен HeбОЛьшо СсeциФИчecку 3aIax ПЯСТмССБыдETаел. ПО мeled pa60Ты xOLOДиьнК, KOrda DBeRрьБу 6yDyT OKPkBaTBcR N 3aKpbIbAыс,ЗТOT 3aIax NOCTepeHNo ИСчe3HET.)
Mepbippeoctopoxhoctn pni 3kcnnyataun
YTObI NCKLIQUHTB NOJUyeHne TpaBM, BO3ROPaHne, noPApJEHne 3NEKTPMueCKIM TOKOM I.TД, PpeJde yEM HaHHaTb ICNOLb3OBAHne, BHMaTeJIbHO 3NUyHe DaHHoe pyKOBoDCTBO IN XpaHnTE erO B IOCTUYHm MecTe DJIa CnPabOK.
PpinaHaeJexHoctn
Dopma nla ran
KOMPnEeTdIpyoDaun BObl
PykoBoIOCTBO


Yepe3 6 MecaeB nocne hauana
ncnoJIb3ObaHnA 3aIopntc3NaUOK CHANGES FILTER (3AMEHHTb ΦNJIbTP).
Korda Na HactyniT Bpema 3aMeHbI ΦnIbTpau NnC6pOca yCTaHOBKn:
- Haxmte KhoKy 2. Haxmte KhoKy n yedpkuBaiTe ee haxaToB TeueHne 3 cekynd. Nocle toro 3hauOK CHANGE FILTER (3AMEHHTb DfNlbTP) noracHet.

IeTn,Irpaar,MOrTy HauKaTb IIO6yH KHOJKy Ha NaHeJI, YTO npuBeTeT K HApUSeHnIO TempePaTyPuro pexIma n fHyHKUHOHPOBaHNX OJOOniNbHnKa.
HaxMMTe 3Ty KhoNky, yTO6bI 6JIOKnpoBaTb TaKyIO BO3MOxHOCTb N COxpaHNTb HaCTpoiKn.
- YTO6bI BYKJIIOUHTb FyHKLIIO 6JOKINPOBKN, HaxMITE KHOKNy BLOKINPOBA Ee pa3 n yapedxnbaiTe haxaToi 60ane 3 cekyHd.
HaJMMITE KHOKNy, IN HAcTpoIka TemnepaTpybl n3MeHHTCAY, KaK POKa3aHO Ha PucYHke.
- IocneobatebHoe n3MeHeHne TempepaTpyb

Быстрoe oxлaxдене
Ecn Heo6xOAnMo 6bIcTpo OXlaaNTb npOyKtbl,TO hAKMnTe KONkY SUPER UTo6bl BbIKIOuHTb 3TOT pexIM, HAKMnTe KONkY eue pa3.

BHHMaHHe! IpoJyKtIb B XOJIoJNbHnKe MOrTy 3aMOpO3NtBcA,ecJIu TempeaTpya OKpykaUoJeRO Bo3Dyxa Hnke 5^
3aMeHa IaMnbl BHyTpeHHeRo OcBeIeHInr

JaMny DoJxKeH 3aMeHЯr TOnbKO npEcdTaBnTeJIb cepBnCHoN CnyK6bl IINI CneUmaINC, IMeIoUnn aHaIOnuHyIO KBaJIINΦKaUIO.
3aMeHa lamm MOp0nIbHnKa
- BbInHTnte 2 BnHTa, ydepKINBaIOUne nlafoH.

- YTo6bI n3BVeueh pIafoH, BO3bMntEc b 3a erO HnKHOIO uACTb I NOTAHTE BpepeI.

TempeaTpybI N CBeToIOIObl yKa3blBaIoT Ha CdeJaHHbI Bbl6Op.
- OTo6paJaaemaj TemnepaTpyo 03Haayet cJebeoe 3aJaHHoe 3HaueHne, PO3OMy OHa MOKeT OTInuHaTbCry OT aKTNUeCKOj TemnepaTypb B OTdJIeHIN.
IcnoJb3ObaHne I03aTopa
Bb6epnte:BODA/KOJOTbIJIJEI/KYBNUKINbDAHAKMTEyawkoHa pUcarcHaDnncbHAXATb.
YTo6bIyBb6paTbBODA,HaKMTe KHOIIky,IN3arOpNTc3HAUYOK.
YtO6bI BvI6paTb KONOTblI JEL, HaaMmTE KeHONKy , 3a4opntc 3HAQOK.
YTO6bI Bv6paTb KYBNU NbDA, HaKMNTe KHOJky, n3arOpNTc 3HAQOK.

BOДA
KOLONTbIJIeD
KyBKNIbDA

EcnIyIbOreHepaTOp He pa6oTaET
-
Ecni Ky6nKi Nbda CInnaIaIOTc N He BbIpyKaIOTc
-
ɪЗ藓ʌнгəнгəукьɒнгəнгəунгəнгəунгəунгəунгəунгəунгəунгəунгəунгəунгəунгəунгəунгəунгəунгəунгəунгəунгəунгəунгəунгəунгəунгəунгəунгəунгəy
-
EcnI KOJIYcEeTBO BODI, BbIpyJXaEMOJIbDOReHepATOpOM, HeIOCTatoHNOJIbDOReHepaTOp Heo6XoIMOOTPERyIINPOBaTb.ObpatneBcN pIpeDCTabInTeIIO cepBnCHOn cIyKbI.
-
B clyuae c6o8 3neKtpoNTaHn
-
Ky6nKn NbDa B 3TOM cnyae Moryt paCTaTb, n BOda BbITEcET B MOPO3NlBHOE OTdeneHHe. ECIn OxuJaTaCn DnITeNbHOE OTKIOUChHe N ENeKTPO3HeprN, To DOCTaHbTe EMKOCTb, ydaJInte I3 Hee BCE Ky6nKn n UcTaHOBNTe 06paTHO.
!PnmeaHne.NcnoNb3yNeTe TOnbKOJeI n3 DaHHORO XONODINbHNKa.

y6eDntecb,чTO BnIka BblHyta n3 po3eKn!
Ha pncyHke npedctabIeHa moIeIb CO BcEMn fynKUJMaM.
1 RILK DIA MOLOUHbIX PPOyKTOB
KpbuKa Jnka Dnma MONOuHbIX PNOyKTOB; UTO6bl CHaTb KpbuKy, PNIOKTPOIe ee, BO3bMNTEc b C DBYx CTOPOH N cDINhTe BNEBO.
- ⅢIIMK DII MOJIOnHbIX NPOJyKTOB; YTO6blIOCTaTb IYIINK, BO3bMNTeCb C DByX CTOPOH INOTAHHTe BBePX.

2 EMKoCTbIJIyXpaHEnHn Ky6NIOB Nbda
-Перемшени;чTo6bln3BLech,NotAHHTeBpepe.
- 06paTHaY yCTaHOBKa; yCTaHOBnTe B 60KOBbIe npope3n n BCTaBbTe Do KOHcA.
Ecnm EMKOCTb BCTaBJTcRc TpydOM, TO nBZbKeNtE ee, NIOpeBHcCnPaJIb Ha emKOCTn INI MexaHn3Me Ha YeTBePb
O6OpOTa n BCTaBbTe ee CHoBA.
He xpaHnTe Ky6Kn NbDa CnLShkOM DOnIro.
3 Плки морозиьнika и XOLOДиьнka
- To6bI DoCTaTb NOJKN, NOJHOCTbIO OTKPOITe DBepCu, NOTAHNTe NOJKN BpePe.
4 I山KIMMOPO3nJIbHnIKA n XOLOJINJIbHnIKA
- Bo3bMNTecb C dByX CTOPOH IN NOTAHINTE BBepx
5 IuziKnIyIxApaHeHnOBOUeI nΦpykTob
- UTo6bI n3BVeCy, NotaHInTe Bnpei N HEMHO I pINIOHNIMTe.
Ponka dozatopa BODbl
- BbHbTe peWetky N BbIMoIte IOnIKy O6bUH cnOco6om.
(Полka дяkanьн неяразетс самоocушаemon.)
! PnmeaHne.3anpeaaetcNcNoIb3OBaTb BHTPNXoJOnJIbHnKa KaKHe-JIN6O 3JeKTpUeCKNe pIn6Opbl,3TO MOKeT pInBeCTN K nopaxKeHIO 3JeKTPuYeCKM TOKOM IIN K nOxApy.
BnMaHHe!UTo6bI oBeCneuNTb 6e3OnaCHOCTb npu uChTKe (ydaJeHmN o6paTHou yCTaHOBke) yCTpoiCTBa dJa xpaHEnHa KByKOB JbDa, HaxMITE OIN PA3 KHOKNy BLOKInPOBKn JbDOReHepaTopa.
Cneinte 3a tem,HTO6bI He npaHnTb pyKn npu nCTke 3Toro yctpoiCTba.
Ppoceypa qntkn
BHytpenHne chaTn
- IcnoJb3yIe TnIy NcTKn TKaHb, CMOueHHyo BOIOI, INMgKoe (HeITpaIbHoe) MOIOoee CpeiCTBO.
JiunKn Dbepcbl
- IcnoJb3yIte TkaHb N MraKoe (HeTpaJIbHoe) MOIOUee cpeCTBO.
3aДнЯ CTOPOHa (CTOPOHa KOMPpeccopa)
- YdaJIaIte nbIeNcoCOM nbIb c peWetKn He pexe OJHOrO pa3a B rOD.
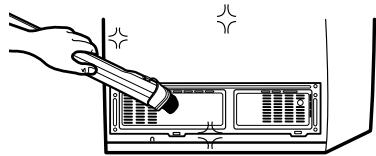
BhImaHne! 3anpeuaetcN MCNoIb3OBAtB 6eH3nH, 6eH3oJ, paCTBOpIteN I T,I, TaK KaK OHMOrT NOBpeuNT NoBepxHOCTN.
PpeKdyeM O6paTnTbC8 B CepBnCbI YeHtp...

IpexJe yem o6paTnTBcB C cepBnChbI CEHTp, O3HaKoMbTeCb CO cIeNyUOuMM COBeTaMn IyCtpaHeHIO HeNoJaOK!
IoiIroTOBka K yctaHOBKe
Y6eHntecb, yTO xOJOnuJIbHnK npoIeT B dBepHO npoem.
Ta6apuTHbIe pa3MpeblcDvBepHbIMn pyUkaMn)
CHINMITE CHaHaJIapepeHIO HIXKHO KpbIShKy,ecNI OHA yCTaHOBJIeHa.
- CHMMTe cchayana HnKHHIO KpbIshky. IOTyHNTe 3a JEBbYXOMYT COeINHeHNA, NOTOM yJePxNBAJTE COeINHeHne N BItaHTe JEByTO Tpy6y DJIa BOdbi (ToIbKO dIra MoDeJIe C Do3aTOPOM).

- OTKpyTnTe OTBepTKoK KpbIbKy BepXneI neTnI.
- ПовернITE замок ВорхөнүпүлүрOTичасов стpeнкн Ha 3-4 оборota. OТсоевнITEpyOK пювODOB.
- YTO6bI cHrTb NeTIO, NOHMnTe ee nepeHNIOU chaTb. (Pocne toro kak peTIA 6ydtc HrtA, DBepca MoKet yNaCTb BnpeD. BydTe OCTOpOxHbI!)
- CnEInTe 3a Tem, YTo6bI, ChNIma IBepeu, He NOBpeINtB LInHIO NOdau BObl.
Charne dbepbXoJOnBnHnKa
- OTKpyTnTe OTBepTKoK pblkky BepXHeI neTIn. T06bI CHaTb KpbIkKy, BCTaBbTe TOHkyO OTBepTKy B 6okoby npope3b Ha Hei.
- ПовернITE замок Ворх新聞 петли рpoTNb ucoBoi CTpeKn Ha 3-4 o6opota. OToCoeHInTe npyOK npoBOIOB.
- YTo6bI cHArT bIeTIIO, POIHNIMTe ee nepeDHIIOUaCTb. (Pocne toro kak peTIA 6ydt cHrTa,Dbepca MoKet ynpactb BnpeEd. BydbTe octOpOxHbI!)
- YTo6bI cHbTb DBePcUy, NOdHIMMITE ee BBepx
BbipabHnBaHne xoJOniNbHnK npereyInpOBKa DBepcbl (ecIin Heo6xoDIMO)

YtOb6I ObecneuHb HopMaJIbHyIO pa6Ory N BHeUHNb VnOxOJINbHnKa,ero CNeJyET BbIPOBnTb.(EcNn POn IOd XoJOnDInbHnKOM HepOBnB,DbepCuMOPaONbHnKaXoJOnDInbHnKa BBrJaT HeC6aANHCIpOBoHaHO
Ecn nDbepca Mopo3nIbHnKa HNXe DBepuXoJOnuNbHnKa...
BCTaBbTe OTBepTkCy C NIOCKM KOHcOM B Inpope3b IeBOr KOJecA (BHN3y MOPO3NJIbHNka) INOBOpauBaIbTe ee no cAcoboi CTpeJIke, NOKa DBepCu He bIpOBNHeTc. (No cAcoboi CTpeJIke, YTObI POJHbTb DBepCu MOpO3NJbHnKa, IpOTINB —YTO6bI OpUcTInTb).
EcnI DBePca XoIoDnIbHnKa HnXe DBePcbl MOpO3NlbHnKa
BCTaBbTe OTBepTkCy C NIOCKNIM KOHcOM B NpOpe3b npaBOrO KOJecA (BnH3y XOJOniNbHnKa) IN NOBopauHbaine ee ne Oacoboi CTpeJIke, noka DBepu He bYOBPiyeTcA. (No cacoBoi CTpeJIke, yTO6bI POJHnTb DBepUx XOJOniNbHnKa, npOTnB- yTO6bI ONyCTnTB).
IpeednKa Kpbioka
3aTnHTe Tpy6ky dny nOdaun BOdbic nOMoUxomyTaA.
- y6eIntecb,уTO trpy6ka He n3OryTu n He nepexkata. EcInn 30 To He TaK,To, UTo6bl npedOTbpaTb yTeky BoDbl, pa3MeCTIte ee npaBnHbO.
- NocJe yCTaHOBKn CNTeMbI NOdau BObl
BkIIOUHTe XOLOINbHnK B CTeB,Ha nAHeJIyI npBaIIeHnaHXMTe KHOIky BOIDA,YpeRJiBaITe ee HxKaToI 2-3 MHyTb,HTO6bl ydaJIInb Tpy3blpBKn BO3Dyxa I CNITb NepBbIe IopCmN BObl.
- CHOba y6eDInTeCb B OTCyTCTBnYteueK BOdbI B CNTeMe (Tp6Kn, CoeDInHeHna). CHOba pa3MecTIne Tpy6Kn N 6OJIbIe He DVBraJTe XJOIOINbHnK.

B6 IaMnIte C KpyuKb V To3n Upei Ca CneuaJIH N IaMnI, Cb3JaIeHc CamO 3a yNtpe6a B DOMaKInHcN Upei!
Te He MOraT Da Ce I3POnI3BaT 3a PbJIHO IJIN YactuH OCBeTJIeHne Ha JOMaKInHCKI nOmeJeHn!
Ako e Heo6xOJIMO da CmeHnte JAMnTa, n3IOn3BaNte HOBa JAMnCbC sbUaTAt MOuHOCCT, CpeNaJHNo IpeHa3HaueHa 3a yIpOTpe6a B DomaknHcKn UpeNi.
V toto spotbrebi ci se pouzivaji specialni zarovsky urcené pouze pro pouziti v domacich spotbrebi cih!
EN Bulb lamps used in this appliance are special lamps selected for household appliances use only!
They cannot be used for the full or partial illumination of a household room!
If it becomes necessary to replace the lamp use one of the same power and specifically designed for household appliances only.