
TRAVELMATE 5742G - Laptop ACER - Free user manual and instructions
Find the device manual for free TRAVELMATE 5742G ACER in PDF.
| Product type | Notebook (laptop) |
| Brand | Acer |
| Model | TravelMate 5742G |
| Screen | Widescreen 16:9 (select models) |
| Battery | Lithium-ion, rechargeable, conditioning recommended before first use |
| Power Supply | AC adapter 100-240 V AC, grounding pin |
| Pointing device | Integrated touchpad (with or without fingerprint reader depending on model) |
| Keyboard | Keyboard with integrated numeric keypad, Windows keys |
| Optical drive | DVD drive (select models), Class 1 laser device |
| Connectivity | Integrated Ethernet, V.92 fax/data modem (select models), Wi-Fi and Bluetooth (select models) |
| Ports | USB 2.0, HDMI (select models), IEEE 1394 (select models), ExpressCard (select models), audio jack |
| Security | Kensington security slot, BIOS passwords (supervisor, user, boot), Acer Bio-Protection fingerprint reader (select models) |
| Included software | Acer eRecovery Management, Acer Backup Manager, Acer PowerSmart, Acer PureZone (select models) |
| Power management | ACPI, sleep and hibernation, Acer PowerSmart key (select models) |
| Operating temperature | 0 °C to 50 °C (storage: -20 °C to 60 °C) |
| Battery charging temperature | 0 °C to 40 °C |
| Maintenance and cleaning | Turn off the computer, remove the battery, use a soft damp cloth; do not use liquids or aerosols |
| Repairability | Do not open yourself; entrust to an Acer authorized service center |
| Warranty | International Travelers Warranty (ITW) included |
| Compliance | ENERGY STAR, FCC Class B, R&TTE Directive, TBR 21 (select models) |
Frequently Asked Questions - TRAVELMATE 5742G ACER
User questions about TRAVELMATE 5742G ACER
0 question about this device. Answer the ones you know or ask your own.
Ask a new question about this device
Download the instructions for your Laptop in PDF format for free! Find your manual TRAVELMATE 5742G - ACER and take your electronic device back in hand. On this page are published all the documents necessary for the use of your device. TRAVELMATE 5742G by ACER.
USER MANUAL TRAVELMATE 5742G ACER
TravelMate Series Notebook PC
Model number:
Serial number:
Date of purchase:
Place of purchase:
Information for your safety and comfort
Safety instructions
Read these instructions carefully. Keep this document for future reference. Follow all warnings and instructions marked on the product.
Turning the product off before cleaning
Unplug this product from the wall outlet before cleaning. Do not use liquid cleaners or aerosol cleaners. Use a damp cloth for cleaning.
CAUTION for plug as disconnecting device
Observe the following guidelines when connecting and disconnecting power to the power supply unit:
Install the power supply unit before connecting the power cord to the AC power outlet.
Unplug the power cord before removing the power supply unit from the computer.
If the system has multiple sources of power, disconnect power from the system by unplugging all power cords from the power supplies.
CAUTION for Accessibility
Be sure that the power outlet you plug the power cord into is easily accessible and located as close to the equipment operator as possible. When you need to disconnect power to the equipment, be sure to unplug the power cord from the electrical outlet.
CAUTION for bundled dummy cards (only for certain models)
Your computer shipped with plastic dummies installed in the card slots.
Dummies protect unused slots from dust, metal objects or other particles. Save the dummies for use when no cards are in the slots.
CAUTION for Listening
To protect your hearing, follow these instructions.
- Increase the volume gradually until you can hear clearly and comfortably.
- Do not increase the volume level after your ears have adjusted.
- Do not listen to music at high volumes for extended periods.
- Do not increase the volume to block out noisy surroundings.
Decrease the volume if you can't hear people speaking near you.
iv
Warnings
- Do not use this product near water.
- Do not place this product on an unstable cart, stand or table. If the product falls, it could be seriously damaged.
- Slots and openings are provided for ventilation to ensure reliable operation of the product and to protect it from overheating. These openings must not be blocked or covered. The openings should never be blocked by placing the product on a bed, sofa, rug or other similar surface. This product should never be placed near or over a radiator or heat register, or in a built-in installation unless proper ventilation is provided.
- Never push objects of any kind into this product through cabinet slots as they may touch dangerous voltage points or short-out parts that could result in a fire or electric shock. Never spill liquid of any kind onto or into the product.
- To avoid damage of internal components and to prevent battery leakage, do not place the product on a vibrating surface.
- Never use it under sporting, exercising, or any vibrating environment which will probably cause unexpected short current or damage rotor devices, HDD, Optical drive, and even exposure risk from lithium battery pack.
- The bottom surface, areas around ventilation openings and AC adapter may get hot. To avoid injury, ensure they do not come in contact with your skin or body.
- Your device and its enhancements may contain small parts. Keep them out of the reach of small children.
Using electrical power
- This product should be operated from the type of power indicated on the marking label. If you are not sure of the type of power available, consult your dealer or local power company.
- Do not allow anything to rest on the power cord. Do not locate this product where people will walk on the cord.
- If an extension cord is used with this product, make sure that the total ampere rating of the equipment plugged into the extension cord does not exceed the extension cord ampere rating. Also, make sure that the total rating of all products plugged into the wall outlet does not exceed the fuse rating.
- Do not overload a power outlet, strip or receptacle by plugging in too many devices. The overall system load must not exceed 80% of the branch circuit rating. If power strips are used, the load should not exceed 80% of the power strip's input rating.
- This product's AC adapter is equipped with a three-wire grounded plug. The plug only fits in a grounded power outlet. Make sure the power outlet is properly grounded before inserting the AC adapter plug. Do not insert the plug into a non-grounded power outlet. Contact your electrician for details.

Warning! The grounding pin is a safety feature. Using a power outlet that is not properly grounded may result in electric shock and/or injury.

Note: The grounding pin also provides good protection from unexpected noise produced by other nearby electrical devices that may interfere with the performance of this product.
- The system can be powered using a wide range of voltages; 100 to 120 or 220 to 240V AC. The power cord included with the system meets the requirements for use in the country/region where the system was purchased. Power cords for use in other countries/regions must meet the requirements for that country/region. For more information on power cord requirements, contact an authorized reseller or service provider.
Product servicing
Do not attempt to service this product yourself, as opening or removing covers may expose you to dangerous voltage points or other risks. Refer all servicing to qualified service personnel.
Unplug this product from the wall outlet and refer servicing to qualified service personnel when:
the power cord or plug is damaged, cut or frayed
liquid was spilled into the product
the product was exposed to rain or water
the product has been dropped or the case has been damaged
- the product exhibits a distinct change in performance, indicating a need for service
- the product does not operate normally after following the operating instructions

Note: Adjust only those controls that are covered by the operating instructions, since improper adjustment of other controls may result in damage and will often require extensive work by a qualified technician to restore the product to normal condition.
Guidelines for safe battery usage
This notebook uses a Lithium-ion battery. Do not use it in a humid, wet or corrosive environment. Do not put, store or leave your product in or near a heat source, in a high temperature location, in strong direct sunlight, in a microwave oven or in a pressurized container, and do not expose it to temperatures over 60^ (140°F). Failure to follow these guidelines may cause the battery to leak acid, become hot, explode or ignite and cause injury and/or damage. Do not pierce, open or disassemble the battery. If the battery leaks and you come into contact with the leaked fluids, rinse thoroughly with water and seek medical attention immediately. For safety reasons, and to prolong the lifetime of the battery, charging will not occur at temperatures below 0^ (32°F) or above 40^ (104°F).
The full performance of a new battery is achieved only after two or three complete charge and discharge cycles. The battery can be charged and discharged hundreds of times, but it will eventually wear out. When the operation time becomes noticeably shorter than normal, buy a new battery. Use only the approved batteries, and recharge your battery only with the approved chargers designated for this device.
Use the battery only for its intended purpose. Never use any charger or battery that is damaged. Do not short-circuit the battery. Accidental short-circuiting can occur when a metallic object such as a coin, clip or pen causes direct connection of the positive (+) and negative (-) terminals of the battery. (These look like metal strips on the battery.) This might happen, for example, when you carry a spare battery in your pocket or purse. Short-circuiting the terminals may damage the battery or the connecting object.
The capacity and lifetime of the battery will be reduced if the battery is left in hot or cold places, such as in a closed car in summer or winter. Always try to keep the battery between 15^ and 25^ (59°F and 77°F). A device with a hot or cold battery may not work temporarily, even when the battery is fully charged. Battery performance is especially limited in temperatures well below freezing.
Do not dispose of batteries in a fire as they may explode. Batteries may also explode if damaged. Dispose of batteries according to local regulations. Please recycle when possible. Do not dispose as household waste.
Wireless devices may be susceptible to interference from the battery, which could affect performance.
Replacing the battery pack
The notebook uses lithium batteries. Replace the battery with the same type as that which came bundled with your product. Use of another battery may present a risk of fire or explosion.

Warning! Batteries may explode if not handled properly. Do not disassemble or dispose of them in fire. Keep them away from children. Follow local regulations when disposing of used batteries.
Caution for Optical Drive Device (only for certain models)
CAUTION: This appliance contains a laser system and is classified as a "CLASS 1 LASER PRODUCT." In case of any trouble with this device, please contact your nearest AUTHORIZED service station. To prevent direct exposure to the laser beam, do not try to open the enclosure.
CLASS 1 LASER PRODUCT
CAUTION: INVISIBLE LASER RADIATION WHEN OPEN. AVOID EXPOSURE TO BEAM.
APPAREIL A LASER DE CLASSE 1 PRODUIT
LASERATTENTION: RADIATION DU FAISCEAU LASER INVISIBLE EN CAS D'OUVERTURE. EVITTER Toute EXPOSITION AUX RAYONS.
LUOKAN 1 LASERLAITE LASER KLASSE 1
Telephone line safety
- Disconnect all telephone lines from the equipment when not in use and/or before servicing.
- To avoid the remote risk of electric shock from lightning, do not connect the telephone line to this equipment during lightning or thunderstorms.

Warning! For safety reasons, do not use non-compliant parts when adding or changing components. Consult your reseller for purchase options.
Operating environment

Warning! For safety reasons, turn off all wireless or radio transmitting devices when using your laptop under the following conditions. These devices may include, but are not limited to: wireless Ian (WLAN), Bluetooth and/or 3G.
Remember to follow any special regulations in force in any area, and always switch off your device when its use is prohibited or when it may cause interference or danger. Use the device only in its normal operating positions. This device meets RF exposure guidelines when used normally, and it and its antenna are positioned at least 1.5 centimeters (5/8 inches) away from your body (refer to the figure below). It should not contain metal and you should position the device the above-stated distance from your body. To successfully transmit data files or messages, this device requires a good quality connection to the network. In some cases, transmission of data files or messages may be delayed until such a connection is available. Ensure that the above separation distance instructions are followed until the transmission is completed. Parts of the device are magnetic. Metallic materials may be attracted to the device, and persons with hearing aids should not hold the device to the ear with the hearing aid. Do not place credit cards or other magnetic storage media near the device, because information stored on them may be erased.
Medical devices
Operation of any radio transmitting equipment, including wireless phones, may interfere with the functionality of inadequately protected medical devices. Consult a physician or the manufacturer of the medical device to determine if they are adequately shielded from external RF energy or if you have any questions. Switch off your device in health care facilities when any regulations posted in these areas instruct you to do so. Hospitals or health care facilities may be using equipment that could be sensitive to external RF transmissions.
Pacemakers. Pacemaker manufacturers recommend that a minimum separation of 15.3 centimeters (6 inches) be maintained between wireless devices and a pacemaker to avoid potential interference with the pacemaker. These recommendations are consistent with the independent research by and recommendations of Wireless Technology Research. Persons with pacemakers should do the following:
Always keep the device more than 15.3 centimeters (6 inches) from the pacemaker
- Not carry the device near your pacemaker when the device is switched o. If you suspect interference, switch off your device, and move it.
Hearing aids. Some digital wireless devices may interfere with some hearing aids. If interference occurs, consult your service provider.
Vehicles
RF signals may affect improperly installed or inadequately shielded electronic systems in motor vehicles such as electronic fuel injection systems, electronic antiskid (antilock) braking systems, electronic speed control systems, and air bag systems. For more information, check with the manufacturer, or its
representative, of your vehicle or any equipment that has been added. Only qualified personnel should service the device, or install the device in a vehicle.
Faulty installation or service may be dangerous and may invalidate any warranty that may apply to the device. Check regularly that all wireless
equipment in your vehicle is mounted and operating properly. Do not store or carry flammable liquids, gases, or explosive materials in the same compartment as the device, its parts, or enhancements. For vehicles equipped with an air bag, remember that air bags inflate with great force. Do not place objects, including installed or portable wireless equipment in the area over the air bag or in the air bag deployment area. If in-vehicle wireless equipment is improperly
installed, and the air bag inflates, serious injury could result. Using your device while flying in aircraft is prohibited. Switch off your device before boarding an aircraft. The use of wireless teledevices in an aircraft may be dangerous to the operation of the aircraft, disrupt the wireless telephone network, and may be illegal.
Potentially explosive environments
Switch off your device when in any area with a potentially explosive atmosphere and obey all signs and instructions. Potentially explosive atmospheres include areas where you would normally be advised to turn off your vehicle engine. Sparks in such areas could cause an explosion or fire resulting in bodily injury or even death. Switch off the device at refueling points such as near gas pumps at service stations. Observe restrictions on the use of radio equipment in fuel depots, storage, and distribution areas; chemical plants; or where blasting operations are in progress. Areas with a potentially explosive atmosphere are often, but not always, clearly marked. They include below deck on boats, chemical transfer or storage facilities, vehicles using liquefied petroleum gas (such as propane or butane), and areas where the air contains chemicals or particles such as grain, dust or metal powders. Do not switch the notebook on when wireless phone use is prohibited or when it may cause interference or danger.
Emergency calls
Warning: You cannot make emergency calls through this device. To make an emergency call you shall dial out through your mobile phone or other telephone call system.
Disposal instructions
Do not throw this electronic device into the trash when discarding. To minimize pollution and ensure utmost protection of the global environment, please recycle. For more information on the Waste from Electrical and Electronics Equipment (WEEE) regulations, visit http://www.acer-group.com/public/Sustainability/sustainability01.htm.
Mercury advisory
For bulb-inside projectors or electronic products containing an non-LED-backlit-LCD/CRT monito or display: Lamp(s) inside this product contain mercury and must be recycled or disposed of according to

local, state or federal laws. For more information, contact the Electronic Industries Alliance at www.eiae.org. For lamp-specific disposal information, check www.lamprecycle.org.
ENERGY STAR

ENERGY STAR
Acer's ENERGY STAR qualified products save your money by reducing energy cost and protecting the environment without sacrificing features or performance. Acer is proud to offer our customers products with the ENERGY STAR mark.
What is ENERGY STAR?
Products that are ENERGY STAR qualified use less energy and prevent greenhouse gas emissions by meeting strict energy efficiency guidelines set by the U.S. Environmental Protection Agency. Acer is committed to offer products and services worldwide that help customers save money, conserve energy and improve the quality of our environment. The more energy we can save through higher energy efficiency, the more we reduce greenhouse gases and the risks of climate change. More information refers to http://www.energystar.gov or http://www.energystar.gov/powermanagement.
Acer ENERGY STAR qualified products: (only for certain models)
- Produce less heat and reduce cooling loads, and warmer climates.
- Automatically go into "display sleep" and "computer sleep" mode after 10 and 30 minute of inactivity respectively.
- Wake the computer from sleep mode by pushing keyboard or moving mouse.
Computers will save more than 80% energy at "sleep" mode.
ENERGY STAR and the ENERGY STAR mark are registered U.S. marks
Tips and information for comfortable use
Computer users may complain of eyestrain and headaches after prolonged use. Users are also at risk of physical injury after long hours of working in front of a computer. Long work periods, bad posture, poor work habits, stress, inadequate working conditions, personal health and other factors greatly increase the risk of physical injury.
Incorrect computer usage may lead to carpal tunnel syndrome, tendonitis, tenosynovitis or other musculoskeletal disorders. The following symptoms may appear in the hands, wrists, arms, shoulders, neck or back:
- numbness, or a burning or tingling sensation
- aching, soreness or tenderness
pain, swelling or throbbing
stiffness or tightness - coldness or weakness
If you have these symptoms, or any other recurring or persistent discomfort and/or pain related to computer use, consult a physician immediately and inform your company's health and safety department.
The following section provides tips for more comfortable computer use.
Finding your comfort zone
Find your comfort zone by adjusting the viewing angle of the monitor, using a footrest, or raising your sitting height to achieve maximum comfort. Observe the following tips:
- refrain from staying too long in one fixed posture
- avoid slouching forward and/or leaning backward
- stand up and walk around regularly to remove the strain on your leg muscles
take short rests to relax your neck and shoulders - avoid tensing your muscles or shrugging your shoulders
- install the external display, keyboard and mouse properly and within comfortable reach
- if you view your monitor more than your documents, place the display at the center of your desk to minimize neck strain
Taking care of your vision
Long viewing hours, wearing incorrect glasses or contact lenses, glare, excessive room lighting, poorly focused screens, very small typefaces and low-contrast displays could stress your eyes. The following sections provide suggestions on how to reduce eyestrain.
Eyes
Rest your eyes frequently.
- Give your eyes regular breaks by looking away from the monitor and focusing on a distant point.
- Blink frequently to keep your eyes from drying out.
XII
Display
- Keep your display clean.
- Keep your head at a higher level than the top edge of the display so your eyes point downward when looking at the middle of the display.
- Adjust the display brightness and/or contrast to a comfortable level for enhanced text readability and graphics clarity.
-
Eliminate glare and reflections by:
-
placing your display in such a way that the side faces the window on any light source
- minimizing room light by using drapes, shades or blinds
using a task light - changing the display's viewing angle
using a glare-reduction filter -
using a display visor, such as a piece of cardboard extended from the display's top front edge
-
Avoid adjusting your display to an awkward viewing angle.
- Avoid looking at bright light sources, such as open windows, for extended periods of time.
Developing good work habits
Develop the following work habits to make your computer use more relaxing and productive:
Take short breaks regularly and often.
Perform some stretching exercises.
- Breathe fresh air as often as possible.
Exercise regularly and maintain a healthy body.

Warning! We do not recommend using the computer on a couch or bed. If this is unavoidable, work for only short periods, take breaks regularly, and do some stretching exercises.

Note: For more information, please refer to "Regulations and safety notices" on page 36.
First things first
We would like to thank you for making an Acer notebook your choice for meeting your mobile computing needs.
Your guides
To help you use your Acer notebook, we have designed a set of guides:
First off, the Just for Starters...poster helps you get started with setting up your computer.
The printed TravelMate Series Generic User Guide contains useful information applying to all models in the TravelMate product series. It covers basic topics such as Acer eRecovery Management, using the keyboard, Audio, etc. Please understand that due to its nature, the Generic User Guide as well as the AcerSystem User Guide mentioned below will occasionally refer to functions or features which are only contained in certain models of the series, but not necessarily in the model you purchased. Such instances are marked in the text with language such as "only for certain models".
The printed Quick Guide introduces you to the basic features and functions of your new computer. For more on how your computer can help you to be more productive, please refer to the AcerSystem User Guide. This guide contains detailed information on such subjects as system utilities, data recovery, expansion options and troubleshooting. In addition it contains warranty information and the general regulations and safety notices for your notebook. It is available in Portable Document Format (PDF) and comes preloaded on your notebook. Follow these steps to access it:
1 Click on Start, All Programs, AcerSystem.
2 Click on AcerSystem User Guide.

Note: Viewing the file requires Adobe Reader. If Adobe Reader is not installed on your computer, clicking on AcerSystem User Guide will run the Adobe Reader setup program first. Follow the instructions on the screen to complete the installation. For instructions on how to use Adobe Reader, access the Help and Support menu.
Basic care and tips for using your computer
Turning your computer on and off
To turn on the computer, simply press and release the power button below the LCD screen beside the easy-launch buttons. Please refire to "Quick Guide" for the location of the power button.
xiv
To turn the power off, do any of the following:
Use the Windows shutdown command Click on Start then click on Shut Down.
Use the power button
You can also put the computer in sleep mode by pressing the sleep hotkey

Note: If you cannot power off the computer normally, press and hold the power button for more than four seconds to shut down the computer. If you turn off the computer and want to turn it on again, wait at least two seconds before powering up.
Taking care of your computer
Your computer will serve you well if you take care of it.
- Do not expose the computer to direct sunlight. Do not place it near sources of heat, such as a radiator.
- Do not expose the computer to temperatures below 0^ ( 32^ ) or above 50^ ( 122^ ).
- Do not subject the computer to magnetic fields.
- Do not expose the computer to rain or moisture.
- Do not spill water or any liquid on the computer.
- Do not subject the computer to heavy shock or vibration.
- Do not expose the computer to dust or dirt.
- Never place objects on top of the computer.
- Do not slam the computer display when you close it.
- Never place the computer on uneven surfaces.
Taking care of your AC adapter
Here are some ways to take care of your AC adapter:
- Do not connect the adapter to any other device.
- Do not step on the power cord or place heavy objects on top of it. Carefully route the power cord and any cables away from foot traffic.
- When unplugging the power cord, do not pull on the cord itself but pull on the plug.
- The total ampere ratings of the equipment plugged in should not exceed the ampere rating of the cord if you are using an extension cord. Also, the total current rating of all equipment plugged into a single wall outlet should not exceed the fuse rating.
Taking care of your battery pack
Here are some ways to take care of your battery pack:
- Use only batteries of the same kind as replacements. Turn the power off before removing or replacing batteries.
- Do not tamper with batteries. Keep them away from children.
- Dispose of used batteries according to local regulations. Recycle if possible.
Cleaning and servicing
When cleaning the computer, follow these steps:
1 Turn off the computer and remove the battery pack.
2 Disconnect the AC adapter.
3 Use a soft, moist cloth. Do not use liquid or aerosol cleaners.
If either of the following occurs:
the computer has been dropped or the body has been damaged;
- the computer does not operate normally
Please refer to "Frequently asked questions" on page 31.
Information for your safety and comfort iii
Safety instructions iii
Caution for Optical Drive Device
(only for certain models) vii
Operating environment viii
Medical devices viii
Vehicles ix
Potentially explosive environments ix
Emergency calls ix
Disposal instructions
Mercury advisory x
ENERGY STAR
Tips and information for comfortable use xi
First things first xiii
Your guides xiii
Basic care and tips for using your computer xiii
Turning your computer on and off xiii
Taking care of your computer xiv
Taking care of your AC adapter xiv
Taking care of your battery pack XV
Cleaning and servicing XV
Touchpad 1
Touchpad basics (with fingerprint reader) 1
Touchpad basics (with two-click buttons) 2
Using the keyboard 3
Lock keys and embedded numeric keypad* 3
Windows keys 4
Audio 5
Acer PureZone (only for certain models) 5
Video 5
16:9 display (only for certain models) 5
Using the system utilities 6
Acer Bio-Protection (only for certain models) 6
Acer Backup Manager 7
Power management 8
Acer eRecovery Management 9
Burn backup discs 10
Restore 11
Restore Windows from backup discs 12
Battery pack 14
Battery pack characteristics 14
Maximizing the battery's life 14
Installing and removing the battery pack 15
Charging the battery 16
Checking the battery level 16
Optimising battery life 16
Battery-low warning 17
Taking your notebook PC with you 18
Disconnecting from the desktop 18
Moving around 18
Preparing the computer 18
What to bring to meetings 19
Taking the computer home 19
Preparing the computer 19
What to take with you 19
Special considerations 20
Setting up a home office 20
Traveling with the computer 20
Preparing the computer 20
What to take with you 20
Special considerations 21
Traveling internationally with the computer 21
Preparing the computer 21
What to bring with you 21
Special considerations 21
Securing your computer 22
Using a computer security lock 22
Using passwords 22
Entering passwords 23
Setting passwords 23
Expanding through options 24
Connectivity options 24
Fax/data modem (only for certain models) 24
Built-in network feature 25
Universal Serial Bus (USB) 25
IEEE 1394 port (only for certain models) 26
High-Definition Multimedia Interface
(only for certain models) 26
ExpressCard (only for certain models) 27
Installing memory 28
BIOS utility 29
Boot sequence 29
Enable disk-to-disk recovery 29
Password 29
Using software 30
Playing DVD movies 30
Frequently asked questions 31
Requesting service 34
International Travelers Warranty (ITW) 34
Before you call 34
Troubleshooting
Troubleshooting tips 35
Error messages 35
Regulations and safety notices
FCC statement 36
Modem notices (only for certain models) 37
LCD pixel statement 39
Radio device regulatory notice 39
General 39
The FCC RF safety requirement 40
Canada — Low-power license-exempt radio
communication devices (RSS-210) 41
Exposure of humans to RF fields (RSS-102) 41
LCD panel ergonomic specifications 41
Touchpad
The built-in touchpad is a pointing device that senses movement on its surface. This means the cursor responds as you move your finger across the surface of the touchpad. The central location on the palmrest provides optimum comfort and support.
Touchpad basics (with fingerprint reader)
The following items show you how to use the touchpad with Acer Bio-Protection fingerprint reader.
- Move your finger across the touchpad (1) to move the cursor.
- Press the left (2) and right (4) buttons located beneath the touchpad to perform selection and execution functions. These two buttons are similar to the left and right buttons on a mouse. Tapping on the touchpad is the same as clicking the left button.
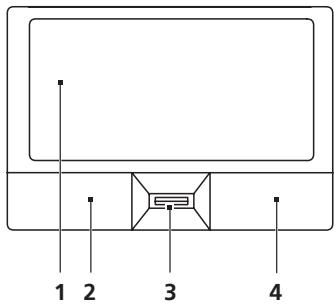
| Function | Left button (2) | Right button (4) | Main touchpad (1) | Center button (3) |
| Execute | Quickly click twice. | Tap twice (at the same speed as double-clicking a mouse button). | ||
| Select | Click once. | Tap once. | ||
| Drag | Click and hold, then use finger on the touchpad to drag the cursor. | Tap twice (at the same speed as double-clicking a mouse button); rest your finger on the touchpad on the second tap and drag the cursor. | ||
| Access context menu | Click once. |
Touchpad basics (with two-click buttons)
The following items show you how to use the touchpad with two-click buttons.
- Move your finger across the touchpad to move the cursor.
- Press the left and right buttons located beneath the touchpad to perform selection and execution functions. These two buttons are similar to the left and right buttons on a mouse. Tapping on the touchpad is the same as clicking the left button.
| Function | Left button | Right button | Main touchpad |
| Execute | Quickly click twice. | Tap twice (at the same speed as double-clicking a mouse button). | |
| Select | Click once. | Tap once. | |
| Drag | Click and hold, then use finger on the touchpad to drag the cursor. | Tap twice (at the same speed as double-clicking a mouse button); rest your finger on the touchpad on the second tap and drag the cursor. | |
| Access context menu | Click once. |

Note: Illustrations for reference only. The exact configuration of your PC depends on the model purchased.

Note: When using the touchpad, keep it — and your fingers — dry and clean. The touchpad is sensitive to finger movement; hence, the lighter the touch, the better the response. Tapping harder will not increase the touchpad's responsiveness.

Note: By default, vertical and horizontal scrolling is enabled on your touchpad. It can be disabled under Mouse settings in Windows Control Panel.
Using the keyboard
The keyboard has full-sized keys and an embedded numeric keypad*, separate cursor, lock, Windows, function and special keys.
Lock keys and embedded numeric keypad*
The keyboard has three lock keys which you can toggle on and off.
| Lock key | Description |
| Caps Lock | When Caps Lock is on, all alphabetic characters typed are in uppercase. |
| Num Lock <Fn> + <F11>* | When Num Lock is on, the embedded keypad is in numeric mode. The keys function as a calculator (complete with the arithmetic operators +, -, *, and /). Use this mode when you need to do a lot of numeric data entry. A better solution would be to connect an external keypad. |
| Scroll Lock <Fn> + <F12> | When Scroll Lock is on, the screen moves one line up or down when you press the up or down arrow keys respectively. Scroll Lock does not work with some applications. |
The embedded numeric keypad functions like a desktop numeric keypad. It is indicated by small characters located on the upper right corner of the keycaps. To simplify the keyboard legend, cursor-control key symbols are not printed on the keys.
| Desired access | Num Lock on | Num Lock off |
| Number keys on embedded keypad | Type numbers in a normal manner. | |
| Cursor-control keys on embedded keypad | Hold <Shift> while using cursor-control keys. | Hold <Fn> while using cursor-control keys. |
| Main keyboard keys | Hold <Fn> while typing letters on embedded keypad. | Type the letters in a normal manner. |
- only for certain models
Windows keys
The keyboard has two keys that perform Windows-specific functions.
| Key | Description |
| Windows key | Pressed alone, this key has the same effect as clicking on the Windows Start button; it launches the Start menu. It can also be used with other keys to provide a variety of functions: |
| <>: Open or close the Start menu | |
| <> + <D>: Display the desktop | |
| <> + <E>: Open Windows Explore | |
| <> + <F>: Search for a file or folder | |
| <> + <G>: Cycle through Sidebar gadgets | |
| <> + <L>: Lock your computer (if you are connected to a network domain), or switch users (if you're not connected to a network domain) | |
| <> + <M>: Minimizes all windows | |
| <> + <R>: Open the Run dialog box | |
| <> + <T>: Cycle through programs on the taskbar | |
| <> + <U>: Open Ease of Access Center | |
| <> + <X>: Open Windows Mobility Center | |
| <> + <BREAK>: Display the System Properties dialog box | |
| <> + <SHIFT+M>: Restore minimized windows to the desktop | |
| <> + <TAB>: Cycle through programs on the taskbar by using Windows Flip 3-D | |
| <> + <SPACEBAR>: Bring all gadgets to the front and select Windows Sidebar | |
| <CTRL> + <> + <F>: Search for computers (if you are on a network) | |
| <CTRL> + <> + <TAB>: Use the arrow keys to cycle through programs on the taskbar by using Windows Flip 3-D | |
| Note: Depending on your edition of Windows, some shortcuts may not function as described. | |
| Application key | This key has the same effect as clicking the right mouse button; it opens the application's context menu. |
Audio
The computer also comes with 32-bit High Definition (HD) Audio and speaker(s).
Acer PureZone (only for certain models)
The system provides you whole new enthusiastic audio experience including Acer PureZone with built-in stereo microphones featuring beam forming and echo cancellation technologies. Acer PureZone technology supports Acoustic Echo Cancellation, Beam Forming and Noise Suppression for pure sound recording. To set up your microphone, run the Acer HD Audio Manager by double-clicking the Acer HD Audio Manager icon in the system tray of your Windows system. The Acer HD Audio Manager dialog box will pop up. Click the Microphone tab, and then click the Microphone Effects tab. Select Beam Forming and Acoustic Echo Cancellation to set the microphone effect.

Note: Disable the beam forming to get the multi-sound source input.
Video
16:9 display (only for certain models)
16:9 display delivers Full HD movies at home like never before. Sky-high color saturation guarantees an authentic HD viewing experience.16:9 quality means true home theater visuals have finally arrived for notebook entertainment enthusiasts.
Using the system utilities
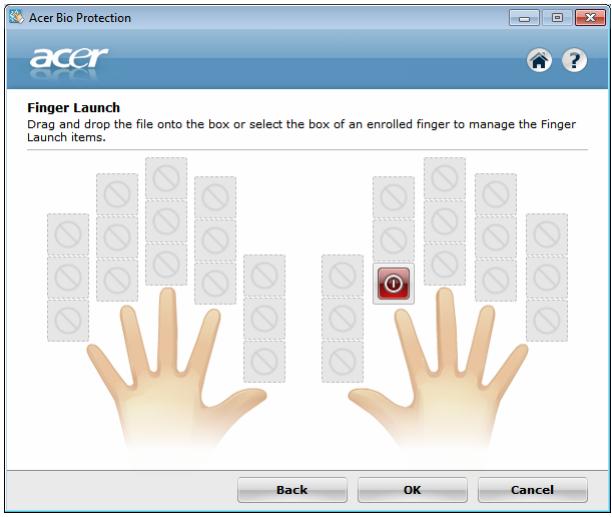
Acer Bio-Protection (only for certain models)
Acer Bio-Protection Fingerprint Solution is a multi-purpose fingerprint software package integrated with the Microsoft Windows operating system. Utilizing the uniqueness of one's fingerprint, Acer Bio-Protection Fingerprint Solution incorporates protection against unauthorized access to your computer with centralized password management via Password Bank; and fast application/ website launching and login with Acer FingerLaunch.
With Acer Bio-Protection Fingerprint Solution, you can now enjoy an extra layer of protection for your personal computer, as well as the convenience of accessing your daily tasks with a simple swipe of your finger!
For more information, refer to the Acer Bio-Protection help files.
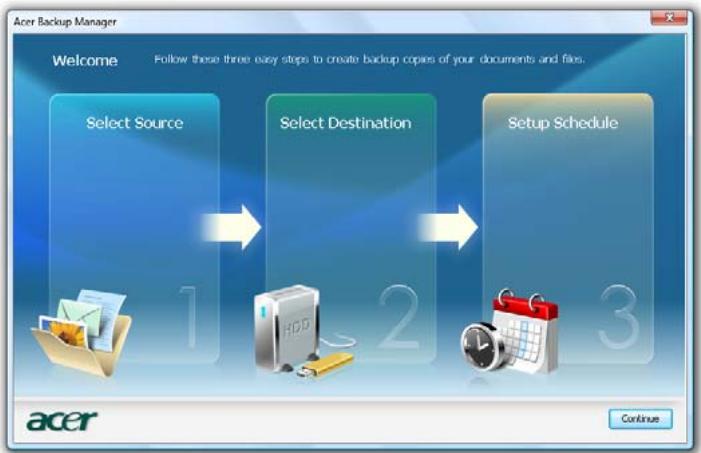
Acer Backup Manager

Note: This feature is only available on certain models.
Acer Backup Manager is a simple three-step process that allows you to create backup copies of your entire system or selected files and folders according to a schedule or as you need to.
To start Acer Backup Manager, press the Acer Backup Manager key above the keyboard. Alternatively, you can go to Start > All Programs > Acer Backup Manager > Acer Backup Manager. This will open the Welcome screen; from this screen you will be taken through the three steps to setup scheduled back ups. Click Continue to proceed to the following screen. Click the + button and follow the onscreen instructions:
1 Select the content you want to back up. The less content you select, the quicker the process will be, but it will increase your risks of losing data.
2 Select where you want the backup copies to be stored. You will need to select an external drive or your D: drive; Acer Backup Manager cannot store a backup on the source drive.
3 Select how often you want Acer Backup Manager to create back ups.
Once you have finished these three steps, backups will be created according to the schedule. You can also create backups manually by pressing the Acer Backup Manager key.
If you wish to change your settings at any time, run Acer Backup Manager from the Start menu and go through the steps outlined above.
Power management
This computer has a built-in power management unit that monitors system activity. System activity refers to any activity involving one or more of the following devices: keyboard, mouse, hard disk, peripherals connected to the computer, and video memory. If no activity is detected for a period of time (called an inactivity timeout), the computer stops some or all of these devices in order to conserve energy.
This computer employs a power management scheme that supports the advanced configuration and power interface (ACPI), which allows for maximum power conservation and maximum performance at the same time. Windows handles all power-saving chores for your computer.
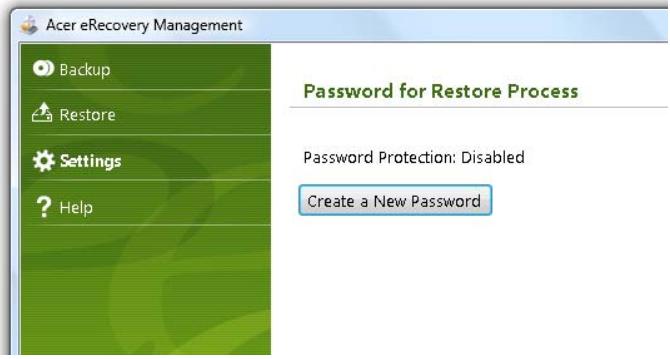
Acer eRecovery Management
Acer eRecovery Management is a tool to quickly restore the system. You can back up/restore the factory default image, and reinstall applications and drivers.

Note: All of the following content is for general reference only. Actual product specifications may vary.
Acer eRecovery Management consists of the following functions:
1 Backup:
- Create Factory Default Disc
Create Drivers and Applications Disc
2 Restore:
- Completely Restore System to Factory Defaults
- Restore Operating System and Retain User Data
Reinstall Drivers or Applications
This chapter will guide you through each process.

Note: This feature is only available on certain models. For systems that do not have a built-in optical disc burner, plug in an external optical disc burner before entering Acer eRecovery Management for optical disc-related tasks.
To use the password protection feature of Acer eRecovery Management, you must first set the password. The password is set by launching Acer eRecovery Management and clicking Settings.
Burn backup discs
From the Backup page of Acer eRecovery Management, you can burn the factory default image or back up drivers and applications.
1 Click on Start > All Programs > Acer > Acer eRecovery Management.
2 Acer eRecovery Management opens to the Backup page.
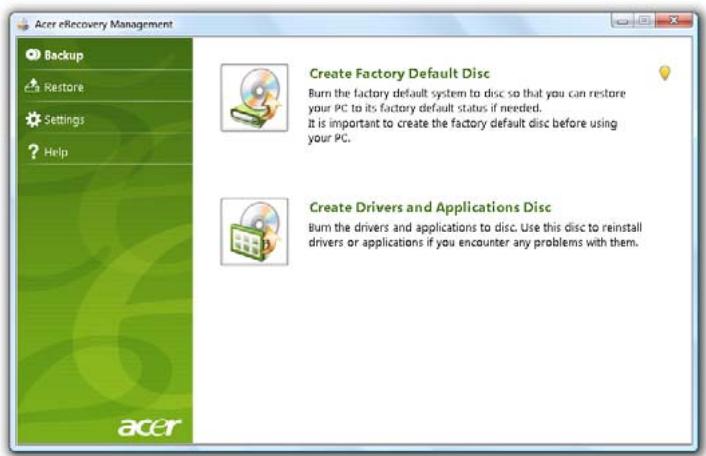
3 Select the type of backup (factory default or drivers and applications) you would like to burn to disc.
4 Follow the instructions on screen to complete the process.

Note: Create a factory default image when you want to burn a bootable disc that contains your computer's entire operating system as it was delivered to you from the factory. If you wish to have a disc that will allow you to browse the contents and install selected drivers and applications, create a drivers and application backup instead — this disc will not be bootable.
Restore
The restore feature allows you to restore or recover the system from a factory default image or from previously created CD and DVD backups. You can also reinstall applications and drivers for your Acer system.
1 Click on Start, All Programs, Acer, AcerRecovery Management.
2 Switch to the Restore page by clicking Restore.
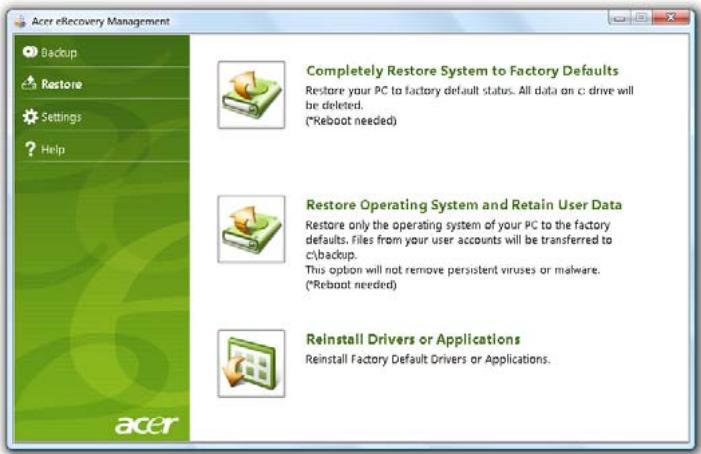
3 You can choose to restore the system from a factory default image or reinstall applications and drivers.
4 Follow the instructions on screen to complete the process.
Restore Windows from backup discs

Note: This feature is only available on certain models.
To restore Windows from your previously burned backup discs, you will need to insert the first backup disc and enable the F12 Boot Menu via the BIOS Setup Utility.
1 Turn on your computer and insert the first system recovery disc into the optical disc drive. Restart your computer.
2 During startup when the Acer logo shows, press the F2 key to enter BIOS Setup, where you can set system parameters.
3 Use the left and right arrow keys to select the Main menu.
4 Use the up and down arrow keys to select F12 Boot Menu
5 Use the F5 or F6 key to change F12 Boot Menu to Enabled.
6 Press the ESC key to enter the Exit submenu, press the ENTER key to Exit Saving Changes. Press the ENTER key again to select Yes. The system will reboot.
7 After rebooting, when the Acer logo shows, press the F12 key to open the Boot Menu. Here you can select which device to boot from.
8 Use the arrow keys to select the IDE1*, then press the ENTER key. Windows will be installed from the recovery disc.
9 Insert the second recovery disc when prompted, then follow the onscreen prompts to complete the restore.
10 Remove the recovery disc from the optical drive once the restore is complete. Do this before rebooting your computer.
If you prefer to set the boot priority for long-term use, you should select the Boot submenu.
1 Turn on your computer and insert the first system recovery disc into the optical disc drive. Restart your computer.
2 During startup when the Acer logo shows, press the F2 key to enter BIOS Setup, where you can set system parameters.
3 Use the left and right arrow keys to select the Boot menu.
4 Use the up and down arrow keys to select the IDE1 device.
5 Use the F6 key to move the IDE1 device to the highest boot priority, or use the F5 key to move other devices to a lower boot priority. Ensure that the IDE1* device is the highest priority.
6 Press the ESC key to enter the Exit submenu, press the ENTER key to Exit Saving Changes. Press the ENTER key again to select Yes. The system will reboot.
7 When you reboot, Windows will be installed from the recovery disc.
8 Insert the second recovery disc when prompted, then follow the onscreen prompts to complete the restore.
9 Remove the recovery disc from the optical drive once the restore is complete. Do this before rebooting your computer.
Battery pack
The computer uses a battery pack that gives you long use between charges.
Battery pack characteristics
The battery pack has the following characteristics:
- Employs current battery technology standards.
Delivers a battery-low warning.
The battery is recharged whenever you connect the computer to the AC adapter. Your computer supports charge-in-use, enabling you to recharge the battery while you continue to operate the computer. However, recharging with the computer turned off results in a significantly faster charge time.
The battery will come in handy when you travel or during a power failure. It is advisable to have an extra fully charged battery pack available as backup. Contact your dealer for details on ordering a spare battery pack.
Maximizing the battery's life
Like all other batteries, your computer's battery will degrade over time. This means that the battery's performance will diminish with time and use. To maximize your battery's life, you are advised to adhere to the recommendations set out below.
Conditioning a new battery pack
Before you use a battery pack for the first time, there is a "conditioning" process that you should follow:
1 Insert the new battery without turning the computer on.
2 Connect the AC adapter and fully charge the battery.
3 Disconnect the AC adapter.
4 Turn on the computer and operate using battery power.
5 Fully deplete the battery until the battery-low warning appears.
6 Reconnect the AC adapter and fully charge the battery again.
Follow these steps again until the battery has been charged and discharged three times.
Use this conditioning process for all new batteries, or if a battery hasn't been used for a long time. If the computer is to be stored for more than two weeks, you are advised to remove the battery pack from the unit.

Warning: Do not expose battery packs to temperatures below 0^ (32^) or above 45^ (113^) . Extreme temperatures may adversely affect the battery pack.
By following the battery conditioning process you condition your battery to accept the maximum possible charge. Failure to follow this procedure will prevent you from obtaining the maximum battery charge, and will also shorten the effective lifespan of the battery.
In addition, the useful lifespan of the battery is adversely affected by the following usage patterns:
- Using the computer on constant AC power with the battery inserted. If you want to use constant AC power, you are advised to remove the battery pack after it is fully charged.
- Not discharging and recharging the battery to its extremes, as described above.
- Frequent use; the more you use the battery, the faster it will reach the end of its effective life. A standard computer battery has a life span of about 300 charges.
Installing and removing the battery pack

Important! Before removing the battery from the unit, connect the AC adapter if you want to continue using your computer. Otherwise, turn off the computer first.
To install a battery pack:
1 Align the battery with the open battery bay; make sure that the end with the contacts will enter first, and that the top surface of the battery is facing up.
2 Slide the battery into the battery bay and gently push until the battery locks in place.
To remove a battery pack:
1 Slide the battery release latch to release the battery.
2 Pull the battery from the battery bay.
Charging the battery
To charge the battery, first make sure that it is correctly installed in the battery bay. Plug the AC adapter into the computer, and connect to a mains power outlet. You can continue to operate your computer on AC power while your battery is charging. However, charging the battery with the computer turned off results in a significantly faster charge time.

Note: You are advised to charge the battery before retiring for the day. Charging the battery overnight before traveling enables you to start the next day with a fully charged battery.
Checking the battery level
The Windows power meter indicates the current battery level. Rest the cursor over the battery/power icon on the taskbar to see the battery's present charge level.
Optimising battery life
Optimizing battery life helps you get the most out of battery operation, prolonging the charge/recharge cycle and improving recharging efficiency. You are advised to follow the suggestions set out below:
Purchase an extra battery pack.
- Use AC power whenever possible, reserving battery for on-the-go use.
- Eject a PC Card if it is not being used, as it will continue to draw power (for selected model).
- Store the battery pack in a cool, dry place. The recommended temperature is 10^ ( 50^ ) to 30^ ( 86^ ). Higher temperatures cause the battery to self-discharge faster.
- Excessive recharging decreases the battery life.
- Look after your AC adapter and battery.
Battery-low warning
When using battery power pay attention to the Windows power meter.

Warning: Connect the AC adapter as soon as possible after the battery-low warning appears. Data will be lost if the battery to become fully depleted and the computer shuts down.
When the battery-low warning appears, the recommended course of action depends on your situation:
| Situation | Recommended Action |
| The AC adapter and a power outlet are available. | 1. Plug the AC adapter into the computer, and then connect to the mains power supply. 2. Save all necessary files. 3. Resume work. Turn off the computer if you want to recharge the battery rapidly. |
| An extra fully charged battery pack is available. | 1. Save all necessary files. 2. Close all applications. 3. Shut down the operating system to turn off the computer. 4. Replace the battery pack. 5. Turn on the computer and resume work. |
| The AC adapter or a power outlet is unavailable. You have no spare battery pack. | 1. Save all necessary files. 2. Close all applications. 3. Shut down the operating system to turn off the computer. |
Taking your notebook PC with you
This section gives you tips and hints to consider when moving around or traveling with your computer.
Disconnecting from the desktop
Follow these steps to disconnect your computer from external accessories:
1 Save any open files.
2 Remove any media, floppy disks or compact disks from the drive(s).
3 Shut down the computer.
4 Close the display cover.
5 Disconnect the cord from the AC adapter.
6 Disconnect the keyboard, pointing device, printer, external monitor and other external devices.
7 Disconnect the Kensington lock if you are using one to secure the computer.
Moving around
When you are just moving within short distances, for example, from your office desk to a meeting room.
Preparing the computer
Before moving the computer, close and latch the display cover to place it in Sleep mode. You can now safely take the computer anywhere you go within the building. To bring the computer out of Sleep mode, open the display; then press and release the power button.
If you are taking the computer to a client's office or a different building, you may choose to shut down the computer:
Click on Start then click on Shut Down.
Or:
You can put the computer in Sleep mode by pressing Fn + F4 . Then close and latch the display.
When you are ready to use the computer again, unlatch and open the display; then press and release the power button.

Note: If the Sleep indicator is off, the computer has entered Hibernation mode and is turned off. If the power indicator is off but the Sleep indicator is on, the computer has entered Sleep mode. In both cases, press and release the power button to turn the computer back on. Note that the computer may enter Hibernation mode after being in Sleep mode for a period of time.
What to bring to meetings
If your meeting is relatively short, you probably do not need to bring anything with you other than your computer. If your meeting will be longer, or if your battery is not fully charged, you may want to bring the AC adapter with you to plug in your computer in the meeting room.
If the meeting room does not have an electrical outlet, reduce the drain on the battery by putting the computer in Sleep mode. Press <Fn> + <F4> or close the display cover whenever you are not actively using the computer. To resume, open the display (if closed), then press and release the power button.
Taking the computer home
When you are moving from your office to your home or vice versa.
Preparing the computer
After disconnecting the computer from your desktop, follow these steps to prepare the computer for the trip home:
- Check that you have removed all media and compact disks from the drive(s). Failure to remove the media can damage the drive head.
- Pack the computer in a protective case that can prevent the computer from sliding around and cushion it if it should fall.

Caution: Avoid packing items next to the top cover of the computer. Pressure against the top cover can damage the screen.
What to take with you
Unless you have some items at home, take the following items with you:
AC adapter and power cord
The printed Quick Guide
Special considerations
Follow these guidelines to protect your computer while traveling to and from work:
- Minimize the effects of temperature changes by keeping the computer with you.
- If you need to stop for an extended period of time and cannot carry the computer with you, leave the computer in the trunk of the car to avoid exposing the computer to excessive heat.
- Changes in temperature and humidity can cause condensation. Allow the computer to return to room temperature, and inspect the screen for condensation before turning on the computer. If the temperature change is greater than 10^ ( 18^ ), allow the computer to come to room temperature slowly. If possible, leave the computer for 30 minutes in an environment with a temperature between outside and room temperature.
Setting up a home office
If you frequently work on your computer at home, you may want to purchase a second AC adapter for use at home. With a second AC adapter, you can avoid carrying the extra weight to and from home.
If you use your computer at home for significant periods of time, you might also want to add an external keyboard, monitor or mouse.
Traveling with the computer
When you are moving within a larger distance, for instance, from your office building to a client's office building or traveling locally.
Preparing the computer
Prepare the computer as if you were taking it home. Make sure that the battery in the computer is charged. Airport security may require you to turn on your computer when carrying it into the gate area.
What to take with you
Take the following items with you:
AC adapter
- Spare, fully-charged battery pack(s)
Additional printer driver files if you plan to use another printer
Special considerations
In addition to the guidelines for taking the computer home, follow these guidelines to protect your computer while traveling:
Always take the computer as carry-on luggage.
If possible, have the computer inspected by hand. Airport security X-ray machines are safe, but do not put the computer through a metal detector.
- Avoid exposing floppy disks to hand-held metal detectors.
Traveling internationally with the computer
When you are moving from country to country.
Preparing the computer
Prepare the computer as you would normally prepare it for traveling.
What to bring with you
Bring the following items with you:
AC adapter
Power cords that are appropriate for the country to which you are traveling
- Spare, fully-charged battery packs
Additional printer driver files if you plan to use another printer
Proof of purchase, in case you need to show it to customs officials
International Travelers Warranty passport
Special considerations
Follow the same special considerations as when traveling with the computer. In addition, these tips are useful when traveling internationally:
- When traveling in another country, check that the local AC voltage and the AC adapter power cord specifications are compatible. If not, purchase a power cord that is compatible with the local AC voltage. Do not use converter kits sold for appliances to power the computer.
- If you are using the modem, check if the modem and connector is compatible with the telecommunications system of the country you are traveling in.
Securing your computer
Your computer is a valuable investment that you need to take care of. Learn how to protect and take care of your computer.
Security features include hardware and software locks — a security notch and passwords.
Using a computer security lock
The notebook comes with a Kensington-compatible security slot for a security lock.
Wrap a computer security lock cable around an immovable object such as a table or handle of a locked drawer. Insert the lock into the notch and turn the key to secure the lock. Some keyless models are also available.
Using passwords
Passwords protect your computer from unauthorized access. Setting these passwords creates several different levels of protection for your computer and data:
- Supervisor Password prevents unauthorized entry into the BIOS utility. Once set, you must enter this password to gain access to the BIOS utility. See "BIOS utility" on page 29.
- User Password secures your computer against unauthorized use. Combine the use of this password with password checkpoints on boot-up and resume from Hibernation for maximum security.
- Password on Boot secures your computer against unauthorized use. Combine the use of this password with password checkpoints on boot-up and resume from Hibernation for maximum security.

Important! Do not forget your Supervisor Password! If you forget your password, please get in touch with your dealer or an authorized service center.
Entering passwords
When a password is set, a password prompt appears in the center of the display screen.
- When the Supervisor Password is set, a prompt appears when you press < F2 > to enter the BIOS utility at boot-up.
- Type the Supervisor Password and press
to access the BIOS utility. If you enter the password incorrectly, a warning message appears. Try again and press . - When the User Password is set and the password on boot parameter is enabled, a prompt appears at boot-up.
- Type the User Password and press
to use the computer. If you enter the password incorrectly, a warning message appears. Try again and press .

Important! You have three chances to enter a password. If you fail to enter the password correctly after three tries, the system halts. Press and hold the power button for four seconds to shut down the computer. Then turn on the computer again, and try again.
Setting passwords
You can set passwords using the BIOS utility.
Expanding through options
Your notebook PC offers you a complete mobile computing experience.
Connectivity options
Ports allow you to connect peripheral devices to your computer as you would with a desktop PC. For instructions on how to connect different external devices to the computer, read the following section.
Fax/data modem (only for certain models)
Your computer has a built-in V.92 56 Kbps fax/data modem. (only for certain models)

Warning! This modem port is not compatible with digital phone lines. Plugging this modem into a digital phone line will damage the modem.
To use the fax/data modem port, connect a phone cable from the modem port to a telephone jack.
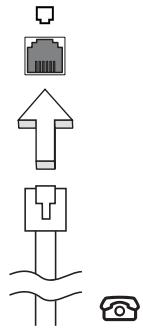

Warning! Please make sure that the cable you use is appropriate for the country in which you are working.
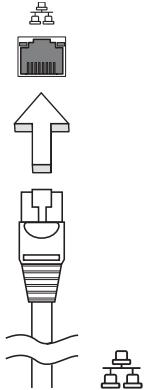
Built-in network feature
The built-in network feature allows you to connect your computer to an Ethernet-based network.
To use the network feature, connect an Ethernet cable from the Ethernet (RJ-45) port on the chassis of the computer to a network jack or hub on your network.
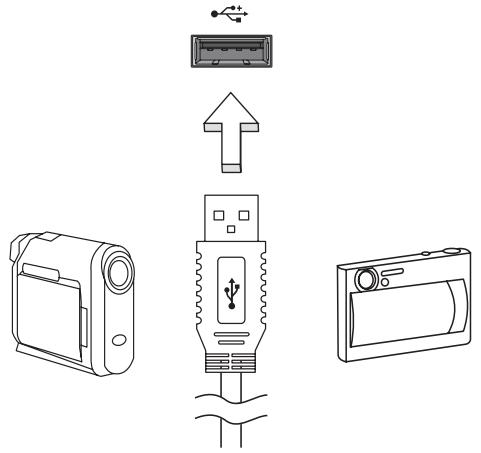
Universal Serial Bus (USB)
The USB 2.0 port is a high-speed serial bus which allows you to connect USB peripherals without taking up precious system resources.
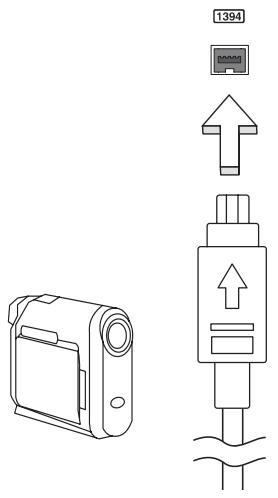
IEEE 1394 port (only for certain models)
The computer's IEEE 1394 port allows you to connect to an IEEE 1394-compatible device like a video camera or digital camera. See your video or digital camera's documentation for details.
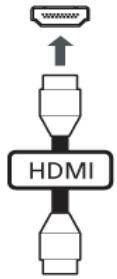
High-Definition Multimedia Interface (only for certain models)
HDMI (High-Definition Multimedia Interface) is an industry-supported, uncompressed, all-digital audio/video interface. HDMI provides an interface between any compatible digital audio/video source, such as a set-top box, DVD player, and A/V receiver and a compatible digital audio and/or video monitor, such as a digital television (DTV), over a single cable.
Use the HDMI port on your computer to connect with high-end audio and video equipment. Single cable implementation allows tidy setup and fast connection.
ExpressCard (only for certain models)
The ExpressCard is the newest version of the PC Card. It is a smaller and faster interface that further enhances the usability and expandability of your computer.
ExpressCards support a vast number of expansion options, including flash memory card adapters, TV-tuners, Bluetooth connectivity and IEEE 1394B adapters. ExpressCards support USB 2.0 and PCI Express applications.

Important! There are two types, ExpressCard/54 and ExpressCard/34 (54mm and 34mm), each with different functions. Not all ExpressCard slots will support both types. Please refer to your card's manual for details on how to install and use the card, and its functions.
Inserting an ExpressCard
Insert the card into the slot and push gently until it clicks into position.
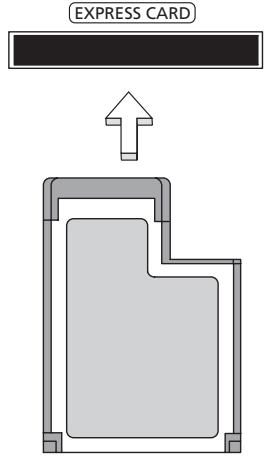
Ejecting an ExpressCard
Before ejecting an ExpressCard:
1 Exit the application using the card.
2 Left-click on the remove hardware icon on the taskbar and stop the card operation.
3 Push the card gently into the slot and release to pop out the card. Then pull the card free from the slot.
Installing memory
Follow these steps to install memory:
1 Turn off the computer, unplug the AC adapter (if connected) and remove the battery pack. Then turn the computer over to access its base.
2 Remove the screws from the memory cover; then lift up and remove the memory cover.
3 (a) Insert the memory module diagonally into the slot, then (b) gently press it down until it clicks into place.
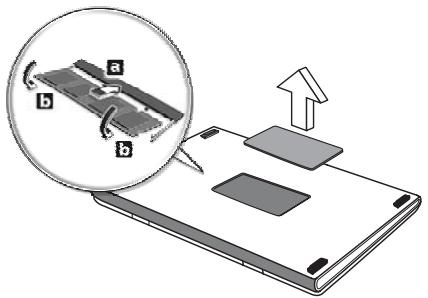
4 Replace the memory cover and secure it with the screw.
5 Reinstall the battery pack, and reconnect the AC adapter.
6 Turn on the computer.
The computer automatically detects and reconfigures the total memory size. Please consult a qualified technician or contact your local Acer dealer.
BIOS utility
The BIOS utility is a hardware configuration program built into your computer's BIOS.
Your computer is already properly configured and optimized, and you do not need to run this utility. However, if you encounter configuration problems, you may need to run it.
To activate the BIOS utility, press <F2> during the POST; while the notebook PC logo is being displayed.
Boot sequence
To set the boot sequence in the BIOS utility, activate the BIOS utility, then select Boot from the categories listed at the top of the screen.
Enable disk-to-disk recovery
To enable disk-to-disk recovery (hard disk recovery), activate the BIOS utility, then select Main from the categories listed at the top of the screen. Find D2D Recovery at the bottom of the screen and use the
Password
To set a password on boot, activate the BIOS utility, then select Security from the categories listed at the top of the screen. Find Password on boot: and use the
Using software
Playing DVD movies

Note: This feature is only available on certain models.
When the DVD drive module is installed in the optical drive bay, you can play DVD movies on your computer.
1 Eject the DVD disk.

Important! When you launch the DVD player for the first time, the program asks you to enter the region code. DVD disks are divided into 6 regions. Once your DVD drive is set to a region code, it will play DVD disks of that region only. You can set the region code a maximum of five times (including the first time), after which the last region code set will remain permanent. Recovering your hard disk does not reset the number of times the region code has been set. Refer to the table below for DVD movie region code information.
2 The DVD movie will automatically play after a few seconds.
| Region code | Country or region |
| 1 | USA, Canada |
| 2 | Europe, Middle East, South Africa, Japan |
| 3 | Southeast Asia, Taiwan, South Korea |
| 4 | Latin America, Australia, New Zealand |
| 5 | Former USSR, parts of Africa, India |
| 6 | People's Republic of China |

Note: To change the region code, insert a DVD movie of a different region into the DVD drive. Please refer to the online help for more information.
Frequently asked questions
The following is a list of possible situations that may arise during the use of your computer. Easy solutions are provided for each one.
I turned on the power, but the computer does not start or boot up.
Look at the power indicator:
- If it is not lit, no power is being supplied to the computer. Check the following:
If you are using on the battery, it may be low and unable to power the computer. Connect the AC adapter to recharge the battery pack.
- Make sure that the AC adapter is properly plugged into the computer and to the power outlet.
If it is lit, check the following:
- Is a non-bootable (non-system) disk in the external USB floppy drive? Remove or replace it with a system disk and press <Ctrl> + <Alt> + <Del> to restart the system.
Nothing appears on the screen.
The computer's power management system automatically blanks the screen to save power. Press any key to turn the display back on.
If pressing a key does not turn the display back on, three things might be the cause:
- The brightness level might be too low. Press <Fn> + <D> (increase) to adjust the brightness level.
- The display device might be set to an external monitor. Press the display toggle hotkey <Fn> + <F5> to toggle the display back to the computer.
- If the Sleep indicator is lit, the computer is in Sleep mode. Press and release the power button to resume.
No audio is heard from the computer.
Check the following:
- The volume may be muted. In Windows, look at the volume control (speaker) icon on the taskbar. If it is crossed-out, click on the icon and deselect the Mute all option.
-
The volume level may be too low. In Windows, look at the volume control icon on the taskbar. You can also use the volume control buttons to adjust the volume.
-
If headphones, earphones or external speakers are connected to the line-out port on the computer, the internal speakers automatically turn off.
I want to eject the optical drive tray without turning on the power.
There is a mechanical eject hole on the optical drive. Simply insert the tip of a pen or paperclip into the hole and push to eject the tray.
The keyboard does not respond.
Try attaching an external keyboard to a USB port on the computer. If it works, contact your dealer or an authorized service center as the internal keyboard cable may be loose.
The printer does not work.
Check the following:
- Make sure that the printer is connected to a power outlet and that it is turned on.
- Make sure that the printer cable is connected securely to the computer's parallel port or a USB port and the corresponding port on the printer.
I want to restore my computer to its original settings without recovery CDs.

Note: If your system is the multilingual version, the operating system and language you choose when you first turn on the system will be the only option for future recovery operations.
This recovery process helps you restore the C: drive with the original software content that is installed when you purchase your notebook. Follow the steps below to rebuild your C: drive. (Your C: drive will be reformatted and all data will be erased.) It is important to back up all data files before using this option.
Before performing a restore operation, please check the BIOS settings.
1 Check to see if Acer disk-to-disk recovery is enabled or not.
2 Make sure the D2D Recovery setting in Main is Enabled.
3 Exit the BIOS utility and save changes. The system will reboot.

Note: To activate the BIOS utility, press <F2> during POST.
To start the recovery process:
1 Restart the system.
2 While the Acer logo is showing, press <Alt> + <F10> at the same time to enter the recovery process.
3 Refer to the onscreen instructions to perform system recovery.

Important! This feature occupies 15 GB in a hidden partition on your hard disk
Requesting service
International Travelers Warranty (ITW)
Your computer is backed by an International Travelers Warranty (ITW) that gives you security and peace of mind when traveling. Our worldwide network of service centers are there to give you a helping hand.
An ITW passport comes with your computer. This passport contains all you need to know about the ITW program. A list of available, authorized service centers is in this handy booklet. Read this passport thoroughly.
Always have your ITW passport on hand, especially when you travel, to receive the benefits from our support centers. Place your proof-of-purchase in the flap located inside the front cover of the ITW passport.
If the country you are traveling in does not have an Acer-authorized ITW service site, you can still get in contact with our offices worldwide. Please consult http://global.acer.com.
Before you call
Please have the following information available when you call Acer for online service, and please be at your computer when you call. With your support, we can reduce the amount of time a call takes and help solve your problems efficiently. If there are error messages or beeps reported by your computer, write them down as they appear on the screen (or the number and sequence in the case of beeps).
You are required to provide the following information:
Name:
Address:
Telephone number:
Machine and model type:
Serial number:
Date of purchase:
Troubleshooting
This chapter shows you how to deal with common system problems. Read it before calling a technician if a problem occurs. Solutions to more serious problems require opening up the computer. Do not attempt to open the computer yourself; contact your dealer or authorized service center for assistance.
Troubleshooting tips
This notebook PC incorporates an advanced design that delivers onscreen error message reports to help you solve problems.
If the system reports an error message or an error symptom occurs, see "Error messages" below. If the problem cannot be resolved, contact your dealer. See "Requesting service" on page 34.
Error messages
If you receive an error message, note the message and take the corrective action. The following table lists the error messages in alphabetical order together with the recommended course of action.
| Error messages | Corrective action |
| CMOS battery bad | Contact your dealer or an authorized service center. |
| CMOS checksum error | Contact your dealer or an authorized service center. |
| Disk boot failure | Insert a system (bootable) disk into the floppy drive (A:), then press <Enter> to reboot. |
| Equipment configuration error | Press <F2> (during POST) to enter the BIOS utility, then press Exit in the BIOS utility to reboot. |
| Hard disk 0 error | Contact your dealer or an authorized service center. |
| Hard disk 0 extended type error | Contact your dealer or an authorized service center. |
| I/O parity error | Contact your dealer or an authorized service center. |
| Keyboard error or no keyboard connected | Contact your dealer or an authorized service center. |
| Keyboard interface error | Contact your dealer or an authorized service center. |
| Memory size mismatch | Press <F2> (during POST) to enter the BIOS utility, then press Exit in the BIOS utility to reboot. |
If you still encounter problems after going through the corrective measures, please contact your dealer or an authorized service center for assistance. Some problems may be solved using the BIOS utility.
Regulations and safety notices
FCC statement
This device has been tested and found to comply with the limits for a Class B digital device pursuant to Part 15 of the FCC rules. These limits are designed to provide reasonable protection against harmful interference in a residential installation. This device generates, uses, and can radiate radio frequency energy and, if not installed and used in accordance with the instructions, may cause harmful interference to radio communications.
However, there is no guarantee that interference will not occur in a particular installation. If this device does cause harmful interference to radio or television reception, which can be determined by turning the device off and on, the user is encouraged to try to correct the interference by one or more of the following measures:
Reorient or relocate the receiving antenna.
- Increase the separation between the device and receiver.
- Connect the device into an outlet on a circuit different from that to which the receiver is connected.
- Consult the dealer or an experienced radio/television technician for help.
Notice: Shielded cables
All connections to other computing devices must be made using shielded cables to maintain compliance with FCC regulations.
Notice: Peripheral devices
Only peripherals (input/output devices, terminals, printers, etc.) certified to comply with the Class B limits may be attached to this equipment. Operation with non-certified peripherals is likely to result in interference to radio and TV reception.
Caution
Changes or modifications not expressly approved by the manufacturer could void the user's authority, which is granted by the Federal Communications Commission, to operate this computer.
Notice: Canadian users
This Class B digital apparatus complies with Canadian ICES-003.
Compliant with Russian regulatory certification

ME61
Modem notices (only for certain models)
Notice for USA
This equipment complies with Part 68 of the FCC rules. Located on the modem is a label that contains, among other information, the FCC Registration Number and Ringer Equivalence Number (REN) for this equipment. Upon request, you must provide this information to your telephone company.
If your telephone equipment causes harm to the telephone network, the telephone company may discontinue your service temporarily. If possible, they will notify you in advance. But, if advance notice is not practical, you will be notified as soon as possible. You will also be informed of your right to file a complaint with the FCC.
Your telephone company may make changes in its facilities, equipment, operations, or procedures that could affect the proper functioning of your equipment. If they do, you will be notified in advance to give you an opportunity to maintain uninterrupted telephone service.
If this equipment should fail to operate properly, disconnect the equipment from the phone line to determine if it is causing the problem. If the problem is with the equipment, discontinue use and contact your dealer or vendor.

Caution: To reduce the risk of fire, use only No. 26 AWG or larger UL Listed or CSA Certified Telecommunication Line Cord.
TBR 21
This equipment has been approved [Council Decision 98/482/EC - "TBR 21"] for single terminal connection to the Public Switched Telephone Network (PSTN). However, due to differences between the individual PSTNs provided in different countries, the approval does not, of itself, give an unconditional assurance of successful operation on every PSTN termination point. In the event of problems, you should contact your equipment supplier in the first instance. For more information about applicable countries, please refer to "Regulations and safety notices" on page 36
Notice for Australia
For safety reasons, only connect headsets with a telecommunications compliance label. This includes customer equipment previously labelled permitted or certified.
Notice for New Zealand
1 The grant of a Telepermit for any item of terminal equipment indicates only that Telecom has accepted that the item complies with minimum conditions for connection to its network. It indicates no endorsement of the product by Telecom, nor does it provide any sort of warranty. Above all, it provides no assurance that any item will work correctly in all respects with another item of Tele permitted equipment of a different make or model, nor does it imply that any product is compatible with all of Telecom's network services.
2 This equipment is not capable, under all operating conditions, of correct operation at the higher speeds for which it is designed. Telecom will accept no responsibility should difficulties arise in such circumstances.
3 Some parameters required for compliance with Telecom's Telepermit requirements are dependent on the equipment (PC) associated with this device. The associated equipment shall be set to operate within the following limits for compliance with Telecom's Specifications:
a There shall be no more than 10 call attempts to the same number within any 30 minute period for any single manual call initiation, and
b The equipment shall go on-hook for a period of not less than 30 seconds between the end of one attempt and the beginning of the next call attempt.
4 Some parameters required for compliance with Telecom's Telepermit requirements are dependent on the equipment (PC) associated with this device. In order to operate within the limits for compliance with Telecom's specifications, the associated equipment shall be set to ensure that automatic calls to different numbers are spaced such that there is not less than 5 seconds between the end of one call attempt and the beginning of another.
5 This equipment shall not be set up to make automatic calls to Telecom's 111 Emergency Service.
6 This device is equipped with pulse dialing while the Telecom standard is DTMF tone dialing. There is no guarantee that Telecom lines will always continue to support pulse dialing.
7 Use of pulse dialing, when this equipment is connected to the same line as other equipment, may give rise to bell tinkle or noise and may also cause a false answer condition. Should such problems occur, the user should NOT contact the telecom Fault Service.
8 This equipment may not provide for the effective hand-over of a call to another device connected to the same line.
9 Under power failure conditions this appliance may not operate. Please ensure that a separate telephone, not dependent on local power, is available for emergency use.
LCD pixel statement
The LCD unit is produced with high-precision manufacturing techniques. Nevertheless, some pixels may occasionally misfire or appear as black or red dots. This has no effect on the recorded image and does not constitute a malfunction.
Radio device regulatory notice

Note: Below regulatory information is for models with wireless LAN and / or Bluetooth only.
General
This product complies with the radio frequency and safety standards of any country or region in which it has been approved for wireless use. Depending on configurations, this product may or may not contain wireless radio devices (such as wireless LAN and/or Bluetooth modules). Below information is for products with such devices.
Declaration of Conformity for EU countries
Hereby, Acer, declares that this notebook PC series is in compliance with the essential requirements and other relevant provisions of Directive 1999/5/EC.
List of applicable countries
EU member states as of July 2009 are: Belgium, Denmark, Germany, Greece, Spain, France, Ireland, Italy, Luxembourg, the Netherlands, Austria, Portugal, Finland, Sweden, United Kingdom, Estonia, Latvia, Lithuania, Poland, Hungary, Czech Republic, Slovak Republic, Slovenia, Cyprus, Malta, Bulgaria and Romania. Usage allowed in the countries of European Union, as well as Norway, Switzerland, Iceland and Liechtenstein. This device must be used in strict accordance with the regulations and constraints in the country of use. For further information, please contact local office in the country of use. Please see http://ec.europa.eu/enterprise/rtte/imply.htm for the latest country list.
The FCC RF safety requirement
The radiated output power of the wireless LAN Mini PCI Card and Bluetooth card is far below the FCC radio frequency exposure limits. Nevertheless, the notebook PC series shall be used in such a manner that the potential for human contact during normal operation is minimized as follows:
1 Users are requested to follow the RF safety instructions on wireless option devices that are included in the user's manual of each RF option device.

Caution: To comply with FCC RF exposure compliance requirements, a separation distance of at least 20cm (8 inches) must be maintained between the antenna for the integrated wireless LAN Mini PCI Card built in to the screen section and all persons.


Note: The wireless Mini PCI adapter implements a transmission diversity function. The function does not emit radio frequencies simultaneously from both antennas. One of the antennas is selected automatically or manually (by users) to ensure good quality radiocommunication.
2 This device is restricted to indoor use due to its operation in the 5.15 to 5.25 GHz frequency range. FCC requires this product to be used indoors for the frequency range 5.15 to 5.25 GHz to reduce the potential for harmful interference to co-channel Mobile Satellite systems.
3 High power radar are allocated as primary users of the 5.25 to 5.35 GHz and 5.65 to 5.85 GHz bands. These radar stations can cause interference with and/or damage this device.
4 An improper installation or unauthorized use may cause harmful interference to radio communications. Also any tampering of the internal antenna will void the FCC certification and your warranty.
Canada — Low-power license-exempt radio communication devices (RSS-210)
Exposure of humans to RF fields (RSS-102)
The notebook PC series employs low gain integral antennas that do not emit RF field in excess of Health Canada limits for the general population; consult Safety Code 6, obtainable from Health Canada's website at www.hc-sc.gc.ca/rpb.
LCD panel ergonomic specifications
| Design viewing distance | 500 mm |
| Design inclination angle | 0.0° |
| Design azimuth angle | 90.0° |
| Viewing direction range class | Class IV |
| Screen tilt angle | 85.0° |
| Design screen illuminance | • Illuminance level: [250 + (250cosα)] lx where α = 85° • Color: Source D65 |
| Reflection class of LCD panel (positive and negative polarity) | • Ordinary LCD: Class I • Protective LCD: Class III |
| Image polarity | Both |
| Reference white: | • Yn |
| Pre-setting of luminance and color temperature @ 6500K (tested under BM7) | • u'n • v'n |
| Pixel fault class | Class II |
Gammu TravelMate
Acer eRecovery Management
9
Considerations speciales 21
Considerations speciales 22
(International Travelers Warranty; ITW) 36
Avant d'appeler 36
Dépannage 37
LCD panel ergonomic specifications 42
Touchpad
Acer eRecovery Management
This Class B digital apparatus complies with Canadian ICES-003.
LCD panel ergonomic specifications
| Design viewing distance | 500 mm |
| Design inclination angle | 0.0° |
| Design azimuth angle | 90.0° |
| Viewing direction range class | Class IV |
| Screen tilt angle | 85.0° |
| Design screen illuminance | • Illuminance level: [250 + (250cosα)] lx where α = 85° • Color: Source D65 |
| Reflection class of LCD panel (positive and negative polarity) | • Ordinary LCD: Class I • Protective LCD: Class III |
| Image polarity | Both |
| Reference white: | • Yn |
| Pre-setting of luminance and color temperature @ 6500K (tested under BM7) | • u'n • v'n |
| Pixel fault class | Class II |
TravelMate Serie
CLASS 1 LASER PRODUCT
ACHTUNG: INVISIBLE LASER RADIATION WHEN OPEN. AVOID EXPOSURE TO BEAM.
APPAREIL A LASER DE CLASSE 1 PRODUIT
LASERATTENTION: RADIATION DU FAISCEAU LASER INVISIBLE EN CAS D'OUVERTURE. EVITTER TOUTE EXPOSITION AUX RAYONS.
LUOKAN 1 LASERLAITE LASER KLASSE 1
Acer Backup Manager 7
Energieverwaltung 8
Acer eRecovery Management 9
HDMI (High-Definition Multimedia Interface)
(disk-to-disk recovery) 31
Kennwort 31
(International Travelers Warranty; ITW) 36
Vor einem Anruf 36
Problemlösung 37
Tipps zur Problembehebung 37
Fehlermeldungen 37
LCD panel ergonomic specifications 42
Touchpad
Acer eRecovery Management
LCD panel ergonomic specifications
| Design viewing distance | 500 mm |
| Design inclination angle | 0.0° |
| Design azimuth angle | 90.0° |
| Viewing direction range class | Class IV |
| Screen tilt angle | 85.0° |
| Design screen illuminance | • Illuminance level: [250 + (250cosα)] lx where α = 85° • Color: Source D65 |
| Reflection class of LCD panel (positive and negative polarity) | • Ordinary LCD: Class I • Protective LCD: Class III |
| Image polarity | Both |
| Reference white: | • Yn |
| Pre-setting of luminance and color temperature @ 6500K (tested under BM7) | • u'n • v'n |
| Pixel fault class | Class II |
Série TravelMate
CLASS 1 LASER PRODUCT
CAUTION: INVISIBLE LASER RADIATION WHEN OPEN. AVOID EXPOSURE TO BEAM.
APPAREIL A LASER DE CLASSE 1 PRODUIT
LASERATTENTION: RADIATION DU FAISCEAU LASER INVISIBLE EN CAS D'OUVERTURE. EVITTER Toute EXPOSITION AUX RAYONS.
LUOKAN 1 LASERLAITE LASER KLASSE 1
Acer Backup Manager 7
Gestão de energia 8
Acer eRecovery Management 9
Gravar disco com copia de seguranca 10
Restaurant 11
Restaurant Windows a partir de discos de copia
de seguranca 12
Bacteria 14
14
High-Definition Multimedia Interface
(International Travelers Warranty; ITW) 36
LCD panel ergonomic specifications 41
Acer eRecovery Management
LCD panel ergonomic specifications
| Design viewing distance | 500 mm |
| Design inclination angle | 0.0° |
| Design azimuth angle | 90.0° |
| Viewing direction range class | Class IV |
| Screen tilt angle | 85.0° |
| Design screen illuminance | • Illuminance level: [250 + (250cosα)] lx where α = 85° • Color: Source D65 |
| Reflection class of LCD panel (positive and negative polarity) | • Ordinary LCD: Class I • Protective LCD: Class III |
| Image polarity | Both |
| Reference white: | • Yn |
| Pre-setting of luminance and color temperature @ 6500K (tested under BM7) | • u'n • v'n |
| Pixel fault class | Class II |
TravelMate Serie
TravelMate Serie Notebook PC
Modelnummer:
Serienummer:
Aankoopdatum:
Plaats van aankoop:
LASERPRODUCT KLASSE 1
VOORZICHTIG: ONZICHTBARE LASERSTRALING INDIEN GEOPEND. VOORKOM BLOOTSTELLING AAN STRAAL.
APPAREIL A LASER DE CLASSE 1 PRODUIT
LASERATTENTION: RADIATION DU FAISCEAU LASER INVISIBLE EN CAS D'OUVERTURE. EVITTER Toute EXPOSITION AUX RAYONS.
LUOKAN 1 LASERLAITE LASER KLASSE 1
Acer Backup Manager 7
Energiebeheer 8
Acer eRecovery Management 9
Backup-disk branden 10
Herstellen 11
High-Definition Multimedia Interface
ITW (International Travelers Warranty) 34
Voordat u belt 34
Problemen oplossen 35
LCD panel ergonomic specifications 39
Touchpad
Acer eRecovery Management
Acer eRecovery Management

Backup

Restore

Settings

Help
Password for Restore Process
Password Protection: Disabled
Create a New Password
Backup-disk branden
Via de Backuppagina van Acer eRecovery Managementkest u de standard fabrieksimage branden of stuurprogramma's en toepassen gen backuppen.
1 Klik op Start, Alle Programma's, Acer, Acer eRecovery Management.
2 Acer eRecovery Management opent de Backuppagina.
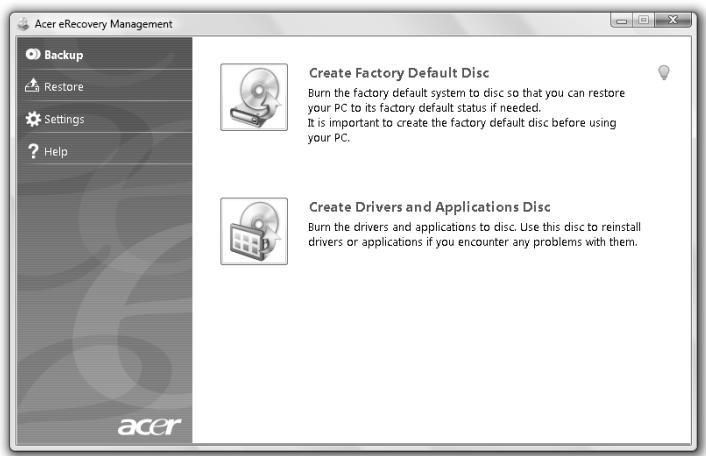
ITW (International Travelers Warranty)
LCD panel ergonomic specifications
| Design viewing distance | 500 mm |
| Design inclination angle | 0.0° |
| Design azimuth angle | 90.0° |
| Viewing direction range class | Class IV |
| Screen tilt angle | 85.0° |
| Design screen illuminance | • Illuminance level: [250 + (250cosα)] lx where α = 85° • Color: Source D65 |
| Reflection class of LCD panel (positive and negative polarity) | • Ordinary LCD: Class I • Protective LCD: Class III |
| Image polarity | Both |
| Reference white: Pre-setting of luminance and color temperature @ 6500K (tested under BM7) | • Yn • u'n • v'n |
| Pixel fault class | Class II |
TravelMate Series
TravelMate Series Notebook-PC
Modellnummer:
Serienummer:
Innkjopsdata:
Innkjopssted:
Acer Backup Manager 7
Strømstyring 8
Acer eRecovery Management 9
Lag sikkerhetskopidisk 10
Gjenopppretting 11
Sikkerhetskopiere Windows fra sikkerhetskopier 12
Batteri 14
Aktiver disk to disk recovery (diskgenoppretting) 29
Password 29
International Travelers Warranty (ITW) 33
Fordringer 33
LCD panel ergonomic specifications 38
Berøringsplate (Touchpad)
Deninnebygde beroringsplaten er en pekeenhet som foler bevegelser pa overflaten. Dette betyr at markoren reagerer nár du beveger fingeren pa overflaten av beroringsplaten. Midtposisjonen pa handleddstøtten gir optimal komfort og stotte.
Acer eRecovery Management
International Travelers Warranty (ITW)
Datamaskinen er sikret med en garantiordning som kalles "International Travelers Warranty" (ITW), som gir deg trygghet og sjelefred nár du er på reise. Vårt verdensomspennende nettverk av servicesentre er der for á gi deg en hjelpende händ.
Et ITW-pass følgmer med datamaskinen. Dette passet inneholder alt du behoover á vite om ITW-programmet. En liste over tilgengelige, autoriserte servicesentre finner du i dette praktiske heftet. Les grundig gjennom dette passet.
LCD panel ergonomic specifications
| Design viewing distance | 500 mm |
| Design inclination angle | 0.0° |
| Design azimuth angle | 90.0° |
| Viewing direction range class | Class IV |
| Screen tilt angle | 85.0° |
| Design screen illuminance | • Illuminance level: [250 + (250cosα)] lx where α = 85° • Color: Source D65 |
| Reflection class of LCD panel (positive and negative polarity) | • Ordinary LCD: Class I • Protective LCD: Class III |
| Image polarity | Both |
| Reference white: Pre-setting of luminance and color temperature @ 6500K (tested under BM7) | • Yn • u'n • v'n |
| Pixel fault class | Class II |
TravelMate Seriens
CLASS 1 LASER PRODUCT
CAUTION: INVISIBLE LASER RADIATION WHEN OPEN. AVOID EXPOSURE TO BEAM.
APPAREIL A LASER DE CLASSE 1 PRODUIT
LASERATTENTION: RADIATION DU FAISCEAU LASER INVISIBLE EN CAS D'OUVERTURE. EVITTER Toute EXPOSITION AUX RAYONS.
LUOKAN 1 LASERLAITE LASER KLASSE 1
Acer Backup Manager 7
Strømstyring 8
Acer eRecovery Management 9
High-Definition Multimedia Interface
International Travelers Warranty (ITW) 34
Indenduringer 34
Fejlfinding pà computeren 35
Fejlfinding 35
Fejlmeddelelser 35
LCD panel ergonomic specifications 39
Pegefelt
Acer eRecovery Management
International Travelers Warranty (ITW)
LCD panel ergonomic specifications
| Design viewing distance | 500 mm |
| Design inclination angle | 0.0° |
| Design azimuth angle | 90.0° |
| Viewing direction range class | Class IV |
| Screen tilt angle | 85.0° |
| Design screen illuminance | • Illuminance level: [250 + (250cosα)] lx where α = 85° • Color: Source D65 |
| Reflection class of LCD panel (positive and negative polarity) | • Ordinary LCD: Class I • Protective LCD: Class III |
| Image polarity | Both |
| Reference white: | • Yn |
| Pre-setting of luminance and color temperature @ 6500K (tested under BM7) | • u'n • v'n |
| Pixel fault class | Class II |
TravelMate-serien
Allman anecdarguide
TravelMate-serien - barbar dator
Modellnummer:
Seriennummer:
Inkopsdatum:
Inkopsstalle:
KCLASS 1 LASERPRODUKT
WARNING: OSYNLIG LASERSTRÄLNING NÄR DENNA DEL ÄR ÖPPEN. UNDVIK ATT UTSÄTTA DIG FÖR STRÄLEN.
APPAREIL A LASER DE CLASSE 1 PRODUIT
LASERATTENTION: RADIATION DU FAISCEAU LASER INVISIBLE EN CAS
D'OUVERTURE. EVITTER Toute EXPOSITION AUX RAYONS.
LUOKAN 1 LASERLAITE LASER KLASSE 1
Acer Backup Manager 7
Acer eRecovery Management 9
International resegaranti (International Travelers Warranty; ITW) 33
Innan du ringer 33
Felsöka datorn 34
Felsökningstips 34
Felmeddelanden 34
LCD panel ergonomic specifications 38
Pekplatta
Acer eRecovery Management
Acer eRecovery Management

Backup

Restore

Settings

Help
Password for Restore Process
Password Protection: Disabled
Create a New Password
Aktivera disk-to-disk recovery
International resegaranti (International Travelers Warranty; ITW)
LCD panel ergonomic specifications
| Design viewing distance | 500 mm |
| Design inclination angle | 0.0° |
| Design azimuth angle | 90.0° |
| Viewing direction range class | Class IV |
| Screen tilt angle | 85.0° |
| Design screen illuminance | • Illuminance level: [250 + (250cosα)] lx where α = 85° • Color: Source D65 |
| Reflection class of LCD panel (positive and negative polarity) | • Ordinary LCD: Class I • Protective LCD: Class III |
| Image polarity | Both |
| Reference white: | • Yn |
| Pre-setting of luminance and color temperature @ 6500K (tested under BM7) | • u'n • v'n |
| Pixel fault class | Class II |
TravelMate -sarja
Peruskëyttäjan opas
Acer eRecovery Management
9
Polta varmistuslevy
10
Palauta
11
"International Travelers Warranty" (ITW) 33
LCD panel ergonomic specifications 38
Kosketusalusta
Acer eRecovery Management
LCD panel ergonomic specifications
| Design viewing distance | 500 mm |
| Design inclination angle | 0.0° |
| Design azimuth angle | 90.0° |
| Viewing direction range class | Class IV |
| Screen tilt angle | 85.0° |
| Design screen illuminance | • Illuminance level: [250 + (250cosα)] lx where α = 85° • Color: Source D65 |
| Reflection class of LCD panel (positive and negative polarity) | • Ordinary LCD: Class I • Protective LCD: Class III |
| Image polarity | Both |
| Reference white: | • Yn |
| Pre-setting of luminance and color temperature @ 6500K (tested under BM7) | • u'n • v'n |
| Pixel fault class | Class II |
Cepnia TravelMate
TinnoBoe pyKOBODCTBO NOIb3OBaTeJЯ
TopTaTnBbI KOMNbIeTp cepNn TraveIMate
Hormep mojenn:
CepinHbI HOMep:
Дараз nokynк:
MecTo nokyn:
HΦopMaçnЯДЯВaшeи 6e3OpaCHOCTN yDObcTBA pa6Otbl
PpaBnla TexHnKn 6e3OnaChOCTn
BHMMaTeIbHo 03HaKOMbTeCb C 3TmM INHCTpyKcIyMn. CoXpaHIne 3TO TOKymeHT dIra HabeDeHn CnpaBok B 6dyuSeM. CJeDyIne BCem INHCTpyKcIyM n IpeDynpExkDeHnM, HaNecEHbIM Ha N3dJIne.
BbiknoueHne ycTpoiCtBa nepe qncTkOJ
Ipeedero uNCTKoI OTKNoUaHTe 3To I3DeHne O T HAcTeHNHO pO3eTKn NHTAHn. He nCnoJIb3yIte JxNkne IIN a3pO3OnbHbIe YnCTraIue cpeIcTBa. IJIa UNTKn IcNoJIb3yIte BnAkJHyIO TkaHb.
PNEyIPEKDEHNE NO NOdkHueHIO NOTKluOeHNO yCTpoiCTBa
Прип подключени и OTКлючени петашия OT Источниka habржени соблдаи Te ciledуошие Инструкши:
YctaHOBtne IcTOUHnK PntAHn, npexJe Yem NpOKnIooAtb ShHyp PtTaHnK P03eTke CTeBOrO 3NeKTponITAHn.
OTKJIUOaIe IHHp NITaHnIpepeoCTOeDINHeHnEM nCTOuHnKa PITaHnO T KOMNbTOpepa.
EcHn CnCTema 3aHTbBaETcO NT HeCKoJIbKHX NcTOUHNKO B NtAHH, TO OTKJIOUHTe NITAHne OT CnCTeMbI,OTCOeINHB BCE UHypbl NITAHN O T6NOKOB NITAHN.
IPEdYIPEXKDEHNE B OTHOWeHn IOCTynHOCTN
IocTyK cTeBoi po3eTke, B KOTOpyB BCTaBnIeTcHhupPiTuHa, He DoJIxKeH 6bIb 3aTpudHeN, 3Ta po3eTKa DOJXHa HaxOJNbCMAkCMMaJIbHo 6bn3KO K IOnb30BaTeIIo OobpyOboAHn. Ppi Heo6xoJIMOCtN OTKJIIOHTb PiTuHne OT OboOpYDoBaHn OBaTeJIbHO BbIHMaIte ShHypPiTuHa N3 po3eTKI 3JIeKTPoNTaHnI.
PpeDynpexKdEHNBE BOTHOSeHIN
PnBODa ONTNUeCKNX INCKOB
(TOЛько ДЯ ONpeДeнньIX MOdЕЛeн)
BhImaHHe:B 3om yCtpoiCTBe npImeHReTcIa3epHa cNCTema,IO3OMy OH
CunTaTcra "JIA3EPHbIM YCTPOICTBOM KJIACCA 1." B cnyae HenoJaIOK B
pa6oTe 3toro yctpoiCTBa o6patntecb 3a nOmozbuB 6bnkaiu
ABTOPN3OBAHHbI CepBnchbI ueHr. He OTKpbBaIe KoxyX, UTo6bI Ha BaC He
nonan lyu Ia3epa.
CLASS 1 LASER PRODUCT
CAUTION: INVISIBLE LASER RADIATION WHEN OPEN. AVOID EXPOSURE TO
BEAM.
APPAREIL A LASER DE CLASSE 1 PRODUIT
LASERATTENTION: RADIATION DU FAISCEAU LASER INVISIBLE EN CAS
D'OUVERTURE. EVITTER TOUTE EXPOSITION AUX RAYONS.
LUOKAN 1 LASERLAITE LASER KLASSE 1
Bcerda depkaTb ycToPoiCTBO Ha pacctoHn He MeHee 15,3 caHTmEtpOB ot KapdnoCTmUyIaTopa
He hocntb BkIIOueHHOyeCTpoiCTBO pIaOM c KapdIOOCIMyJIaTOpOM. EcNI BAM NOKaKeTc, yTo B paOte kapdIOCTmMyJIaTOpa BO3HnKJIIN NOMEXN, BblKJIIOUHTe yCTPOICTBO uY6epuTe erO.
Cnyxobbl annapaBtI. HeKOTOpbIe cHΦpOBbIe 6ecnpoBOdHbIe ycTpoCTBa MOryt Bb3bBAbTB NOMEXI B pa6Ote CnyxOBbIX annapaTOB. B cNyae BO3HnKHOBeHnI NOMex o6paTntecb 3a COBETOM K BaUeMy NOCTaBUnKy ycNyr.
ABTOMO6nJI
PCHINHbIbMOrT BnIbHa pa6Otu HnnpabInbHO yctAHOBnHex IIN
He npabInbHO 3KpaHnPOBaHHbIX 3NeKTPoHHbIX CnCTeM B aBTOMObIIJx, HApIMep, 3NeKTPoHHbIX CnCTeM BnPbICKa TOnJIbBA, TopMO3HbIX CnCTeM IpOTNBCKOJIbXeHnI (IpOTNB03aKJIINHBaHnI), nepeKIOueHn IpeJaU y npabBHeHnB O3dyuHbIMn IOyHKAMn 6e3OanChocTn. DOnONHtJIbHbIe CBeDeHnM OMKHO y3HaTb Y
IpeDcABInTeN 3AbOda-n3rTOBtEnra BaWero ABTOMObIIJn IIN dpYrOro
DOONHtJIbHO yCTAHOBnEHNO B HEm o6OpyOBaHnI. IPOBOInb TExNHueckoe
O6CnyKbAHnE yCTpOJCTBa NlN yCTaHaBJIbABy eRb A BTOMO6NIe DOJXhbl TOJbKO
KBaINΦuNCUPoBaHHbIe CneuaIaNtBi. HenpabInbHna YCTAHOBKa IIN
O6CnyKbAHnE MOrT Co3DaTb ONACHOCT b CdeJaTb HeJeCTBnHO rapaHTNIO
Ha 3To yCTpOJCTBO. PeryIpaHNo IpoBepaIte PpabInbHOCTb MOtaxa I pa6Obl
BCero pAnIOOBopyOBaHnB BAWeM aBTOMO6NIe. He xpaHnte I Ne nepeBo3NTe
TopOHyMe JxIDKOCtN, Ra3OBe 6aJIIOHbl NlN B3PbIOONaChBle MATEpNaIb B ODHOM
OTCeK e C3Tm UcTPOJCTBOM, ERO DeTaJIaM NlN DoONHtJIbHbIMN
PiHaNDLeXHcO7aMn K Hemy. EcIbn BaAs aBTOMO6NIb OBOPyOBaH B03dyuHbIMN
IOyHKAMn 6e3OanChocTn, To NOMHnte, YTO OHn packpbIBaIOTcC OChEB 60JIbIoN
CINIO. He NOMEsaIte PpeDMteB, B TOM YNCNE CMONTPOBaHHbe IIN nepeHOChble
PaINOyCtPOJCTBa, Na Bo3DyUHbIMN NOyUKAMn 6e3OanChocTn IIN Ha PyTN INx
packpbITNA. B clyuae HnpabInbHO yCTAHOBKn 6ecPBOODHO OBOpyOBaHn B
CaIOHe aBTOMO6NJL packpbItNe BO3DyUHoi NOyUKN 6e3OanChocTn MoKet
PiNbEcTn K cepEzHO TRabMe. IcNoIb3OBAHne yCTpOJCTBa Ha bOpTy camOIeta BO
Bpem NoIeta 3aIpeSeHo. BIKNUOaIte BaWe yCTPOJCTBO nepeD nocAdkOB
CAMonET. IVcNoIb3OBAHne 6ecPBOIDbIX yCTPOJCTB CMAOnTe MOKet BV3BaTb
ONachIbe Nomexn B pa6Ote CnCTe CMOnLa, HapUHTb paDNOTePhOHHyU CB43b
N, KpOMe TOrO, MOKet 6bl 3aIPpeSeHo 3aKOHOM.
B3pbIBOOJaChbIe ycIOBnA
BbIKIyauTe yCTPOCTBO B MeCTax C NOBIIeHHOIB3pbIBOOAnCHOCtBO I CJIeDyIte BCEM IHCTpyKUINM U Yka3AHINM HA 3HaKax. K B3pbIBOOANChbIM MeCTAM OTHOcTc8 O6IaCTn, rIe MOrY TNONPocITb BbIKIQUHTb DnIRaTeNb ABTOMObUNIA. Bo3HKnHOBeHne NCKpbl B TaKINX MeCTAX MOKeT PnIBecTN K B3pbIBy INI NIOkApY, YTO MOKeT Bbl3BaTb TpaMbI INI dAxe CMePTb. BbIKIouaTe HOYToYK PRAOM C rA3OBbIMn HAcOCAMN I6EH3OKoJIOHKAMn HA cepBVCbIX cTAHcIINX. O3HaKOMbTECb C ORpaHUnHeHmN Ha IcNOJbOBAHne paINOOBOpdyOBaHInB MeCTax XpaHeHInu PaCIPpeJeHIna TOPIINBa, XIMNUeCKNX 3aBODax INI MCeTAX, rIe BeUYTCs B3pbIBHbIe pa60tbl. B3pbIBOONaCHbIE MeCTa OBuHNO (HO He o6raTeNbHO) OTMeueHbI cNEuaJIbHbIMN 3HaKaAMn. K TakIM MeCTAM OTHCOTcN pOnaJy6Hoe pOcTpaHCTBO Kopa6Ne, MeCTa XpaHeHInu PaCIPpeJeHIna XIMNKaTOb, ABTOMObINu HA CxNKeHHOM ra3e (IpponaHe
IIN6yTaHe),aTakKe ObnactN,1eB BO3dyXe COdePkaTcRA XIMnueckne BeSeecTBA IINu YAcTnUbI, TaKNe KaK MyKa, NblN INM MetaIIInuecka NyDpa. He BkJIOuAte HooTy6yK B MeCtax, 1e3anpeUeHO NOnb3OBAtbc MObINbHbIMn TeNeΦoHaMn ININx IINcNoB3OBAHne MoKET Bbl3BaTb NOMEX ININ ONaCHYIO CNTyaUHIO.
3KCTpeHHbIe Bbl3OBbl
BHMaHne! BbIIOJIHeHHe 3KCTpeHHbIX BbI3OBB C NOMOuBIO TOTOYcTPOiCTBa HbEO3MOxHO. 3KCTpeHHbI Bbl3OB HUxHO CJeIaTb C BaWero MObIbHOro TeNeΦoHa IJIN C NOMOuBIO dpyroTteΦoHHO CNCTeMbI.
IHCTpyKcnn no yTnIn3aCnn
He BbIbpaIbIbAIte 3To 3NeKTPoHHO yCTPOIcTBO B MyCOPHOe BeIPO. TTObI cOKpATnTb Do MHNIMyMa 3aRpy3HeHne OKpyXaIOSe Cpebl I o6epeHTb ee MaKcIMaJIbHyU 3aIuNTy, noXaIyNcTa, cDaBaIte erO ha nepepaB0kTy. DOnOpINHTeJbHbIe CBeJeHnO O npaBnJax YtNiImaIIN OcIpyKIBwero 3NeKTPoTeXHnueCKOrO n 3NeKTPoHHO O6OpYOBaHnA (Waste from Electrical and Electronics Equipment, WEEE) MoJHo y3HaTb Ha Be6-CTpaHnIe http://www.acer-group.com/public/Sustainability/sustainability01.htm.
IpeDynpexKdHne o coDepeXaHn npTyTN
JaMnOBbIe npoekTopbI nJIe3JeKtPoHnA npOdyKuIc c JKK/3JIT MOHnTOpam6be3 CBeToDIOHOH NODCBETKn:JaMaNa(bI) BHyTpri 3TOrO yCTpoiCTBa CoepKaAT pTyB I DOJXHbI 6blTb Nepepa60TaHbI nII JIKBnIDnpoBaHbI B COOTBeTCTBN C JOKaJIbHbIMN, UTAHTbIMN INI JFepepaJIbHbIMN 3aKOHAm. Boone npDo6HyU INΦopMaUH BOI

MOKeTe HaNTn Ha caTte fedepaun 3neKtpoHHbIX OTPacJIe www.eiae.org. INΦopMaζIIO ΜικВιДaζN KOHKpeTHbIX BIVOB JAmN Bbl MOKeTe HaHTn Ha caTte www.lamprecycle.org.
ENERGY STAR

IpoodykunAcer,cooTBeTCTBvUOaJra Tpe6oBaHnAm ENERGY STAR,3koHOMIT BaUIN CpeDCTBa,CNHKA 3atpaTbHa 3neKtpo3HeprnIO, n 3aUuIaET OkpyKaIOUyU Opey 6ez cokpaueHnI yHKUHOHaNbHbIX BO3MOXHOCTe INI CNHXeHnI 6bICTpOdeECTBn. KomNaHnAcer pada IpeDIOXHTb CBOIM NOKyNaTeIam npodykUnC JorOTInOM ENERGY STAR.
CbeHnI n coBtI dIyO6CTBa pa60TbI
HnOgda nOJb3OBaTeNl, npOBoJaUeMnHO BpEmHeN 3a KOMNbIOpEPM, JauNyIOCTaHa qpe3MePHe HapRjKeHne rna3 n roNoBHyo 60JI. POnJb3OBaTeNl TaKke cATo pNCKyOT nOlyuHT bHn3NuEcKyu TpaBMy, ecn 6dyT MHO OACOB NOpDra CNDetb 3a KOMNbIOpEPM. IpoDoJNkITbHoe BpEmra paBOtbl, HeynObHna no3a, HnPaBnJIbHna opraHn3aun paOchero Mecta, CTpeCC, HnOJXODJaUe YcNOBnpaBoTB, coCToHnne liuHoro 3dOpOBbY npyTne fakTopbl 3NaHTeHbHO yBeJIuHBAIoT pNc NpUyeHnF h3NuEcKo TpaBMbl.
Henpabunbna na 3a KOMnbOpom MoKeT npBecTu K NOBHeNIO 3aIcTHOrO cyXoJIbHO rCnHrPOMa, TeHNHHTy, BOCnAneHIO cyXoJInI N CnHOBaJIbHO cmKn nIIN dpynx cKeJeTHO-MblIeuehBy 3a60JeBaHNI. B KnCTx pyk, 3aIpcTbAx, nIeay, npednpebyax, wee nIIN CNHe MOryT NOBtBcR cNeDyUOnie CmMTOMbl:
OHemHeH, XKeHne NJI NOKaJIbIbAHne
JOMOTA, 60JIe3HeHHoe OuUSeHne NJIcIa6OCTb
60nb, onyxonb nI npIbcaunr
OueneHeNoctb HnHnapXKeHne
Cyxoctb nnn cna6octb
Пи наличим тaknx CmNTOMOB, NOBTOPЯJOUIXCЯ ИЛ NOCTOЯньх Oушselfny ДИСКOMфорта ИИп 60лeзнEHьх OушselfNYх ри paБоTe 3a KOMьТОЕРOM HemeДленHo 6obpaTInTeсь 3a KOHCyIbTaциЕ к ВраЧу N COOБцITE OБ 3TomВ OTdEN TEXHKN 6e3OJaNCHOCtN И OXpaHbl 3dOpOBByBaшew KOMпани.
B cneyuouem pa3dene npnbOaTcra coBeTb, kaK cdeIaTb pa6oTy 3a KOMnblTepor M 60nee ydo6hoi.
Ponck ydo6horo pa6oeryo noIoxeHn
HaIInTe IaIe c6b MaKcImaIbHo yIobHoe nIOJoxHeNe 3a KOMblOtePOM, MeHra yron o3opar MOHITopa, NcNoJIb3yra NODCTABky dIra HOr INI pErynIpyra BlicOTy kpcna. BocnoJIb3yIteCb cneIyUoIIMn COBETAM:
He cnDnTe nOOnIry B OndHnIO3e
HeCKIOHЯTeCb Hn3KO 3a CTOJOM I He OTKINdbaIbTeCb DaJIeKO Ha cINHKy Kpecna
- Пернодунеши Востаимаи Тсь, Ктосы Сны Нарожене В мускулax Hor
- DeNaIte KopoTKe nepepbIbbl, UTo6bl Ocna6ntb HaprrxHne B Wee n Pnueax
He HanpraaTe MyskylbI He NoDnMaTe BbICOKO nJeu
yctahOBHTBHeHnI DnCnPe,KnabNaTyPbMbIbHa pa6OeM MecTe TaK, TTObI DO HNx 6bIIO JERKO DOTaHyTbcra
ecIN Bbl CMOTPHTe Ha MOHITOp YaIe, Yem Ha DOKyMeHTbI, To pa3MeCTInTe DnCJIeN IO CEHTpy CTOnA, YTObI WeJ HAprraJacb KAK MoXHO MeHbWe
3a60Ta o 3peHnN
EcnnoonrycmOTpebHaMOHITOp,HocntbHenpaBnIbHO NOo6paHHbeOcKn IIN KOHTaKTHBeIINH3bl,NCIOJIb3OBaTbApKNIpaBOTaTB 3a CTOnOM C6NeCTaee NOBepxHOCTbIO,IPOXO OTERpyeYIpNObaTb pe3KoCTb 3kPaHa,NCIOJIb3OBaTb MeIKNI shpIΦT INIM MaIOKOHTpAcTHbI DInCnIeI,To INa3a 6yDyT CInbHO yCTaBaTb.B CneDuOnix pa3DeJax PnIBoDArTC CoBeTb,Kak UMeNbUHtB Ype3MepHoE HapPKeHne rna3.
Tna3a
- DabaBaiTe rna3am YacTbI OTdbIX.
- Перiodи ueckn OTbOInde TgIa3a OT MOHITopa n CMOTpTe Ha KaKo-NH6yDb ydaJIeHHbI ppeDMet.
- Yacto MiraTe, TTo6bI rna3a He 3acbixaJI.
Ducnnne
- ČeρχινTe Σικηλειν B Κυκτόte.
Baisha roIoba doJokhna HaxoDITbcra Bblie HnKHei KpOMKn DncPiJe, YTO6bl npIn npocMOTpe n3O6paXeHnB U cHTpe DncPiJe rna3a CmOTpeIN CBepxu BHn3. - Otperynnpyte npkoctb n/nn KOHTpact dncnner taK, TTO6bI TEKT 6blno Ierko YntaTb, a rpaqika oTo6paKaJaaCb YeTeKo.
-
UMeHbIHTe MepuaHne I OTPaKeHne:
-
yctahOBHTe DnCpIeN TaK, YTO6bI erO 6OKoBa J KpOMKa 6bla O6paueHa K OKHy IJIN NCTOCHNIky OCBeUeHna
- yMeHbIHTe CBET B NOMEUeHn, IcNoJIb3yI NOpTbePbI, IITOpbl IJIIN KaJIHO3N
BKNIOaHTe OcBeHHe Ha paOohem MeCTe - otperynyuTe yroJ o630pa dinnpej
- IcnoIb3yIe aHTn6NIKOBbl ΦJIbTp
- yctahOBHTe Ha BepxHHe KpOMKe DnCnIeR COINHcE3aUNTHbI KO3bIpeK, HapnpMep, KapToHHyO NOLOCKy
He cmOTpnte Ha dinCnIe n3 HeyDo6HOro noJoxKeHna.
He cmOTpnte IIOJITy Ha NCTOUYI KRPKOrO CBeTa, TAKNe KaK OTKpbTbE OKHa.
Bbipabotka npabnblhoro ctnla paobtbi
BbIpa6oTaIe y c6e CneDyUOuIe npNBbIcN pa6oTbI 3a KOMNbIOTepom, KOtOpbIe IIO3BOJrT MeHbSe yCTaBaTb n pa6oTaTb 6OJIe pIo4yKTINBHO:
-Делайт ekopoTKne yacTbIe nepepbBbl B pa6oTe.
xiv
- DeJaIe Te KaKHe-NH6yDb ynpaxHeHnIa Pa3MnHKn.
- KaK MoXHo YaIe BbIXOJTe NIObIiWAtb YIcTbIM, CBEXIM BO3dYxOM.
- Perynlaepno DeaaiTe nniueckyo 3apkky, ykpenlaioy To.

PpeynpejdeHHe He noIb3yItecb KOMnIbIOTepoHa nIbAHe HIN B NoCTeH. Ecn 3TOrO HeNb3a N36ExKaTb, To pa6oTaIe ToJbKO KOpOTKmM nepnoaMn, qacto DeJaTe nepepbIBbl N BblONHJrTe ynpaxHeHn Ira pa3MNKn.

Mby pa3pa6oTaII npI dy pyKOBoIDCTB, KOToPbIe NOMOryT Bam B INcNoJIb3OBAHIN HoyT6yka Acer:
Празд BCero, Плakат Дя Наиношux...nomoxet Bam nO3hakOMtbcr c TeM, KaK hAcTpaNbTa KOMnbIOTep.
Tunoboe pykoBOCTBO nonb3OBaTeN IJn cepuTravelMate coepKNT
none3HyIO INHOpMaUIO, npImeHmYIO KO Bcem MoJeIam cepuTravelMate.
B HEM ONCbIAOTcO SCHOBHbIe TEmbl, TaKHe KAc TEXHOJrA Acer eRecovery
Management, pabota c KnabnAtypoi, 3BykOM n T.D. IOnKaJyIcTa, ImeTe B BVdu,
TO TUNOBoe pykoBOCTBO noJIb3OBaTeN IyNOMaHyTOE HIXe AcerSystem
User Guide ABJIoTcO O6oBSeHHbIMN, N03TOMy B HINX INOHJa bdyT OINcBbATbcra
fynKcMn nn CBOITBA, peaJIn3OBaHNbIe He B KynJIeHHoB BamM MoJeI, a JInuB B
ONpeDeJIENHbIX MOJEnx 3ToJ cepuN. B Taknx cnUyAax B TeKCTe IMeETcN NOMeTKa "TOnbKO dIg ONpeDeJIENHbIX MOJeIe".
KpaTkoe pyKOBOCTBO BnDE 3HaKOMNT Bac C OCHOBHbIMN XapAKTePcTNIKAMN I ΦyHKUJIM BAWeO HOBOr KOMNbHOtepA. YTo6bI y3HaTb 60JIbSe O TOM, KaK NOBICHTI pOdyKTINBHOCTB BAWeJ pa60tI C NOMOUsIO KOMNbHOtepA, Bbl MOKeTe o6paTntCBs K AcerSystem User Guide. 3To pyKOBOCTBO CoepXJT NOpOboHyU INΦoOpMaunO O CnCTeMHbIX ΦyHKUJx, BOCCTaHOBLeHm N daHHbIX, BO3MOKHOCTAX paCShpeHn I yCTpaHEnn HEnCIPaBHOcte. KpOME TORO, OHO COePjNT rapaTHnHyU INΦoOpMaunO, a TAKKe obuJe npeDnncHn I npabIna 6BeONaCHOCTn Pn pa60Te C BAWM HoYt6yKom. PyKOBOCTBO NoCTaBJIaETcR BMeCTe C KOMNbHOtepOM, PpeDbapITeBHo 3aRpyKeHHe B Hero BΦopMaTe PDF. ChTo6bI o6paTntCBs K HeMy, Bam HaIO cDeNaTb cIeDyOuee:
1 ΜιεπΚΗΝΤΕ ΚΗΟΝΚΥ

Iyck, 3aTeM Bce nporpamMbI, 3aTeM AcerSystem.
OchOBhIe cBeHnIyXoJe 3a KOMbIOTepOM I COBtBI NcNoJIb3OBaHnIO
BkIIOUeHne N BbIKIOUeHne KOMNbIOTepa
YtobbKJIIOHHTb KOMIbIOTep, npocTo HaxMITE n OTnycTe BbIKHOaTeJI bNTAHnpaCNOJoxHeHHIOd JKK-3KpaHOM pRdOM c KhoNkAMm 6bICTporo 3anycka. Cm.KpATKe pyKOBOCTBO, rde yka3aHo paCNOJoxHeNe KhoNk 3JeKTPoNTAHn.
YtO6bI OTKJIIOUHTb NITAHNE, BbIINOHInTe CNeJeYIOUne DeiCTBnA:
- IcnoIb3yIeTe KOMaHd OTKJIouHeHry KOMIbIOTepa Windows
HaxMMTe KhoNkY «Pnyck», 3aTeM BbIbepuTe «3aBepueHne pa6OtbI».
- IcnoJb3yIte KhoNkpy nHTaHn
IpebeCTn KOMbIOTeB pexIM "COH"MOXHO TaKKe OJHOBpeMeHHbIM HaxaTneM dYHKUHOHaJIbHbIX KJIaBIM

Pnmuemuehne: Ecn He ydaetc OTKIOHNTb 3IeKTPoNTaHne KOMNbOtepa OoblyHbIM CnOCOBom, TO HAKMITE uYdePKBaIte KHOKNy IITaHnHa He MeHee YeTbIpex CeKYHd, YTObI KOMNbOtep OTKIOHNIcE. Ecn Bbl OTKIOUHN N KOMNbOtep N XOTNe BKIOHTb erO ChOBA, NOJOKDInTe He MeHbIe, Yem DBe CeKYHd npeed TeM, KaK IOBTOpHo BKLIOUHTb NITaHne.
YXoI 3a KOMIbIOTepOM
Baw KOMNbIOTep 6yDet xopoOo Cnykntb, ecIn 6yDete 3a Hm npabnblho yxaxNBaTb.
He BbIcTabJIaTe KOMbIbTepe Ha npraMoJ coJIneHbI CBet. He cTaBbTe eropaDM C NCTOChHKamn TepNa, HapPImep, Cp aPaHaTOpOM OTOnJIeHna.
He noDBepraTe KOMbIeTp Bo3dIeCTBnIO TempeaTyp HnKe 0°C (32°F) nnn Bblwe 50°C (122°F).
He noDBepraTe KOMnbIOpE Bo3JeCTBnIO MaHnHTbIX nOJIe.
- OseperaTe KOMnbIOp et DoJxIy IIN BnaI.
He npoInBaIte BOy uHn HHyO XnKIOCTb Ha KOMNbIOTeP.
- OseperaTe KOMnbIOTep OT yIapOB nII BnBpaun.
- ObeperaTe KOMpbIOTep OT nbIN n rpa3N.
- YtO6bI He NIOBpeiNb KOMNbIoTeP.
3akpbibra, He xlonanTe KpbIkoK KombTopepa.
- HNKOrIa He cTaBbTe KOMNbIOTep Ha HepOBHyIO NobEpxHOCTb.
YxOД 3a aДaNTepOMпepeMeHHO TOKa
3ndeB npNBedeH NO HeCKoNbKO peKOMeHdaunno yxOdy 3a aanTepom nepMeHHoro TOka:
He nodknouaTe K adanTepy HnkaKne npyrue yctpoiCTBa.
He hactynaTe Ha shyhp nHTaHnHa He KnaHte Ha Hero HnKaKnx TjKeJbIX npedmetOB. IpotraHnte shyhp nHTaHnHa KaBeHN TaKIM o6pa3OM, YTObHa HNX bIIO TpydHO hactynITb.
BbIeprnBaIshyp nItaHnI3pO3ETKn, TAHHTe He 3a shHyp, a 3a BnIky.
- Ecπn noIb3yeTeCb yIINHInTeIeM, o6uI HOMHaIbHbI TOK nOdkNHOeHNHO K cETn OOBpyDobAHnI He dONKeH npeBbIaTb HOMHaIbHoe 3NaHeHne HOMHaIbHoro TOka KaBeIg. KpOme TORo, HOMHaI BcEx TOKOB BCero OOBpyDobAHnI, NOKIIIOeHHORO K OOnH pO3Etke NtTaHnI, He dONKeH npEBybIaTb HOMHaI PnAbaKOro npEdoxpaHITeIe.
YxOД 3a aKKyMnyTOpOM
3ndeB npBBeHcHeckoIbKO peKOMeHdaCn IIO yXOy 3a aKKymyTOpOM:
- IcnoIb3yIte aKKymJYTopbI TOnbKO TORo Ke TnPa, KaK n 3aMeHReMbIe.
OTKnHcHTe NITaHHe NpeEd TEM, KaK BbIHMaTb INI MHeYrTaAkkymyJrTOp.
He noIb3yIeTcB aKkyMnyIaTOpAMn HEn3BecTHbIX npOn3BOiTeNe.IepKInTe aKKMyJrAToPbIB He DoCTYHOM DnIa DeTeMceTe. - IinkBnDInpyTe nCIOB3OBAHHBe aKkMyJrTOpbl B COOTBeTCTBm C MeCTHbIMn npabuIamn. Ecn 3To BO3MOXHo, OtnpaBbTe aKkMyJrTOpbl Ha nepepaBoTky.
UncTka n o6cIyXnBaHne
Pnue Tke KOMbTope npOeNaTe CteDyUoIne DeiCTBna:
1 BbIKIIOUHTe KOMMbIOTep N BbIbTe aKKMyJrTOp.
2 OtcoeHnHTe aanTep npeMeHHoro Toka.
3 IcnoJb3yIte MmKyo TkaHb, CMOueHHyIO BOIo. He IcnoJb3yIte JnDkne nIaepo30JIbHbIe YnCTraIe CpeCDTba.
Ecn npon3oJna Onda n3 cneyuOuNX CNTyaui:
KoMnBIOTeP ypoHnIIN nIIN KOpNyc KOMnbIOTePa 6bl NOBpeXKeH.
KoMnIbIOpTeP He pa6oTaet DoJXHbIM o6pa3OM.
npINBOOa ONTNueCKNX DnCKOB
(TOJIbKO DnIg ONpeJeHHeNbIX MoJeNe) VIII
UcnoBna 3KcnIyatauix
MeiHcne yctpoIcTa ix
ABTOMO6JIH X
B3pbboonachbIe ycIOBnX
3KCTpeHHbIe Bbl3OBbl xi
Ihctpykunno ytnn3aun xi
IpeynpexkdeHne o codepkahnn pTytn xi
ENERGY STAR xi
CbeHnI IOBtI dJIy yO6CTBa pa6oTbI xii
Bhaane o rnaBHOM XV
Baun pykoBODCTBa XV
OchOBhIe CBeHeHnO6 yxoJe 3a KOMNbIOTePOM N COBETbl
IIO IcnoJIb3OBaHnIO XVI
BkIIOUeHne I BbIKIOUeHne KOMNbIoTepa XVI
YxOa 3a KOMnIbIOTepoXvi
Yxoid 3a aadantepom nepemehnoro Toka xvii
Uxo3a aKKymyIaTOpOM XVII
Ynctka n o6nykBaHne XVii
CenhcopnnaHeIb 1
OchobblncnoJb30BaHnna CeHCOPHO nanei
(c DaKTInIOCKOnIuYeCKnM CUnTbIbAteJIeM) 1
OchobblncnoJIb3OBaHnI cEHcOpHoi nHeJI
(CДБУМКHONPKAMN) 2
IcnoJb3ObaHne KnaBnaTypbl 3
KJIaBnIb6JIOKINPOBKn IN BCTpoEHna YIΦpOBAra KNaBnAtypa* 3
Klabs Windows 4
Aydino 5
Acer PureZone (ToIbko dIy onpeIeJIeHHbIX MoJeIe) 5
Bvideo 5
3KpaHΦopMaTa 16:9 (ToIbKO dIa ONpeIeIeHHbIX
MOdelen) 5
IcnoJb3ObaHne CNCTeMHbIX yTnJIHT 6
Acer Bio-Protection
(TOJIbKO DnIg ONpeJeHHeNbIX MoJeNe) 6
Acer Backup Manager 7
UnpaBneHne nHTaHnem 8
Acer eRecovery Management 9
3aHnscpe3epBHOJ KOIMHa ONTueckn Dnck 10
BocstahOBJIeHne 11
BocctaHOBJeHne Windows cДИСКВ apxHBbIX KOni 12
Akkymylatopna 6tapey 14
XapakTeepntKn aKkMyJrTopHo 6aTapei 14
YBeJIuHHeHne cPoKa cIyKbblakkymJrTOpHoB 6aTapeN 14
UctaHOBka nI3BLeueHne aKkymyTOpHO bTapeN 16
3apdakkymyIaTOpHoi6batapei 16
IpoBepka ypoBn3apJa aAkkymlaTopHoi 6atapei 16
OnTmM3aIy IcNoIb3OBAHn8 6aTapei 17
IpeDynpexkdeHne O Hn3KoM ypoBHe 3apya
aKymyIaTOpHoi 6aTapei 18
Bepem HooT6yK c co6oB 19
Otkluehenoe ot paoboyero ctoJa 19
Передвжени 19
IoprotoBka KOMbTepa 19
UTo pInHocntb Ha coBeuHaHn 20
3a6npaem KOMnbIOTep DOMOJ 20
IoiroTOBka KOMNbIOTepa 20
UTo 6paTb c co6oB 21
Oco6bIe coo6paKeHn 21
UcTpaNbAem domaunn oΦnc 21
IyTeeCTBnA C KOMNbIOTePOM 21
Iodrotobka kombtopea 21
Uto 6paTb c co6oB 22
Oco6bIe coo6paXeHn 22
MekdyhapoDbIe nyTeueCTBnC KOMnbIOTepom 22
IoproToBka KOMnIyTepa 22
UTo 6paTb c co6oB 22
Oco6bIe coo6paXeHn 23
BézonaacHocTb BaUero KOMNbIOTepa 23
IcnoB3ObaHne 3aMka 6e3oNaCHOCTN KOMnbIOTepa 23
IcnoJIb3OBAHne naponei 23
BvOJ napoJIeI 24
3aandne naponei 24
PacshinpeHne c NOMOUsbIO dONoHNHTeJIbHbIX BO3MOxHocTei 25
CnoocobIpoKJIIOUeHn 25
MOnem nIepeaun paKcoB/daHHbIX
(TOJIbKO IaI ONpeJeHbIX MoJeIe) 25
BcTpoEHnIbe cpeIcTBa pa6OTb I BCETN 26
YHnBepcaIbHa nocJeIOBaTeIbHa 1uHa (USB) 26
Iopr IEEE 1394 (ToJIbKO JnIa onpeJeHbIX moJeIe) 27
High-Definition Multimedia Interface
(TOJIbKOДЯОпeДeЛeньxMoDEnei) 27
ExpressCard (ToIbko IJnO nppeJeHbIX MoJeNei) 28
UctaHOBka namrtn 29
YtunaBIOS 30
IocJeIOBATEJIbHOCt bHaayabHO 3aRpy3kn 30
BkJIoueHne fynKcIn Acer disk-to-disk recovery
(BocctaHOBHeHne "cДиСka HaДиСк") 30
Iaponb 30
Pa6oTa c nporpaMMaMn 31
Iprocmotp nIbMoB Ha DVD 31
32
ObpaueHne 3a Texnuecko Iopdeprkko 34
MekdynapoDhbIe rapaHTn IyIpyTeWecTBYIOx
(ITW) 34
Ppekde, yem obaaatbca 3a nOmoIbIO 34
YcTpaHHe HEnOJaOk KOMNbIbIepea 35
CobetbI NO NOnCKy uYcTpaHEHIO HeNCpabHocTei 35
Coo6eHnOb oOn6kax 35
IpaBnla n 3aMeuHnno 6e3OpacHoCTn 36
3ameuahne FeepaIbHoi Komnssn no 3eKtpocBra3n 36
PpIMeuaHnO MoDeme
(TOJIbKOДЯОпрделеньIMMOdelen) 37
3aBHeHne O nKceJax KIOKpncTaJIuYeCKoO 3kpaHa 37
Hopmatubhoe ybeDomJIeHne B OTHoHeHH paIIOyCTpoiCTB 37
Ombaayactb 37
Tpe6oBaHn8 6e3oNaChOCTn ΦeDepaJIbHoN KOMiCCnI IO
3JIeKTPoCBA3N BOTHOUWeHIN BBICOKNX YACTOT 38
KaHada-Hn3KOMOuHOCTHbIe,OCBO6oXdEHHbIeOT NlueH3nn
paIIOKOMMyHnKaIauHOHHbIe yCTpoIcTBa (RSS-210) 40
Bo3deICTBHe Na IIOJe BbICOKOaCTOTbIx nOJIe (RSS-102) 40
LCD panel ergonomic specifications 40
Cechopnay naneJb
BcTpoEHNaCeHCOPHa nAHeIb -3To yKa3bIBaIOoee ycTpoiCtBO, OuYuaIOoee DnIXeHnnoeroNOBepxHocTN.3ToO3NaHaeT, YTO KypCop OTBeuaeT Na DnIXeHnnaJIbueB no NobepxHocTN ceHCOPHO nAHeIN. LcHTpaJIbHoe paONIOKeHne ynpaDnpyk npEoCTabJrE mAKcImaJIbHoe yDo6CTBO n NODpeKky.
OCHOBbI NcNoJIb3OBaHnI CeHCOPHO nHaJIeN (C DaKTInIOCKoNHyeCKm CHTbIBaTeJIeM)
CneyuOuHe 3NeMeHTbI Noka3bIbaIoT, KaK
NcNoB3OBaTb CehCOPHyo NaHEnb C
daKTInNOckONmuCeCKM CnuTbIbaTeNm Acer Bio-Protection.
- Yto6bI DnBraTb KypCopOM, BODInTe naJIbIeM NO ceHCOPHoi nAHeN (1).
HaKab Ha NeByu (2) n npabyu (4) KnaBnHn, HaxoJnncsA NO Kpaam CeHCOPHO nanei, CMOxete o6ecneHTb FyHKmN BblOba nNC0nHHeHn. 3TN DBe KnaBnHn NDoobHbI npBoH n neBOI KnaBnHAMMbHn. NocTyKBAHne NO CeHCOPHO naneHn aHaNoTNU HO hXaTnIO neBOI KHONMbHn.
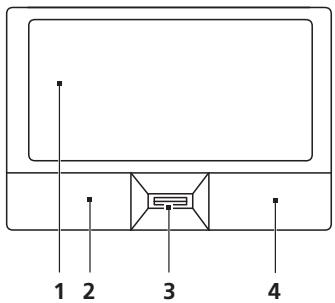
OCHOBbI NCNoJIb3OBaHnA CeHCOPHO nHaHeJI (C DByM KHOPIKaM)
Cneyuioine 3nemehbI Noka3bIBaHOT, KaK NCnOJIb3OBaTB CeHCOPHyIO naHeB C DByM KHOKNKaMNI.
- TToBbI DnBraTb KypcOpom, BOnTe NaJIbIeM No CeHcOpHoN naHeJI.
HaKab Ha JIeByIO npaByIO KJIaBUN, HaxOJaIuecE NO Kpaam CeHCOPHO nAHeN, CMOKeTe oBeCneHbT cyHKun BbIbopa N cNoJHnra. 3TN DBe KJIaBUN IOIObHbI npaBOI N JIeBOI KJIaBUNAMMbIu. IocTyKbBaHne IO ceHCOPHO nAHeN aHaJIoMnHO HaxaTIO JIeBOI KONKn MbIu.
PpmeaHne:3Ta yHKuIy DoCTynHa He BO BCeX MoJeIax.
Iporpamma Acer Backup Manager 3a TPN poctbix wara no3Bonaet co3daBaTb pe3epBHyIO KONIO BCEIN CnCTEmbl INN OTDeJIbHbIX paJIOB IN PAnOK NO paCnicaHIO n IO Heo6XOdImocTN.
Стобул STANUCITb Acer Backup Manager,нжмite Клавишу Acer Backup ManagerВ Верхней чаTN Клавиатypы.Либо Вьберп Te MeHIO Nyck > Bce nporpaMMbI > Acer Backup Manager > Acer Backup Manager. OTKpoeTc 3kpa n pInBETCTBnR.СТOTOЗКрANA 3a Tpru Stara Bbl CMOXTe HacTpOBtpe3epBHOe KOINPOBaHne POp pacncaHIO.Чтобул поЕТИ Na cIeDyUOsiN 3KpA, SteKNHTe ПpoJoJxNTb.JIeKNHTe KONkny + n cIeDyIte Yka3aHnI MHa 3Kpahe:
1 Bb6epnte coepxmoe nra pe3epBhoro konipobAHn. Yem mehbe coepxmoRO bblpaHO, Tem 6bictpee ocyuectBnIETc npoccc KOnipOBaHn, HO TEM Bblwe pNCK notepn daHHbIX.
2 BbIbepeMeToIgIxpaHeHnpe3epBbIxKoNII. IOTpe6yeTcBbIbPaTb BHeuHnDnCKIIN DnCKD: -Acer Backup Manager He MoXeT xpaHntb pe3epBbIe KOONHa IcXoHOM DnCke.
3 BbIbepeTe nepIOduNHOCTb, c KOTOpoi Acer Backup Manager 6ydet BblONHrTb pe3epBHOe KOINPOBaHne.
По заBERшEN 3tIX Trex WarOB pe3ePBHbIe KOJIIN 6yIyT co3dAbaTbCS aBToMaTnueCKn corIacHo paCnIcaHIo. MoKHO TaKKe co3dAteb pe3ePBHyIO KOJIINO BpyHyIO HaxkATHeM KJIaBNIu Acer Backup Manager.
UTo6bI N3MeHnTb HAcTpoKn, B JIOboe BpeM 3aynCTte Acer Backup Manager n3 MeHIO Nysck I NOBTopiTe OINcaHHbIe BblIe WAI.
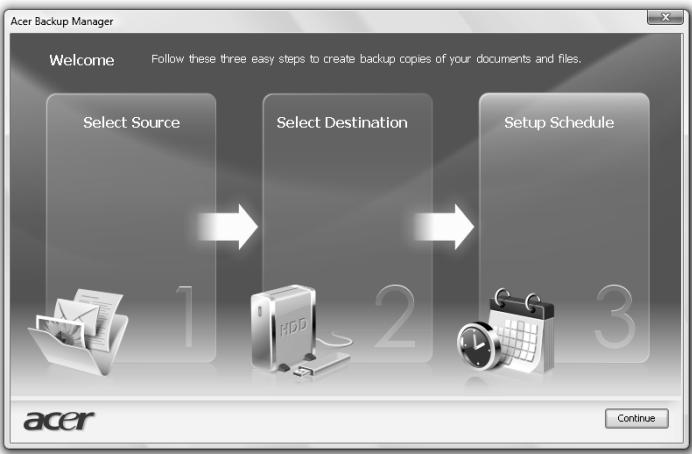
YnpabJIeHne pNTaHnem
B daHHom kOMMbItepe cTeB BCTpoeHHoe yCTpoiCTBO ynpaBHeHnI nTahnEM, KOTOpoe cNeIIT 3a CNTeMHbIMN DeIcTBnMn. IOnC NCTeMHbIMN DeIcTBnMn IOnpa3yMeBaIOCTcJIIObIe DeIcTBnC BOBLeeHHeM OJHOr OJIIN HeCKOJIbKnx YCTpoiCTB, TAKNX KaK: KJIaBnAtuPa, Mbls, DnCKOBoD, JECTKN DnCK, nepuΦepriHbIe yCTpoiCTBa, CoedInHeHbIe C NocJeDoBaTeNbIMn I npaIIeJIbHbIMN nopTaMn, a TaKxE BnDeonAmrTb. EcnI 3a KaKoe-TO BpeMra (TaK Ha3bIbAeMOe BpeM 6e3dEChTB) He OTCJeXnBaEtcR HnKaKaJr DeTaeJIbHoCTb, KOMMbItePep octaHaBnIBaet qactb IIN BCE 3TN yCTpoiCTBa, YTObl 3KOHOMtB 3HeprnIO.
Acer eRecovery Management
1 Haxmte Nyck, Bce nporpaMbl, Acer, AcerRecovery Management.
2 Ipeennte Ha cTpaHnUy BocctaHOBNTb, HaxkAB KhoNkY BoCCTaHOBNTb.
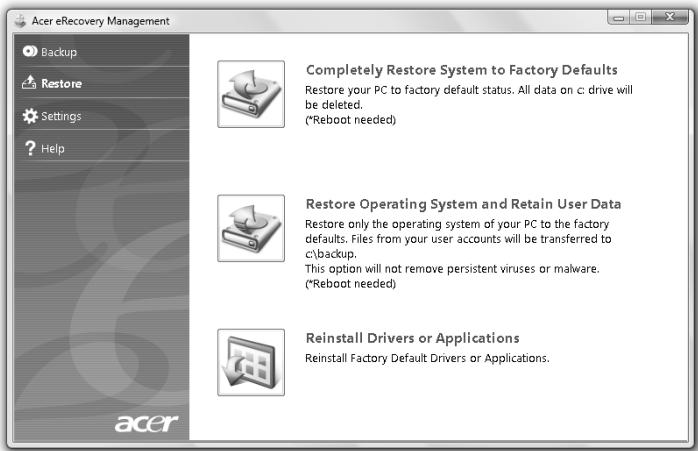
3 MoXHo BbIbpaTb BocCTaHOBJIeHHe CnCTeMb I3 O6pa3a NcXoJHO KOHfNpyaunnnnepeyctaHOBky dpaIBePoB nPpINOxKeHH.
4ДЯЗавершениprouceca cIeDyIte INHCTpyKUIM Ha 3KpaHe.
BocCTaHOBJIeHne Windows cДИСКОВ apXINHBIX KONII

PpmeaHHe:3TaФyHKUЯDocTyHnHa He BO BCEx MoDeIax.
YTo6bI BocCTaHOBnTb Windows c apxNBbIX KOJI, paHee 3aIncAHbIX Ha NcKIn, HxJH0 BCTaBnTb nepBbI apxNBbI dNcK IN yTuJIte HAcTpoINBIOS BKJIouHTb MeHIO 3aRpy3Kn no F12.
1 BkIIOUHTe KOMNbOTe nB npINbOD ONTNUeCKNX DnCKOB BCTaBbTe nepBbI dNcK dIra BoCCTaHOBJIeHnA CnCTeMbI. Ipepe3arpy3nte KOMNbOTe.
2 Bo Bpem 3ayncKa, KOrJa nOABnTc JIorOTn Acer, HaxMnte KlaBnUy F2, UTO6bI BOITN B yTNInTy HAcTpoiKa BIOS n B Hei HAcTpOnt b napametpbI CNTeMbI.
3 HaxkataHem KnaBnU CO CTrpeNkAmn BnEBO N BnpaBO BbIeJIte IOdMeHIO TnaBHOe.
4 HaxaTneM KJIaBnIc O CTpeIknAMn BBePx N BnI3 BbIeJIInTe MeHIO 3arpy3Kn I0 F12.
5 HaxaTneM KJIabuNf F5 nF6 n3MeHnTe dIy MeHIO 3arpy3Kn no F12 3NaueHHe Ha BkJIoUeHo.
6 Haxmte KlaBnUy ESC, YTObI BOITN B NOIMHeo BbIXoD, Haxmte KlaBnUy ENTER, YTObI BbIITN, COxpaHNB n3MeHEnH. Haxmte KlaBnUy ENTER eue pa3, YTObI BbIbpaTb Da. PpOn3OJTe Npe3aRpy3ka CnCTeMbl.
7 Pocne nepe3arpy3kn, KOrda noRanTcI JorOTnAcer, HaxMnte KnaBnUy F12, YTO6bI OTKpbITb MeHIO 3arpy3kn. 3deCb MOxHO Bbl6paTb, C KaKOrO yCTpoiCTBa 6ydet 3arpykaTcR cNCTema.
8 HaxaTneM KnaBnU CO tpeKamMbIeJIte IDE1*, 3aTeM HaxMMTe KnaBnUy ENTER. Cntema Windows 6byet yctahOBHeA c DnCKa BOCCTaHOBHeHn.
9 YBnDeB nprnlaaHHe, BCTaBbTe BTOPOI DnCK BOCCTaHOBJIeHn, 3aTeM BblOJHnIte yka3aHnHa 3KpaHe dIy 3aBepSeHn BOCCTaHOBJIeHn.
10 После заBERSEHЯ BOCCTAHOBLEHЯ ИЗВЕКТЕ ДИСС BOCCTAHOBLEHЯ ИЗпивда.ЭTO HUKHO CDEIaTb Do nepe3arpy3kn KOMMbTepa.
EcnI XOTnTe 3aadTb npOpntET 3arpy3Kn Ha dIITeIbHbI CpOK, TO BbIeJIteIe IOnMeHIO 3arpy3ka.
1 BkIIOUHTe KOMNbHOTep nB npINbOD ONTNUeCKNX DnCKOB BCTaBBte nepBbI dNCKdIy BOCCTaHOBHeHnCnCTeMbI. Ipepe3arpy3nte KOMNbHOTep.
2 Bo Bpem 3ayncka, KOrda NoRbntc JIorOTn Acer, HaxMnte KJIaBnUy F2, UTO6bl BOITN BYTNI TY HAcTpOJa BIOS n B Hei HAcTpOnt b NapametpbI CNTeMbI.
3 HaxaTHeM KJIaBnIc CO CTpeNkAMN BIneBO N BnpaBO BbIeJIte IOpMeHIO 3arpy3ka.
4 HaxaTneM KnaBnSi CO CTePknAm BBepx N Bn3 BbIeJIte yCtpoiCTBO IDE1*.
5 HaxaTneM KnaBnIu F6 nepemecnte npBOD IDE1* B no3nIcIO C hAnBbICmM npOpNTet 3arpy3kn nn HaxaTneM KnaBnIu F5 nepemecnte npytne ycTroNCTBa B no3nIcIO C bolee Hn3kIM npOpNTeOM 3arpy3Kn. Y6eDnTEcb, yTO dJa npBDoA IDE1* yctahOBJIe HAnBbICmI npOpNTet.
6 HaxmTe KnaBnUy ESC, yTo6bI BOITN B NOMeHIO BixOa, HaxmTe KnaBnUy ENTER, yTo6bI BbiTn, coXpaHNB n3MeHeHn. HaxmTe KnaBnUy ENTER eue pa3, yTo6bI BB6paTb Da. PpOn3oJET nepe3arpy3ka cnCTeMbl.
7 Пи петаузke систema Windows 6удт усановлесс дисka BOCCTaHOBJIeHЯ.
8 YBnDeB nprrnaaehne, BCTaBte BTOPOI DnCK BOCCTaHOBJIeHnI, 3aTEM BbInONHnIte yka3aHnHa 3KpaHe Ipn 3aBepSeHnI BOCCTaHOBJIeHnI.
9 Iocne 3aBepseHn BOCCTaHOBnEHN n3BnKeNt E nCK BOCCTaHOBnEHN n3 npBOda. 3To HxJHo CdeNaTb Do nepe3arpy3Kn KOMNbHOtepa.
AkkymyItopna 6aTape8
B kombIyotepe nCnOlb3yeTcAaKMyIyTopHa 6aTaPe8, oBeCneuBaHouaJ npoDJIKNTeJIbHOe BpEm aBOTHOMHO pa60Tbl.
XapaktepcntnKn aKKymyJTopHOb 6aTapeN
IcnoIb3yemaj aKKMyJrTopna 6aTapeo6laJaet cNeyuOuIMn XapakTepeNCTKamn:
CoOTBecTBnE TeKUzIM TexHOJOrnueckIM CtAnDapTaM.
- Φунци педпгек demун Oниkom урове зapяда.
3apdakkymyIaTOPHObatapeN BbIOnHaeTc npnIOdkJIuOeHNK
IpepeHocHOMy KOMMbIoTepey aadntepa 3JeKtpoNTaHnIepeMeHHoro Toka.
3apd batapeN BO3MOKeH N B Ipocece NcNoJb3OBAHnKOMMbIoTepa,
no3BOJRA He npRepBaT pa60Tu npn 3apd aeKymyIaTopa.Tem He
MeHee, 3apd akKymyIaTOPHObatapeN pnpBbIKUChEHHOM KOMMbIoTepe
3aHImaET 3HaHTeJIbHO MeHbIe BpeMeHn.
3apxehnha 6atapeu n03Bnnt nCnObl3OBaTb KOMNbIeTp B nOEzke nn npn c6oax 3neKTPoNtHaHn. PeKomeHdyTeaMeTb B pe3epBe DOnOHNTEbHyIO nONHOCTbIO 3apxxeHHyIO 6atapeU. CBeJeHn o npno6peTeHnn pe3epBHO n AKKymIaTHOH 6atapeu MoXHO nOJIyHTb y npoDaBaZa nepeHOCHOro KOMNbIeTepa.
YBeJIuHHe cPoKa cIyK6bI aKKyMylTOpHO bTapei
Kak n liobbIe dpyrHe 6aTapeu, aKKymyIaTOPHa 6bTapeu nepeHocHOro KOMnIbIOTepa co BpeMeHem TepaET emKOCTb. 3TO 3NaHT, YTO BpeMpa60tbl OT 6bTapeu CO BpeMeHem cOKpaUaETc. IJn IpoDJIeHnIcPoka CnyXbbl aKKymyIaTOPHoi 6bTapeu peKOMeHdyETc SJeIOBaTb PnIBVeDEHHbIM HIXke peKOMeHDaUcNm.
IoproTOBka HOBOJ aKKymyTOpHOJ 6aTapeN K IcNoJIb3OBAHnIO
Ipeed nauanom nCnoJIb3OBAHnHO BOI aKKyMnyTOpHOn 6aTaPeN peKoMeHndyeTc npOBecTn npOeCC "IOJrTOBKn" ee K paBoTe:
1 BcTaBbTe HOByo akKymyIaTOpHyo 6aTapeIO B BbIKJIooHeHHbI KOMNbIOTeP er He BKIIOuaaTe erO.
2 POKJIouHte aIaITepe 3neKtpoIHTaHnI IN POJIHOCTbIO 3apJITe 6aTaapeHo.
3 OtknouHTe aanTep 3JeKtpoNTaHna.
4 BkIIOHTe KOMNbIOTe np paOtaIte, nCNoJIb3yra 3JIeKTPoNITaHnA O T aKKMyJrTOpHO6bTapei.
5 IcnoIb3yIte KOMNbIOTep Do noJIHOrO pa3praJa 6aTapeu N IOBHeNn npEduynpeKdEHNr O Hn3KOM yPObHe 3apraJa.
6 IopKJIouHTe aanTep 3neKtpOnuTaHnA n BHObI NOHOCbIO 3apAnTe 6atapeo.
Повторя Te onиcaHьie Bblse DeiCTBnЯ Дп BAIIIOJIHeHЯ Tpex ZIKNoB нолно ra3рда n 3apda 6aTapeN.
BbInonHnIe 3Tu npOeDpyu NODROBKn DJIa BCEx HObIX 6aTapei n
6aTapei, KOTOpblie He IcNtOB3OBaINCb DInTEbHOe BpeM. EcNI
KOMNbIOTeP He IPiAnHPyeTcNcNtOB3OBaTb B TeYeHne IByx HeJeB INII
6oJee, peKOMHeNyEeTcN3BLeKeTa b AkkymyIaTOPhyU 6aTapeU.

BnmaHHe: He noDbepraIte akKymyIaTOpHyIO 6aTapeIO Bo3deIcTBnIO TempeAtyp HnKe 0°C (32°F) n BbIe 45°C (113°F). Bo3deIcTBnE BbICOKNx Hn3Knx TempeAtyp MoKet He6naoropnIaTHo NOBInrTaHa pa6OToCnOco6HoCTb akKymyIaTOpHO 6aTapei.
IpoceDypa noDrotOBKn aKKyMnyTpHOJ 6atapeN K nCNoJIb3OBAHnIO yBEnuHbaeT eMKoCTb (MaKcImaNbHbI yPOBeH 3apJa) 6atapeN. EcNI He npBOODtB npOeDpyu noDrotOBKn, 6atapeH cMOKeT 3apJkaTbcrdo MaKcImaMbHorO yPOBnA, a cPOK ee Cnyk6bl COKpaTntcR.
UcTaHOBka aKkymyIpyTpHoi 6aTapei.
1 CoBmecTnTe kpa8baTapen C kpaamn 6bTaapeHoro oTceKa, y6eINBwInCb, yTO rpaHb 6bTaapeN C KOHTaKTMn HAnpaBNeHa BOBHypb, a BepXHЯ NOBepXHOCTb 6bTaapeN - BBepx.
2 BCTaBbTe 6bTaapeoB 6bTaapeHbI OTcEKN CJIeRka HaxMnTe Ha Hee dIy KCaunn B OTcKe.
13BneueHne aKKymJrTopHOi 6bTapei:
1 CdbnHbTe fKcTop aKymyTHO bTaapeu.
2 BbITaHInTe 6aTaapeNo n3 OTeKa.
3apayakymyTopno6aTapei
Ipeed 3apydom y6eintecb, yto 6atapey yctahOBnHa B 6atapeHOM OTcKe. IoiklnouhTe aadantep 3neKtponntaHnK KOMNbHTepy n K cetn 3neKtponntaHn. B npoccepe pa3raP moXHO npdoJXKaTb pa6Oty C KOMNbOTepom. Tem He MeHee, 3apjd akKymJIaTOpHOn 6atapeu npi BblKnHHeHHOM KOMNbHTepe 3aHImaeT3NaHTeJIbHO MeHbSe BpemHn.

PpmeaHne: PekomEnyTeTc 3apKaTb 6batapeo B hauane KaKdoTo dH. 3apJd 6batae HocbIe npede Haanom Noe3dkn N03BOJNT yTpom Hauatb paBoTy c NOJIHOCTb 3apJxKeHHoB 6bataeepi
PpocmToT pHnIbMOB Ha DVD

Yacto 3aDaBaemble BOpocbl
Jaee npBBeHc nncok Bo3MOxHbIX cTuYaCn, KOtOpIe MOrY BCTpeTITbcra PnIOJIb3OBaHH BaIHM KOMNbIOTepOM. Ipa KaKdoN cTuYaCn npBBeHbI npocTbIe OTBeTbI n peSeHn.
Iocne haxatna KHONKn nHTaHn KOMnbIOTep He 3anyckaetc nnHe 3arpykaetc.
BzrrnHHe Ha INdikKaTop Power (Pitahne):
Ecn OH He CBeNTcA, nTahHe Ha KOMbIeP He NoaHO. PpOBepe TcneyUoee:
Ecni Bbl pa6oTaTe OT aKkyMnyTota,3To MoKeT O3HaTuB,TO erO 3apJn Hn3Kn I HeCnoc6eH nIaTb KOMNbIoTe. PoIqKnIOHTe aAnTep nepemehnHO ToKa, YTO6bl 3apJNDt b AKKyMnyTOp.
- Y6eIITcB, YTO aIaNTep IpeMeHHOrO TOKa IOnKhbIM O6pa3OM NODKJIUChEN K KOMNbIOTepy IN K CetN.
Ecni INHdkatop cBeNTTC, npOBepbTe cNejuOooee:
HaxoHTcTaNHe NpEHa3HaueHHaNJa 3aRpy3Kn (He CnCTeMHa) DnCKTeA BO BHeUHEM USB-PrnBODe n6kXn DnCKOB? BbIbTe 3Ty DnCKeTy IIN BCTaBbTe BMeTO Hee 3aRpy3OHyIO (CnCTeMHyIO) DnCKeTy, 3aTeM IJIpe3aynckCa CnCTeMbI ONDHObPeMeHHO HaxKMTE KnabuSh .
KnaBnatapyHepearnpyeT.
IqdoeHnTe BHeuHIO KJabNaTpy K nopTy USB cnpaba NJIIN CJIeBA naHEni KOMbHTopeA. EcII OHa 6ydt pa6oTaB, o6paTInTeCb K BaUeMy dJIepy NJIIN B aBTOPI3OBaHHbI cepBnCHbI ueHTp - BO3MOxHO, He IPOdKJIouChEN BHyTpEHN Ka6eNB KJIaBNaTpybl.
PpInTepepaOtaeT.
BbInOpHnTe cneDyUOuNe DeiCTBna:
- YdoctOBepbTecb, YTO npInTeP NOdkHoueK Cetn I YTO eTo NITaHne BKJIIOUeHO.
- Y6eIITecb,чTo OOnH pa3bem Ka6eI npInTepa HadeJxHO nOcOeINHeN K npaJIJIeBHomy IIn USB-nOpTy kOMNbHTepa,a dpyro - K COOTBeTCTByUOeMy nopTy npInTepa.
Яху BOCCTaHOBnTb NepBOHaJaHbHbIe HAcTpOriK Moero KOMNbIOTepa, He IcNoJIb3yA KOMNaKT-ДИСКN BOCCTaHOBNeHЯ.

PpmeaHne: EcnB Baae CnCTeme 3aRpyKeHa MhOrOra3bUHaBepn OpeaOnHOHcNCTeMbI, TO pN nocJeDyUoX Nopeaunx BOCCTAHOBJIeHn6 ByT NcNoB3ObaTcR ToIbKO Te BapnaHTb OC n 3bIka, KOTOpBe Bbl BbIbpaJIN pN nepBOM BKIOueHn NiTaHn CnCTeMbI.
C nOMOJIbUdoHHOI npOeDpybl BOCCTaHOBNeHn MOKHO BOCCTaHOBNTb DnCK C:c opunHaJIbHbIM IporpamMbHbIM ObecneueHem, KOtOpoe 6blNo yCTaHOBNEHo, KOrda Bbl npIObpeTANI HOYt6yK. JIra BOCCTaHOBNeHn Dncka C: BblONHInTe npOeDpy, npINBeHNHyIO HnKe. (Dnck C: 6UYET pepeOpMaTIPOBaH, IN BCE DaHHbIe 6yDt ydaneHbI). Ipeep BblONHHeHem 3ToI npOeDpybl O8a3aTeNbHO Co3daNte pe3epBhIE KOnnn BCex φaIIOB.
Ipeed 3anyckom npoceDpyb BocctaHOBNEHn npOBepbTe hacpoKn BIOS.
1 PpOBePbTe, BkJIuOHeHa JIn cyHKnAer disk-to-disk recovery.
2 Y6eIITecb, yTO fynkui D2D Recovery B MeHIO Main yCTaHOBJIeHa B Enabled.
3 BbIynte n3 yTnNTbl BIOS, coXpaHbN n3MeHeHna.

Прмочанe:ЧтобдakтubизироваыутлNTу BIOS,нжмпTe
3anyck pnoceuypb BocctaHOBneHnA:
1 Ipepe3aRpy3nTe CnCTeMy.
2 Poka oTo6paKaTe JIorOtIn Acer. IJIa 3anUcKa npOeDpybI BOCCTaHOBNeHnHaXMMTE OJHOBpeMeHHo
3 Дя поведеня BOCCTAHOBJIENЯ CNTeMbI CNeDyIte yKa3aHnA M, OTO6paXaembIM Ha 3KpaHe.

Baxho! 3Ta yTnIHTa 3aHmaeT OT 15 Γ6aI T B CkpyITOM pa3dene Ha JeCTKOM DNCKe.
CobetbI IO NOnCKy I yCTpaHeHnHO HeNCpPaBHOCTeI
3TOT nopTaHbI KOMIbIOpTe COePJKT COBpeMeHHbIe pa3pa60Kn, N03BOJIAUJIe BbIOJNTb COOJIeHnIa 6oOIN6Kax Ha 3kpan dIy ObnIeYehnI nonCKa HeNCnPabHOCTN.
EcIn CnCTema Coo6aet ob Own6ke IINI INPOBnIOTc CmIMTOMbl Own6Kn, CM. "Co06eHn8 oOwn6kax". EcIn HeNoIaNka He MoKet 6bITb yCTpaHeHa, CBJXnTEcb c npOanabQom. CM. "ObpaSeHne 3a TexHnuecko nOpDepKko" Ha cTp. 34.
Coo6uènna o6 oùn6kαx
Ecni ciCTema BbIaet Coo6eHne He 6 Ob Oun6ke, 3aIIuHte erO n npIMTe Mepbl IyctpaHEnn HeNCnPabHocTn. B cIeNyUoJe TabNtpe NpeueNcIeHbI COo6eHnO bO OUn6kax B aIpabHTHom nopAKe, a TaKxe peKOMeHdyEmble DeIcTBnNo Ix yCtpaHEnIO.
LCD panel ergonomic specifications
| Design viewing distance | 500 mm |
| Design inclination angle | 0.0° |
| Design azimuth angle | 90.0° |
| Viewing direction range class | Class IV |
| Screen tilt angle | 85.0° |
| Design screen illuminance | • Illuminance level: [250 + (250cosα)] lx where α = 85° • Color: Source D65 |
| Reflection class of LCD panel (positive and negative polarity) | • Ordinary LCD: Class I • Protective LCD: Class III |
| Image polarity | Both |
| Reference white: | • Yn |
| Pre-setting of luminance and color temperature @ 6500K (tested under BM7) | • u'n • v'n |
| Pixel fault class | Class II |
Ko mputer seri i1 TravelMate
Notebook PC seriii TravelMate
Oznaczenia modelu:
Numer seryjny:
Data zakupu:
Miejsce zakupu:
http://www.acer-group.com/public/Sustainability/sustainability01.htm

Acer Backup Manager 7
Zarzadzanie energia 8
Acer eRecovery Management 9
(International Travelers Warranty; ITW) 35
LCD panel ergonomic specifications 41
Touchpad
Acer eRecovery Management
LCD panel ergonomic specifications
| Design viewing distance | 500 mm |
| Design inclination angle | 0.0° |
| Design azimuth angle | 90.0° |
| Viewing direction range class | Class IV |
| Screen tilt angle | 85.0° |
| Design screen illuminance | • Illuminance level: [250 + (250cosα)] lx where α = 85° • Color: Source D65 |
| Reflection class of LCD panel (positive and negative polarity) | • Ordinary LCD: Class I • Protective LCD: Class III |
| Image polarity | Both |
| Reference white: | • Yn |
| Pre-setting of luminance and color temperature @ 6500K (tested under BM7) | • u'n • v'n |
| Pixel fault class | Class II |
TravelMate sorozat
CLASS 1 LASER PRODUCT
CAUTION: INVISIBLE LASER RADIATION WHEN OPEN. AVOID EXPOSURE TO BEAM.
APPAREIL A LASER DE CLASSE 1 PRODUIT
LASERATTENTION: RADIATION DU FAISCEAU LASER INVISIBLE EN CAS
D'OUVERTURE. EVITTER TOUTE EXPOSITION AUX RAYONS.
LUOKAN 1 LASERLAITE LASER KLASSE 1
Acer eRecovery Management
9
Mentési lemez irasa
10
Visszaalitas
11
(International Travelers Warranty; ITW) 35
Mielott telefonána 35
Hibaelhárítás 36
LCD panel ergonomic specifications 41
Érintópad
Acer eRecovery Management
LCD panel ergonomic specifications
| Design viewing distance | 500 mm |
| Design inclination angle | 0.0° |
| Design azimuth angle | 90.0° |
| Viewing direction range class | Class IV |
| Screen tilt angle | 85.0° |
| Design screen illuminance | • Illuminance level: [250 + (250cosα)] lx where α = 85° • Color: Source D65 |
| Reflection class of LCD panel (positive and negative polarity) | • Ordinary LCD: Class I • Protective LCD: Class III |
| Image polarity | Both |
| Reference white: Pre-setting of luminance and color temperature @ 6500K (tested under BM7) | • Yn • u'n • v'n |
| Pixel fault class | Class II |
Rada TravelMate
Notebook Čady TravelMate
Cislo modelu:
Serieové císlo:
Datum zakoupeni:
Misto zakoupeni:
Acer Backup Manager 7
Rizeni spotreby 8
Acer eRecovery Management 9
High-Definition Multimedia Interface
(International Travelers Warranty; ITW) 33
Než zavoláte 33
LCD panel ergonomic specifications 38
Zařízení touchpad
Acer eRecovery Management
LCD panel ergonomic specifications
| Design viewing distance | 500 mm |
| Design inclination angle | 0.0° |
| Design azimuth angle | 90.0° |
| Viewing direction range class | Class IV |
| Screen tilt angle | 85.0° |
| Design screen illuminance | • Illuminance level: [250 + (250cosα)] lx where α = 85° • Color: Source D65 |
| Reflection class of LCD panel (positive and negative polarity) | • Ordinary LCD: Class I • Protective LCD: Class III |
| Image polarity | Both |
| Reference white: Pre-setting of luminance and color temperature @ 6500K (tested under BM7) | • Yn • u'n • v'n |
| Pixel fault class | Class II |
Séria TravelMate
Acer Backup Manager 7
Správa napájania 8
Acer eRecovery Management 9
High-Definition Multimedia Interface
(len pre urcité modely) 26
ExpressCard (len pre urcité modely) 27
Instalacia pamate 28
UtilitaBIOS 29
LCD panel ergonomic specifications 38
Dotyková plocha
Acer eRecovery Management
Acer eRecovery Management je nastroj na rychle obnovenie systému. Je mozné tież zalohovat' alebo obnovit' obraz predvoleny vyrobcom a preinstalovat' aplikácie a ovládače.

Poznamka: Vsetky nasledujuce informacia su len vseobecne. Parametre aktualneho vyrobku mozu byt' odlišné.
Acer eRecovery Management obsahuje nasledujuće funkcie:
1 Záloha:
LCD panel ergonomic specifications
| Design viewing distance | 500 mm |
| Design inclination angle | 0.0° |
| Design azimuth angle | 90.0° |
| Viewing direction range class | Class IV |
| Screen tilt angle | 85.0° |
| Design screen illuminance | • Illuminance level: [250 + (250cosα)] lx where α = 85° • Color: Source D65 |
| Reflection class of LCD panel (positive and negative polarity) | • Ordinary LCD: Class I • Protective LCD: Class III |
| Image polarity | Both |
| Reference white: Pre-setting of luminance and color temperature @ 6500K (tested under BM7) | • Yn • u'n • v'n |
| Pixel fault class | Class II |
Serija TravelMate
Acer Backup Manager 7
Upravljanje z napajanjem 8
Acer eRecovery Management 9
International Travelers Warranty (ITW)
(Mednarodna potovalna garancija) 33
PredenPoklicete 33
LCD panel ergonomic specifications 40
Sledilna plošča
Acer eRecovery Management
Acer eRecovery Management

Backup

Restore

Settings

Help
Password for Restore Process
Password Protection: Disabled
Create a New Password
LCD panel ergonomic specifications
| Design viewing distance | 500 mm |
| Design inclination angle | 0.0° |
| Design azimuth angle | 90.0° |
| Viewing direction range class | Class IV |
| Screen tilt angle | 85.0° |
| Design screen illuminance | • Illuminance level: [250 + (250cosα)] lx where α = 85° • Color: Source D65 |
| Reflection class of LCD panel (positive and negative polarity) | • Ordinary LCD: Class I • Protective LCD: Class III |
| Image polarity | Both |
| Reference white: | • Yn |
| Pre-setting of luminance and color temperature @ 6500K (tested under BM7) | • u'n • v'n |
| Pixel fault class | Class II |
TravelMate serija
Acer Backup Manager 7
Acer eRecovery Management 9
Snimanje diskova sa sigurnosnom kopijom 10
Povrat 11
Povrat Windows s diskova sa sigurnosnom kopijom 12
Baterijskicomplet 14
Karakteristike baterijskog kompleta 14
LCD panel ergonomic specifications 41
Dodirna ploča
Ugrăna dodirna ploča jePokazivački urežaj koji prepoznajePokrete na svojoj povrsini. To znači daPokazivač reagira kakoPokrećete svoj prest preko površine dodirne ploče. Središnje mjesto na osloncu za dlanove pruža optimalnu udobnost i podršku.
Osnove o dodirnoj ploči (s Čitačem otiska prsta)
Sljedecé stavkePokazuju kako biste trebali koristiti dodirnu ploču s Acer Bio-Protection citacem otisaka prstiju.
- Za pomakPokazivača, prstom prelazite preko dodirne ploče (1).
- Pritisnite lijevu (2) i desnu (4) tipku ispod dodirne ploce za funkcije odabira i izvršenja. Ove dvije tipke djeluju slicno lijevoj i desnoj tipki miša. Lagano lupkanje po dodirnoj ploči ima istu funkcjju kao i klik lijevom tipkom miša.
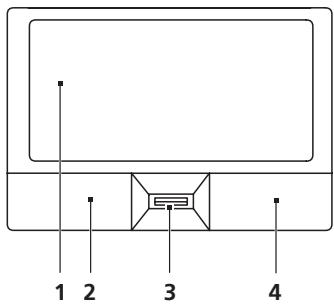
| Funkcija | Lijeva tipka (2) | Desna tipka (4) | Osnovna dodirna ploča (1) | Središnja tipka (3) |
| Izvrši | Brzo kliknite dva puta. | Lagano lupnite dva puta (istom brzinom kao kod dvostrukog klika tipke miša). | ||
| Odaberi | Kliknite jednom. | Lagano lupnite jednom. | ||
| Vuci | Kliknite i držite, zatim uporabite prst na dodirnoj ploči kako bisté "vukli"Pokazivač. | Lagano lupnite dva puta (istom brzinom kao kod dvostrukog klika tipke miša); prilikom drugog lupkanja ostavite prest na dodrnoj ploči i "povlačite"Pokazivač. | ||
| Pristup kontekstno m izborniku | Kliknite jednom. |
Acer eRecovery Management
Acer eRecovery Management je alat za brzi povrat sustava. Takoder mozete izraditi sigurnosnu kopiju/povrat standardnog tvornickog imidza i ponovno instalirati aplikacije upravljacke programe.

International Travelers jamstvo (ITW)
Văse računalo je pod International Travelers jamstvom (ITW) koje vam daje sigurnost i spokoj kada putujete. Naša mreža servisnih centara diljem svijeta je tu da vam pruži pomoć.
LCD panel ergonomic specifications
| Design viewing distance | 500 mm |
| Design inclination angle | 0.0° |
| Design azimuth angle | 90.0° |
| Viewing direction range class | Class IV |
| Screen tilt angle | 85.0° |
| Design screen illuminance | • Illuminance level: [250 + (250cosα)] lx where α = 85° • Color: Source D65 |
| Reflection class of LCD panel (positive and negative polarity) | • Ordinary LCD: Class I • Protective LCD: Class III |
| Image polarity | Both |
| Reference white: | • Yn |
| Pre-setting of luminance and color temperature @ 6500K (tested under BM7) | • u'n • v'n |
| Pixel fault class | Class II |
Seria TravelMate
Ghidul general de utilizes
Computer portabil seria TravelMate
Numarul modelului:
Numarulserie:
Data achizitiei:
Locul achizitiei:
Acer eRecovery Management
9
Inscriptionarea discurilor de siguranta
10
Restaurarea
11
Restaurati Windows de pe discurile de siguranta
12
Bateria
14
14
Maximizarea duratei de viata a bateriei 14
Considerati special 20
LCD panel ergonomic specifications 41
Zona de atingere
Acer eRecovery Management
LCD panel ergonomic specifications
| Design viewing distance | 500 mm |
| Design inclination angle | 0.0° |
| Design azimuth angle | 90.0° |
| Viewing direction range class | Class IV |
| Screen tilt angle | 85.0° |
| Design screen illuminance | • Illuminance level: [250 + (250cosα)] lx where α = 85° • Color: Source D65 |
| Reflection class of LCD panel (positive and negative polarity) | • Ordinary LCD: Class I • Protective LCD: Class III |
| Image polarity | Both |
| Reference white: | • Yn |
| Pre-setting of luminance and color temperature @ 6500K (tested under BM7) | • u'n • v'n |
| Pixel fault class | Class II |
TravelMate Cepnia
YHnBepcaJIHo nOTpe6nteIcKo pKOBODCTBO
CepnaTravelMateIpecoHaJIenHoyTuK
Mодел homeр:
CepiH Homep:
Да та на зakува:
MЯсто на заува:
BHHIMABAITE 3a DoCTbIHOCT
Ybepete Ce, Ye eNEKtpnueckn KONTaKT, B KOITo BKJIIOUbaTe 3axpaHbaIe Ka6eI, e neCHO DoCTbIeH I CE HAMIPA Bb3MOXHO HAI-6IIIN3O DO YOBeKa, pa6Oteu C o6OpyDbaHeTo. Korato Ce HanaIa Da cnpTe 3axpaHbaHeTo KbM O6OpyDbaHeTo, He 3abpaBraIte Da n3BaInte 3axpaHbaIe Ka6eI OT eNEKtpnueckn KONTaKT.
BHHMABAITE 3a HaJIInuHne Ha n3KycTBeHn KapTu (cAmO 3a HjaKOI MoDeJIi)
KOMNIOBpBT Bn e DoCTaBeH C nIaCTMaOBN KApTn, NocTaBeHN B KApTOBnTe CnIoTOBe. N3KycTBeHNrte KApTn PpeJna3BaT HeN3nON3BaHnTe CnIoTOBe OT npax, MeTaNHN nIIN dpyrN qactnIz. 3ana3eTe N3KycTBeHNrte KApTn n IIN n3nON3BaIte, KOrato B CnIoTOBete HЯMa dpyrN KApTn.
BHHIMABAIETnpncnyuShaHe
3a da npednaTe cnyxa cn, cneBaIte Te3n INCTpykUn.
- YBeJIuYaBaTe CnIaTa Ha 3ByKa IocTepeHNo, JOKaTO He CyBaTe RaCHO N KOMΦopTHO.
He yBeneucaBaTe CnIaTa Ha 3ByKa, CneI KaTo yUIne Bn CBNkHaT.
iv
He cnyuwaTe My3nKa C BnCOKa CnJa Ha 3Byka DblrN nepNoI OT BpeMe.
He yBeneuHabai Te cnilata Ha 3Byka, 3a da HeyTpapan3npaTe 6yMHa o6ctaHOBka.
- HamaJIeTe CINaTa Ha 3Byka, aKo He yuBaTe XopaTa, KOInTo rOBoPrt OKIo BAc.
PpeDynpexKdEHHa
He n3no3BaIte npOdyKta 6n3o Do B0da.
He nocTabaIe npOdykTa Ha HeCTabuHa KOJIuKa, cToKa IIM Maca. Ako npOdykTbT NaIHe, MoKe da ce nobpei cepno3Ho.
- Има сnotobe и OTbOpn 3a BeHTnlaucn, KOINTO OcNHyprBaT NaIeXdHata pa6oTa Ha npodykta n ro ppeNa3Bat OT ppepRbaHe. He 6nBa da 6nokpuate nInn Pokpmbate Te3n OTbOpn. 3a Da n He 6nokpuate OTbOpnte, He 6nBa da noCTabTe npodykta Ha JERNo, DINBaH, KINIM INn NODobHa NOBbpxHOCT. Hnkora He NoctabYte npodykta 6bn30 Do nInn NaD paDnAToP, HarpBaUc BeHTnI INn BrgaDeHa IHCTaNaucn, OCBEN AOK He CTE MY OCNHypruINu HxKHaTae BEHTnlaucn.
Hikora He nbxaIte HnkaBn IpeMTe B npOdykTa Ipe3 OTbOpnte INpOceNITe, TbKaTO MoKe Da yUcJIte ONaCHN TOcN IOd HnPexKeHne INI DA npEiIN3BnKaTe KbCO CbeDInHeHne, KOEtO MoKe npuYNH NOKap INI TOKOB yIap. Hnkora He pa3nBaIte HnkaBn TeuHOCTN BbpXy INI B npOdykTa.
3a da n36eHHeTe NOBpexJaHe Na BbTpEShHnTe KOMNoHEHTn I da npedotBpaTHe Teu Ha 6aTePnIte, He noCTabYIe npOdyKTA Bbpxv Bn6pnpaun IOBbpXHOCTn.
Hnkora He ro n3no3BaTe B cpea, KbdeTo ce n3BpWBat CnOpT, fn3nueckny npaxHeHnna NmN Ma KaBnTo n Da 6nlo Bn6paCun, Tb Kato ToBA BepoTHO ue npuHN HeOuaKbaHo KbCo CbeDnHeHne Nn Ne NobpeDi poTOphnte yctpoiCTBa, TBbpDnA DnCK, ONTNCHOTO yCTPOIcTB, a MOxE DOpN DA BN n3NoXn Ha pNCK OTn3NoXeHne HnNTNeBnB 6aTepeHn nakET.
- Долнота NOBbpxHOCT, Уч actbnte OKOLO BeHTnlaCIOHNHITE OTBOPN ИnpomehJIINBOTOKOBnIТ АдNTep мОже Да ce HarpeR. 3a Да ce n36berHe HapahBaHe, Te He Tp86Ba Да ce DoNupat Do BaaWata Koxa Ил TЯNo.
BaIeTo yCTpoiCTBO n DOnbIhEnHra Ta KbM Hero MoKe da CbIbPkaT dpe6Hn qactu. IpbXte rN daJeY OT oBCera Ha maJIkn deua.
I3noJ3BaHe Ha eJNEKtpNueCTBO
To3n npOdyKT Tp86Ba da ce n3nOJ3Ba c Tnla 3axpaHbaHe, noocyeHoHaMapknpoBkata. Ako He cTe cnryprn KaKBo e 3axpaHbaHEto npi Bac, KOHCyItnpaIte Ce c DnCTpn6TyTopa INIc MecTha Ta eJeKtpnuecka KOMnaHna.
He octabraye Hnio Bbpxy 3axpanbaunna Ka6en. He noctabraye npodykta Taka, ye nO ka6ena da cTbnbat xopa.
Ako n3noI3BaTe yDJIxNtEn C npOdykTa, yBepTe Ce, ye o6uata HOMHaJIHa MOUHOCT Ha 06OpYDbAHeto, BKNIOHe BOyDJIxNtTeJ, He HAnXBbPnHOMHaJIHaTAMoUHOCT Ha yDJIxKTeJ. CbIo Taka ce yBepTe, ye o6uata HOMHaJIHa MOUHOCT Ha BCNUKINpOdyKTIn, BKNIOeHN B CTehHn KONTaKT, He HAnXBbPnMoUHOCTTa Ha 6byOHa.
He BkIIOUBAIte MHOrO yCTpOiCTBa HabeIDhJx, 3a da He npTeOBapITe eIeKTPuYeCKnKOHTAKT, Ka6eNIIIN6yKcA. O6IOTo CNTEmHO HatoBAPBaHe He 6bIa Da NaXbPn8 80% OT HOMHaHnHATA MOHOCHT Ha pa3KIOHeHneTO. Ako n3IOn3BaTe pa3KIOHnTeJ, HatoBAPBaHTo He 6bIa Da NaXbPn8 80% OT HOMHaHnTa BXODHa MOUHOCT Ha pa3KIOHnTeJI.
- AC aadantepbT ha npodukta e oobopydban c trnKJleh 3a3eMeH uencei. UencelbT nacba cmo Ha 3a3eMeH eektpueckn KOHTaKT. YbepeTe ce, ye eektpueckn KOHTaKT e 3a3eMeH npabJIHo, npdeI da BKJIOHTe uenceHa HA AC aanTepa. He BkJIOVAIte uencela B he3a3eMeH eektpueckn KOHTaKT. 3a noboe neopdo6HOCTn nITaIte CBOA eekTPOTexHnik.

BhImaHHe! 3a3eMaBaunrT uNfTe mApKra 3a 6e3OnaChocT. Ako n3NoJ3BaTe eJeKtpnueckn KOHTAKT, KOITo He e 3a3Emen npabJIHo, MoKe Da NOLyUHTe TOKOB ydap N/nn da Ce HapaHHTe.

Белека: 3a3eЯBaUHT cIuT cIuTo kA Bn npEДи3Ba OT HeOчakBан Wym, npOu3BExdAn OT dpyr n eNekTpueckn yCtpoiCTBa Na6bIIO3O, KoiTO MoKe Da nonpeHn Ha pa6oTaTHa npOduKTA.
CnCTeMaTAmoKe Da 6bJe 3axpaHeHa C HanpeXeHne OT roJAM dnaIa3OH: npomEniB TOK OT 100 do 120 nIn oT 220 do 240 V. 3axpaHbAunrKa6en, DoCTaBeH 3aeJHO cBc CnCTeMaTa, OTROBaRr Ha N3NCKBaHnraTa 3a N3IOJI3BaHe B CTpaHata/peNoHa, KbDeTo CnCTeMaTa e 3akyneHa. 3axpaHbAunTe Ka6en 3a N3IOJI3BaHe B Dpyr CTpaHn/peNoHn Tp6Ba Da OTROBaRr HA N3NCKBaHnraTa 3a Te3n CTpaHn/ perNoHn. 3a Nobee HnΦopMaunr OTHOCHO N3NCKBaHnraTa 3a 3axpaHbAunr Ka6en Ce CBbPjKeTe C OphiuaJNe HnCTpr6yTop nIn DoCTaBvHK Ha ycIyI.
O6cnyXbaHe Ha npoDyKta
He ce onntbaite da o6cnyKbate npodkyta camt, Tb KaTO OTbapraHTo nIM maxaHTo Ha kanaun MoKe Da BN N3IOXn Ha pNCK OT TOKOB ydap nn dpyn yBpeJdAnHa. OctabeTe 6cnyKbAHeto KaBANuPcap cepBn3eH nepcoHaJI.
Ötkaayte npódykta ot CTehnna KOHTaNT N NCKaTe 06cnykBaHe OT KbaJIINΦuIpaH cepBn3eN nepcoHaI, KOrato:
3axpaHbauT Ka6eN nnIeNceE neOBpeH, cpr3aH nnI npOTpNT
Bbpxy npoDyKta e pa3Jra TeHocT
- npoodykTbTe 6nI n3IOKeH Na IbXd IIN BODa
- npoDyKTbTe nadHaI nn KopnycbT My e 6nI yBpeDeH
ce H6nIqDaba p3ka n 3a6eJekma npomraHa b pa6oTaHa npOyKta, Koeto CoHn Hyjda ot cepBn3Ho o6cnjXbaHe
IpoDyKbT He pa6oTn HOpMaHNo, BbIpeKn Ye cTe Cna3BaIn yKa3aHnraTa 3a pa6oTa
Белека: Perулираite calo Te3n KohtpoI, KOnTo ca onicaHb Yka3aHnraTa 3a pa6Ota, TbK aTo HnpeBnHto peYunpaHe Ha npTu KOHTPOJIM MOKe Da npUHHn UeTeN uYeCTO Ue e HyXHa MHOrO pa6Ota OT KBaIIINΦuIpaH TexHbK, 3a Da ce Bb3CTaHOBn pOdyKtBa HOpMaIIHO CbCTOJHHe.
Yka3aHn3a 6e3oNa cha ynoTe6a Ha 6aTepeInTe
To3n HooTy6k u3non3Ba JIITneBO-IOHNa 6aTepy. He ro I3non3BaIte BvB BnaXHa, MOKpa IIN KOPo3NBa CpeA. He NoCTabYIte, He cIbXpaHraBaIte N He OCTabYIte npOdyKTA B INN 6bn30 Do n3TOUHnK Ha TOnIIIna, Ha MAcTc O BnCoka TempePaTypa, NOI pIpa CblHueBa CBeTIIna, B MIKPOBbJIHOBa NeyKa IIN B KOHTeHep IOI HAJraHe, a CbIo ToKa He ro I3nIaraiTe Ha TempePaTypu Na 60°C (140°F). Ako He cna3BaTe Te3n Yka3AnHn, OT 6aTepyTa MOKe Da npoteYe KncEInHa, INI PbK cAmata 6aTepyra da Ce Harpee n 3anaIn IIN ekCnIIOnpa, KoEtO MoKe Da npuHHn Uetn I/Inn HapAHBaHn. He npobBaIte, He OTbApReIe N He pa3rno6BaIte 6aTepyra. Ako 6aTepyra npoteYe n Ce DOKOCheTe DO n3TEKJIte TeHocTn, INIpaKHe T O6IIINO C BoDA n He3a6abHNO nOTbpCete MeDmUHNCKa NOMou. OT CbOpaXeHnRA 3a 6e3OnaNacOCT, a IN 3a da CE yDbJIxN XIBOTA Ha 6aTepyra, Ta He ce 3apeJda pn TEMpePaTypn Poi 0°C (32°F) INI n Ad 40°C (104°F).
Пьната eфektubnoct Ha HOBATA 6atepna Ce noctura yap cneД BA nIu Tprпьни цкьla Ha 3apekdahe И pa3pekdahe. BatepnaТ мож De ca 3apekda И pa3pekda стOTиц ПьТи, Ho hakpa Ie ce N3TOU.N. Korato Врето 3a pa6Ota StaHe Збелектелно NO-Kpatko OT HopMaHnOTo, KynTe HOBA 6atepna.ИЗнOL3ВaIte само OODobepHu 6atepnu IN ppe3apekdaIte 6atepnaTc с Camo C Odo6peHn Зардну yctpoiCTBa, пe徳нa3NaueHn 3a TOBA yCTpoiCTBO.
I3non3BaIte 6aTepeRyta cmo nnpedHa3HaueHne. HkOra He n3nON3BaIte nobpeDeHa 6aTeepn nn 3apJdHO yctpOcTBO.He npabete Kbco cbeDInHeHne C 6aTeepnTa.MoKe da ce nOnyuNeymuJeHo KbCo cBeDInHeHne, KOraTO MeTaNpeDMeKATO MOHeTa,KnAme nn XmMkaJka Cb3dae npKa Bpb3ka MeJdy noToXnTeHnata (+) n OtpuCaTeHnata (-) KMeMa Ha 6aTeepnTa.(KleMeTe N3rIeKdAT KaTo MetaHn IeHTN Bbpy 6aTeepnTa.) ToBa MoKe da Ce cnyu HapPImep Korato Hocnte pe3epBna 6aTeepnBa Dxko6a nn ChaTATA cn. KbCOTcBeDInHeHne Ha KJIeMeNTe MoKe da NoBpeNi 6aTeepnTa nn CBbp3aJnra n ppeMet.
KanauntbTи JxNBoTbT Ha 6aTePnraTa ige HamaJeT, ako 6aTePnraTa 6bJde OCTaBeHa Ha ropeu nn cTydeHm Mecta, HanpImep B 3aTbOpeHa KOa Ipe3 IyTO nIi 3mata. BInHarnIeJaTe Da IbPxNte 6aTePnraTa Ha TeMnepaTypa MExdy 15^ n 25^ (59^ n 77^) . YcTrooiCTBO c ropeua nn cTydeHa 6aTePnra MoKe BpeMeHHo Da He npopabotn, dOpn aKO 6aTePnraTa e HAnbJHo 3apeHeHa. Pa6oTata Ha 6aTePnraTa e ocobEno HeeΦeKTtBHa npn TeMnpaTypn MHoro NOD TOnkata Ha 3Ampb3BaHe.
He n3xBpIyIe 6aTePInTe BOrbH, TbK aTo MoKeJa eKcPiOuIpaT. BaTePInTe Morat da ekCnIIOuIpaT cbIo TaKa I aKO ca NOBpeHn. N3xBpIyIe n3NoI3BaHInTe 6aTePInB CbOTBeTCTBne C MeCTHIne 3aKoHOBn pa3npoeD6n. Monr, peUKNIIpaIte rN BnHaRn, KOrato e Bb3MOxHo. He rN n3XBpIyIe C dOmakHcknte OTnAbu.
БezжунITE yctpoCTBa Moke da yceuat cmyeHnO T batepnaT, KoTo ue BLOshn pa6oTaT aM.
CmHa Ha batepHnna naket
Hoyt6ykbT n3non3Ba IINTnEbn 6aTeepn. CMeHeTe 6aTeepnTa cBc CbIuBn KaTo Ta3N, KOJTO e Do7la c npOdykTa OTHauNo. Ako n3non3BaTe dpyra 6aTeepn, CbIeCTByBa pNCK oT noKap nn EKcNl03n.

BhImaHHe! BaTePnHTe Moar Da EKcNIOJOpaT, aKO He 6opabnte TgX npAunHo. He rna pa3rno6BaIte N He rnu 3xVBpIraTe B orbN. DpbjXte rna daJeY ot Deua. Cb6JIIODaBaIte MeCTHnte 3aKOHOBn pa3nopeD6n, KORATO n3XBpIraTe n3NoI3BaHn 6aTePnn.
IpeDynpexKeHne 3a ypei C onTnUHO yCTPOJCTBO (cAmO 3a HЯKOn MOneJIi)
BnmaHne:To3n ypeI cbIbprka Ia3epHa cncTeMa n e KlnacnФuIpaH kaTO "IA3EPEH IPOyKT KJAC 1".B cnyau Ha KaKbTOn I da bIIO npO6IeM c To3n ypeI MOJI cBbPKeTe ce c Hai-6IIN3KN JIO BAc OΦNlUAIJEH cepBIn3.3a da ce npEJa3NTe OT dIpuKTHo INIarane Ha Ia3epHnIbY, He ce ONITBaIte da OTBaprTe Kopnyca.
JI3EPEH IPOyKT KJIAC 1
BHNMAHNE: IPII OTBAPRHE CE N3JIbYBA HEBNIMIA JIA3EPHA
PAIINAJI. N35YBAIte DA CE I3NAIATE HA JbUA.
APPAREIL A LASER DE CLASSE 1 PRODUIT
LASERATTENTION: RADIATION DU FAISCEAU LASER INVISIBLE EN CAS D'OUVERTURE. EVITTER Toute EXPOSITION AUX RAYONS.
LUOKAN 1 LASERLAITE LASER KLASSE 1
VORSICHT: UNSICHTBARE LASERSTRAHLUNG, WENN ABDECKUNG GEOFFNET NICT DEM STRAHLL AUSSETZEN
PRODUCTO LÁSER DE LA CLASE I
ADVERTENCIA: RADIACION LÁSER INVISIBLE AL SER ABIERTO. EVITE EXPONERSE A LOS RAYOS.
ADVARSEL: LASERSTRÁLING VEDÁBNING SE IKKE IND I STRÁLEN.
VARO! LAVATTAESSA OLET ALTTINA LASERSATEILLYLLE.
VARNING: LASERSTRÄLNING NÄR DENNA DEL ÅR ÖPPNAD ÅLÅ TUIJOTA SÄTEESEENSTIRRA EJ IN I STRÄLEN
VARNING: LASERSTRÁLNING NAR DENNA DEL ÅR ÖPPNADSTIRRA EJ IN I STRÄLEN
ADVARSEL: LASERSTRÄLING NAR DEKSEL ÅPNESSTIRR IKKE INN I STRÄLEN
БezonaCHOCT Ha TeJeΦoHnHTe JInHm
- Otkaute BCnKn TepeonHn JInnO T O6OpyBaHeto, KOrato He ro n3noJ3BaTe N/Inn npEdu o6cIyKbaHe.
3a da n36erHeTe daneuHnry pNCK OT TOKOB yIap OT MbInHry, He CbP3BaIte TelefoHHata LInnra C TOBA obOpdyBaHe no BpeMe Ha rpbMOTeBvHn Hbyp.

BHMaHHe!OTcbo6paXeHn3a6e3oNaChocT,He n3non3BaIte HeoO6peHn YacTn,Korato Do6abTe NIn CMeHrTe KOMnoHEHTn. IITaTe DnCTp6yTopa CN KaKBO MoKeTe Da 3akynite.
Papotna cpea

BhimaHne!OTcbo6paKeHn3a6e3OnacHocT,ИЗКЛЮчBAite BCuKn 6e3KuHn nI np paIOnpeDaBaTeIHH yCTpoIcTBA,KORATo n3No3BaTe IanTOna npi cIeIHNte ycNobN. Te3n ycNobN BkIIOvBaT,HO He ce orpaHnuBaT c:6e3KuH eN LAN (WLAN), Bluetooth n/In 3G.
He 3a6paBraIte Da cna3BaTe BcKaKbN CnEuaHn Perylaunn B CnIa Ha BCaKo
MRCTO I BNHaRn N3KJIuOyBaIte YCTPOINCTBOTO, KORATO IN3NON3BaHEno My e 3a6paHEno
IIN KOrato MOKe Da npedn3Bnka INTEpepeHnue IIN OnaChoc. IN3NON3BaIte
YCTPOINCTBOTo cAmo B HOPMaHInTe 3a pa6ota NOJoxeHn E NO3UeHN. YCTPOINCTBOTo
OTROBAPn Ha pAsnpoeD6Btte 3a IN3JaarHe Na PaINOueCTOTHO (RF) IN3lbVbaHe,
KORATO CE IN3NON3BA HOPMaHIO N KORATO TO n ANTeHATA MY Ca HA NOHE
1,5CAHTUMETPa (5/8 InHua) OT TAnOTo BV (BnXte INIOCTPauHnTaNo-dOny). He 6bVa
da CbDbpKa MetaI IN Tp6Ba Da NoCTaBnTe YCTPOINCTBOTo H raOpENOCOeHTo
pa3CTOARHe OTE TAnIOTo Cn. 3a Da npedaba FaiIOBe C daHHn IIN Cbo6eHnra
ycneHNO, YCTPOINCTBOTo Ce HxJdAe OT Do6pa, KaueCTBeHa Bp3Ka C mpekata.
B HAKON CnyuAn, npexBpIaNHe To Ha FaiIOBe C daHHn IIN Cbo6eHnma MoKe Da ce
3a6abN, DOKATO He CE NOBn Takaba Bp3ka. YBepete Ce, Ye rOpENOCOeHnTe
YkazAHN 3a pa3CTOARHnEt Ote Cna3BaT, DOkato npexBpIaNHeTo HE npIKJIIOuH.
Hakon Uactn OT yCTPOINCTBOTo Ca MarHetNUHn. YCTPOINCTBOTo MOKe Da npIBNuHa
HAKON METaHn PpeMeTn, a Xopa Cbc CnyXOBn anapatHe Ta He bNA Da IbpxkAT
YCTPOINCTBOTo BIn3O Do yXOTO, B Koeto IMat CnyXOB anapat. He noctabraiye
KpeiHTNH KapTN INI IN dpyr MaHHTNH HocHTeNl BIn3O Do yCTPOINCTBOTo, Tb Kato
InHΦopMaUqraTbBpy TX MOKe Da 6bJe IN3TpNTa.
MeiHcN yctpoCTBa
Pa6oTaTc BcKaKbVa paIIOIN3JIbVbATEHNO O6OpyDbaHe, BkIIOHTeNHO 6e3JNUHn TeJeOHN, MoKe Da nonpeuHa yHKIOHAnHOCCTTa Ha HeIOCTaYH0 Do6pe 3aUInTeHm MeINCHN yCTPOINCTBa. KoHCyTTnpaiTe Ce c Jekap INi C npOn3BOInTeHn HA MeINCHKO TO YCTPOINCTBO, 3a Da pa36epete DaII To e NaIeXHO 3aUnTEHO OT BbUNHa paINOChEOTHa eHeprN iIN Ako IMaTe DpyrN Bbnpocn, CBp3aHn C Hero. N3KIOUByAte YCTPOINCTBOTo CN B3dpaBHN 3aBeDeHn, KOrato TAm IMa peYlnaun, KOINTo NCKAT TOBA OT Bac. BoHNlUIne IIN 3dpaBHNTE
3aBeHeHnMoKe Da nI3NoI3BaT ObOpyDbaHe, YyBCTBnTeJIHO KbM BbHJHn paAnOChToTHn TpaHCmCmN.
Писмейкрп. Пюпзбдтелпге На Писмейкрп рпөрөрчВат МИнмално pa3ctогнeо 15,3caNTIMeТра (6 Инчa) мexду Писмейкрpa и BCЯКВи 6e3ЖИЧИng yCTpoIcTBA, 3aда сиЗБERне BCЯКВа eBEHTyAINha INHTepФepeHцma Cпeисмейкрpa. Te3n рпөрөрьк Na PoДКрЕнHa NTe3aBvCmIMte N3cIeDbAHnЯ nпөрөрькITE Ha ИСТИТУТа 3a ИССLEДВанe Ha 6e3ЖИчНe ТExHOLorIn Wireless Technology Research. Лицата с писмейкрп Тябba DA спa3Вat Сл徳нite yka3ан�:
BnHaI npbXte ycTpoiCTBOTo Ha noHe 15,3 caHTmEtpa (6 nHya) ot neiCMeiKbpa.
He hocTe ycToBTO6IIN3OdoIeNcMeKbpaCn,IOKaTOeBKnUoHeO. Ako noO3npate,ye IMa pNCKOT INTEppepeHzra,NkJIuOteYcToBTOI ro npemecte.
Cnyxobn anapatn. Haryon zufpobu 63kunhycpoiCTba npedn3BkBaT INTEPpepeHn y hkyoN Cnyxobn anapatn. Pnp TaKbB clyuae ce CBpKeTe C DOCTaBvNka Ha cnyxobn anapat.
MOTOPHNI PpeBO3Hn CpeDCTBa
PapnochctoTHne CnHann MoRat Da 3aceHaT He npabunHIO IHCTanipauHn IIN HnpabunHNO ppeNa3eHn ENEKTPOHN CNTeMn B MOTOPH N ppeBO3Hn CpeCTBa KaTO HapnPmep eNeKTPoHN CNTeMn 3a BpckBaHe Ha TropBOTO, eNEKTPoHN CNTeMn IpoTNb6Iokpane Ha CnpauchKe, eNEKTPoHN CNTeMn 3a KOHTpO n HA CKOpocTTa IIN CNTeMn 3a B3dyuHn B3rJabHNu. PoTppcTe NOBEue INHΦopMaunia Ppi Ipn03BODInTeN - IIN HerOB ppeCTaBUNe - Ha BaWTo O ppeBO3HO cpeCTBO IIN HA DoobabehOTO obOpuyBaHe. Camo KbaJIuPhiunpa NepcoHAn Tpr8BaDa o6cIyXBa yCTPOCTBO IIN Da INCTaJIpa UCTPOCTBO B MOTOPHO ppeBO3HO cpeCTBO. HnpabunHn InCTaNaun IIN ObcLyKBaHe MORAT Da ca Onacn I da anylupat rapanraTa Ha ycTPOCTBO. PeoBOH pOboEpaBte DaII BCSUKN Be3xUnHn UpeDN B MOTOPHO Bn ppeBO3HO cpeCTBO Ca MOHTnpaHn INfHKUOnHPa T pabunHNo. He cbxpanaBaiTe I Ne ppehacYte 3anaUMn TeHuOCTn, ra3Obe IIN ECKIIO3NBn MATEpnaI N 6I3o DO yCTPOCTBO, HeroBnte Yactn IIN dONbJInHeN. Ppi MOTOPH ppeBO3Hn cpeCTBA C B3dyuHa B3rJabHNu - He 3a6paBayte, ye Bb3dyuHNte B3rJabHNu ce NaDyBat C roJMa Cnila. He Noctabayte ppeMetn, BkIIOUHTeJIHO INCTaJIpaHO IIN ppeHOCIMo Be3xUnHO obOpuyBaHe, Ppi I3xoJa Ha B3dyuHaT a B3rJabHNu IIN TaM, KbJeTo Ce pa3dyBa T. Ako B MOTOPHO ppeBO3HO cpeCTBO IMA HnpabunHIO INCTaJIpaHO 6Be3xUnHO obOpuyBaHe n Bb3dyuHaT a B3rJabHNu ce OTBOpN, MoKe Da CE Noluyat cepno3Hn HapaHABAHN. I3non3BaHeto Ha yCTPOCTBO IO BpeMe Ha camOJeTH nonet e 3abpaHeo. I3KnIOUBAITE yCTPOCTBO, ppei Da ce KaUBeT ha camOJeT. I3non3BaHeto Ha 6Be3xUnHn yCTPOCTBA B camOJeT moKe Da 3actPaushaba paBoTaTa Ha camOJeTa IIN da cmUaBa 6e3xUnHaT a TetePhOHn MpeKa, a cbto Taka MoKe Da e He3akOHNo.
B3pmb0oNacHa cpea
ИЗк nullуайе усторьOTO сь Вь Вся КОТУ Има B3руноанca atMocфера,и сддайе BCNчkn 3нauи уka3аня.Взруноансата atMocфера ВК nullуаймесда,Кьдeto obNKHOBEH BO INHCTpyKTnpat DA n3KIOUHTe DBURAteЯ Ha abTomobилси.Исрпге Н IOOБнМecтmaMorATДпprunHЯЕСПОЗИЕИ nojak,KoTo NOKMOKEДЯпpeIN3BVAKe TelenCHHapAnHBAHЯИДОРcMbpt. ИЗк nullуайе усторьOTO Ha Mehta 3a пezeapжданe C roрво KaTo Hapimep 6beHsinocTahmNi rαstCtAHmNi.Cna3BaIte OррачehнЯТа 3a yNOTpe6aHa paDINOOBOpdyBaHe B ropBnckLkdaIDObe,30HN 3a cbxpanHne I pa3pdeJIenHne; XIMNUeCKN 3aBOi;ИЛN Ha MeCTa,Кьдeto CE N3BbPswBat B3prNBdEINOCTHN. MecTATA CB3рUNOONacha ATMOCфepa YecTo,HO He BnHAr, Ca OT6eJ3aHnЯCHO. Te BKIOUbat NOMeSEHnraTaNДпANy6bata NaIIaBaTeJIHc bIoBe, NomseHnA 3a cbxpanHne IIN TPAHCfep Ha XIMNKaIIn,прBo3Hn CpeDCTBa, KOnTO IN3NON3BAT BteHNeH ra3 (KATO pponan ИлбbyTaH),KaKTo I MecTa,Кьдeto Bb3dYbXbT CbDbpxa XIMNKaIIn IIN YacTnIu KaTO 3PbHuZa,Ipax IIN MetaJIHn npaUnHKN.He BKNIOUYaiTe HOyT6yKa,Кьдeto e 3a6paHenaу yNtOpe6bata Ha Be3KUnHn TeJeФOHI INI KьDETo MOKe DaпpeIN3BVAKe INHTepfpeHcnry INIOnachOCT.
CneuHn o6aJdAnna
BHHMaHHe: He MoXeTe Da npaBnTe CneuHN ObaXdAnHrype3 ToBa yCTpoiCTBO. 3a Da HappaBnTe CneuHO o6aXdane, Tp8bA Da NahepeTe OT MObUHnra Cn Telepon NIN Dpyra CnCTema 3a TeleponHnO baxdHnra.
Yka3aHnna 3a n3XbPpIHe
He n3xBbprnIte ToBa eNeKtpoHNo yCtpoiCTBO B6oknyka. 3a da HamaJInte 3ambpcraBaHeTo I da ce norgnKInTe 3a 3auNTaHa cBeTobHATA npriOda, MoJr peuKlnpaIte. 3a noBee uHΦopMaun oTHOCHO pa3npoe6bIte 3a OTnaDbUOn OT eNeKtpuYecko I eNeKtpoHNO o6OpyDbaHe (Waste from Electrical and Electronics Equipment, WEEE), nocTeTe http://www.acer-group.com/public/Sustainability/sustainability01.htm.
BHHMaHHe -XnBaK
3a npoeKtopn c BrpaDeHa Iamna nIeIeKtpOnHn npOyKtn c LCD/CRT MOHITOPn nn DnCpIe 6e3 3aIHO OCBETBaHe: lamnta/nte B To3n npOyKT CbIbPkaT KINBAk INrpa6Ba Da ce peuKlnpat IIN N3XBpIaR T CBOTBeTCTBne C MeCTHnTe, DbPxAKBnTe IIN fpeepaHNTE 3aKOHn. 3a NOBEe INHΦopMaun, CbPjKeTe Ce CbC CbIO3a Ha eNekTPoHNHe INDyctpn (Electronic Industries Alliance) Ha www.eiae.org. 3a CneUPhiUHa INΦopMaun 3a IN3XBpJIrHe Ha lamnITE, BIXTe Ha www.lamprecycle.org.

ENERGY STAR

IpoNyKTnTe Ha Acer c IoroTO ENERGY STAR Bn nomarat da neCTnTe napu kaTo hAmalraBat pa3XoJa Bn Ha eHeprna n 3aunTabat OKoNHaTa CpeDa Be3 ToBa Da e B OoubP6 Ha fynKcnnte nn npOn3BoDInTeHnocTtHa yCtpoiCTBOTo. Acer ce ropdee c TOBa, ye Moke da npedloKn Ha KIneHTnte cn IpoDyKTn, Hoceun IoroTO ENERGY STAR.
KaKBo e ENERGY STAR?
IpoodykTn c loroto ENERGY STAR kohcymnpaT no-maIko eheprna I npedotBpataBaT emncn Ha napHnKOBn ra3Obe KaTO OTRObaprT Ha CTpNKTHnTe pa3nope6bn 3a eheprnHa efeKeTnBHOCT Ha AreHcunrTa 3a 3auNTa Ha OKoJHATA cpeDa Ha CAU. Acer e npednara npodykTn n ycnyrNo ceNcBcRr, KOtO NOMarat Ha KIneHTnte da neCrt Napr n eheprnHa da NODobprBa KaueCTBOTo HA OKoJHATA cpeDa. KoIKOto NOBee eHeprn MoXem Da CneCTM Upe3 No-BvCOKA eHeprnHa eFeKTNBHOCT, TOnKOBA NOBee MOxem Da HAMaJIIM eMnCnTE Ha napHnKOBn ra3Obe I pNCKOBete 3a IpomraHa Ha KInMaTa. 3a NOBee INHΦopMaIg BIVKte http://www.energystar.gov nIuhttp://www.energystar.gov/powermanagement.
Пождукту на Acer слоро TE NERGY STAR:
IpoN3BExdT NO-MaIKO TOnnHa HamaJIbAT HaTOBaPbHeTo npW OXJaXdaHE B NO-TObJI KImMaT.
- ABTomatnUHO npemHaba B pexm "3acnBaHe Ha MOHTopa" n "3acnBaHe Ha KOMIObpa" npi JInca Ha aKTINBHOCT B npOdbJIkeHne Ha cBoTBeTHo 10 n 30 mHyTu.
Cb6ykahe Ha KOMNIObpa Ot peKIM 3acnBaHe Ype3 HaTnckaHe Ha 6yTOH Ha KJIaBnaATypaTa IIN DBNKeHne HA MIIkata.
KOMNHTPNTe ige cneTAT NOBHe 80% eHepnB Pexm "3acnBaHe".
ENERGY STAR n IoroTo ENERGY STAR ca pernctpupaH amepikaHcKn TbproBcKn MapKn.
CbBETI INHΦopMaζηa 3a yDObHo I3POn3BaHe
KOMNIObPNHe NOTpeBnTeHn YecTo Ce ONJaKBaT OT 60JKN B OChte N IJIaBaTa CneI npOblJNKeTIHa yNtpe6a. Te cbIo Taka ca n3NoXeHN Ha pNcK oT om3NuCeKn yBpeJdAnHc CneI dblIn YacOBe paBoTa npEe KOMNIOTbp. DblrTe paBOThn YacOBe, looata cToKa, looHTe paBOTHn HABuN, CTpeCBT, HeNOxOJaUnte paBOTHn ycIOBn, IunHOTo 3dpabHO CbCToRnHne N dpyrN fakTopn CmJHo NobuBaBAT PnCKa OT om3NuCeKO yBpeKDaHe.
HenpaBnHToI 3nON3BaHe Ha KOMNtBpa MoKe Da DOBeDe Do CnHApom Ha KapnaHnTuHEn, TeHDoHnT, TeHDOcHOBuT INI INDpyrM MyCKyIHO-CKeJIeTHN 3a6oJbAHHa. MoKe Da IMaTe CneDNHTe CmIMTOMn B pIeTe, KITKInTe, pAmHeTe, BpTa IIN rP6a:
- 3tpbHaIOCT nI npaeo IIN TbdeNnKauO yceuaHe
6OJIka NJIu YUBCBNTeJIHOCT - 6oIka, noDyBaHe nIi nyIcnpaHe
BKOUaHeHOCT UIN CTERHaTOCT
CTydeHnHa nn Cna6oCT
XII
Ako mMaTe Te3n CmNtOMn nJIn dpyr NocToHEn DnCKomΦopT n/nn 6oNka, CBbp3aHa c n3nON3BaHeTo Ha KOMnHO p, He3a6abHo ce CBbpXeTe c JIekap n HΦOpMnpaYte 3dpaBbHnO tDeJn Ha φnPmTa cN.
CneHnT pa3dEn Bn daBa cbBcTu KaK No-yDObHo Da n3NoI3BaTe KOMNtBpa Cn.
HamepeTe cBoraTa 30Ha Ha KOMΦoPT
Otkpinye cBorya 30Ha Ha KOMΦoT, KaTo npomeHYe bYbIa Ha rIeJaHe Ha MOHITOPa, n3NoJ3BaTe noJIOXka 3a KpaKa IIn NOBnIraTe BVCOnHATA Ha CTOna Cn,doKATO He NoCTnHETe ONTImaJIHOTo NOIOKeHne. Bb3noJ3BaIte ce ot CJIeHNTE cBBeTI:
He cToIe TBpIe IbJIro B eHnAkoCTaTnUHO NIOXKeHne
- 1368raBaiTe da ce HabeJdaTe Hapei nnHa3aI
CTabaIe n ce pa3XoJdaIte peIOBHO, 3a da oIeKuIte HAppeKeHneTO B MycKUInTe Ha KpaKaTa Cn
B3eMaITe Cn KpaTKn IOnuBKn N OTnyckaIte BpTa N paMeHeTe Cn
- 368aBte da cTgate Myckynte cn nIa CBBaTe pameHeTe cn
HCTaIpaIte BbHUNHa DnCnJIe, KNaBnAtypaTa MmUkKaTa npaBnHO Ha yDo6Ho pa3cTOrAHne
aKo TJIeIaTe MOHITOpa NIOBHe, OTKOJIKOTo DOKUMeHTn Ha XapTn, NOCTaBeTe DIncIIpeB Ye CHTbpa HbIbopoTo Cn, 3a Da HamaJIte HAnpexKeHneTO Bbpxy BpTa Cn
KpaTko pBKOBOcTBO Bn PpeiCTaB OCHOBHIne 0yHKuN N Bb3MOXHOCTNa Ha
HOBN Bn KOMNHTbP. 3a NOBue HnOpMaun KaK BaUNr KOMNHTbP MoKe Da BN NOMORHe Da CTe IIO-NPOyKTUBHn, MOJI BNUKTe IOTpe6ntenckTo pBkoBOCTBO
AcerSystem (AcerSystem User Guide). To sbdbrka npdoobHa INfopmaun 3a
TeMn KaTo CnCTeMn HNCTpymEnTn, Bb3CTaHOBRAHe Ha daHHN, OIcHn 3a bIprEi npeuBaHa He npo6IeMn. B DoIbIhHeHne, To cbIbPxJa n rapaHcNoHna
INHOpMaIaIy, KaKTo N OCHOBHTe peRyIaIuN I 6eJIeKk 3a 6e3OaCHOcT, Cbbp3aHn C BaIIM HOYt6yK.
To e B PDF ΦopMaT (Portable Document Format) n e npeДвapиTeHNo 3apeДeHo Ha HoyT6yka Bn. 3a Da ro OTBOpIte, CpeДвaIte Te3N CTbIKN:
1 KlinkheTe Ctap, Bcun nporpamn, AcerSystem.
2 HaTnCHeTe IOTpe6IteJIcKO pBkoBOcTBo AcerSystem (AcerSystem User Guide).

Белека: 3aда OTbOpTe Фаллви e hyжен Adobe Reader. Ako Adobe Reader He e Инстампан на КOMПOTьр в, Натсканeto Вьрху Notpe6nteNcKTo pьковodctBo AcerSystem (AcerSystem User Guide), nbpBO ue CTapTnpa ИНстационнота пограма на Adobe Reader. Следваite ИНструкшпе на Екрана, за дзИьршпte ИНстацията. 3a Инструкшпкak ce Използba Adobe Reader, OTbOpTe MeHIoTO Help and Support.
CbBETn 3a OCHOBHa rPnJka n N3NoJ3BaHe Ha KOMNIOTbpa
BkIIOUBaHe nN3KJIIOUBaHe
3a Da BKNIOHnTe KOMNIOBbpa, npocTo HATNCHEte O TNYCHeTe 6yTOHa 3a 3axpAHBaHe nOLCD ekpaHa, do 6yToHnTe 3a necho cTAPtnPaHe. MoJ, npOBepeTe B bP30To pBkoBOcTBo KbDe ce HAMnpa 6yTohT 3a 3axpAHBaHe.
3a da n3KJIIOHTe KOMIOTbpa, HAnpaBeTe HЯKoe O cIeDNHtE HeHa:
- I3noJ3BaIe KOMaHdAta 3a I3KJIIOUcBaHe Ha Windows HATnCHete Ctapt, cIeI KOeTo I3KJIIOUcbAbe.
- I3noI3BaIte 6yToHa 3a 3axpaHbAne
Mokete cIto taKa da BkapaTe KOMNHObpa B peXIM "3acnBaHe", KaTo HATNCHEte KJIaBUNHaTa KOM6HauZra<

Белека:В слуай,Че He можete Да ИЗКПIOHTE KOMПOTьра уретHopмалнITE пpoцEDури,НатиСHEТЕ 3адрьЖTe 6уToHa 3a 3axpaHBAhe 3a NOBEчeOT YeTINP IN CekYHД,3aДа ИЗКПIOHTEKOMПOTьра пИнHyДпETENHO.АкTe ИЗКПIOHЛIN KOMПOTьра И nCKaTeДа ГВКПIOHTE OTHOBO,IЗЧAKAЯTe HAI-MaJIKO DBe CekYHД.
Грnxka 3a KOMNIObpa
Baunr KOMnHToBp ige BN cnyKn Do6pe, aKo ce rpnKInTe 3a Hero.
He n3naarTe KOMnHbpa Ha npra Ka CbHcVeBa CBETnHa. He ro noctabraye 6n3o Do n3TOuHNiHa HToPnHa KaTo HapnMep paDnAtopn.
He ro n3naarTe ha tempepatyp noD 0^ (32^) nnHaad 50^ (122^)
- Πa3eTe KOMNIObpa OT MaHHTHIN NOIeta.
- Na3eTe KOMnIObpa O T bKd NnBnaIa.
He pa3nBaIte Boa IIN npYr TeHocTbBpXy KOMIOtba.
- Pana3eTe KOMNIObpa O T CUNHn Ydapn NIN Bn6paun.
- Na3eTe KOMnIObpa O npax nJIn KaJ.
Hikora He noctabay Te npyri npedmetn Bbpxy kOmIOIbpa.
He TpbukaiTe KOMNtBpHnI DaCnPnei, Korato ro 3aTbaprTe.
Hikora He noctabraye KOMIOTbpa Bbpxy HepaBHN NOBbpxHOCTN.
Гржи 3a вшия AC aanTep
ETo HApKoNHaunHa da ce rpnKIne 3a cBor AC aanTep:
He cBbP3BaIe aIaIepa c HnKaBn dpyr n ycTpoiCTba.
He cTbnaIte Bbpxy 3axpaHbauJn Ka6eI n He noCTaBnTe TeKKn ppeMeTn Bbpyx Hero. NocTaBeTe 3axpaHbauJn Ka6eI n BCaKaBn DpyrN Ka6eI n HactpaHn OT MeCTa, NO KOnTO CE MINHaBa YecTo.
Korato OTKaate 3axpaHbau nkaBen, He dbpnaTe camnKaBen, a XbaaTe uencena.
Bcnya,ye n3noI3BaTe yIbIJIKInTeN,obuata HOMHaJIH MaOuHOCT Ha BkIIOUeHOToOBOpYDaBaHe He 6bNa Da HAnXBpIry HOMHaJIHATA MOUHOCT Ha KaBeJa.CbIo Taka OoTa HOMHaJIH MaOuHOCT Ha BCnUKOTo OBOpYDaHe, BkIOUeHO BeDNH cBUn KOHTaKT Ha CTeHaT,He 6bNa Da HAnXBpIry MoUHOCTTa Ha 6byOHa.
Гржи 3a пaketeбаери
ETo HnKoJIko NaHIna Da ce rpnKeTe 3a CbOaTaePm:
- I3noJ3BaIte camo eJNaKbI 6aTeepn 3a 3amHa. I3KJIIOUeTe KOMNHObpa, npedn da BaInte nIN CmehIe 6aTeepnIte.
He cn irpaTe c 6aTeepnTe. DpbXte rnaeoy ot deua. - 13XbBpIaIe I3NoJIbAHInTe 6aTepeIN B CbOTBeTCTBne C MeCTHIne 3aKoHOpa3nopeIbN. Ako e Bb3MOxH0 - peUKNIPAaIte rN.
Moi, BuxTe "YeTo 3aDaBaHb Vbnpoc" Ha cTp. 32.
HΦopMaζη 3a Baʌe yɒobCTBO n 6e3ɔnacHOCT
III
Yka3aHna 3a 6e3oNaCHOCT iii
IpeDynpexdEHe 3a ypeC cOnTnHc yctpoiCTBO
(cam03a HraKoM MoJeIi) vi
Pabotna cpea viii
MeDnCnHcN yCTpoiCTBa viii
MToTOpHn IpeB03Hn CpeDCTBa ix
B3pmboonacna cpea
CpeuHn o6aKdHnX
Yka3aHnna 3a n3xBbprnHe X
BHHMaHHe-JKnBaK X
ENERGY STAR xi
CbBETn INHΦopMaζηa 3a yDóHo n3IOn3BaHe xi
PpeiBcNcuKo
xiv
BaunTe pkoBODCTBa xiv
CbBETn 3a OCHOBa HpNka Nn3NoJ3BaHe Ha KOMnIOTpba XV
BkIIOUBaHe I n3KIOUBaHe XV
Pnka 3a KOMNtbpa XV
PnK3aBaunrAC aanTep XVI
Ipnx3a naketa 6aTePnXvi
IOnuCTBaHe n O6cnyKBaHe XVI
Tbyna
1
OchOBHn Heu3a 3a TbUpaI (cYeTe3a npbCTOBN OTpeaTbU) 1
OchOBHn Heuza 3a TbUpaI (c6yToHn C DBOHn HATNCKaHe) 2
Kak ce n3noJ3Ba KnaBnAtypata
2
Lock kIaBnH n BrpaDen uΦpeH na* 3
Windows KnaBnI 4
Aydno
5
Acer PureZone (cAmO 3a HЯкоМодели) 5
Bndeo
5
16:9 dincpnei (cAmO 3a HjaKoM oMeI) 5
I3noJ3BaHe Ha cNCTeMHHTe IHCTpyMeHTn
6
Acer Bio-Protection (cAmo 3a HЯkon MódejN) 6
Acer Backup Manager 7
YnpaBJIeHne Ha 3axpaHbaHeTo
8
Acer eRecovery Management
9
3aIncBaHe Ha pe3epBn IINCKOBe 11
Restore (Bb3ctaHOBAhe) 12
Bb3ctaHOBaHa Ha Windows ot pe3epBn DnCKOBe 13
Батурень пakет
15
XapakTeepntKnHa6bATEpHnnaPaket 15
YBeJIuHaBaHe Ha XbOta Ha 6aTePnTa 15
IocTaBHe N I3BaXdAne Ha 6aTePnHnPaKet 16
3apekdahe na 6aTepeyra 17
Поберка на НИВОТо на застята 17
OnTmM3npaHe Ha KVBota Ha 6aTepeyra 17
IpeDynpexdEHe 3a npdaa6bATEPn 18
Hocete cB0ra Hoyt6yK PC cbc ce6e cn 19
Otkaune ot paobtoHTo MrcTo 19
MecTeHe 19
IodrotBHe Ha KOMNtBpa 19
KaKBo Da HocHTe Ha DeJIOBn CpeuN 20
IpehaHe Ha KOMIObpa KbM Doma 20
IoiTBAHe Ha KOMIObpa 20
KaKBO da Hocnte cbc cebe cn 21
CneuaJIHn npenopbKn 21
IoppejdaheHa domaehoΦnc 21
TbTyBaHe c KOMnHToBpa 21
IoiTbHe Ha KOMIObpa 21
KaKBO da Hocnte cbc cebe cn 22
CneuaJIHn npenopbKn 22
MekdynapoNDHObTyBaHe c KOMNIOTpba 22
IoiTbHe Ha KOMnIObpa 22
KaKBO da Hocnte cbc cebe cn 22
Cneuaannn npenopbkn 23
PpeDn3BaHe Ha KOMNIOTbpa 23
I3noJI3BaHe Ha KOMnIObpeH 3aKJIIOUBaU, MexAHIN3bM 23
I3noJI3BaHe Ha napoH 23
BbBexdaheHa napoi 24
3aandaBaHeHa napoJI 24
ДоьлнITEЛНи ВьзMOXHOCTN 25
Bapnnt 3a Bpb3ka 25
Moem 3a paKc/DaHHn (cAmo 3a HJKOu MoeJIu) 25
BrgaedeHaMpexKoBaФyHKUHOHaJIHOCT 26
Universal Serial Bus (USB) 26
IEEE 1394 nopT (cAmO 3a HЯкоMоДeЛи) 27
BucokokauecTBen MyIITmEduH INHTeppeic
(cam03a HraKoN MoJeIi) 27
ExpressCard (camo 3a HЯков mojeи) 28
IocTabRHeHa namet 29
BIOS coΦτyep 30
IocneIOBaTeJIHOCT3a3apeXdane 30
Kak da akTbBupaTe Bb3CTaHOBraHe
disk-to-disk 30
Парona 30
I3noJI3BaHeHa coΦTyep 31
Bb3npo3Bexdahe Ha qinmHa DVD 31
YeTo 3aIaBaHn Bbnpocn 32
CepBn3Ho o6cnykBaHe 35
MeknyhapoHa nIbTHnuecka rapaunia (ITW) 35
Ipei Da I03BbHnTe 35
OtctpaHbAHe Ha npo6IeMn 36
CbBETn 3aOTcTpaHraBeHa npo6IeMn 36
Cbo6eHna 3a rpeuka 36
YbeDomJIeHn3a perylaucnN 6e3onacNoCT 37
LCD panel ergonomic specifications 43
Tb4naI
BrpAenHrTbUnpaEycTroPcIcTBO,KoToDolnAByDmBXKeHneNoNOBpXHOCTTaCn. Toba03NaHaba,Ye Kypcopt pearnpaNcLepdNDbIXeHHeToHa npbcta BN no NobpPxHOCTTaHa TbUnada.MrCTOTO My No CpeDaTa Ha noDnloKkata 3a DnAnTa BN OcnHyprBa MaKcImaJIHo yOboCTBO N KOMΦopt.
OchOBHn HeuHa 3a TbUpaI (CyeTeu 3a npbCTOBN OTpeuTaBUN)
CneHnTe enemEni BN noka3Bt KaK Da n3non3BaTe TBuNa da CyeTea 3a npbctobu OTneuAcbu Acer Bio-Protection.
KATO MecTne IpBCTa Cn IO TbUnaJa (1), BVE MeCTne Kycpcopa.
- Upe3JIeBnI (2) n DeCnIa (4) 6yToH noTbUHaJa, BVE n3BbPbWate cyHKuIN 3a n36Op n n3bJIhRaHe. Te3n DBa 6yToHa ca KaTOJIeBnI n Decen 6yToH Ha MInka. Ako TynHete JekO C npbCT TbUHaJa, BCE eJHo CTe HATnCHaJI NJIeBnI 6yToH.
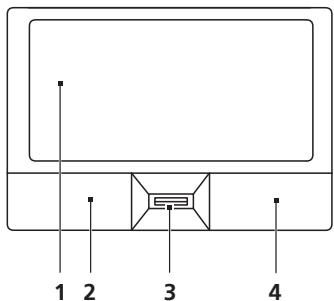
Acer eRecovery Management
Acer eRecovery Management e nHcTpymeHT 3a 6bP30 Bb3ctaHOBaVe Ha cnCTemata. MoKTe Da apXNBupate/Bb3CTaHOBnTe MMnJa Ha pa6pnuHnTe Na HacTpoiKn i Da npEnHCTaINpate pnpINOKeHnTa i DpaBepuTe.

Белека: Спенито сьдьрхане e само за обся пордства.
PeалнITE поюктовспесифигаши мочи ида се ралчават.
Acer eRecovery Management pa3nonara cbc cneiHnte yHKu:
1 Backup (Pe3epBn KOnnE):
Cb3daBaHe Ha DnCK CΦa6pUHn HacTpoiKn
Cb3daBaHe Ha Dnck C dpaiBepu npinloKeHna
2 Restore(Bb3ctaHOBBaHe):
Bb3ctahOBn n3zraJIO fapuHnTe hactpoKn Ha cntemata
Bb3ctahOByBaHe Ha onepaunOHHa Tcntema n 3ana3BaHe Ha noTpe6nteJNCNTe DaHHN
- Ipeunctaipapahe Ha dpaBepn npinloxhenia
Ta3n InaBa 1e Bn HacOyBa BB BCEKn OT Te3n npOceCn.

Белека:Таи Фуннкша e Налоча само ппн hykon модени. ПпсNTСТЕМ, KОТTO HЯМAT Вгадена 3aПИСВЧКа 3a ONTПУНДИСКOBe, BKNHQUETe BbHSHA 3aПИСВЧКa Ha ONTПУНДИСКOBe, Ппеди ДАИЗПONЗВATE Acer eRecovery Management 3a Heца, CBbp3aHn C ONTПУНДИСКOBe.
3a da akTINBnPaTe n 3nON3BaTe onCnIa 3a 3aunTa qpe3 napOla Acer eRecovery Management, Tp6Ba nbpBo da 3aadete npOJa 3a. NapOnata ce hacTroBa qpe3 cTAPnPaHe Ha Acer eRecovery Management n 4paKBaHe Ha HAcTroKn.
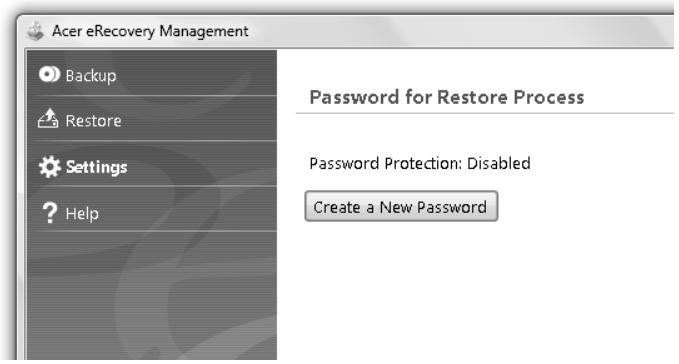
3aHnCbaHe Ha pe3epBHN DnCKOBe
OT ctpaHncaTa „Backup (Pe3epBn KOnna)“ Ha Acer eRecovery Management MoKeTe Da 3aIIuSeTe NmUdka Ha fpa6pruHnTe cToHocTn IIn Da cb3daTe pe3epBHO KOnne Ha dpaIbepn I pnIIOKeHn.
1 Kπικηte Cṭατ, Bcυκη προραμή, Acer, Acer eRecovery Management.
2 Acer eRecovery Management oTbapr cTpaHncaTa Backup (Pe3epBn konna).
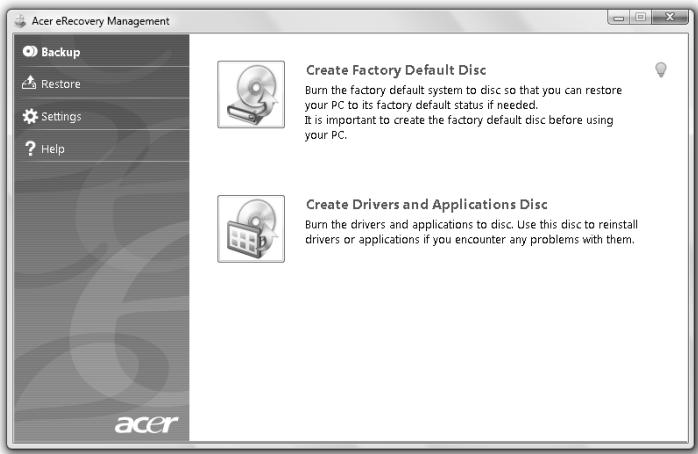
3 I36epeTe Tnpa pe3epBHO KOJIne (Φa6pUHn CToHocTn IJI npAbePn npInIOKeHH), KOIto NCKate Da 3aNlWte He DaNcKa.
4 CneDbaiTe INHCTpyKuINTE Ha ekpaHa, 3a da n3BbpuINTE npoueca.

Белека: Сьздайе Фабриец Имдж, Когато жениerte наимшete CTAPTOВ ДИСК, КОТо Сьдьржca ЗЯлata Oпрацнонс систema на KOMПOTьрази в ТАКа, КAKTO ВЕДОCTав�а OT Фабрикета. Акожениerte д IMаTe ДИСК, КОТо ДИ ВИ ПОЗВOLЯBA д npereлждate Сьдьрханeto IN DA INHCTaJIpATE ONpeDELEH ndpaIBepи и пиLOXЖEN; Сьздайтpe pe3ePBHO KОпe Ha ДраиВери и пиLOXЖEN; В пOTиBEн сИчай —ДИСКыТ HЯМа д e CTapTOB (bootable).
Restore (Възсановаянe)
ФункцяТа Вьзэтановьаге Ви пОБЯВа Да ВьзврпeTe Илддь Вьзэтановite CNTeMaTа OT ИМДж Ha ФбчнITE NaHCTpoКИ Илд OTпpeДвapnteHc CB3dadeHn apxuBHy CD n DVD. Можete сью тaka д пpenHctanipaTe npINLOKHeHn I dpaIbepn Ha CBOЯТа Acer cnCTema.
1 KIINKHeTe CstApT, BcUKN nporpamn, Acer, Acer eRecovery Management.
2 IpnemHeTe KbM cTpaHnca B3cTaHOBBAhe Upe3 1paKBaHe Bbpxy B3CTaHOBBAhe.

3 MoXeTe Da n36peTe Da BB3CTaHObITE CnCTeMaTa OT fapuueH mNdk, da npEnHCTaIInpate npInIOKeHn I dpaiBepn.
4 CneBbaTe HnCTpyKzImTe Ha ekpaHa, 3a Da n3BbPwTe npoceca.
Bb3ctaHOBBaHe Ha Windows ot pe3epBnI nickOBe

Benzka: Ta3nФункция e haJIuHa cAmo npn HЯkon MOneJIn.
3a da Bb3ctaHOBnTe Windows ot npedBapntelno 3aIncanH Bbpxy dmckOBe pe3epBNKoNIA, ue Tp6Ba da noCTaBnTE B KOMnIObpa nbpBnO T Tx I da AKTNBpuTa onuTAt F12 Boot Menu npesBIOS Setup Utility.
1 BkIIOHe Te KOMNIObpa I NoCTaBeTe B ONTNUHOTo DnCKOBO yCTPOJCTBO NpBnIA DNCK 3a Bb3cTaHOBRAHe Ha CnCTeMaT. PecTApTnpaIte Baunia KOMNIObP.
2 Korato ha ekpaHa e nokaxe Ioro Ha Acer no BpeMe Ha cTapTupaHTo, HATNCHeTe 6yToHa F2 3a Da Bne3eTe B BIOS Setup, KbIeTO MOKeTe Da 3aJaTeCnCTeMHn npaMeTpN.
3 I3noJIbAaTe KJIaBUNITE 3a CTpeIka Harope n HauOly, 3a da n36epete Main (TlaBHO) NOmEnHO.
4 Μιπολβαντε Κλανιδινε 3a Κτρελκα ὄρεης ἀνόγ, 3a Αα Ιπδερετε F12 Boot Menu.
5 I3noJIaBaiTe KnaBnI F5 nIi F6, 3a da npomehnte F12 Boot Menu B Enabled (AkTINBeH).
6 HaTnchete ESC 3a da BneseTe e NOpMeHIO Exit (U3xoI); HaTnchete ENTER 3a "N3xoI cBc 3aapanBaHe Ha npomEn" Exit Saving Changes. HaTnchete OTHOBO ENTER, 3a da n36epeTe Yes. Cnctemata ue ce pectaptnpa.
7 Cnepectaptnpahe, koraTo ce nokaxe Joroto Acer, hataChete F12 3a OTbapareHa MeHIO Boot Menu. TyK moKeTe da n36epeTe ot Koe yCTpoiCTBO NCKaTe da B3eMeTe daHHnte.
8 I3noJI3BaIte KJIaBUNITE CTpeNk, 3a Da nI36epeTe IDE1*, cIeI TOBa HATINCHETE ENTER. Windows ue 6bJe INHCTaIInpaH OT DnCKa 3a Bb3CTaHOBBAHe.
9 IocTaBeTe BToRnI DaNCK 3a Bb3CTaHOBRAHe, KOrATo NOncKa OT BaC CNTeMaTa, n CLeT TOBa CNeDBAIte INHCTpyKUnITE Ha ekpaHa 3a3aBbPbVAHe Ha Bb3CTaHOBRAHETO.
10 Cne KaTo npKKnOCh npOuecBt, n3BaTe DnCKa 3a Bb3CTaHOBBaHe OT onTnHOTo yctpoIcTB. n3BaTe ro npedn da pecTpIpaTe KOMnHTbpa cn.
YBeJInuIaBaHe Ha JxIBota Ha 6aTeepnTa
Kato BCnKn Dpyn Batepnn, Batepna Ha KOMnIObpa Bn Ue Ce BLOuN C BpeMeTo. Toba O3Haayaba, Ye eFeKTINBHOCTTa Ha batepna HaMaJRABa C BpeMeTo n 3nOJI3BaHeto. 3a Da yBeIInHuTe MaKcIMaJIHo XINBOTa Ha Batepna Ta cn, CbBeTBame Bn Da cJeDbATE Te3n npenOpbkn.
Подговен Ha HOBбатейн пaket
Ipei Da n3non3BaTe daenb 6aTepeH naKeT 3a npbB nbT,Ima onpeJen npocec no "conditioning", KoTo e do6pe Da cneBate:
1 IocTaBeTe HOBaTa 6aTeepn, 6e3 Da BkHIOuBaTe KOMIOTbpa.
2 CbpxkeTe AC aanterpa n 3apeTe 6aetepnTa Hanblno.
3 Otkaute AC aantera.
4 BkIIOHcTe KOMIOITbpa n pa6oTeTe Ha ToK OT 6aTePnraTa.
5 I3toe6baTePnraHaHbIHO,doKaTOceNoaBnpeDynpexKeHHneTo 3a naHaHa6baTePnra.
6 CbpxkeTe AC aanTepa n OTHOBo 3apeTe 6aTePnTa HnblHNo.
HaTnCHeTe CTap, cIeI KOeTo N3KnIOuBaHe.
Nnn:
Mokete cBtO taka da Bkapate KOMNHTbpa B pexnM "3acnBaHe", kaTo HaTncheTe KJIaBnHaT a KOM6Haunca
Korato cTe roTOBn OTHOBO Da n3nON3BaTe KOMNIOTBpa, OTBOpTe DnCnIe N HATNCHEte n OTNychete 6yToHa 3a 3axpaHbaHe.

Белека: Ако Иndикаговт 3а "3acпиBaHe" e Иклочen, комнговпгТе ВлиязВЛВ ржим Ha "Xибернauя" e Изклочen. Ако Иndикаговт 3a 3axpaHbAe He INKlOUChen, HO Иndикаговт 3a 3acпиBaHe e BKlOUChEN, 3haчи KomnIgTbpT e BJI3bl B pexim "3acпиBaHe". И в Ды资本市场, на ТСИСЕ и OTПСЕ бутона 3a 3axpaHbAteTo, 3a DA BKNIOUHTe KOMNIGTbpA. Имайт прдNiD, Que KOMNIGTbpT може DA bIeze B pexim "Xибернauя", слд Като ДьлгО Врeme e БИB ржим "3acпиBaHe".
Kakbo da Hocnte Ha deNoBn CpeuN
Ako cpeuata Bn e cpaBnHTeH KpaTka, BepoTHo He ce hana Hocnte HnIoDpyro, ocBeH KOMNtbpa cn. Ako cpeuaTa Bn ue 6bJe no-npOdbJknTeHa, nInIbK ako 6aTePnra TnHe e 3apeHa HanblHo, doBee e da BzemTe AC aanTepa Cbc c6e cn, 3a Da BkNoHTe KOMNtbpa B 3aNaTa 3a cpeu.
AkoB3aIata 3a cpeun Hma eNekTpueckn KOht, neCteTe 6aTepyta, KaTO BKapate KOMNtBpa B pexkM "3acnBahe".HaTnCKaTe
Ppehahe Ha KOMNIObpa KbM Doma
3a cnyuante, KOrato npehacrte KOMnHtbpa ot ofoica KbMa Doma cn nIIM 6bpaTHOTO.
Подотьг He Na KOMNIOТьpa
CneI KaTo OTKaUHTe KOMNIObPa O T pa6oTHOTo MRCTo, CneBaIte Te3n CTbKn, 3a Da rO NOIROTBtE 3a NbTg KbM Doma:
- Повере Te ди ст e n3BaДИN BCnUKN HOCHTeIN N KOMnAKT dIcKOBe OT yctpoiCTbATA. Ako He n3BaДиTe HOCHTeINTe, MoKe da nOBpeДиTe rJaBaTa Ha yctpoiCTBTO npi npeHacraHeto.
- ПoctabeteКOMNIObpaВcneuHaHO KyΦaPYe, KoTo He My N03BOnBa Da ceпьзra Hacam-Hatam И OMEKOTЯBa EBeHTyaJIHn yIapn I naJaHnI.

BhimaHne: 368BaTe Da onakobate Hea da TognKa Kaak Ha KOMNtba. HAtncbT Bbpxu ropnKa Kaak Moke da nOBpei ekpaHa.
Kakbo da hocnte cbc ce6e cn
Ocbeh aKo rHn HmATE y DOMa Cn, B3emTe CJIeHNTE Heua cbc ce6e cn:
AC aanTep n ka6eJ 3a 3axpaHbaHe
- Pechato Kpatko pboKoBOcTBo
CneuaHn npenopbkn
CneBbAte Te3n npenopbKn, 3a da npedna3nte KOMNIObpa cn no BpeMe Ha nbTyBaHe do n ot pa6ota:
- HamaIeTe efeKta OT TempeaTpHnTe npomeHn, KaTo DbpxnTe KOMnIOTbpa npu ce6e cn.
Ako ce haIarafa da cnpeTe 3a IbIro BpeMe n He MOxete Da B3eMeTe KOMIOBpa cbc Ce6e Cn, OCTabeTe ro B 6araXHnka Ha KONaTa, 3a Da He 6bJe H3JIOKeH Na PpeKaJIeHa TopeUHa. - Поменит e Tempepatypata n BnaxKHOCTT a MOra t da npuHnT KOHeH3aun. Octabete Tempepatypata ha KOMNtbpa da ce BbPhe KbM HnBOTO Ha cTaHATA n IperIeJaTe ekpaHa 3a KOHeH3aun, Ipedn da BKnIOUHTe KOMNtbpa. Ako Tempepatypata pa3nika e nobee ot 10^ (18°F), Octabete KOMNtbpa 6abHo da IOCTmHHe Do CTaH a Tempepatypa. Ako e Bb3MOxH0, OCTabete ro 3a 30 MNHyTn Ha McTo C Tempepatypa MeJdy BbHsHaT a N CTaHata.
IoppeKdaHe Ha DOMaWeH oΦnC
Ako cheTo pa6oTne Ha KOMnHtBpa BkBzU, Do6pa IeJe e Da cN Kynte BTOPI AC aAnTep 3a NOn3BaHe y Doma. Taka Hma Da ce HanaRa BCEKN PbT da HocIne aAnTepa OT n Do Doma Cn.
Ako n3nO3BaTe KOMNHTbpa y Doma cn 3a nBnI npEpoOn OT BpeMe, Do6pa IeJe e CbUTo Taka da cn B3eMeTe BbHuaKJlaBnaTpya, MOHITOP INM MUska.
TbTyBaHe c KOMNtbpa
3a cnyuante, KOrato ce npuDnBxKBaTe Ha No-rolemn pa3ctOraHnHa npMep ot crpaTata Ha Ofnca Bn KbM CrpaTaHa Ofnca Ha KIneHT, INI NbK PbTyBaTe n3 rpa.
IoirotBraHe Ha KOMNHTbpa
Полговете KMнOTьра тaka, BCE endo ue ro hocnte KbM Doma cn. Ybepete ce, ye 6baTePnraTа B KomNtBpa e 3apeHeha. Oxpanata Na HЯkon IeTnua MoKe da noncka OT BaСда BKJIOUChTE KMnOTbpa, KOraTO ro HOCnte KbM CamOJeT.
Kakbo da hocnte cbc ce6e cn
HocTe CneDnTe Heua cBc ce6e cn:
AC aanterp
- Pe3epBHeN, HanbIJIHO 3apeIeH 6aTepeIeH naket (IIJI nakTeI)
- Довлинтелни драиьери за прип elect, по сма即时да изюлбате ругприп elect
CneuaHn npenopbKn
OcbEN npenopbKNe, KOINTO ca cbIuTe KaTO npi npeHaCnHe Na KOMNIOBpa KbM Doma BV, CneDbaiTe n Te3n npenopbKn, 3a da npedna3nTe JIANTOna cn NO BpeMe Ha NbTyBaHe:
BnHaHn HocTe KOMNtbp KaTo pBuHc 6aA.
Ako e Bb3MOxHo, HeKa ro npereNaT ha pbla. PeHTreHOBnTe anapatn Ha neTuaTa ca 6e3Opacn, Ho He npekapBaIte KOMNIObpa npe3 DeTeKTOp 3a MeTaN.
- 1368aBaiTe Da do6nKabate fnoi-ducketn Do pUHN DeTeKTOpn 3a MeTaN.
Mexnyapodno nbTyBaHe c KOMnTbpa
3a cnyuante, korato nbybate ot edna ctpana B pyra.
IoirotBraHe Ha KOMNIObpa
Ioirotbete KOMNIObpa Taka, KaKTo no npHn6nxTe ro nOIOBTBUN3a nbTyBaHe.
Kakbo da hocnte cbc ce6e cn
HocTe CneDnTe Hea cbc ce6e cn:
AC aanterp
Ka6eHn 3a 3axpaHbAne, NOxOJaIuN 3a CtpaHaTa, KbM KOrTo NbTyBaTe
Pe3epBn, HanbJHo 3apeeHn 6aTepuHn naketn
- Довлинтелни драиьери за припгет, по сматate на Използватуnpинтep
-ДOKаЗaTeIcTbO 3a nOKyPkata,В cLnya,Ye ce HANOxN Da ro NOKaXeTe Ha MTHnUeCKn CnyKInTeJI
- Пасоста Мекдуарогда пьтнческа rapанця (International Travelers Warranty)
CneuaHn npenopbKn
CneBbAte CbIHTe CNEaJIHn npenOpbKn KaTO 3a NbTyBaHe Ha KpaTKn pa3ToRHa. B DoNTbJIHHeHc KbM TEx, MoKe I Te3N CbBETn Da ca BN NpNe3Hn npi MekdYhApOJHO NbTyBaHe:
Korato OTNBAte B Dpyra Ctpana, npOBepTe daJn CneuNfkaunTe Ha MeCTHaTACeEkeTpueckaMpexa N Kabela 3a 3axpaHbAhe Ha AC aanTepa ca CbBMeCTmN. AKe He e, KPyTe Ke6eI 3a 3axpaHbAhe, CbBMeCTmC HAnpeXeHNeTo Ha MeCTHaTACeEkeTpueckaMpexa. He n3noJI3BaIte KOHBePToPHTe KOMIIeKTI, KOITc Ce IpoDaBaT 3a DomakInHcN ypei, C KOMIHObPa.
- Ako n3no3BaTe MoEm, npoBepe Te daJIN MoEma N KOHeKTopa ca CbBMeCTUMI C TeJIeKOMyHnKaUHOHHaTa CnCTeMa Ha CTpaHaTa, B KOrTo OTuBAte.
C HactoToO Acer DeKnapupa, Ye Ta3n Cepna NepcoHaJIH KOMNIOTpI TIN "HoTy6yK" Ca B CbOTBeTCTBne CbC CbUeCTBeHNTe 3NcKBaHn I dpyTInTe npInIOxIMn NoCTaHOBHeHn Ha DnpeKTInBa 1999/5/EC.
CnncbKaHa cboTBeTHNte CtpaHn
CtpaHnTe-ueHKn Ha EC KbM. I0nn 2009 r. ca: BcHn, DaHn, TepMaHn, Tbpun, NcpanHn, FpauHn, NpnaHn, ItanHn, LIOKcEm6byr, HndepNaHn, AbCTPn, IpOpyraJIn, FmHnAaHn, UBeuHn, OBeDInHeHTo kpaIcTBo, EctOnHn, PaTbN, NtBa, POnHa, YHrapn, Chekata peny6nka, CNoBaXkata peny6nka, CnoBEnn, Knbp, MaTn, BbIparn and PymbHn. N3non3BaHeto Ha yctpoiCTBOTo e no3BolenoB v CtpaHnTe OT Ebponeckn Cb03, KaKTo n B HopBern, UBeuCaapn, NcAndIn n NIXteHsaH. YcPoRcTBTO Tpr6Ba da ce n3non3Ba B cTpora cbobpa3HOCT c peryaUnite n OrpaHneHnTa Ha dbpxabata, B KoYTo ce n3non3Ba. 3a DOnbJIInTeHa nHΦopMaun, MoIe CbByPxTe ce C MeCTHn oOpnc B dByxabata, B KoYTo ro n3non3BaTe. MoIe BxKeTe http://ec.europa.eu/enterprise/rttte/implem.htm 3a akTyaIIIN3upaH cnncbK ha cTpaHnte.
ИЗнСКВанeto 3a радиоуесТОТнa 6e3ОпаСноCT ha FCC
Изльчваната ИЗхODиma моциocт Ha Mini PCI kapтata 3a 6e3ЖиЧEN LAN n Bluetooth Kapтata e MHOro NOД ORpaHUNeHЯТа 3a paДIONoeCTOTHO I3NarAHe Ha FCC. BbIpekn TOBa, cepYra HOyT6yK KOMNtPn Tp46Ba DA ce I3NOn3Ba Taka,Ye NOTeHuaJIbT 3a YOBeWsk N KOtAekt NO BpeMe Ha HOpMaJHa pa6Ota DA 6bJe CBeDeH Do MHNIMyM, KaKTO CNeDla:
1 Ot notpe6nteIte Ce 3nckBa da cneBat yka3aHnra 3a paiaoecToHa 6e3onacnoCT Ha 6e3xNCHNe YcTpoCTBA, KOInTO ca ONiCaHN B Notpe6nteIKCtO pKOBODCTBO HA BCRAO paiaoecToHOYcTPOCTBO.

BHMaHHe:3a da ce OTROBaRHa n3nCKBaHnraTa 3a paAnOueCToTHO 6bUbaHe Ha FCC, Tp8Ba Da ce noDlbPka pa3cTOrHne ot noHe 20 cm (8 nHu) Mexdy anTeHaTa 3a nHTerPnpaHaTa Mini PCI kapTa 3a 6e3xuueh LAN, BrpaDeHa B OTdeneHneTo ha ekpaHa, n xopata HaOKOIO.
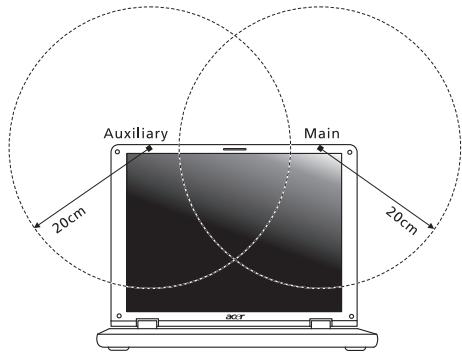

Белека: Адanteрт ha 3a 6e3xuHata Mini PCI KapTa Иma Функцяla 3a pa3HoO6pa3BaHe Ha TpaHcMncnTe. Ta3n Функцян He ИЗльчba paДIOUcEToTи eHNOBpeMeHNo IOT DBeTe aHTeHn.ЕДнATA aHTeHa ce IN3bUpa ABtOMaTHUNo IIN pBHyO (OT NOTpe6nteJIte), 3a Да OCSInyprn BVCOKOKaueCTBeHn paДIOKOMyHnkaUIn.
2 Toba yctpoiCTBO e orpaHnueHo 3a n3noI3BaHe cAmo Ha 3akpnto npaIpa6oTaMyB cheTOnHna Dnana30n MeKdy 5,15 n 5,25 GHz.FCC n3ncKaBnpoDykTA da ce n3noJ3Ba Ha 3akpnto 3apaDi YceTOnHna Dnana30n MeKdy 5,15 n 5,25 GHz,3a da ce hamaJIIn NoteHuaIa 3a BpeHa INTEppepeHua CMObIIHNTE caTeINTHn CnCTEmn Ha cbIuNTe KaHaII.
3 OchoBHTe nOTpeBteHnHaJeHTe OT 5,25 do 5,35 GHz u 5,65 do 5,85 GHz ca paapnte C BnCOKa MOHocT. Teu paapn CTaHmMoraT da npunHrI INTEPpeHnI N/INI Da yBpeJrTOBa yCTpoiCTBO.
4 HenpaBnHata nHctaunnaIyHeynbHOMoJeHOTOnJN3BaHe MOrat da npuHnT INTEPpepeHcnpaDIOKOMyHKaUNTe. BcKaKBO MoINmUcapHa HbTpewHata aHTeHa anynpa FCC ceTnOKnAuaTa n rapaHnraTBA.
KaHaJa—HnCKo-MOuHocTHn paIIOKOMyHnKaUHOHH yCTpoIcTba 6e3 Huxda OT IInCeH3 (RSS-210)
I3naRaHe Ha Xopa Ha Bb3JeIcTBnETo Ha paAnOueCTOTHn NOJeta (RSS-102)
Cepnra HOyTbK KOMNHTpNI 3nOJI3Ba INTErpaIHN aHTeH Nc HNCbk KOeΦnueHt Ha yCNBAHe, KOINTo HE nI3NbYBaT paIIOHeCTOTHO nOle, NaXbBpIaO rpaHnUte, onpeJeHn OT MInncTePcTBOTO Ha 3dpabeOna3BaHeto Ha KaHada 3a HaceneHneTo; HanpaBeTe cnpBaK b KoIekCa no 6e0anachocT 6 (Safety Code 6), KOINTo MoKeJaHaMePnte Ha ye6caJTa Ha MinncTePcTBOTO Ha 3dpabeOna3BaHeto Ha KaHada: www.hc-sc.gc.ca/rpb.
LCD panel ergonomic specifications
| Design viewing distance | 500 mm |
| Design inclination angle | 0.0° |
| Design azimuth angle | 90.0° |
| Viewing direction range class | Class IV |
| Screen tilt angle | 85.0° |
| Design screen illuminance | • Illuminance level: [250 + (250cosα)] lx where α = 85° • Color: Source D65 |
| Reflection class of LCD panel (positive and negative polarity) | • Ordinary LCD: Class I • Protective LCD: Class III |
| Image polarity | Both |
| Reference white: | • Yn |
| Pre-setting of luminance and color temperature @ 6500K (tested under BM7) | • u'n • v'n |
| Pixel fault class | Class II |
TravelMate seeria
Üldkasutusjuhend
TravelMate seeria sulearvuti
Mudeli number:
Seerianumber:
Ostukuupaev:
Ostukoht:
Acer Backup Manager 7
Energiahaldus 8
Acer eRecovery Management 9
Varuketaste körvetamine 10
Taastamine 11
Windows taastamine varundusketastelt 12
Aku 14
Akuomadused 14
Aku eluea pikendamine 14
Aku paigaldamine ja eemaldamine 15
Aku laadimine 16
LCD panel ergonomic specifications 40
Puuteplaat
Acer eRecovery Management
LCD panel ergonomic specifications
| Design viewing distance | 500 mm |
| Design inclination angle | 0.0° |
| Design azimuth angle | 90.0° |
| Viewing direction range class | Class IV |
| Screen tilt angle | 85.0° |
| Design screen illuminance | • Illuminance level: [250 + (250cosα)] lx where α = 85° • Color: Source D65 |
| Reflection class of LCD panel (positive and negative polarity) | • Ordinary LCD: Class I • Protective LCD: Class III |
| Image polarity | Both |
| Reference white: Pre-setting of luminance and color temperature @ 6500K (tested under BM7) | • Yn • u'n • v'n |
| Pixel fault class | Class II |
TravelMate sērija
Acer eRecovery Management
Dublejumkopiju erakstišana diskos
Restore (Atjaunošana)
Windows atjaunošana no dubljumkopiju diskiem
Akumulators
Akumulatora ipasibas
LCD panel ergonomic specifications 39
Skarienpanelis
Acer eRecovery Management
LCD panel ergonomic specifications
| Design viewing distance | 500 mm |
| Design inclination angle | 0.0° |
| Design azimuth angle | 90.0° |
| Viewing direction range class | Class IV |
| Screen tilt angle | 85.0° |
| Design screen illuminance | • Illuminance level: [250 + (250cosα)] lx where α = 85° • Color: Source D65 |
| Reflection class of LCD panel (positive and negative polarity) | • Ordinary LCD: Class I • Protective LCD: Class III |
| Image polarity | Both |
| Reference white: Pre-setting of luminance and color temperature @ 6500K (tested under BM7) | • Yn • u'n • v'n |
| Pixel fault class | Class II |
TravelMate seriju
Bendroji naudojimosi instrukcija
TravelMate seriju nešiojamasis kompiuteris
Modelio numeris:
Serijos numeris:
Pirkimo data:
Pirkimo vieta:
Acer Backup Manager 7
Energios valdymas 8
Acer eRecovery Management 9
Atsarginiu kopiju disku irasymas 10
Restore (atstatymas) 11
Windows atstatymas is rezerviniu kopiju disku 12
Baterija 14
International Travelers Warranty (ITW) garantija 33
Prieskambinant 33
Gedimugi diagnostika 34
Gedimu diagnostikos patarimai 34
LCD panel ergonomic specifications 40
Acer eRecovery Management
Acer eRecovery Management – priemoné greitam sistemas atstatymui. Ja galite padaryti atsarginé kopija/atstatyti gamyklinius parametrus, peridiegti programas ir tvarkykles.

International Travelers Warranty (ITW) garantija
LCD panel ergonomic specifications
| Design viewing distance | 500 mm |
| Design inclination angle | 0.0° |
| Design azimuth angle | 90.0° |
| Viewing direction range class | Class IV |
| Screen tilt angle | 85.0° |
| Design screen illuminance | • Illuminance level: [250 + (250cosα)] lx where α = 85° • Color: Source D65 |
| Reflection class of LCD panel (positive and negative polarity) | • Ordinary LCD: Class I • Protective LCD: Class III |
| Image polarity | Both |
| Reference white: | • Yn |
| Pre-setting of luminance and color temperature @ 6500K (tested under BM7) | • u'n • v'n |
| Pixel fault class | Class II |
Σερά TravelMate
Ti ειναι to ENERGY STAR;
Ta TPOIOVTA ME TIOIOTOINAN ENERGY STAR KATAVALWOVU AYIOEPN EVPEYIA KAI ATOTPPTOU V T EKTIUMTAE AEPIW TOEPEOKNTIou, EDEOU OTVAVTOKPVOTAI OTIC AUOTNPEG OONIEC EVPEYIAKNG AITDOOAGCN TOU OETNIOTKNAV ATO TO PAPGEIO PPOOATAAC NPEIPBAALVOCTOW H.P.A.H Acer EEXI DEQNEUTEVA TPOOAPPEI TAYKOOSI CPOIOVTA KAI UTNPEOIECS TOU BONTOUV TOUG TEALATECS TNS VA ESOIKOVMOUV XPNJMAOA KAI EVPEYIA, KAI VA BELTIWOVUV TNY TIOIOTNTAU TEPiBAAALVOCTOTOU GOU. OAO TPEIOOSTEPN EVPEYIA MTOPOUVE VA ESOIKOVMOUUE MEOU TNC UWNLOTEPCN EVPEYIAKNG AITDOOAGCN, TDOO TPEIOAOTEPO MEIOWUUE TA AEPIAU TOEPEOKNTIou KAI TOUC KIVDUVOCIAUKWv AALLAYW. PEPIOIOTEPCS TANPOOPIECS MTOPEITE VA BPEITE OTNV IOTOOEIAOA http://www.energystar.gov n TNV IOTOOEIAOA http://www.energystar.gov/powermanagement.
IioiTooiuEvA TpoiovTa ENERGY STAR tnc Acer:
Acer Backup Manager 7
x ~8~
Acer eRecovery Management 9
Eyypaqn Eeepoikou bokou 11
Eπαφορα 12
Etnavaapopá tou Windows aTó δiakouc εφεδρεia 13
EuToixia μπatapiwv 15
Xapaktnpiotikα ourotoixiaç μπatapiwv 15
Meviotoinon nS wéλiunS zwns tntapias 15
ToTOnTeTnO kai apaipoeon ouoToixiae mTaTapiwv 17
Φóptiən μπαταρίας 17
ELevXoS OtaOuNs FOptioNs MntatapiaC 18
Bελιστοποίησω φέλιμης ζωής μΠαταρίας 18
PnoeiooioiOn xaunnns opotios μTataia 18
(International Travelers Warranty; ITW) 36
Piv va tnaepwvnoe 36
AvtietwTion PpOaV OTOV UToAoyiOTn 37
H aTnTnTn aOaFALεIac FCC RF 40
Kavadac-XaunlncioxuocoukeuEcpaioeTkoivwviw
Tou xpeiaocovtai aobia (RSS-210) 41
Ekeoanavpwrwov eRss-102) 41
LCD panel ergonomic specifications 41
Eπiφάνεια Αφής
Acer eRecovery Management
To npoypauma Acer eRecovery Management evai eva epyaiaio tou xpoiipotoeitai yia nTv taxaia etavaopac tou ouatnmuato. Mtopeite va kteleaeet n diaikaaia eepoiaeac/ettavaopac tsnc poteinayevns epyoataiakns ekovac ka va eTaveykataotnoe Tepapoyc kai npoypamata oohynons.

1 KavTE KAIK OTo EvapS, Ola TpoypaMaTa, Acer, Acer eRecovery Management.
2 MTeaBeite Otn oElaO EaTavaopap Kavovtac kIK OTo EaTavaopap.
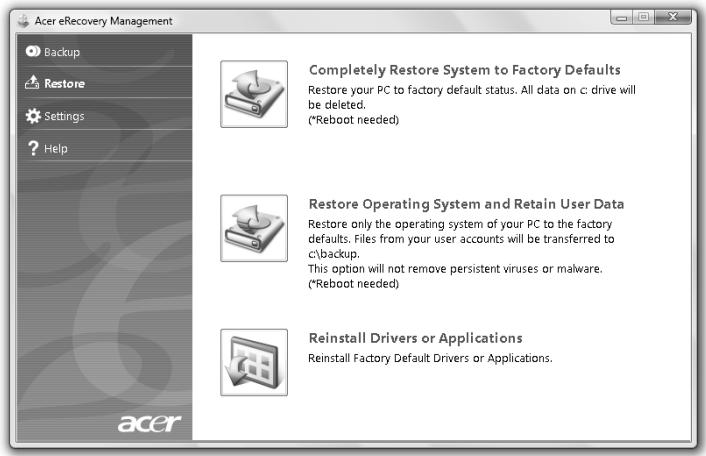
3 MTopeite va EITIeEETnV ETTaVapopa tou ouotnmuato ctoia TPOeTIeYEv n Epyootaiaikn EIKOVA n Tnv ETTaveykataoan Epaoyovkai TPOpaumatw oHnyonC.
4 Akolouhnte TIG oynie tsou eapavicovtai OTNV oovn yia Tnv aonepatwn Tns diaikacia.
- Information for your safety and comfort
- Safety instructions
- Turning the product off before cleaning
- CAUTION for plug as disconnecting device
- CAUTION for Accessibility
- CAUTION for bundled dummy cards (only for certain models)
- CAUTION for Listening
- iv
- Warnings
- Using electrical power
- Product servicing
- Guidelines for safe battery usage
- Replacing the battery pack
- Caution for Optical Drive Device (only for certain models)
- Telephone line safety
- Operating environment
- Medical devices
- Vehicles
- Potentially explosive environments
- Emergency calls
- Disposal instructions
- Mercury advisory
- ENERGY STAR
- Tips and information for comfortable use
- Finding your comfort zone
- Taking care of your vision
- Eyes
- XII
- Display
- Developing good work habits
- First things first
- Your guides
- Basic care and tips for using your computer
- Turning your computer on and off
- xiv
- Taking care of your computer
- Taking care of your AC adapter
- Taking care of your battery pack
- Cleaning and servicing
- Information for your safety and comfort iii
- First things first xiii
- Touchpad 1
- Using the keyboard 3
- Audio 5
- Video 5
- Using the system utilities 6
- Power management 8
- Acer eRecovery Management 9
- Battery pack 14
- Taking your notebook PC with you 18
- Securing your computer 22
- Expanding through options 24
- Frequently asked questions 31
- Troubleshooting
- Regulations and safety notices
- Touchpad
- Touchpad basics (with fingerprint reader)
- Touchpad basics (with two-click buttons)
- Using the keyboard
- Lock keys and embedded numeric keypad*
- Windows keys
- Audio
- Acer PureZone (only for certain models)
- Video
- 16:9 display (only for certain models)
- Using the system utilities
- Acer Bio-Protection (only for certain models)
- Acer Backup Manager
- Power management
- Acer eRecovery Management
- Backup:
- Restore:
- Burn backup discs
- Restore
- Restore Windows from backup discs
- Battery pack
- Battery pack characteristics
- Maximizing the battery's life
- Conditioning a new battery pack
- Installing and removing the battery pack
- To install a battery pack:
- Charging the battery
- Checking the battery level
- Optimising battery life
- Battery-low warning
- Taking your notebook PC with you
- Disconnecting from the desktop
- Moving around
- Preparing the computer
- What to bring to meetings
- Taking the computer home
- What to take with you
- Special considerations
- Setting up a home office
- Traveling with the computer
- Traveling internationally with the computer
- What to bring with you
- Securing your computer
- Using a computer security lock
- Using passwords
- Entering passwords
- Setting passwords
- Expanding through options
- Connectivity options
- Fax/data modem (only for certain models)
- Built-in network feature
- Universal Serial Bus (USB)
- IEEE 1394 port (only for certain models)
- High-Definition Multimedia Interface (only for certain models)
- ExpressCard (only for certain models)
- Inserting an ExpressCard
- Ejecting an ExpressCard
- Installing memory
- BIOS utility
- Boot sequence
- Enable disk-to-disk recovery
- Password
- Using software
- Playing DVD movies
- Eject the DVD disk.
- The DVD movie will automatically play after a few seconds.
- Frequently asked questions
- Nothing appears on the screen.
- No audio is heard from the computer.
- Requesting service
- International Travelers Warranty (ITW)
- Before you call
- Troubleshooting tips
- Error messages
- FCC statement
- Notice: Shielded cables
- Notice: Peripheral devices
- Caution
- Notice: Canadian users
- Compliant with Russian regulatory certification
- Modem notices (only for certain models)
- Notice for USA
- TBR 21
- Notice for Australia
- Notice for New Zealand
- LCD pixel statement
- Radio device regulatory notice
- General
- Declaration of Conformity for EU countries
- List of applicable countries
- The FCC RF safety requirement
- Canada — Low-power license-exempt radio communication devices (RSS-210)
- Exposure of humans to RF fields (RSS-102)
- LCD panel ergonomic specifications
- Gammu TravelMate
- Dépannage 37
- TravelMate Serie
- Energieverwaltung 8
- Problemlösung 37
- Série TravelMate
- Gestão de energia 8
- Bacteria 14
- Energiebeheer 8
- Problemen oplossen 35
- Backup-disk branden
- ITW (International Travelers Warranty)
- TravelMate Series
- Strømstyring 8
- Batteri 14
- Berøringsplate (Touchpad)
- TravelMate Seriens
- Fejlfinding pà computeren 35
- Pegefelt
- TravelMate-serien
- Felsöka datorn 34
- Pekplatta
- Aktivera disk-to-disk recovery
- International resegaranti (International Travelers Warranty; ITW)
- TravelMate -sarja
- Kosketusalusta
- Cepnia TravelMate
- HΦopMaçnЯДЯВaшeи 6e3OpaCHOCTN yDObcTBA pa6Otbl
- PpaBnla TexHnKn 6e3OnaChOCTn
- BbiknoueHne ycTpoiCtBa nepe qncTkOJ
- PNEyIPEKDEHNE NO NOdkHueHIO NOTKluOeHNO yCTpoiCTBa
- IPEdYIPEXKDEHNE B OTHOWeHn IOCTynHOCTN
- PpeDynpexKdEHNBE BOTHOSeHIN
- PnBODa ONTNUeCKNX INCKOB
- (TOЛько ДЯ ONpeДeнньIX MOdЕЛeн)
- ABTOMO6nJI
- B3pbIBOOJaChbIe ycIOBnA
- 3KCTpeHHbIe Bbl3OBbl
- IHCTpyKcnn no yTnIn3aCnn
- IpeDynpexKdHne o coDepeXaHn npTyTN
- CbeHnI n coBtI dIyO6CTBa pa60TbI
- Ponck ydo6horo pa6oeryo noIoxeHn
- 3a60Ta o 3peHnN
- Tna3a
- Ducnnne
- Bbipabotka npabnblhoro ctnla paobtbi
- OchOBhIe cBeHnIyXoJe 3a KOMbIOTepOM I COBtBI NcNoJIb3OBaHnIO
- YXoI 3a KOMIbIOTepOM
- YxOД 3a aДaNTepOMпepeMeHHO TOKa
- YxOД 3a aKKyMnyTOpOM
- UncTka n o6cIyXnBaHne
- Bhaane o rnaBHOM XV
- CenhcopnnaHeIb 1
- IcnoJb3ObaHne KnaBnaTypbl 3
- Aydino 5
- Bvideo 5
- IcnoJb3ObaHne CNCTeMHbIX yTnJIHT 6
- UnpaBneHne nHTaHnem 8
- Akkymylatopna 6tapey 14
- Bepem HooT6yK c co6oB 19
- BézonaacHocTb BaUero KOMNbIOTepa 23
- PacshinpeHne c NOMOUsbIO dONoHNHTeJIbHbIX BO3MOxHocTei 25
- 32
- YcTpaHHe HEnOJaOk KOMNbIbIepea 35
- IpaBnla n 3aMeuHnno 6e3OpacHoCTn 36
- Cechopnay naneJb
- OCHOBbI NcNoJIb3OBaHnI CeHCOPHO nHaJIeN (C DaKTInIOCKoNHyeCKm CHTbIBaTeJIeM)
- OCHOBbI NCNoJIb3OBaHnA CeHCOPHO nHaHeJI (C DByM KHOPIKaM)
- YnpabJIeHne pNTaHnem
- BocCTaHOBJIeHne Windows cДИСКОВ apXINHBIX KONII
- AkkymyItopna 6aTape8
- XapaktepcntnKn aKKymyJTopHOb 6aTapeN
- YBeJIuHHe cPoKa cIyK6bI aKKyMylTOpHO bTapei
- IoproTOBka HOBOJ aKKymyTOpHOJ 6aTapeN K IcNoJIb3OBAHnIO
- 3apayakymyTopno6aTapei
- Yacto 3aDaBaemble BOpocbl
- CobetbI IO NOnCKy I yCTpaHeHnHO HeNCpPaBHOCTeI
- Coo6uènna o6 oùn6kαx
- Ko mputer seri i1 TravelMate
- Zarzadzanie energia 8
- TravelMate sorozat
- Hibaelhárítás 36
- Érintópad
- Rada TravelMate
- Rizeni spotreby 8
- Zařízení touchpad
- Séria TravelMate
- Správa napájania 8
- Dotyková plocha
- Serija TravelMate
- Upravljanje z napajanjem 8
- Sledilna plošča
- TravelMate serija
- Baterijskicomplet 14
- Dodirna ploča
- Osnove o dodirnoj ploči (s Čitačem otiska prsta)
- International Travelers jamstvo (ITW)
- Seria TravelMate
- Bateria
- Zona de atingere
- TravelMate Cepnia
- BHHIMABAITE 3a DoCTbIHOCT
- BHHMABAITE 3a HaJIInuHne Ha n3KycTBeHn KapTu (cAmO 3a HjaKOI MoDeJIi)
- BHHIMABAIETnpncnyuShaHe
- PpeDynpexKdEHHa
- I3noJ3BaHe Ha eJNEKtpNueCTBO
- O6cnyXbaHe Ha npoDyKta
- Yka3aHn3a 6e3oNa cha ynoTe6a Ha 6aTepeInTe
- CmHa Ha batepHnna naket
- IpeDynpexKeHne 3a ypei C onTnUHO yCTPOJCTBO (cAmO 3a HЯKOn MOneJIi)
- БezonaCHOCT Ha TeJeΦoHnHTe JInHm
- Papotna cpea
- MeiHcN yctpoCTBa
- MOTOPHNI PpeBO3Hn CpeDCTBa
- B3pmb0oNacHa cpea
- CneuHn o6aJdAnna
- Yka3aHnna 3a n3XbPpIHe
- BHHMaHHe -XnBaK
- CbBETI INHΦopMaζηa 3a yDObHo I3POn3BaHe
- HamepeTe cBoraTa 30Ha Ha KOMΦoPT
- KpaTko pBKOBOcTBO Bn PpeiCTaB OCHOBHIne 0yHKuN N Bb3MOXHOCTNa Ha
- CbBETn 3a OCHOBHa rPnJka n N3NoJ3BaHe Ha KOMNIOTbpa
- BkIIOUBaHe nN3KJIIOUBaHe
- Грnxka 3a KOMNIObpa
- Гржи 3a вшия AC aanTep
- Гржи 3a пaketeбаери
- HΦopMaζη 3a Baʌe yɒobCTBO n 6e3ɔnacHOCT
- PpeiBcNcuKo
- Tbyna
- Kak ce n3noJ3Ba KnaBnAtypata
- Aydno
- Bndeo
- I3noJ3BaHe Ha cNCTeMHHTe IHCTpyMeHTn
- YnpaBJIeHne Ha 3axpaHbaHeTo
- Батурень пakет
- Hocete cB0ra Hoyt6yK PC cbc ce6e cn 19
- PpeDn3BaHe Ha KOMNIOTbpa 23
- ДоьлнITEЛНи ВьзMOXHOCTN 25
- YeTo 3aIaBaHn Bbnpocn 32
- OtctpaHbAHe Ha npo6IeMn 36
- YbeDomJIeHn3a perylaucnN 6e3onacNoCT 37
- Tb4naI
- OchOBHn HeuHa 3a TbUpaI (CyeTeu 3a npbCTOBN OTpeuTaBUN)
- 3aHnCbaHe Ha pe3epBHN DnCKOBe
- Restore (Възсановаянe)
- Bb3ctaHOBBaHe Ha Windows ot pe3epBnI nickOBe
- YBeJInuIaBaHe Ha JxIBota Ha 6aTeepnTa
- Подговен Ha HOBбатейн пaket
- Kakbo da Hocnte Ha deNoBn CpeuN
- Ppehahe Ha KOMNIObpa KbM Doma
- Подотьг He Na KOMNIOТьpa
- Kakbo da hocnte cbc ce6e cn
- CneuaHn npenopbkn
- IoppeKdaHe Ha DOMaWeH oΦnC
- TbTyBaHe c KOMNtbpa
- IoirotBraHe Ha KOMNHTbpa
- Mexnyapodno nbTyBaHe c KOMnTbpa
- IoirotBraHe Ha KOMNIObpa
- CnncbKaHa cboTBeTHNte CtpaHn
- ИЗнСКВанeto 3a радиоуесТОТнa 6e3ОпаСноCT ha FCC
- KaHaJa—HnCKo-MOuHocTHn paIIOKOMyHnKaUHOHH yCTpoIcTba 6e3 Huxda OT IInCeH3 (RSS-210)
- I3naRaHe Ha Xopa Ha Bb3JeIcTBnETo Ha paAnOueCTOTHn NOJeta (RSS-102)
- TravelMate seeria
- Energiahaldus 8
- Aku 14
- Puuteplaat
- TravelMate sērija
- Akumulators
- Skarienpanelis
- TravelMate seriju
- Energios valdymas 8
- Baterija 14
- Gedimugi diagnostika 34
- International Travelers Warranty (ITW) garantija
- Σερά TravelMate
- x ~8~
- EuToixia μπatapiwv 15
- AvtietwTion PpOaV OTOV UToAoyiOTn 37
- Eπiφάνεια Αφής
Brand : ACER
Model : TRAVELMATE 5742G
Category : Laptop