PWS1300-125 - Angle grinder BOSCH - Free user manual and instructions
Find the device manual for free PWS1300-125 BOSCH in PDF.
User questions about PWS1300-125 BOSCH
0 question about this device. Answer the ones you know or ask your own.
Ask a new question about this device
Download the instructions for your Angle grinder in PDF format for free! Find your manual PWS1300-125 - BOSCH and take your electronic device back in hand. On this page are published all the documents necessary for the use of your device. PWS1300-125 by BOSCH.
USER MANUAL PWS1300-125 BOSCH
OBJ DOKU-34927-004.fm Page 1 Monday, December 8, 2014 3:03 PM
WEU
Robert Bosch GmbH
Power Tools Division
70764 Leinfelden-Echterdingen
GERMANY
www.bosch-pt.com
1609 92A 0S0 (2014.12) O/147 WEU

1609 92A 0S0
PWS
1000-115|1000-125|1000-125 CE|1300-125 CE

BOSCH
de Originalbetriebsanleitung
en Original instructions
fr Notice originale
es Manual original
pt Manual original
it Istruzioni originali
n Oorspronkelijke
gebruksaanwijizing
da Original brugsanvisning
sv Bruksanvisning i original
no Original driftsinstruks
fi Alkuperaset ojeet
el Ppwrtoio 0nnyw xphonc
tr Orijinal isletme talimati
ar aulu (jwll Ua


2
Deutsch . 6
English 16
Français. 25
Espanol .Pagina 36
Portugues. 47
Italiano . 57
Nederland 68
Dansk. 78
Svenska Sida 87
Norsk. 96
Suomi. 105
Elambdanuika 114
Türkce Sayfa 125
L 144


6 | Deutsch
Deutsch
Sicherheitshinweise
Henk Becker
Executive Vice President Engineering
Helmut Heinzelmann
Head of Product Certification
PT/ETM9

Robert Bosch GmbH, Power Tools Division 70764 Leinfelden-Echterdingen, GERMANY 08.12.2014
Montage
General Power Tool SafetyWarnings
WARNING
Read all safety warnings and all in
Structions. Failure to follow the warnings
and instructions may result in electric shock, fire and/or serious injury.
Save all warnings and instructions for future reference.
The term "power tool" in the warnings refers to your mains-operated (corded) power tool or battery-operated (cordless) power tool.
Work area safety
- Keep work area clean and well lit. Cluttered or dark areas invite accidents.
Do not operate power tools in explosive atmospheres, such as in the presence of flammable liquids, gases or dust. Power tools create sparks which may ignite the dust or fumes. - Keep children and bystanders away while operating a power tool. Distractions can cause you to lose control.
Electrical safety
- Power tool plugs must match the outlet. Never modify the plug in any way. Do not use any adapter plugs with earthed (grounded) power tools. Unmodified plugs and matching outlets will reduce risk of electric shock.
- Avoid body contact with earthed or grounded surfaces, such as pipes, radiators, ranges and refrigerators. There is an increased risk of electric shock if your body is earthed or grounded.
-
Do not expose power tools to rain or wet conditions. Water entering a power tool will increase the risk of electric shock.
Do not abuse the cord. Never use the cord for carrying, pulling or unplugging the power tool. Keep cord away from heat, oil, sharp edges and moving parts. Damaged or entangled cords increase the risk of electric shock. -
When operating a power tool outdoors, use an extension cord suitable for outdoor use. Use of a cord suitable for outdoor use reduces the risk of electric shock.
If operating a power tool in a damp location is unavoidable, use a residual current device (RCD) protected supply. Use of an RCD reduces the risk of electric shock.
Personal safety
Stay alert, watch what you are doing and use common sense when operating a power tool. Do not use a power tool while you are tired or under the influence of drugs, alcohol or medication. A moment of inattention while operating power tools may result in serious personal injury.
- Use personal protective equipment. Always wear eye protection. Protective equipment such as dust mask, non-skid safety shoes, hard hat, or hearing protection used for appropriate conditions will reduce personal injuries.
Prevent unintentional starting. Ensure the switch is in the off-position before connecting to power source and/or battery pack, picking up or carrying the tool. Carrying power tools with your finger on the switch or energising power tools that have the switch on invites accidents.
Remove any adjusting key or wrench before turning the power tool on. A wrench or a key left attached to a rotating part of the power tool may result in personal injury.
- Do not overreach. Keep proper footing and balance at all times. This enables better control of the power tool in unexpected situations.
Dress properly. Do not wear loose clothing or jewellery. Keep your hair, clothing and gloves away from moving parts. Loose clothes, jewellery or long hair can be caught in moving parts.
If devices are provided for the connection of dust extraction and collection facilities, ensure these are connected and properly used. Use of dust collection can reduce dust-related hazards.
Power tool use and care
- Do not force the power tool. Use the correct power tool for your application. The correct power tool will do the job better and safer at the rate for which it was designed.
- Do not use the power tool if the switch does not turn it on and off. Any power tool that cannot be controlled with the switch is dangerous and must be repaired.
Disconnect the plug from the power source and/or the battery pack from the power tool before making any adjustments, changing accessories, or storing power tools. Such preventive safety measures reduce the risk of starting the power tool accidentally. - Store idle power tools out of the reach of children and do not allow persons unfamiliar with the power tool or these instructions to operate the power tool. Power tools are dangerous in the hands of untrained users.
- Maintain power tools. Check for misalignment or binding of moving parts, breakage of parts and any other condition that may affect the power tool's operation. If damaged, have the power tool repaired before use.


English|17
Many accidents are caused by poorly maintained power tools.
- Keep cutting tools sharp and clean. Properly maintained cutting tools with sharp cutting edges are less likely to bind and are easier to control.
- Use the power tool, accessories and tool bits etc. in accordance with these instructions, taking into account the working conditions and the work to be performed. Use of the power tool for operations different from those intended could result in a hazardous situation.
Service
Have your power tool serviced by a qualified repair person using only identical replacement parts. This will ensure that the safety of the power tool is maintained.
SafetyWarnings for AngleGrinder
SafetyWarnings common for Grinding, Sanding,Wire Brushing or Abrasive Cutting Off Operations
This power tool is intended to function as a grinder, sander, wire brush or cut-off tool. Read all safety warnings, instructions, illustrations and specifications provided with this power tool. Failure to follow all instructions listed below may result in electric shock, fire and/or serious injury.
Operations such as polishing are not recommended to be performed with this power tool. Operations for which the power tool was not designed may create a hazard and cause personal injury.
- Do not use accessories which are not specifically designed and recommended by the tool manufacturer. Just because the accessory can be attached to your power tool, it does not assure safe operation.
The rated speed of the accessory must be at least equal to the maximum speed marked on the power tool. Accessories running faster than their rated speed can break and fly apart.
The outside diameter and the thickness of your accessory must be within the capacity rating of your power tool. Incorrectly sized accessories cannot be adequately guarded or controlled.
- Threaded mounting of accessories must match the grinder spindle thread. For accessories mounted by flanges, the arbour hole of the accessory must fit the locating diameter of the flange. Accessories that do not match the mounting hardware of the power tool will run out of balance, vibrate excessively and may cause loss of control.
Do not use a damaged accessory. Before each use inspect the accessory such as abrasive wheels for chips and cracks, backing pad for cracks, tear or excess wear, wire brush for loose or cracked wires. If power tool or accessory is dropped, inspect for damage or install an undamaged accessory. After inspecting and installing an accessory, position yourself and bystanders away from the plane of the rotating accessory and run
the power tool at maximum no-load speed for one minute. Damaged accessories will normally break apart during this test time.
Wear personal protective equipment. Depending on application, use face shield, safety goggles or safety glasses. As appropriate, wear dust mask, hearing protectors, gloves and shop apron capable of stopping small abrasive or workpiece fragments. The eye protection must be capable of stopping flying debris generated by various operations. The dust mask or respirator must be capable of filtrating particles generated by your operation. Prolonged exposure to high intensity noise may cause hearing loss.
- Keep bystanders a safe distance away from work area. Anyone entering the work area must wear personal protective equipment. Fragments of workpiece or of a broken accessory may fly away and cause injury beyond immediate area of operation.
Hold the power tool by insulated gripping surfaces only, when performing an operation where the cutting accessory may contact hidden wiring or its own cord. Cutting accessory contacting a "live" wire may make exposed metal parts of the power tool "live" and could give the operator an electric shock.
Position the cord clear of the spinning accessory. If you lose control, the cord may be cut or snagged and your hand or arm may be pulled into the spinning wheel.
- Never lay the power tool down until the accessory has come to a complete stop. The spinning wheel may grab the surface and pull the power tool out of your control.
- Do not run the power tool while carrying it at your side. Accidental contact with the spinning accessory could snag your clothing, pulling the accessory into your body.
Regularly clean the power tool's air vents. The motor's fan will draw the dust inside the housing and excessive accumulation of powdered metal may cause electrical hazards.
Do not operate the power tool near flammable materials. Sparks could ignite these materials.
Do not use accessories that require liquid coolants. Using water or other liquid coolants may result in electrocution or shock.
Kickback and related warnings
- Kickback is a sudden reaction to a pinched or snagged rotating wheel, backing pad, brush or any other accessory. Pinching or snagging causes rapid stalling of the rotating accessory which in turn causes the uncontrolled power tool to be forced in the direction opposite of the accessory's rotation at the point of the binding. For example, if an abrasive wheel is snagged or pinched by the workpiece, the edge of the wheel that is entering into the pinch point can dig into the surface of the material causing the wheel to climb out or kick out. The wheel may either jump toward or away from the operator, depending on direction of the wheel's movement at the point of pinching. Abrasive wheels may also break under these conditions.
18|English
Kickback is the result of power tool misuse and/or incorrect operating procedures or conditions and can be avoided by taking proper precautions as given below.
- Maintain a firm grip on the power tool and position your body and arm to allow you to resist kickback forces. Always use auxiliary handle, if provided, for maximum control over kickback or torque reaction during start-up. The operator can control torque reactions or kickback forces, if proper precautions are taken.
- Never place your hand near the rotating accessory. Accessory may kickback over your hand.
- Do not position your body in the area where power tool will move if kickback occurs. Kickback will propel the tool in direction opposite to the wheel's movement at the point of snagging.
- Use special care when working corners, sharp edges, etc. Avoid bouncing and snagging the accessory. Corners, sharp edges or bouncing have a tendency to snag the rotating accessory and cause loss of control or kickback.
Do not attach a saw chain woodcarving blade or toothed saw blade. Such blades create frequent kickback and loss of control.
Safety warnings specific for Grinding and Abrasive Cutting-Off operations
- Use only wheel types that are recommended for your power tool and the specific guard designed for the selected wheel. Wheels for which the power tool was not designed cannot be adequately guarded and are unsafe.
The grinding surface of the centre depressed wheels must be mounted below the plane of the guard lip. An improperly mounted wheel that projects through the plane of the guard lip cannot be adequately protected.
The guard must be securely attached to the power tool and positioned for maximum safety, so the least amount of wheel is exposed towards the operator. The guard helps to protect operator from broken wheel fragments, accidental contact with wheel and sparks that could ignite clothing. - Wheels must be used only for recommended applications. For example: do not grind with the side of the cut-off wheel. Abrasive cut-off wheels are intended for peripheral grinding; side forces applied to these wheels may cause them to shatter.
Always use undamaged wheel flanges that are of correct size and shape for your selected wheel. Proper wheel flanges support the wheel thus reducing the possibility of wheel breakage. Flanges for cut-off wheels may be different from grinding wheel flanges. - Do not use worn down reinforced wheels from larger power tools. Wheels intended for larger power tools are not suitable for the higher speed of a smaller tool and may burst.
Additional safety warnings specific for abrasive cutting off operations
- Do not "jam" the cut-off wheel or apply excessive pressure. Do not attempt to make an excessive depth of cut.
Overstressing the wheel increases the loading and susceptibility to twisting or binding of the wheel in the cut and the possibility of kickback or wheel breakage.
- Do not position your body in line with and behind the rotating wheel. When the wheel, at the point of operation, is moving away from your body, the possible kickback may propel the spinning wheel and the power tool directly at you.
When wheel is binding or when interrupting a cut for any reason, switch off the power tool and hold the power tool motionless until the wheel comes to a complete stop. Never attempt to remove the cut-off wheel from the cut while the wheel is in motion otherwise kickback may occur. Investigate and take corrective action to eliminate the cause of wheel binding. - Do not restart the cutting operation in the workpiece. Let the wheel reach full speed and carefully re-enter the cut. The wheel may bind, walk up or kickback if the power tool is restarted in the workpiece.
Support panels or any oversized workpiece to minimize the risk of wheel pinching and kickback. Large workpieces tend to sag under their own weight. Supports must be placed under the workpiece near the line of cut and near the edge of the workpiece on both sides of the wheel. - Use extra caution when making a "pocket cut" into existing walls or other blind areas. The protruding wheel may cut gas or water pipes, electrical wiring or objects that can cause kickback.
Safety warnings specific for sanding operations
Do not use excessively oversized sanding disc paper. Follow manufacturers recommendations, when selecting sanding paper. Larger sanding paper extending beyond the sanding pad presents a laceration hazard and may cause snagging, tearing of the disc, or kickback.
Safety warnings specific for wire brushing operations
- Be aware that wire bristles are thrown by the brush even during ordinary operation. Do not overstress the wires by applying excessive load to the brush. The wire bristles can easily penetrate light clothing and/or skin.
If the use of a guard is recommended for wire brushing, do not allow any interference of the wire wheel or brush with the guard. Wire wheel or brush may expand in diameter due to work load and centrifugal forces.
Additional safety warnings

Wear safety goggles.
Use suitable detectors to determine if utility lines are hidden in the work area or call the local utility company for assistance. Contact with electric lines can lead to fire and electric shock. Damaging a gas line can lead to explosion. Penetrating a water line causes property damage or may cause an electric shock.


English | 19
Release the On/Off switch and set it to the off position when the power supply is interrupted, e. g., in case of a power failure or when the mains plug is pulled. This prevents uncontrolled restarting.
- Do not touch grinding and cutting discs before they have cooled down. The discs can become very hot while working.
Secure the workpiece. A workpiece clamped with clamping devices or in a vice is held more secure than by hand.
Products sold in GB only: Your product is fitted with a BS 1363/A approved electric plug with internal fuse (ASTA approved to BS 1362).
If the plug is not suitable for your socket outlets, it should be cut off and an appropriate plug fitted in its place by an authorised customer service agent. The replacement plug should have the same fuse rating as the original plug.
The severed plug must be disposed of to avoid a possible shock hazard and should never be inserted into a mains socket elsewhere.
Products sold in AUS and NZ only: Use a residual current device (RCD) with a rated residual current of 30mA or less.
Product Description and Specifications

Read all safety warnings and all instructions. Failure to follow the warnings and instructions may result in electric shock, fire and/or serious injury.
Intended Use
The machine is intended for cutting, roughing and brushing of metal and stone materials without the use of water.
For cutting with bonded abrasives, a special cutting guard (accessory) must be used.
When cutting in stone, provide for sufficient dust extraction. With approved sanding tools, the machine can be used for sanding with sanding discs.
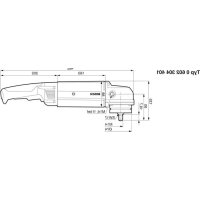
Product Features
The numbering of the product features refers to the illustration of the machine on the graphics page.
1 Release lever for protection guard
2 Spindle lock button
3 On/Off switch
4 Thumbwheel for speed preselection (PWS 1000-125 CE/PWS 1300-125 CE)
5 Auxiliary handle (insulated gripping surface)
6Grinder spindle
7 Protection guard for grinding
8 Mounting flange
9 Grinding wheel
10 Clamping nut
11 Quick-clamping nut SDS- liic*
12 Protection guard for cutting
13 Cutting disc
14 Hand guard
15 Rubber sanding plate
16 Sanding sheet
17 Round nut
18 Cup brush
19 Cutting guide with dust extraction protection guard *
20 Diamond cutting disc
21 Handle (insulated gripping surface)
22 Direction-of-rotation arrow on housing
*Accessories shown or described are not part of the standard delivery scope of the product. A complete overview of accessories can be found in our accessories program.
Technical Data
| Angle Grinder | PWS ... | 1000-115/1000-125 | 1000-125 CE | 1300-125 CE |
| Article number | 3603... | CA2 6.. | CA2 8.. | CA2 9.. |
| Rated power input | W | 1001 | 1010 | 1300 |
| Rated speed | \( \mathbf{min}^{-1} \) | 11000 | 11500 | 11500 |
| Speed control adjustment | \( \mathbf{min}^{-1} \) | - | 2800 - 11500 | 2800 - 11500 |
| Grinding disc diameter, max. | mm | 115/125 | 125 | 125 |
| Thread of grinder spindle | M 14 | M 14 | M 14 | |
| Thread length (max.) of grinder spindle | mm | 22 | 22 | 22 |
| Reduced starting current | - | ● | ● | |
| Constant electronic control | - | ● | ● | |
| Speed preselection | - | ● | ● | |
| Soft starting | - | ● | ● | |
| Kickback stop | - | ● | ● | |
| Restarting Protection | - | ● | ● | |
| The values given are valid for a nominal voltage [U] of 230 V. For different voltages and models for specific countries, these values can vary. | ||||
Bosch Power Tools
160992A0S0|8.12.14)


20|English
| Angle Grinding | PWS ... | 1000-115/1000-125 | 1000-125 CE | 1300-125 CE |
| Overload Protection | - | ● | ● | |
| Weight according to EPTA-Procedure 01/2003 | ||||
| - with vibration-damping auxiliary handle | kg | 2.2 | 2.1 | 2.4 |
| - with standard-auxiliary handle | kg | 2.2 | 2.1 | 2.4 |
| Protection class | ☐/II | ☐/II | ☐/II | |
| The values given are valid for a nominal voltage [U] of 230 V. For different voltages and models for specific countries, these values can vary. | ||||
Noise/Vibration Information
| Sound emission values determined according to EN 60745-2-3. | PWS ... | 1000-115/1000-125 | 1300-125 CE | |
| 3 603 ... | CA2 6.. | CA2 8.. | CA2 9.. | |
| Typically the A-weighted noise levels of the product are | ||||
| Sound pressure level | dB(A) | 90 | 90 | 93 |
| Sound power level | dB(A) | 100 | 101 | 104 |
| Uncertainty K | dB | 3 | 3 | 3 |
| Wear hearing protection! | ||||
| Vibration total values \(a_h\) (triax vector sum) and uncertainty K determined according to EN 60745: | ||||
| Surface grinding: | ||||
| \(a_h\) | m/s2 | 7.0 | 8.0 | 13.0 |
| K | m/s2 | 1.5 | 1.5 | 1.5 |
| Disk sanding: | ||||
| \(a_h\) | m/s2 | 5.0 | 5.0 | 6.0 |
| K | m/s2 | 1.5 | 1.5 | 1.5 |
The vibration level given in this information sheet has been measured in accordance with a standardised test given in EN 60745 and may be used to compare one tool with another. It may be used for a preliminary assessment of exposure. The declared vibration emission level represents the main applications of the tool. However if the tool is used for different applications, with different accessories or insertion tools or is poorly maintained, the vibration emission may differ. This may significantly increase the exposure level over the total working period.
An estimation of the level of exposure to vibration should also take into account the times when the tool is switched off or when it is running but not actually doing the job. This may significantly reduce the exposure level over the total working period.
Identify additional safety measures to protect the operator from the effects of vibration such as: maintain the tool and the accessories, keep the hands warm, organisation of work patterns.
Declaration of Conformity
C
We declare under our sole responsibility that the product described under "Technical Data" is in conformity with all relevant provisions of the directives 2011/65/EU, 2014/30/EU, 2006/42/EC including their amendments and complies with the following standards: EN 60745-1, EN 60745-2-3.
Technical file (2006/42/EC) at:
Robert Bosch GmbH, PT/ETM9,
70764 Leinfelden-Echterdingen, GERMANY
Henk Becker Helmut Heinzelmann
Executive Vice President Head of Product Certification
Engineering PT/ETM9
ppa

Robert Bosch GmbH, Power Tools Division
70764 Leinfelden-Echterdingen, GERMANY
08.12.2014
Assembly
Mounting the Protective Devices
Before any work on the machine itself, pull the mains plug.
Note: After breakage of the grinding disc during operation or damage to the holding fixtures on the protection guard/power tool, the machine must promptly be sent to an after-sales service agent for maintenance. For addresses, see section "After-sales Service and Application Service".
English|21
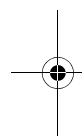
Protection Guard for Grinding
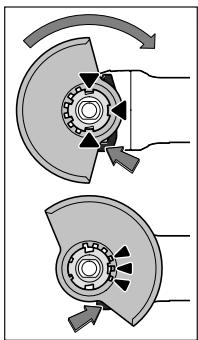
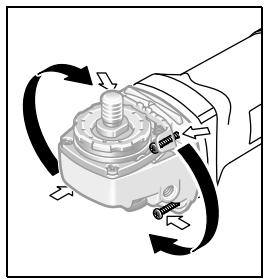
Place the protection guard 7 onto the spindle collar of the machine until the encoding keys of the protection guard agree with the spindle collar. Press and hold the release lever 1 while doing this. Press the protection guard 7 onto the spindle collar until the shoulder of the protection guard is seated against the flange of the machine, and turn the protection guard until it can clearly be heard to engage.
Adjust the position of the protection guard 7 to the requirements of the work process. For this, press the release lever 1 upward and turn the protection guard 7 to the required position.
Always adjust the protection guard 7 in such a manner that all 3 red caps of release lever 1 engage into the corresponding notches of the protection guard 7.
Adjust the protection guard 7 in such a manner that sparking is prevented in the direction of the operator.
The protection guard 7 may be turned only upon actua tion of the release lever 11 Otherwise the power tool may not continue to be used under any circumstances and must be taken to an after-sales service agent.
Note: The encoding keys on the protection guard 7 ensure that only a protection guard that fits the machine type can be mounted.
Protection Guard for Cutting
For cutting with bonded abrasives, always use the protection guard for cutting 12.
Provide for sufficient dust extraction when cutting stone.
The protection guard for cutting 12 is mounted in the same manner as the protection guard for grinding 7.
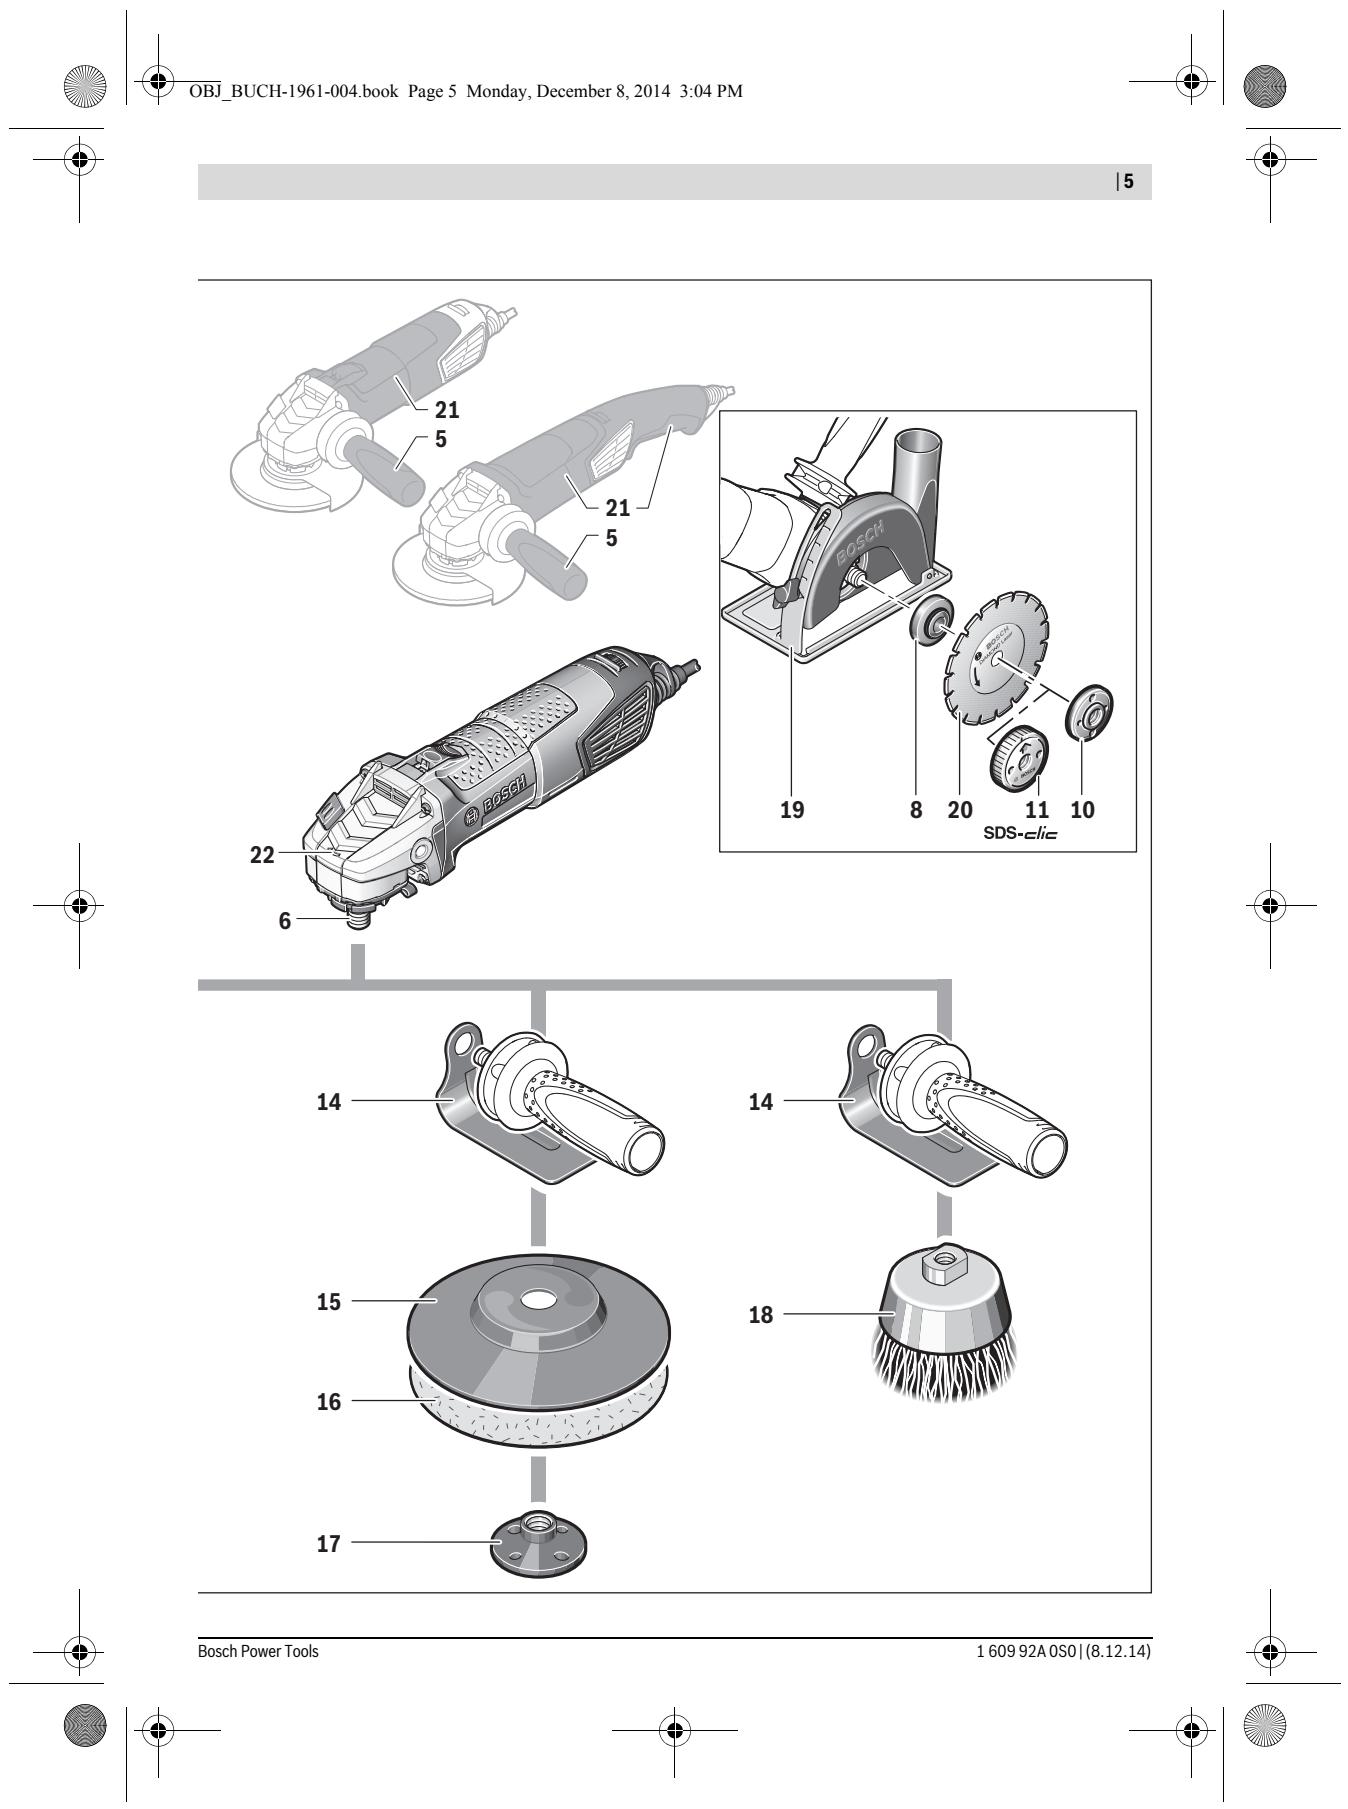
Cutting Guide with Dust Extraction Protection Guard
The cutting guide with dust extraction protection guard 19 is mounted in the same manner as the protection guard for grinding 7.
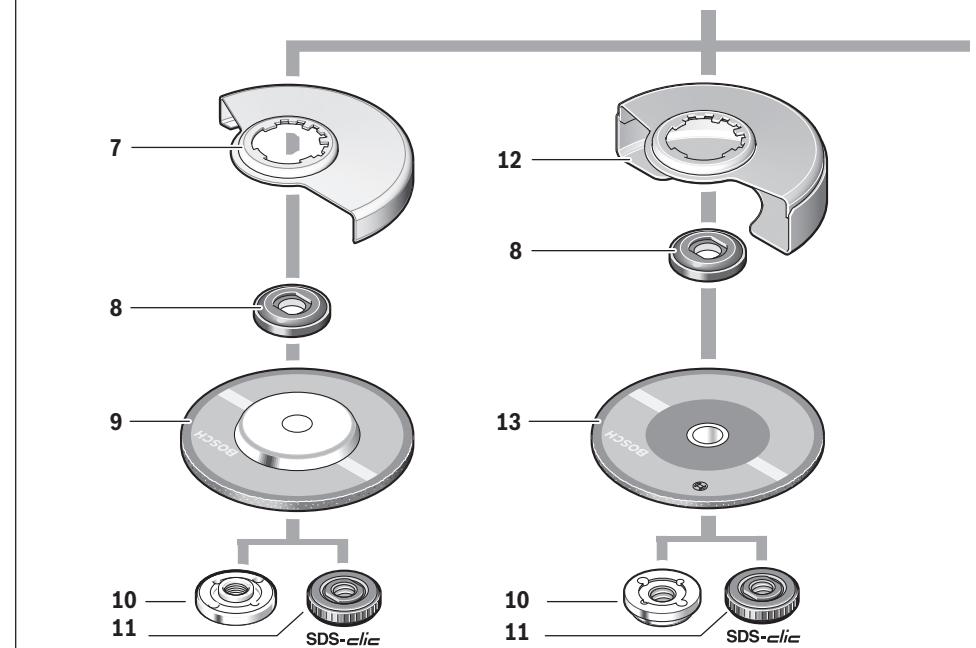
Auxiliary Handle
Operate your machine only with the auxiliary handle 5.
Screw the auxiliary handle 5 on the right or left of the machine head depending on the working method.
Hand Guard
For operations with the rubber sanding plate 15 or with the cup brush/wheel brush/flap disc, always mount the hand guard 14.
The hand guard 14 is fastened with the auxiliary handle 5.
Mounting the Grinding Tools
Before any work on the machine itself, pull the mains plug.
Do not touch grinding and cutting discs before they have cooled down. The discs can become very hot while working.
Clean the grinder spindle 6 and all parts to be mounted.
For clamping and loosening the grinding tools, lock the grinder spindle with the spindle lock button 2.
Actuate the spindle lock button only when the grinder spindle is at a standstill. Otherwise, the machine may become damaged.
Grinding/Cutting Disc
Pay attention to the dimensions of the grinding tools. The mounting hole diameter must fit the mounting flange without play. Do not use reducers or adapters.
When using diamond cutting discs, pay attention that the direction-of-rotation arrow on the diamond cutting disc and the direction of rotation of the machine (see direction-of-rotation arrow on the machine head) agree.
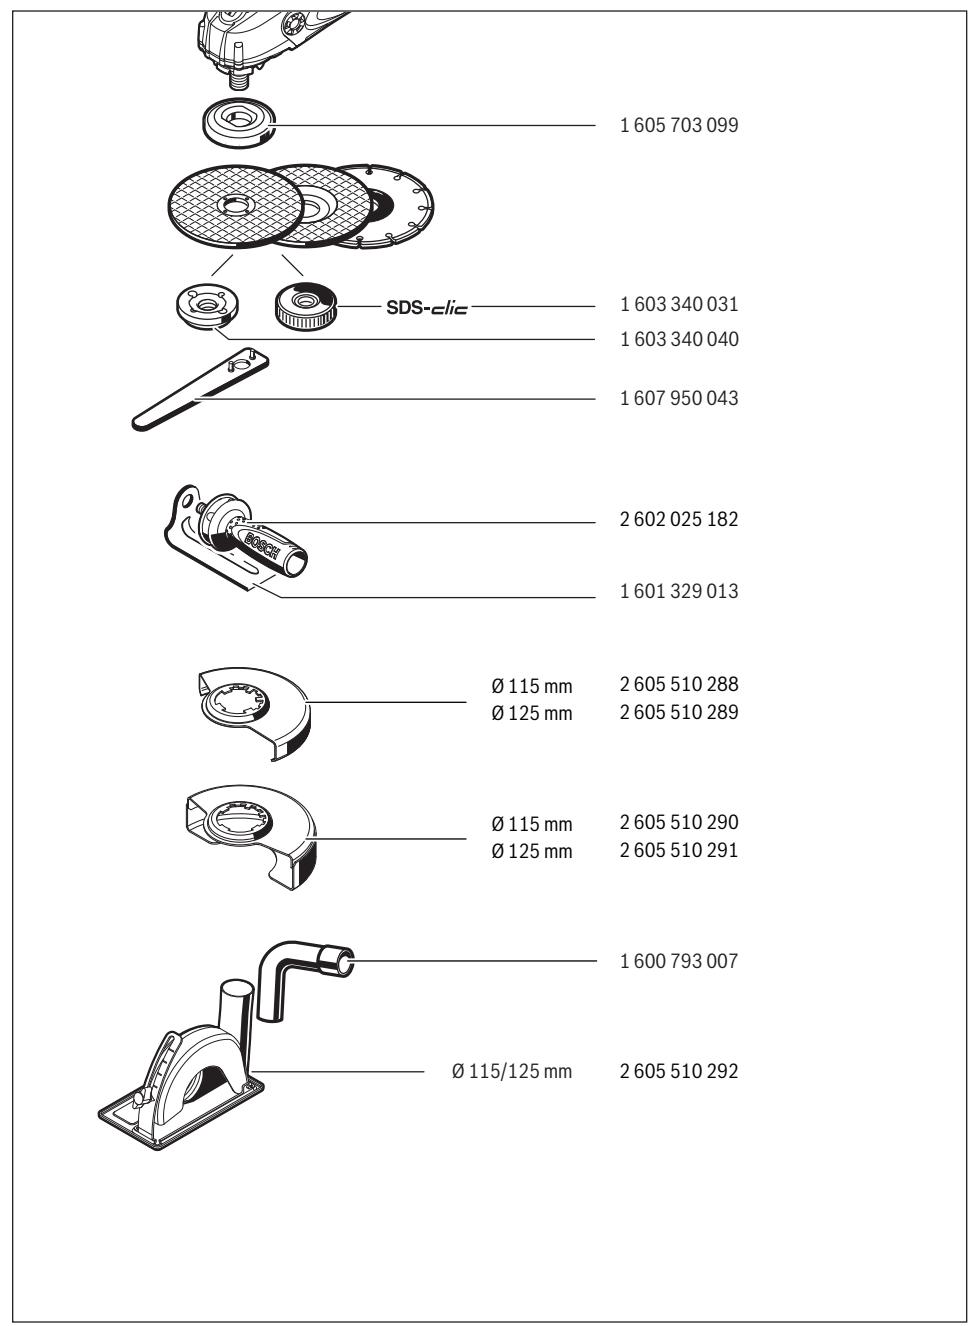
See graphics page for the mounting sequence.
To fasten the grinding/cutting disc, screw on the clamping nut 10 and tighten with the two-hole spanner.
After mounting the grinding tool and before switching on, check that the grinding tool is correctly mounted and that it can turn freely. Make sure that the grinding tool does not graze against the protection guard or other parts.
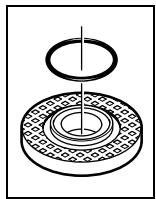
A plastic part (O-ring) is fitted around the centring collar of mounting flange 8. If the O-ring is missing or damaged, the mounting flange 8 must be replaced before resuming operation.
Flap Disc
For operations with the flap disc, always mount the hand guard 14.
Rubber Sanding Plate
For operations with the rubber sanding plate 15, always mount the hand guard 14.
See graphics page for the mounting sequence.
Screw on the round nut 17 and tighten with the two-pin spanner.
Cup Brush/Disc Brush
For operations with the cup brush/wheel brush, always mount the hand guard 14.
See graphics page for the mounting sequence.

22 | English
The cup brush/disc brush must be able to be screwed onto the grinder spindle until it rests firmly against the grinder spindle flange at the end of the grinder spindle threads. Tighten the cup brush/disc brush with an open-end spanner.
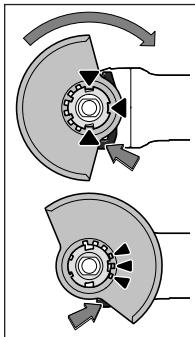
Quick-clamping Nut SDS- liC
For convenient changing of grinding tools without the use of additional tools, you can use the quick-clamping nut 11 instead of the clamping nut 10.
The quick-clamping nut 11 may only be used for cutting discs.
Use only a flawless, undamaged quick-clamping nut 11. When screwing on, pay attention that the side of the quick-clamping nut 11 with printing does not face the grinding disc; the arrow must point to the index mark 22

Lock the grinder spindle with the spindle lock button 2. To tighten the quick-clamping nut, firmly turn the grinding disc in clockwise direction.
A properly attached, undamaged quick-clamping nut can be loosened by hand when turning the knurled ring in anticlockwise direction.
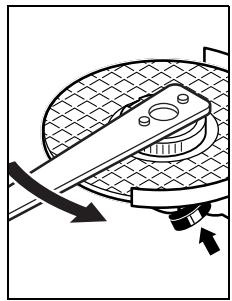
Never loosen a tight quickclamping nut with pliers. Always use the two-pin spanner. Insert the two-pin spanner as shown in the illustration.
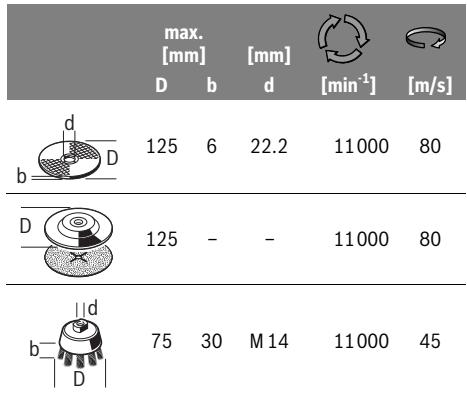
Approved Grinding Tools
All grinding tools mentioned in these operating instructions can be used.
The permissible speed [^-1] or the circumferential speed [m / s] of the grinding tools used must at least match the values given in the table.
Therefore, observe the permissible rotational/circumferential speed on the label of the grinding tool.
Rotating the Machine Head
Before any work on the machine itself, pull the mains plug.
The machine head can be rotated with respect to the machine housing in 90^ steps. In this manner, the On/Off switch can be brought into a more convenient position for special working situations, e.g., for cutting operations using the cutting guide with dust extraction protection guard 19 or for left-handed persons.
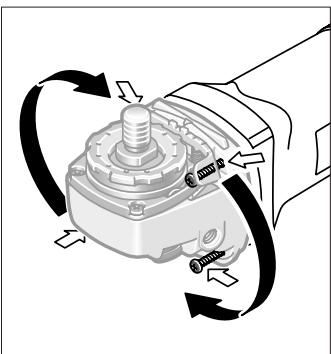
Completely unscrew the four screws. Rotate the machine head carefully, without removing it from the housing, to the new position. Screw in and tighten the four screws again.
Dust/Chip Extraction
- Dusts from materials such as lead-containing coatings, some wood types, minerals and metal can be harmful to one's health. Touching or breathing-in the dusts can cause allergic reactions and/or lead to respiratory infections of the user or bystanders. Certain dusts, such as oak or beech dust, are considered as carcinogenic, especially in connection with wood-treatment additives (chromate, wood preservative). Materials containing asbestos may only be worked by specialists.
- As far as possible, use a dust extraction system suitable for the material.
- Provide for good ventilation of the working place.
- It is recommended to wear a P2 filter-class respirator.
Observe the relevant regulations in your country for the materials to be worked.
Prevent dust accumulation at the workplace. Dusts can easily ignite.


English | 23
Operation
Starting Operation
Observe correct mains voltage! The voltage of the power source must agree with the voltage specified on the nameplate of the machine. Power tools marked with 230V can also be operated with 220V .
When operating the machine with power from mobile generators that do not have sufficient reserve capacity or are not equipped with suitable voltage control with starting current amplification, loss of performance or untypical behavior can occur upon switching on.
Please observe the suitability of the power generator being used, particularly with regard to the mains voltage and frequency.
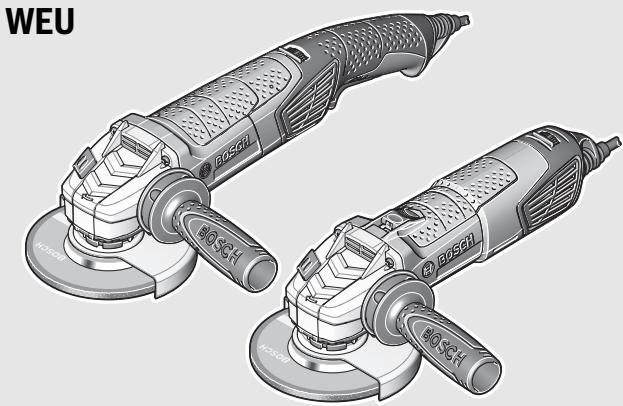
Switching On and Off
PWS 1000... (see figure A)
To start the power tool, push the On/Off switch 3 forwards.
To switch off the machine, release the On/Off switch 3.
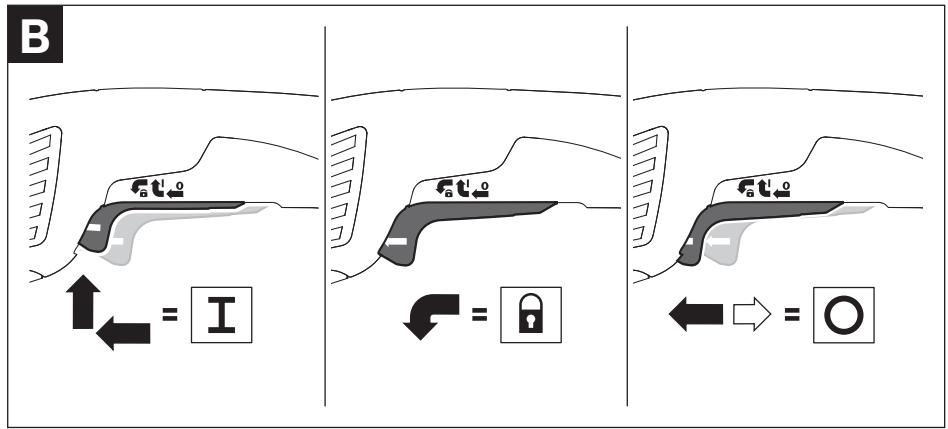
PWS 1300.. (see figure B)
To start the power tool, press the On/Off switch 3 forward and then down.
To lock the On/Off switch 3, press the On/Off switch 3 down at the front until it latches.
To switch off the power tool, release the On/Off switch 3 or, if it is locked, briefly push down the back of the On/Off switch 3 and then release it.
To save energy, only switch the power tool on when using it.
- Check grinding tools before using. The grinding tool must be mounted properly and be able to move freely. Carry out a test run for at least one minute with no load. Do not use damaged, out-of-centre or vibrating grinding tools. Damaged grinding tools can burst and cause injuries.
Kickback stop (PWS 1000-125 CE/PWS 1300-125 CE)

In case of a sudden drop in speed, e.g., caused by a jammed disc while cutting, the power supply to the motor is electronically interrupted.
To restart the operation, switch the On/Off switch 3 to the Off position and start the machine again.
Restarting Protection (PWS 1000-125 CE/ PWS 1300-125 CE)
The restarting protection feature prevents uncontrolled restarting of the machine after an interruption in the power supply.
To restart the operation, switch the On/Off switch 3 to the Off position and start the machine again.
Reduced starting current (PWS 1000-125 CE/ PWS 1300-125 CE)
The electronic reduced starting current limits the power consumption when switching the tool on and enables operation from a 13 ampere fuse.
Note: When the machine runs with full speed after switching on, the reduced starting current, the restarting protection and the kickback stop features have failed. The power tool must promptly be sent to an after-sales service agent for maintenance. For addresses, see Section .After-sales Service and Application Service".
Constant Electronic Control (PWS 1000-125 CE/ PWS 1300-125 CE)
Constant electronic control holds the speed constant at no-load and under load, and ensures uniform working performance.
Speed preselection (PWS 1000-125 CE/PWS 1300-125 CE)
The required speed can be preselected with the thumbwheel 4 (also while running).
The data in the following table are recommended values.
| Material | Application | Accessory | Thumbwheel Position |
| Metal | Removing paint | Sanding disc | 2 - 3 |
| Wood, metal | Brushing, rust removal | Cup brush, sanding disc | 3 |
| Metal, masonry | Grinding | Grinding disc | 4 - 6 |
| Metal | Rough grinding | Grinding disc | 6 |
| Masonry, stone | Cutting | Cutting disc and cutting guide (Cutting masonry/stone is permitted only with use of the cutting guide) | 6 |
Working Advice
Exercise caution when cutting slots in structural walls; see Section "Information on Structures".
- Clamp the workpiece if it does not remain stationary due to its own weight.
Do not strain the machine so heavily that it comes to a standstill.
After heavily straining the power tool, continue to run it at no-load for several minutes to cool down the accessory.
24|English
- Do not touch grinding and cutting discs before they have cooled down. The discs can become very hot while working.
Do not use the power tool with a cut-off stand.
Rough Grinding
Never use a cutting disc for roughing.
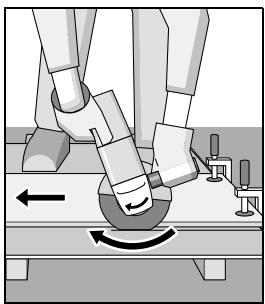
The best roughing results are achieved when setting the machine at an angle of 30^ to 40^ . Move the machine back and forth with moderate pressure. In this manner, the workpiece will not become too hot, does not discolour and no grooves are formed.
Flap Disc
With the flap disc (accessory), curved surfaces and profiles can be worked.
Flap discs have a considerably higher service life, lower noise levels and lower sanding temperatures than conventional sanding sheets.
Cutting Metal
For cutting with bonded abrasives, always use the protection guard for cutting 12.
When cutting, work with moderate feed, adapted to the material being cut. Do not exert pressure onto the cutting disc, tilt or oscillate the machine.
Do not reduce the speed of running down cutting discs by applying sideward pressure.
The machine must always work in an upgrinding motion. Otherwise, the danger exists of it being pushed uncontrolled out of the cut.
When cutting profiles and square bar, it is best to start at the smallest cross section.
Cutting Stone
Provide for sufficient dust extraction when cutting stone.
Wear a dust respirator.
The machine may be used only for dry cutting/grinding.
For cutting stone, it is best to use a diamond cutting disc. When using the cutting guide with dust extraction protection guard 19, the vacuum cleaner must be approved for vacuuming masonry dust. Suitable vacuum cleaners are available from Bosch.

Switch on the machine and place the front part of the cutting guide on the workpiece. Slide the machine with moderate feed, adapted to the material to be worked.
For cutting especially hard material, e. g., concrete with high pebble content, the diamond cutting disc can overheat and become damaged as a result. This is clearly indicated by circular sparking, rotating with the diamond cutting disc. In this case, interrupt the cutting process and allow the diamond cutting disc to cool by running the machine for a short time at maximum speed with no load.
Noticeably decreasing work progress and circular sparking are indications of a diamond cutting disc that has become dull. Briefly cutting into abrasive material (e.g. lime-sand brick) can resharpen the disc again.
Information on Structures
Slots in structural walls are subject to the Standard DIN 1053 Part 1, or country-specific regulations.
These regulations are to be observed under all circumstances. Before beginning work, consult the responsible structural engineer, architect or the construction supervisor.
Maintenance and Service
Maintenance and Cleaning
Before any work on the machine itself, pull the mains plug.
For safe and proper working, always keep the machine and ventilation slots clean.
In extreme conditions, always use dust extraction as far as possible. Blow out ventilation slots frequently and install a portable residual current device (PRCD).
When working metals, conductive dust can settle in the interior of the power tool. The total insulation of the power tool can be impaired.
Please store and handle the accessory(-ies) carefully.
If the replacement of the supply cord is necessary, this has to be done by Bosch or an authorized Bosch service agent in order to avoid a safety hazard.
After-sales Service and Application Service
Our after-sales service responds to your questions concerning maintenance and repair of your product as well as spare parts. Exploded views and information on spare parts can also be found under:
www.bosch-pt.com
Bosch's application service team will gladly answer questions concerning our products and their accessories.


Francais|25
In all correspondence and spare parts order, please always include the 10-digit article number given on the type plate of the machine.
Great Britain
Robert Bosch Ltd. (B.S.C.)
P.O.Box 98
Broadwater Park
North Orbital Road
Denham
Uxbridge
UB 95HJ
At www.bosch-pt.co.uk you can order spare parts or arrange the collection of a product in need of servicing or repair.
Tel. Service: (0344) 7360109
E-Mail: boschservicecentre@bosch.com
Ireland
Origo Ltd.
Unit 23 Magna Drive
Magna Business Park
City West
Dublin 24
Tel. Service: (01) 4666700
Fax: (01) 4666888
Australia, New Zealand and Pacific Islands
Robert Bosch Australia Pty. Ltd.
Power Tools
Locked Bag 66
Clayton South VIC 3169
Customer Contact Center
Inside Australia:
Phone: (01300) 307044
Fax: (01300) 307045
Inside New Zealand:
Phone: (0800) 543353
Fax: (0800) 428570
Outside AU and NZ:
Phone: +61 395415555
www.bosch.com.au
Republic of South Africa
Customer service
Hotline: (011) 6519600
Gauteng - BSC Service Centre
35 Roper Street, New Centre
Johannesburg
Tel.: (011) 4939375
Fax: (011) 4930126
E-Mail: bsctools@icon.co.za
KZN - BSC Service Centre
Unit E, Almar Centre
143 Crompton Street
Pinetown
Tel.: (031) 7012120
Fax: (031) 7012446
E-Mail: bsc.dur@za.bosch.com
Western Cape - BSC Service Centre
Democracy Way, Prosperity Park
Milnerton
Tel.: (021) 5512577
Fax: (021) 5513223
E-Mail: bsc@zsd.co.za
Bosch Headquarters
Midrand, Gauteng
Tel.: (011) 6519600
Fax: (011) 6519880
E-Mail: rbsa-hq.pts@za.bosch.com
Disposal
The machine, accessories and packaging should be sorted for environmental-friendly recycling.
Do not dispose of power tools into household waste!
Only for EC countries:

According to the European Directive 2012/19/EU for Waste Electrical and Electronic Equipment and its implementation into national right, power tools that are no longer usable must be collected separately and disposed of in an environmentally correct manner.
Subject to change without notice.
Français
Henk Becker
Executive Vice President
Engineering
Helmut Heinzelmann
Head of Product Certification
PT/ETM9

Robert Bosch GmbH, Power Tools Division 70764 Leinfelden-Echterdingen, GERMANY 08.12.2014
Montage
Robert Bosch (France) S.A.S.
Henk Becker Helmut Heinzelmann
Executive Vice President Head of Product Certification
Engineering PT/ETM9

Robert Bosch GmbH, Power Tools Division 70764 Leinfelden-Echterdingen, GERMANY 08.12.2014
Montaje
Executive Vice President
Engineering
Helmut Heinzelmann
Head of Product Certification
PT/ETM9


i. V. h = ml
Robert Bosch GmbH, Power Tools Division
70764 Leinfelden-Echterdingen, GERMANY
08.12.2014
Montagem
Executive Vice President Engineering
Helmut Heinzelmann
Head of Product Certification PT/ETM9

Robert Bosch GmbH, Power Tools Division 70764 Leinfelden-Echterdingen, GERMANY 08.12.2014
Montaggio
Executive Vice President Engineering
Head of Product Certification
PT/ETM9


i. V. h = ml _____
Robert Bosch GmbH, Power Tools Division
70764 Leinfelden-Echterdingen, GERMANY
08.12.2014
Montage
Snelspanmoer SDS-clic
Executive Vice President Engineering
Helmut Heinzelmann
Head of Product Certification PT/ETM9


Robert Bosch GmbH, Power Tools Division 70764 Leinfelden-Echterdingen, GERMANY 08.12.2014
Montering
Bosch Service Center
Telegrafvej 3
2750 Ballerup
På www.bosch-pt.dkkan der online bestillesreservedeleller oprettes en reparations ordre.
TIf. Service Center: 44898855
Fax: 44898755
E-Mail: vaerktoej@dk.bosch.com
Bortskaffelse
Henk Becker
Executive Vice President
Engineering
Helmut Heinzelmann
Head of Product Certification
PT/ETM9
f^ ( x) = 2x - 1 > 0
Robert Bosch GmbH, Power Tools Division 70764 Leinfelden-Echterdingen, GERMANY 08.12.2014
Montage
Bosch Service Center
Telegrafvej 3
2750 Ballerup
Danmark
Tel.: (08) 7501820 (inom Sverige)
Fax: (011) 187691
Avfallshantering
Executive Vice President
Head of Product Certification
Engineering
PT/ETM9
ppa

i.v. h : w
Robert Bosch GmbH, Power Tools Division
70764 Leinfelden-Echterdingen, GERMANY
08.12.2014
Montering
Executive Vice President
Head of Product Certification
Engineering
PT/ETM9


i. V. h = mh
Robert Bosch GmbH, Power Tools Division
70764 Leinfelden-Echterdingen, GERMANY
08.12.2014
Asennus
Henk Becker
Executive Vice President
Engineering
Helmut Heinzelmann
Head of Product Certification
PT/ETM9

Robert Bosch GmbH, Power Tools Division 70764 Leinfelden-Echterdingen, GERMANY 08.12.2014
Euvaopoloynon
Uvapuoloyon tow npoatauteukow diataeew
ByaTeTo oic ano tyn npia npiv ano onoiadnote epyaio stno nektpko epyaleio.
Ynobet: _e nepintwnoukata ndiapkeia tnc epyaiaic onaoei o diaokoc leavanc n uanoouv Balaon biotaec unoboxnic oovnpauaktipra/ot neekpkiopoeayaleo, toe tonekpkiopoeyaleio npenei va npookoiatei/aonoataei aueooc otO Service. Tia tic oxetikc dieuovuaeic bIene to kepaiaio "Service knapoxnoubouawxpnjoc
Tpopuakrtipac yia leiavon
OeTe Tov npopuAakTnpa 7 enAvw
atnu uno0do nTo nAekptkoepyav
leio, mepiTa Kwokikonoiuva EK
keVtpa Tov npoUakTnpa va taiaipdou akiBoc nTu uno0do.
Ipaalna va natnoete kai va
kpatnoete natnEvo to nKnpto
anouavdaownc 1.
Tate Tov npoUakTnpa 7
enAvw oTo Aauo Tou aOva mepxvi
va kaioei enAvw oTo neplaiaio
Tou npoUakTnpa otn pAavntca
kai yupitote Tov mEoxv akouocte
ot avdaowae.
PpooapuoTe Tg oen Tou npoopuaakTnpa 7 OTC anaiitnaeic TnC ouo kteaeon epyaiaac. I' auto natIto To O ao anouavdaawanc 1 npoc ta enavw ka yupiatoe Tov npoopuaakTnpa 7 Otn θoennou emtBupeir.
NapuuicTeTovnpoouaaktnpa7navtoeKataTeioTo pno,6ote ka ta 3 Kokkiva ekkvtpa Tou oXloa anoPavdaawoc 1va aopalizouv otacaviroxec ykonoc Tou npoouaiktnpa 7.
Puθμiote Tov npoouakrtipa 7 katé tetoio trono, wotε va kalunter to anivnpiou nou kateuθüvetaipoc to xειρπη.
O npopulaktnpac 7 npenei va mnpoei va yupiate i movo metao ano natma tou oxloou anoauv6dawongc 1!Aiaopoetka to nAektpko epyaleio dev emtpenetai va xpanoonoi9ei naov kaipenei va anoatalei/va npookiotei oTo Service.
Ynobet: Ta eKkveTpa KwikoToinanCOTV npOpulakTnpa 7 eHtpeouv Tn ouvapoloyanTo nEeKTpIcO epyaleio mvo npOpulakTnpv Nau taipiaQovu auto.
Tpoopulakrtipac yia komi
Tia nV konn me oTepea mea aeavon vX npouponoiie- te naVtoTE TPOPOUAKTjpa konnc 12.
Tia Tny konni ntpwpatw npenei va oovtioge yia ma enapki avappoqonokovnic.
O npopuakntpa yia kon1 12 ouvapmooyeirai onw o npoqulaakrtpac yia leiavon7.
KaIuμa avappoΦnOc yia koni μe uopouvo oBnyo
To kaluuma avappopnnc yia koni me oupoemeo obny 19 ouvapouoloyeiir onoc npoupaakrtpac yia leiavon 7.
Tpoo0eTe n aβn
Xpnouponoeite to nAekptko epyaieo navtotee ouvapuoloynevtn npoo0etn laib 5.
Uvaupoloyote nnpo0etn la9 5, avaloya me tov ekatoTe Tpno epyaiaac, ot n dei nTv apotepn nleupa Tnc KcpaanCtou oumnEketn.
Tpoopulaktnipacxepiou
Tia oLec tic epyaoie c me Toe aatao biao aeiaovc 15 n te tvn notpoeiobouptra/tn biocoeiobouptra/ to pioideoh biao aeiaovcn peene va xnpouonoeite na vtove npopuakntpa xepoiu 14.
Suvapoloyntov npoapakntpa xepiou 14 me tnv npooTe Tn laBn 5.
EuvaipoloyonTovLeavtikwEpyaleiw
ByaceTo pic ano ntv npia npiv ano onoiabnnotepyaoia oTo nlektpko epyaieio.
Na mivte tou diokouc AiaovnKai KOTnPvKpuoouv. KaTmepyaoi ot diokoi eepaivovtun unepBoLkA.
Na kaapizetov aEova 6 kai ola ta uno ouvapoloynoeapntmuata.
Tia va umopoeetva ophieteta kai/na luocetata Eaivtka epaiae iakvtonoate to dova natwta to nAkpovavdoanc dvo2.
Euvrponon kal Service
Suvrtnponkai kaogapiao
ByaceTo pica ano npia npiv ano onoiadnoTe eyaia oTnlektpko epyaleio.
IatnpieTe to nleKtpko epyaleio kai Tc oxiaoue aepi- oou kathetapec yia va mnpoeite v eaoyaceo kala kai aoqaaoc.
Ynó akpáiec ouvθηkec εργαoiac v xρησηοιeite kata to duvaro μia avappófnan okovnic. Kaθapiετe TAKTUK tix αομεc aepiouo με πεπειδe oéqai kauvδeoté evav npoataeutuk diakɔŋt diapopoic (PRCD). Kata tvn katepyaia metalawu mopei va katakaθeiaywynm okovn stoe wotepkou tou nλektpkou epyaileiou. Eta mopei va enpeaotei avpntikn npooatauteukn mʊwnon ngktpkou epyaileiou.
Na anoynkeuete kai va metaxeipizote ra eapntmuatae enmu-
Mia tuxov avaykaia avtikataaon tou nAektpko Kaawdiou npenei va dieXeOei ano tvn Bosch n ao eva ecuaio6otmu evo kaatadna Service TNC Bosch, ia va anopoeuxei taKaBdivduveuoiac
Service kal npoxn oupbouaw xphanc
To Service anavta otic eupntoaeocac octikae t ne tvn eiokeun kai tn ouvtipnan tou npoiovoc aoc kaowc yia ta katalna avtaalaktika:
www.bosch-pt.com
H oába napoxhç ououboulwv tc Bosch anavr éuxapiotwc otic epwtneic aac oxetiká μe ta npoiovta mac kai ta avtala-ktkà touc.
'Otavzntate diaaaopnTikc nInpoopiec kaowkai otavnapayyelvet e avtalaktnka npetie va avapepete onoobhnoote to 10uipao apotuo eupertoiou nou avaypapetai otnivakida kataokaouaon.
EAAaδa
Robert Bosch A.E.
Epxia 37
19400Kopwni-Aθηγα
Tnλ.: 2105701258
Φaξ:2105701283
www.bosch.com
www.bosch-pt.gr
ABZ Service A.E
Tnλ: 2105701380
Φaξ: 2105701607
Anoupon
Ta nλeKtpiεpyαIεia, Ta εApTημata kai ooukeuaoic npéπi va avakukawovtai me tpno φιλικο πoε, to nepiβaλov.
Mny pivvete Ta nAekptika epyaaleia oTa anoppimuata tou oniou aoc!
Móvo yia xópeç tnc EE:

Tnpoue to dikaiwma aalaywv.


160992A0S0|(8.12.14)
Bosch Power Tools


Türkce | 125
Türkce
Güvenlik Talimatu
Elektrikl El Aletleri icin Genel Uyari Talimatu
Executive Vice President
Head of Product Certification
Engineering
PT/ETM9


Robert Bosch GmbH, Power Tools Division
70764 Leinfelden-Echterdingen, GERMANY
08.12.2014
Montaj
Bosch San. ve Tic. A.S.
Ahi Evran Cad. No:1 Kat:22
Polaris Plaza
80670 Maslak/Istanbul
BoschUzmanEkibi +90 (0212)3671888
Isiklar LTD. STI
Kizilay Cad. No: 16/C Seyhan
Adana
Tel.: 0322 3599710
Tel.: 0322 3591379
J 1
J J
J J
J J
J J
J J
J J
J J
J J
J J
J J
J J
J J
J J
J J
J J
J J
J J
J J
J J
J J
J J
J J
J J
J J
J J
J J
J J
J J
J J
J J
J J
J J
J J
J J
山
ooJU JooJooJooJooJooJooJoo
JUULI 10000000000000000000000000000000000000000000
L
3.1ablgjuswll eldo jy juswll oIc! JJ
.5j 0o aui jySsI oessl Jaw jabxg
J
(PWS 1000-125 CE/PWS 1300-125 CE)
Jiwi ic ojdl s jgjSJI JI JJJ
16 16
aJgJy aJyJgJy 0sJy J:aldo
LJI JIJI JIJI JJIJIJIJIJIJIJIJIJIJIJIJIJIJIJIJIJIJIJIJIJIJIJIJIJIJIJIJIJIJIJIJIJIJIJIJIJIJIJIJIJIJIJIJIJIJIJIJIJIJIJIJIJIJIJIJIJIJIJIJIJIJIJIJIJIJIJIJIJIJIJIJIJIJIJIJIJIJIJIJIJIJIJIJIJIJIJIJIJIJIJIJIJIJIJIJIJIJIJIJIJ
aJzJxI Ldoal Iab! ojeig g Jzill OlaIg
do jSjo Jl aJySL oJL wj jU .all20
oJgwoogjUjllaoaOjaJIg:JgliJI.LjgeJUjJI
- p 2. a
jg jkJl k
(PWS 1000-125 CE/PWS 1300-125 CE)
a a a a a a a a a a a a a a a a a a a a a a a a a a a
oLoo u c U Lao Jg oJdoJU 1
Jsi
Lw 8g p dssuill jjgl Jgolla ool jy
JJIJIJIJIJJIG
abg
(AaJJI Jj)PWS 1000..
山
3.10a2g
3labguluuljuyuiyJl oJl labx
(B oJgJl gJ) PWS 1300..
J 3 13
ao sao 3labg lalwll elao wul o .gawu uJl Jowu 3labg wul elao
juiu elao u juy auiyj 1 o 1o! 10 10 10 10 10 10 10 10
3 10
JooLgOssuWloicbogaJUqSll oos Jsw
aJbJI μgj
JgSj Jb y 1sssssssssssssssss
JooSooIgpoLwUSSuJoEulill 5sc
a aJ 1 k Jlsw .jgJ
J 4 a a a a a a a a a a a a a a a a a a a a a a
1g2gao gjocjueaayllaaillgogskallogall j
| gδδδδδδδδδδδδδδδδδδδδδδδδδδδδδδδδδδδδδδδδδδδδδδδδδδδδδδδδδδδδδδδδδδδδδδδδδδδδδδδδδδδδδδδδδδδδδδδδδδδδ | |
| 2-3 | δδδδδδδδδδδδδδδδδδδδδδδδδδδδδδδδδδδδδδδδδδδδδδδδδδδδδδδδδδδδδδδδδδδδδδδδδδδδδδδδδδδδδδδδδδδδδδδδδδδ δ |
| 3 | δδδδδδδδδδδδδδδδδδδδδδδδδδδδδδδδδδδδδδδδδδδδδδδδδδδδδδδδδδδδδδδδδδδδδδδδδδδδδδδδδδδδδδδδδδδδδδδδδ |
| 4-6 | δδδδδδδδδδδδδδδδδδδδδδδδδδδδδδδδδδδδδδδδδδδδδδδδδδδδδδδδδδδδδδδδδδδδδδδδδδδδδδδδδδδδδδ |
| 6 | δδδδδδδδδδδδδδδδδδδδδδδδδδδδδδδδδδδδ |
| 6 | δδδδδδδδδδδδδδδδδδδδδδδδδδ |
| [الbvط/مُّل] | [الbvط/مُّل] | d | b | D |
| 80 | 11000 | 22,2 | 6 | 125 |
| 80 | 11000 | - | - | 125 |
| 45 | 11000 | M 14 | 30 | 75 |
w gJU W
山 auiuui uuiuui uuuuui uuuuui uuuuui uuuuui uuuuui uuuuui uuuuui uuuuui uuuuui uuuuui uuuuui uuuuui uuuuui uuuuui uuuuui uuuuui uuuuui uuuuui uuuuui uuuuui uuuuui uuuuui uuuuui uuuuui uuuuui u
aI I Jg jg 90° g aagj kJg Jg Jg Jg Jg Jg Jg Jg Jg Jg Jg Jg Jg Jg Jg Jg Jg Jg Jg Jg Jg Jg Jg Jg Jg Jg Jg Jg Jg Jg Jg Jg Jg Jg Jg Jg Jg Jg Jg Jg Jg Jg Jg Jg Jg Jg Jg Jg Jg Jg Jg
aagill jLggo gabll Jnfo bawll
19 aagill jggo boll jnlo bawll uocu pi
.7aIgllbcsjaoi
glx|
.5
gJ 5 Jdo
Uw9jU WJ JUW
| 1300-125 CE | 1000-125 CE | 1000-115/1000-125 | PWS ... | ägjä |
| ● | ● | - | الBLEVVبُّلْرْهُمُ بَدْيرِبْهُمُ مَّادِيَفَسَنْمُ لَعَلْدْهُمُ | |
| ● | ● | - | الBLEVVبُّلْرْهُمُ بَدْيرِبْهُمُ لَعَلْدْهُمُ | |
| ● | ● | - | الBLEVVبُّلْرْهُمُ بَدْيرِبْهُمُ | |
| ● | ● | - | الBLEVVبُّلْرْهُمُ bَدْيرِبْهُمُ | |
| 2,4 | 2,1 | 2,2 | §§ | EPTA-Procedure 01/2003 مَّهُمُ بَعْدْهُمُ |
| 2,4 | 2,1 | 2,2 | §§ | الBLEVVبُّلْرْهُمُ بَعْدْهُمُ |
| □/II | □/II | □/II | الBLEVVبُّلْرْهُمُ |
Uljjjjg jc Ulog
| 1300-125 CE | 1000-125 CE | 1000-115/1000-125 | PWS ... | الإستعمال مصطفى بعبيال ححيات | |
| CA2 9.. | CA2 8.. | CA2 6.. | 3 603 ... | ||
| 93 | 90 | 90 | (A)سُبْير | الإستعمال مصطفى بعبيال ححيات | |
| 104 | 101 | 100 | (A)سُبْير | الإستعمال مصطفى بعبيال ححيات | |
| 3 | 3 | 3 | دَسَبْير | K üglaَل!دَسَبْير!دَسَبْير!دَسَبْير!دَسَبْير!دَسَبْير!دَسَبْير!دَسَبْير!دَسَبْير!دَسَبْير!دَسَبْير!دَسَبْير!دَسَبْير!دَسَبْير!دَمَسَبْل!دَسَبْير!دَسَبْير!دَسَبْير!دَسَبْير!دَسَبْير!دَسَبْير!دَسَبْير!دَسَبْير!دَسَبْير!دَسَبْير!دَسَبْير!دَسَبْير!دِسَبْير!دَسَبْير!دَسَبْير!دَسَبْير!دَسَبْير!دَسَبْير!دَسَبْير!دَسَبْير!دَسَبْير!دَسَبْير!دَسَبْير!دَسَبْير!دَسَبَل!دَسَبْير!دَسَبْير!دَسَبْير!دَسَبْير!دَسَبْير!دَسَبْير!دَسَبْير!دَسَبْير!دَسَبْير!دَسَبْير!دَسَبْير!دَسَبْير!dَسَبْير!dَسَبْير!dَسَبْير!dَسَبْير!dَسَبْير!dَسَبْير!dَسَبْير!dَسَبْير!dَسَبْير!dَسَبْير!dَسَبْير!dَسَبْير!dَسَزَر!دَسَزَر!dَسَزَر!dَسَزَر!dَسَزَر!dَسَزَر!dَسَزَر!dَسَزَر!d·سَزَر!d·سَزَر!d·سَزَر!d·سَزَر!d·سَزَر!d·سَزَر!d·سَزَر!d·سَزَر!d·سَزَر!d·سَزَر!d·سَزَر!d·سَزَر!d·سَزِر!d·سَزَر!d·سَزَر!d·سَزَر!d·سَزَر!d·سَزَر!d·سَزَر!d·سَزَر!d·سَزَر!d·سَزَر!d·سَزَر!d·سَزَر!d·سَزَر!d・سَزَر!d・سَزَر!d・سَزَر!d・سَزَر!d・سَزَر!d・سَزَر!d・سَزَر!d・سَزَر!d・سَزَر!d・سَزَر!d・سَزَر!d・سَزَر!d・سَزِر!d・سَزَر!d・سَزَر!d・سَزَر!d・سَزَر!d・سَزَر!d・سَزَر!d・سَزَر!d・سَزَر!d・سَزَر!d・سَزَر!d・سَزَر!d・سَزَر!d·سَزَر!d·سَزَر!d·سَزَر!d·سَزَر!d·سَزَر!d·سَزَر!d·سَزَر!d·سَزَر!d·سَزَر!d·سَزَر!d·سَزَر!d·سَز—"مصطفى مصطفى مصطفى مصطفى مصطفى مصطفى مص TFT" | |
| 13,0 | 8,0 | 7,0 | \( ^{2} \)l/ρ | ah | |
| 1,5 | 1,5 | 1,5 | \( ^{2} \)l/ρ | K | |
| 6,0 | 5,0 | 5,0 | \( ^{2} \)l/ρ | :الإستعمال مص TFTg | |
| 1,5 | 1,5 | 1,5 | \( ^{2} \)l/ρ | ah | |

ggl
Jg j 1 aai Jl lglg g o Lj 1 1 1 1 1 1 1 1 1 1
UaJgJy aJL
2006/42/EC .2014/30/EU .2011/65/EU
Executive Vice President Head of Product Certification
Engineering
PT/ETM9

i. V. h = m _____
Robert Bosch GmbH, Power Tools Division
70764 Leinfelden-Echterdingen, GERMANY
JU 1JJJJU JU JU UUUU UUUUUUUUUUUUUUUUUUUUUUUUUUUUUUUUUUUUUUUUUUUUUUUUUUUUUUUUUUUUUUUUUUUUUUUUUUUUUUUUUUUUUUUUUUUUUUUUUUUUUUUUUUUUUUUUUUUUUUUUUUUUUUUUUUUUUUUUUUUUUUUUUUUUUUUUUUUUUUUUUUUUUUUUUUUUUuuuuuuuuuuuuuuuuuuuuuuuuuuuuuuuuuuuuuuuuuuuuuuuuuuuuuuuuuuuuuuuuuuuuuuuuuuuuuuuuuuuuuuuuuuuuuuuuuuuuuuuuuuuuuuuuuuuuuuuuuuuuuuuuuuuuuuuuuuuuuuuuuuuuuuuuuuuuuuuuuuuuuuuuuuuuuuuuuuuuuuuuuuuuuuuuuuuuuuuu uu
aJoo Joo ooo ooo oo ooo
a9.1jIgXl gsiu cali 69, a9smu ail yg Jku jauill ojg lgb ujjll jy
-2g
Ssui jiljuiu ooi uoai uo aai laS
g jgljglqlaablyllgololpo yu 100000000000000000000000000000000000000000
Joo 10000000000000000000000000000000000000000000000000
JzU|Sxg auiyLl oaiu:lu,uijui
Jauill Ujuaauiuug uusulaiq
aagaaagaaagaaagaaagaaagaaagaaagaaagaaagaaagaaagaaagaaagaaagaaagaaagaaagaaagaaagaaagaaagaaagaaagaaagaaagaaagaaagaaagaaagaaagaaagaaagaaagaaagaaagaaagaaagaaagaaagaaagaaagaaagaaagaaagaaagaaagaaagaaagaaagaaagaaa
aagawal jolal sgc Juaiky
oJgaaJI|j
auiuieo 10gwwjll jaii
aabaaill gogll aao 0gagall
aIagJI UJUgJI 1
jIgJlJgoo Cwjj 2
Labylguswulzliao 3
Laoo jlgjll sbc bdo alsc 4
(PWS 1000-125 CE/PWS 1300-125 CE)
(ugjoo yaoJI abw) glo! yao 5
6
aLg 7
Jog aaW 8
9
awdgo10
*SDS-e.li.e 11
*b0aU aLg 11bc 12
* 13
*Jll aGg1g 14
* 15
*0jai11 16
*oJusuo ugoLo 17
*a#dolulowjll 18
*aiggul ugo gboal baw 19
* wJXJI gBJI J 20
(ugjooa) 21
Jg 22
g o g gglgll l 1y jg jlbj a
gill liolj g aolJgill jgogll
a#lo! jzj lae
aolgljla jJl

aabla colo la aaiyjglll jgs Jg 100 g u yu yu yu yu yu yu yu yu yu yu yu yu yu yu yu yu yu yu yu yu yu yu yu yu yu yu yu yu yu yu yu yu yu yu yu yu yu yu yu yu yu yu yu yu yu yu yu yu yu yu y
J Lg Jg Jg Jg Jg Jg Jg Jg Jg Jg Jg Jg Jg Jg Jg Jg Jg Jg Jg Jg Jg Jg Jg Jg Jg Jg Jg Jg Jg Jg Jg Jg Jg Jg Jg Jg Jg Jg Jg Jg Jg Jg Jg Jg Jg Jg Jg Jg Jg Jg Jg
g“aBglgbll" sic 1s kwh wJdA aag gglgdln lglgglgglgglgglgglgglgglgglgglgglgglgglgglgglgglgglgglgglgglgglgglgglgglgglgglgglgglgglgglgglgglgglgglgglgglgglgglgglgglgglgglgglgglgglgglgglgglgglgglggl
a a a a a a a a a a a a a a a a a a a a a a a a a a a a a a a a a a a a a a a a a a a a a a a a a a a a a a a a a a a a a
a a a a a a a a a a a a a a a a a a a a a a a a a a a a a a a a a a a a a a a a a a a a a a a a a a a a a a a a a a a a a a a a a
aiaol aIgU Ibc oIgaiI Jn oJ L 1
jz jy d .aJssll oJzJI AwoLoo n
Jog lqlc jlsjxl bao Ula Jo aasall g aotlal
.ajsJALI JpI Ula
a a a a a a a a a a a a a a a a a a a a a a a a a a a a a a a a a a a a a a a a a a a a a a a a a a a a a a a a a a
gagagagagagagagagagagagagagagagagagagagagagagagagagagagagagagagagagagagagagagagagagagagagagagagagagagagagagagagagagagagagagagagagagagagagagagagagagagagagagagagagagagagagagagagagagagag
Jlaiil gI auijijll Jaii I Jai pssw K 111111111111111111111111111111111111111
gllg lallaaolol
a aasaaal lglll gabg dawl
aaaalagglbcbg 0dyljgkll
aallgoln cbsn kss 2.0dglalqll oal
LJyblaylgjll oed jusnn jll
aioljcg,als
JbBbBabwBbBbBbBbBbBbBbBbBbBbBbBbBbBbBbBbBbBbBbBbBbBbBbBbBbBbBbBbBbBbBbBbBbBbBbBbBbBbBbBbBbBbBbBbBbBbBbBbBbBbBc. 10000000000000000000000000000000000000000000000000000000000000000000000000000
JLsWbBpSdAaLgGlaI JJIbgiNnnsell Aagglalols aLg g JIaLgll Eglgoggrll Sic JIaIg 1uJg0gglgJlAggawag Igg aIg biNn.aaqdlsggclc ic iIi yIyIyIyIyIyIyIyIyIyIyIyIyIyIyIyIyIyIyIyIyIyIyIyIyIyIyIyIyIyIyIyIyIyIyIyIyIyIyIyIyIyIyIy
aafwllacg jnoj no jnnaia J aaii I 10000000000000000000000000000000000000000000000000000000000000000000000
Jg 1000000000000000000000000000000000000000000000000000000000000000000000000000000
Jg jgljIg jIg Jg Jg Jg Jg Jg Jg Jg Jg Jg Jg Jg Jg Jg Jg Jg Jg Jg Jg Jg Jg Jg Jg Jg Jg Jg Jg Jg Jg Jg Jg Jg Jg Jg Jg Jg Jg Jg Jg Jg Jg Jg Jg Jg Jg Jg Jg Jg Jg Jg Jg
JL JI JI JI JI JI JI JI JI JI JI JI JI JI JI JI JI JI JI JI JI JI JI JI JI JI JI JI JI JI JI JI JI JI JI JI JI JI JI JI JI JI JI JI JI JI JI JI JI JI JI J1
gall jn a jy ma yjy kll o dll pddw 0 .d uuul l l jy uu u .glall ay laI. gall
yj yj yj yj yj yj yj yj yj yj yj yj yj yj yj yj yj yj yj yj yj yj yj yj yj yj yj yj yj yj yj yj yj yj yj yj yj yj yj yj yj yj yj yj yj yj yj yj yj yj yj
Lg a aallll lgllll 12 o jgc yag aaiy dlaaia Ld A. gaiiial gaiiaaiia ojlgdlg iie .gaiiaaiiaolwajgaiiaaiiauas S gaiisaiiaaiia gaiisaiiaaiia gaiisaiiaaiia gaiisaiiaaiia gaiisaiiaaiia gaiisaiiaaiia gaiisaiiaaiia gaiisaiiaaiia gaiisaiiaaiia gaiisaiiaaiia gaiisaiiaaiia gaiisaiiaaiia gaiisaiiaaiia gaiisaiiaaiia gaiisaiiaaiia gailgaiiigaiiagaiiagaiiagaiiagaiiagaiiagaiiagaiiagaiiagaiiagaiiagaiiagaiiagaiiagaiiagaiiagaiiagaiiagaiiagaiiagaiiagaiiagaiiagaiiagaiiagaiiagaiiagaiiagaiiagaiiagaiiagaiiagaiiagaiiag
scl j. oIgabblsslglbfa
aIyIaIyIaIyIaIyIaIyIaIyIaIyIaIyIaIyIaIyIaIyIaIyIaIyIaIyIaIyIaIyIaIyIaIyIaIyIaIyIaIyIaIyIaIyIaIyIaIyIaIy


JolsswI p2y 2 yll auiuuiuuiuuiuuiuauai I JdSsI JUa uuc Jusu J UauiuuiuuiuuiuuiuuiuuiuuiuuiuuiuuiuuiuuiuuiuuiuuiuuiuuiuuiuuiuuiuuiuuiuuiuuiuuiuuiuuiuuiuuiuuiuuiuuiuuiuuiuuiuuiuuiuuiuuiuuiuuiuuiuuiuuiuuiuuiuuiuuiuuiuuiuuuuuuuuuuuuuuuuuuuuuuuuuuuuuuuuuuuuuuuuuuuuuuuuuuuuuuuuuuuuuuuuuuuuuuuuuuuuuuuuuuuuuuuuuuuuuuuuuuuuuuuuuuuuuuuuuuuuuuuuuuuuuuuuuuuuuuuuuuuuuuuuuuuuuuuuuuuuuuuuuuuuuuuuuuuuuuuuuuuuuuUU
Lac J. j. j. j. j. j. j. j. j. j. j. j. j. j. j. j. j. j. j. j. j. j. j. j. j. j. j. j. j. j. j. j. j. j. j. j. j. j. j. j. j. j. j. j. j. j. j. j. j. j. j. J 1 1 1 1 1 1 1 1 1 1 1 1 1 1 1 1 1 1 1 1 1 1 1 1 1 1 1 1 1 1 1 1 1 1 1 1 1 1 1 1 1 1 1 1 1 1
J
Jl
aui jss sss aolc ajjd tla
.aaalgag aJdJUJI JgJl
U 111111111111111111111111111111111111111
A
-
aaiiill "auiyjssll" aibn baaiaa i 100gall auiyjssll sddii auiyjssll t aiaai lai g (auiyjssll aaiu u) auiyjssll .auiyjssll aaiu u (jgs) poyo g joi
Joo
a a a a a a a a a a a a a a a a a a a a a a a a a a a a a a a a a a a a a a a a a a a a a a a a a a a a a a a a a a a a a a a a
Lg 10000000000000000000000000000000000000000000000000000000000000000
sJ.ugbIgI JbOJIe aUjSJOJdJ 1 JSLIJI JyWJnJ aUjSJOLOJJ 2 .uJySJOJ
aJyjSJI 0e JI Jn Jn Jn Jn Jn Jn Jn Jn Jn Jn Jn Jn Jn Jn Jn Jn Jn Jn Jn Jn Jn Jn Jn Jn Jn Jn Jn Jn Jn Jn Jn Jn Jn Jn Jn Jn Jn Jn Jn Jn Jn Jn Jn Jn Jn Jn Jn Jn Jn Jn J


146


160992A0S0|(8.12.14)
Bosch Power Tools