
PKS1600 - Circular saw BOSCH - Free user manual and instructions
Find the device manual for free PKS1600 BOSCH in PDF.
| Product Type | Circular Saw |
| Brand | BOSCH |
| Model | PKS1600 |
| Rated power input | 1600 W |
| Rated voltage | 230 V |
| No-load speed | 5000 rpm |
| Max. cutting depth (0°) | 66 mm |
| Max. cutting depth (45°) | 48 mm |
| Max. saw blade diameter | 190 mm |
| Min. saw blade diameter | 184 mm |
| Blade bore | 30 mm |
| Max. blade thickness | 1.8 mm |
| Base plate dimensions | 327 x 160 mm |
| Weight (according to EPTA) | 5.4 kg |
| Protection class | II (double insulation) |
| Spindle lock | Yes |
| Pendulum guard | Yes |
| CutControl (cut control indicator) | Yes (on models A/AF) |
| Dust/chip collection box | Yes (on models A/AF) |
| Guide rail | Optional (supplied with models AF) |
| Parallel stop | Yes |
| Cutting depth adjustment | By clamping lever |
| Bevel cut angle adjustment | 0° to 45° |
| Safety switch (double-pole) | Yes |
| Sound pressure level | 92 dB(A) |
| Sound power level | 103 dB(A) |
| Vibrations (wood cutting) | 4.0 m/s² (K=1.5 m/s²) |
Frequently Asked Questions - PKS1600 BOSCH
User questions about PKS1600 BOSCH
0 question about this device. Answer the ones you know or ask your own.
Ask a new question about this device
Download the instructions for your Circular saw in PDF format for free! Find your manual PKS1600 - BOSCH and take your electronic device back in hand. On this page are published all the documents necessary for the use of your device. PKS1600 by BOSCH.
USER MANUAL PKS1600 BOSCH
Power Tools Division
70764 Leinfelden-Echterdingen
GERMANY
www.bosch-pt.com
1609 92A OT4 (2014.10) O/112 WEU

1609 92A 0T4
WEU
PKS
55|55A|55-2A|66A|66AF|66-2 AF

BOSCH
de Originalbetriebsanleitung
en Original instructions
fr Notice originale
es Manual original
pt Manual original
it Istruzioni originali
n Oorspronkelijke
gebruiksaanwijzing
da Original brugsanvisning
sv Bruksanvisining i original
no Original driftsinstruks
fi Alkuperäiset ohtjeet
el Ppwrtoo oynw xpn
tr Original isletme talimati
ar aJl Jauill lae

2
Deutsch . 6
English 13
Français. 20
Espanol .Pagina 28
Portugues.. 36
Italiano.. 44
Nederlands . 52
Dansk. 59
Svenska. Sida 66
Norsk. 73
Suomi. 79
Elambdaikai 86
Türkce Sayfa 94
Uc 109


4


5
6 | Deutschland
Deutsch
Executive Vice President Engineering
Helmut Heinzelmann
Head of Product Certification PT/ETM9

Robert Bosch GmbH, Power Tools Division
70764 Leinfelden-Echterdingen, GERMANY
General Power Tool SafetyWarnings
WARNING
Read all safety warnings and all instructions. Failure to follow the warnings
and instructions may result in electric shock, fire and/or serious injury.
Save all warnings and instructions for future reference.
The term "power tool" in the warnings refers to your mains-operated (corded) power tool or battery-operated (cordless) power tool.
Work area safety
- Keep work area clean and well lit. Cluttered or dark areas invite accidents.
- Do not operate power tools in explosive atmospheres, such as in the presence of flammable liquids, gases or dust. Power tools create sparks which may ignite the dust or fumes.
- Keep children and bystanders away while operating a power tool. Distractions can cause you to lose control.
Electrical safety
Power tool plugs must match the outlet. Never modify the plug in any way. Do not use any adapter plugs with earthed (grounded) power tools. Unmodified plugs and matching outlets will reduce risk of electric shock.
Avoid body contact with earthed or grounded surfaces, such as pipes, radiators, ranges and refrigerators.
There is an increased risk of electric shock if your body is earthed or grounded.
Do not expose power tools to rain or wet conditions.
Water entering a power tool will increase the risk of electric shock.
Do not abuse the cord. Never use the cord for carrying, pulling or unplugging the power tool. Keep cord away from heat, oil, sharp edges and moving parts. Damaged or entangled cords increase the risk of electric shock.
14|English
- When operating a power tool outdoors, use an extension cord suitable for outdoor use. Use of a cord suitable for outdoor use reduces the risk of electric shock.
If operating a power tool in a damp location is unavoidable, use a residual current device (RCD) protected supply. Use of an RCD reduces the risk of electric shock.
Personal safety
Stay alert, watch what you are doing and use common sense when operating a power tool. Do not use a power tool while you are tired or under the influence of drugs, alcohol or medication. A moment of inattention while operating power tools may result in serious personal injury.
Use personal protective equipment. Always wear eye protection. Protective equipment such as dust mask, non-skid safety shoes, hard hat, or hearing protection used for appropriate conditions will reduce personal injuries.
Prevent unintentional starting. Ensure the switch is in the off-position before connecting to power source and/or battery pack, picking up or carrying the tool. Carrying power tools with your finger on the switch or energising power tools that have the switch on invites accidents.
Remove any adjusting key or wrench before turning the power tool on. A wrench or a key left attached to a rotating part of the power tool may result in personal injury.
Do not overreach. Keep proper footing and balance at all times. This enables better control of the power tool in unexpected situations.
Dress properly. Do not wear loose clothing or jewellery. Keep your hair, clothing and gloves away from moving parts. Loose clothes, jewellery or long hair can be caught in moving parts.
If devices are provided for the connection of dust extraction and collection facilities, ensure these are connected and properly used. Use of dust collection can reduce dust-related hazards.
Power tool use and care
Do not force the power tool. Use the correct power tool for your application. The correct power tool will do the job better and safer at the rate for which it was designed.
Do not use the power tool if the switch does not turn it on and off. Any power tool that cannot be controlled with the switch is dangerous and must be repaired.
Disconnect the plug from the power source and/or the battery pack from the power tool before making any adjustments, changing accessories, or storing power tools. Such preventive safety measures reduce the risk of starting the power tool accidentally.
- Store idle power tools out of the reach of children and do not allow persons unfamiliar with the power tool or these instructions to operate the power tool. Power tools are dangerous in the hands of untrained users.
- Maintain power tools. Check for misalignment or binding of moving parts, breakage of parts and any other condition that may affect the power tool's operation. If damaged, have the power tool repaired before use. Many accidents are caused by poorly maintained power tools.
- Keep cutting tools sharp and clean. Properly maintained cutting tools with sharp cutting edges are less likely to bind and are easier to control.
- Use the power tool, accessories and tool bits etc. in accordance with these instructions, taking into account the working conditions and the work to be performed. Use of the power tool for operations different from those intended could result in a hazardous situation.
Service
Have your power tool serviced by a qualified repair person using only identical replacement parts. This will ensure that the safety of the power tool is maintained.
SafetyWarnings for Circular Saws
Cutting procedures
DANGER: Keep hands away from cutting area and the blade. Keep your second hand on auxiliary handle, or motor housing. If both hands are holding the saw, they cannot be cut by the blade.
Do not reach underneath the workpiece. The guard cannot protect you from the blade below the workpiece.
Adjust the cutting depth to the thickness of the workpiece. Less than a full tooth of the blade teeth should be visible below the workpiece.
- Never hold piece being cut in your hands or across your leg. Secure the workpiece to a stable platform. It is important to support the work properly to minimize body exposure, blade binding, or loss of control.
Hold the power tool by insulated gripping surfaces only, when performing an operation where the cutting tool may contact hidden wiring or its own cord. Contact with a "live" wire will also make exposed metal parts of the power tool "live" and could give the operator an electric shock.
- When ripping, always use a rip fence or straight edge guide. This improves the accuracy of cut and reduces the chance of blade binding.
Always use blades with correct size and shape (diamond versus round) of arbour holes. Blades that do not match the mounting hardware of the saw will run eccentrically, causing loss of control.
- Never use damaged or incorrect blade washers or bolt. The blade washers and bolt were specially designed for your saw, for optimum performance and safety of operation.
- Kickback causes and related warnings
- Kickback is a sudden reaction to a pinched, bound or misaligned saw blade, causing an uncontrolled saw to lift up and out of the workpiece toward the operator;

English|15
- When the blade is pinched or bound tightly by the kerf closing down, the blade stalls and the motor reaction drives the unit rapidly back toward the operator;
- If the blade becomes twisted or misaligned in the cut, the teeth at the back edge of the blade can dig into the top surface of the wood causing the blade to climb out of the kerf and jump back toward the operator. Kickback is the result of saw misuse and/or incorrect operating procedures or conditions and can be avoided by taking proper precautions as given below.
- Maintain a firm grip with both hands on the saw and position your arms to resist kickback forces. Position your body to either side of the blade, but not in line with the blade. Kickback could cause the saw to jump backwards, but kickback forces can be controlled by the operator, if proper precautions are taken.
When blade is binding, or when interrupting a cut for any reason, release the trigger and hold the saw motionless in the material until the blade comes to a complete stop. Never attempt to remove the saw from the work or pull the saw backward while the blade is in motion or kickback may occur. Investigate and take corrective actions to eliminate the cause of blade binding. - When restarting a saw in the workpiece, centre the saw blade in the kerf and check that saw teeth are not engaged into the material. If saw blade is binding, it may walk up or kickback from the workpiece as the saw is restarted.
Support large panels to minimise the risk of blade pinching and kickback. Large panels tend to sag under their own weight. Supports must be placed under the panel on both sides, near the line of cut and near the edge of the panel.
Do not use dull or damaged blades. Unsharpened or improperly set blades produce narrow kerf causing excessive friction, blade binding and kickback. - Blade depth and bevel adjusting locking levers must be tight and secure before making cut. If blade adjustment shifts while cutting, it may cause binding and kickback.
Use extra caution when sawing into existing walls or other blind areas. The protruding blade may cut objects that can cause kickback.
Lower guard function
- Check lower guard for proper closing before each use. Do not operate the saw if lower guard does not move freely and close instantly. Never clamp or tie the lower guard into the open position. If saw is accidentally dropped, lower guard may be bent. Raise the lower guard with the retracting handle and make sure it moves freely and does not touch the blade or any other part, in all angles and depths of cut.
- Check the operation of the lower guard spring. If the guard and the spring are not operating properly, they must be serviced before use. Lower guard may operate sluggishly due to damaged parts, gummy deposits, or a build-up of debris.
The lower guard may be retracted manually only for special cuts such as "plunge cuts and angle cuts". Raise
the lower guard by retracting the handle and as soon as the blade enters the material, release the lower guard. For all other sawing operations, the lower guard should operate automatically.
Always observe that the lower guard is covering the blade before placing saw down on bench or floor. An unprotected, coasting blade will cause the saw to walk backwards, cutting whatever is in its path. Be aware of the time it takes for the blade to stop after switch is released.
Additional safety warnings
Do not reach into the chip ejector with your hands. They could be injured by rotating parts.
Do not work overhead with the saw. In this manner you do not have sufficient control over the power tool.
- Use suitable detectors to determine if utility lines are hidden in the work area or call the local utility company for assistance. Contact with electric lines can lead to fire and electric shock. Damaging a gas line can lead to explosion. Penetrating a water line causes property damage or may cause an electric shock.
Do not operate the power tool stationary. It is not designed for operation with a saw table.
Do not use high speed steel (HSS) saw blades. Such saw blades can easily break.
- Do not saw ferrous metals. Red hot chips can ignite the dust extraction.
- When working with the machine, always hold it firmly with both hands and provide for a secure stance. The power tool is guided more secure with both hands.
Secure the workpiece. A workpiece clamped with clamping devices or in a vice is held more secure than by hand.
Always wait until the machine has come to a complete stop before placing it down. The tool insert can jam and lead to loss of control over the power tool.
Products sold in GB only: Your product is fitted with a BS 1363/A approved electric plug with internal fuse (ASTA approved to BS 1362).
If the plug is not suitable for your socket outlets, it should be cut off and an appropriate plug fitted in its place by an authorised customer service agent. The replacement plug should have the same fuse rating as the original plug.
The severed plug must be disposed of to avoid a possible shock hazard and should never be inserted into a mains socket elsewhere.
Products sold in AUS and NZ only: Use a residual current device (RCD) with a rated residual current of 30mA or less.
Product Description and Specifications

Read all safety warnings and all instructions. Failure to follow the warnings and instructions may result in electric shock, fire and/or serious injury.
16|English
Intended Use
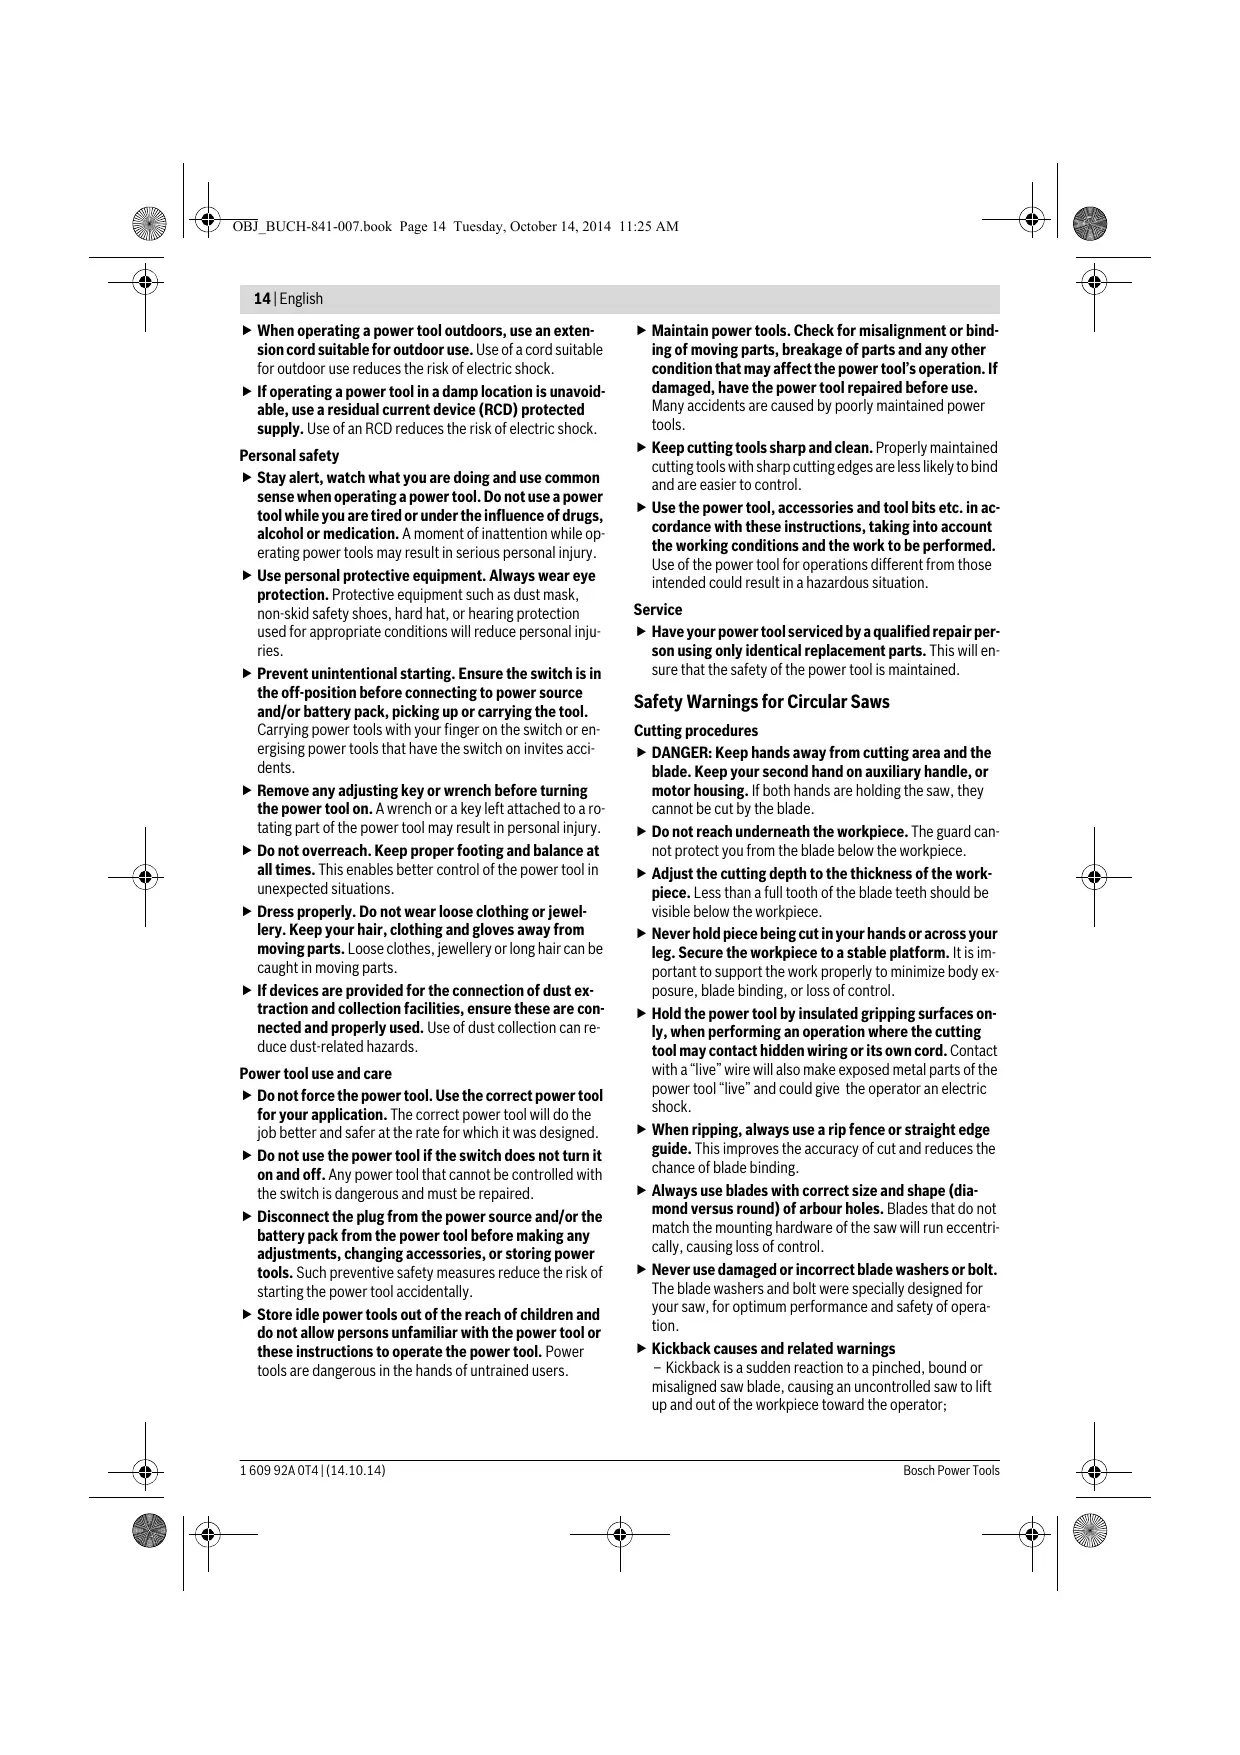
The machine is intended for lengthways and crossways cutting of wood with straight cutting lines as well as mitre cuts in wood while resting firmly on the workpiece. With suitable saw blades, thin-walled non-ferrous metals, e.g., profiles, can also be sawed.
Working ferrous metals is not permitted.
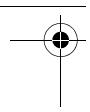
Product Features
The numbering of the product features refers to the illustration of the machine on the graphics page.
1 Lock-off button for On/Off switch
2 On/Off switch
3 Auxiliary handle (insulated gripping surface)
4 Spindle lock button
5 Scale for litre angle
6 Hex key
7 Wing bolt for bevel-angle preselection
8 Wing bolt for parallel guide
9 "CutControl" - Viewing window for cutting line (PKS 55 A/ PKS 55-2 A/ PKS 66 A/ PKS 66 AF/ PKS 66-2 AF)
0 Parallel guide
11 Retracting blade guard
12 Base plate
13 Lever for retracting blade guard
14 Wing bolt for bevel-angle preselection
15 Blade guard
16 Chip ejector
17 Handle (insulated gripping surface)
18 Clamping bolt with washer
19 Clamping flange
20 Saw blade
21 Mounting flange
22 Saw spindle
23 Vacuum hose
24 Deflection tube for chips
25 Dust/chip box
26 Slider of dust/chip box
27 Clamping lever for cutting-depth preselection
28 Cutting-depth scale
29 Cutting mark, 45^
30 Cutting mark, 0^
31 Guiderail
32 Button for guide-rail lock
33 Material clamp*
*Accessories shown or described are not part of the standard delivery scope of the product. A complete overview of accessories can be found in our accessories program.
Technical Data
| Circular Saw | PKS 55 | PKS 55 A PKS 55-2 A | PKS 66 A PKS 66 AF* PKS 66-2 AF* | |
| Article number | 3 603 E00 0.. | 3 603 E01 0.. | 3 603 E02 0.. | |
| Rated power input | W | 1200 | 1200 | 1600 |
| No-load speed | min-1 | 5600 | 5600 | 5000 |
| Cutting depth, max. | ||||
| - for 0° bevel angle | mm | 55 | 55 | 66 |
| - for 45° bevel angle | mm | 38 | 38 | 48 |
| Spindle lock | ● | ● | ● | |
| CutControl | - | ● | ● | |
| Dust/chip box | - | ● | ● | |
| Base plate dimensions | mm | 288 x 153 | 288 x 153 | 327 x 160 |
| Saw blade diameter, max. | mm | 160 | 160 | 190 |
| Saw blade diameter, min. | mm | 150 | 150 | 184 |
| Blade thickness, max. | mm | 1.8 | 1.8 | 1.8 |
| Mounting bore | mm | 20 | 20 | 30 |
| Weight according to EPTA-Procedure 01/2003 | kg | 3.9 | 3.9 | 5.4 |
| Protection class | □/II | □/II | □/II | |
The values given are valid for a nominal voltage [U] of 230 V. For different voltages and models for specific countries, these values can vary.
Starting cycles generate brief voltage drops. Interference with other equipment/machines may occur in case of unfavourable mains system conditions. Malfunctions are not to be expected for system impedances below 0.36 ohm.
- PKS 66 AF/PKS 66-2 AF with guide rail
sh|17
Noise/Vibration Information
Sound emission values determined according to EN 60745-2-5.
Typically the A-weighted noise levels of the product are: Sound pressure level 92 dB(A); Sound power level 103 dB(A). Uncertainty K = 3 dB.
Wear hearing protection!
Vibration total values a_h (triax vector sum) and uncertainty K determined according to EN 60745:
Cutting wood: a_h = 4.0 m/s^2, K = 1.5 m/s^2 ,
Cutting metal: a_h = 3.0m / s^2 = 1.5m / s^2
The vibration level given in this information sheet has been measured in accordance with a standardised test given in EN 60745 and may be used to compare one tool with another. It may be used for a preliminary assessment of exposure. The declared vibration emission level represents the main applications of the tool. However if the tool is used for different applications, with different accessories or insertion tools or is poorly maintained, the vibration emission may differ. This may significantly increase the exposure level over the total working period.
An estimation of the level of exposure to vibration should also take into account the times when the tool is switched off or when it is running but not actually doing the job. This may significantly reduce the exposure level over the total working period.
Identify additional safety measures to protect the operator from the effects of vibration such as: maintain the tool and the accessories, keep the hands warm, organisation of work patterns.
Declaration of Conformity C

We declare under our sole responsibility that the product described under "Technical Data" is in conformity with all relevant provisions of the directives 2011/65/EU, 2014/30/EU, 2006/42/EC including their amendments and complies with the following standards: EN 60745-1, EN 60745-2-5.
Technical file (2006/42/EC) at:
Robert Bosch GmbH, PT/ETM9,
70764 Leinfelden-Echterdingen, GERMANY
Henk Becker
Helmut Heinzelmann
Executive Vice President
Head of Product Certification
Engineering
PT/ETM9

Robert Bosch GmbH, Power Tools Division
70764 Leinfelden-Echterdingen, GERMANY
Mounting/Replacing the Saw Blade
Before any work on the machine itself, pull the mains plug.
When mounting the saw blade, wear protective gloves.
Danger of injury when touching the saw blade.
Only use saw blades that correspond with the characteristic data given in the operating instructions.
Do not under any circumstances use grinding discs as the cutting tool.
Selecting a Saw Blade
An overview of recommended saw blades can be found at the end of this manual.
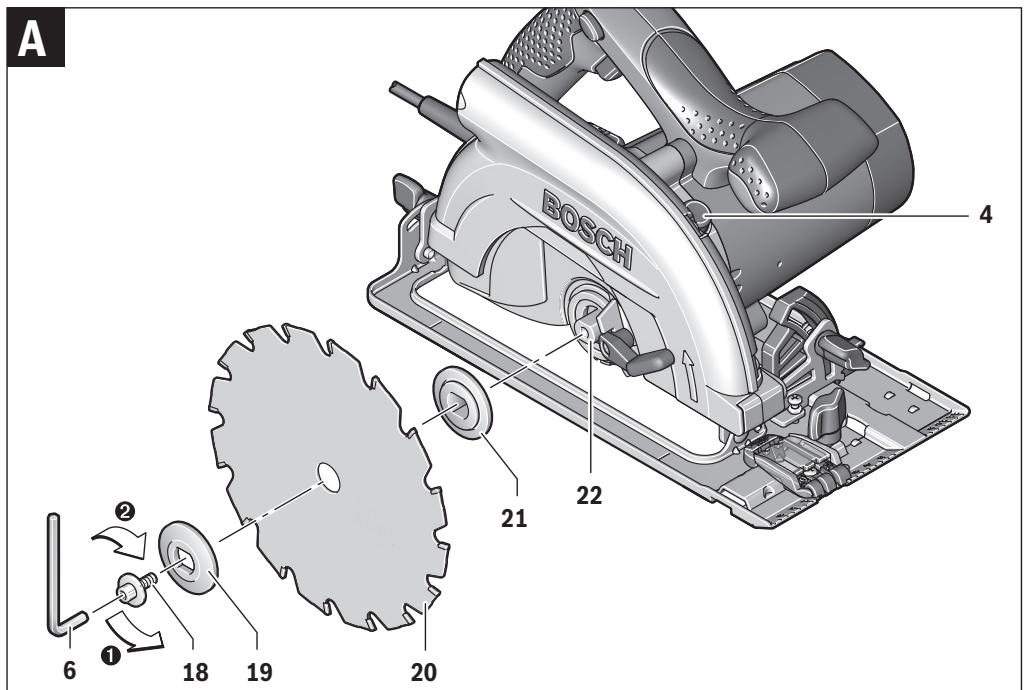
Removal of the Saw Blade (see figure A)
For changing the cutting tool, it is best to place the machine on the face side of the motor housing.
- Press the spindle lock button 4 and keep it pressed.
The spindle lock button 4 may be actuated only when the saw spindle is at a standstill. Otherwise, the power tool can be damaged. - With the Hex key 6, unscrew the clamping bolt 18 turning in rotation direction 0.
- Tilt back the retracting blade guard 11 and hold firmly.
- Remove the clamping flange 19 and the saw blade 20 from the saw spindle 22.
Mounting the Saw Blade (see figure A)
For changing the cutting tool, it is best to place the machine on the face side of the motor housing.
- Clean the saw blade 20 and all clamping parts to be assembled.
- Tilt back the retracting blade guard 11 and hold firmly.
- Place the saw blade 20 on to the mounting flange 21. The cutting direction of the teeth (direction or arrow on saw blade) and the direction-of-rotation arrow on the blade guard 15 must correspond.
- Mount the clamping flange 19 and screw in the clamping bolt 18 turning in rotation direction . Observe correct mounting position of mounting flange 21 and clamping flange 19.
- Press the spindle lock button 4 and keep it pressed.
- With the Hex key 6, tighten the clamping bolt 18 turning in rotation direction ② . The tightening torque is between 6 - 9 Nm , which corresponds to hand tight plus 1/4 turn.
Dust/Chip Extraction (see figures B-E)
Before any work on the machine itself, pull the mains plug.
Dusts from materials such as lead-containing coatings, some wood types, minerals and metal can be harmful to one's health. Touching or breathing-in the dusts can cause allergic reactions and/or lead to respiratory infections of the user or bystanders.
Certain dusts, such as oak or beech dust, are considered as carcinogenic, especially in connection with wood-treatment additives (chromate, wood preservative). Materials containing asbestos may only be worked by specialists.
- As far as possible, use a dust extraction system suitable for the material.
- Provide for good ventilation of the working place.
- It is recommended to wear a P2 filter-class respirator.
Observe the relevant regulations in your country for the materials to be worked.
18|English
Prevent dust accumulation at the workplace. Dusts can easily ignite.
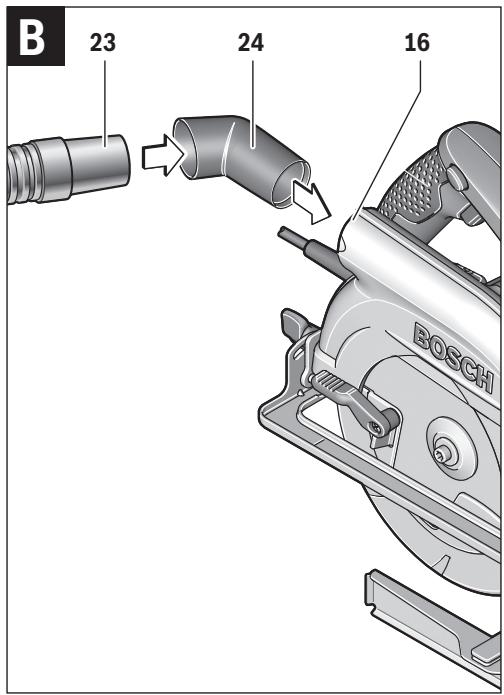
Note: While sawing, always use the deflection tube 24 or the dust/chip box 25 so that you will not be hit by thrown about chips.
The deflection tube 24 can be used with or without dust/chip extraction. Depending on the application, turn the deflection tube 24 in such a manner that you are not hit by chips and insert it firmly into the sawdust ejector 16.
External Dust Extraction (see figure B)
Mount the vacuum hose 23 (accessory) on to the chip ejector 16. Connect the vacuum hose 23 to a vacuum cleaner (accessory). An overview for connecting to various vacuum cleaners can be found at the end of this manual.
The machine can be plugged directly into the receptacle of a Bosch all-purpose vacuum cleaner with remote starting control. The vacuum cleaner starts automatically when the machine is switched on.
The vacuum cleaner must be suitable for the material being worked.
When vacuuming dry dust that is especially detrimental to health or carcinogenic, use a special vacuum cleaner.
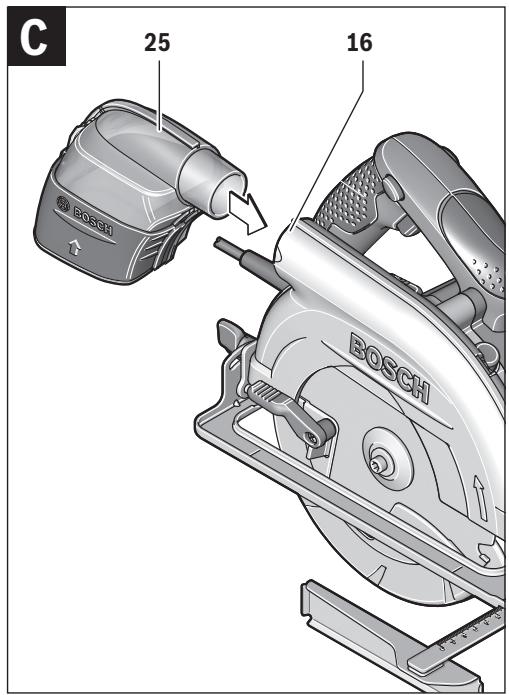
Integrated Dust Extraction (see figures C-E)
For smaller jobs, the dust/chip box 25 can be used with the slider 26 shut. For larger jobs, the slider 26 should be open so that the chips can fall out.
Insert the dust/chip box 25 firmly into the chip ejector 16.
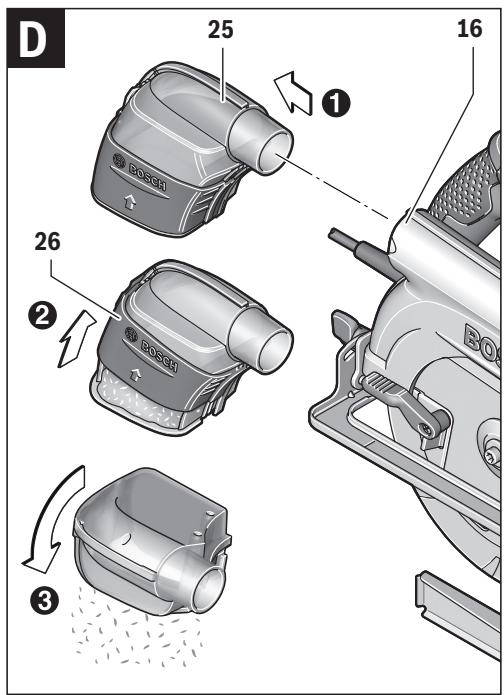
Empty the dust/chip box 25 in time to maintain optimum efficiency.
To empty the dust/chip box 25, pull it off of the chip ejector 16. Press the slider 26 upward, turn the dust/chip box 25 aside and empty it.
Before reattaching, clean the connection sleeve of the dust/chip box 25.
Operation
Operating Modes
Before any work on the machine itself, pull the mains plug.
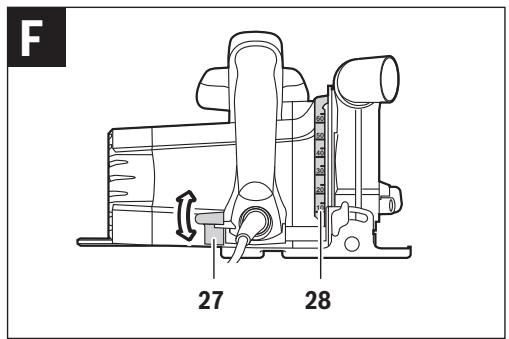
Adjusting the Cutting Depth (see figure F)
Adjust the cutting depth to the thickness of the workpiece. Less than a full tooth of the blade teeth should be visible below the workpiece.
Loosen the clamping lever 27. For a smaller cutting depth, pull the saw away from the base plate 12; for a larger cutting depth, push the saw toward the base plate 12. Adjust the desired cutting depth at the cutting-depth scale. Tighten the clamping lever 27 again.
Adjusting the Cutting Angle
Loosen the wing bolts 7 and 14. Tilt the saw sideways. Adjust the desired measure on the scale 5. Tighten the wing bolts 7 and 14 again.
Note: For bevel cuts, the cutting depth is smaller than the setting indicated on the cutting-depth scale 28.
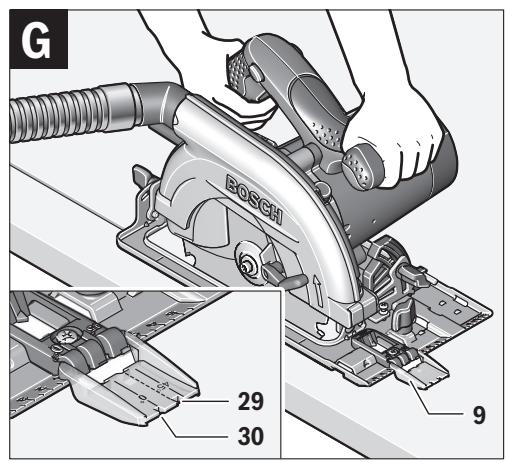
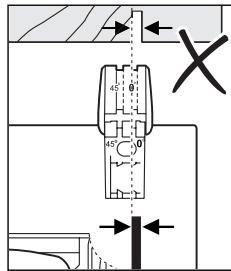
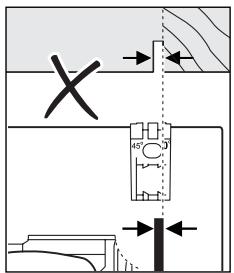
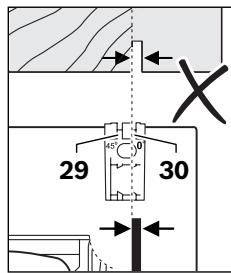
Cutting Marks (see figure G)
(PKS 55 A/PKS 55-2 A/PKS 66 A/PKS 66 AF/ PKS 66-2 AF)
The "CutControl" 9 viewing window, which folds out to the front, is used for precise guiding of the circular saw alongside the cutting line on the workpiece. The "CutControl" 9 viewing window has a mark each for right-angled cuts and for 45^ cuts.
The 0^ cutting mark 30 indicates the position of the saw blade for right-angled cuts. The 45^ cutting mark 29 indicates the position of the saw blade for 45^ cuts.

For precise cuts, position the circular saw against the workpiece as shown in the figure. It is best to carry out a trial cut.
Cutting Marks (PKS 55)
The 0^ cutting mark 30 indicates the position of the saw blade for right-angled cuts. The 45^ cutting mark 29 indicates the position of the saw blade for 45^ cuts.
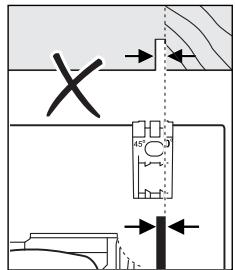
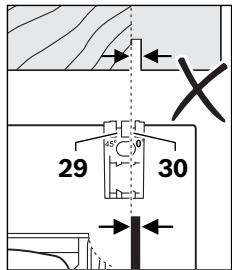
For precise cuts, position the circular saw against the workpiece as shown in the figure. It is best to carry out a trial cut.
Starting Operation
Observe correct mains voltage! The voltage of the power source must agree with the voltage specified on the nameplate of the machine. Power tools marked with 230V can also be operated with 220V .
Switching On and Off
To start the machine, first push the lock-off button for the On/Off switch 1 and then press the On/Off switch 2 and keep it pressed.
To switch off the machine, release the On/Off switch 2.
Note: For safety reasons, the On/Off switch 2 cannot be locked; it must remain pressed during the entire operation.
To save energy, only switch the power tool on when using it.
sh|19
Working Advice
Before any work on the machine itself, pull the mains plug.
Protect saw blades against impact and shock.
Guide the machine evenly and with light feed in the cutting direction. Excessive feed significantly reduces the service life of the saw blade and can cause damage to the power tool.
Sawing performance and cutting quality depend essentially on the condition and the tooth form of the saw blade. Therefore, use only sharp saw blades that are suited for the material to be worked.
Sawing Wood
The correct selection of the saw blade depends on the type and quality of the wood and whether lengthway or crossway cuts are required.
When cutting spruce lengthways, long spiral chips are formed.
Beech and oak dusts are especially detrimental to health. Therefore, work only with dust extraction.
Sawing Non-ferrous Metals
Note: Use only a sharp saw blade that is suitable for non-ferrous metals. This ensures a clean cut and prevents blade binding.
Guide the switched on power tool against the workpiece and carefully start the cut. Continue the cut with low feed and without interruption.
When sawing profiles, always begin the cut from the narrow side; when sawing U-profiles, never start the cut from the open side. Support long profiles in order to avoid blade binding and kickback of the power tool.
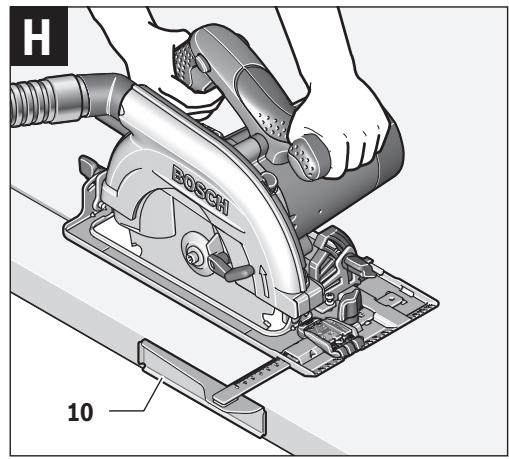
Sawing with Parallel Guide (see figure H)
The parallel guide 10 enables exact cuts along a workpiece edge and cutting strips of the same dimension.
Loosen wing bolt 8 and slide the scale of the parallel guide 10 through the guide in the base plate 12. Adjust the desired cutting width as the scale setting at the respective cutting mark 30 or 29; see Section "Cutting Marks". Tighten wing bolt 8 again.
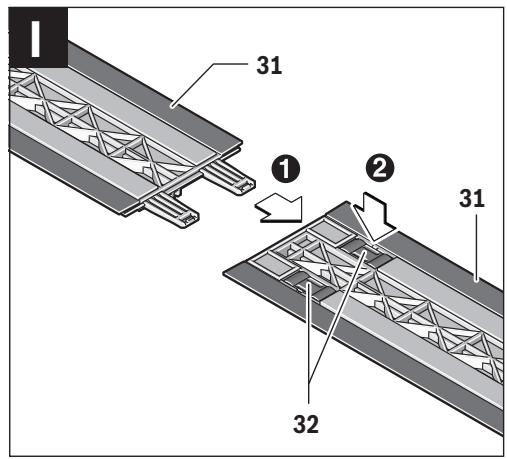
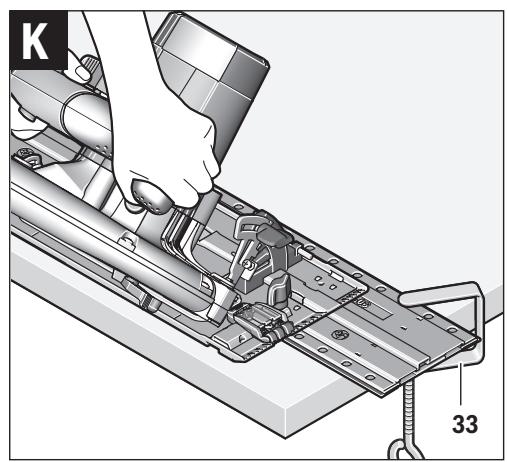
Sawing with Guide Rail (see figures I-K)
The guide rail 31 is used to carry out straight cuts.
The adhesive coating prevents the guide rail from slipping and protects the surface of the workpiece.
The guide rail 31 can be extended. For this, turn around both guide rails 31 by 180^ and connect both guide rails 31 by inserting them. Press button 32 to lock the guide rails. To disassemble the guide rails, press the opposite button 32 and pull the guide rails 31 apart.
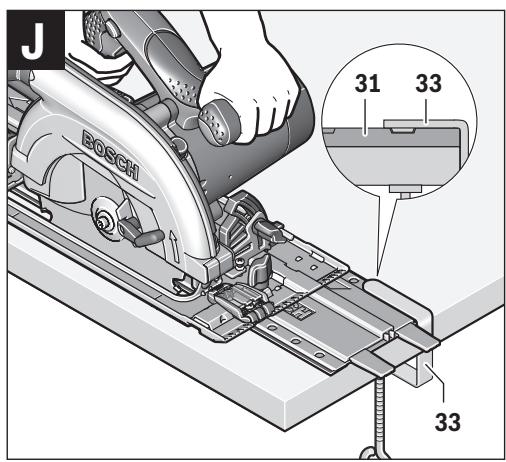
The guide rail 31 has two marks on the top side. The side with the "90" mark is used for right-angled cuts, and the side with the "45" mark is used for all other metre cuts.
The rubber lip on the guide rail acts as a splinter guard for 90^ and 45^ cuts; it prevents fraying of the surface while sawing wooden materials.
Upon initial sawing, the rubber lip is adapted to your circular saw, and slightly cut off in this process.
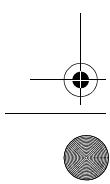
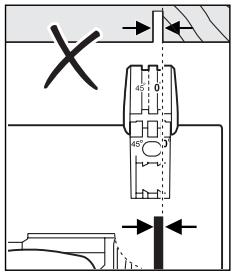
Note: On the workpiece side where the cut is being started, the guide rail 31 must always face flush against the workpiece, and may not project beyond it.
Should the guide rail 31 project beyond the workpiece end, do not rest the circular saw on the guide rail 31 without holding the circular saw. The guide rail 31 is made of plastic and cannot hold the circular saw.
Fasten the guide rail 31 to the workpiece using the special screw clamps 33. Take care that the cam on the inside of the screw clamp 33 is seated in the corresponding recess of the guide rail 31.
Switch the machine on and guide it in the cutting direction applying moderate and steady feed.
Maintenance and Service
Maintenance and Cleaning
Before any work on the machine itself, pull the mains plug.
For safe and proper working, always keep the machine and ventilation slots clean.
The retracting blade guard must always be able to move freely and retract automatically. Therefore, always keep the area around the retracting blade guard clean. Remove dust and chips by blowing out with compressed air or with a brush.
Saw blades that are not coated can be protected against corrosion with a thin coat of acid-free oil. Before use, the oil must be removed again, otherwise the wood will become soiled.
Resin and glue residue on the saw blade produces poor cuts. Therefore, clean the saw blade immediately after use.
If the replacement of the supply cord is necessary, this has to be done by Bosch or an authorized Bosch service agent in order to avoid a safety hazard.
After-sales Service and Application Service
Our after-sales service responds to your questions concerning maintenance and repair of your product as well as spare parts. Exploded views and information on spare parts can also be found under:
www.bosch-pt.com
Bosch's application service team will gladly answer questions concerning our products and their accessories.
In all correspondence and spare parts order, please always include the 10-digit article number given on the type plate of the machine.
20 | Français
Great Br
Robert Bosch Ltd. (B.S.C.)
P.O.Box 98
Broadwater Park
North Orbital Road
Denham
Uxbridge
UB 95HJ
At www.bosch-pt.co.uk you can order spare parts or arrange
the collection of a product in need of servicing or repair.
Tel. Service: (0844) 7360109
E-Mail: boschservicecentre@bosch.com
Ireland
Origo Ltd.
Unit 23 Magna Drive
Magna Business Park
City West
Dublin 24
Tel. Service: (01) 4666700
Fax: (01) 4666888
Australia, New Zealand and Pacific Islands
Robert Bosch Australia Pty. Ltd.
Power Tools
Locked Bag 66
Clayton South VIC 3169
Customer Contact Center
Inside Australia:
Phone: (01300) 307044
Fax: (01300) 307045
Inside New Zealand:
Phone: (0800) 543353
Fax: (0800) 428570
Outside AU and NZ:
Phone: +61 3 95415555
www.bosch.com.au
Republic of South Africa
Customer service
Hotline: (011) 6519600
Gauteng - BSC Service Centre
35 Roper Street, New Centre
Johannesburg
Tel.: (011) 4939375
Fax: (011) 4930126
E-Mail: bsctools@icon.co.za
KZN - BSC Service Centre
Unit E, Almar Centre
143 Crompton Street
Pinetown
Tel.: (031) 7012120
Fax: (031) 7012446
E-Mail: bsc.dur@za.bosch.com
Western Cape - BSC Service Centre
Democracy Way, Prosperity Park
Milnerton
Tel.: (021) 5512577
Fax: (021) 5513223
E-Mail: bsc@zsd.co.za
Bosch Headquarters
Midrand, Gauteng
Tel.: (011) 6519600
Fax: (011) 6519880
E-Mail: rbsa-hq.pts@za.bosch.com
Disposal
The machine, accessories and packaging should be sorted for environmental-friendly recycling.
Do not dispose of power tools into household waste!
Only for EC countries:
According to the European Directive 2012/19/EU for Waste Electrical and Electronic Equipment and its implementation into national right, power tools that are no longer usable must be collected separately and disposed of in an environmentally correct manner.
Subject to change without notice.
François
Executive Vice President Engineering
Helmut Heinzelmann
Head of Product Certification PT/ETM9

i.v. h : w
Robert Bosch GmbH, Power Tools Division
70764 Leinfelden-Echterdingen, GERMANY
Robert Bosch (France) S.A.S.
Executive Vice President Engineering
Helmut Heinzelmann
Head of Product Certification PT/ETM9

i. V. h = ml
Robert Bosch GmbH, Power Tools Division
70764 Leinfelden-Echterdingen, GERMANY
Leinfelden, 19.09.2014
hol 33
Montaje
Executive Vice President Engineering
Helmut Heinzelmann
Head of Product Certification PT/ETM9


Robert Bosch GmbH, Power Tools Division 70764 Leinfelden-Echterdingen, GERMANY
Fascicolo technique (2006/42/CE) presso:
Robert Bosch GmbH, PT/ETM9,
70764 Leinfelden-Echterdingen, GERMANY
Henk Becker
Executive Vice President
Engineering
Helmut Heinzelmann
Head of Product Certification
PT/ETM9


Robert Bosch GmbH, Power Tools Division
70764 Leinfelden-Echterdingen, GERMANY
Executive Vice President Engineering
Helmut Heinzelmann
Head of Product Certification PT/ETM9

i. V. h = mh
Robert Bosch GmbH, Power Tools Division
70764 Leinfelden-Echterdingen, GERMANY
Executive Vice President Engineering
Helmut Heinzelmann
Head of Product Certification PT/ETM9

i. V. h = m _____
Robert Bosch GmbH, Power Tools Division 70764 Leinfelden-Echterdingen, GERMANY
Bosch Service Center
Telegrafvej 3
2750 Ballerup
På www.bosch-pt.dkk kan der online bestilles resededele erler oprettes en reparations ordre.
Tlf. Service Center: 44898855
Fax: 44898755
E-Mail: vaerktoej@dk.bosch.com
Bortskaffelse
Executive Vice President Engineering
Helmut Heinzelmann
Head of Product Certification PT/ETM9

Robert Bosch GmbH, Power Tools Division
70764 Leinfelden-Echterdingen, GERMANY
Bosch Service Center
Telegrafvej 3
2750 Ballerup
Danmark
Tel.: (08) 7501820 (inom Sverige)
Fax: (011) 187691
Avfallshantering
Executive Vice President Engineering
Helmut Heinzelmann
Head of Product Certification PT/ETM9

i. V. h = ml _____
Robert Bosch GmbH, Power Tools Division
70764 Leinfelden-Echterdingen, GERMANY
Executive Vice President
Head of Product Certification
Engineering
PT/ETM9

Robert Bosch GmbH, Power Tools Division
70764 Leinfelden-Echterdingen, GERMANY
Sigma npwpatukc npoetobonountkc unodeic
Mn baCte ta xepia oac otny eEoTo vov pokavidiw/vype- zuw. Mnopei va aac tpaunpatiaouv ta nepiortpepoeva eaprtmuata.
Mny epyaee0e kpatowta to npovn ao to Kepa- Lt oac. Etai dev mopeite va elevete ikavonoinikto nKtpiko epyaieio.
Xpoumonoeite kataaAanleavixveutkeoc ouakeec yia va evtioniete tuxov unopatec tropoobotkevapuuec n va uouboueaeote nyn tonuk eaipia npoxnc evpeyac. H enapn me naktpiuec yaupec mnpoei va onnyoae o npkayai k anekptonlanEi. H npokan znuic o evav ayyo owtaeiou (yaizoi) mnpoei va onnyoae o ekpnE. To trumna evoc aWlva vepou npokaieZnuic o npayata n/kai npoei va onnyneoi e nekptonlanEia.
EAnvuk@89
Mn xnpaonoioeite to nAektpko epyaleo aa staepo. npooipietai yia otaepn xpnoi.
Mn xnpouoioeire npovodokouc ano xaluaHSS. TeTOIOI piovodokoi mnpoei va otaoouv ekoia.
Mny kobete oabnpouxa maTuaov kautya pnopei va avaapEouv Tny avappoponokovnc.
Otav epyaeeva kpatate to nlektpok opeyaleio kaAa kai me ta doo aoc xepia kai va povvtcte yia tvnaopaaIh oen tou owatoc aoc. To nlektpik opeyaleio obnyeiata aopaaoletepa otav to kpatate kai me ta doo aoc xepia.
AopaiTeTo uno katepyaia Teiaio. Eva uno katepyaia Teiaio oukypatietai oapalatoepa me ia diataeou apiyncn ieia neyevnpa te xepiaac.
Piv ano3eot noekpok opeaio nepieveet npota va otapatnoei evtalevca kiveital. To tonoetnevo Eaptma nopei va oynwoei kai va odnyoia otnv anw- 1eia tou cexyou tou nekpikou epyaleiou.
Executive Vice President Engineering
Helmut Heinzelmann
Head of Product Certification PT/ETM9
j_w B u i. v. h · w
Robert Bosch GmbH, Power Tools Division 70764 Leinfelden-Echterdingen, GERMANY Leinfelden,19.09.2014
Συναρμολόγηση
ToOnoTeTnO/AlAayn npovodioKou
ByaTeTo pfc ano Tnv npiznpv ano onoiabnoTe epyaio st noektpko epyaleio.
Na pôpáte npooataeutká yavtia otav ouvapmooyeite tov npiovódioko. Kivduoc traumaiou o nepiittwn εnpic με tov npiovódioko.
Xpnooioie movo npiovobikouc nou diaotouv ta xapaktnipoiuknou avapepovtai autec tic obnyie c xeipouo.
Mny tonothetaoetne note diaokouc leiavonc.
Etnoyipovodikou
SigmaOaoyan Tou npiovobikou (Bleene Eikova A)
Euvrponon kal Service
Uvntponn kal kαθaipαoε
ByaZeTo oic ano TnV npizapnv ano onoiabHnote epyaia 0r nlektpko epyaieio.
Daatnpoeite to nlektpko epyaaleio kai tic oxiauec aepiogou kaopae yva maopeire va epyaceoek Kaa kai aopaaowc.
O naivdpoukoc npopuakktnapcnepie va monei va kiveita navtoe aleutheta pa ka va kalevei autouata. I' auto va biatneite kaapo tov toea epyaiaic yupw ano tov naivdpouko npopuakntpa. Na anopakpuve Toxov okovec n/kaik oka videlta ie pienoevo aepa n eva nivlo.
Pioivobiaikoi xwipc emiotpwn npopoov na pnoataeurov ano tv oeiowon ^ eva letro stpwa laiox wic oea. PIVTO npovia ja npenei, ouwc, va anopakpuve to laibi yia va mlepwtheta EuLo.
Tuyov kataoia npitvnc /kai kolaac enavw otov npiovobioko etbpoov apvtikc atnyiotnta konic. i' auto va kaapietounpovobiaokou aoeowc metn xpon touc.
Mia tuxov avaykaia avitakataaon tou nektpikou kalomega npenei va dieqxtheta ano tv Bosch n ao eva eouaoobotmevo katotma Service Tc Bosch, yia va anopexutheta etai kahe bIakivduveuon Tc aapaleiac.
94 | Türkiye
Service kal npoxn oupouawxphonc
To Service anavta otic epwtnoic oac oxetikä μe tny emiokeuñ kai tn ouvtippon tou pioiovoc oac kaθw yia ta katállnla avtalaaktika:
www.bosch-pt.com
H oàda npaoxng ouibouawv Tc Bosch anavta euxapiotw otic epwtnoe oac oxetiká μe ta npoiovta mac kal a vtaaaktiKa TOUC.
'Otav zntate diaaapntikc nnpoopopiec kaohc kai otav npayevete avtaalaktika npenei va avaepepe onomega note to 10nphi apiog eupetnpiou nou avaypafetai otny mivakiabaataakeuaotn.
EAAaδa
Robert Bosch A.E.
Epxeiac 37
19400Kopwni-Aθηγα
Tnλ:2105701258
Φaξ: 2105701283
www.bosch.com
www.bosch-pt.gr
ABZ Service A.E.
Tnλ.: 2105701380
Φaξ: 2105701607
Anoupon
Ta nλeKtpiKa εpyaεia, Ta εαρτημata ka iοι oaukeuaaες πρεπειν avaakukawovtai μe τρόnpoiikó προς πeipβáλoν.
Mny pivete Ta nekpiKa epyaia oTa anoppmuata Tou anitouoac!
Movi yia xwope tnc EE:
Executive Vice President
Engineering
Helmut Heinzelmann
Head of Product Certification
PT/ETM9


Robert Bosch GmbH, Power Tools Division
70764 Leinfelden-Echterdingen, GERMANY
Bosch San. ve Tic. A.S.
Ahi Evran Cad. No:1 Kat:22
Polaris Plaza
80670 Maslak/Istanbul
Bosch Uzman Ekibi +90 (0212) 367 18 88
Işiklar LTD.ŞTI
Kizilay Cad. No: 16/C Seyhan
Adana
Tel.: 0322 3599710
Tel.: 0322 3591379
j0 10 sglgill ssuuaaeg g8 iaglll jgeall wgc aabol .12 oclal aayaiy
29g30aallglallll 8aiall gllwsc1. "gblaoi oaiol jai
(K-IjgJJIj)agjjgJgJgJg
gabll 31 aagill aaw aywly diSay. aaiowll
abwll g aig gill ksw (gXjI aai bll q
aSwjJgJfJgJ.31 aagill aSw Jgbl JgSaw 31 aagill jksw Jg180° agjy 31 aagill
bəvəl elol .32 jll lc bəvəl ciuill. yaiJI lagia
31 aagill iKw elp g jai 32 jll 1. Jlal
31 aagll aSg 2000000000000000000000000000000000000000000000000000000000000000
.
gbllllgl aagill aas yabolall aaal jgj gil gio lccn 45o g90o gl .waii
go jui aIac Ugic aIbll aaiu Iaoi go qu .qio jia gbi uus
aawol31 aagill aawgj uajl y:abdo
2g 5gimoll uai jlc luiu jall uaii aag aqj .gag gsj jgay
31 aagill asw ggsjg jygiu cilis 1aas uic jaiiy sjl ljjal oijl E yjie jll aabqagill asw .sjl ljjiaally llss 31 agill
JJIJIJIJIJIJIJIJIJIJIJIJIJIJIJIJIJIJIJIJIJIJIJIJIJIJIJIJIJIJIJIJIJIJIJIJIJIJIJIJIJIJIJIJIJIJIJIJIJIJIJIJIJIJIJIJIJIJIJIJIJIJIJIJIJIJIJIJIJIJIJIJIJIJIJIJIJIJIJIJIJIJIJIJIJIJIJIJIJIJIJIJIJIJIJIJIJIJIJIJIJ
g93 33 aol oJllo pIauiy 31 aagill Asw Cuiu, g9 wll gwagill jaiu u Uc yolal. Jwll abba
31 aagill aaw gaiioll 33 aojolll Jgai jaoaeg gogolbui Iggg aguljssll Jsw
.
aIg aIaI
aIJIg aJAL
a a 1
auijssll oessll lcc sla
gawg ayjyJll Jssd aai jLc taJ L
1g 1Jg jg q
aasaaasaaagaaagaaagaaagaaagaaagaaagaaagaaagaaagaaagaaagaaagaaagaaagaaagaaagaaagaaagaaagaaagaaagaaagaaagaaagaaagaaagaaagaaagaaagaaagaaagaaagaaagaaagaaagaaagaaagaaagaaagaaagaaagaa
aJzjaiJI ayIgJI Ubc JgLo Jao aguji Uc IgsiaJI ggl jnll Jdo JoJluIgJyJI
. a a g
a a a a a a a a a a a a a a a a a a a a a a a a a a a a a a a a a a a a a a a a a a a a a a a a a a a a a a a a a a a a a a a a a a a a aaa
#
g gag gag gag gag gag gag gag gag gag gag gag gag gag gag gag gag gag gag gag gag gag gag gag gag gag gag gag gag gag gag gag gag gag gag gag gag gag gag gag gag gag gag gag gag gag gag gag gag gag gag gaga aaa aaa aaa aaa aaa aaa aaa aaa aaa aaa aaa aaa aaa aaa aaa aaa aaa aaa aaa aaa aaa aaa aaa aaa aaa aaa aaa aaa aaa aaa aaa aaa aaa aaa aaa aaa aaa aaa aaa aaa aaa aaa aaa aaa aaa aaa aaa aaa aaa aaa aaaa aa aa aa aa aa aa aa aa aa aa aa aa aa aa aa aa aa aa aa aa aa aa aa aa aa aa aa aa aa aa aa aa aa aa aa aa aa aa aa aa aa aa aa aa aa aa aa aa aa aa aa aa aa aa aa aa aa aa aa aa aa aa aa aa aa aa aa aa aa aa aa aa aa aa aa aa aa aa aa aa aa aa aa aa aa aa aa aa aa aa aa aa aa aa aa aa aa aa aa aa aaa
a d jd jd jd jd jd
jlaal paiag la jiuia jai bao aai! abdo
jai baoi gao g ao bi gao ell aai ay daa yall
juiall
lajw dy jauw al aabg no ayurssll oossy joi
goi ag dy jaua gl yaiu uuy iuy
.lasll ic elbaai l ngg uo
ukw u w sic qayw all no lai uui ly
sic lub! agiaall wailu yu xq aanaw
U ksw aawwwll ksw jwi
(HjgJglj) jlglldo go jil
Jau 10 gjg jai aai Jglai aai
(FoJgallgj)gbai (gac bdo
JU JI JI JI JI JI JI JI JI JI JI JI JI JI JI JI JI JI JI JI JI JI JI JI JI JI JI JI JI JI JI JI JI JI JI JI JI JI JI JI JI JI JI JI JI JI JI JI JI JI JI J1
27 15
12 15
12 15
15
27 15
aJUJI cJUJI UJg JU
.14g7nnsnnn nnnn nn nnnn nnnn nnnn nnnn nnnn nnnn nnnn nnnn nnnn nnnn nnnn nnnn nnnn nnnn nnnn nnnn nnnn nnnn nnnn nnnn nnnn nnnn nnnn nnnn nnnn nnnn nnnn nnnn nnnn nnnn nnnn nnnn nnnn nnnn nnne
(GjgJgJ) gblaJl (PKS 55 A/ PKS 55-2 A/ PKS 66 A/ PKS 66-2 AF/ PKS 66-2 AF)
"CutControl" ploal aai lall ao jol oaoi w
gabll bai jol gic jil juiiall agaill 9
agj oai jk jaoi joiw alg 1c s dall
gabllg aai agjbu glal 9 "CutControl" 45^ agjy
jaj sic juiall jai jsjo 30o gbal all oae jui
j29 45° gbal aoe jui agjjai all egbal
.45° wad agjlgagall jai sic juiall jai jsjo
gdu blos uul aebgl gdl luiuall jsl uao .gdu bla lc uoaal jno.ojau
(PKS 55)
sic juiioll jai jso 30o gall aoLjw J2945o gall aoLc w. aglll aiaIgbll .45oJagglggball sic juioll jai js
g 1 g 100000000000000000000000000000000000000000000000000000000000000000000000000000000000
.1sJ 10aJ aJ aJ aJ aJ aJ aJ aJ aJ aJ aJ aJ aJ aJ aJ aJ aJ aJ aJ aJ aJ aJ aJ aJ aJ aJ aJ aJ aJ aJ aJ aJ aJ aJ aJ aJ aJ aJ aJ aJ aJ aJ aJ aJ aJ aJ aJ aJ aJ aJ aJ
J j 1 J 1 J 1 J 1 J 1 J 1 J 1 J 1 J 1 J 1 J 1 J 1 J 1 J 1 J 1 J 1 J 1 J 1 J 1 J 1 J 1 J 1 J 1 J 1 J 1 J 1 J 1 J 1 J 1 J 1 J 1 J 1 J 1 J 1 J
24 aagj u gui lai j o sai wu wiu sic abdo 0jwll eui 25 ojuil/ajulg i ggi 0jUaill
24 aagill gai 1saw
24 aagill gai jj. oJuiil/ajil abaiu
aig oJuiil oJuiil 2 uoi aiiai
.16 oJuiil dao
(Bogalj)
.16 oJuill 23 aoi Iogjz jcl .(gill (o) aIgs ababaiy 23 kail gajbay aIgai yIc uIabaiy Jglgll Jgai Jgai Jgai Jgai Jgai Jgai Jgai Jgai Jgai Jgai Jgai Jgai Jgai Jgai Jgai Jgai Jgai Jgai Jgai Jgai Jgai Jgai Jgai Jgai Jgai Jgai Jgai Jgai Jgai Jgai Jgai Jgai Jgai Jgai
oLo go JlsswJgJlsabW gJ 1 y
LgJyogjll Jsw
OzBawSic aollaqJlc abWp ssi
. GdIaIbSdWgl jUbWauuWgAaUy
(E-CgJglj)
JLac25 oJusill/ajzil (gdsio 1sI
JU Jy ju 26 26 26 26
.26 26 26
.26 26
.26 26
.26 26
.16 0Jusill
wlll 25 oJluil/ajg gdsu jy j. gio aIeall lai i
20 ao ae125 oJluil/ajg gdsu jy j
ggso jg, 26 26 16 oJluil
aJy jy g 25 oJluil/ajj
25 oJluil/ajg gdsu jy alog aJbui y
. uji
山
Jg
Jg aJyIySL JsSll uoo o no yIaIyIyIw I.ayIySL Oe Sll Uoc sI Jr!
#
jJJJJUJUJUJUJUJU
Jg aJySJI aJyWJ Jn Jo JyTJ all WJ 4 .aJySJ oJdI Jc Jc
1jaioll joi ciaggluljla
Jusai aaiiaagai jieauiyssiioe 1s Jn s Jn Jn Jn Jn Jn Jn Jn Jn Jn Jn Jn Jn Jn Jn Jn Jn Jn Jn Jn Jn Jn Jn Jn Jn Jn Jn Jn Jn Jn Jn Jn Jn Jn Jn Jn Jn Jn Jn Jn Jn Jn Jn Jn Jn Jn Jn Jn Jn Jn Jn Jnn
a 11 aaiia iagai
121 21 aaw 20 laiaa jai j5 - (jai jc gaaal oai) jai jai qaoaagai (gai ggu
.15 aygll abc 21 cui al aoi qao gao (jiaiaall
aayl daiy 18 sll ags g 19 sll aaa y
aaog 21 laggl aaw bajg jai aai .
19 4 4 4 4 4 4 4 4 4 4 4 4 4 4 4 4 4 4 4 4 4 4 4 4 4 4 4 4 4 4 4 4 4 4 4 4 4 4 4 4
6 1uJgJgJgJgJgJgJgJgJgJgJgJgJgJgJgJgJgJgJgJgJgJgJgJgJgJgJgJgJgJgJgJgJgJgJgJgJgJgJgJgJgJgJgJgJgJgJgJgJgJgJ
(E-BgJgJbil) oJluJ/1jLJb
Jg aJySsJ 10000000000000000000000000000000000000000000
15c 15g2111111111111111111111111111111111111111111111111
aaiiul
| PKS 66 A PKS 66 AF* PKS 66-2 AF* | PKS 55 A PKS 55-2 A | PKS 55 | الإستعمال劳动合同 | |
| 3 603 E02 0.. | 3 603 E01 0.. | 3 603 E00 0.. | الإستعمال劳动合同 | |
| 1600 | 1 200 | 1 200 | عَلِّ | الإستعمال劳动合同 |
| 5000 | 5 600 | 5 600 | سَفْعْنْ | الإستعمال劳动合同 |
| 66 | 55 | 55 | مَعَلِّ | عَلِّ |
| 48 | 38 | 38 | مَعَلِّ | عَلِّ |
| ● | ● | ● | الإستعمال劳动合同 | |
| ● | ● | - | CutControl ادینه نهانی | |
| ● | ● | - | سَفْعْنْ/هشامانی | |
| 327 x 160 | 288 x 153 | 288 x 153 | مَعَلِّ | سَفْعْنْ/هشامانی |
| 190 | 160 | 160 | مَعَلِّ | سَفْعْنْ/هشامانی |
| 184 | 150 | 150 | مَعَلِّ | سَفْعْنْ/هشامانی |
| 1,8 | 1,8 | 1,8 | مَعَلِّ | سَفْعْنْ/هشامانی |
| 30 | 20 | 20 | مَعَلِّ | سَفْعْنْ/هشامانی |
| 5,4 | 3,9 | 3,9 | سَعَ | EPTA-Procedure 01/2003 |
| □/II | □/II | □/II | الإستعمال劳动合同 |
Jl JjIg jIg jIg jIg jIg jIg jIg jIg jIg jIg jIg jIg jIg jIg jIg jIg jIg jIg jIg jIg jIg jIg jIg jIg jIg jIg jIg jIg jIg jIg jIg jIg jIg jIg j1230 1230 []
i. aai 1000
.1g0g036aagao
duuJU daw go PKS 66-2 AF/PKS 66 AF*
jU j0sssuill aIgaiIaIaIaIaIaIaIa
Jzulg auiuSll oaiu:luu:uij1i
Joull Ujoo puiu g uai dai aie s
C
gglj
aJgjauall aaiI J aalai Iui gmo Lc jai
Executive Vice President
Head of Product Certification
Engineering
PT/ETM9

i.v. h = m
Robert Bosch GmbH, Power Tools Division
70764 Leinfelden-Echterdingen, GERMANY
:EN60745 KgIgIg (JgI a
2U/01,5=K.2U/04,0=ah:uJU
2U/ρ 1,5=K.²U/ρ3,0=a h: ∴JzJU|μu
aJzllgJgSdAJIjIjWILgGnWuJdA
J60745 1
los. jssll qssaaajjssdall ajjaldoi
J 1 J 1 J 1 J 1 J 1 J 1 J 1 J 1 J 1 J 1 J 1 J 1 J 1 J 1 J 1 J 1 J 1 J 1 J 1 J 1 J 1 J 1 J 1 J 1 J 1 J 1 J 1 J 1 J 1 J 1 J 1 J 1 J 1 J 1 J
aJlJI JuaIJI Jai Uglg 1e g aJi Jai Uglg llg paoj ai d.1d aIbJIg IJIaIJI Jai Jai Jai Jai Jai Jai Jai Jai Jai Jai Jai Jai Jai Jai Jai Jai Jai Jai Jai Jai Jai Jai Jai Jai Jai Jai Jai Jai Jai Jai Jai Jai Jai Jai Jai Jai Jai Jai Jai Jai Jai Jai Jai Jai Jai Jai Jai Jai Jai Jai Jali
jlo21 UdoaLog LgUwI - aJ sJzJ 4oAsL Jaaal
jlll jlll juc oic uac aai wai ai aaii - 1sill g uiialg uiialiai luiial (jai jil juiialg) bil (j) sglu loa bla kui guw gai qiao luail dlabc uic laa pssll aag 5ll
Jolai
abwlg JooJg alao lo JI auilg UoJ
auijgs ooc oaiu J. Jauy uui jgsl oall
juoi jgi loic g i ciau ngsi loic
abol oui Ioc aiggl g uasll gl uall
U 1s d aui jgsl ooll paiu siu sic aoxl
.0a
aBgl cIJI bI Jg oJI aIg lSt sJl
jI jI g 10 aIg gl iLs, aJI aIg ISt iJ.
aIg g 1gJg 10 gJi I n aIg 10 aIg
jI aIg 10 aIg 10 JI aIg
JI aJI gJI OJ I JAIwIg Egi wJI J
JI aJI aJI
g5 1sbl. gao yk kwhlln jll slyo lalog uol auljusll oall .lalaggl qagpalsll g/ g juysll 0all jaiiall ioc uq cui s n! ayuasll jayll cug n g auiyssll 0g 1111111111111111111111
6dall jll gblal qg bll dgc jil 9gdgiell glg odssj.ajlsl .2g
Iag uolc aasuuswssggl qia Jlc oJusuuaaaw. lai jilgi Lc .ao gio auu cagallq uai kswj glal
glaaallll 12. awwlo y jy 12 12 12 12 12 12 12 12 12 12 12 12 12 12 12 12 12 12 12 12 12 12 12 12 12 12 12 12 12 12 12 12
dJg jLg g baw 1jg jj Jn!
.1w Usw IgolsswI ayig aogogog oJ
jblal no oecb lbw 1jg ywll qy
.0cJl caa