
CHV1600E - Battery EGO - Free user manual and instructions
Find the device manual for free CHV1600E EGO in PDF.


| Product Type | Lithium-ion battery |
| Brand | EGO |
| Model | CHV1600E |
| Nominal voltage | 56 V |
| Capacity | 2.5 Ah (140 Wh) |
| Weight | 1.5 kg |
| Dimensions (L x W x H) | 150 x 100 x 80 mm |
| Cell type | Lithium-ion |
| Charge indicator | 4-level LED |
| Compatibility | EGO 56 V tools |
| Built-in protection | Against overcharge, over-discharge, short-circuit, and overheating |
| Operating temperature | -5°C to 40°C |
| Storage temperature | -20°C to 50°C |
| Recommended charger | EGO 56 V charger (type CH5500, CH7000) |
| Charging time (standard charger) | Approximately 50 min |
| Maintenance | Clean with a dry cloth; do not immerse in water |
| Storage | In a dry place, protected from frost and direct light |
| Recycling | Do not dispose of with household waste; recycle at a waste collection center |
| Warranty | 2 years (subject to EGO conditions) |
Frequently Asked Questions - CHV1600E EGO
User questions about CHV1600E EGO
0 question about this device. Answer the ones you know or ask your own.
Ask a new question about this device
Download the instructions for your Battery in PDF format for free! Find your manual CHV1600E - EGO and take your electronic device back in hand. On this page are published all the documents necessary for the use of your device. CHV1600E by EGO.
USER MANUAL CHV1600E EGO
natural_image
Line drawing of an EGO device with cable and plug, no text or symbols presentCHV1600E
56 VOLT CHARGER
EN 56 VOLT CHARGER 3
DE 56-VOLT-LADEGERÄT 8
FR CHARGEUR 56 V 14
natural_image
Technical diagram of a portable electronic device with labeled connection point C-1 (no text or symbols beyond label)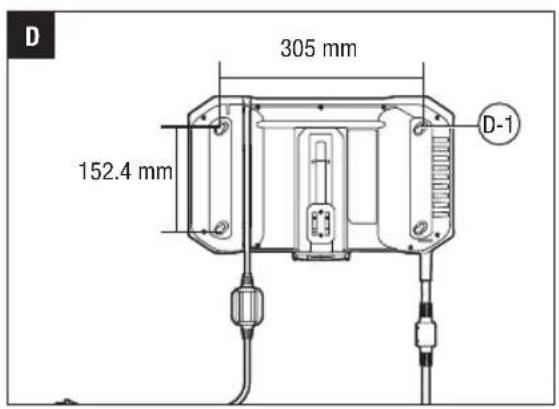

EGO Europe GmbH
The Anchorage, 34 Bridge Street Reading, RG1 2LU, United Kingdom
READ ALL INSTRUCTIONS!

READ OPERATOR'S MANUAL
⚠ Notice: These instructions shall also be available in an alternative format, e.g. on a website.
⚠️ Residual risk! People with electronic devices, such as pacemakers, should consult their physician(s) before using this product. Operation of electrical equipment in close proximity to a heart pacemaker could cause interference or failure of the pacemaker.
WARNING: To ensure safety and reliability, all repairs should be performed by a qualified service technician.
WARNING: This appliance can be used by children aged from 8 years and above and persons with reduced physical, sensory or mental capabilities or lack of experience and knowledge if they have been given supervision or instruction concerning use of the appliance in a safe way and understand the hazards involved. Children shall not play with the appliance. Cleaning and user maintenance shall not be made by children without supervision.
SAFETY SYMBOLS
The purpose of safety symbols is to attract your attention to possible dangers. The safety symbols and the explanations with them deserve your careful attention and understanding. The symbol warnings do not by themselves, eliminate any danger. The instructions and warnings they give are no substitutes for proper accident prevention measures.
WARNING: Be sure to read and understand all safety instructions in this Operator's Manual, including all safety alert symbols such as "DANGER," "WARNING," and "CAUTION" before using this tool. Failure to follow all instructions listed below may result in electric shock, fire, and/or serious personal injury.
SAFETY INSTRUCTIONS
This page depicts and describes safety symbols that may appear on this product. Read, understand, and follow all instructions on the machine before attempting to assemble and operate.
| Safety Alert | Precautions that involve your safety | |
| Read Operator's Manual | To reduce the risk of injury, user must read operator's manual. | |
| Indoor Use Use | this device indoors only | |
| Class II Construction | Double-insulated construction | |
| CE | CE | This product is in accordance with applicable EC directives. |
| UKCA | UKCA | This product is in accordance with applicable UK legislation. |
| WEEE | Waste electrical products should not be disposed of with household waste. Take to an authorized recycler. | |
| V Volt | Voltage | |
| A Amperes Current | ||
| Hz Hertz Frequency (cycles per second) | ||
| W Watt Power | ||
| min Minutes Time | ||
| ~ | Alternating Current | Type of current |
| --- | Direct Current | Type or a characteristic of current |
WARNING: Read and understand all instructions.
Failure to follow all instructions listed below may result in electric shock, fire and/or serious personal injury.
WORK AREA SAFETY
- Keep the work area clean and well lit. Cluttered or dark areas invite accidents.
- Do not operate the EGO charger in explosive environments, such as in the presence of flammable liquids, gases, or dust. A charger might create a spark, which may ignite the dust or fumes.
ELECTRICAL SAFETY
- Do not expose to the charger to rain or wet conditions. Water entering the charger will increase the risk of electric shock.
EN
- Do not abuse the cord. Never use the cord for carrying, pulling, or unplugging the charger. Keep the cord away from heat, oil, sharp edges, or moving parts. Damaged or entangled cords increase the risk of electric shock.
■ The EGO charger can charge the EGO lithium-ion battery packs listed in fig.A2.
SERVICE
- Have your charger serviced by a qualified repair person using only identical replacement parts. This will ensure that the safety of the charger is maintained.
- When servicing a charger, use only identical replacement parts. Follow instructions in the Maintenance section of this manual. Use of unauthorized parts or failure to follow Maintenance instructions may create a risk of shock or injury.
SAFETY RULES FOR CHARGER
CAUTION: This appliance is not intended for use by persons (including children) with reduced physical, sensory or mental capabilities, or lack of experience and knowledge, unless they have been given supervision or instruction concerning use of the appliance by a person responsible for their safety.
■ Before using the battery charger, read all instructions and cautionary markings in this manual and on the battery charger, the battery and the product to prevent misuse of the products and possible injury or damage.
- Do not handle charger, including the charger plug and charger terminals with wet hands.
- Make sure that the cord is located so that it will not be stepped on, tripped over, come in contact with sharp edges or moving parts, or otherwise be subjected to damage or stress.
This will reduce the risk of accidental falls, which could cause injury and damage to the cord, which could then result in electric shock.
- Keep the cord and charger from heat to prevent damage to housing or internal parts.
- Do not allow gasoline, oils, petroleum-based products, etc. to come in contact with plastic parts. These materials contain chemicals that can damage, weaken, or destroy plastic.
- Do not operate the charger with a damaged cord or plug, which could cause shorting and electric shock. If damaged, have the charger repaired or replaced by an authorized service
technician at an EGO Service Center.
- Do not disassemble the charger. Take it to an authorized service technician when service or repair is required. Incorrect reassembly may result in a risk of electric shock or fire.
■ Unplug the charger from the electrical outlet before attempting any maintenance or cleaning to reduce the risk of electric shock.
- Disconnect charger from the power supply when not in use. This will reduce the risk of electric shock or damage to the charger if metal items should fall into the opening. It will also help prevent damage to the charger during a power surge.
- Risk of electric shock. Do not touch the uninsulated portion of output connector or uninsulated battery terminal.
- Save these instructions. Refer to them frequently and use them to instruct others who may use this tool. If you lend this tool to someone else, also lend these instructions to them to prevent misuse of the product and possible injury.
IMPORTANT SAFETY INSTRUCTIONS
■ Save these instructions. This manual contains important safety and operating instructions for EGO 56V Charger CHV1600E.
■ Before using the battery charger, read all instructions and cautionary markings on the battery charger, the battery and the product using the battery.
SPECIFICATIONS
| Charger Input 220-24 | 0 V~50 Hz, 1600 W |
| Charger Output | 56 V=---, 22 A |
| Charging Time | Approximately 60 minutes for 20AH battery packApproximately 90 minutes for 30AH battery packApproximately 120 minutes for 40AH battery packApproximately 140 minutes for 48AH battery packApproximately 180 minutes for 60AH battery packApproximately 210 minutes for 72AH battery pack |
| Charger Weight 4.5 kg | |
| Optimum Charging Temperature | 5°C-40°C |
DESCRIPTION
KNOW YOUR CHARGER (Fig. A1)
- LED Indicators
- Power Plug
- Power Cord
- Hanger
- Cooling Air Port
OPERATION
The charger is designed to charge EGO Power+ batteries that are installed in the battery compartment of EGO multi-port charging unit CHU6000 and electric zero turn mower ZT4200E-L.
It is not allowed to recharge non-rechargeable batteries.
HOW TO CHARGE THE BATTERY PACK (Fig. B1&B2)
| B-1 CHU6000 B-4 Battery Pack | |
| B-2 Power Plug B-5 ZT4200E-L | |
| B-3 Charge Port |
WARNING: Do not use the charger outdoors or expose it to wet or damp conditions.
NOTICE: Lithium-Ion battery packs are shipped partially charged. Before using it the first time, fully charge the battery pack. charged. Before using it the first time, fully charge the battery pack.
- Align the raised ribs of the battery pack with the mounting slots in the battery compartment and slide the battery pack down onto the charging unit. Make sure that the battery packs are securely attached to the battery compartment.
- Insert the power plug into the charge port.
- Connect the charger to the power supply (220-240V\~50Hz). The three LED indicators will briefly shine green, indicating that the charger is working correctly.
- The charger will communicate with the battery packs to evaluate the condition of the battery packs. When the battery packs meet the charging conditions, the charger will begin charging the battery packs and three LED indicators on the charger will shine green in sequence, from left to right. The fan in the charger continuously works to cool the charger.
- When the battery packs are fully charged, three LED indicators stop alternating and will shine solid green. The power indicator on the battery packs will go out. Wait until the cooling fan stops, remove the power plug from the charge port and disconnect the charger from the power supply.
NOTICE:
EN
■ A significantly reduced run time after fully charging a battery pack indicates that the batteries are near the end of their usable life and the battery pack must be replaced.
■ The charger may warm during charging. This is part of the normal operation of the charger. Charge in a well-ventilated area.
NOTICE:
■ A significantly reduced run time after fully charging the battery pack indicates that the batteries are near the end of their usable life and must be replaced.
■ The charger may warm during charging. This is part of the normal operation of the charger. Charge in a well-ventilated area.
LED FUNCTIONS OF CHARGER
| STATUS | LED INDICATORS ON THE CHARGER | POWER INDI-CATOR ON THE BATTERY PACK |
| Defective | All LED indicators shining solid red | Off |
| Cold/Hot Battery | First LED indicator flashing green | Off |
| Cold/Overheated charger | First LED indicator shining solid red | Off |
| Charger output overcurrent | First two LED indicators shining solid red | Off |
| The charger's fan is defective | First LED indicator flashing red | Off |
| Charging | Shining green in sequence, from left to right. | Flashing red, orange and green alternately/Last segment flashing green, rest solid green |
| Full Charged | All LED indicators shining solid green | Off |
CHARGING A HOT OR COLD BATTERY PACK
If the battery pack in the mower is not in the normal temperature range, the first of the three LED indicators will flash green. When the battery pack cools down or warms up to a normal temperature range, the charger will automatically begin charging and the three LED indicators will shine in sequence normally.
EN
HANGER (Fig. C)
The hanger is designed for hanging the power plug. It can be placed in two positions. The lower position is for hanging the power plug (Fig. A). The higher position is for convenient storage.
C-1 Hanger
WALL-MOUNT HOLES (Fig. D)
The charger has four hanging holes for convenient storage. Install four screws on the wall 305 mm apart horizontally and 152.4 mm apart vertically to hang the charger. Use screws sufficiently strong to hold the charger.
D-1 Wall-mount Hole
WINDING GROOVE (Fig. E)
When the charger is hung on the wall, there will be a groove towards the back of the charger. The groove can be used as a winding groove. Wind the power cord in the winding groove if it is too long to use conveniently.
E-1 Winding Groove
MAINTENANCE
WARNING: To avoid serious personal injury, always disconnect the battery pack from the charger when cleaning or performing any maintenance.
WARNING: When servicing, use only identical EGO replacement parts. Use of any other parts may create a hazard or cause product damage.
WARNING: It is not recommended to use compressed dry air as a cleaning method of the charger. If cleaning with compressed air is the only method to apply, always wear safety goggles or safety glasses with side shields when cleaning the charger. If the operation is dusty, also wear a dust mask.
WARNING: If the power cord is damaged, it must be replaced by the manufacturer, its service agent or similarly qualified persons in order to avoid a hazard.
GENERAL MAINTENANCE
Avoid using solvents when cleaning plastic parts. Most plastics are susceptible to damage from various types of commercial solvents and may be damaged by their use. Use clean clothes to remove dirt, dust, oil, grease, etc.
WARNING: Do not at any time let brake fluids, gasoline, petroleum-based products, penetrating oils, etc. to come in contact with plastic parts. Chemicals can damage, weaken or destroy plastic which may result in serious personal injury.
WARNING: When servicing, use only identical EGO replacement parts. Use of any other parts may create a hazard or cause product damage. To ensure safety and reliability, all repairs should be performed by a qualified service technician at an EGO Service Center.
When not in use, store the machine in door.
Protecting the environment

Do not dispose of electrical appliances as unsorted municipal waste, use separate collection facilities.
Contact your local government for information regarding the collection systems available.
If electrical appliances are disposed of in landfills or dumps, hazardous substances can leak into the groundwater and get into the food chain, damaging your health and well-being.
TROUBLESHOOTING
EN
| PROBLEM CAUSE SOLUTION | ||
| Charger does not work. Three LED indicators are shining solid red. | Battery pack or charger is defective. | ■ Try to charge a different battery pack.■ Unplug the charger and wait until the LED indicators go o then reconnect the plug to the power supply.■ If none of the above solves the problem, call EGO Custom Service |
| Charger does not work and first LED indicator flashes green. | Battery pack is too hot or too cold. | Allow the battery pack to cool down or warm up. Charging will begin when battery pack returns to the normal temperature. |
| Charger does not work and first LED indicator shine solid red. | Cold/Overheated charger | Unplug the charger and wait until the charger cool down or warm up, then reconnect the plug to the power supply. |
| Charger does not work and first two LED indicators shine solid red. | Charger output overcurrent | Unplug the charger and then reconnect the plug to the power supply. If it does not work, call EGO Customer Service. |
| Charger does not work and first LED indicator flashes red. | The charger's fan is blocked or defective. | Unplug the charger, shake the charger slightly, and then reconnect the charger between the power supply and the charge port to see whether the charger fan works normally. If it does not work, call EGO Customer Service. |
| Charger does not work and all LED indicators are off. | ■ Bad connection between the battery pack and mower.■ The charger is defective. | ■ Try to remove and reinsert the battery pack in the charge port.■ Unplug the charger and then reconnect the plug to the power supply. If it does not work, call EGO Customer Service. |
WARRANTY
EGO WARRANTY POLICY
Please visit the website egopowerplus.com for full terms and conditions of the EGO Warranty policy.
Dumps, hazardous substances can leak into the groundwater and get into the food chain, damaging your health and well-being.
VEILIGHEIDSVOORSCHRIFTEN VOOR OPLADERS
LATURIN LED-TOIMINNOT
SIKKERHET I ARBEIDSOMRÅDET
GENERELT VEDLIKEHOLD
BEZPIECZEŃSTWO W MIEJSCU PRACY
POLITYKA GWARANCYJNA EGO
SEZNAMTE SE S VAŠÍ NABÍJEČKOU (obr. A1)
DÔLEŽITÉ BEZPEČNOSTNÉ POKYNY
ÎNCĂRCAREA UNUI SET DE ACUMULATORI CALD SAU RECE
LUGEGE KASUTUSJUHENDIT
LAADIJA OHUTUSREEGLID
OLULISED OHUTUSJUHISED
g_2g_3s_6o_0m d_md_bd_sm_gd_gm_0u o_bl_0g_fm_yg_jb_0s_1
gāngfēngyān yuāngmōbāngdō
VAŽNA SIGURNOSNA UPUTSTVA
■ Sačuvajte ovo uputstvo. Ovaj priručnik sadrži važna sigurnosna i radna uputstva za EGO 56 V punjač CHV1600E.
■ Pre korišćenja punjača baterija, pročitajte sva uputstva i napomene upozorenja na punjaču baterija, na bateriji i proizvodu koji koristi bateriju.
SPECIFIKACIJE
| Ulaz punjača 220-240 | V~50 Hz, 1600 W |
| Izlaz punjača | 56 V—, 22 A |
SR
| Vreme punjenja | Približno 60 minuta za 20 AH baterijuPribližno 90 minuta za 30 AH baterijuPribližno 120 minuta za 40 AH baterijuPribližno 140 minuta za 48 AH baterijuPribližno 180 minuta za 60 AH baterijuPribližno 210 minuta za 72 AH bateriju |
| Težina punjača 4,5 kg | |
| Optimalna temperatura punjenja | Od 5 do 40°C |
OPIS
UPOZNAJTE SVOJ PUNJAČ (slika A1)
- LED indikatori
- Utikač napajanja
- Kabl napajanja
- Vešalica
- Otvor za vazdušno hlađenje
RUKOVANJE
Punjač je dizajniran da puni EGO Power+ baterije koje su instalirane u odeljku za baterije EGO jedinice za punjenje sa više portova CHU6000 i električne kosilice sa nultim okretanjem ZT4200E-L.
Nije dozvoljeno puniti nepunjive baterije.
KAKO PUNITI BATERIJU (slika B1 i B2)
| B-1 CHU6000 B-4 Baterija | ||
| B-2 Utikač napajanja B-5 ZT4200E-L | ||
| B-3 Port za punjenje | ||

UPOZORENJE: Ne koristite punjač na otvorenom toru i ne izlažite ga mokrim ili vlažnim uslovima.
NAPOMENA: Litijum-jonske baterije se isporučuju delimično napunjene. Pre prve upotrebe, potpuno napunite bateriju. Pre prve upotrebe, potpuno napunite bateriju.
-
Poravnajte izdignuta rebra na bateriji sa montažnim prorezima na odeljku za bateriju i gurnite bateriju dole na jedinicu za punjenje. Vodite računa da baterije budu čvrsto pričvršćene na odeljak za baterije.
-
Umetnite utikač napajanja u port za punjenje.
3 Spojite punjač na izvor napajanja (220-240 V \~50 Hz). Tri LED indikatora će kratko svetleti zeleno, ukazujući da punjač radi pravilno. - Punjač će komunicirati sa baterijama da bi procenio stanje baterija. Kada baterije ispune uslove za punjenje, punjač će početi da puni baterije a tri LED indikatora na punjaču će redom svetleti zeleno, sleva nadesno. Ventilator u punjaču neprekidno radi da bi hladio punjač.
- Kad baterije budu potpuno napunjene, tri LED indikatora će prestati da se smenjuju i neprekidno će svetleti zeleno. Indikator napajanja na baterijama će se isključiti. Sačekajte da se ventilator za hlađenje zaustavi, uklonite utikač napajanja iz porta za punjenje i odvojite punjač od izvora napajanja.
NAPOMENA:
■ Značajno smanjeno vreme rada nakon što je baterija potpuno napunjena ukazuje da su baterije blizu kraja svog radnog veka i da se baterija mora zameniti.
■ Punjač se može zagrevati tokom punjenja. To je deo normalnog rada punjača. Punite na dobro provetrenom mestu.
NAPOMENA:
■ Značajno smanjeno vreme rada nakon što je baterija potpuno napunjena ukazuje da je baterija blizu kraja svog radnog veka i da se mora zameniti.
■ Punjač se može zagrevati tokom punjenja. To je deo normalnog rada punjača. Punite na dobro provetrenom mestu.
LED FUNKCIJE PUNJAČA
| STATUS | LED INDIKATORI NA PUNJAČU | INDIKATOR NAPAJANJA NA BATERIJI |
| Defektno | Svi LED indikatori svetle neprekidno crveno | lsključeno |
| Hladna/vruća baterija | Prvi LED indikator bljeska zeleno | lsključeno |
| Hladan/ pregrejan punjač | Prvi LED indikator svetli neprekidno crveno | lsključeno |
| Prekomerna struja izlaza punjača | Prva dva LED indikatora svetle neprekidno crveno | lsključeno |
| Ventilator punjača je defektan | Prvi LED indikator bljeska crveno | lsključeno |
| Punjenje | Redom svetle zeleno, sleva nadesno. | Naizmenično bljeska crveno, narandžasto i zeleno/Poslednji segment bljeska zeleno, ostatak je neprekidno zelen |
| Potpuno napunjeno | Svi LED indikatori svetle neprekidno zeleno | Isključeno |
PUNJENJE VRUĆE ILI HLADNE BATERIJE
VAŽNA SIGURNOSNA UPUTSTVA
■ Sačuvajte ova uputstva. Ovaj priručnik sadrži važne sigurnosne napomene i uputstva za upotrebu za punjač CHV1600E od 56 V proizvođača EGO.
- Prije upotrebe punjača baterija u cijelosti pročitajte uputstva i upozorenja u ovom priručniku i na punjaču baterija, bateriji i proizvodu koji upotrebljava bateriju.
TEHNIČKI PODACI
| Ulazna struja punjača | 220-240 V~50 Hz, 1600 W |
| Izlazna struja punjača | 56 V --- , 22 A |
| Vrijeme punjenja | Otprilike 60 minuta za komplet baterija 20AHOtprilike 90 minuta za komplet baterija 30AHOtprilike 120 minuta za komplet baterija 40AHOtprilike 140 minuta za komplet baterija 48AHOtprilike 180 minuta za komplet baterija 60AHOtprilike 210 minuta za komplet baterija 72AH |
| Masa punjača 4,5 kg | |
| Optimalna temperatura punjenja | 5°C-40°C |
OPIS
UPOZNAJTE SVOJ PUNJAČ (sl. A1)
.הכלההוּרָהוּרָהוּרָהוּרָהוּרָהוּרָהוּרָהוּרָהוּרָהוּרָהוּרָהוּרָהוּרָהוּרָהוּרָה
Ctrlator is incorrect.
"הכלהה" – "הכלהה" – "הכלהה" – "הכלהה" – "הכלהה" – "הכלהה" – "הכלהה" – "הכלהה" – "הכלהה" – "הכלהה" – "הכלהה" – "הכלהה" – "הכלהה" – "הכchia
תְקַרָה בְאָרִי
natural_image
Line drawing of an EGO device with cable and plug, no text or symbols presentCHV1600E
56
HE
شاحن 56 فولت
AR



- CHV1600E
- VOLT CHARGER
- READ ALL INSTRUCTIONS!
- READ OPERATOR'S MANUAL
- SAFETY SYMBOLS
- SAFETY INSTRUCTIONS
- WORK AREA SAFETY
- ELECTRICAL SAFETY
- EN
- SERVICE
- SAFETY RULES FOR CHARGER
- IMPORTANT SAFETY INSTRUCTIONS
- DESCRIPTION
- KNOW YOUR CHARGER (Fig. A1)
- OPERATION
- HOW TO CHARGE THE BATTERY PACK (Fig. B1&B2)
- NOTICE:
- LED FUNCTIONS OF CHARGER
- CHARGING A HOT OR COLD BATTERY PACK
- HANGER (Fig. C)
- WALL-MOUNT HOLES (Fig. D)
- WINDING GROOVE (Fig. E)
- MAINTENANCE
- GENERAL MAINTENANCE
- Protecting the environment
- WARRANTY
- EGO WARRANTY POLICY
- VEILIGHEIDSVOORSCHRIFTEN VOOR OPLADERS
- LATURIN LED-TOIMINNOT
- SIKKERHET I ARBEIDSOMRÅDET
- GENERELT VEDLIKEHOLD
- BEZPIECZEŃSTWO W MIEJSCU PRACY
- POLITYKA GWARANCYJNA EGO
- SEZNAMTE SE S VAŠÍ NABÍJEČKOU (obr. A1)
- DÔLEŽITÉ BEZPEČNOSTNÉ POKYNY
- ÎNCĂRCAREA UNUI SET DE ACUMULATORI CALD SAU RECE
- LUGEGE KASUTUSJUHENDIT
- LAADIJA OHUTUSREEGLID
- OLULISED OHUTUSJUHISED
- gāngfēngyān yuāngmōbāngdō
- VAŽNA SIGURNOSNA UPUTSTVA
- SPECIFIKACIJE
- OPIS
- UPOZNAJTE SVOJ PUNJAČ (slika A1)
- RUKOVANJE
- NAPOMENA:
- PUNJENJE VRUĆE ILI HLADNE BATERIJE
- UPOZNAJTE SVOJ PUNJAČ (sl. A1)
- תְקַרָה בְאָרִי
Brand : EGO
Model : CHV1600E
Category : Battery